6 способів оновити драйвери в Windows 11
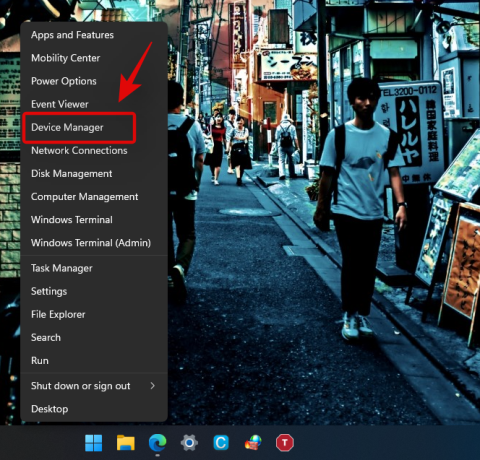
Оновлення драйверів у Windows 11 є важливим процесом для виправлення помилок та покращення сумісності пристроїв. Дізнайтеся, як це зробити ефективно.
Панель завдань Windows була в центрі уваги відтоді, як вона отримала новий оновлений вигляд з випуском Windows 11. Тепер ви можете центрувати панель завдань, насолоджуватися новим центром дій, змінювати його вирівнювання та розташовувати його по обидва боки екрана. На жаль, розгортання цієї функції виявилося менш успішним, оскільки все більше користувачів протягом кількох місяців намагаються змусити свою панель завдань працювати в Windows 11.
Хоча корпорація Майкрософт визнала проблему, випустила обхідний шлях і зараз працює над її виправленням, користувачі все ще не можуть знову запустити панель завдань. Якщо ви знаходитесь у тому самому човні, ми склали список усіх доступних виправлень, щоб відновити роботу панелі завдань у Windows 11. Щоб почати, дотримуйтесь інструкції нижче.
Зміст
Чому моя панель завдань не відображається?
Панель завдань Windows 11 має новий вигляд, завдяки оновленому погляду на її функціонування. Панель завдань тепер залежить від кількох служб і самого меню «Пуск» для належної роботи. Здається, що процес оновлення з Windows 10 до Windows 11, здається, зіпсує панель завдань залежно від того, яку версію Windows 10 ви інсталювали у вашій системі та до якої версії Windows 11 ви оновлюєтеся.
Крім того, нещодавнє оновлення Windows, випущене минулого місяця, також, здається, викликає цю проблему для деяких користувачів, тоді як інші стикаються з тим же через невідповідність системного часу, незважаючи на те, що все налаштовано належним чином. Існує багато способів виправити панель завдань, і ми рекомендуємо почати з наведених нижче виправлень по черзі.
12 способів виправити проблеми з панеллю завдань у Windows 11
Використовуйте наведені нижче методи, щоб розпочати виправлення панелі завдань у Windows 11. Якщо ви вже намагалися перезавантажити систему, ви можете пропустити перший метод.
Виправлення №1: перезавантажте ПК
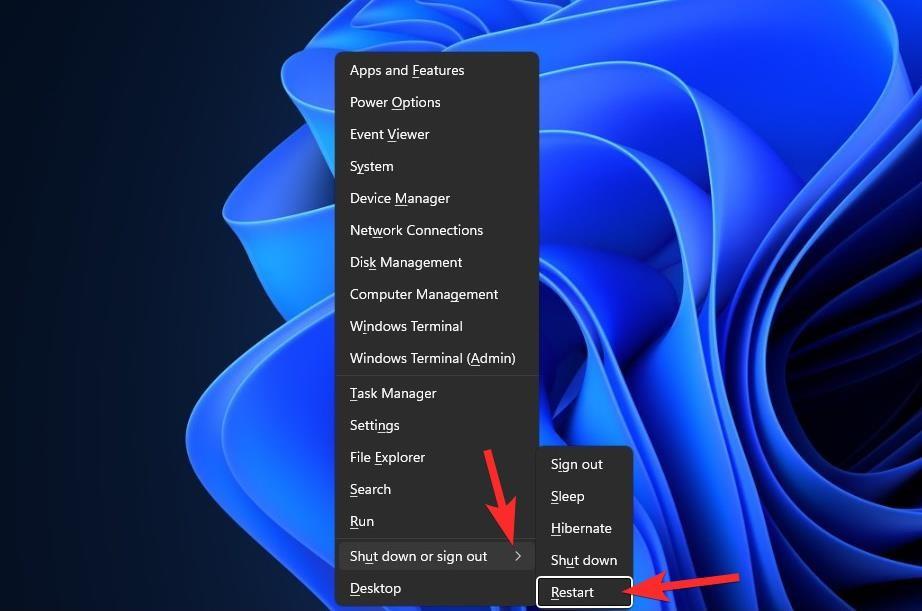
Перш ніж випробувати щось незвичайне, краще спробувати простіші заходи, наприклад перезавантажити ПК або Windows Explorer (див. нижче). Це надасть вашій системі м’яке скидання, що дозволить перезавантажити дані і, можливо, вирішити проблеми з панеллю завдань і меню «Пуск».
Виправлення №2: переконайтеся, що "Автоматично приховувати панель завдань" вимкнено
Натисніть Windows + iна клавіатурі та натисніть «Персоналізація» зліва.
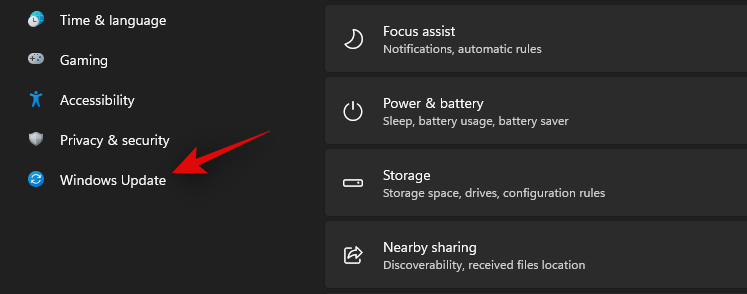
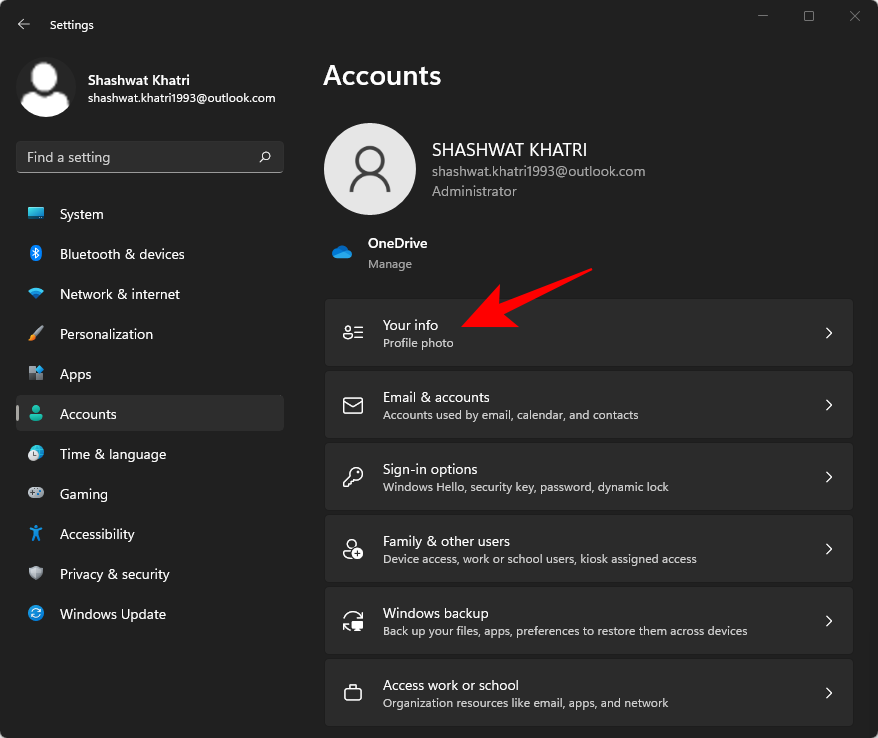
Натисніть на «Панель завдань».
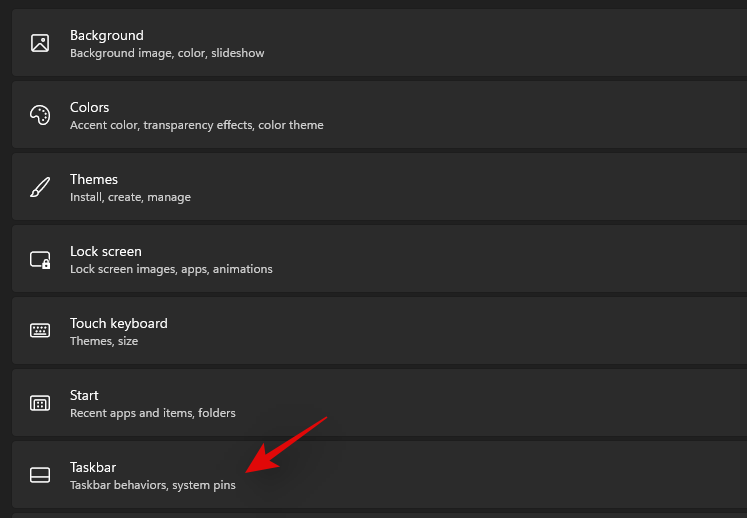
Тепер натисніть «Поведінка панелі завдань».
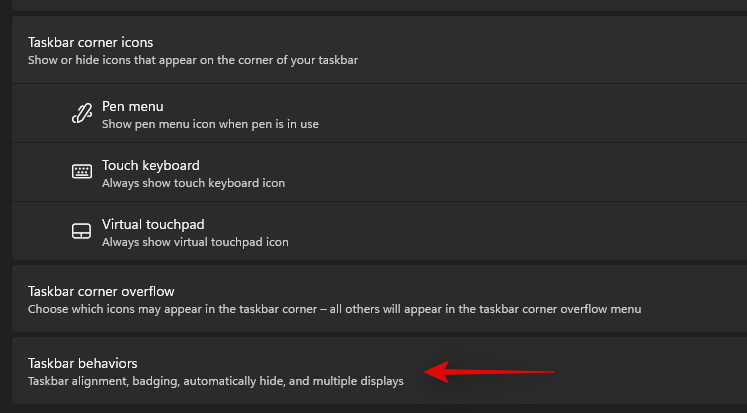
Зніміть прапорець «Автоматично приховувати панель завдань».

Тепер закрийте програму «Налаштування», і якщо ваша панель завдань автоматично приховувалась, її слід вимкнути у вашій системі.
Виправлення №3: Перезапустіть необхідні служби
Як згадувалося раніше, Windows 11 оновила панель завдань, що тепер означає, що вона покладається на кілька служб для належної роботи в будь-якій системі. Давайте перезапустимо всі ці служби, щоб переконатися, що фоновий конфлікт не перешкоджає належній роботі панелі завдань у вашій системі.
Натисніть Ctrl + Shift + Escна своїй системі, щоб запустити диспетчер завдань. Перейдіть на вкладку "Деталі" вгорі.
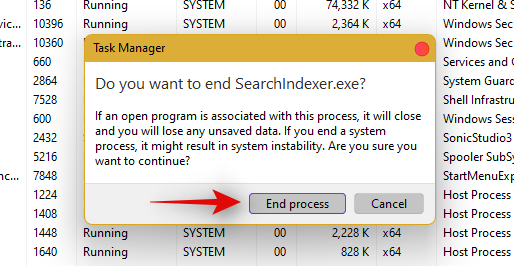
Тепер знайдіть наступні запущені служби та виберіть їх, натиснувши на них. Натисніть «Видалити» на клавіатурі та підтвердіть свій вибір, вибравши «Завершити процес».
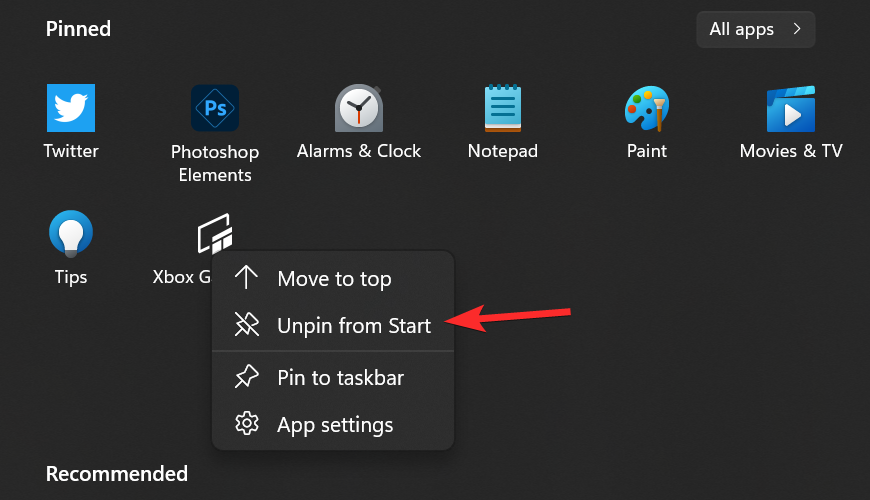
Давайте зараз перезапустимо Провідник Windows. Натисніть «Файл» у верхньому лівому куті та виберіть «Запустити нове завдання».
Введіть «explorer.exe» і натисніть Enter на клавіатурі. Ви також можете натиснути «Ок», якщо потрібно.
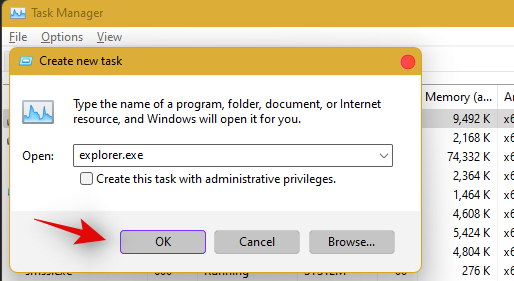
Після перезавантаження Explorer просто перезавантажте комп’ютер, щоб перезапустити інші служби у вашій системі.
Тепер панель завдань має бути відновлена, якщо причиною вашої проблеми був конфлікт фонової служби.
Виправлення №4: видаліть IrisService в реєстрі та перезапустіть
Натисніть, Ctrl + Shift + Escщоб відкрити диспетчер завдань. Потім натисніть Файл у верхньому лівому куті.
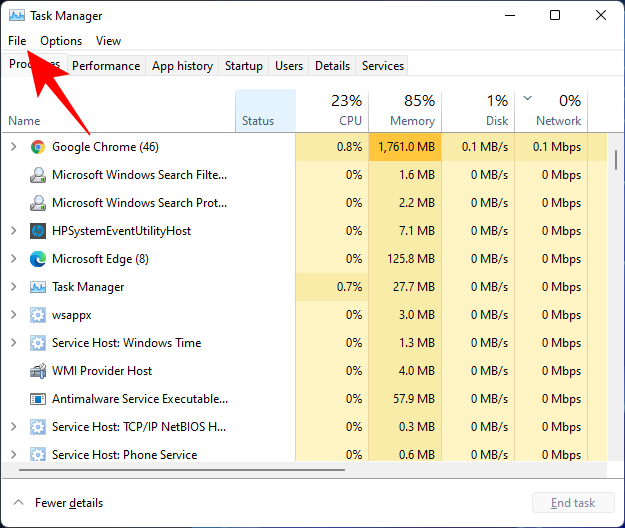
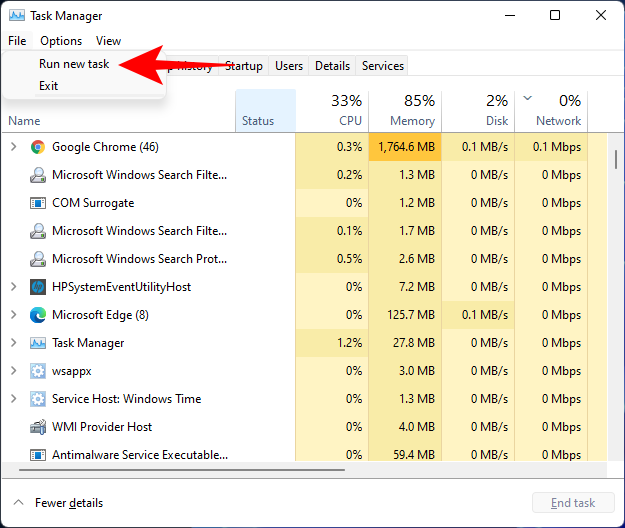
Виберіть Запустити нове завдання .
Введіть cmd і натисніть Enter.
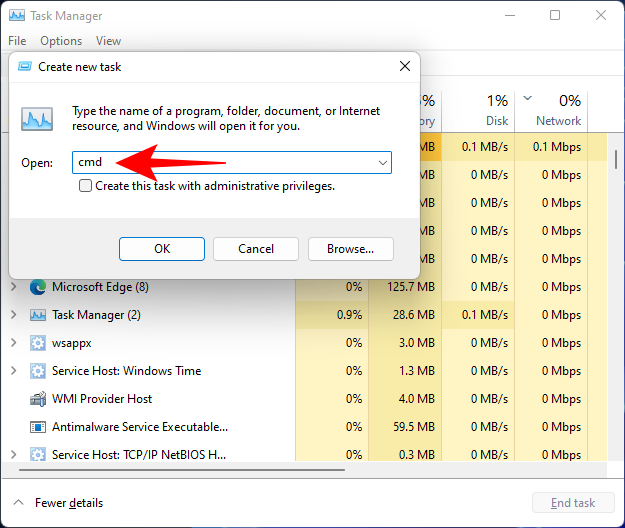
Це відкриє підвищений екземпляр командного рядка. Тепер скопіюйте таку команду та вставте її в командний рядок:
reg delete HKCU\SOFTWARE\Microsoft\Windows\CurrentVersion\IrisService /f && shutdown -r -t 0

Потім натисніть Enter. Як тільки ви це зробите, ваш ПК перезавантажиться. Після запуску резервного копіювання все має повернутися в норму, включаючи панель завдань.
Виправлення № 5: додайте функцію UndockingDisabled до реєстру
Натисніть, Ctrl + Shift + Escщоб відкрити диспетчер завдань. Потім натисніть « Файл» (у верхньому лівому куті) і « Запустити нове завдання» .
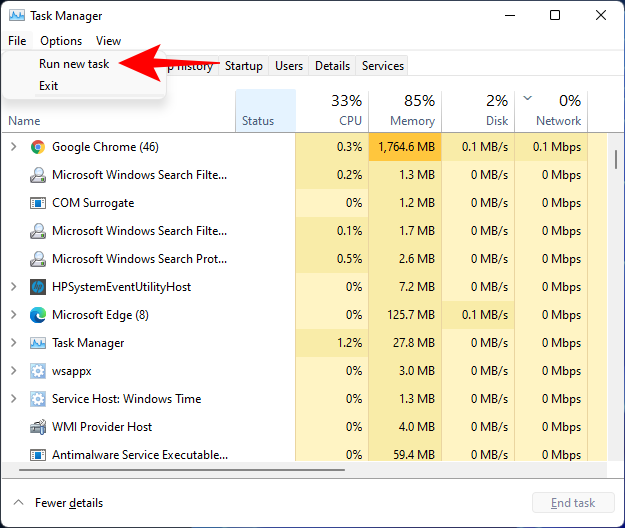
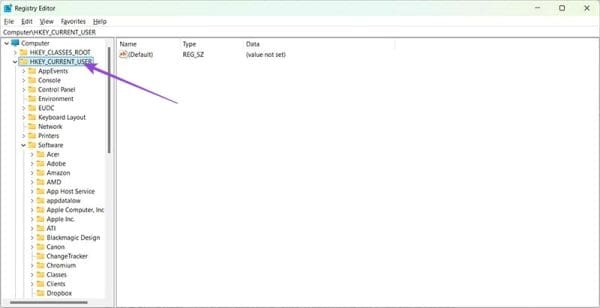
Введіть regedit і натисніть Enter.
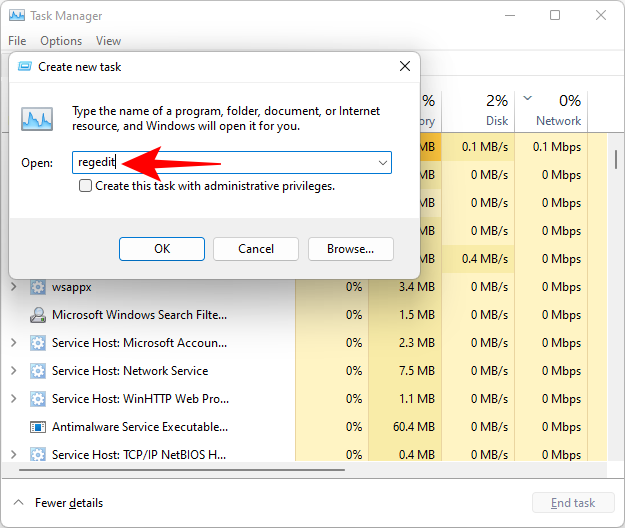
Це відкриє редактор реєстру. Тепер перейдіть за такою адресою:
Computer\HKEY_LOCAL_MACHINE\SOFTWARE\Microsoft\Windows\CurrentVersion\Shell\Update\Packages
Крім того, просто скопіюйте наведене вище та вставте його в адресний рядок редактора реєстру, наприклад:

Після натискання клавіші Enter вас буде перенаправлено на вказаний ключ. Праворуч клацніть правою кнопкою миші пробіл і виберіть Створити > DWORD (32-розрядне) значення .
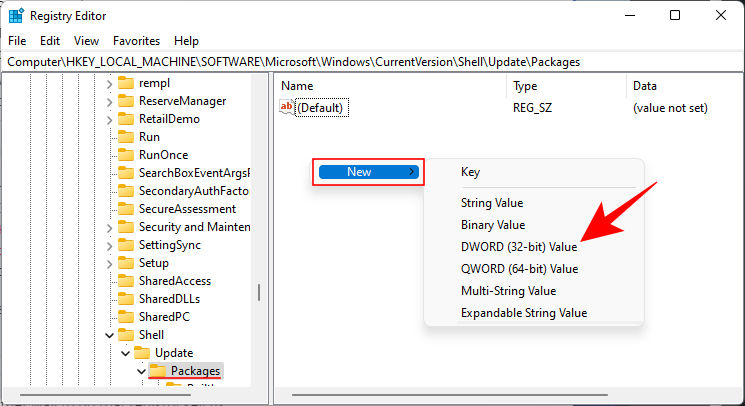
Назвіть цей щойно створений DWORD UndockingDisabled .
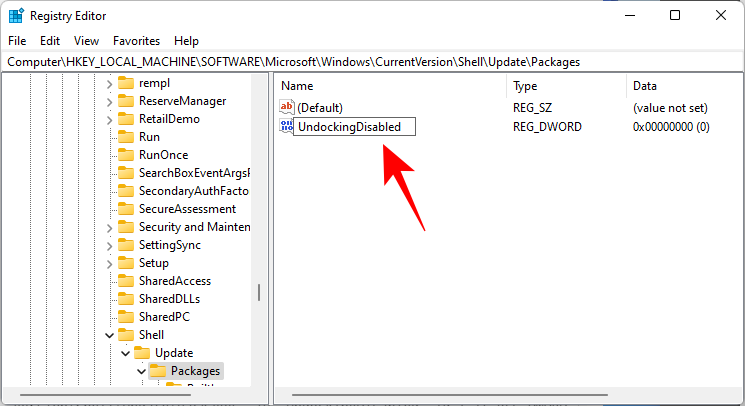
Потім двічі клацніть на ньому та змініть «Дані значення» на 1 . Потім натисніть OK .
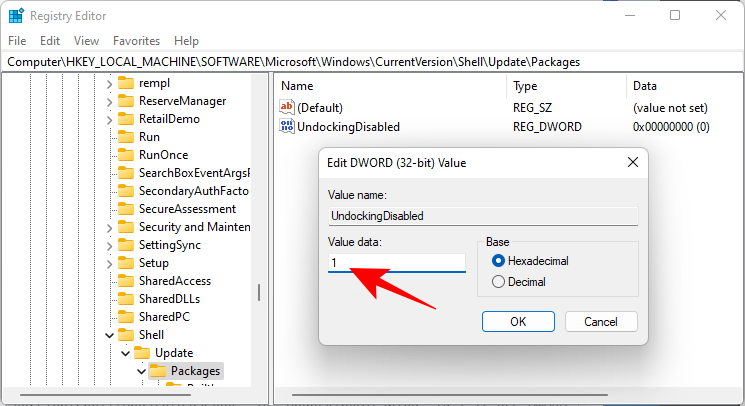
Перезавантажте комп��ютер, щоб зміни вступили в силу.
Виправлення №6: Запуск команд SFC і DISM
Натисніть «Пуск», введіть cmd і натисніть « Запуск від імені адміністратора» .
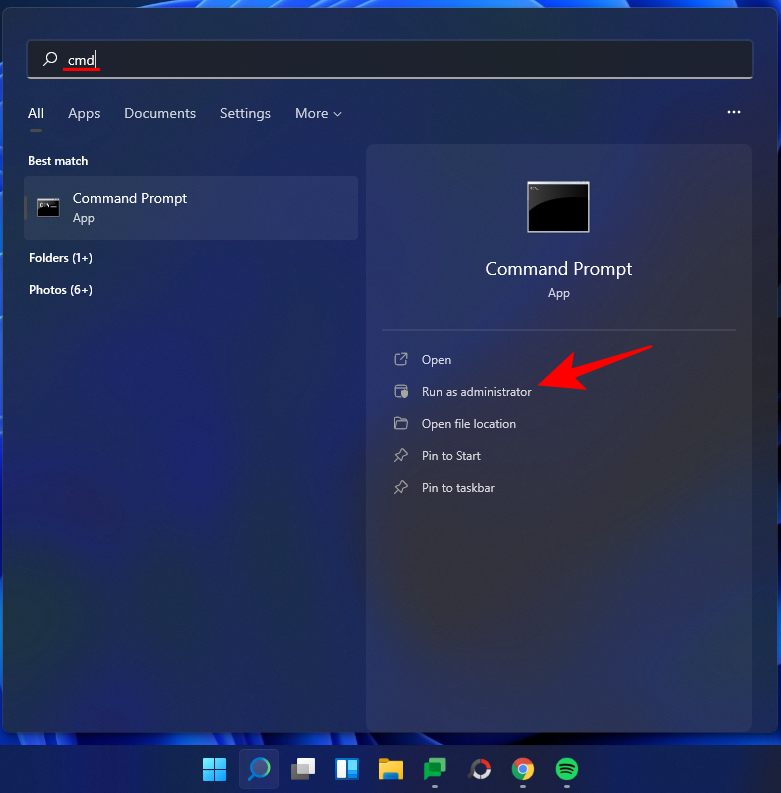
Тепер введіть таку команду:
sfc /scannow
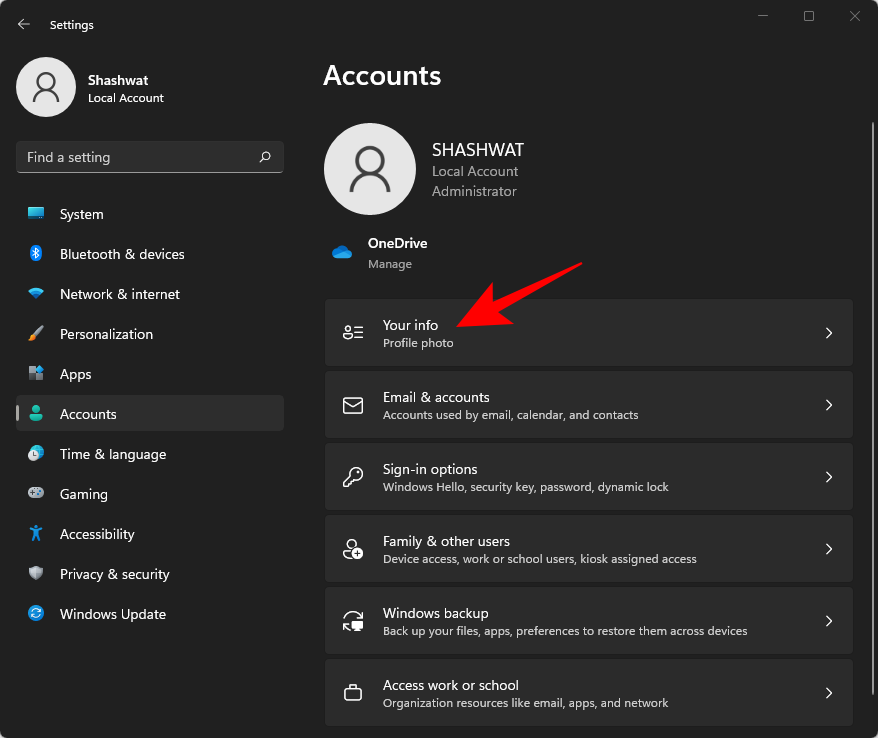
Натисніть Enter. Зачекайте, поки SFC завершить сканування та виправить усі знайдені проблеми.

Далі виконайте таку команду DISM для інструмента обслуговування та керування зображенням розгортання:
dism /online /cleanup-image /scanhealth
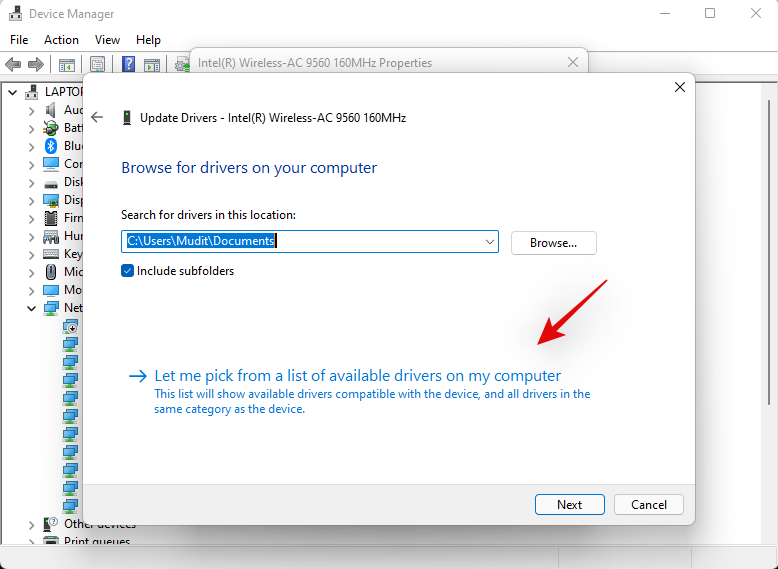
Потім натисніть Enter. Знову дочекайтеся завершення сканування.

Тепер запустіть таку команду DISM:
dism /online /cleanup-image /restorehealth

Натисніть Enter. Зачекайте, поки DISM відновить здоров’я.

Нарешті, запустіть команду chkdsk, щоб запустити утиліту Check Disk:
chkdsk c: /r
Натисніть Enter. Командний рядок видасть повідомлення про те, що він «не може заблокувати поточний диск… тому що том використовується іншим процесом», і попросить вашого дозволу запланувати сканування перед наступним завантаженням. Введіть, Yщоб відповідати.

І натисніть Enter. Тепер перезавантажте комп’ютер, дозвольте інструменту Перевірка диска виконати свою роботу та перевірте, чи панель завдань відновила нормальне функціонування.
Виправлення №7: перевстановіть UWP
Натисніть Ctrl + Shift + Escна клавіатурі, щоб запустити диспетчер завдань. Натисніть «Файл» і виберіть «Запустити нове завдання».
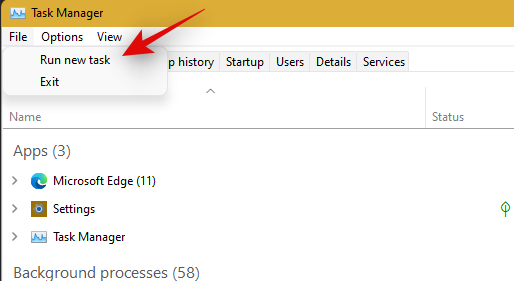
Введіть «PowerShell» і натисніть Ctrl + Shift + Enterна клавіатурі.
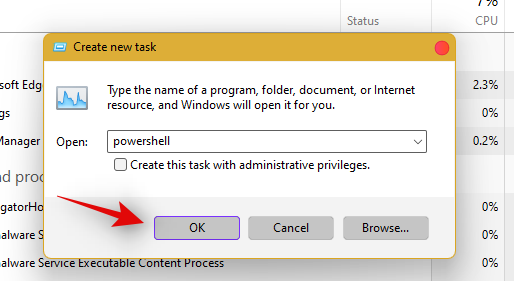
Тепер PowerShell буде запущено як адміністратор у вашій системі. Введіть таку команду:
Get-AppxPackage -AllUsers | Foreach {Add-AppxPackage -DisableDevelopmentMode -Register “$ ($ _. InstallLocation) \ AppXManifest.xml”}
Натисніть Enter. PowerShell видасть поточний список повідомлень червоного кольору. Але не турбуйтеся про це. Просто дочекайтеся завершення виконання команди.

Виправлення №8: Перевірте UAC і, якщо потрібно, додайте редагування реєстру
UAC є обов’язковим для всіх сучасних програм і функцій, включаючи меню «Пуск» і панель завдань. Спершу слід увімкнути UAC, якщо він вимкнений, і перезавантажити систему. Якщо Панель завдань все ще не працює для вас, ми рекомендуємо спробувати додати значення меню «Пуск» Xaml до свого редактора реєстру.
Додавання цього значення, здається, перезапускає та перереєструє служби панелі завдань, які, здається, знову змусять панель завдань працювати на більшості систем. Дотримуйтесь інструкції нижче, щоб почати.
Перевірте й увімкніть UAC, якщо вимкнено
Натисніть Ctrl + Shift + Escна клавіатурі, щоб запустити диспетчер завдань. Тепер натисніть «Файл» у верхньому лівому куті екрана та виберіть «Запустити нове завдання».

Введіть «cmd» і натисніть Ctrl + Shift + Enterна клавіатурі.
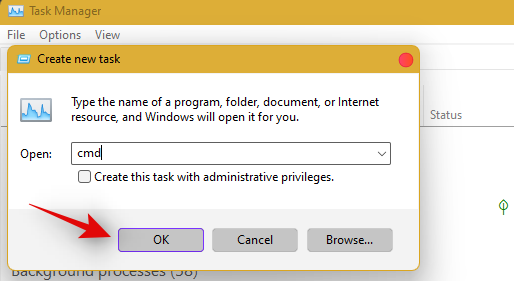
Тепер введіть таку команду та натисніть Enter, щоб виконати команду.
C:\Windows\System32\cmd.exe /k %windir%\System32\reg.exe ADD HKLM\SOFTWARE\Microsoft\Windows\CurrentVersion\Policies\System /v EnableLUA /t REG_DWORD /d 0 /f
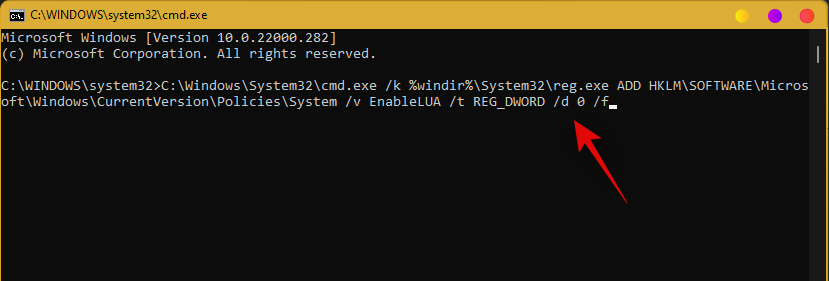
UAC will now be enabled for your system. Restart your PC for the changes to take effect on your system. Once restarted, Taskbar should be up and running on your system if UAC was the issue for you. If not, use the guide below to trigger the taskbar’s functionality on your system.
Add Registry Value
Press Ctrl + Shift + Esc to launch the task manager. Now click on ‘File’ in the top left corner and select ‘Run new task’.

Type in ‘cmd’ and press Ctrl + Shift + Enter on your keyboard.

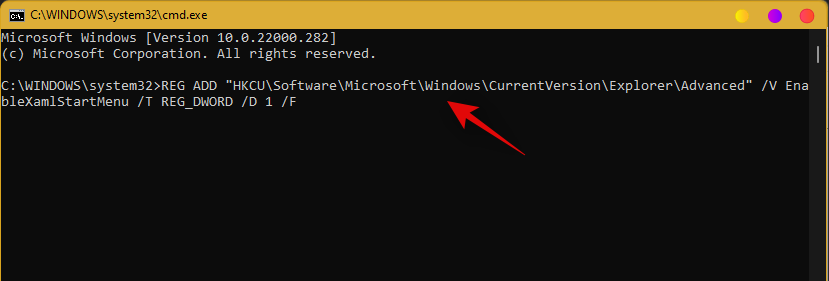
Now type in the following command and press Enter on your keyboard.
REG ADD "HKCU\Software\Microsoft\Windows\CurrentVersion\Explorer\Advanced" /V EnableXamlStartMenu /T REG_DWORD /D 1 /F
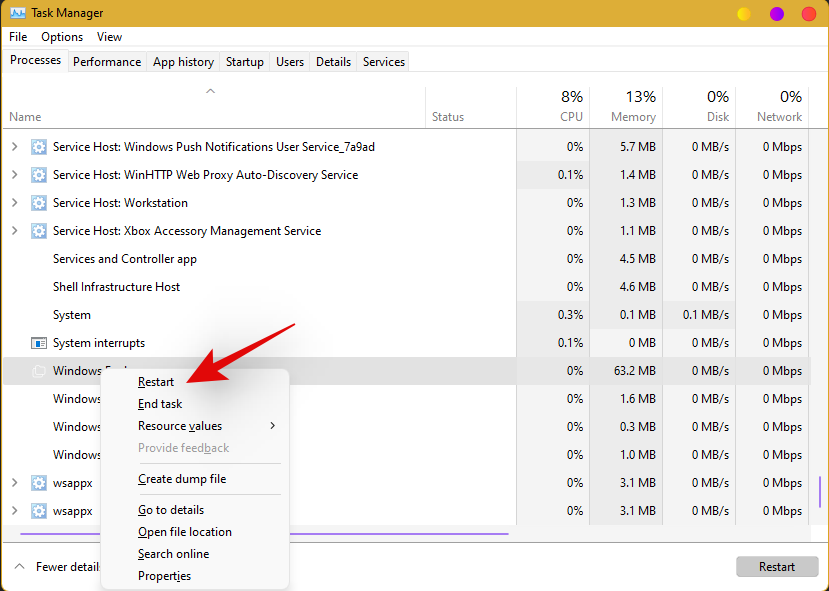
Go back to the task manager now, find Windows Explorer in the list, and right-click on it. Select Restart to restart explorer.exe.
Once restarted, try to access your taskbar. The taskbar should now be available on your system.
Fix #9: Edit date and time to fix Taskbar
Date and Time settings seem to be the major cause of issues with the taskbar in Windows 11. Use the guide below to try out the following time fixes to see which one works the best for you.
Ensure that your time is correctly synchronized with the time server
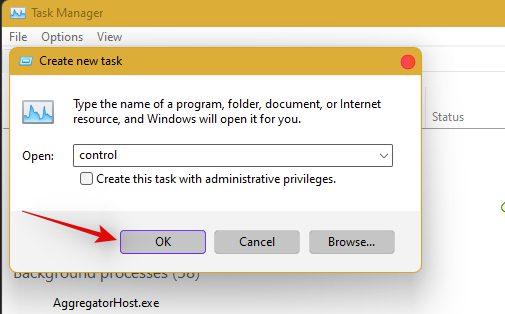
Press Ctrl + Shift + Esc on your keyboard and click on ‘File’. Select ‘Run new task’.

Type in ‘Control’ and hit Enter on your keyboard.
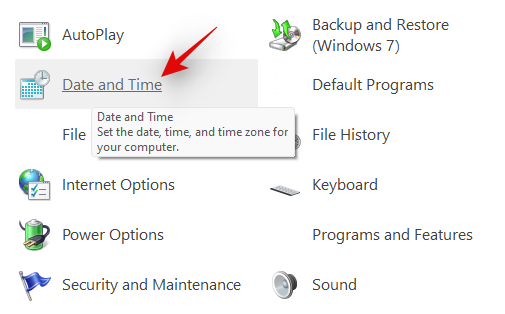
Click on ‘Date and Time’.
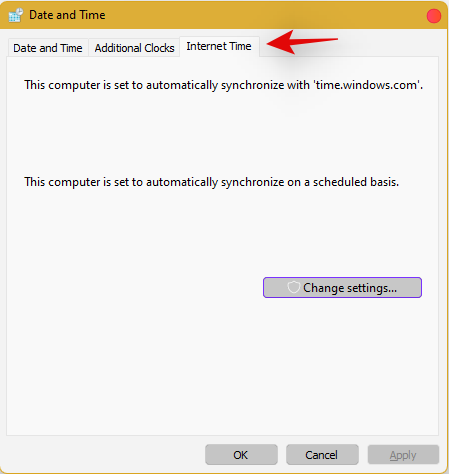
Select ‘Internet Time’ from the top.
Click on ‘Change Settings’.
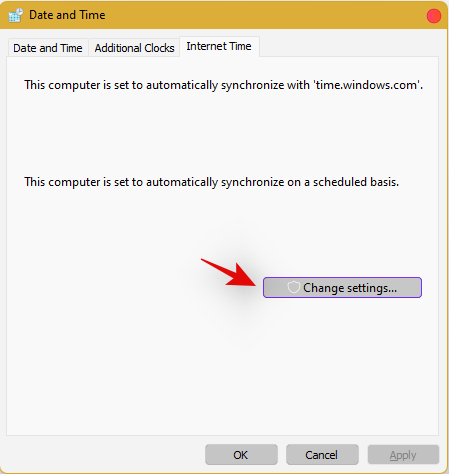
Uncheck the box for ‘Synchronize with an Internet time server’.
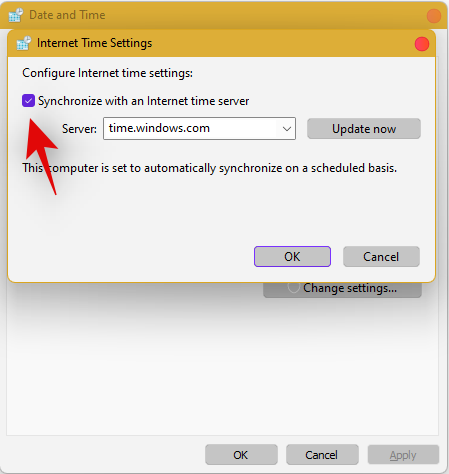
Click on ‘Ok’ once you are done.
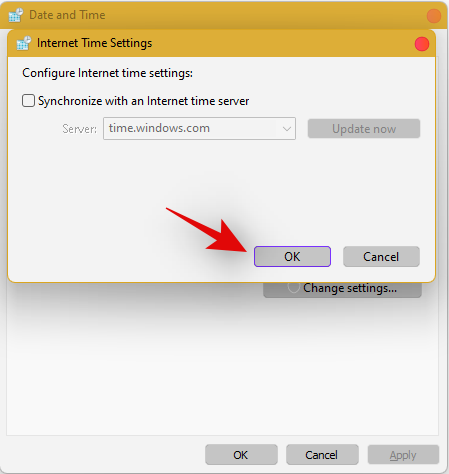
Restart your PC at this point and check your taskbar. If it is still disabled, do not fret, follow the steps above and enable Synchronization with an Internet Time Server again.
Once enabled, press Ctrl + Shift + Esc on your keyboard, and find Windows Explorer in the list on your screen. Right-click the listing and select ‘Restart’.

Once explorer restarts, try using the Taskbar. If synchronization was your issue, then it should now be fixed on your system. If not, continue with the other time fixes mentioned below.
Change date to 1 day ahead
Open the Task Manager by pressing Ctrl + Shift + Esc simultaneously. Then click on File.
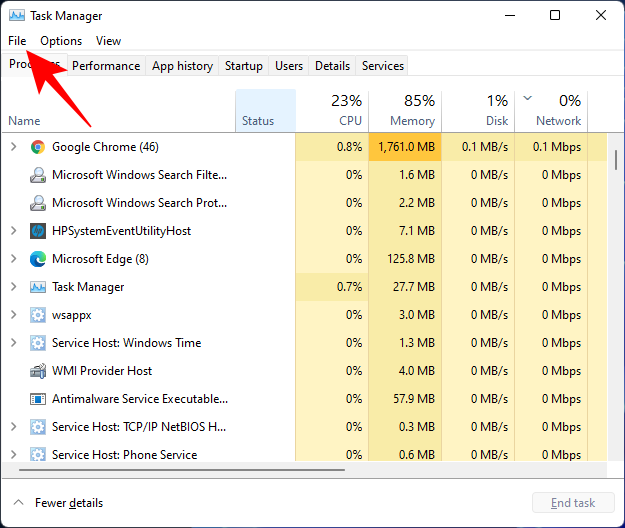
Click on Run new task.
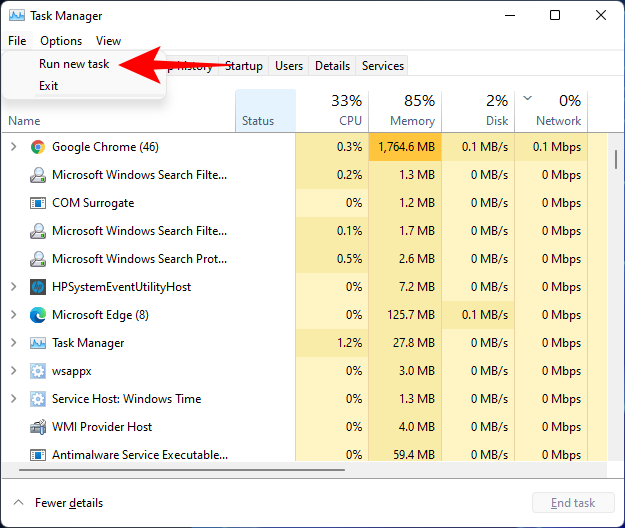
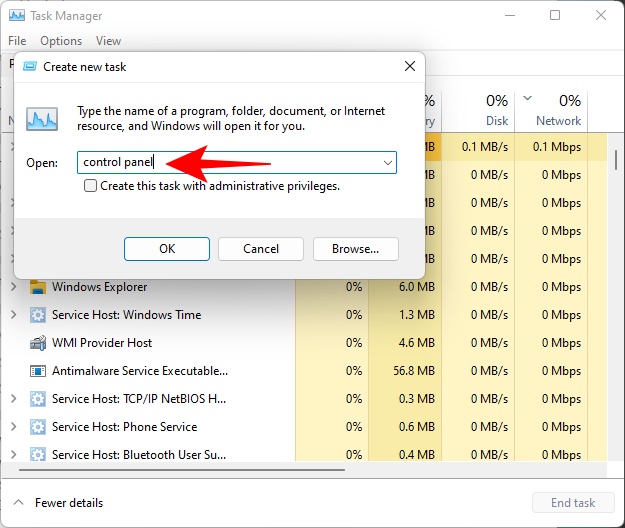
Type control panel and hit Enter.
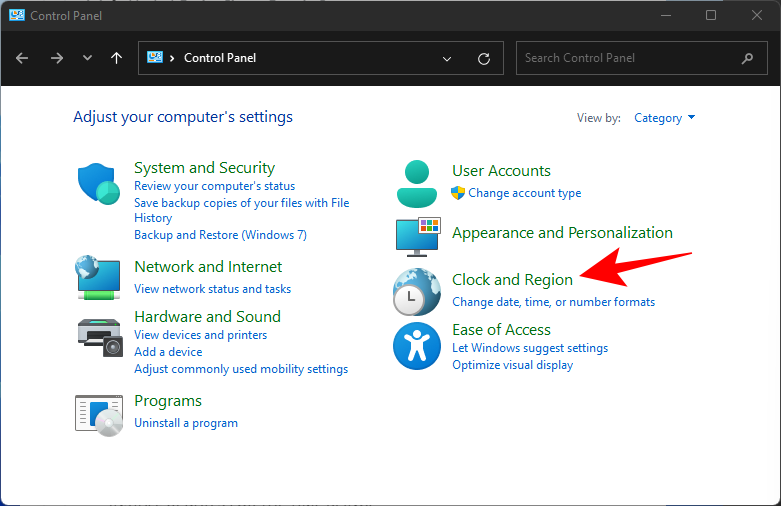
Now click on Clock and Region.
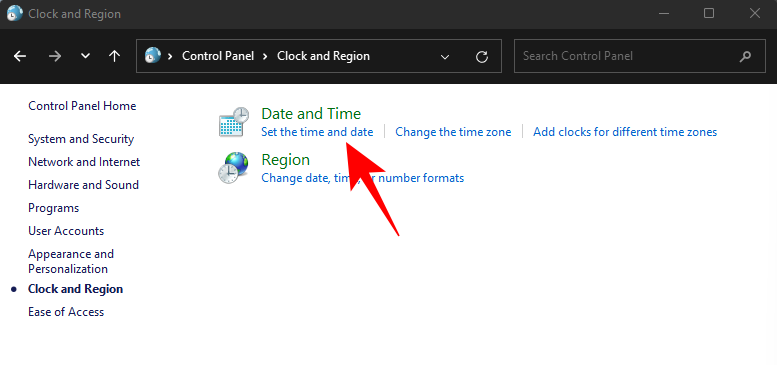
Under “Date and Time”, click on Set the time and date.
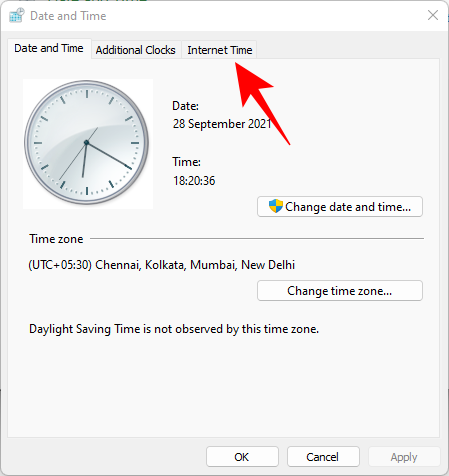
Click on the Internet Time tab to switch to it.
Click on Change settings…
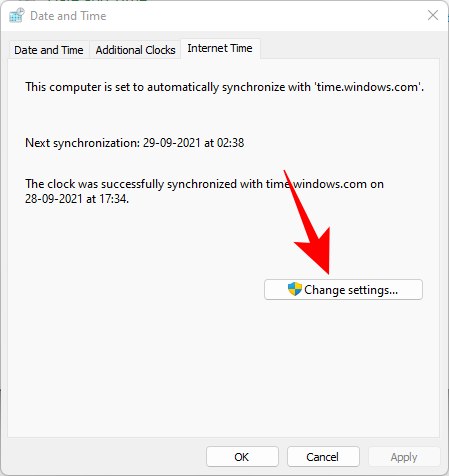
Uncheck Synchronize with an Internet time server, then click OK.
Now click on the Date and Time tab to switch back to it.
Here, click on Change date and time…
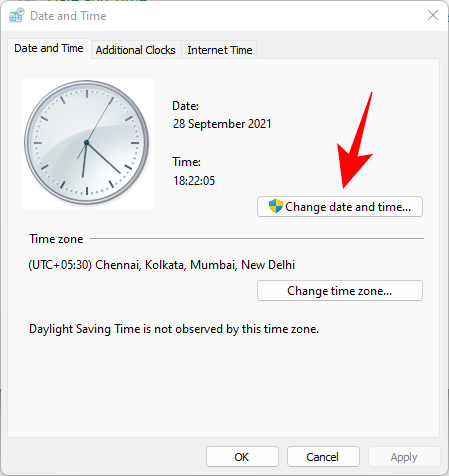
Now change the date and time to reflect tomorrow. As of writing this post, it is the 1st November so we will be changing the date to 2nd November.
Change Dates to last cumulative updates
If you are still unable to get the Taskbar working then you will have to jump through a few hoops to change your date and time multiple times and get the taskbar working on your system. Follow the guide below to get you started.
Press Ctrl + Shift + Esc on your keyboard, click on ‘File’ and select ‘Run new task’.

Type in ‘Control’ and press Enter on your keyboard.

Select ‘Date and Time’.

Switch to ‘Internet time’.

Click on ‘Change Settings’.

Uncheck the box for ‘Synchronize with an Internet Time Server’.

Click on ‘Ok’.

Switch back to ‘Date and Time’. Click on ‘Change Date and Time’ and select your date as 2nd September.
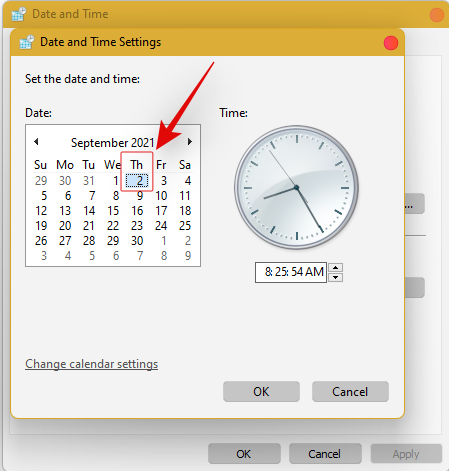
Close all windows and restart your system. Once restarted, open the ‘Date and Time’ dialog box again and change your date to 7th October this time.
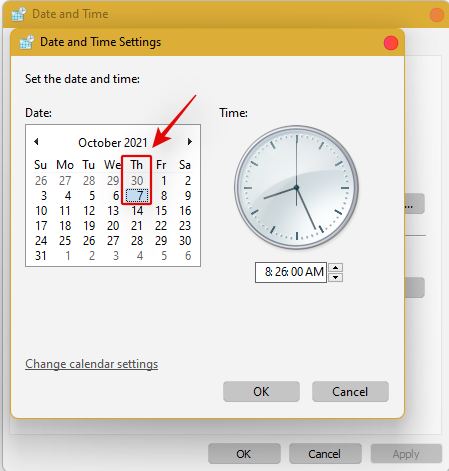
Restart your system again and Taskbar should now be back up and running on your system again. You can now enable synchronization for time again using the steps above on your system.
If synchronizing time does not work, move a month ahead to restore Taskbar
If you are still unable to get Taskbar up and running on your system again you can try the last date change fix. We recommend you use the steps above to change your date and time to a month ahead of your current date. Once changed, restart your system, and the taskbar should be up and running on your system now.
The downside of this fix is that if you revert to your normal date, Taskbar will stop working on your system. Having a mismatched date can cause issues with background syncs for various applications and cause some websites to malfunction. You will also have issues installing and getting the latest Windows Updates, so you will need to check all of these manually when updating in the future.
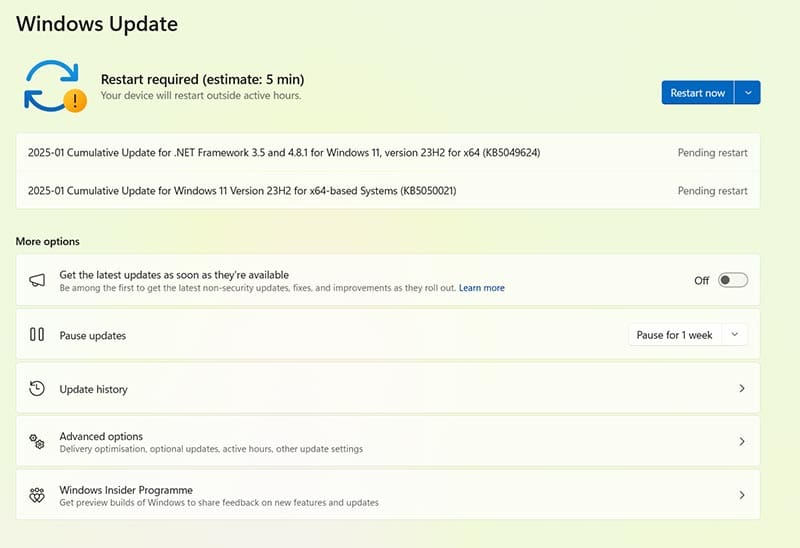
Fix #10: Uninstall the latest cumulative Windows Update ie: KB5006050
The cumulative update released in September for Windows 11 seems to also cause issues with the taskbar on some desktops and laptops. Use the guide below to uninstall the necessary update from your system.
Press Windows + i and select Windows Update from the left.
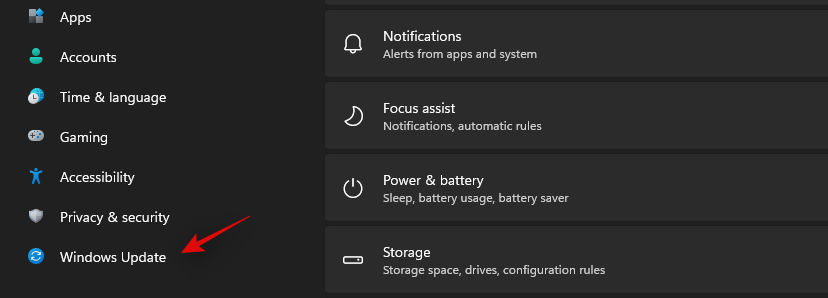
Click on ‘Update history’.
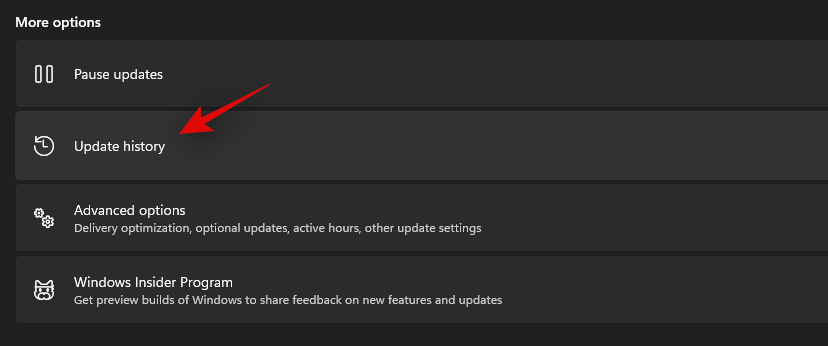
Now select ‘Uninstall updates’.
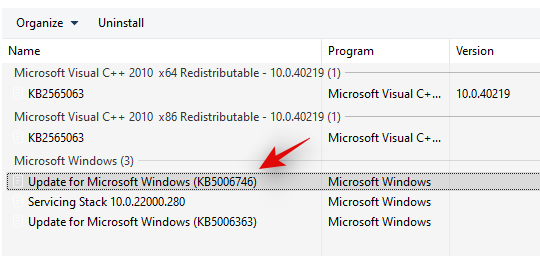
Click and select Windows Cumulative update KB5006050 from the list.
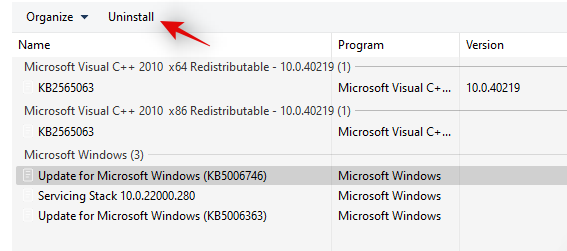
Now click on ‘Uninstall’ at the top and confirm your choice to uninstall the selected update.
Restart your system and taskbar functionality should now be restored on your system.
Fix #11: Restore PC to a previous restore point
If you had the taskbar working at a previous point in time then we recommend you restore your PC to a previously available restore point on your system. Follow the guide below to get you started.
Press Ctrl + Shift + Esc on your keyboard and click on ‘File’. Select ‘Run new task’ once you are done.

Type in CMD and press Ctrl + Shift + Enter on your keyboard.

Now type in ‘rstrui.exe’ and press Enter on your keyboard.
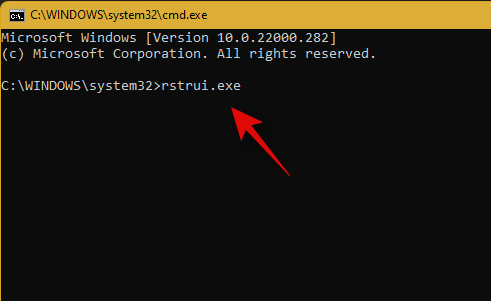
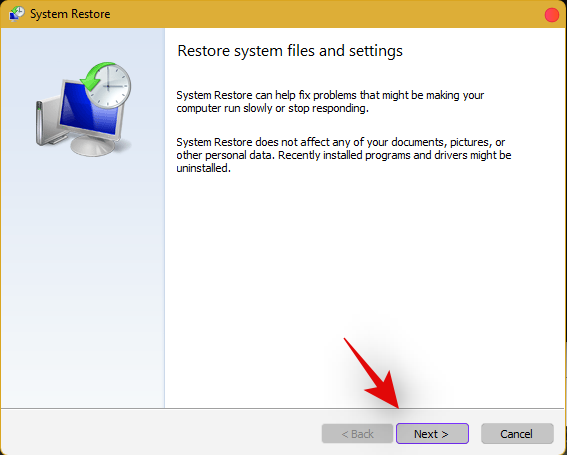
The system restore utility will now launch on your system. Click on ‘Next’.
Select the desired restore point from the list on your screen. Click on ‘Next’ once you are done.
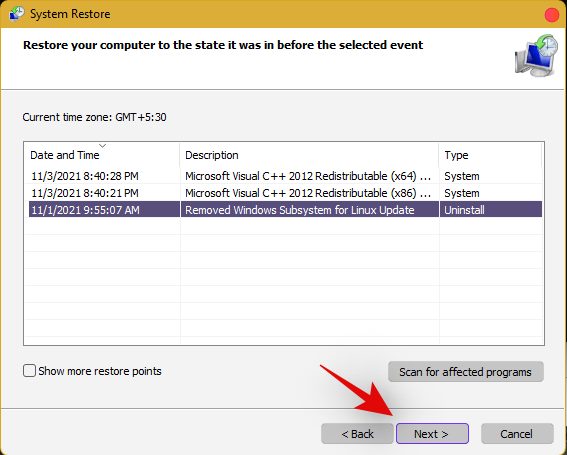
Tip: Click on ‘Scan for affected programs’ to view a list of installed programs that will be removed from your system during the restore process.
Click on ‘Finish’ once the restore finishes and restart your system.
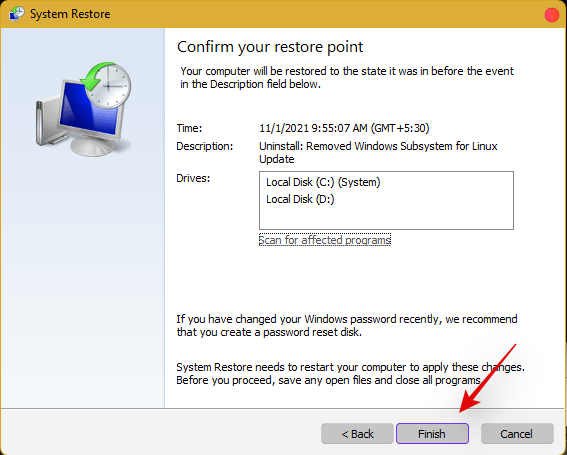
The taskbar should now be back up and running on your system again.
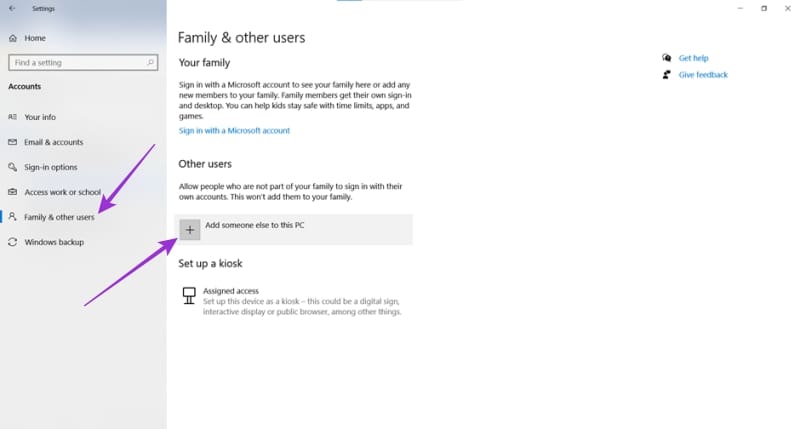
Fix #12: Last Resort: Create a new local admin account and transfer all your data
If by this point Taskbar still fails to work for you then it’s time for some drastic measures. You can create a new local admin account, check if Taskbar is working there, and then transfer all your data to the new account. This will be a tedious process but it is the next best way to get the taskbar working on your system without resetting your PC. Follow the guide below to get you started.
Create a new local admin account
Herre’s how you can create a new local admin account on your system.
Note: Most users facing the taskbar issue are unable to access the Settings app as well. Hence we will be using CMD to add a new local admin account to your PC. However, if the Settings app is available to you then you can use the same to add a new account as well.
Press Ctrl + Shift + Esc on your keyboard, click on ‘File’ and select ‘Run new task’.

Type in ‘cmd’ and press Ctrl + Shift + Enter on your keyboard.

CMD will now be launched as an administrator. Use the command below to add a new local admin account. Replace NAME with the Username of your choice for the new account. You can add a password later once you have confirmed that the taskbar is available in the new account.
net user /add NAME 
Once you have added the new user, use the command below to convert it to an administrator account on your PC. As usual, replace NAME with the Username for the new account you created earlier.
net localgroup Administrators NAME /add

Now type in the following to log out of your current account.
logoff

Once logged out, click on the newly added account to log in to the same. Once logged in, check if the taskbar is available in the new account. If it is, you can use the next section to transfer all your data. However, if the taskbar is still missing then you have no choice but to perform a fresh install of Windows 11 on your PC from a removable USB media drive.
Transfer all your data
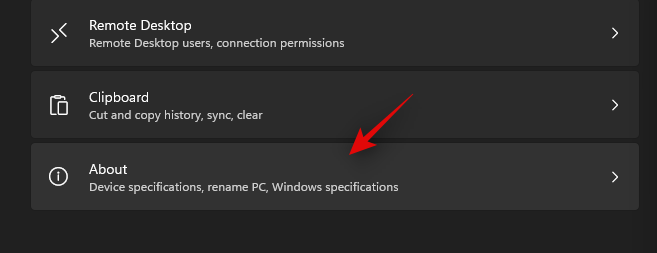
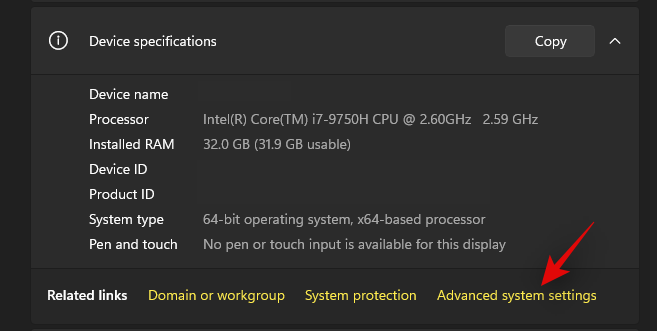
Press Windows + i on your keyboard and click on ‘About’ on your right.
Click on ‘Advanced system settings’.
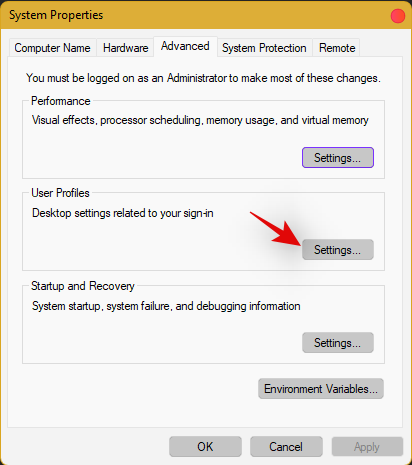
Click on ‘Settings’ under ‘User Profiles’.
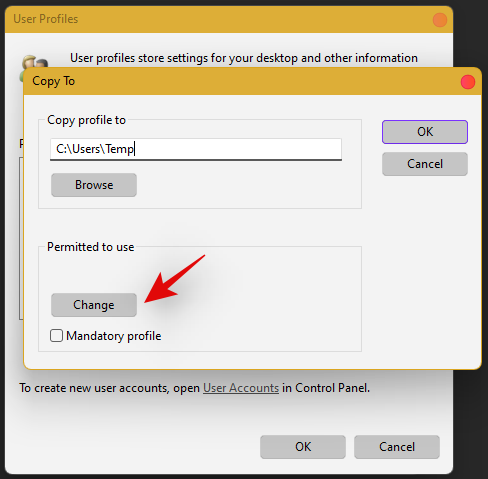
Select your original profile by clicking on it and selecting ‘Copy To’.
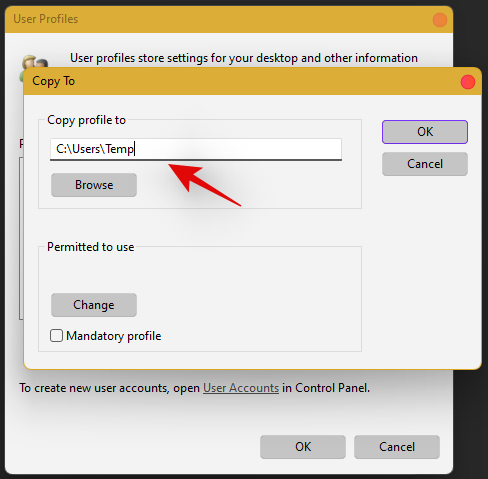
Now enter the following path under ‘Copy profile to’. Rename NAME to the username of your previous profile from where you wish to copy all your data.
C:\Users\NAME
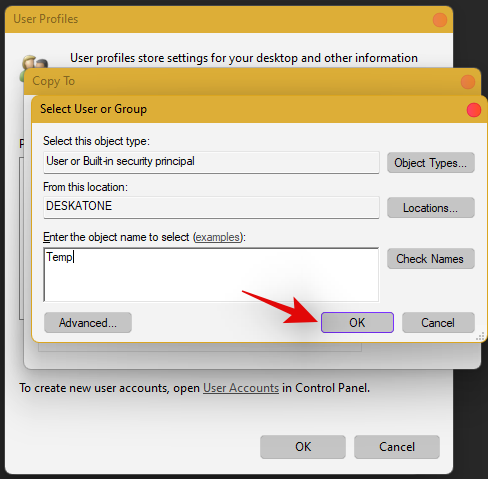
Click on ‘Change’.
Enter the name for your new user profile and press Enter on your keyboard.
Click on ‘Ok’ once you are done.
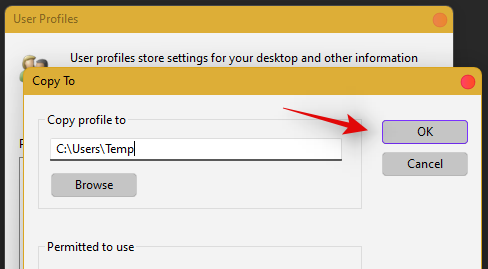
All your data will now be copied over to the new profile where the taskbar is functional on your PC. You can now delete your previous user account and set a password for your new account as well.
Frequently Asked Questions (FAQs):
With so many fixes, you are bound to have a few questions on your mind. Here are some commonly asked ones that should help you get up to speed.
How do I access Windows apps and Settings without a taskbar?
You can use the Task Manager to launch almost any program or Settings page on your system. To launch the desired program, launch the Taskbar > File > Run new task and enter the path to the program you wish to launch. Press Enter if you wish to launch the program normally or press Ctrl + Shift + Enter if you wish to launch the program with administrator privileges.
Is it safe to edit the Registry?
Registry edits are never safe as they have the potential to break your system. Fixes from trusted sources can help you avoid such issues but a good rule of thumb is to always back up your registry before making any edits. This way you can easily restore your Registry values in case some get messed up when editing the Registry.
When will Microsoft fix this issue?
Sadly, Microsoft is yet to release a proper fix for this issue. The company has tried to release a fix in the past cumulative updates to Windows 11 but they have been a hit and miss. We expect Microsoft to completely fix this issue in the upcoming feature update to Windows 11 when the OS gets the ability to run Android apps officially.
Can I update my Windows 11 after fixing the taskbar?
This will depend on the fix that you’re currently using. If you are using a date fix then you won’t be able to install updates until you restore to the current time. This will, however, cause the taskbar to be disabled again and the changes will be carried over after you update your PC. However, if you are using any other fix then you can easily update Windows.
For users with the date fix, you should try updating with the modified time first. If the update gets stuck on ‘Installing 0%’ or ‘Downloading 100%’ then change your date and time to the current date and time and update your PC. Ensure that you do not restart explorer or your PC during this process to keep the current instance of the taskbar alive on your system during the update process. This should help fix the issue for you once Microsoft officially releases an update to fix the issue.
We hope you were able to easily get the taskbar back up and running on your system using the guide above. If you face any more issues, feel free to reach out to us using the comments section below.
Related:
Оновлення драйверів у Windows 11 є важливим процесом для виправлення помилок та покращення сумісності пристроїв. Дізнайтеся, як це зробити ефективно.
На жаль, пісочниця Minecraft від Mojang відома проблемами з пошкодженими світами. Прочитайте наш посібник, щоб дізнатися, як відновити ваш світ та уникнути втрати прогресу.
Якщо ваша камера Zoom перевернута, ви можете скористатися опцією «Повернути на 90°» для правильного відображення. Дізнайтеся більше про налаштування відео Zoom.
Прочитайте цей посібник, щоб дізнатися, чому ви отримуєте повідомлення про помилку. Наразі ви не маєте права зареєструватися в Zoom і як це можна виправити.
Якщо Windows Search використовує надзвичайно високі ресурси ЦП або диска, ви можете скористатися наведеними нижче способами усунення несправностей у Windows 11. Методи вирішення проблеми включають простіші методи…
20 лютого 2021 року: Google заблокував усі розширення Meet, які допомагали у перегляді сітки, включно з переліченими нижче. Ці розширення більше не працюють, і, здається, єдиною альтернативою є…
Єдиний екран, якого користувачі Windows колективно бояться, це блакитний екран смерті. BSOD існує вже протягом десятиліть, змінюючи дуже мало з роками, але все ще достатньо потужний, щоб...
Завдяки глибокій інтеграції з Microsoft Office 365 Microsoft Teams стала найкращим рішенням для відеодзвінків для мільйонів людей по всьому світу. Незважаючи на те, що він не є найбільш зручним для користувачів…
Microsoft Teams — це комплексний інструмент, який останнім часом став досить популярним завдяки своїм функціям спільної роботи в команді. Сервіс дозволяє створювати конкретні команди для вашої організації, запрошувати...
12 жовтня 2021 року: Велике оновлення! Зверніть увагу, що вам більше не потрібно замінювати файл appraiserres.dll, щоб обійти перевірку TPM і виправити помилку встановлення під час встановлення Windows 11. …
З моменту випуску Windows 11 минуло кілька місяців, і з тих пір користувачі переходили на нову ОС. Оскільки все більше і більше користувачів випробовують нові проблеми Windows 11, помилки та налаштування з’являються на диску…
Усі дуже хочуть отримати в свої руки оновлення Windows 11. Але якщо є одна річ, яка може зіграти в їхній план легкого оновлення, так це страшна система…
Windows 11 була випущена для громадськості після того, як у червні цього року сталася суперечлива інформація. З тих пір ОС зазнала численних змін, серед яких були бажані заморожені…
Панель завдань Windows була в центрі уваги відтоді, як вона отримала новий оновлений вигляд з випуском Windows 11. Тепер ви можете центрувати панель завдань, насолоджуватися новим центром дій, змінювати його…
Windows 11 буде доступна для широкого загалу за кілька місяців, і всі прагнуть отримати нову ОС. Він має нове меню «Пуск», можливість самостійно встановлювати програми Android і…
Microsoft Teams — це чудова комунікаційна утиліта для користувачів на всіх платформах, але як тільки ви закінчите її використовувати, ось тут програма починає дратувати. Якщо ви не використовуєте Te…
Будь-яка служба, доступна в Інтернеті, має власний набір проблем, і Microsoft Teams не є винятком. На тлі пандемії COVID-19 кількість користувачів інструменту для співпраці значно зросла…
Коли Windows 11 з’явилася у світі, макети прив’язки були першим, що привернуло загальну увагу. Вони були інноваційними, новими та насправді корисними під час роботи в системі Windows…
Windows 11 щойно була випущена для громадськості, і, здається, вона приваблює багатьох нових користувачів. Багато користувачів перейшли до Windows 11 і оновилися до Windows 11, а інші хочуть скористатися…
Google Meet став однією з найбільш обговорюваних платформ для віддаленої співпраці, які зараз доступні на ринку. Він пропонує безліч дивовижних функцій і забезпечує надійність…
Маєте проблеми з повільною роботою PyCharm та IntelliJ у Windows 11? Відкрийте для себе перевірені виправлення, щоб пришвидшити ваші IDE, оптимізувати продуктивність та відновити продуктивність. Покрокові рішення для розробників.
Маєте проблеми з надокучливою помилкою клацання жорсткого диска у Windows 11? Відкрийте для себе перевірені покрокові виправлення, щоб відновити безперебійну роботу та запобігти втраті даних. Поверніть свій ПК у правильний стан вже сьогодні!
Дізнайтеся, як виправити помилку 0xc000007b, у нашому детальному посібнику, в якому розглядаються причини цього коду помилки та список перевірених рішень.
Дізнайтеся, що робити, якщо Windows Phone Link не працює, за допомогою покрокового списку рішень, які допоможуть вам повторно підключити телефон до комп’ютера.
Якщо ви намагалися виправити код помилки 0x80860010 на своєму ПК, знайдіть можливі виправлення тут.
Цікаво, як деактивувати Microsoft Copilot, фірмовий штучний інтелект, який тепер є стандартним у Windows та Edge? Скористайтеся нашим покроковим посібником, щоб дізнатися більше.
Дізнайтеся, як використовувати датчик сховища Windows 11 для автоматичного звільнення місця на диску. Покроковий посібник з оптимізації сховища, видалення тимчасових файлів і забезпечення безперебійної роботи ПК. Важливі поради для початківців.
Дізнайтеся, як безпечно налаштувати резервне копіювання реєстру Windows 11 за допомогою покрокових інструкцій. Захистіть налаштування системи без зусиль та уникайте поширених помилок для безпечної роботи з ПК.
Маєте проблеми з мережевим друком між Windows 10 та Windows 11? Відкрийте для себе перевірені покрокові рішення для безперебійного спільного використання принтерів у вашій домашній або офісній мережі. Більше жодних розчарувань — друкуйте без зусиль вже сьогодні!
Маєте проблеми зі зміною фону у Windows 11 Pro? Відкрийте для себе перевірені покрокові рішення для відновлення персоналізації робочого столу. Виправте це швидко та поверніться до налаштованого інтерфейсу!
