Durant anys, Windows ha estat promocionant la seva gran quantitat de noves funcions i millores afirmant que són només un clic del menú Inici. Però, què passa si el menú Inici deixa d'obrir-se? Bé, pot passar que el menú Inici de Windows 11 de sobte deixi de funcionar per a tu, fent que fer tasques habituals sigui una mica difícil.
Si el menú Inici no s'obre a Windows 11, hi ha tantes solucions com podríem pensar per ajudar-vos a resoldre el problema .
Relacionat: Com desinstal·lar aplicacions a Windows 11
NOTA: Si les 17 (!) correccions habituals que es donen a continuació fallen, proveu la correcció núm. 18 que es mostra a continuació a la secció "Últims recursos" que parla de la creació d'un nou usuari mitjançant la línia d'ordres . Això us ajuda a crear un nou usuari mitjançant CMD, sense necessitat d'accedir a l'aplicació Configuració o al menú Inici, que potser no us funcioni. Dit això, la correcció núm. 1 sobre el problema causat per "Windows Update KB5004300" és una nova addició, així que potser comproveu-ho primer.
Continguts
Hem inclòs un total de 20 (!) correccions per resoldre el problema amb el menú Inici a Windows 11 a continuació. 3 d'elles són solucions generals que només s'han de provar després d'estar segurs que les 17 correccions principals no són d'ajuda.
17 correccions primàries
Proveu aquestes solucions primer abans de provar les 3 correccions generals (també es mostren a continuació).
Solució núm. 1: desinstal·leu i torneu a instal·lar l'actualització de Windows KB5004300
Una solució recent descoberta per usuaris d'ulls d'àguila sembla arreglar fàcilment el menú d'inici de les noves actualitzacions de Windows 11. L'actualització de Windows publicada amb el nom KB5004300 sembla estar causant aquest problema. Si desinstal·leu i torneu a instal·lar-lo al vostre PC, us arreglarà el menú Inici i la barra de tasques. Seguiu la guia següent per començar.
Premeu Windows + iel teclat per obrir l'aplicació Configuració. Feu clic a "Actualització de Windows" a la vostra esquerra.
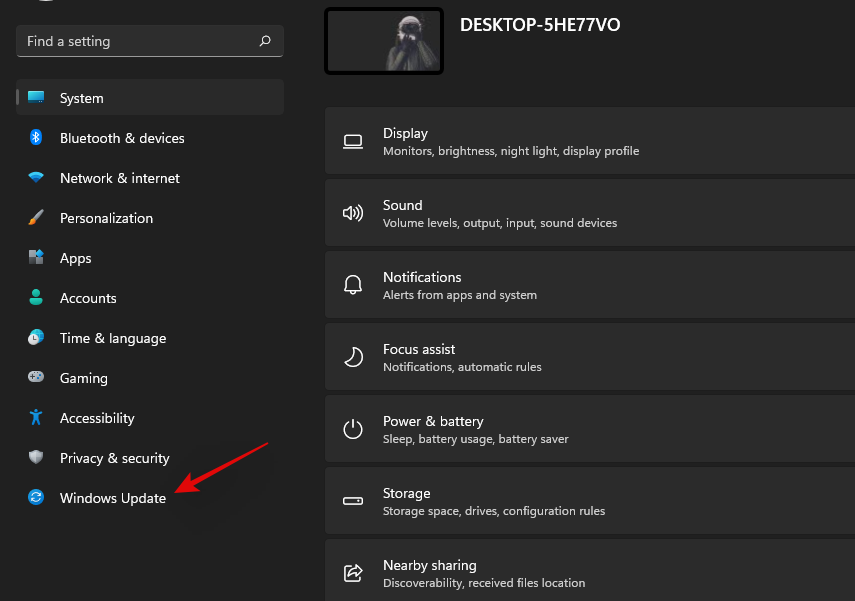
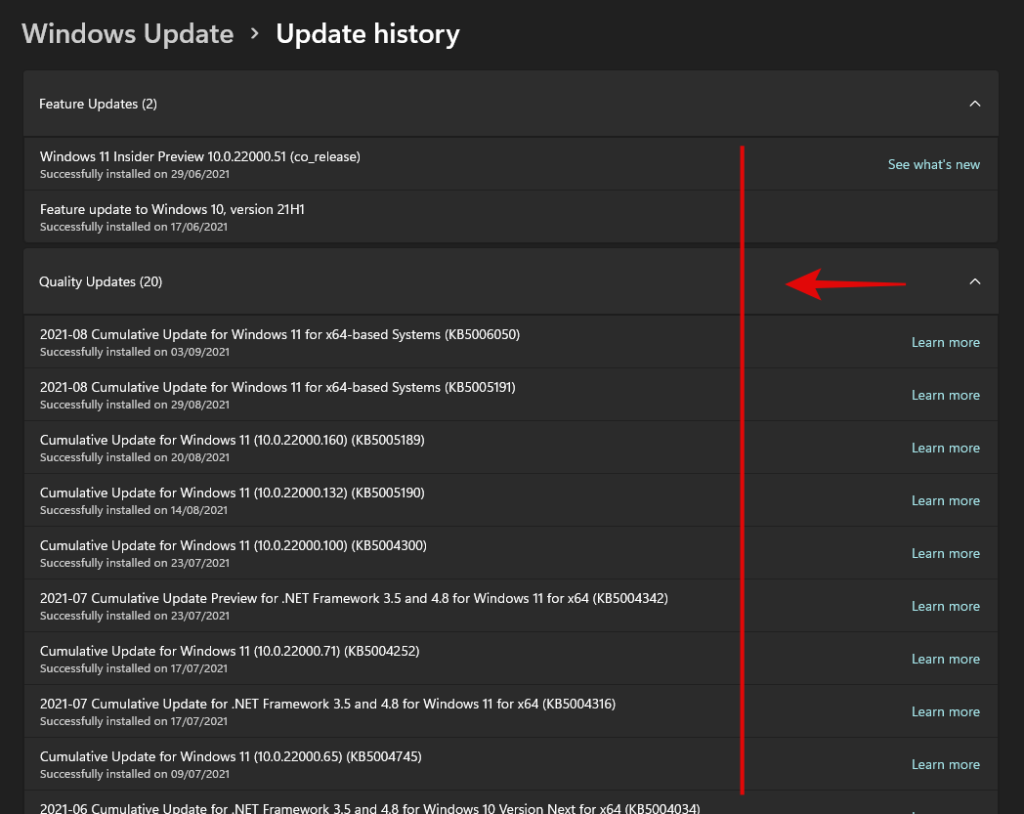
Ara feu clic a "Actualitzar l'historial".
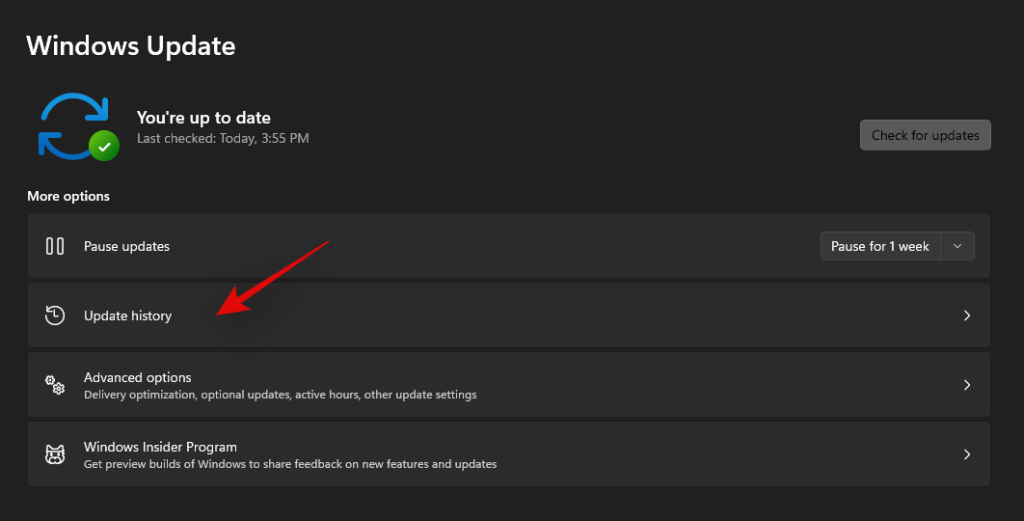
Feu clic a "Desinstal·la les actualitzacions".
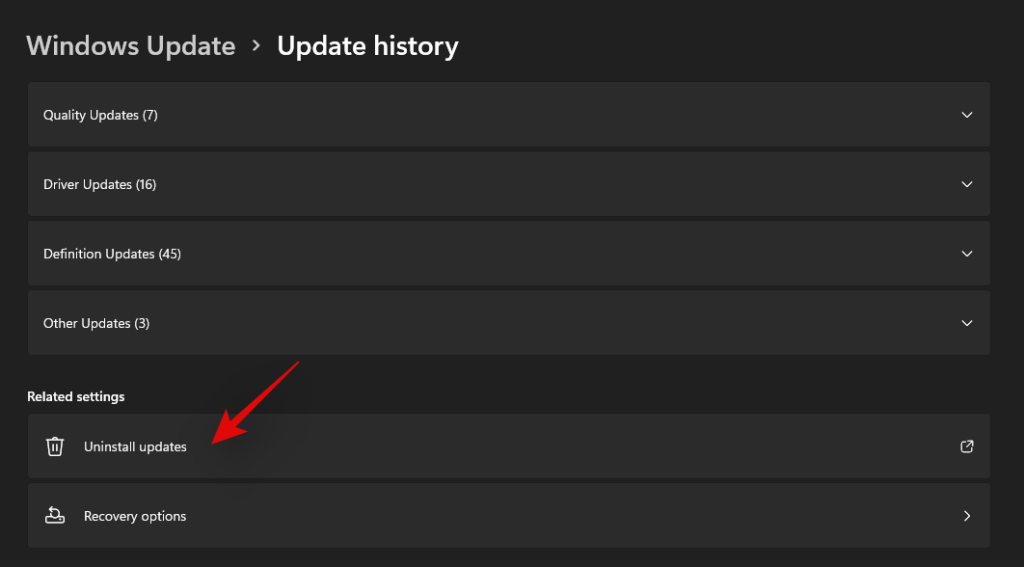
Ara se us redirigirà al Centre de control. Cerqueu l'actualització KB5004300 en qüestió a la llista i feu-hi clic i seleccioneu-la.
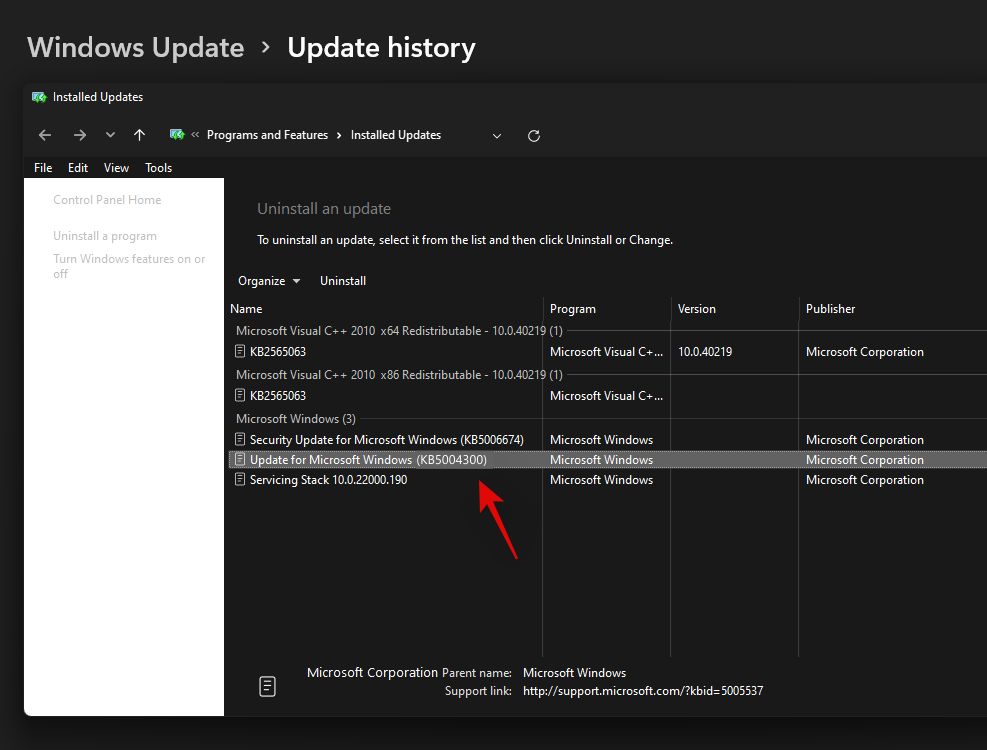
Ara feu clic a "Desinstal·la" a la part superior.
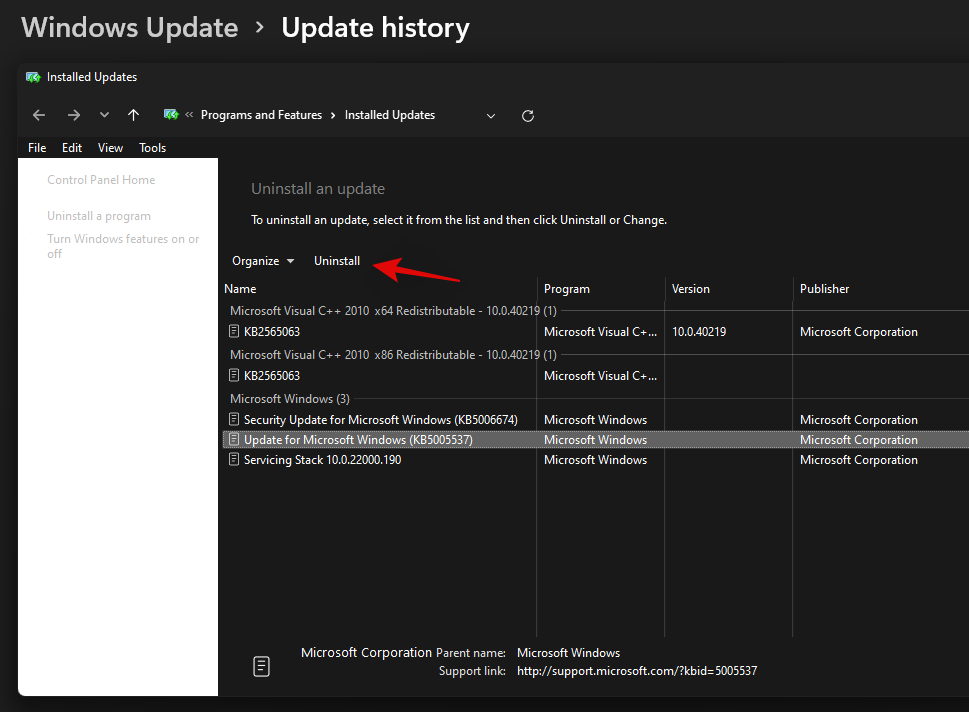
Seguiu les instruccions a la pantalla per eliminar l'actualització del vostre PC. Un cop actualitzat, reinicieu el vostre ordinador per fer una bona mesura.
Ara premeu de Windows + inou un cop reinicieu l'ordinador i torneu a seleccionar Windows Update.

Comproveu si hi ha actualitzacions i ara hauríeu de tenir l'opció de tornar a instal·lar Windows Update KB 5004300 al vostre ordinador.
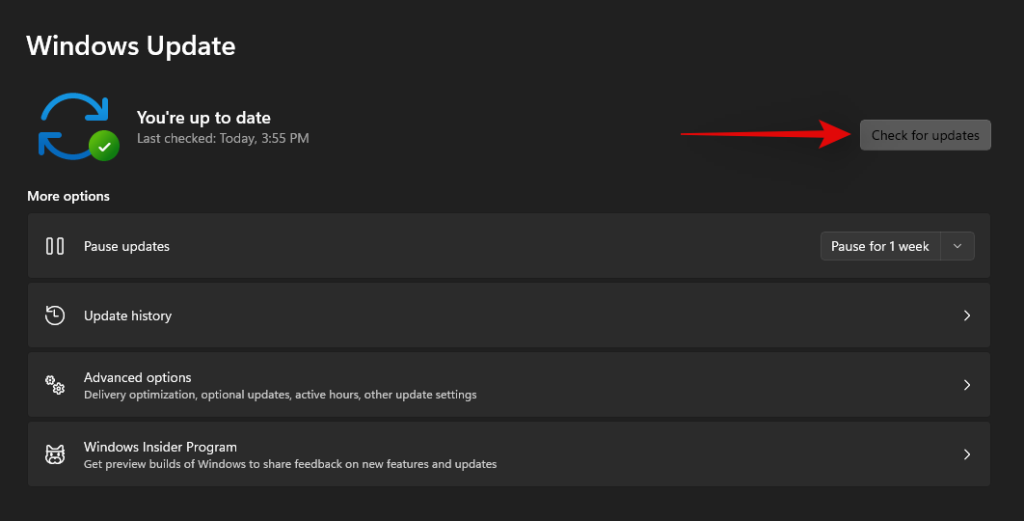
Baixeu i instal·leu l'actualització i la barra de tasques i la funcionalitat del menú Inici s'haurien de restaurar a Windows 11.
Correcció núm. 2: força el reinici del servei Iris
Una actualització recent de les versions privilegiades de Microsoft ha causat problemes importants amb la barra de tasques i el menú Inici per a molts usuaris. Si també esteu subscrit al canal Insider i heu tingut problemes amb l'actualització al número de compilació 22449 o superior, podeu utilitzar la solució esmentada a continuació.
Aquest mètode suprimirà el valor de registre del servei Iris, que hauria de forçar la reinstal·lació en un reinici. Una reinstal·lació sembla ajudar a solucionar aquest problema per a la majoria dels usuaris. Fins i tot si no esteu a les mateixes versions, val la pena intentar-ho. Seguiu la guia següent per començar.
Nota: aquesta ordre reiniciarà immediatament el vostre PC. Si teniu algun treball en curs en segon pla, assegureu-vos que el deseu abans de continuar amb aquesta guia.
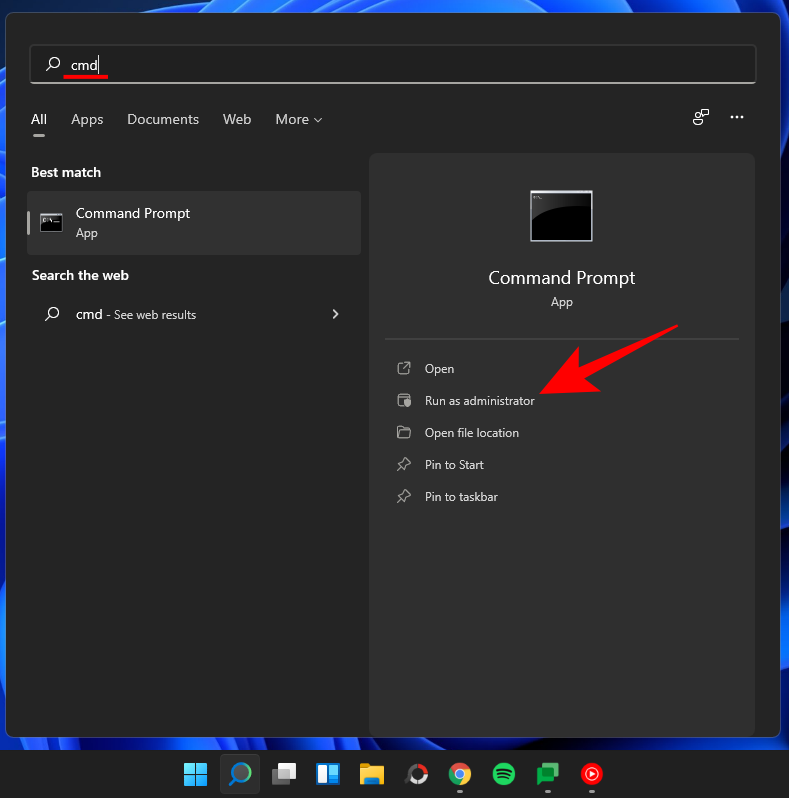
Premeu Windows + S el vostre teclat i cerqueu CMD. Feu clic a "Executar com a administrador" o premeu Ctrl + Shift + Enter al vostre teclat.
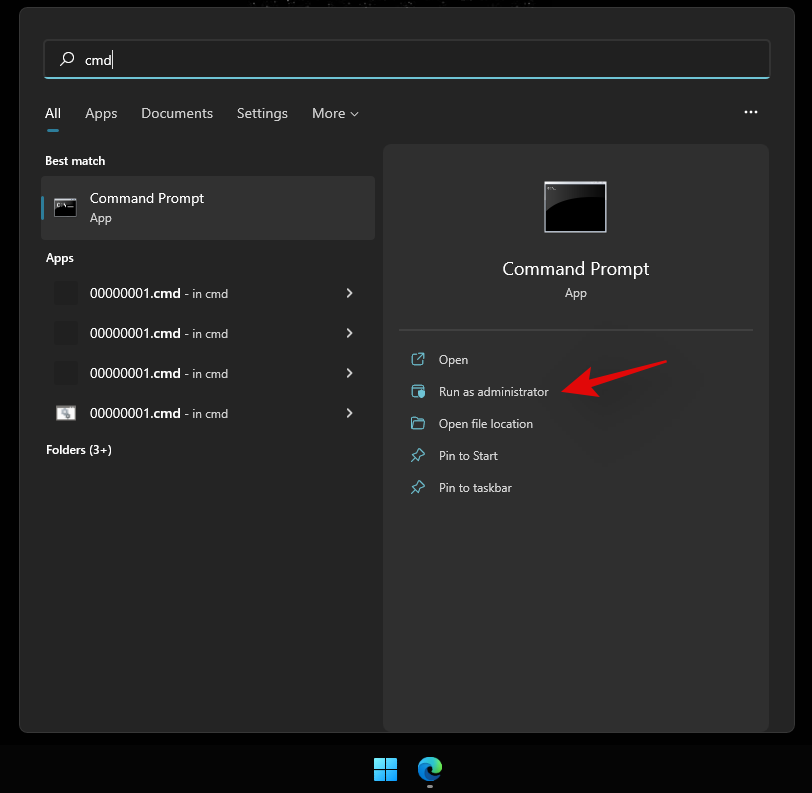
Introduïu la següent comanda i premeu Intro al vostre teclat.
reg delete HKCU\SOFTWARE\Microsoft\Windows\CurrentVersion\IrisService /f && shutdown -r -t 0

Ara el vostre PC es reiniciarà. Inicieu sessió al vostre PC com de costum i la funcionalitat del menú Inici s'hauria de restaurar al vostre sistema.
Solució núm. 3: reinicieu el vostre ordinador
Aquest és, amb diferència, el mètode més senzill que em ve al cap mentre s'intenta solucionar la majoria dels problemes en un ordinador amb Windows 11. Normalment, quan feu un reinici del sistema, essencialment forceu tots els processos, Windows inclòs, a reiniciar tots els seus serveis i processos. Això també reinicia el procés del menú Inici que ajudarà a solucionar el problema.
Si no és obvi, aquí teniu els passos per reiniciar el vostre ordinador.
Assegureu-vos que totes les vostres aplicacions i fitxers estiguin tancats. O, simplement, aneu a la pantalla de l'escriptori prement Windows key + D junts. Ara, premeu les Alt + F4 tecles juntes del teclat per obtenir la pantalla "Apaga Windows".
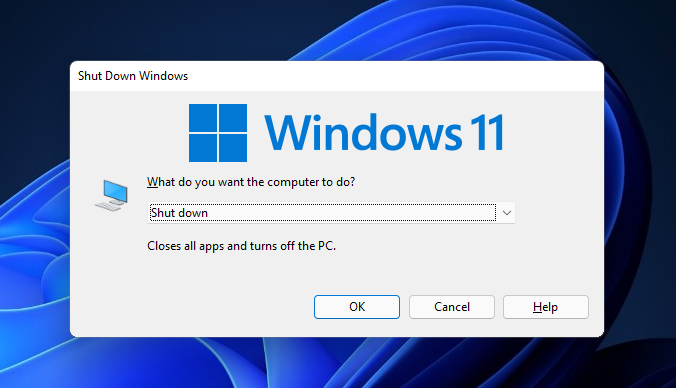
Feu clic al menú desplegable, seleccioneu "Reinicia" i premeu el botó "D'acord".
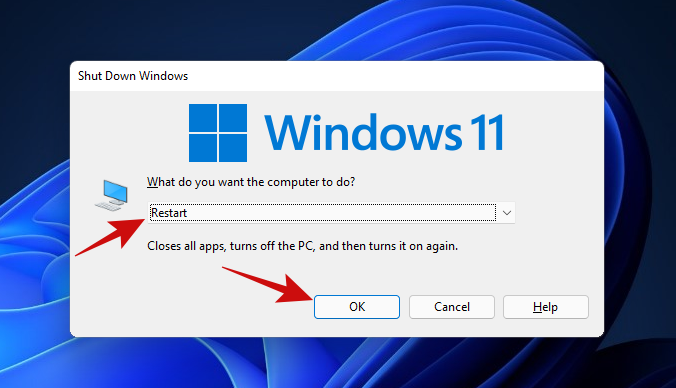
Un cop reinicieu l'ordinador, hauríeu de poder tornar a utilitzar el menú Inici. Si encara no podeu, proveu el següent mètode.
Correcció núm. 4: reinicieu l'Explorador de Windows mitjançant el Gestor de tasques
La següent solució fàcil per a un menú d'inici congelat utilitza el Gestor de tasques. El Gestor de tasques pot ser l'eina perfecta per gestionar qualsevol procés en execució en un ordinador amb Windows.
Si teniu un menú Inici que no vol respondre als vostres clics, seguiu els passos esmentats a continuació per veure si soluciona el vostre problema.
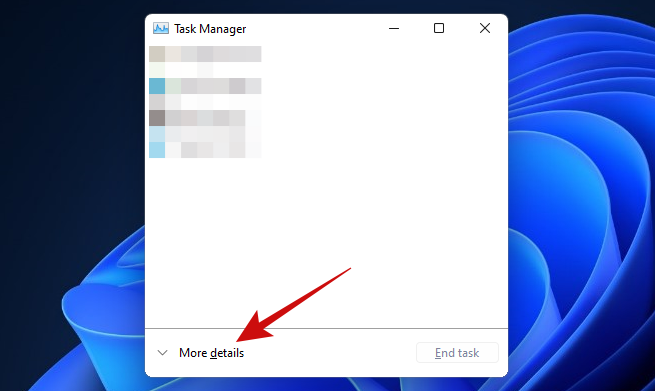
Premeu les Ctrl + Shift + Esc tecles per activar el Gestor de tasques. Si el vostre Gestor de tasques té aquest aspecte, feu clic al botó "Més detalls" per accedir a la vista detallada.
Un cop dins del Gestor de tasques, desplaceu-vos per la llista de processos per trobar el procés "Explorador de Windows". Feu clic amb el botó dret sobre el procés i feu clic a l'opció "Reinicia".
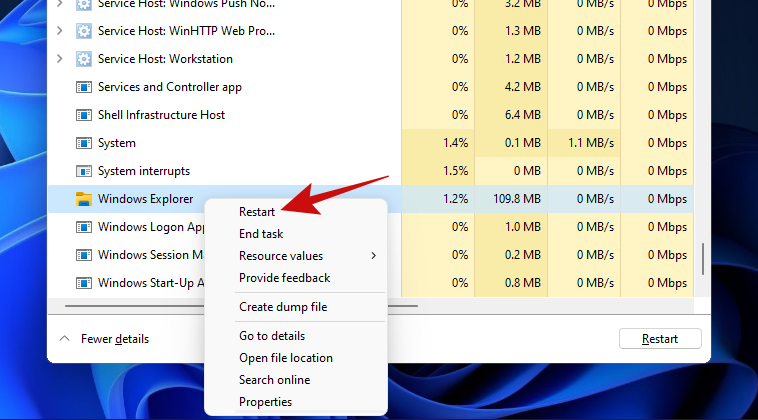
Un cop fet clic, Windows hauria de reiniciar el procés de l'Explorador de Windows en un instant, i això hauria de solucionar el vostre menú d'inici.
Reiniciar el procés de l'Explorador de Windows és molt semblant a reiniciar el vostre ordinador. L'única diferència és que aquí només reinicieu un únic procés, mentre que, amb un reinici, reinicieu tots els processos. A més, moltes persones en el passat han tingut èxit arreglant el seu menú Inici amb aquest mètode, cosa que fa que val la pena provar-ho.
Solució núm. 5: comproveu si hi ha actualitzacions a Windows
Si encara no podeu fer que el menú Inici s'obri, hauríeu de provar Windows Update. És possible que el problema estigui més estès del que creieu i és possible que Microsoft hagi publicat una correcció ràpida per corregir el menú Inici que no respon.
Aquí teniu com podeu fer-ho.
Obriu l'aplicació Configuració amb les Win key + i tecles juntes. Un cop obert, feu clic a l'opció "Actualització de Windows".
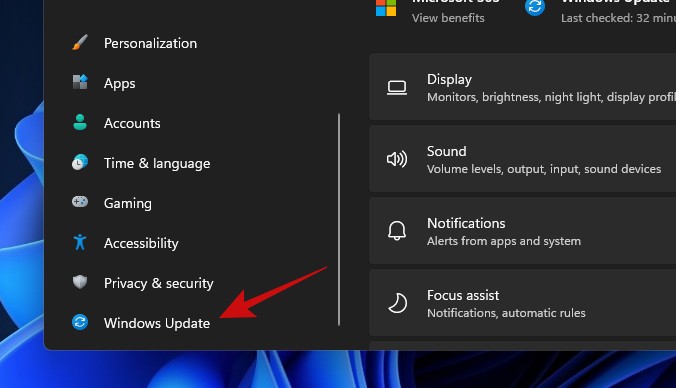
Feu clic al gran botó "Comprova si hi ha actualitzacions" per començar a comprovar si hi ha actualitzacions disponibles a Windows per al vostre ordinador. Si està disponible, deixeu que Windows instal·li totes les actualitzacions.
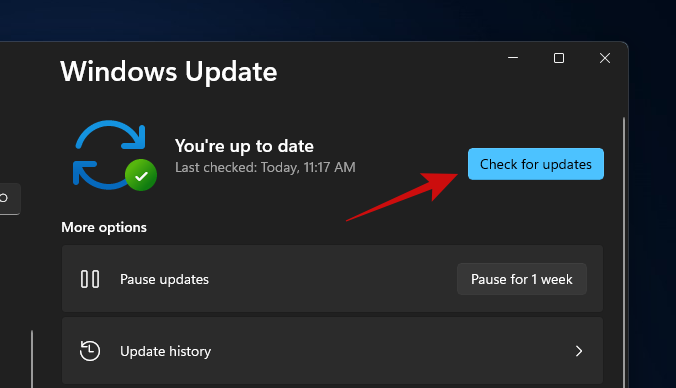
Quan Windows hagi acabat d'actualitzar el vostre PC, només cal que reinicieu-lo i proveu d'obrir el menú Inici. Si encara no podeu obrir el menú Inici, creiem que és hora d'anar a buscar les solucions més avançades.
Correcció núm. 6: executeu DISM i SFC
DISM (Deployment Image Servicing and Management) i SFC (System File Checker) són dues de les eines més potents per identificar i reparar instal·lacions corruptes de Windows. Aquestes eines es poden utilitzar amb el símbol del sistema o amb Windows PowerShell. Per a aquesta guia, els farem servir amb el símbol del sistema.
Comencem amb DISM. DISM es pot utilitzar per agafar còpies noves dels fitxers de Windows danyats.
Premeu Win key + r per obrir el quadre Executar, escriviu cmd i, a continuació, premeu Ctrl + Shift + Enter junts (en lloc de prémer Intro) per obrir un indicador d'ordres elevat.
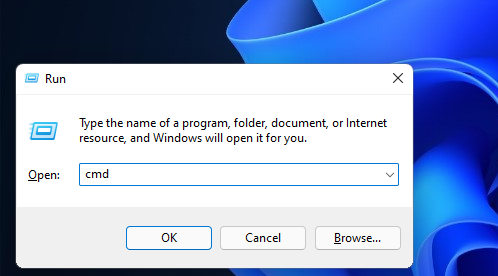
Un cop estigueu dins del símbol del sistema, enganxeu el codi següent i premeu Intro.
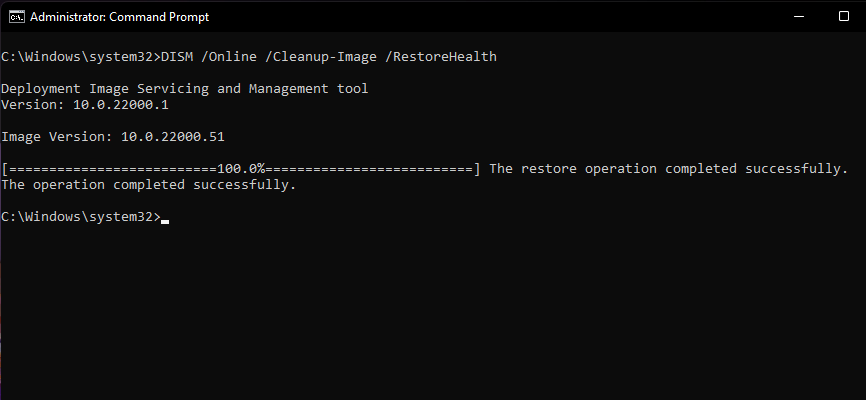
DISM /Online /Cleanup-Image /RestoreHealth
DISM ara intentarà restaurar els fitxers danyats (si n'hi ha) de la vostra instal·lació actual sol·licitant una còpia nova d'aquest fitxer des de l'actualització de Windows. Tot el procés durarà uns 15-20 minuts. A continuació es mostra com es veu l'ordre en acció.
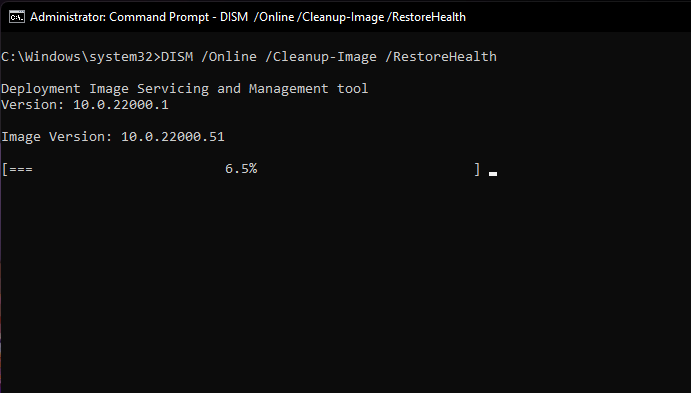
Un cop l'ordre hagi restaurat tots els fitxers danyats, hauríeu de veure alguna cosa com això.
Un cop hàgiu acabat amb aquest pas, mantingueu oberta la finestra del símbol del sistema per executar la següent ordre.
El següent pas és verificar la integritat de tots els fitxers de Windows 11 per assegurar-vos que estiguin en bon estat. Per a això, utilitzarem l'eina SFC.
Heus aquí com.
Enganxeu el codi següent a la finestra del símbol del sistema i premeu Enter.
sfc /scannow
Així és com es veu l'ordre.
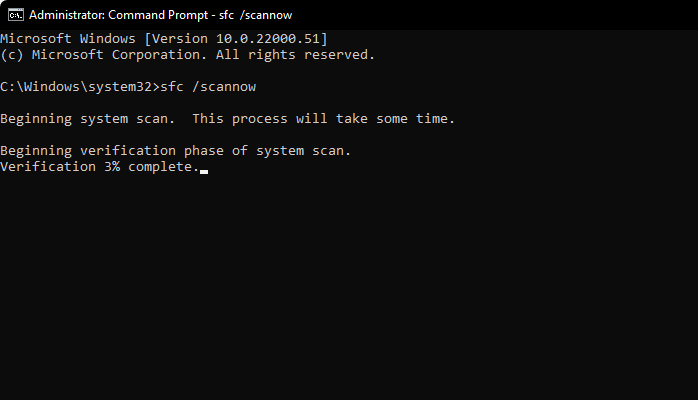
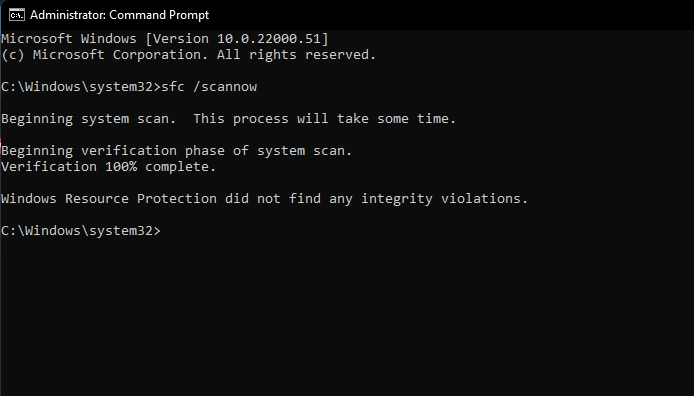
L'ordre anterior només trigarà un parell de minuts a acabar d'escanejar la integritat dels fitxers de Windows. Un cop fet, el resultat hauria de ser així.
Consell: assegureu-vos que el vostre ordinador tingui una connexió a Internet estable perquè aquest mètode funcioni.
Ara és el moment d'un reinici.
Encara enganxat amb un menú d'inici trencat, és hora de provar el següent mètode.
Relacionat: 6 maneres d'actualitzar els controladors a Windows 11
Correcció núm. 7: reconstrueix l'índex de cerca
El menú Inici i la Cerca de Windows estan estretament integrats. És possible que els problemes amb la cerca i la indexació hagin aparegut al menú Inici i l'hagin afectat. Així doncs, descartem també aquesta possibilitat.
Fem una ullada als passos per fer-ho.
Obriu el quadre Executar prement Win key + r. A continuació, enganxeu el text següent al quadre Executar i premeu Intro.
control /name Microsoft.IndexingOptions
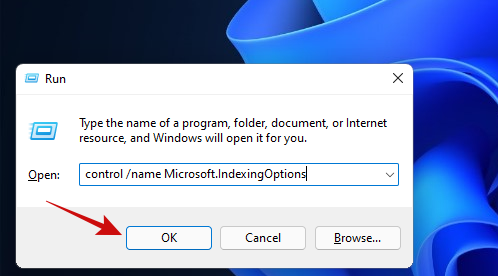
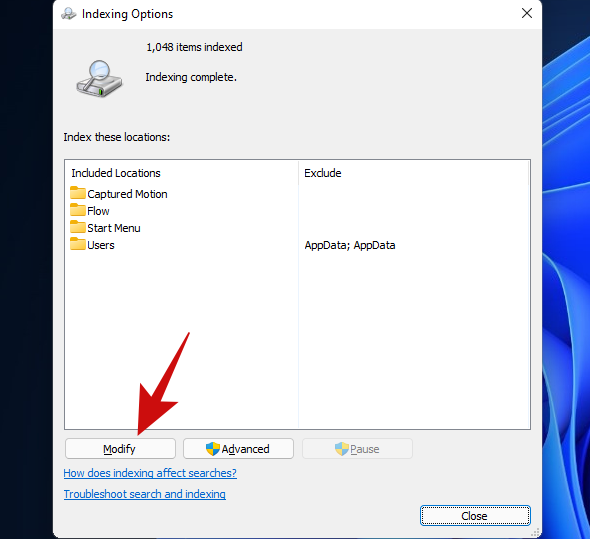
Hauríeu de veure que s'obre una finestra emergent titulada "Opcions d'indexació". Feu clic al botó "Modifica".
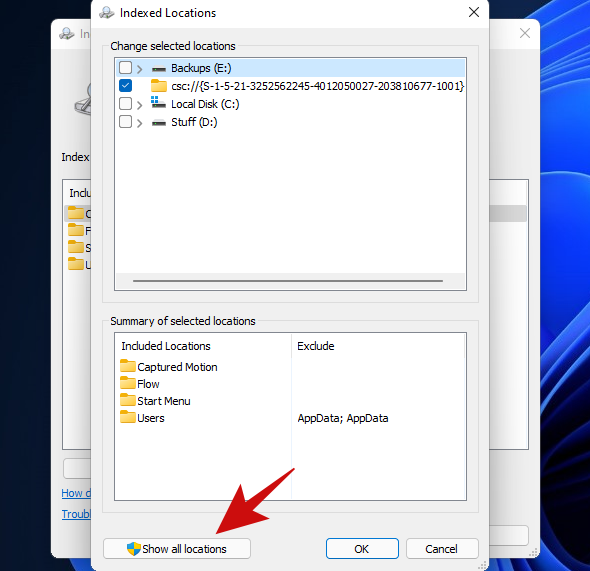
Feu clic al botó "Mostra totes les ubicacions".
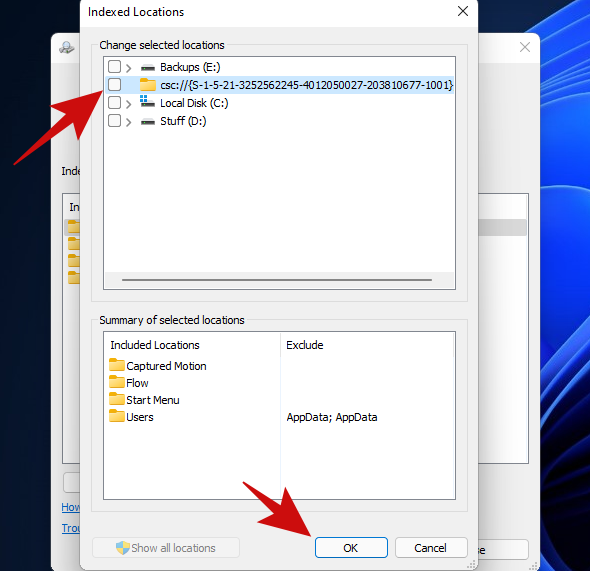
En aquesta pantalla, desmarqueu totes les ubicacions i feu clic al botó "D'acord". La nostra només tenia una ubicació marcada, així que només vam desmarcar una ubicació d'aquesta llista.
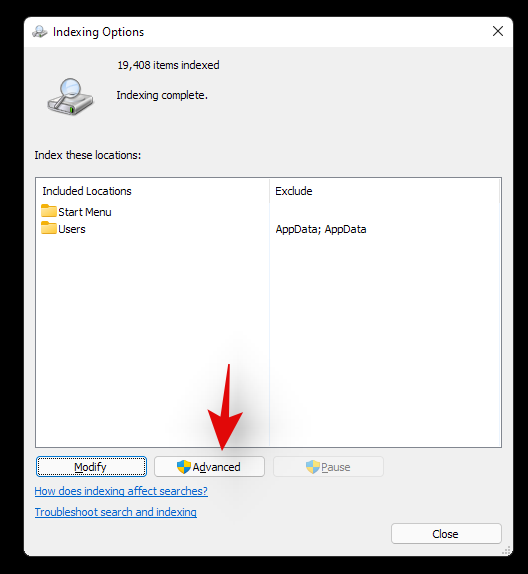
Feu clic al botó "Avançat".
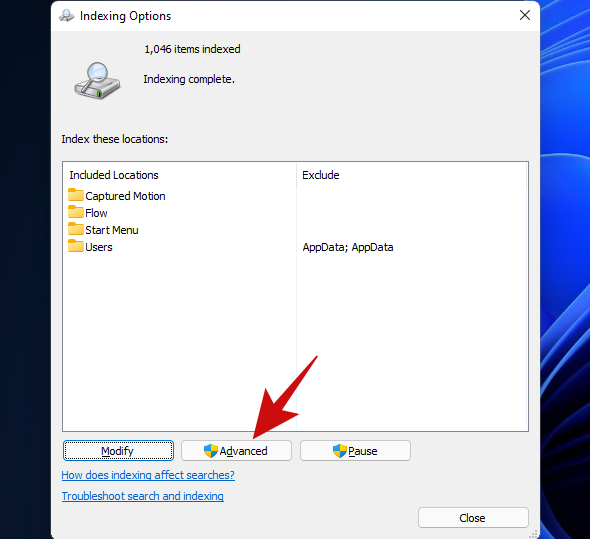
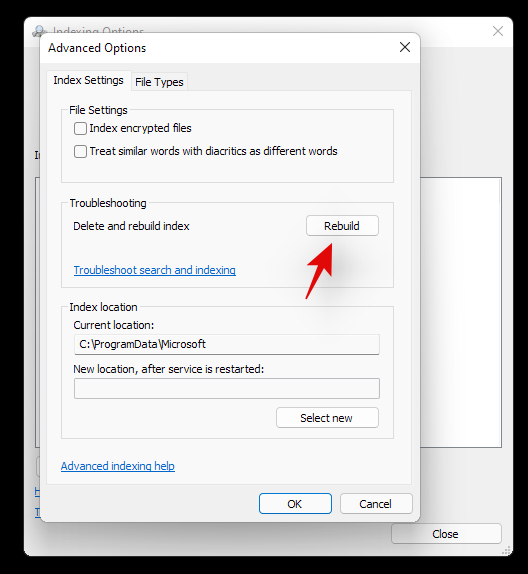
Feu clic al botó "Reconstrueix".
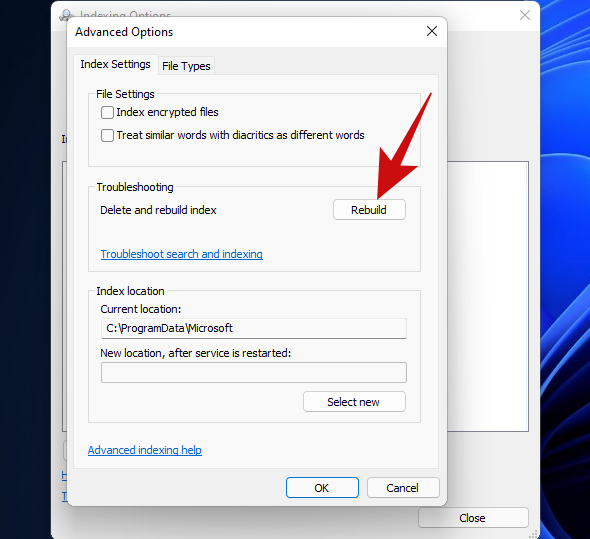
Ara Windows començarà a reconstruir l'índex de cerca. Estigueu segurs, tot el procés ara serà gestionat per Windows i realment no requereix cap intervenció de l'usuari, tot i que triga una mica de temps a completar-se.
Quan Windows hagi reconstruït el vostre índex de cerca, reinicieu l'ordinador. Un cop torneu a estar dins de Windows, proveu d'obrir el menú Inici. Si encara no funciona, creiem que és hora d'optar per un mètode més resistent.
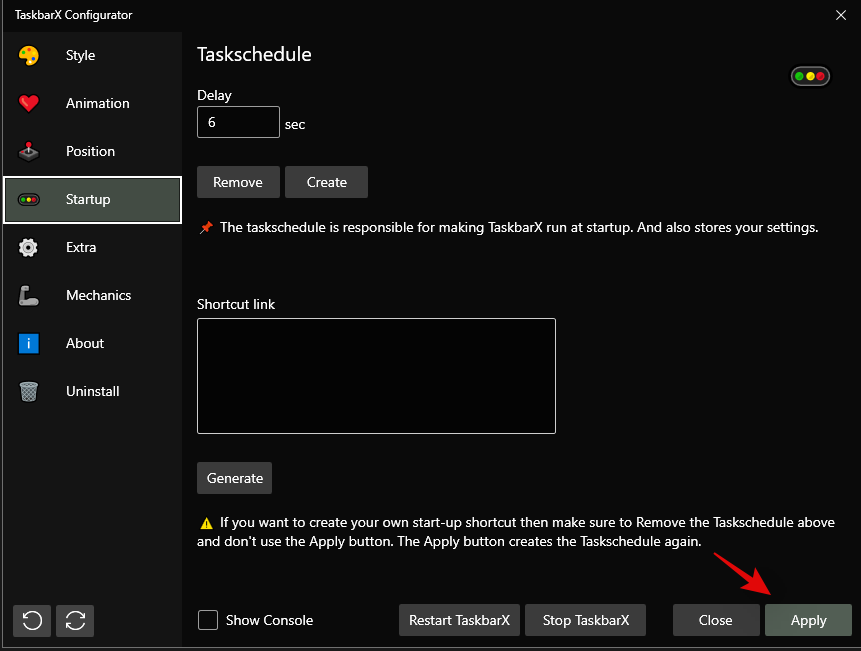
Si heu instal·lat algun programa de tercers per modificar l'aspecte o les funcions del vostre menú d'inici, us recomanem que elimineu tots aquests programes. Probablement, un d'aquests programes no és compatible amb el nou menú d'inici de Windows 11, motiu pel qual teniu problemes amb el vostre sistema. Si teniu una de les aplicacions següents esmentades a continuació, us recomanem que en revertiu la configuració i les desinstal·leu tan aviat com sigui possible. La majoria d'aquestes aplicacions es van dissenyar per a Windows 10 i són incompatibles amb el codi del menú Inici de Windows 11 fins a cert punt. Una actualització recent de Windows 11 probablement va trencar la seva compatibilitat fent que el menú d'inici no funcionés al vostre sistema.
- Obriu Shell
- Inici clàssic
- WinAero Tasbar
- Barra de tasquesX
I més. Si l'eliminació d'una aplicació de tercers que modifica el vostre menú d'inici ajuda a restaurar-ne la funcionalitat, podeu esperar una actualització compatible per tornar a utilitzar l'aplicació.
Heu utilitzat un pirateig de registre per obtenir el menú d'inici de Windows 10 anterior a Windows 11? Si és així, és probable que la funcionalitat d'aquest pirateig de registre es trenqui amb una recent actualització de Windows 11. En aquests casos, podeu utilitzar la guia següent per revertir els canvis al vostre sistema.
Premeu Windows + R el vostre teclat i escriviu el següent al quadre de diàleg Executar.
regedit

Premeu Intro al vostre teclat un cop hàgiu acabat per iniciar l'editor del registre. També podeu fer clic a "D'acord".
Ara copieu i enganxeu l'adreça que es mostra a continuació a la barra d'adreces a la part superior de l'editor del registre i premeu "Enter" al vostre teclat.
Computer\HKEY_CURRENT_USER\Software\Microsoft\Windows\CurrentVersion\Explorer\Advanced
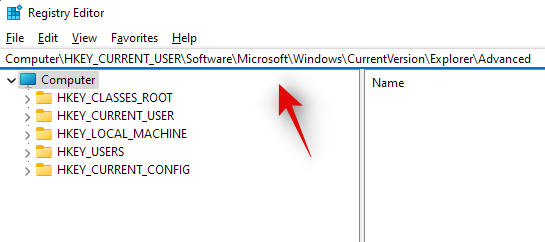
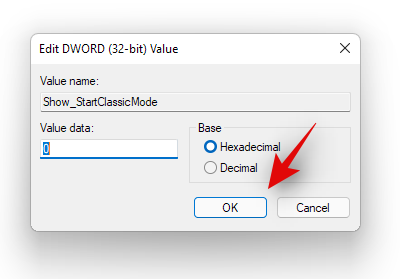
Cerqueu "Show_StartClassicMode" a la vostra dreta i feu-hi clic amb el botó dret.

Seleccioneu 'Modifica'.

Canvieu les seves dades de valor a "0" i feu clic a "D'acord". No tanqueu encara l'editor del registre.
Premeu Ctrl + Shift + Esc el vostre teclat per iniciar el Gestor de tasques. Ara feu clic i canvieu a la pestanya "Detalls" a la part superior.
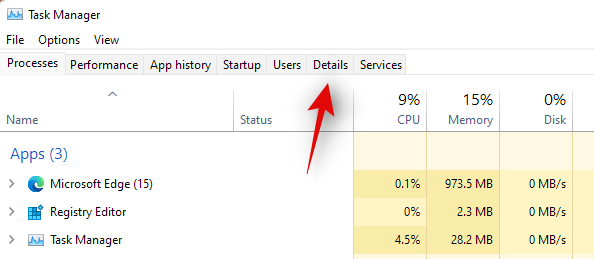
Feu clic i seleccioneu Explorrer.exe de la llista i premeu Suprimeix al teclat.

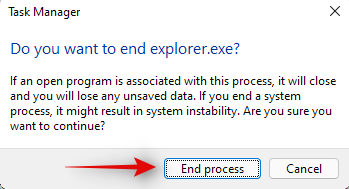
Confirmeu la vostra elecció fent clic a "Finalitzar procés".
Ara feu clic a "Fitxer" a la cantonada superior esquerra i seleccioneu "Executar una tasca nova".
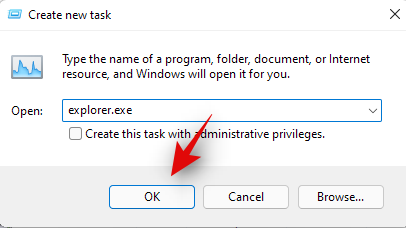
Escriviu "Explorer.exe" i premeu Intro al vostre teclat. També podeu fer clic a "D'acord".
Ara es reiniciarà l'Explorador al vostre sistema. Torneu a l'editor del registre i feu clic i seleccioneu "Start_ShowClassicMode".
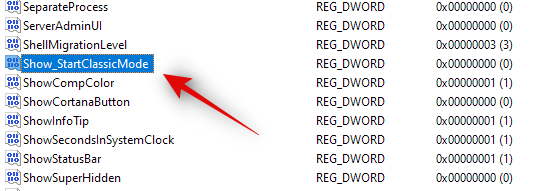
Premeu Suprimeix al teclat i confirmeu la vostra elecció per eliminar el valor del registre.

Reinicieu el vostre sistema per fer-ho bé ara.
Si el vostre menú d'inici no funcionava a causa d'un pirateig del registre per obtenir el menú d'inici més antic, ja s'hauria d'arreglar. Podeu comprovar el mateix fent clic a la icona del menú Inici a la barra de tasques.
Windows 11 ha recorregut un llarg camí en comparació amb els seus predecessors. Els processos, les tasques i les aplicacions en segon pla estan més racionalitzats ara i diverses funcions i elements semblen tenir els seus propis paquets dedicats. Aquests paquets dedicats us faciliten la resolució de problemes amb determinades funcions de Windows i fins i tot reinstal·lar-los en el pitjor dels casos. Si el menú d'inici encara no us funciona, podeu tornar a instal·lar els elements bàsics de Windows 11 que també reinstal·larà el mòdul del menú Inici al vostre sistema. Això hauria d'ajudar a solucionar qualsevol conflicte en segon pla i fer que el menú Inici torni a funcionar al vostre sistema. Seguiu la guia següent per començar.
Premeu Windows + S el vostre teclat i cerqueu PowerShell. Feu clic a "Executar com a administrador" un cop l'aplicació aparegui als resultats de la cerca.
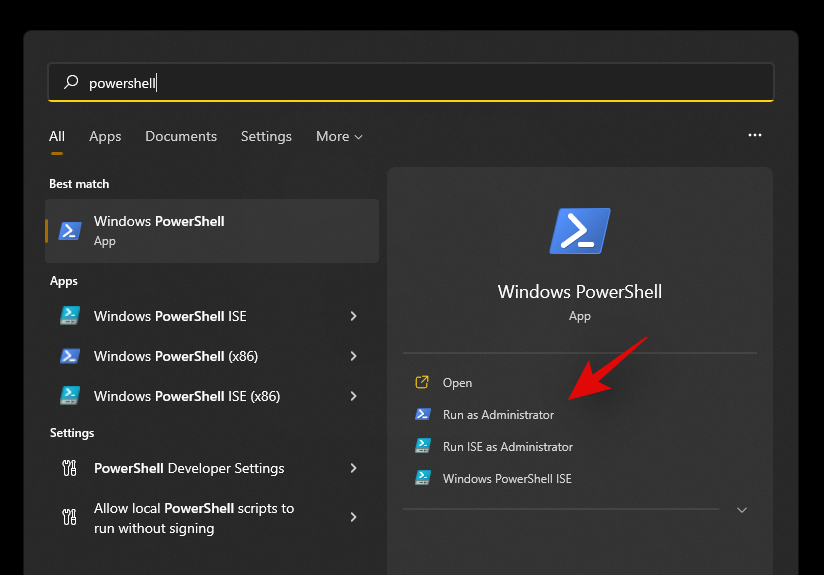
Ara escriviu la següent comanda i premeu "Enter" al vostre teclat.
Get-appxpackage -all *shellexperience* -packagetype bundle |% {add-appxpackage -register -disabledevelopmentmode ($_.installlocation + “\appxmetadata\appxbundlemanifest.xml”)}

Ignoreu qualsevol advertència que rebeu i continueu amb el procés. Un cop completat, reinicieu el vostre sistema per fer una bona mesura.
Ara que el menú Inici i altres funcions bàsiques s'han reinstal·lat al vostre sistema, reconstruïm l'índex del vostre sistema per tornar-ho a funcionar i tornar-ho a funcionar. Premeu Windows + R el vostre teclat per obrir el quadre de diàleg Executar.
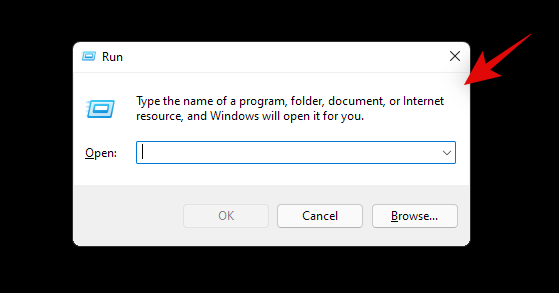
Escriviu la següent comanda i premeu Enter al vostre teclat.
control /name Microsoft.IndexingOptions
Feu clic a "Modifica" i seleccioneu "Mostra totes les ubicacions".
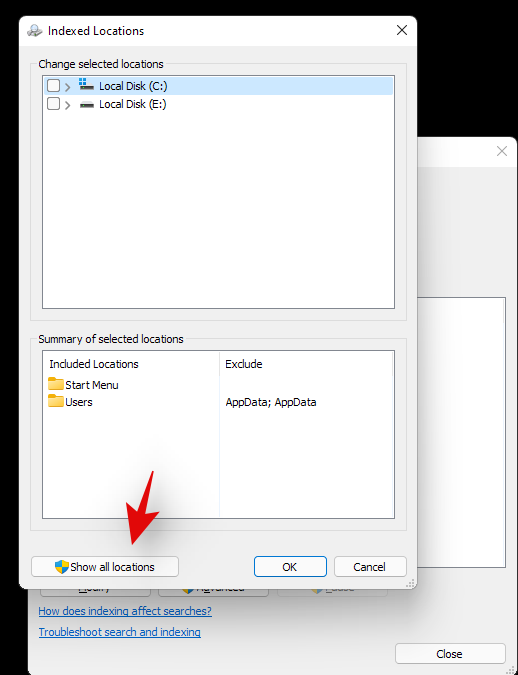
Desmarqueu totes les caselles de la llista actual.
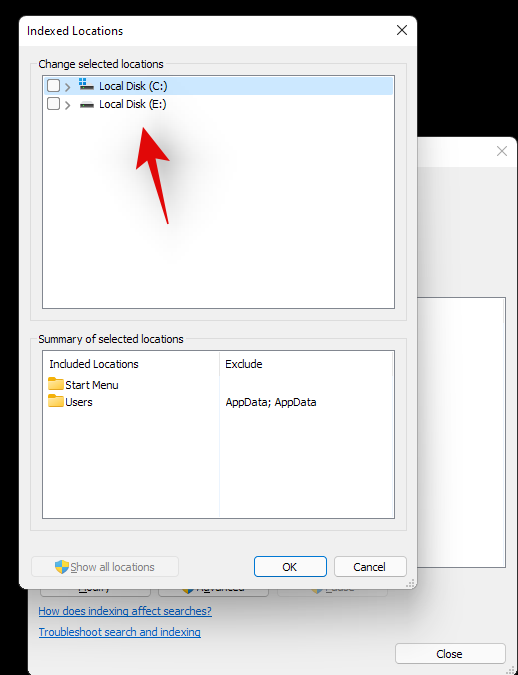
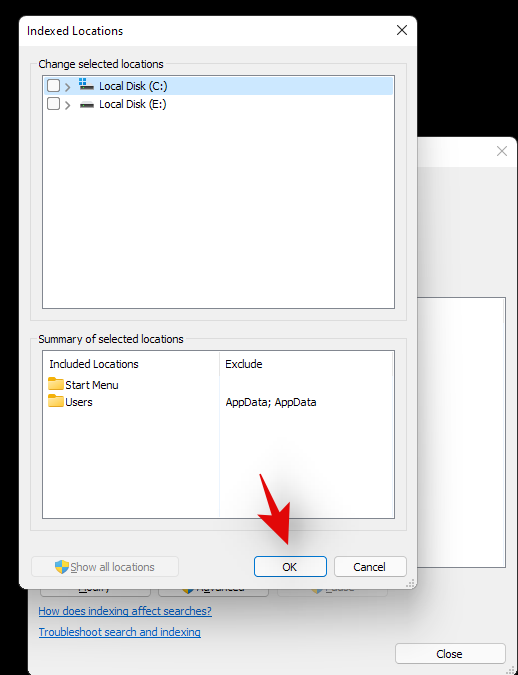
Feu clic a "D'acord".
Feu clic a "Avançat" ara.
Seleccioneu "Reconstruïu" a Resolució de problemes.
Feu clic a "D'acord" quan aparegui l'avís a la pantalla.
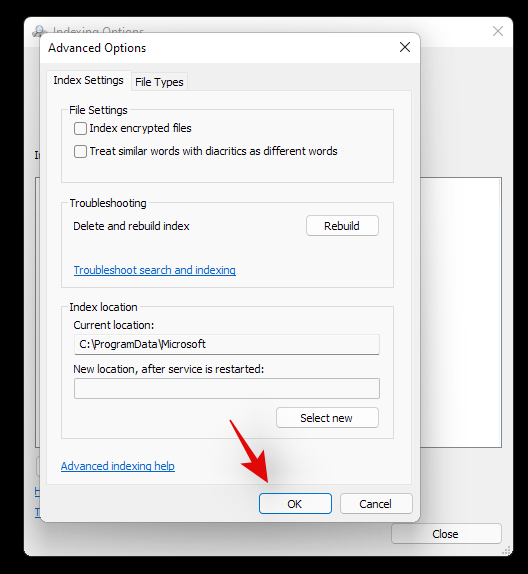
Un cop finalitzat el procés, us recomanem que reinicieu el sistema.
You can now try clicking on the Start icon once your system restarts. Reinstalling the Start menu should help fix any issues with the Start menu on most systems.
Fix #11: Install any pending driver and Windows updates
This might be a bit obvious but you should definitely install any pending driver updates or Windows update on your system. This will help get you up and running on the latest drivers and help your system be compatible with all the hardware installed on your system. While drivers rarely cause issues with Windows features, you can never be too sure. Hence we recommend you install the latest available drivers on your system. You can use the link below to go to our detailed guide for updating drivers on Windows 11. If you are using a pre-built system or a laptop, then we recommend checking your OEM support page for dedicated driver updates as well.
There is a registry value that if modified, can disable your Start menu altogether. If you have been using registry modifiers, cleaners, and more, then it is likely that this registry value was modified which ended up disabling the Start menu on your system. Additionally, the Start menu’s functionality was moved to a Xaml process once Windows 10 was released. This process is known to glitch out
Use the guide below to check if the start menu is disabled on your system and re-enable it if needed.
Press Windows + R on your keyboard and type in the following command given below.
regedit
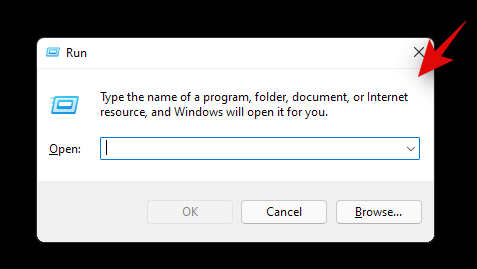
Now press Enter on your keyboard or click on ‘Ok’.
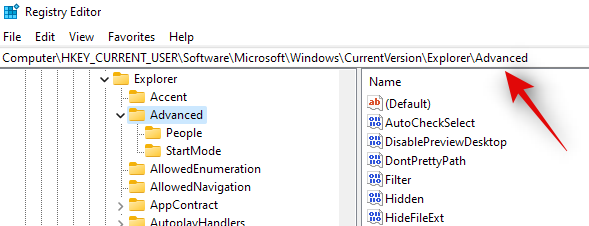
Copy and paste the following address in the address bar at the top of your registry editor.
HKEY_CURRENT_USER\Software\Microsoft\Windows\CurrentVersion\Explorer\Advanced
Now right-click on your right tab and select ‘New’.
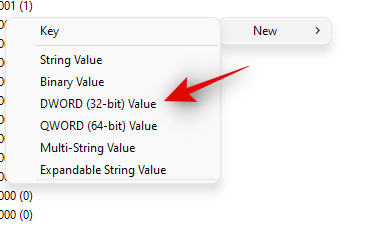
Select ‘DWORD (32-bit value)’.
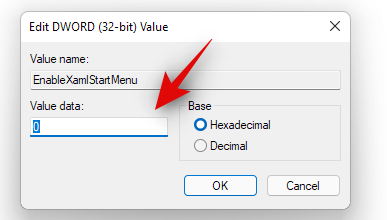
Enter the name as ‘EnableXamlStartMenu’.
Enter the value as ‘0’.
Restart your PC now.
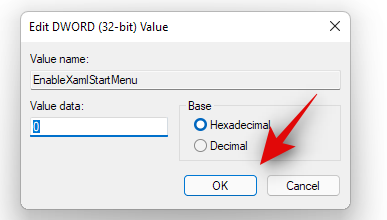
Once restarted try activating the Start menu now. If the Xaml process was facing conflicts, then they should be fixed now and the Start menu should be back up and running on your system again.
Fix #13: Restart Windows background services
If the Start menu still fails to launch then it’s time to restart all background Windows services. Usually restarting the ‘ShellExperienceHost.exe’ is enough but if that does not work for you, you can try restarting all the services listed below. This usually gets the Start menu back up and running on most systems.
Press Ctrl + Shift + Esc on your keyboard to open the ‘Task Manager’. Now click on ‘Details’ at the top to switch to the Details tab.
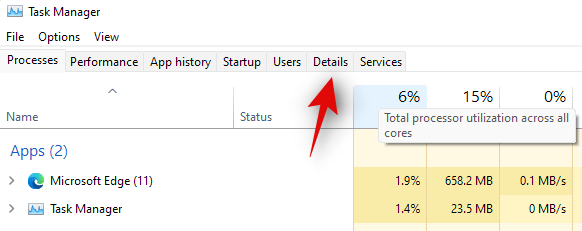
Find ‘StartMenuExperienceHost.exe’ in the list and click and select it.

Press Delete on your keyboard or click on ‘End Task’ in the bottom right corner. Click on ‘End Process’ again to confirm your choice.
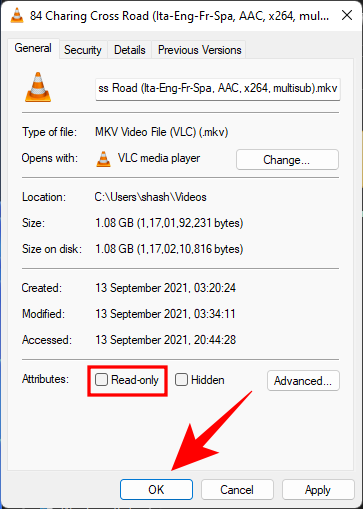
ShellExperienceHost.exe will now be killed. The process should automatically restart within a few seconds. Once restarted, try activating the Start menu on your system. If the menu starts working then you are good to go. However, if it is still not working then use the guide above to restart the following services on your system as well.
- SearchIndexer.exe
- SearchHost.exe
- RuntimeBroker.exe
And that’s it! If a background process was stopping you from accessing the Start menu then the issue should be fixed for you by now.
Fix #14: Run a Windows Troubleshooter
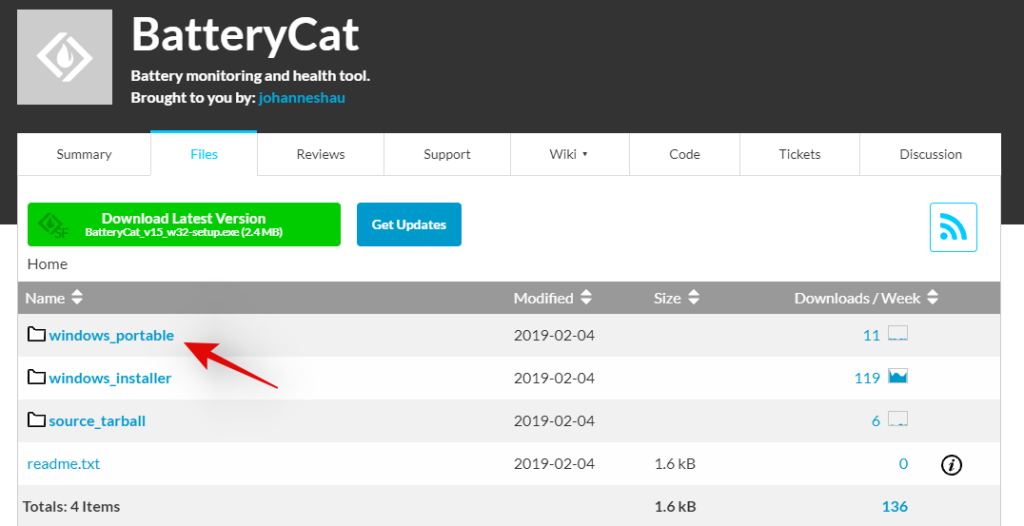
During a Windows 1909 feature update back in 2019, the Start menu was essentially broken due to a background conflict. To fix this issue for the masses, a troubleshooter was released by Microsoft to help fix this issue. If the Start menu is still not working for you then you can try running this troubleshooter on your system. Use the guide below to download and run the troubleshooter on your system.
Download the archive linked above to a convenient location on your local storage and extract its contents.
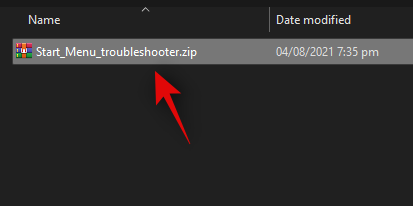
Now copy and paste the ‘startmenu.diagcab’ file on your desktop.
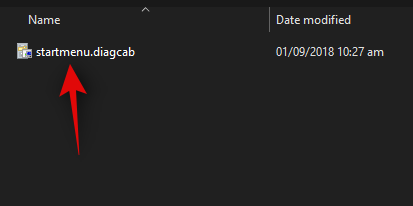
Double click and run the file from your desktop. Click on ‘Advanced’.
Check the box for ‘Apply repairs automatically’. Click on ‘Next’ once you are done.
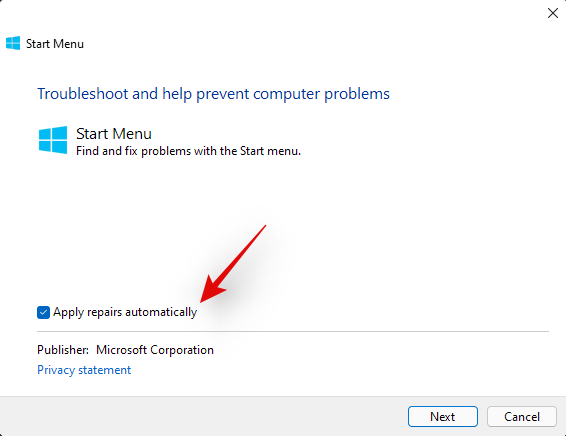
The troubleshooter will now do its thing and try to fix the Start menu on your system. Any errors or issues found will be automatically fixed and the Start menu’s functionality should now be restored on your system.
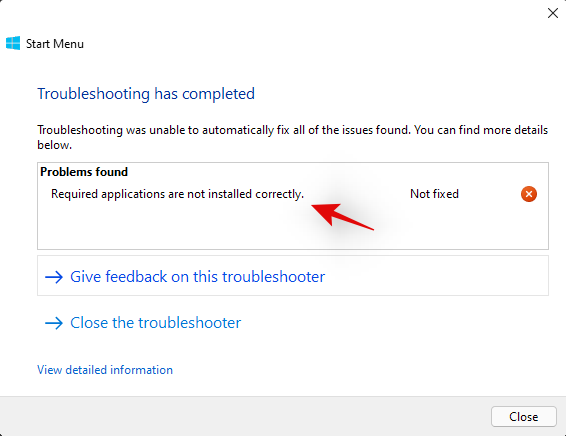
However, if the troubleshooter fails to fix the Start menu then this might indicate a more serious issue on your system. In such cases, let’s verify if Windows is actually able to access and initiate the process for the Start menu on your system. Use the checks below to help you along with the process.
We now need to check if the Start menu is actually available within your install of Windows 11. Let’s create a new local account that will help you verify its functionality. If the Start menu is working in the new account then it is likely an issue with your current user account.
Press Windows + i on your keyboard and click on ‘Accounts’ on your left.
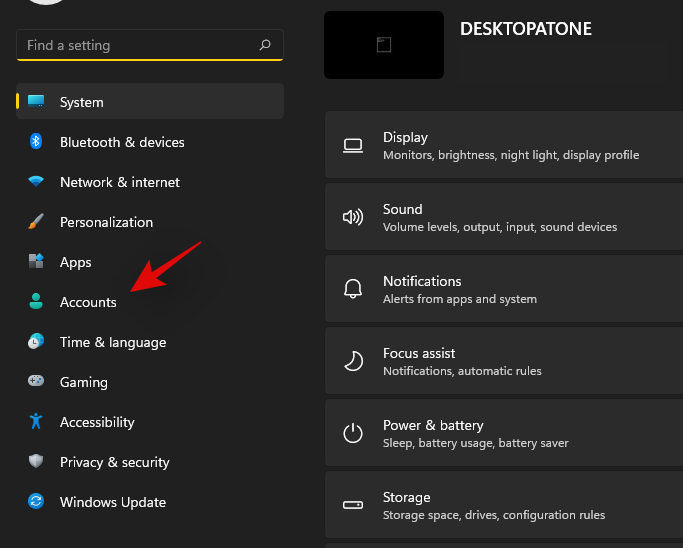
Click on ‘Family & other users’.
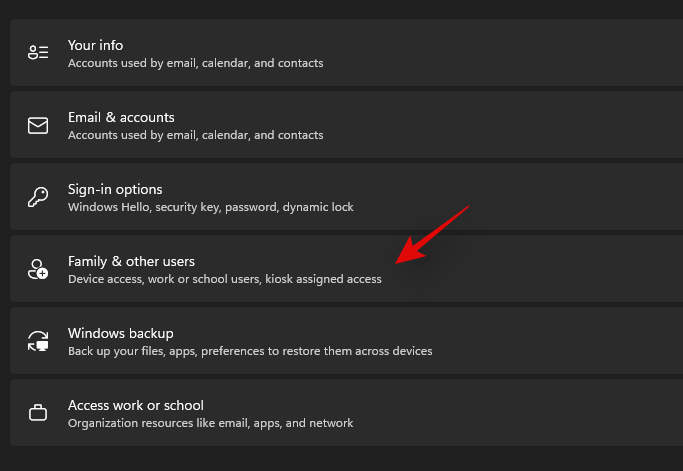
Now click on ‘Add account’ under other users.

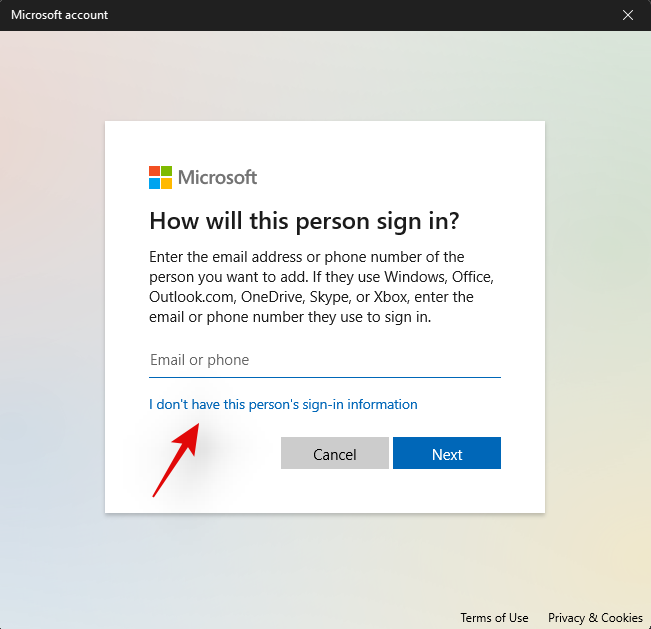
Click on ‘I don’t have this person’s sign-in information’.
Click on ‘Add a user without a Microsoft Account’.
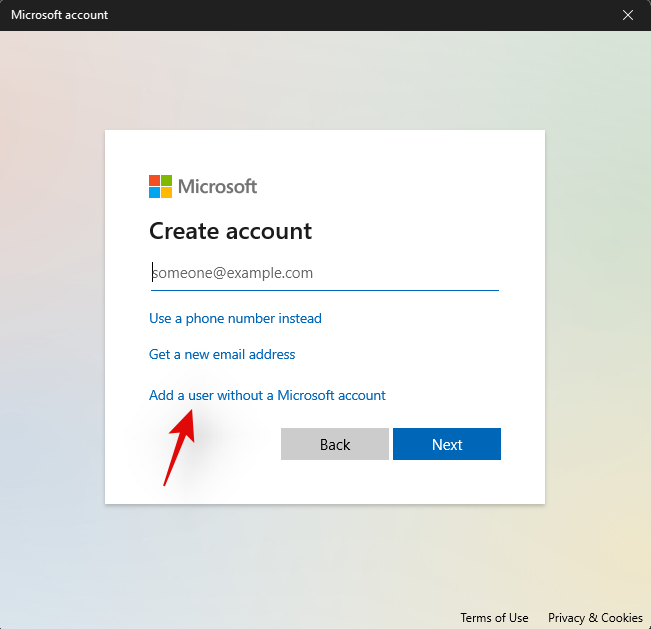
Now enter a username for the new account, and a password if needed.
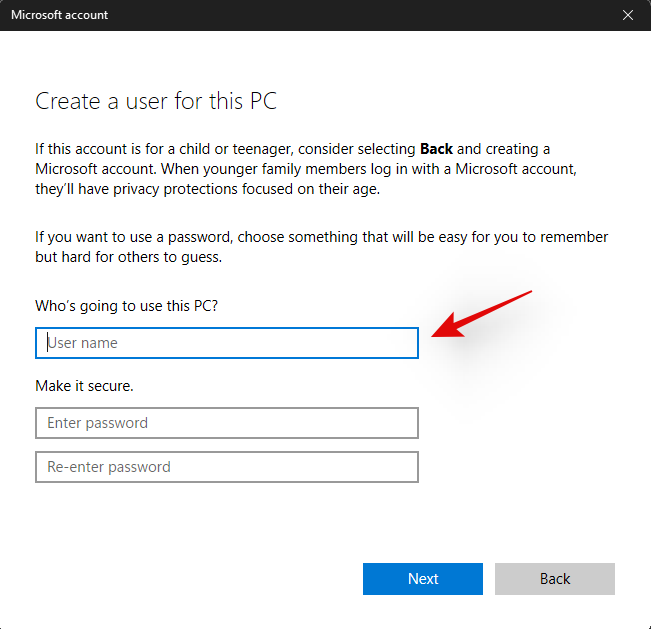
Click on ‘Next’ once you are done.
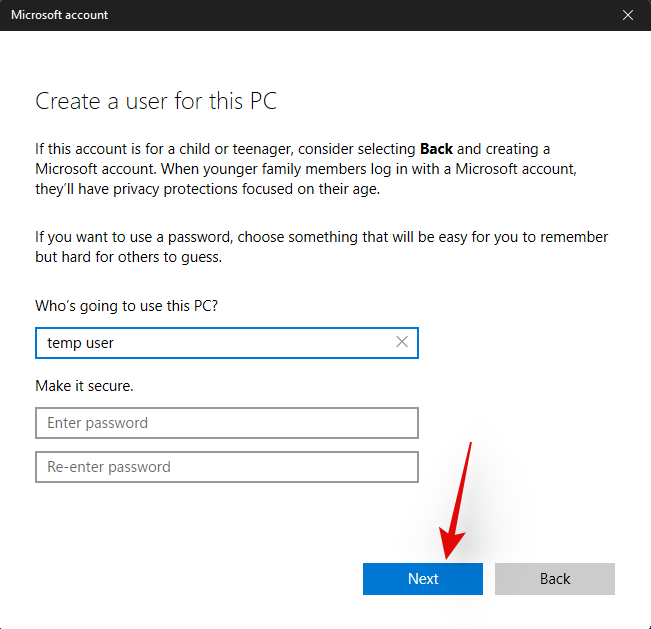
The new user account will now be created. Sign out of your current account and sign in to the new account.
Try to activate the Start menu now in the new temporary local account. If it is working then this is an issue specific to your user account. However, in case the Start menu fails to open, then this might indicate a more serious issue with your Windows 11 installation.
It’s now time to check if the Start menu is working in Safe mode. In case it is, then a third-party app is likely interfering with the Start menu’s functionality. You can remove any third-party apps used to modify the Start menu to try and fix this issue. Follow the guide below to activate Safe mode on Windows 11.
Press Windows + i on your keyboard and select ‘Windows Update’.
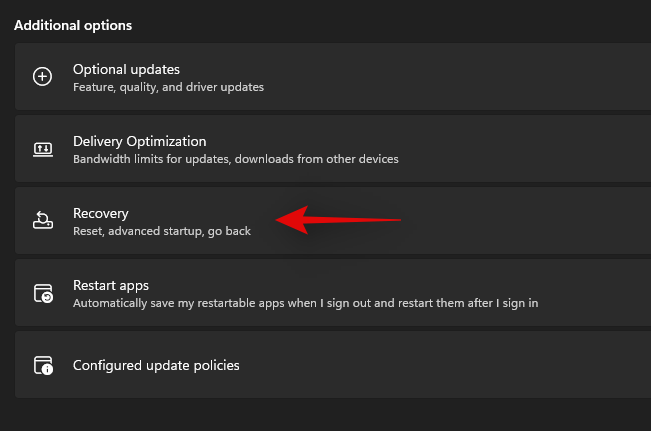
Now click on ‘Advanced options’.
Click and select ‘Recovery’.
Now click on ‘Restart now’ beside ‘Advanced startup’.

Click on ‘Restart now’ again.
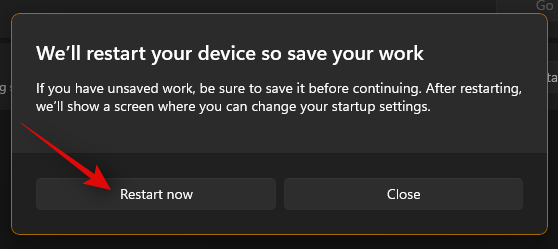
Your PC will now restart to the recovery screen. Click and select ‘Troubleshoot’.
Now click on ‘Advanced options’.
Click on ‘Startup Settings’.
Press ‘F4’ to start your PC in safe mode now.
Once your PC restarts, the safe mode should be active on your system. Now try to activate the start menu. If the menu activates, then it is likely that a third-party app is causing issues on your Windows 11 system. You can try removing apps used to customize the Start menu one by one to find the culprit on your system.
Fix #17: Run a malware and antivirus scan
We recommend you try and run a malware scan before opting for the last resort. If any malware or malicious service is causing issues with the Start menu, then a scan will help solve these issues. Use the guide below to run a malware scan through Windows Defender.
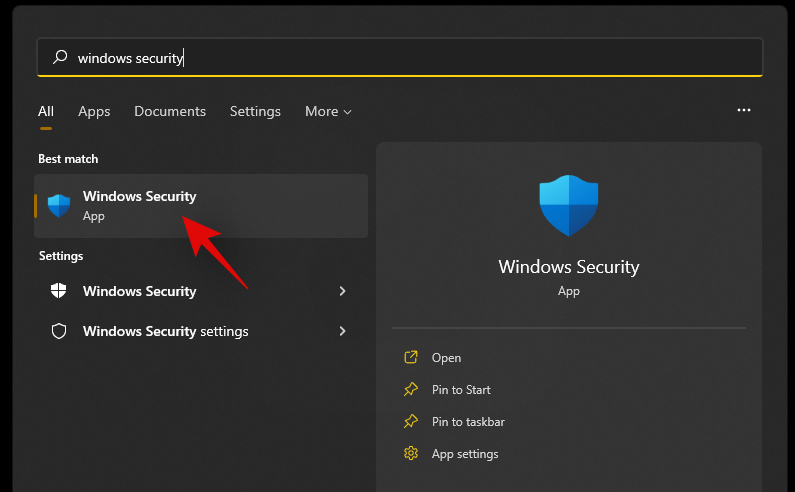
Press Windows + S on your keyboard and search for ‘Windows Security’. Click and launch the app once it shows up in your search results.
Click on ‘Virus & threat protection’.
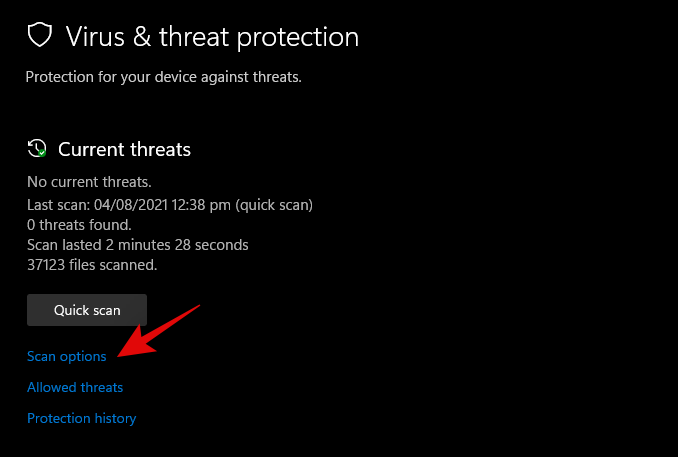
Click on ‘Scan options’.
Select ‘Full Scan’.
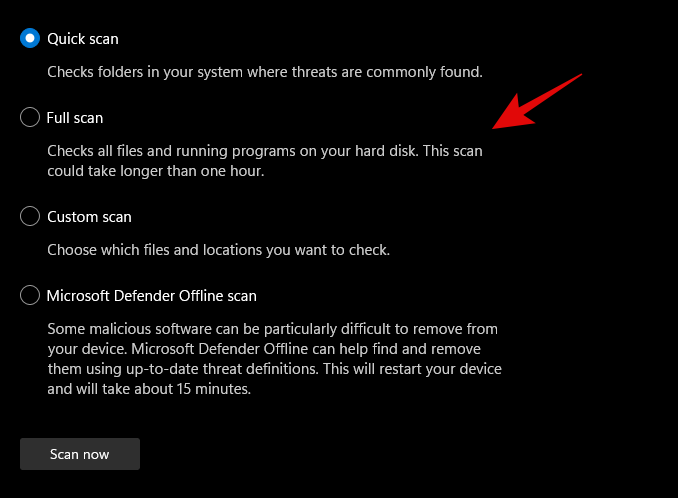
Finally, click on ‘Scan now’.
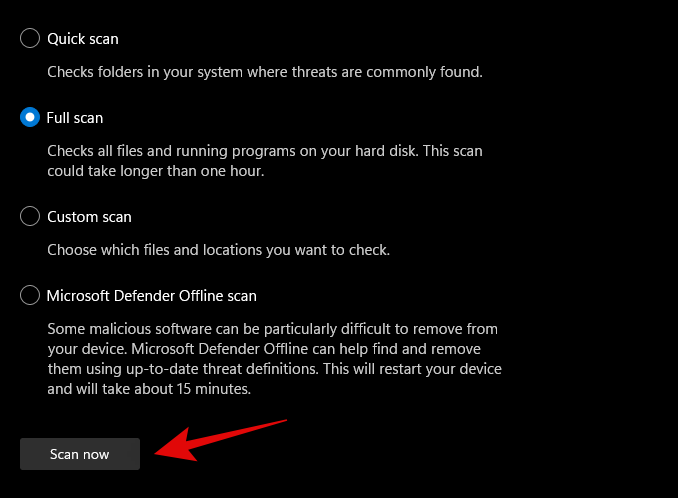
Windows Defender will now scan your entire PC for malware and malicious software. In case any are found, they will be automatically quarantined, and you will be prompted to take the necessary action as soon as possible.
3 General Fixes: Last Resort options
Fix #18: Create a new user via command prompt
If you’re facing an issue where you’re unable to add a local account via Settings to your PC then you can use the command prompt (CMD) for the same. Once added you can try and check if the Start menu is working for you. If it is, you can try the fixes below to restore it in your original account. However, if none of the fixes work for you then you can use the newly created account instead. The new account will be created with administrator privileges so you shouldn’t have problems moving your files and Settings. More on this below.
Press Windows + R to bring up the Run dialog box and type in the following. Press Ctrl + Shift + Enter on your keyboard once you are done.
cmd
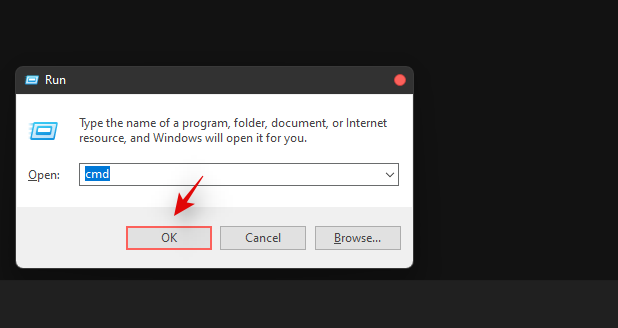
Type in the following command and press Enter on your keyboard. Replace ‘USER’ with your desired username for the new account. Similarly, replace ‘PASSWORD’ with your desired password.
net user /add USER PASSWORD
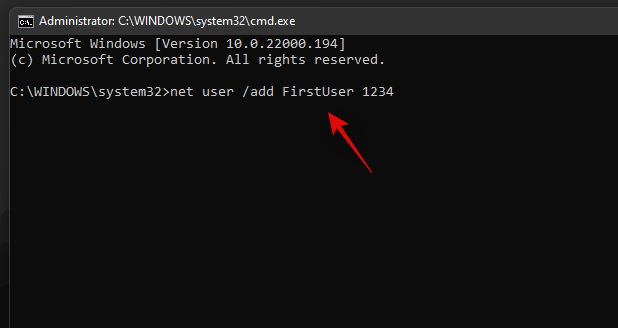
Now execute the following command as well and use the same username as above.
net localgroup administrators USER /add
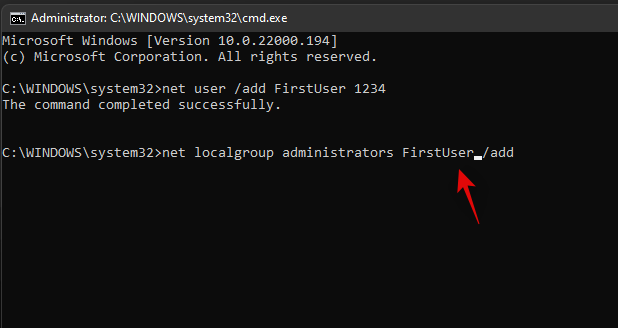
The user will now be added to your PC. Simply restart and log into the new account when the PC restarts.
The start menu should work alright now in the new user account. You can copy your files from the old user account to the new account.
To find your data in the old user account, open Windows Explorer and go to the User folder under the C Drive (or whichever drive you have installed Windows in).
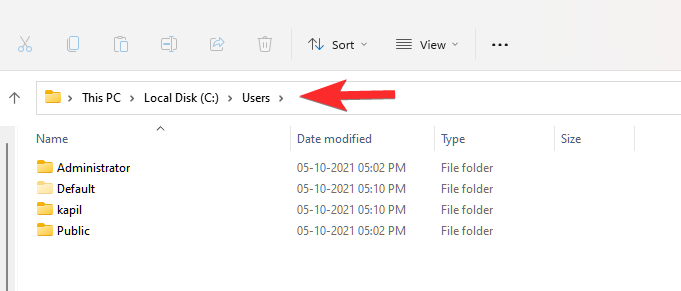
Click on the old user account. Now, copy all the files from here to your new user account that you can also find in the Users folder.
An easy method to transfer files from one user account (old one) to another user account (new one) is to copy the profile. Read more about it here.
Fix #19: Perform a Windows Reset
If you had zero luck with all of the previous methods, we think you should try a Windows Reset. It has been known to solve a host of problems in Windows 11 while keeping your personal files intact. Moreover, resetting Windows to its factory settings can give your PC a fresh start.
Here are the steps.
For this method, you’ll need an elevated PowerShell instance.
Press Win key + r to open the Run box, then type in ‘PowerShell and press Ctrl + Shift + Enter to open PowerShell as administrator.
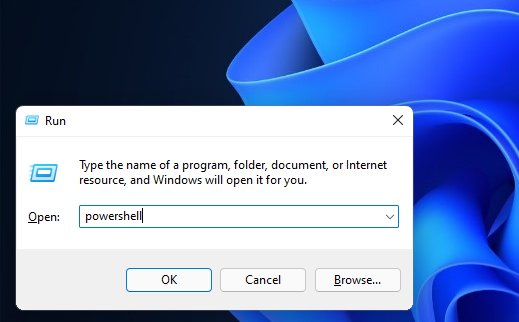
When opened correctly, you should already be inside the C:\Windows\system32 folder.
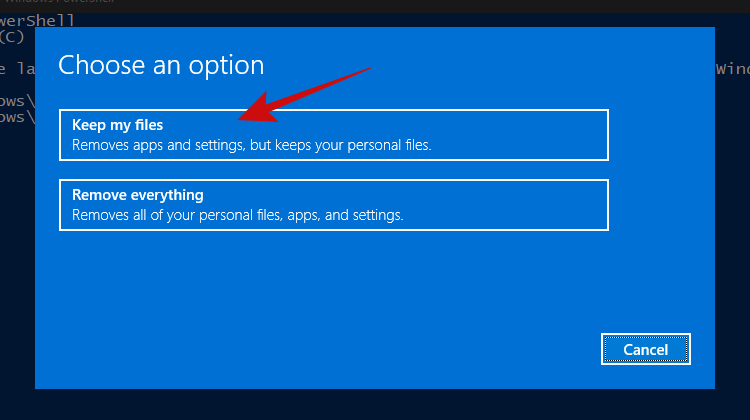
Now type in ‘system reset and press enter. You should be presented with two options, to either keep all your files or to remove everything. Click on ‘Keep my files’.
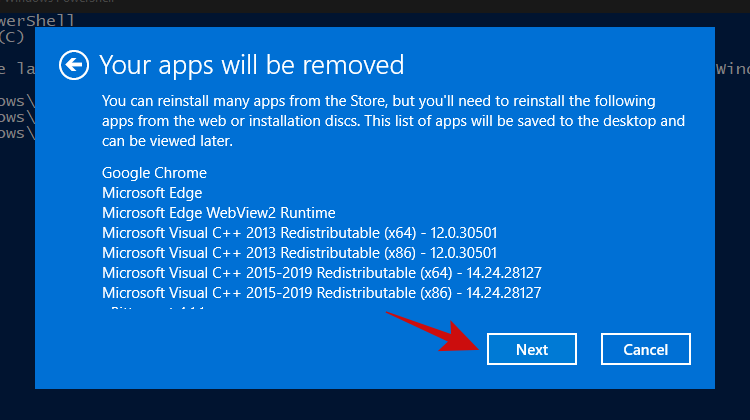
Within a few minutes, Windows should give you a list of apps that’ll be removed from your PC after the reset. Here’s how our list looks.
Once you’ve scrolled through the list of apps, simply click on the ‘Next’ button.
Windows should now start the reset process. Simply follow the instructions and your PC should be reset within a couple of minutes. The Start menu should be working now.
Fix #20: Re-install Windows from scratch
Well, if you’re really considering this method, it’s safe to assume that none of the other methods worked for you. At this point, we think it’s now time to go for a clean installation of Windows 11, which will probably wipe your current Windows partition (if you choose to).
Note: Before proceeding with this method, we recommend making a complete backup of all your files stored inside folders on the Windows drive, such as in Downloads, Documents, and the likes.
Once you have backed up all your files from the Windows drive, let’s take a look at the things you’ll need.
- A USB stick of 8GB or more (no external hard drives, unless you want to lose all your precious data)
- Rufus
Next, follow our guide on downloading and installing the Windows 11 ISO.
Read: How to Download and Install Official Windows 11 ISO
We hope that after following this guide, you were able to fix the annoying and unresponsive Start menu in Windows 11 and bring it back to life.
If you find yourself stuck at any point in this guide, let us know in the comments below.
Related:




![Com solucionar lerror de pantalla verda de Windows 11 [8 maneres] Com solucionar lerror de pantalla verda de Windows 11 [8 maneres]](https://blog.webtech360.com/resources8/images31/image-5564-0105182715287.png)
![[Actualització: 8 de novembre] Leina de retall no funciona a Windows 11? Com solucionar els problemes derror o dreceres Aquesta aplicació no es pot obrir. [Actualització: 8 de novembre] Leina de retall no funciona a Windows 11? Com solucionar els problemes derror o dreceres Aquesta aplicació no es pot obrir.](https://blog.webtech360.com/resources8/images31/image-6552-0105182756436.jpg)


