Оновлення Windows завжди були горезвісною неприємністю для багатьох користувачів з часів Windows XP. На щастя, доставка оновлень Windows різко покращилася за останні кілька років, і дуже мало оновлень функцій сьогодні викликає серйозні проблеми .
Ви можете налаштувати Windows на автоматичне завантаження та оновлення у фоновому режимі і навіть перезавантажувати його під час неактивності. Все це чудово, але що робити, якщо встановлено непотрібне оновлення? Або що, якщо ви отримаєте оновлення, яке погіршує продуктивність вашого пристрою ? Що ж, у цьому випадку ви можете видалити оновлення Windows у Windows 11. Але ось кілька речей, які вам слід пам’ятати, перш ніж видаляти оновлення з комп’ютера з Windows 11.
Пов’язано: Як відключити оновлення в Windows 11
Зміст
Навіщо видаляти оновлення Windows?
Причин, чому ви хочете видалити оновлення Windows, може бути кілька, ось деякі з найпоширеніших. Якщо ви виправляєте помилки після останнього оновлення Windows, ви також можете переглянути цей список.
Якщо у вашій системі виникли такі проблеми, спробуйте видалити останнє оновлення Windows, щоб спробувати вирішити проблему.
- Знижена загальна продуктивність системи
- Несправні оновлення драйверів
- Порушена функціональність функцій Windows
- Неправильно керовані ресурси у фоновому режимі
- Високе використання ЦП або диска
- Небажане оновлення драйвера, якого ви намагалися уникнути
- Неправильна робота Windows Security або UAC
- Неправильні налаштування регіону, які неможливо змінити
- Відсутні налаштування або параметри в Windows 11
і більше. Під час встановлення нового оновлення для Windows 11 може виникнути безліч проблем, особливо якщо ви підписані на бета-версію або канал інсайдерів. У таких випадках ви можете спробувати видалити відповідне оновлення, скориставшись посібником у цій публікації.
Пов’язано: Як скасувати очікуване оновлення Windows Insider
Чи безпечно видаляти оновлення Windows?
Так, доки ви не видаляєте оновлення Windows примусово вручну або не використовуєте застарілу утиліту, вам слід безпечно видаляти оновлення Windows зі своєї системи. Однак слід пам’ятати, що Microsoft використовує оновлення Windows, щоб надати виправлення безпеки, виправлення тощо, щоб захистити вашу систему від останніх загроз і вразливостей безпеки.
Видалення оновлень Windows також призведе до видалення таких виправлень, які, у свою чергу, зроблять вашу систему вразливою до онлайн-загроз. Це особливо актуально, якщо ви хочете видалити останні оновлення безпеки.
Таким чином, хоча ви можете безпечно видалити будь-яке оновлення, рекомендується відновити внесені зміни, як тільки помилку буде виправлено. Якщо після повторної інсталяції оновлення ваша помилка або помилка не зникають, ви можете почекати, доки Microsoft не випустить наступне оновлення та виправлення.
Пов’язано: Як видалити Bing з Windows 11
Як знайти оновлення, які потрібно видалити
Ми можемо видаляти оновлення різними методами, але щоб знайти, яке оновлення ви хочете видалити, вам потрібно визначити його на своєму ПК. Кожному оновленню Microsoft присвоюється номер KB, який допомагає визначити та ідентифікувати оновлення на споживчих ПК, а також на серверах Microsoft. Ми можемо використати цей номер у своїх інтересах і видалити відповідне оновлення з вашої системи, скориставшись одним із наведених нижче посібників. Ось як можна визначити останні оновлення Windows, встановлені на вашому ПК.
Спосіб №01: Використання налаштувань
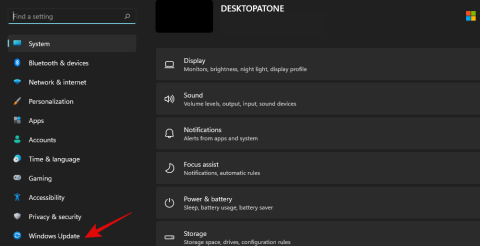
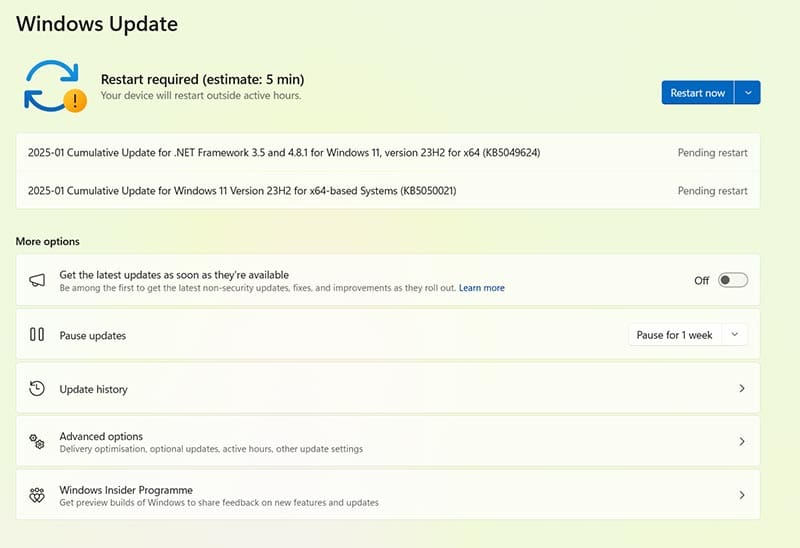
Натисніть Windows + iна клавіатурі та виберіть «Оновлення Windows» зліва.
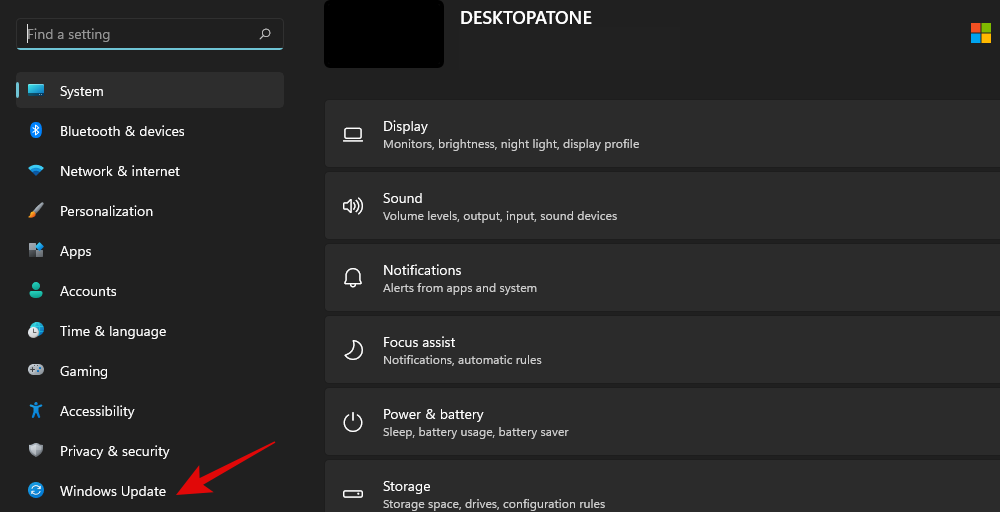
Натисніть «Оновити історію».
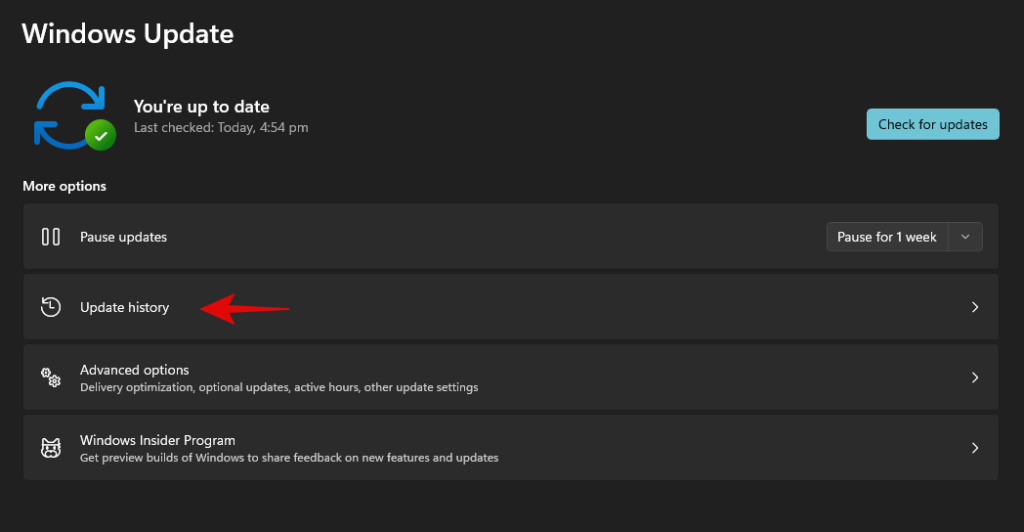
Тепер ви отримаєте список нещодавно встановлених оновлень Windows у вашій системі.
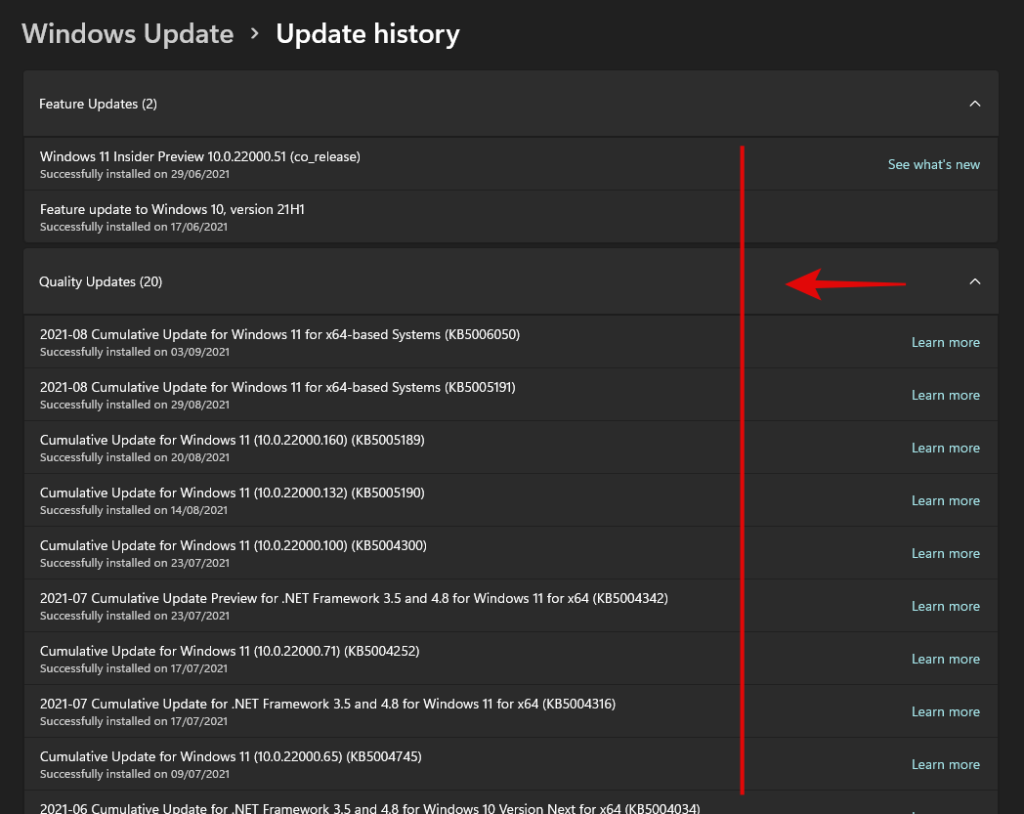
Просто запишіть номер КБ оновлення, яке ви хочете видалити зі свого ПК.
Метод №02: Використання CMD
Натисніть Windows + Sна клавіатурі та знайдіть CMD. Натисніть «Запустити від імені адміністратора», коли програма з’явиться у ваших результатах пошуку.
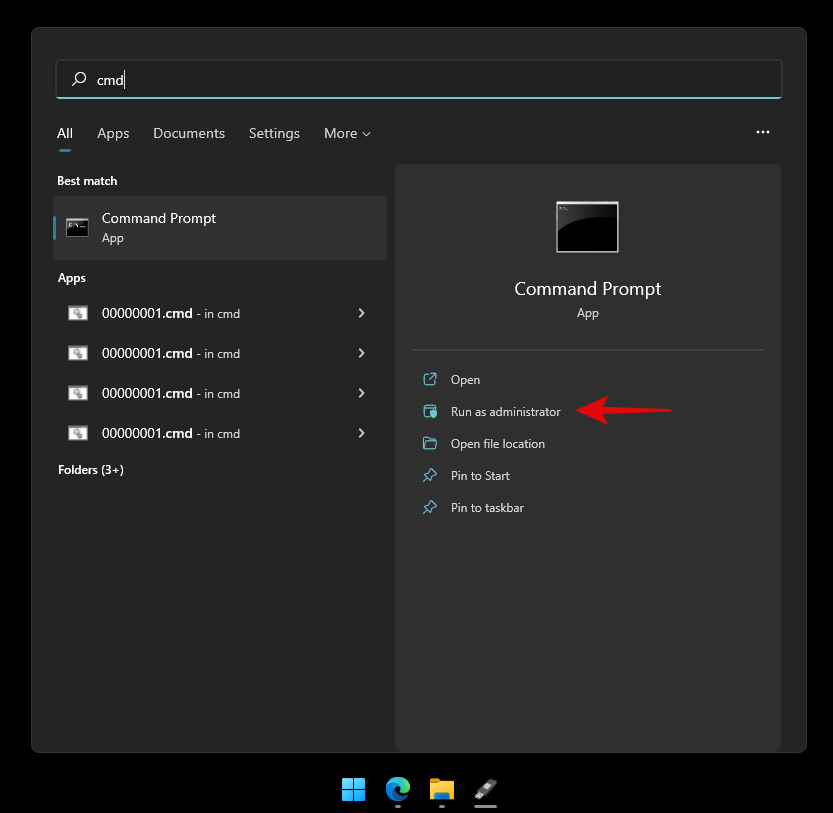
Введіть таку команду та натисніть Enter на клавіатурі.
wmic qfe list brief /format:table
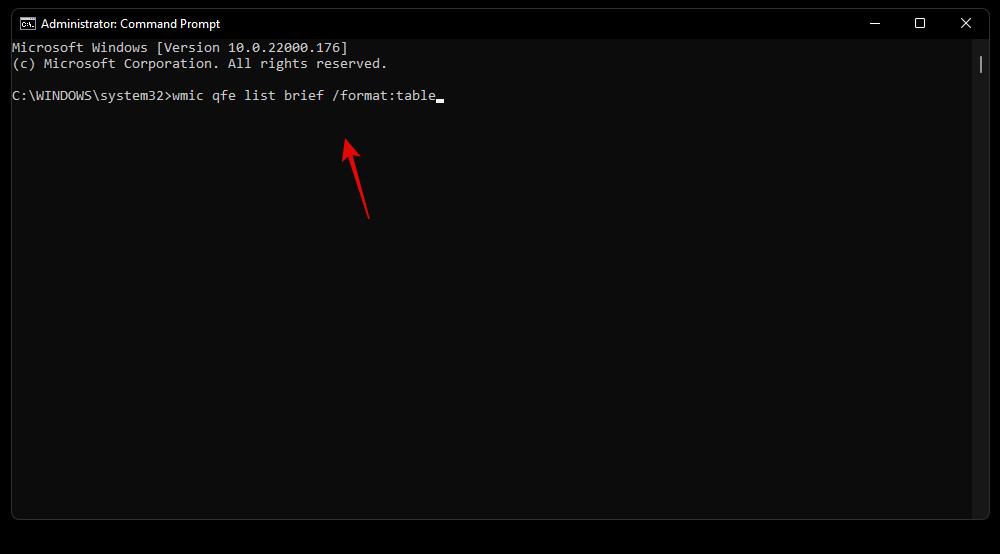
Тепер ви отримаєте список усіх останніх оновлень Windows, встановлених на вашому ПК. Натисніть і розгорніть відповідну категорію зі списку нижче.
- Якісні оновлення: оновлення функцій для Windows 11, які вносять серйозні зміни в ОС.
- Оновлення драйверів: стандартні /OEM оновлення драйверів для ваших периферійних пристроїв і компонентів, які надаються через оновлення Windows.
- Оновлення визначень. Оновлення визначення безпеки, щоб допомогти Microsoft Defender виявляти та поміщати на карантин загрози у вашій системі.
- Інші оновлення: оновлення продуктів, функцій та інших функцій OEM, характерних для вашого пристрою. Функції та пакети досвіду Windows також будуть оновлені в цій категорії.
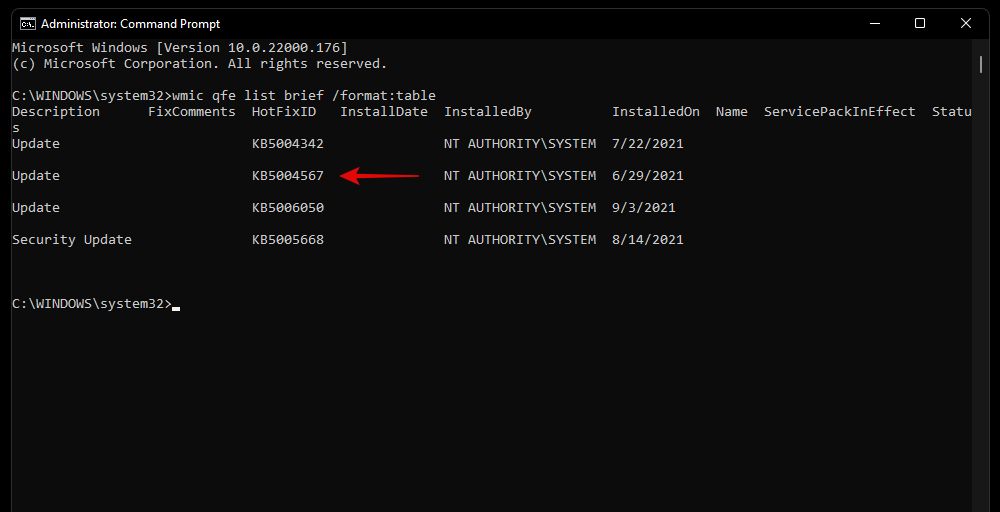
Визначте оновлення, яке потрібно видалити, і запишіть його «HotFixID». Ми будемо використовувати цей ідентифікатор, щоб видалити відповідне оновлення, використовуючи наведений нижче посібник.
Як видалити оновлення Windows з ПК
Ви можете видалити оновлення Windows зі свого комп’ютера одним із наведених нижче способів. Якщо ви заблокували доступ до Windows або не можете завантажитися на робочий стіл, ми рекомендуємо використовувати метод Windows RE або метод CMD. Якщо у вас є доступ до робочого столу, ви можете використовувати програму Налаштування, щоб легко видалити оновлення зі своєї системи. Використовуйте наведені нижче посібники, щоб розпочати роботу залежно від ваших уподобань.
Спосіб №01: Використання налаштувань
Натисніть Windows + iна клавіатурі та натисніть «Оновлення Windows» на лівій бічній панелі.

Натисніть «Оновити історію».

Прокрутіть униз і натисніть «Видалити оновлення».
Тепер ви будете перенаправлені на панель керування, де ви знайдете список останніх оновлень, які можна видалити з вашої системи.

Виберіть оновлення, яке потрібно видалити, і натисніть «Видалити» вгорі.

Дотримуйтесь інструкцій на екрані, щоб видалити відповідне оновлення зі свого ПК.
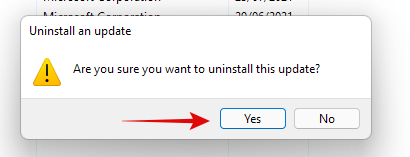
Тепер ви можете перезавантажити ПК, і всі проблеми, з якими ви зіткнулися через оновлення, тепер повинні бути виправлені.
Спосіб №02: Використання засобу усунення несправностей оновлення Windows
Натисніть Windows + iна клавіатурі та натисніть «Усунути неполадки».
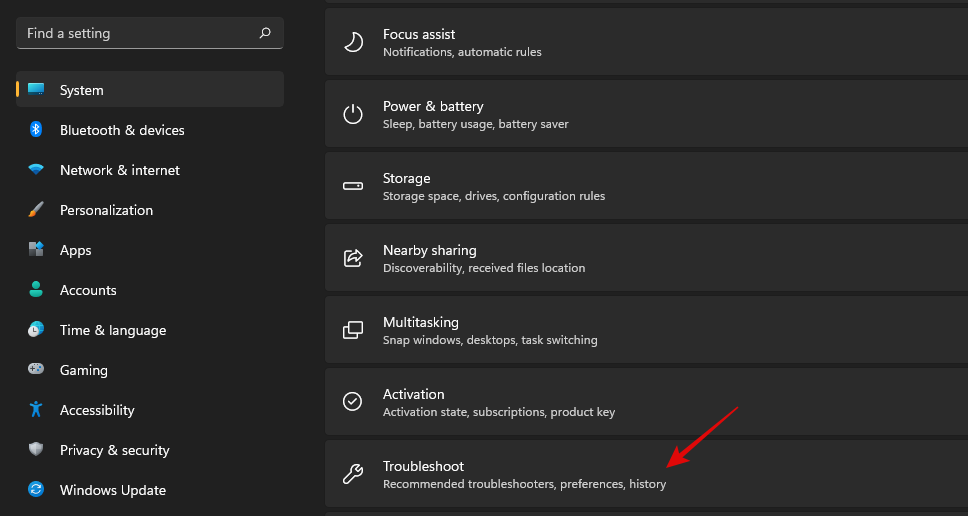
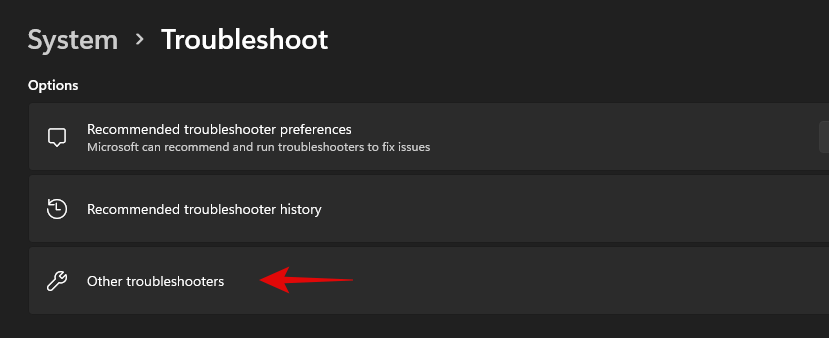
Натисніть «Інші засоби усунення несправностей».
Натисніть «Виконати» біля Windows Update.
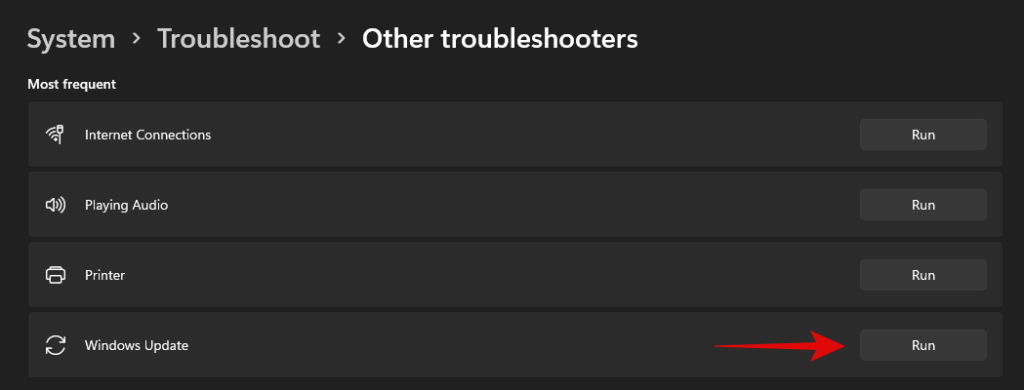
Засіб усунення несправностей Windows тепер шукатиме проблеми з оновленнями Windows на вашому ПК та викликані ними. Якщо такі знайдуться, засіб усунення несправностей автоматично вирішить проблему. Якщо винуватцем є останнє оновлення, засіб усунення несправностей надасть вам можливість вибрати та видалити необхідне оновлення Windows. Дотримуйтесь н��ступних інструкцій на екрані, щоб повністю видалити оновлення.
Після завершення натисніть «Закрити».
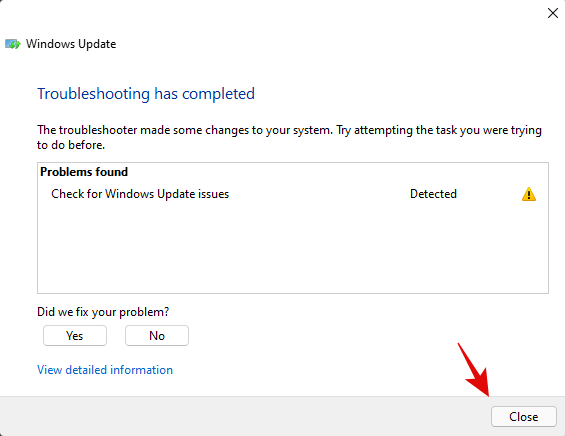
Перезавантажте комп’ютер для повної міри, і тепер проблема повинна бути виправлена на цьому етапі. Якщо ні, ви можете скористатися наведеним нижче методом PowerShell, щоб вручну видалити потрібне оновлення Windows зі своєї системи.
Метод №03: Використання PowerShell або CMD
Натисніть Windows + Sна клавіатурі та знайдіть PowerShell. Натисніть «Запустити від імені адміністратора», коли програма з’явиться у ваших результатах пошуку.
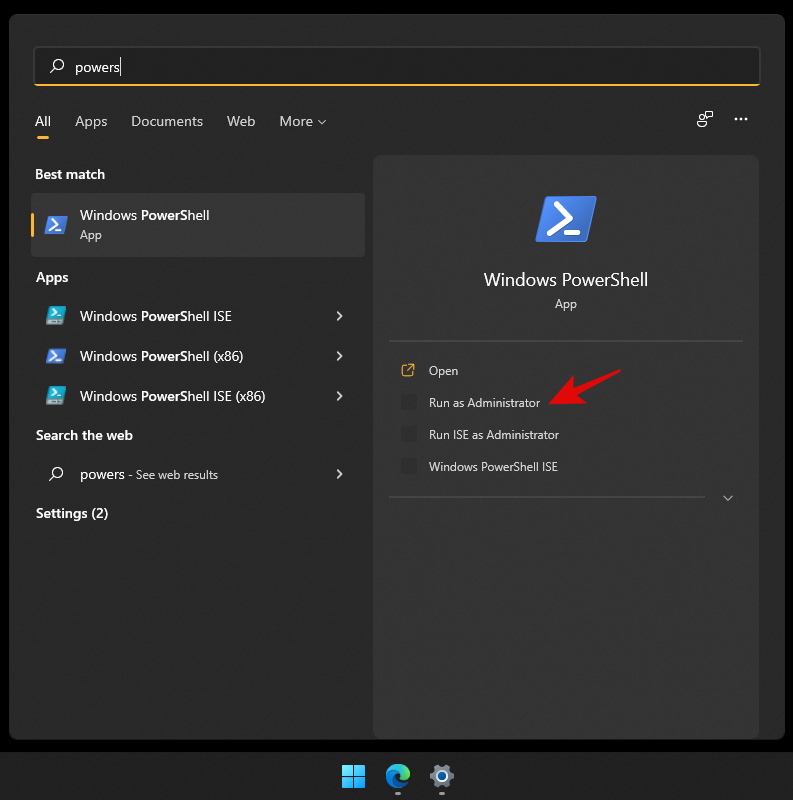
Введіть таку команду та натисніть Enter на клавіатурі, щоб виконати її.
wmic qfe list brief /format:table

Тепер ви отримаєте список усіх нещодавно встановлених оновлень Windows у вашій системі у форматі таблиці. Запишіть номер КБ для вибраного Windows Update.
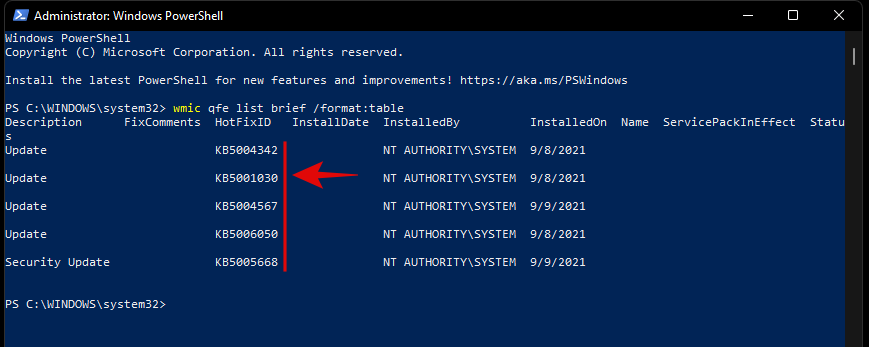
Примітка. Вам потрібна лише цифра, а не літери перед нею.
Після завершення введіть наведену нижче команду та виконайте її. Замініть "NUMBER" номером KB, який ви записали раніше.
wusa /uninstall /kb:NUMBER
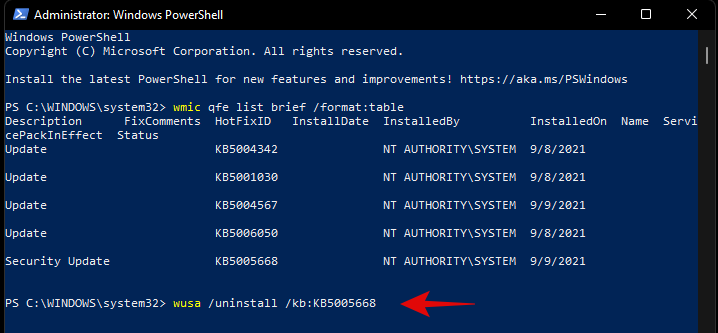
Коли з’явиться запит, підтвердьте свій вибір.
Якщо з’явиться запит на перезавантаження, ми рекомендуємо якнайшвидше перезавантажити систему, зберігаючи роботу у фоновому режимі.
Однак якщо ви не бажаєте отримувати підтвердження перед видаленням і перезапуском, ви можете скористатися командою нижче.
wusa /uninstall /kb:NUMBER /quiet
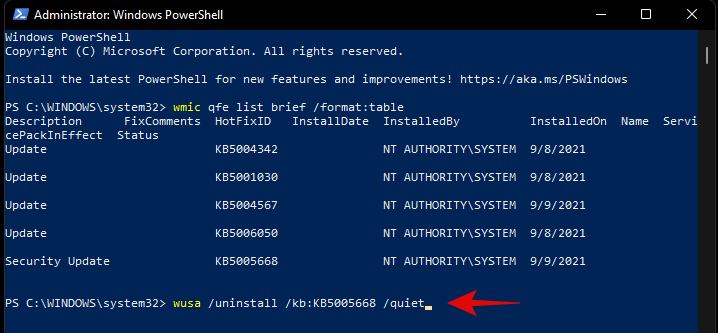
Хоча наведена вище команда не запитуватиме підтвердження, вона чекатиме, поки ваші програми нормально вимикаються у фоновому режимі. Якщо ви хочете примусово закрити свої програми та негайно перезавантажити систему, ви можете скористатися командою, наведеною нижче.
wusa /uninstall /kb:NUMBER /quiet /forcerestart
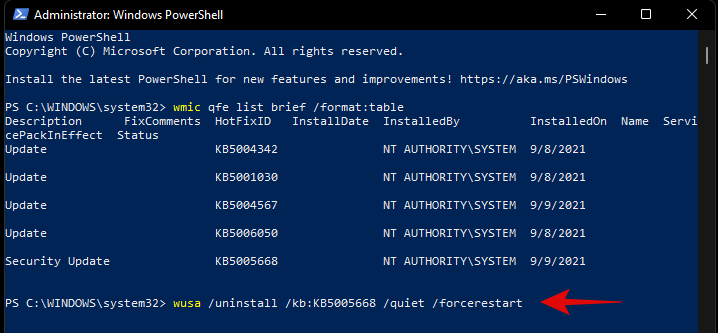
Згодом, якщо ви хочете лише підтвердити перезавантаження, ви можете скористатися командою нижче.
wusa /uninstall /kb:NUMBER /quiet /promptrestart
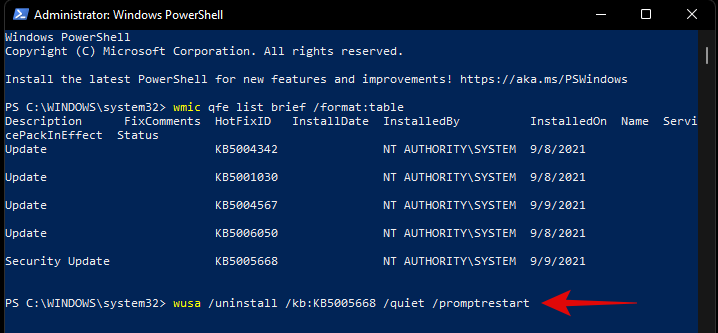
І це все! Проблемне оновлення Windows тепер має бути видалено з вашого ПК.
Спосіб №04: З Windows RE
Середовище відновлення Windows також дозволяє видаляти конфліктуючі оновлення. Скористайтеся наведеним нижче посібником, щоб почати. Якщо ви зіткнулися з BSOD і вже перебуваєте в середовищі відновлення, ви можете пропустити перші кілька кроків цього посібника.
Натисніть Windows + iна клавіатурі та виберіть Windows Update зліва.
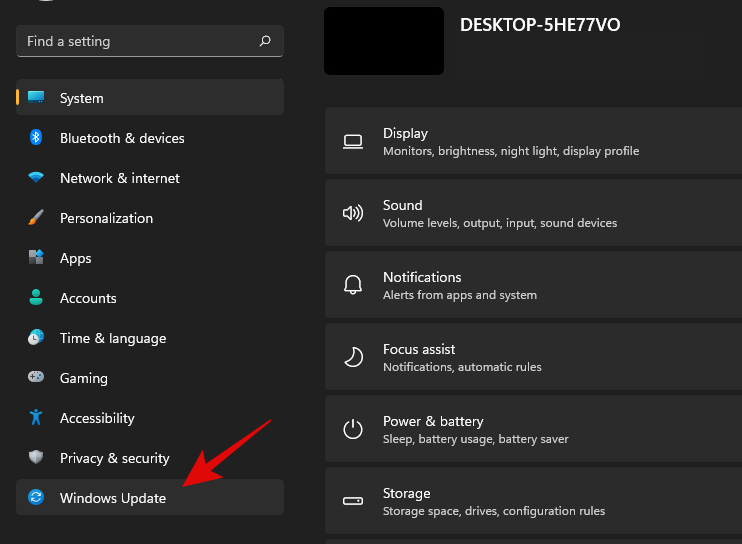
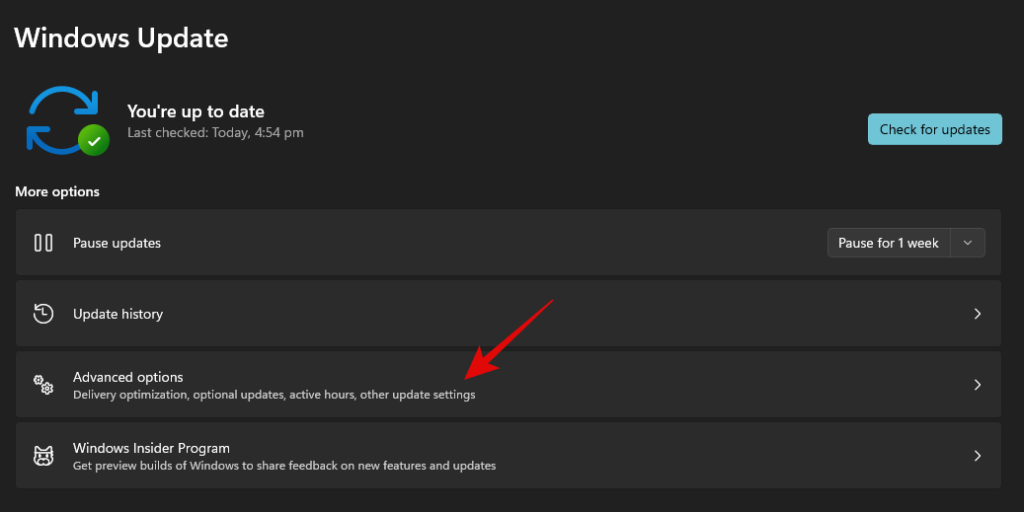
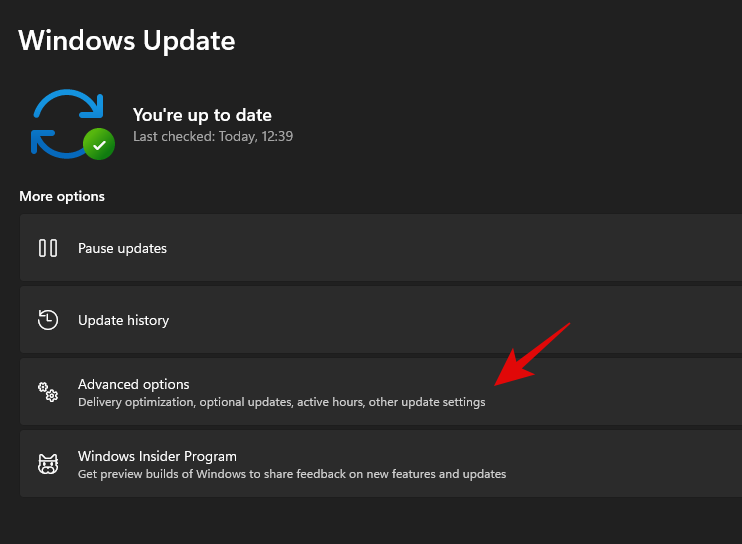
Тепер натисніть «Додаткові параметри».
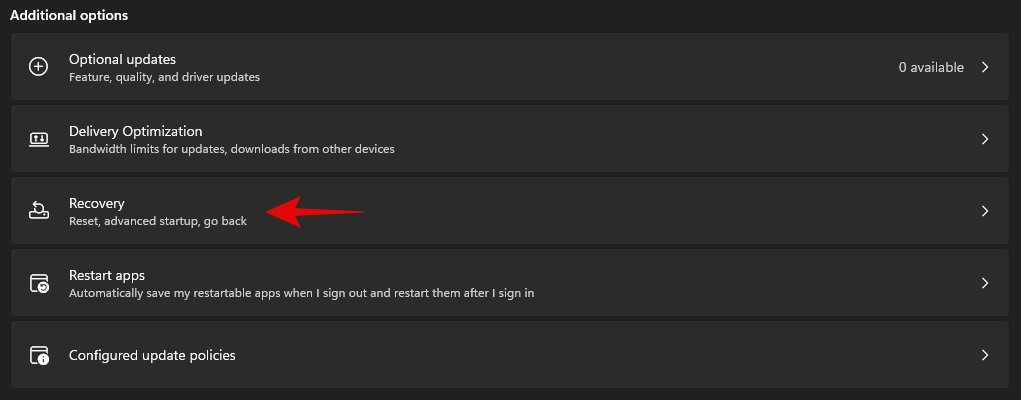
Виберіть «Відновлення».
Click on ‘Restart now’ beside Advanced Startup.

You will now boot into the recovery environment. Click on ‘Troubleshoot’.
Now click on ‘Advanced Options’.
Select ‘Uninstall updates’.
Click and select the type of update you wish to install from the options on your screen.
- Uninstall latest quality update
- Uninstall latest feature update
Note: In case you are confused, feature updates refer to major updates to your Windows system that include new features, updated integrations, and sometimes new UI. Quality updates on the other hand encompass everything else including Security updates, Driver updates, Intelligence updates, Telemetry updates, and more.
Click on your administrator account and log in with your password.
Click on ‘Uninstall quality/feature’ update to confirm your choice.
Click on ‘Done’ once the process finishes.
Restart your PC and boot into Windows normally. You shouldn’t face any more issues caused by a problematic Windows update.
Method #05: Using DISM
DISM or Deployment Image Servicing and Management tool is an administrative tool within Windows that helps repair your Windows image and even mount images if needed. DISM supports image formats like .wim, .vhd, and more.
The tool can help you fix issues with your Windows installation and even remove problematic Windows updates. If you are looking to remove windows updates using DISM, then you can follow the steps below to get you started.
Note: DISM can be accessed via CMD and thus, you can use this guide from a recovery environment or an installation media as well. Follow the guide above to get CMD working on your lock screen or within Windows Recovery Environment.
Launch CMD and type in the following command. Press Enter on your keyboard once you are done.
dism /online /get-packages /format:table
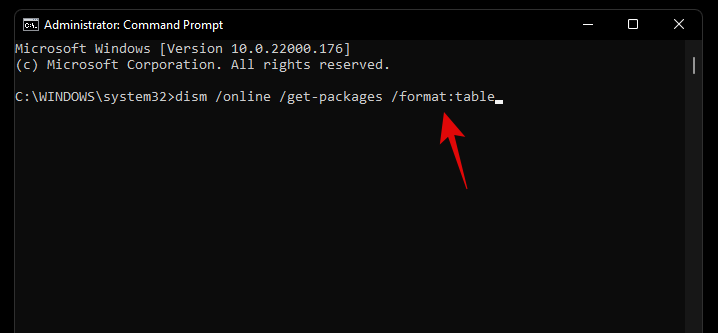
Unlike the WUSA commands we used earlier with PowerShell and CMD, you will need to note down the entire name of the Windows Update package we need to remove. Unfortunately, this includes special characters, spaces, and everything else included in the name. Thankfully you can easily copy the entire name to your clipboard by selecting it with your mouse and then using the keyboard shortcut. Once done, type in the command below and replace NAME with the package name you noted down earlier.
Note: This includes the term ‘Package_for_’ prefixed before some updates.
dism /online /Remove-Package /PackageName:NAME

The selected Windows Update will now be uninstalled from your system. In some cases, you will be prompted to restart your system, type in ‘Y’, and hit Enter on your keyboard to restart your system immediately.
How to stop receiving an update
While removing an update can help you, this does not mean that the broken Windows Update will stop showing up in your Updates section. This can be annoying and if you have automatic updates then you run the risk of automatically installing the problematic update in the background. In all such cases, you can try blocking Windows Updates on your system using the guides below depending on your preferences.
Method #01: Stop OEM driver updates through Windows update
OEM driver updates are delivered through Windows updates as well depending on their importance. Security vulnerabilities and bugs that have been recently found in components like CPU, GPU, or your wireless card, are instantly patched through such updates.
However, if you do not wish to install an OEM driver update provided by Windows update, then you can follow the guide below to block your OEM driver updates.
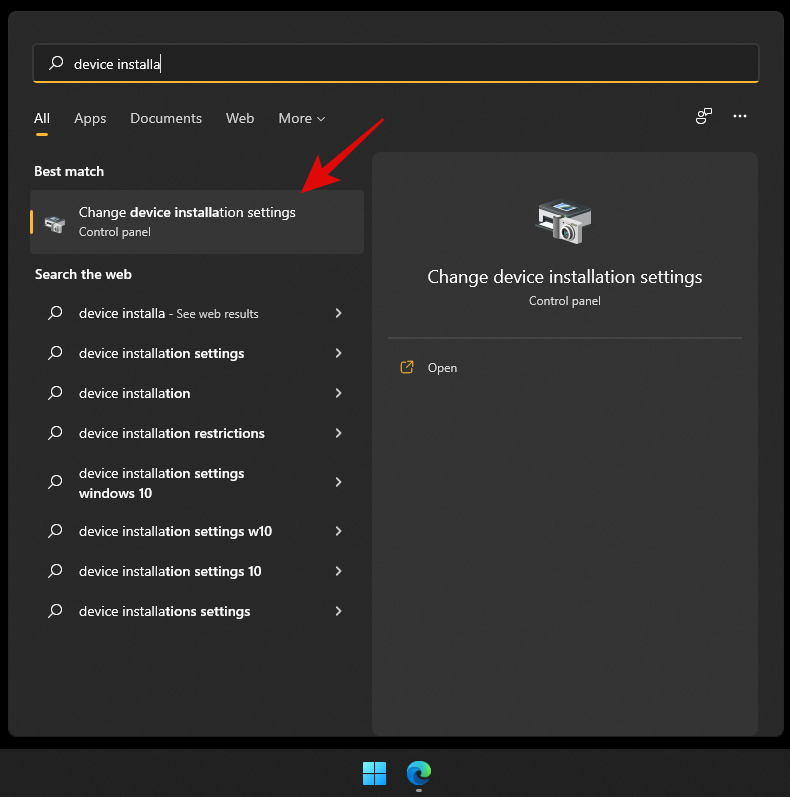
Press Windows + S on your keyboard and search for ‘Change device installation settings’. Click and launch the app from your search results.
Select ‘No’.
Click on ‘Save changes’.
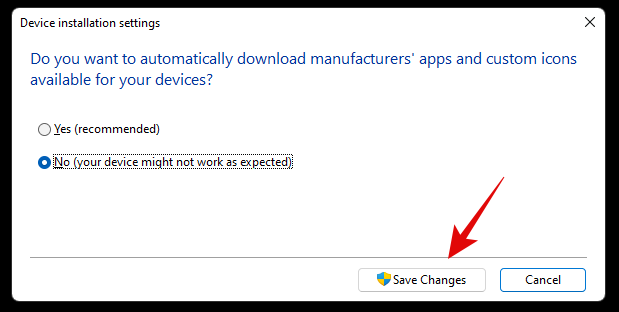
The changes will now be saved and you will no longer receive OEM driver updates through Windows Update.
Related: 6 Ways to Update Drivers on Windows 11
Method #02: Stop updates for Microsoft products
If you have been receiving constant updates for new Microsoft features and old products that keep messing up your system, then you can use the guide below to disable updates for Microsoft products via Windows Update.
Press Windows + i on your keyboard to open the Settings app and select ‘Windows Update’ from the left sidebar.

Click on ‘Advanced options’.

Now turn off the toggle for ‘Receive updates for other Microsoft products’ at the top.
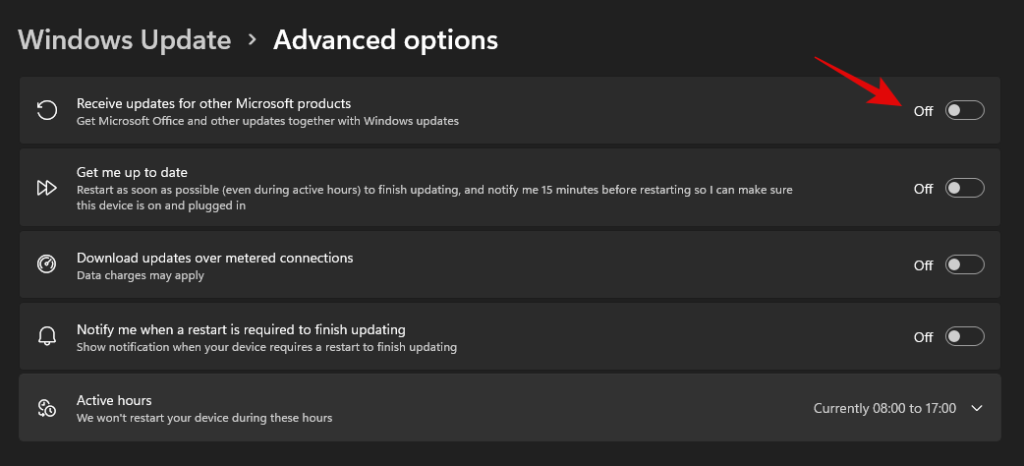
You will no longer receive updates for Microsoft products installed on your system via Windows update.
Method #03: Change active hours for background download and installation for updates
If you’re just looking to dismiss updates so that they don’t interfere with your work hours, then this is the perfect option for you. You can decide when Windows can download and update your PC in the background which will prevent Windows from interfering with your work hours. Follow the guide below to get you started.
Press Windows + i on your keyboard and click on ‘Windows Update’ on your left.

Click on ‘Advanced options’.

Now turn off the toggle for ‘Get me up to date’.
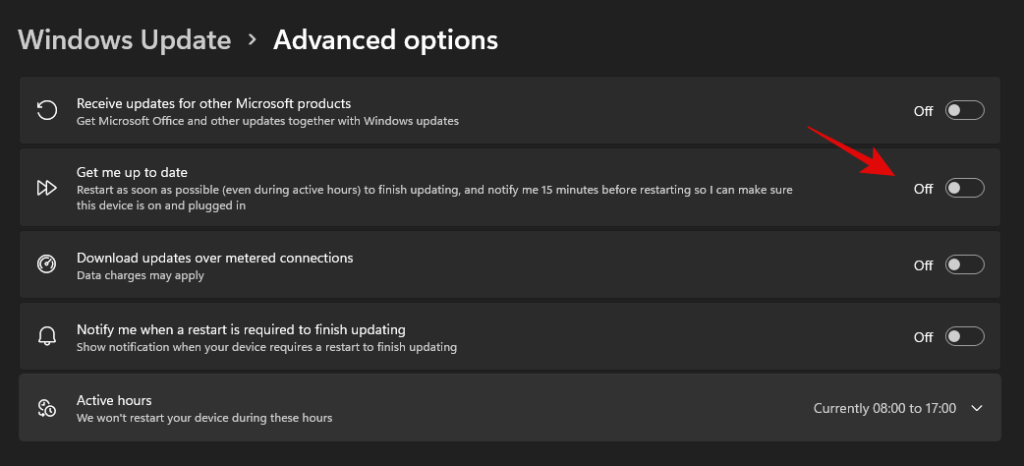
Click on ‘Active hours’.
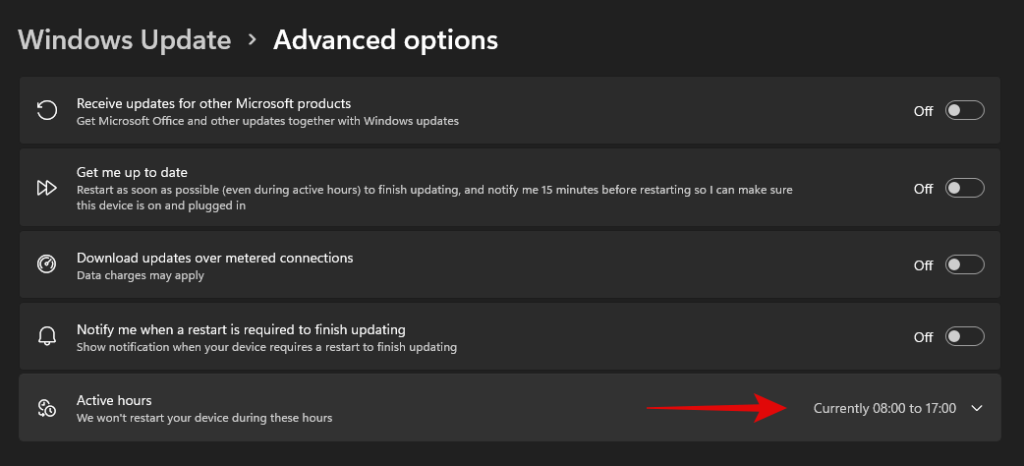
Click on the drop-down menu and select ‘Manually’.
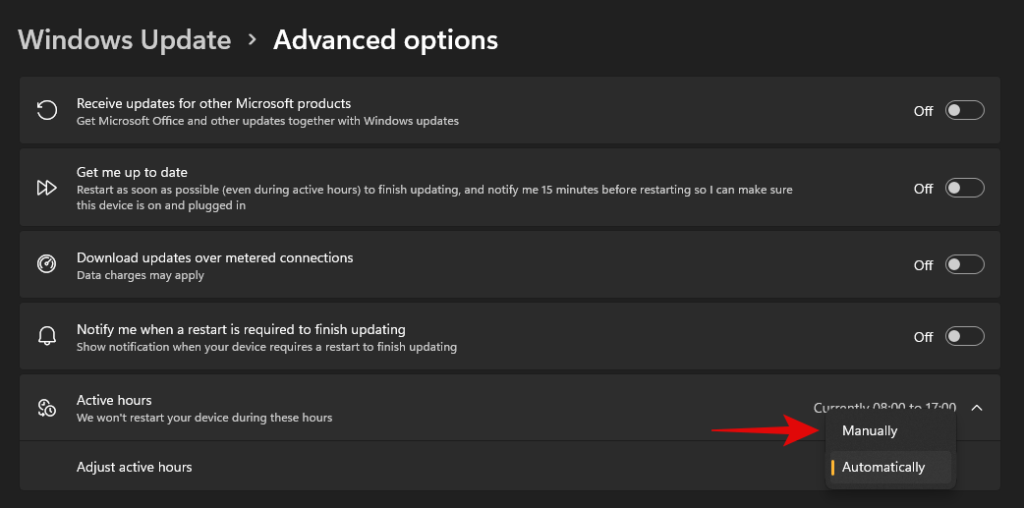
Define your desired start and end time. Windows won’t download updates and restart your PC during these hours.

And that’s it! Active hours should now be enabled for your system.
Method #04: Block Windows updates that you never wish to install
If you are receiving forced Windows updates that you don’t ever wish to install on your system then you can use a dedicated Windows troubleshooter to solve your issue.
This can be helpful in case you are trying to stop an update that disables a certain feature on your system that you don’t want disabled. This could be access to voltage controls, clock speed controls, turbo controls, fan controls, RGB control, and more. Follow the guide below to get you started.
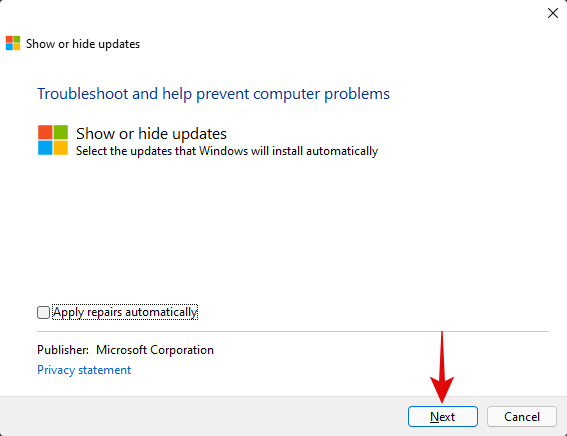
Download the Windows Update Show Hide troubleshooter using the link above and launch it on your PC. Click on ‘Advanced’.
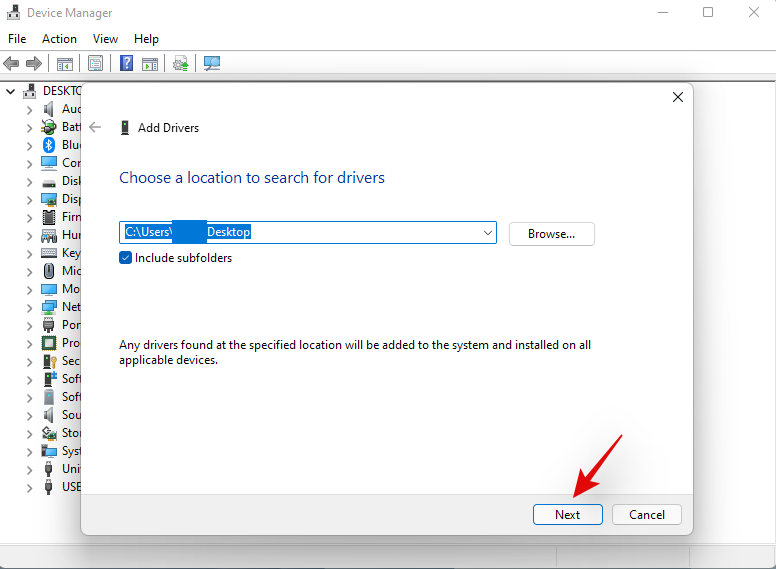
Uncheck the option for ‘Apply repairs automatically’.
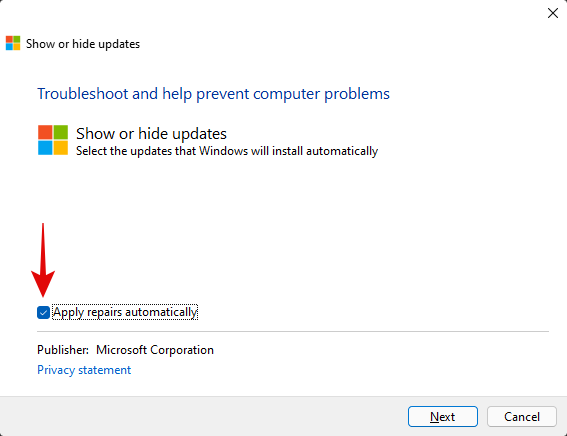
Click on ‘Next’.
The troubleshooter will now look for pending updates and display them on your screen. Click on ‘Hide updates’.
Check the boxes for all the updates you don’t wish to receive on your PC.
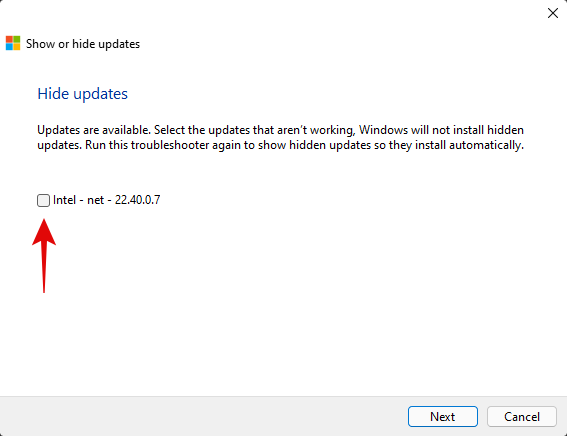
Click on ‘Next’.
Ensure that ‘Hide updates’ is selected and click on ‘Next’.
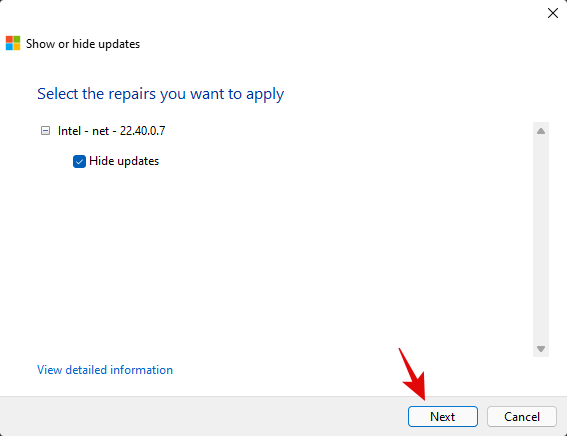
The troubleshooter will now hide the necessary Windows updates from your PC which in turn will prevent them from ever being downloaded on your PC. Click on ‘Close’.
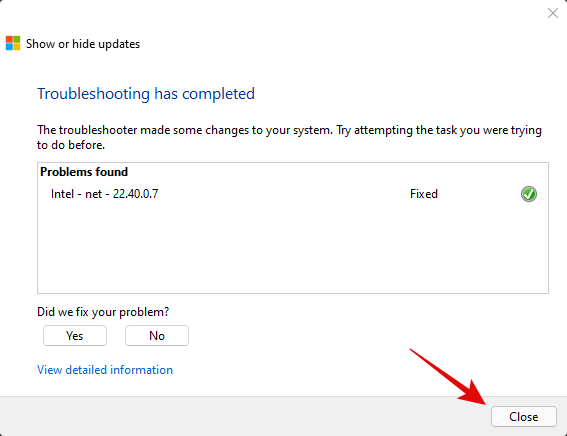
And that’s it! You will now have blocked the necessary updates on Windows 11.
Can you turn off Windows updates?
Yes, you can use certain workarounds and tricks to disable Windows updates on your PC. However, this isn’t recommended as you will lose out on important security patches which would leave you vulnerable to online threats including hackers, malware, adware, and more.
Hence we recommend you keep your PC updated or at least opt to install the latest security updates on your PC. Even if you are losing out on features it’s usually because of a hardware security vulnerability that would compromise your system.
However, if you still wish to disable Windows Updates on your PC, you can use this dedicated guide from us. If you face any issues, feel free to drop a comment.
Can’t uninstall Windows updates? Try these fixes!
If you are unable to install updates on your PC, then you can try the following fixes. However, if you are still unable to uninstall updates then this might indicate an issue with your Windows installation in which case resetting your PC might be the best option.
Follow the guides below to get you started.
Method #01: Reset Windows components and try again
If you have been unable to uninstall updates then you can try resetting your windows components. This will help fix corrupted system files in the background that might be preventing you from uninstalling updates on your system. We will be using a modified script from Mircosoft to help reset all components of Windows 11. The script was originally developed for Windows 10 or higher and hence will need some edits to work properly on Windows 11. This script will perform the following tasks on your system when executed;
- Remove older Windows updates folder
- Re-register Windows update files
- Reset your network connection
Follow the steps below to run the script on your system and reset Windows update components on your PC.
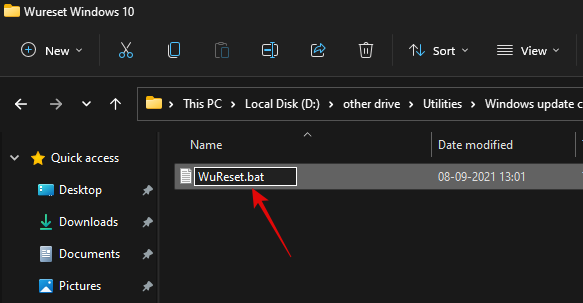
Download the script using the link above to your local storage and extract it to a convenient location. Once extracted right click on the script.
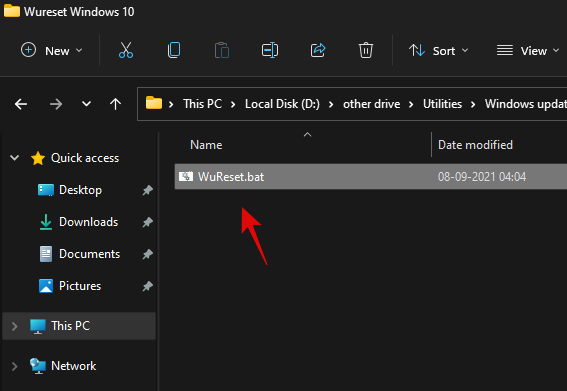
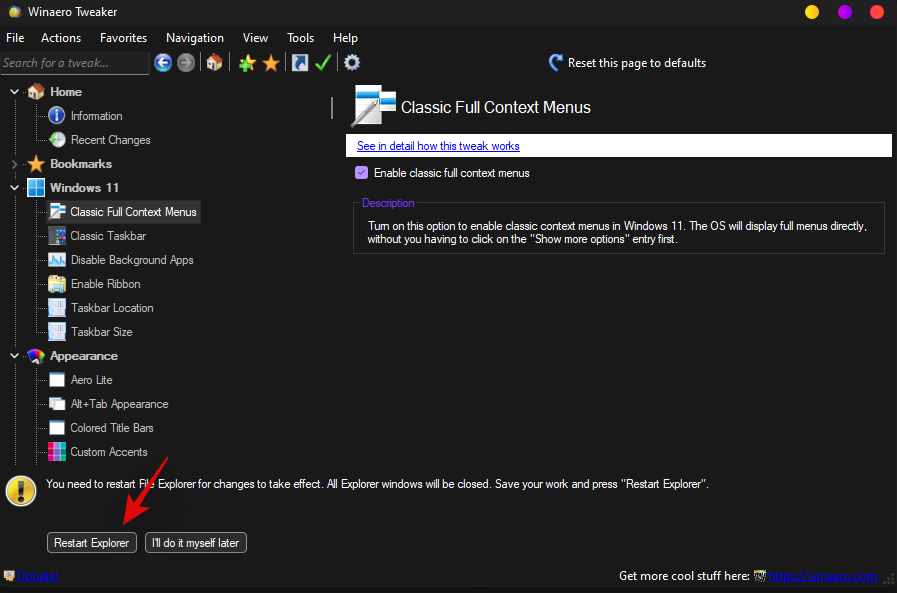
Click on ‘Show more options’.
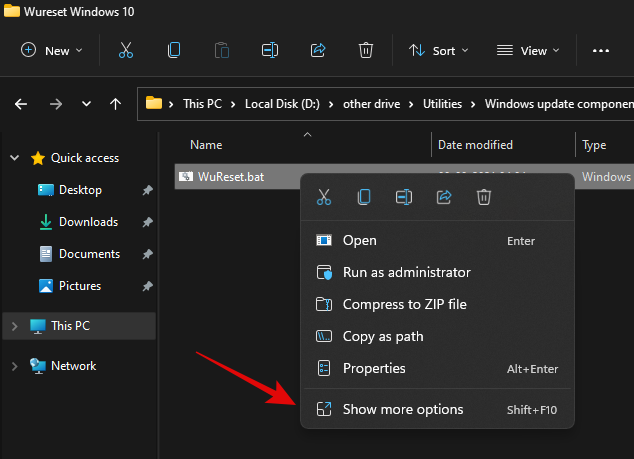
Select ‘Rename’.
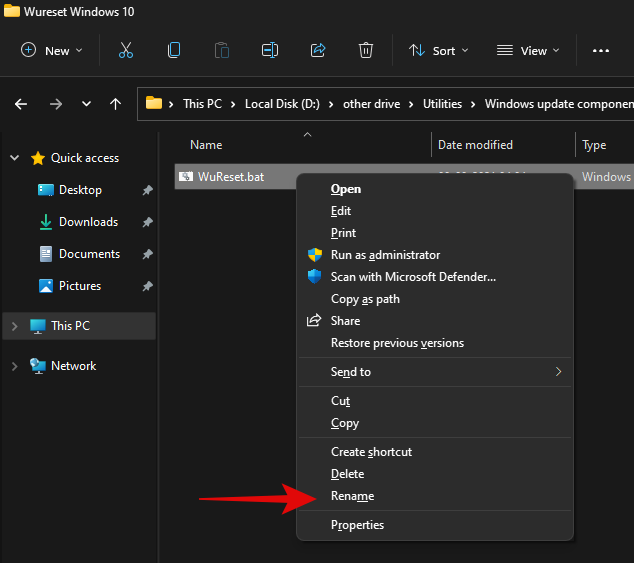
Replace ‘.bat’ with ‘.txt’.
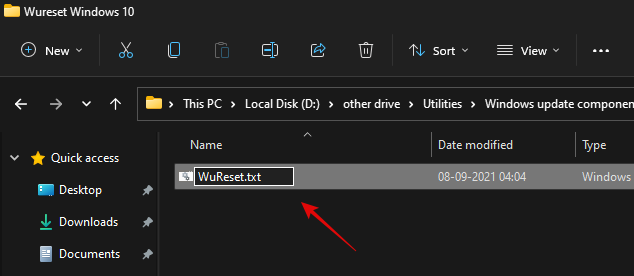
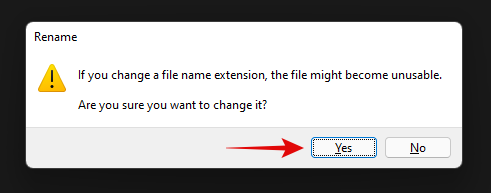
Click on ‘Yes’ to confirm your choice.
Now double click and open the file and it should open in your notepad. Once opened, scroll to the ‘:Reset’ section for resetting network commands and add the following line after the first delete command as shown below.
del /s /q /f "%SYSTEMROOT%\Logs\WindowsUpdate\*"
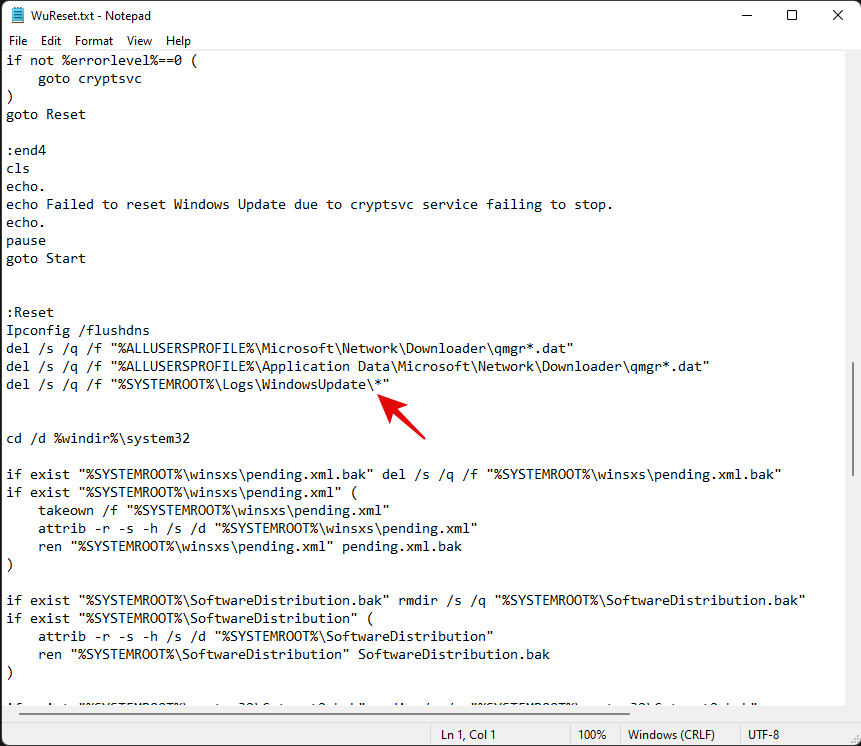
Once added, hit Ctrl + S on your keyboard. Ensure that there are no formatting changes or spaces before or after the line. The file will now be saved on your system along with its recent changes. We will now add some code to Reset Windows’s update policies on your system. Copy the lines below and paste them after your system commands. Ensure that two empty lines are available at either end of the code as shown below.
:: Windows Update policies resetting
reg delete "HKCU\SOFTWARE\Policies\Microsoft\Windows\WindowsUpdate" /f
reg delete "HKCU\SOFTWARE\Microsoft\Windows\CurrentVersion\Policies\WindowsUpdate" /f
reg delete "HKLM\SOFTWARE\Policies\Microsoft\Windows\WindowsUpdate" /f
reg delete "HKLM\SOFTWARE\Microsoft\Windows\CurrentVersion\Policies\WindowsUpdate" /f
gpupdate /force
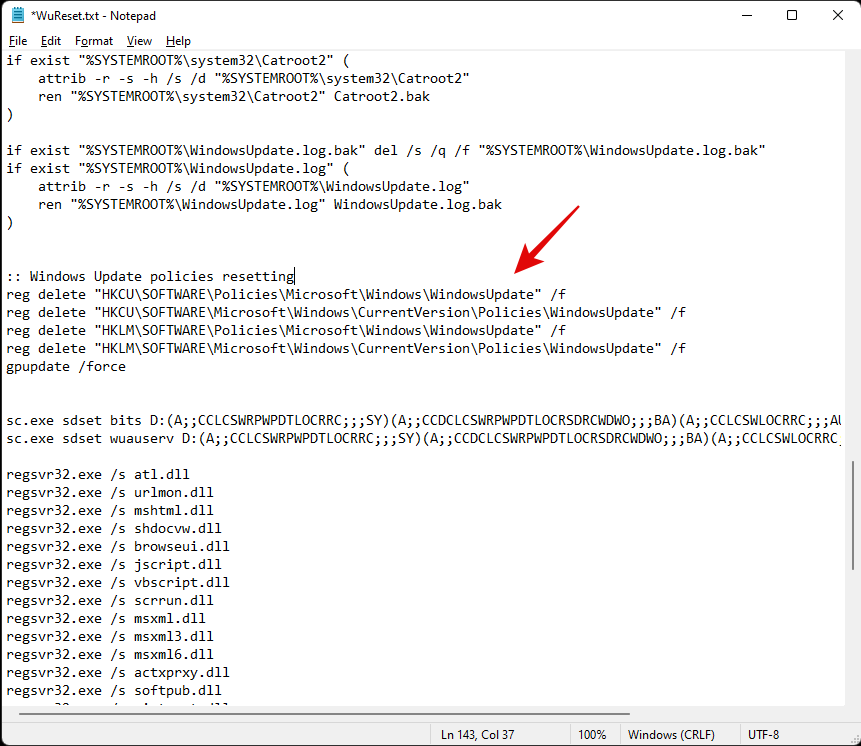
Lastly, let’s add some lines to ensure that the startup type for this service is set to ‘Automatic’. Copy the code below and add the lines after your winsock reset commands but before your service starting commands as shown below. Copy and paste the code in its respective location.
:: Set the startup type as automatic
sc config wuauserv start= auto
sc config bits start= auto
sc config DcomLaunch start= auto
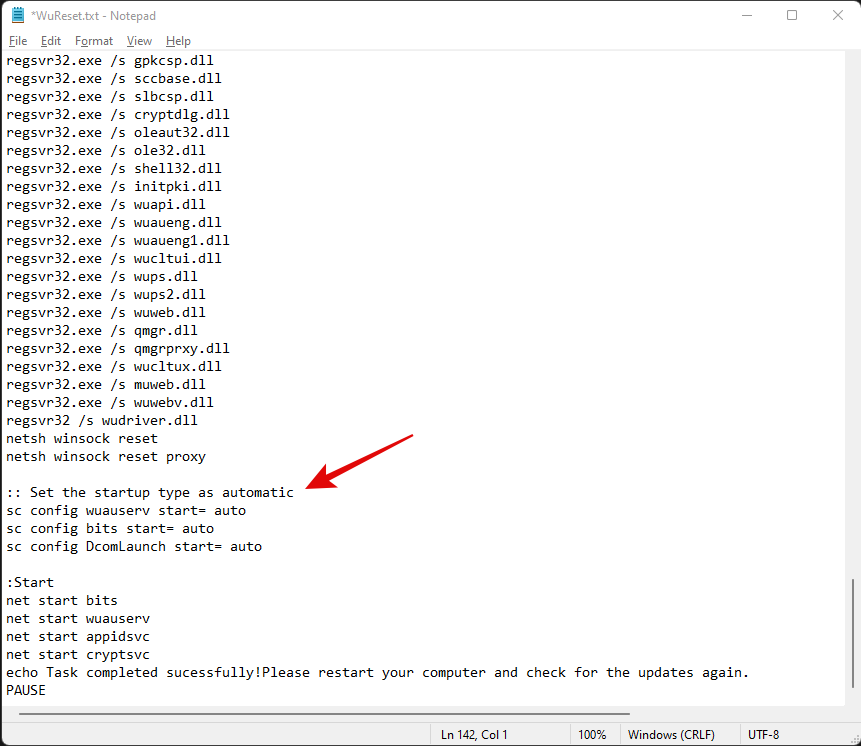
Once you are done, hit Ctrl + S on your keyboard to save your changes. Close the file and right-click on it again and select ‘Show more options’.
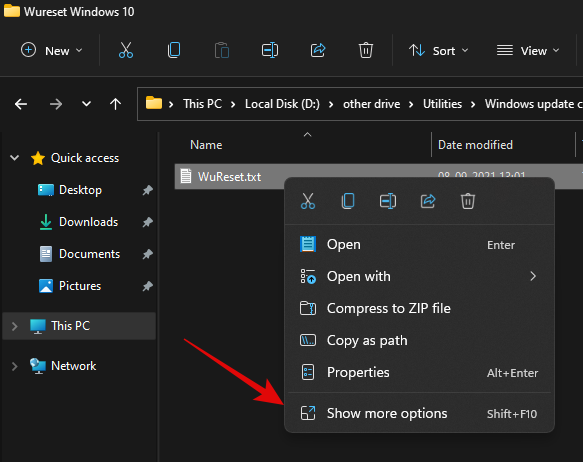
Click on ‘Rename’.
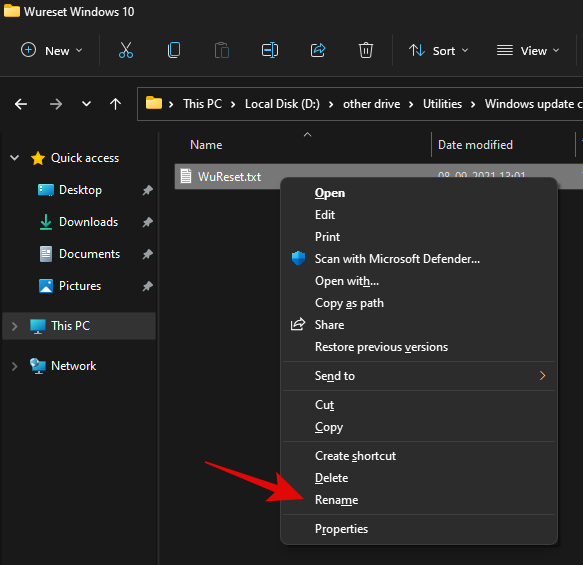
Replace ‘.txt’ with ‘.bat’.
Once done, right-click on the file and select ‘Run as administrator’.
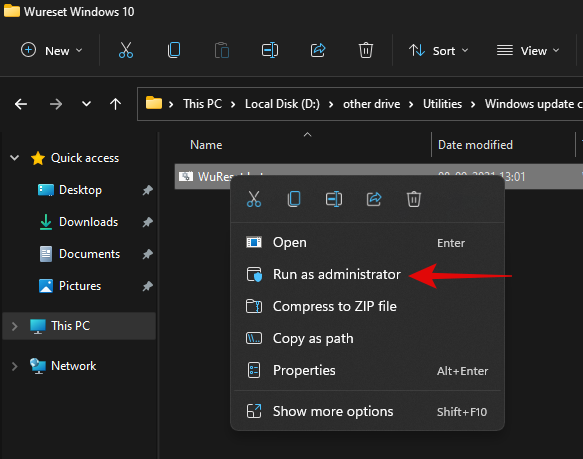
The batch script will now run on your PC and do its thing. Once the process completes, you will be asked to restart your PC. We highly recommend that you restart your PC at the earliest after running this script. Upon a restart, your Windows update should be reset and a fresh start should help you easily install pending Windows updates on your PC.
Method #02: Use DISM to uninstall the concerned packages
If you are still unable to uninstall specific Windows Update packages then simply use the DISM method to remove the concerned updates from your PC. This method force removes any available Windows updates from your PC without any issue. You will get a list of all the available updates in a table format which should make it much easier for you to find the culprit on your PC. Simply follow the guide at the top to get you started.
Method #03: Run SFC & DISM commands
At this point, if Windows still fails to update your system then you are facing a more serious issue than we anticipated earlier. This could indicate system-level corruption of files or missing system files from your system. In such cases, you can run SFC and DISM checks to fix corrupted files as well as restore missing system files. Follow the guide below to get you started.
Press Windows + S on your keyboard and search for CMD. Click on ‘Run as administrator’ once it shows up in your search results.
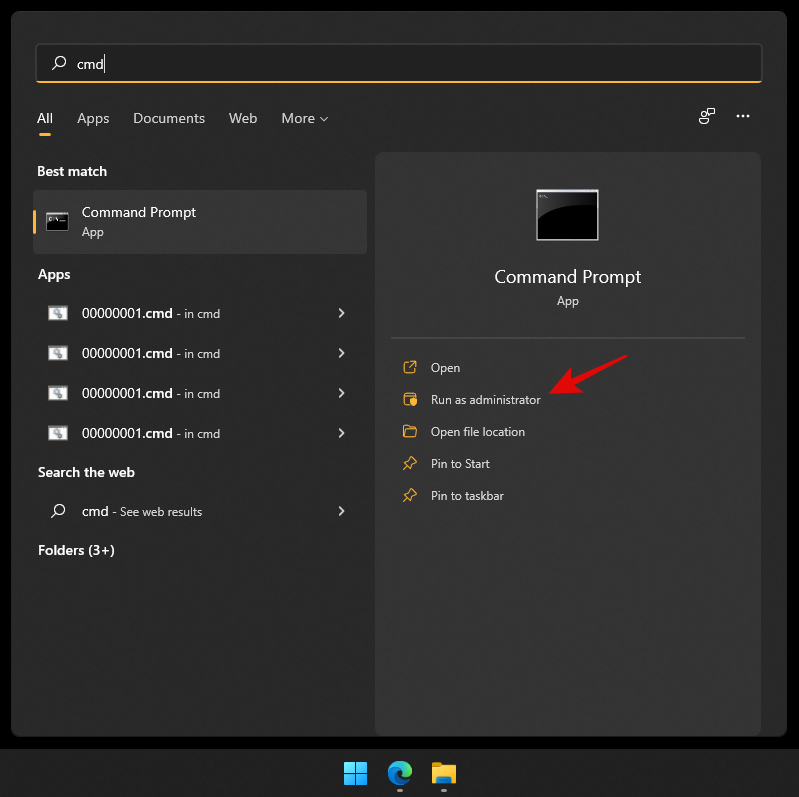
Type in the following command and press Enter on your PC.
sfc /scannow
Once the SFC scan completes, type in the following command and execute it.
DISM /Online /Cleanup-Image /RestoreHealth
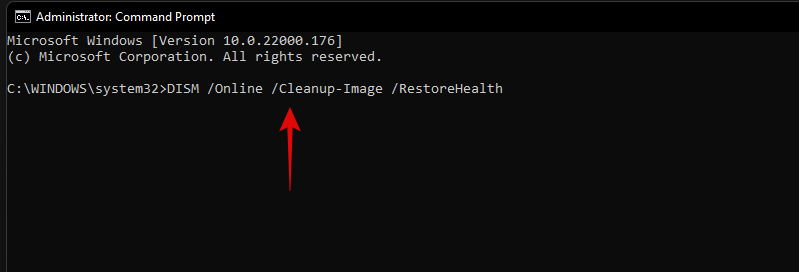
We recommend you restart your PC once the process completes.
Method #04: Last resort: Reset your PC
If nothing seems to be working for you then it might be time for a fresh installation of Windows 11 on your system. You can try getting in touch with your support team as well but if nothing works then a reset of your PC is the best option. In most cases, a reset while keeping your local files should help get Windows update working on your system.
Windows 11 connects to the update servers and updates your security definitions and drivers during OOBE. Windows will fix all update issues and reinstall necessary services on your system to get Windows update back up and running on your system during this process.
► You can use this dedicated guide from us to reset your Windows 11 PC.
We hope you were able to easily uninstall updates from your Windows 11 PC using the guide above. If you face any issues, feel free to drop a comment below.
Related:






![Як видалити McAfee в Windows 11 [5 способів] Як видалити McAfee в Windows 11 [5 способів]](https://blog.webtech360.com/resources8/images31/image-4917-0105182719945.png)

Serhiy Net -
ще один спосіб: через powershell команду Get-WindowsUpdate -KBArticleID KB1234567 | Uninstall-WUUpdate. доповнення до гайду 👍
Marichka_99 -
дякую! цей посібник врятував мій день. оновлення windows 11 було як вірус - видалив і свобода! рекомендую всім читати перед апдейтами
Olha Programmer -
у мене після оновлення windows 11 блобсфр не запустився. видалив за гайдом і все запрацювало. дякую! раджу всім хто має проблеми
Svitka -
повністю згоден. сам робив так і все ок. дякую!
Natalka -
а якщо оновлення не видаляється? пише помилку. що робити
Volodya UA -
поділюся цією статтею з друзями в чаті. всім хто на windows 11 треба знати про усунення несправностей
Oksana Kyiv -
супер стаття! дякую автору. саме те що треба для усунення несправностей після оновлення
Katya Dnipro -
спробував, видалив оновлення але тепер драйвери полетіли. що далі робити з усуненням несправностей
Larysa Zahid -
Після читання вашого гайду я успішно видалила оновлення, яке спричиняло краш браузера. Тепер комп'ютер працює стабільно, і я можу спокійно працювати. Додатково раджу всім встановити інструмент wushowhide.diagcab від MS для блокування конкретних KB. Це ідеальне доповнення до посібника, спасибі за натхнення на пошук
Viktor IT -
дякую за поради щодо усунення несправностей. без цього не обійтися з microsoft
Rostyk Kyiv -
круто! все просто і зрозуміло
Ivan Kot -
дякую за покроковий посібник! нарешті видалив це чортівське оновлення windows 11 яке все сповільнило. все спрацювало ідеально
Yulia Cat -
додайте будь ласка скріншоти до кроків. бо новачкам важко без картинок. стаття супер інакше
Bohdan -
відмінна робота автора! все чітко пояснено