Cando Windows 11 foi revelado ao mundo, Snap Layouts foi o primeiro que chamou a atención de todos. Eran innovadores, novos e realmente útiles cando se traballaba nun sistema Windows. Polo tanto, todo o mundo estivo agardando os Snap Layouts, pero un erro recente parece ter enturbiado a experiencia para todos.
Moitos usuarios informaron de falta ou redución da funcionalidade para Snap Layouts en Windows 11. Se enfrontou o mesmo problema, pode usar os seguintes métodos para solucionar este problema no seu sistema. Imos comezar.
Contidos
Por que Snap Layouts non funciona no meu PC?
Os Snap Layouts son unha función nova e, polo tanto, aínda está na súa infancia. Se enfrontou problemas, é probable que se deba a un valor de rexistro non coincidente en segundo plano ou a un servizo en segundo plano defectuoso. Tamén podes ter este problema debido a conflitos en segundo plano se tes outra aplicación de xestión de deseño instalada no teu sistema.
Isto inclúe os propios PowerToys de Microsoft que teñen o complemento FancyZones, moi parecido aos Snap Layouts en Windows 11. De calquera xeito, hai moitas formas de solucionar este problema e recomendámosche que comece coas que se mencionan a continuación.
Relacionado: Eliminar Bing de Windows 11
Como corrixir os deseños Snap en Windows 11
Recomendámosche primeiro que probes algunhas comprobacións iniciais para asegurarte de que un problema nominal non che impida acceder a Snap Layouts. Isto inclúe probar os atallos de teclado e comprobar o interruptor na aplicación Configuración. Se todo isto resulta ben, podes probar algunhas das outras correccións mencionadas a continuación. Imos comezar.
1. Proba cos atallos de teclado
Preme Windows + 'a direction key'no teu teclado cunha xanela activa no teu escritorio. Isto debería axudar a colocalo no lado dirixido da pantalla. Recomendámosche que probes isto nunha das aplicacións predeterminadas ou Microsoft Edge para asegurarte de que estás a usar unha aplicación compatible.
Se Snap Layouts funciona a través dos teus atallos pero non a través do botón de maximizar, é probable que teñas que reiniciar a túa GUI. Non obstante, se non recibe ningunha resposta na súa pantalla, recomendámoslle que siga a guía que aparece a continuación para asegurarse de que Snap Layouts estea activado no seu PC.
Relacionado: Como desinstalar actualizacións en Windows 11
2. Asegúrate de que os deseños instantáneos estean activados
Use a seguinte guía para activar Snap Layout no seu PC. Se non podes acceder á aplicación Configuración ou se os cambios non poden facerse efectivos a través da aplicación Configuración, podes usar o método do Editor do Rexistro a continuación para activar os deseños instantáneos no teu PC. Imos comezar.
Método #01: Habilita usando Configuración
Preme Windows + ino teu teclado e fai clic en "Multitarea".
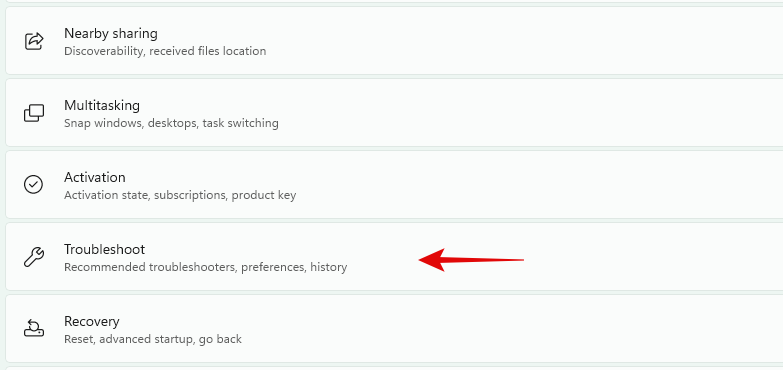
Activa o selector para "Snap Windows".
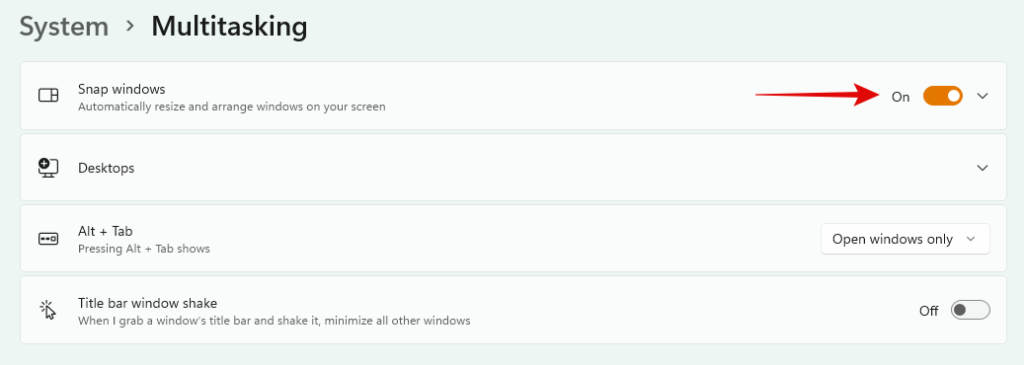
Fai clic de novo na mesma lista de Snap Layouts para ver máis opcións.
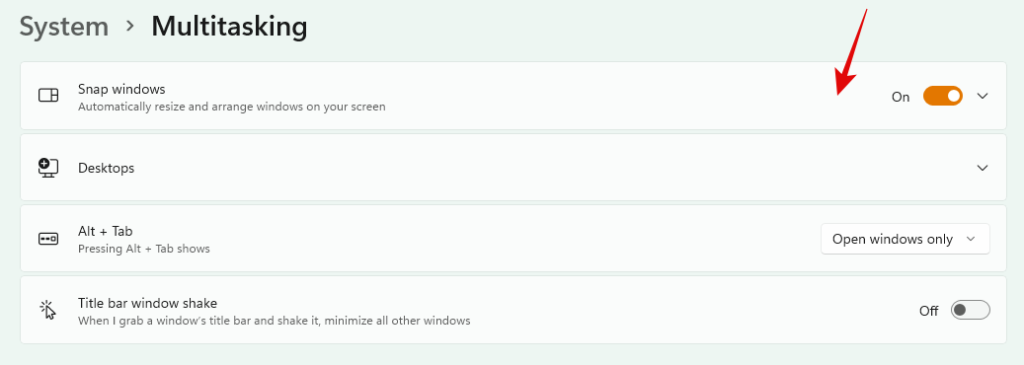
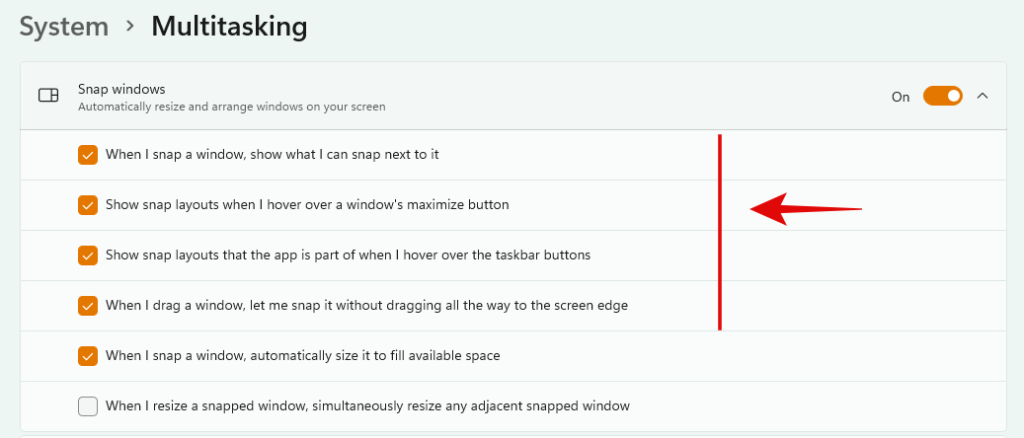
Ademais, recomendámosche que marque e active as seguintes opcións para a experiencia predeterminada de Snap Layouts. Tamén podes activar outras opcións na túa pantalla para unha experiencia máis mellorada, segundo o teu criterio.
- Cando abro unha xanela, móstrase o que podo facer a carón dela
- Mostrar deseños instantáneos cando pase o rato sobre o botón de maximizar dunha xanela
- Mostrar deseños instantáneos dos que forma parte a aplicación cando paso o rato sobre os botóns da barra de tarefas
- Cando arrastre unha xanela, déixame axustar sen arrastrala ata o bordo da pantalla
Reinicia o teu PC para unha boa medida.
E xa está! Agora debería estar activado Snap Layouts no teu PC.
Relacionado: Como desactivar os sons de alerta de Windows 11
Método #02: Habilita usando o Editor do Rexistro
Se non podes activar Snap Layouts desde a túa aplicación Configuración, podes usar o método do Editor do Rexistro que se indica a continuación.
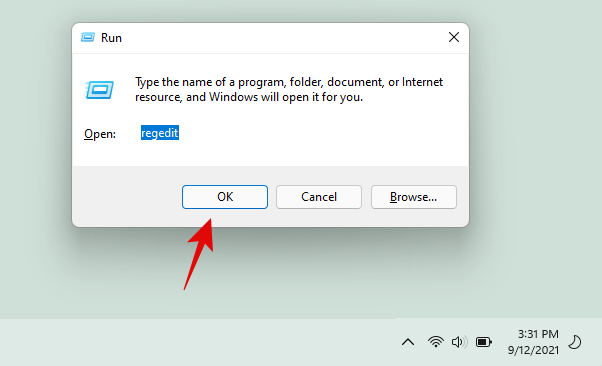
Preme Windows + Rno teu teclado para abrir o cadro de diálogo Executar e escribe o seguinte termo. Preme Intro no teu teclado unha vez que remates.
regedit
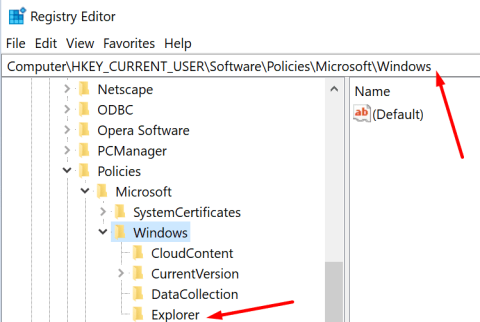
Navega ata o seguinte directorio na aplicación agora. Tamén pode copiar e pegar o mesmo na súa barra de enderezos na parte superior.
Computer\HKEY_CURRENT_USER\Software\Microsoft\Windows\CurrentVersion\Explorer\Advanced
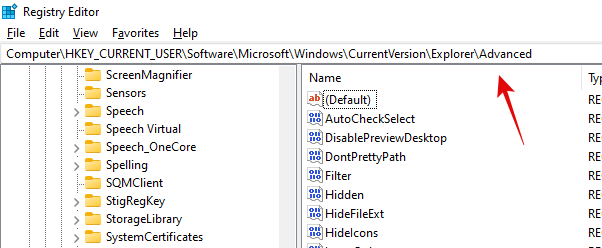
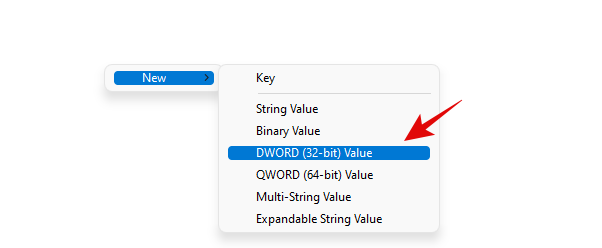
Busca un valor chamado "EnableSnapAssistFlyout" á túa dereita. Se non existe, fai clic co botón dereito do rato á túa dereita e selecciona "Novo".
Seleccione "Valor DWORD (32 bits)".
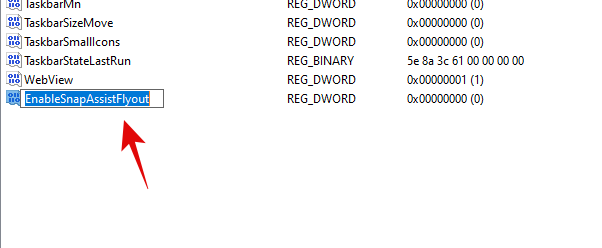
Introduce "EnableSnapAssistFlyout" como nome e preme Intro no teu teclado.
Fai dobre clic e abre o valor que acabas de crear.
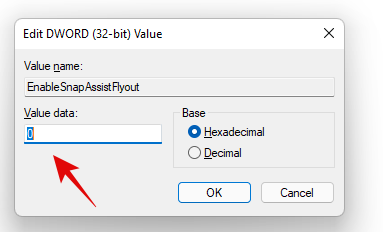
Establece os seus "Datos de valor" en "1".
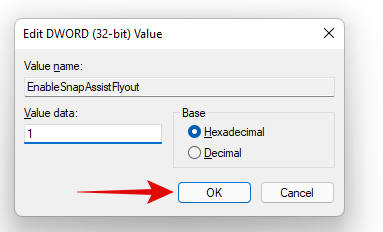
Fai clic en "Aceptar" para gardar os teus cambios.
E xa está! Podes reiniciar o teu PC para boa medida e Snap Layouts agora debería estar activado no teu sistema.
3. Check your system requirements
The race to get Windows 11 is in its prime and everyone seems to be rushing to install the new OS on their system. While Windows 11 requires Secure Boot and TPM 2.0, there are many ways to install it on an incompatible system using a few tricks.
Many users have opted for the same but one of the downsides of installing on an incompatible system is losing out on features like Snap Layouts. Here are Windows 11’s minimum system requirements and if you are losing out on performance, then it might be the reason Snap Layouts are unavailable to you.
- Processor: 1GHz or faster 2 Core 64-bit processor or an equivalent SOC.
- RAM: 4GB or more (6GB or more for Windows 11 Pro and Enterprise editions.)
- Storage: 64GB or more.
- Secure Boot: Required
- UEFI: Required
- TPM: Required (2.0)
- Graphics: DX12 or later, WDDM 2.0 or later
- Display: Minimum 720p display that is at least 9″ in size (diagonally) with a minimum color depth of 8-bits.
4. If you only get 4 layout options
If you’re only getting 4 layout options on your desktop or only two on your tablet then this is known behavior. You are currently limited by either your screen resolution or your current app. You can find your issue by switching between different apps and trying to get a different sized layout.
If you manage to get one, then it is likely that the app that you were using earlier wasn’t compatible with Snap Layouts. On the other hand, if you seem limited to only 4 layout options, then it is likely due to your screen size. You can try using a higher resolution on your display if possible, or upgrading your display if you intend.
5. Remove any third-party apps with similar functionality
If you were using any third-party apps to manage your layout on Windows 10 then you are likely facing a background conflict due to the same. This includes apps like PowerToys, Divvy, AquaSnap, MaxTo, Display Fusion, and more. You can try updating the app to its latest version to see if the conflict is fixed on your system.
If however, the latest update isn’t compatible with Windows 11 then you will have to uninstall the app from your system. Unfortunately, until the app is updated by the developer to be compatible with Windows 11 there is no workaround to get it working on your system with Snap Layouts.
6. If Snap Layouts don’t work with Firefox
If Snap Layouts aren’t working with Firefox then don’t fret, this is a known issue encountered by most Firefox users. Firefox users need to disable the current title bar used by Firefox to make it compatible with Snap Layouts. Follow the guide below to get you started.
Open Firefox and right-click in your toolbar. Now select ‘Customize Toolbar’.
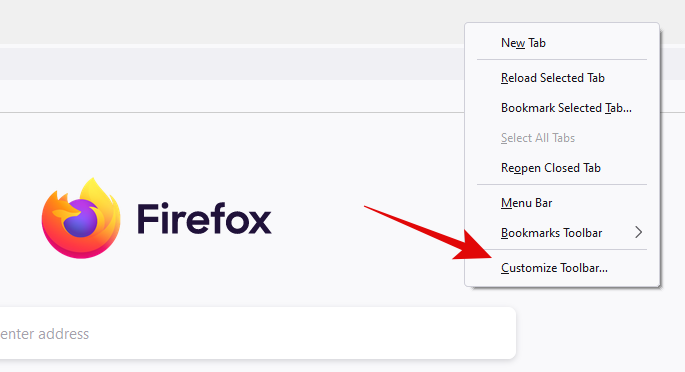
Check the box for ‘Title bar’ in the customization section now open on your screen.
Restart Firefox.
And that’s it! Snap Layouts should now be enabled within Firefox on your PC. If however, Snap Layouts fail to work then you can use the following checks to ensure that everything is working properly on your system.
7. Ensure that your app is compatible with Snap Layouts
While technical documentations glance over this fact, you indeed need a compatible app within Windows 11 for it to work with Snap Layouts on your system. Windows do not specify the exact app specifications needed but eagle-eyed users have been able to find that apps that use their own Control box within Windows aren’t compatible with Snap Layouts.
The app essentially has its own container that manages its window sizes, resizing, and more. This way the app can ensure an optimum experience for you without allowing you to make the app too small or big on your screen.
This is especially the case with apps like Spotify, iTunes, and more where you would be unable to use Snap Layouts due to their own specific control boxes.
8. Having troubles on touchscreen?
If you have a touchscreen device then you are likely facing issues with Snap Layouts due to the same. Windows 11 is still in its infancy and Microsoft is doing its best to accommodate all devices before a final release. The functionality of Snap Layouts seems to be a hit and miss on touchscreens for now.
However, if you aren’t having problems activating Snap Layout but rather with its actual layout then this issue might be more specific to your device. Windows 11 doesn’t support Snap Layouts on screen size less than 9″. If you have a device with a smaller screen then it is likely the reason why you don’t have access to Snap Layouts. Additionally, if you seem limited to only 2 Layouts then this too is a limitation of screen size. This is the minimum number of allowed Layouts on the smallest screen supported by Windows 11.
9. How to use Snap Layouts
Snap Layouts can be used in many ways depending on your current needs and requirements. You can customize their behavior according to your needs and then activate them using one of the methods mentioned below.
- Keyboard Shortcut: Press the Windows key + any direction key to snap the current window in the same direction. You can use this in conjunction with the Alt+Tab shortcut to easily manage and multitask between different windows.
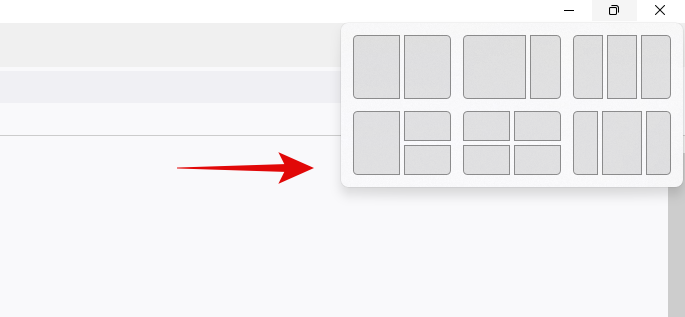
- Maximize button: Hover over the maximize button of any window to view its available Snap Layouts. Select the layout you wish to use by clicking on it and the current window will be automatically snapped to the desired location.
Additionally, you can also use the guide below to customize your Snap Layouts behavior on your PC. This way Snap windows will limit or enhance their behavior based on your actions while multitasking.
10. Customize Snap Layout’s behavior
You can use the steps below to customize how, when, and where your windows will snap. Follow the steps to get you started.
Press Windows + i on your keyboard and click on ‘Multitasking’ on your right.
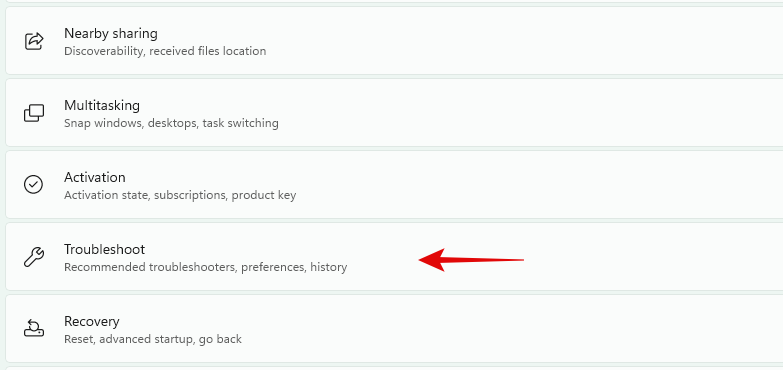
Now ensure that the toggle for ‘Snap windows’ is enabled on the top.

Click on the same listing to view more options.

Enable or disable one of the following options depending on how you wish to customize your Snap Layouts.
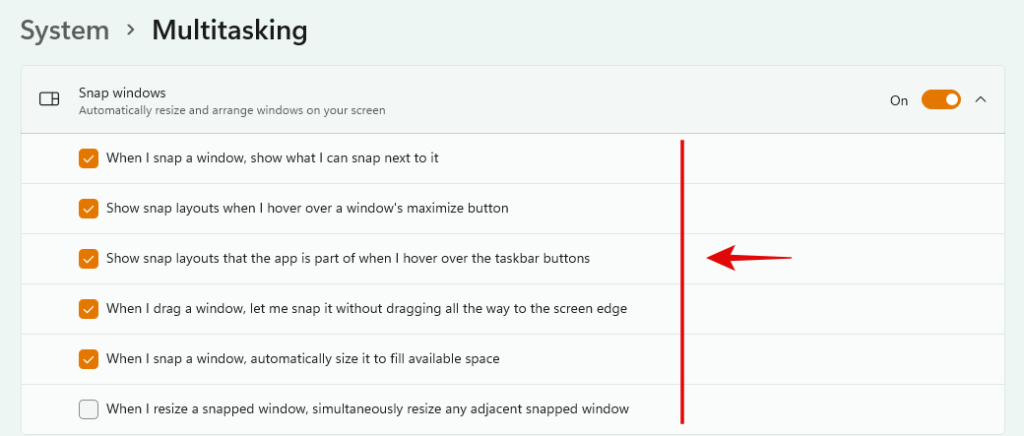
- When I snap a window, show what I can snap next to it
- Show Snap Layouts when I hover over a window’s maximize button
- Show Snap Layouts that the app is part of when I hover over the taskbar buttons
- When I drag a window, let me snap it without dragging it all the way to the screen edge
- When I snap a window, automatically size it to fill available space
- When I resize a snapped window, simultaneously resize any adjacent snapped window
We hope you were able to easily fix your Snap Layouts using the guide above. If you face any issues or have any more questions for us, feel free to reach out using the comments section below.
Related:







![Como corrixir o erro da pantalla verde de Windows 11 [8 xeitos] Como corrixir o erro da pantalla verde de Windows 11 [8 xeitos]](https://blog.webtech360.com/resources8/images31/image-5564-0105182715287.png)
![[Actualización: 8 de novembro] A ferramenta de recorte non funciona en Windows 11? Como solucionar problemas de erro ou atallos de Esta aplicación non se pode abrir. [Actualización: 8 de novembro] A ferramenta de recorte non funciona en Windows 11? Como solucionar problemas de erro ou atallos de Esta aplicación non se pode abrir.](https://blog.webtech360.com/resources8/images31/image-6552-0105182756436.jpg)
