Durante anos, Windows foi promocionando a súa serie de novas funcións e melloras afirmando que están a só un clic do menú Inicio. Pero que pasa se o menú Inicio deixa de abrirse? Pois ben, pode ocorrer que o menú Inicio de Windows 11 deixe de funcionar de súpeto para ti, polo que facer tarefas habituais sexa un pouco difícil.
Se o menú Inicio non se abre para ti en Windows 11, hai tantas correccións como se nos ocorre para axudarche a resolver o problema .
Relacionado: Como desinstalar aplicacións en Windows 11
NOTA: Se as 17 (!) correccións habituais que se indican a continuación fallan, proba a corrección #18 que se indica a continuación na sección "Últimos recursos", que fala sobre a creación dun novo usuario mediante a liña de comandos . Isto axúdache a crear un novo usuario mediante CMD, sen ter que acceder á aplicación Configuración ou ao menú Inicio, que quizais non che funcionen. Dito isto, a corrección número 1 sobre o problema causado por "Windows Update KB5004300" é unha nova adición, polo que quizais comprobe isto primeiro.
Contidos
Incluímos un total de 20 (!) correccións para resolver o problema co menú Inicio en Windows 11 a continuación. 3 delas son correccións xerais que só se deben probar despois de estar seguro de que as 17 correccións primarias non son de axuda.
17 Correccións primarias
Proba estas correccións primeiro antes de probar as 3 correccións xerais (tamén se indican a continuación).
Solución n.º 1: desinstale e reinstale a actualización de Windows KB5004300
Unha corrección recente descuberta por usuarios con ollos de aguia parece arranxar facilmente o menú de inicio nas novas actualizacións de Windows 11. A actualización de Windows publicada co nome KB5004300 parece estar causando este problema. Se desinstalas e reinstalas o mesmo no teu PC, solucionarás o menú Inicio e a barra de tarefas. Siga a guía a continuación para comezar.
Preme Windows + ino teu teclado para abrir a aplicación Configuración. Fai clic en "Windows Update" á túa esquerda.
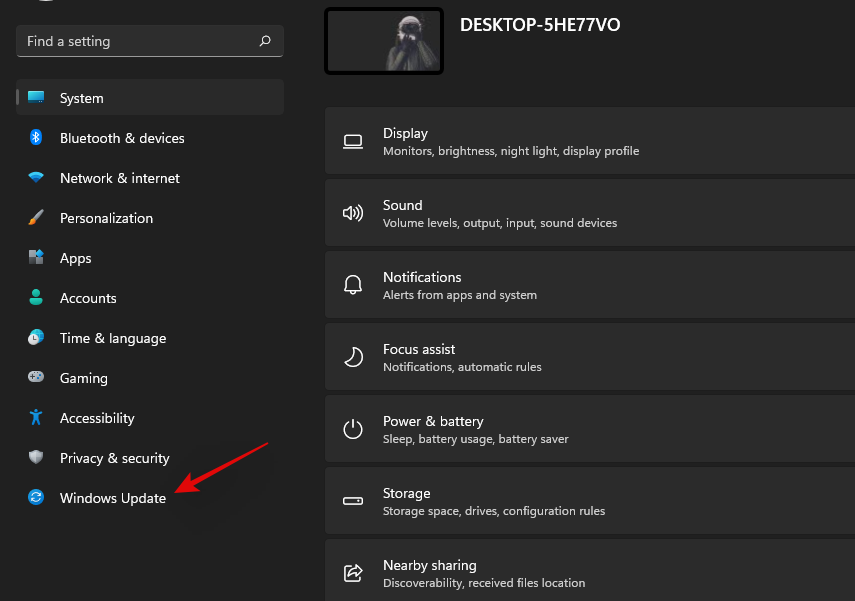
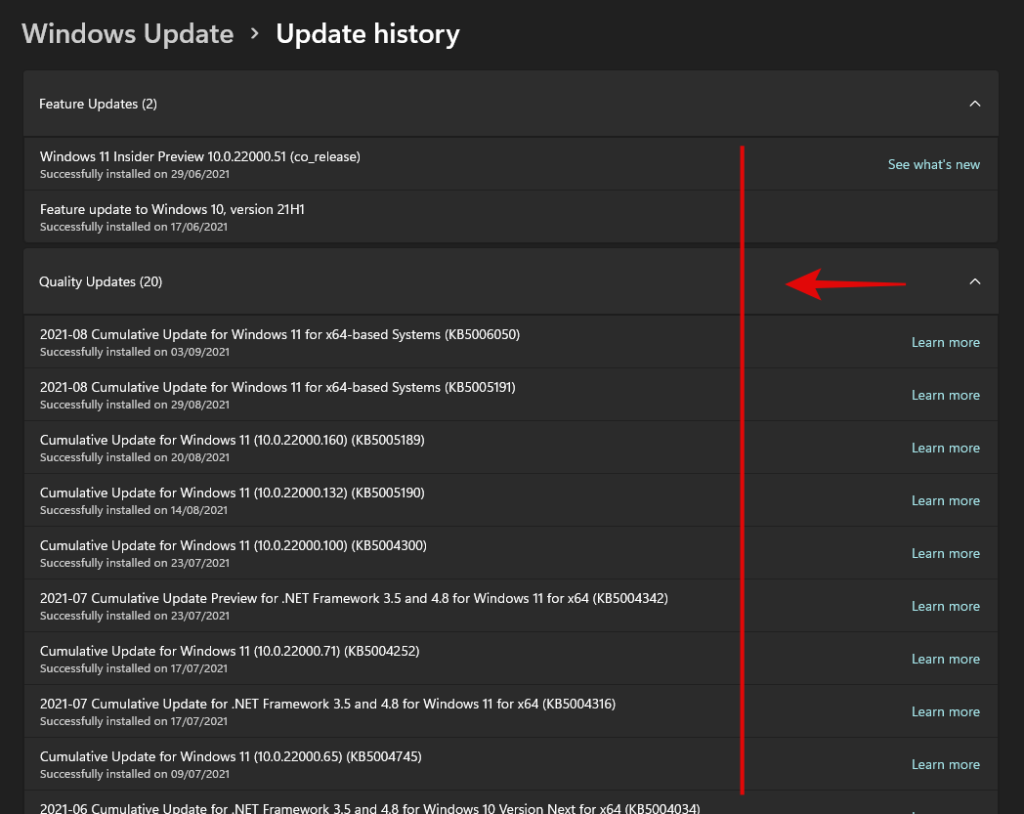
Agora fai clic en "Actualizar historial".
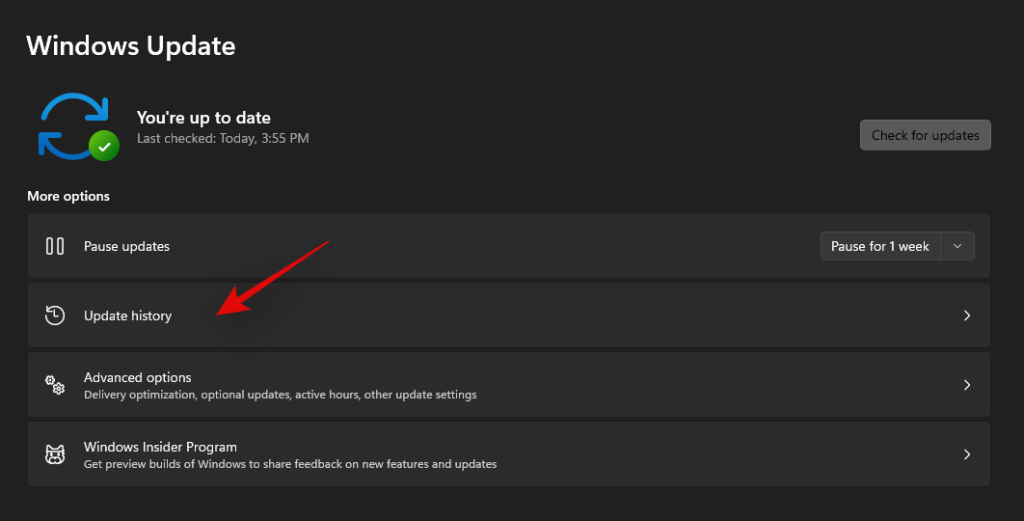
Fai clic en "Desinstalar actualizacións".
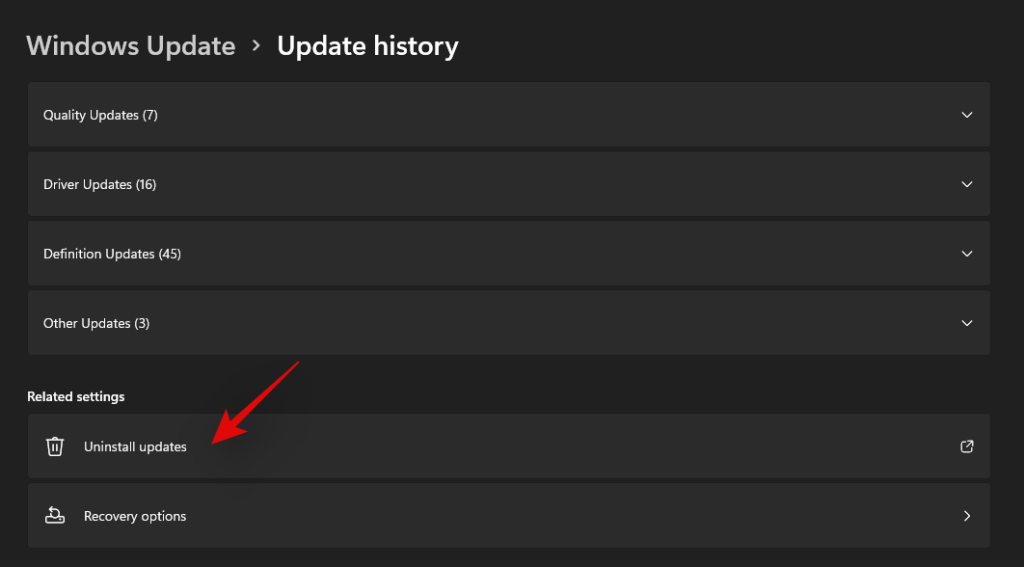
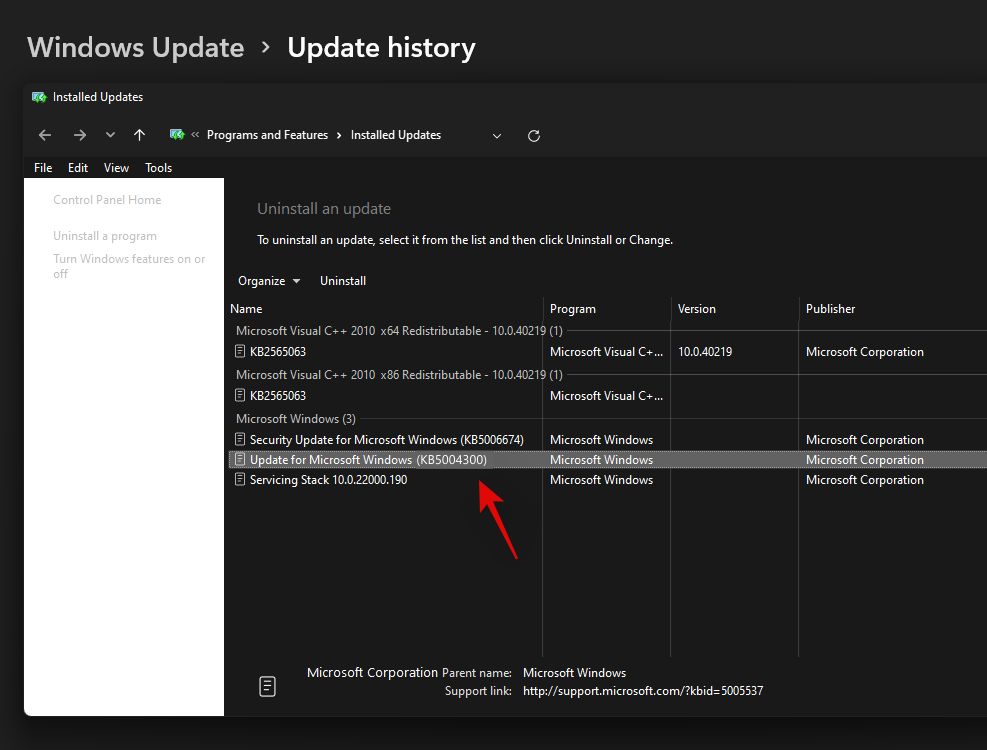
Agora será redirixido ao Centro de control. Busca a actualización KB5004300 en cuestión na lista e fai clic e selecciónaa.
Agora fai clic en "Desinstalar" na parte superior.
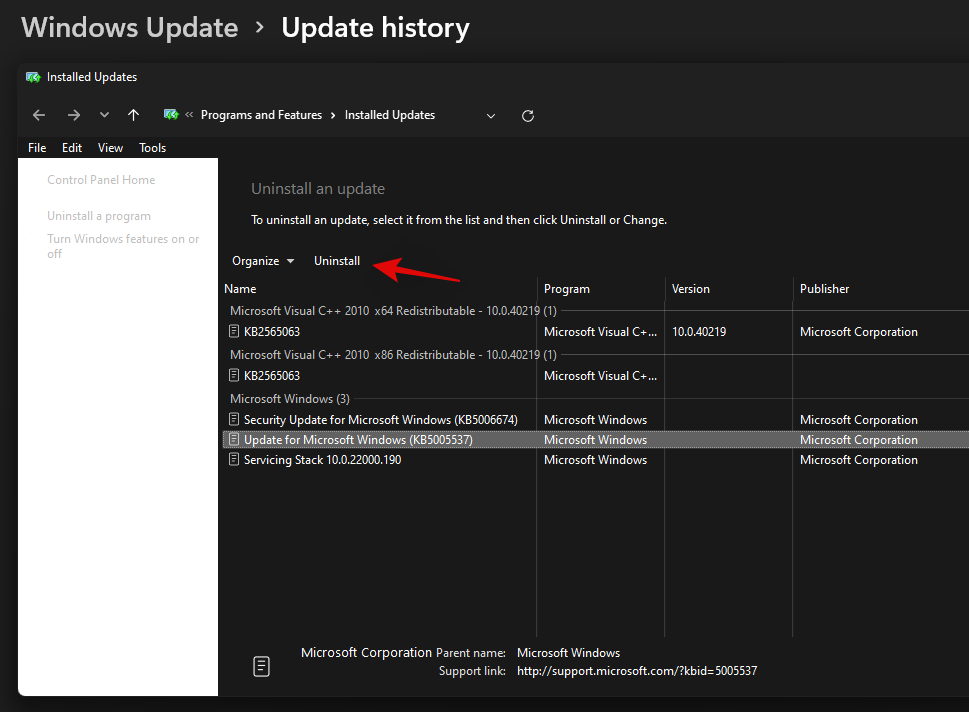
Siga as instrucións en pantalla para eliminar a actualización do seu PC. Unha vez actualizado, reinicia o teu PC para boa medida.
Agora preme de Windows + inovo unha vez que o teu PC se reinicie e selecciona Windows Update de novo.

Comproba se hai actualizacións e agora deberías ter a opción de instalar Windows Update KB 5004300 no teu PC de novo.
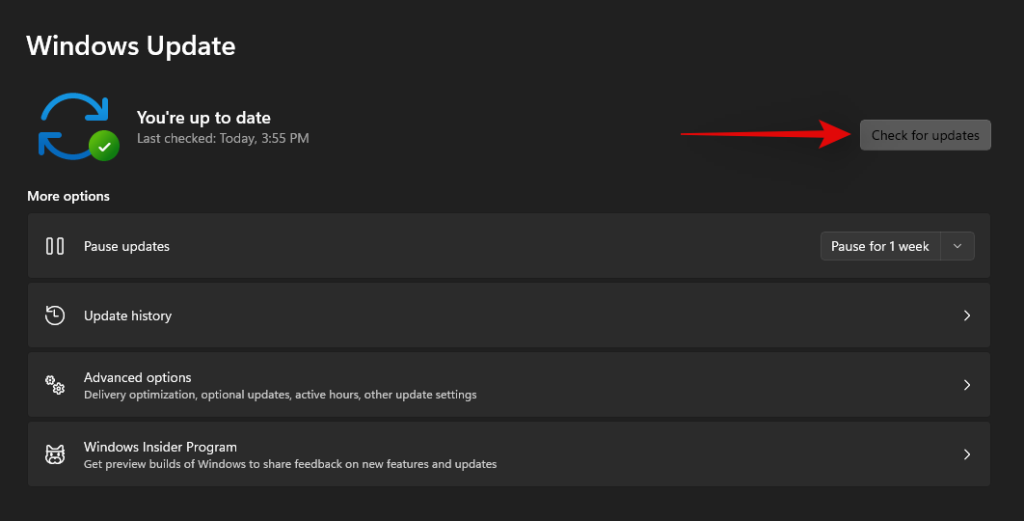
Descargue e instale a actualización e as funcións da barra de tarefas e do menú Inicio deberían restaurarse agora en Windows 11.
Corrección n.º 2: forzar o reinicio do servizo Iris
Unha actualización recente das compilacións internas de Microsoft causou importantes problemas coa barra de tarefas e o menú Inicio para moitos usuarios. Se tamén estás subscrito á canle Insider e tes problemas ao actualizar ao número de compilación 22449 ou superior, podes usar a corrección que se menciona a continuación.
Este método eliminará o valor de rexistro para o servizo Iris, que debería obrigar a reinstalalo ao reiniciar. Unha reinstalación parece axudar a solucionar este problema para a maioría dos usuarios. Aínda que non teñas as mesmas versións, paga a pena probar esta solución. Siga a guía a continuación para comezar.
Nota: este comando reiniciará inmediatamente o teu PC. Se tes algún traballo en curso en segundo plano, asegúrate de gardalo antes de continuar con esta guía.
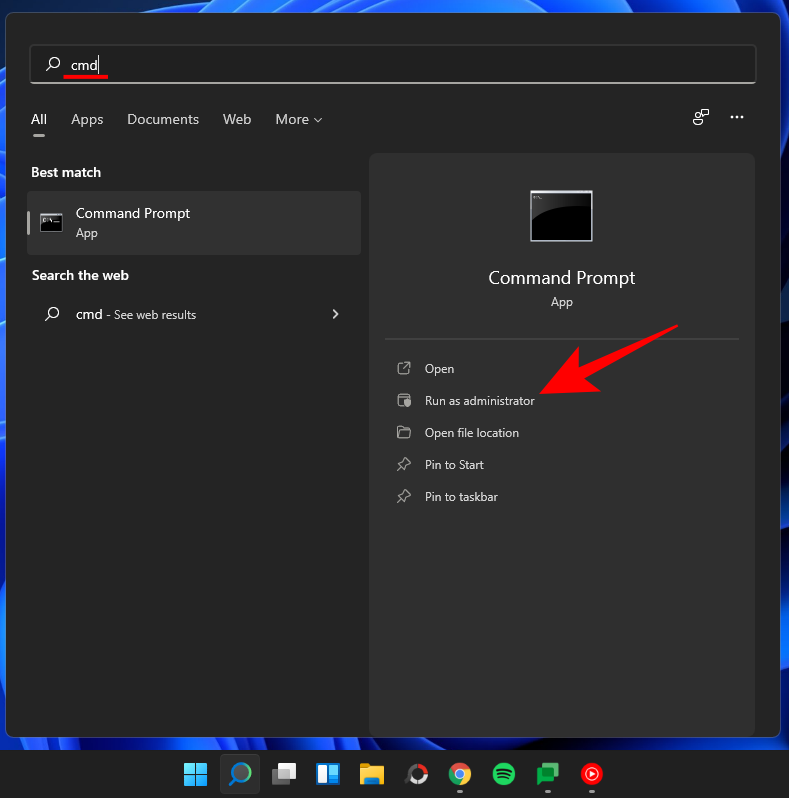
Preme Windows + S no teu teclado e busca CMD. Fai clic en "Executar como administrador" ou preme Ctrl + Shift + Enter no teu teclado.
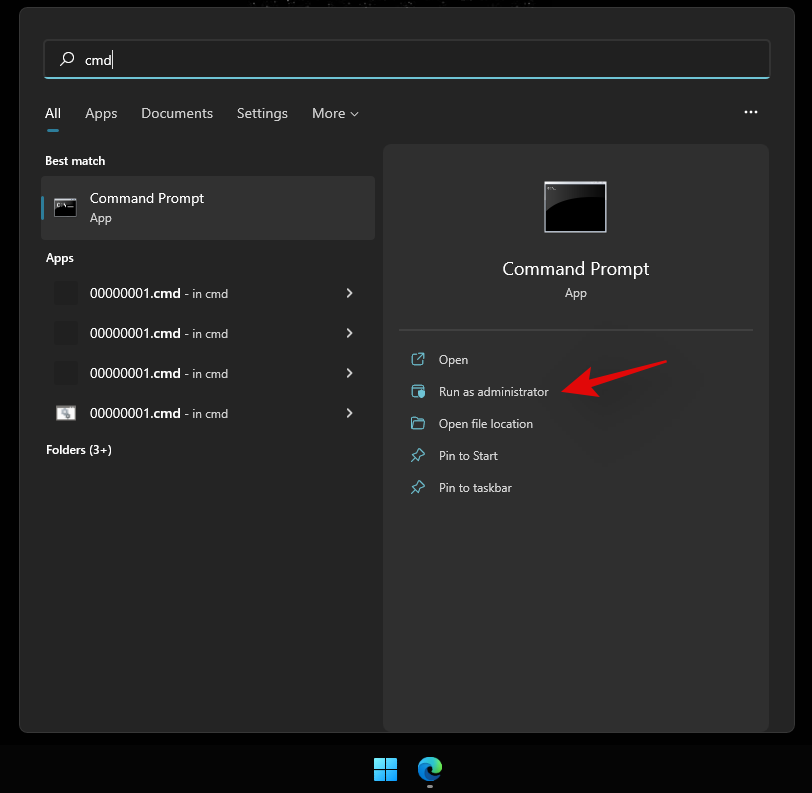
Introduza o seguinte comando e prema Intro no seu teclado.
reg delete HKCU\SOFTWARE\Microsoft\Windows\CurrentVersion\IrisService /f && shutdown -r -t 0

Agora o teu PC reiniciarase. Inicie sesión no seu PC como de costume e agora debería restaurarse a funcionalidade do menú Inicio no seu sistema.
Solución n.° 3: reinicia o teu PC
Este é, de lonxe, o método máis sinxelo que se me ocorre ao tentar solucionar a maioría dos problemas nun PC con Windows 11. Normalmente, cando reinicias o sistema, obrigas esencialmente a que todos os procesos, incluído Windows, reinicien todos os seus servizos e procesos. Isto tamén reinicia o proceso do menú Inicio que axudará a solucionar o problema con el.
Se non é obvio, aquí tes os pasos para reiniciar o teu PC.
Asegúrate de que todas as túas aplicacións e ficheiros estean pechados. Ou simplemente vai á pantalla do Escritorio premendo Windows key + D xuntos. Agora, preme as Alt + F4 teclas xuntas do teu teclado para ver a pantalla "Apagar Windows".
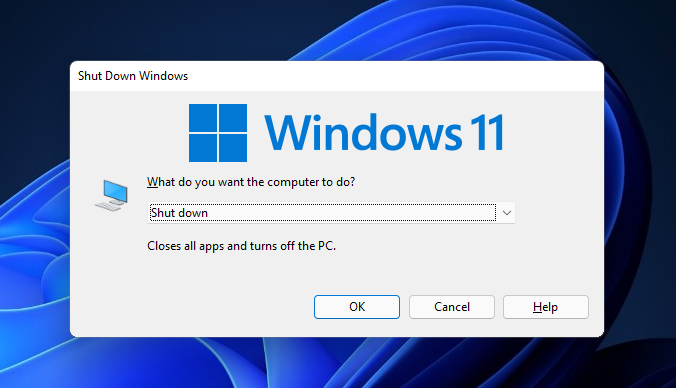
Fai clic no menú despregable, selecciona "Reiniciar" e prema o botón "Aceptar".
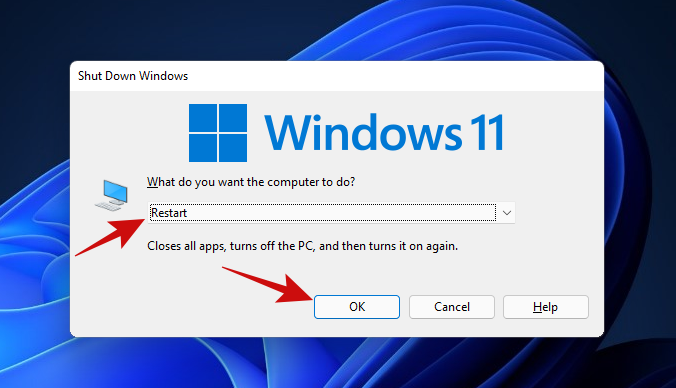
Unha vez que se reinicie o PC, deberías poder volver a utilizar o menú Inicio. Se aínda non podes, proba o seguinte método.
Solución n.° 4: reinicie o Explorador de Windows usando o Xestor de tarefas
A seguinte solución sinxela para un menú Inicio conxelado usa o Xestor de tarefas. O Xestor de tarefas pode ser a ferramenta perfecta para xestionar calquera proceso en execución nun PC con Windows.
Se tes un menú Inicio que non quere responder aos teus clics, sigue os pasos que se indican a continuación para ver se soluciona o teu problema.
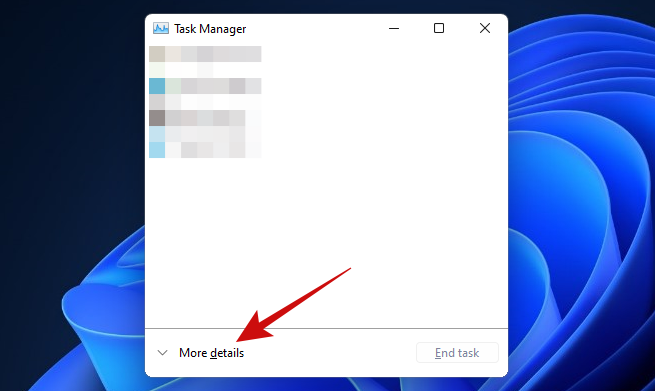
Preme as Ctrl + Shift + Esc teclas para activar o Xestor de tarefas. Se o teu Xestor de tarefas ten este aspecto, fai clic no botón "Máis detalles" para acceder á vista detallada.
Unha vez dentro do Xestor de tarefas, desprácese pola lista de Procesos para atopar o proceso "Explorador de Windows". Fai clic co botón dereito sobre o proceso e fai clic na opción "Reiniciar".
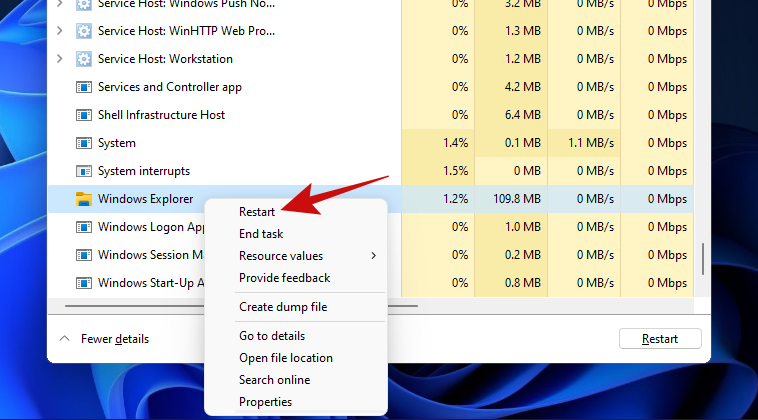
Unha vez que se fai clic, Windows debería reiniciar o proceso do Explorador de Windows nun instante e iso debería arranxar o menú de inicio.
Reiniciar o proceso do Explorador de Windows é bastante similar a reiniciar o teu PC. A única diferenza é que aquí só está a reiniciar un único proceso, mentres que, cun reinicio, reinicia todos os procesos. Ademais, moitas persoas no pasado tiveron éxito arranxando o seu menú Inicio con este método, o que fai que valga a pena probalo.
Solución n.º 5: comprobe as actualizacións de Windows
If you still can’t get the Start menu to open, you should give Windows Update a try. The problem may be more widespread than you think and Microsoft may have released a hotfix to patch the unresponsive Start menu.
Here’s how you can do that.
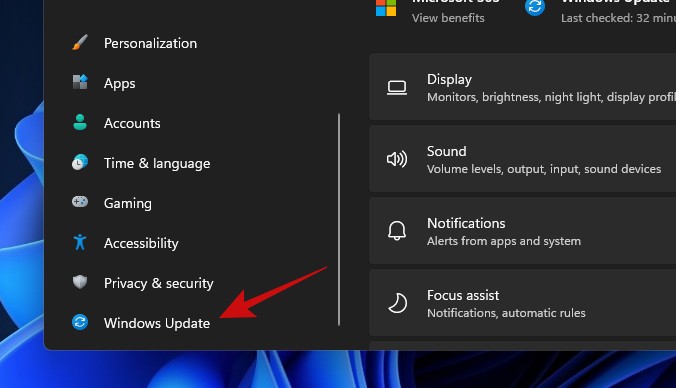
Open the Settings app with Win key + i keys together. Once opened, click on the ‘Windows Update’ option.
Click on the big ‘Check for updates’ button to start checking for any available updates to Windows for your PC. If available, let Windows install all the updates.
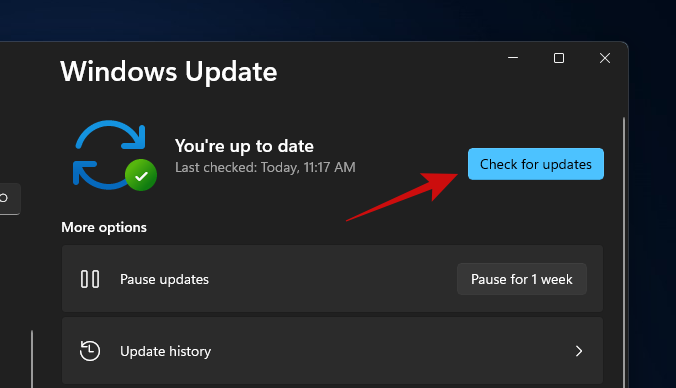
When Windows is done updating your PC, simply give it a restart and try opening the Start menu. If you still can’t open the Start menu, we think it’s time to go for the more advanced fixes.
Fix #6: Run DISM and SFC
DISM (Deployment Image Servicing and Management) and SFC (System File Checker) are two of the most potent tools for identifying and repairing corrupt Windows installations. These tools can be used with either Command Prompt or Windows PowerShell. For this guide, we’ll be using them with Command Prompt.
Let’s start with DISM. DISM can be used to grab fresh copies of corrupted Windows files.
Press Win key + r to open the Run box, type in cmd and then press Ctrl + Shift + Enter together (instead of pressing enter) to open an elevated Command Prompt.
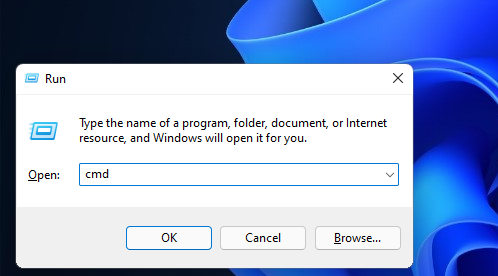
Once you’re inside Command Prompt, paste the below code and hit enter.
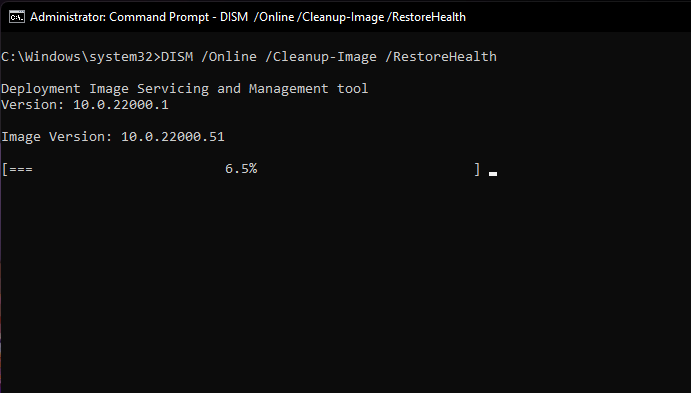
DISM /Online /Cleanup-Image /RestoreHealth
DISM will now try to restore the corrupted files (if any) from your current installation by requesting a fresh copy of that file from Windows update. The entire process will take some ~15-20 minutes. Here’s how the command looks in action.
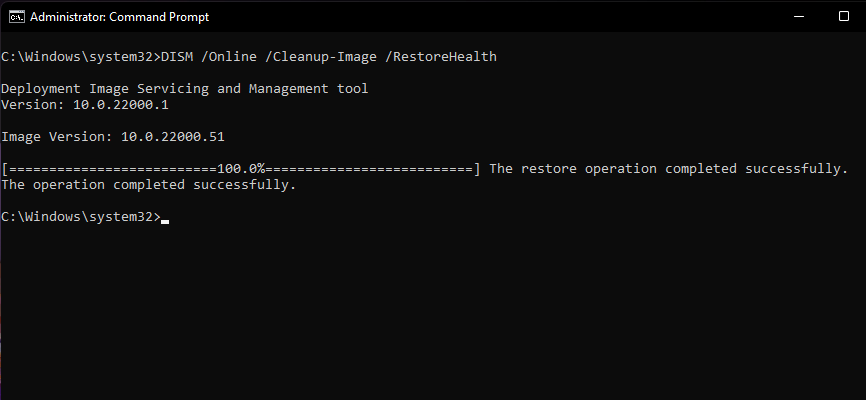
Once the command has restored all the damaged files, you should see something like this.
Once you’re done with this step, keep the Command Prompt window open to run the next command.
The next step is to verify the integrity of all your Windows 11 files to make sure they’re in good shape. For this, we’ll use the SFC tool.
Here’s how.
Paste the below code in the Command Prompt window, and hit enter.
sfc /scannow
Here’s how the command looks like.
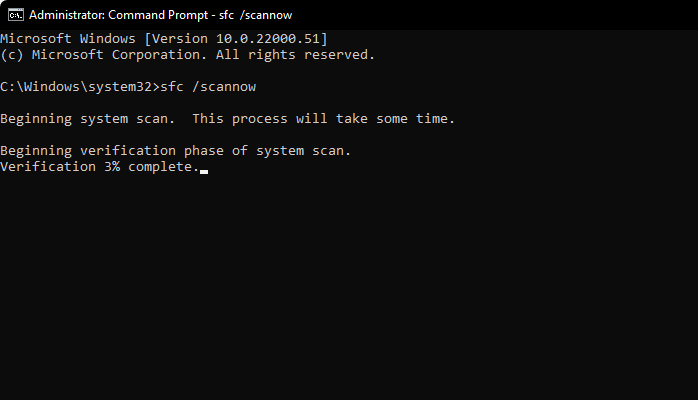
The above command will only take a couple of minutes to finish scanning the integrity of your Windows files. Once done, the result should look like this.
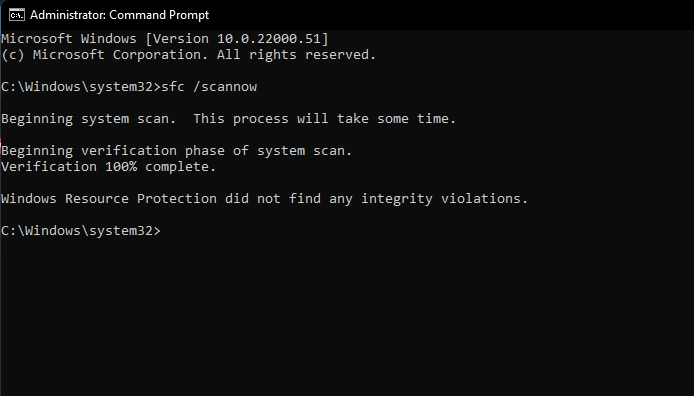
Tip: Make sure your PC has a stable internet connection for this method to work.
It’s now time for a reboot.
Still stuck with a broken Start menu, it’s time to try the next method.
Related: 6 Ways to Update Drivers on Windows 11
Fix #7: Rebuild Search Index
The Start menu and Windows Search are closely integrated. Issues with search and indexing may have crept into the Start menu and affected it. So, let’s rule out this possibility as well.
Let’s take a look at the steps to do it.
Open the Run box by pressing Win key + r. Then paste the below text in the Run box and hit enter.
control /name Microsoft.IndexingOptions
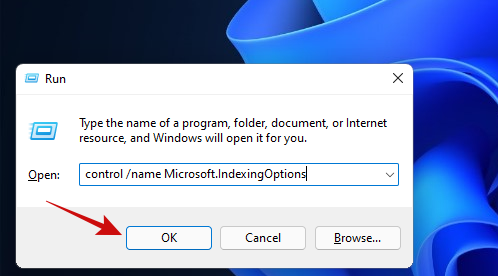
You should see a popup titled ‘Indexing Options’ open up. Click on the ‘Modify’ button.
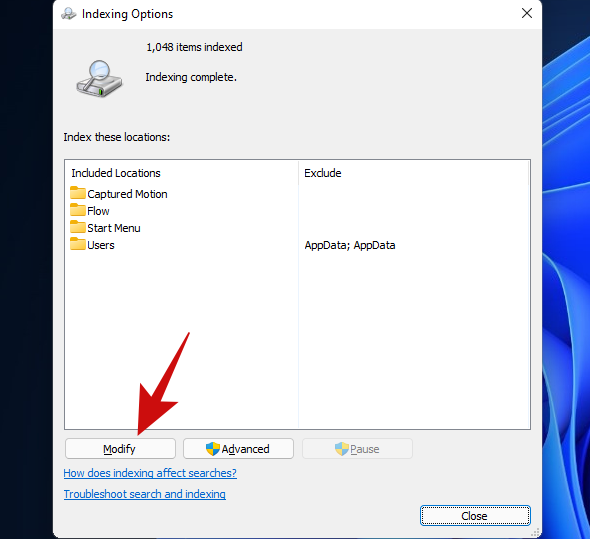
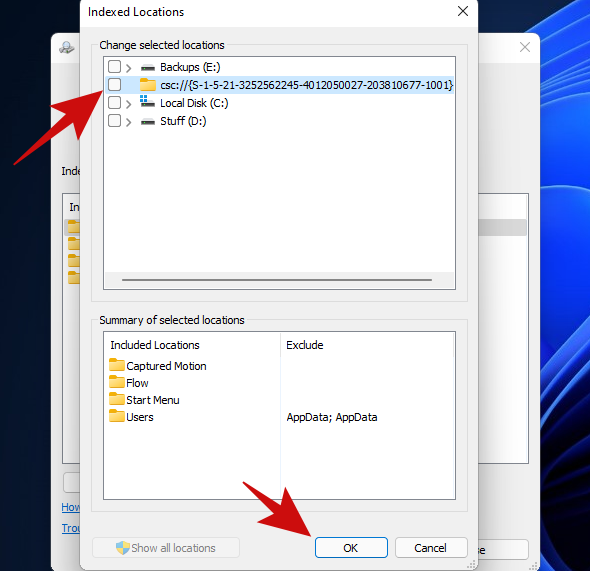
Click on the ‘Show all locations’ button.
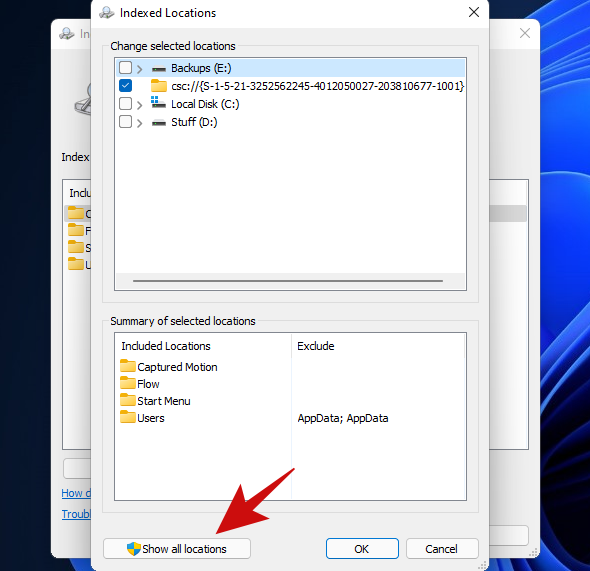
On this screen, uncheck all the locations and click on the ‘OK’ button. Ours had only one location ticked, so we unticked just one location on this list.
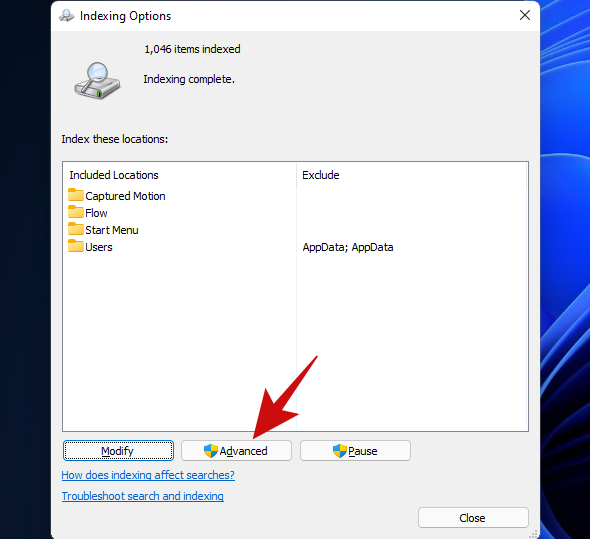
Click on the ‘Advanced’ button.
Click on the ‘Rebuild’ button.
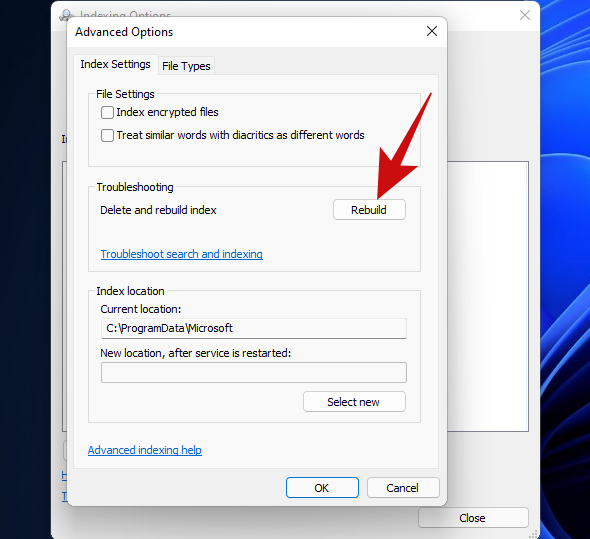
Windows will now start rebuilding the Search Index. Rest assured, the entire process will now be handled by Windows and doesn’t really require any user input, although it does take quite a bit of time to complete.
When Windows has rebuilt your Search Index, restart your PC. Once you’re inside Windows again, try opening the Start menu. If it still doesn’t work, we think it’s time to opt for a more resilient method.
If you have installed any third-party programs to modify the look or functions of your start menu then we recommend removing all such programs. Likely, one of these programs is not compatible with the new Windows 11 start menu which is why you are facing issues with your system. If you have one of the following apps mentioned below, then we recommend you revert their settings and uninstall them as soon as possible. Most of these apps were designed for Windows 10 and are incompatible with the Windows 11 Start menu code to a certain extent. A recent Windows 11 update likely broke their compatibility causing the start menu to glitch out on your system.
- Open Shell
- Classic Start
- WinAero Tasbar
- TaskbarX
And more. If removing a third-party app that modifies your start menu helps restore its functionality then you can wait for a compatible update to use the app again.
Did you use a registry hack to get the older Windows 10 start menu on Windows 11? If so then it is likely that this registry hack’s functionality broke with a recent Windows 11 update. In such cases, you can use the guide below to revert the changes on your system.
Press Windows + R on your keyboard and type in the following in the Run dialog box.
regedit

Press Enter on your keyboard once you are done to launch the registry editor. You can also click on ‘Ok’ instead.
Now copy and paste the address given below in the address bar at the top of the registry editor and press ‘Enter’ on your keyboard.
Computer\HKEY_CURRENT_USER\Software\Microsoft\Windows\CurrentVersion\Explorer\Advanced
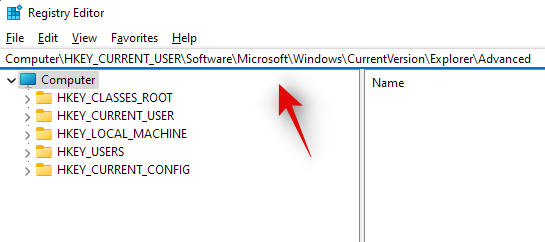
Look for ‘Show_StartClassicMode’ on your right and right-click on it.

Select ‘Modify’.

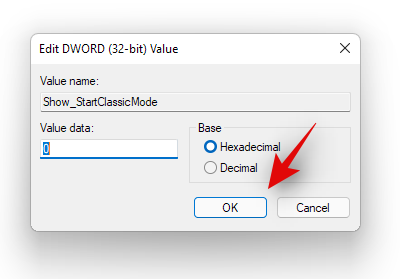
Change its value data to ‘0’ and click on ‘Ok’. Do not close the registry editor just yet.
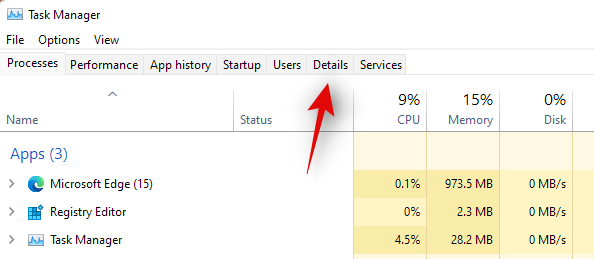
Press Ctrl + Shift + Esc on your keyboard to launch the Task Manager. Now click and switch to the ‘Details’ tab at the top.
Click and select Explorrer.exe from the list and press Delete on your keyboard.

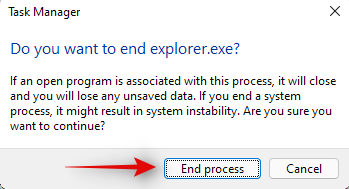
Confirm your choice by clicking on ‘End Process’.
Now click on ‘File’ in the top left corner and select ‘Run new task’.
Type in ‘Explorer.exe’ and press Enter on your keyboard. You can also click on ‘Ok’ instead.
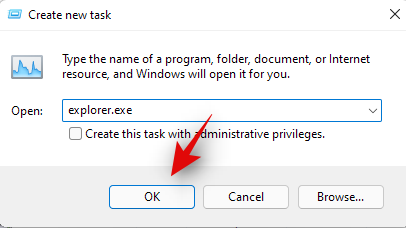
Explorer will now be restarted on your system. Switch back to the registry editor and click and select ‘Start_ShowClassicMode’.
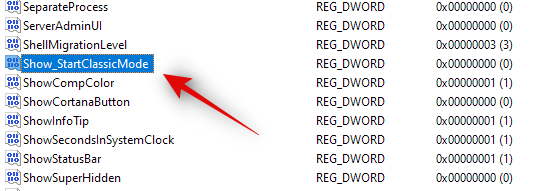
Press Delete on your keyboard and confirm your choice to delete the registry value.

Restart your system for good measure now.
If your Start menu wasn’t working due to a registry hack to get the older start menu then it should be fixed by now. You can check for the same by clicking on the Start menu icon in your taskbar.
Windows 11 has come a long way when compared to its predecessors. Background processes, tasks, and apps are more streamlined now and various features and elements seem to have their own dedicated packages. These dedicated packages make it easier for you to troubleshoot problems with certain features of Windows and even reinstall them in worst-case scenarios. If the start menu is still not working for you then you can reinstall basic elements of Windows 11 which will also reinstall the Start menu module on your system. This should help fix any background conflicts and get the Start menu back up and running on your system. Follow the guide below to get you started.
Press Windows + S on your keyboard and search for PowerShell. Click on ‘Run as administrator’ once the app shows up in your search results.
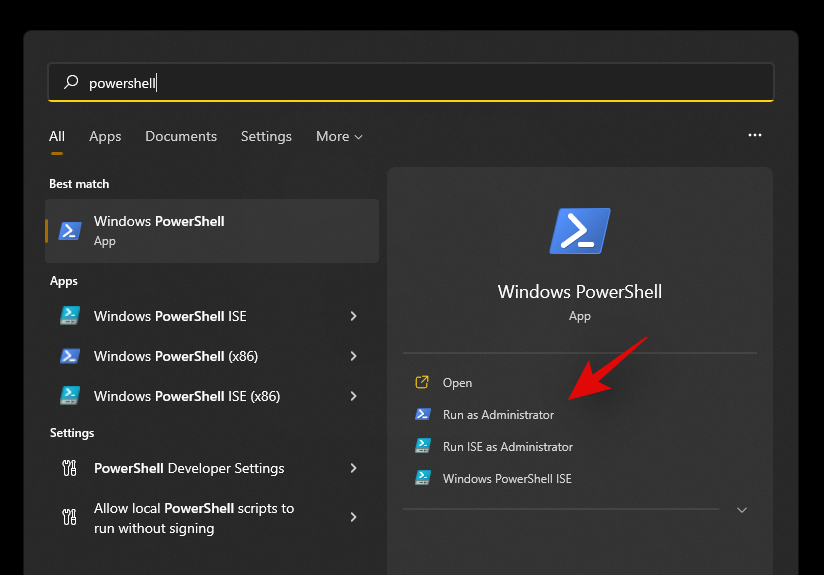
Now type in the following command and press ‘Enter’ on your keyboard.
Get-appxpackage -all *shellexperience* -packagetype bundle |% {add-appxpackage -register -disabledevelopmentmode ($_.installlocation + “\appxmetadata\appxbundlemanifest.xml”)}

Ignore any warnings that you get and continue with the process. Once complete, restart your system for good measure.
Now that the Start menu and other basic features have been reinstalled on your system, let’s rebuild your system’s index to get everything back up and running again. Press Windows + R on your keyboard to open the Run dialog box.
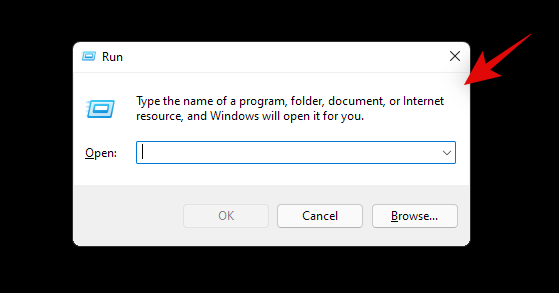
Type in the following command and press Enter on your keyboard.
control /name Microsoft.IndexingOptions
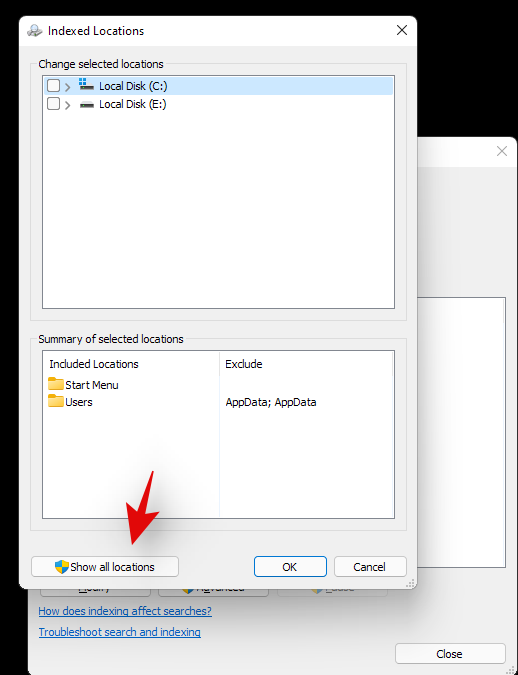
Click on ‘Modify’ and select ‘Show all locations’.
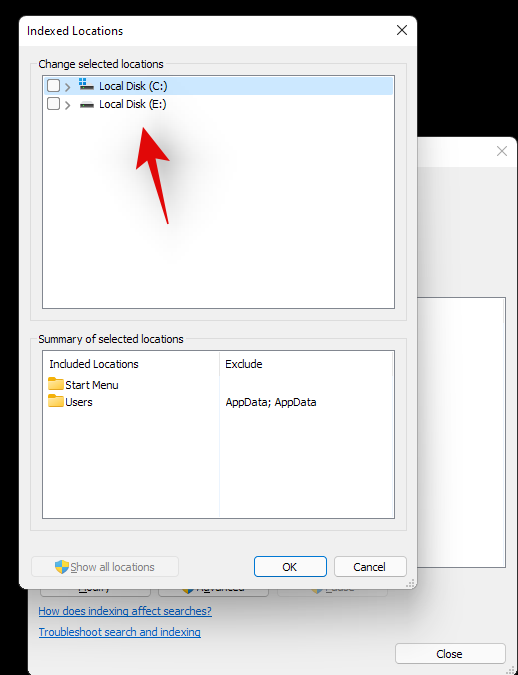
Uncheck all the boxes in the current list.
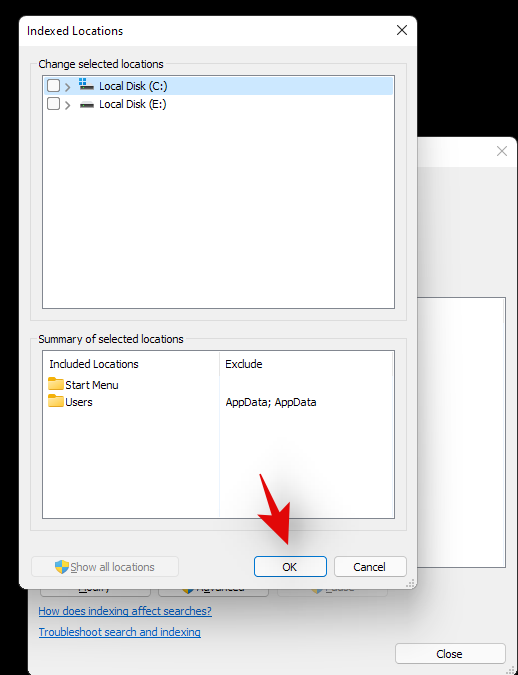
Click on ‘Ok’.
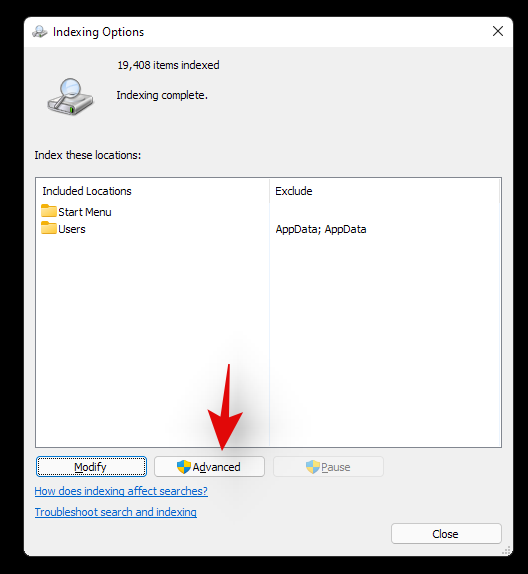
Click on ‘Advanced’ now.
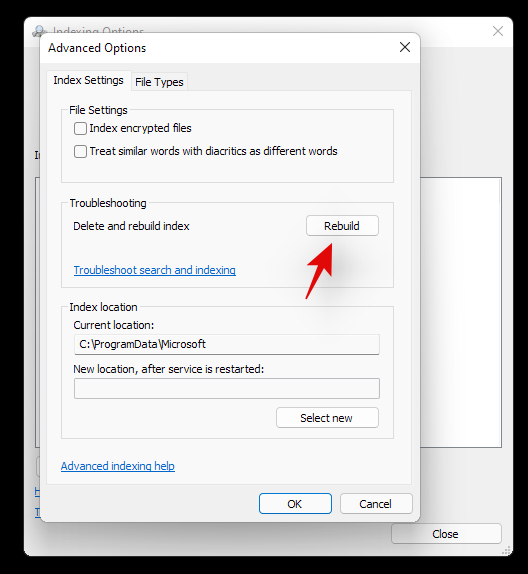
Select ‘Rebuild’ under troubleshooting.
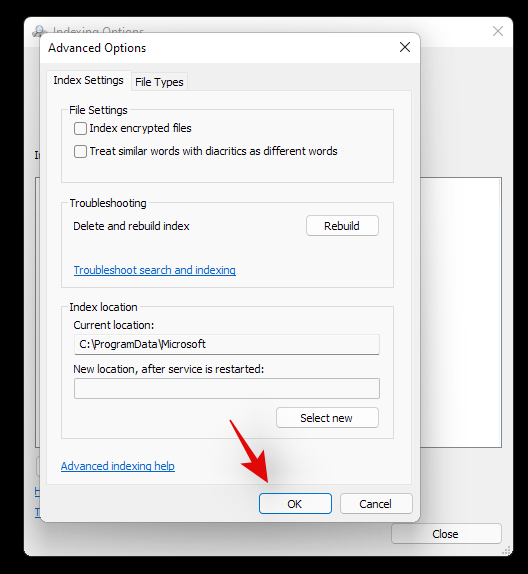
Click on ‘Ok’ once the warning pops up on your screen.
Once the process finishes, we highly recommend you restart your system.
You can now try clicking on the Start icon once your system restarts. Reinstalling the Start menu should help fix any issues with the Start menu on most systems.
Fix #11: Install any pending driver and Windows updates
This might be a bit obvious but you should definitely install any pending driver updates or Windows update on your system. This will help get you up and running on the latest drivers and help your system be compatible with all the hardware installed on your system. While drivers rarely cause issues with Windows features, you can never be too sure. Hence we recommend you install the latest available drivers on your system. You can use the link below to go to our detailed guide for updating drivers on Windows 11. If you are using a pre-built system or a laptop, then we recommend checking your OEM support page for dedicated driver updates as well.
There is a registry value that if modified, can disable your Start menu altogether. If you have been using registry modifiers, cleaners, and more, then it is likely that this registry value was modified which ended up disabling the Start menu on your system. Additionally, the Start menu’s functionality was moved to a Xaml process once Windows 10 was released. This process is known to glitch out
Use the guide below to check if the start menu is disabled on your system and re-enable it if needed.
Press Windows + R on your keyboard and type in the following command given below.
regedit
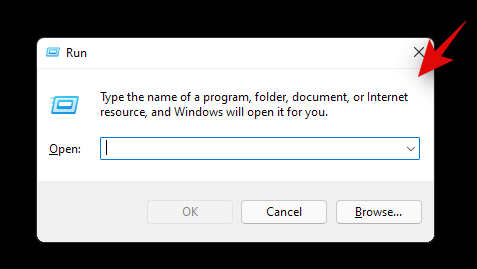
Now press Enter on your keyboard or click on ‘Ok’.
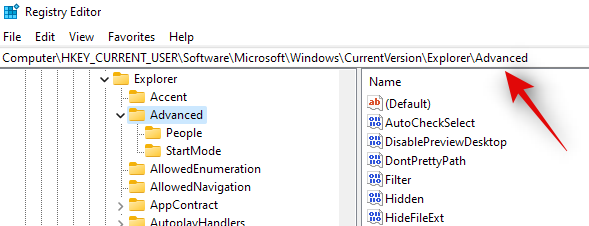
Copy and paste the following address in the address bar at the top of your registry editor.
HKEY_CURRENT_USER\Software\Microsoft\Windows\CurrentVersion\Explorer\Advanced
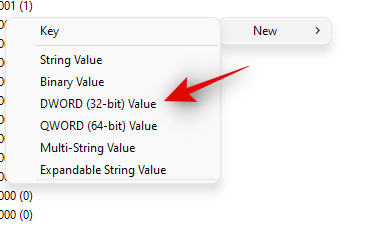
Now right-click on your right tab and select ‘New’.
Select ‘DWORD (32-bit value)’.
Enter the name as ‘EnableXamlStartMenu’.
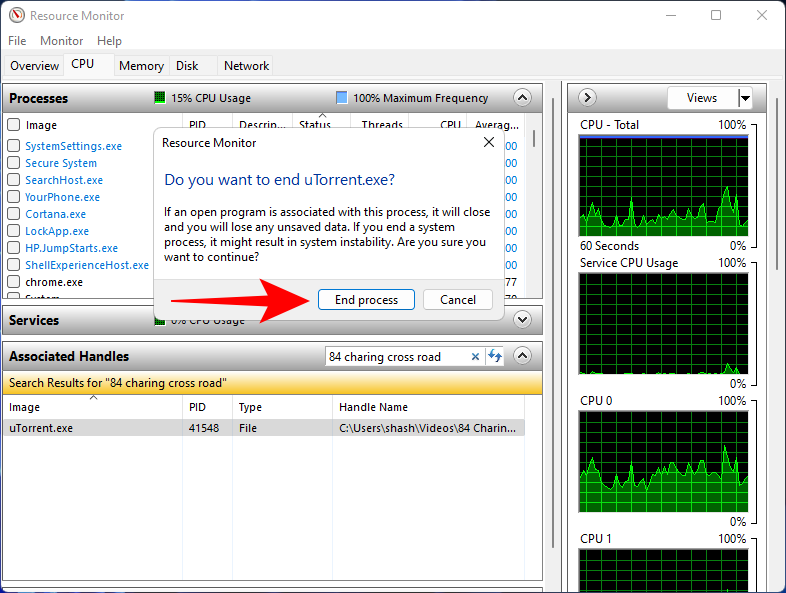
Enter the value as ‘0’.
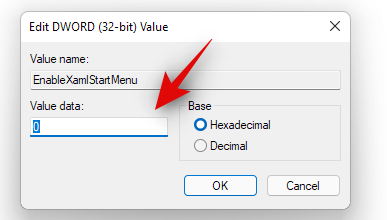
Restart your PC now.
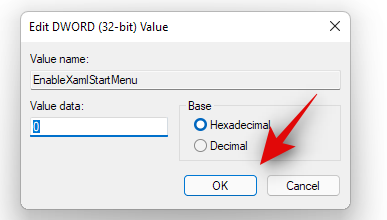
Once restarted try activating the Start menu now. If the Xaml process was facing conflicts, then they should be fixed now and the Start menu should be back up and running on your system again.
Fix #13: Restart Windows background services
If the Start menu still fails to launch then it’s time to restart all background Windows services. Usually restarting the ‘ShellExperienceHost.exe’ is enough but if that does not work for you, you can try restarting all the services listed below. This usually gets the Start menu back up and running on most systems.
Press Ctrl + Shift + Esc on your keyboard to open the ‘Task Manager’. Now click on ‘Details’ at the top to switch to the Details tab.
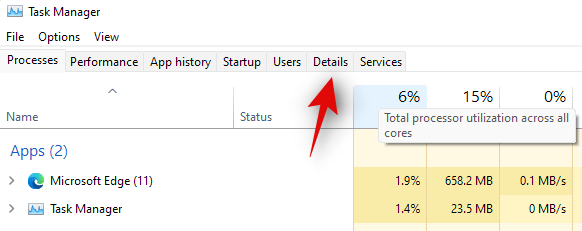
Find ‘StartMenuExperienceHost.exe’ in the list and click and select it.

Press Delete on your keyboard or click on ‘End Task’ in the bottom right corner. Click on ‘End Process’ again to confirm your choice.
ShellExperienceHost.exe will now be killed. The process should automatically restart within a few seconds. Once restarted, try activating the Start menu on your system. If the menu starts working then you are good to go. However, if it is still not working then use the guide above to restart the following services on your system as well.
- SearchIndexer.exe
- SearchHost.exe
- RuntimeBroker.exe
And that’s it! If a background process was stopping you from accessing the Start menu then the issue should be fixed for you by now.
Fix #14: Run a Windows Troubleshooter
During a Windows 1909 feature update back in 2019, the Start menu was essentially broken due to a background conflict. To fix this issue for the masses, a troubleshooter was released by Microsoft to help fix this issue. If the Start menu is still not working for you then you can try running this troubleshooter on your system. Use the guide below to download and run the troubleshooter on your system.
Download the archive linked above to a convenient location on your local storage and extract its contents.
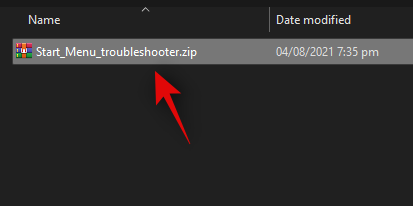
Now copy and paste the ‘startmenu.diagcab’ file on your desktop.
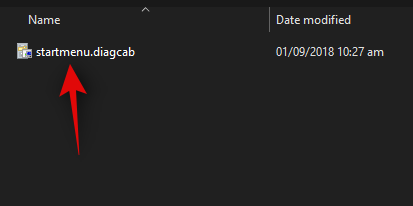
Double click and run the file from your desktop. Click on ‘Advanced’.
Check the box for ‘Apply repairs automatically’. Click on ‘Next’ once you are done.
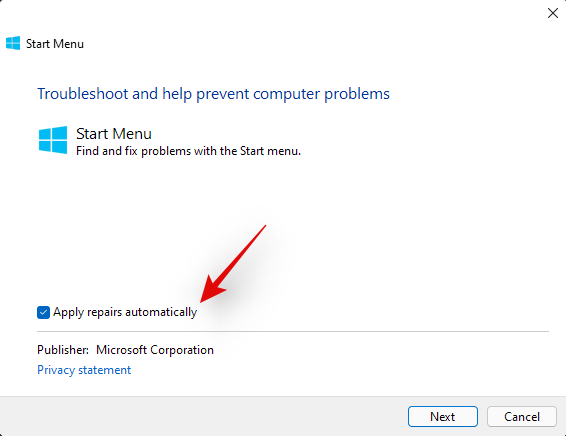
The troubleshooter will now do its thing and try to fix the Start menu on your system. Any errors or issues found will be automatically fixed and the Start menu’s functionality should now be restored on your system.
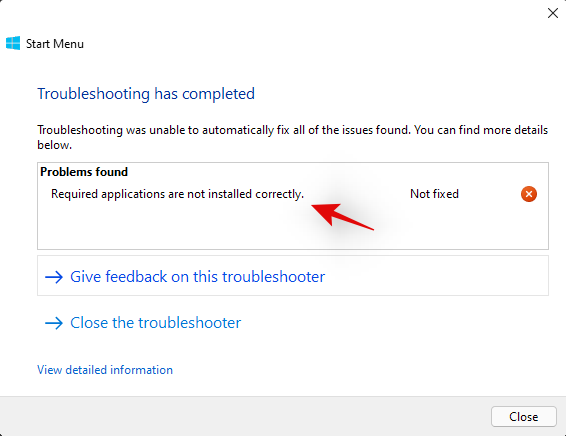
However, if the troubleshooter fails to fix the Start menu then this might indicate a more serious issue on your system. In such cases, let’s verify if Windows is actually able to access and initiate the process for the Start menu on your system. Use the checks below to help you along with the process.
We now need to check if the Start menu is actually available within your install of Windows 11. Let’s create a new local account that will help you verify its functionality. If the Start menu is working in the new account then it is likely an issue with your current user account.
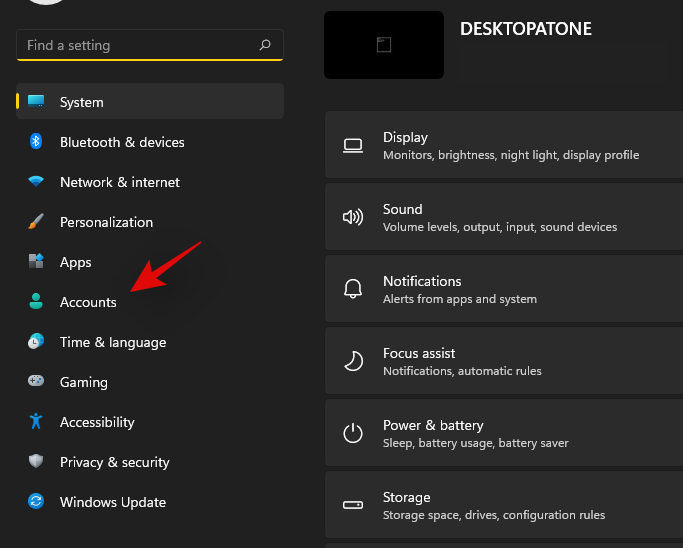
Press Windows + i on your keyboard and click on ‘Accounts’ on your left.
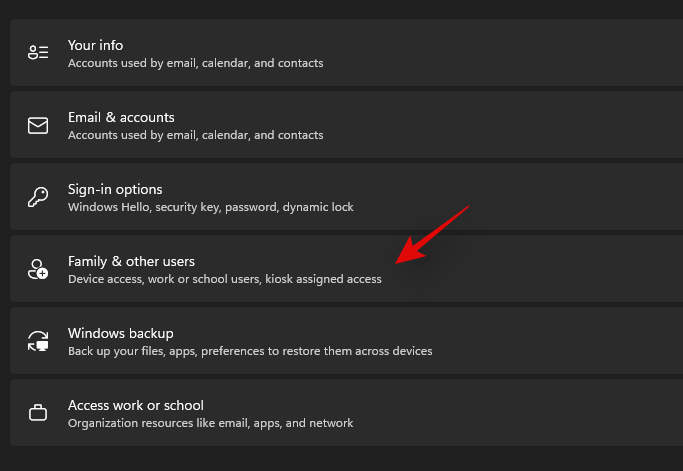
Click on ‘Family & other users’.
Now click on ‘Add account’ under other users.

Click on ‘I don’t have this person’s sign-in information’.
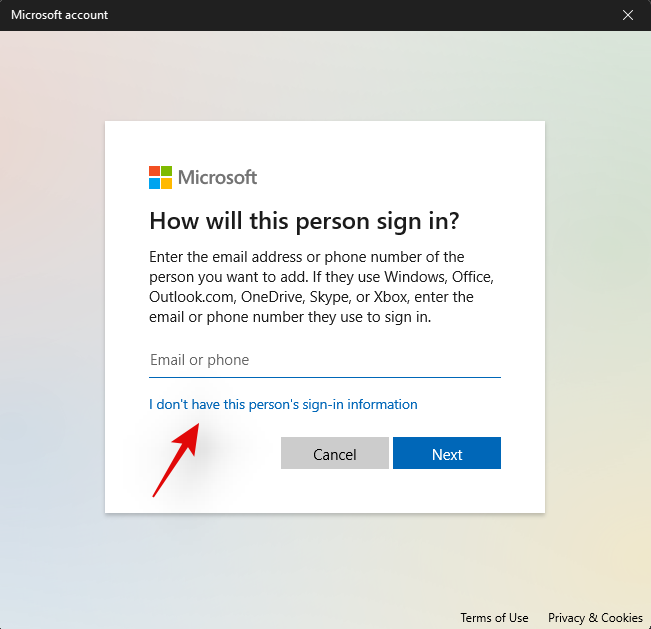
Click on ‘Add a user without a Microsoft Account’.
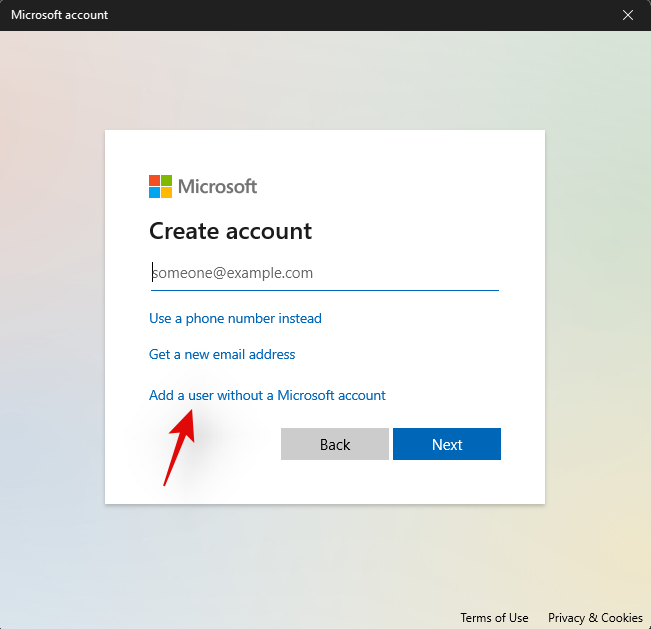
Now enter a username for the new account, and a password if needed.
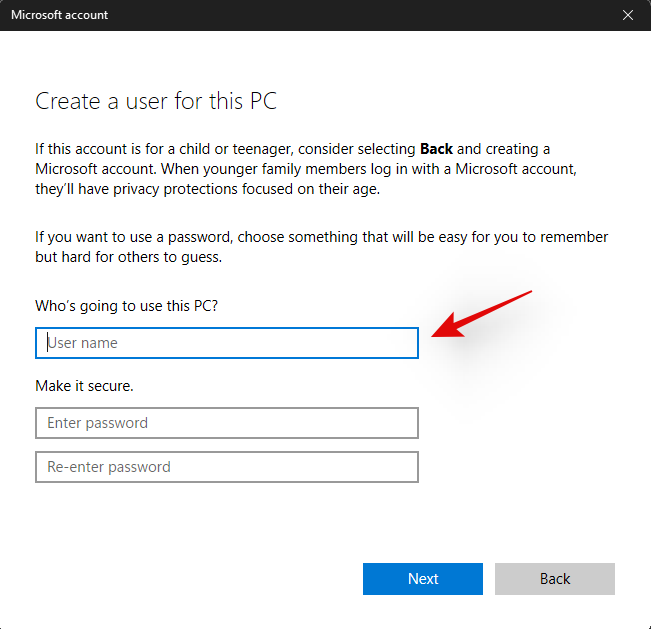
Click on ‘Next’ once you are done.
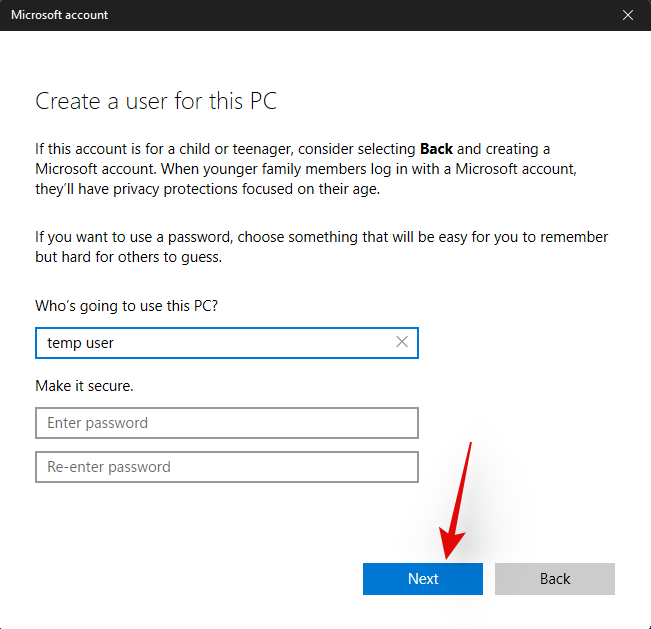
The new user account will now be created. Sign out of your current account and sign in to the new account.
Try to activate the Start menu now in the new temporary local account. If it is working then this is an issue specific to your user account. However, in case the Start menu fails to open, then this might indicate a more serious issue with your Windows 11 installation.
It’s now time to check if the Start menu is working in Safe mode. In case it is, then a third-party app is likely interfering with the Start menu’s functionality. You can remove any third-party apps used to modify the Start menu to try and fix this issue. Follow the guide below to activate Safe mode on Windows 11.
Press Windows + i on your keyboard and select ‘Windows Update’.
Now click on ‘Advanced options’.
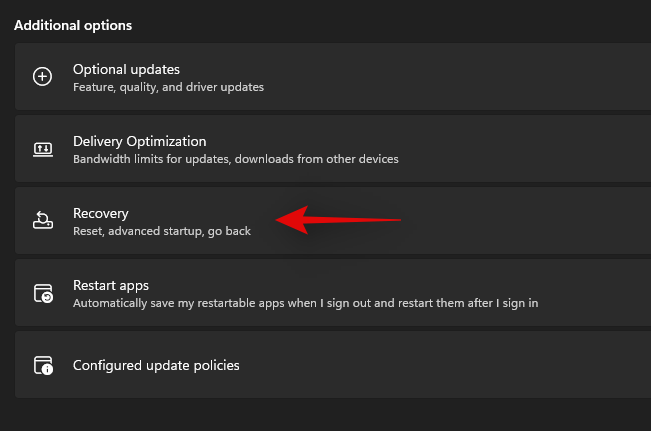
Click and select ‘Recovery’.
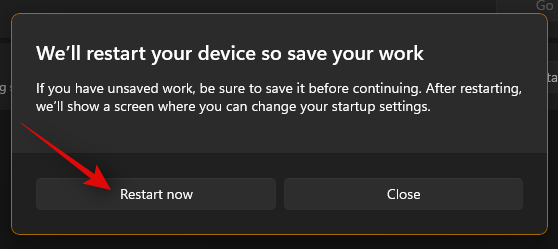
Now click on ‘Restart now’ beside ‘Advanced startup’.

Click on ‘Restart now’ again.
Your PC will now restart to the recovery screen. Click and select ‘Troubleshoot’.
Now click on ‘Advanced options’.
Click on ‘Startup Settings’.
Press ‘F4’ to start your PC in safe mode now.
Once your PC restarts, the safe mode should be active on your system. Now try to activate the start menu. If the menu activates, then it is likely that a third-party app is causing issues on your Windows 11 system. You can try removing apps used to customize the Start menu one by one to find the culprit on your system.
Fix #17: Run a malware and antivirus scan
We recommend you try and run a malware scan before opting for the last resort. If any malware or malicious service is causing issues with the Start menu, then a scan will help solve these issues. Use the guide below to run a malware scan through Windows Defender.
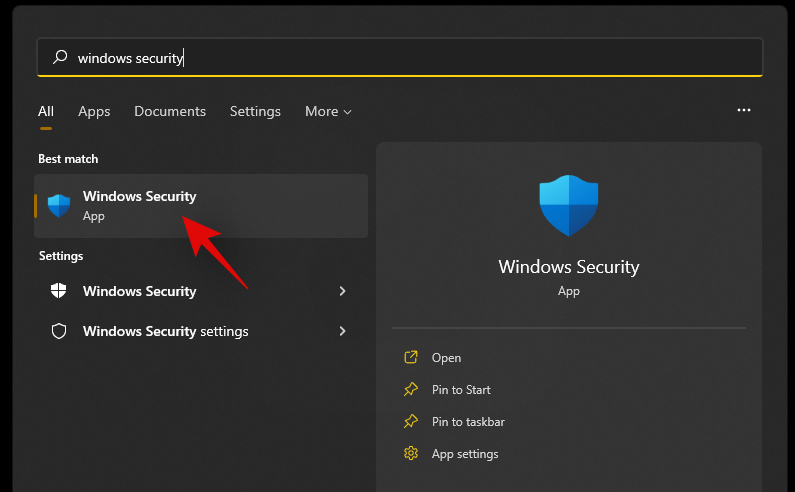
Press Windows + S on your keyboard and search for ‘Windows Security’. Click and launch the app once it shows up in your search results.
Click on ‘Virus & threat protection’.
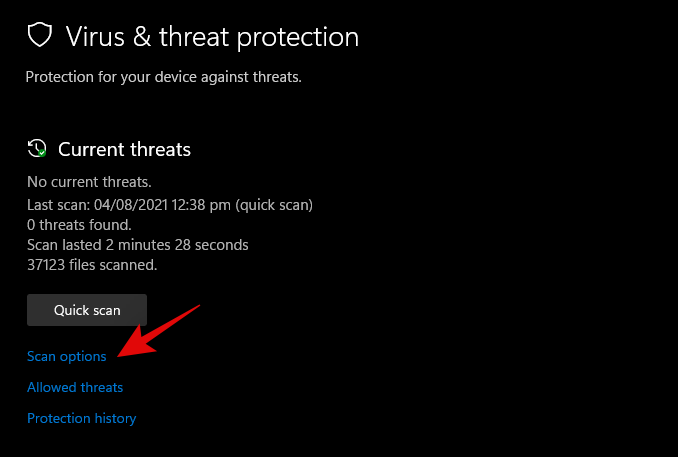
Click on ‘Scan options’.
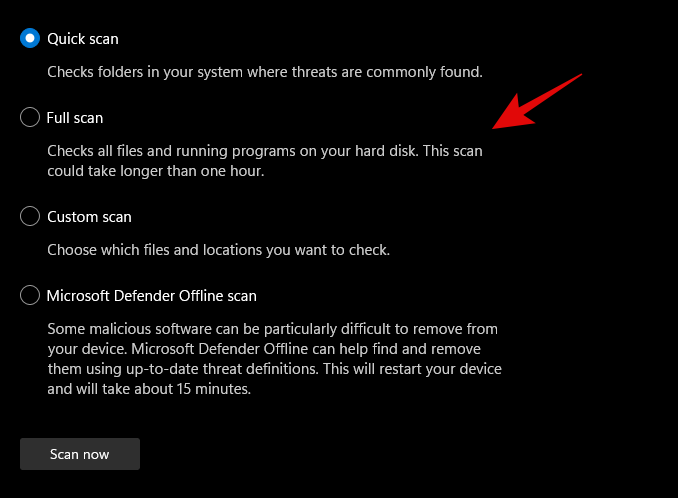
Select ‘Full Scan’.
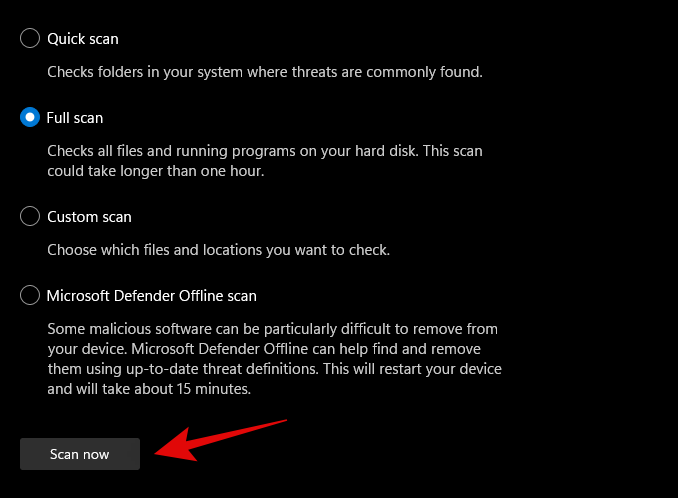
Finally, click on ‘Scan now’.
Windows Defender will now scan your entire PC for malware and malicious software. In case any are found, they will be automatically quarantined, and you will be prompted to take the necessary action as soon as possible.
3 General Fixes: Last Resort options
Fix #18: Create a new user via command prompt
If you’re facing an issue where you’re unable to add a local account via Settings to your PC then you can use the command prompt (CMD) for the same. Once added you can try and check if the Start menu is working for you. If it is, you can try the fixes below to restore it in your original account. However, if none of the fixes work for you then you can use the newly created account instead. The new account will be created with administrator privileges so you shouldn’t have problems moving your files and Settings. More on this below.
Press Windows + R to bring up the Run dialog box and type in the following. Press Ctrl + Shift + Enter on your keyboard once you are done.
cmd
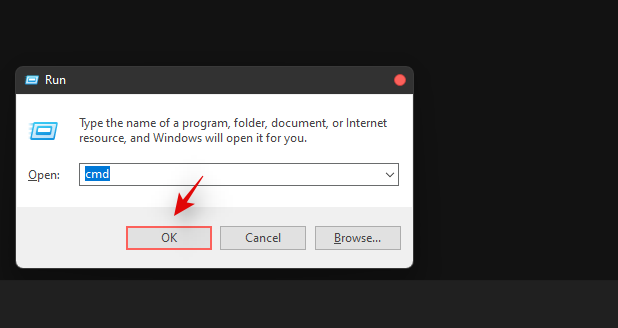
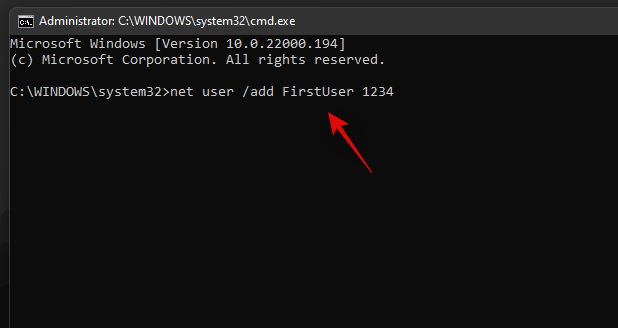
Type in the following command and press Enter on your keyboard. Replace ‘USER’ with your desired username for the new account. Similarly, replace ‘PASSWORD’ with your desired password.
net user /add USER PASSWORD
Now execute the following command as well and use the same username as above.
net localgroup administrators USER /add
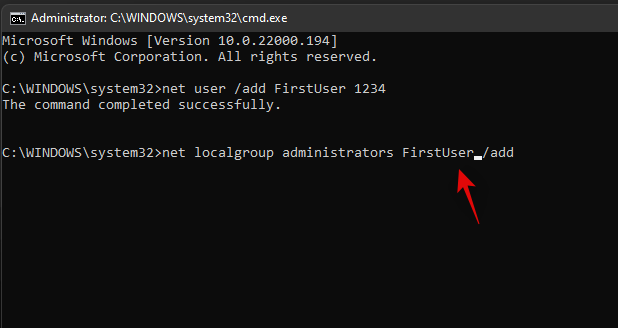
The user will now be added to your PC. Simply restart and log into the new account when the PC restarts.
The start menu should work alright now in the new user account. You can copy your files from the old user account to the new account.
To find your data in the old user account, open Windows Explorer and go to the User folder under the C Drive (or whichever drive you have installed Windows in).
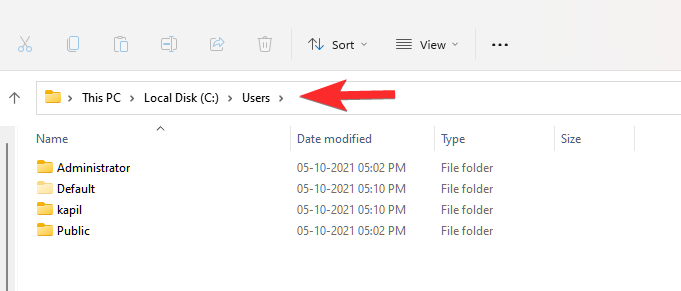
Click on the old user account. Now, copy all the files from here to your new user account that you can also find in the Users folder.
An easy method to transfer files from one user account (old one) to another user account (new one) is to copy the profile. Read more about it here.
Fix #19: Perform a Windows Reset
If you had zero luck with all of the previous methods, we think you should try a Windows Reset. It has been known to solve a host of problems in Windows 11 while keeping your personal files intact. Moreover, resetting Windows to its factory settings can give your PC a fresh start.
Here are the steps.
For this method, you’ll need an elevated PowerShell instance.
Press Win key + r to open the Run box, then type in ‘PowerShell and press Ctrl + Shift + Enter to open PowerShell as administrator.
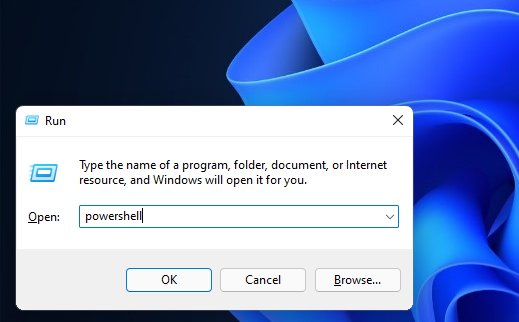
When opened correctly, you should already be inside the C:\Windows\system32 folder.
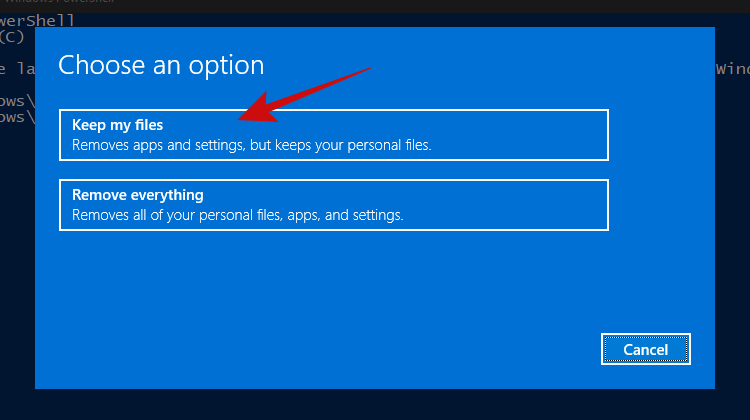
Now type in ‘system reset and press enter. You should be presented with two options, to either keep all your files or to remove everything. Click on ‘Keep my files’.
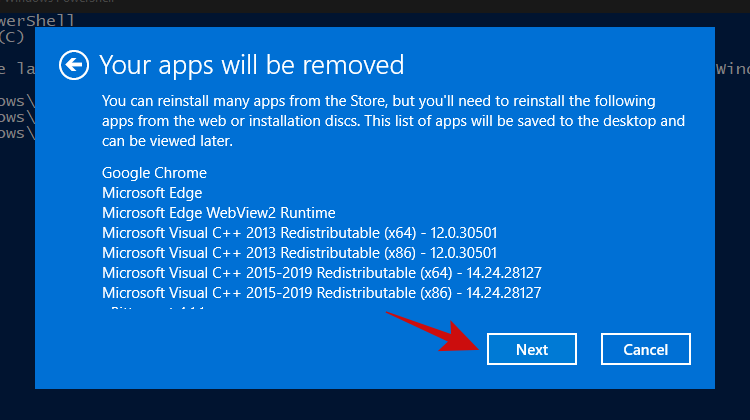
Within a few minutes, Windows should give you a list of apps that’ll be removed from your PC after the reset. Here’s how our list looks.
Once you’ve scrolled through the list of apps, simply click on the ‘Next’ button.
Windows should now start the reset process. Simply follow the instructions and your PC should be reset within a couple of minutes. The Start menu should be working now.
Fix #20: Re-install Windows from scratch
Well, if you’re really considering this method, it’s safe to assume that none of the other methods worked for you. At this point, we think it’s now time to go for a clean installation of Windows 11, which will probably wipe your current Windows partition (if you choose to).
Note: Before proceeding with this method, we recommend making a complete backup of all your files stored inside folders on the Windows drive, such as in Downloads, Documents, and the likes.
Once you have backed up all your files from the Windows drive, let’s take a look at the things you’ll need.
- A USB stick of 8GB or more (no external hard drives, unless you want to lose all your precious data)
- Rufus
Next, follow our guide on downloading and installing the Windows 11 ISO.
Read: How to Download and Install Official Windows 11 ISO
We hope that after following this guide, you were able to fix the annoying and unresponsive Start menu in Windows 11 and bring it back to life.
If you find yourself stuck at any point in this guide, let us know in the comments below.
Related:







![Como corrixir o erro da pantalla verde de Windows 11 [8 xeitos] Como corrixir o erro da pantalla verde de Windows 11 [8 xeitos]](https://blog.webtech360.com/resources8/images31/image-5564-0105182715287.png)
![[Actualización: 8 de novembro] A ferramenta de recorte non funciona en Windows 11? Como solucionar problemas de erro ou atallos de Esta aplicación non se pode abrir. [Actualización: 8 de novembro] A ferramenta de recorte non funciona en Windows 11? Como solucionar problemas de erro ou atallos de Esta aplicación non se pode abrir.](https://blog.webtech360.com/resources8/images31/image-6552-0105182756436.jpg)
