Os controladores de dispositivos axudan a corrixir erros, facer e mellorar a compatibilidade de periféricos e compoñentes coas actualizacións actuais e novas dos sistemas operativos. Se instalaches Windows 11 (ou estás a planear facelo) pero agora tes problemas con algún dos compoñentes do teu PC, a actualización dos seus controladores é unha das primeiras solucións a probar. Aquí tes como podes actualizar os controladores en Windows 11 .
Contidos
Por que actualizar os controladores?
Os condutores axudan con varios factores e situacións. Poden axudar a resolver erros de compatibilidade e incluso axudar a que os dispositivos sexan recoñecidos no teu sistema. Aquí algúns dos beneficios máis comúns de actualizar o seu controlador.
- Resolve os erros de compatibilidade co teu sistema ou outros periféricos.
- Obtén as funcións máis recentes.
- Corrixir erros existentes.
- Obter a última versión do firmware.
- Corrixir a comunicación entre hardware e software.
- Obtén un dispositivo externo recoñecido no teu sistema.
- Corrixir o mal funcionamento do hardware.
E moito máis. Se tes problemas con algún dos teus compoñentes ou periféricos, é probable que necesites unha actualización inmediata do controlador. Podes usar unha das guías seguintes dependendo das túas necesidades actuais para actualizar os controladores do teu sistema.
Relacionado: Como facer capturas de pantalla en Windows 11
Necesito actualizar os meus controladores?
Ben, si, recoméndase que manteñas sempre os controladores actualizados á última versión. Os controladores axudan a resolver erros introducidos con actualizacións anteriores, introducen funcións novas e melloradas e incluso ofrecen compatibilidade con hardware novo e próximo.
Tanto se tes problemas cos compoñentes do teu PC como se non, sempre é unha boa idea manter os teus controladores actualizados coa última versión dispoñible.
Non obstante, se o teu hardware ou compoñente funcionou correctamente, deberías seguir este consello cun gran de sal. Algunhas actualizacións de controladores poden introducir novos erros e problemas en casos raros.
Polo tanto, se o teu hardware funciona correctamente, recomendámosche que consultes os foros de tecnoloxía en liña para obter información sobre a última actualización antes de actualizar o teu controlador. Deste xeito, se algún novo erro rompe a funcionalidade, podes deter a actualización actual ata que se publique unha nova corrección.
7 formas de actualizar controladores en Windows 11
Podes utilizar un dos seguintes métodos para actualizar os controladores do teu sistema Windows 11. Por defecto, Windows inclúe unha utilidade integrada para axudarche a buscar os mellores controladores dispoñibles para todos os teus compoñentes e periféricos. Podes usar esta utilidade ao teu favor e actualizar os controladores de case todos os compoñentes e periféricos do teu sistema. Use un dos métodos a continuación que mellor se adapte ás súas necesidades actuais.
Método #01: Usando o xestor de dispositivos
O xestor de dispositivos é unha utilidade de xestión de controladores en Windows desde os primeiros días e tamén se inclúe con Windows 11. Podes usar o xestor de dispositivos para buscar e instalar ou case calquera controlador de compoñente no teu sistema. No caso de que teñas un ficheiro de controlador que queres instalar desde o teu almacenamento local, podes usar a primeira guía. No caso de que queiras buscar e instalar un controlador para un dispositivo, podes usar a segunda guía.
Método #1.1: Instala controladores desde o teu ordenador
Preme "Windows + X" no teu teclado e fai clic en "Xestor de dispositivos".
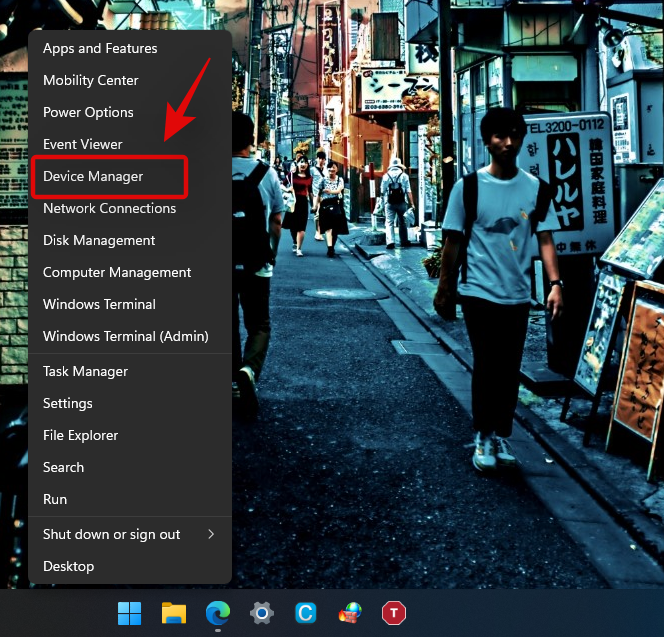
Agora desprácese pola lista e atope o dispositivo que queres actualizar, fai clic co botón dereito sobre el e selecciona "Actualizar controlador".
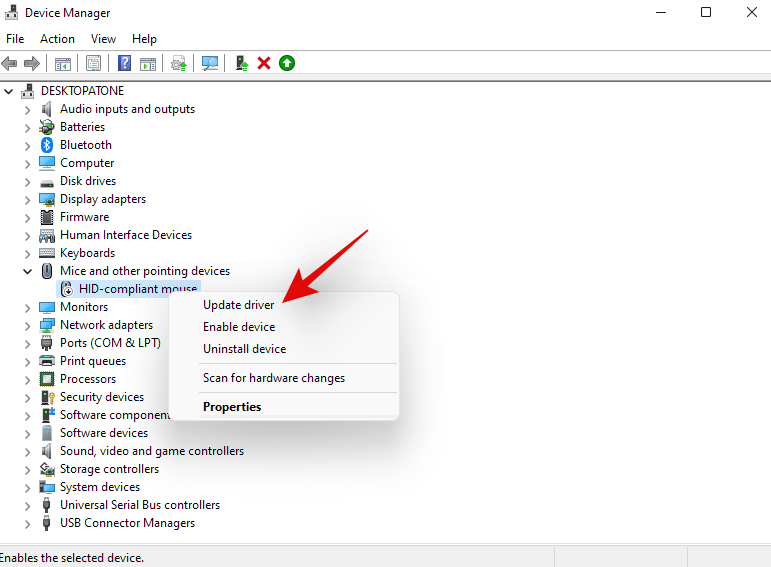
Agora fai clic en "Buscar controladores no meu ordenador".
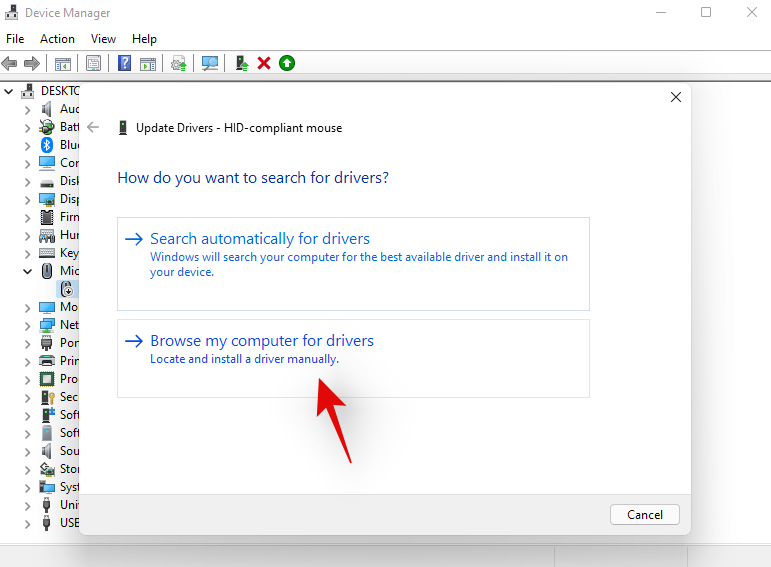
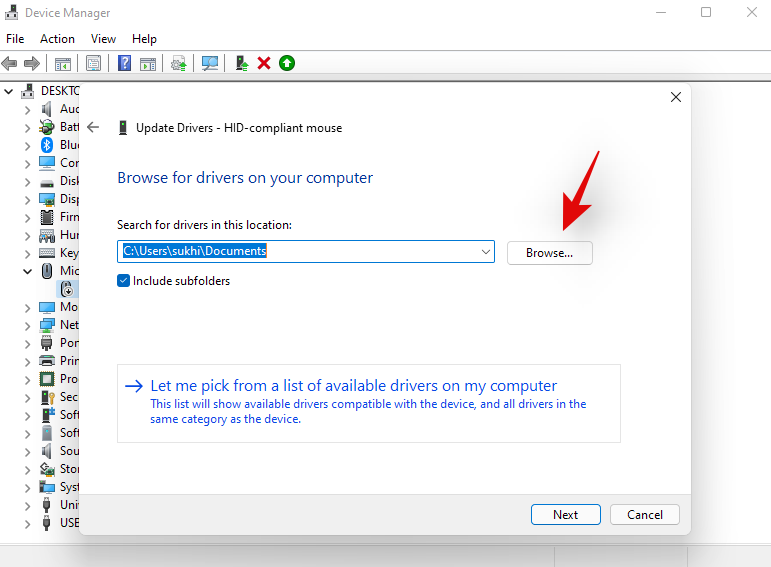
Fai clic en "Examinar" e selecciona o ficheiro do controlador necesario do teu almacenamento local.
Unha vez seleccionado, fai clic en "Seguinte".
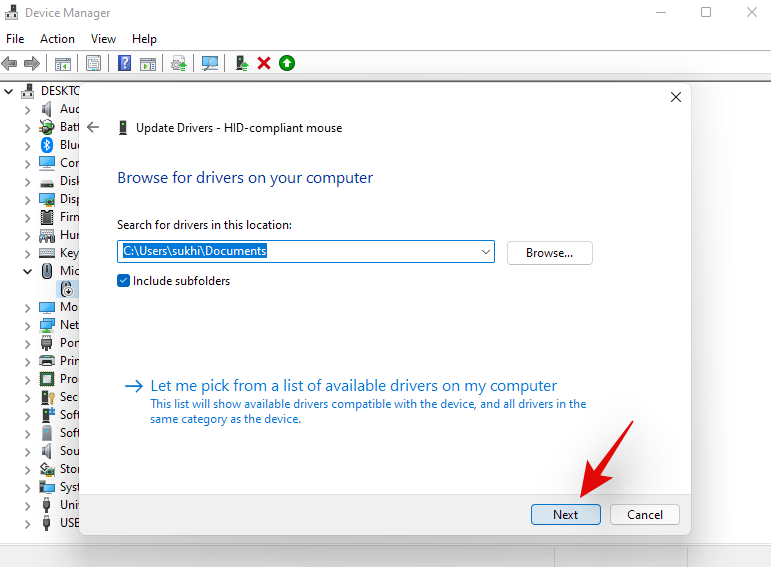
E xa está! O controlador agora debería estar actualizado no teu dispositivo.
Método #1.2: Busca controladores en liña
Preme "Windows + X" no teu teclado e selecciona "Xestor de dispositivos".

Agora fai clic co botón dereito sobre o dispositivo que queres actualizar e selecciona "Actualizar controlador".

Fai clic en "Buscar automaticamente controladores".
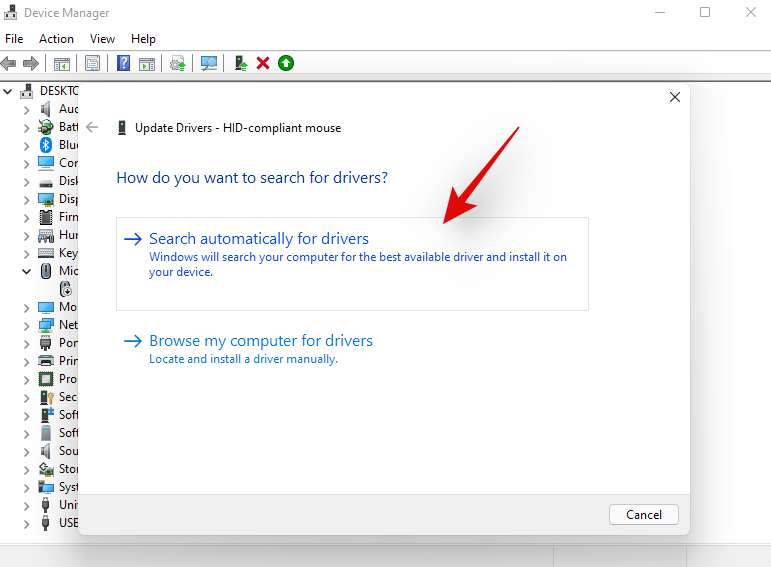
Windows agora buscará controladores en todas as súas bases de datos para o seu dispositivo. Se se atopa, o controlador actualizarase cunha xanela de confirmación para o mesmo. Se non é así, quizais esteas tentando actualizar un compoñente cuxos controladores están dispoñibles a través do teu OEM.
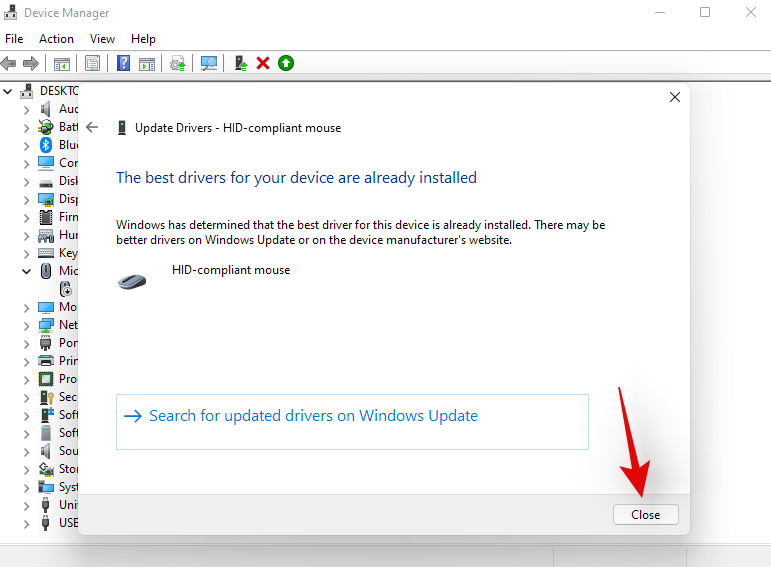
Podes utilizar as guías seguintes para actualizar tales compoñentes ou periféricos.
Relacionado: Como compartir ficheiros en Windows 11
Método #02: Descarga e instala actualizacións do teu OEM
Se tes un sistema preconstruído ou un portátil, é probable que os controladores dedicados para o teu sistema se publiquen a través do teu OEM. Aínda que estes poden non ser os controladores máis recentes que podes obter do teu fabricante, aínda estarán altamente optimizados para a capacidade térmica e de enerxía da túa unidade. Se non podes atopar algúns controladores para o teu sistema, recomendámosche que visites a páxina de asistencia do teu OEM e intentes buscar o teu dispositivo. Podes utilizar as seguintes ligazóns para visitar a páxina de asistencia do teu fabricante e despois buscar o teu dispositivo.
Using the above sites you should be able to find and install the correct drivers for your system. In most cases, the drivers will be bundled with their own executable, which will help you install the driver easily. However, if you get .inf files, then you can use the guides above to manually install them on your system.
Method #03: Using OEM utilities
Most manufacturers bundle PC assistant utilities with their devices as well that help you get the latest drivers for your components and peripherals. If you’re using a pre-built system or a laptop, then chances are that this utility was already installed on your device.
You can look for it in the Start menu and then use it to update to the latest driver for your device. If your OEM utility is by chance unavailable on your device then you can use the links above to visit your OEM’s support site. You will find all the necessary drivers as well as the one-touch update utility in the support section for your system.
Method #04: Using Windows update
Many essential driver updates are also delivered through the Windows update. If you haven’t had the opportunity to check for Windows updates in a while, then chances are that your component or peripheral’s driver is also pending in the Windows update. You can simply check for any pending Windows updates and install them to get the latest drivers. In case you are unfamiliar with Windows Update, you can use the guide below to check for updates on your Windows 11 PC.
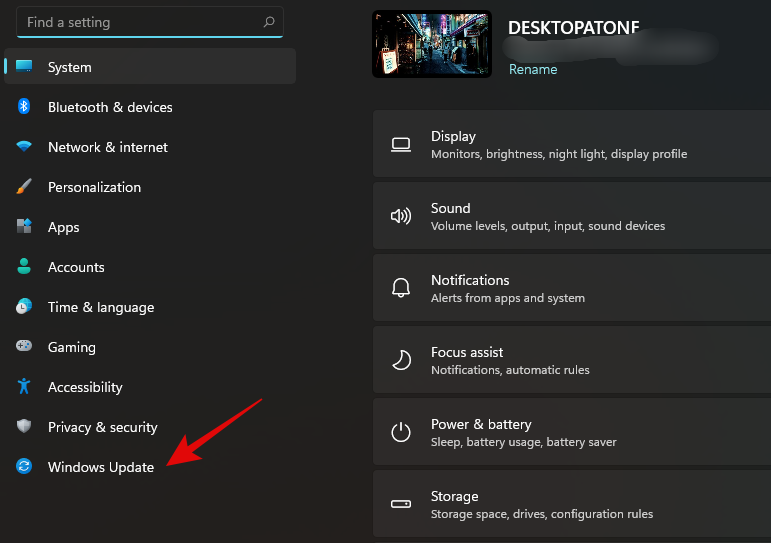
Press ‘Windows + i’ on your keyboard to open the Settings app. Click on ‘Windows Update’ in your left sidebar.
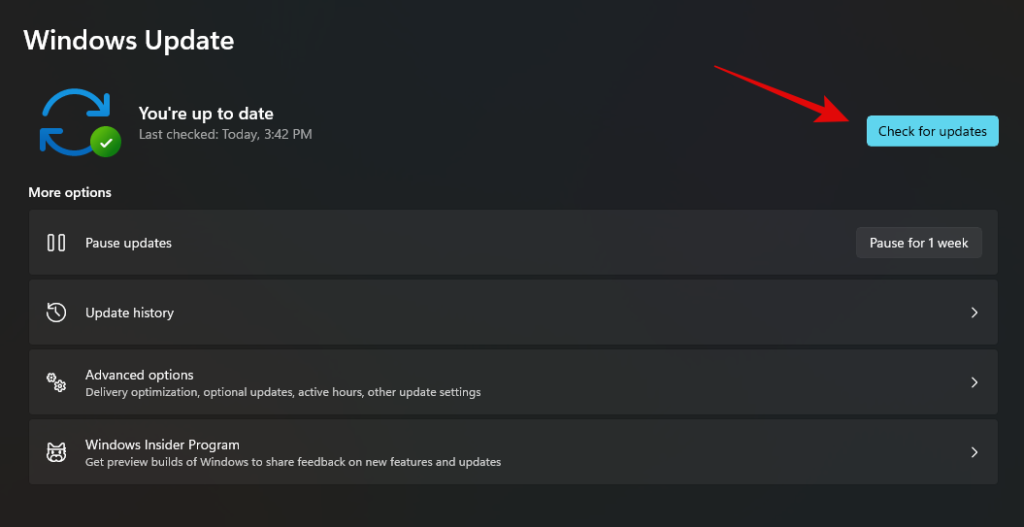
Now click on ‘Check for updates’ and install any pending updates that show up.
Note: A Wifi connection is recommended for downloading Windows Updates in case you haven’t updated your system in a while.
Method #05: Enable automatic driver updates by OEM via Windows updates
Windows Updates have a dedicated setting that allows it to deliver component and peripheral specific drivers to your device through your OEM. This way you can get the latest drivers for your system without having to download any other utilities. However, this option can sometimes be disabled on many systems by default. In case disabled, you won’t receive any OEM driver updates through the Windows Update. Hence let’s ensure that this option is enabled on your system. Use the guide below to get started.
Press ‘Windows + S’ on your keyboard to bring up Windows Search.
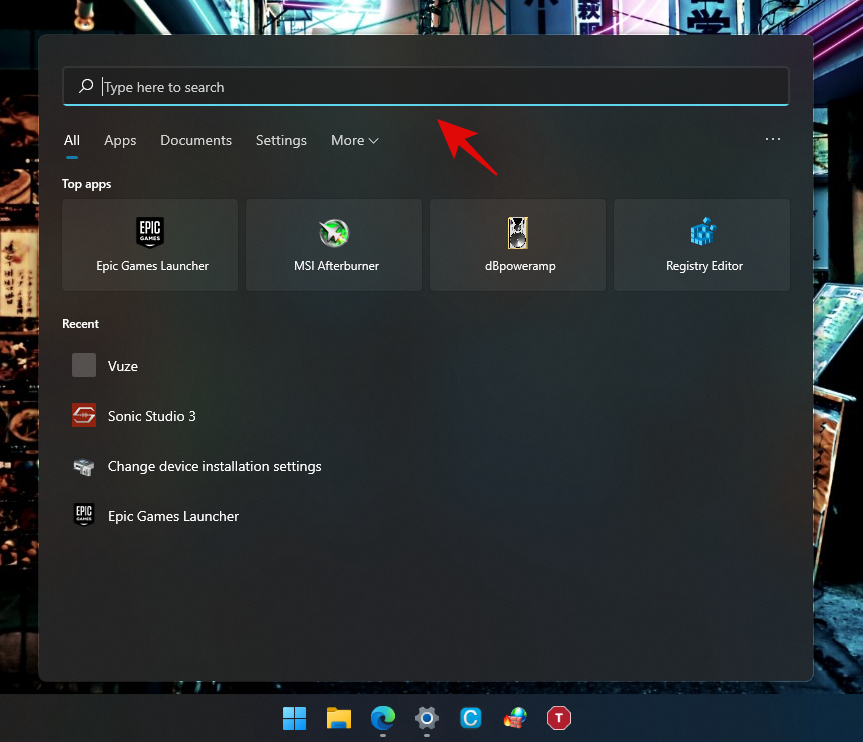
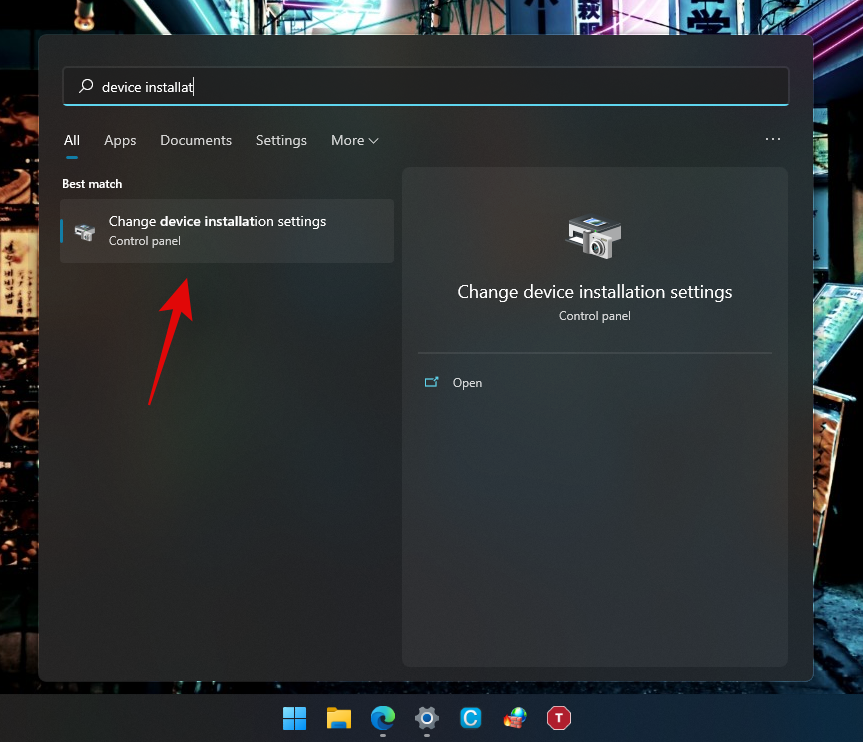
Now type in ‘Device installation settings’ and launch the app once it shows up in your search results.
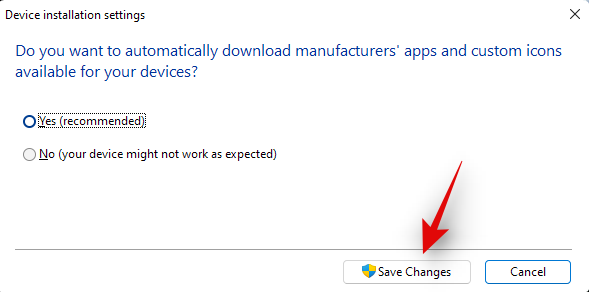
Select ‘Yes’.
Click on ‘Save Changes’.
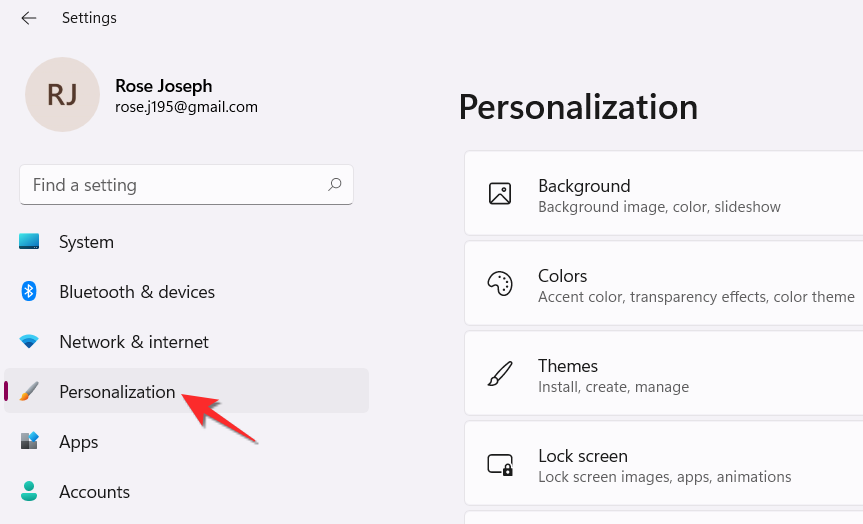
Now press ‘Windows + i’ on your keyboard to open the Settings app. Click on ‘Windows Update’ in the left sidebar.

Click on ‘Check for updates’ on your right.

Your PC will now check for any pending updates including OEM drivers. If any are found, they will be automatically downloaded and installed on your system.
Method #06: Check for optional updates
Windows also sends out optional updates for your components and peripherals that might not be needed for your system but can be updated if you end up encountering issues with your drivers. Optional updates are available in the ‘Windows Update’ section of your Settings app and you can check for optional updates and install them using the guide below.
Press ‘Windows + i’ on your keyboard to open the Settings app. Click on ‘Windows Update’ in your left sidebar.

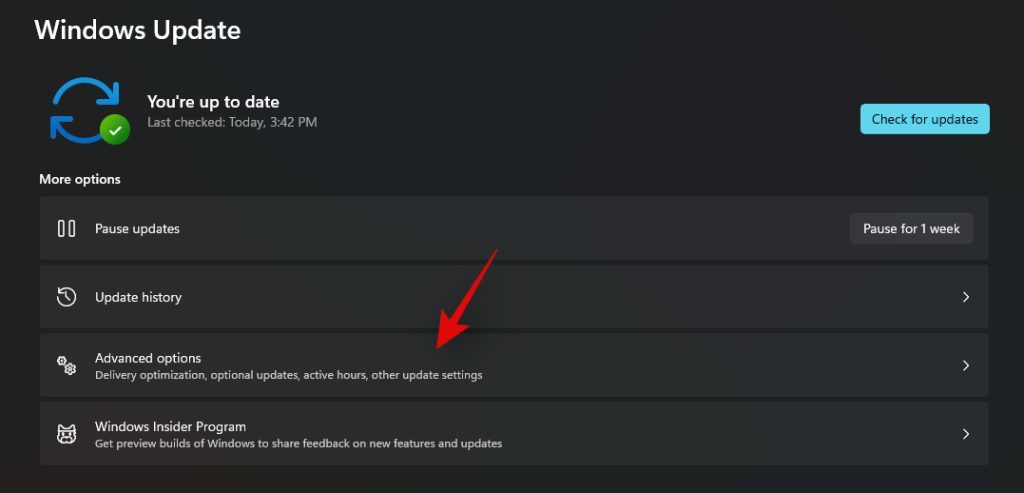
Now click on ‘Advanced Options’.
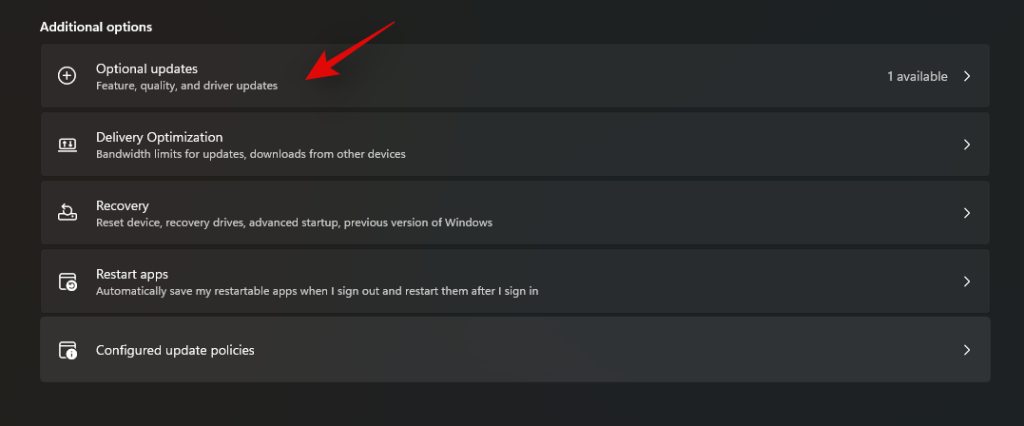
Click and select ‘Optional updates’ under ‘Additional options’.
Click on ‘Driver updates’.
Note: If you don’t have any optional driver updates available then you won’t get this category.
Check the box for the update you wish to install on your device.

Click on ‘Download & install’.
Windows will now download the selected driver updates and install them on your system. Depending on the driver, you might be asked to restart your device, this is completely normal and you can follow the on-screen instructions to do so.
Method #07: Add drivers manually for a missing component in ‘Device Manager’
Usually, any unrecognized component or peripheral will show up as ‘Unsupported device’ in the Device Manager. But this is sometimes not the case and if your device is missing from the Device Manager, then you can use the guide below to install drivers manually.
Press ‘Windows + X’ and select ‘Device Manager’ to launch the utility.

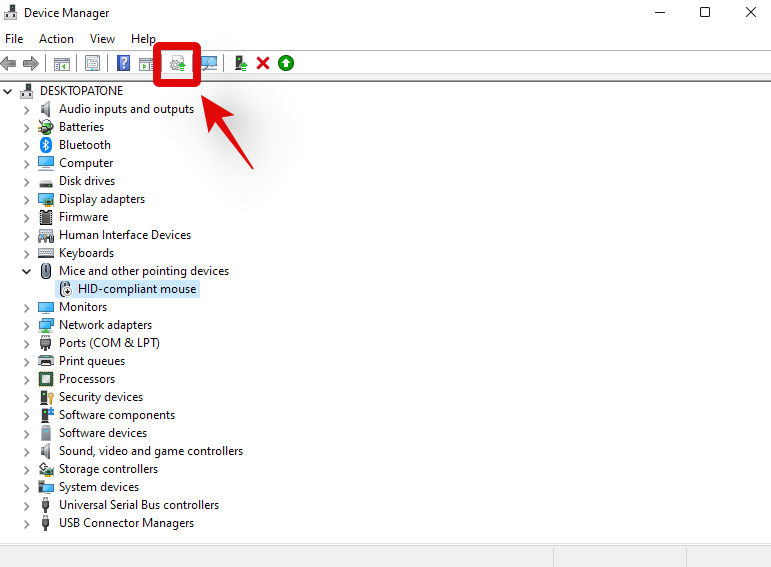
Now click on the ‘Add drivers’ icon in the toolbar as shown below.
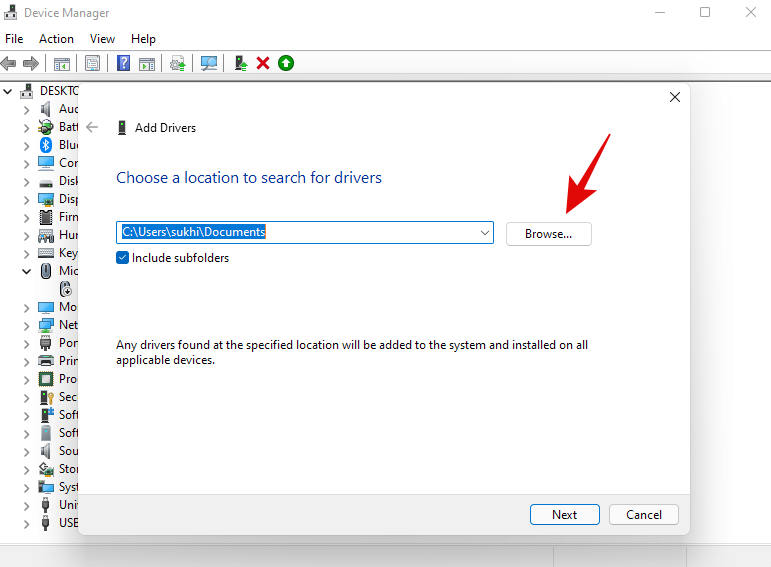
Click on ‘Browse’ and select the necessary driver file from your local storage.
Click on ‘Next’ once you are done.
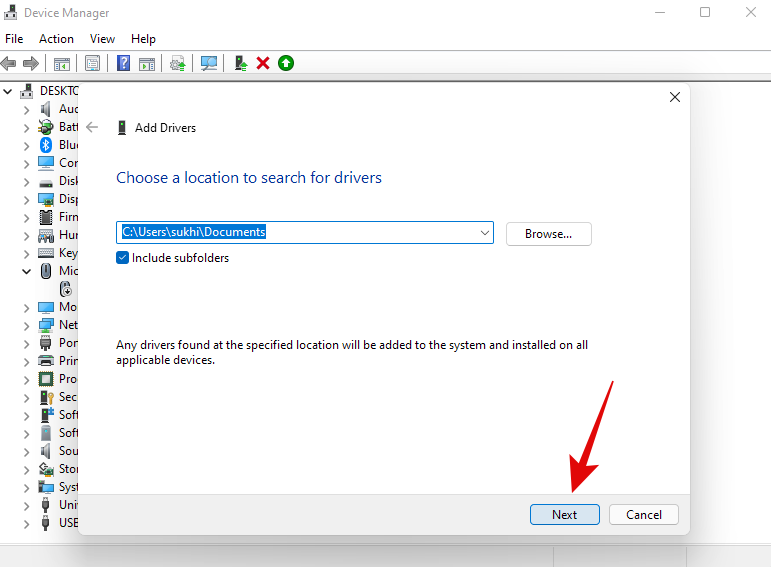
Windows will now look for drivers in the specified location and install all the compatible and necessary ones on your system. You should be able to install drivers from devices that are completely absent from the Device Manager this way.
How to uninstall troublesome driver updates
You can easily uninstall troublesome driver updates that seem to be causing more issues than solving them. Use the guide below to easily uninstall driver updates from your system.
Method #01: Uninstall via Device Manager
If you manually installed your driver or used an executable from your OEM then this is the recommended method for you. If Windows managed to store the previous driver on your system then you will also get the option to roll back your driver. However, if this is not the case then you will need to uninstall the installed driver and then install a previous version.
Press ‘Windows + X’ on your keyboard and click and select ‘Device Manager’.

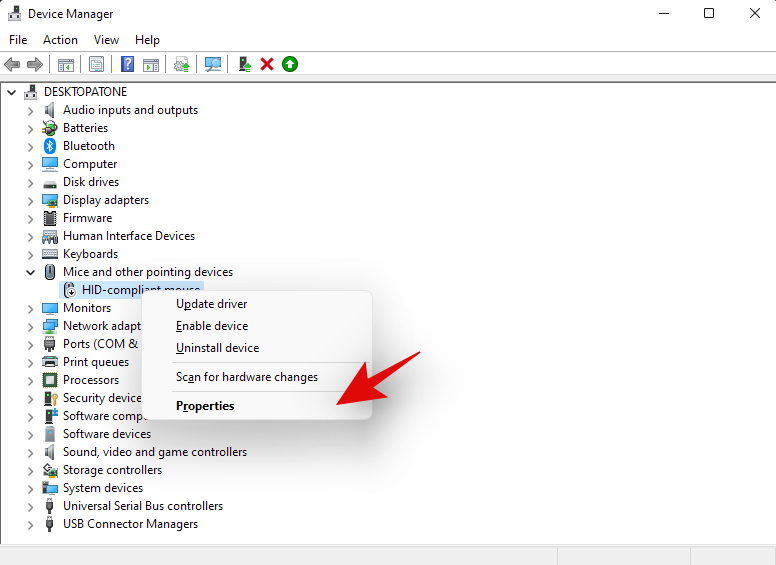
Now navigate to the concerned device, right-click on it, and select ‘Properties’.
Switch to the ‘Driver’ tab at the top.
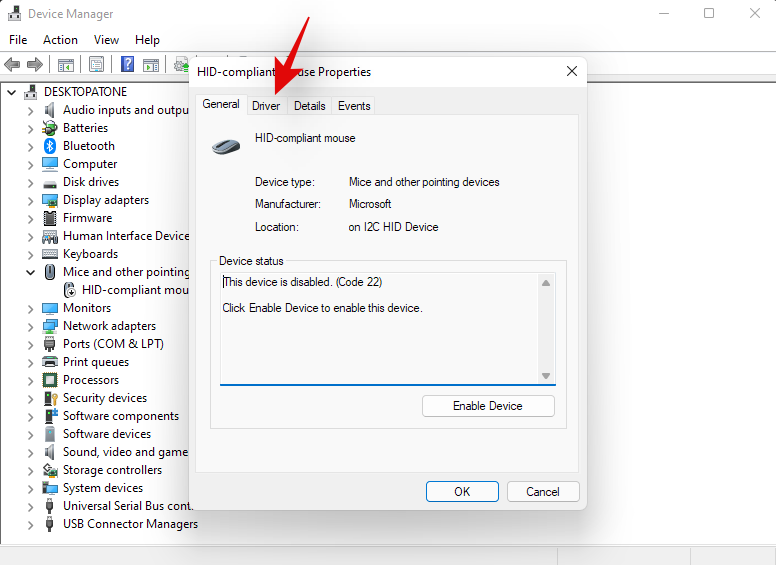
Now if the rollback option is available, click on it and follow the on-screen instructions to roll back your driver. However, if this option is greyed out then click on ‘Uninstall device’.
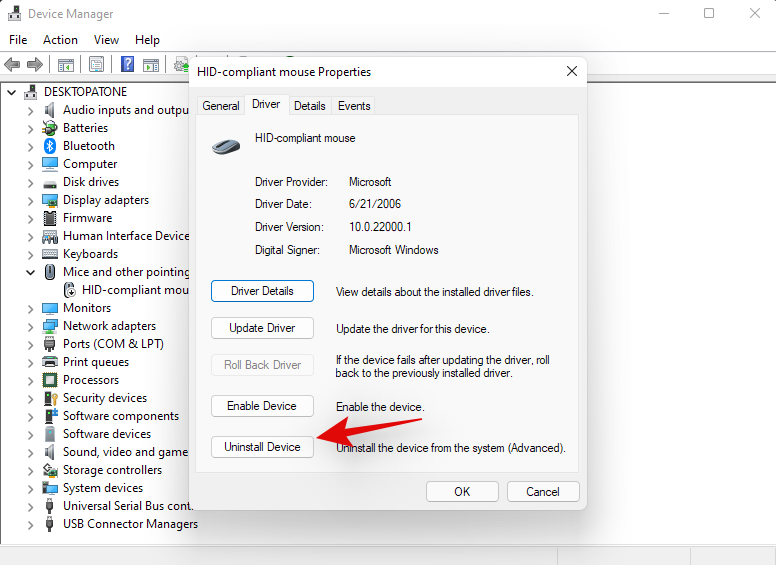
Check the box for ‘Attempt to remove the driver for this device’ and click on ‘Uninstall’.
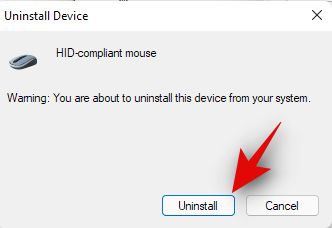
Windows will now uninstall the device from your system and remove its driver as well.
Method #02: Uninstall via Windows Update
If the concerned driver update was delivered through Windows update then you can uninstall the specific update to remove and uninstall the driver from your system. Use the guide below to get started.
Press ‘Windows + i’ on your keyboard to bring up the Settings app and then click on ‘Windows Update’ in the left sidebar.

Click on ‘Update History’.
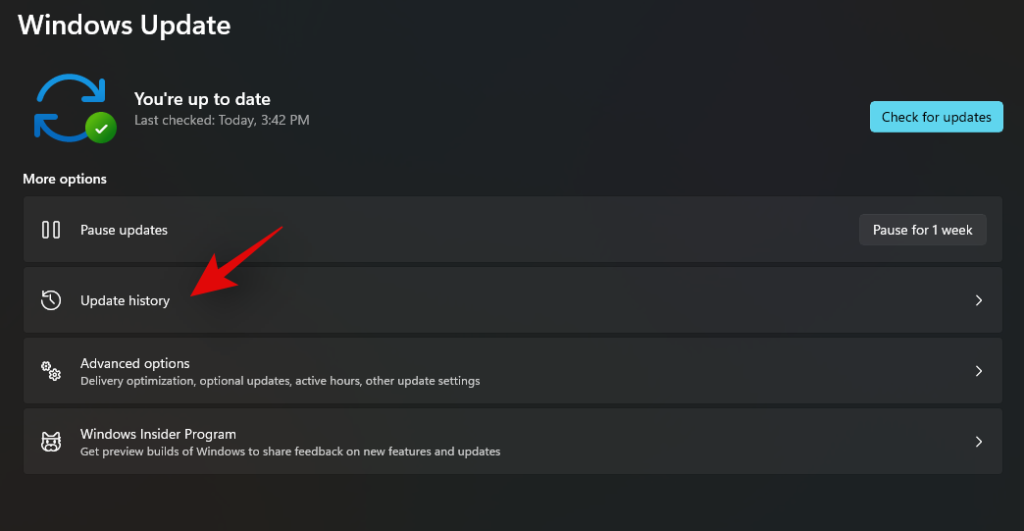
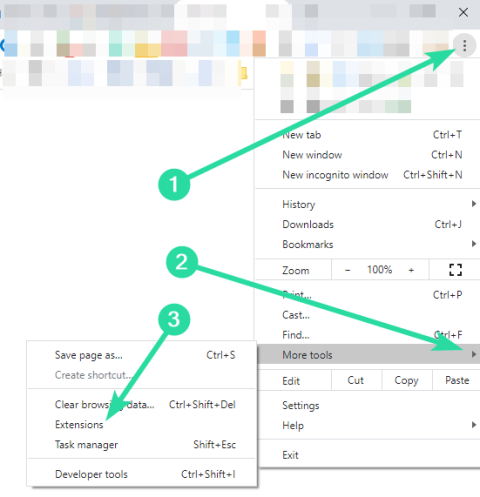
Now scroll to the bottom and click on ‘Uninstall Updates’.
Click and select the update you wish to install and click on ‘Uninstall’ in the toolbar at the top.

Click on ‘Yes’ to confirm your choice.

The selected update will now be uninstalled from your system. Depending on the driver update, you might be required to restart your system as well.
How to stop getting driver updates via Windows Updates
OEM driver updates have a notorious reputation for degrading your performance overtime in an attempt to get consumers to buy a new system. While the ability to get OEM driver updates through Windows is a great feature, it can sometimes uninstall unnecessary updates in the background that can degrade your system’s performance. In such cases you can use the guide above to uninstall them from your device but what about blocking them? Well in that case you can use the guide below instead.
Press Windows + S on your keyboard and search for ‘Device installation settings’ and click and launch the app once it shows up in your search results.

Click and select ‘No’ to stop receiving OEM driver updates.
Now click on ‘Save Changes’.
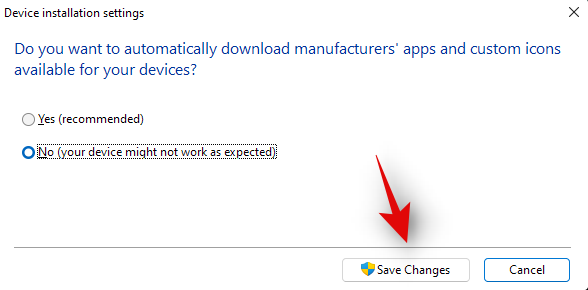
And that’s it! You will no longer receive any driver updates through Windows Updates in Windows 11.
We hope you were able to get familiar with all the ways in which you can install drivers on Windows 11. If you face any issues or have any more questions for us, feel free to reach out using the comments section below.
RELATED







![Como corrixir o erro da pantalla verde de Windows 11 [8 xeitos] Como corrixir o erro da pantalla verde de Windows 11 [8 xeitos]](https://blog.webtech360.com/resources8/images31/image-5564-0105182715287.png)
![[Actualización: 8 de novembro] A ferramenta de recorte non funciona en Windows 11? Como solucionar problemas de erro ou atallos de Esta aplicación non se pode abrir. [Actualización: 8 de novembro] A ferramenta de recorte non funciona en Windows 11? Como solucionar problemas de erro ou atallos de Esta aplicación non se pode abrir.](https://blog.webtech360.com/resources8/images31/image-6552-0105182756436.jpg)
