Zoom é actualmente unha das aplicacións de videoconferencia máis utilizadas no mercado. Ademais das súas amplas capacidades de videoconferencia, o chat integrado de Zoom ten un montón de funcións á espera de acceder.
Zoom diferenciou os seus chats en chats "en reunión" e "chats privados". A configuración de cada un destes pode ser modificada individualmente. Imos mergullarse directamente e aprender sobre a función de chat de Zooms.
Contidos
Como activar o chat de Zoom
O anfitrión dunha reunión de Zoom ten a opción de permitir ou impedir que os participantes usen a función de chat durante a reunión. Unha vez activado, os participantes poden facer clic na icona "Chat" na parte inferior da pantalla e seleccionar a quen queren dirixirse no grupo. Sigue a guía a continuación para saber como activar ou desactivar o chat na reunión.
Paso 1 : inicia sesión no portal web de Zoom e vai a "A miña conta".
Paso 2 : en "Na reunión (básico)", desprázate ata "Chat". Aquí podes alternar entre permitir ou impedir que os participantes usen a opción de chat.

Como cambiar o acceso ao chat nunha reunión
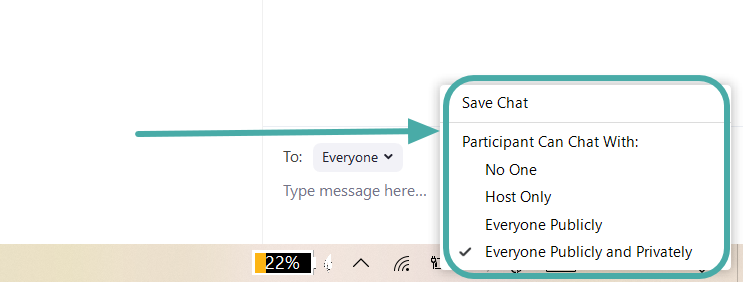
Ademais de activar ou desactivar o chat durante a reunión, o anfitrión dunha reunión pode restrinxir a quen poden falar os participantes. Hai 4 opcións que pode escoller entre un anfitrión:
- Ningún : os participantes non poden conversar con ninguén na reunión
- Só anfitrión : os participantes só poden enviar mensaxes ao anfitrión da reunión, pero non a outros participantes.
- Todos publicamente : os participantes poden conversar con todos os participantes da reunión pero só publicamente.
- Todos publicamente e en privado : ademais de chatear publicamente, os participantes tamén poden enviar mensaxes a outros participantes en privado.
Siga esta guía para cambiar ou restrinxir o uso da funcionalidade de chat nunha reunión de Zoom.
Paso 1 : inicia sesión na aplicación Zoom e inicia unha nova reunión.
Paso 2 : seleccione o botón "Chat" na parte inferior da pantalla. Isto mostrará a barra de chat emerxente.

Paso 3: fai clic no botón "Máis" (tres puntos) situado na esquina dereita xusto enriba da caixa de chat. Aquí podes regular diferentes permisos para que os participantes usen a funcionalidade de chat.
Como falar en privado
Zoom permite aos usuarios conversar entre eles a través dun chat privado. Os usuarios poden enviarse ficheiros, capturas de pantalla e imaxes entre si sen molestar ao resto do grupo. Para manter os chats privados "privados" os usuarios deben activar "Chats cifrados" (siga lendo).
Siga esta guía para iniciar un novo chat en Zoom:
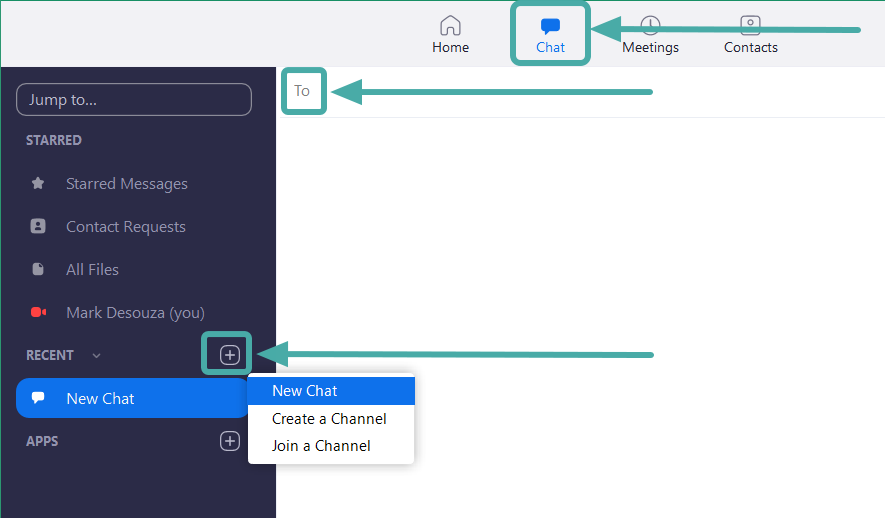
Paso 1 : inicie sesión en Zoom e seleccione o botón "Chat" na parte superior da aplicación. Isto mostrará a páxina de inicio do chat.
Paso 2 : fai clic no pequeno botón "+" ao lado de "Recente" no panel esquerdo e selecciona "Novo chat". Unha vez que crees un chat, poderás engadir a persoa coa que che gustaría conversar, na parte superior da páxina.
Como indicar o seu estado
As iconas de estado son unha forma discreta de indicar se un usuario está ocupado, nunha chamada, nunha reunión, etc. Aparecen xunto ao nome do usuario e axudan a identificar o estado actual do usuario.
As únicas iconas de estado que se poden implementar son as iconas "Ausente" e "Non molestar/Ocupado". Se un usuario activa o estado "Non molestar", deixará de recibir notificacións de chat ou chamada.
Para cambiar o teu estado en Zoom, fai clic na imaxe do perfil na esquina superior dereita e selecciona o estado desexado na lista despregable
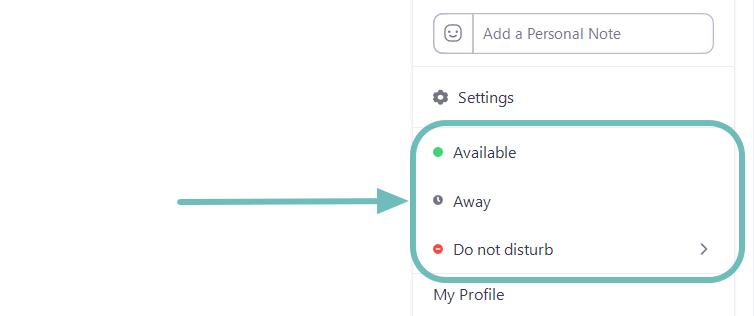
Para obter unha lista completa das iconas de estado e o seu significado, vai á páxina de iconas de estado de Zoom.
Como usar as mencións de chat
As "mencións de chat" permiten aos usuarios dirixir a súa conversa a usuarios específicos nunha canle ou chat. O usuario mencionado recibirá unha notificación de que foi mencionado. Facendo clic na notificación levaraos á mensaxe de chat na que foron mencionados. Isto é especialmente útil para crear un fluxo de conversación, xa que o usuario sabe que se está a dirixir.
Para mencionar un usuario, simplemente escriba '@' e comece a escribir o nome do usuario. Aparecerá unha lista con todos os usuarios da chamada actual para axudarche a escoller.
As mencións de chat tamén se poden usar para ligar a unha determinada canle. Use as seguintes mencións de chat para notificar a outros usuarios:
- @all : envía unha notificación a todos os usuarios da canle.
- @[Nome do usuario] : Menciona un usuario en particular
- #[nome da canle] : ligazón a unha determinada canle. Só os membros desa canle poderán acceder a esa ligazón.
Como enviar ficheiros
A función de chat de Zoom permite aos usuarios non só enviar mensaxes entre si, senón tamén ficheiros. Isto elimina a necesidade de usar outras aplicacións para compartir ficheiros para compartir ficheiros xa que todas as transaccións poden ocorrer dentro da propia xanela de chat.
Para enviar un ficheiro, fai clic no botón "Ficheiro" situado enriba da caixa de texto. Agora podes seleccionar onde queres cargar o ficheiro (Dropbox, Google Drive, Microsoft Onedrive, Box ou o teu ordenador) e seleccionar o ficheiro que queres enviar.
Como enviar unha captura de pantalla
Zoom tamén permite aos usuarios facer unha captura de pantalla directamente desde a xanela de chat. Esta ferramenta intuitiva permítelle recortar unha parte da pantalla, debuxar nela para resaltar os aspectos que desexa e despois descargala ou enviala por chat.
Siga estes pasos para enviar unha captura de pantalla desde a xanela de chat de Zoom
Paso 1 : inicie sesión na aplicación de escritorio Zoom e abra a xanela de chat na que desexa enviar a captura de pantalla.
Paso 2 : fai clic no botón "Captura de pantalla" situado xusto enriba da caixa de texto.

Step 3: Now click and drag your cursor to select the portion of the screen you would like to crop. Once selected, you can edit the image with the tools provided at the bottom of the image.

Step 4: You can choose to ‘Download’ the image or ‘Send’ it in the chat.
Note: For the mobile version of the app, users must utilize the default screenshot settings of the phone (Different phones employ different ways to take screenshots. For example, on a Samsung phone holding the power button + volume down button for 1 second will take a screenshot of the current screen). Users can then share the screenshot using Share>Photo.
How to use Zoom reactions
In an attempt to make the chat feature more fun, Zoom allows users to integrate emojis as well as gifs into their chat. Zoom chat also allows reactions to messages. To react to a certain message, hover your mouse over the message. Now click on the add reaction smiley that appears. You can choose a reaction from a long list of emojis.

In addition to this, there are some hidden features as well. For example, try typing ‘Happy birthday’ and hitting send.
How to enable encrypted chats
This feature when enabled encrypts all chat messages sent between Zoom users. Even admin and hosts can only see the name of the user, and the date and time of their last message in Chat History. While users can still share files, screenshots and emojis, they will not be able to use the integrated GIFs, or edit sent messages
Follow this guide to enable encrypted chats in zoom chat.
Note: You must have admin privileges to make these changes.
Step 1: Sign in to the Zoom web portal and click on ‘Account Management’ in the left panel.
Step 2: Select IM Management. Now click on the IM Settings tab located at the top of the page.
Step 3: Scroll down to ‘Enable advanced chat encryption’ and toggle ON.
How to access chats while sharing screen
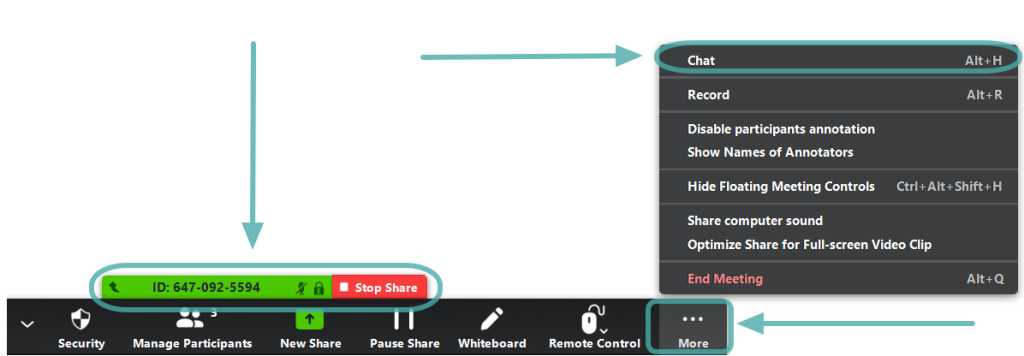
By default, Zoom hides the toolbar when a user is sharing their screen. If you wish to access the chat function while screen sharing using the desktop app, first look for the green tab with the Meeting ID on the screen.
This is where the toolbar is minimized. Note: By default, the toolbar is at the top of the screen, but it can be moved to the bottom too. Simply move the cursor over the Room ID and the toolbar will appear. Click ‘More’>’Chats’ to open the pop-out chat window.
Don’t worry, no one can see what you are typing since Zoom only lets you share one screen at a time.
Note: The mobile version of the app, does not allow users to chat while sharing their screen. Users must end screen sharing, before pulling up the chat functionality.
How to use personal chat space
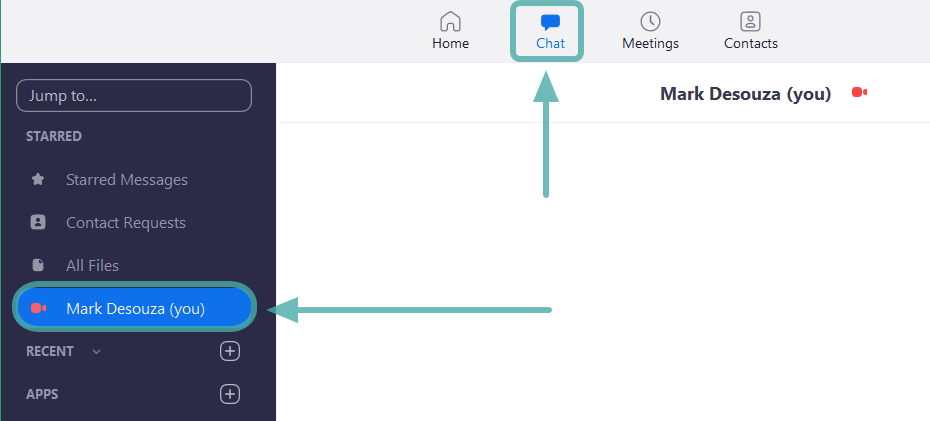
Zoom offers users a personal space in their chat tab. This chat remains a blank workspace that you could fill with memos, images, or documents. This chat remains visible only to the user.
To access the personal chat space on Zoom, click on the ‘Chat’ tab at the top of the app. In the left panel, under ‘Starred’, click on your username. This will bring up a black chat page. Use the ‘Files’, ‘Screenshots’ and other options just as you would in a chat with another person.
How to save chats
Zoom allows the host, co-host or participants of a meeting to save all the chats that occurred within the duration of the meeting. By doing so they can later go through the in-meeting chats to make notes or share it with the group itself.
Follow this guide to save chats manually in a Zoom meeting.
Step 1: While in a meeting, click on the ‘Chat’ button at the bottom of the screen. This will pop out the chat panel.

Step 2: Click on the ‘More’ (three dots) button at the right corner just above the textbox and select ‘Save chat’. The chat will be saved locally on the device. By default, the chat is saved to the Documents folder. To access this chat, go to Documents>Zoom and locate the folder with the date and time corresponding to the meeting.

How to Autosave
Users can also set their Zoom account to autosave all chats within a meeting. This way they do not have to manually save chats at the end of each meeting. Follow this guide to enable autosave in-meeting chats.
Step 1: Sign in to Zoom.us and select ‘Settings’ from the left panel.
Step 2: Under the ‘Meetings’ tab, select ‘In Meeting (Basic)’ and scroll down to ‘Auto saving chats’. Toggle ON to have Zoon save your chats after every meeting.

How to save on Cloud
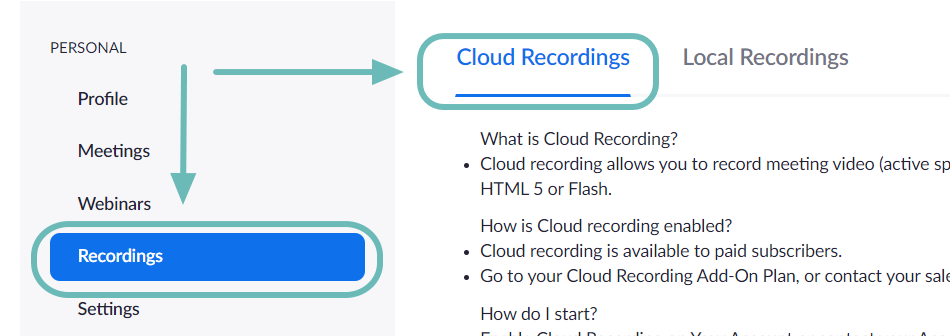
If you have a paid account (Pro or higher) and have Cloud Recording enabled, you may choose to save chats on the Zoom cloud. This way you can access the chats no matter where you log in from. To save in-meeting chats to the Zoom cloud, follow this guide below:
Step 1: Sign in to Zoom.us and select ‘Settings’ from the left panel.
Step 2: Next to recording, (on the right side of the page) click ‘Edit’. Select ‘Save chat text from the meeting’ and hit ‘Save changes’
To access chats saved on the cloud, log in to the web client, and select ‘Recordings’ from the left panel. You can either download the meetings or share them.
How to set expiry date
Chats have an expiry date on them. After a certain time, they disappear from the chat window. Paid account users can decide the duration for which chats will remain before being automatically deleted.
To set the time duration, follow the steps below:
Step 1: Sign in to Zoom.us and go to Account Management > IM Management.
Step 2: Click ‘IM settings’ and scroll down to ‘Storage’
Step 3: Select the duration you would like to keep the chats, and hit ‘Save changes’
By default, Zoom messages stored on the cloud remain for 2 years and those stored on local devices remain for 1 year.
Zoom definitivamente fixo moito esforzo na súa funcionalidade de chat e móstrase. Agardamos que vos gustara ler este artigo. Hai algunha característica que teña notado que destaque do paquete? Avísanos nos comentarios a continuación. Ah, e avísanos se aínda probaches o ovo de Pascua "Feliz aniversario"!
