How to Clean a PS5 Fan Without Taking It Apart: A Safe Beginner Guide

Learn how to clean PS5 vents safely without opening the console, using Sony-recommended low-power vacuuming, dry wiping, and proper airflow.
Taking a chain off a bike is straightforward once you know how that chain is joined. The important part is not forcing every chain apart the same way. Modern derailleur chains commonly use a master link—also called a quick link or power link—while some chains are joined with a special connecting rivet. Older and single-speed chains may use a clip-style master link.
This guide gives you a practical decision path for all three. It follows current manufacturer and workshop guidance from Park Tool's derailleur-chain replacement guide, Shimano's QUICK-LINK installation/removal manual, and SRAM's PowerLock service guidance.
| Chain connection | What it looks like | Typical removal tool | Important caution |
|---|---|---|---|
| Modern quick link / master link | One link has two distinctive side plates, often with slots or a different finish. | Master-link pliers | Reuse rules vary. Some links are one-time-use. |
| Shimano QUICK-LINK | A dedicated connector link in the chain. | Shimano specifies TL-CN10 for the documented QUICK-LINK procedure. | Follow the manual for your exact chain and connector. |
| SRAM PowerLock | SRAM connector link, sometimes directional. | Master-link pliers | SRAM states Eagle PowerLock is single-use; install a new one after removal. |
| Connecting-rivet chain | No removable quick link; one or more special connecting rivets may look different. | Compatible chain tool | Do not choose an existing special connecting rivet as the place to break the chain. |
| Clip-style single-speed master link | Two pins, a removable side plate, and a spring/C-clip. | Needle-nose pliers | Do not confuse it with a modern slotted quick link. |
Shift the chain onto the smallest front chainring if the bike has multiple chainrings and onto a small rear sprocket. That leaves the rear derailleur less stretched and makes the chain easier to handle. Park Tool also notes that removing the rear wheel is optional but can take additional tension off the chain and make removal easier.
If you are working on a single-speed, BMX, fixed-gear, coaster-brake, or internally geared bike, the setup is different because there is no derailleur spring to provide chain slack. Park Tool's single-speed procedure starts by loosening the axle nuts so the wheel can move forward and relieve chain tension.
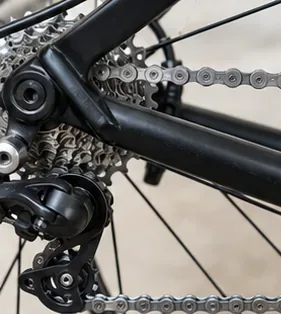
Rotate the cranks slowly while visually inspecting the chain until you find the connector. A modern quick link usually has side plates that look different from the surrounding links. It may be a different color, have elongated openings around the pins, or carry an arrow or model marking.
If you find a quick link, stop there and use the quick-link method below. If every link appears conventional, inspect for a special connecting rivet. Park Tool advises that when breaking a connecting-rivet chain, the rivet you drive out should be several links away from any special connecting rivet already installed.
Do not assume that two chains with the same number of speeds use the same connector. Tool compatibility can differ by chain shape as well. For example, Park Tool's current CT-3.3 documentation lists compatibility with modern SRAM T-Type, SRAM Flattop, and Shimano XTR 12-speed chains, while older chain tools may not fit those profiles.
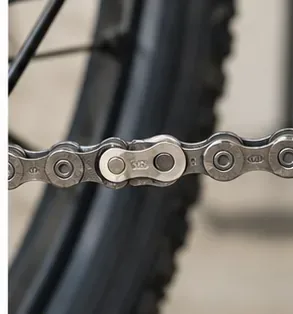
Move the quick link to the lower, accessible run of chain. Remove as much chain tension as practical. Insert the jaws of compatible master-link pliers into the link and squeeze just far enough for the two plates to slide out of their locked position. Park Tool's MLP-1.2 instructions describe this sequence as removing chain tension, inserting the tool tips into the master link, and squeezing until the link separates.
For Shimano QUICK-LINK chains covered by its current dealer manual, Shimano specifies its TL-CN10 tool: place the tool on the QUICK-LINK, slide the pins, and remove the connector. Use the instructions for your exact Shimano chain rather than assuming every generation is identical.
For SRAM, connector reuse deserves special attention. SRAM states that Eagle PowerLock is designed for single use only, can be removed with chain-link pliers, and must not be reused. Have a compatible replacement PowerLock ready if you are removing one of those chains for later reinstallation.
A clip-style master link has a spring clip or C-clip rather than the slotted plates found on many derailleur-chain quick links. Park Tool recommends needle-nose pliers to remove the C-clip and master link. Keep the small pieces together so they are not lost, and inspect the manufacturer's reuse requirements before reinstalling them.
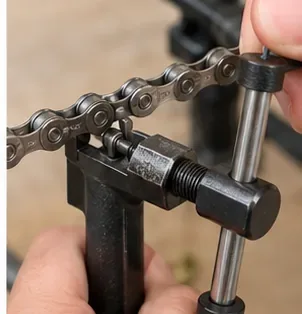
Place a regular rivet—several links away from any special connecting rivet—into a chain tool that is compatible with the chain. Center the chain-tool driving pin precisely on the chain rivet. Turn the handle steadily while watching from the side so the tool pin stays straight. Park Tool emphasizes straight alignment because an off-center tool can damage the tool pin or chain plates.
Drive the selected rivet out far enough for the chain to separate. If the chain is worn and being discarded, complete rivet removal is generally uncomplicated. If the chain will be reused, follow the chain maker's specified reconnection method; do not assume the ordinary rivet you pushed out is intended to be pressed back in.
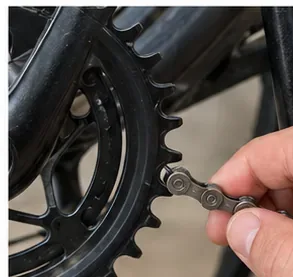
Once the chain is open, hold one end so it does not whip into the frame. Lift it off the front chainring, then guide it away from the cassette and through the rear derailleur cage. Watch how it passes around the upper and lower jockey wheels and on which side of any derailleur-cage tabs it runs. Park Tool specifically warns that correct routing around derailleur cage tabs matters during installation.
If the chain is greasy, place it directly on a rag, tray, or disposable work surface rather than dropping it onto brake rotors, brake pads, upholstery, or flooring.
If the chain is coming off only for service, label or bag any reusable connector parts so they do not disappear. If the connector is one-time-use, discard it and obtain the correct replacement. Before reinstalling the chain, also inspect any directional markings on the chain and connector.
If you removed the chain because it is worn, do not automatically copy its length onto a new chain unless you know the old chain was correctly sized. Park Tool's replacement procedure recommends checking chain length and derailleur position rather than assuming an existing chain was right.
First, make sure all chain tension is off the connector and that your pliers are positioned in the correct openings. Dirt, dried lubricant, corrosion, or a link that was installed under high tension can make separation harder. Clean the link enough to see the plate slots, then try again with the correct master-link tool.
Do not twist the chain sideways with screwdrivers or pry against the side plates. That can bend a link or damage the drivetrain. If a manufacturer's single-use connector is extremely stubborn, replacement is still the plan once it comes off, so focus on using the correct removal tool rather than preserving the connector.
Yes—if the chain has a removable master or quick link and you have the proper link-removal tool. A chain tool is unnecessary for many modern master-link chains. Conversely, if the chain is rivet-connected and has no removable connector, a compatible chain tool is the normal workshop method.
Some quick links can occasionally be opened by hand when very clean and lightly loaded, but that is not a universal technique. Using master-link pliers gives controlled force and reduces the chance of pinching your fingers or bending the plates.
The fastest way to take a chain off a bike is to identify the connector before reaching for a tool. A modern quick link normally comes apart with master-link pliers. A clip-style single-speed master link uses its clip. A rivet-connected chain requires a compatible chain tool and a carefully chosen regular rivet. Once the chain is open, unthread it slowly, note the derailleur routing, and follow the manufacturer's connector-reuse rules before reinstalling it.
Learn how to clean PS5 vents safely without opening the console, using Sony-recommended low-power vacuuming, dry wiping, and proper airflow.
Learn how to clean a car air filter safely, when a paper filter should be replaced instead, and how reusable filters require different care.
Learn how to clean a Keurig entrance and exit needle safely, clear coffee-ground clogs, rinse the brewer, and know when descaling is the next step.
Learn how to remove dried nail glue from clothes safely, when acetone is appropriate, which fabrics need extra care, and when to stop and call a cleaner.
Learn how to clean a metal range hood filter safely, when dishwasher cleaning is okay, and why charcoal filter care depends on your exact model.
Learn how to remove rust from golf clubs safely, judge the result, protect raw and plated finishes, and know when cleaning should stop.
Learn how to clean fabric blinds safely with gentle vacuuming, spot cleaning, rinsing, and drying—plus when water, washing, or DIY deep cleaning can cause damage.
Learn how to season gas grill grates safely, including when cast iron needs seasoning, when porcelain enamel does not, and how to check the result.
Clean a Breville toaster oven safely with mild soap, soft cloths, and the right sequence. Learn what clean should look like, what to avoid, and when to stop.
Learn how to clean a microwave grease filter, when a dishwasher is appropriate, and why charcoal filters should be replaced instead of washed.








