Home
» How To
»
How to Clean a Keurig Needle Safely: A 4-Step Guide for Clogs and Coffee Grounds
How to Clean a Keurig Needle Safely: A 4-Step Guide for Clogs and Coffee Grounds
A slow Keurig, a partial cup, or coffee grounds in the mug can point to a clogged brewing needle—but those symptoms do not prove the needle is the only problem. Keurig’s own care guides say coffee grounds can collect in the entrance and exit needles, and several models instruct owners to loosen those grounds with a straightened paper clip. The safest approach is to clean the needle first, rinse the brewer, and then move to model-specific troubleshooting if the problem remains.
This guide was checked against Keurig manufacturer support material on September 13, 2026. The basic method below matches guidance published for common K-Cup brewers such as the K-Elite and K-Classic. Exact part shapes and removal methods vary by model, and some older Keurig 2.0/Plus brewers can use a dedicated Brewer Maintenance Accessory instead of—or in addition to—the paper-clip method.
What you need before cleaning the Keurig needle
A clean metal paper clip that can be straightened
A mug large enough for a water-only rinse
Fresh water
A sink for rinsing removable pod-holder parts, if your model allows them to be removed
Your brewer’s model number or user guide if the pod holder does not release the way described below
Verified safety point: Keurig manuals warn that the needles above and below the pod holder are sharp. The company also instructs users to turn off and unplug the brewer before cleaning or maintenance. Do not feel around inside the pod chamber with your fingers. Action: power the brewer off, unplug it, remove any used pod, and let hot parts cool before you begin.
How to clean a Keurig needle in 4 steps
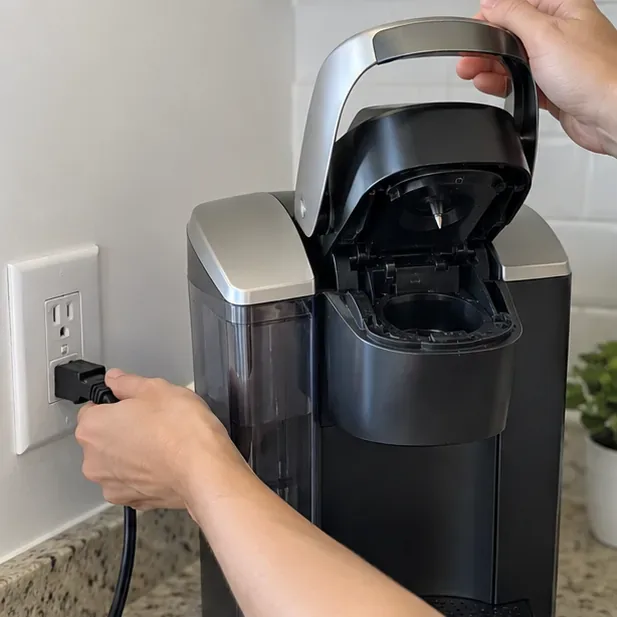
1. Turn off and unplug the brewer, then open the handle
Switch the machine off, unplug it from the outlet, and lift the handle so you can see the pod chamber. Remove any K-Cup pod. If the brewer was just used, give the pod area time to cool because very hot water can remain around the brewing chamber.
Start with the brewer powered off and unplugged, then raise the handle so the pod chamber is accessible without reaching into the sharp needle area.
Why this matters: the needle is not simply a blunt water outlet. It is designed to puncture the pod, so contact can cut skin. Action: keep your fingers on the handle and removable plastic parts rather than inside the chamber.
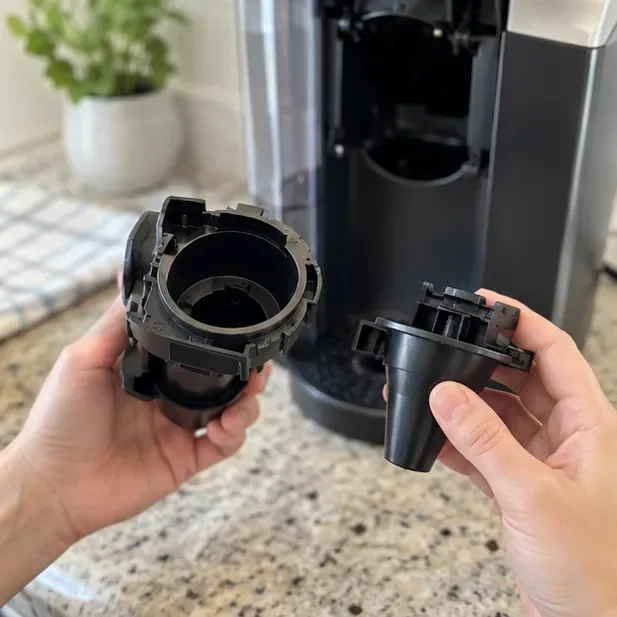
2. Remove the pod holder and funnel if your model’s guide allows it
On many Keurig K-Cup brewers, the lower exit needle sits inside the pod-holder assembly. Keurig’s K-Elite and K-Classic care instructions tell users to remove the pod holder and detach its funnel to reach the exit needle. The release method can differ by brewer, so do not force a part that does not move normally.
On compatible models, remove the pod-holder assembly and separate the funnel so the exit-needle area can be inspected and cleaned.
Model-dependent point: not every Keurig has the same pod-holder design. Action: if the assembly does not release easily, stop and check the model-specific guide on Keurig Support rather than prying it out.
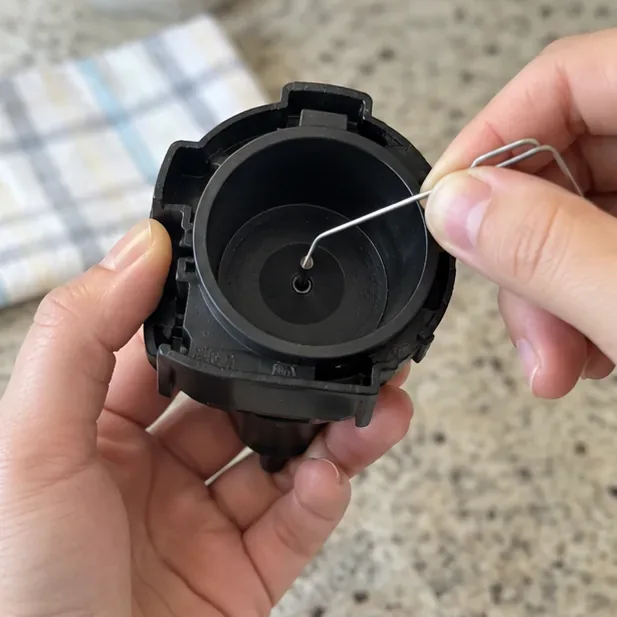
3. Clear the exit needle gently with a straightened paper clip
Locate the exit needle opening in the bottom of the removable K-Cup pod holder. Carefully insert the straightened end of the paper clip into the opening and move it gently to loosen compacted coffee grounds. Keurig’s K-Elite and K-Classic instructions specifically describe this technique for the exit needle.
Insert a straightened paper clip only into the exit-needle opening and move it gently to loosen trapped coffee grounds; do not force the wire deeper.
If your model’s removable parts are washable, rinse the pod-holder components thoroughly with water and reassemble them as directed. Do not use the paper clip as a drill or lever. The goal is to loosen debris, not enlarge, reshape, or bend the needle opening.
Verified point: Keurig recommends gentle clearing of coffee grounds, not forceful scraping. Action: stop if the paper clip meets hard resistance or the needle appears bent or damaged.
4. Clean the entrance needle, reassemble, and run two water-only brews
With the brewer still off and the handle raised, locate the entrance needle on the underside of the lid. On models such as the K-Elite and K-Classic, Keurig directs users to carefully insert a straightened paper clip into the needle holes and gently move it around to loosen grounds. Some entrance needles have more than one opening, so clean only the openings you can clearly identify without forcing the wire.
With the handle raised, clean the visible entrance-needle opening carefully; after reassembly, place a mug below and run water-only rinse cycles.
Reinstall the pod holder if you removed it, lower the handle, plug the machine back in, and place a mug on the drip tray. Keurig’s common-brewer guidance calls for two water-only brew cycles after cleaning the entrance needle. Do not insert a K-Cup pod during these rinses.
Verified point: the rinse is part of the manufacturer’s needle-cleaning procedure because it helps flush loosened grounds out of the brew path. Action: inspect the rinse water after each cycle. A few loose grounds may appear at first; the second rinse should be noticeably cleaner.
Quick diagnosis: what a needle cleaning can and cannot fix
Symptom
What is verified
What to do next
Coffee grounds in the cup
Keurig says grounds can collect in the entrance or exit needle.
Clean both needle areas and run two water-only brews.
Partial cup or interrupted brew
A clogged exit needle can contribute to partial brewing on some models.
Clean the needle first; if the problem remains, follow your model’s descale and troubleshooting instructions.
Slow flow after needle cleaning
Needle debris is not the only possible cause.
Check the reservoir seating and follow the brewer’s official descaling procedure if mineral scale is suspected.
Needle looks bent, cracked, or damaged
A paper clip cannot repair damaged hardware.
Stop using the brewer and contact Keurig support for model-specific service guidance.
Common misunderstandings about Keurig needle cleaning
“Descaling and needle cleaning are the same thing”
They are not the same maintenance task. Keurig manuals discuss needle cleaning as a way to remove coffee grounds from the entrance and exit needle. Descaling is a separate process intended to remove mineral buildup from the brewer’s internal water path. A machine can need one, the other, or both.
What is verified: Keurig’s K-Classic care guide lists needle cleaning and descaling separately, and its troubleshooting section can direct a user from an exit-needle check to descaling when a partial-cup problem continues. Action: clear visible coffee-ground clogs first; if flow is still reduced, perform the exact descaling process in your model’s manual rather than assuming the paper clip solved every restriction.
“A Keurig has only one needle”
Many K-Cup brewers have an entrance needle above the pod and an exit needle at the bottom of the pod holder. That is why cleaning only the upper needle can leave a lower clog untouched.
What is verified: Keurig’s K-Elite and K-Classic documentation identifies both an entrance and an exit needle. Action: check both locations if your model’s guide shows both, especially when grounds are appearing in the cup.
“If the paper clip does not slide in easily, push harder”
That is not supported by Keurig’s instructions. Manufacturer guidance says to insert the paper clip carefully and move it gently to loosen coffee grounds. It does not instruct users to force the wire through an obstruction.
Action: use light pressure only. If you cannot identify the opening clearly, or the needle appears deformed, stop and use the support path for your exact brewer.
“Pouring vinegar or cleaner directly into the needle is a better shortcut”
Keurig’s needle-cleaning instructions reviewed for this guide use a straightened paper clip, water rinsing, and—on certain Keurig 2.0/Plus systems—a Brewer Maintenance Accessory. They do not direct users to pour vinegar or household cleaner directly into a needle opening.
What remains unverified: a household workaround may circulate online, but that does not make it a manufacturer-approved needle-cleaning method for your brewer. Action: keep needle cleaning mechanical and water-based, and use only the model-specific descaling solution or procedure Keurig specifies when you need to descale.
What changes on Keurig 2.0 and Plus Series brewers?
Some Keurig 2.0 and Keurig Plus Series machines were supplied with or supported a Brewer Maintenance Accessory. Keurig describes this accessory as a tool for clearing natural coffee-ground buildup from the entrance needle. The accessory instructions call for filling its silicone bulb with water, positioning it in the pod holder, and raising and lowering the handle to loosen grounds.
Model-dependent point: this accessory is not universal to every current or older brewer. Action: if you own a 2.0/Plus model, compare your machine and accessories with the official Keurig 2.0 Brewer Maintenance Accessory instructions before following a generic paper-clip tutorial.
How do you know the cleaning worked?
After reassembly, run the recommended water-only rinses and watch for three practical signs: water flows steadily into the mug, loose grounds stop appearing, and the brewer completes the selected rinse amount without an obvious interruption. Those signs support the idea that a ground clog was cleared, but they do not prove the entire brewer is free of mineral scale or other faults.
What is unknown from symptoms alone: a partial cup can have more than one cause. Keurig’s troubleshooting for common brewers also points to reservoir issues, descaling needs, or customer service when a problem persists. Action: if two clean rinses do not restore normal flow, move to your model’s official troubleshooting and descaling steps instead of repeatedly probing the needle.
When to stop and contact Keurig
The needle is visibly bent, loose, cracked, or damaged.
The brewer still produces partial cups after the needle is cleaned and the model-specific descaling procedure is completed.
The pod-holder assembly cannot be removed or reinstalled without force.
The brewer leaks, gives an electrical error, or behaves abnormally after reassembly.
You are unsure whether your model uses a removable pod holder or a maintenance accessory.
Keurig’s current support site provides product-specific FAQs, manuals, troubleshooting, chat, and phone support. Start with Keurig Support and select your exact coffee maker.