Home
» How To
»
How to Remove a Drain Stopper From a Sink Without Damaging the Linkage
How to Remove a Drain Stopper From a Sink Without Damaging the Linkage
A sink stopper should come out with controlled, low-force movements. The goal is not simply to get the stopper loose; it is to remove it without bending the horizontal rod, cracking a plastic pivot nut, twisting the drain body, or creating a leak that was not there before. A good result is easy to recognize: the stopper lifts free, the linkage remains intact, the drain opening is accessible for cleaning, and the stopper works smoothly after reassembly.
This guide focuses on common bathroom sink stoppers. The most frequent design is a lift-rod pop-up, where a rod behind the faucet moves a linkage under the sink. Other sinks use a push-to-close stopper that unscrews from above. Because those designs come apart differently, identifying what you have is the first quality-control step.
First, identify the stopper type
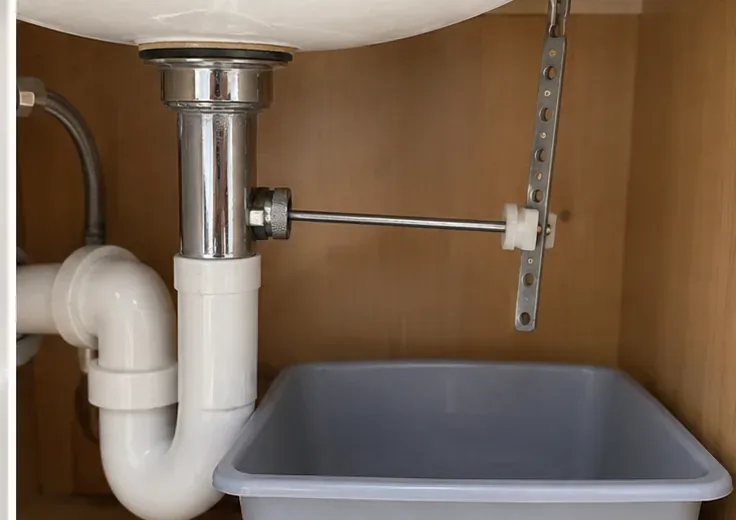
Look at the faucet and the stopper before reaching for tools. If a small lift rod rises behind or through the faucet, you probably have a conventional pop-up drain. Under the sink, that system normally includes a vertical perforated strap, a horizontal pivot rod, and a nut where the horizontal rod enters the drain body. Kohler describes the same basic mechanism in its pop-up drain adjustment guidance.
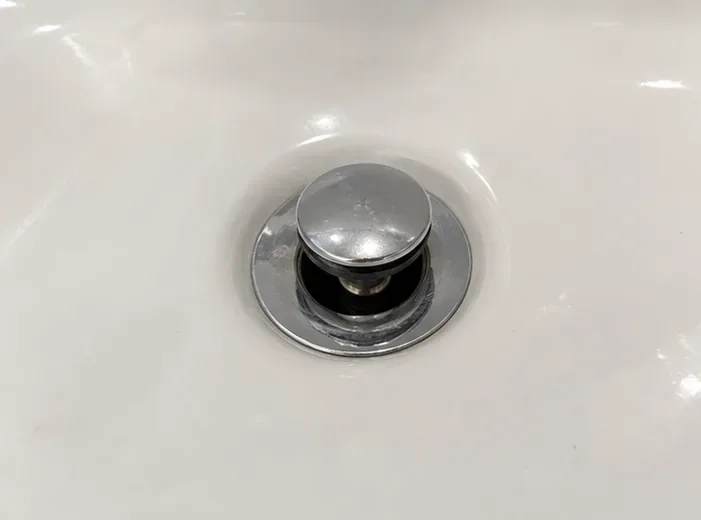
A conventional pop-up stopper shown from above. If your faucet also has a lift rod, expect a linkage beneath the sink.
If there is no lift rod and the stopper opens or closes when you press it, it may be a threaded push-style stopper. Pfister states that its Push & Seal stopper can be removed by unscrewing it for drain access; see the manufacturer’s Push & Seal service information. Do not disconnect under-sink linkage if your drain does not have any.
What you see
Likely type
Removal approach
Lift rod at faucet plus horizontal rod under sink
Lever-operated pop-up
Release the pivot rod, then lift the stopper
No lift rod; stopper clicks when pressed
Push-to-close / threaded push stopper
Open it, then try unthreading the stopper from above according to the model instructions
Stopper turns but will not release, or parts differ from these layouts
Model-specific design
Stop and check the manufacturer’s parts diagram or installation guide
What you need
A shallow plastic tub, tray, or towel for drips
Flashlight or work light
Disposable gloves if the drain has hair or sludge buildup
Adjustable pliers only if a pivot nut will not loosen by hand
A small brush and mild dish soap for cleaning the removed stopper
For stopper-only removal, you normally do not need to disassemble the P-trap. Avoid running the faucet while the pivot rod is removed, because water can escape from the open pivot-rod port on some drain bodies.
How to remove a lift-rod pop-up drain stopper
1. Clear the cabinet and catch drips
Remove stored items from below the sink so you can see the drain body directly under the basin. Place a shallow tub or folded towel below the drain. You are creating a clean work area and a way to notice even a small leak later.
The horizontal pivot rod enters the side of the drain body and connects to the perforated lift-rod strap. A shallow tub below the plumbing catches incidental drips.
2. Find the horizontal pivot rod and note its current position
Follow the drain pipe down from the sink. The horizontal rod usually enters the rear or side of the drain body and then passes through a hole in the vertical strap. Before taking anything apart, note which hole the rod uses and how the spring clip is positioned. A quick photo with your phone can make reassembly easier.
The stopper may already be removable without disconnecting anything. Try lifting it straight up with gentle pressure. Delta notes that if a stopper does not lift straight out, the horizontal rod is holding it in place; the company’s drain-stopper cleaning guidance directs users to remove the rod-retaining nut and move the rod away from the drain so the stopper can be freed.
3. Release the rod from the strap if access requires it
On many installations, a spring clip secures the horizontal rod to the perforated strap. Squeeze the clip and slide it off, then withdraw the rod from the strap. If the pivot nut is easy to reach with the rod still attached, you may be able to leave the strap connection alone. The quality target is simple: create enough straight-line access to the pivot nut without bending the rod.
4. Loosen the pivot nut and withdraw the horizontal rod
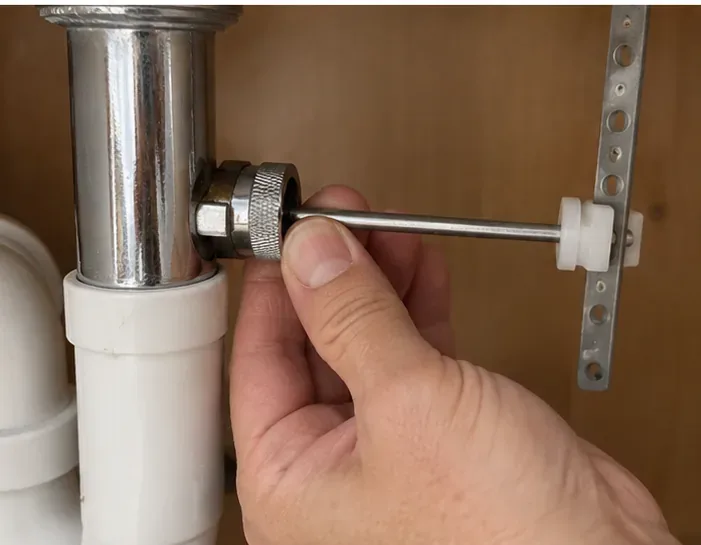
Turn the pivot nut counterclockwise. Many nuts are designed to be hand-tightened, so start with your fingers. If it is stuck, use pliers carefully and apply only enough force to break it free. Hold the drain body steady with your other hand if necessary. If the whole drain body begins to rotate, stop rather than forcing the nut.
Loosen the pivot nut at the drain body, keeping the horizontal rod straight. Excessive side load can bend the rod or stress the fitting.
Once the nut is free, pull the horizontal rod straight out far enough to disengage the bottom of the stopper. Kohler’s instructions describe the same sequence: unthread the rod nut, pull out the ball rod, and then remove the stopper.
5. Lift the stopper out from above
Return to the sink and pull the stopper upward. It should now rise with little resistance. If it still feels mechanically captured, do not pry against the sink or yank on the decorative cap. Look under the sink again and confirm that the pivot rod has actually cleared the stopper’s lower loop or eye.
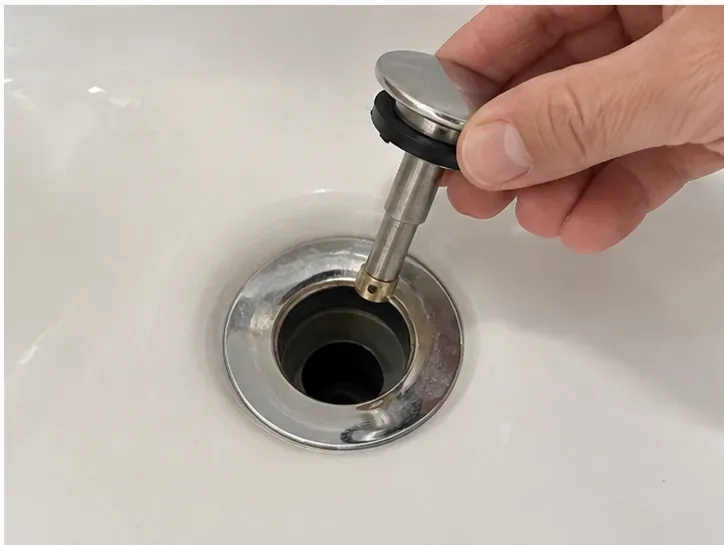
With the pivot rod disengaged, the stopper should lift out cleanly from above without prying against the sink finish.
What a successful removal should look like
After removal, inspect both the stopper and the drain opening. The stopper stem should be straight, its seal should not be torn, and no pieces should be missing. The opening should be accessible enough to remove hair, soap residue, and other debris without pushing it deeper into the drain.
If your original problem was slow drainage, clean the underside of the stopper and the top section of the drain first. A stopper packed with hair can reduce flow even when the P-trap is clear. If the drain remains slow after the visible debris is removed, the restriction may be farther down the line, which is beyond what stopper removal alone can fix.
How to remove a push-style stopper
For a push-to-close stopper with no lift rod, first press it into the open position. Grip the decorative cap and try turning it counterclockwise. Some designs unthread as a complete stopper; others have a cap that removes separately from an internal cartridge. Pfister specifically says its Push & Seal stopper is threaded and can be removed by twisting the finished cap counterclockwise.
Stop if the cap spins without rising, if the drain flange begins rotating, or if the model has a hidden set screw or cartridge arrangement you cannot identify. At that point, model-specific documentation matters more than additional force.
Clean, reinstall, and test the result
Clean the removed stopper with warm water, mild dish soap, and a small brush. Wipe the drain opening without scratching the metal finish. Avoid using a screwdriver as a scraper on a plated drain flange.
For a lever-operated pop-up, place the stopper back into the drain with its lower opening aligned toward the pivot-rod port. Slide the horizontal rod back into the drain body so its tip engages the stopper. Reinstall the pivot nut, reconnect the rod to the same strap hole, and reinstall the spring clip. Tighten the pivot nut enough to seal and operate smoothly, but do not overtighten a plastic nut.
Use this three-part quality check
Movement: Operate the lift rod or press the stopper several times. The stopper should move freely without binding.
Drainage: Open the stopper and run water. Water should pass normally, with no new restriction caused by incorrect linkage adjustment.
Leak check: While water is running and again after the basin drains, inspect the pivot-nut area and the drain body below the sink. The area should remain dry.
If the stopper closes but will not open far enough, reconnect the horizontal rod at a different strap hole only after comparing the setup with the manufacturer’s instructions. If the sink leaks around the drain flange rather than the pivot nut, that is a different repair involving the drain-body seal, gasket, putty, or silicone; removing the stopper alone will not correct it.
When to change your approach
The pivot nut is heavily corroded: penetrating oil and replacement hardware may be more appropriate than increasing force.
The drain body turns when you loosen the nut: stop. Twisting the body can disturb the seal between the drain flange and sink.
A plastic nut is cracked or distorted: replace the damaged part rather than trying to make it seal by overtightening.
The stopper has no visible linkage and will not unthread: identify the brand/model before proceeding.
You need to remove the entire drain flange or tailpiece: that is a larger job than stopper removal and may require new sealing material and trap disassembly.
Bottom line
For the most common bathroom sink pop-up, the reliable method is to work from below: identify the horizontal pivot rod, release or reposition its linkage as needed, loosen the pivot nut, withdraw the rod, and then lift the stopper from above. The right method feels controlled. If parts are bending, the drain body is rotating, or the stopper remains captured, treat that resistance as a sign to verify the design rather than apply more force.
After reassembly, judge the job by function and dryness: the stopper should open and close smoothly, the sink should drain normally, and the pivot connection should stay dry. Those checks matter more than simply getting the stopper out.