Home
» How To
»
How to Clean an Epson Printhead Safely: Start With the Built-In Cleaning Tools
How to Clean an Epson Printhead Safely: Start With the Built-In Cleaning Tools
The safest way to clean an Epson printhead is usually not to open the printer and wipe, soak, or flush the printhead by hand. Start with Epson’s built-in maintenance tools: print a nozzle check, run Head Cleaning only if the pattern shows gaps, and then print another nozzle check. Escalate to Power Cleaning only when your exact Epson model supports it and the manual says the nozzle pattern or repeated cleaning justifies it.
This matters because Epson’s own maintenance instructions are designed to move ink through the nozzles without physically touching the printhead. The company also warns not to turn the printer off or open certain covers during a cleaning cycle. If you are looking for instructions involving syringes, cleaning fluid, soaking, or swabbing the nozzle plate, those are not part of the general Epson consumer maintenance procedures covered here.
First, Confirm That the Printhead Is Actually the Problem
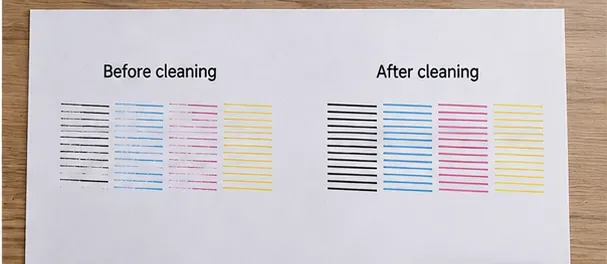
Missing lines, horizontal banding, faded colors, or one color dropping out can indicate clogged nozzles, but they do not prove it. Paper settings, low ink, damp paper, print-quality settings, or alignment can create similar symptoms. Epson’s troubleshooting guidance therefore starts with a nozzle check: a small diagnostic pattern printed by the printer so you can see whether individual ink nozzles are firing correctly.
If the pattern is complete, do not keep cleaning the printhead. Repeated cleaning uses ink and will not fix problems caused by paper settings or alignment. If the pattern has gaps or faint sections, Head Cleaning is appropriate.
A nozzle check is the decision point: gaps or faint sections suggest clogged nozzles, while a complete pattern means you should investigate other print-quality causes.
How to Clean an Epson Printhead in 5 Steps
1. Load Plain Paper and Run a Nozzle Check
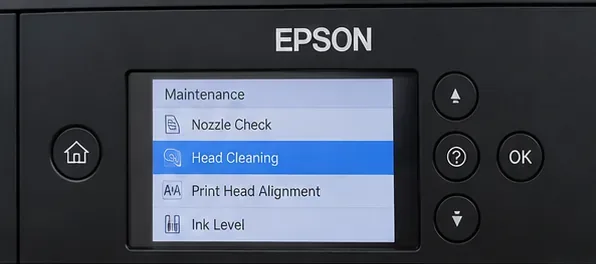
Load a few sheets of plain paper. On many Epson printers with an LCD, the option is under Maintenance and is named Nozzle Check or Print Head Nozzle Check. On other models, you may start it from Epson’s printer utility on Windows or macOS, or with a button sequence on the printer.
Do not rely on a menu path from a different Epson model if your screen looks different. Epson’s product lines use different control panels and software versions. Search your model on Epson Support if you cannot find the function.
After the page prints, look for missing segments. A few gaps generally point to normal Head Cleaning. If most or nearly all of the pattern is missing, some Epson manuals direct you to Power Cleaning instead. Follow the pattern examples in your own manual.
2. Run Head Cleaning, Then Let the Cycle Finish
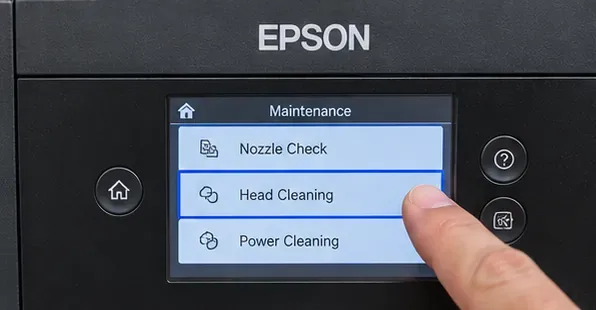
If the nozzle check shows gaps, choose Head Cleaning or Print Head Cleaning. The printer will run an automatic cleaning cycle. During this process, the power light may flash.
Epson warns not to turn off the printer or open the specified cover or scanner unit while a cleaning cycle is running. Interrupting the cycle can prevent proper operation or cause printing problems.
A maintenance screen showing the Head Cleaning function documented on many Epson printers. Exact menu layout and wording vary by model.
When the cycle finishes, do not assume the problem is solved. The correct next step is another nozzle check.
3. Print Another Nozzle Check and Repeat Only as the Manual Allows
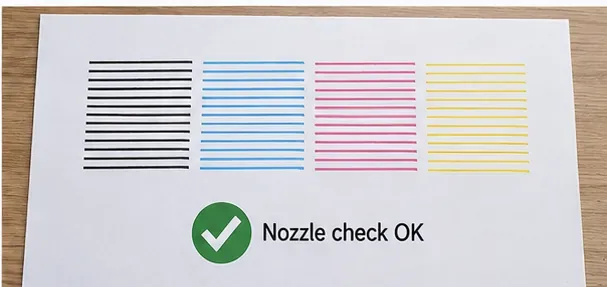
Print the diagnostic pattern again. If the lines are now complete, stop cleaning and return to normal printing. If there are still gaps, Epson manuals for many consumer models allow another normal cleaning cycle.
Many current Epson guides say that if there is no improvement after cleaning the printhead up to three times, you should stop, turn the product off with its normal power control, and wait before trying again. However, the waiting period is model-specific. Many EcoTank manuals specify at least 12 hours, while Epson’s SureColor P700/P900 documentation specifies at least 6 hours. Do not turn “12 hours” into a universal rule.
4. Use Power Cleaning Only When Your Epson Manual Calls for It
Power Cleaning is a stronger ink-flushing maintenance routine available on many, but not all, Epson printers. It is not simply “Head Cleaning, but better.” Epson says it consumes a large amount of ink and should be used only when necessary.
On EcoTank models covered by Epson’s current guidance, each tank may need to be at least one-third full before Power Cleaning. Epson warns that running it with too little ink can damage the product. Power Cleaning can also fill a maintenance box or ink pad faster, which may eventually require replacement or service.
If your nozzle-check page is almost entirely missing, or normal cleaning has failed in the sequence described by your manual, Power Cleaning may be the next supported step. The menu path also varies. For example, some current Epson LCD models place it under Maintenance > Print Head Cleaning > Power Cleaning.
Some Epson models provide Power Cleaning in the maintenance menu. Use it only when the model manual calls for it, because it consumes substantially more ink.
5. Recheck the Pattern; If It Still Fails, Stop Repeating Cycles Indefinitely
After any cleaning procedure, print a fresh nozzle check. A complete pattern means the nozzle issue is resolved. If gaps remain after the number of cleaning attempts allowed in the manual, give the printer the required rest period rather than running cleaning cycles continuously.
Some newer Epson manuals add another escalation step called Power Ink Flushing after a failed Power Cleaning, while other models tell you to contact Epson support instead. This is another reason to use model-specific instructions: these features are not available on every Epson printer and can consume significant ink.
A complete nozzle pattern means the nozzles are firing normally; additional head-cleaning cycles are unnecessary.
When This Method Is Appropriate
Symptom
Best first action
One or more colors have small gaps or broken lines
Run a nozzle check, then normal Head Cleaning if the check confirms gaps.
Most of the nozzle pattern is missing
Check your model manual; some Epson printers direct you to Power Cleaning.
Nozzle check is perfect but prints still show bands
Check paper type, quality settings, printhead alignment, and paper condition instead of repeating cleaning.
Printer sat unused for a long time
Run a nozzle check first; Epson may recommend Power Cleaning if normal cleaning cannot restore the pattern.
Ink tanks are low
Refill as required before cleaning. Power Cleaning on many EcoTank models requires each tank to be at least one-third full.
Repeated cleaning does not improve the pattern
Stop, wait the model-specific interval, retry only as directed, then use Epson support if the problem remains.
What Not to Do
Do Not Start by Physically Wiping or Soaking the Printhead
For normal Epson consumer maintenance, the supported path is the printer’s cleaning function. Unless Epson provides a service procedure for your exact model, removing the printhead, pushing liquid through it with a syringe, soaking it, or rubbing the nozzle plate creates unnecessary risk. It can damage delicate nozzles, seals, electronics, or ink-delivery components.
Do Not Turn the Printer Off During Head Cleaning
Epson specifically cautions against shutting the product down or opening certain covers during the cleaning cycle. Wait until the cycle finishes and the printer returns to a ready state.
Do Not Run Power Cleaning Repeatedly “Just in Case”
Power Cleaning uses much more ink than ordinary Head Cleaning. On supported tank models, Epson also warns that it can make the maintenance box or ink pads reach capacity sooner. Use it only when the nozzle pattern and your model’s manual justify it.
Do Not Confuse Alignment With Clog Removal
Print Head Alignment corrects placement or alignment problems; it does not clear blocked nozzles. If your nozzle check has gaps, use the cleaning path. If the nozzle check is complete but text or lines look offset, alignment may be the right tool.
A Concrete Example
Suppose an EcoTank owner prints a document and sees cyan lines missing. The owner prints a nozzle check and finds several gaps only in the cyan section. That pattern supports running normal Head Cleaning. After the cleaning cycle, a second nozzle check improves but still shows two small gaps, so the owner runs another normal cleaning if the model manual permits it. Once the pattern becomes complete, the owner stops.
Now consider a different case: the nozzle check is nearly blank after a printer has been unused for months. On an Epson model whose manual explicitly recommends Power Cleaning for that pattern, the owner first confirms the tanks meet the required ink level and that the maintenance box has enough capacity. The owner then runs one Power Cleaning and follows the manual’s waiting and retest instructions. These two cases look similar to the user—“bad print quality”—but the correct maintenance level is different.
Why the Exact Model Number Matters
Epson sells cartridge printers, EcoTank printers, WorkForce models, photo printers, and SureColor devices. Their maintenance menus, button combinations, allowable cleaning repetitions, waiting periods, ink prerequisites, and escalation tools are not identical. Even current Epson documentation shows this variation: many consumer models use a 12-hour waiting period after repeated cleaning, while some SureColor models specify 6 hours.
Before doing anything beyond ordinary Head Cleaning, find the full model number on the printer and open its manual through Epson Support. That is especially important before Power Cleaning, Power Ink Flushing, or any maintenance procedure that consumes a large amount of ink.
Quick Checklist
Print a nozzle check before cleaning.
Clean only if the pattern shows gaps or faint lines.
Use Head Cleaning first for ordinary clogs.
Do not turn off or open the printer during the cleaning cycle.
Print another nozzle check after each allowed cleaning cycle.
Stop when the pattern is complete.
Use Power Cleaning only when your exact model supports and requires it.
Check ink levels before Power Cleaning; many EcoTank models require at least one-third in each tank.
Respect the model-specific waiting period instead of running cleaning cycles continuously.
Contact Epson support if the supported maintenance sequence does not restore the nozzle pattern.
Bottom Line
To clean an Epson printhead safely, let the printer do the cleaning first. A nozzle check tells you whether the nozzles are actually clogged; normal Head Cleaning is the first corrective step; Power Cleaning is a model-dependent escalation that uses much more ink. If repeated supported cleaning does not help, waiting and seeking Epson support is safer than improvising a manual flush.
The exact menu names, number of allowed cleaning cycles, waiting period, and Power Cleaning requirements depend on the printer. Use Epson’s official product support page to find the manual for your model before escalating beyond ordinary Head Cleaning.