How to Clean a PS5 Fan Without Taking It Apart: A Safe Beginner Guide

Learn how to clean PS5 vents safely without opening the console, using Sony-recommended low-power vacuuming, dry wiping, and proper airflow.
If a sink faucet suddenly sprays sideways, feels weaker than it used to, or develops a white crust around the outlet, the faucet head is a reasonable place to start. The obstruction is often in the aerator, spray-face openings, or a small screen near the outlet. But “faucet head” can describe several different parts, and the safest cleaning method depends on which one you have.
A conventional bathroom faucet may have a threaded aerator at the tip. A modern faucet may use a recessed “cache” aerator that needs a small key. A kitchen pull-down faucet may have a larger spray head with multiple spray modes and soft nozzles. Those differences matter because a method that is appropriate for a removable metal aerator can be a poor choice for a coated or specialty finish.
The manufacturer guidance reviewed for this article on September 12, 2026 shows why there is no single universal rule. Delta currently recommends a 50/50 mixture of white vinegar and water for mineral deposits on many removable aerators and says a soft toothbrush can help after soaking. Kohler, however, warns in its faucet care guidance against cleaners containing acids on faucet finishes and recommends mild soap, warm water, and a soft cloth for the exterior. The practical answer is to clean the removable water-contact part according to the model instructions while treating the decorative finish more conservatively unless its manufacturer explicitly approves an acidic cleaner.
First, decide whether the problem is actually at the outlet. Look at the stream and at the faucet head while the water is off.
| What you notice | Most likely first check | What it suggests |
|---|---|---|
| Uneven or sideways stream | Aerator mesh or spray holes | Mineral deposits or trapped debris near the outlet |
| White or chalky crust | Visible aerator and spray face | Hard-water mineral buildup |
| Low flow in every spray mode | Aerator, screen, flow regulator, or supply path | The clog may be deeper than the outer face |
| Low flow in only one spray mode | Spray-face openings or internal diverter | A localized spray-head restriction may be more likely |
| Leak around the head after cleaning | Gasket and thread alignment | A seal may be missing, damaged, or seated incorrectly |
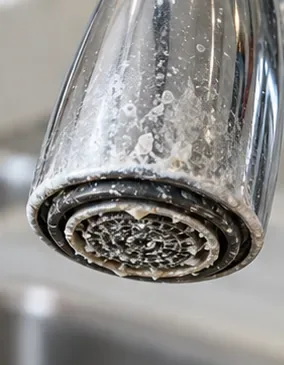
If the faucet is new and the flow has been poor since installation, or if cleaning the outlet does not change anything, do not keep repeating the same soak. Delta notes on some models that a flow regulator elsewhere in the faucet can be the source of a low-flow problem even when the outlet component is clean.
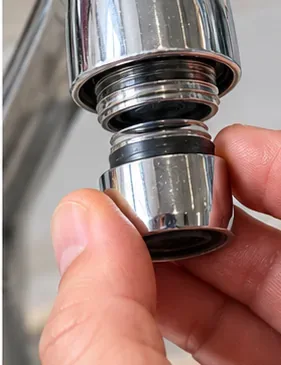
Often, yes—but not always in the same way. A visible threaded aerator may unscrew by hand. A recessed aerator may require the small plastic or metal key supplied with the faucet. Kohler documents faucets where the aerator is removed with a key before debris is flushed from the faucet. Some Delta models have aerators that pull straight down or use a specialized removal method rather than simply unscrewing.
Before using pliers, check the manual or parts diagram for the model. The wrong tool can deform an aerator or scar a finished faucet. If the part will not move with the method described by the manufacturer, stop rather than increasing force.
For a pull-down kitchen spray head, the face may be designed for cleaning without disassembly. Delta's Touch-Clean spray holes, for example, are designed so calcium and lime buildup can be wiped away from the soft spray holes with a finger. Kohler describes its MasterClean sprayface as an easy-to-clean surface intended to resist mineral buildup. If your spray head uses that type of soft nozzle, try the manufacturer-approved wipe-clean method before taking the head apart.
Not as a universal rule. The safer approach is to remove the aerator or other serviceable insert and soak only that part when the manufacturer approves vinegar or another descaling method.
Delta's support guidance for several aerators recommends a 50/50 solution of white vinegar and water. On one aerator page, Delta also advises soaking the entire removable aerator rather than taking apart an inner screen that could be damaged or reinstalled incorrectly. That is useful guidance for compatible Delta parts—but it should not automatically be applied to every faucet brand or finish.
Kohler's general faucet care guidance takes a more conservative approach to the finished surface: mild soap, warm water, and a clean soft cloth, with a warning against acids and abrasive materials. This creates an important tradeoff. Vinegar can be effective on mineral scale, but long exposure on a finish that its manufacturer does not approve may create a cosmetic problem while solving the flow problem.
If the aerator cannot be removed, do not default to tying a bag of vinegar around the entire spout. First check the care instructions for the finish. Some manufacturers permit diluted vinegar on certain finishes; others tell owners to avoid acids. When the manual is unclear, warm water, mild soap on the exterior, and manufacturer support are safer than an improvised long soak.
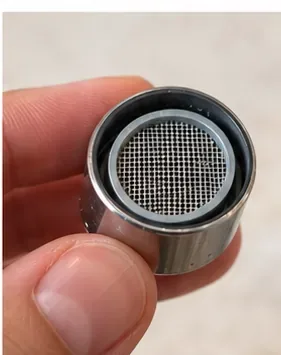
Close the faucet normally and put a towel in the sink so a small screen or gasket cannot disappear down the drain. If the aerator contains multiple layers, note their order before removing them. A quick photo with your phone can make reassembly easier.
Unscrew, pull, or unlock the aerator exactly as the model instructions describe. Use the supplied cache-aerator key when one is required. Avoid gripping decorative surfaces with bare metal tools unless the manufacturer explicitly instructs you to do so.
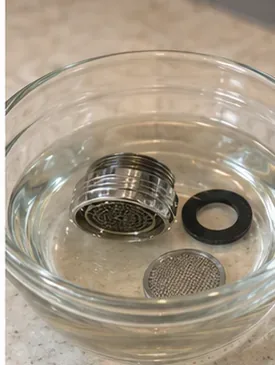
For a removable aerator whose manufacturer permits it, a 50/50 mixture of white vinegar and water is a common official recommendation from Delta. Soak for the time specified for the part. Delta guidance varies by product: some support answers describe roughly 30 minutes, while others allow an hour or longer. That variation is another reason to follow the specific part or model instructions rather than assuming “overnight” is always better.
If your manufacturer prohibits acids, use its recommended cleaning method instead. Do not substitute stronger acids, rust removers, toilet-bowl cleaners, bleach-based products, or abrasive cleaners on the theory that stronger chemistry will work faster.
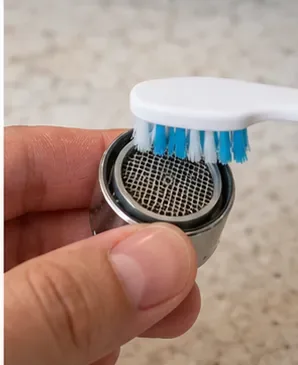
After soaking, use a soft toothbrush or other soft-bristle brush to lift loosened mineral scale from the mesh and outer openings. Delta specifically recommends a clean, soft toothbrush for some aerators. The goal is to remove material that has already softened, not to grind the mesh or scrape a plated surface.
Rinse the aerator and any approved removable pieces with clean water. Look through the mesh under good light. If a deposit is still visible, repeat the manufacturer-approved process rather than attacking it with an abrasive pad.
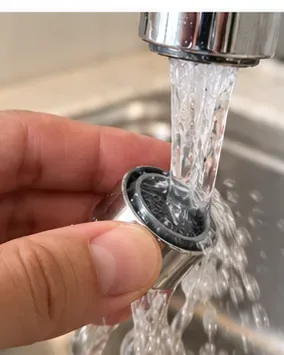
Check the rubber gasket or O-ring before reinstalling. A flattened, cracked, twisted, or missing seal can cause a leak around the tip even when the aerator itself is clean. Do not remove an internal screen that the manufacturer says is not intended to come apart. Delta specifically warns against removing the inner screen from some aerators because it can be damaged and may not reinstall correctly.
Reinstall the aerator by hand or with the correct key, taking care not to cross-thread it. Turn on cold water gradually and watch the stream. Then test hot water and any spray modes the faucet provides.
Kohler's instructions for one touchless faucet direct users to remove the aerator, run cold and hot water to clear debris, then reconnect the aerator. Your faucet may use a different sequence, so use the model manual when it gives a flushing procedure.

Clean the exterior according to the finish-care instructions. Kohler recommends mild soap, warm water, and a soft cloth for its faucet finishes. Delta says warm water and a soft damp cloth are appropriate for water spots and instructs owners to rinse thoroughly after using an approved cleaner. Both manufacturers emphasize drying the surface rather than letting water evaporate and leave deposits behind.
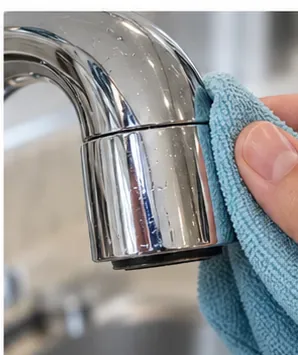
Start with the face of the spray head rather than immediately disconnecting the hose. If the nozzle uses flexible silicone-style spray holes, gently rub the deposits away as the manufacturer describes. Then run water through each spray mode and compare the pattern.
If a removable screen is documented in the spray-head connection, clean it according to the manual. If the head unscrews from a pull-down hose, secure the hose so it does not retract into the spout before disconnecting anything. Do not open sealed internal assemblies unless the service instructions identify them as owner-serviceable.
If one mode remains weak after the visible nozzles are clean, the problem may involve the spray selector or an internal component rather than scale on the face. Replacement of the spray head can be more appropriate than repeated soaking when the selector is failing mechanically.
Use a short practical check instead of judging only by appearance:
If the flow is still low with a clean aerator, remove the assumption that the faucet head is the problem. Depending on the model, the next checks may include the flow regulator, pull-down hose, supply valves, inlet screens, cartridge, or household water pressure. A faucet that is weak on both hot and cold water may point to a shared restriction; a problem on only one side may point farther upstream.
Replacement is reasonable when the mesh is torn or permanently deformed, the housing is cracked, the threads are damaged, the gasket will no longer seal, or cleaning no longer restores the expected stream. Match the replacement to the faucet model or the manufacturer's part number. Aerators that look similar can use different threads, flow rates, and internal designs.
Do not increase the flow by removing a regulator or flow-control component unless the manufacturer says that part is optional and doing so is legal for your installation. The goal of cleaning is to restore the designed flow, not to bypass the faucet's intended configuration.
Dry the outlet and finished faucet with a soft cloth when you notice standing droplets. This is low-effort maintenance with a clear benefit: both Delta and Kohler care guidance note that allowing water to evaporate on the surface encourages visible deposits or water spots. If your water is very hard, the aerator may need attention more often, but there is no useful universal “every 30 days” schedule for all faucets. Clean when the stream pattern changes or when deposits become visible, and follow any interval specified for the model.
The most reliable approach is to treat the faucet head as two different cleaning jobs: remove mineral deposits from the serviceable water outlet, and protect the decorative finish according to its own care rules. That separation solves the common flow problem without turning a simple aerator cleaning into a damaged-finish repair.
Learn how to clean PS5 vents safely without opening the console, using Sony-recommended low-power vacuuming, dry wiping, and proper airflow.
Learn how to clean a car air filter safely, when a paper filter should be replaced instead, and how reusable filters require different care.
Learn how to clean a Keurig entrance and exit needle safely, clear coffee-ground clogs, rinse the brewer, and know when descaling is the next step.
Learn how to remove dried nail glue from clothes safely, when acetone is appropriate, which fabrics need extra care, and when to stop and call a cleaner.
Learn how to clean a metal range hood filter safely, when dishwasher cleaning is okay, and why charcoal filter care depends on your exact model.
Learn how to remove rust from golf clubs safely, judge the result, protect raw and plated finishes, and know when cleaning should stop.
Learn how to clean fabric blinds safely with gentle vacuuming, spot cleaning, rinsing, and drying—plus when water, washing, or DIY deep cleaning can cause damage.
Learn how to season gas grill grates safely, including when cast iron needs seasoning, when porcelain enamel does not, and how to check the result.
Clean a Breville toaster oven safely with mild soap, soft cloths, and the right sequence. Learn what clean should look like, what to avoid, and when to stop.
Learn how to clean a microwave grease filter, when a dishwasher is appropriate, and why charcoal filters should be replaced instead of washed.








