Home
» How To
»
How to Clean a Mechanical Keyboard Safely: Keycaps, Switches, and Case
How to Clean a Mechanical Keyboard Safely: Keycaps, Switches, and Case
A mechanical keyboard can look fine from a distance while hiding crumbs, hair, skin oils, and dust under the keycaps. The safest cleaning approach is simple: power the keyboard off, remove only the parts your model is designed to let you remove, clean dry debris first, use very little moisture on the keyboard body, and let every washed keycap dry completely before reassembly.
That basic method is well supported by current manufacturer guidance. Corsair recommends switching off or unplugging the keyboard, removing keycaps, cleaning keycaps separately in warm soapy water, using light compressed air for the keyboard, and preventing liquid from reaching the printed circuit board. Logitech likewise recommends unplugging first, keeping moisture to a minimum, using a lightly damp lint-free cloth, and using compressed air between keys. Razer tells users to unplug, remove keycaps when the model allows it, use compressed air for debris, and never submerge the keyboard. See the current Corsair keyboard-cleaning guidance, Logitech cleaning guidance, and Razer device-cleaning guidance.
What is the safest way to clean a mechanical keyboard?
Start with the least invasive method and move deeper only if dirt remains. For routine dust, you may not need to remove every keycap. For a keyboard with visible grime, crumbs under the keys, or sticky keycaps, a deeper clean with removable keycaps makes sense. If a switch still double-types or fails after cleaning, the problem may be mechanical or electrical rather than dirt.
Action: Before touching anything, disconnect USB power or switch the keyboard off. For wireless models, follow the manufacturer’s power-off instructions and remove user-replaceable batteries if the manual calls for it.
What supplies do you actually need?
A keycap puller if your keycaps are designed to be removed
A soft brush
Compressed air
One or two lint-free microfiber cloths
A bowl of warm water and a small amount of mild dish soap for compatible removable keycaps
A dry towel and a clean place where keycaps can air-dry overnight
Optional: a manufacturer-approved cleaner for stubborn exterior grime
You do not need to soak the keyboard, spray cleaner directly into it, or dismantle switches for ordinary cleaning. Those steps add risk without helping most dust-and-grime problems.
Step 1: Photograph the layout, power off, and remove compatible keycaps
Take a quick photo of the full keyboard before removing keycaps. That matters more than it sounds: function-row legends, navigation clusters, modifier sizes, and regional layouts are easy to mix up during reassembly.
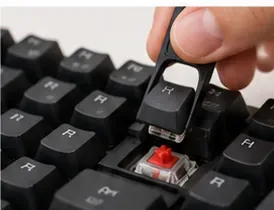
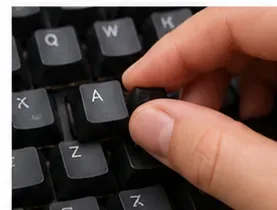
Take a quick layout photo first, then remove keycaps methodically so reassembly is easier.
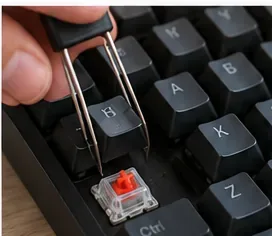
If your keyboard has removable keycaps, use a keycap puller and lift each keycap as straight as practical. Large keys such as the spacebar, Enter, and Shift may use stabilizers, so do not force them if they do not release the same way as ordinary keys. Some low-profile boards and specialty keyboards have different retention systems.
Action: If you are unsure whether a particular keycap is removable, check the model manual before pulling harder.
Step 2: Wash removable keycaps separately
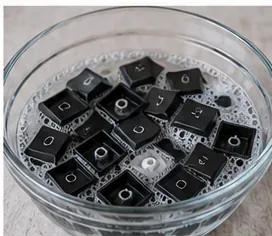
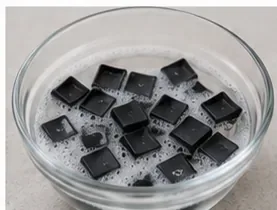
Corsair’s support guidance recommends placing removed keycaps in warm soapy water for 30 to 60 minutes, then rinsing and drying them. Keychron also describes a similar separate keycap-cleaning method in its mechanical-keyboard cleaning guide.
For compatible removable plastic keycaps, a warm soapy-water soak can loosen skin oils and grime.
This advice applies to ordinary removable keycaps, not automatically to every artisan cap, wood cap, coated cap, printed novelty cap, or unusual material. A safe process for standard PBT or ABS caps may not be appropriate for specialty finishes.
Action: When keycap material or finish is uncertain, skip soaking until you verify the maker’s care instructions.
Step 3: Rinse and let keycaps dry completely
Soak only the keycaps, not the keyboard body or switches, and rinse them before drying.
After soaking, rinse the keycaps to remove soap residue, towel off surface water, and spread them out where air can reach them. Corsair explicitly recommends allowing washed keycaps to air-dry overnight before reinstalling them.
Do not judge dryness only by the top surface. Water can remain inside the stem or underside recess even when the legend looks dry.
Action: Give washed keycaps an overnight drying period rather than rushing them back onto the switches.
Step 4: Remove loose debris from the keyboard body
With the keyboard still unplugged and the keycaps off, clear dry contamination before using any damp cloth. Compressed air and a soft brush are both supported by multiple manufacturers for loose debris.
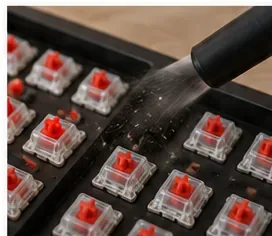
Use light compressed air to move loose crumbs and dust away from the keyboard plate and switch gaps.
Use light bursts and direct loosened debris out of the keyboard instead of simply moving it deeper into corners. If you prefer not to use compressed air, a soft brush is a useful low-risk alternative for crumbs and hair.
Action: Work over a clean table or mat so dislodged debris has somewhere to fall and can be seen easily.
Step 5: Brush around the switches and plate
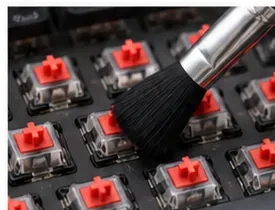
A soft brush is useful after compressed air for debris that remains around switch housings and the plate.
A soft brush can reach the spaces around switch housings, stabilizers, and the plate without introducing liquid. This is often enough to solve keys that feel gritty because a crumb or hair is interfering around the cap and switch area.
What brushing cannot reliably fix is an internally damaged switch. Razer’s troubleshooting guidance notes that if key problems continue after cleaning and other checks, the switch itself may be the issue; switch replacement should only be attempted when the keyboard is designed to be hot-swappable. See Razer’s keyboard key troubleshooting guidance.
Action: If one key keeps double-typing or missing inputs after the surrounding debris is gone, stop escalating the cleaning and investigate the switch or warranty instead.
Step 6: Wipe the case and plate with minimal moisture
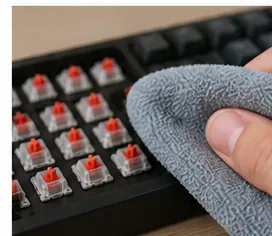
Keep any cloth only lightly damp and prevent moisture from dripping into switches or the circuit board.
Use a lint-free cloth that is dry or only lightly damp, depending on the manufacturer’s guidance for your model. Keep liquid away from switch openings, sockets, LEDs, and seams. Logitech specifically says not to put cleaning liquid directly on the device and to keep moisture to a minimum on non-waterproof products.
Action: Apply any permitted cleaner to the cloth, not directly to the keyboard.
Is isopropyl alcohol always safe on a mechanical keyboard?
No. This is one of the most important manufacturer-dependent details. Corsair says IPA can be used on exposed external surfaces. Razer’s current general cleaning page, updated August 19, 2026, says to avoid isopropyl alcohol or other alcohol-based cleaning solutions for its devices. Logitech’s keyboard instructions default to a lightly water-dampened lint-free cloth rather than alcohol.
That means there is no responsible universal rule such as “70% alcohol is always safe for keyboards.” Coatings, legends, painted surfaces, plastics, and finishes vary.
Action: Use alcohol only when your keyboard manufacturer explicitly permits it for the surface you intend to clean.
Step 7: Do not soak or flush the switches
Mechanical switches are not the same thing as removable keycaps. A common misconception is that if the keycaps can be washed, the switches can be washed too. The cited manufacturer guidance supports washing removable keycaps separately while keeping liquid out of the keyboard body and circuit board.
Hot-swappable switches can sometimes be removed for replacement or advanced maintenance, but that is a model feature, not a routine cleaning requirement. Removing switches also introduces the possibility of bent pins, damaged sockets, or incorrect reinsertion.
Action: For normal cleaning, leave switches installed unless your keyboard manual specifically supports removal and you have a reason beyond ordinary dust.
Step 8: Reinstall the dry keycaps and test every key
Reinstall keycaps only after they are completely dry, then test every key before returning the keyboard to normal use.
Use your reference photo to reinstall the keycaps. Press them straight onto the correct switch stems, paying extra attention to stabilized keys. Then reconnect the keyboard and test typing, modifiers, function keys, media keys, and any keys that were previously sticky or inconsistent.
Remove removable keycaps with a puller and lift straight up rather than twisting them sideways.
If a key feels wrong after reassembly, remove that keycap and check that it is seated correctly and that no debris remains around the switch.
Action: Test the keyboard before putting wrist rests, desk mats, or other accessories back in place.
Common cleaning myths: what is verified, what depends, and what is unknown?
Claim
What the evidence supports
What to do
“You should use alcohol on every mechanical keyboard.”
Manufacturer guidance conflicts. Corsair permits IPA for exposed surfaces; Razer says to avoid alcohol-based solutions.
Follow the specific manufacturer for your model.
“If keycaps are removable, everything under them can get wet.”
False. Manufacturers repeatedly warn against liquid entering the keyboard body or circuit board.
Wash keycaps separately and keep the board nearly dry.
“Compressed air is bad for every keyboard.”
Not supported by the cited guidance. Corsair, Logitech, Razer, and Keychron all describe compressed air as a cleaning option.
Use light, controlled air for loose debris.
“The dishwasher is the fastest way to clean keycaps.”
The manufacturer sources used here do not recommend a dishwasher. They describe hand soaking in warm soapy water instead.
Use the lower-risk hand-wash method unless your keycap maker says otherwise.
“A dirty switch is always why a key double-types.”
Not necessarily. Persistent input problems can come from switch or hardware faults after debris is removed.
Test after cleaning; troubleshoot or replace only when supported.
How often should you clean a mechanical keyboard?
There is no single evidence-based interval that fits every desk. A keyboard used in a pet-free office with no food nearby needs less attention than a keyboard beside meals, pets, open windows, or a workshop. The useful trigger is visible contamination or a change in feel, not a rigid calendar.
For routine care, unplug the keyboard, use compressed air or a soft brush to remove loose debris, and wipe the exterior with a manufacturer-approved cloth. Reserve full keycap removal and washing for heavier buildup.
Action: Do a quick visual check whenever crumbs, hair, or sticky residue become noticeable instead of waiting for keys to malfunction.
How do you know the cleaning worked?
All keycaps are fully dry and seated at the same height they had before cleaning.
No key feels unusually gritty, sticky, or obstructed.
Every key registers consistently in a typing test or keyboard tester.
Stabilized keys such as Space, Enter, Shift, and Backspace move freely.
No liquid is visible around switches, seams, cable connectors, or the case.
There is no new double-typing, missed input, or intermittent connection after reconnection.
If the keyboard still has one or more malfunctioning keys after a careful clean, the next step is not a harsher cleaner. Check the manufacturer’s troubleshooting instructions, firmware guidance, hot-swap support, and warranty options. Cleaning is effective for dust, crumbs, skin oils, and surface grime; it cannot repair a worn switch, cracked solder joint, corroded circuit board, or liquid-damaged electronics.