Windows — це комплексна операційна система, яка дозволяє диктувати та керувати дозволами доступу на основі поточного активного облікового запису. Це значно полегшує адміністраторам керування ПК у своїй організації, дозволяючи їм надавати вибраним особам підвищені дозволи.
Але що робити, якщо у вас є ПК? Як ви керуєте локальними обліковими записами? Що робити, якщо у вас немає облікового запису адміністратора? Ви заблоковані назавжди? Якщо у вас виникали ці запитання або ви нещодавно стикалися з помилкою, коли вам потрібен дозвіл адміністратора, у нас є ідеальний посібник для вас.
Ось все, що вам потрібно знати про облікові записи адміністратора в Windows 11.
Примітка щодо сумісності з Windows 10: посібники на цій сторінці були зібрані з використанням Windows 11, тому інтерфейс користувача, який використовується на знімках екрана, є Windows 11. Але ці посібники повністю працюють і в Windows 10. Тому не соромтеся використовувати посібники для Windows 11, а також для ПК з Windows 10.
Пов’язано: Як шукати в Windows 11
Зміст
Що таке обліковий запис адміністратора в Windows 11?
Обліковий запис адміністратора — це найвищий обліковий запис у Microsoft Windows з найвищими привілеями. Це дозволяє вам, як адміністратору, керувати своїм ПК, однак, як ви хочете. Ви можете вносити зміни в системні файли, встановлювати програми з підвищеними можливостями, змінювати інсталяцію Windows, налаштовувати користувацьку автоматизацію та багато іншого. Дозвіл на виконання таких завдань недоступний для стандартних або гостьових користувачів. Крім того, як адміністратор, ви можете керувати функціями Windows і диктувати, які з них доступні та доступні вашим користувачам.
Навіщо потрібен обліковий запис адміністратора?
Обліковий запис адміністратора — це обліковий запис з найвищими привілеями в Windows. Це означає, що ви можете вносити зміни на системному рівні у свою операційну систему за допомогою облікового запису адміністратора без будь-яких обмежень. Ось деякі з поширених причин, чому вам може знадобитися обліковий запис адміністратора на вашому ПК.
- Щоб внести зміни на системному рівні у вашу систему
- Щоб редагувати/змінювати чи відновлювати ваші системні файли
- Для запуску команд і сценаріїв рівня адміністратора
- Щоб увімкнути або вимкнути функції Windows
- Для встановлення програм і налаштувань системного рівня
- Щоб змінити або перевстановити драйвери
- Щоб отримати доступ до налаштувань персоналізації в Windows
- Щоб скинути або змінити паролі локальних облікових записів
і багато іншого. Причин, чому вам потрібен обліковий запис адміністратора в Windows 11, може бути багато, але чи знаєте ви, що в Windows є два типи облікових записів адміністратора. Ну не зовсім, але ось все, що вам потрібно про них знати.
Пов'язано: Як вимкнути звуки сповіщень Windows 11
Увійдіть як адміністратор: що вам потрібно знати
Windows за замовчуванням має вбудований обліковий запис адміністратора, навіть якщо він недоступний на заблокованому екрані. Цей обліковий запис за замовчуванням створюється під час інсталяції Windows, щоб схвалити всі системні зміни, внесені на вашому ПК під час налаштування Windows.
Крім того, Windows також дозволяє налаштувати додатковий обліковий запис адміністратора з вашого локального облікового запису, якщо у вас є необхідні дозволи. Ви також можете перетворити свій поточний обліковий запис на обліковий запис адміністратора, якщо ви зараз використовуєте стандартний обліковий запис у Windows 11.
Налаштування кожного з цих облікових записів має різні вимоги, і залежно від поточних налаштувань ви можете вибрати будь-яку з налаштувань. Але якщо ви намагаєтеся відновити пароль свого локального облікового запису, найкраще використовувати обліковий запис адміністратора за замовчуванням, оскільки в цьому випадку ви не зможете пройти повз екран блокування.
Крім того, ось кілька поширених речей, які ви повинні мати на увазі, перш ніж продовжити роботу з наведеними нижче посібниками.
- Адміністратор за замовчуванням не має пароля для входу, якщо його не налаштував адміністратор
- Якщо ваш блок був виданий вашою організацією або навчальним закладом, то наведені нижче методи, швидше за все, вам не підійдуть. Обліковий запис адміністратора за замовчуванням буде заблоковано вашою організацією, і ваш поточний обліковий запис не матиме необхідних привілеїв, щоб продовжити використання інших методів у цьому посібнику. Вам, швидше за все, доведеться зв’язатися з адміністратором, якщо у вас є такий пристрій.
- Якщо ви ділитеся пристроєм з іншими користувачами, вам слід вимкнути обліковий запис адміністратора після того, як ви внесли необхідні зміни у свою систему, щоб уникнути несанкціонованого доступу до конфіденційної інформації. У таких випадках також рекомендується встановити пароль для облікового запису адміністратора за замовчуванням.
- Деякі методи, наведені нижче, вимагають, щоб у вашій системі була встановлена Windows 11 Pro або новіша версія. Якщо ви використовуєте домашню версію Windows 11, ваші можливості будуть обмежені.
Різниця між обліковим записом адміністратора за замовчуванням та наданням доступу адміністратора до облікового запису користувача
Обліковий запис адміністратора за замовчуванням — це окремий обліковий запис, який є в кожній інсталяції Windows незалежно від вашого пристрою чи версії Windows. З іншого боку, перетворений обліковий запис — це стандартний або гостьовий обліковий запис на вашому комп’ютері, якому було підвищено права адміністратора.
Після підвищення ваш обліковий запис буде належати до групи адміністраторів, і ви матимете всі необхідні права адміністратора для внесення змін на системному рівні на вашому ПК. Адміністратор за замовчуванням в основному використовується під час спроби відновити втрачені паролі облікових записів локальних облікових записів користувачів на вашому ПК.
З іншого боку, перетворення облікового запису — це простий процес підвищення дозволів вашого поточного облікового запису, що дозволить вам працювати як адміністратор поточного пристрою. Адміністратора за замовчуванням можна вимкнути у вашій системі за допомогою простої команди, тоді як ваш локальний обліковий запис потрібно буде знову конвертувати, якщо ви хочете скасувати зміни. Використовуйте один із наведених нижче методів, який найкраще відповідає вашим поточним потребам.
Пов'язано: Як відключити клавіатуру в Windows 11
Як увійти як адміністратор в Windows 11
Ви можете ввійти як адміністратор у Windows 11, використовуючи різні методи, які ми розглянули вище. Ви можете ввімкнути обліковий запис адміністратора за замовчуванням, якщо хочете внести тимчасові зміни на своєму ПК або відновити втрачений пароль. Ви також можете налаштувати новий обліковий запис адміністратора для нового користувача, якщо ви хочете поділитися своїм пристроєм з кимось. Нарешті, ви можете перетворити свій поточний локальний обліковий запис на обліковий запис адміністратора, якщо ви самі хочете отримати права адміністратора на поточному пристрої. Скористайтеся одним із наведених нижче методів, який найкраще відповідає вашим поточним потребам та вимогам.
Спосіб №01: Використовуйте обліковий запис адміністратора за замовчуванням
Ви можете використовувати обліковий запис адміністратора за замовчуванням на своєму ПК з Windows 11, щоб внести необхідні зміни, скориставшись наведеним нижче посібником. Після внесення змін ви можете вимкнути обліковий запис за допомогою наступного посібника. Давайте розпочнемо.
1.1 Увімкніть обліковий запис адміністратора за замовчуванням
Спочатку нам потрібно ввімкнути/показати обліковий запис адміністратора на вашому ПК. Це можна зробити різними методами. Якщо ви можете подолати заблокований екран, ви можете скористатися одним із цих методів. Однак, якщо ви не можете пройти повз екран блокування, вам потрібно буде отримати доступ до CMD із заблокованого екрана та скористайтеся наведеним нижче посібником. У таких випадках ви можете скористатися посібником унизу, щоб активувати CMD прямо з головного екрана. Давайте розпочнемо.
1.1.1 Використання CMD
Запустіть CMD у своїй системі та введіть команду нижче. Після завершення натисніть Enter на клавіатурі, щоб виконати його.
net user administrator /active:yes

Тепер команда має бути успішно виконана.

Натисніть клавішу Windows на клавіатурі та натисніть своє ім’я користувача в нижньому лівому куті. Тепер у цьому розділі має бути видимий обліковий запис адміністратора.
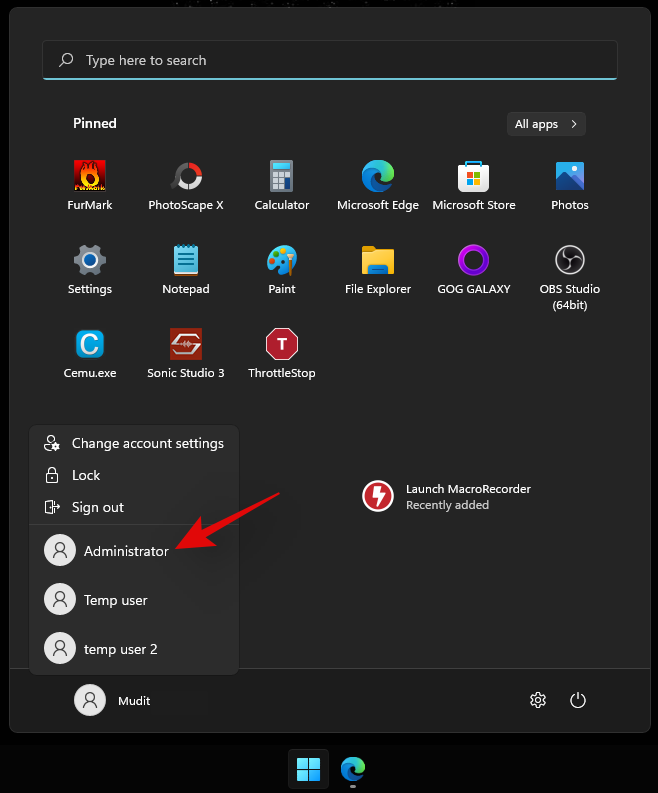
Це означає, що процес пройшов успішно. Тепер ви можете вийти зі свого облікового запису та ввійти в обліковий запис адміністратора. Обліковий запис адміністратора за замовчуванням не має пароля, і OOBE зустріне вас після входу в обліковий запис. Тепер ви можете використовувати наступні посібники, щоб скинути пароль Windows, якщо це необхідно.
1.1.2 Використання інструментів адміністратора
Натисніть Windows + Rна клавіатурі, щоб запустити діалогове вікно запуску. Після запуску введіть наступний термін і натисніть Enter на клавіатурі.
lusrmgr.msc
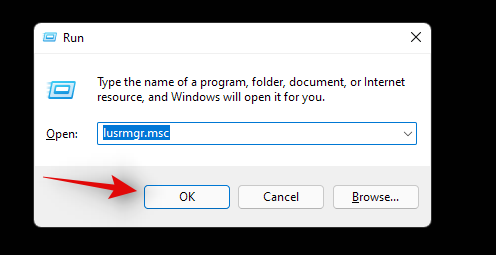
Тепер на вашому ПК буде запущено локальний менеджер груп. Почніть з вибору "Користувачі" зліва.
Натисніть на Адміністратор праворуч. Тепер натисніть Більше дій, а потім Властивості .
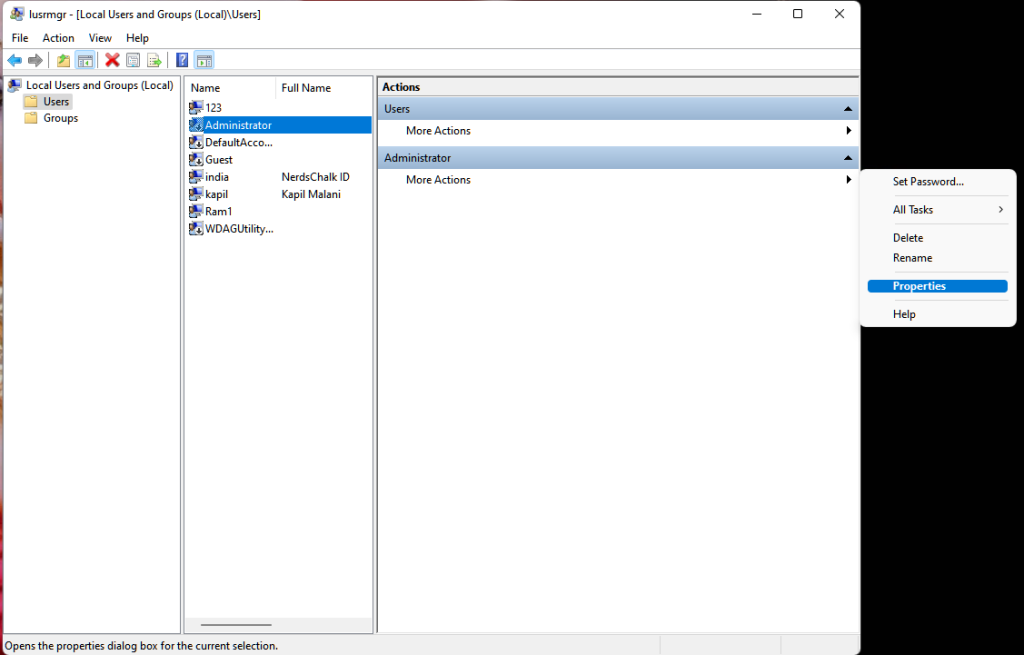
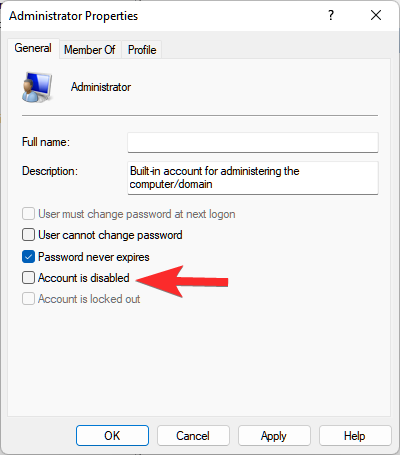
Тепер на вашому екрані відкриється нове вікно. Зніміть прапорець біля опції «Обліковий запис вимкнено».
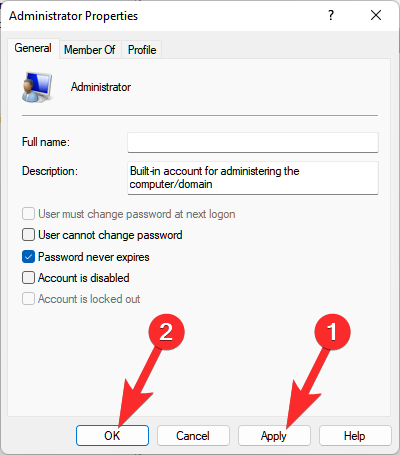
Натисніть «Застосувати», а потім «ОК».
Закрийте локальний менеджер груп і активуйте меню «Пуск». Тепер натисніть своє ім’я користувача в нижньому лівому куті, і тепер у цьому розділі має бути доступний новий обліковий запис «Адміністратор». Тепер ви можете вийти зі свого поточного облікового запису та ввійти в новий обліковий запис адміністратора. Обліковий запис не матиме пароля, і ви зможете легко ввійти в нього, просто натиснувши «Увійти».
1.1.3 Використання редактора реєстру
Метод редактора реєстру застосовний лише до користувачів із Windows 11 Pro або новішої версії, встановленими на їхніх системах. Це пов’язано з тим, що шлях до реєстру, до якого нам потрібно отримати доступ для цього методу, доступний лише для користувачів Windows 11 Pro або новіших версій. Якщо ви користуєтеся Windows 11 Home, замість цього ви можете використовувати метод CMD, перерахований вище.
Натисніть Windows + Rна клавіатурі та введіть наступний термін. Після завершення натисніть Enter на клавіатурі.
regedit
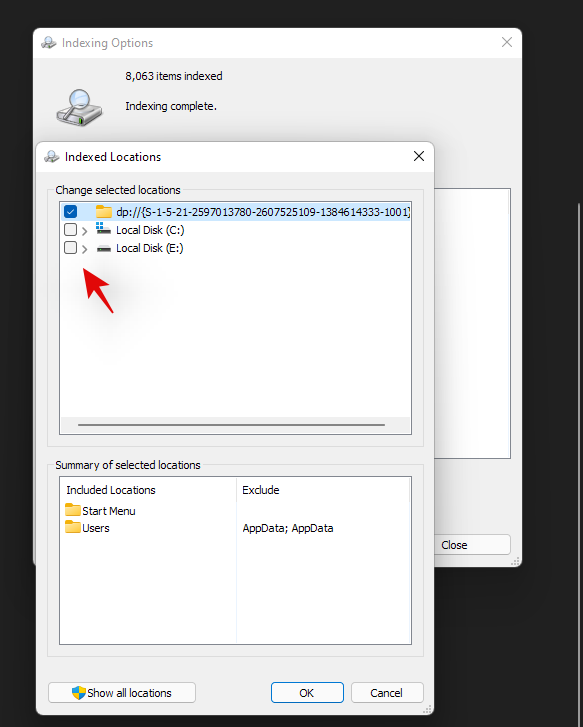
Тепер перейдіть до наступного шляху. Ви також можете скопіювати та вставити те саме в адресний рядок у верхній частині.
Computer\HKEY_LOCAL_MACHINE\SOFTWARE\Microsoft\Windows NT\CurrentVersion\Winlogon\SpecialAccounts\UserList

Вибравши UserList зліва, клацніть правою кнопкою миші на порожній області праворуч і виберіть «Новий».
Натисніть «Значення DWORD (32-розрядне)».
Назвіть значення «Адміністратор» і натисніть Enter на клавіатурі.
Після того, як значення буде додано, закрийте редактор реєстру та перезавантажте комп’ютер. Тепер обліковий запис адміністратора має бути доступним у нижньому лівому куті екрана, коли ви на заблокованому екрані.
1.1.4 Використання GPO
Якщо ви використовуєте корпоративну машину, ви також можете використовувати редактор групової політики, щоб увімкнути обліковий запис адміністратора за замовчуванням на вашому ПК. Однак ця опція буде недоступна для користувачів Windows 11 Home Edition. Дотримуйтесь інструкції нижче, щоб почати.
Натисніть Windows + R, введіть наступний термін і натисніть Enter на клавіатурі, щоб відкрити редактор групової політики на своєму ПК.
gpedit.msc
Перейдіть до наступного каталогу за допомогою лівої бічної панелі.
Computer Configuration\Windows Settings\Security Settings\Local Policies\Security Options\
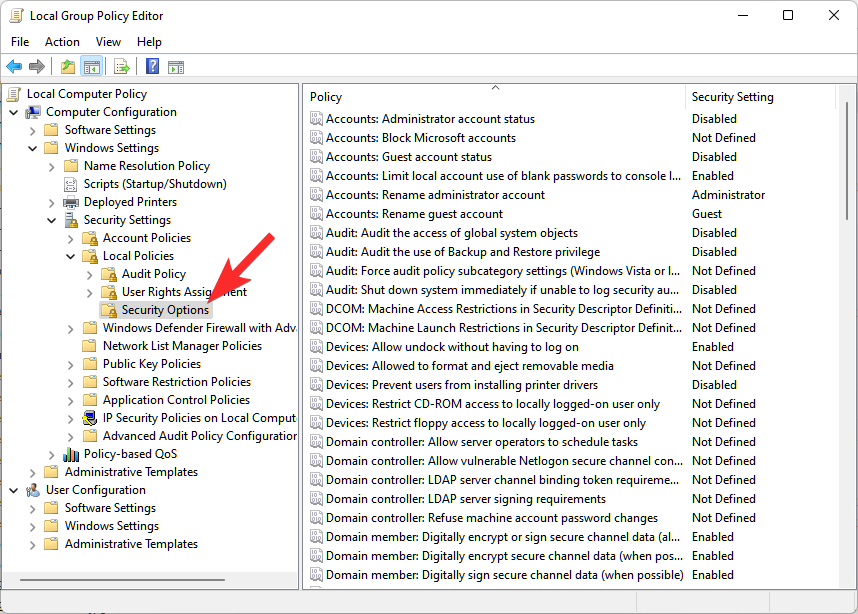
Тепер двічі клацніть на наступному значенні праворуч: Облікові записи: статус облікового запису адміністратора
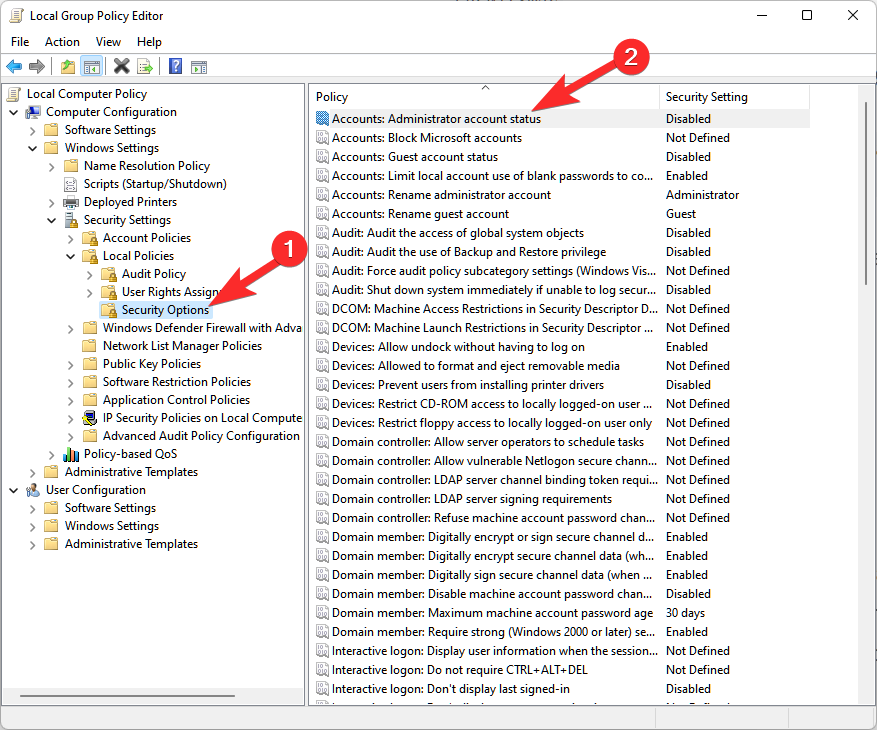
Виберіть «Увімкнено».
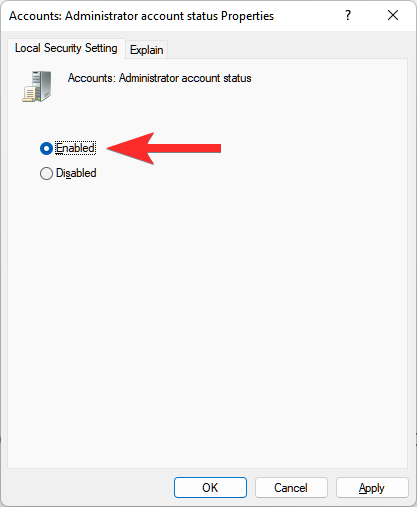
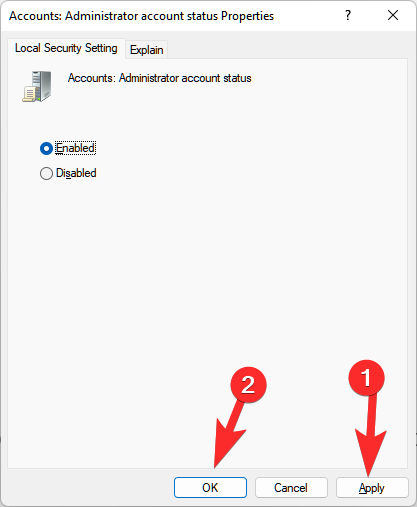
Натисніть «Застосувати», а потім «ОК».
Закрийте вікно GPO і натисніть клавішу Windows на клавіатурі, щоб відкрити меню «Пуск». Тепер натисніть своє ім’я користувача в нижньому лівому куті екрана, і тепер вам буде доступний новий обліковий запис адміністратора.
1.2 Вимкніть обліковий запис адміністратора за замовчуванням
Тепер, коли ви завершили свої адміністративні завдання, рекомендується вимкнути обліковий запис адміністратора, щоб запобігти несанкціонованому доступу до вашої системи. Використовуйте один із наведених нижче методів, який найкраще відповідає вашим поточним потребам та вимогам. Давайте розпочнемо.
1.2.1 Використання CMD
Активуйте CMD на своєму ПК залежно від поточних налаштувань і введіть таку команду. Натисніть Enter на клавіатурі, щоб виконати його.
net user administrator /active:no

І це все! Тепер обліковий запис адміністратора за замовчуванням має бути вимкнено на вашому ПК.
1.2.2 Використання інструментів адміністратора
Press Windows + R and enter the following term in the Run dialog box. Press Enter on your keyboard once you are done.
lusrmgr.msc

Select ‘Users’ from the left sidebar and click on ‘Administrator’ on your right.
Select the checkbox for ‘Account is disabled’ option.
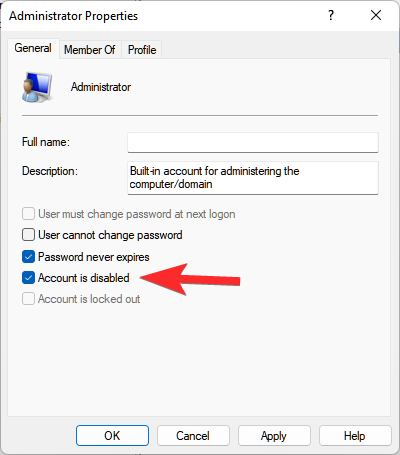
Click Apply and then OK.

Close the admin tools window and the default administrator account should now be disabled on your PC.
1.2.3 Using Registry Editor
Press Windows + R, type in the following, and press Enter on your keyboard to open the Registry Editor on your PC.
regedit

Once the registry editor opens, navigate to the path given below.
Computer\HKEY_LOCAL_MACHINE\SOFTWARE\Microsoft\Windows NT\CurrentVersion\Winlogon\SpecialAccounts\UserList

Click on ‘Administrator’ on your right and hit Del on your keyboard.
Confirm your choice by clicking on ‘Yes’.
Restart your PC and the default admin account should no longer be available on your lock screen.
1.2.4 Using GPO
Press Windows + R and type in the following. Press Enter on your keyboard once you are done.
gpedit.msc
Now navigate to the following path.
Computer Configuration\Windows Settings\Security Settings\Local Policies\Security Options\

Now double click on the following value on your right: Accounts: Administrator account status

Select ‘Disabled’.
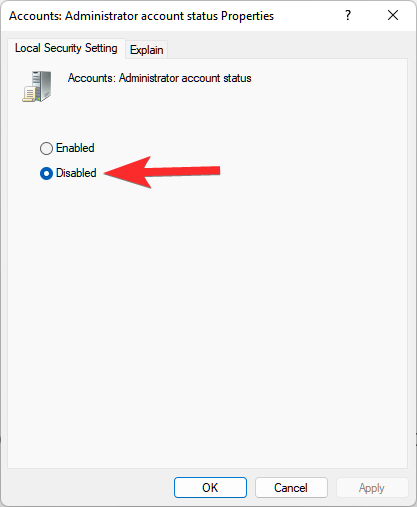
Click on ‘Apply’ and then on ‘OK’.
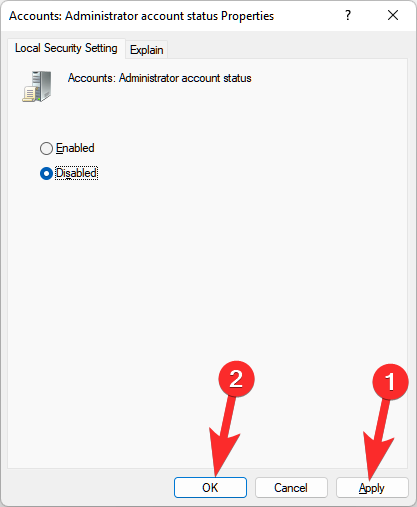
Close the GPO window.
The default administrator account will now be disabled on your PC via the Group Policy Editor in Windows 11.
1.3 Login as admin using command prompt (can’t get past the lock screen issue)
If you are locked out of Windows and would like to access the administrator account to reset your password then you will need to launch CMD from your lock screen first. You will need a recovery environment to proceed with this guide.
You will need to first access CMD using Windows installation media (a Windows bootable USB) for this guide and then follow the steps below. If using an installation media press Shift + F10 during the setup to launch CMD anywhere.
Follow the guide below to get you started once you have launched CMD as given above.
Once the command prompt launches, enter the following command and press Enter on your keyboard.
cd windows

You will now be taken to your default boot drive in CMD. Enter the following command and execute it by press Enter on your keyboard.
cd system32

You will now be in the System32 directory. Execute the command below to create a backup of utilman.exe.
copy utilman.exe utilman.exe.back

Execute the command below within CMD now.
copy cmd.exe cmd1.exe

Now let’s delete the default utilman.exe.
del utilman.exe

We will now rename CMD so that it can be accessed as utilman.exe.
rename cmd.exe utilman.exe

Once all the commands are executed successfully, close the command prompt by typing in the following command.
exit

Restart your PC and proceed to the Windows lock screen as you normally would. Click on the accessibility icon in the bottom right corner and you should now be able to access CMD on your lock screen. Follow the guide above to enable administrator account on your system. Once enabled, you can use the guide below to reset a local account’s password. Once you have reset your password it is highly recommended that you revert the changes we made to cmd.exe and utilman.exe earlier. Use the steps below to revert your changes.
Press Windows + S on your keyboard and search for CMD. Click on ‘Run as administrator’ once it shows up in your search results.
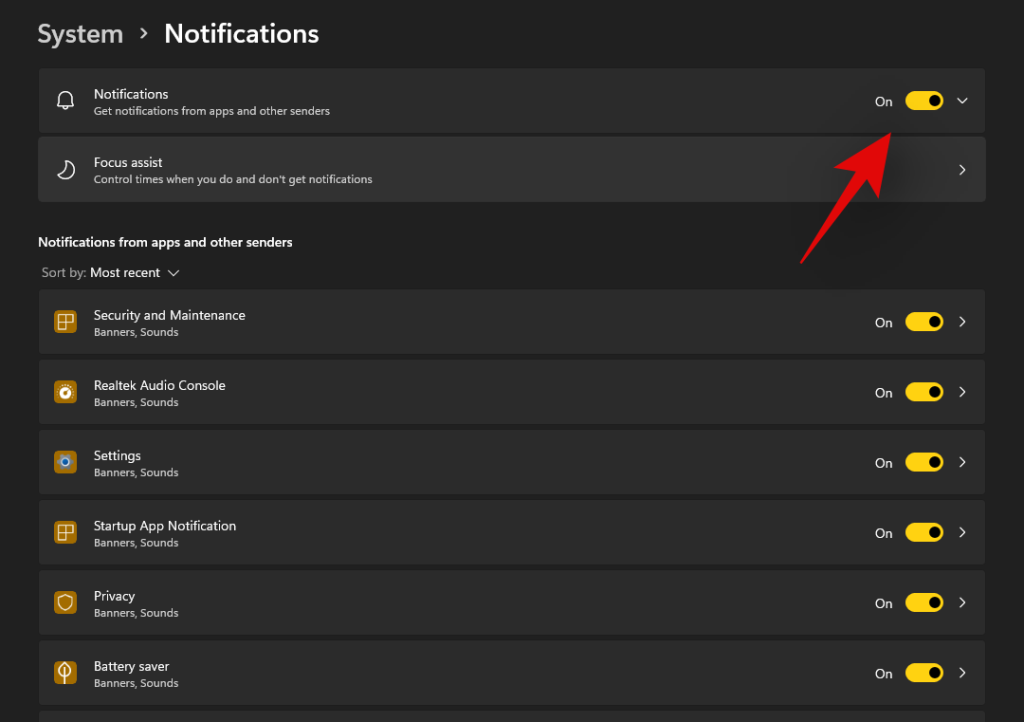
Now enter the following commands one by one and execute them to revert your changes. Make sure to execute each command one after the other without changing their order.


rename utilman.exe.back utilman.exe

CMD functionality should now be restored within Windows 11. You can check for the same by pressing Windows + R on your keyboard, typing in CMD, and hitting Enter on your keyboard. If CMD launches on your system then all the necessary changes have been reverted successfully.
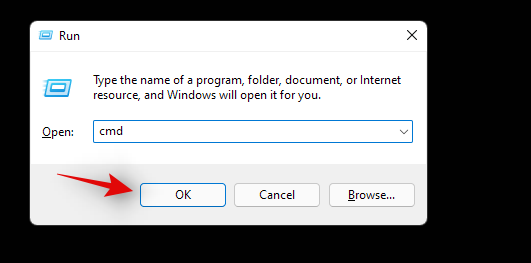
However, if CMD does not launch, make sure that you executed each command successfully on your system by re-verifying each one in the list above.
And that’s it! You should now be able to access CMD from your lock screen.
1.4 Reset password for a local account
You can now reset your local account’s password with the default administrator account we just enabled. Follow the steps below to get you started.
Log in to the Windows administrator account and then press Windows + S on your keyboard. Search for Control Panel and click and launch the app once it shows up in your search results.
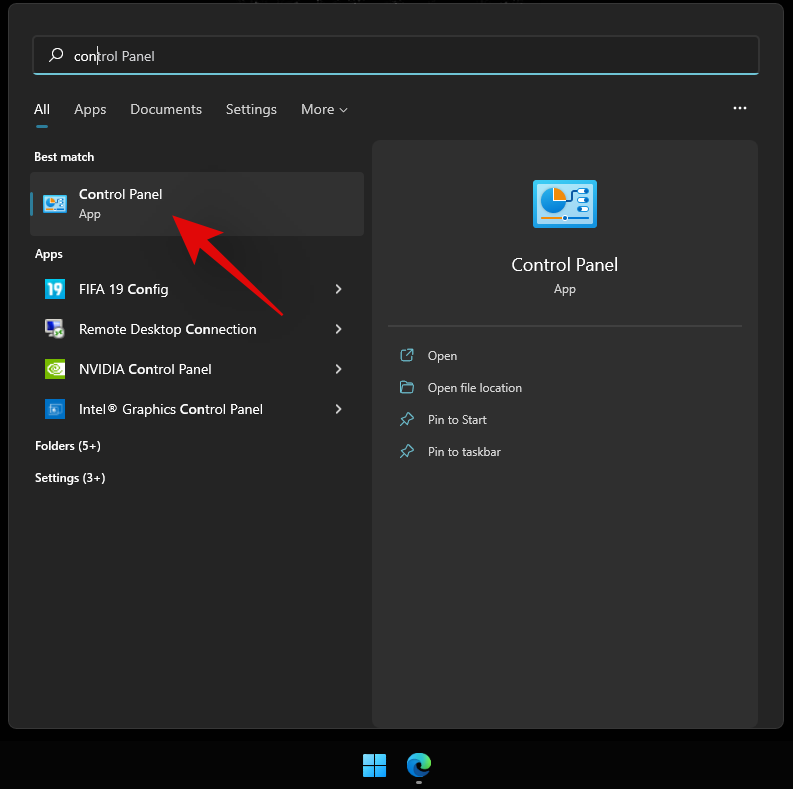
Click on ‘User Accounts’.
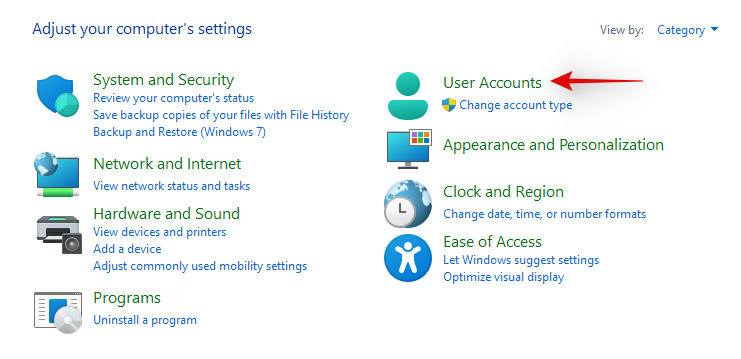
Click on ‘User Accounts’ again.
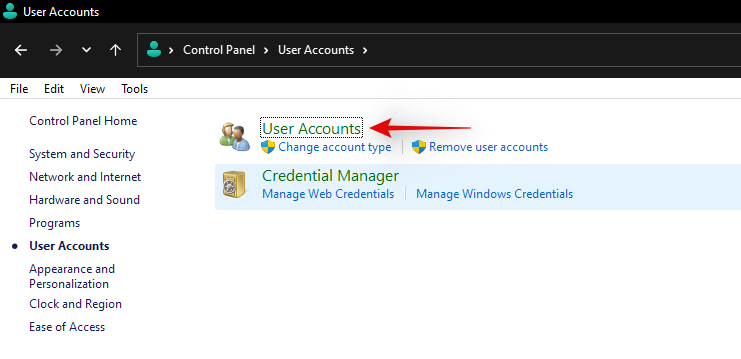
Click on ‘Manage another account’.
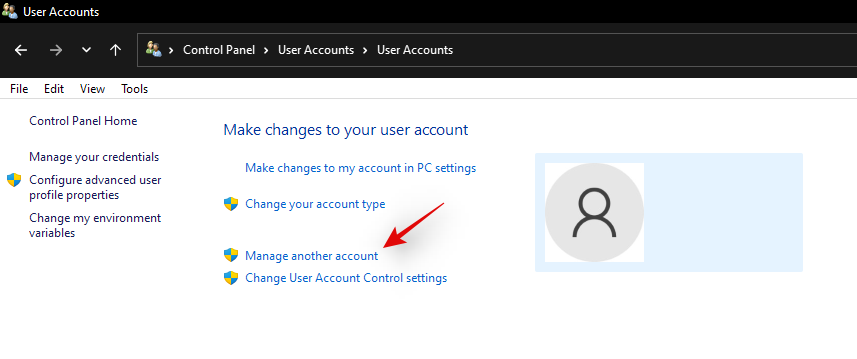
Click and select the account for which you wish to change the password.
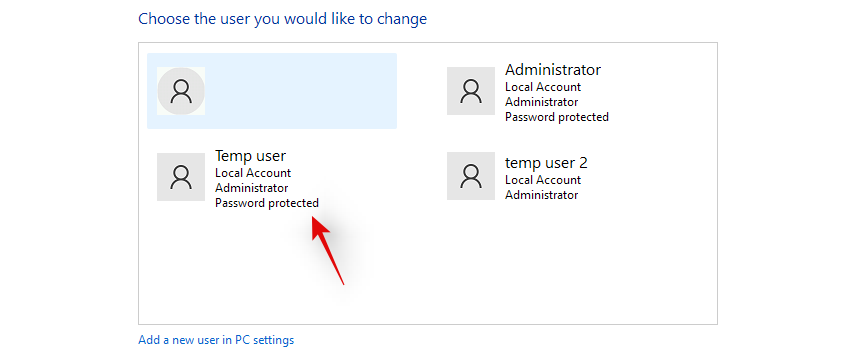
Now click on ‘Change the password’.

Type in your new password and confirm the same in the respective text boxes
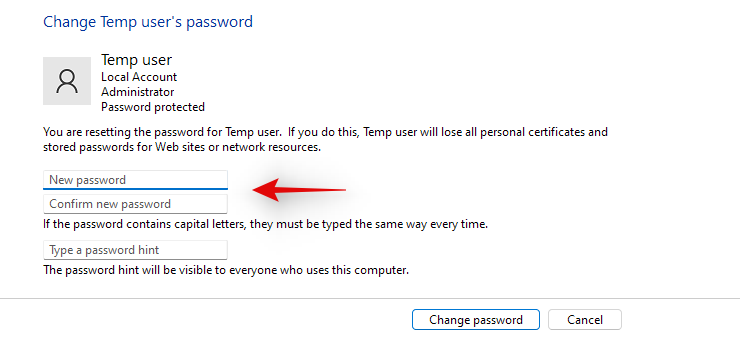
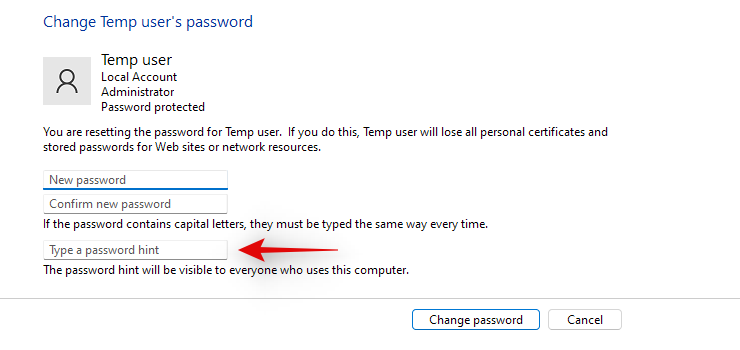
Set a password hint if needed.
Click on ‘Change password’ once you are done.
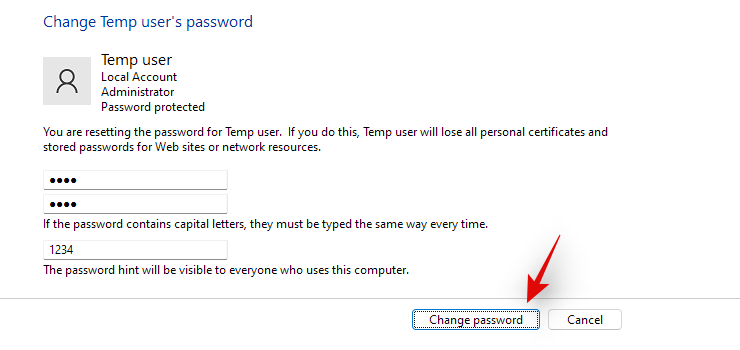
And that’s it! The password for the selected account should now be changed. You can now visit the lock screen and log into your local account using your new password. We recommend you revert any changes made at this point to maintain your security and privacy. You should revert any CMD changes made as well as disable the default administrator account on your system using the guides above.
Method #02: Create a new administrator account in Windows 11
If you wish to create a new administrator account in Windows 11, then you can follow the steps below. Please keep in mind that you will need administrator privileges to create a new administrator user account on your device. Follow the guide below to get you started.
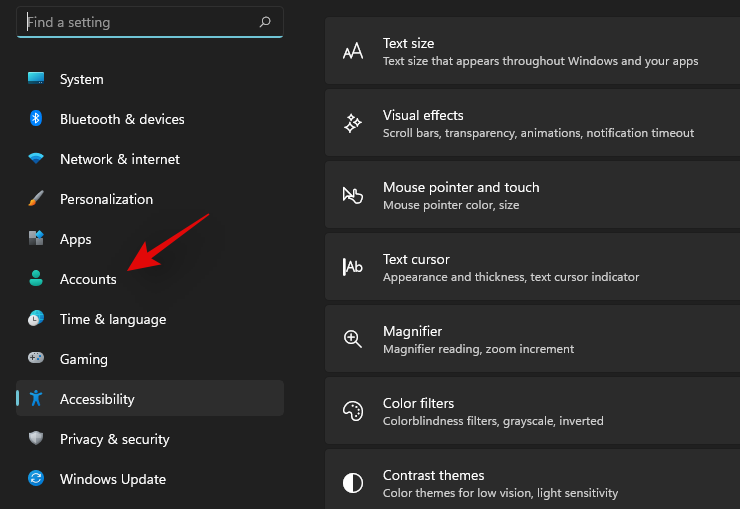
Press Windows + i on your keyboard and select ‘Accounts’ from the left sidebar.
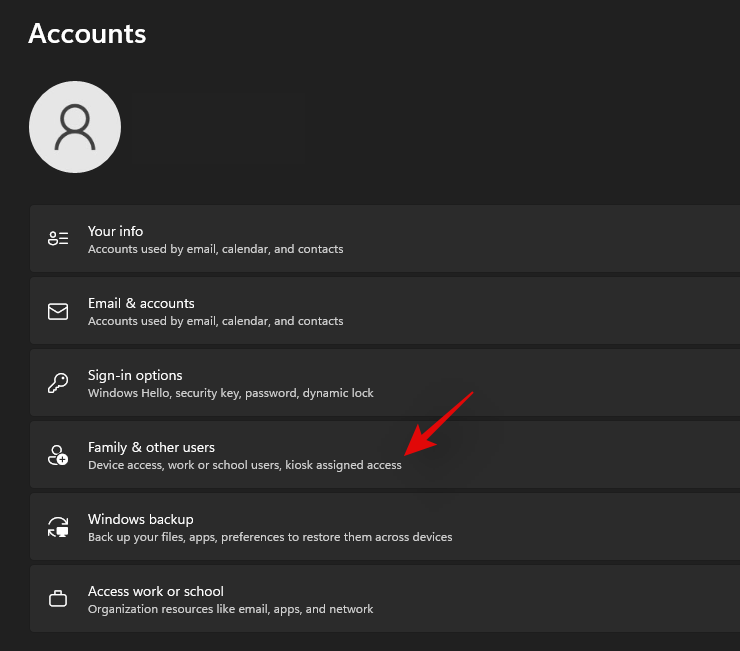
Click on ‘Family & other users’.
Click on ‘Add account’.

At this point, you can enter the Microsoft Account details of the new user and follow the on-screen steps to set up a new account. However, if you are looking to create a new local account then you can continue with the steps below.
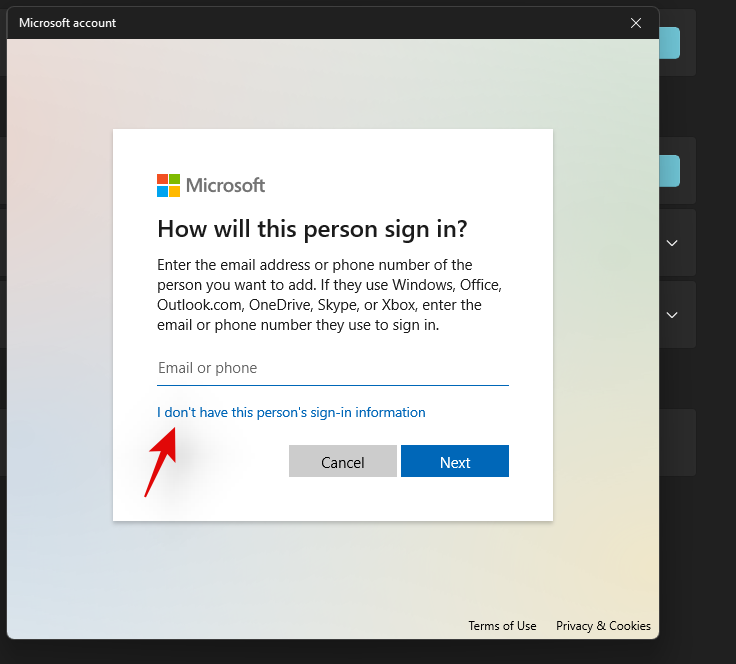
Click on ‘I don’t have this person’s sign-in information’.
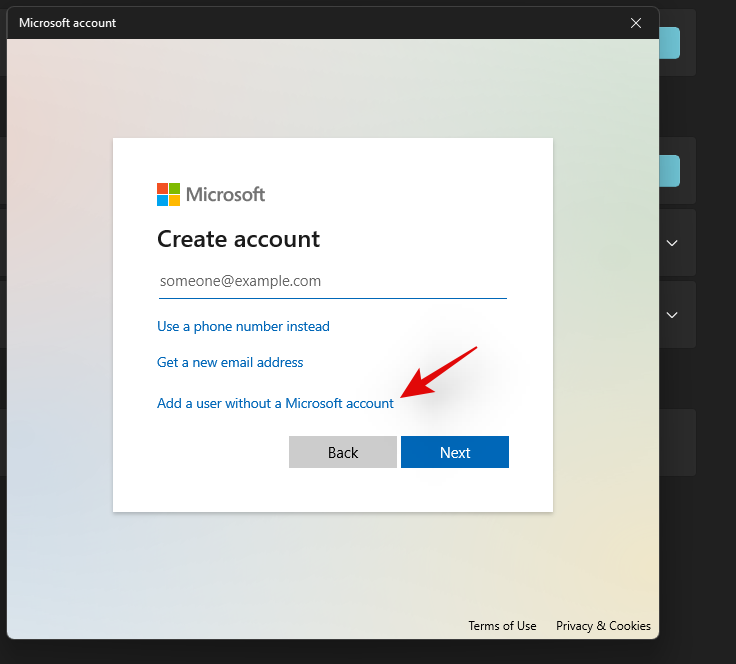
Click on ‘Add a user without a Microsoft account’.
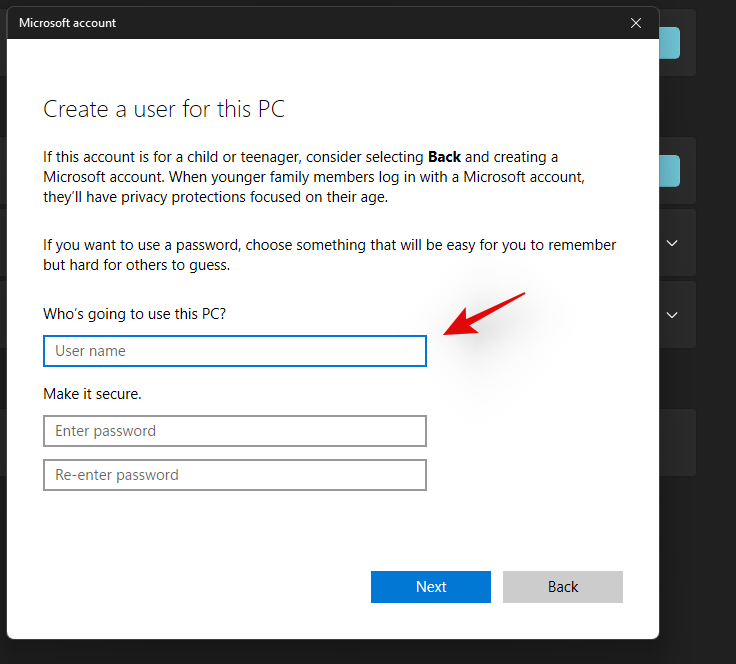
Enter the name of the new user.
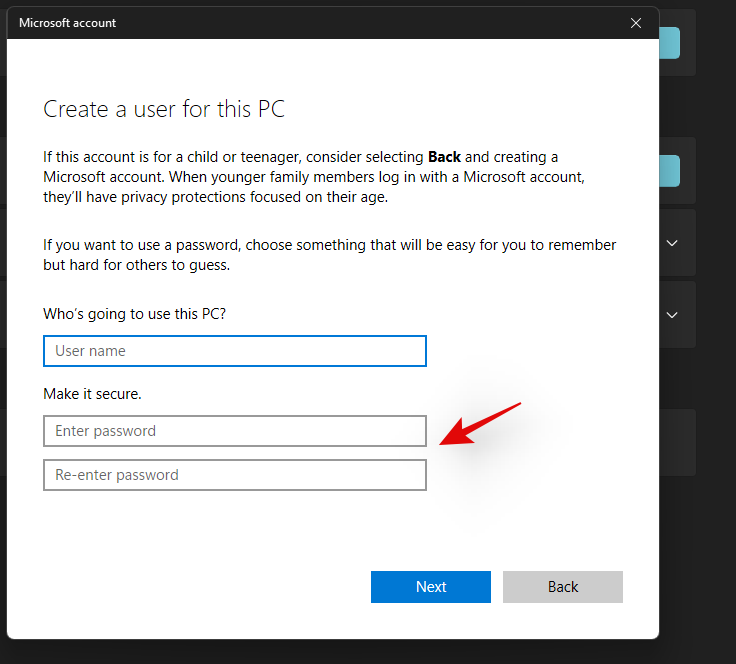
Now set a password and confirm the same.
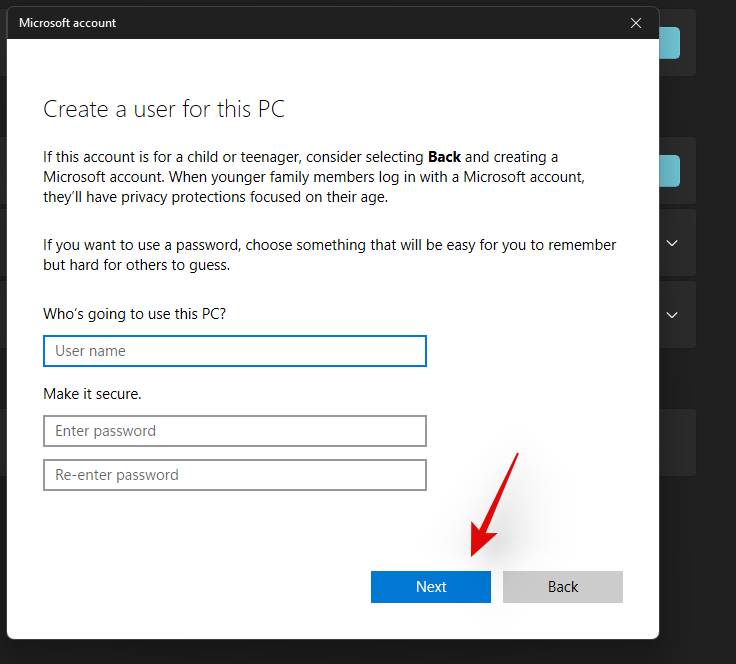
Click on ‘Next’ once you are done.
 \
\
A new account will now be added to your PC. However, the newly added account is a standard account. Let’s convert it into an administrator account. Press Windows + S on your keyboard and search for Control Panel. Click and launch the app from your search results.
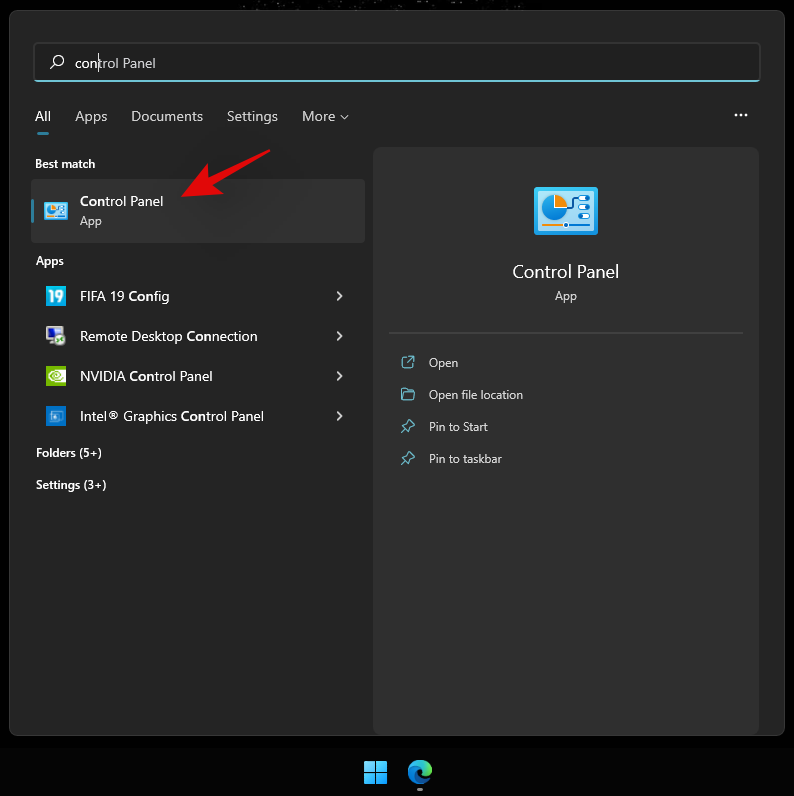
Click on ‘User Accounts’.
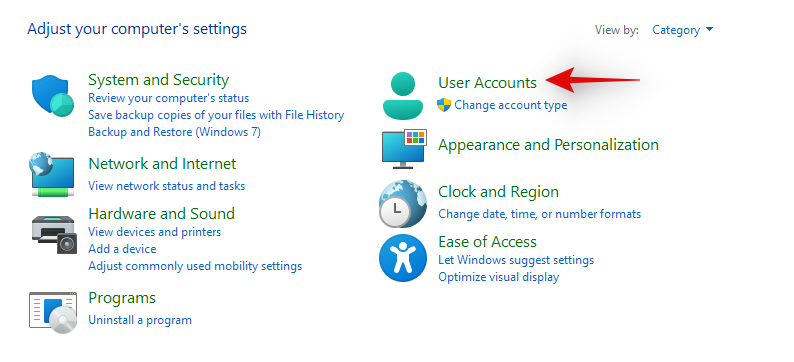
Click on ‘User Accounts’ again.
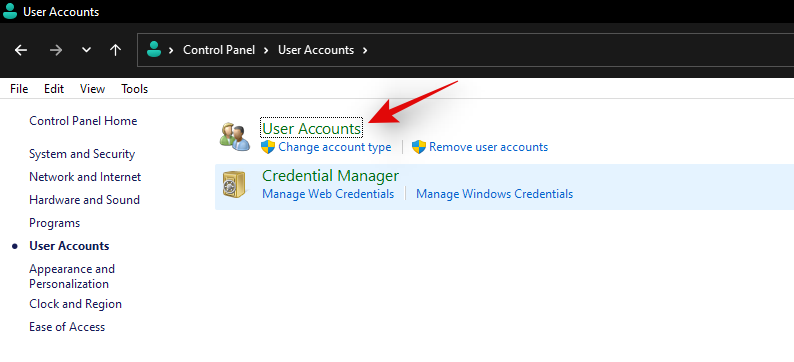
Click on ‘Manage another account’.
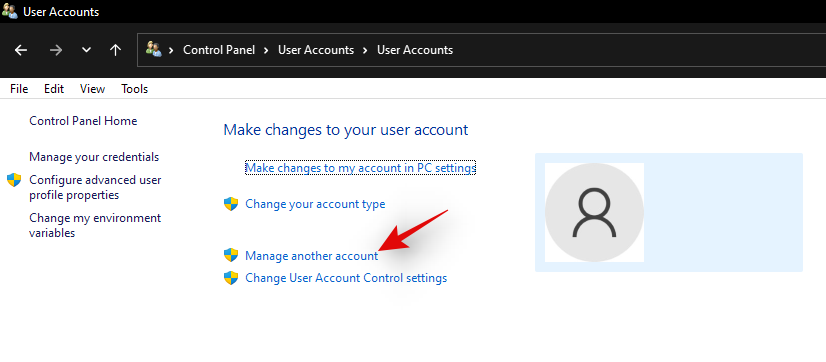
Now click and select the new account you just created.
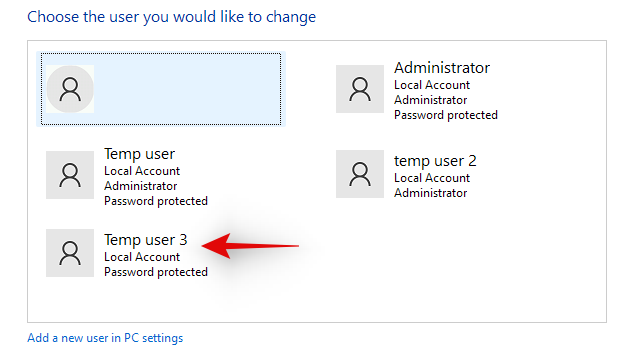
Click on ‘Change the account type’.

Click and select ‘Administrator’.
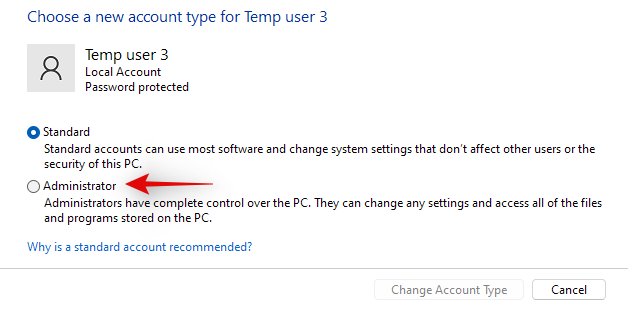
Finally, click on ‘Change account type’.
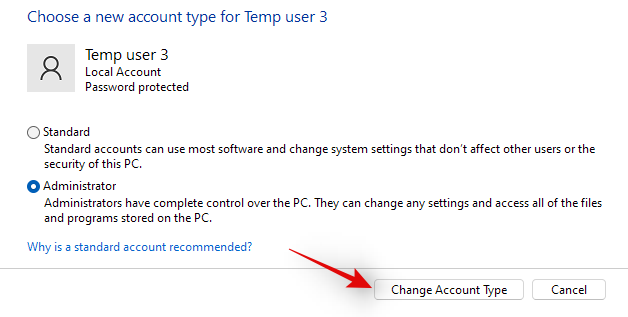
And that’s it! You will now have created a new local administrator account on your device.
Method #03: Change a standard account to an administrator account
If you have a standard account then you can simply switch to an administrator account. If using the Windows Home edition then you can either use the Control Panel method or the ‘netplwiz’ method. On the other hand, Windows Pro and higher users can use either of the methods listed below. Let’s get started.
Note: If you are logged in as a standard user and would like to convert the same account to an administrator account then we recommend you use the netplwiz guide in the methods below.
3.1 Using Control Panel (Windows home)
Press Windows + S on your keyboard, search for Control Panel and launch the app once it shows up in your search results.

Click on ‘User Accounts’.

Click on ‘User Accounts’ again.

If you wish to change your own account’s type then click on ‘Change your account type’. If you wish to convert another local account then select ‘Manage another account’ and select the concerned account. Once selected, click on ‘Change account type’.

Select ‘Administrator’.

Click on ‘Change account type’.

And that’s it, the concerned account should now be an administrator account on your system.
3.2 Using netplwiz
You can also use netplwiz to your advantage and convert user accounts on your PC. Follow the guide below to get you started.
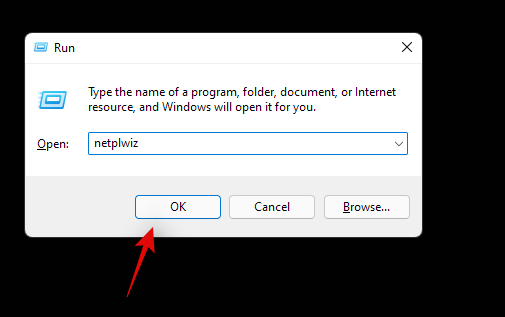
Press Windows + R on your keyboard to launch the run dialog box. Once launched, type in the following and press Enter on your keyboard.
netplwiz
Check the box for ‘Users must enter a user name and password to use this computer’ at the top.
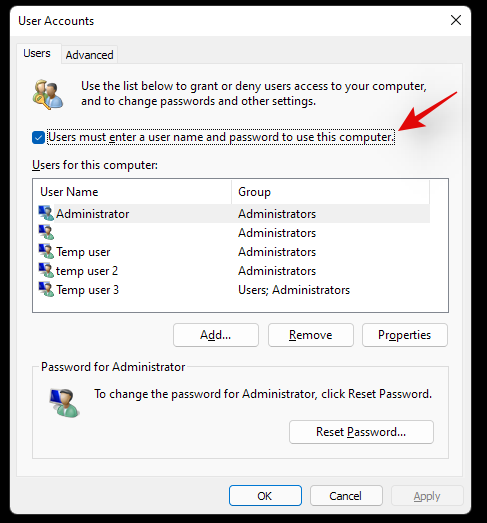
Now click and select the user account you wish to convert from the list below.
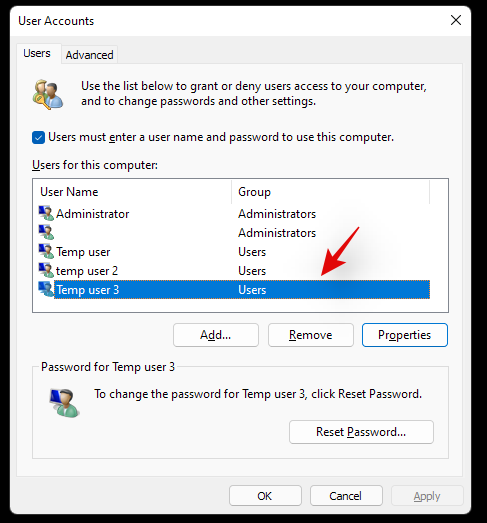
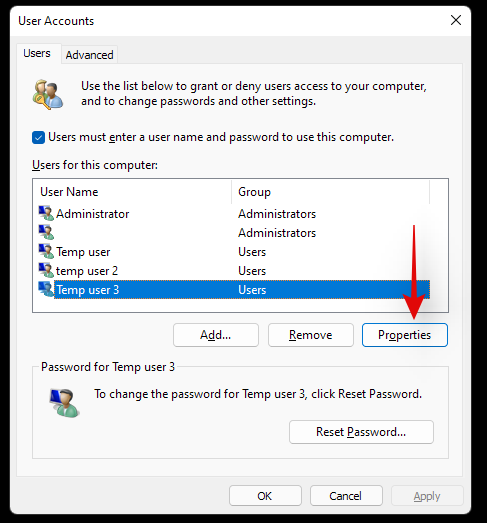
Click on ‘Properties’.
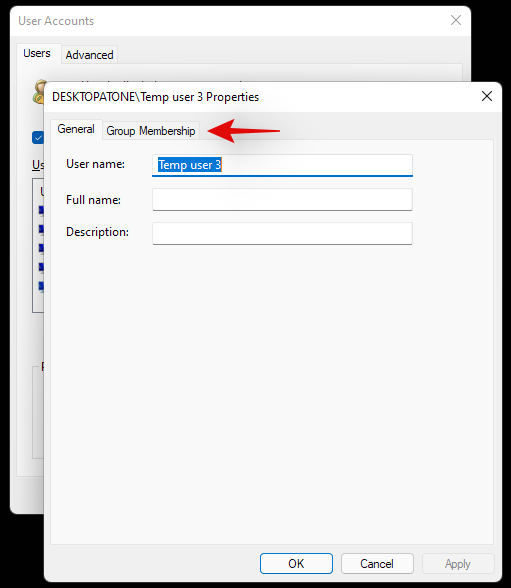
Switch to the ‘Group Membership’ tab at the top.
Click and select ‘Administrator’.
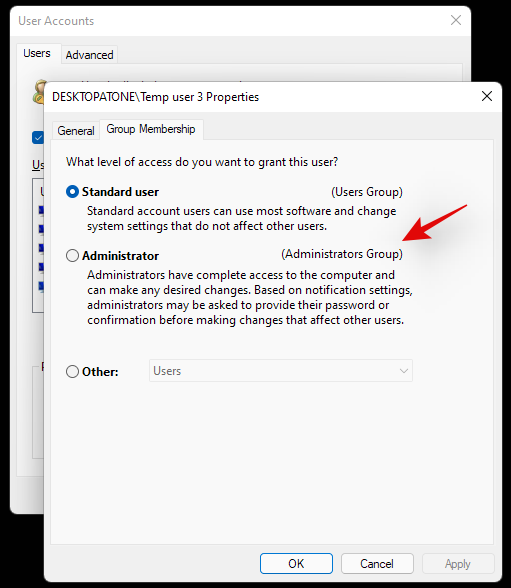
Click on ‘Ok’ twice, once you are done.
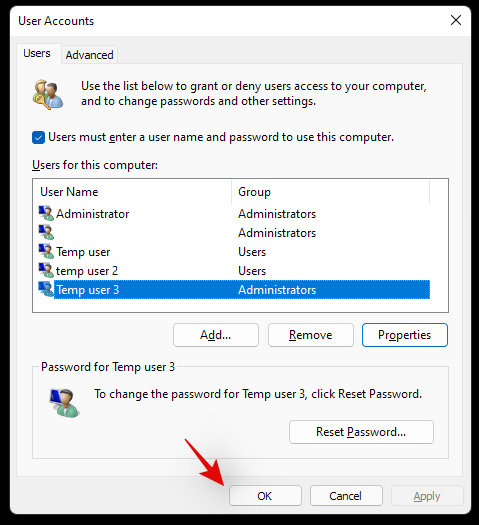
If you converted the current local account that you are signed in with then you will be prompted to re-login to the account for the changes to take effect. Click on ‘Yes’ to confirm your choice.
You will now be taken to the lock screen. Login to the concerned account and you should now have administrator privileges within it.
3.3 Using Local groups manager (Windows Pro and higher)
Press Windows + R on your keyboard, type in the following, and press Enter on your keyboard.
lusrmgr.msc
The local groups manager should now launch on your PC. Click and open ‘Users’ on your left.
Now select the desired User account that you wish to convert from your right and double click on it.
Switch to the ‘Member of’ tab and select the ‘Administrator’ group.
Click on ‘Ok’ once you are done.
And that’s it! The selected account will now have elevated administrator privileges within Windows.
Can you set or reset a password when logged in as an administrator?
Yes, you can easily reset your password as an administrator in Windows 11. This can be done in multiple ways and you can reset the password for a standard account or an administrator account using this method. This can be quite useful if you have forgotten your password and would like to get back into your system without losing your data.
However, you should keep in mind that this can be used by anyone to change your password and get access to your system. Hence, it is recommended that you set a secure password for your default account whenever possible.
For now, you can use the guide below to reset a password in Windows 11 when logged in as an administrator.
How to reset the password once logged in as an administrator
Resetting your password is quite easy when you are logged in to Windows 11 as an administrator. The best way to do this is by using either the Control Panel or CMD. Use one of the guides below that best fits your current needs and requirements. Follow any one of the guides below to get you started.
1. Using Control Panel
Press Windows + S and search for Control Panel. Click and launch the app from your search results.

Click on ‘User Accounts’.

Now click on ‘User Accounts’ again.

Click on ‘Manage another account’.

Now click and select your local account for which you wish to reset your password.

Click on ‘Change the password’.

Add a new password for your local account and confirm the same in their respective text boxes.

Now add a password hint if required.

Click on ‘Change password’ once done.

And that’s it! The password for the selected account should now be changed based on your preferences.
2. Using CMD
You can also reset a local account’s password using CMD. Follow the guide below to get you started.
Press Windows + S on your keyboard and search for CMD. Click on ‘Run as administrator’ once the app shows up in your search result.
Type in the following and press Enter on your keyboard.
net user

You will get a list of all the accounts currently available on your PC. Make a note of the desired account’s username and then type in the command below. Replace ‘NAME’ with the name you noted down earlier and replace ‘PASSWORD’ with your new password. Once done, press Enter on your keyboard.
net user NAME PASSWORD
And that’s it! Once the command is executed, the password for the desired account should be automatically changed on your PC.
How to add a password for the administrator account
If you are looking to secure your PC further then it is recommended that you add a password for the default administrator account. This will ensure that no one aware of this trick can access your Windows account without your authorization. We can add a password for your default admin account in several ways but we recommend you do so either via the advanced menu or via the CMD method. Follow any one of the guides below to get you started.
1. Using Ctrl + Alt + Del
Log in to the default administrator account and press Ctrl + Alt + Del on your keyboard.
Now click and select ‘Change password’.
Enter a new password and confirm the same in their respective fields.
Add a password hint or security question depending on your preferences.
Click on ‘Ok’ once you are done.
And that’s it! Your default administrator account’s password should now be changed on your PC.
2. Using CMD
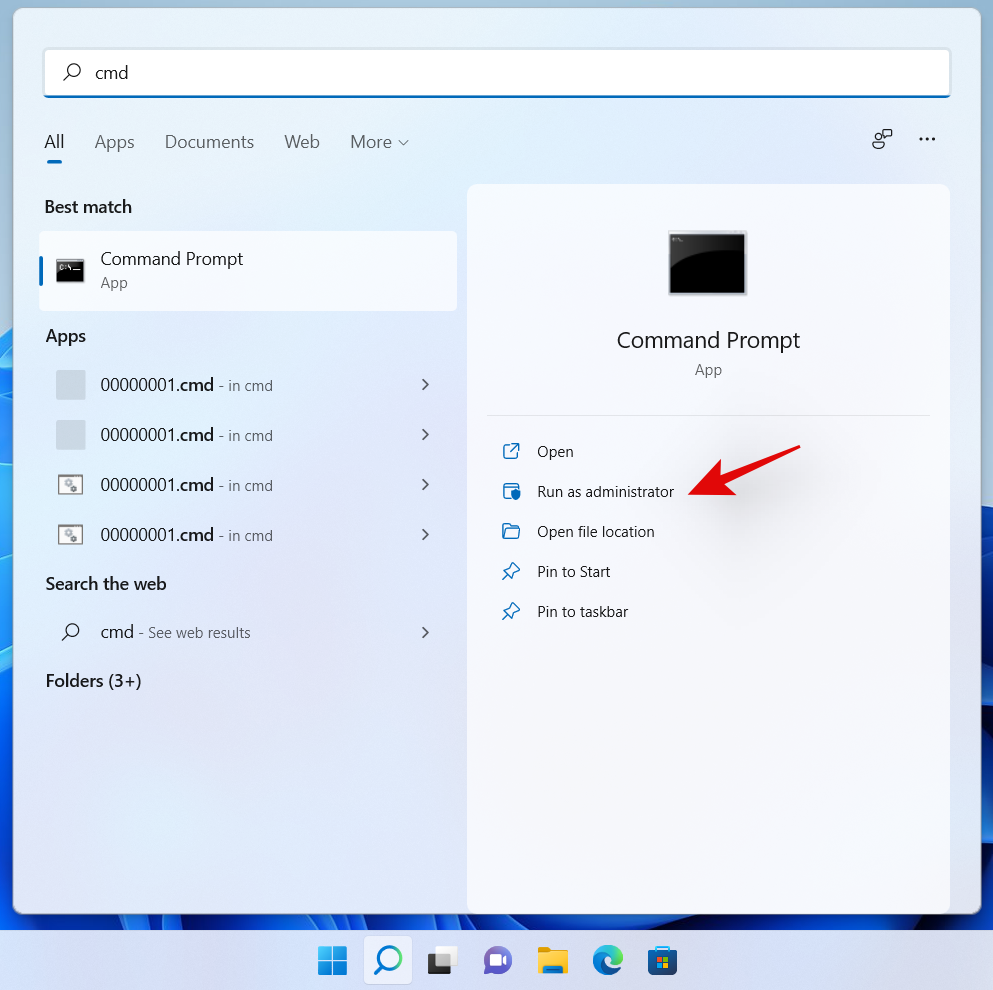
Log in to the default administrator account and press Windows + S on your keyboard. Search for CMD and click on ‘Run as administrator’ once the app shows up in your search results.
Now enter the following command. Replace ‘PASSWORD’ with a password of your desired choice.
net user Administrator PASSWORD

And that’s it! The new password should now be set for your default administrator account.
Should you keep the administrator account enabled?
No, it is not recommended to keep your default/super administrator account enabled. This account has higher and more elevated privileges when compared to a normal administrator account in Windows. This account is used by Windows to perform system-level tasks in the background as well hence it could cause several privacy issues on your system.
In case somebody can access this account, they would have access to your entire data and hardware. The user could then proceed to take control of your entire system or simply infect it with malware, adware, and in the worst cases, ransomware.
We hope you were able to easily log in as an administrator in Windows 11 using the guide above. If you face any issues or have any more questions for us, feel free to reach out to us using the comments section below.
Related:


 \
\


