Як відновити доступ до жорсткого диска, виправити помилку неможливості відкрити жорсткий диск
У цій статті ми розповімо вам, як відновити доступ до жорсткого диска, якщо він вийшов з ладу. Давайте продовжимо!
Якщо ви оновлюєтеся до нового ПК, швидше за все, ви намагаєтеся повторно використовувати жорсткий диск зі свого старого ПК. Якщо ні, можливо, ви плануєте подарувати його члену сім’ї чи другу. Але перш ніж продовжити використання будь-якого з цих варіантів, вам слід повністю стерти свій старий жорсткий диск, щоб наступна людина починала з жорсткого диска заново.
У цій публікації ми розглянемо кілька способів стерти жорсткий диск у Windows 11 .
Зміст
Чому потрібно стирати жорсткий диск?
Перш ніж ми перейдемо до методів, давайте приділимо хвилинку, щоб зрозуміти, чому ви повинні стерти свої жорсткі диски.
Більш очевидна причина витираючи жорсткий диск, щоб очистити всі ваші особисті файли і додатки з диска, переконавшись , що вони не можуть бути відновлені з допомогою інструментів відновлення даних - після відновлення заводських параметрів чи ні. Іншою причиною для очищення диска може бути просто отримати більше місця для зберігання нових файлів. Або, можливо, ви просто хочете налаштувати свій ПК з нуля за допомогою чистої інсталяції Windows і нових розділів для жорсткого диска.
Незалежно від причини, давайте подивимося на передумови для очищення жорсткого диска.
Що робити перед очищенням жорсткого диска?
Перш ніж стерти диск, потрібно подбати про кілька речей.
Давайте розглянемо методи очищення жорсткого диска в Windows 11.
Пов’язано: Як зіставити диск у Windows 11
Як відформатувати диск в Windows 11 або 10
Ви можете відформатувати диск кількома способами залежно від типу доступу до вашої системи. Скористайтеся одним із наведених нижче посібників, які найкраще відповідають вашій поточній ситуації та вимогам.
Це, безсумнівно, один з найпростіших і швидких способів стерти жорсткий диск. Цей процес займає всього пару секунд і ідеально підходить, коли ви хочете звільнити місце для нових файлів на жорсткому диску.
Примітка. Цей метод працюватиме лише для вторинних дисків у вашій системі, а не для завантажувального диска.
Ось кроки.
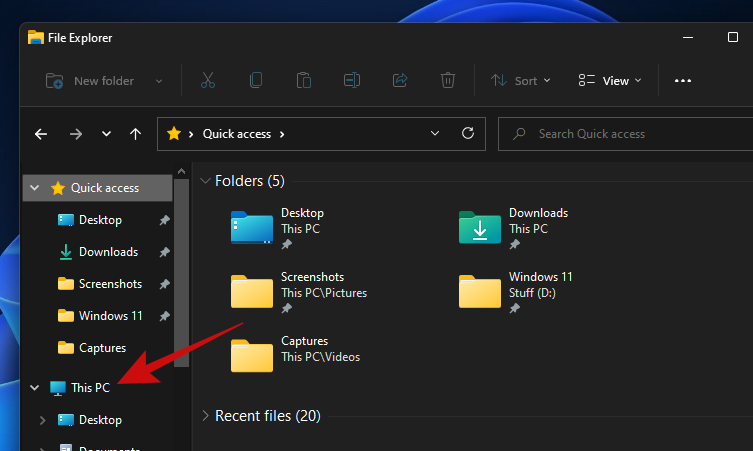
Натисніть, Win key + rщоб відкрити вікно Виконати. Введіть «провідник» і натисніть Enter.
Ви побачите, що відкриється вікно під назвою «Провідник файлів». Натисніть «Цей ПК».
Тепер ви повинні побачити всі диски, підключені до вашого ПК. У нас є три диски, з яких ми будемо використовувати диск «Дані» для цього посібника.
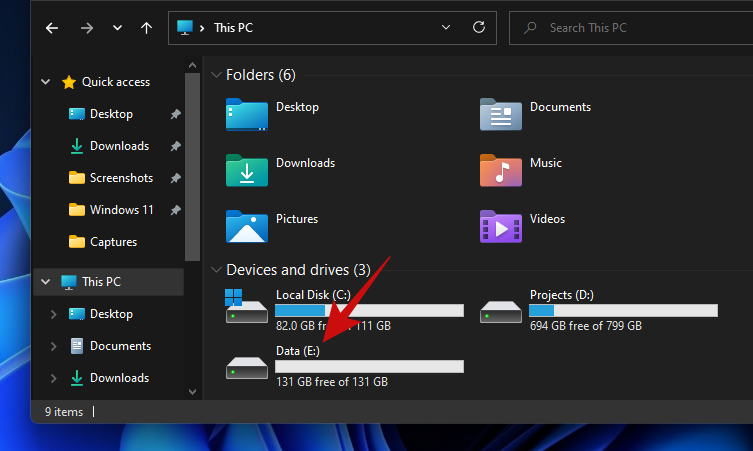
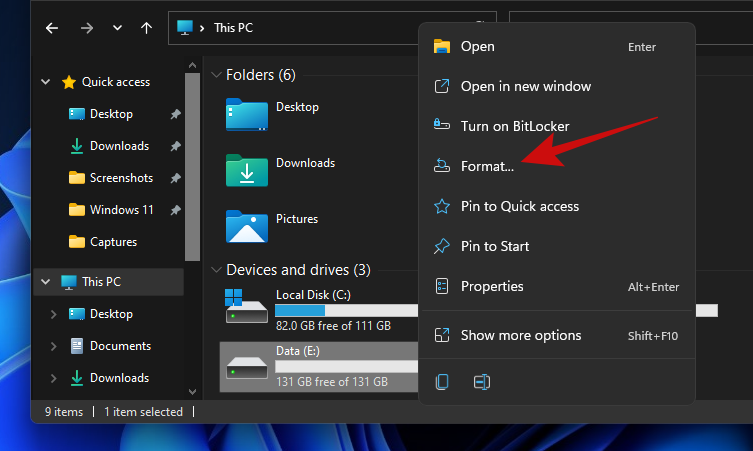
Все, що вам потрібно зробити, це клацнути правою кнопкою миші диск, який ви хочете стерти, і натисніть «Форматувати».
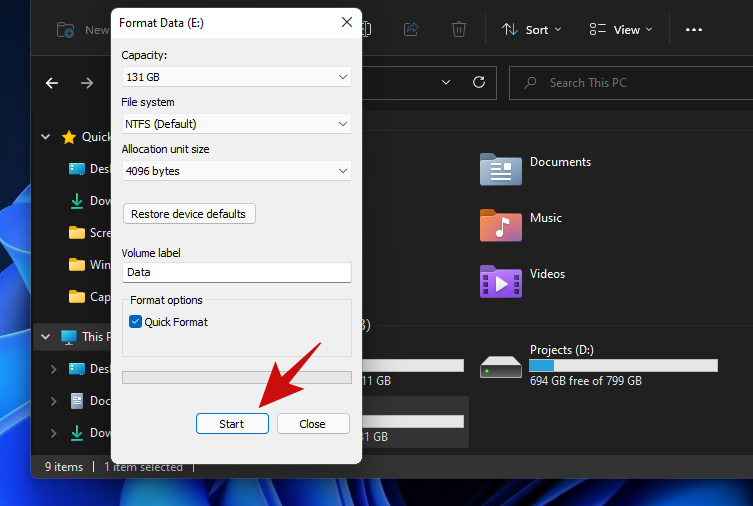
Ви повинні побачити невелике спливаюче вікно "Формат" з купою параметрів. Якщо ви хочете швидко стерти дані, не заважаючи іншим параметрам, натисніть кнопку «Пуск».
Порада: для більш безпечного стирання даних зніміть прапорець «Швидке форматування», а потім натисніть «Почати». Майте на увазі, що ретельне стирання займе набагато більше часу, ніж швидке форматування.
Після завершення очищення ви побачите повідомлення, що підтверджує те саме. Натисніть «ОК», щоб закрити сповіщення.
Тепер ваш диск повністю чистий і готовий до повторного використання.
Спосіб №2: Використання керування дисками
Відкрийте меню «Пуск» і введіть «Керування дисками». Натисніть на результат пошуку або кнопку відкрити.
Ось як виглядає інструмент керування дисками.
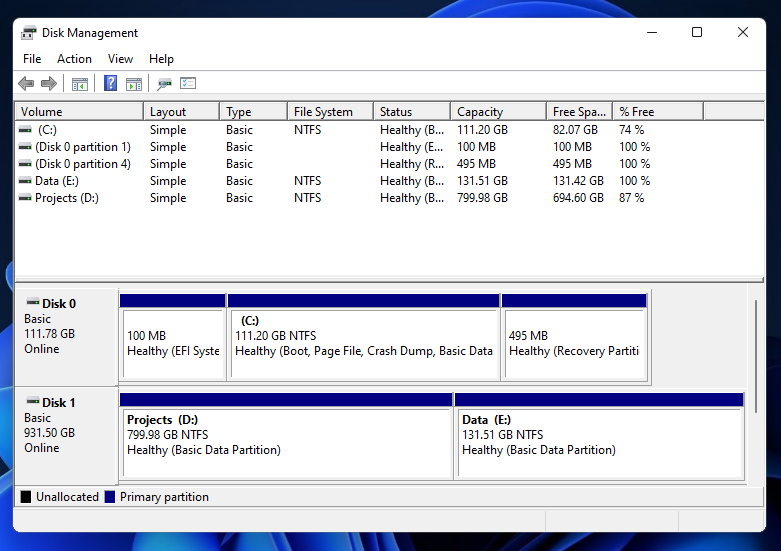
Клацніть правою кнопкою миші том, який потрібно стерти, і натисніть Формат.
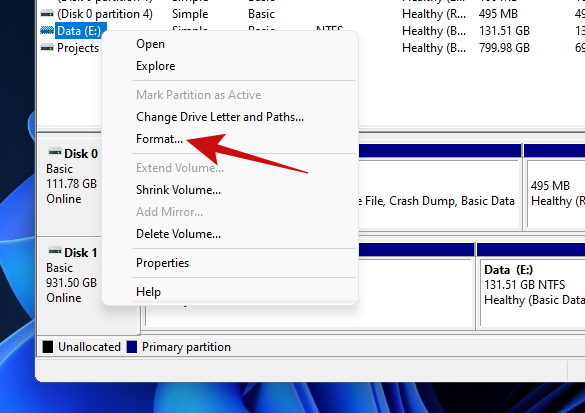
У наступному спливаючому вікні ви повинні мати кілька опцій, як-от зміна назви тому, файлової системи тощо.
Знову ж таки, як і попередній метод, вам слід поставити галочку в опції «Виконати швидке форматування», якщо ви не хочете довго чекати, щоб стерти диск.
Порада: для ретельного стирання, яке має видалити всі сліди ваших даних з вашого диска, зніміть прапорець «Виконати швидке форматування».
Натисніть кнопку «ОК», щоб почати очищення диска.
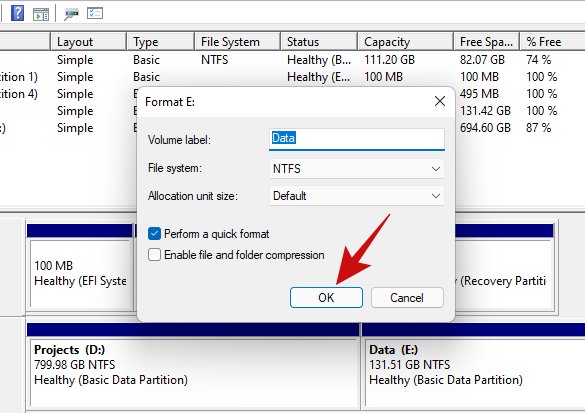
Натисніть кнопку «ОК», щоб підтвердити стирання даних, і ваш диск повинен бути чистим за кілька хвилин.
Спосіб №3: Використання Diskpart в CMD (командний рядок)
Diskpart — це утиліта командного рядка, яку можна використовувати для керування всіма дисками, підключеними до вашого ПК. За допомогою diskpart ви можете робити все: від переліку дисків, створення та видалення розділів і багато іншого.
Давайте подивимося, як можна стерти жорсткий диск за допомогою diskpart.
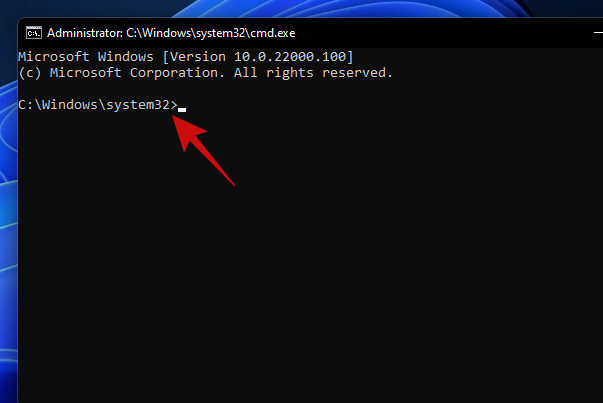
Натисніть, Win key + rщоб відкрити вікно Виконати. Введіть «cmd» і натискайте Ctrl + Shift + Enterклавіші замість просто клавіші enter. Це відкриє підвищений командний рядок.
Шлях за замовчуванням з підвищеного командного рядка має виглядати так.
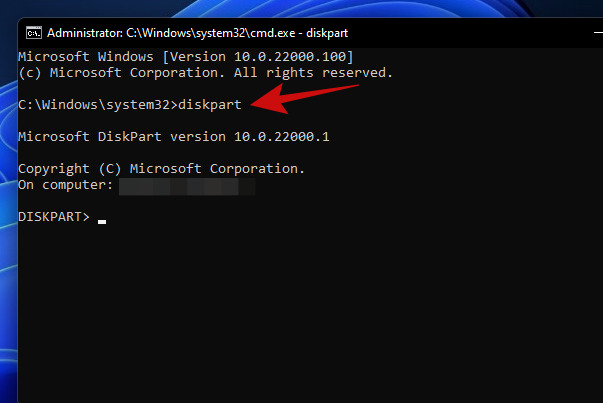
Введіть «diskpart» і натисніть Enter. Тепер ви повинні бути в утиліті diskpart.
Введіть «список диска» і натисніть Enter. Тут має бути перераховано всі диски, підключені до вашого ПК.
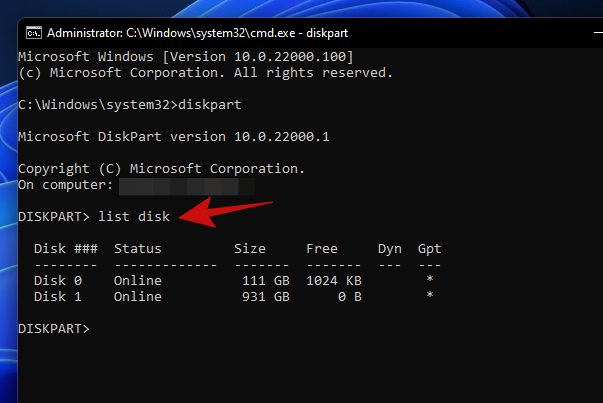
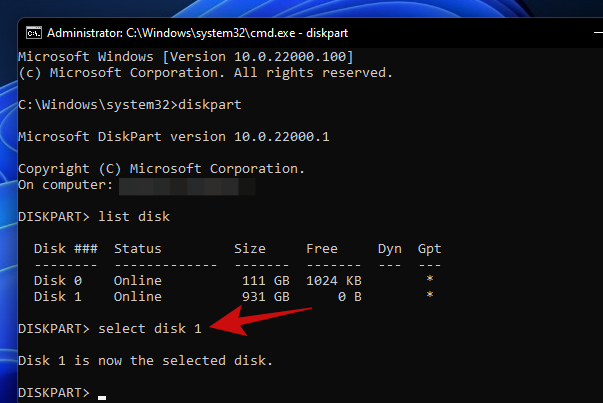
Щоб продовжити очищення диска, введіть «select disk». У нашому ноутбуці є два жорстких диска, і для цього посібника ми розглянемо диск 1, тому ми ввели «вибрати диск 1» та натиснути Enter.
Введіть «clean» і натисніть Enter.
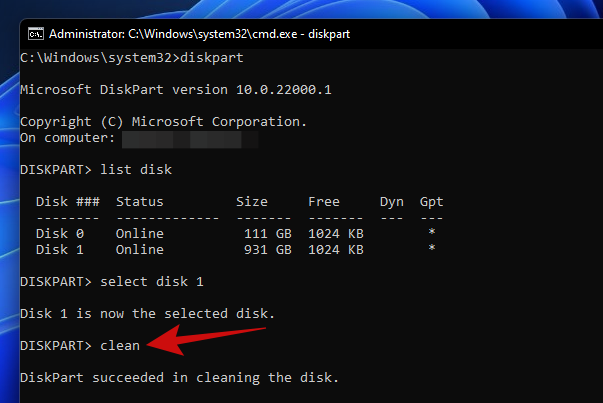
Тепер ваш диск повинен бути повністю порожнім і перетворитися на нерозподілене місце. Вашим наступним завданням має бути створення розділів за допомогою інструмента керування дисками, який ми використовували раніше. Просто запустіть інструмент і ініціалізуйте диск. Після цього ви зможете створити розділи будь-якого розміру, який вам найбільше підходить.
Спосіб №4: Використання параметра Скидання
Windows 11 постачається з опцією «Скинути цей комп’ютер», яка скидає Windows до заводських налаштувань. І найкраща частина скидання цього ПК полягає в тому, що він пропонує користувачам можливість або зберегти всі свої файли та скинути Windows, або видалити все під час скидання Windows.
Якщо ви стираєте диск лише для перевстановлення Windows, ми рекомендуємо спробувати цей метод, перш ніж продовжити чисту інсталяцію.
Ось як це можна зробити.
Відкрийте меню «Пуск» і введіть «Скинути цей комп'ютер». Натисніть на результат пошуку, що з’явиться, або натисніть кнопку «Відкрити».
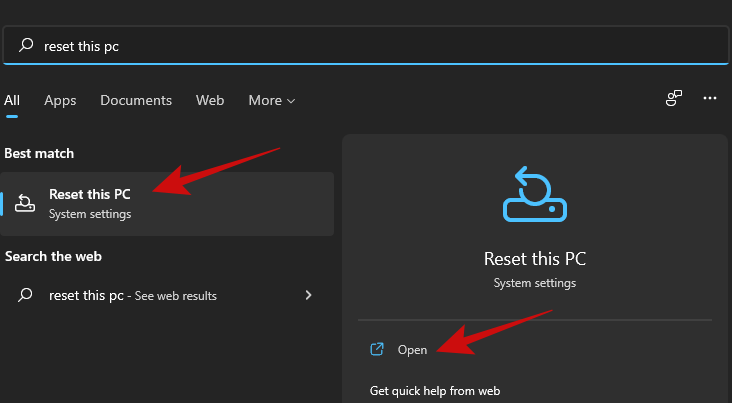
Натисніть кнопку «Скинути ПК», щоб запустити процес скидання Windows.
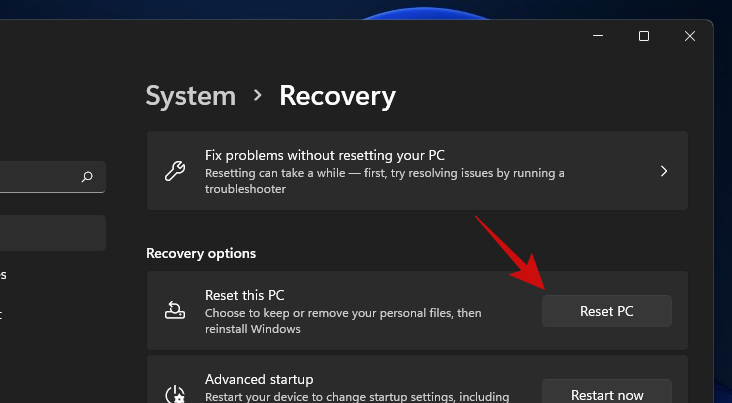
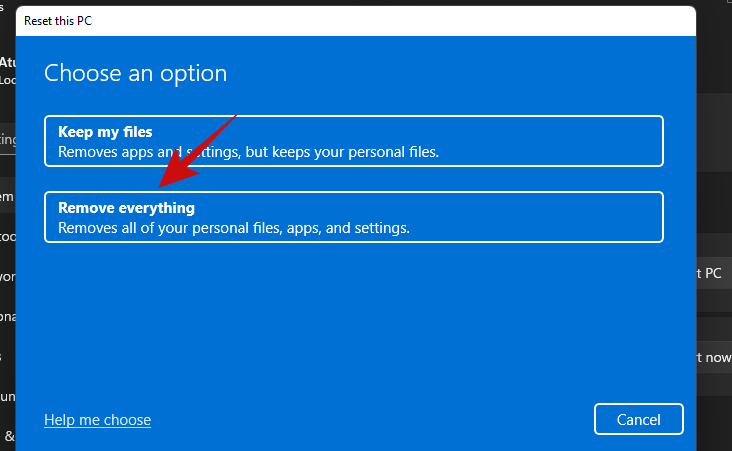
Ви повинні побачити синій екран з двома варіантами. Натисніть «Видалити все», щоб переінсталювати Windows, видаливши всі файли, програми та налаштування.
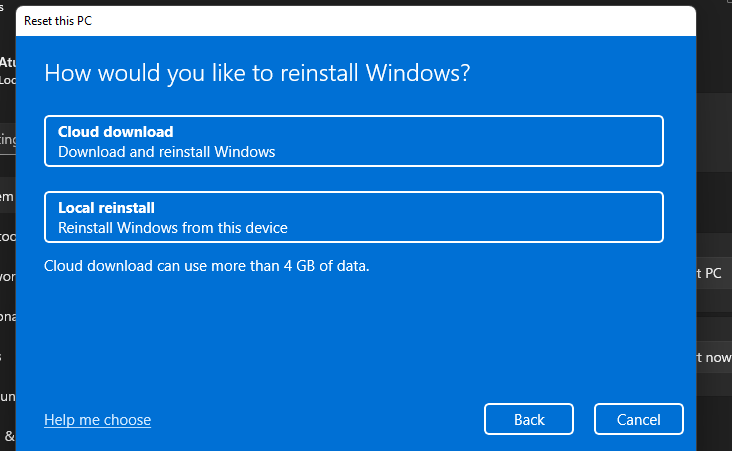
На наступному екрані вас буде запитати, як ви хочете перевстановити Windows. Якщо на вашому комп’ютері є з’єднання з Інтернетом, ви можете перейти до параметра «Хмарне завантаження», інакше — до «Локального перевстановлення».
Дотримуйтесь решти інструкцій на екрані, і миттєво ви отримаєте готовий комп’ютер із новою інсталяцією Windows 11 і без слідів старих файлів і програм на жорсткому диску.
Спосіб № 5: Використання PowerShell
Ви також можете відформатувати диски за допомогою PowerShell. Виконайте наведені нижче дії, щоб відформатувати диск за допомогою PowerShell у Windows 11.
Натисніть Windows + Sна клавіатурі та знайдіть PowerShell. Натисніть «Запустити від імені адміністратора», коли він з’явиться у ваших результатах пошуку.
Введіть таку команду, щоб отримати список усіх томів із дисків, встановлених у вашій системі. Це допоможе вам визначити та знайти диск, який потрібно відформатувати.
get-volume

Виберіть том, який потрібно відформатувати, а потім скористайтеся командою нижче, щоб вибрати його. Замініть X на літеру, призначену відповідному тому.
select X

Тепер скористайтеся командою нижче, щоб відформатувати вибраний том. Замініть NAME на ім’я за вашим вибором, яке буде призначено тому після його форматування.
format-volume -filesystem NTFS -newfilesystemlabel NAME
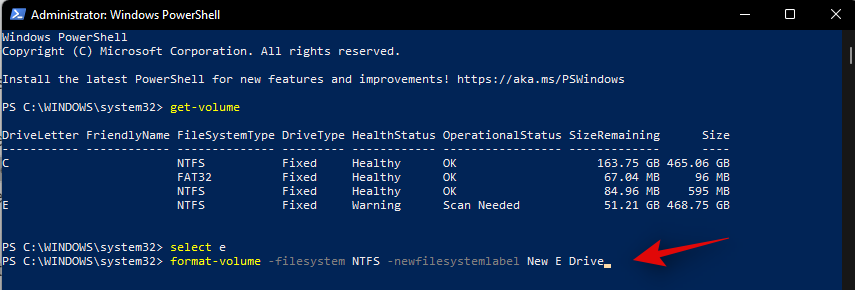
І це все! Вибраний том на відповідному диску буде відформатовано. Дочекайтеся завершення процесу та закрийте PowerShell, щоб використовувати диск як зазвичай.
Спосіб №6: Використання сторонньої утиліти
Існує безліч менеджерів розділів, які можуть допомогти вам легко керувати та форматувати всі диски, встановлені у вашій системі. Дотримуйтесь інструкції нижче, щоб почати. Ми будемо використовувати Gnome Partition Manager для цього посібника, який є надійним індустріальним інструментом, який є повністю безкоштовним. Скористайтеся посиланням нижче, щоб завантажити його до свого локального сховища.
Після того, як GParted буде завантажено у вашу систему, ви можете просто змонтувати його, як і будь-який інший ISO, і почати. Якщо ви хочете очистити та стерти завантажувальний диск, ми рекомендуємо встановити ISO на знімний носій, який дозволить відформатувати диск за межами поточної інсталяції Windows 11. Після встановлення перезавантажте систему та отримайте доступ до Gnome Partition Manager із меню завантаження. Ми будемо використовувати Rufus для монтування образу диска на знімний носій, а потім перезавантажуємо нашу поточну систему.
Примітка. Переконайтеся, що безпечне завантаження вимкнено у вашій системі, щоб ви могли завантажуватися з USB. Крім того, змініть конфігурацію сховища на AHCI замість пам’яті Intel Optane, якщо є така можливість. GParted не зможе розпізнати ваші диски, якщо в конфігурації сховища не встановлено значення AHCI.
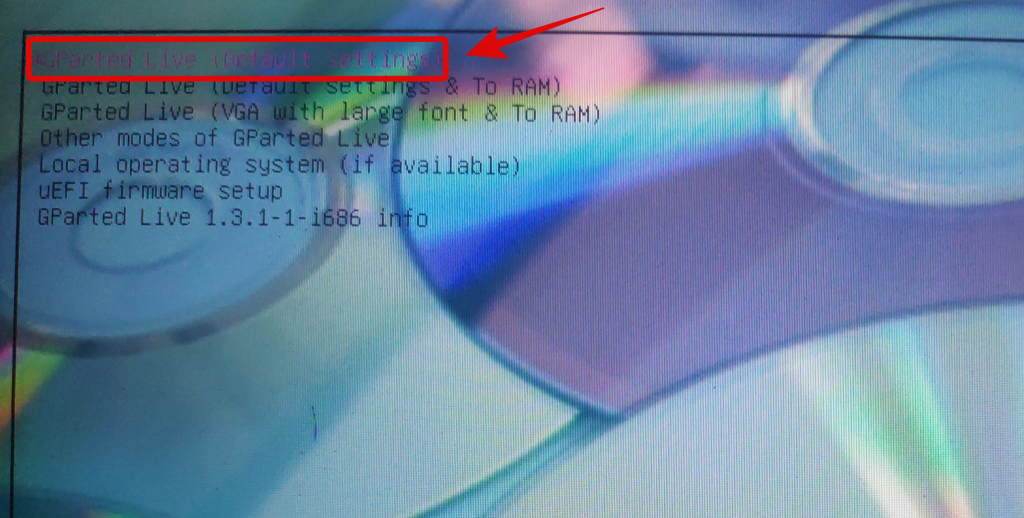
Після того, як ви завантажите свій USB-накопичувач, у вас буде можливість запустити GParted з різними налаштуваннями. Ми рекомендуємо вам вибрати перший варіант і вибрати «Запустити GParted з налаштуваннями за замовчуванням».
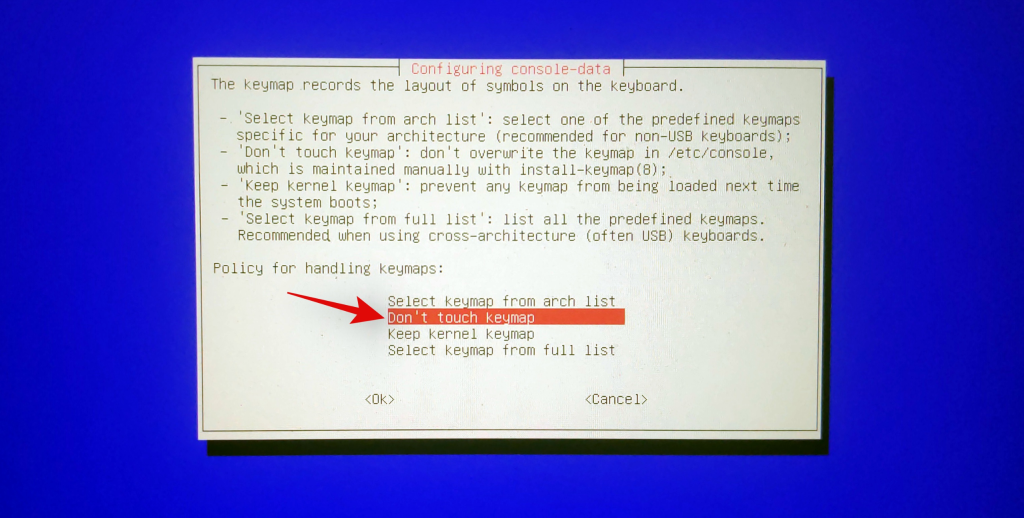
Тепер вам буде запропоновано вибрати розкладку. Ця сторінка стане в нагоді, якщо Gnome неправильно розпізнає вашу клавіатуру. Якщо ваша клавіатура реагує, виберіть «Не торкатися розкладки», щоб продовжити процес.
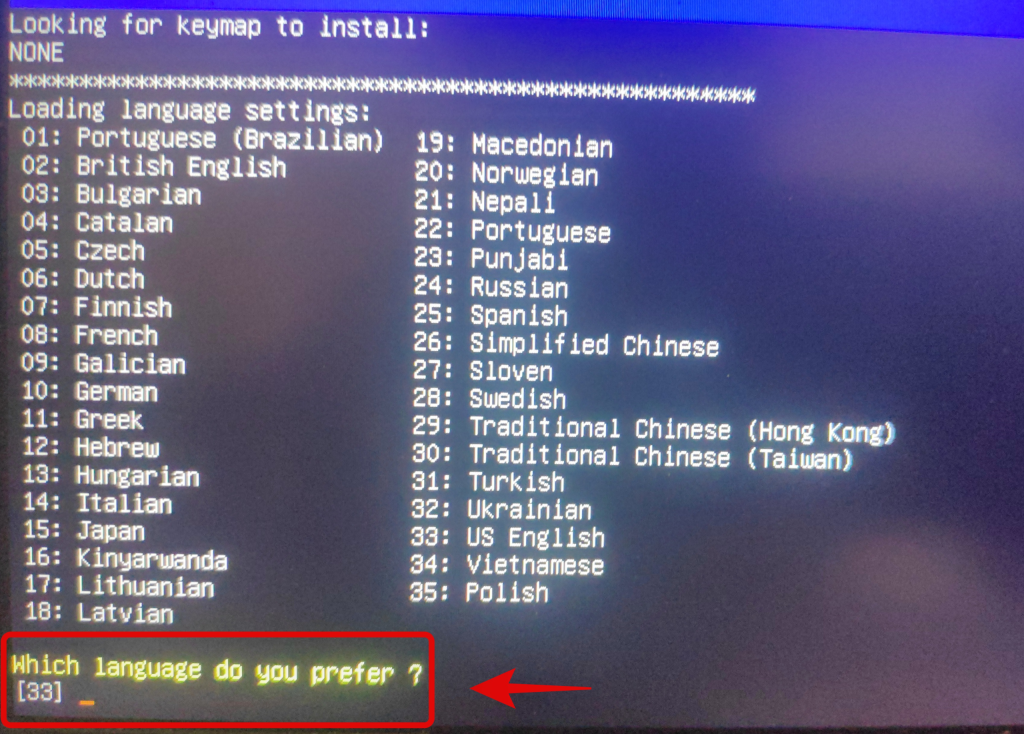
Тепер виберіть свою мову, ввівши її відповідний номер. Введіть '33', якщо ви хочете вибрати американську англійську.
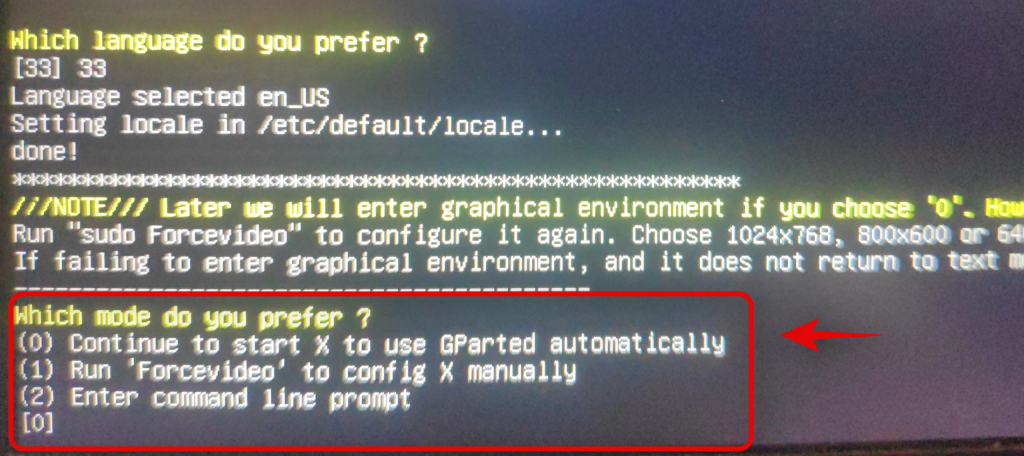
Тепер вас запитають, чи бажаєте ви завантажити GParted із примусовими відеодрайверами чи налаштуваннями за замовчуванням. Варіант примусового відеодрайвера стане в нагоді, якщо GParted не може розпізнати ваш дисплей або якщо у вас виникли проблеми з роздільною здатністю у вашій системі. Рекомендуємо вибрати перший варіант. Введіть "0", щоб вибрати параметр.
Тепер GParted буде завантажено, і ви потрапите на його тимчасовий робочий стіл. Менеджер розділів має автоматично запуститися у вашій системі зараз. Натисніть на спадне меню у верхньому лівому куті та виберіть потрібний диск, який потрібно відформатувати.
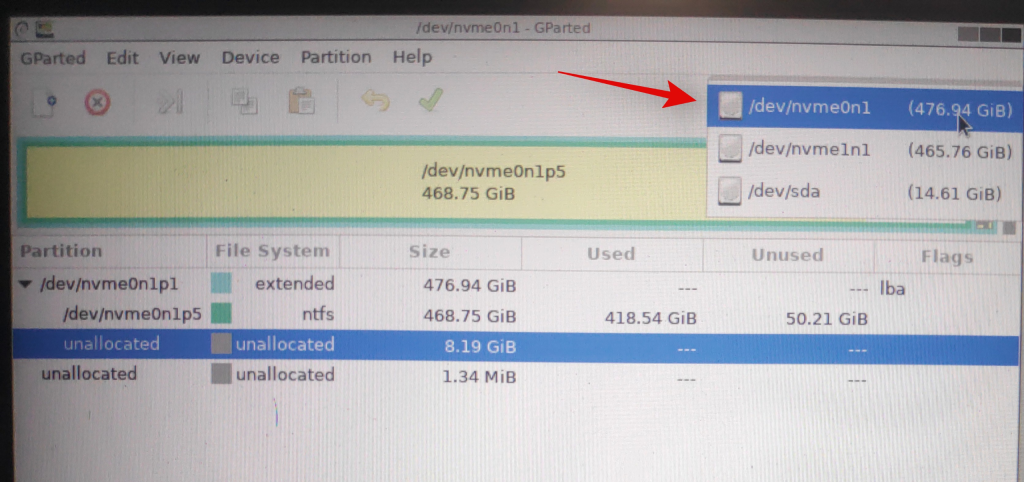
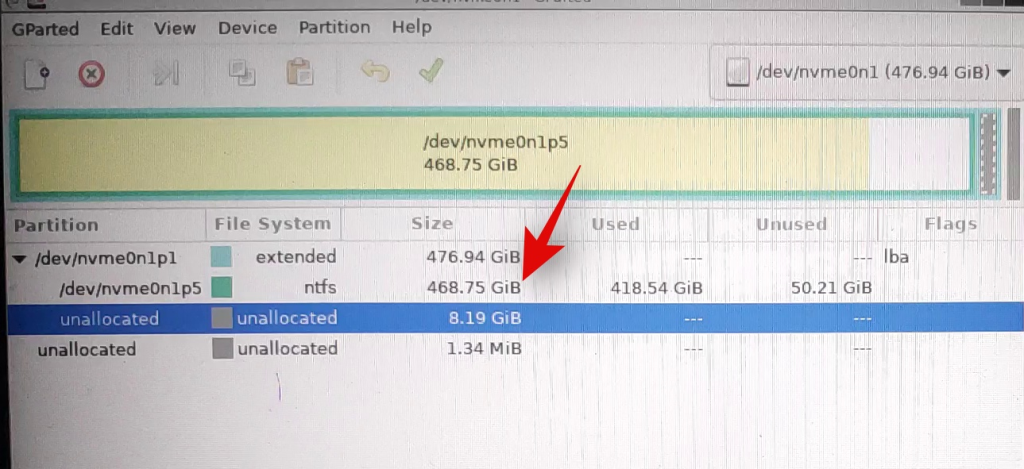
Тепер ви отримаєте список існуючих томів на вибраному диску. Натисніть і виберіть потрібний том, який потрібно відформатувати.
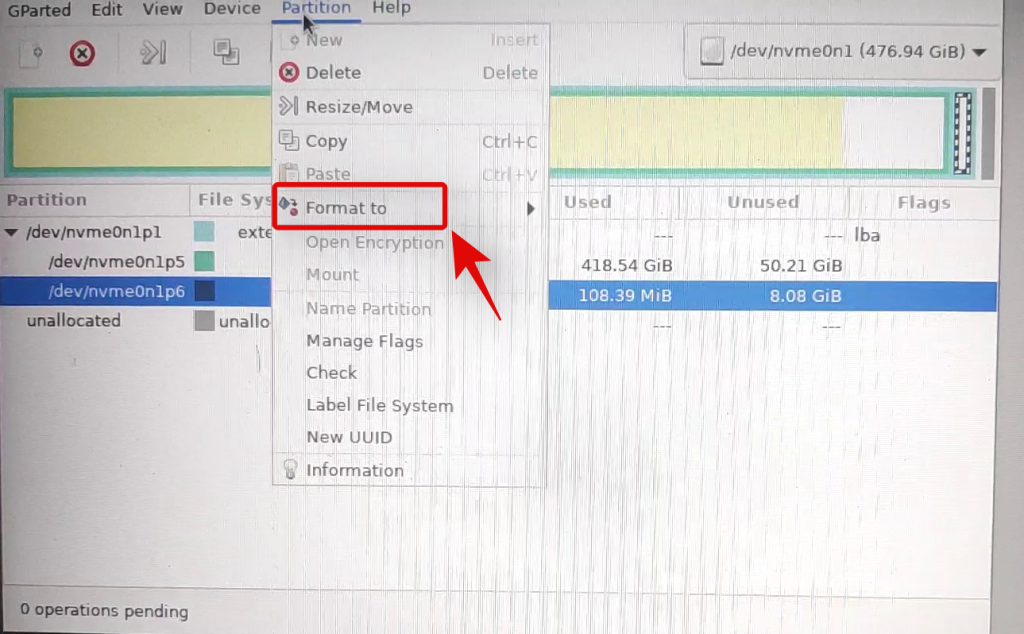
Тепер натисніть «Розділ» у верхній частині та наведіть курсор на «Форматувати в».
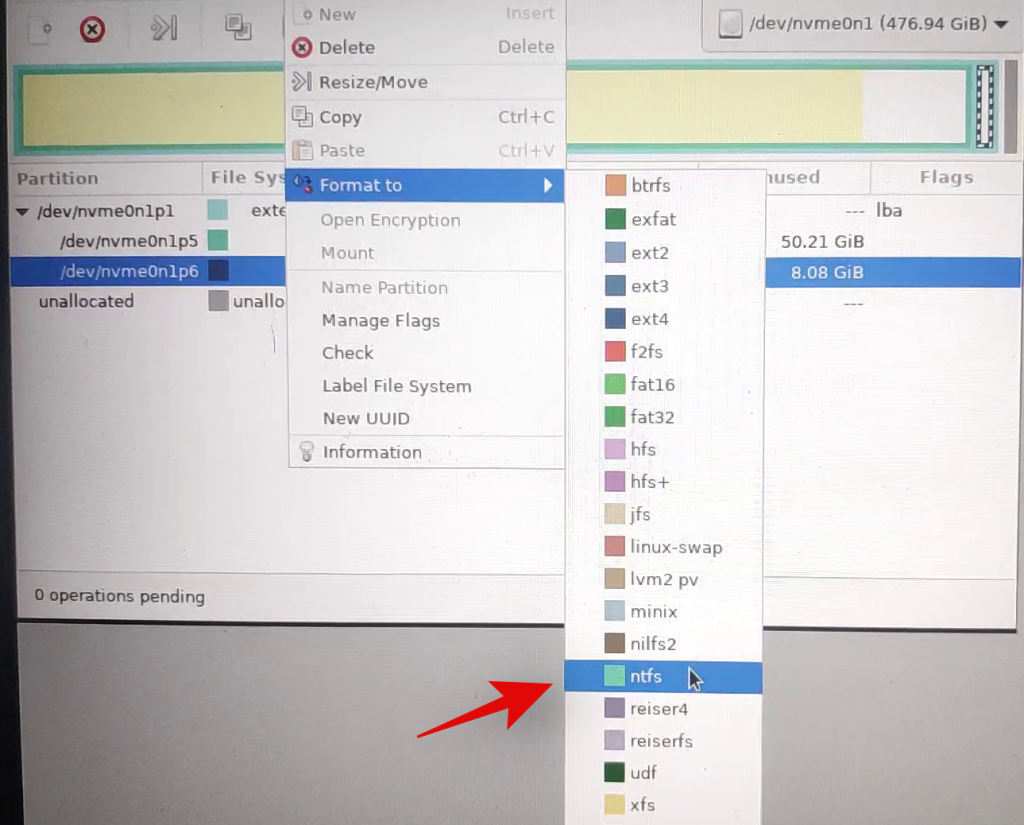
Select your desired drive format but it is recommended that you format your drive in NTFS for all modern systems.
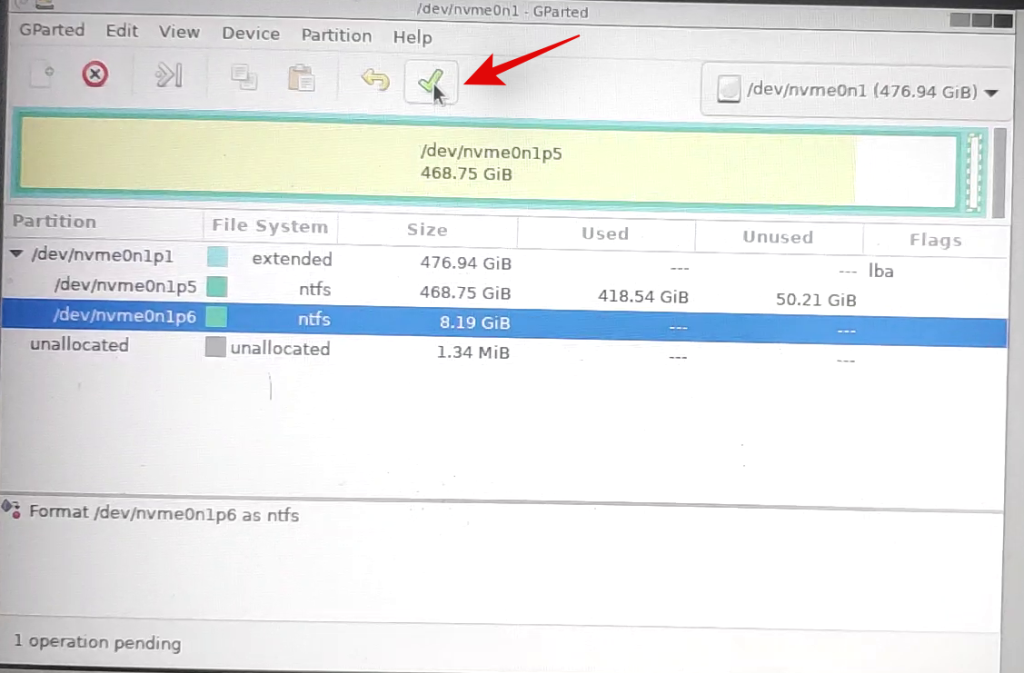
Once you select the desired disk format, GParted will cue the current operation in its task list. Click on the checkmark in the toolbar at the task to execute cued tasks.
Click on ‘Apply’ to confirm your choice.
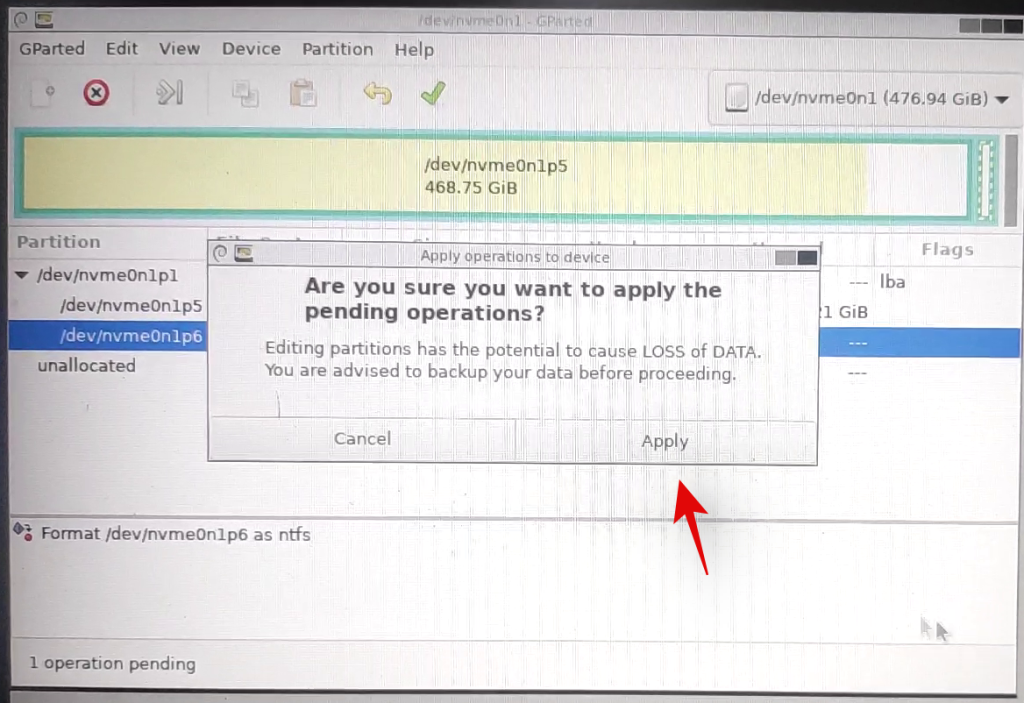
GParted will now perform the necessary operations and the selected volume should be automatically formatted at the end of this process. Close the GParted utility and click on the Power icon on the desktop. Click and select ‘Restart’ and then click on ‘Ok’.
Boot into the BIOS on your system and revert the changes you made earlier. This includes enabling secure boot, changing your storage configuration back to its default settings, and changing your boot device order.
Once you have reverted the changes, unplug your USB and exit the BIOS while saving the changes you made.
You will now be booted into Windows normally and the selected volume should now be formatted and wiped on your system.
Method #7 From Recovery
If you are in Windows Recovery Environment and unable to boot into Windows, then you can use the guide below to format a drive on your system. Please keep in mind that it is not recommended to format your boot drive using the guide below from your recovery environment as this could cause issues with your boot drive and make it unrecognizable. You will then have to completely format the drive and set it up again and install a new version of Windows on it. Hence, use the guide below only to format secondary drives from the Recovery environment or ensure that you have a Windows 11 installation media handy to reinstall the OS that you will remove from your boot drive.
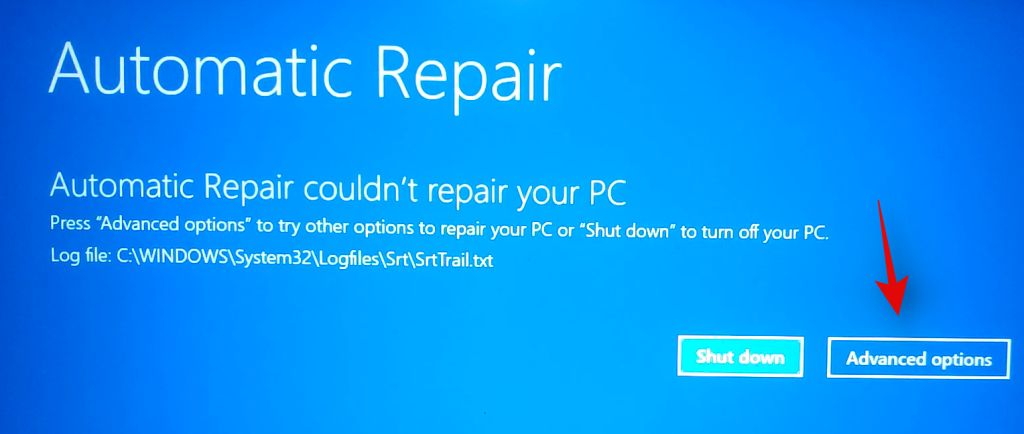
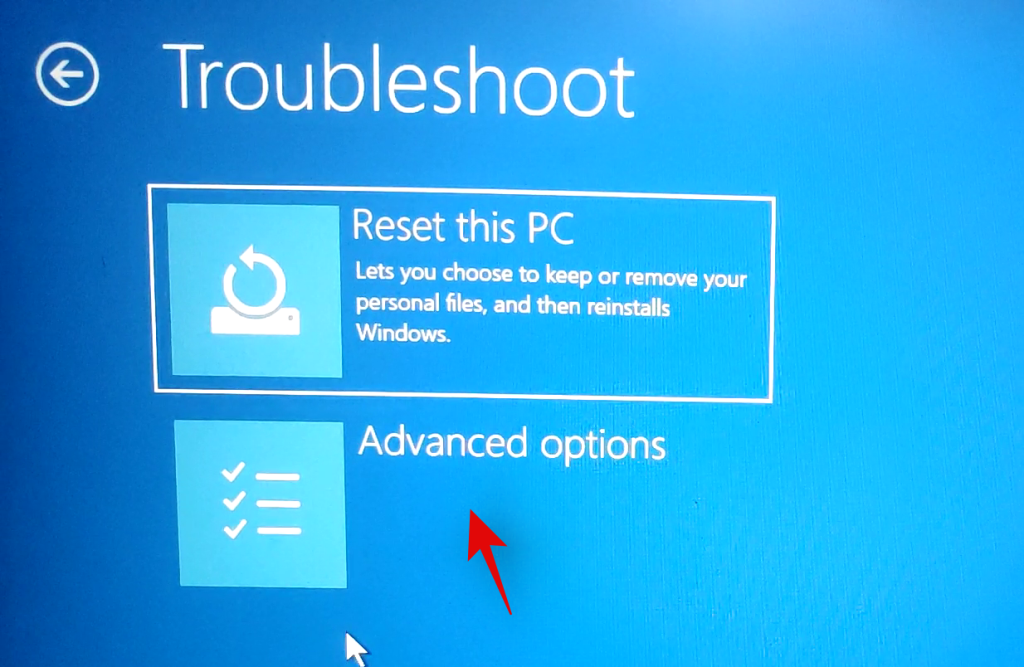
Once you are on the Windows Recovery or troubleshooting screen, click and select ‘Advanced Options’.
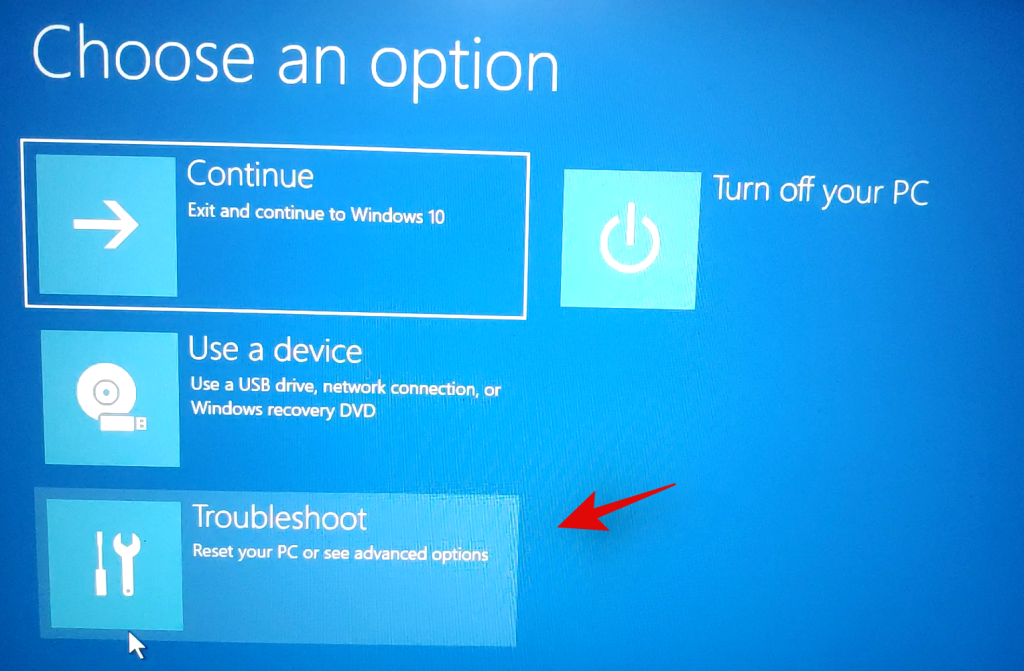
Click on ‘Troubleshoot’.
Select ‘Advanced Options’ again.
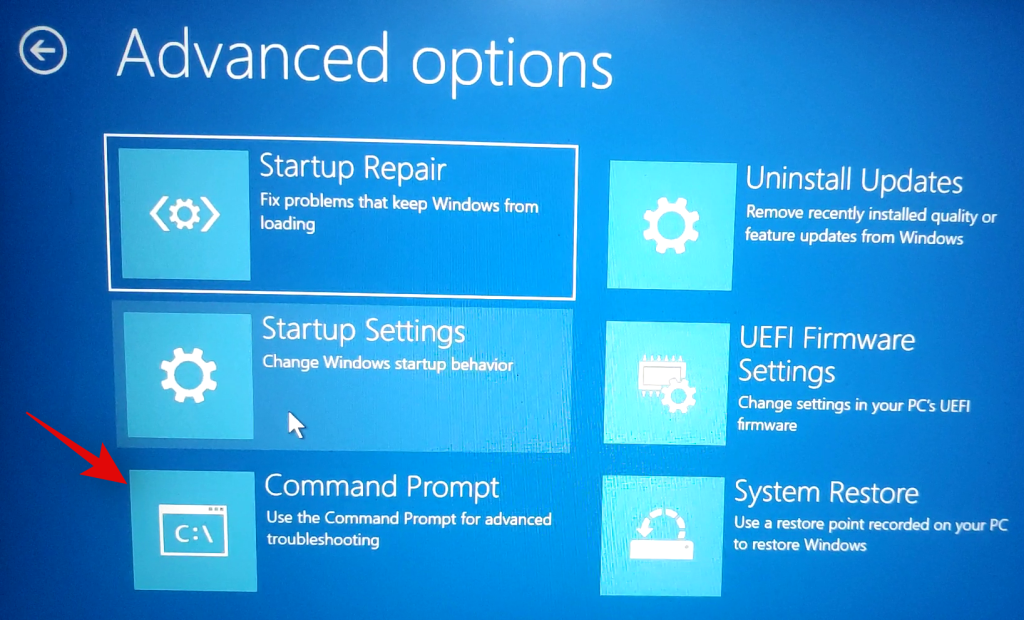
Now click on ‘Command Prompt’ to launch the command prompt.
Type in the following command to launch the diskpart utility.
diskpart
Now execute the following command.
list volume

Find the volume you wish to format and use the command below to select it. Replace X with the dedicated number of the volume you selected.
select volume x
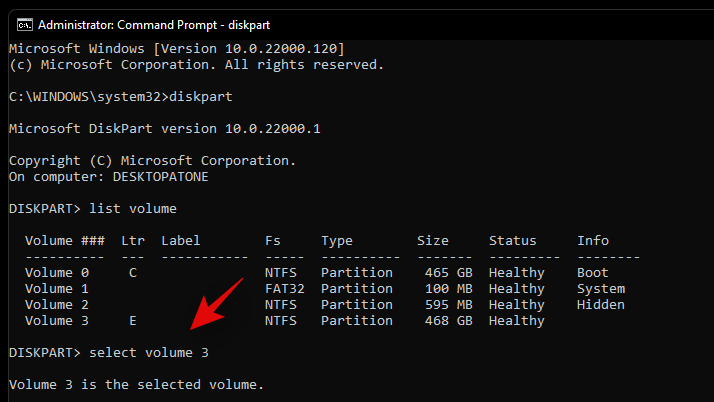
Now use the following command to format the selected volume with NTFS as its format. Replace NAME with the name you wish to give your newly formatted volume.
format fs=ntfs quick label=NAME
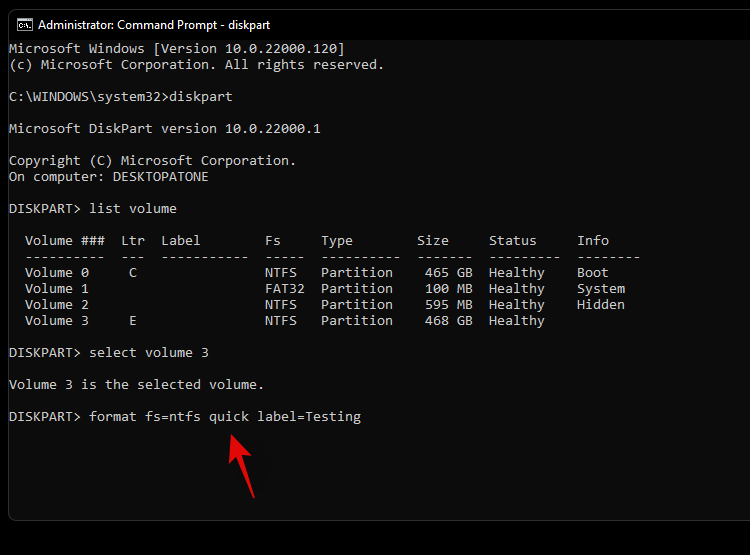
Let diskpart do its thing and the volume should be formatted within a few seconds. Once formatted, type in the following command to exit CMD.
exit
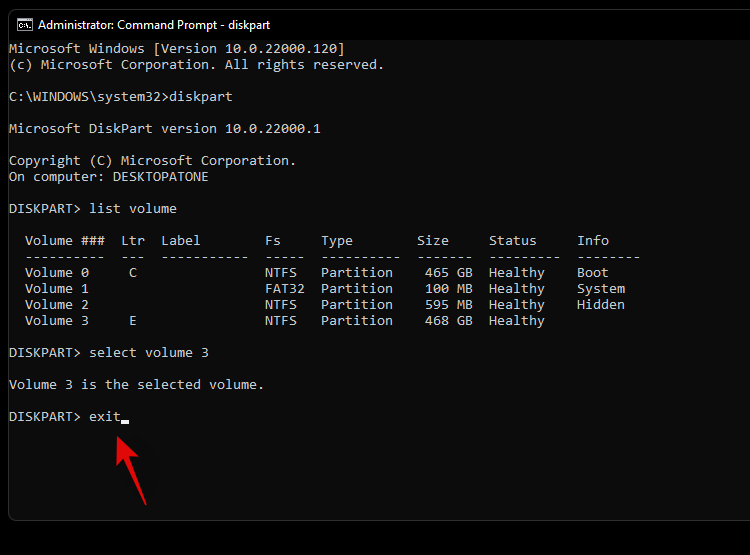
Now restart your PC and the selected volume should be formatted on your system.
Method #8: Using the Windows Setup
You can also format a drive-by directly using the Windows setup as well. Depending on your requirements, you can then exit the setup or continue installing Windows on the freshly formatted drive.
Launch the Windows setup from the installation media when prompted at the time of boot. Once the setup is launched, select your language and click on ‘Next’.
Click on ‘Install Windows’.
Windows Setup will now detect the drives installed on your system. Click and select the drive you wish to format and click on ‘Format drive’ at the bottom.
Confirm your choice and Windows will now proceed to format the selected drive.
And that’s it! Once the drive is formatted, you can continue formatting other drives on your system using the setup or continue with the Windows installation depending on your requirements.
How to completely format a drive on Windows 11 or 10
Completely formatting a drive is a little different from the traditional format methods listed above. While the above-listed methods will delete all your data from the drive, the existing partitions will remain. Additionally, if it is the boot drive that we are talking about then you will also have recovery and EFI partitions on the drive. While this shouldn’t be an issue on your system, they can cause problems when switching systems as the boot order or the recovery media can be recognized incorrectly by the new system.
In such cases, you can wipe all partitions from a drive and completely format it. You can then create new partitions and volumes on the drive depending on the need of the new system that you are switching to. Follow one of the guides below to completely format a drive and remove all partitions and volumes.
Method #1: From a third-party utility
If you wish to completely format your drive using a third-party utility then we recommend using the Gnome Partition Manager. This is an open-source and completely free utility hosted on Sourceforge. You can even compile the binaries on your own in case the privacy is a concern. Follow the guide below to get you started. The Gnome Partition Manager is available in ISO format which allows you to mount it to a removable media and use it individually as well, in case you are looking to completely format your boot drive. Use Rufus to create a USB installation media using the Gnome Partition Manager ISO.
Required
Guide
Make the necessary BIOS changes on your system and plug in the GParted USB into your system. Once plugged in, reboot your device and boot from the USB by pressing a key if prompted.
You will now be at the GParted Splash Screen where you will be requested to select the relevant version of GParted that you wish to use. We recommend you select the first one which is GParted Live with default settings.

Once booted, you will be prompted to change your keymap if needed. If your keyboard seems to be working as intended, select ‘Don’t touch keymap’ or use one of the other options to get keyboard working within Gnome.

Select your preferred language by entering its relevant number. Use number 33 for US English.

Now if you wish to manually install or configure your video output then enter 1 on the next screen. Else if the resolution and video response times seem to be fine for now then enter ‘0’.

GParted will now boot with the dictated settings. Once launched, you will be taken to the temporary desktop where the GParted utility will be launched automatically. Click on the drop-down menu in the top right corner and select the desired disk that you wish to completely format.

Now select a volume on the selected disk and click on ‘Partition’ at the top. Select ‘Format to’ and then select ‘NTFS’.

Repeat the steps above for all the partitions on the disk. Once each partition is cued for formatting, click on the checkmark in your toolbar to execute these tasks.

Confirm your choice by clicking on ‘Apply’.
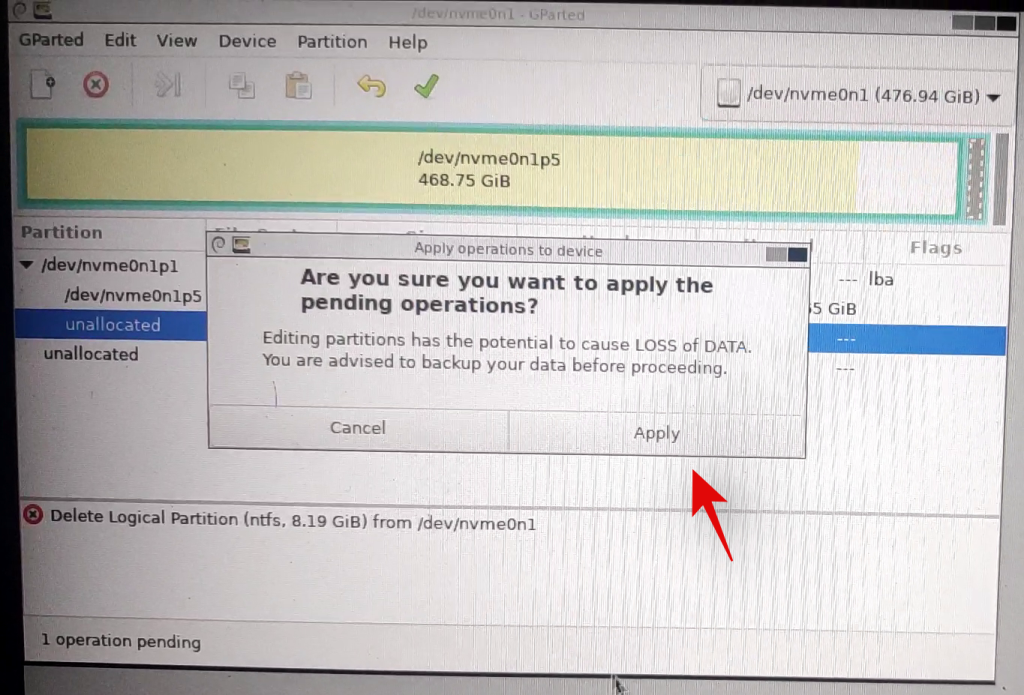
All the selected partitions will now be formatted. We can now delete these partitions. Click and select each partition one by one and then click on the X in your toolbar. This will cue each partition for deletion.
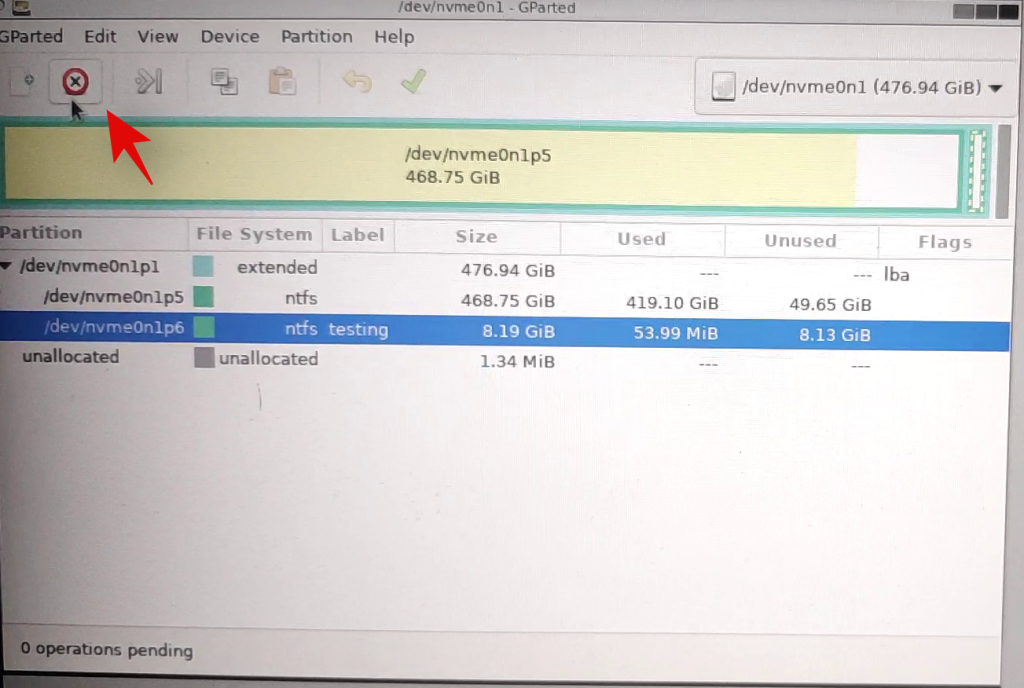
Click on the checkmark again to delete all the selected partitions.
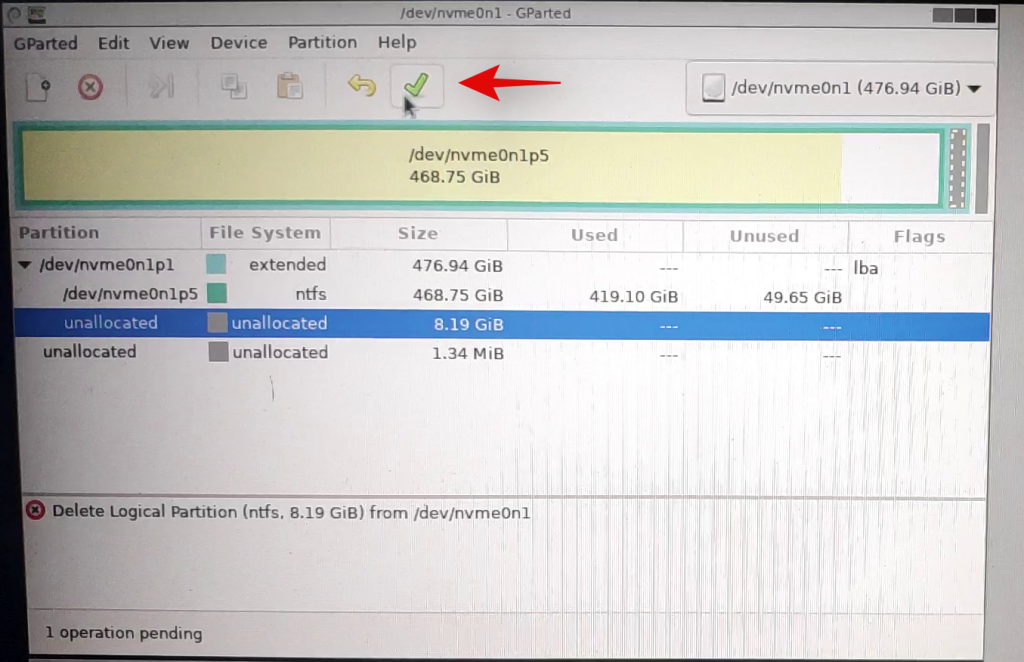
Confirm your choice by clicking on ‘Apply’.

Once all partitions are deleted from the disk, click and select the unallocated volume on the disk and then click on ‘New’ at the top. If you have an existing primary partition on the disk then select that partition and click on the ‘Resize’ icon instead.
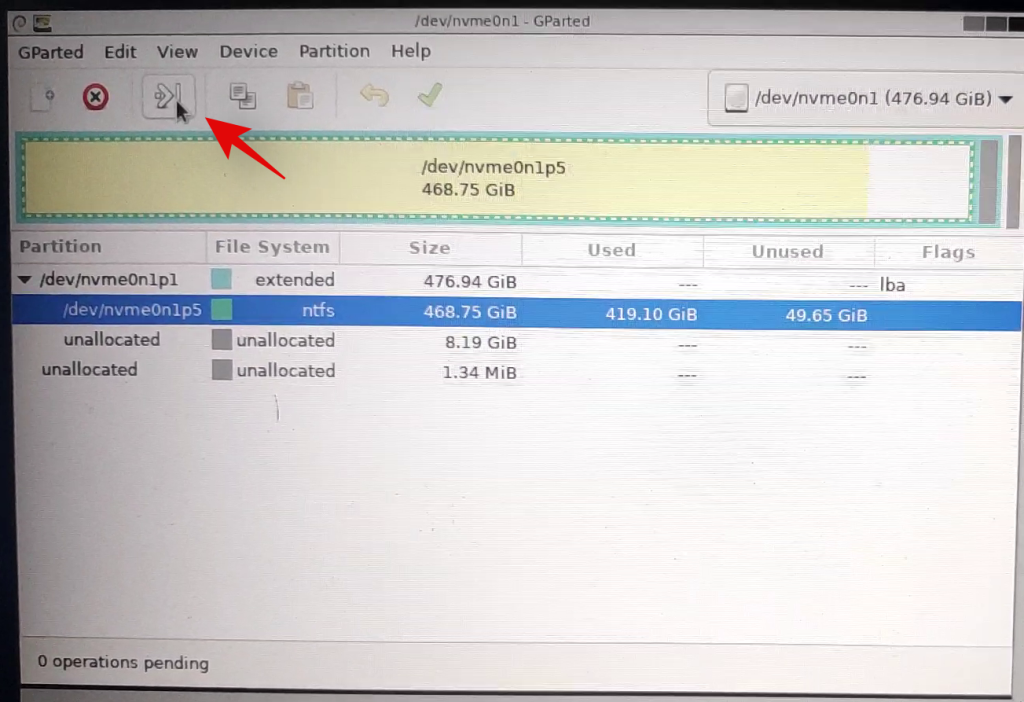
Select the entire size of your disk and enter a name for your disk beside the label text field. If resizing an existing partition, use the slider at the top to drag it to the maximum size.
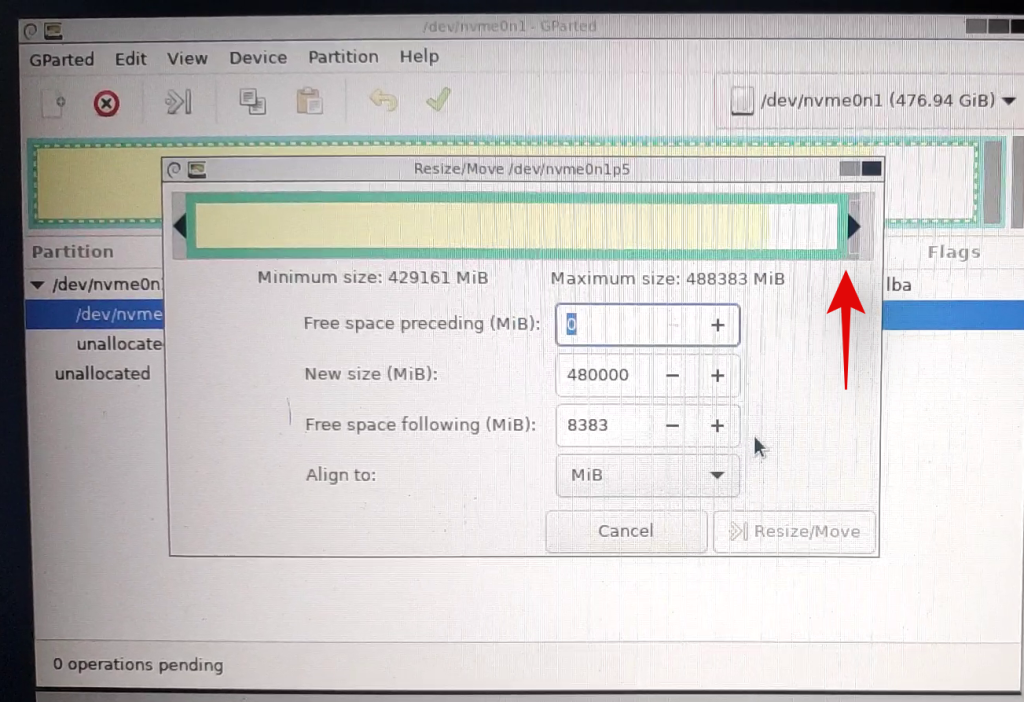
Click on ‘Ok’ or ‘Resize/Move’ depending on your choice.
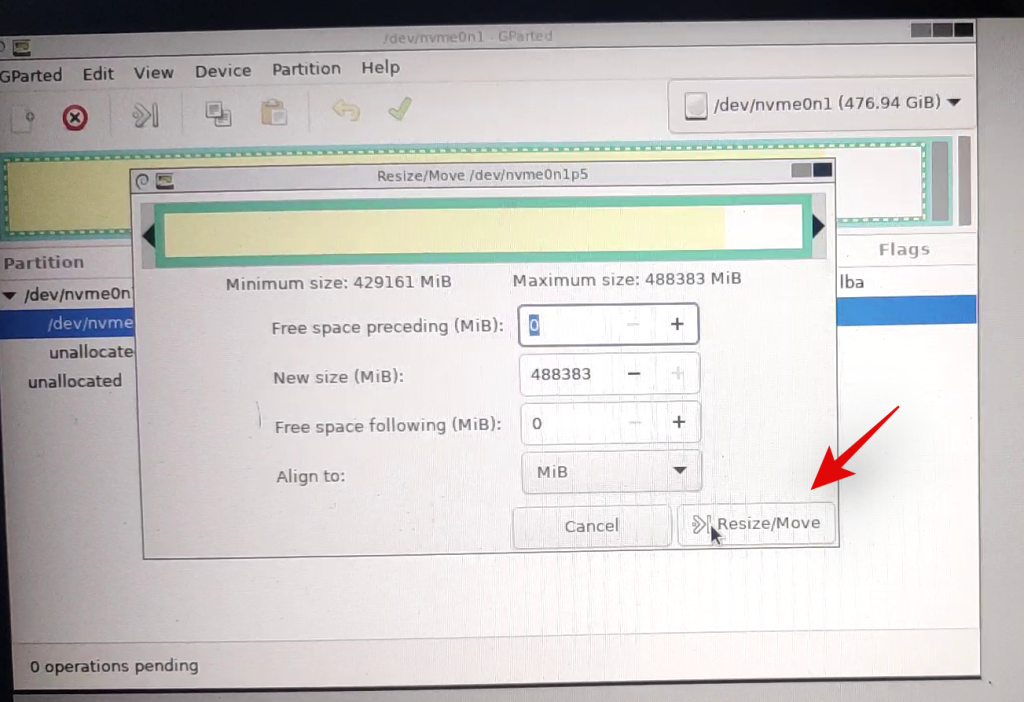
And that’s it! Your entire drive should now be formatted and a single partition equal to the entire size of your drive should now be created which will allow you to use the drive, however, you wish. You can now exit GParted by clicking on the power icon on the desktop. Once rebooting, boot into your BIOS and revert the changes you made earlier. Once reverted, unplug the USB and boot into Windows normally.
Method #2: From CMD
Diskpart is a hugely versatile utility that can be used to completely format a drive as well. Once completely formatted via diskpart, you will need to set your disk as GPT or MBR depending on your platform needs for the drive to be recognized properly.
Launch CMD using one of the guides above depending on the current state of your system. Once CMD is launched, enter the command below to launch diskpart.
diskpart

Now enter the following command and find the disk you wish to completely format.
list disk

Note down the concerned disk’s number and use the command below to select it. Replace N with the disk number you noted down earlier.
select disk N
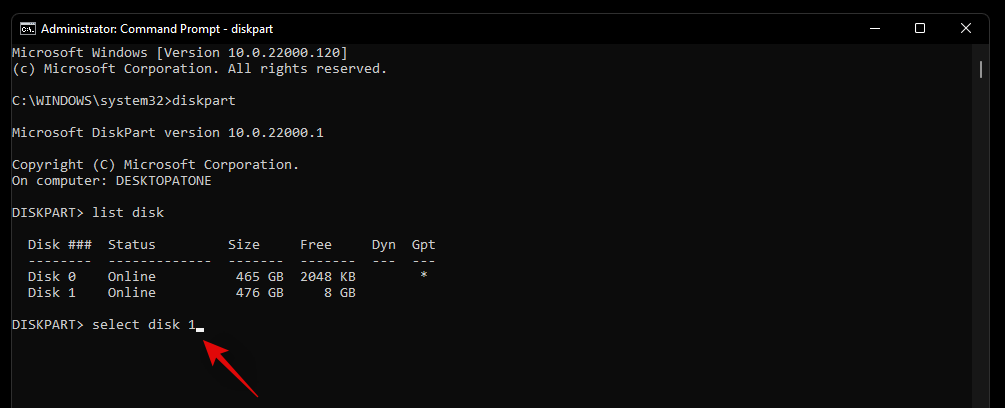
Now enter the command below to clean your disk.
clean
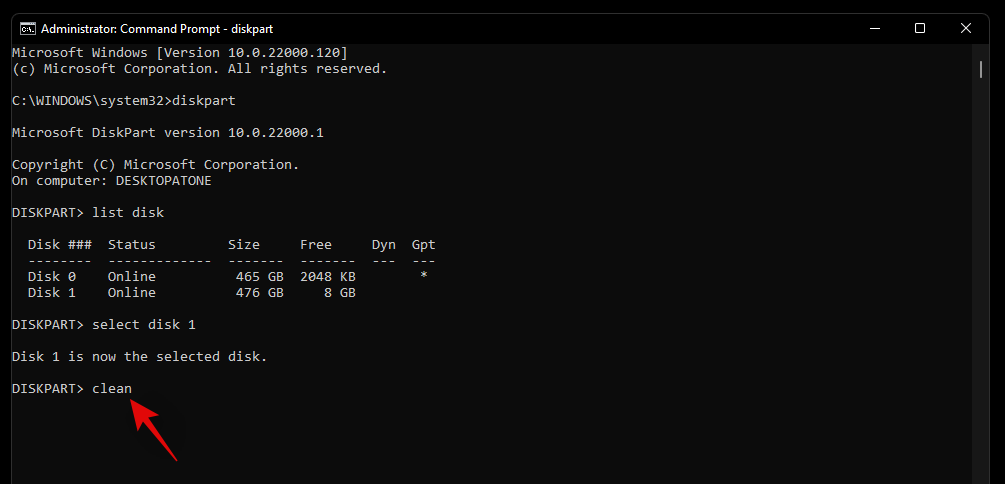
We will now need to create a partition on the selected disk so that it is usable. Enter the command below to get started.
create partition primary
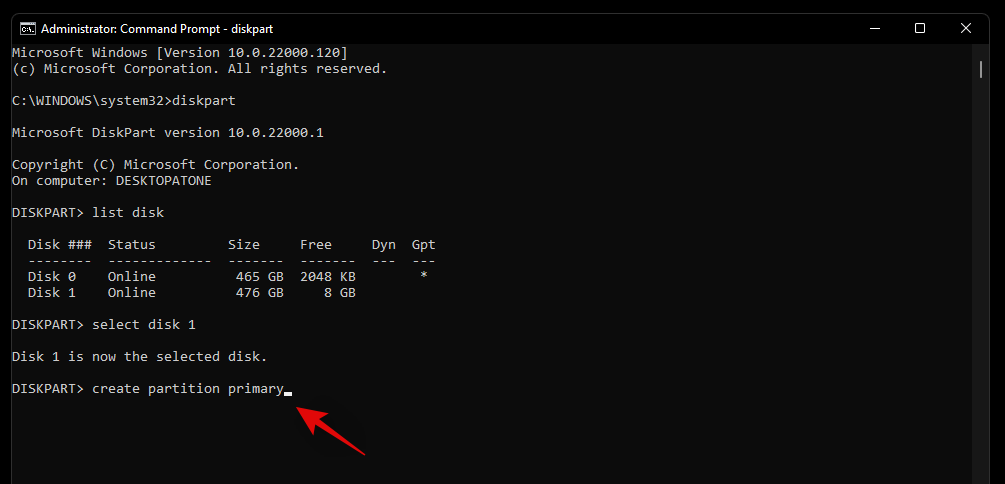
Use the command below to format the newly created volume now.
format fs=ntfs
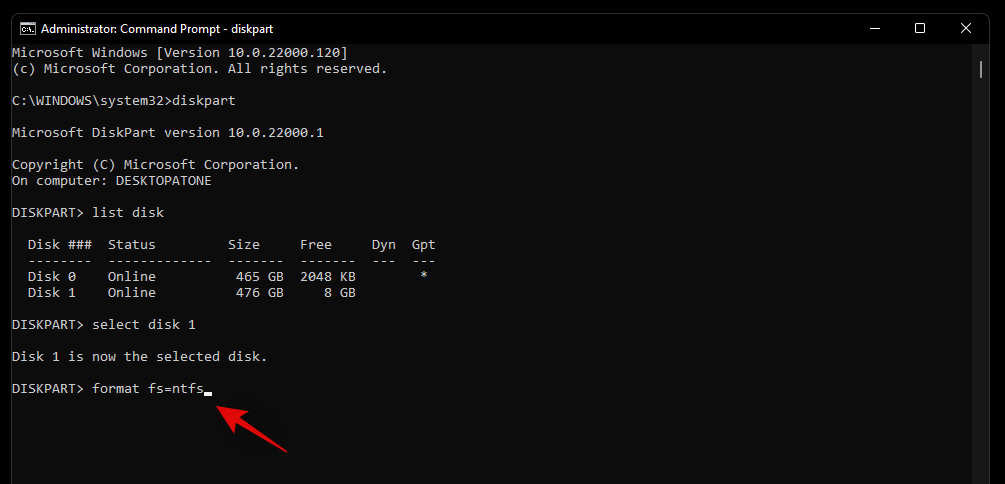
Enter the following command to assign a letter to the drive. Replace X with the letter of your choice.
assign letter=X
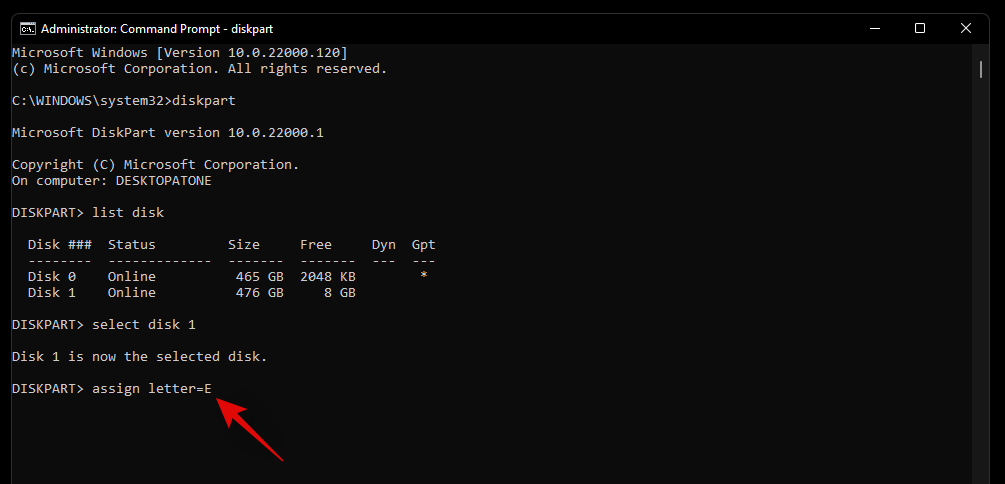
And that’s it! The selected drive should now be completely formatted. Any recovery or EFI partitions on the drive should also now be deleted.
How to switch between MBR and GPT
MBR and GPT are types of disk setups that are used to install new OS on a drive. These types are essential in case you are trying to switch between platforms or use Linux on yoru system. While GPT is a new disk setup with various advantages, MBR is still the most compatible setup format out there. If you are trying to switch your disk setup from MBR to GPT or vice versa then you can use the guide below to change the disk type.
Note: When converting, your disk will be cleaned and all the data will be removed from it. You will need to create new partitions on the drive as well so ensure that you have backed up your data before proceeding with the guide below.
Launch CMD on your system either from the recovery environment or from within Windows depending on the current state of your system. Once launched enter the command below to launch the diskpart utility.
diskpart

Now enter the following command to get a list of all the disks on your system. Note down the number for the concerned list so that you can access it later on.
list disk
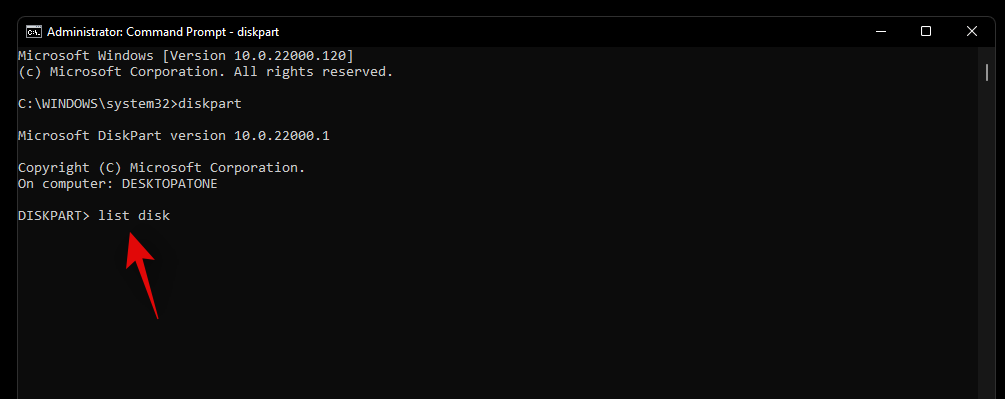
Enter the following command and replace N with the disk number you noted down earlier.
select disk N
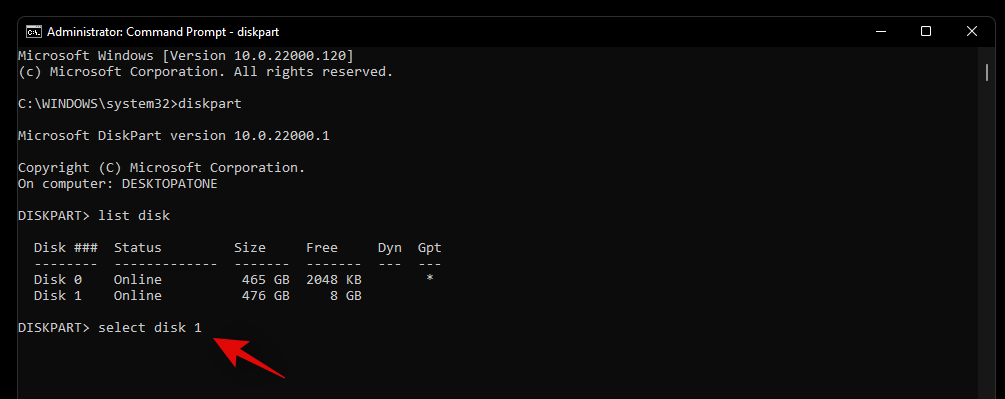
Use the command below to clean the drive.
clean
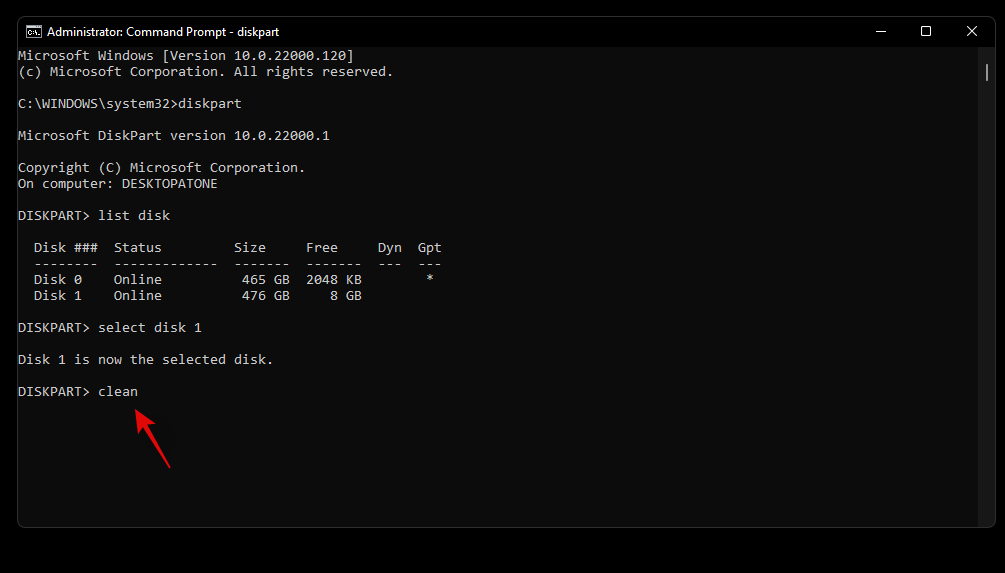
Now let’s convert the drive to your desired disk type. Replace TYPE with MBR or GPT depending on your current requirements.
convert TYPE
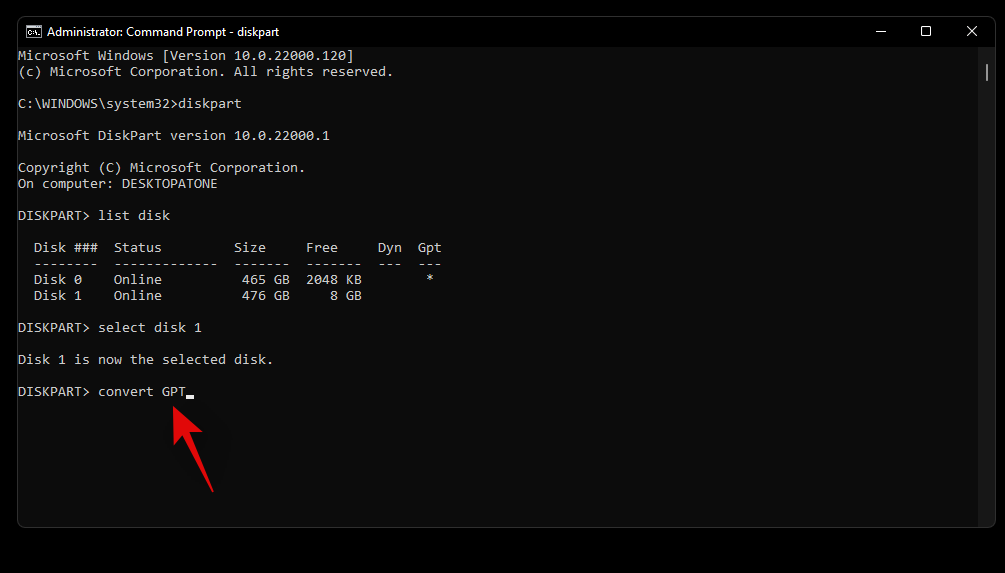
Once the disk has been converted, use the command below to create a primary partition.
create partition primary
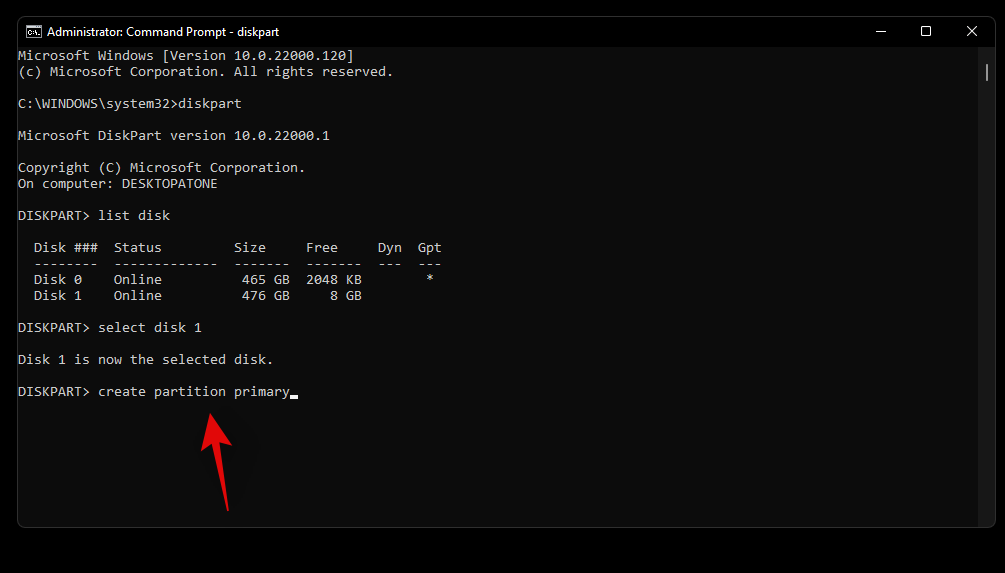
Now use the command below to assign a letter to the drive. Replace X with the drive letter of your choice.
assign letter=X
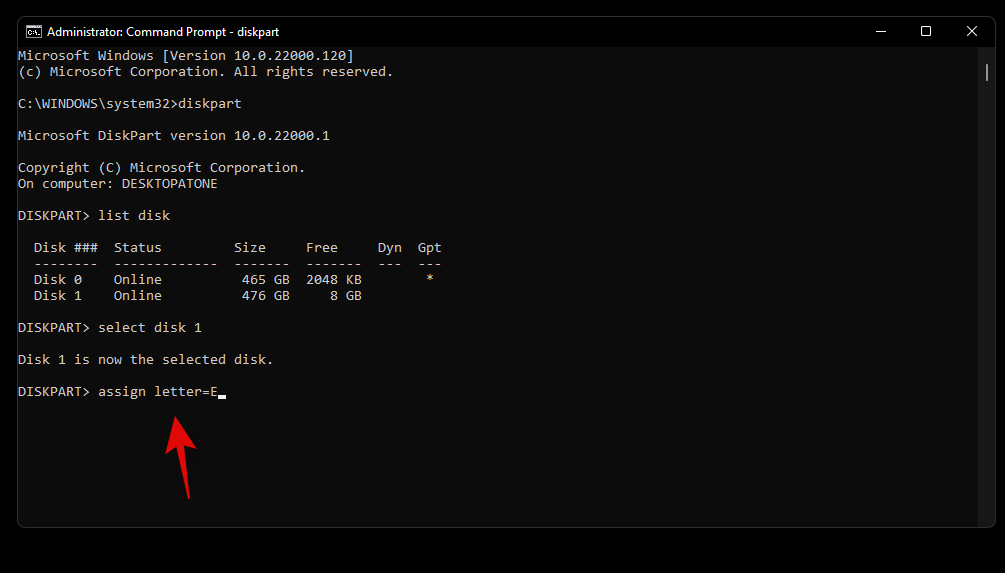
And that’s it! You will now have converted the selected drive to GPT or MBR depending on your current requirements.
How to create new volumes and partitions
Once you have formatted your drives you will find that it is not that easy to use them within Windows. Formatted drives need dedicated partitions which can then be used as storage spaces to store your data or install an OS. Use the guide below to create custom partitions for a selected drive in Windows 11.
Method #1: From CMD
Launch CMD and use the command below to enter diskpart.
diskpart
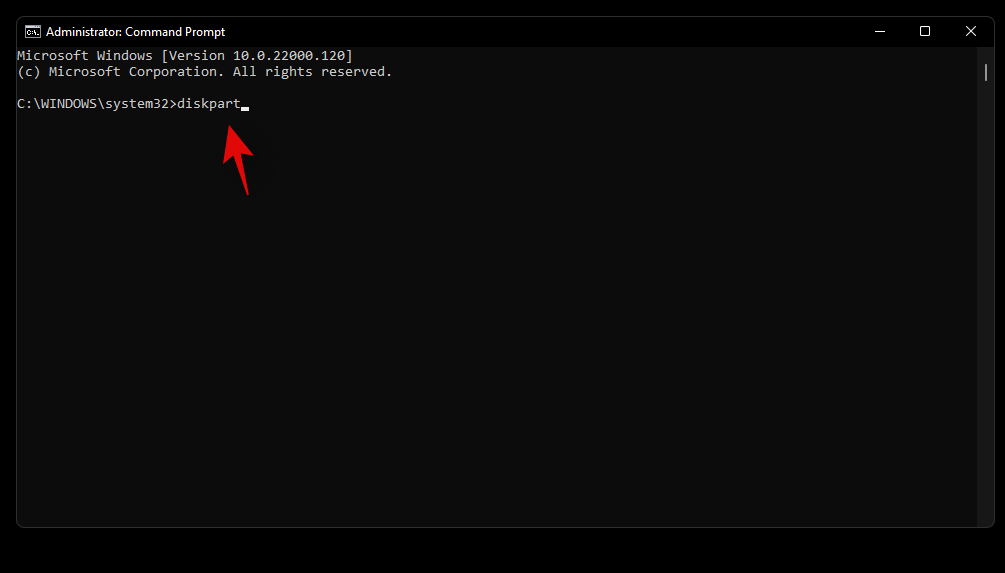
Enter the following command to get a list of all the disks installed on your system. Note down the disk number of the concerned disk.
list disk
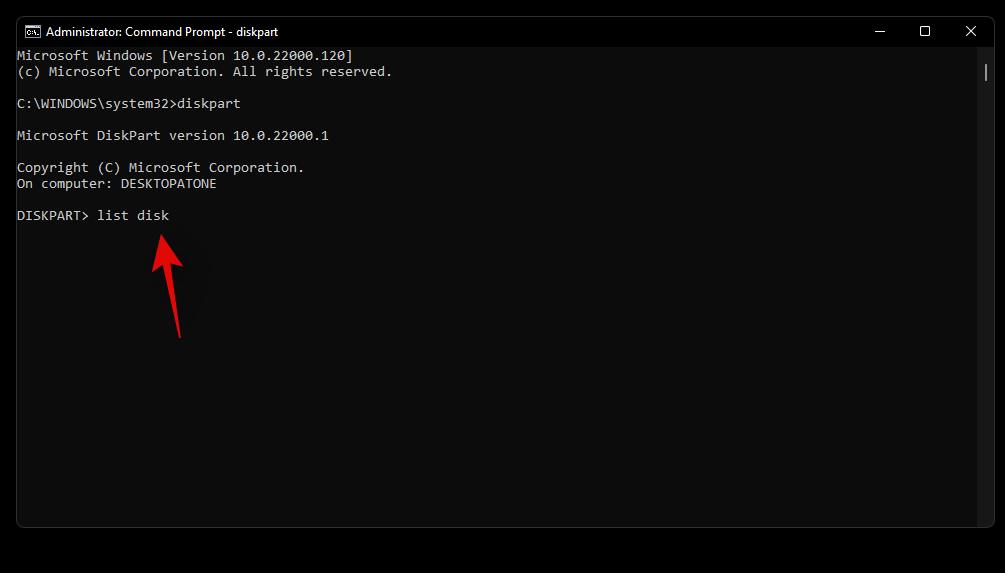
Now enter the command below and replace N with the disk number you noted down earlier.
select disk N
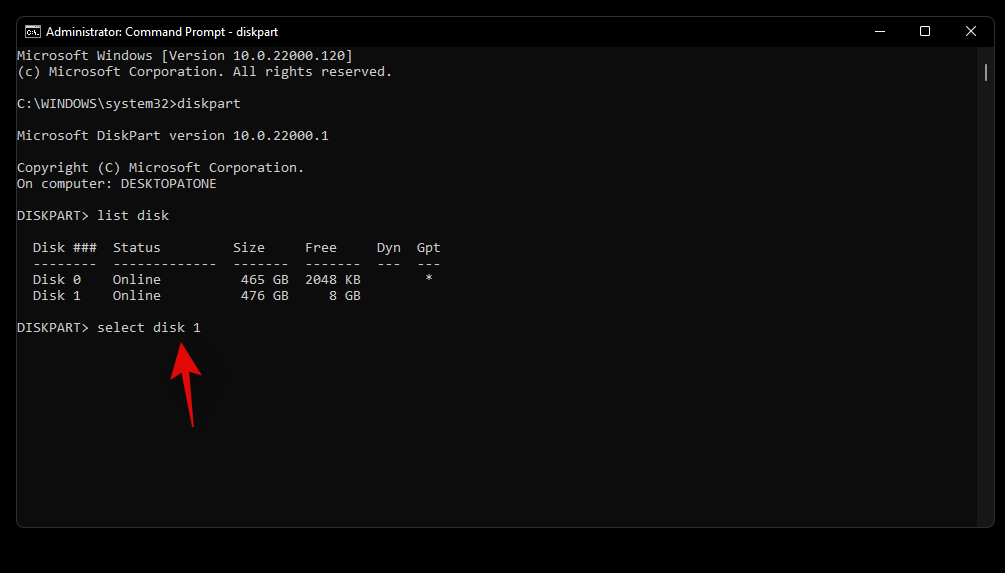
Use the command below to create a custom partition on the selected disk drive. If a partition already exists on the drive then replace ‘primary’ with ‘extended’. Additionally, replace XXXX with the size of your choice for the partition. The size is measured in megabytes where 1000MB = 1GB.
create partition primary size=SIZE
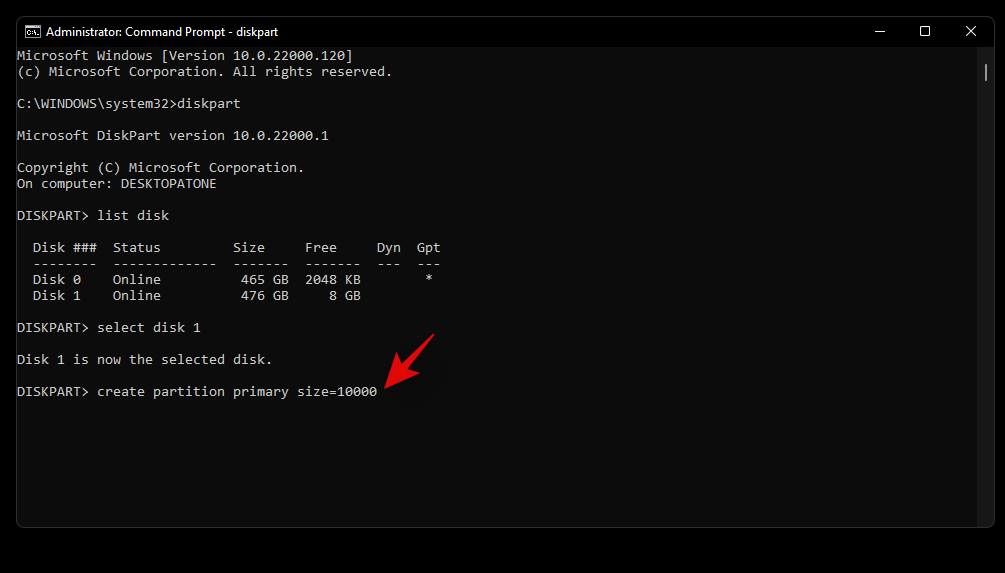
Now enter the following command. Your newly created partition will now show up in this list. Note down its volume number
list volume
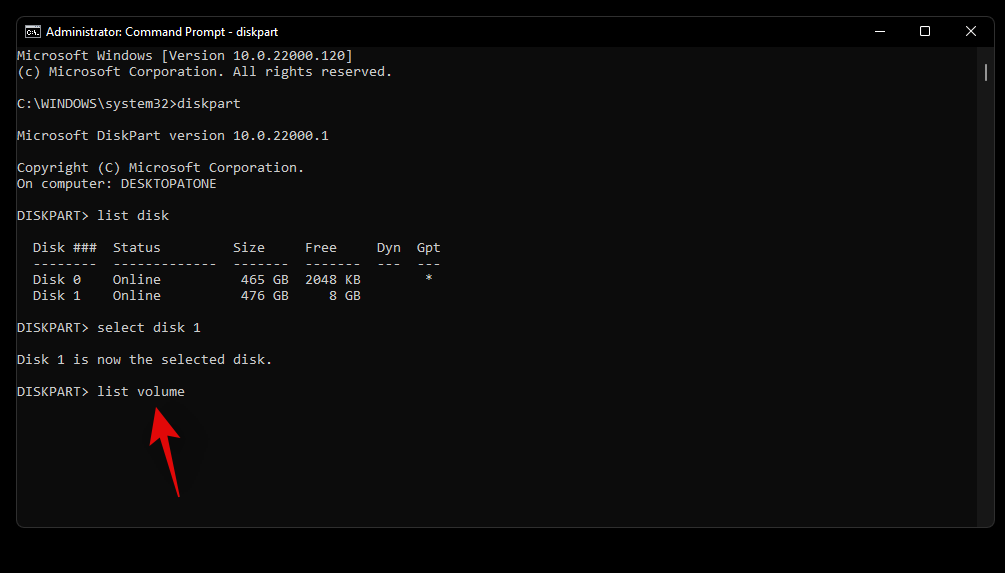
Enter the following command and replace N with the volume number you noted down earlier.
select volume N

Now use the following command to assign a letter to the selected volume. Replace X with the letter of your choice.
assign letter=X
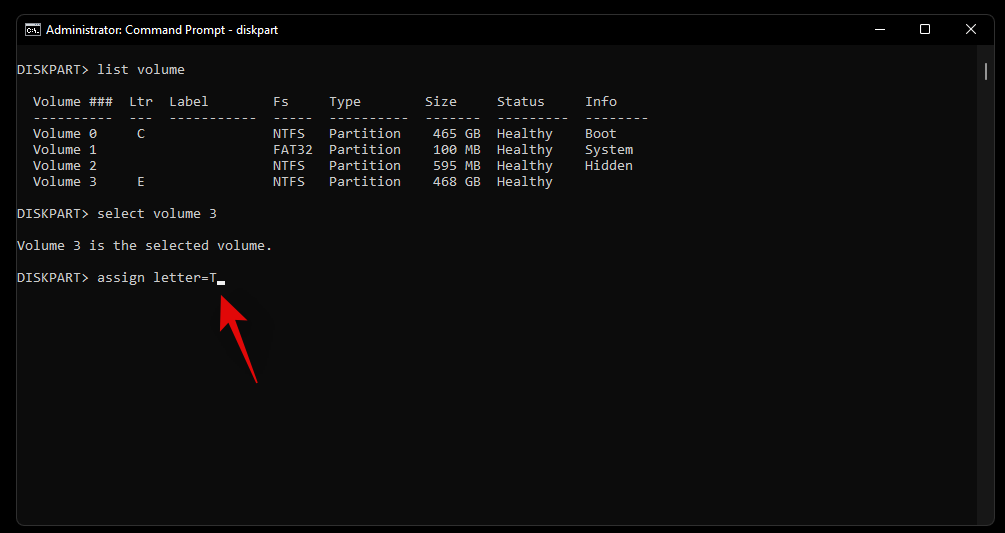
And that’s it! You will now have created a new partition on the selected drive depending on your current needs and requirements.
Method #2: From Disk Management
You can also create a new partition son your system using the Disk Management utility provided within Windows. Use the guide below to get you started.
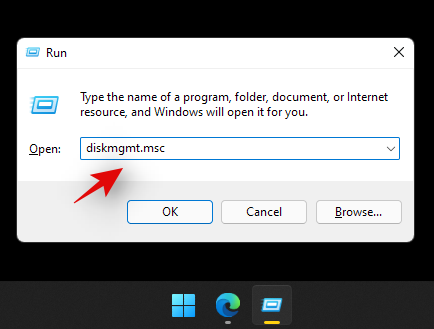
Press Windows + R on your keyboard and type in the following. Press Enter on your keyboard to launch the disk management utility.
diskmgmt.msc
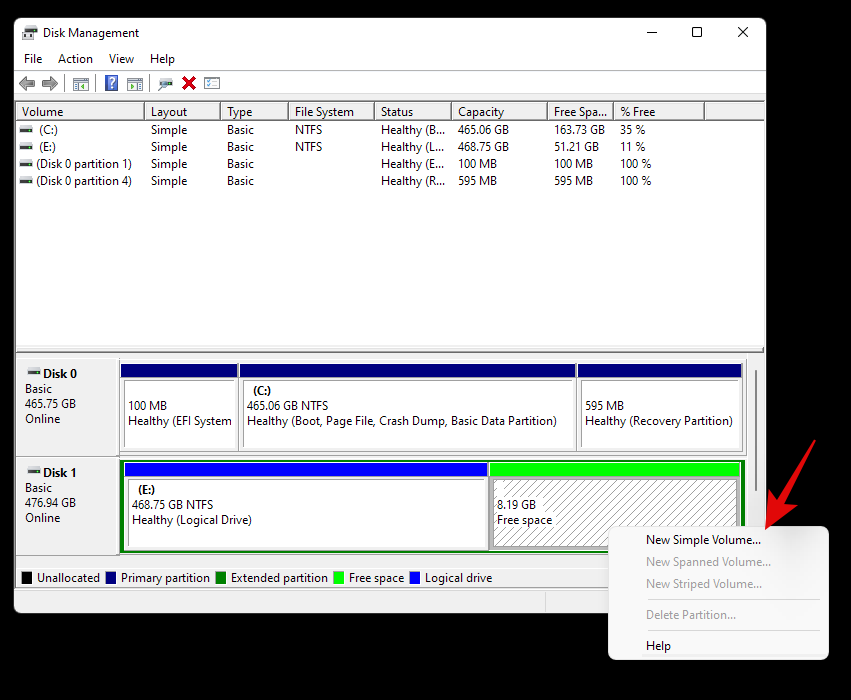
Once the disk management utility is launched, you will get a graphical representation for all your drives. Right-click on the unallocated space at the bottom of your screen and click on ‘New Simple Volume’.
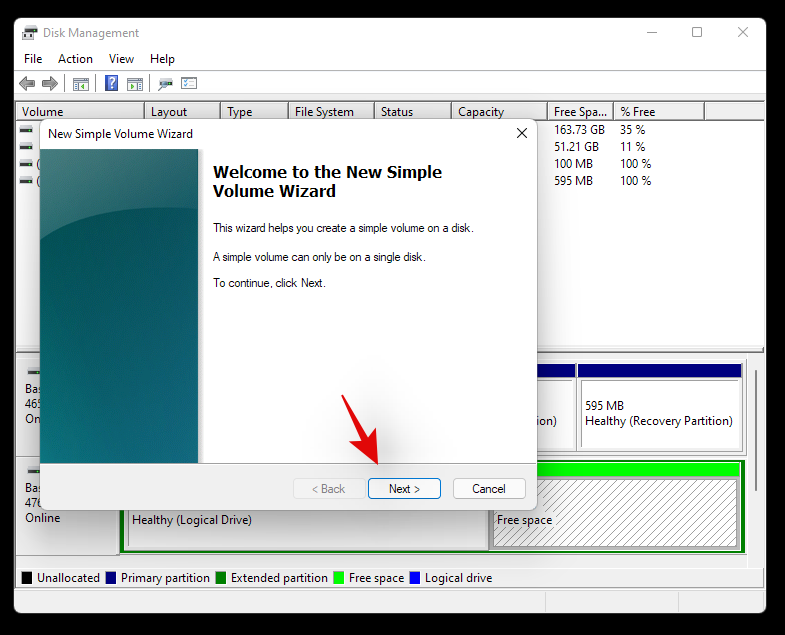
The volume creation wizard will now be launched. Click on ‘Next’ to get started.
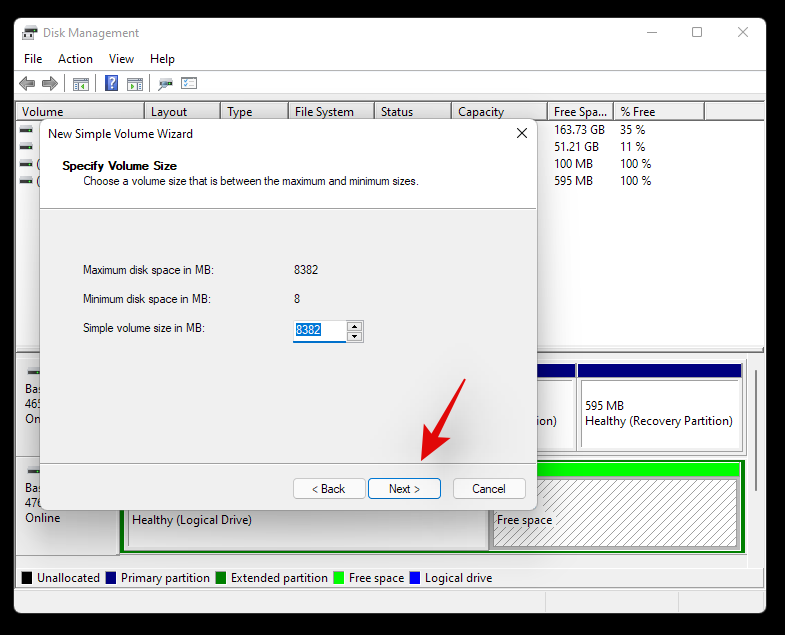
Select a custom size if needed. By default, Windows will use the entire unallocated space to create a new simple volume on your drive. Click on ‘Next’ once you have set the desired size.
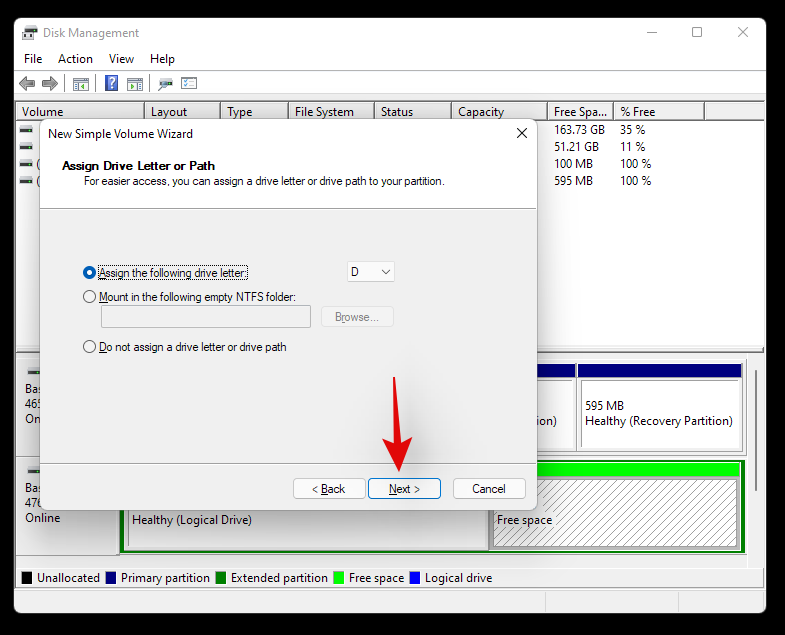
Choose a drive letter for your new volume now. Click on ‘Next’ once you are done.
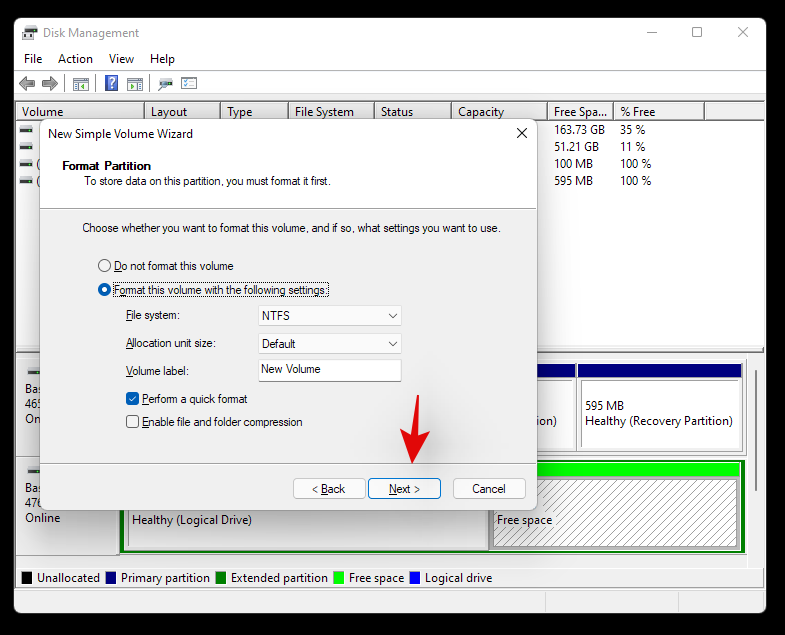
You will now be given the option to format the unallocated space before the volume is created. Choose your disk format by clicking on the drop-down menu and set a name for the new volume beside Volume Label. If you do not wish to format the unallocated space, then click and select ‘Do not format this volume’. Click on ‘Next once you are done.
Finally, click on ‘Finish’ and the new volume will now start being created.
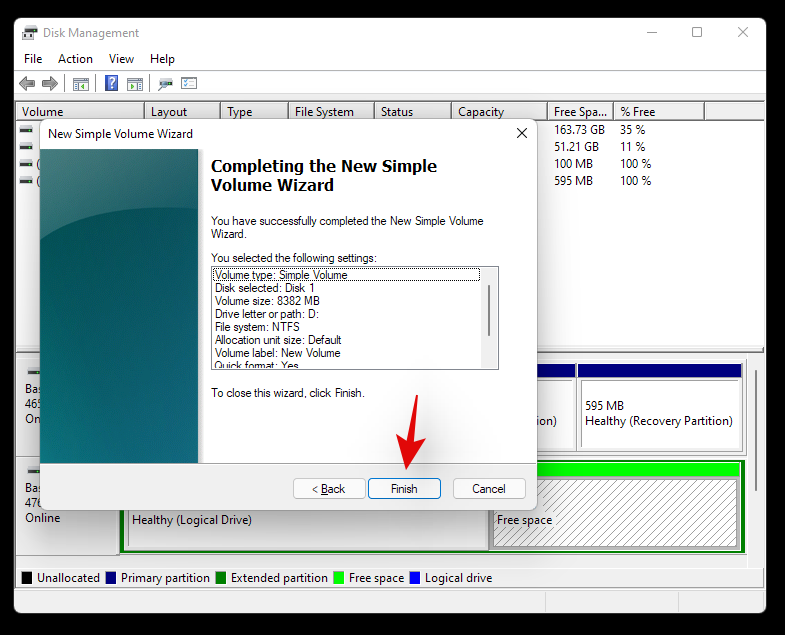
And that’s it! A new volume should now be created on the selected drive.
We hope this guide helped you easily format or wipe your drive in Windows 11 depending on your current needs and requirements. If you face any issues or have any questions for us, feel free to reach out to us using the comments section below.
Related:
У цій статті ми розповімо вам, як відновити доступ до жорсткого диска, якщо він вийшов з ладу. Давайте продовжимо!
Якщо ви оновлюєтеся до нового ПК, швидше за все, ви намагаєтеся повторно використовувати жорсткий диск зі свого старого ПК. Якщо ні, можливо, ви плануєте подарувати його члену сім’ї чи другу. Але перед вами…
Маєте проблеми з повільною роботою PyCharm та IntelliJ у Windows 11? Відкрийте для себе перевірені виправлення, щоб пришвидшити ваші IDE, оптимізувати продуктивність та відновити продуктивність. Покрокові рішення для розробників.
Маєте проблеми з надокучливою помилкою клацання жорсткого диска у Windows 11? Відкрийте для себе перевірені покрокові виправлення, щоб відновити безперебійну роботу та запобігти втраті даних. Поверніть свій ПК у правильний стан вже сьогодні!
Дізнайтеся, як виправити помилку 0xc000007b, у нашому детальному посібнику, в якому розглядаються причини цього коду помилки та список перевірених рішень.
Дізнайтеся, що робити, якщо Windows Phone Link не працює, за допомогою покрокового списку рішень, які допоможуть вам повторно підключити телефон до комп’ютера.
Якщо ви намагалися виправити код помилки 0x80860010 на своєму ПК, знайдіть можливі виправлення тут.
Цікаво, як деактивувати Microsoft Copilot, фірмовий штучний інтелект, який тепер є стандартним у Windows та Edge? Скористайтеся нашим покроковим посібником, щоб дізнатися більше.
Дізнайтеся, як використовувати датчик сховища Windows 11 для автоматичного звільнення місця на диску. Покроковий посібник з оптимізації сховища, видалення тимчасових файлів і забезпечення безперебійної роботи ПК. Важливі поради для початківців.
Дізнайтеся, як безпечно налаштувати резервне копіювання реєстру Windows 11 за допомогою покрокових інструкцій. Захистіть налаштування системи без зусиль та уникайте поширених помилок для безпечної роботи з ПК.
Маєте проблеми з мережевим друком між Windows 10 та Windows 11? Відкрийте для себе перевірені покрокові рішення для безперебійного спільного використання принтерів у вашій домашній або офісній мережі. Більше жодних розчарувань — друкуйте без зусиль вже сьогодні!
Маєте проблеми зі зміною фону у Windows 11 Pro? Відкрийте для себе перевірені покрокові рішення для відновлення персоналізації робочого столу. Виправте це швидко та поверніться до налаштованого інтерфейсу!


