6 módszer az illesztőprogramok frissítésére Windows 11 rendszeren
Fedezze fel a legjobb módszereket az illesztőprogramok frissítésére a Windows 11 rendszeren. Tudd meg miért fontos a frissítés és milyen előnyökkel jár.
A Google Meet az új távoli együttműködési eszköz a városban, amely video- és audiokonferencia-lehetőségeket kínál olyan lenyűgöző funkciókkal együtt, mint a végpontok közötti titkosítás, a HD hang, a HD videó és még sok más. A Google Meet teljesen ingyenesen használható a járvány idején, ami azt jelenti, hogy már sok szervezet és felhasználó – köztük tanárok – használja világszerte.
Ha még nem használja a Google Meetet, és problémái vannak a mikrofonjával, akkor nincs egyedül. Sok felhasználó arról számolt be, hogy különféle okok miatt nem tudja használni a mikrofonját, mi pedig összeállítottunk egy listát a probléma megoldására használható leggyakoribb javítások közül. Vessünk egy pillantást rájuk.
Kapcsolódó: Hogyan módosíthatja a nevét a Google Meetben iPhone, Android és PC rendszeren
Tartalom
Győződjön meg arról, hogy a mikrofon nincs némítva
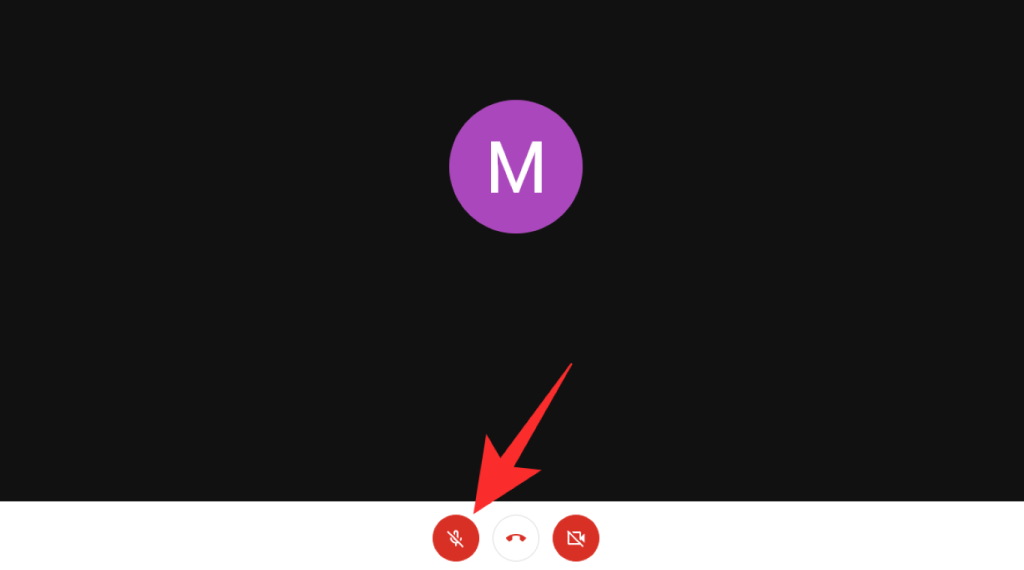
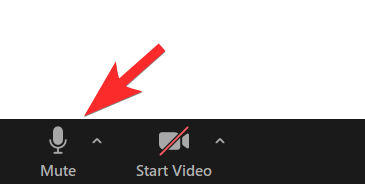
Néha a probléma egészen egyszerű lehet, előfordulhat, hogy egyszerűen elnémul a Google Meet megbeszélésen, és nem tud róla. Ellenőrizze a mikrofon ikont a képernyő alján a hívósávban. Ha piros, akkor el van némítva a Google Meetben. Egyszerűen kattintson az ikonra a némítás feloldásához. Ez lehetővé teszi, hogy a találkozó tagjai hangosan és tisztán hallják Önt.
Ellenőrizze a hardvercsatlakozást, ha van külső mikrofonja
Ha külső mikrofont használ, akár a headsethez van csatlakoztatva, akár külön, először ellenőrizze a headset/mikrofon és a rendszer fizikai csatlakozásait. Kezdje azzal, hogy ellenőrizze a vezetéket, nincs-e rajta vágás vagy szokatlan hajlítás. Bármilyen ütés a vezetékben a vezeték belső meghajlására is utalhat, ami károsíthatja a mikrofont, és megakadályozhatja annak megfelelő működését.
Ha minden normálisnak tűnik, próbálja meg leválasztani a headsetet/mikrofont a rendszerről, majd csatlakoztassa újra. Ezzel nem csak a kapcsolatot állítja vissza a rendszer végén, hanem megszabadul minden olyan hardverkapcsolati problémától is, amely megakadályozhatja a mikrofon megfelelő működését.
Kapcsolódó: Névtelen felhasználók letiltása a Google Meetben
Győződjön meg arról, hogy a beviteli eszköz van kiválasztva a Google Chrome böngészőben
A Chrome azt a funkciót is tartalmazza, amellyel kiválaszthatja, hogy melyik mikrofont fogja használni a különböző eszközök hangbemenetére. Ha a Google Meet mikrofonnal kapcsolatos problémái vannak, akkor valószínűleg nem a megfelelő mikrofonbemenetet választotta ki a Chrome-ban. Az alábbi útmutatót követve kiválaszthatja a kívánt beviteli eszközt.
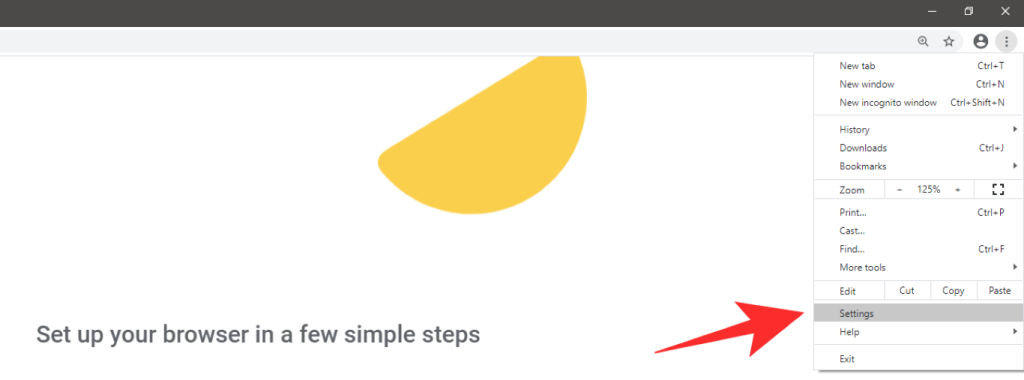
Nyissa meg a Chrome-ot, kattintson a böngésző jobb felső sarkában található „ 3 pont ” menüikonra.

Válassza a " Beállítások " lehetőséget.
Most válassza az " Adatvédelem és biztonság " lehetőséget a bal oldali sávban.

Válassza a " Webhely beállításai " lehetőséget.
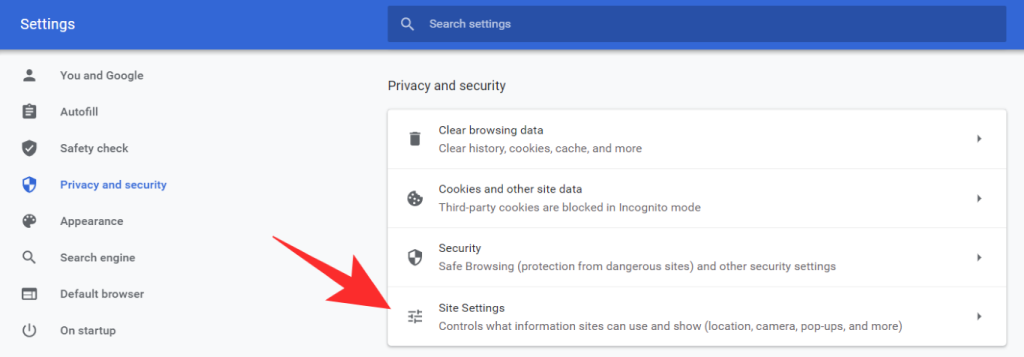
Most kattintson a „ Mikrofon ” elemre a következő képernyőn.

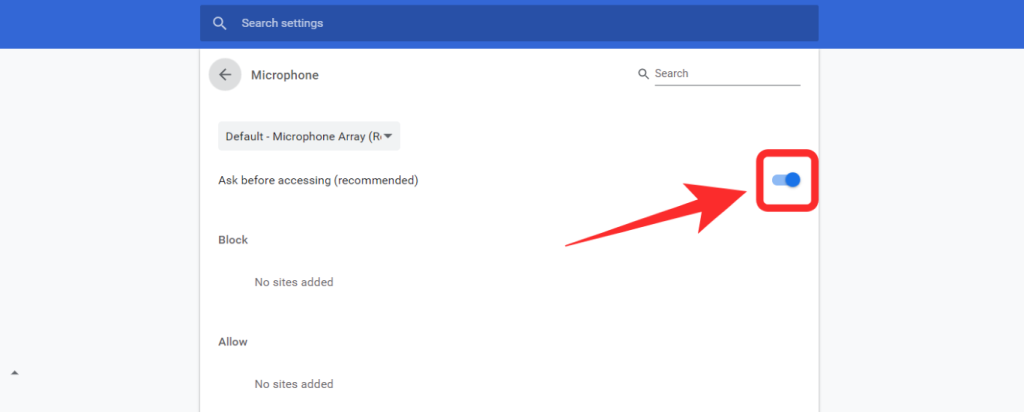
Ha a tetején lévő kapcsoló ki van szürkítve, és mellette a „ Letiltva ” felirat látható, kapcsolja be a kapcsolót, hogy megbizonyosodjon arról, hogy „ Kérdezzen hozzáférés előtt (ajánlott) ” legyen.
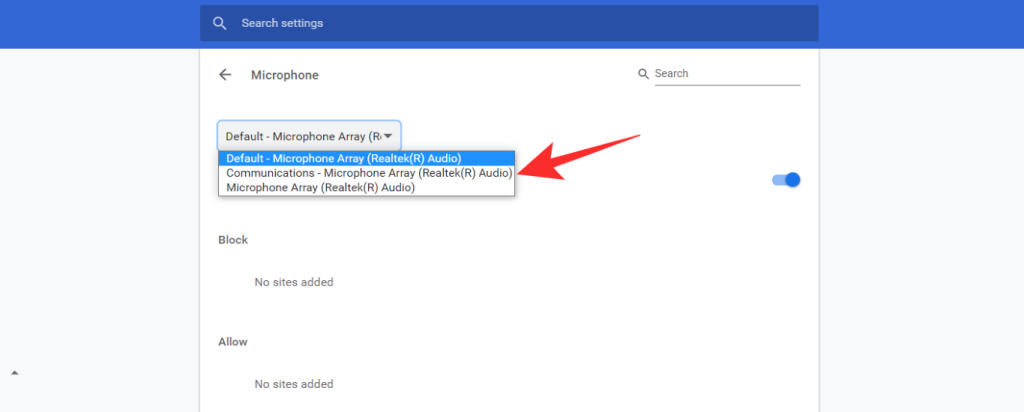
Most kattintson a legördülő menüre a tetején, és válassza ki a kívánt mikrofont, amelyet használni szeretne a Google Meetben.
A beállítások mentéséhez zárja be a " Beállítások " lapot.
Mostantól használhatja a kiválasztott mikrofont a Google Meet-értekezletek során, ami megoldja a mikrofonproblémát.
Kapcsolódó: Google Meet Virtuális háttér: Legfrissebb hírek, Chrome-bővítmény és minden, amit eddig tudunk
Győződjön meg arról, hogy a mikrofon-hozzáférés engedélyezett (Windows és Mac)
Ha továbbra sem tudja használni a mikrofont a Google Meetben, akkor valószínű, hogy a Chrome vagy az Ön által használt böngésző megtagadta a mikrofonhoz való hozzáférést.
Windows rendszeren
A Windows új funkciót vezetett be a mikrofont használó alkalmazások vezérlésére az adatvédelmi lehetőségek növelése érdekében. Ha nem tudja használni a mikrofont a Google Meetben, akkor ellenőrizze a mikrofon engedélyeit a Windows rendszerben. Nézzük meg, hogyan teheti ezt meg.
Nyissa meg a Start menüt a bal alsó sarokban található Start ikonra kattintva, és írja be, és keresse meg a „ Mikrofon adatvédelmi beállításai ” kifejezést. Kattintson a képernyőn megjelenő első beállítási lehetőségre.
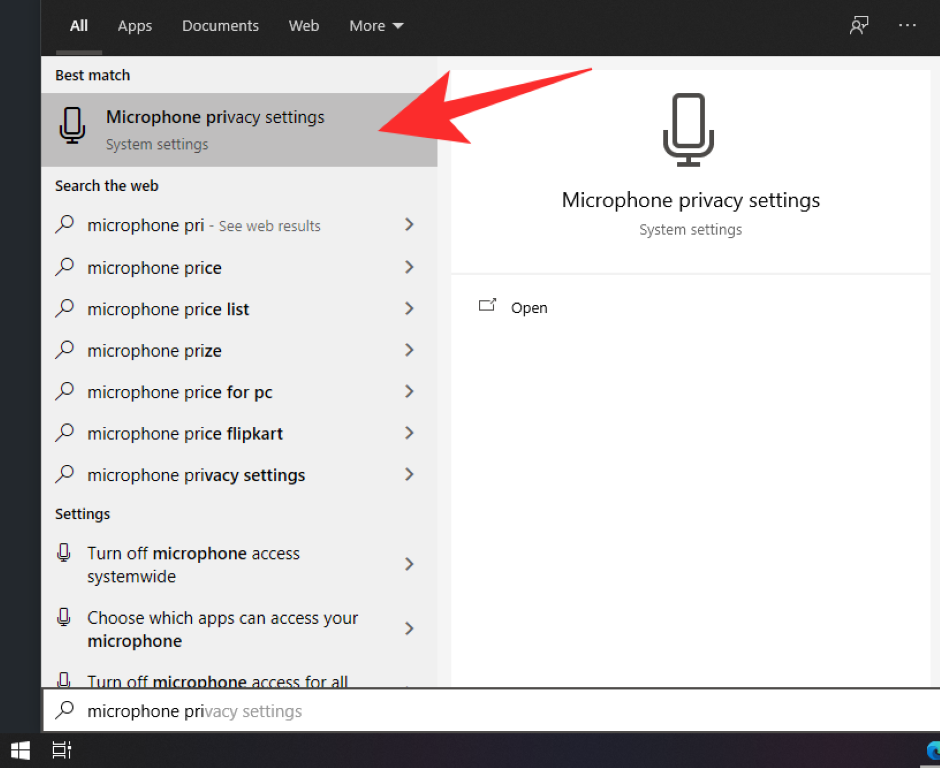
Győződjön meg arról, hogy a tetején található „ Alkalmazások hozzáférésének engedélyezése a mikrofonhoz ” kapcsoló engedélyezve van az eszközön. Ha nem, kapcsolja be a kapcsolót az engedélyezéséhez.
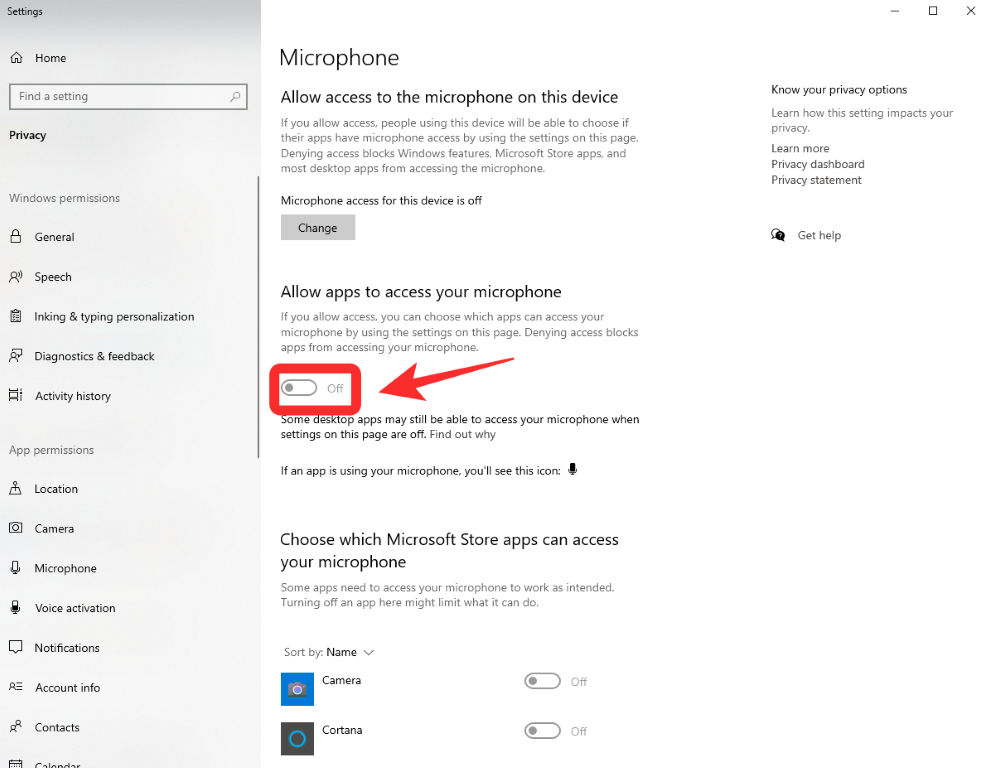
Megjegyzés: A „ Válassza ki, mely alkalmazások férhetnek hozzá a mikrofonjához ” részben keresse meg a Chrome-ot, és ellenőrizze, hogy a mellette lévő kapcsoló be van-e kapcsolva. Ha nem, akkor egyszerűen rákattintással kapcsolja be.
Mac rendszeren
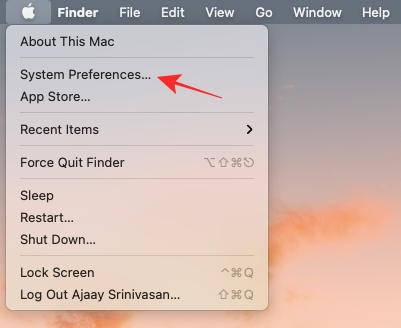
A Windowshoz hasonlóan a mikrofon használatához engedélyt kell adnia egy alkalmazásnak/böngészőnek. A mikrofonjogosultságokat úgy érheti el, hogy először nyissa meg a Rendszerbeállítások alkalmazást Mac számítógépén, vagy kattintson az alkalmazásra a Dockban, vagy kattintson az Apple ikonra a menüsorban, majd válassza a „Rendszerbeállítások” lehetőséget.
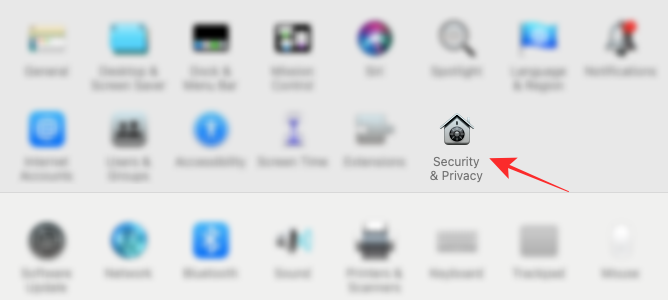
A Rendszerbeállításokban válassza a Biztonság és adatvédelem lehetőséget.
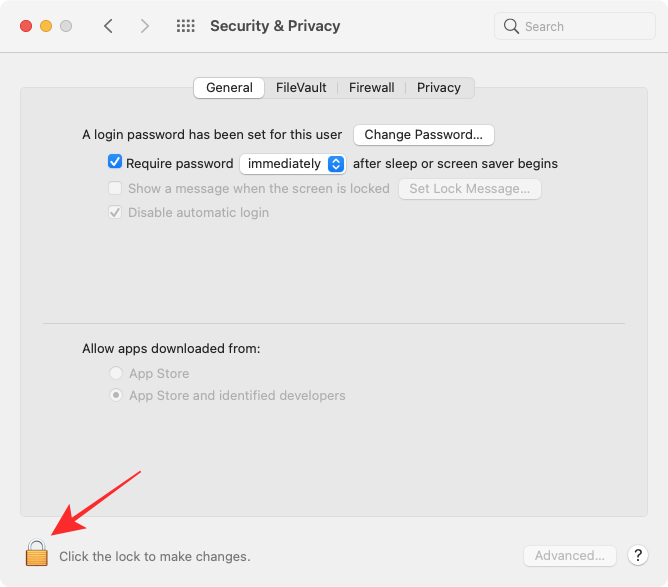
Ha a bal alsó sarokban lévő Zárolás ikon le van zárva, akkor az engedélyek módosításához fel kell oldania. Ehhez kattintson a Lock ikonra, és adja meg Mac jelszavát/PIN-kódját.
Válassza az Adatvédelem fület felül, majd kattintson a Mikrofon lehetőségre a bal oldalsávon.
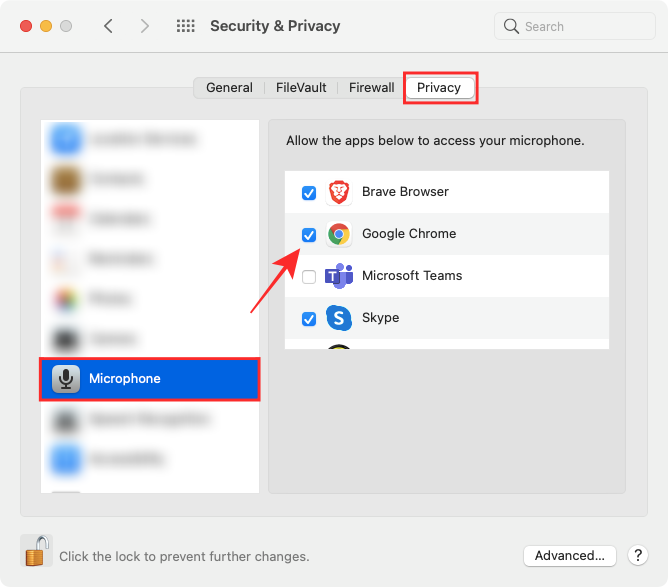
Jelölje be a jelölőnégyzetet azon böngészőalkalmazás mellett, amelynél engedélyezni szeretné a mikrofont. Ezt követően lépjen ki a böngészőből, és indítsa el újra.
Mostantól könnyedén használhatja mikrofonját a Google Meet megbeszélései során.
A mikrofon hangerejének ellenőrzése (Windows és Mac)
Mind a Windows, mind a macOS lehetővé teszi a felhasználók számára, hogy hangerőszintet állítsanak be rendszereik mikrofonjaihoz, ahogyan azt hangkimeneti eszközeiken tennék. Ha alacsony a mikrofonja, akkor a Google Meet-hívásban résztvevők nem hallják megfelelően. Ezért tanácsos ellenőrizni a mikrofon szintjét, ha ilyen helyzetbe kerül.
Windows rendszeren
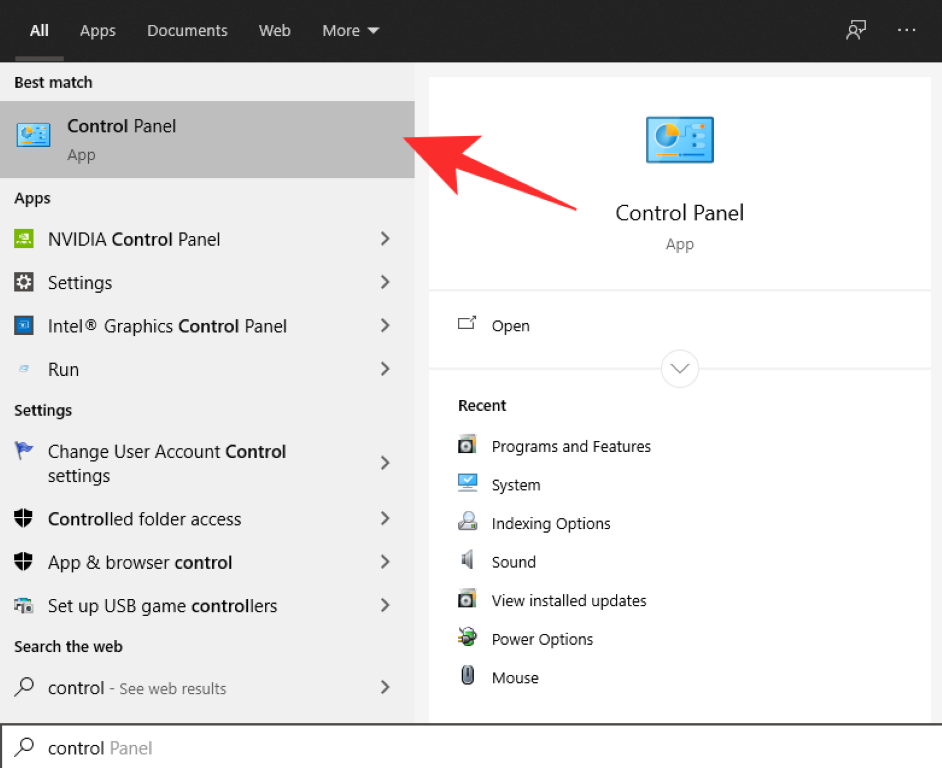
A mikrofon szintjét Windows 10 rendszeren úgy ellenőrizheti, hogy a Start menü segítségével nyissa meg a Vezérlőpultot számítógépén.
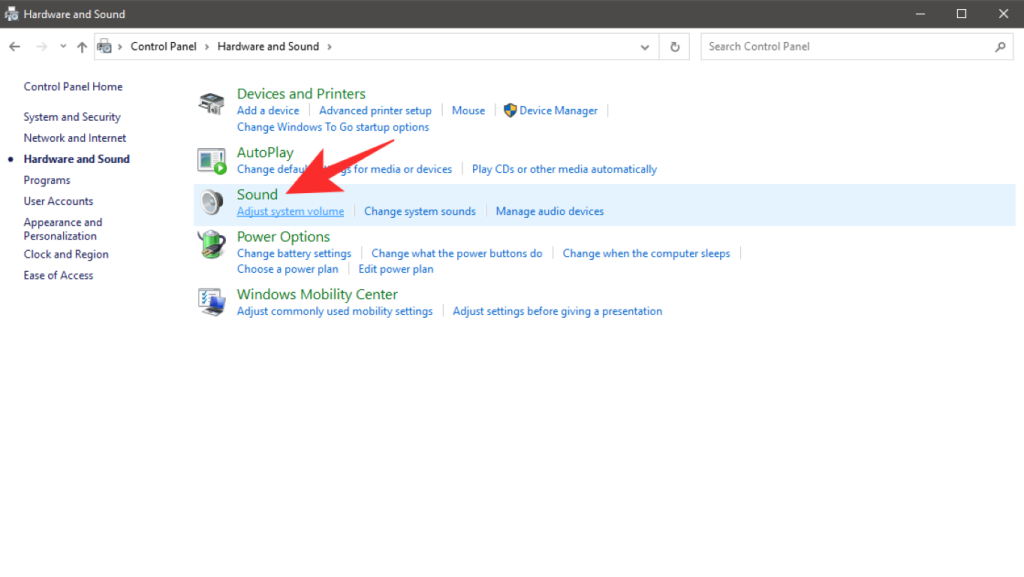
A Vezérlőpulton belül lépjen a "Hardver és hang" elemre a bal oldalsávon, és válassza ki a "Hang" lehetőséget a jobb oldali panelen.
Amikor megjelenik a Hang ablak, válassza ki a „Rögzítés” fület felül. Itt láthatja a rendszeréhez csatlakoztatott összes bemeneti eszköz listáját.
A Felvétel lapon válassza ki a Google Meet-hívásokhoz használt mikrofont, majd kattintson a "Tulajdonságok" gombra az ablak alján.
Amikor a Mikrofon tulajdonságai ablak megjelenik a képernyőn, kattintson a felül található „Szintek” fülre.
Ezen a lapon egy csúszkát kell látnia a „Mikrofon” részben. Húzza jobbra ezt a csúszkát attól függően, hogy milyen magasra szeretné helyezni a mikrofon érzékenységét. Minél jobban húzza jobbra a Mikrofon csúszkát, annál magasabb lesz a mikrofon hangereje, és ez segíthet másoknak jobban hallgatni Önt a Google Meetben.
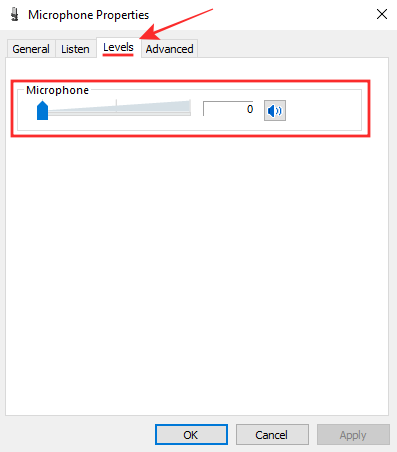
Miután elvégezte a szükséges módosításokat, kattintson az "Alkalmaz" gombra, majd az "OK" gombra a megerősítéshez. Indítson hívást/csatlakozzon egy híváshoz a Google Meetben, hogy ellenőrizze, megfelelően működik-e a mikrofonja.
Mac rendszeren
Ha ellenőrizni szeretné a mikrofon hangerejét Mac számítógépen, nyissa meg a „Rendszerbeállítások” menüpontot a menüsorról, a dokkról vagy a Launchpadről.

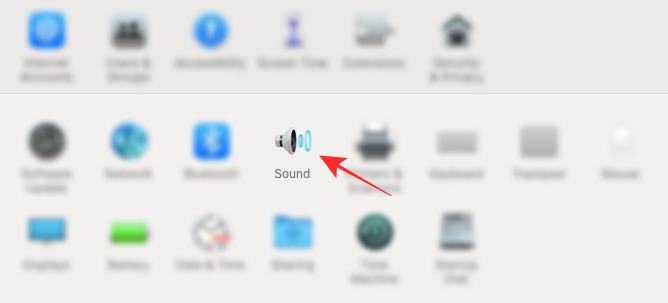
A Rendszerbeállításokban kattintson a „Hang” csempére.
Amikor a Hang képernyő betöltődik, kattintson a felül található „Bemenet” fülre, válassza ki a Google Meet-hívásokhoz használt mikrofont, és húzza jobbra a „Bemeneti hangerő” csúszkát a hangerő növeléséhez.
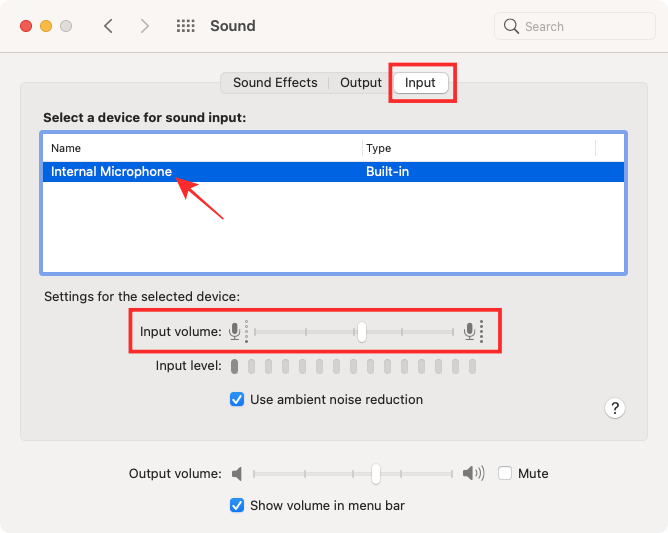
Győződjön meg arról, hogy a hangerő megfelelő-e: mondjon valamit, majd ellenőrizze, hogy hallatszik-e a hangja a „Bemeneti szint” jelzőn ugyanazon a képernyőn.
Indítsa újra a Google Chrome-ot
A böngésző egyszerű újraindítása a mikrofonproblémákat is megoldhatja. Ezzel kiürítheti a gyorsítótárat, újraindíthatja a bővítményeket a háttérben, és ami még fontosabb, minden olyan extra hely szabadul fel, amely problémákat okozhat a mikrofonnal. Bár az újraindítás egyszerűen bezárhatja és újra megnyithatja az alkalmazást, nem mindig szabadul meg a Chrome-on futó háttérfolyamatoktól és bővítményektől.
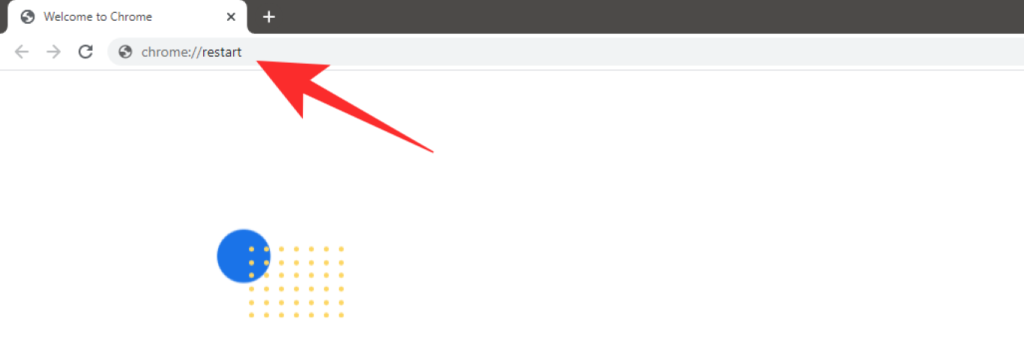
A böngésző megfelelő újraindításához nyisson meg egy új lapot, és írja be a „ chrome://restart ” parancsot az URL-sávba. Ez teljesen újraindítja a krómot, és megszabadul minden olyan ütköző háttérfolyamattól, amely megzavarhatja a mikrofon működését.
Kapcsolódó: A Meet Tab teljes eltávolítása a Gmailből
Indítsa újra a rendszert
Ha a böngésző újraindítása nem segít megoldani a mikrofonproblémákat, akkor megpróbálhatja újraindítani a rendszert. Ezzel megszabadul a rendszer gyorsítótár-fájljaitól és a háttérfolyamatoktól, amelyek zavarhatják a mikrofon működését. Ezenkívül felszabadítja a töltést a rendszer kondenzátoraiból, aminek gondoskodnia kell minden ütköző elektronikáról, amely megakadályozhatja a mikrofon működését (csak külső mikrofonok).
Ha van külső mikrofonja, kapcsolja ki a rendszert, várjon 20 másodpercet, majd indítsa újra a rendszert. Ha beépített mikrofonja vagy fejhallgatója van, egyszerűen használja a Power Menu újraindítási parancsát.
Indítsa újra a mikrofont a CLI használatával (csak Macen)
Mac systems use an integrated optimization system that helps microphones work seamlessly across different devices. If you are unable to use your microphone on your Mac then you can try restarting the microphone using CLI. Use the guide below to restart your microphone.
Note: You will need administrator privileges to complete this process.
On your Mac system, open the Application folder in your Launchpad, select ‘Utilities’ and launch ‘Terminal’. You can also open the Terminal app from the Launchpad or Spotlight.
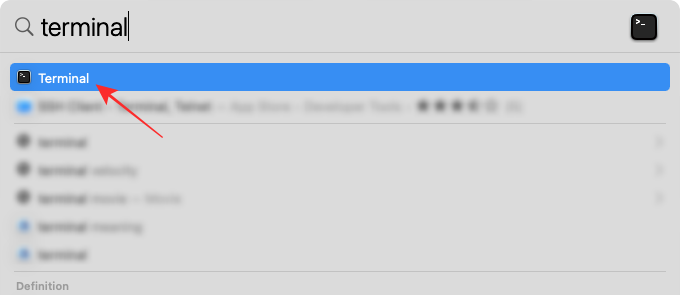
Enter the following command in Terminal:
sudo killall coreaudiod
… and hit Enter to execute it.
Now enter your credentials in the dialog box to restart the service and press Enter.
You should try joining your meeting on Google Meet again and your microphone issues should now be resolved.
Troubleshoot your Microphone on Windows
If something goes wrong with your computer’s microphone, Windows will be able to tell what might be the issue you’re facing and might even fix it for you, if possible. This is done using the native Troubleshoot tool that’s available on Windows 10 which you can use to solve problems related to your computer’s microphone.
For this, open the Windows Settings app from the Start menu or Action Center.
Inside Windows Settings, go to System and click on the ‘Sound’ tab from the left sidebar.
On this screen, click on the ‘Troubleshoot’ button under the ‘Test your microphone’ section.
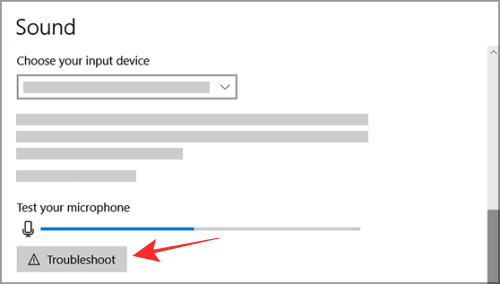
If there’s a problem with your microphone, the tool should be able to detect it and you can then follow the on-screen instructions to get it resolved.
Restart Windows Audio Service
If you have a Windows PC, you can try restarting the Windows audio service to fix the microphone issues that you are facing in Google Meet. Follow the guide below to help you get started.
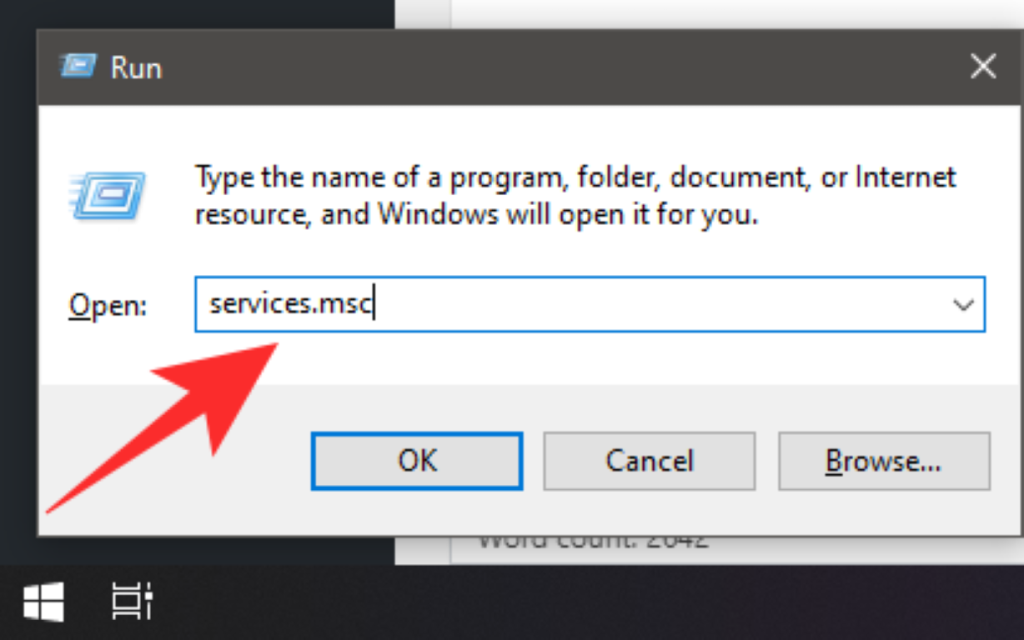
Press the key combination ‘Windows+R’ on your keyboard simultaneously. This should bring up your ‘Run’ dialog box.
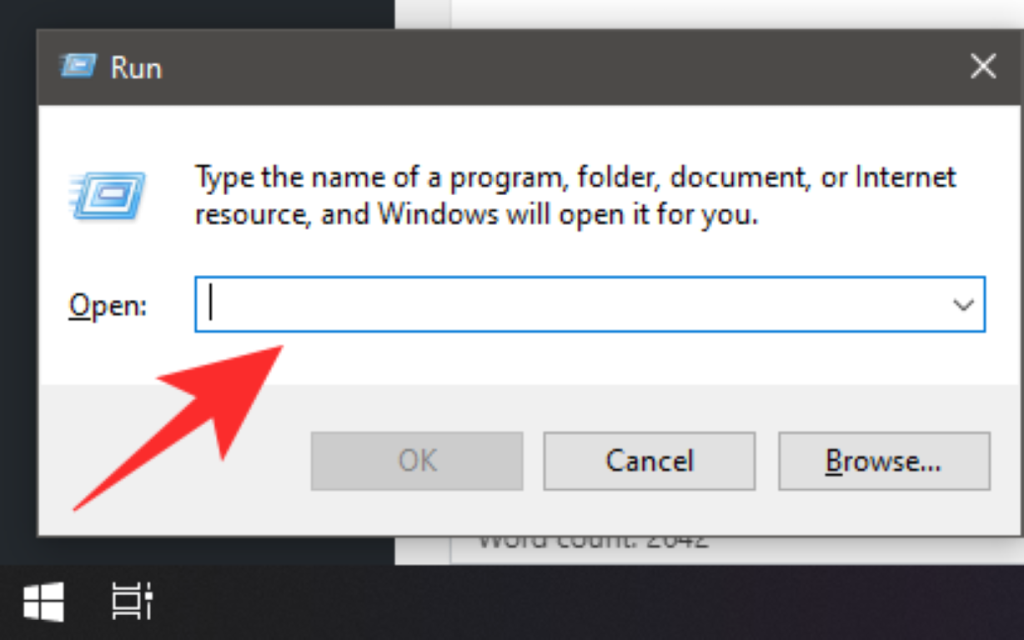
Now type ‘services.msc’ in the Run dialog box and hit Enter on your keyboard to execute the command. This will open the services window on your PC.
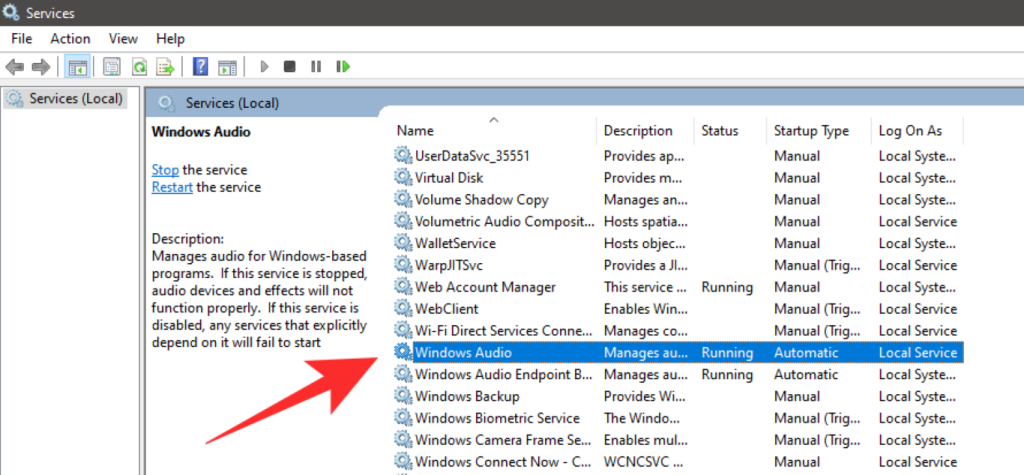
Now find ‘Windows Audio‘ in the list.
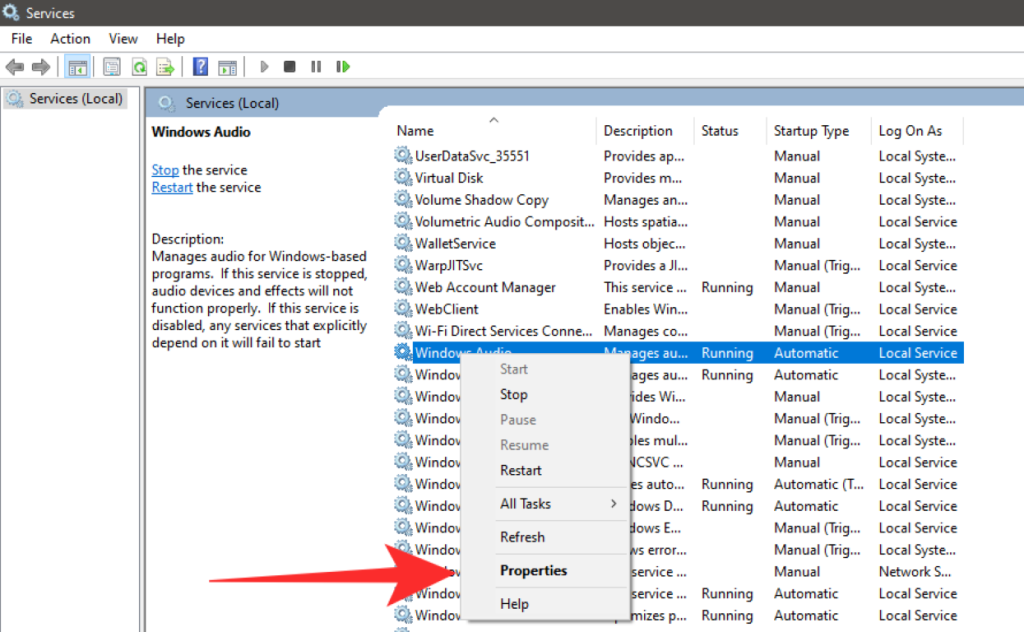
Right-click on the service and click on ‘Properties’ from the sub-menu that appears.
Click on ‘Stop’. This will stop the service.
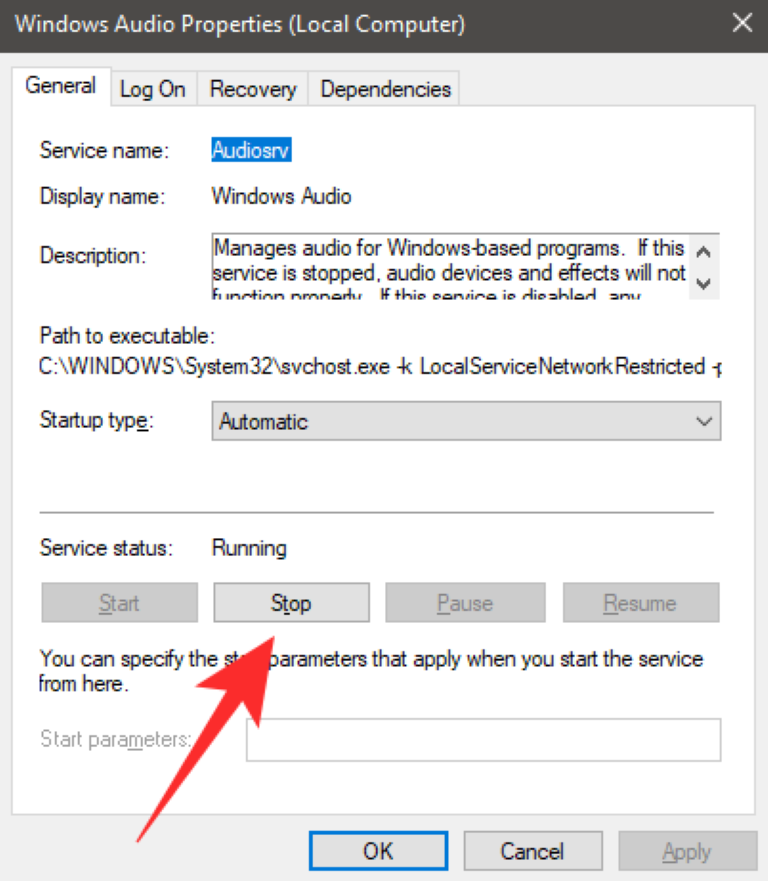
Once stopped, wait for a few seconds and then click on ‘Start‘ again.
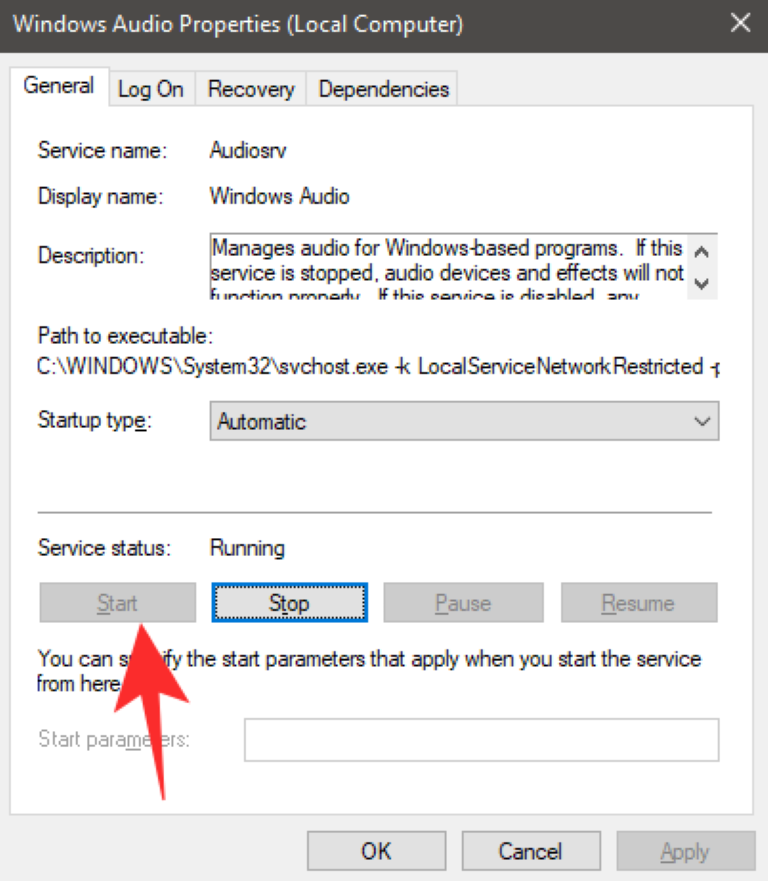
My OEM add-ons restart the service automatically which can be the case for you.
Note: In the properties window, under the ‘General’ tab, click on the drop-down menu beside the ‘Startup Type’ option and select ‘Automatic’ if not selected. Click on ‘Apply’ in the bottom right corner to apply your changes.
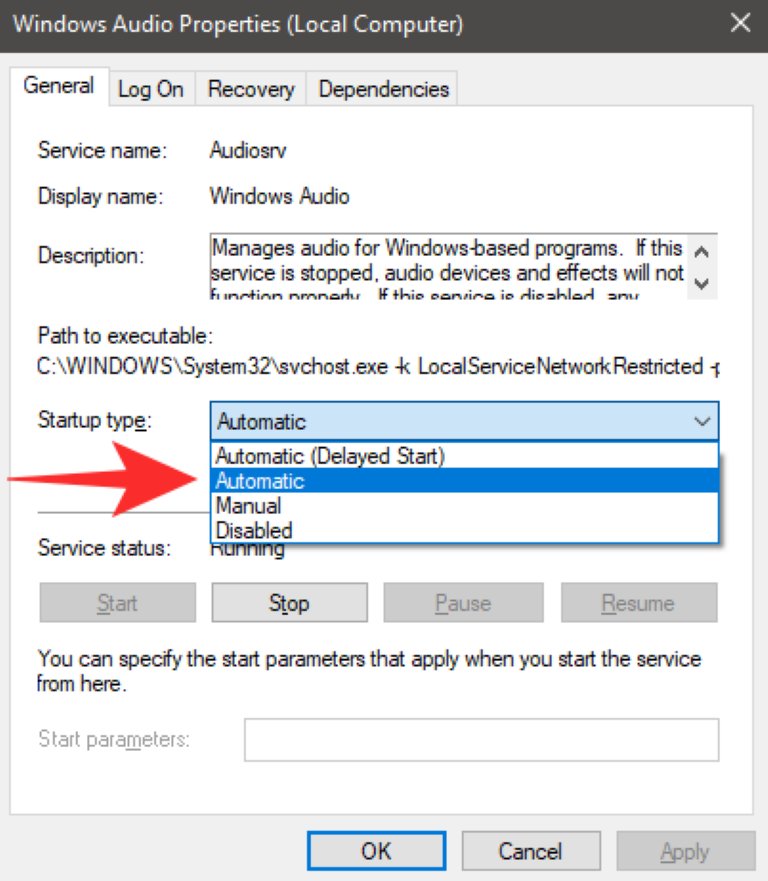
Restart your system.
The Windows audio service will now be automatically restarted on your system’s next bootup which should solve any microphone issues that you were having with Google Meet.
Switch to a Wired Headset
If you are using a Bluetooth headset with an in-built microphone then chances are that Meet services are conflicting with the wireless tech required for your headset to function properly. This is a known issue and many people trying to use a Bluetooth headset with Google Meet around the world are facing the same issue.
Google is expected to fix the issue with future updates, but for now, the only workaround seems to be to use a wired headset with an in-built microphone or to use an external microphone. This will solve all your audio issues with Google Meet and allow you to use the microphone properly.
Free Up System Memory
Real-time audio streaming and input require a decent amount of memory and processing power. If you are on a low-powered system and intermittently face microphone issues now and then, it could be there is not enough free memory for the microphone to work properly with Google Meet.
Google Chrome also uses a significant amount of your RAM and processing power which could also be interfering with your Google Meet experience. To fix these issues, you should start by closing any background applications that could be using the resources of your system.
You should also close any background tabs in Chrome other than Google Meet. This should solve your microphone issues with Google Meet.
Ensure that your Microphone is selected in Windows Settings
Windows also give you the ability to select your default microphone. If a different microphone has been selected in Windows audio settings than the one that you wish to use with Google Meet then it could be conflicting with the background services which could be the cause of your microphone issues. Follow the simple guide below to select your desired microphone as your default audio input device.
Open the Control Panel.
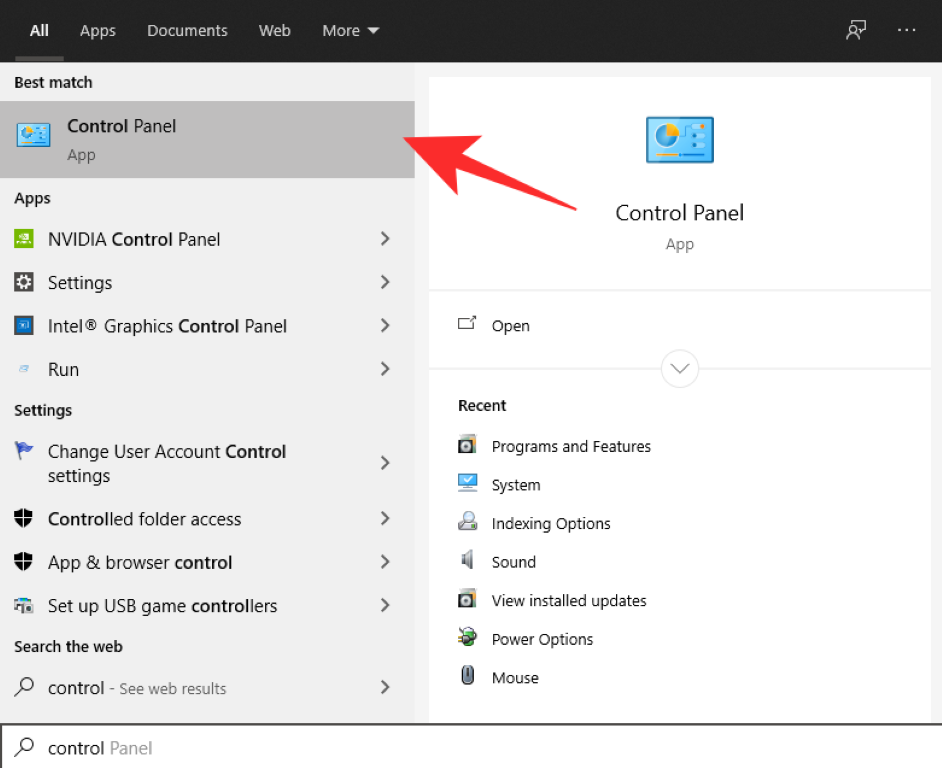
Click on the ‘Hardware and Sound’ category and select ‘Sound’ to open up your sound settings.

Now select the ‘Recording’ tab at the top.
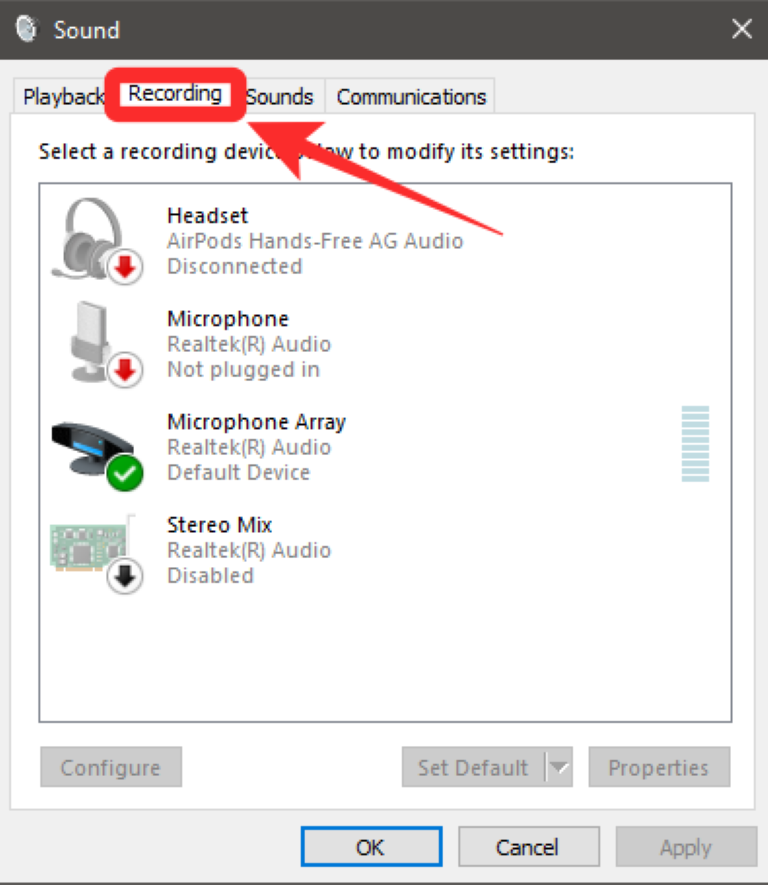
You will now be able to see a list of all the audio input devices connected to your system. Select the microphone that you want to use as your default audio input device and right-click on it.
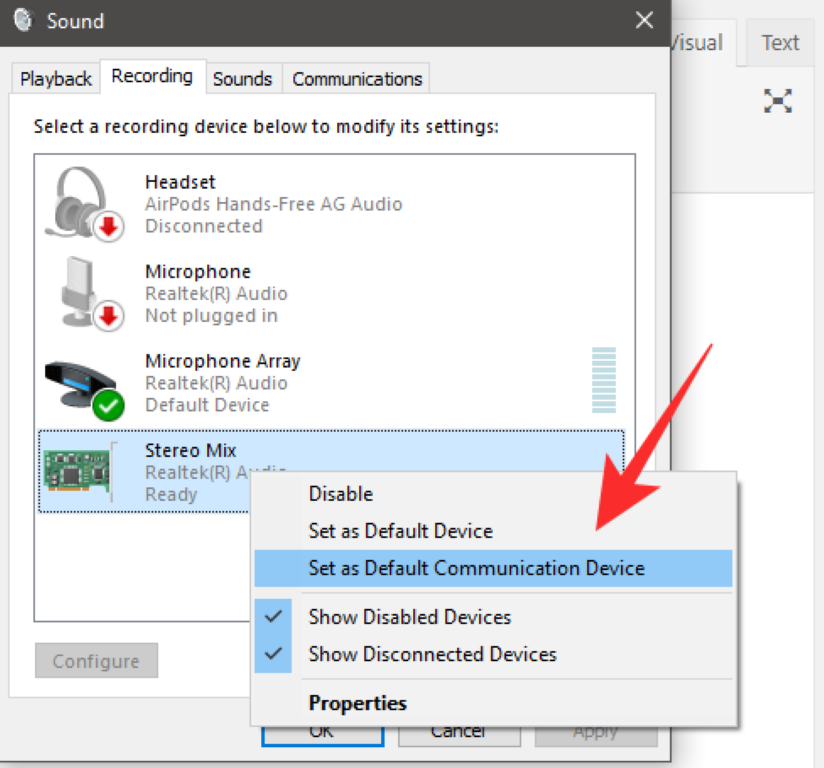
Select ‘Set as default communication device’ from the submenu that appears to start using that microphone as your default audio input device.
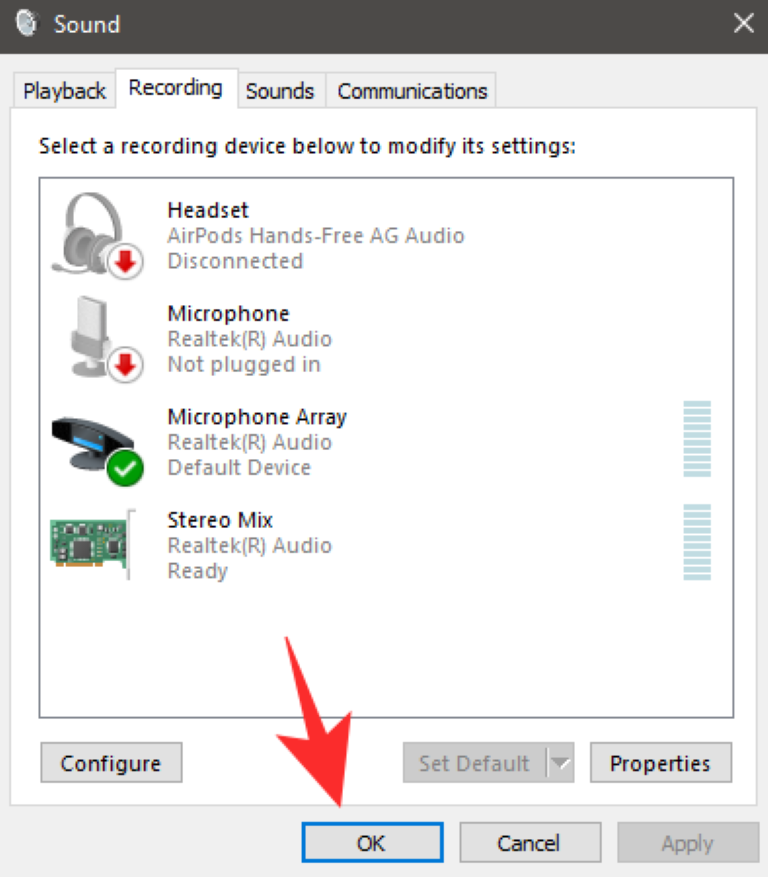
Once done, click on ‘Ok’ at the bottom right corner and close the window.
Your microphone should now be able to work without any issues during meetings on Google Meet.
Update your Microphone drivers (Windows only)
Sometimes your microphone drivers on your Windows system could be outdated which might be preventing your microphone to work properly in Google Meet. You should try to update your microphone drivers to fix these issues. Follow the guide below to help you easily update or reinstall your microphone drivers on Windows 10.
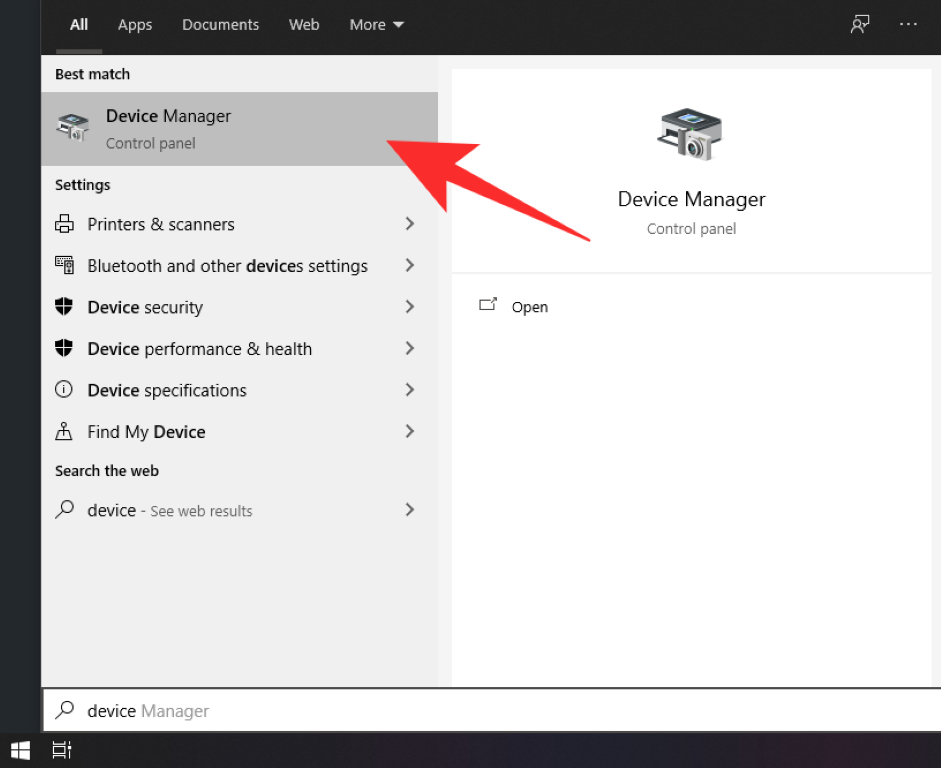
Type ‘Device Manager’ in your taskbar search bar and open the first application that shows up in the search results with the same name.
Now click on the drop-down menu beside ‘Audio Inputs and outputs’
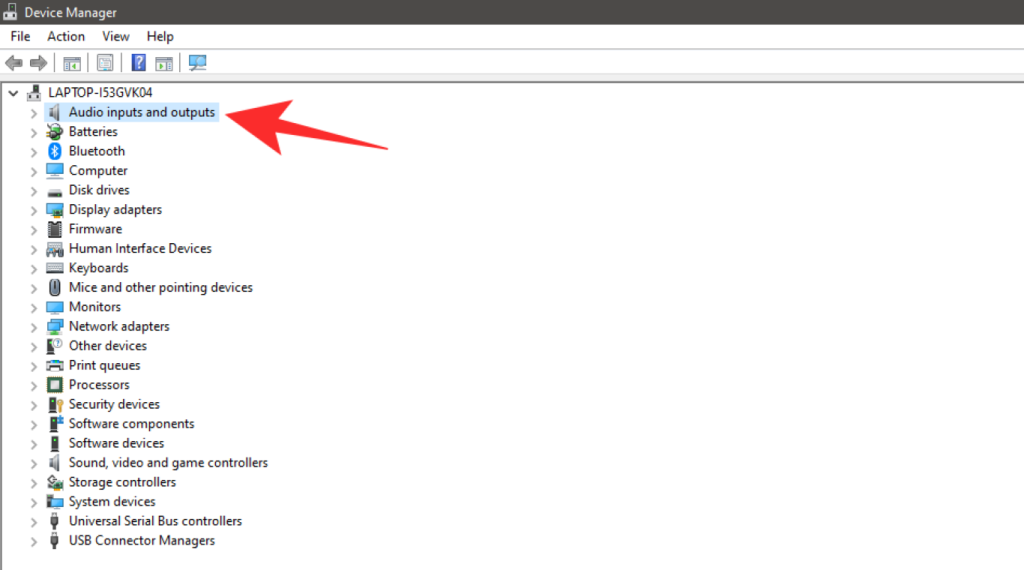
Select the microphone that you wish to use with Google Meet.
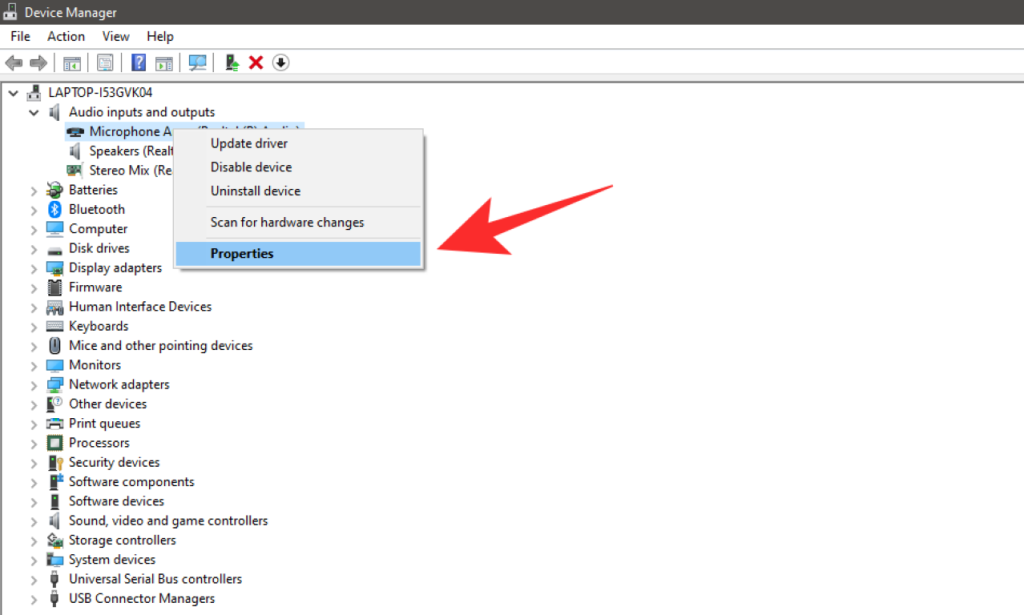
Right-click on the microphone and select ‘Properties’.
Now click on the ‘Driver’ tab at the top to open up driver options for your device. Now if the option for ‘Update Driver’ is not greyed out, click on it to update the drivers for your device.
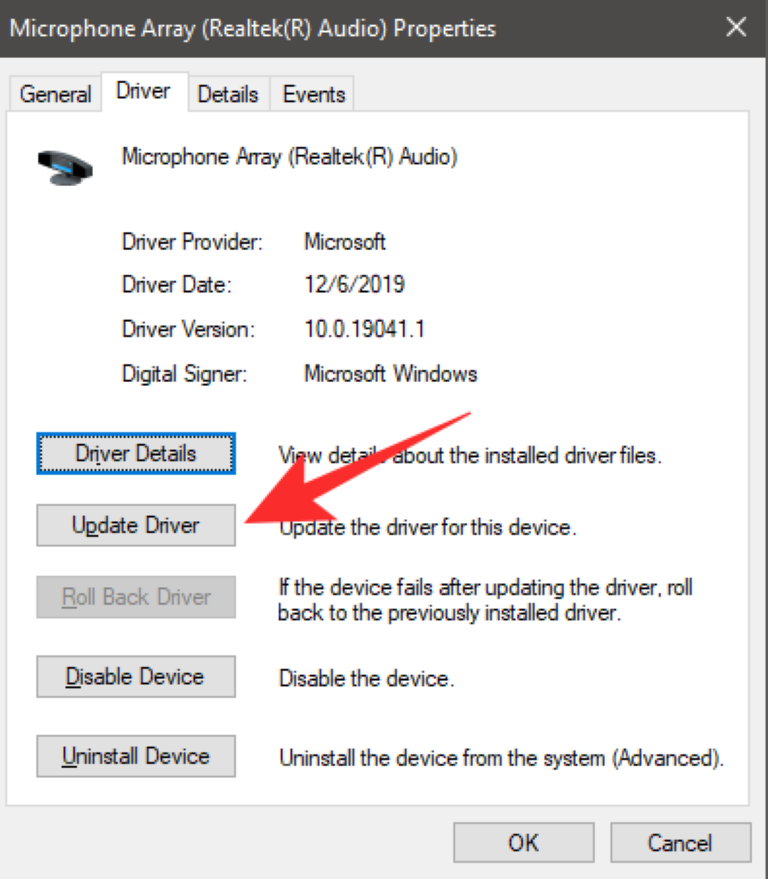
Your microphone drivers will now be updated and you should now be able to use the concerned microphone with Google Meet. Although most microphones are plug-and-play in today’s day and age, this could still help solve your issue depending on your microphone.
Disable Audio Enhancements
There is an option to enable audio enhancements for the microphone on Windows. While this helps improve audio quality for your microphone, this setting is known to interfere with the functioning of Microsoft Meet.
If you are having issues with your microphone, then chances are that audio enhancements have been enabled for your microphone in Windows. Follow the guide below to help you disable audio enhancements for your microphone.
Open the control panel on your Windows PC, click on ‘Hardware and Sound’, and select Sound. This will open the sound settings for your Windows system.

Click on the ‘Recording’ tab at the top of your screen, select the microphone you wish to use during Google Meet meetings from the list, right-click on it, and select ‘Properties’.
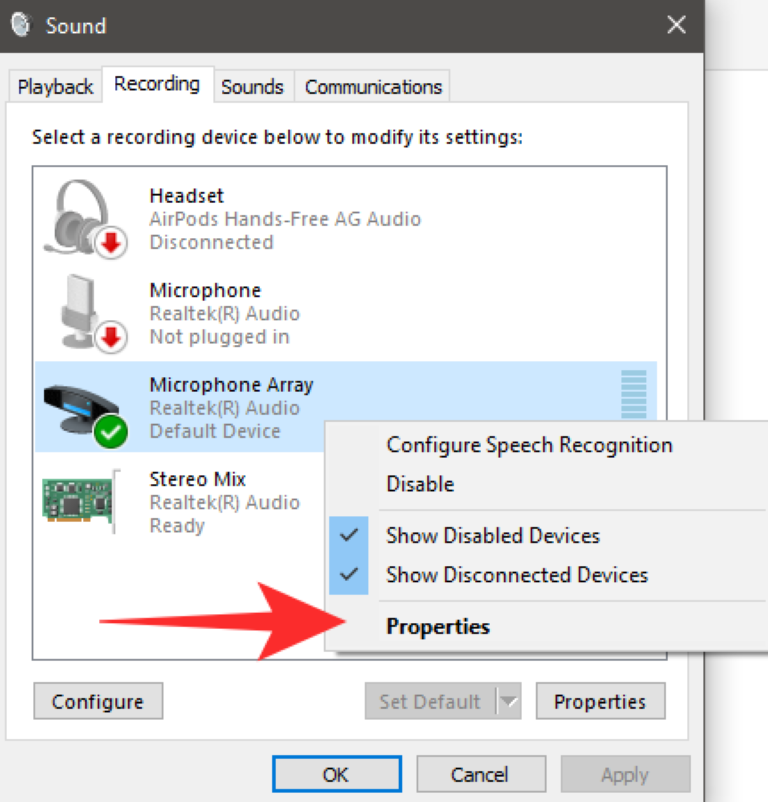
Now in the Microphone Properties window, select the ‘Advanced’ tab from the list at the top. Under the ‘Single Enhancements’ option, uncheck the box beside ‘Enable audio enhancements’.
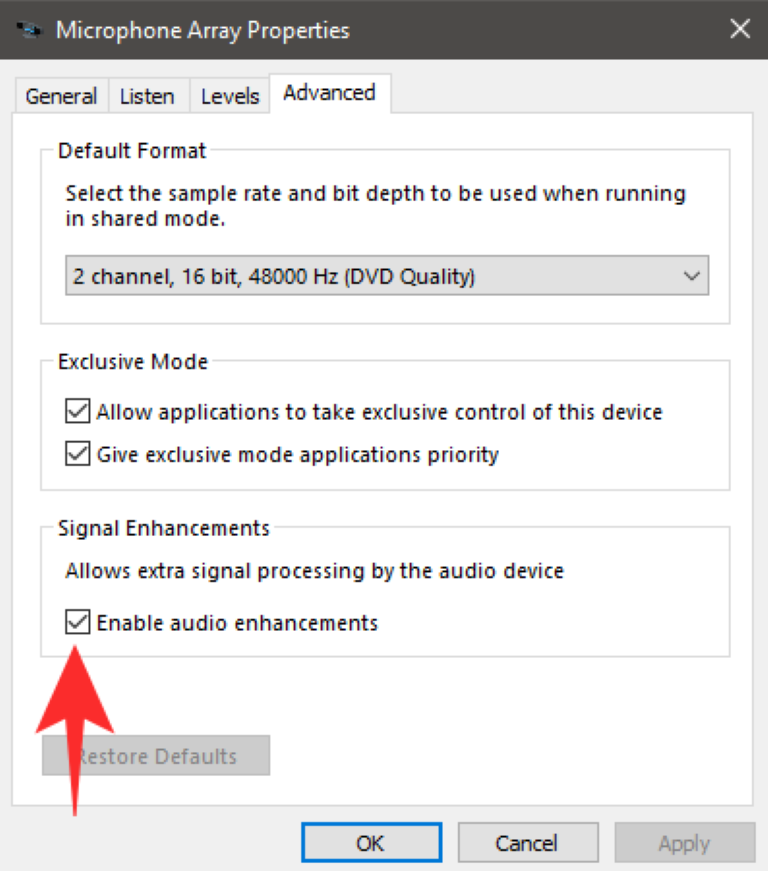
Audio enhancements will now be disabled for the microphone in question. You should now be able to use your microphone during Google Meet meetings.
Clear Google Chrome’s Cache
You can try to clear the cache on Google Chrome to fix your microphone settings. This will get rid of any stored temporary files that might be interfering with the Google Meet extension. Follow the guide below to clear the cache on Google Chrome.
Open Google Chrome, click on the ‘3-dot’ menu icon in the top right corner.
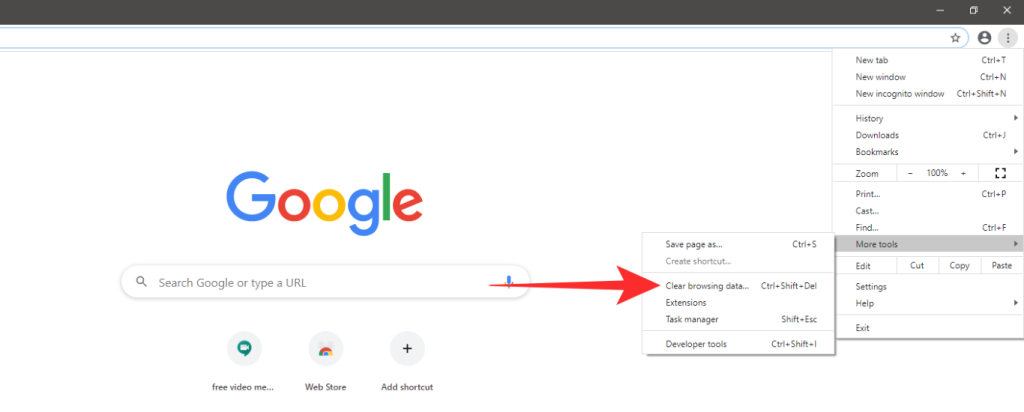
Select ‘More Tools’.
Now select ‘Clear browsing data’.

In the next window, select ‘All-time’ in the time range drop-down menu.
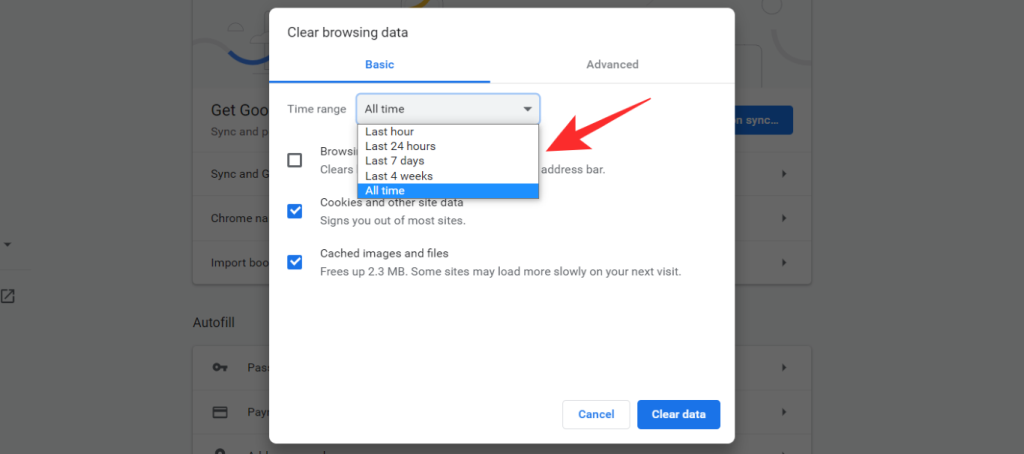
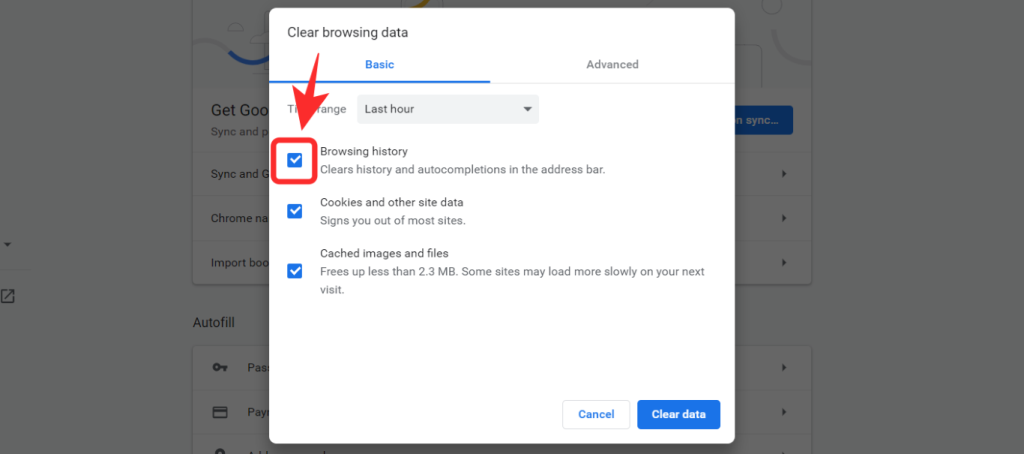
Uncheck the box for ‘Browsing History‘.
Lastly, click on ‘Clear data’ to clear all the cache files.
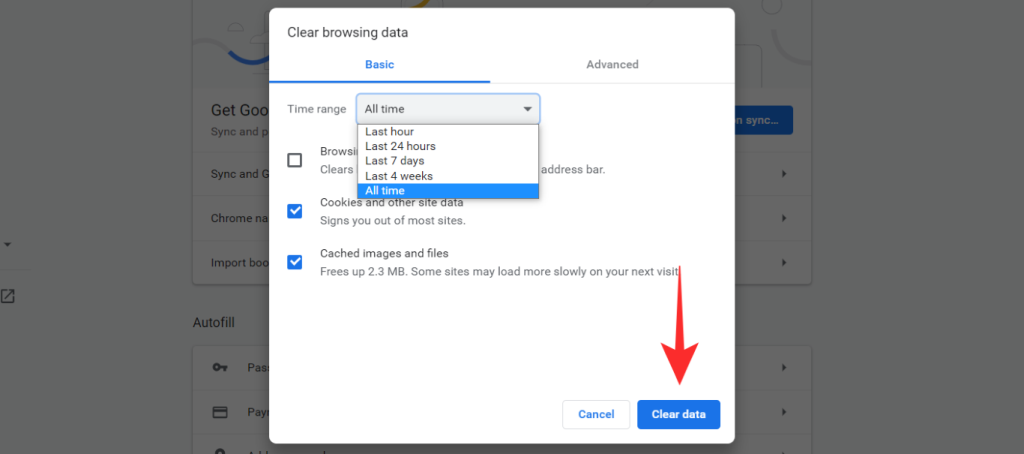
Your cache files will now be cleared and you should now be able to use the microphone in Google Meet.
Close FaceTime from the background
Many users on Mac systems have reported Facetime interfering with Google Meet which causes the microphone to malfunction. If you use Facetime regularly then you should try closing the application in the background before joining a meeting in Google Meet. This should help solve any audio input issues that you were facing with the Google Meet extension.
Sign OUT, then back IN into your Google account
Some users having issues with microphones in Google Meet have reported that signing out of your Google account and signing in again has helped solve this issue. You can try this method to see if it fixes your issue.
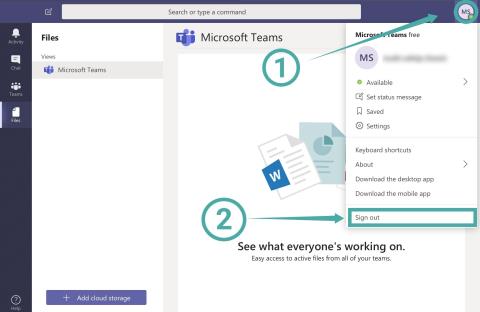
To sign out, simply click on your profile icon in the top right corner of your browser and click on Sign out. Simply sign in to your account again now and try to join a meeting on Google Meet. You should now be able to use your microphone during Google Meet meetings.
Disable Experimental Flags on Google Chrome
If you have enabled any experimental flags in Google Chrome then chances are that they are preventing your microphone from working properly in Google Chrome. You should disable any experimental flags and try to use your microphone again.
Simply type ‘chrome://flags’ in your URL bar and hit enter to access the flags page. Now scroll through the options and disable any enabled tabs by click on the drop-down menu beside it and select ‘Disable’.
Update Google Chrome
Google Meet and its corresponding extension for Chrome was recently given a new overhaul by Google chrome to support the recent influx of users. If you are using an older version of Google Chrome then chances are that it is incompatible with the latest version of Google Meet and the Google Meet extension.
Download the latest stable build of Google Chrome from this link and install it on your system. You should then be able to use your microphone in Google Meet without any issues.
Manually Update Google Meet extension
If nothing seems to work, you can try updating your Google Chrome extensions manually. Simply follow the guide below to help you get started.
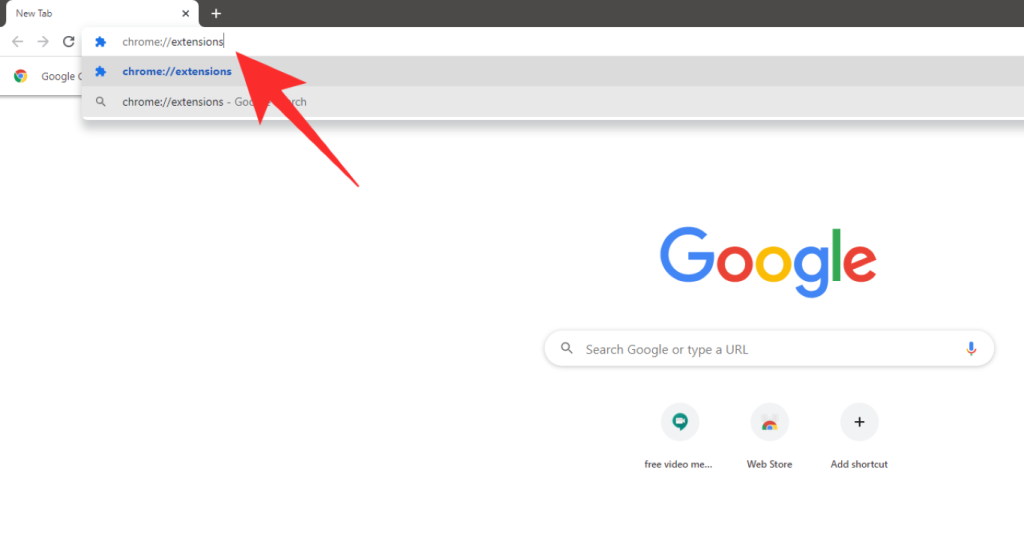
Open Google Chrome on your system and type ‘chrome://extensions’ in your URL bar and hit Enter.
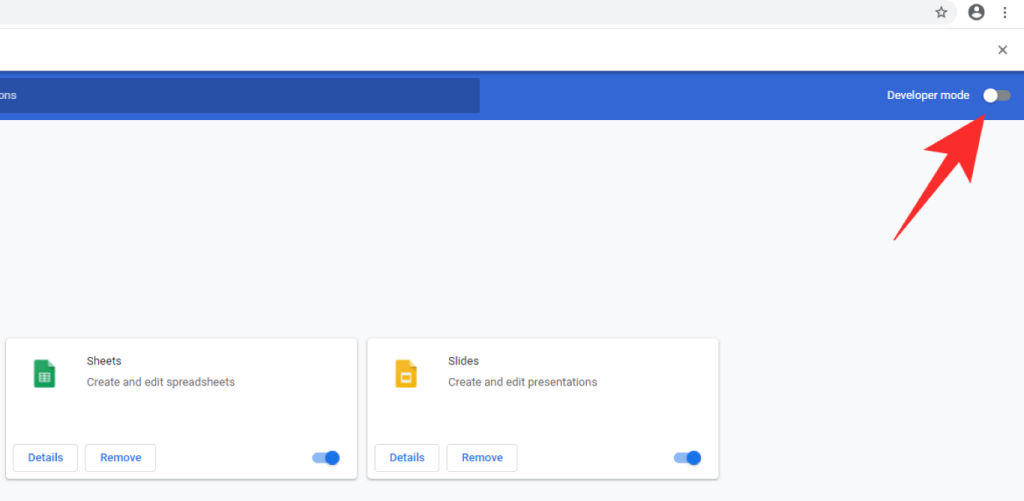
The extensions settings page will now open up. In the top right corner, turn on the toggle for ‘Developer Mode’.
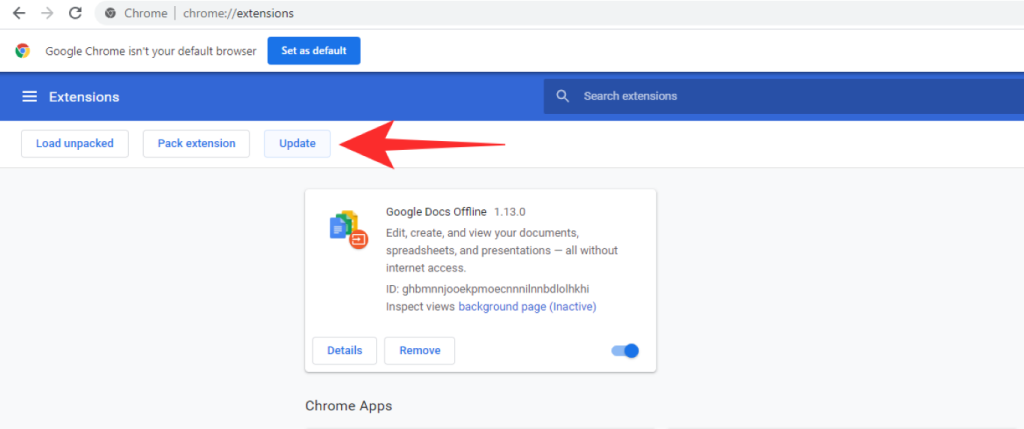
Now simply click on ‘Update’ and chrome will manually update all the extensions installed on your system including Google Meet.
You should now be able to use the microphone freely in Google Meet without any persistent issues.
We hope these fixes helped you solve your microphone issues with Google Meet. If you have any suggestions for us, feel free to get in touch with us using the comments section below.
RELATED:
Miért csökken néhány hang a Windows rendszerben?
Amikor egy értekezleten vesz részt, a Windows csökkenti a más forrásokból származó zajt. Ez nem a Meet, hanem a Windows funkció miatt van.
A többi résztvevő hallhatja a képernyőolvasómat, a zenelejátszómat vagy más alkalmazásokat
Az operációs rendszertől és az audioeszköztől függően előfordulhat, hogy más résztvevők hallják a más böngészőlapokról vagy alkalmazásokból származó hangokat. Annak elkerülése érdekében, hogy a mikrofon más hangokat vegyen fel, használjon fejhallgatót.
Fedezze fel a legjobb módszereket az illesztőprogramok frissítésére a Windows 11 rendszeren. Tudd meg miért fontos a frissítés és milyen előnyökkel jár.
Abban az esetben, ha a Windows Search rendkívül magas CPU- vagy lemezerőforrást használ, akkor a következő hibaelhárítási módszereket használhatja a Windows 11 rendszeren. A probléma megoldásához egyszerűbb módszerek is tartoznak…
2021. február 20.: A Google letiltotta az összes Meet-bővítményt, amely segített a rácsnézetben, beleértve az alább említetteket is. Ezek a bővítmények már nem működnek, és úgy tűnik, az egyetlen alternatíva…
Az egyetlen képernyő, amelytől a Windows-felhasználók félnek, az a Halál Kék Képernyője. A BSOD már évtizedek óta létezik, nagyon keveset változott az évek során, de még mindig elég erős ahhoz, hogy…
A Microsoft Teams a Microsoft Office 365-tel való mélyreható integrációjának köszönhetően emberek milliói számára vált a legjobb videohívási megoldássá világszerte. Annak ellenére, hogy nem a leginkább felhasználóbarát…
A Microsoft Teams egy átfogó eszköz, amely a közelmúltban meglehetősen népszerű csapatmunka funkciói miatt. A szolgáltatás lehetővé teszi, hogy konkrét csapatokat hozzon létre a szervezet számára, meghívjon…
2021. október 12.: Nagy frissítés! Kérjük, vegye figyelembe, hogy többé nem kell lecserélnie az appraiserres.dll fájlt a TPM-ellenőrzés megkerüléséhez és a telepítési hiba kijavításához a Windows 11 telepítésekor. …
Néhány hónap telt el a Windows 11 megjelenése óta, és a felhasználók azóta is áttérnek az új operációs rendszerre. Ahogy egyre több felhasználó próbálja ki a Windows 11 új problémáit, a hibák és a beállítások lemezre kerülnek…
Mindenki nagyon várja a Windows 11 frissítését. De ha van valami, ami megronthatja a könnyű frissítésre vonatkozó terveiket, az a rettegett rendszer…
A Windows 11 most megjelent a nyilvánosság számára, miután az idén júniusban vitatottan kiszivárgott. Azóta az operációs rendszer számos változáson ment keresztül, amelyek között szerepelt az igen örvendetes fagyos…
A Windows tálcája minden figyelem középpontjában áll, mióta a Windows 11 megjelenésével megkapta új, megújult megjelenését. Most középre állíthatja a tálcát, élvezheti az új műveleti központot, megváltoztathatja…
A Windows 11 néhány hónapon belül megjelenik a nagyközönség számára, és mindenki nagyon vágyott az új operációs rendszerre. Tartalmaz egy új start menüt, az Android-alkalmazások natív telepítésének lehetőségét, és…
A Microsoft Teams egy nagyszerű kommunikációs segédprogram a felhasználók számára minden platformon, de amint végzett vele, az alkalmazás kezd bosszantóvá válni. Ha nem használ Te…
Minden online elérhető szolgáltatásnak megvannak a maga problémái, és ez alól a Microsoft Teams sem kivétel. Az együttműködési eszköz felhasználói bázisa jelentősen megnőtt a COVID-19 világjárvány közepette…
Amikor a Windows 11-et bemutatták a világnak, a Snap Layouts volt az első dolog, amely felkeltette mindenki figyelmét. Innovatívak, újszerűek és valóban hasznosak voltak, amikor Windows rendszeren dolgoztak…
A Windows 11 nemrég jelent meg a nyilvánosság számára, és úgy tűnik, hogy sok új felhasználót csábít. Sok felhasználó átugrott és frissített Windows 11-re, míg mások a…
A Google Meet az egyik legtöbbet emlegetett távoli együttműködési platformmá nőtte ki magát, amely jelenleg elérhető a piacon. Rengeteg elképesztő funkciót kínál, és megbízható…
Mivel a Zoom átveszi munkánk, sőt társasági életünk nagy részét, meglehetősen nagy mértékben támaszkodunk rá. A Zoom segítségével a felhasználók létrehozhatják saját virtuális tárgyalótermeiket, és beszélgethetnek…
A Windows 11 a közelmúltban kiszivárgott a nyilvánosság elé, és a világon mindenki sietve próbálta telepíteni az új operációs rendszert egy virtuális gépre a Liike VirtualBox eszközök segítségével. Jön a Windows 11…
Azok, akik elég lelkesek, hogy a Windows 11 Dev build-jét az Insider Programon keresztül hozzák le, lassan kezdték megérteni, hogy a legtöbb felhasználó miért várja meg a stabil kiadás megjelenését. Elsőnek lenni…
Steam Disk Write Disk Error hibát észlel Windows 10 rendszeren a játék frissítése vagy letöltése közben? Íme néhány gyorsjavítás, amellyel megszabadulhat a hibaüzenettől.
Fedezze fel, hogyan távolíthat el alkalmazásokat a Windows 10 rendszerből a Windows Store segítségével. Gyors és egyszerű módszerek a nem kívánt programok eltávolítására.
Fedezze fel, hogyan tekintheti meg vagy törölheti a Microsoft Edge böngészési előzményeit Windows 10 alatt. Hasznos tippek és lépésről-lépésre útmutató!
A Google zökkenőmentessé tette a csoportos megbeszélések lebonyolítását. Tudd meg a Google Meet korlátait és lehetőségeit!
Soha nincs rossz idő a Gmail jelszavának megváltoztatására. Biztonsági okokból mindig jó rutinszerűen megváltoztatni jelszavát. Ráadásul soha
Az online adatvédelem és biztonság megőrzésének egyik alapvető része a böngészési előzmények törlése. Fedezze fel a módszereket böngészőnként.
Ismerje meg, hogyan lehet némítani a Zoom-on, mikor és miért érdemes ezt megtenni, hogy elkerülje a zavaró háttérzajokat.
Használja ki a Command Prompt teljes potenciálját ezzel a több mint 280 (CMD) Windows-parancsot tartalmazó átfogó listával.
Alkalmazhatja a Google Táblázatok feltételes formázását egy másik cella alapján, a Feltételes formázási segédprogrammal, a jelen cikkben ismertetettek szerint.
Kíváncsi vagy, hogyan használhatod a Rendszer-visszaállítás funkciót a Windows 11 rendszeren? Tudd meg, hogyan segíthet ez a hasznos eszköz a problémák megoldásában és a számítógép teljesítményének helyreállításában.








![Feltételes formázás egy másik cella alapján [Google Táblázatok] Feltételes formázás egy másik cella alapján [Google Táblázatok]](https://blog.webtech360.com/resources3/images10/image-235-1009001311315.jpg)
