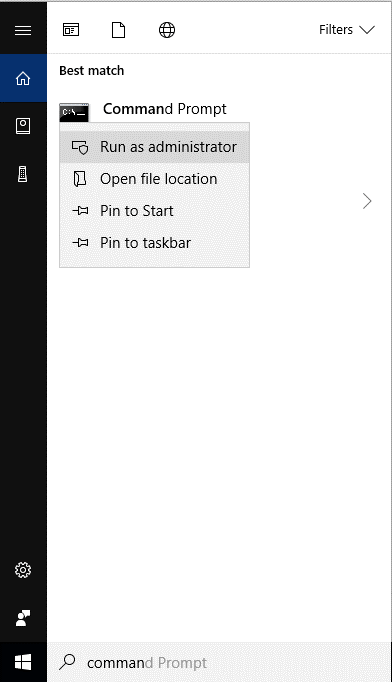
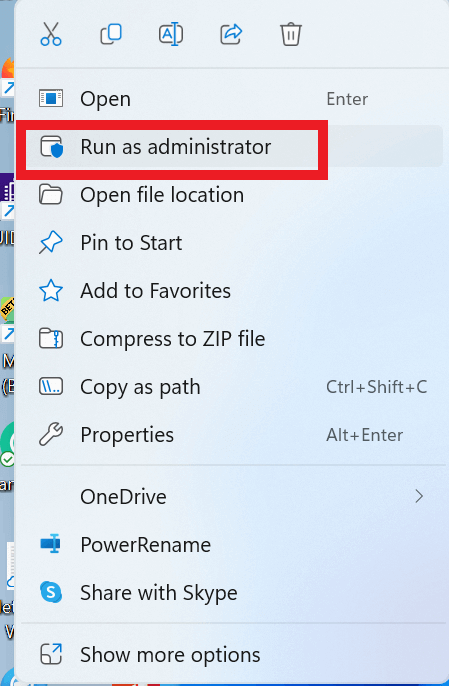
Kuinka kirjautua sisään järjestelmänvalvojana Windows 11:ssä tai Windows 10:ssä

Windows 11 ja 10 tarjoavat käyttöliittymiä ja komentoja, joiden avulla voit hallita järjestelmänvalvojatilin käyttöoikeuksia tehokkaasti.
Vaikka ilmoitukset ovat joissain tapauksissa välttämättömiä, joskus niistä tulee häiriötekijä. Kuten puhelimesi, myös tietokone voi häiritä sinua ilmoituksilla. Tästä syystä Windows 11 sisältää Focus Assist -ominaisuuden, jonka avulla voit välttää häiritseviä ilmoituksia. Tämän ominaisuuden avulla voit tehdä työsi täysin keskittyen sen sijaan, että satunnaiset viestit ja ilmoitukset häiritsisi sinua. Ilmoitukset voivat myös heikentää tuottavuuttasi, joten ne on estettävä oikeaan aikaan.
Vain muutamalla napsautuksella voit piilottaa kaikki ilmoitukset, hälytykset ja viestit tietokoneellasi. Jos olet äskettäin päivittänyt järjestelmäsi Windows 11:een etkä pysty selvittämään uutta käyttöliittymää, tämä artikkeli auttaa sinua antamaan kattavan oppaan Focus Assistin käyttämisestä Windows 11:ssä ilmoitusten poistamiseen.
Aiheeseen liittyvä: Kuvakaappausten ottaminen Windows 11:ssä
Sisällys
Mikä on Focus assist Windows 11:ssä?
Focus Assist on yksinkertaisesti Älä häiritse -tila tietokoneellesi – aivan kuten puhelimissasi. Se on kätevä ominaisuus Windows 11:ssä, jonka avulla voit päästä eroon tarpeettomista ilmoituksista, viesteistä ja hälytyksistä. Focus assist -ominaisuuden avulla voit mukauttaa prioriteettiluetteloasi sen sijaan, että estoisit tietokoneesi kaikilta ilmoituksilta.
Häiriö voi vahingoittaa tuottavuuttasi. Näin ollen Focus Assist -ominaisuuden avulla voit piilottaa kaikki ilmoitukset, hälytykset ja viestit, kun työskentelet tärkeän asian parissa. Varoituksen sijaan he menevät suoraan toimintakeskukseen. Voit tarkastella piilotettuja ilmoituksia toimintakeskuksessa omaan aikaan.
Kuinka Focus assist toimii Windows 11:ssä?
Focus Assist tarjoaa sinulle joustavuuden valita, milloin häiriötekijät, kuten viestit, ilmoitukset ja hälytykset, estetään. Voit ottaa Focus Assistin käyttöön milloin tahansa tai voit myös ajastaa Asetuksissa ajanjakson, joka ottaa tarkennusavustimen käyttöön automaattisesti.
Focus assist -ominaisuuden avulla voit luoda prioriteettiluettelon varmistaaksesi, ettet menetä ilmoituksia yhteystietosi tärkeimmiltä ihmisiltä. Prioriteettilistallasi olevat ihmiset voivat aina tavoittaa sinut, vaikka olisit tärkeässä työssä. Jos tarvitset täyttä keskittymistä työskennellessäsi, voit myös estää kaikki ilmoitukset. Jos haluat tarkastella kaikkia estettyjä ilmoituksia, jotka sait työssäsi, avaa järjestelmäsi toimintakeskus.
Aiheeseen liittyvä: Ponnahdusikkunoiden pysäyttäminen Windows 11:ssä
Focus-avustimen ottaminen käyttöön
Focus Assist on oletuksena pois päältä. Mutta jos haluat, että se lopettaa ilmoitusten vastaanottamisen, noudata alla olevia ohjeita.
Tapa 1: Asetusten käyttäminen
Klikkaa haku -kuvaketta, joka näyttää suurennuslasin tehtäväpalkissa.
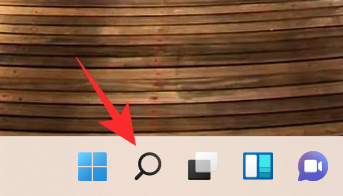
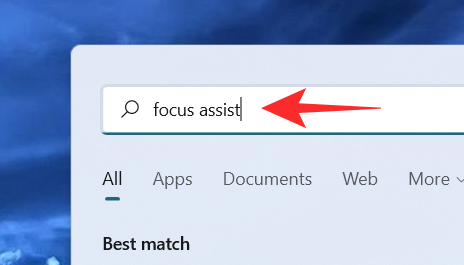
Kirjoita hakupalkkiin tarkennusapu .
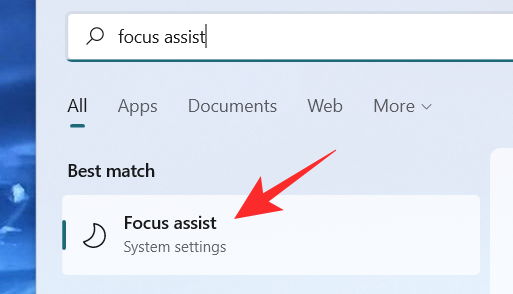
Napsauta Focus Assist -järjestelmän asetuksia.
Focus Assist -järjestelmän asetusikkuna tulee näyttöön. Alle Focus Assist , valitse yksi seuraavista vaihtoehdoista:
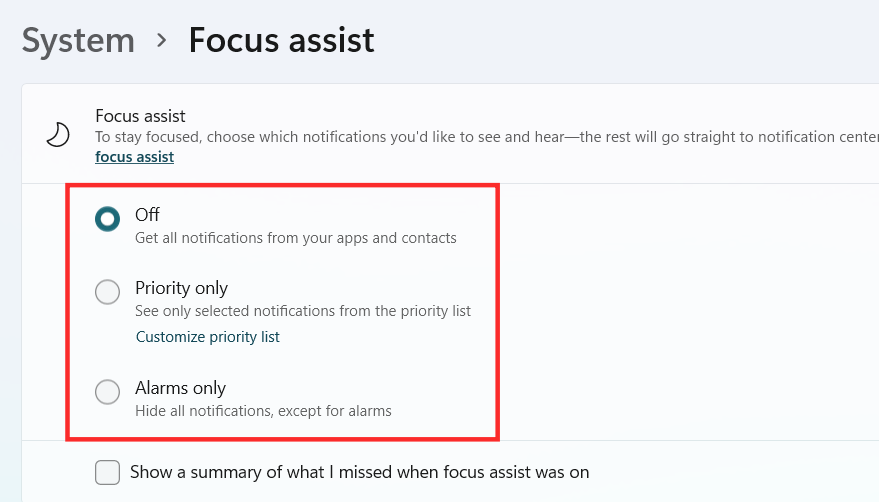
Focus Assist pitäisi nyt olla käytössä Windows 11:ssä tekemäsi valinnan mukaan.
Tapa 2: Toimintakeskuksen käyttö
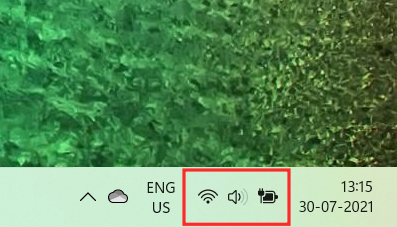
Napsauta Action Centeriä, joka näyttää Wi-Fi-, äänenvoimakkuuden ja akun kuvakkeen yhdessä.
Aivan Bluetooth-kuvakkeen alla näet Focus Assist -kuvakkeen, joka näyttää puolikuulta.
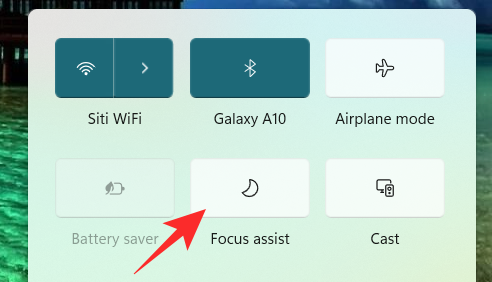
Oletuksena Focus Assist -ominaisuus on poistettu käytöstä. Napsauta sitä ja ominaisuus asetetaan suoraan arvoon Vain prioriteetti .
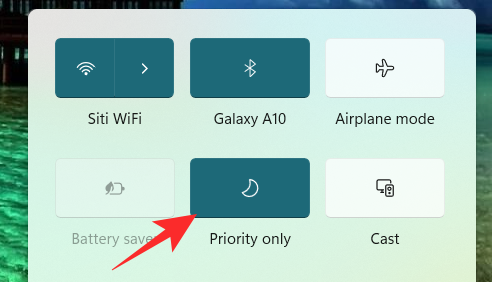
Napsauta sitä uudelleen asettaaksesi Focus Assist -ominaisuuden arvoon Vain hälytykset .
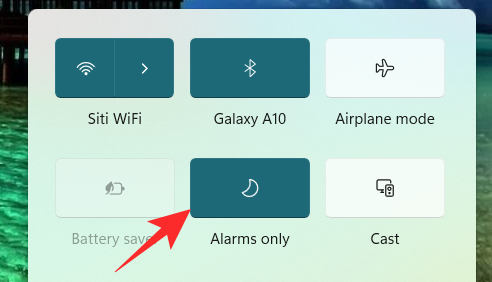
Voit poistaa Focus Assist -ominaisuuden käytöstä napsauttamalla sitä uudelleen.
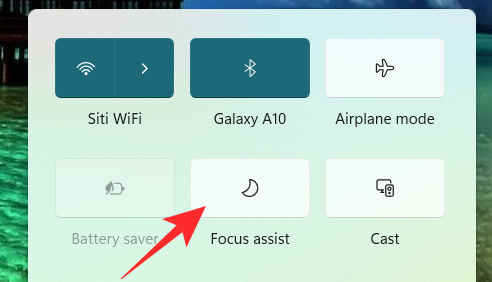
Napsauttamalla Focus Assist -kuvaketta Action Centerissä voit muuttaa sen toiminnon pois päältä, vain prioriteetiksi ja vain hälytyksiksi. Kuitenkin, jos haluat tehdä muita tarpeellisia muutoksia Focus Assist -asetuksiin Action Centeristä, napsauta hiiren kakkospainikkeella Focus Assist -kuvaketta toimintokeskuksessa ja napsauta Siirry asetuksiin .
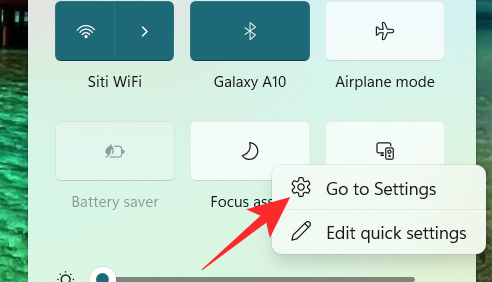
Tämä vie sinut Asetukset-sovellukseen, jossa voit helposti tehdä kaikki aiotut muutokset. Ja siinä se! Tarkennusapu pitäisi nyt ottaa käyttöön Windows 11:ssä suoraan toimintakeskuksesta.
Tapa 3: Ryhmäkäytäntöeditorin käyttäminen
Voit myös ottaa Focus assist -tilan käyttöön ryhmäkäytäntöeditorilla, jos olet järjestelmänvalvoja. Käytä alla olevaa ohjetta auttamaan sinua prosessissa.
Paina Windows + Rnäppäimistöäsi ja kirjoita Suorita-valintaikkunaan seuraava. Avaa ryhmäkäytäntöeditori painamalla näppäimistön enteriä.
gpedit.msc
Siirry seuraavaan alla mainittuun solmuun.
User configuration > Administrative Templates > Start Menu and Taskbar > Notifications
Etsi oikealla puolella oleva "Poista hiljaiset tunnit" -arvo ja kaksoisnapsauta sitä.
Valitse nyt jokin seuraavista vaihtoehdoista nykyisten tarpeidesi mukaan ominaisuusikkunan vasemmasta yläkulmasta.
Ja siinä se! Tarkennusapu otetaan nyt käyttöön tai poistetaan käytöstä ryhmäkäytäntöeditorissa mieltymystesi mukaan. Valitettavasti et voi mukauttaa Focus assist -käyttäytymistä järjestelmänvalvojana. Tämä kyky on edelleen käyttäjällä. Voit ottaa käyttöön tai poistaa käytöstä Focus Assist -toiminnon järjestelmässä vain ryhmäkäytäntöeditorin avulla.
Focus assist -toiminnon käyttäminen
Tarkennusavustimessa on erilaisia asetuksia ja mukautusvaihtoehtoja, joiden avulla voit muuttaa sen toimintaa nykyisten tarpeidesi mukaan. Käytä jotakin alla olevista oppaista, joka vastaa parhaiten nykyisiä vaatimuksiasi.
Tapa 1: Ota käyttöön Vain hälytykset -tila
Vain hälytykset -tilassa Focus Assist -ikkunassa voit piilottaa kaikki ilmoitukset hälytystä lukuun ottamatta. Ota Vain hälytykset -tila käyttöön noudattamalla alla mainittuja ohjeita.
Klikkaa haku -kuvaketta.

Tyyppi Tarkennusapu

Napsauta Focus Assist -painiketta .

Napsauta Focus Assist -kohdassa Vain hälytykset lopettaaksesi ilmoitusten vastaanottamisen hälytyksiä lukuun ottamatta.
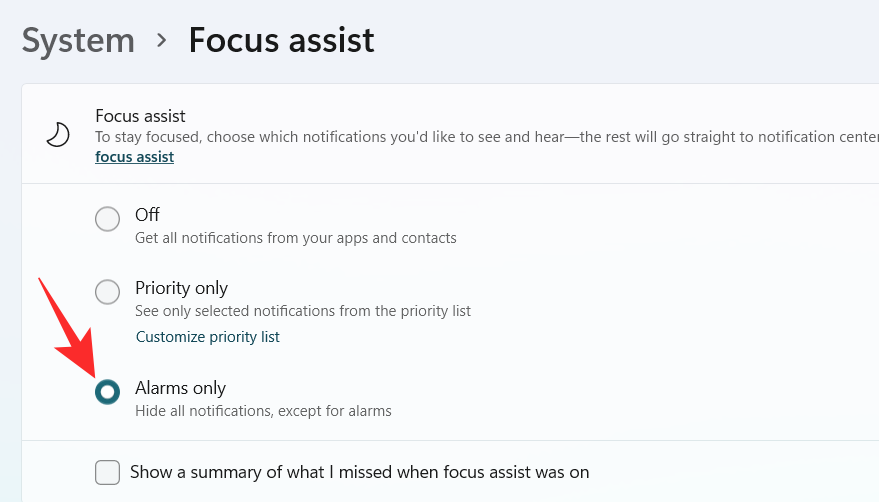
Ja siinä se! Saat nyt tiedon vain järjestelmäsi hälytyksistä. Kaikki muut ilmoitukset niiden tärkeydestä riippumatta hiljennetään Windows 11:ssä.
Tapa 2: Ota Priority käyttöön vain mukautetulla luettelolla
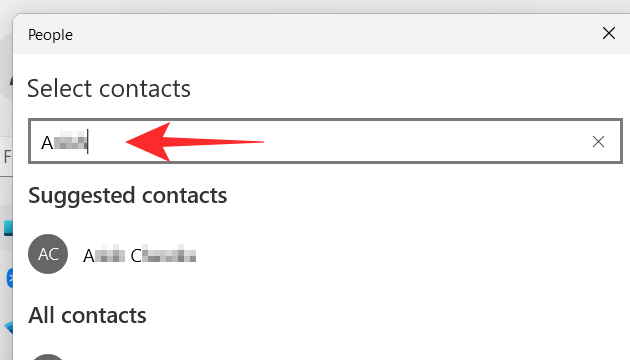
Ihmiset ikkuna ilmestyy ruudulle. Valitse haluamasi ihmiset kirjoittamalla heidän nimensä hakupalkkiin.
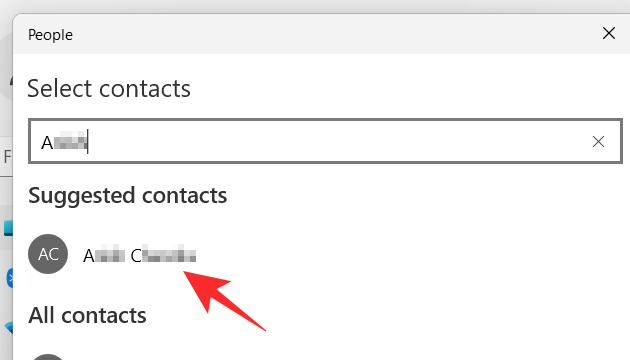
Napsauta henkilön nimeä.
Klikkaa rasti painiketta oikeassa alakulmassa on People ikkunan.
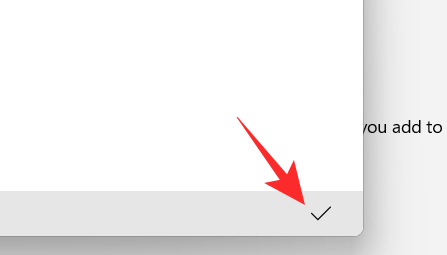
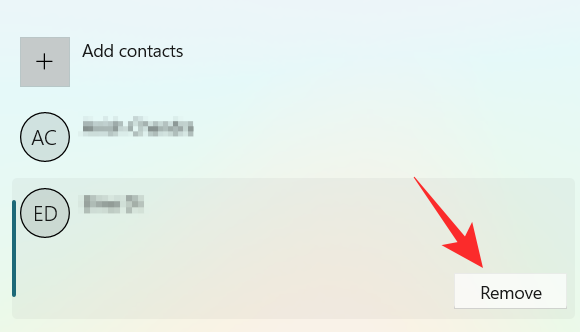
Prioriteettiluettelosi on luotu. Jos haluat nyt poistaa yhteystiedon prioriteettiluettelostasi, napsauta yhteystietoa Henkilöt- kohdassa .

Napsauta Poista .
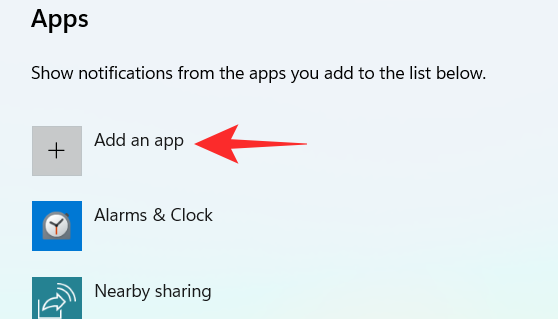
Nyt voit valita Sovellukset- osiossa sovellukset, jotka voivat murtautua hiljaisten tuntien yli. Jos haluat sallia sovellusten näyttää ilmoituksia, napsauta Lisää sovellus -painiketta.
Näytölle tulee luettelo sovelluksista. Napsauta sovellusta, jonka haluat lisätä prioriteettiluetteloosi.
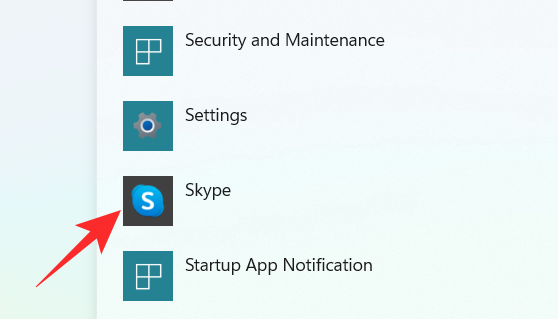
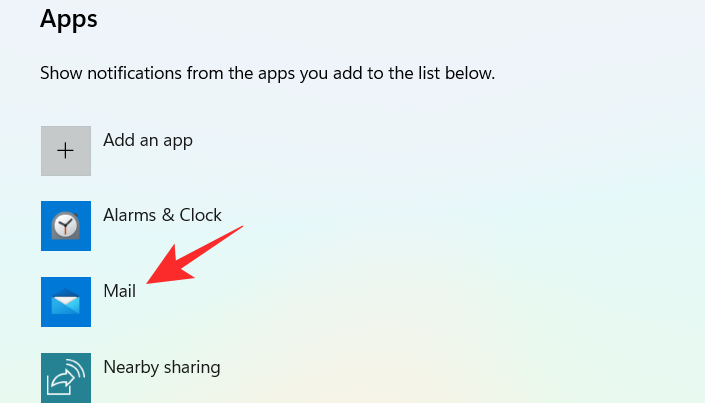
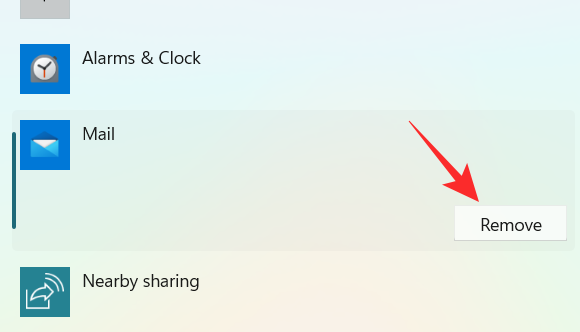
Jatka tätä prosessia, kunnes olet valinnut sovellukset. Jos haluat poistaa sovelluksen prioriteettiluettelostasi, voit napsauttaa sovellusta Sovellus- osiossa.
Napsauta Poista .
Ja näin voit mukauttaa Focus assistin prioriteettiluetteloa ja käyttää sitä eduksesi vastaanottaaksesi ilmoituksia vain tärkeiltä yhteyshenkilöiltä.
Tapa 3: Ota ilmoitusten yhteenveto käyttöön, kun Focus Assi on poistettu käytöstä
Klikkaa haku -kuvaketta.

Tyyppi Tarkennusapu

Napsauta Focus Assist -painiketta .

Napsauta haluamaasi vaihtoehtoa Vain prioriteetti tai Vain hälytykset .
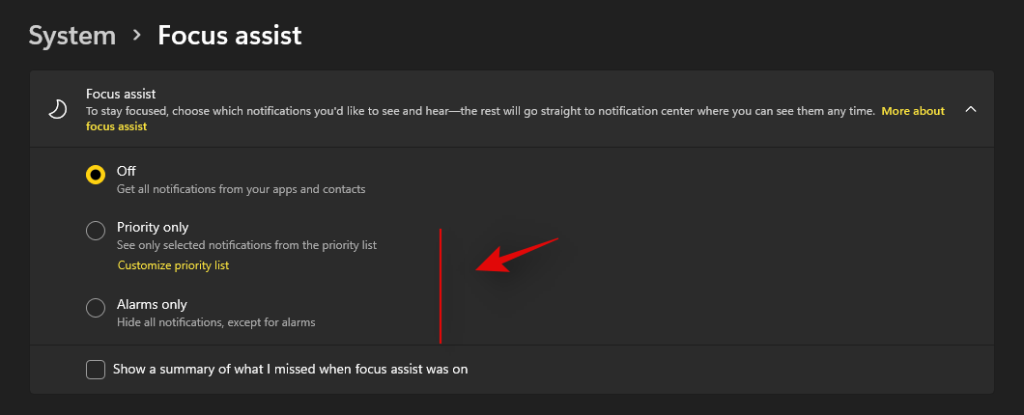
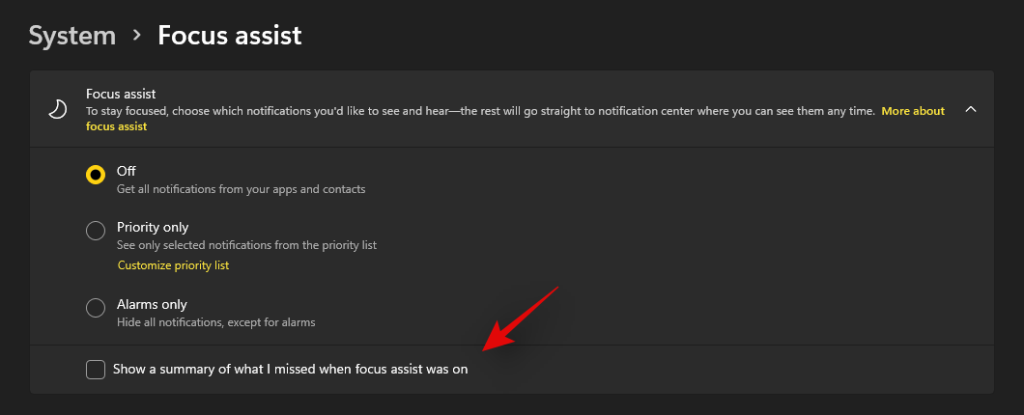
Valitse ruutu Näytä yhteenveto siitä, mitä missasin, kun Focus assist oli päällä .
Tapa 4: Ota automaattiset tarkennusapusäännöt käyttöön tai poista ne käytöstä
The Automatic rules in Focus assist allow you to determine the conditions that can activate the Focus assist automatically. There are four different automatic rules in the Focus Assist settings window that can be customized. Check out the steps mentioned below to customize automatic rules in Focus assist.
Click on the Search icon on the taskbar.

Type Focus assist

Click on Focus Assist.

Under the Automatic rules section, there are four sections. Turn on the toggle switch for the option you want to choose.
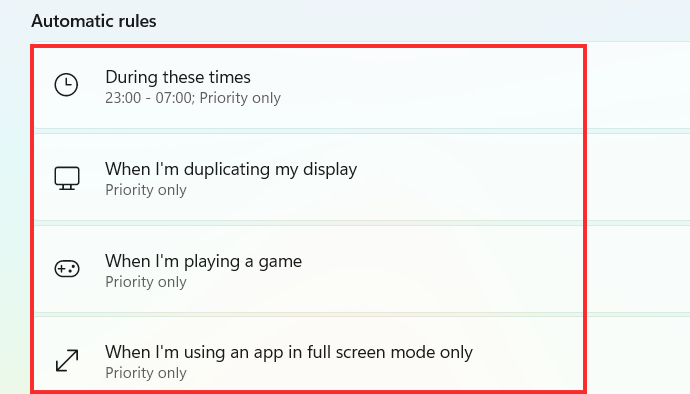
Now, let’s have a look at how to customize the above-mentioned options under Automatic rules.
1. During these times
Turn on the toggle switch, which is extreme right to the During these times tab.
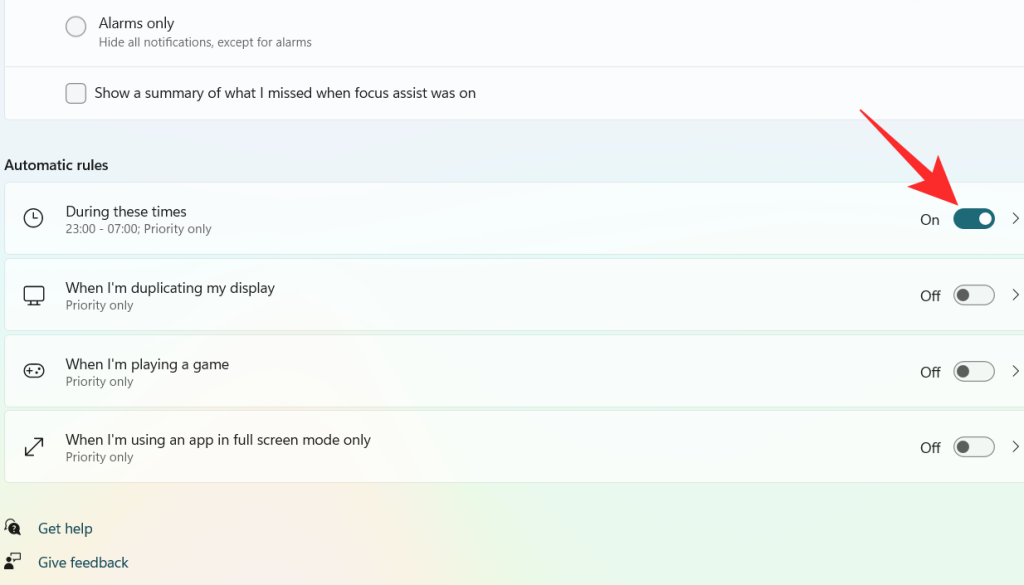
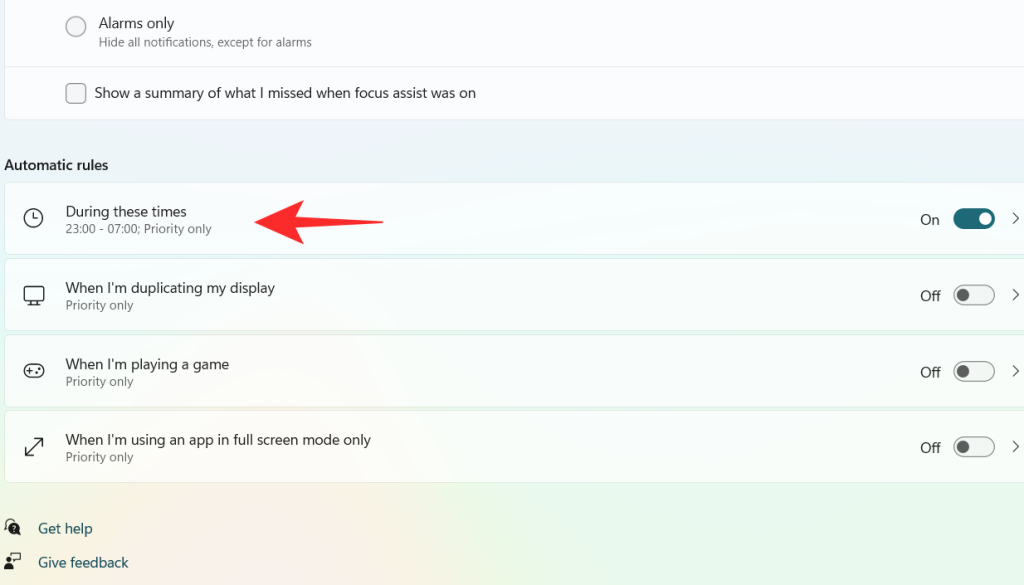
Click on the During these times tab.
Click on the box under Start time.
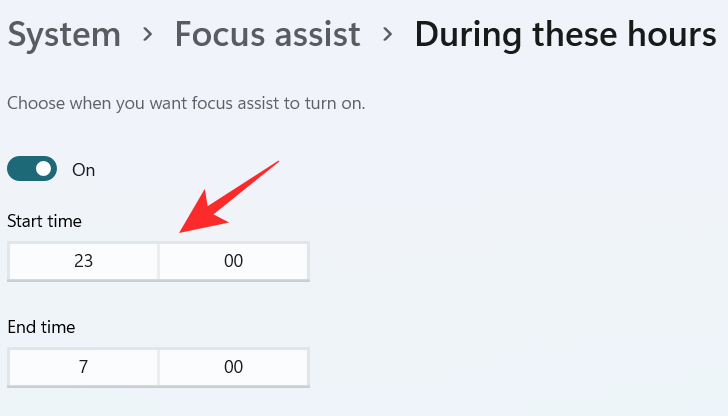
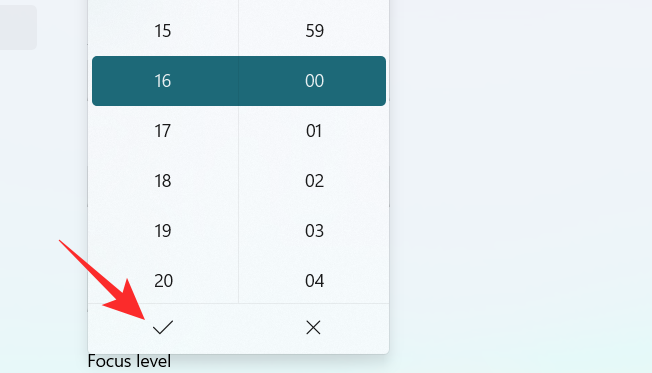
Select the time when you want the Focus Assist to turn on and click on the tick on the bottom of the dropdown menu.
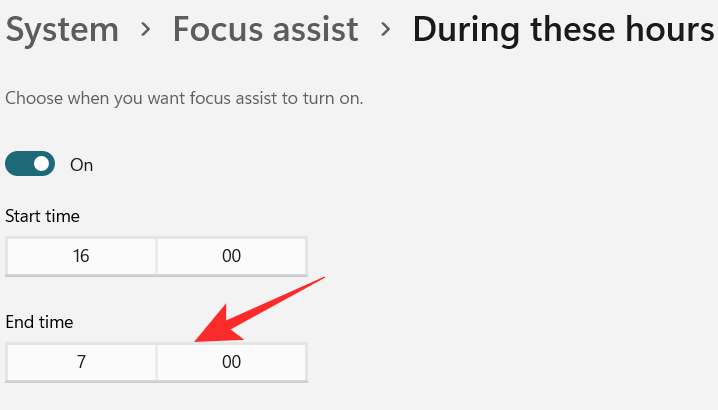
Click on the box under End time.
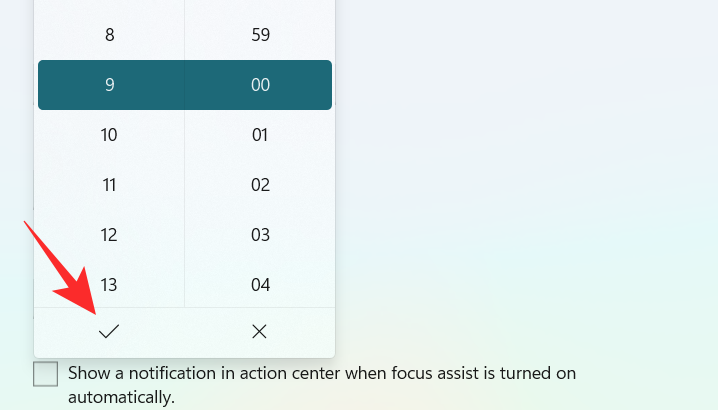
Select the time when you want the Focus Assist to turn off and click on the tick on the bottom of the dropdown menu.
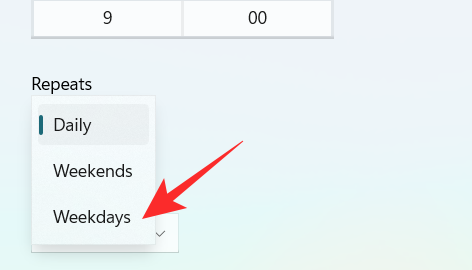
Click on the box under Repeats.
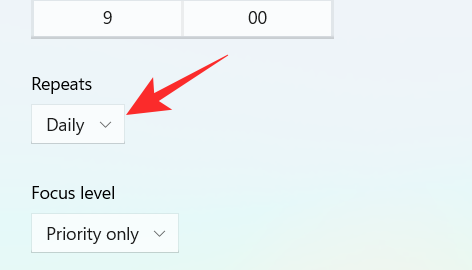
A small dropdown menu appears. Set the schedule to Daily, Weekends, or Weekdays.
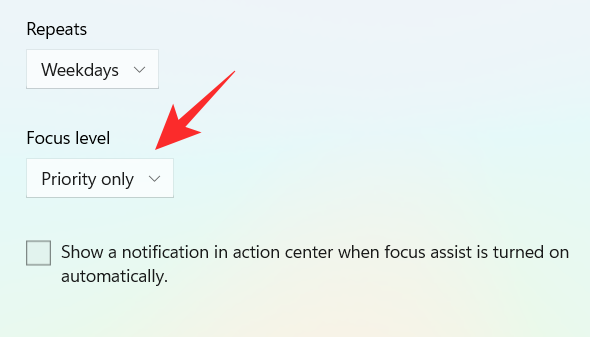
Click on the box under Focus level.
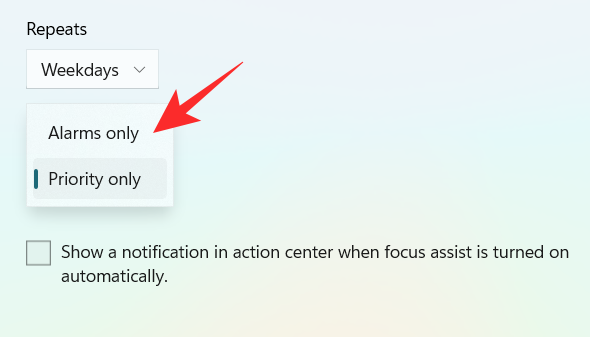
A small dropdown menu appears. Choose between Alarm only or Priority only.
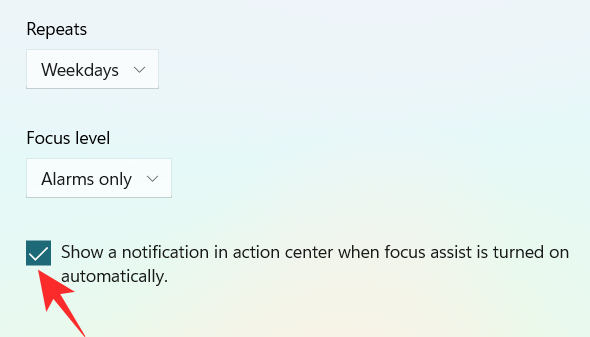
Finally, to get a notification when the Focus assist is turned on, check the box “Show a notification in action center when Focus assist is turned on automatically“.
2. When I’m duplicating my display
Turn on the toggle switch, which is extreme right to the When I’m duplicating my display tab.
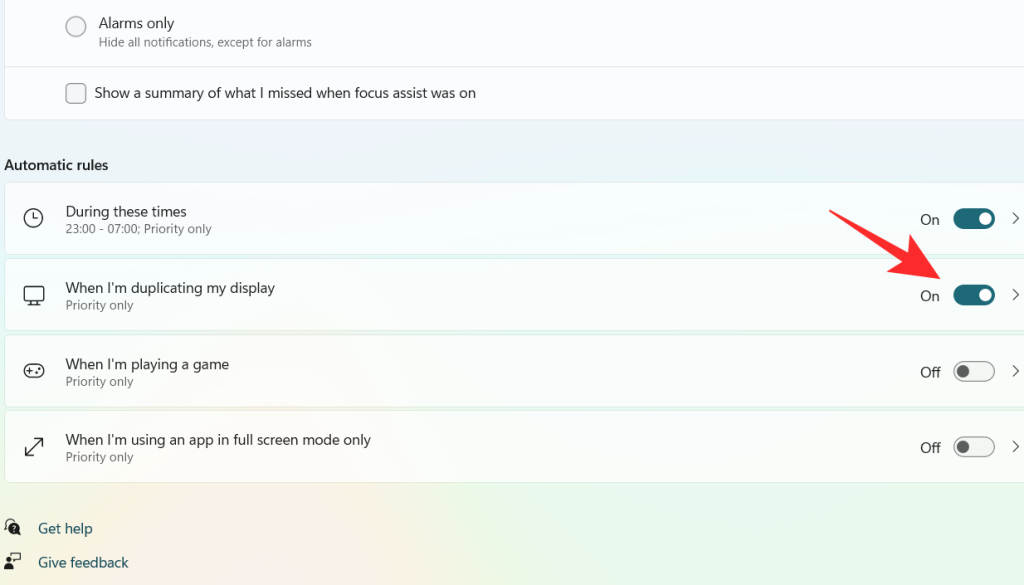
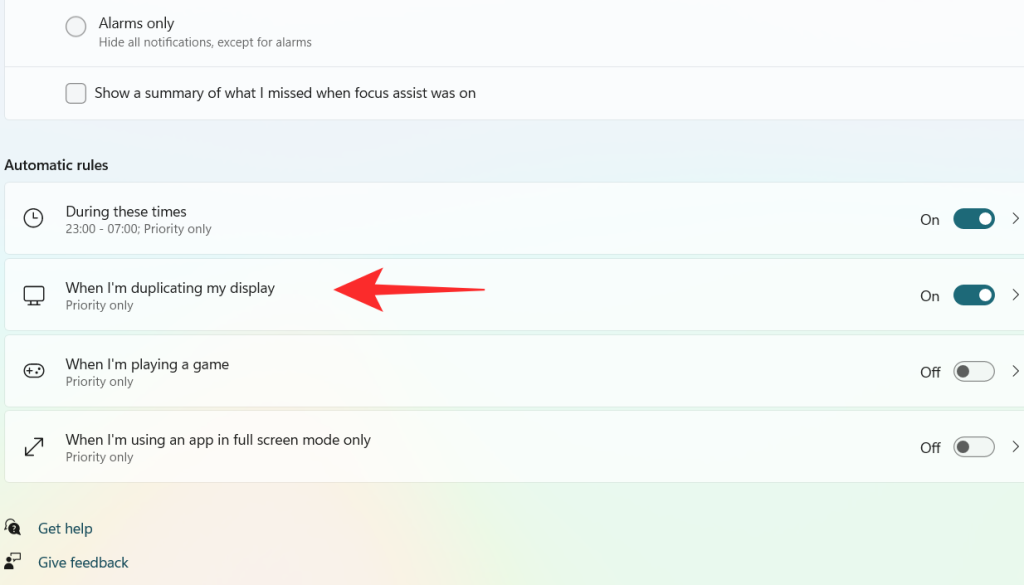
Click on the When I’m duplicating my display tab.
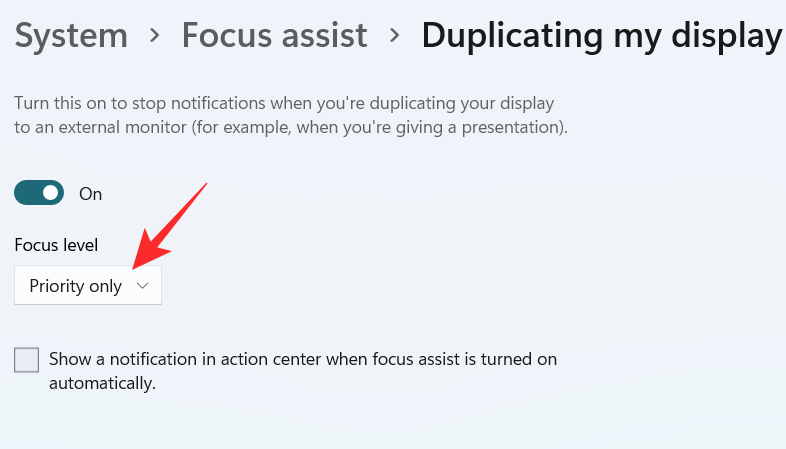
Click on the box under Focus level.
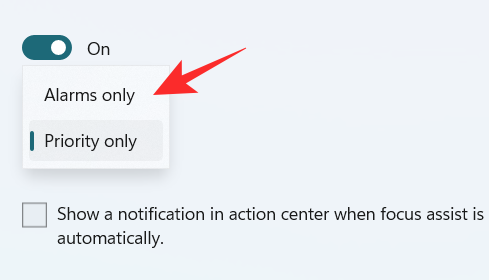
A dropdown menu appears, click on your desired option between Priority only and Alarms only.
To get a notification when the Focus assist is turned on, check the box “Show a notification in action center when Focus assist is turned on automatically“
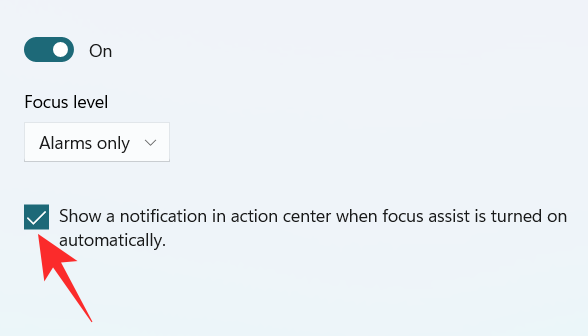
3. When I’m playing a game
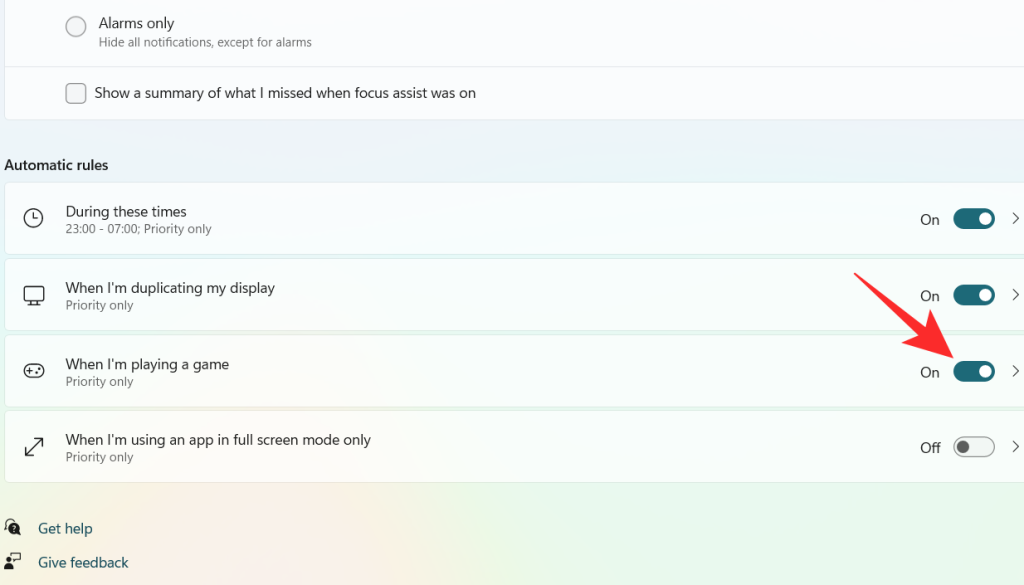
Turn on the toggle switch, which is extreme right to the When I’m playing a game tab.
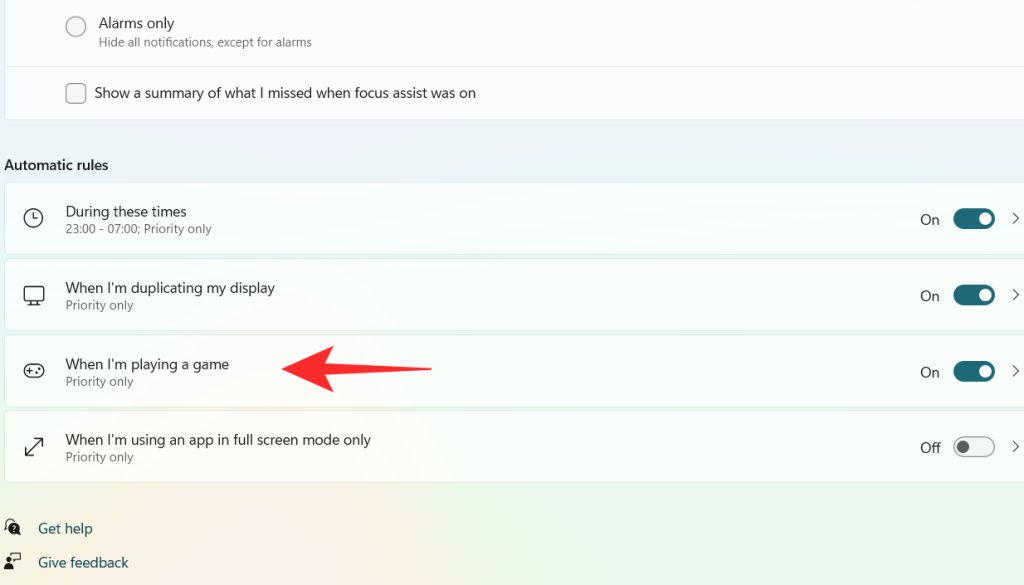
Click on the When I’m playing a game tab
Click on the box under Focus Level.
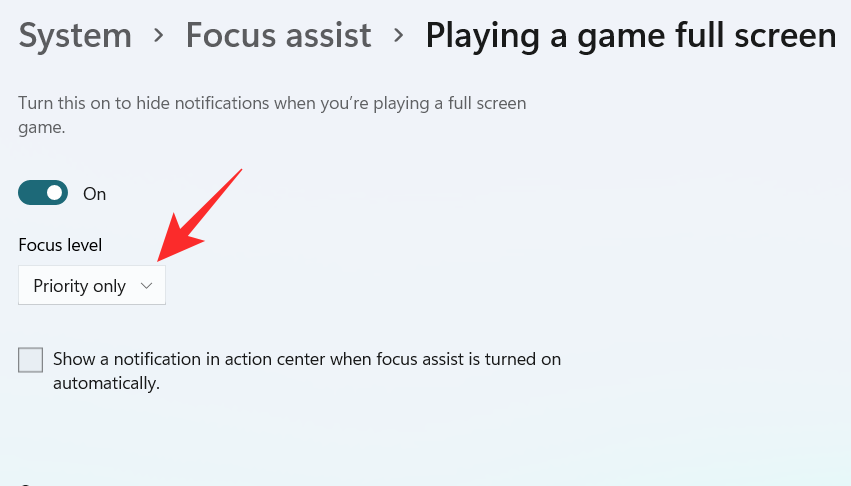
A dropdown menu appears, click on your desired option between Priority only and Alarms only.

To get a notification when the Focus assist is turned on, check the box “Show a notification in action center when Focus assist is turned on automatically“

4. When I’m using an app in full-screen mode only
Turn on the toggle switch, which is extreme right to the When I’m using an app in full-screen mode only tab.
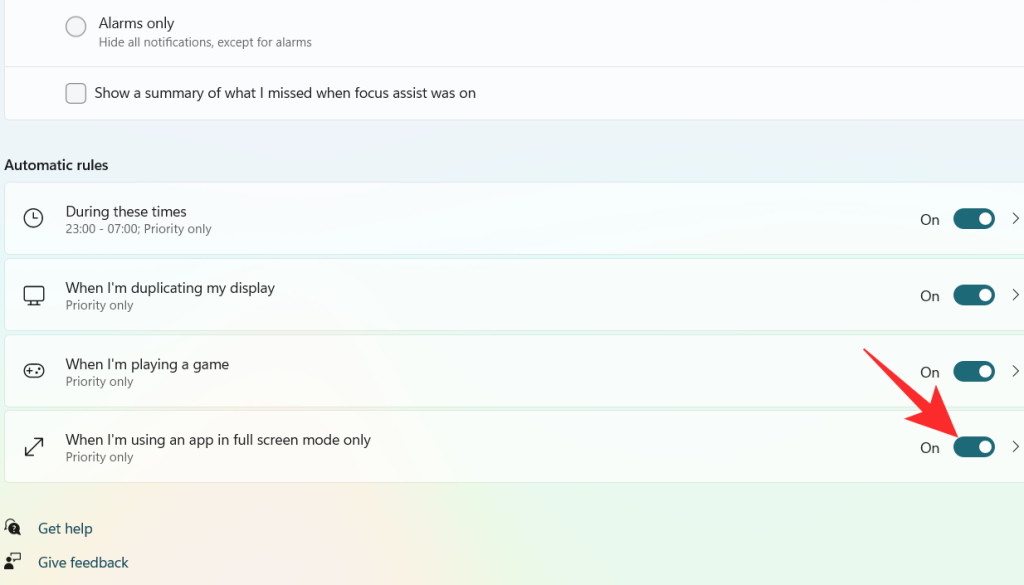
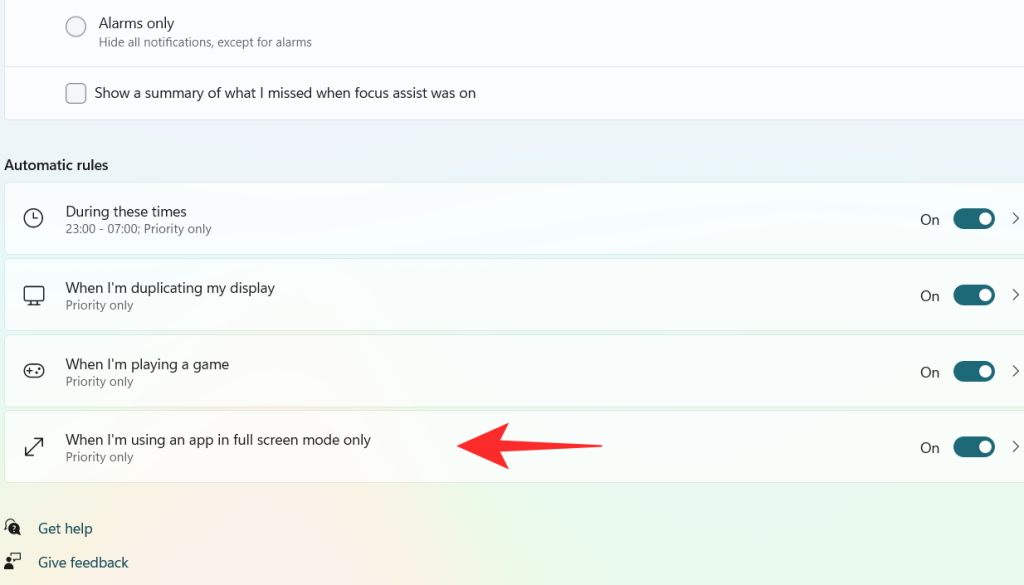
Click on the When I’m using an app in full-screen mode only tab
Click on the box under Focus Level.
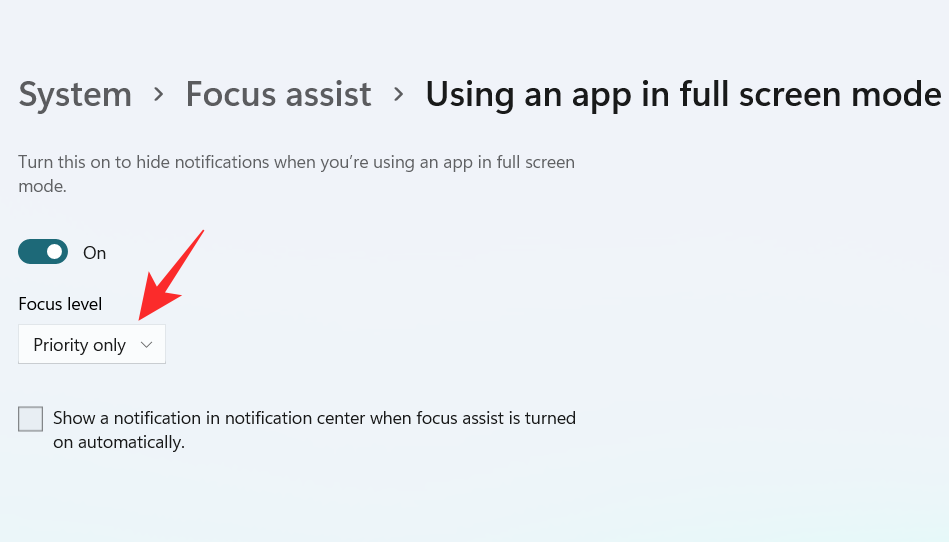
A dropdown menu appears, click on your desired option between Priority only and Alarms only.

To get a notification when the Focus assist is turned on, check the box “Show a notification in action center when Focus assist is turned on automatically“.

Using the above customizations, you can schedule and control Focus assist’s behavior according to your workflow for maximum efficiency no matter the task at hand.
Can you remove the Focus Assist icon from the Action Center?
Yes, you can easily remove the Focus Assist icon from the Action Center. Windows 11 brings a host of new cosmetic and UI changes and one of them has been the ability to customize your action center. You can now add or remove icons from the action center depending on your needs and opt for a more minimal or productive look depending on your workflow.
For now, you can only add and remove certain system modules but in the future, some users expect Microsoft to add the support for third-party apps as well. This would be a much welcome change that would allow you to manage dedicated system settings managed by third-party apps directly from your action center.
Customize your Focus assist icon in the action center
Depending on your current needs you can either remove or add the Focus assist module to the action center. Use one of the guides below depending on your current requirements.
1. Remove it
Click on the Action Center which shows the icon of Wifi, volume, and battery together.

Right-click on an empty place or on any icon and click on Edit quick settings.
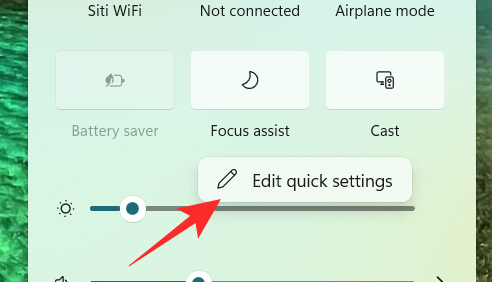
Click on the unpin symbol at the top right corner of the Focus Assist icon to remove the Focus Assist icon from the Action Center.
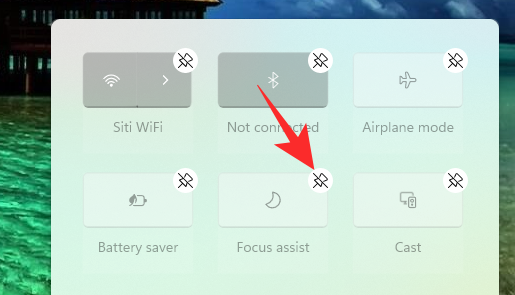
The Focus assist module should now have been removed from your action center. If not, we recommend you restart explorer.exe or your PC for the changes to take effect.
2. Restore it
Click on the Action Center which shows the icon of Wifi, volume, and battery together.

Right-click on an empty place or on any icon and click on Edit quick settings.
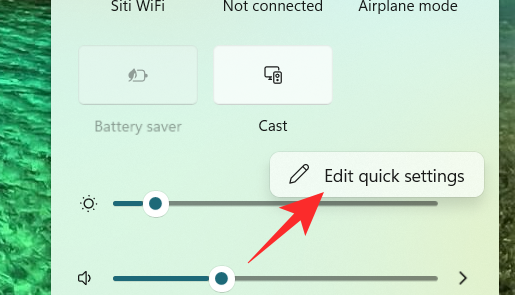
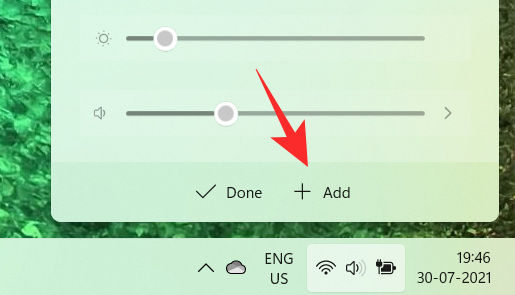
Now, click on the Add button at the bottom of the action center.
A list of different settings appears. Click on Focus Assist from the list and you will get to see the Focus Assist icon on the Action Center again.
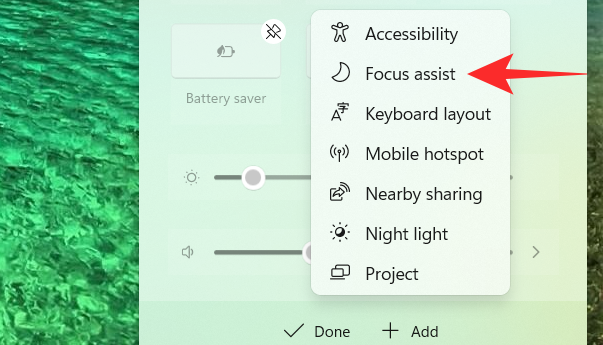
And that’s how you can add the Focus assist module back in the action center.
Focus assist keeps turning on automatically Issue: How to fix
If Focus assist keeps turning on automatically then there could be a couple of reasons for this behavior. Depending on its cause we can either fix it or use a workaround to manage the issue. Let’s find out why Focus assist keeps turning on automatically on your system.
Fix #1: Check Automatic Rules
Are you having this issue when projecting to a secondary display? Or when sharing your screen with a public computer? Then it is likely that focus assist is getting turned on automatically due to the default automatic rules in Windows 11.
By default, focus assist will silence all notifications in such scenarios to help maintain your privacy. But this can be counterproductive in case you are just trying to use a bigger display from a portable system like a laptop or an NUC.
It could also be that scheduled Focus assist was turned on your system by mistake which will enable and disable Focus assist automatically during certain hours. If any of these situations sounds like what you are facing then you can use the guide below to disable all automatic rules that enable Focus assist during certain scenarios and workflows on Windows 11. Let’s get started.
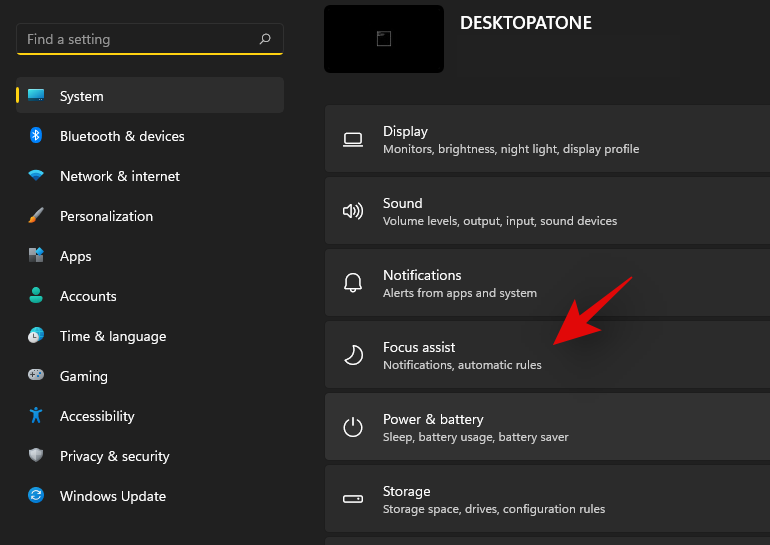
Press Windows + i on your keyboard to open the Settings app. Ensure ‘System’ is selected on your left and then click on ‘Focus Assist’ on your right.
Go down to automatic rules and turn off the following toggles.
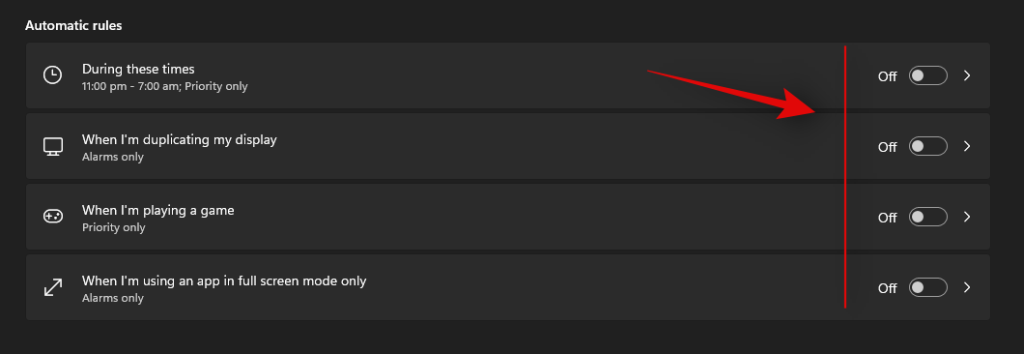
Once these rules are disabled, Windows 11 will not turn on Focus assist automatically on your system.
Fix #2: Turn of GeForce Overlay
This is another way to solve Focus assist misbehaving on your system. If you have a dGPU from Nvidia and are using the GeForce experience app then we recommend disabling its overlay option and restarting your system. With the automatic rule for ‘When I’m using an app in full-screen mode only’ turned on, Windows will mistake the Nvidia overlay detection on your desktop for a full-screen app which will trigger the Focus assist settings in return. You can also disable this automatic rule in case you wish to keep the Geforce Experience overlay enabled on your system.
Focus assist greyed out, option missing or not working; How to fix
Is the focus assist option missing from Windows 11 settings app? Is the module greyed out in the action center? This is a known bug that shows up occasionally with every feature update of Windows. Even certain versions of Windows 10 faced huge issues with this bug until a fix was released.
Fix #1: Enable in Group Policy Editor
If Focus assist seems to be missing from your system then it is likely disabled using the group policy editor. If your PC is managed by your organization or your workplace then it is likely disabled by your administrator. If you have access to the group policy editor then you can use the guide below to enable focus assist on your system. However, in case you have limited access, then you might need to get in touch with your administrator to enable Focus assist on your system.
Press Windows + R on your keyboard to bring up the Run dialog box and type in the following command to launch the Group Policy Editor. Click on ‘Ok’ once you are done.
gpedit.msc
Navigate to the following node.
User configuration > Administrative Templates > Start Menu and Taskbar > Notifications
Double click on ‘Turn off Quiet Hours’ on your right.
Click and select ‘Disabled’ in the top left corner.
Click on ‘Ok’ to save your changes.
And that’s it! Focus assist should now be enabled on your system in case it was disabled using the group policy editor.
Fix #2: Reinstall and repair default Windows UWP apps and system apps
If Focus assist is still missing from your system then let’s check if all the necessary apps and utilities are installed properly on your system. Use the guide below to check and repair Windows 11’s basic apps and functionality on your system.
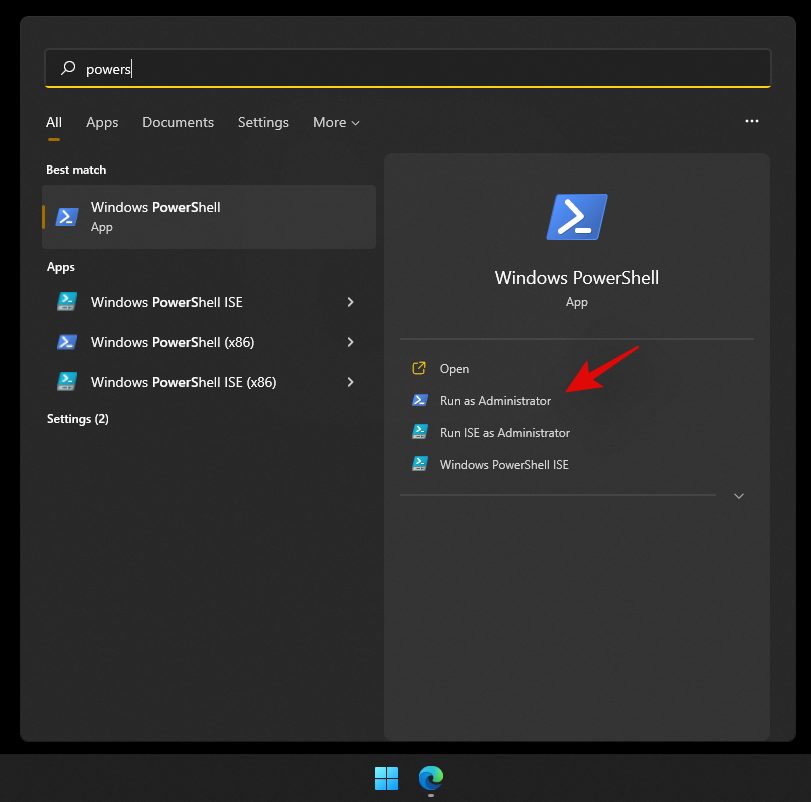
Press Windows + S and search for PowerShell. Click on ‘Run as administrator’ once it shows up in your search results.
Once PowerShell is launched, execute the following command to reinstall all UWP apps and check and repair other default utilities required by Windows 11 in the background.
Get-AppXPackage -AllUsers | Foreach {Add-AppxPackage -DisableDevelopmentMode -Register "$ ($ _. InstallLocation) \ AppXManifest.xml"}

Wait for the process to finish and restart your PC for good measure. If Focus assist was corrupted or missing from your system, then this fix should help solve all your issues.
Fix #3: Check for a Windows Update
Haven’t updated in a while? We recommend checking for recent Windows Updates. While updates rarely disable major features like Focus assist, a new feature update installation can help refresh your registry, fix mismatched values and more importantly iron out bugs that could be preventing you from accessing Focus assist on your system. Use the guide below to check for recent Windows updates on your system.
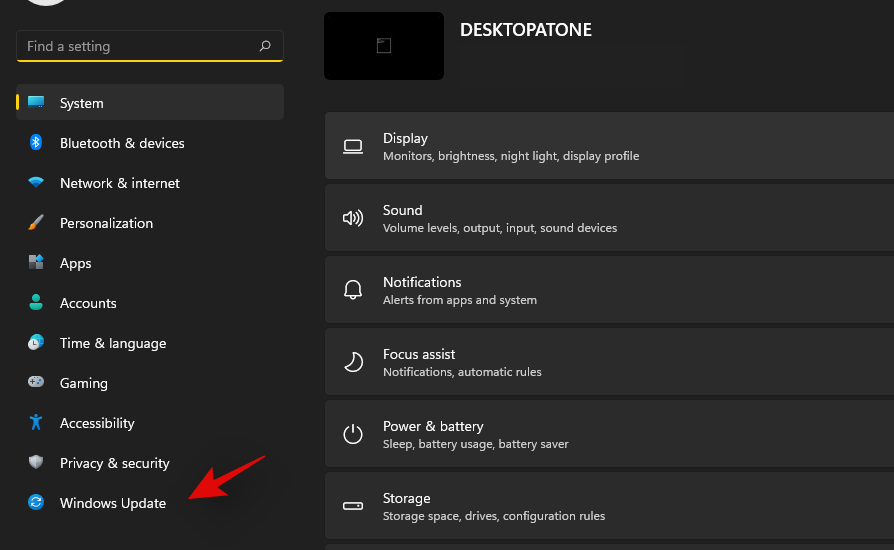
Press Windows + i on your keyboard to open the Settings app and click on ‘Windows Update’ on your left.
Click on ‘Check for updates’.

In case any new updates show up, let them install on your system and restart if prompted. In case you are using a metered connection then you will need to click on ‘Download now’ manually to avoid any unexpected data charges.
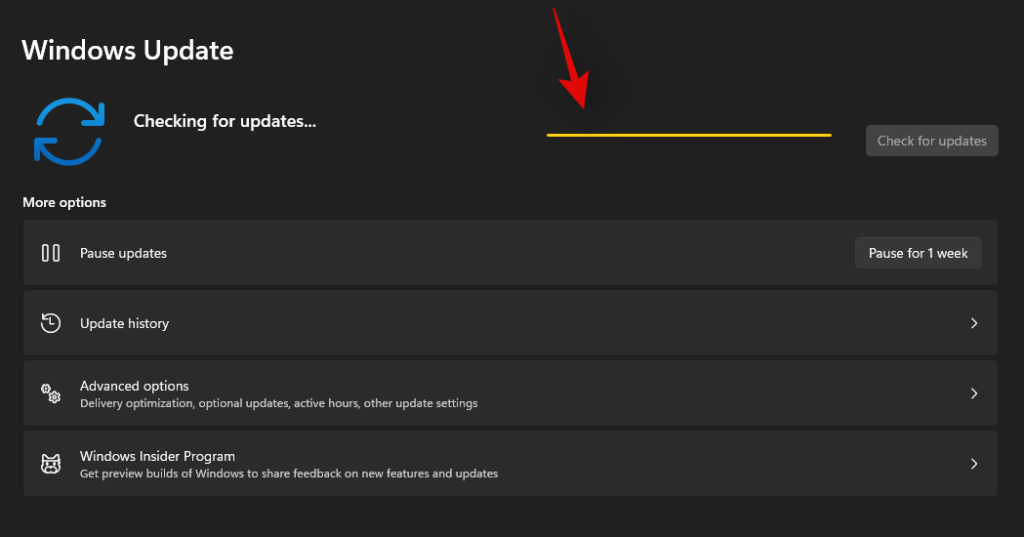
Once the necessary Windows updates are installed on your system, Focus assist should be restored in your action center and the Settings app.
Last Resort: Reset your PC
If Focus assist is still missing from your PC then this indicates a corrupted Windows installation on your system. The best way to fix this without wasting much time on troubleshooting would be to simply reset your PC while keeping all your files intact. This will refresh the entire Windows 11 installation and reinstall all the apps which should help restore functionality for all Windows features including Focus assist. Follow the guide below to reset your PC while keeping your files.
Note: The reset process will remove all installed applications and only retain files stored manually on your local storage. A list of all the removed apps will be available in .txt format on your desktop once your PC has been reset.
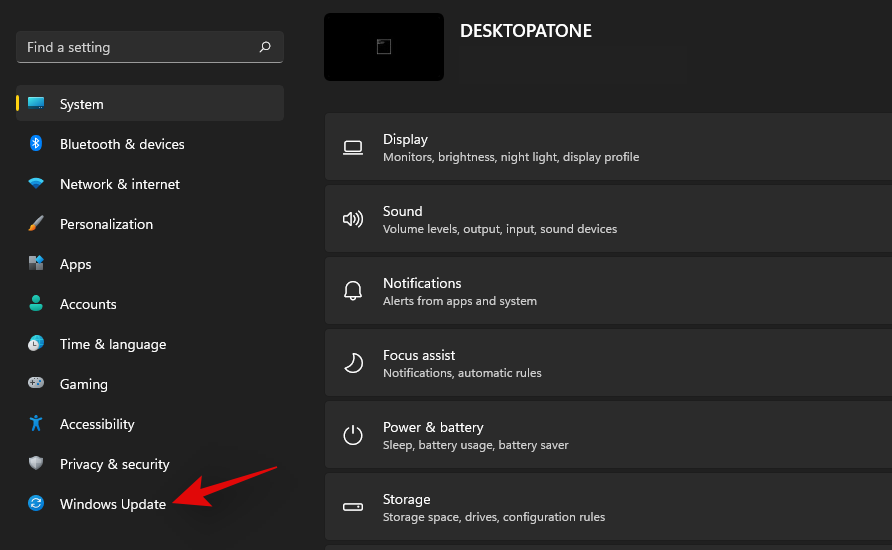
Press Windows + i on your keyboard and click on ‘Windows Update’ on your left.
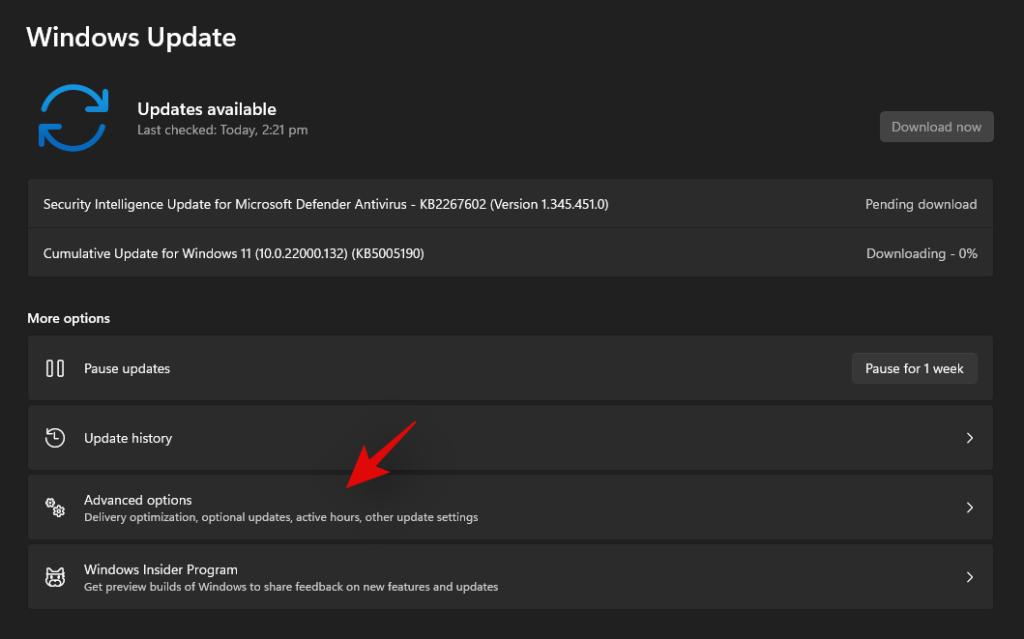
Click on ‘Advanced options’.
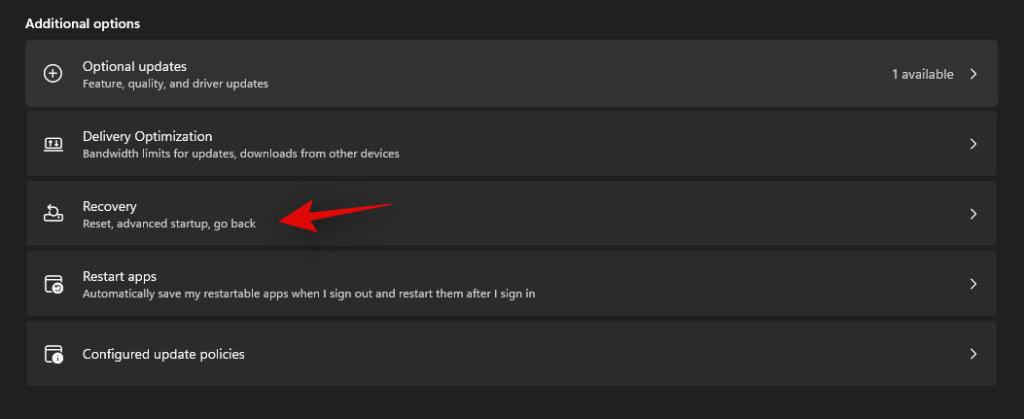
Click and select ‘Recovery’.
Click on ‘Reset PC’ beside Reset this PC.

Click on ‘Keep my files’.
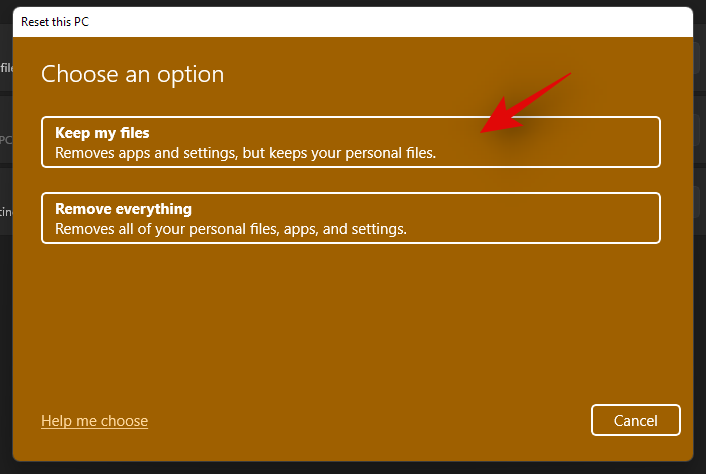
Windows will now process all the files on your local storage. Click on ‘Reset’.
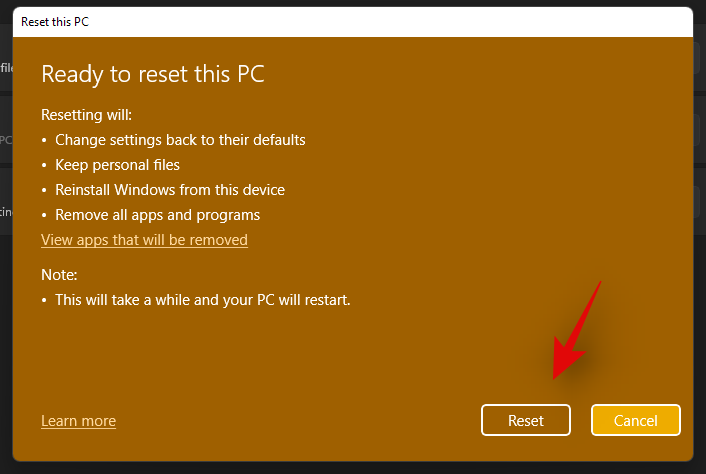
Note: If you are using Windows 11 Pro or higher then you will get the option to use a local installation/recovery media to reinstall Windows 11 as well. However, this option will be missing for Windows 11 Home users.
Windows will now reset your PC while retaining all your files. Your PC will restart several times during this process. This is completely normal and you should let Windows do its thing. If you are using a laptop or a portable NUC, then ensure that your unit is plugged into the power at all times during this process.
How to turn off Focus assist permanently
Do you wish to turn off Focus assist permanently in all scenarios? Then you can use the guide below to do so. The best way to disable Focus assist is by using the group policy editor. But in case you are using Windows 11 Home Edition, then you can use the first method in this guide to disable Focus assist permanently.
Method #1: Disable all settings and rules
Once you disable all the settings and rules for Focus assist, the feature should be turned off automatically on your system. Use the guide below to get you started.
Press Windows + i on your keyboard to open the Settings app and click on ‘Focus assist’ on your right.

Click and select ‘Off’ at the top.
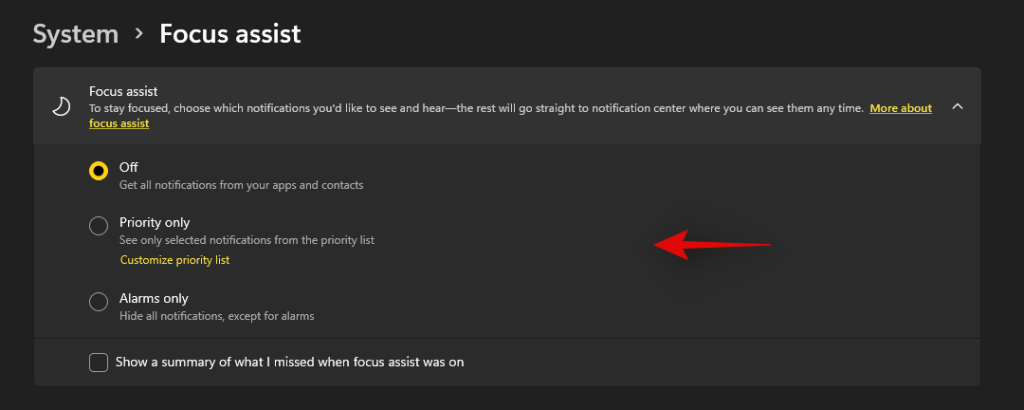
Uncheck the box for ‘Show a summary of what I missed when focus assist was on’.

Subsequently, disable all the toggles under ‘Automatic rules’ as shown below.

We also recommend turning off notifications for unnecessary apps using the guide after this section to avoid unnecessary notifications from interrupting you when focus assist is disabled.
Method #2: Using Group Policy Editor
The group policy editor will permanently disable focus assist on your system and even prevent you from accessing it in your settings. However, this method will only work on Windows 11 Pro or higher versions. In case you have the Windows 11 home edition, you can use the guide above to disable Focus assist instead.
Press Windows + R and type in the following to open Froup Policy EDitor. Click on ‘Ok’ once done.
gpedit.msc
Navigate to the following node.
User configuration > Administrative Templates > Start Menu and Taskbar > Notifications
Find and double-click on ‘Turn on Quiet Hours’ on your right.
Select ‘Enabled’ in the top left and click on ‘Ok’.
Focus assist will now be permanently disabled on the selected system. We recommend you restart your system or explorer.exe in case the changes do not take place immediately.
Is there any other way to disable notifications?
Yes, you can disable notifications individually on a per-app basis in Windows 11 to customize the notifications you receive. This is another way to ensure that you are only notified about the apps and notifications that you intended. Customizing your notifications this way will also allow you to retain the full functionality of the focus assist mode without having to disable certain rules to avoid mismatched scenarios in your workflow.
However, the only downside to managing your notifications this way is that you have to keep enabling and disabling notifications for apps every few months depending on your new installs and uninstalls. You can use the guide below to disable notifications on a per-app basis in Windows 11.
Disable notifications permanently on a per-app basis
Here’s how you can disable notifications on a per-app basis in Windows 11.
Press Windows + i on your keyboard to open the Settings app and then click on ‘Notifications’ on your right.
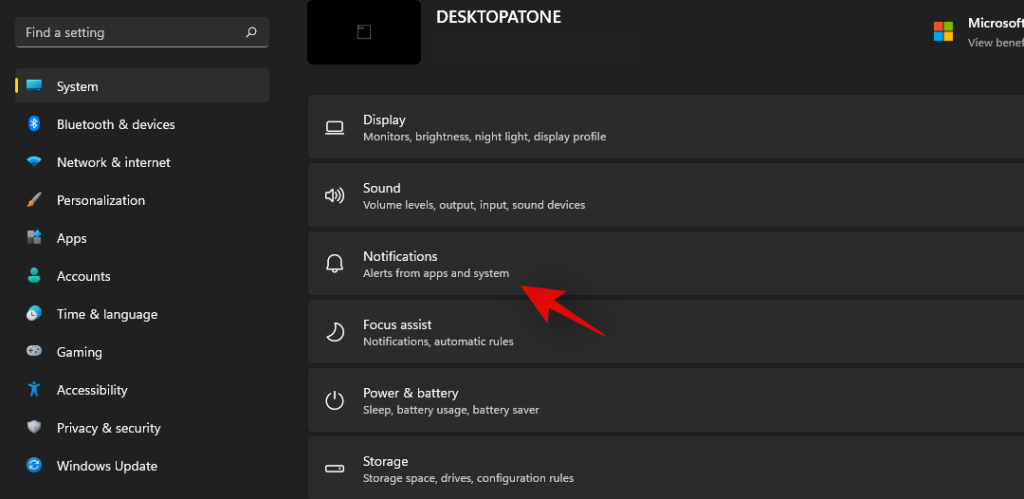
You will now get a list of all the apps that have the permission to deliver notifications on your system. Scroll the list to find the necessary apps and turn off the toggle beside them to disable notifications.
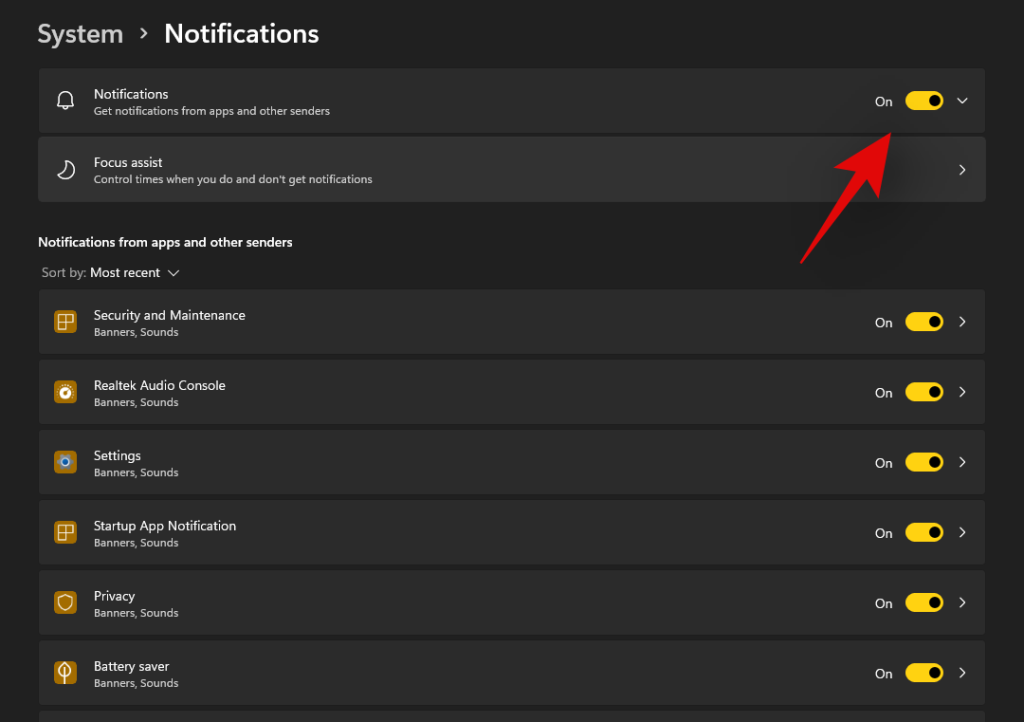
Repeat the steps above for all the intended apps to disable notifications.
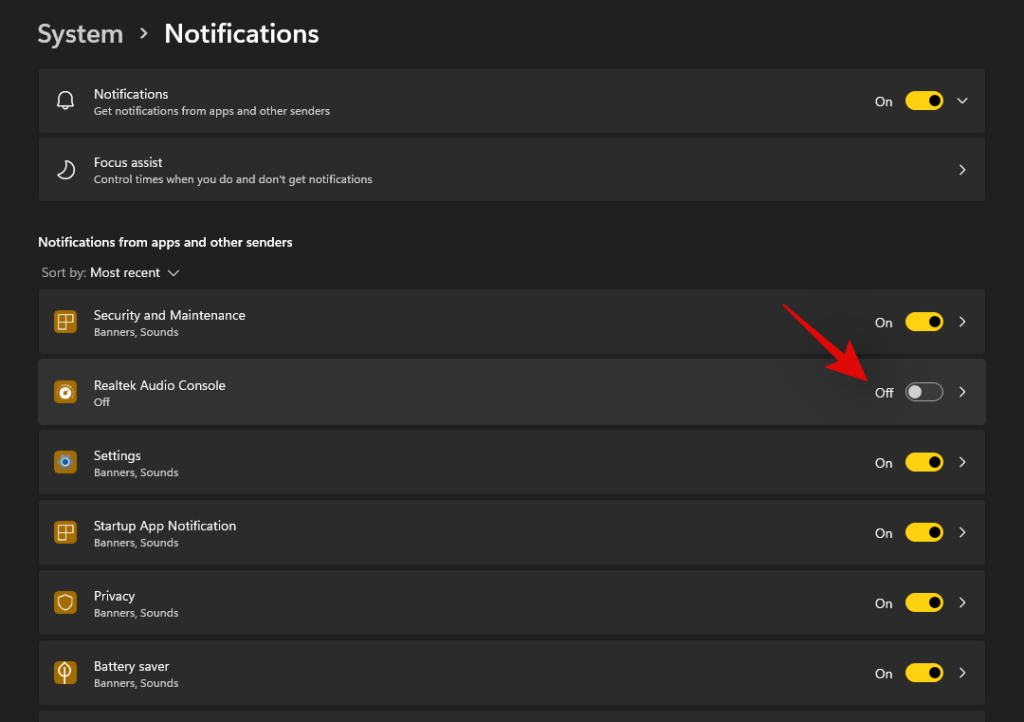
Close the Settings app and notifications for the selected apps should now be permanently disabled on your system.
Can you customize notifications in Windows 11?
Well, not exactly. Windows 11 currently has very limited options when it comes to customizing your notifications. You can not change the look, behavior, or color palette of your notifications without changing the accent color of your overall UI. However, you can customize the way your notifications sound. You can set a nice quiet notification sound that does not interrupt your workflow or opt for a quirky take that makes for a few good laughs each time you get a notification. The choice is completely up to you. Use the guide below to customize your Windows 11 notification sounds.
Required
Guide
Let’s start by first placing the .wav file in a compatible media folder so that you can set it as your default notification sound in Windows 11. Navigate to the concerned .wav file and copy it to your clipboard.
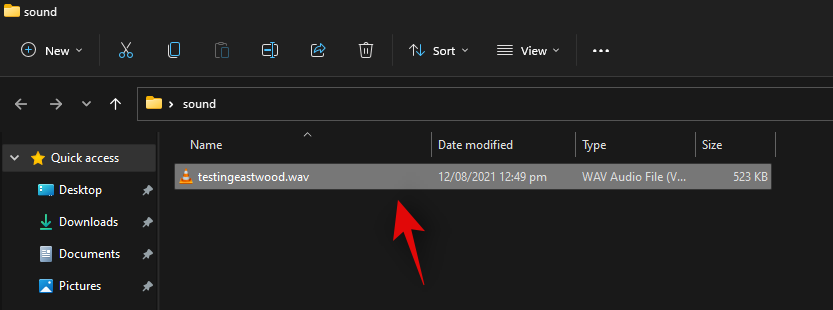
Now navigate to the following path given below. Paste your .wav file in this location. Click on ‘Continue’ when you will be prompted for administrator permission.
C:\Windows\media
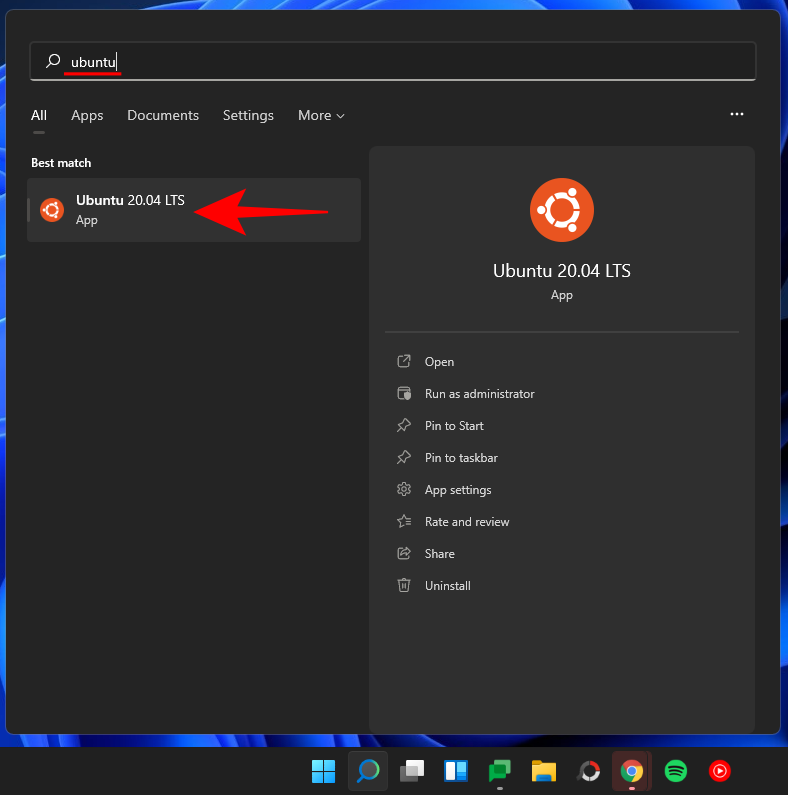
We can now use the .wav file as our default notification sound. Press Windows + i on your keyboard to open the Settings app and then click on ‘Sound’ on your right.
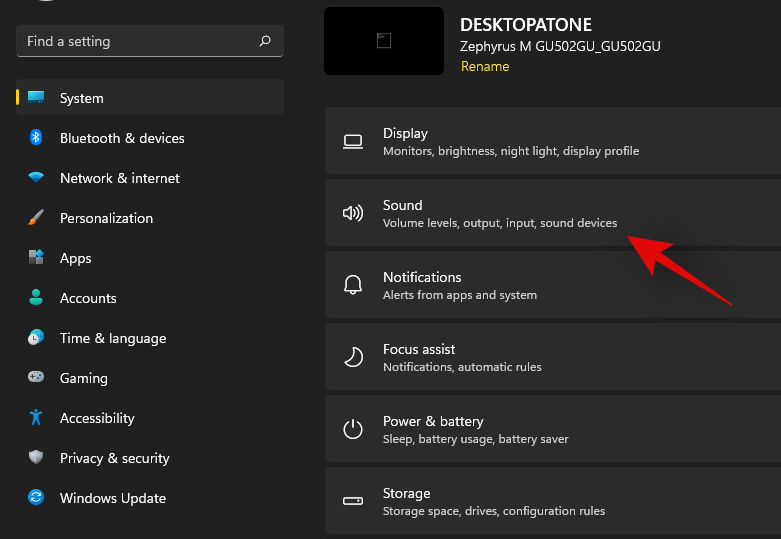
Scroll to the bottom and click on ‘More sound settings’.

Click and switch to the ‘Sounds’ tab at the top.
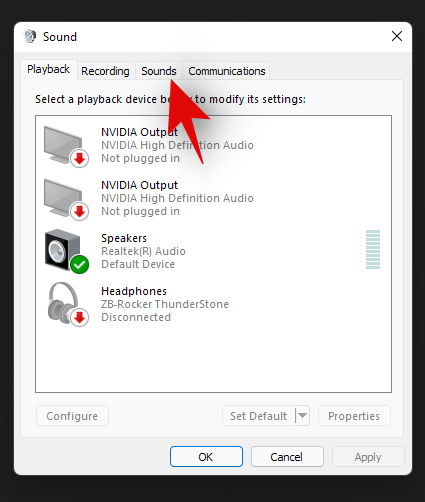
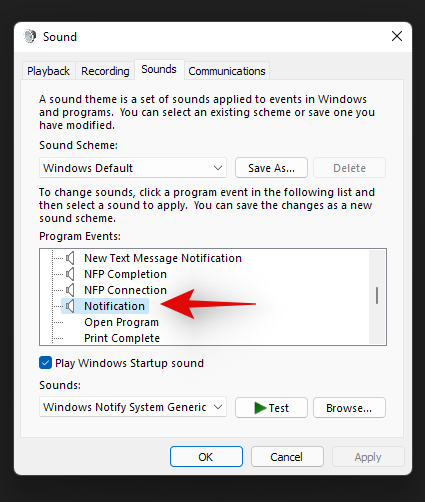
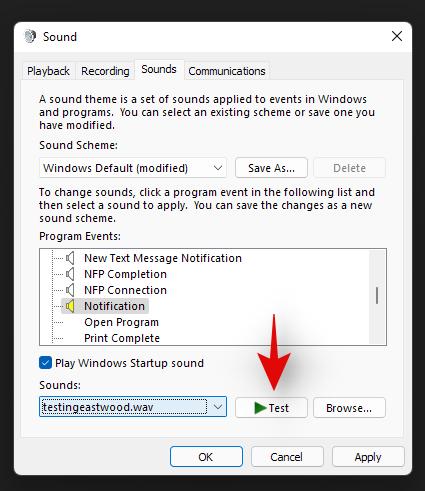
Under ‘Program Events’ scroll the list and find ‘Notifications’. Click on ‘Notifications’ to select it.
Now click on the drop-down arrow under Sounds and select the .wav file we pasted in the Media folder.
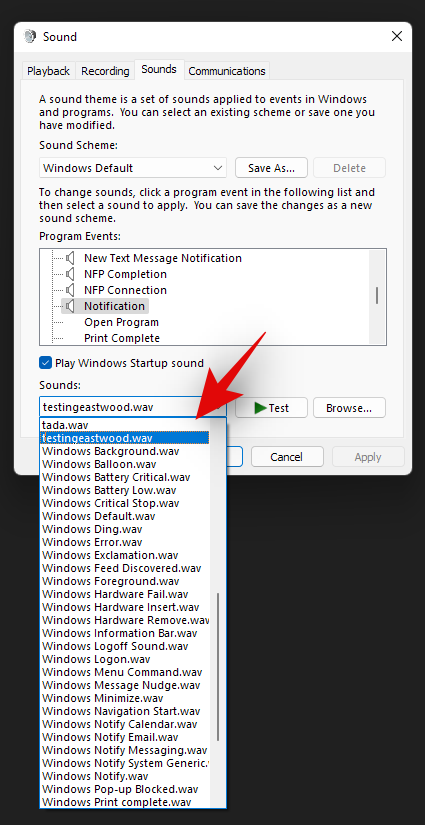
You can click on ‘Test’ to test your custom notification sound.
Click on ‘Ok’ to save your changes.
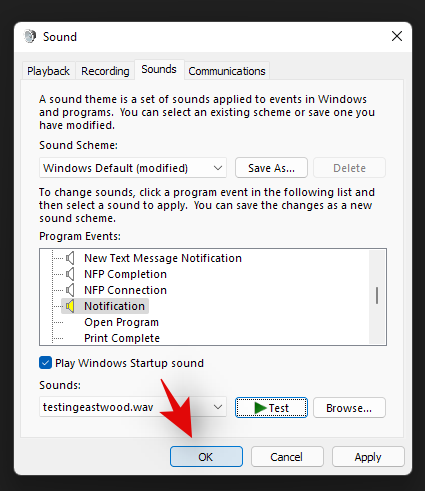
And that’s it! You will now have set a custom sound as your default notification sound in Windows 11.
Distractions from notifications are a huge problem especially when you are into some important work. Using the steps mentioned above, now, you can easily get rid of unnecessary notifications and work peacefully with full concentration.
Related:
Windows 11 ja 10 tarjoavat käyttöliittymiä ja komentoja, joiden avulla voit hallita järjestelmänvalvojatilin käyttöoikeuksia tehokkaasti.
Opi, kuinka löytää ja palauttaa Oma tietokone Windows 11:ssä helposti. Seuraa käytännön ohjeita ja vinkkejä!
Opi, kuinka voit vaihtaa oletusselaimesi Windows 11:ssä helposti ja nopeasti. Täydellinen opas kaikille käyttäjille, jotka haluavat mukauttaa selainkokemustaan.
Opi kuinka ottaa TPM 2.0 käyttöön BIOSissa Windows 11:lle. Tämä ohje opastaa sinua askel askeleelta prosessissa, joka on välttämätön järjestelmän turvallisuuden kannalta.
Kuvakaappaukset Windows 11:ssä - Opi käyttämään Print Screenia ja Snip & Sketch -sovellusta tehokkaammin.
Voit myös luoda ja lisätä uuden käyttäjätilin, jälleen sekä paikallisesti että verkossa, jollekin muulle, joka käyttää järjestelmääsi. Tässä on kaikki, mitä sinun tulee tietää uuden käyttäjätilin luomiseksi Windows 11:ssä.
Tässä artikkelissa käsitellään, miten avata Ohjauspaneeli Windows 11:ssä tehokkaasti. Löydä kaikki tärkeimmät menetelmät ja vinkit avauksen helpottamiseksi.
Tämä blogi opastaa sinua Windows 11:n Copilot-ominaisuuden poistamisessa käytöstä.
Älä julkaise kuviasi ilmaiseksi Instagramissa, kun voit saada niistä maksun. Lue ja tiedä, kuinka ansaita rahaa Instagramissa ja hyödynnä tätä sosiaalisen verkostoitumisen alusta.
Opi muokkaamaan ja poistamaan PDF-metatietoja helposti. Tämän oppaan avulla voit helposti muokata tai poistaa PDF-metatietoja muutamalla helpolla tavalla.
Tiesitkö, että Facebookilla on täydellinen luettelo puhelinluettelosi yhteystiedoista sekä heidän nimensä, numeronsa ja sähköpostiosoitteensa.
Ongelma voi estää tietokonettasi toimimasta kunnolla, ja sinun on ehkä muutettava suojausasetuksia tai päivitettävä ohjaimia niiden korjaamiseksi.
Tämä blogi auttaa lukijoita muuttamaan käynnistettävän USB:n ISO-tiedostoksi kolmannen osapuolen ohjelmistolla, joka on vapaasti käytettävissä ja suojattu haittaohjelmilta.
Törmäsitkö Windows Defenderin virhekoodiin 0x8007139F ja sinun oli vaikea suorittaa tarkistuksia? Tässä on tapoja, joilla voit korjata ongelman.
Tämä kattava opas auttaa korjaamaan "Task Scheduler Error 0xe0434352" Windows 11/10 -tietokoneellasi. Tarkista korjaukset nyt.
LiveKernelEvent 117 Windows-virhe aiheuttaa tietokoneesi jumiutumisen tai kaatumisen odottamatta. Opi diagnosoimaan ja korjaamaan se asiantuntijoiden suosittelemilla vaiheilla.
Tämä blogi auttaa lukijoita korjaamaan PowerPointin, joka ei anna minun tallentaa ääniongelmia Windows-tietokoneella, ja jopa suosittelee muita näytön tallennuskorvikkeita.
Mietitkö kuinka kirjoittaa PDF-dokumenttiin, koska sinun on täytettävä lomakkeita, lisättävä huomautuksia ja allekirjoitettava. Olet törmännyt oikeaan viestiin, lue eteenpäin!
Tämä blogi auttaa käyttäjiä poistamaan System Requirements Not Met -vesileiman, jotta he voivat nauttia tasaisemmasta ja turvallisemmasta Windows 11:n käyttökokemuksesta sekä puhtaammasta työpöydästä.
Tämä blogi auttaa MacBookin käyttäjiä ymmärtämään, miksi Pink Screen -ongelmat ilmenevät ja kuinka ne korjataan nopeilla ja yksinkertaisilla vaiheilla.
Tutustu vaiheittaisiin tapoihin mukauttaa tehtäväpalkin kuvakkeita Windows 11:ssä. Mukauta työpöytääsi helposti, paranna tuottavuutta ja tee tietokoneestasi todella omasi. Päivitetyt vinkit uusimpiin ominaisuuksiin.
Tutustu vaiheittaiseen oppaaseen GPT-osiotyylin poistamiseksi kiintolevyltä. Opi turvallisia menetelmiä levynhallinnan, DiskPartin ja kolmannen osapuolen työkalujen avulla levyn muuntamiseksi tai tyhjentämiseksi turvallisesti.
Ota selvää, miten voit ottaa dynaamisen virkistystaajuuden käyttöön Windows 11:ssä saadaksesi sulavan kuvan ja säästääksesi akkua. Vaiheittainen opas vinkeineen näyttökokemuksen vaivattomaan optimointiin.
Onko sinulla ongelmia tulostinvirheen 709 kanssa? Löydä vaiheittainen rekisterikikka, jolla voit korjata sen pysyvästi. Paranna tuottavuuttasi tällä luotettavalla Windowsin vianmääritysoppaalla. Ei enää tulostusongelmia!
Tutustu yksinkertaisiin, vaiheittaisiin menetelmiin Windows 11 -version ja koontiversion tarkistamiseen. Pysy ajan tasalla uusimmista ominaisuuksista ja varmista, että järjestelmäsi on optimoitu huippusuorituskykyä varten.
Onko sinulla ongelmia fontin lihavoinnin ja kursiivin toimimisen kanssa? Tutustu toimiviin, vaiheittaisiin ratkaisuihin Wordiin, Google Docsiin, CSS:ään ja muihin ohjelmiin. Palauta tekstin muotoilu raiteillesi jo tänään!
Onko sinulla ongelmia tulostimen offline-virheen 709 kanssa Windows 11:ssä? Tutustu todistettuihin, vaiheittaisiin ratkaisuihin tämän turhauttavan ongelman ratkaisemiseksi ja saumattoman tulostuksen palauttamiseksi. Teknistä asiantuntemusta ei tarvita!
Onko sinulla ongelmia Windows 11:n Chkdskin kanssa, joka on jumissa 10 %:ssa tai 100 %:ssa? Tutustu vaiheittaisiin vianmääritysvinkkeihin, joiden avulla voit korjata levyvirheet nopeasti ja turvallisesti ja pitää tietokoneesi toiminnassa sujuvasti.
Onko Windows 11:ssä ongelmia hitaan suorituskyvyn tai kaatumisten kanssa? Tutustu turvallisiin, vaiheittaisiin menetelmiin rekisterivirheiden korjaamiseksi vaarantamatta järjestelmääsi. Asiantuntijan vinkkejä vaivattomaan kokemukseen.
Onko sinulla ongelmia Windows 11:n iCloud Media Library -virheen kanssa? Tutustu toimiviin ohjeisiin iCloud-synkronointiongelmien korjaamiseksi, valokuvien, musiikin ja muun palauttamiseksi. Palaa saumattomaan integraatioon ilman vaivaa.

