Windows on kattava käyttöjärjestelmä, jonka avulla voit sanella ja hallita käyttöoikeuksia tällä hetkellä aktiivisen tilin perusteella. Tämä helpottaa järjestelmänvalvojien organisaation tietokoneiden hallintaa, koska he voivat tarjota valituille henkilöille korotettuja käyttöoikeuksia.
Mutta entä jos omistat tietokoneesi? Kuinka hallitset paikallisia tilejä? Entä jos sinulla ei ole järjestelmänvalvojan tiliä? Oletko suljettu ikuisesti? Jos sinulla on ollut näitä kysymyksiä tai jos olet äskettäin kohdannut virheen, jossa vaadit järjestelmänvalvojan lupaa, meillä on täydellinen opas sinulle.
Tässä on kaikki mitä sinun tulee tietää Windows 11:n järjestelmänvalvojatileistä.
Huomautus Windows 10 -yhteensopivuudesta: Tämän sivun oppaat on koottu Windows 11:llä, joten kuvakaappauksissa käytetty käyttöliittymä on Windows 11. Mutta nämä oppaat toimivat täysin myös Windows 10:ssä. Joten voit käyttää oppaita Windows 11:ssä ja Windows 10 -tietokoneessa.
Aiheeseen liittyvä: Hakujen tekeminen Windows 11:ssä
Sisällys
Mikä on järjestelmänvalvojan tili Windows 11:ssä?
Järjestelmänvalvojan tili on Microsoft Windowsin ylin tili, jolla on korkeimmat oikeudet. Näin voit järjestelmänvalvojana hallita tietokonettasi haluamallasi tavalla. Voit tehdä muutoksia järjestelmätiedostoihin, asentaa laajennettuja ohjelmia, muokata Windows-asennusta, määrittää mukautettua automaatiota ja paljon muuta. Vakio- tai vieraskäyttäjillä ei ole lupaa tehdä tällaisia tehtäviä. Lisäksi järjestelmänvalvojana voit hallita Windowsin ominaisuuksia ja sanella, mitkä niistä ovat käytettävissä ja käyttäjien käytettävissä.
Miksi tarvitset järjestelmänvalvojan tilin?
Järjestelmänvalvojan tili on tili, jolla on korkeimmat oikeudet Windowsissa. Tämä tarkoittaa, että voit tehdä järjestelmätason muutoksia käyttöjärjestelmääsi käyttämällä järjestelmänvalvojan tiliä ilman rajoituksia. Tässä on joitain yleisiä syitä, miksi saatat tarvita järjestelmänvalvojan tilin tietokoneellesi.
- Järjestelmätason muutosten tekeminen järjestelmään
- Järjestelmätiedostojen muokkaaminen/muokkaaminen tai korjaaminen
- Järjestelmänvalvojan tason komentojen ja komentosarjojen suorittaminen
- Voit ottaa käyttöön tai poistaa käytöstä Windowsin ominaisuuksia
- Järjestelmätason ohjelmien ja säätöjen asentaminen
- Ohjainten muokkaaminen tai uudelleenasentaminen
- Voit käyttää mukautusasetuksia Windowsin sisällä
- Paikallisten tilien salasanojen nollaus tai vaihtaminen
ja paljon muuta. Voi olla monia syitä, miksi tarvitset järjestelmänvalvojan tilin Windows 11:ssä, mutta tiesitkö, että Windowsissa on kahdenlaisia järjestelmänvalvojan tilejä. No ei aivan, mutta tässä on kaikki mitä sinun tulee tietää niistä.
Aiheeseen liittyvä: Windows 11 -hälytysäänien poistaminen käytöstä
Kirjaudu sisään järjestelmänvalvojana: Asiat, jotka sinun on tiedettävä
Windowsissa on oletuksena sisäänrakennettu järjestelmänvalvojatili, vaikka sellainen ei olisi saatavilla lukitusnäytölläsi. Tämä oletustili luodaan Windowsin asennuksen yhteydessä, jotta voidaan hyväksyä kaikki tietokoneellesi tehdyt järjestelmämuutokset Windowsin asennuksen yhteydessä.
Lisäksi Windows antaa sinun määrittää ylimääräisen järjestelmänvalvojan tilin paikalliselta tililtäsi, jos sinulla on tarvittavat käyttöoikeudet. Voit myös muuntaa nykyisen tilisi järjestelmänvalvojan tiliksi, jos käytät tällä hetkellä vakiotiliä Windows 11:ssä.
Kunkin näiden tilien määrittämisessä on erilaiset vaatimukset, ja nykyisestä asetuksestasi riippuen voit valita jommankumman asetuksista. Mutta jos yrität palauttaa paikallisen tilisi salasanan, oletusjärjestelmänvalvojan tilin käyttö on paras vaihtoehto, koska et pystyisi pääsemään lukitusnäytön ohi tässä tapauksessa.
Lisäksi tässä on muutamia yleisiä asioita, jotka sinun tulee pitää mielessä, ennen kuin jatkat alla olevien oppaita.
- Oletusjärjestelmänvalvojalla ei ole sisäänkirjautumissalasanaa, ellei järjestelmänvalvoja ole sitä mukauttanut
- Jos yksikkösi on organisaatiosi tai oppilaitoksesi myöntämä, alla olevat menetelmät eivät todennäköisesti toimi sinulle. Organisaatiosi lukitsee järjestelmänvalvojan oletustilin, eikä nykyisellä tililläsi ole tarvittavia oikeuksia jatkaaksesi muita tämän oppaan menetelmiä. Sinun on todennäköisesti otettava yhteyttä järjestelmänvalvojaan, jos omistat tällaisen yksikön.
- Jos jaat laitteen muiden käyttäjien kanssa, poista järjestelmänvalvojan tili käytöstä, kun olet tehnyt tarvittavat muutokset järjestelmään välttääksesi luvattoman pääsyn arkaluontoisiin tietoihin. Tällaisissa tapauksissa on myös suositeltavaa asettaa salasana oletusjärjestelmänvalvojatilille.
- Jotkut alla olevat menetelmät edellyttävät, että järjestelmääsi on asennettu Windows 11 Pro tai uudempi. Jos käytät Windows 11 home Editionia, vaihtoehtosi ovat rajalliset.
Ero oletusjärjestelmänvalvojan tilin ja käyttäjätilin järjestelmänvalvojan käyttöoikeuksien antamisen välillä
Oletusjärjestelmänvalvojan tili on erillinen tili, joka on jokaisessa Windows-asennuksessa laitteestasi tai Windows-versiosta riippumatta. Toisaalta muunnettu tili on tietokoneesi vakio- tai vierastili, joka on korotettu järjestelmänvalvojan oikeuksiin.
Kun tilisi on korotettu, se kuuluu Järjestelmänvalvoja-ryhmään ja sinulla on kaikki tarvittavat järjestelmänvalvojan oikeudet tehdäksesi järjestelmätason muutoksia tietokoneellasi. Oletusjärjestelmänvalvojaa käytetään useimmiten yritettäessä palauttaa kadonneita salasanoja paikallisille käyttäjätileille tietokoneellasi.
Toisaalta tilin muuntaminen on yksinkertainen prosessi nykyisen tilisi käyttöoikeuksien korottamiseksi, minkä ansiosta voit toimia nykyisen laitteen järjestelmänvalvojana. Oletusjärjestelmänvalvoja voidaan poistaa käytöstä järjestelmässäsi yksinkertaisella komennolla, kun taas paikallinen tilisi on muutettava uudelleen, jos haluat peruuttaa muutokset. Käytä jotakin alla olevista tavoista, jotka parhaiten vastaavat nykyisiä tarpeitasi.
Aiheeseen liittyvä: Näppäimistön poistaminen käytöstä Windows 11:ssä
Kuinka kirjautua sisään järjestelmänvalvojana Windows 11:ssä
Voit kirjautua sisään järjestelmänvalvojana Windows 11:ssä käyttämällä yllä mainitsemiamme menetelmiä. Voit joko ottaa oletusjärjestelmänvalvojan tilin käyttöön, jos haluat tehdä tilapäisiä muutoksia tietokoneellesi tai palauttaa kadonneen salasanan. Voit myös luoda uuden järjestelmänvalvojan tilin uudelle käyttäjälle siltä varalta, että haluat jakaa laitteesi jonkun kanssa. Lopuksi voit muuntaa nykyisen paikallisen tilisi järjestelmänvalvojan tiliksi, jos haluat itse saada järjestelmänvalvojan oikeudet nykyiselle laitteelle. Noudata yhtä alla olevista tavoista, joka parhaiten vastaa nykyisiä tarpeitasi ja vaatimuksiasi.
Tapa #01: Käytä oletusjärjestelmänvalvojan tiliä
Voit käyttää Windows 11 -tietokoneesi oletusjärjestelmänvalvojatiliä tehdäksesi tarvittavat muutokset alla olevan oppaan avulla. Kun olet tehnyt muutokset, voit poistaa tilin käytöstä seuraavan oppaan avulla. Aloitetaan.
1.1 Ota käyttöön oletusjärjestelmänvalvojatili
Meidän on ensin otettava käyttöön tai näytettävä järjestelmänvalvojan tili tietokoneellasi. Tämä voidaan tehdä eri menetelmillä. Jos pääset lukitusnäytön ohi, voit käyttää jompaakumpaa näistä tavoista. Jos et kuitenkaan pääse ohittamaan lukitusnäyttöä, sinun on käytettävä CMD:tä lukitusnäytöltäsi ja käytettävä alla olevaa ohjetta. Tällaisissa tapauksissa voit käyttää alareunassa olevaa opasta aktivoidaksesi CMD:n suoraan aloitusnäytöltäsi. Aloitetaan.
1.1.1 CMD:n käyttö
Käynnistä CMD järjestelmässäsi ja kirjoita alla oleva komento. Kun olet valmis, paina Enter näppäimistöllä suorittaaksesi sen.
net user administrator /active:yes
Komennon pitäisi nyt olla suoritettu onnistuneesti.
Paina näppäimistön Windows-näppäintä ja napsauta käyttäjänimeäsi vasemmassa alakulmassa. Järjestelmänvalvojan tilin pitäisi nyt näkyä tässä osiossa.
Tämä tarkoittaa, että prosessi on onnistunut. Voit nyt kirjautua ulos tilistäsi ja kirjautua sisään järjestelmänvalvojan tilille. Oletusjärjestelmänvalvojatilillä ei ole salasanaa, ja OOBE toivottaa sinut tervetulleeksi, kun kirjaudut sisään tilille. Voit nyt käyttää seuraavia oppaita Windows-salasanan nollaamiseen tarvittaessa.
1.1.2 Hallintatyökalujen käyttäminen
Windows + R
Käynnistä Suorita-valintaikkuna painamalla näppäimistöä. Kirjoita seuraava termi käynnistyksen jälkeen ja paina Enter-näppäintä.
lusrmgr.msc
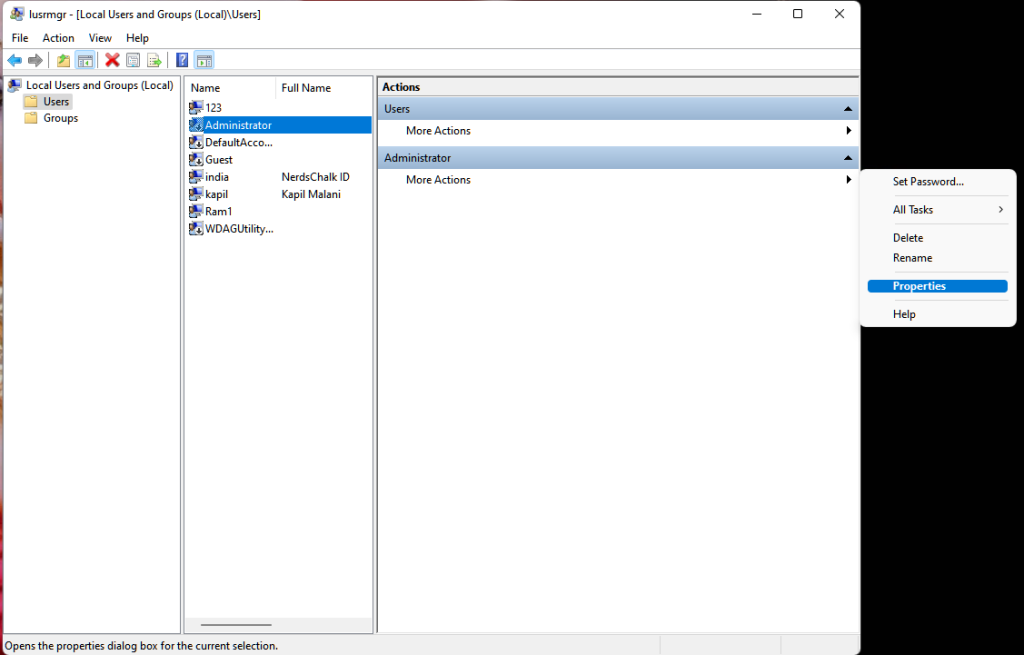
Paikallisten ryhmien hallinta käynnistetään nyt tietokoneellasi. Aloita valitsemalla vasemmalta "Käyttäjät".
Napsauta oikealla olevaa Järjestelmänvalvoja . Napsauta nyt Lisää toimintoja ja sitten Ominaisuudet .
Uusi ikkuna avautuu nyt näytöllesi. Poista valinta kohdasta "Tili on poistettu käytöstä".
Napsauta "Käytä" ja sitten "OK".
Sulje paikallinen ryhmien hallinta ja aktivoi Käynnistä-valikko. Napsauta nyt vasemmassa alakulmassa olevaa käyttäjänimeäsi, ja uuden järjestelmänvalvojan tilin pitäisi nyt olla saatavilla tässä osiossa. Voit nyt kirjautua ulos nykyisestä tilistäsi ja kirjautua sisään uudelle järjestelmänvalvojan tilille. Tilillä ei ole salasanaa, ja sinun pitäisi pystyä kirjautumaan siihen helposti napsauttamalla Kirjaudu sisään.
1.1.3 Rekisterieditorin käyttö
Rekisterin muokkausmenetelmä soveltuu vain käyttäjille, joiden järjestelmiin on asennettu Windows 11 Pro tai uudempi. Tämä johtuu siitä, että tätä menetelmää varten käytettävä rekisteripolku on vain Windows 11 Pron tai uudempien käyttäjien käytettävissä. Jos olet Windows 11 Home -käyttäjä, voit käyttää sen sijaan yllä lueteltua CMD-menetelmää.
Paina Windows + R
näppäimistöäsi ja kirjoita seuraava termi. Paina Enter-näppäintä, kun olet valmis.
regedit
Siirry nyt seuraavalle polulle. Voit myös kopioida ja liittää sen yläreunassa olevaan osoitepalkkiin.
Computer\HKEY_LOCAL_MACHINE\SOFTWARE\Microsoft\Windows NT\CurrentVersion\Winlogon\SpecialAccounts\UserList
Kun UserList on valittuna vasemmalla, napsauta oikealla olevaa tyhjää aluetta hiiren oikealla painikkeella ja valitse Uusi.
Napsauta "DWORD (32-bittinen) arvo".
Nimeä arvoksi "Järjestelmänvalvoja" ja paina Enter-näppäintä.
Kun arvo on lisätty, sulje rekisterieditori ja käynnistä tietokone uudelleen. Järjestelmänvalvojan tilin pitäisi nyt olla käytettävissä näytön vasemmassa alakulmassa lukitusnäytössä.
1.1.4 GPO:n käyttö
Jos käytät yrityskonetta, voit myös käyttää ryhmäkäytäntöeditoria ottaaksesi oletusjärjestelmänvalvojan tilin käyttöön tietokoneessasi. Tämä vaihtoehto ei kuitenkaan ole Windows 11 Home -version käyttäjien käytettävissä. Noudata alla olevaa ohjetta päästäksesi alkuun.
Paina Windows + R
, kirjoita seuraava termi ja paina näppäimistön Enter-näppäintä avataksesi ryhmäkäytäntöeditorin tietokoneellasi.
gpedit.msc
Siirry seuraavaan hakemistoon käyttämällä vasenta sivupalkkia.
Computer Configuration\Windows Settings\Security Settings\Local Policies\Security Options\
Kaksoisnapsauta seuraavaa oikealla olevaa arvoa: Tilit: Järjestelmänvalvojan tilin tila
Valitse 'Käytössä'.
Napsauta "Käytä" ja sitten "OK".
Sulje GPO-ikkuna nyt ja paina näppäimistön Windows-näppäintä avataksesi Käynnistä-valikon. Napsauta nyt käyttäjänimeäsi näytön vasemmassa alakulmassa ja uuden järjestelmänvalvojan tilin pitäisi nyt olla käytettävissäsi.
1.2 Poista oletusjärjestelmänvalvojan tili käytöstä
Nyt kun olet suorittanut järjestelmänvalvojan tehtävät, on suositeltavaa poistaa järjestelmänvalvojan tilisi käytöstä estääksesi luvattoman pääsyn järjestelmääsi. Käytä jotakin alla olevista tavoista, jotka parhaiten vastaavat nykyisiä tarpeitasi ja vaatimuksiasi. Aloitetaan.
1.2.1 CMD:n käyttö
Aktivoi CMD tietokoneellasi nykyisten asetusten mukaan ja kirjoita seuraava komento. Suorita se painamalla näppäimistön Enter-näppäintä.
net user administrator /active:no
Ja siinä se! Oletusjärjestelmänvalvojan tili pitäisi nyt poistaa käytöstä tietokoneellasi.
1.2.2 Hallintatyökalujen käyttäminen
Press Windows + R
and enter the following term in the Run dialog box. Press Enter on your keyboard once you are done.
lusrmgr.msc
Select ‘Users’ from the left sidebar and click on ‘Administrator’ on your right.
Select the checkbox for ‘Account is disabled’ option.
Click Apply and then OK.
Close the admin tools window and the default administrator account should now be disabled on your PC.
1.2.3 Using Registry Editor
Press Windows + R
, type in the following, and press Enter on your keyboard to open the Registry Editor on your PC.
regedit
Once the registry editor opens, navigate to the path given below.
Computer\HKEY_LOCAL_MACHINE\SOFTWARE\Microsoft\Windows NT\CurrentVersion\Winlogon\SpecialAccounts\UserList
Click on ‘Administrator’ on your right and hit Del on your keyboard.
Confirm your choice by clicking on ‘Yes’.
Restart your PC and the default admin account should no longer be available on your lock screen.
1.2.4 Using GPO
Press Windows + R
and type in the following. Press Enter on your keyboard once you are done.
gpedit.msc
Now navigate to the following path.
Computer Configuration\Windows Settings\Security Settings\Local Policies\Security Options\
Now double click on the following value on your right: Accounts: Administrator account status
Select ‘Disabled’.
Click on ‘Apply’ and then on ‘OK’.
Close the GPO window.
The default administrator account will now be disabled on your PC via the Group Policy Editor in Windows 11.
1.3 Login as admin using command prompt (can’t get past the lock screen issue)
If you are locked out of Windows and would like to access the administrator account to reset your password then you will need to launch CMD from your lock screen first. You will need a recovery environment to proceed with this guide.
You will need to first access CMD using Windows installation media (a Windows bootable USB) for this guide and then follow the steps below. If using an installation media press Shift + F10
during the setup to launch CMD anywhere.
Follow the guide below to get you started once you have launched CMD as given above.
Once the command prompt launches, enter the following command and press Enter on your keyboard.
cd windows
You will now be taken to your default boot drive in CMD. Enter the following command and execute it by press Enter on your keyboard.
cd system32
You will now be in the System32 directory. Execute the command below to create a backup of utilman.exe.
copy utilman.exe utilman.exe.back
Execute the command below within CMD now.
copy cmd.exe cmd1.exe
Now let’s delete the default utilman.exe.
del utilman.exe
We will now rename CMD so that it can be accessed as utilman.exe.
rename cmd.exe utilman.exe
Once all the commands are executed successfully, close the command prompt by typing in the following command.
exit
Restart your PC and proceed to the Windows lock screen as you normally would. Click on the accessibility icon in the bottom right corner and you should now be able to access CMD on your lock screen. Follow the guide above to enable administrator account on your system. Once enabled, you can use the guide below to reset a local account’s password. Once you have reset your password it is highly recommended that you revert the changes we made to cmd.exe and utilman.exe earlier. Use the steps below to revert your changes.
Press Windows + S
on your keyboard and search for CMD. Click on ‘Run as administrator’ once it shows up in your search results.
Now enter the following commands one by one and execute them to revert your changes. Make sure to execute each command one after the other without changing their order.
rename utilman.exe.back utilman.exe
CMD functionality should now be restored within Windows 11. You can check for the same by pressing Windows + R
on your keyboard, typing in CMD, and hitting Enter on your keyboard. If CMD launches on your system then all the necessary changes have been reverted successfully.
However, if CMD does not launch, make sure that you executed each command successfully on your system by re-verifying each one in the list above.
And that’s it! You should now be able to access CMD from your lock screen.
1.4 Reset password for a local account
You can now reset your local account’s password with the default administrator account we just enabled. Follow the steps below to get you started.
Log in to the Windows administrator account and then press Windows + S
on your keyboard. Search for Control Panel and click and launch the app once it shows up in your search results.
Click on ‘User Accounts’.
Click on ‘User Accounts’ again.
Click on ‘Manage another account’.
Click and select the account for which you wish to change the password.
Now click on ‘Change the password’.
Type in your new password and confirm the same in the respective text boxes
Set a password hint if needed.
Click on ‘Change password’ once you are done.
And that’s it! The password for the selected account should now be changed. You can now visit the lock screen and log into your local account using your new password. We recommend you revert any changes made at this point to maintain your security and privacy. You should revert any CMD changes made as well as disable the default administrator account on your system using the guides above.
Method #02: Create a new administrator account in Windows 11
If you wish to create a new administrator account in Windows 11, then you can follow the steps below. Please keep in mind that you will need administrator privileges to create a new administrator user account on your device. Follow the guide below to get you started.
Press Windows + i
on your keyboard and select ‘Accounts’ from the left sidebar.
Click on ‘Family & other users’.
Click on ‘Add account’.
At this point, you can enter the Microsoft Account details of the new user and follow the on-screen steps to set up a new account. However, if you are looking to create a new local account then you can continue with the steps below.
Click on ‘I don’t have this person’s sign-in information’.
Click on ‘Add a user without a Microsoft account’.
Enter the name of the new user.
Now set a password and confirm the same.
Click on ‘Next’ once you are done.
\
A new account will now be added to your PC. However, the newly added account is a standard account. Let’s convert it into an administrator account. Press Windows + S
on your keyboard and search for Control Panel. Click and launch the app from your search results.
Click on ‘User Accounts’.
Click on ‘User Accounts’ again.
Click on ‘Manage another account’.
Now click and select the new account you just created.
Click on ‘Change the account type’.
Click and select ‘Administrator’.
Finally, click on ‘Change account type’.
And that’s it! You will now have created a new local administrator account on your device.
Method #03: Change a standard account to an administrator account
If you have a standard account then you can simply switch to an administrator account. If using the Windows Home edition then you can either use the Control Panel method or the ‘netplwiz’ method. On the other hand, Windows Pro and higher users can use either of the methods listed below. Let’s get started.
Note: If you are logged in as a standard user and would like to convert the same account to an administrator account then we recommend you use the netplwiz guide in the methods below.
3.1 Using Control Panel (Windows home)
Press Windows + S
on your keyboard, search for Control Panel and launch the app once it shows up in your search results.
Click on ‘User Accounts’.
Click on ‘User Accounts’ again.
If you wish to change your own account’s type then click on ‘Change your account type’. If you wish to convert another local account then select ‘Manage another account’ and select the concerned account. Once selected, click on ‘Change account type’.
Select ‘Administrator’.
Click on ‘Change account type’.
And that’s it, the concerned account should now be an administrator account on your system.
3.2 Using netplwiz
You can also use netplwiz to your advantage and convert user accounts on your PC. Follow the guide below to get you started.
Press Windows + R
on your keyboard to launch the run dialog box. Once launched, type in the following and press Enter on your keyboard.
netplwiz
Check the box for ‘Users must enter a user name and password to use this computer’ at the top.
Now click and select the user account you wish to convert from the list below.
Click on ‘Properties’.
Switch to the ‘Group Membership’ tab at the top.
Click and select ‘Administrator’.
Click on ‘Ok’ twice, once you are done.
If you converted the current local account that you are signed in with then you will be prompted to re-login to the account for the changes to take effect. Click on ‘Yes’ to confirm your choice.
You will now be taken to the lock screen. Login to the concerned account and you should now have administrator privileges within it.
3.3 Using Local groups manager (Windows Pro and higher)
Press Windows + R
on your keyboard, type in the following, and press Enter on your keyboard.
lusrmgr.msc
The local groups manager should now launch on your PC. Click and open ‘Users’ on your left.
Now select the desired User account that you wish to convert from your right and double click on it.
Switch to the ‘Member of’ tab and select the ‘Administrator’ group.
Click on ‘Ok’ once you are done.
And that’s it! The selected account will now have elevated administrator privileges within Windows.
Can you set or reset a password when logged in as an administrator?
Yes, you can easily reset your password as an administrator in Windows 11. This can be done in multiple ways and you can reset the password for a standard account or an administrator account using this method. This can be quite useful if you have forgotten your password and would like to get back into your system without losing your data.
However, you should keep in mind that this can be used by anyone to change your password and get access to your system. Hence, it is recommended that you set a secure password for your default account whenever possible.
For now, you can use the guide below to reset a password in Windows 11 when logged in as an administrator.
How to reset the password once logged in as an administrator
Resetting your password is quite easy when you are logged in to Windows 11 as an administrator. The best way to do this is by using either the Control Panel or CMD. Use one of the guides below that best fits your current needs and requirements. Follow any one of the guides below to get you started.
1. Using Control Panel
Press Windows + S
and search for Control Panel. Click and launch the app from your search results.
Click on ‘User Accounts’.
Now click on ‘User Accounts’ again.
Click on ‘Manage another account’.
Now click and select your local account for which you wish to reset your password.
Click on ‘Change the password’.
Add a new password for your local account and confirm the same in their respective text boxes.
Now add a password hint if required.
Click on ‘Change password’ once done.
And that’s it! The password for the selected account should now be changed based on your preferences.
2. Using CMD
You can also reset a local account’s password using CMD. Follow the guide below to get you started.
Press Windows + S
on your keyboard and search for CMD. Click on ‘Run as administrator’ once the app shows up in your search result.
Type in the following and press Enter on your keyboard.
net user
You will get a list of all the accounts currently available on your PC. Make a note of the desired account’s username and then type in the command below. Replace ‘NAME’ with the name you noted down earlier and replace ‘PASSWORD’ with your new password. Once done, press Enter on your keyboard.
net user NAME PASSWORD
And that’s it! Once the command is executed, the password for the desired account should be automatically changed on your PC.
How to add a password for the administrator account
If you are looking to secure your PC further then it is recommended that you add a password for the default administrator account. This will ensure that no one aware of this trick can access your Windows account without your authorization. We can add a password for your default admin account in several ways but we recommend you do so either via the advanced menu or via the CMD method. Follow any one of the guides below to get you started.
1. Using Ctrl + Alt + Del
Log in to the default administrator account and press Ctrl + Alt + Del
on your keyboard.
Now click and select ‘Change password’.
Enter a new password and confirm the same in their respective fields.
Add a password hint or security question depending on your preferences.
Click on ‘Ok’ once you are done.
And that’s it! Your default administrator account’s password should now be changed on your PC.
2. Using CMD
Log in to the default administrator account and press Windows + S
on your keyboard. Search for CMD and click on ‘Run as administrator’ once the app shows up in your search results.
Now enter the following command. Replace ‘PASSWORD’ with a password of your desired choice.
net user Administrator PASSWORD
And that’s it! The new password should now be set for your default administrator account.
Should you keep the administrator account enabled?
No, it is not recommended to keep your default/super administrator account enabled. This account has higher and more elevated privileges when compared to a normal administrator account in Windows. This account is used by Windows to perform system-level tasks in the background as well hence it could cause several privacy issues on your system.
In case somebody can access this account, they would have access to your entire data and hardware. The user could then proceed to take control of your entire system or simply infect it with malware, adware, and in the worst cases, ransomware.
We hope you were able to easily log in as an administrator in Windows 11 using the guide above. If you face any issues or have any more questions for us, feel free to reach out to us using the comments section below.
Related: