Com obrir el tauler de control a Windows 11
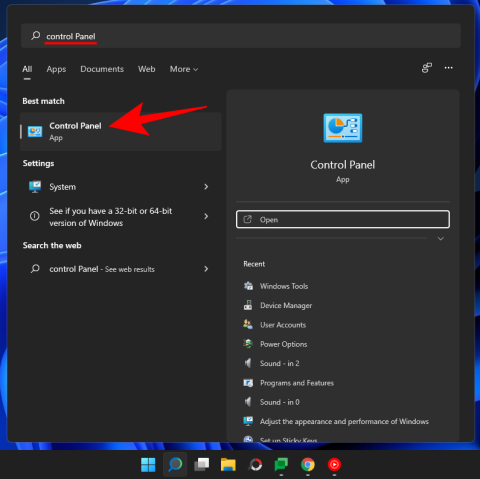
Descobreix com obrir el Tauler de control a Windows 11 amb diverses opcions eficients.
Les tecles d'accés ràpid de l'ordinador portàtil són eines essencials quan intenteu accedir a les funcions bàsiques del vostre dispositiu. Us permeten controlar el volum, ajustar la brillantor , la retroil·luminació del teclat, el comportament del touchpad i molt més. Depenent del vostre dispositiu, podríeu tenir tecles d'accés directe addicionals per a funcions dedicades, com ara activar el canvi de tecles n, desactivar el vostre touchpad, desactivar el teclat , activar el mode avió, canviar els modes d'alimentació i molt més.
Tanmateix, el vostre ordinador portàtil pot acabar perdent la seva funcionalitat i eficiència en cas que les tecles d'accés ràpid deixin de funcionar. Això us obligaria a canviar/editar cada paràmetre mitjançant les seves opcions dedicades a l'aplicació Configuració de Windows, cosa que pot ser força feixuga. Si les tecles d'accés ràpid de l' ordinador portàtil no funcionen al vostre ordinador portàtil, podeu utilitzar els mètodes següents per corregir les tecles d'accés directe.
Relacionat: Com moure la barra de tasques a la part superior a Windows 11
Continguts
Per què les tecles d'accés ràpid no funcionen?
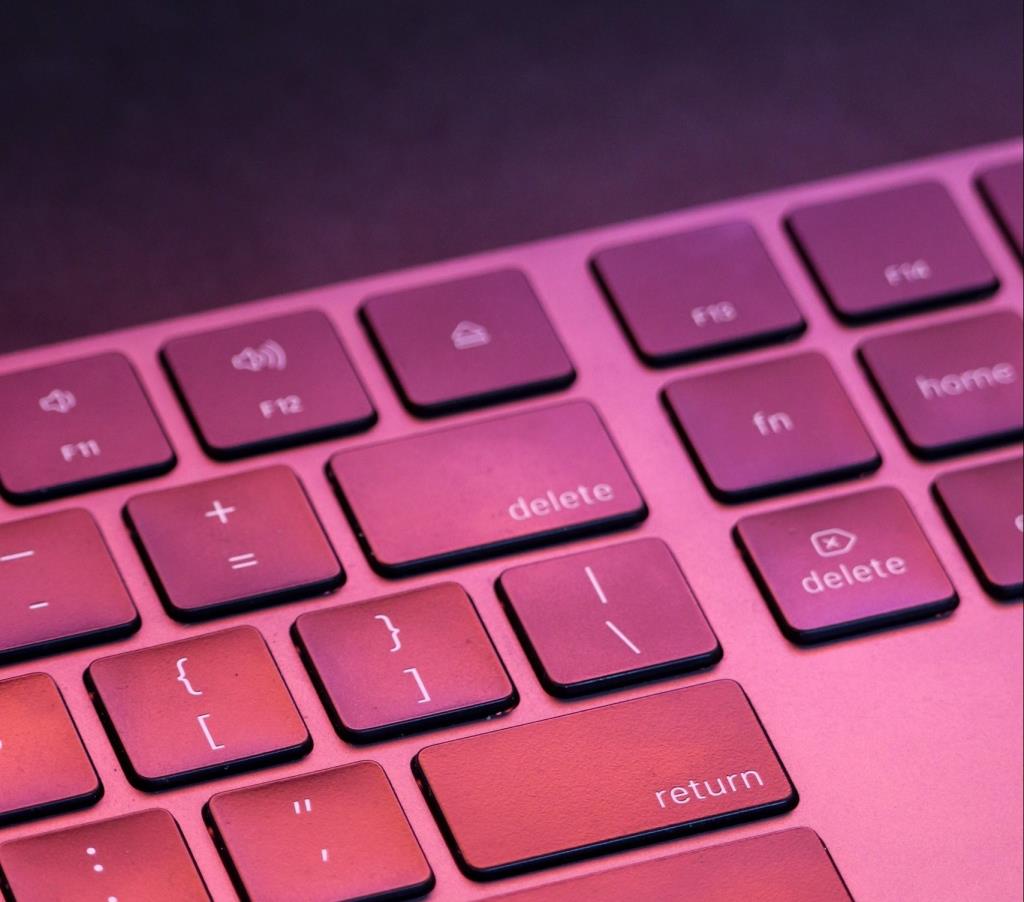
Les tecles d'accés directe del vostre ordinador portàtil poden deixar de funcionar per diversos motius, però com que Windows 11 és força nou, el motiu més comú sembla ser els conflictes de controladors i els conflictes d'utilitat OEM en segon pla. Això es deu al fet que la majoria dels controladors publicats actualment pels OEM estan dissenyats per a Windows 10. Windows 11 introdueix diversos canvis diferents en segon pla i la manera com es gestionen els controladors, que sembla trencar la funcionalitat de les tecles d'accés directe en molts dispositius diferents.
Les unitats més afectades semblen ser d'Asus i Lenovo a causa de les seves utilitats dedicades com Armory Crate Service que s'han d'actualitzar per a Windows 11. Això no vol dir que altres fabricants estiguin exempts d'aquest problema, moltes unitats Dell i Acer també semblen perden la seva funcionalitat de tecles d'accés ràpid amb Windows 11.
Si teniu algun d'aquests dispositius o si les tecles d'accés ràpid del vostre ordinador portàtil no funcionen en general a Windows 11, podeu utilitzar els mètodes següents per intentar solucionar el vostre problema. Comencem.
Relacionat: Com crear un punt de restauració a Windows 11
Com arreglar les tecles d'accés directe als portàtils Windows 11
Podeu utilitzar els mètodes següents per intentar que les tecles d'accés ràpid funcionin de nou al vostre ordinador portàtil. Els mètodes s'han llistat per ordre de prioritat i les correccions més habituals s'han enumerat a la part superior. Podeu començar amb la primera correcció i seguir la llista per provar de trobar la solució que funcioni per al vostre sistema. Comencem.
Mètode 1: comproveu si hi ha actualitzacions OEM
Si teniu una utilitat de teclat dedicada que gestiona les tecles d'accés ràpid en segon pla, com ara Armory Crate Service o la utilitat Synaptics, podeu provar d'actualitzar els controladors des del lloc web del vostre OEM. Aquestes utilitats són diferents dels controladors de teclat específics i executen serveis i tasques en segon pla que ajuden a activar les tecles d'accés ràpid al vostre ordinador portàtil.
Si alguna d'aquestes utilitats està trencada o no funciona, us recomanem que comproveu les últimes actualitzacions o que torneu a instal·lar la versió actual al vostre ordinador portàtil. Utilitzeu els enllaços següents per visitar el lloc d'assistència del vostre OEM i comproveu les últimes actualitzacions d'utilitats. Un cop trobats, feu-hi clic i descarregueu-los al vostre emmagatzematge local i instal·leu-los al vostre ordinador portàtil com més aviat millor.
Un cop instal·lats, les tecles d'accés ràpid haurien de tornar a funcionar al vostre ordinador portàtil. Us recomanem que reinicieu el vostre ordinador portàtil per evitar conflictes amb les versions instal·lades anteriorment en segon pla. Si les tecles d'accés ràpid encara no funcionen, pots utilitzar la guia següent per restablir i actualitzar les teves utilitats OEM al teu ordinador portàtil.
Relacionat: Com reparar Windows 11
Mètode 2: assegureu-vos que les utilitats OEM funcionin correctament
Si sembla que les vostres utilitats OEM no funcionen en segon pla, aquí teniu un parell de mètodes de resolució de problemes per restaurar la seva funcionalitat. Comencem.
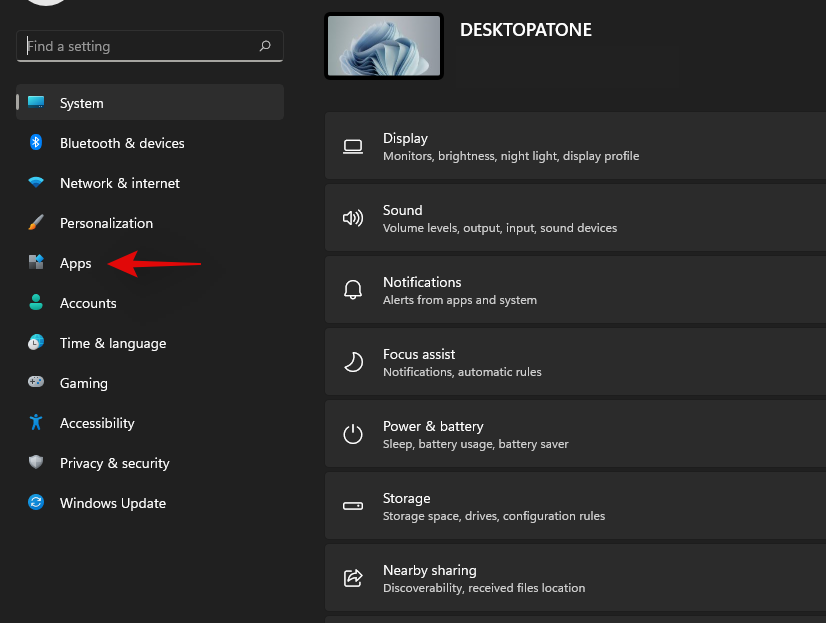
Premeu Windows + iel vostre teclat i feu clic a "Aplicacions" a la vostra esquerra.
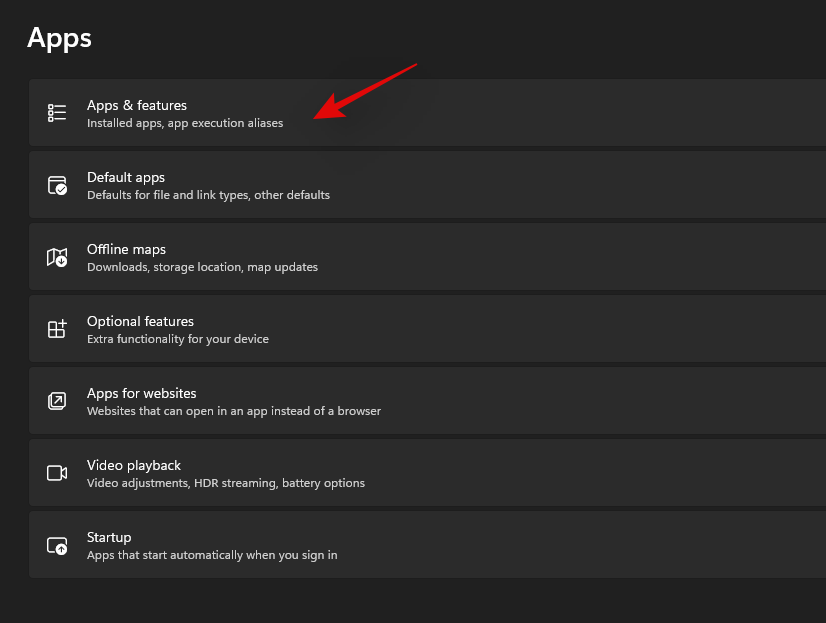
Feu clic a "Aplicacions i funcions".
Cerqueu l'aplicació en qüestió en aquesta llista i feu clic a la icona del menú "3 punts" que hi ha al costat.
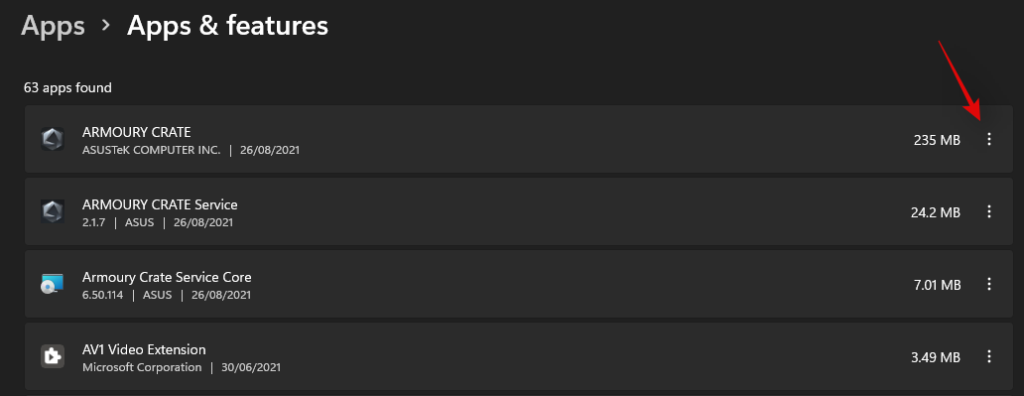
Seleccioneu "Opcions avançades".
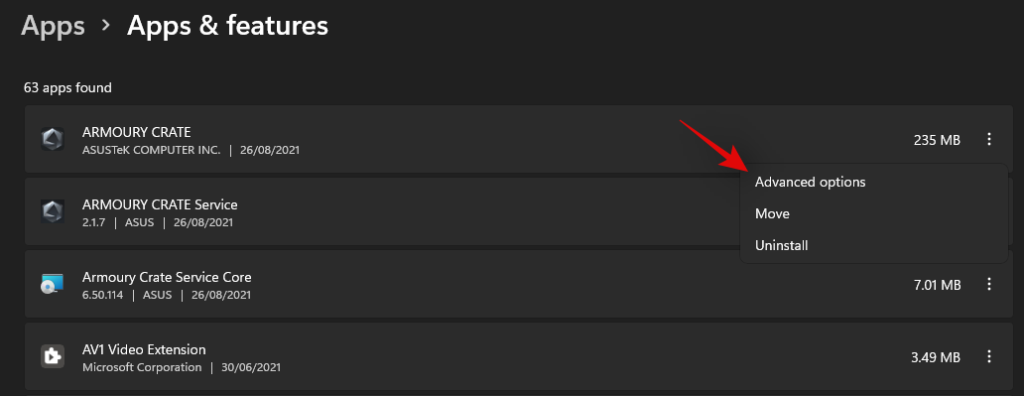
Ara seguiu una de les seccions següents en funció del que vulgueu fer amb l'aplicació seleccionada.
2.1 Habilita la funcionalitat de fons
Feu clic al menú desplegable a "Permisos d'aplicacions en segon pla" i seleccioneu "Potència optimitzada" o "Sempre".
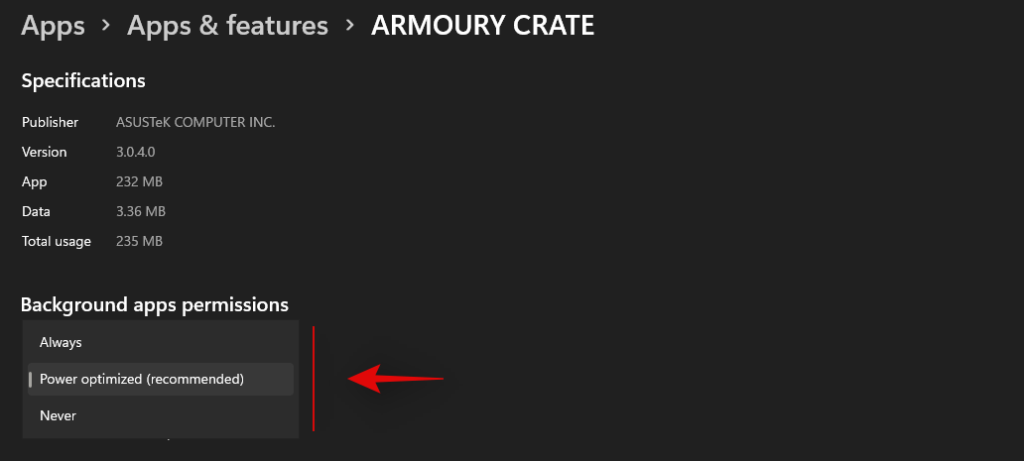
"Potència optimitzada" permetrà que l'aplicació funcioni en segon pla segons el vostre pla d'energia actual. D'altra banda, "Sempre" donarà permís a l'aplicació per mantenir-se activa i treballar en segon pla, independentment del pla d'energia seleccionat actualment.
2.2 Repareu l'aplicació
Windows 11 també us permet reparar la vostra aplicació. Simplement desplaceu-vos fins a la part inferior i feu clic a "Terminar" primer.
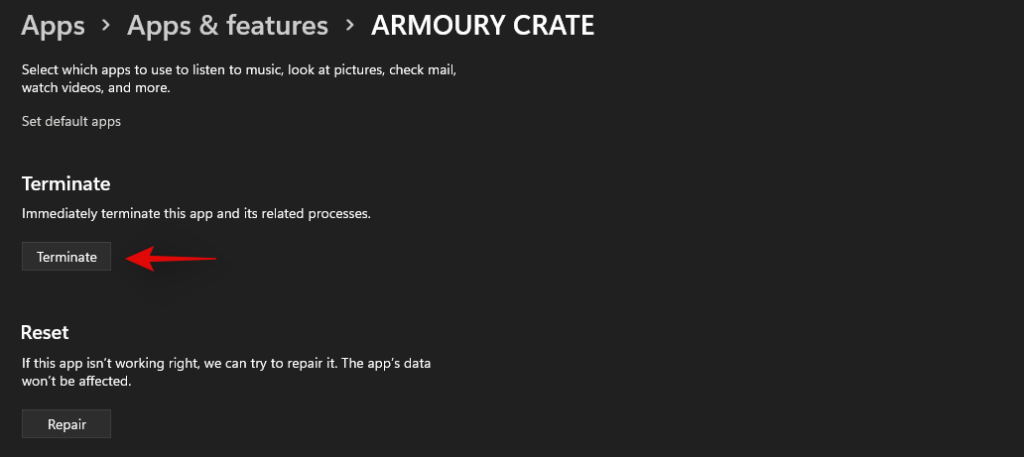
Ara feu clic a "Reparar".
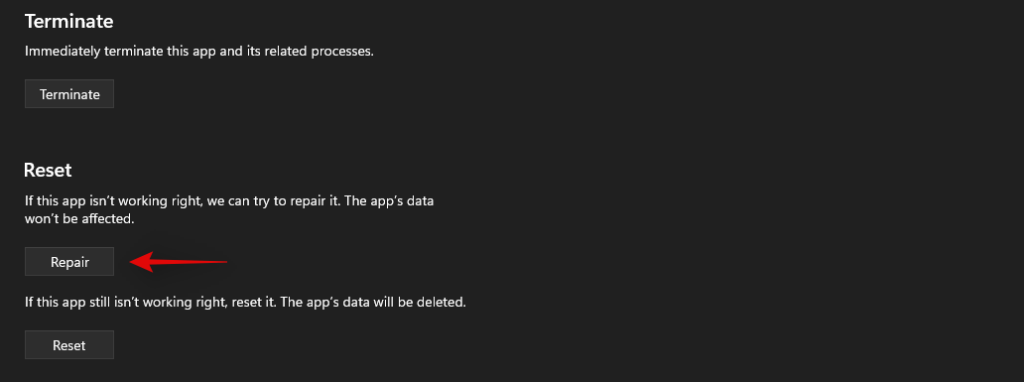
Espereu que Windows faci les seves coses, un cop aparegui una marca de verificació al costat de l'opció, proveu d'iniciar l'aplicació en qüestió al vostre ordinador portàtil.
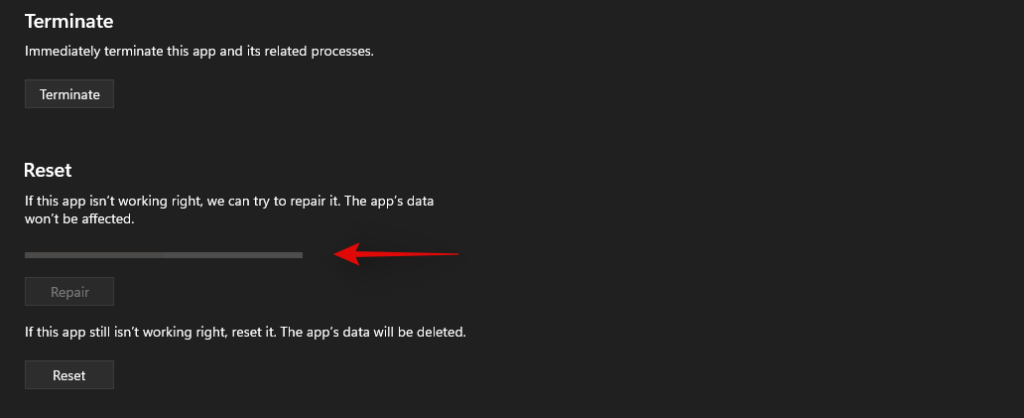
Proveu les tecles d'accés directe ara, si un problema menor o un conflicte feia que l'aplicació no funcionés en segon pla, ara s'hauria de restaurar la funcionalitat de les tecles d'accés directe al vostre ordinador portàtil.
2.3 Restableix l'aplicació
Si els mètodes anteriors no us han funcionat, podeu restablir l'aplicació OEM. Això restablirà les seves dades i us donarà un nou començament com si l'aplicació s'acabés d'instal·lar al vostre ordinador portàtil. Això hauria d'ajudar a restaurar la funcionalitat de les tecles d'accés ràpid en la majoria dels casos. Tanmateix, tingueu en compte que les dades de la vostra aplicació es restabliran, cosa que us obligarà a tornar a iniciar sessió a l'aplicació si escau. A més, també es restabliran els canvis o personalitzacions que hàgiu fet a l'aplicació. Seguiu els passos següents per començar.
Feu clic a "Terminar" per tancar l'aplicació.

Ara feu clic a "Restablir".

Feu clic a "Restablir" de nou per confirmar la vostra elecció.

Ara l'aplicació es restablirà al vostre ordinador portàtil. Us recomanem que reinicieu l'ordinador portàtil per fer una bona mesura i torneu a provar d'utilitzar les tecles d'accés ràpid. Si l'aplicació no funcionava correctament a Windows 11, ara s'hauria de restaurar la funcionalitat de les tecles d'accés ràpid al vostre ordinador portàtil.
Mètode 3: actualitzeu els controladors
Un altre motiu pel mal funcionament del vostre teclat serien els controladors obsolets. Si no heu actualitzat els controladors del vostre teclat en el passat, és probable que sigui el motiu pel qual les tecles d'accés ràpid del teclat no funcionen a Windows 11. Windows 11 gestiona i instal·la els vostres controladors de manera diferent, a més, en alguns casos, se sap que Windows 11 substituïu el controlador del vostre teclat OEM per un controlador genèric en cas que sigui l'últim.
Si les tecles d'accés directe encara no us funcionen, us recomanem que actualitzeu els controladors i instal·leu els darrers controladors de teclat disponibles al vostre OEM. Simplement visiteu el vostre lloc OEM mitjançant un dels enllaços següents i baixeu el controlador corresponent al vostre emmagatzematge local.
Un cop descarregat, instal·leu el controlador i reinicieu el vostre ordinador portàtil. Denegueu qualsevol actualització del controlador del teclat que ofereix Windows 11 i les tecles d'accés ràpid haurien de tornar a funcionar. Utilitzeu els enllaços següents per començar.
Si els controladors del vostre teclat encara estan obsolets i les tecles d'accés ràpid no funcionen, pot ser que sigui el moment de comprovar si hi ha actualitzacions de controladors a través de Windows. És probable que el vostre OEM us proporcioni les últimes actualitzacions de controladors mitjançant Actualitzacions de Windows. Comproveu les actualitzacions del controlador del teclat a les actualitzacions de Windows al vostre ordinador portàtil mitjançant la guia següent. Primer ens assegurarem que el vostre ordinador portàtil rebi actualitzacions de controladors mitjançant Windows Update. Seguiu la guia següent per començar.
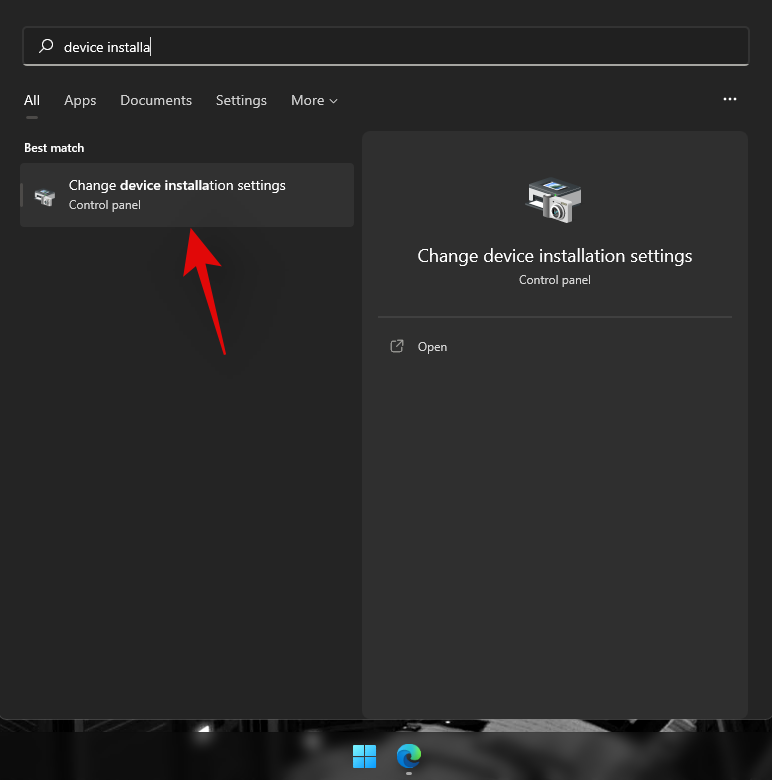
Premeu Windows + Sel teclat i cerqueu "Canvia la configuració d'instal·lació del dispositiu". Feu clic i inicieu l'aplicació quan aparegui als resultats de la cerca.
Seleccioneu "Sí (recomanat)".
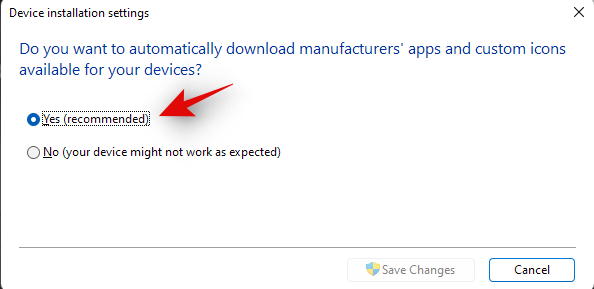
Feu clic a "Desa els canvis".
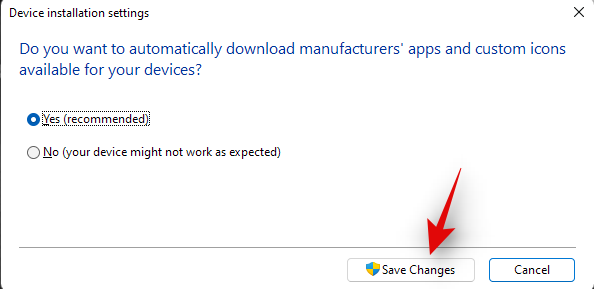
Espereu que Windows habiliti les actualitzacions de controladors per al vostre ordinador portàtil. Un cop habilitat, tanqueu la finestra de configuració d'instal·lació del dispositiu i premeu Windows + iel vostre teclat. Seleccioneu "Actualització de Windows" a l'esquerra.
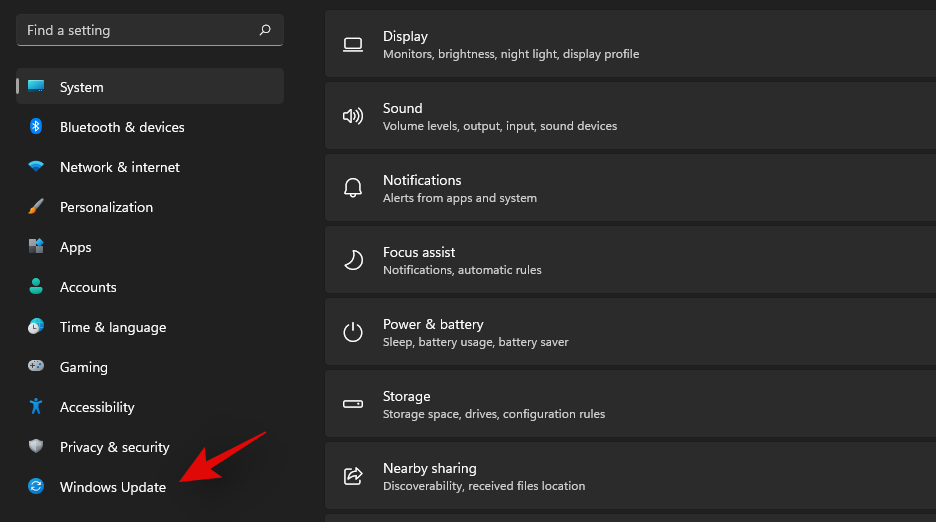
Feu clic a "Comprova les actualitzacions" a la part superior i instal·leu les actualitzacions que es mostrin.
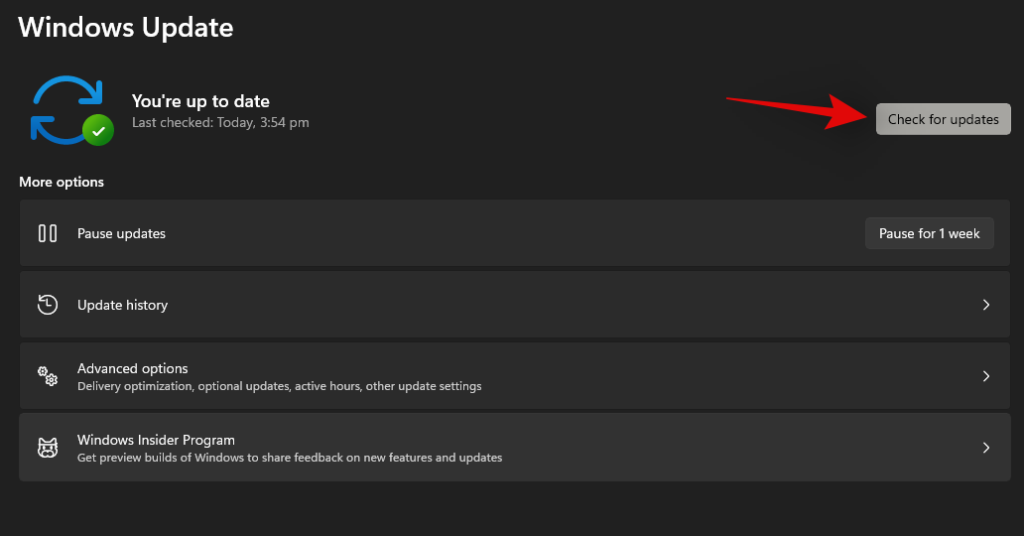
Un cop instal·lat, feu clic a "Opcions avançades" a la part inferior.
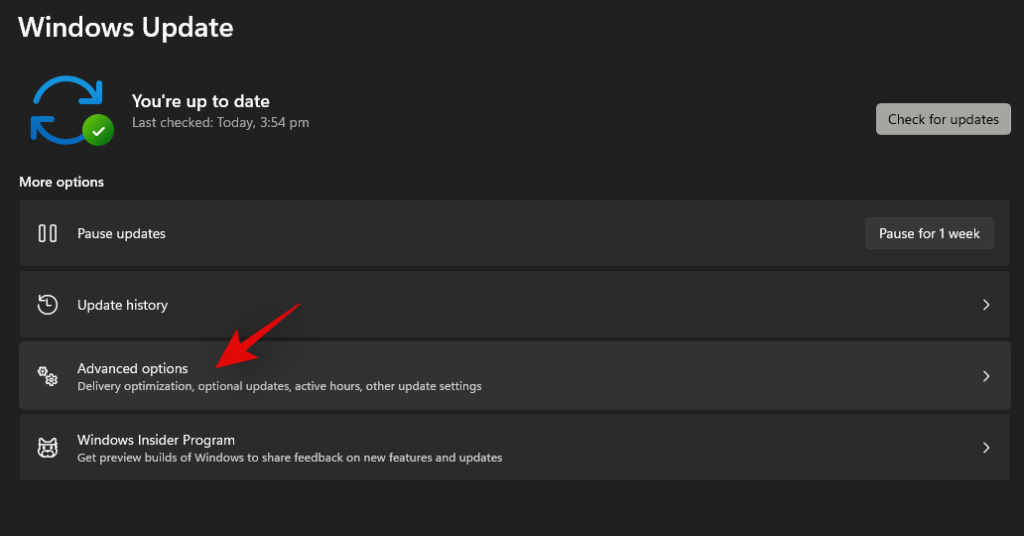
Ara feu clic a "Actualitzacions opcionals".
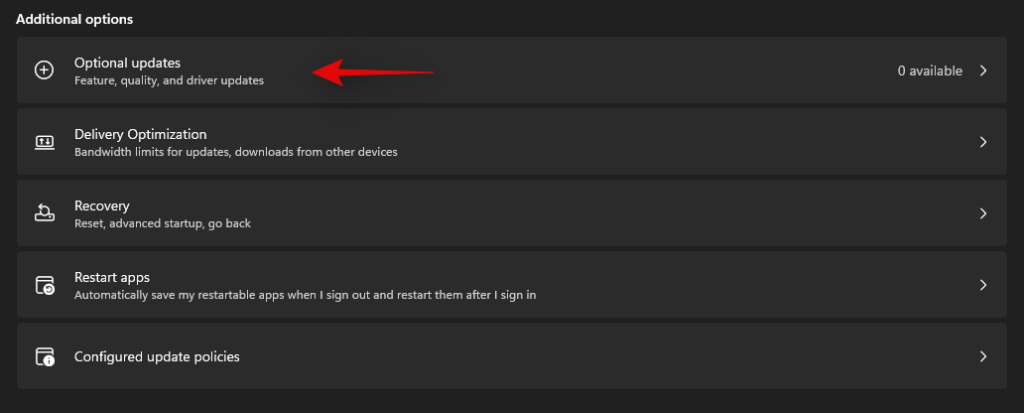
Feu clic i expandiu "Actualitzacions de controladors (n)", on n representa el nombre actual d'actualitzacions de controladors disponibles per al vostre ordinador portàtil. Marqueu la casella dels controladors de teclat que apareixen en aquesta llista. Feu clic a "Descarrega i instal·la" a la part inferior de la pantalla. Reinicieu el vostre ordinador portàtil fins i tot si no ho demana una actualització de Windows.
I ja està! Ara s'haurien d'instal·lar els darrers controladors de teclat al vostre ordinador portàtil, cosa que us ajudarà a restaurar la funcionalitat de les tecles d'accés ràpid. Si no és així, podeu continuar amb les solucions següents per provar d'arreglar les tecles d'accés ràpid.
Mètode 4: Torneu a instal·lar els controladors del teclat
Si cap dels mètodes anteriors us funciona, és hora de tornar a instal·lar els controladors del teclat. Tot i que els controladors poques vegades s'enfronten a conflictes en segon pla, les instal·lacions errades, els components incompatibles i les actualitzacions incorrectes poden malmetre els controladors del teclat, sobretot si teniu una il·luminació RGB personalitzada gestionada per una utilitat OEM.
Cadascuna d'aquestes aplicacions utilitza una manera diferent de connectar-se a la retroil·luminació del teclat per ajudar a personalitzar-la segons les vostres necessitats. Aquestes maneres de connectar-se al sistema no funcionen bé amb altres aplicacions de tercers que gestionen el mapa, la disposició del teclat i molt més. Reinstal·lar el controlador del teclat pot ajudar a solucionar la majoria d'aquests problemes, i ho podeu fer instal·lant un controlador dedicat del vostre OEM o utilitzant un controlador genèric procedent de Windows. Comencem.
4.1 Torneu a instal·lar el controlador genèric del teclat
Premeu Windows + Xel vostre teclat i feu clic a "Gestor de dispositius".
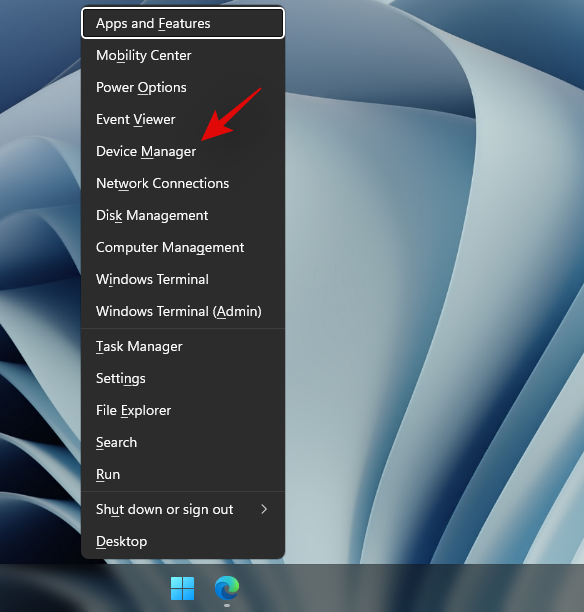
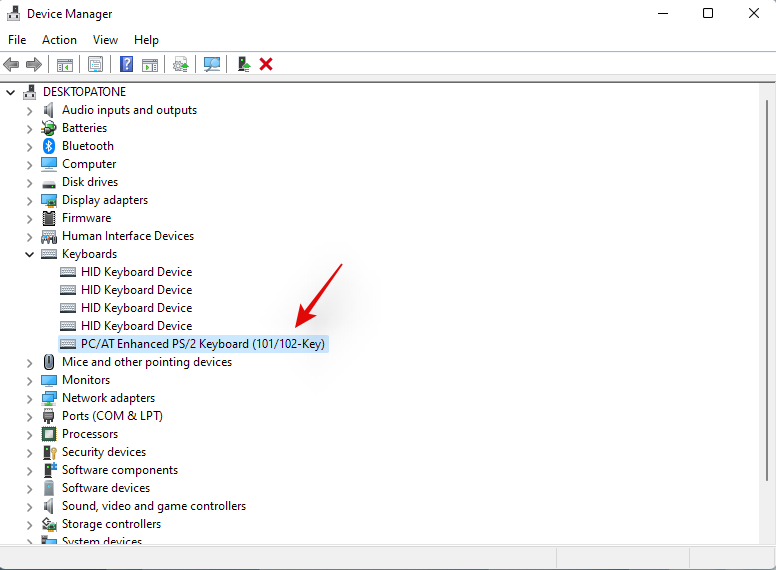
Un cop obert, cerqueu el vostre teclat en qüestió a la llista i feu-hi clic amb el botó dret. Si no trobeu el vostre teclat o teniu diverses llistes, podeu seleccionar-les i desinstal·lar-les totes. Un cop desinstal·lats, els controladors sobrants s'eliminaran mentre que els necessaris es tornaran a descarregar automàticament.
Feu clic a "Desinstal·la el dispositiu".
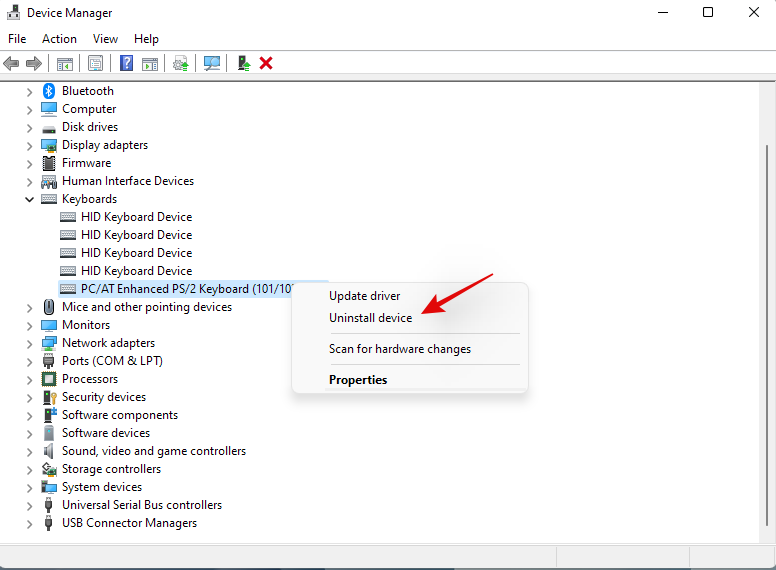
Feu clic a "Desinstal·la" de nou per confirmar la vostra elecció.
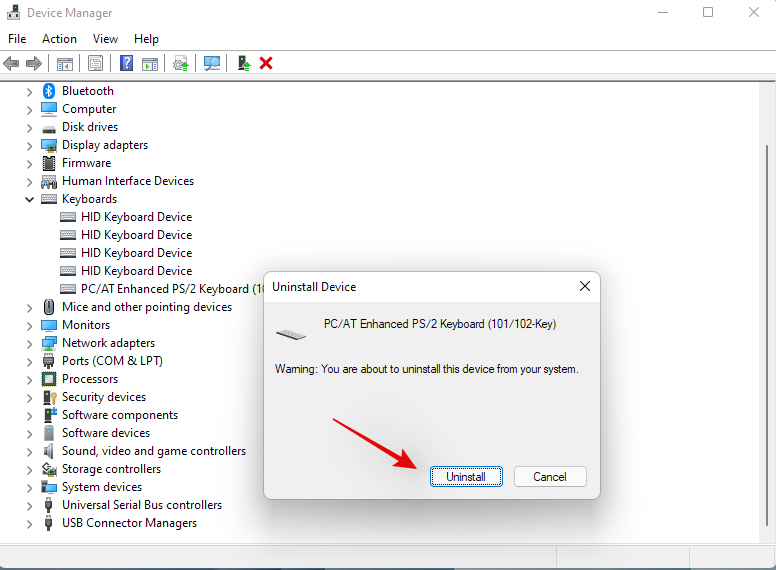
Reinicieu el vostre ordinador portàtil si se us demana i repetiu els passos anteriors per eliminar tots els controladors de teclat necessaris instal·lats al vostre sistema. Un cop desinstal·lat, feu clic amb el botó dret a una àrea buida i seleccioneu "Busca canvis de maquinari". També podeu fer clic a la icona dedicada a la vostra barra d'eines.

Ara Windows buscarà els controladors genèrics que falten per al vostre teclat natiu i els reinstal·larà automàticament al vostre ordinador portàtil.
Tanmateix, si Windows no troba els vostres controladors, podeu utilitzar la guia següent per instal·lar manualment els controladors de teclat dedicats del vostre OEM.
4.2 Torneu a instal·lar els controladors del teclat manualment
Baixeu i instal·leu els controladors de teclat necessaris al vostre emmagatzematge local. Assegureu-vos d'extreure el fitxer prèviament en cas que hàgiu descarregat un arxiu. Hauríeu de trobar un fitxer .inf dins del qual hi ha el controlador que s'instal·larem manualment al vostre sistema. Seguiu els passos següents per començar.
Premeu Windows + Xel vostre teclat i seleccioneu "Gestor de dispositius".

Ara amplieu la secció "Teclats" i feu clic amb el botó dret al teclat en qüestió. Si teniu diversos dispositius HID a "Teclats", us recomanem que desinstal·leu tots els controladors innecessaris per evitar conflictes.
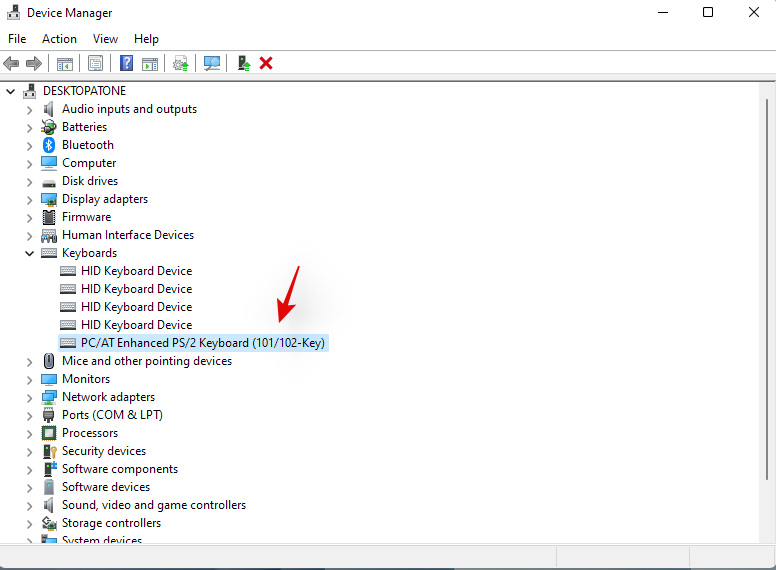
Seleccioneu "Desinstal·la el dispositiu".

Marqueu la casella "Intenta eliminar el controlador d'aquest dispositiu" si l'opció està disponible. Feu clic a "Desinstal·la" per confirmar la vostra elecció.

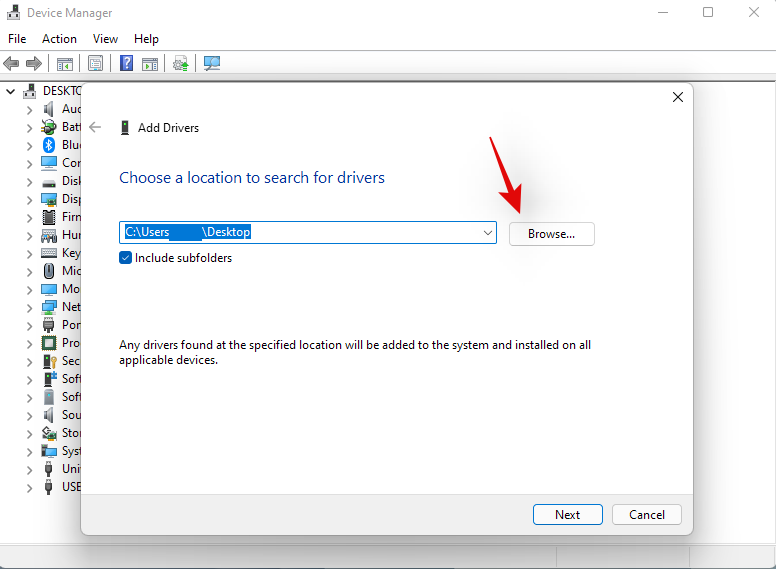
El teclat seleccionat ara es desinstal·larà del vostre sistema. El vostre teclat deixarà de funcionar després de desinstal·lar el controlador en qüestió. Aquest és un comportament normal i la funcionalitat del vostre teclat s'hauria de restaurar un cop tornem a instal·lar els controladors necessaris. Repetiu els passos anteriors per a tots els dispositius HID que vulgueu eliminar. Un cop eliminats els dispositius necessaris, feu clic a la icona "Afegeix controladors" a la barra d'eines.

Feu clic a "Examinar".
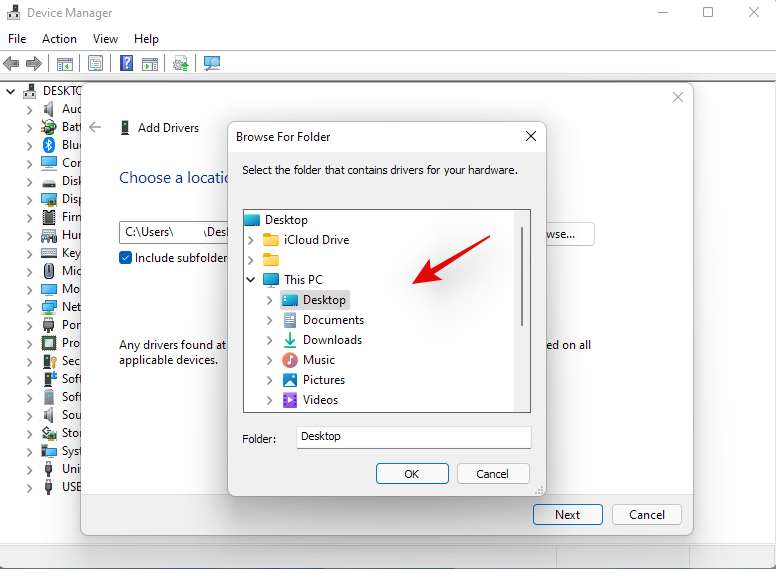
Navegueu a la carpeta on heu emmagatzemat els controladors OEM i feu clic a "D'acord".
Marqueu la casella "Inclou subcarpetes" només per estar segur. Feu clic a "Següent" un cop hàgiu acabat.
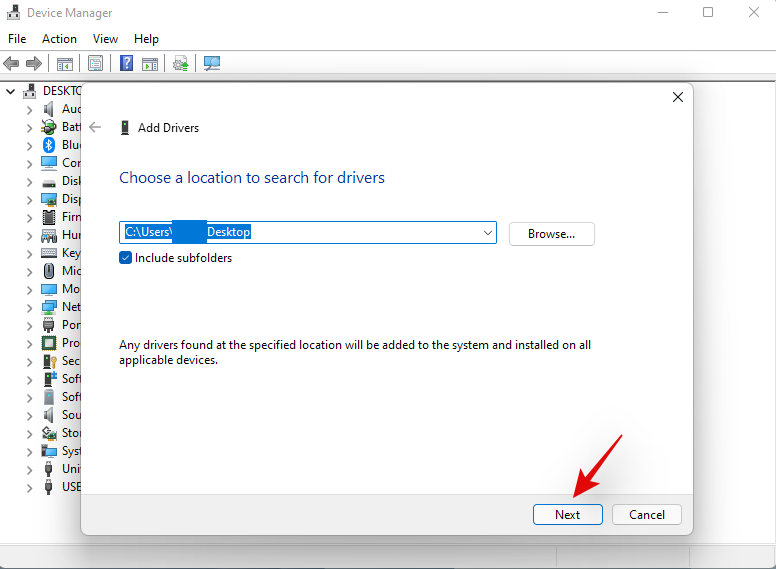
Ara Windows escanejarà la ubicació per trobar controladors compatibles i els instal·larà automàticament al vostre sistema.
Un cop instal·lat, us recomanem que reinicieu el vostre ordinador portàtil.
I ja està! Ara s'hauria de restaurar la funcionalitat de les tecles d'accés ràpid al vostre sistema si un conflicte de controlador de fons estava causant problemes al vostre sistema.
Nota: no instal·leu cap controlador de teclat mitjançant l'actualització de Windows en el futur per evitar perdre de nou la funcionalitat de la tecla d'accés ràpid.
Mètode 5: desactiva el mode de joc
Se sap que el mode de joc a Windows causa problemes en determinats ordinadors portàtils. El mode de joc de Microsoft s'ha tornat més intel·ligent i el mode intenta aplicar automàticament la millor configuració de perifèrics per a la vostra experiència de joc. Això inclou ajustar l'àudio, la configuració del ratolí, habilitar el canvi de tecles n al teclat, el bloqueig de tecles de Windows i molt més.
Tanmateix, l'habilitació automàtica d'aquesta configuració requereix connectar-se a controladors i eines dedicats que sovint són gestionats pel vostre OEM. Això podria crear conflictes en segon pla que podrien impedir-vos utilitzar les tecles d'accés ràpid a Windows 11. Utilitzeu la guia següent per desactivar el mode de joc al vostre ordinador portàtil.
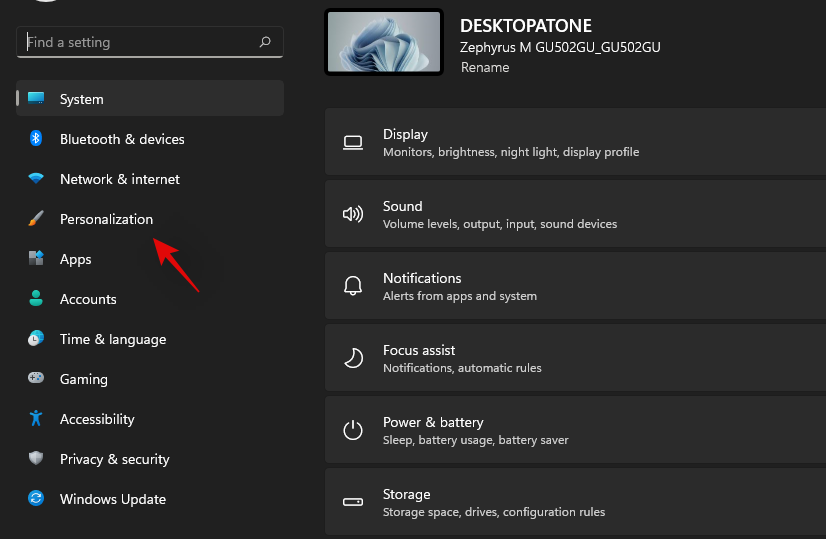
Premeu Windows + iel vostre teclat i feu clic a "Personalització" a la vostra esquerra.
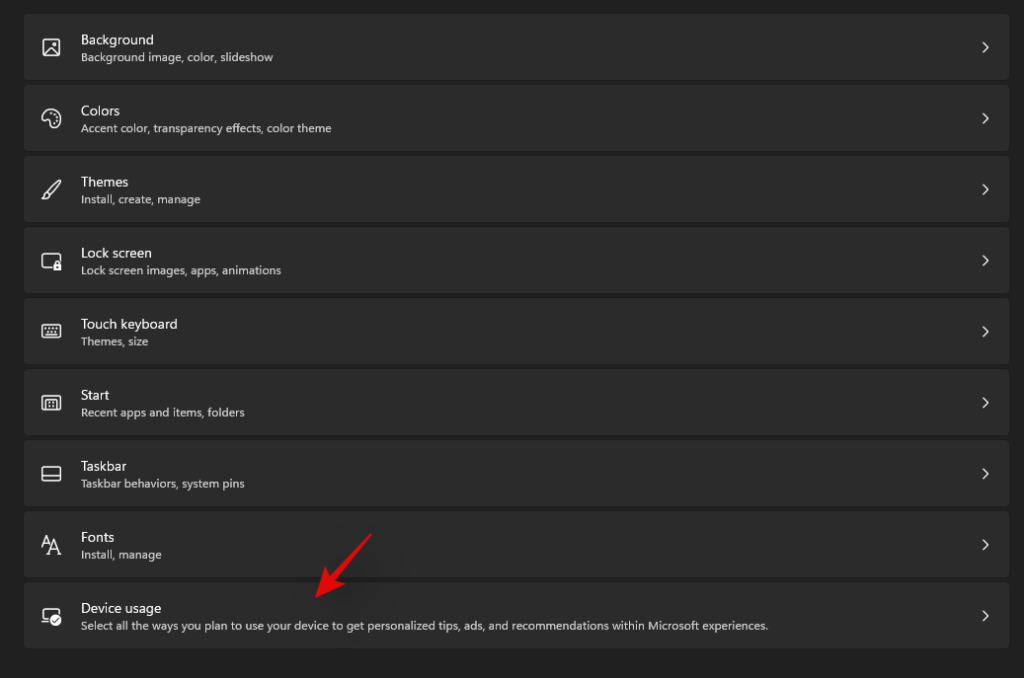
Feu clic a "Ús del dispositiu".
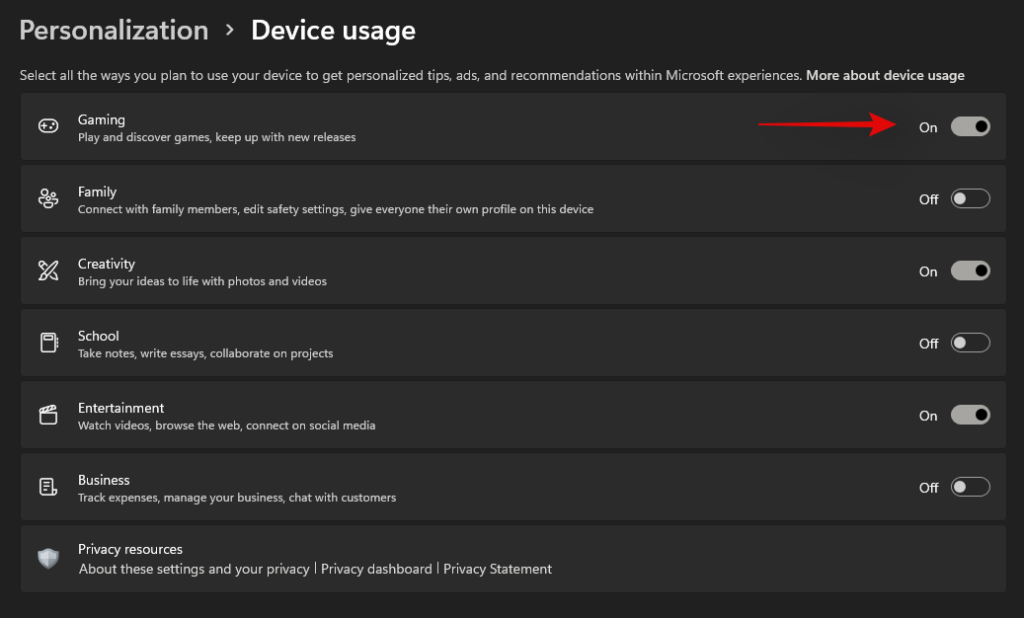
Desactiveu el commutador per a "Jocs".
Feu clic a "Jocs" a la vostra esquerra ara.
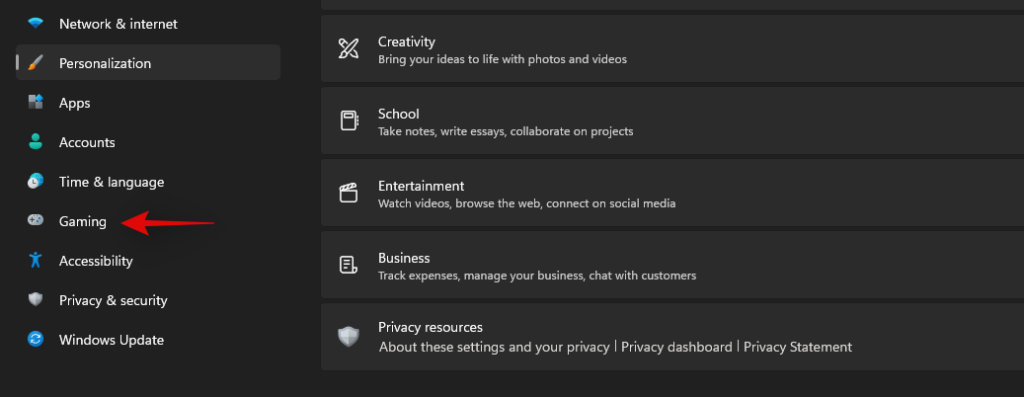
Feu clic a "Mode de joc" a la vostra dreta.

Desactiveu el commutador per al "Mode de joc" a la part superior de la pantalla.

Tanqueu l'aplicació Configuració i reinicieu l'ordinador portàtil.
Si les tecles d'accés directe comencen a funcionar en un reinici, és probable que el mode de joc interfereixi amb les tecles d'accés directe en segon pla.
Mètode 6: reinicieu el servei HID
You can also restart your HID service which should help restart all your HID or Human Interface Devices. This includes your keyboard and restarting the HID service should help fix your hotkeys if your custom software or mapper was unable to hook into the HID service. Use the guide below to get you started.
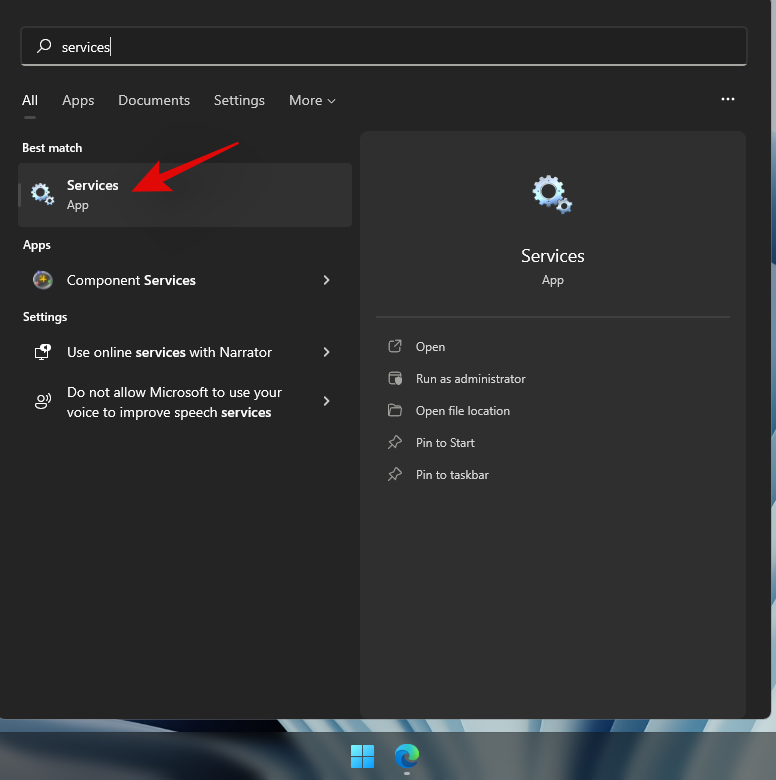
Press Windows + S and search for ‘Services’. Click and launch the app once it shows up in your search results.
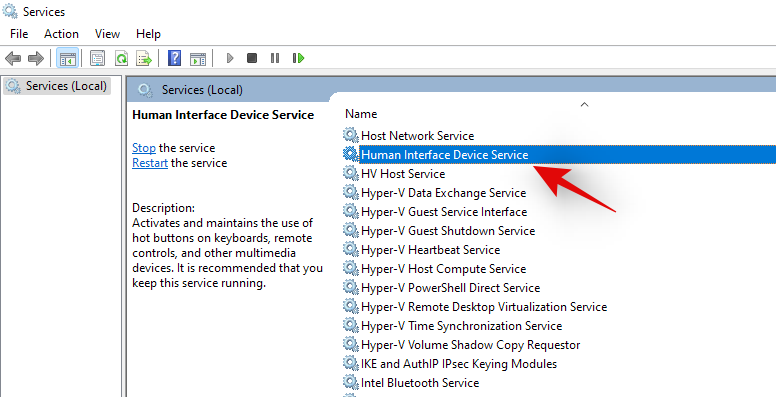
Look for ‘Human Interface Device Service’ and right-click on it.
Select ‘Restart’.
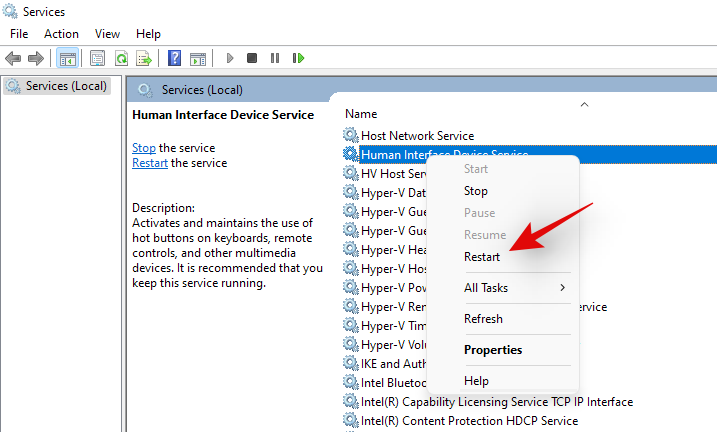
Windows will now restart your HID service.
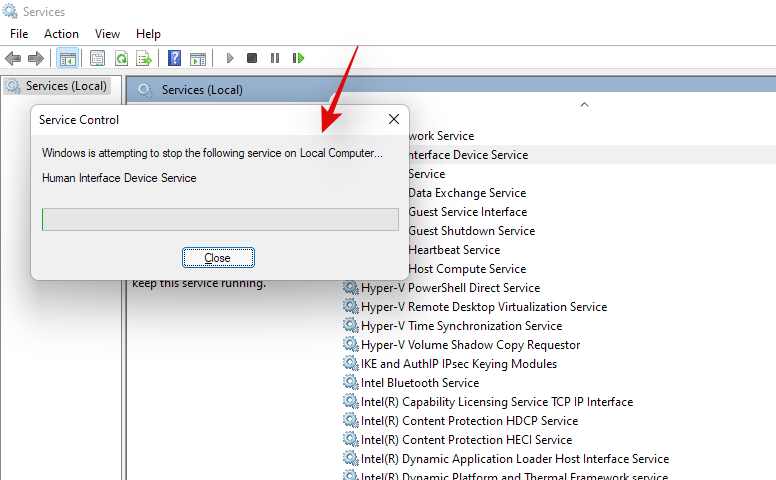
You can try testing out your hotkeys now. If a conflict in the background was preventing your custom software from hooking into the HID service, then this issue should now be fixed and your hotkey functionality should now be restored.
Method #7: Disable filter keys
Filter keys are another culprit within Windows that is known to cause issues on many devices. Ideally, Filter keys is an accessibility feature meant to be used so that you can avoid brief repeated key inputs which is quite useful for users with anxiety, hyperactivity, hand tremors, and other similar conditions.
However, if this feature has been enabled by mistake, then it could prevent Windows from detecting your hotkey inputs and combinations. You can check if Filter keys are enabled on your system and disable them using the guide below.
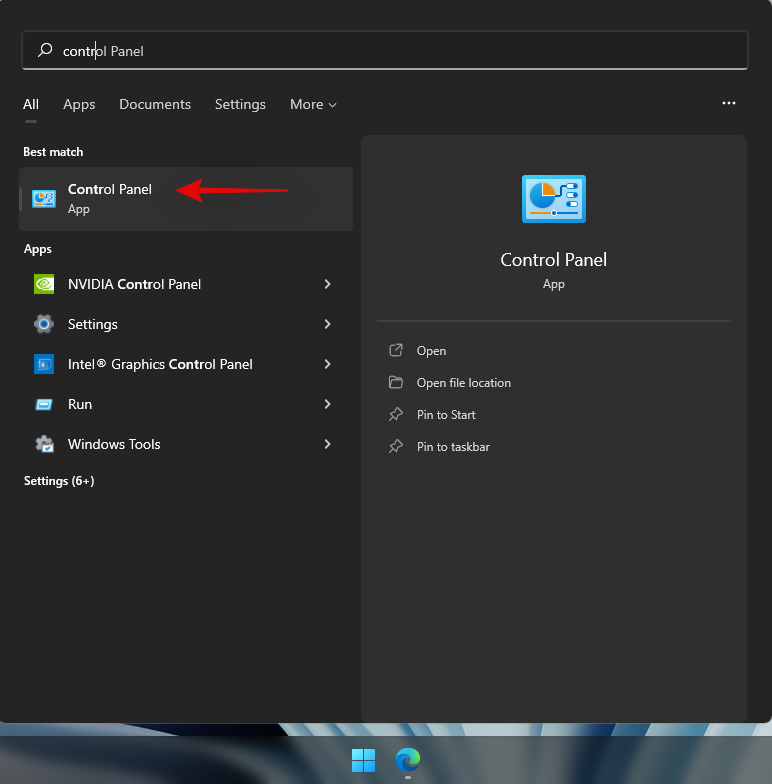
Press Windows + S and search for Control Panel. Click and launch the app once it shows up in your search results.
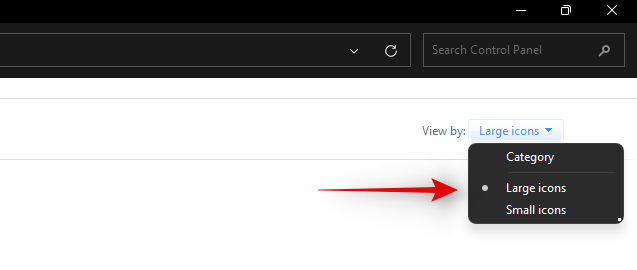
Switch to ‘Large icons’ by clicking on the drop-down menu in the top right corner.
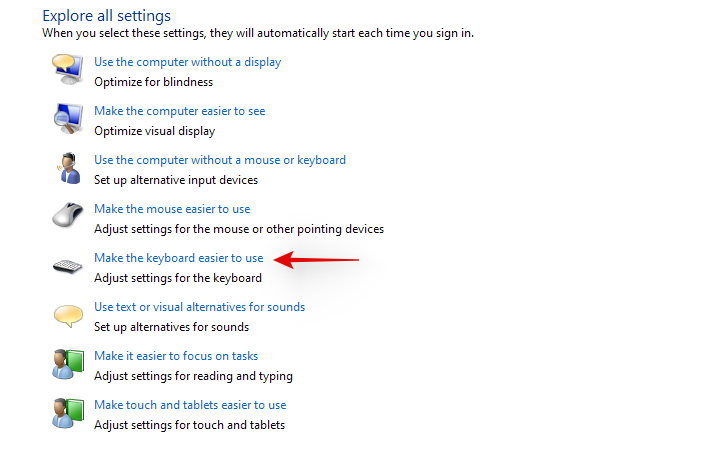
Click on ‘Ease of Access Center’.

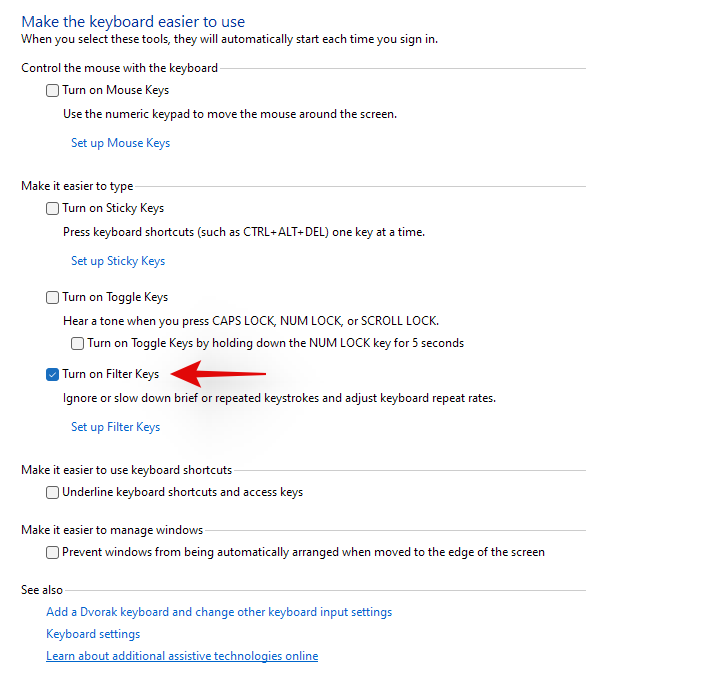
Click on ‘Make the keyboard easier to use’.
Now uncheck the box for ‘Turn on filter keys’.
Click on ‘Ok’ at the bottom.
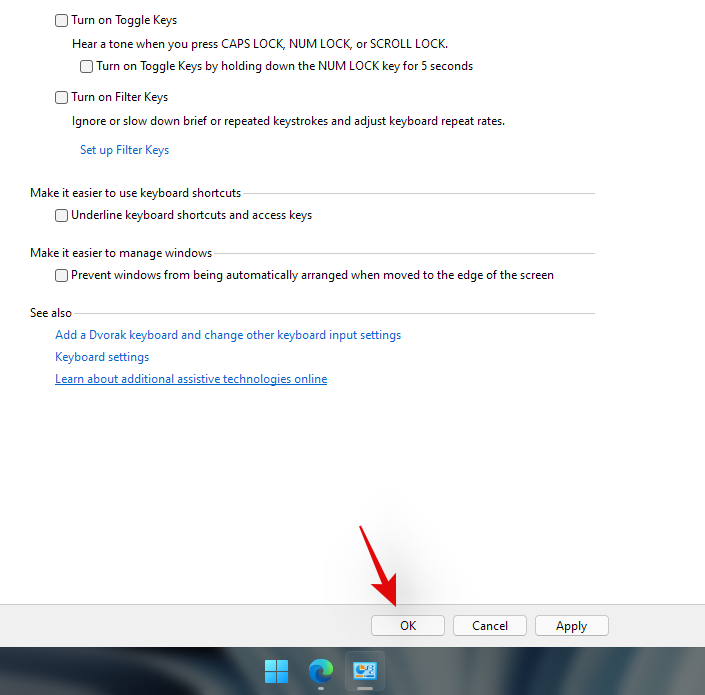
And that’s it! Filter keys should now be disabled on your system. Check your hotkey combinations and their functionality should now be restored on your system.
Method #8: Disable Function (Fn) lock if available
Fn lock is a feature in most laptops that allows you to lock and use the Fn keys and their functionality. Most systems use Fn keys as alternate keys mapped to functions and utilities that will be needed to manage your system. For example, F7 could be used to increase brightness and F8 could be used to decrease brightness. If directly pressing these keys helps you manage your brightness then the Fn lock is disabled on your laptop.
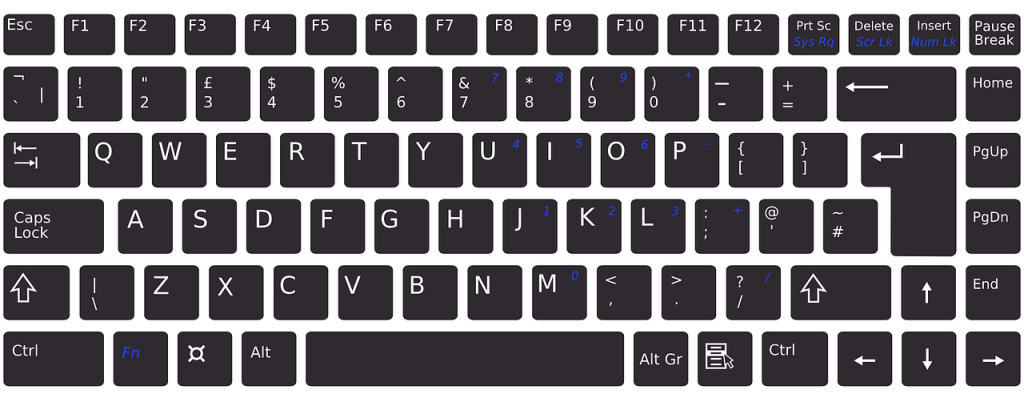
However, if hitting F7 and F8 registers as the respective key then the Fn lock is enabled on your device. In such cases, your Fn keys will behave normally and you will need to use Fn + F7 or F8 combination to adjust your brightness. You can disable or toggle this lock using keyboard shortcuts on most laptops. Look for an ‘Fn Lock’ icon on one of your keys and pres Fn + the respective key, on your keyboard. This should help disable Fn lock on your keyboard if enabled, and restore your hotkeys functionality.
In case a key combination is not available on your device, then you will most likely need to access your BIOS. Most manufacturers allow you to disable and enable Fn lock from the BIOS for easy access. Simply press F2 on your splash screen once your laptop is booting to enter the BIOS menu. Once in the BIOS menu, find the relevant option and toggle the Fn lock for your laptop.
In case a BIOS menu option is also not available to you then your laptop most likely uses the default Fn lock combination which is ‘Fn + Esc’ on your keyboard. This will help toggle the Fn lock on your system which should help restore your hotkeys.
Method #9: Check the on-screen keyboard
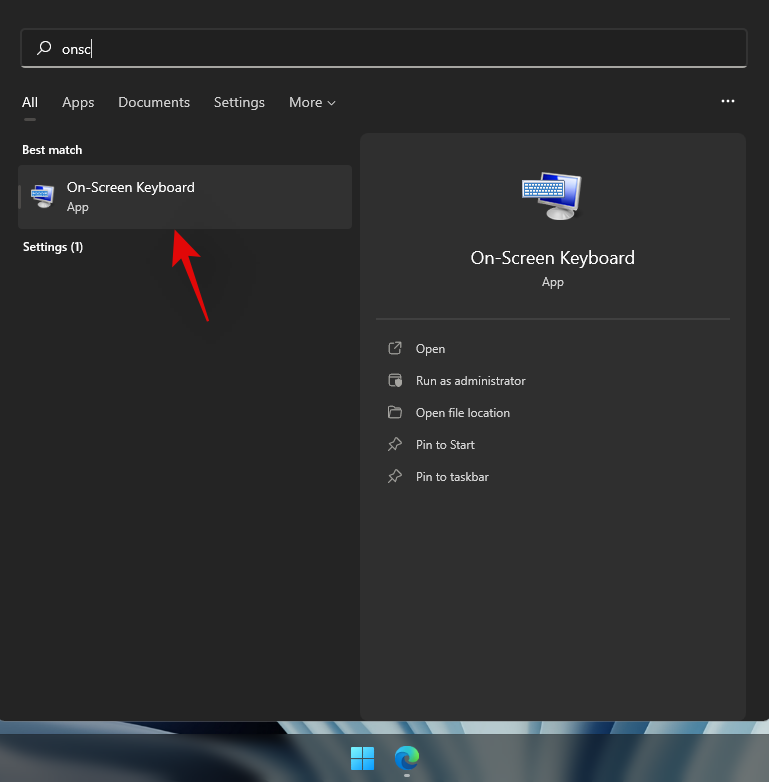
On-Screen keyboard within Windows can help you determine if your hotkeys have actually stopped working or you are facing a software issue. Start by launching the on-screen keyboard on your laptop using the taskbar icon. If the icon is hidden, press Windows + S on your keyboard and search for ‘On-Screen Keyboard’. Click and launch the app from your search results.
Now try using a hotkey that does not use Fn keys on your keyboard as they would be unavailable on your on-screen keyboard. If not try testing out each key and see if it still works on your laptop.
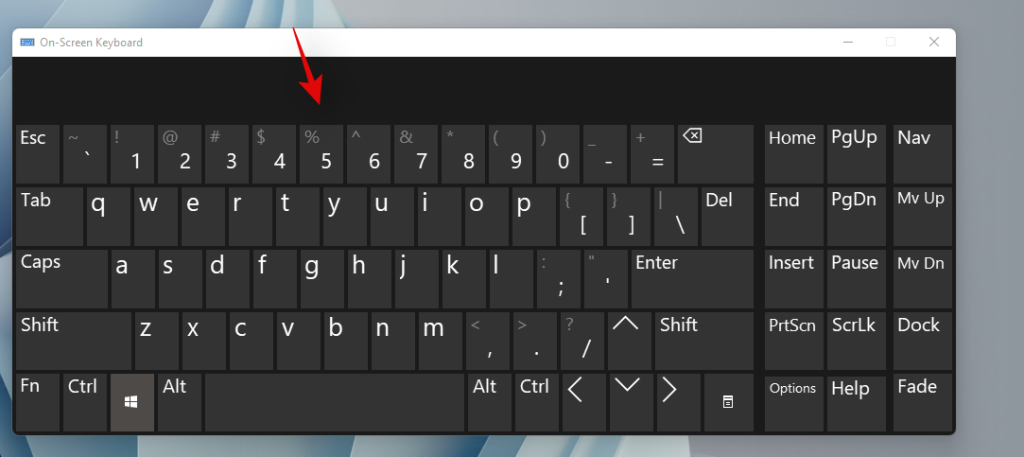
If all your keys seem to be registering with hotkeys working via the on-screen keyboard, then this indicates a hardware issue with your keyboard. In such cases, we recommend you get in touch with your OEM support team and try to solve your issue. If however, you are unable to activate your hotkeys via the on-screen keyboard as well, then you can use the fixes below to try and solve your issue.
Method #10: Use Windows troubleshooter
If hotkeys still fail to work on your system then it’s time to run a dedicated Windows troubleshooter. Windows troubleshooters have become highly advanced in the past few years and they can help fix most issues with your system nowadays. Use the guide below to run a keyboard troubleshooter on Windows 11.
Press Windows + i on your keyboard and click on ‘Troubleshoot’ on your right.
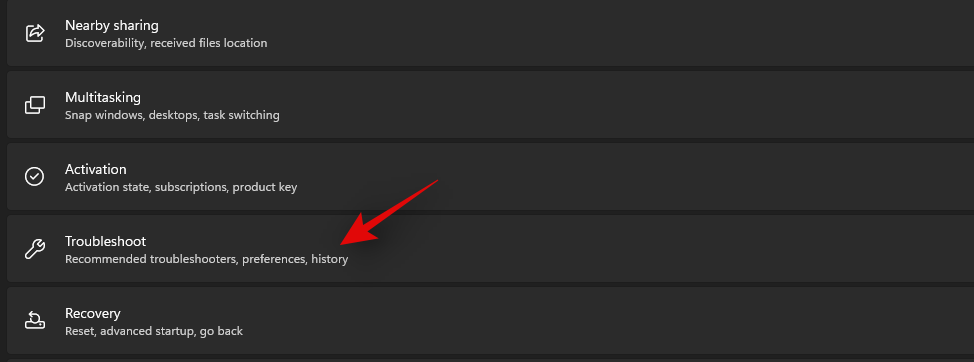
Now click on ‘Other troubleshooters’.
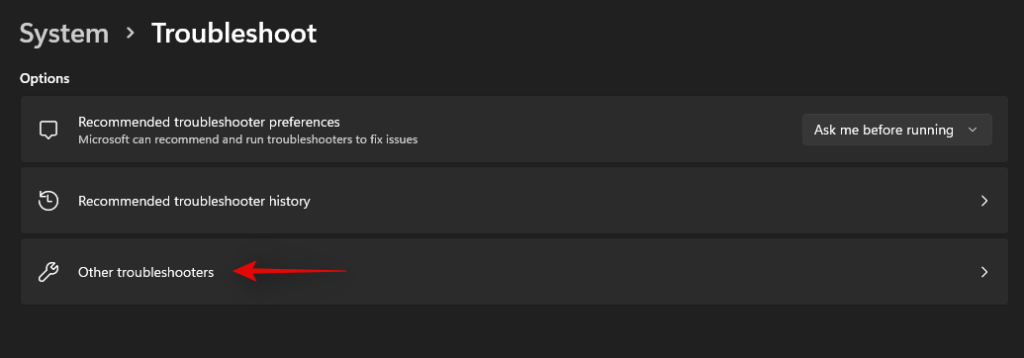
Scroll down and click on ‘Run’ beside ‘Keyboard’.

Windows troubleshooter will now do its thing and try to find issues with your keyboard.
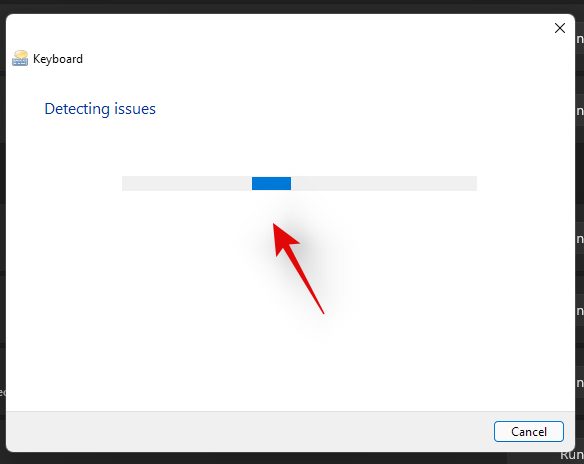
If any are found, follow the on-screen instructions to apply the relevant fixes. However, if the troubleshooter does not find anything then you can use the methods below to try and get your hotkeys working again.
Method #11: Run SFC scan
If hotkeys still aren’t working on your laptop then this might indicate an issue with your Windows installation. Let’s try to fix Windows system files and Windows 11 image on your laptop to try and fix hotkeys on your system. Use the guide below to get you started.
Press Windows + S on your keyboard and search for ‘CMD’. Click on ‘Run as administrator’ once it shows up in your search results.
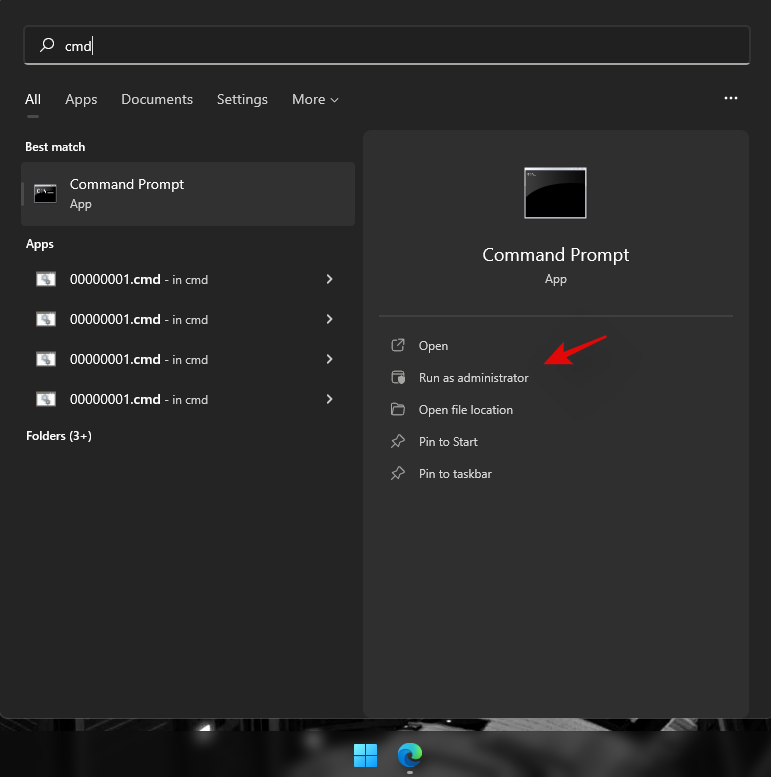
Now type in the following command and press Enter on your keyboard to execute it.
sfc /scannow

Windows will now scan and verify all of your system files and replace corrupted ones with fresh system files. If a corrupted Windows 11 installation broke your hotkeys functionality, then this should help fix it on your laptop.
Method #12: Run DISM fixes to restore Windows image
If you got the following message after running the SFC scan above, then it is highly important to run the DISM commands to fix your Windows 11 image.
“Windows Resource Protection found corrupt files but was unable to fix some (or all) of them”
Additionally, if the SFC scan is completed successfully but your hotkeys still do not work, then you can use the DISM commands to try and fix your Windows image as well. This will restore system files and solve background conflicts that might be preventing you from using your hotkeys. Follow the steps below to get you started.
Press Windows + S on your keyboard, search for CMD and click on ‘Run as administrator’ once it shows up in your search results.

Type in the following command and press Enter on your keyboard to execute it.
DISM /Online /Cleanup-Image /RestoreHealth

Wait for the process to complete and restart your laptop for good measure.
If a corrupted Windows image was the cause of your issue, then hotkey functionality should now be restored on your laptop.
Method #13: Uninstall any third-party tools
If you have any third-party tools customizing your keyboard then we recommend you disable or uninstall them at once. This includes the likes of key mappers, macro customizers, keyboard backlighting customizers, keyboard layout changes, and more. Such apps use different ways to hook into your keyboard drivers via Windows and any one of these could be outdated and not compatible with Windows 11 on your system.
We recommend you uninstall any such tools from your system at the earliest and remove any additional leftover configuration files if available. You should also check for driver updates to your keyboard and roll back to a previously known driver to revert any major changes applicable to your system. Use the guide below to roll back your keyboard driver.
13.1 How to rollback your keyboard driver
Press Windows + X on your keyboard and click on ‘Device manager’.

Find the desired keyboard in your list of devices and right-click on it once found.

Select ‘Properties’.
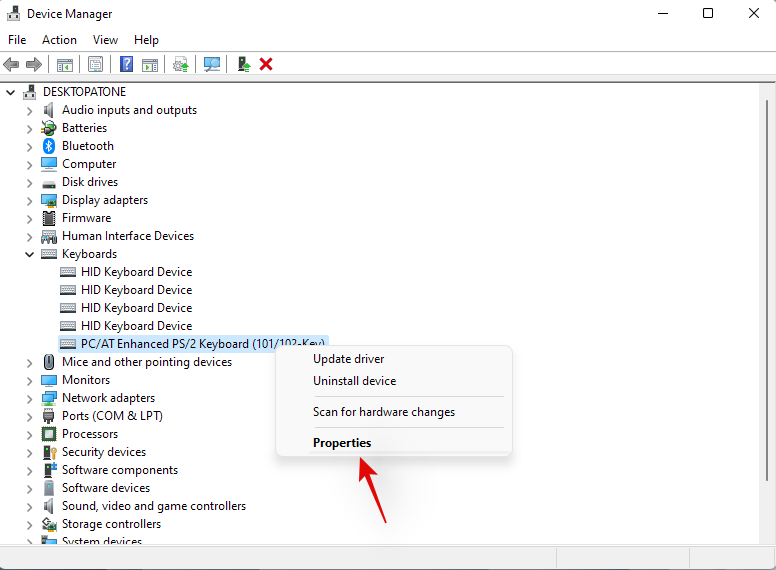
Click and switch to the Driver tab.
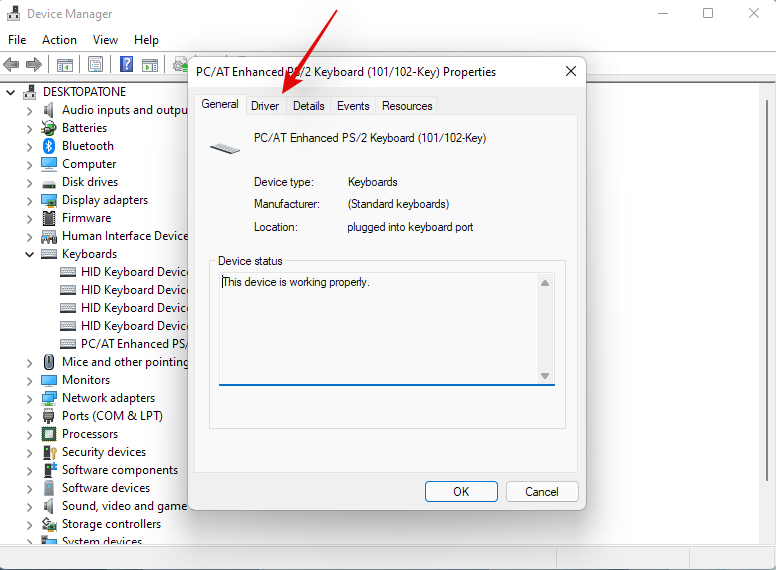
Click on ‘Rollback driver’ if available.
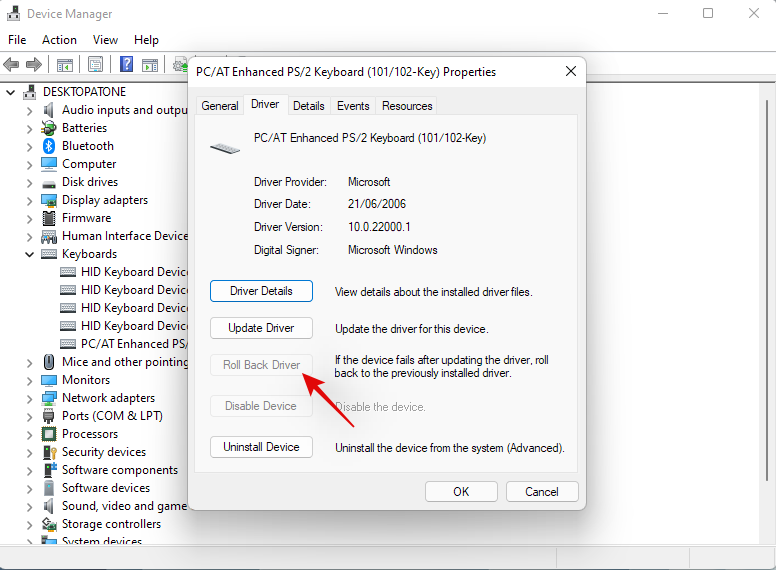
Follow the on-screen instructions to finish rolling back your driver.
Restart your system if prompted.
Once the driver is reverted to its previous iteration hotkeys should start working on your system again.
However, if you don’t have the option to roll back your driver then you will need to uninstall the installed drivers for your keyboard and hope that Windows sources the correct drivers when it scans for new hardware on your system. If you have dedicated drivers available for your keyboard on your OEM support site, then you can install them manually. Follow Method #10 below to reinstall your keyboard drivers manually or through Windows in this case.
Method #14: Connect to a different USB port (external keyboards only)
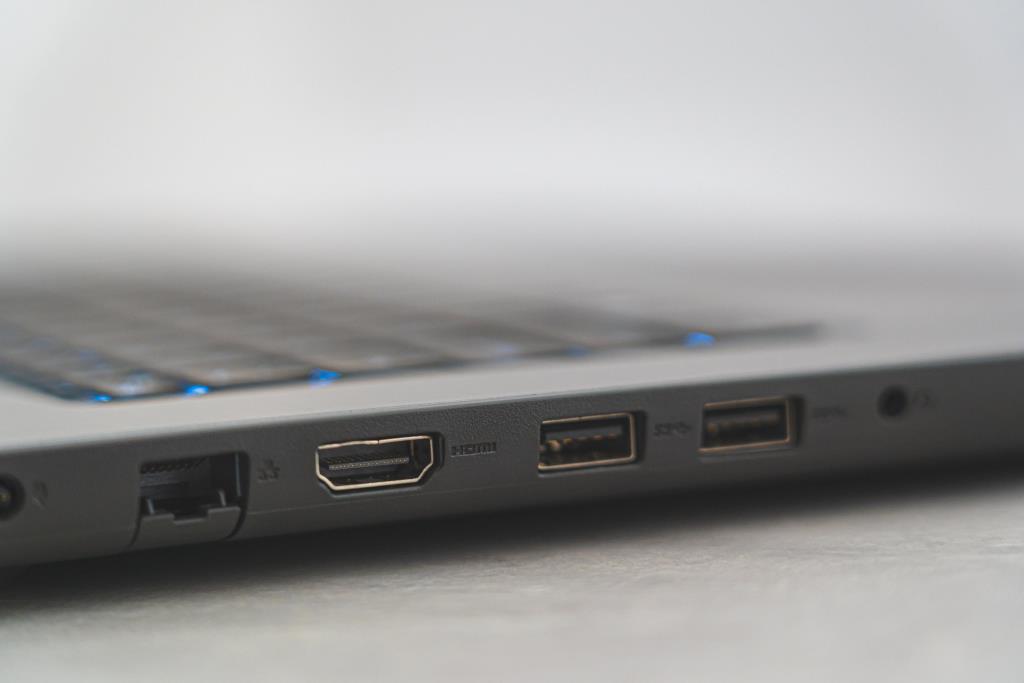
If you are using an external keyboard then we recommend using a different USB port. Depending on your keyboard you might need a USB 2.0 or USB 3.0 port for compatibility and keyboard layout reasons. Additionally, if your keyboard uses fancy backlighting and other custom features then it likely requires a USB 3.0 port on your system to power all of its features.
In contrast, if you are trying to use a legacy keyboard via adapters then you will likely need to test USB 2.0 and USB 1.2 for best performance depending on your unit. Moreover, we recommend you ensure that your laptop is plugged into power so that it can power your USB ports properly.
If however, your external keyboard still fails to work then you can try reinstalling its drivers on your system using the guide in this post.
Method #15: Check GPO and re-enable hotkeys if disabled
If you are using Windows Pro or higher that has been issued by your organization or your educational institute then it is likely that hotkeys have been disabled on your system by your administrator. This could be a side effect due to a recent change, or it could be your new company policy.
Administrators tend to disable third-party apps on company-issued and education systems which also, in turn, disables hotkey functionality for most laptops. You can fix this issue by contacting your administrator and whitelisting your hotkey app in case you don’t have access to the Group Policy Editor. However,
If you are an administrator, with access to GPO, then you can use the guide below to re-enable hotkeys on your system.
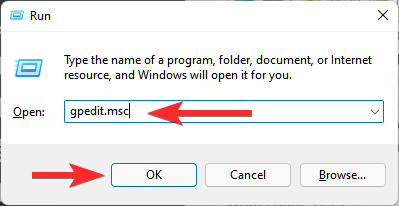
Press Windows + R on your keyboard, type in the following term, and press Enter on your keyboard.
gpedit.msc
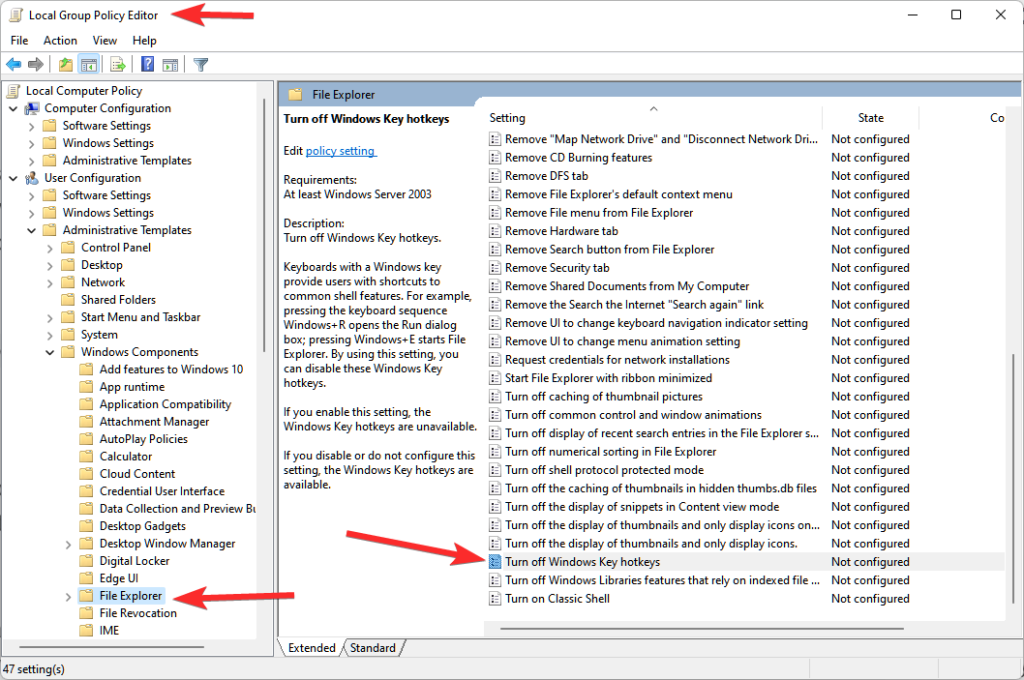
Navigate to the following path.
User Configuration > Administrative Templates > Windows Components > File Explorer
Double click on ‘Turn off Windows Key hotkeys’.
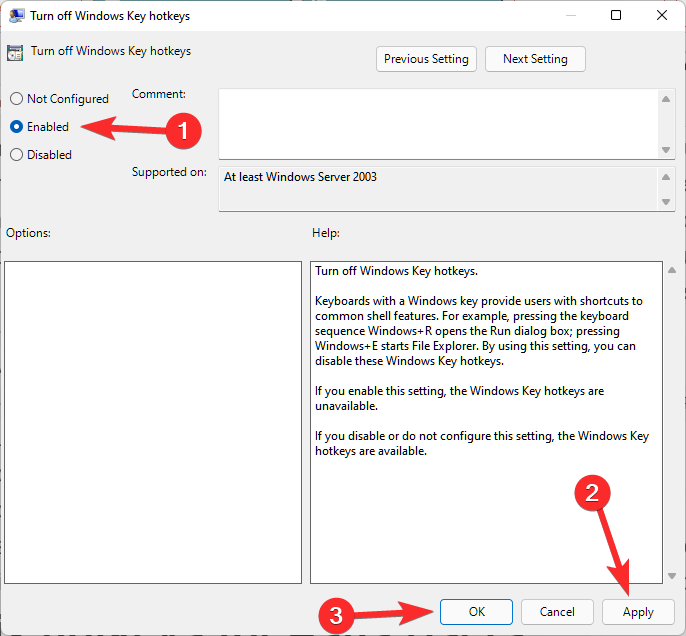
Click and select ‘Enabled’ in the top left. Then click ‘Apply’ in the bottom right and then click ‘OK’.
Restart your laptop for good measure and hotkey functionality will now be restored on your system. Please keep in mind that this will only work for OEMs that hook into Windows shortcuts natively to get hotkeys working again. For manufacturers that have dedicated utilities, you can use one of the guides below.
Fix hotkeys for Asus Users
If you are an Asus user with a ROG or a TUF unit, then it is likely that you are dealing with Armoury Crate. Armoury Crate is Asus’s utility that helps you manage your power plan, performance plan, overclocking, keyboard backlighting, and more depending on your laptop. Over the years Armoury Crate has grown to be quite finicky and has been riddled with telemetry and adware.
Moreover, the Aura Sync utility seems to be a hit or miss when syncing your peripherals’ backlighting with each other. If you have an Asus unit and hotkeys don’t seem to be working for you then it is likely that the Asus hotkeys app hasn’t been launching in the background. In this case, you can either try to manually start the app or reinstall AC service and the Asus System interface reconfigure your hotkeys and restore their functionality. Use one of the guides below that best fits your current needs and requirements.
Method #1: Try to manually start AsusHotkeyExec.exe
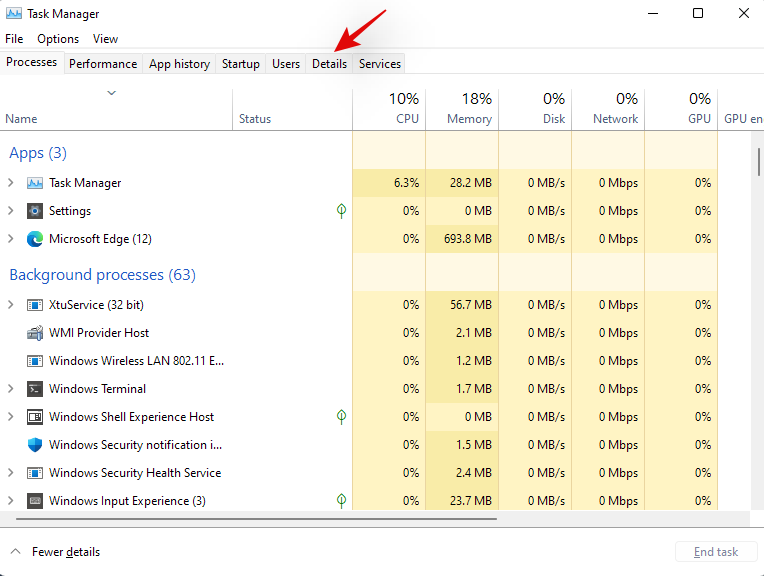
Press Ctrl + Shift + Esc on your system to open the Task Manager and switch to the ‘Details’ tab.
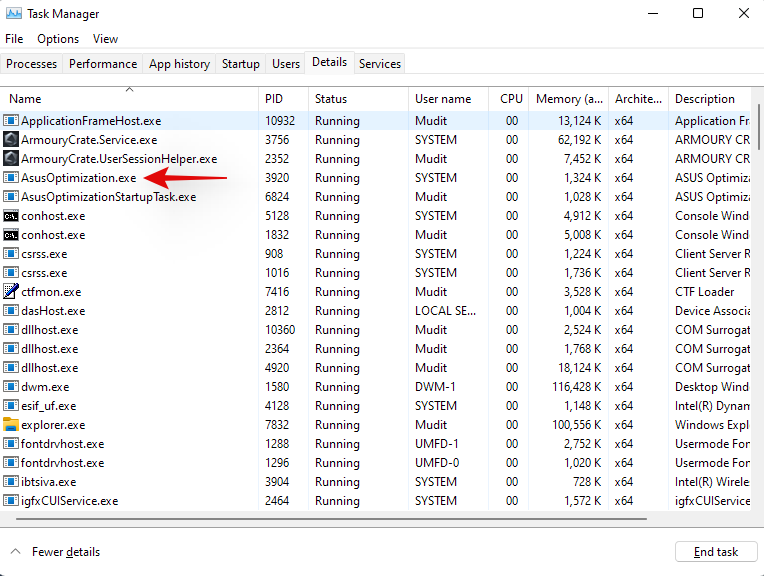
Depending on your preferences, the install location of AsusHotKeyExec.exe could vary. Hence we will use an already running process to find its install location. Start by right-clicking on either of the following ongoing tasks.
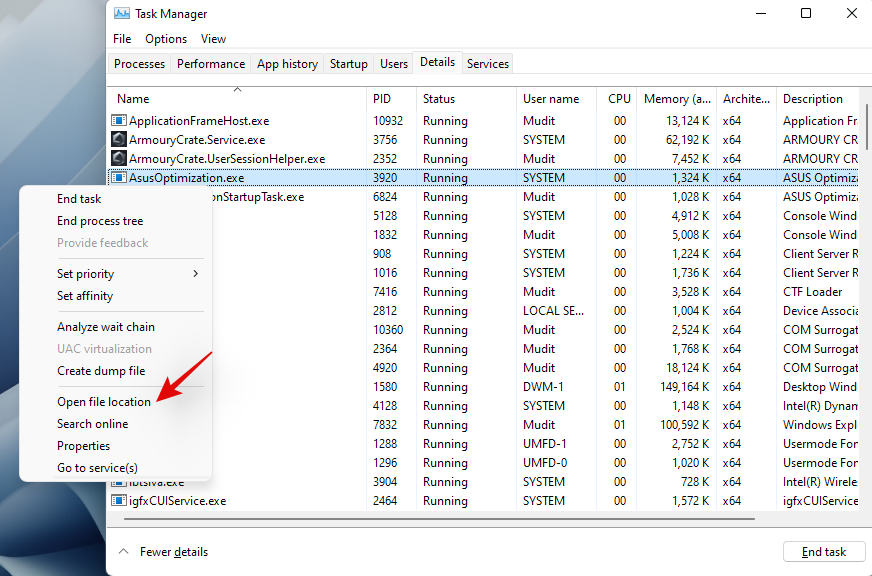
Select ‘Open file location’.
You should now be taken to the ‘C:\Windows\System32’ ideally, where you should find the ‘AsusHotkeyExec.exe’. Right-click on the app and select ‘Run as administrator’.
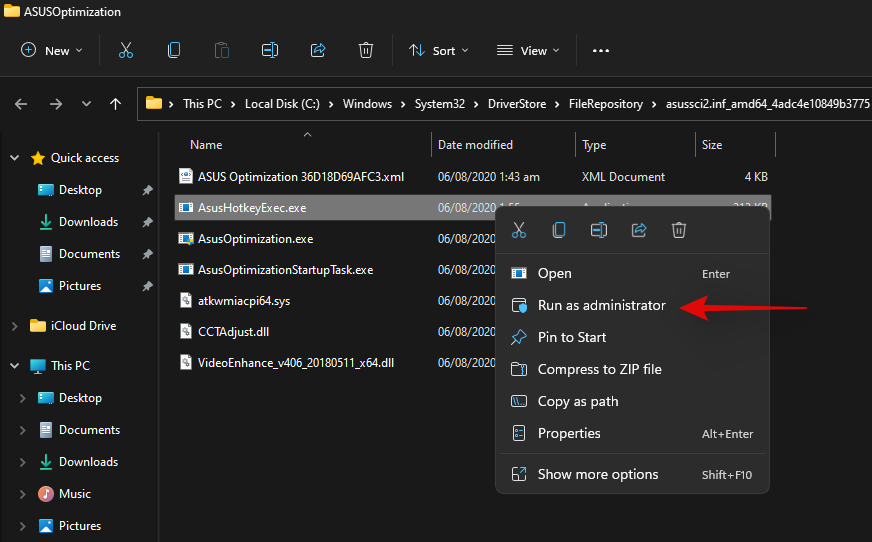
The app will now launch in the background and restore hotkey functionality on your system.
Try using one of your hotkeys now, if it seems to be working then, likely, AsusHotkeyExec.exe did not automatically launch in the background. This could be an isolated incident but if the app fails to launch even after a restart, then you will need to re-enable its auto start functionality.
You can do this by reinstalling Asus System Interface and Armoury Crate Service on your laptop using the guide below.
Method #2: Re-install Asus System Interface and Armoury Crate service
Asus System Control Interface is a prominent utility regularly updated by Asus that helps most tools like Armoury Crate, Armoury Crate Service, MyAsus System Diagnosis, and more to run properly on your system. Armoury Crate service on the other hand is your overclocking utility bundled with specific overclocking and power management configurations for your specific device. Depending on your ROG or TUF unit, AsusHotkeyExec.exe could be bundled with either of these services. Let’s re-install both of them on your system.
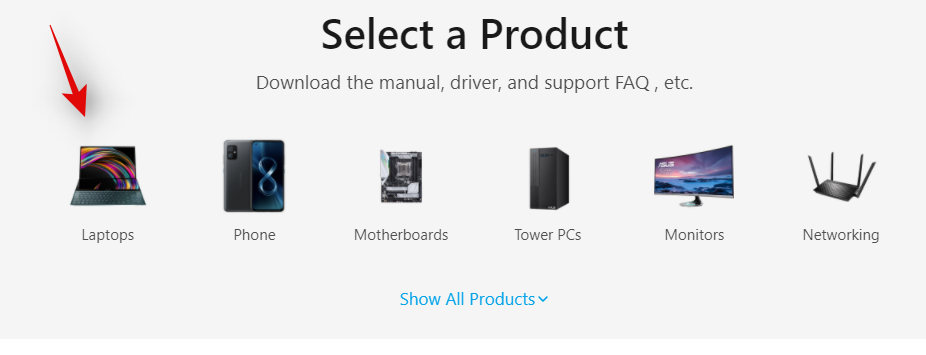
Visit the link above and click on ‘Laptops’.
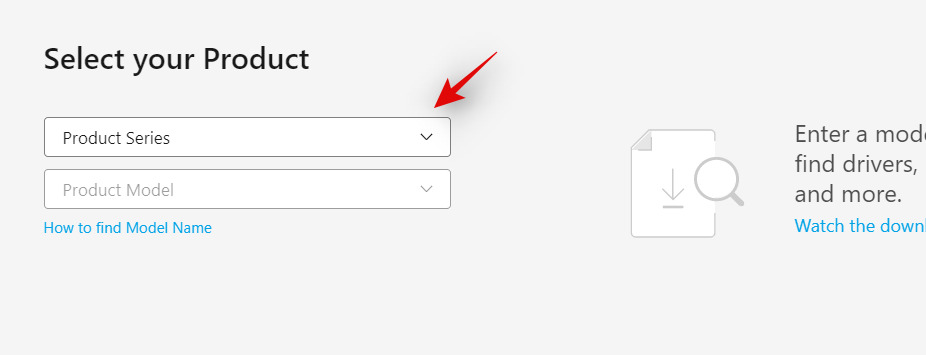
Click on ‘Product Series’ and select your Series from the drop-down menu.
Click on the next drop-down menu and select your laptop from the list.
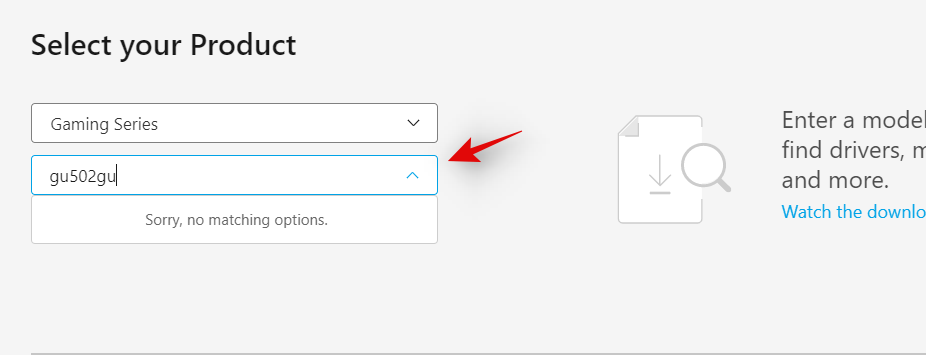
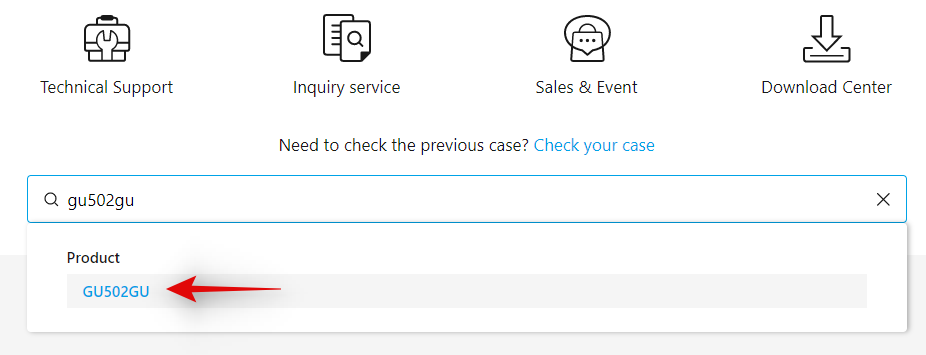
If your unit is not listed in this list, then you can search for it using the search bar at the top. Click on your laptop model once it shows up in your search results under ‘Products’.
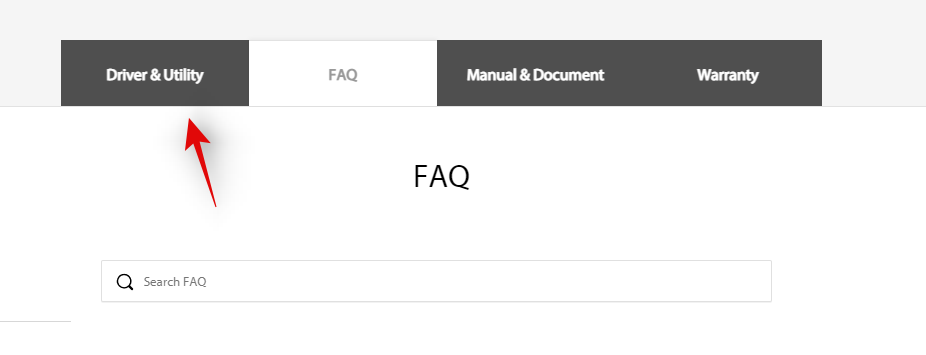
Click on ‘Driver & Utility’.
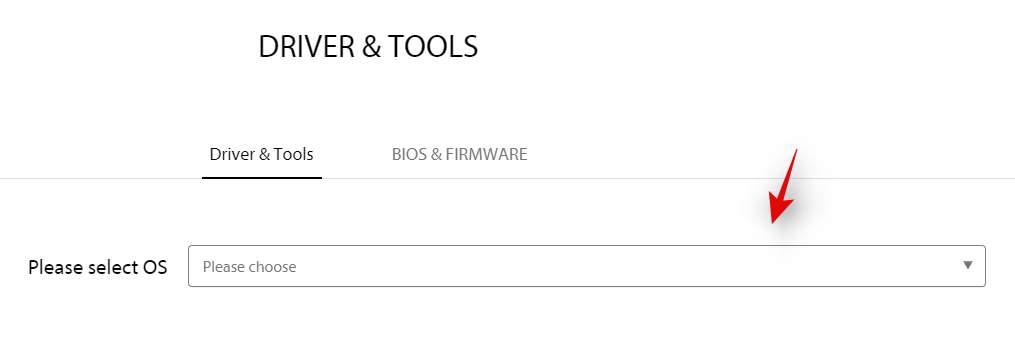
Choose ‘Windows 10 64-bit’ as your OS.
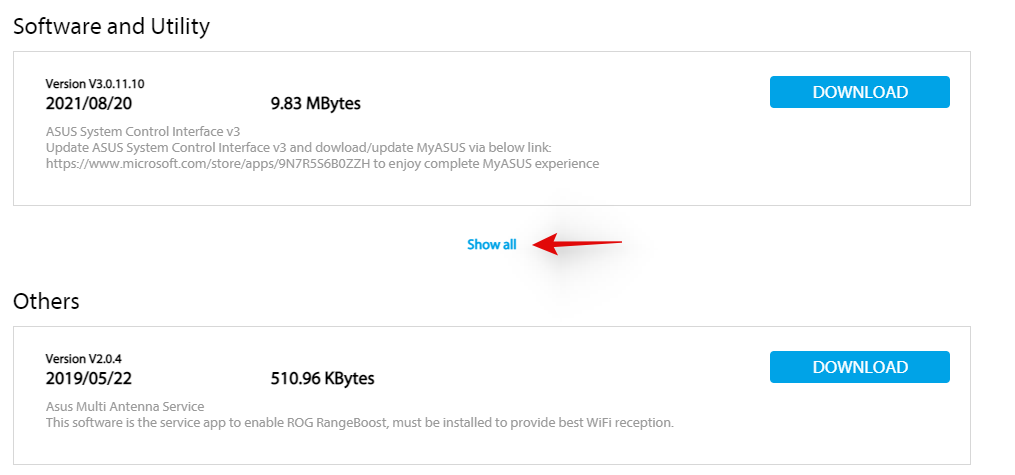
Now scroll down to the ‘Software and Utility’ section and click on ‘Show all’.
Click on ‘Download’ beside the latest version of ASUS System Control Interface.
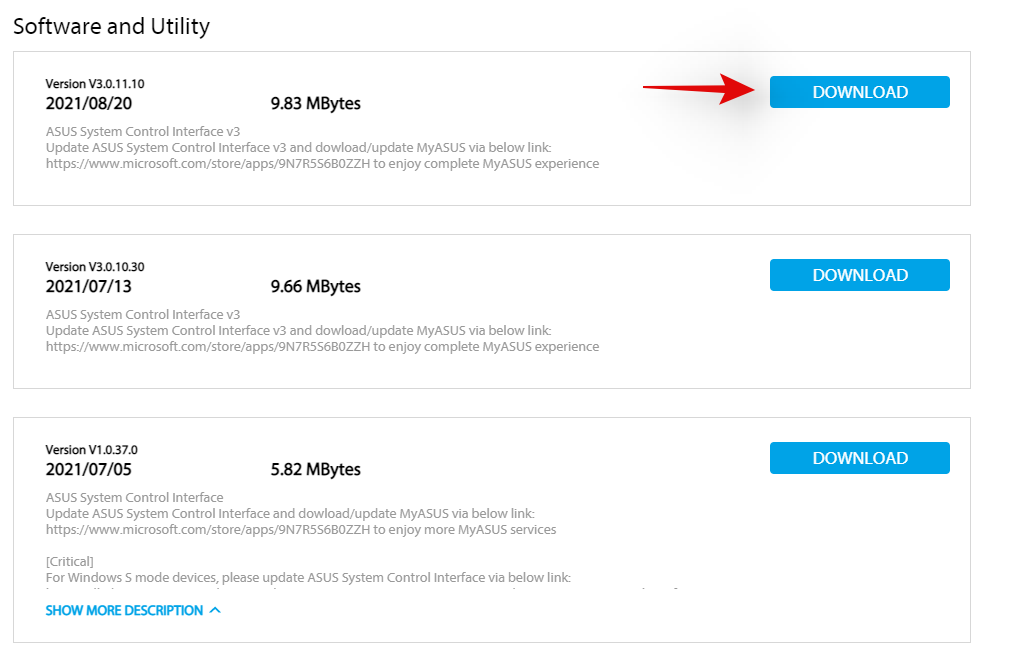
Similarly, click on ‘Download’ beside Armoury Crate Service.
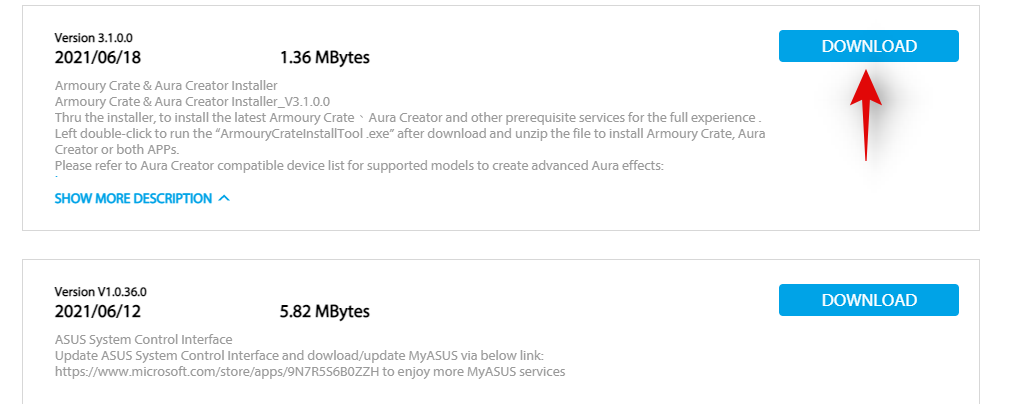
Note: Asus has now started bundling the Armoury Crate app, Armoury Crate Service, Aura Sync app, and Aura Sync service in a single package for many laptops. If this is the case for your unit as well, then you can download this package.
Now let’s remove all installed services and packages that we are going to reinstall. Press Windows + i on your keyboard and click on ‘Apps’ on your left.

Click on ‘Apps and features’.

Now uninstall the following applications if you managed to source the Armoury Crate Service package from the download page.

However, if you got a single package to install Armoury Crate, Armoury Crate Service, Aura Sync app, and Aura Sync service, then uninstall the following applications from your laptop.
To uninstall an app, click on the 3-dot menu beside it and select ‘Uninstall’. Click on ‘Uninstall’ again to confirm your choice. Repeat the steps above to uninstall all the necessary apps from your system.
Note: Do not remove services like Refresh Rate service, Pointing device service, and more from your laptop during this process. Even though they hook into the Armoury crate, there is no need to uninstall them as the existing installation will work with your reinstalled Armoury Crate and its services.
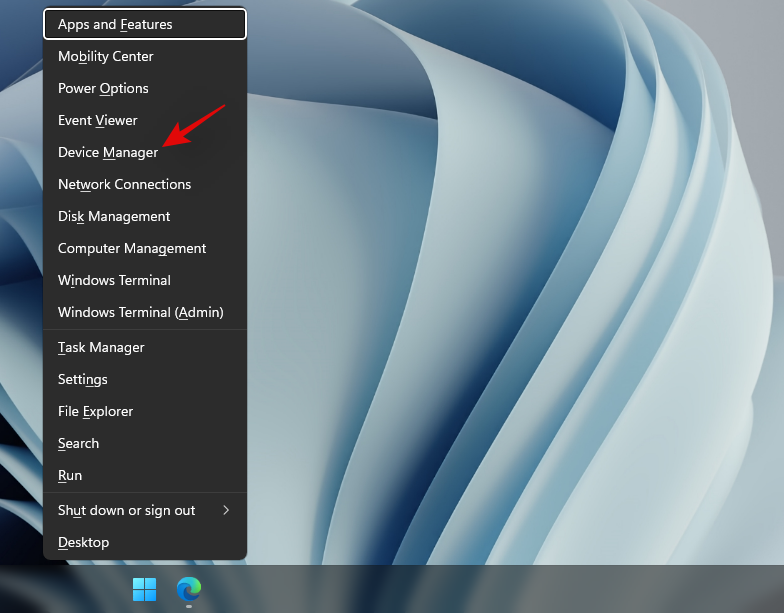
We will now uninstall Asus System Control Interface from your system. The best way to do this is by using the Device Manager. Follow the guide below to get you started.
Press Windows + X on your keyboard instead and select ‘Device Manager’.
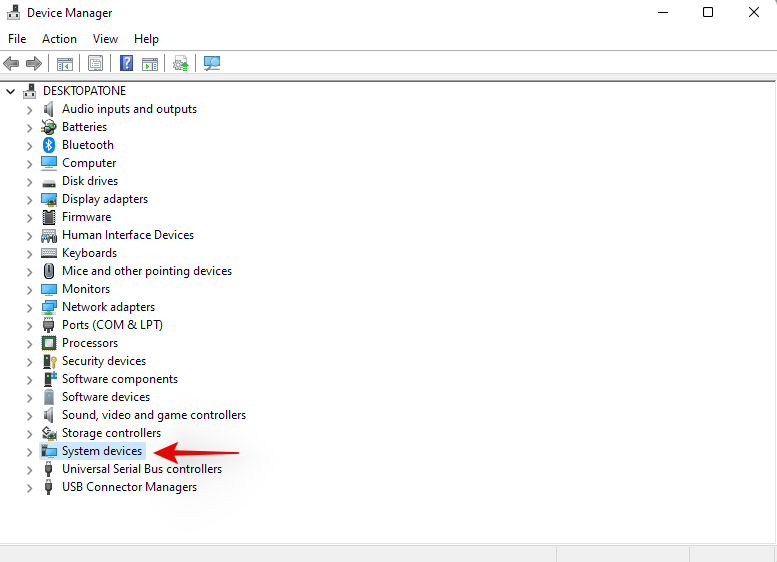
Click and expand ‘System devices’ in Device Manager.
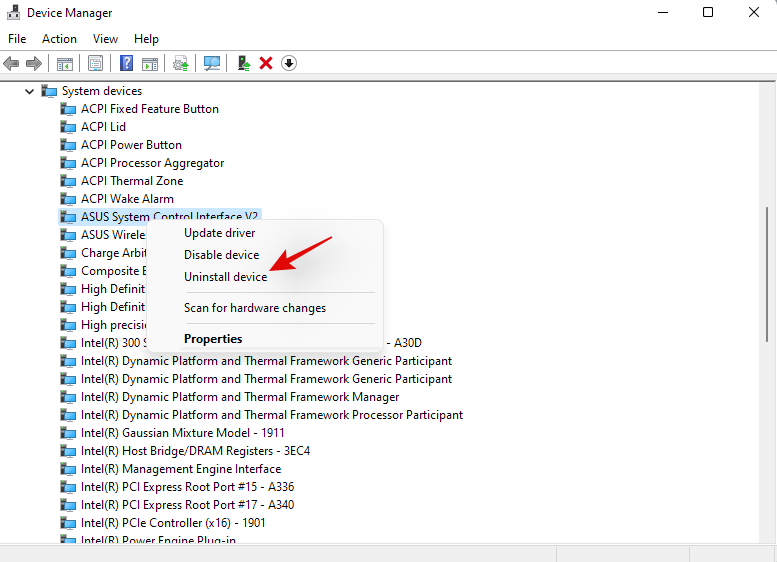
Right-click on ‘Asus System Control Interface’ and select ‘Uninstall device’.
Click on ‘Uninstall’ to confirm your choice. Additionally, check the box for ‘Attempt to remove the driver for this device’ if available.
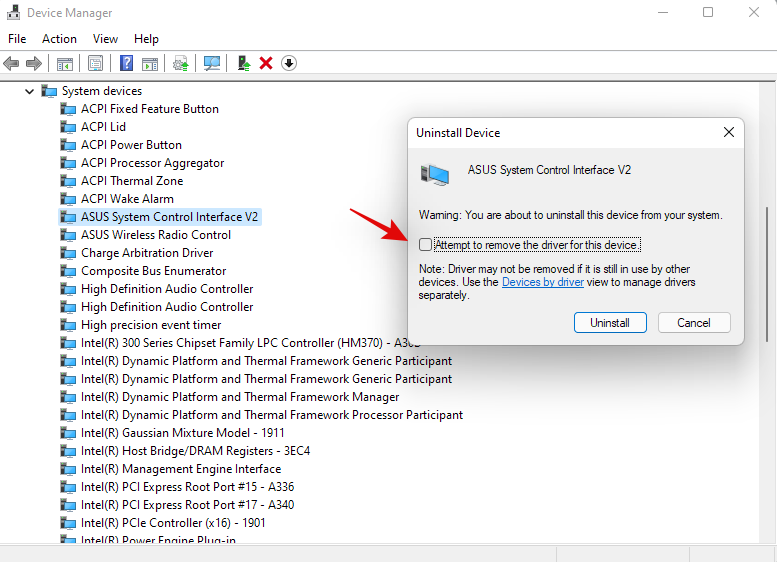
If Asus System Control Interface is unavailable in your device manager then you can restart your laptop at this point. Once restarted, follow the subsequent steps to re-install Armoury Crate and Asus System Control Interface on your system. The concerned drivers will now be uninstalled from your system. You can now restart your laptop for the changes to take effect.
Once your laptop restarts, navigate to the packages we downloaded from Asus’s website on your local storage and start by installing Asus System Control Interface first. Double-click and launch the .exe file and follow the on-screen instructions to install Asus System Control Interface on your laptop. You will be prompted to restart your system once the process completes. We recommend you restart your system at this point before proceeding with the installation of Armoury Crate on your system.
Once your system restarts, double click and launch the Armoury Crate package.
Select the utilities you wish to install on your system. Unless you have other Asus peripherals that support RGB backlighting through Aura Sync, there is no point in installing Aura Sync. Once you have selected the desired utilities, click on ‘Next’.
Click on ‘Install’ to start the installation process.
The package will now connect to Asus’s servers, identify your laptop and install the necessary compatible utilities. Once installed, we recommend you restart your system for good measure.
And that’s it! Once your system restarts, hotkeys should be back up and running again on your system.
Fix hotkeys for Lenovo users
If you own a Lenovo unit especially from the ThinkPad or IdeaPad series, then you will need to try out the following fixes. Lenovo’s professional lineup of laptops is bundled with tons of hotkeys and there are mainly 3 fixes you can try to fix your issue. Let’s first verify if your hotkeys have actually stopped working. Follow the steps below to get you started.
Method #1: Disable all shortcuts and enhancements
Let’s start by disabling all keyboard shortcuts and keyboard enhancements within Windows for your laptop’s keyboard. Follow the guide below to get you started.
Press Windows + S on your keyboard and search for ‘Control Panel’. Click and launch the app from your search results.
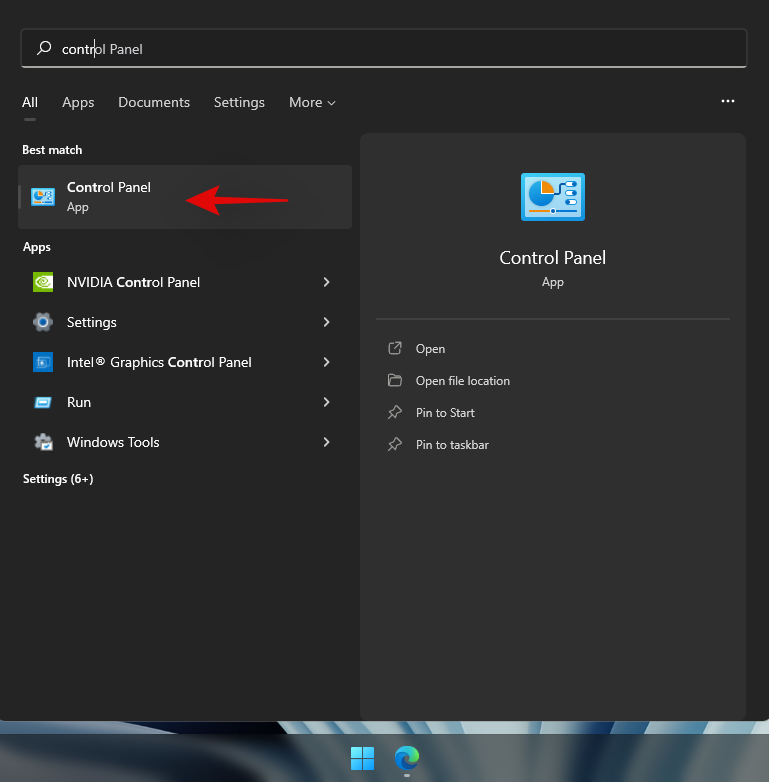
Click on the drop-down menu in the top right corner and select ‘Large icons’.

Click on ‘Ease of access center’.

Click on ‘Make the keyboard easier to use’.
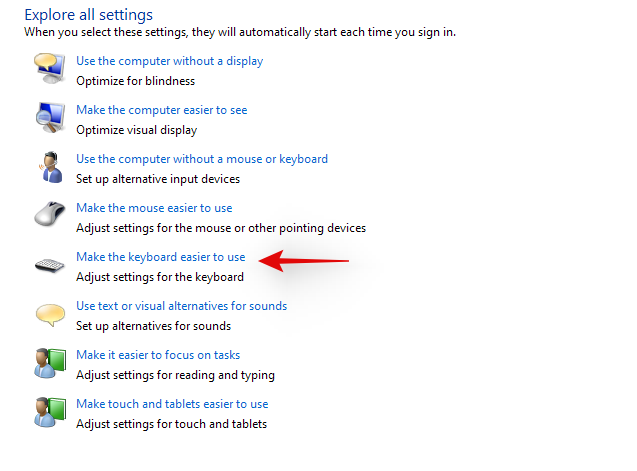
Uncheck all the options available on your screen.
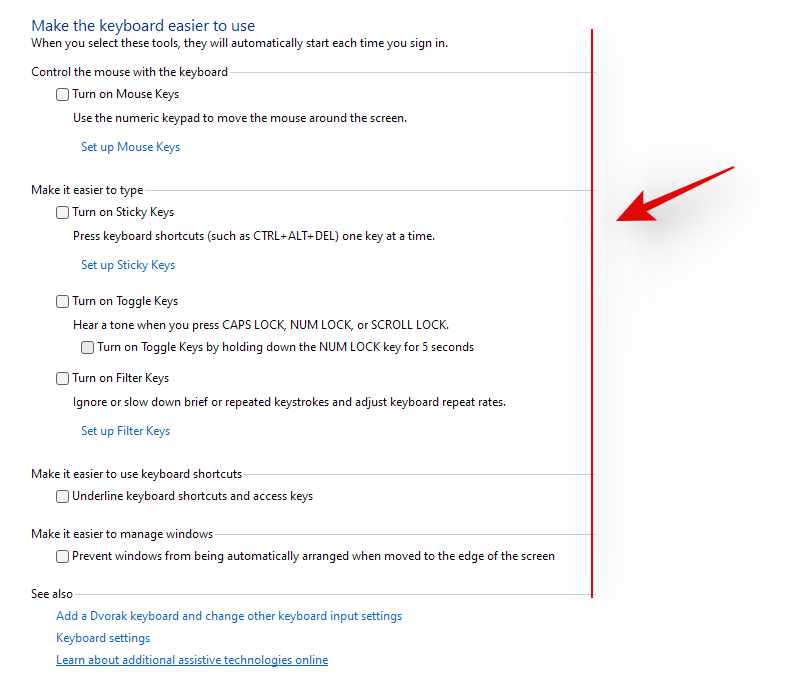
Save your changes and restart your laptop for good measure.

If keyboard enhancements enabled by Windows were causing conflicts with your hotkeys, then your hotkey functionality should be restored on your laptop by now.
Method #2: Update your drivers using Lenovo support
You might have manually updated your drivers, you might have reinstalled and rolled back your drivers, but this isn’t similar to downloading and installing drivers through the support app. Most OEM support apps are designed to automatically scan for known issues with your hardware in the background and fix them automatically. These support app also come with hotfixes and patches that aren’t readily available to the end consumer. These hotfixes and patches are applied when downloading and installing the concerned driver or utility,
Hence we recommend that you download and reinstall the following drivers on your system through the Lenovo support app. Depending on your unit’s make and model, you could be using a different Lenovo app like Lenovo Vantage and more. The process is similar for all these apps and you simply need to manually uninstall your keyboard drivers first and then reinstall the corresponding ones from your support app.
Note: We won’t be removing your power management drivers and instead we will be simply reinstalling them. Removing power management drivers can end up harming your vital components especially if your laptop is doing some resource-heavy work in the background.
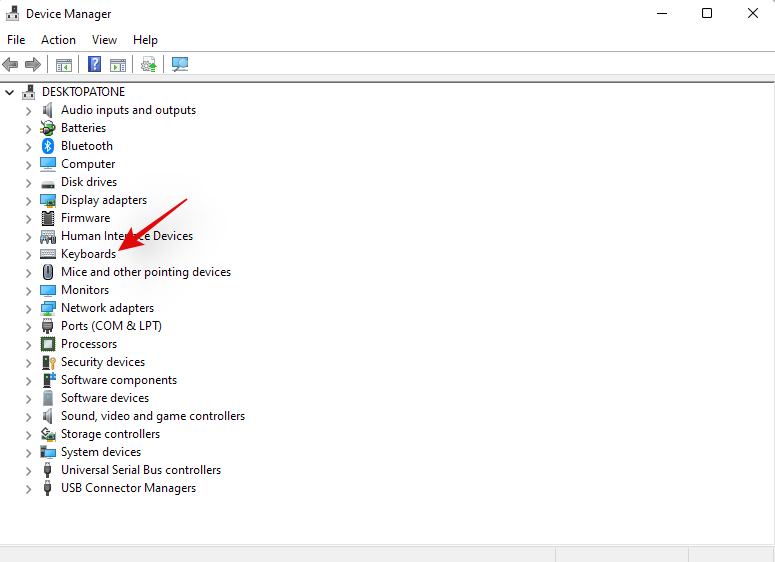
Press Windows + X and select ‘Device Manager’.

Find your keyboard under ‘Keyboards’ and right-click on it.
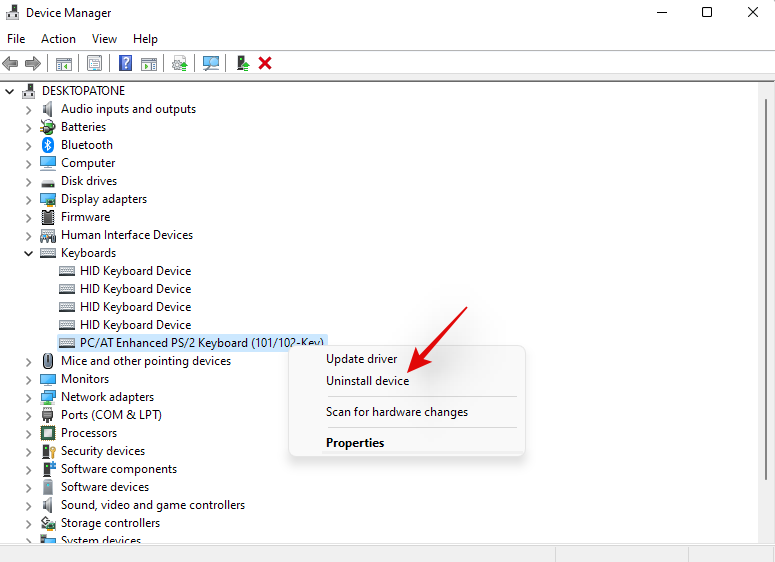
Select ‘Uninstall device’.
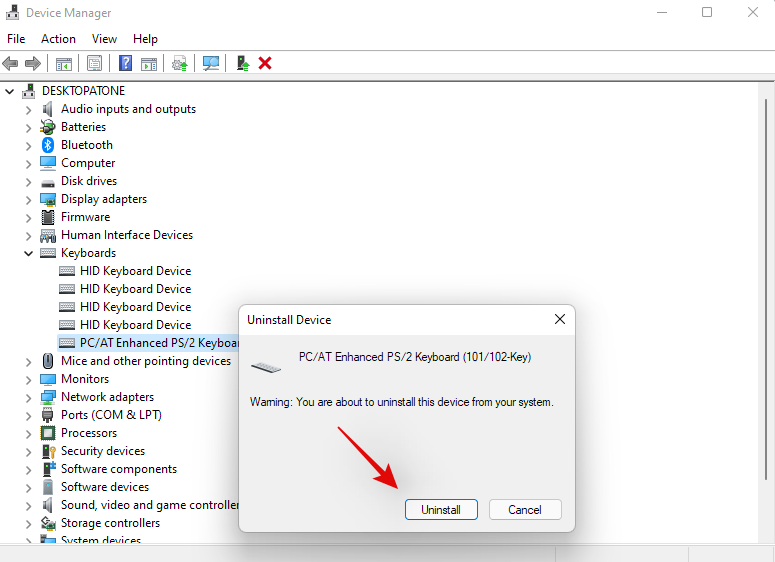
Check the box for ‘Attempt to remove the driver for this device’ if available. Click on ‘Uninstall’.
Your keyboard driver will now be uninstalled. Open the Lenovo System Update, Lenovo Vantage, or the corresponding Lenovo support app depending on your current laptop. We will be using the Lenovo System update app for this guide as that will be used by most modern systems currently and in the future. If you do not have the app installed on your unit, then you can use the link below to download it to your laptop.
Download and install the app on your system using the link above. Once installed, launch the app and log in with your device and account details if prompted.
Click on ‘Get new updates’ on your left.
Lenovo System update app will now detect your configuration and look for compatible upgrades accordingly. Once the process completes, all available updates will be shown on your screen according to their priority. Check each of the following sections and check the boxes for the updates you wish to install on your laptop. Your keyboard driver will also show up in this list as it is currently missing from your system. Ensure that you check the box for your keyboard driver before moving to the next step.
Note: Do not check the boxes for your bios updates. We recommend you download and install bios updates, individually and separately so that your laptop does not face installation conflicts in the background during this process.
Click on ‘Download’ in the bottom right corner.
Lenovo system update will now download and install all the selected drivers on your system. Your laptop could automatically restart a few times during this process which is normal. Simply log back into your account and wait until the installation process has been completed.
Once all the drivers are installed on your system, try using your keyboard hotkeys again. In most cases for Lenovo devices, your hotkeys should be back up and running on your system again. Lenovo is known to apply certain patches in the background when installing hotkey drivers and create certain tasks to maintain the functionality of your hotkeys. A reinstallation should have reinitiated this process again which should have fixed your hotkeys.
Fix hotkeys for Acer users
If you are using an Acer system then there isn’t much you can do at this point. Acer is known to keep its hotkeys simple with minimal customization available to the end-user. This in turn means that if the above-stated general fixes did not work for you then it is unlikely that resetting the CMOS will. However, if you have overclocked your unit or have been messing around with voltage values, then you can try resetting your CMOS to get hotkeys back up and running on your system again.
Resetting the CMOS does a lot of things but it mainly helps reset changes to core system values like your voltage, frequency speed, and more. Resetting the CMOS also helps discharge capacitors on some laptops which can give you a sudo-fresh start which is known to solve many persistent errors and issues with systems in the past. Use this comprehensive guide by us to reset your CMOS on your Acer unit.
Check out: How to Reset BIOS in Windows 11
Facing error codes when restarting HID services? Try these fixes!

If you decided to restart your HID service using the guide at the top, then you could end up facing two common errors depending on how your system has been configured. These are known errors and can be fixed on your system using the guides below. Follow the steps to get you started.
Method #1: For error code 126
Error code 126 can be fixed by replacing the Hidserv.dll to your system 32 folder. Follow the guide below to get you started.
Note: You will need a Windows 11 installation media or ISO in case the .dll file is unavailable on your system. Make sure you have either of these handy before proceeding with the guide below. In case you do not have an installation media handy, then you can use the link below to download Hidserv.dll to your local storage.
Open the Windows installation media you have handy and search for Hidserv.dll using the search box in your top right corner.
Once found, copy the file to a convenient location on your local storage. If however, you downloaded the file to your local storage using the link above, then extract the archive to a convenient location and follow the steps below to edit its security permissions.
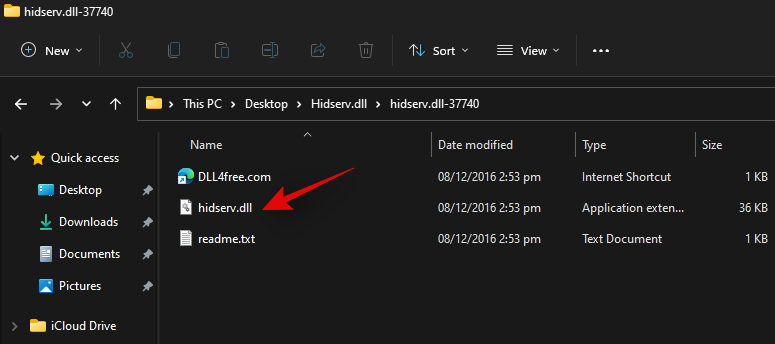
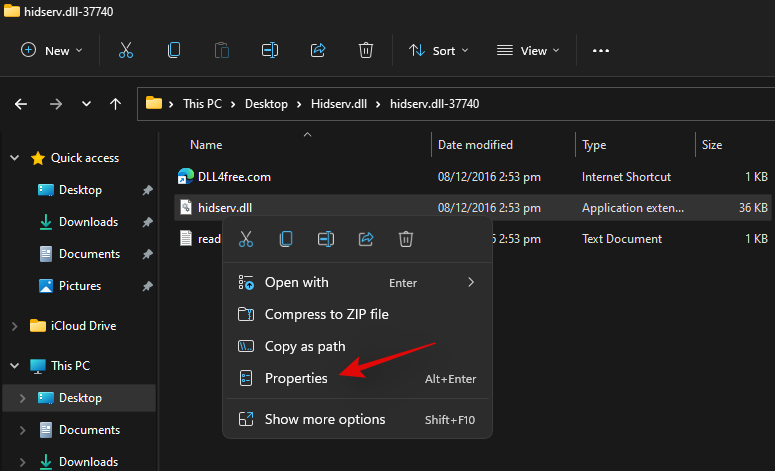
Right-click on the downloaded Hidserv.dll and select ‘Properties’.
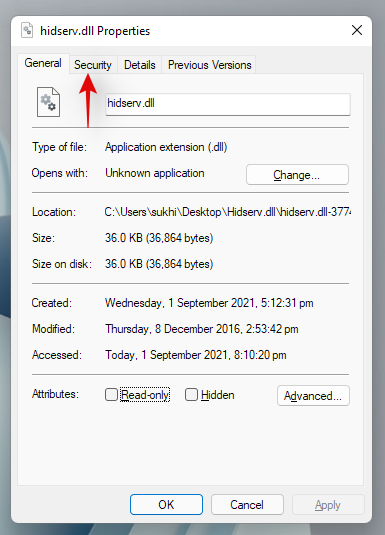
We will now need to manually grant permissions to the necessary users and applications so that Hidserv.dll can work properly on your system. Switch to the Security tab at the top.
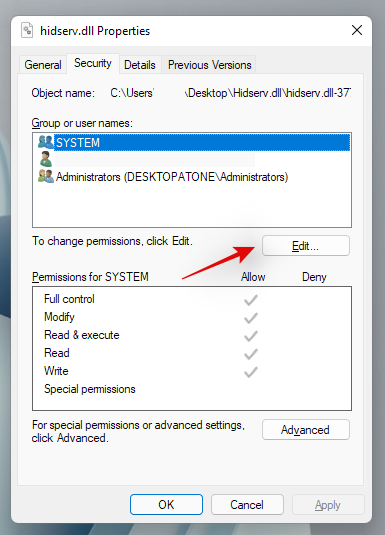
Click on ‘Edit’ at the top.
Click on ‘System’ at the top and check the box for ‘Write’
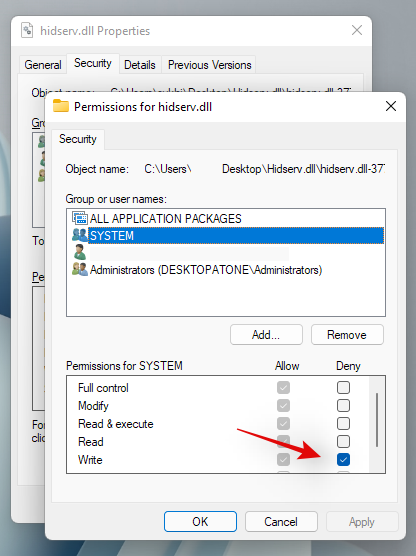
Click on ‘Apply’ once done. Select ‘Yes’ to confirm your choice. Repeat the steps above and restrict permissions for Administrators and other users in the list above. Once you are done, click on ‘Add’.
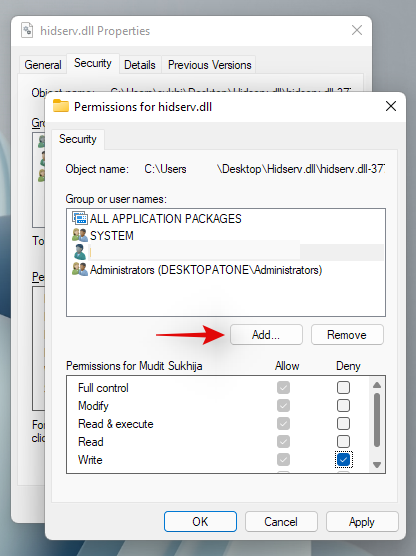
Now enter the following term and press Enter on your keyboard.
All Application Packages
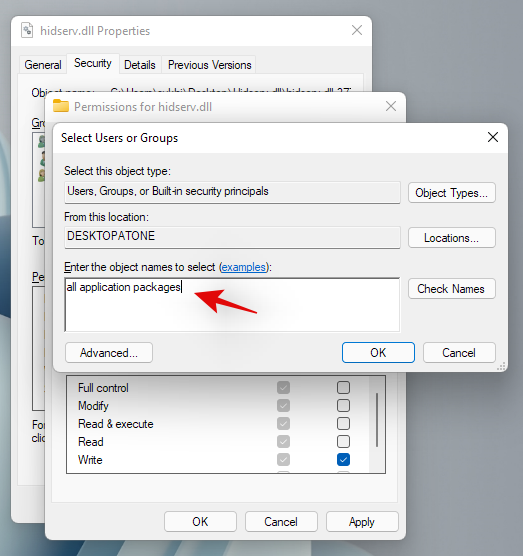
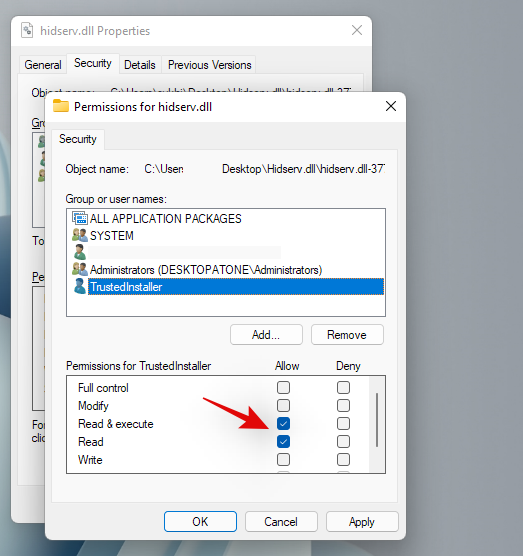
Select the following permissions for ‘ALL APPLICATION PACKAGES’.
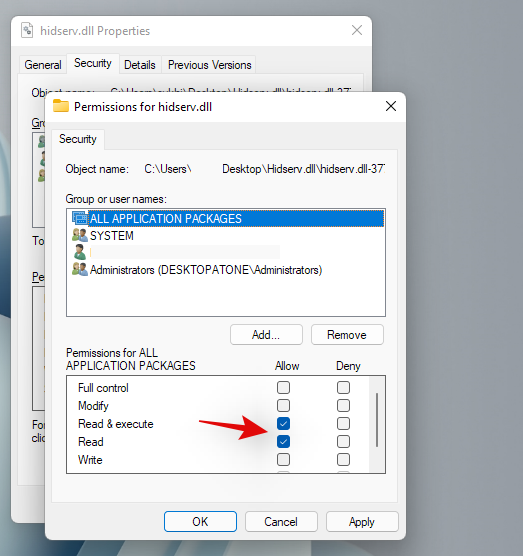
Similarly, click on ‘Add’ again.

Now enter the following term and click on ‘Ok’.
NT Service\TrustedInstaller
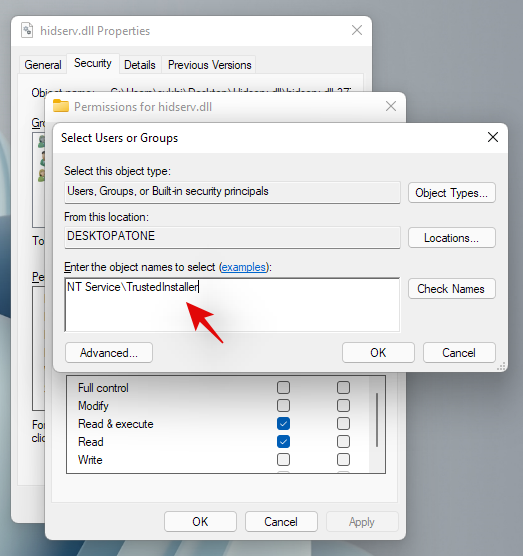
Check the boxes for the same permissions as we did for the application packages above.
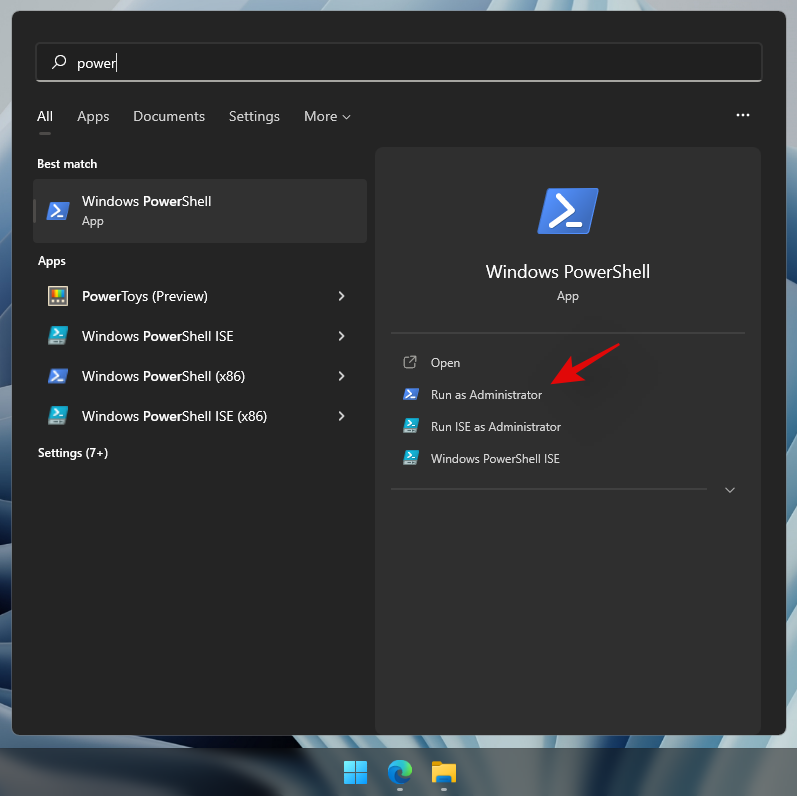
We now need to add permissions for restricted UMP packages on your system. There is no way to do this using the Windows File Explorer, so we will be using a PowerShell script instead. Press Windows + S on your keyboard and search for PowerShell. Click on ‘Run as administrator’ once it shows up in your search results.
Once PowerShell launches, copy and paste the code below in your PowerShell window. Do not execute the commands just yet.
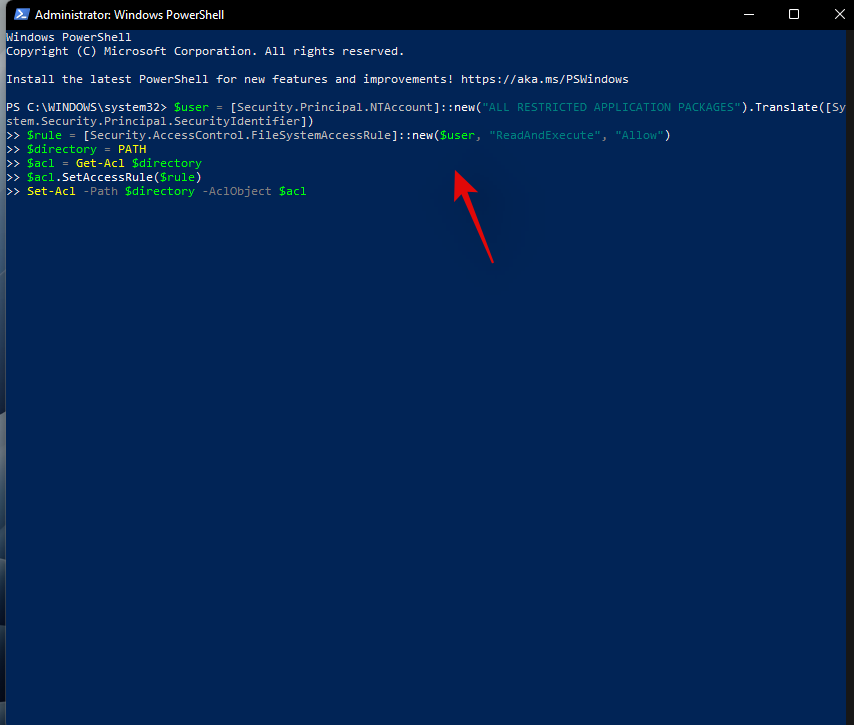
$user = [Security.Principal.NTAccount]::new("ALL RESTRICTED APPLICATION PACKAGES").Translate([System.Security.Principal.SecurityIdentifier])
$rule = [Security.AccessControl.FileSystemAccessRule]::new($user, "ReadAndExecute", "Allow")
$directory = PATH
$acl = Get-Acl $directory
$acl.SetAccessRule($rule)
Set-Acl -Path $directory -AclObject $acl
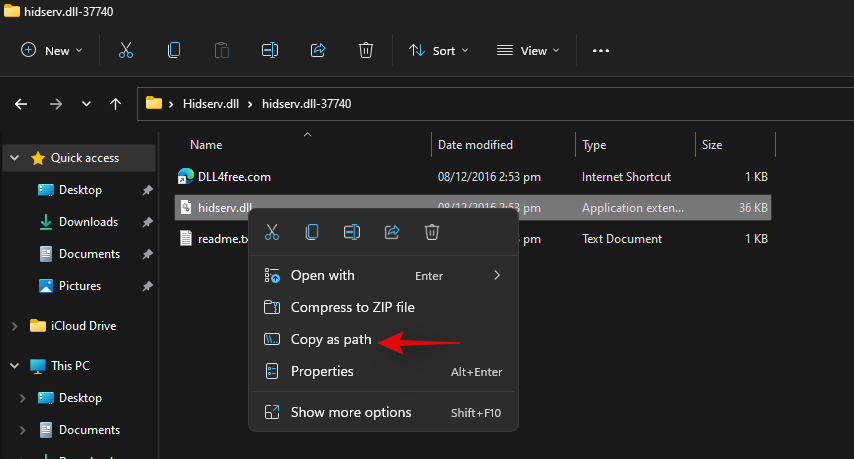
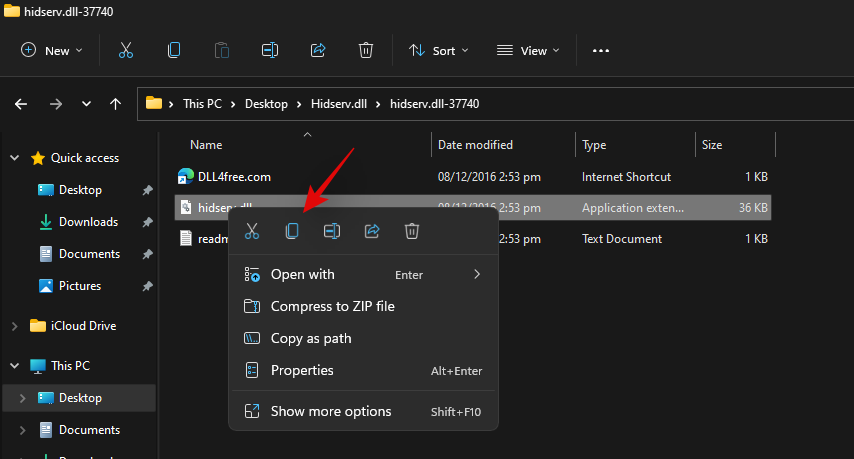
Now navigate to the Hidserv.dll file that we just edited the permissions for and right-click on it. Select ‘Copy as path’.
Go back to your PowerShell window and replace “PATH” with the path we just copied.
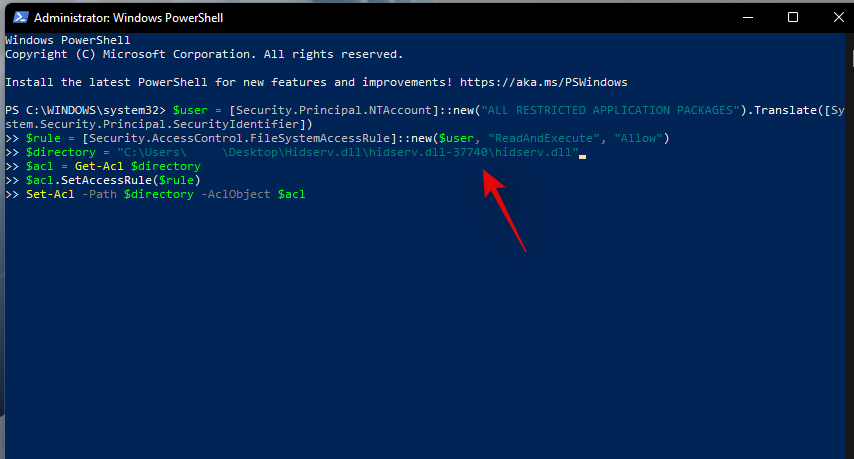
Once replaced, hit Enter on your keyboard to execute the command. Once completed, the new permissions for restricted application packages should now be added to your new Hidserv.dll file.
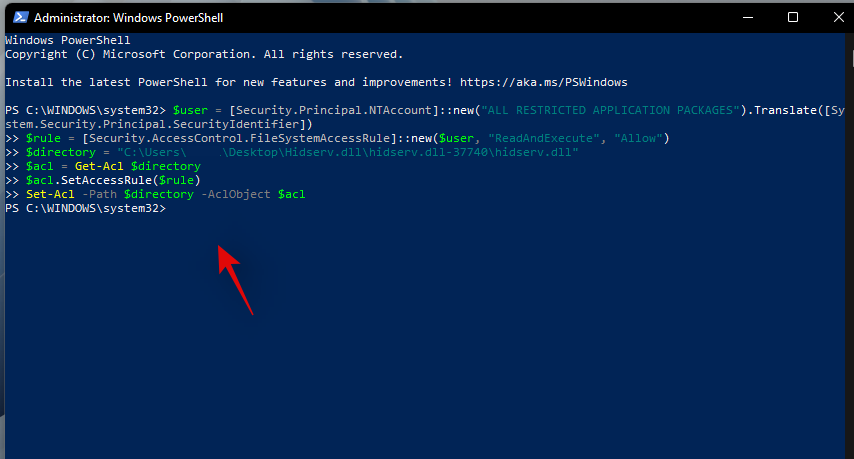
Note: If you are typing in the path manually then you will need to include in double-quotes as shown in the final screenshot. Pasting a copied path using the method above will automatically add double quotes to it.
It’s now time to replace or add the file to your boot directory. Navigate to the Hidserv.dll file we just created and copy it to your clipboard.
Press Windows + E on your keyboard and navigate to the following path.
C:\Windows\System32
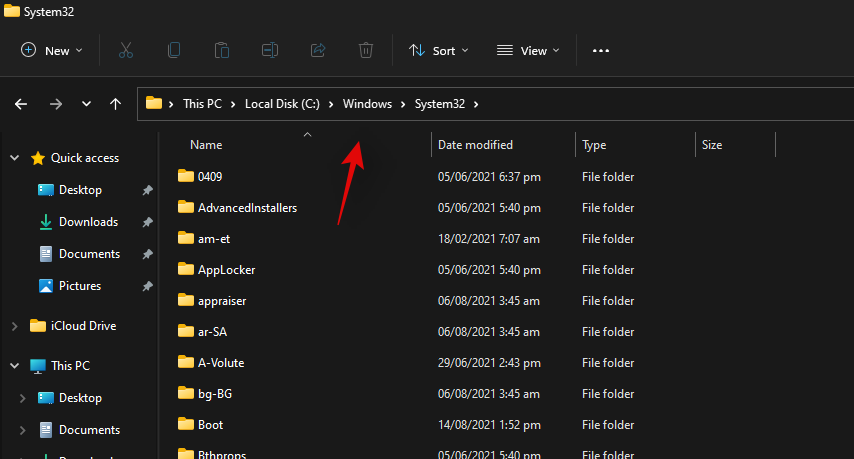
Paste your file in this location. Click on ‘Replace the file in the destination’.
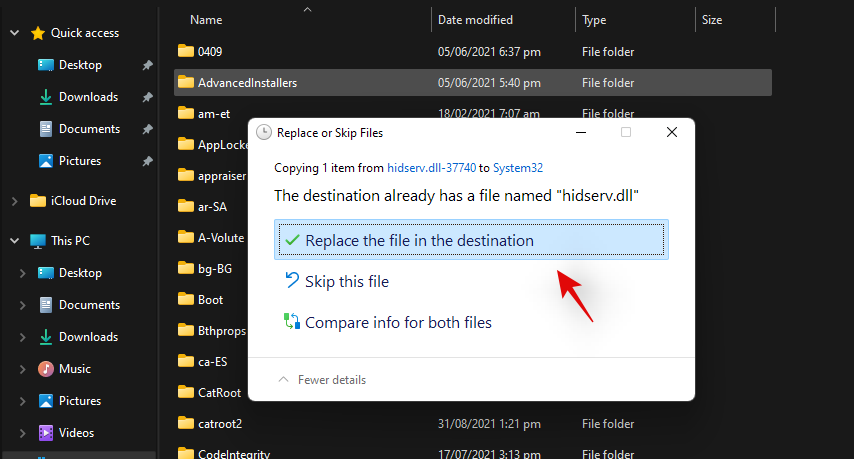
Click on ‘Yes’ to grant the necessary administrator permissions. Once the file is replaced, restart your system for good measure. You can now check your HID services in the Services app to see if it is back up and running again. If not, you can try starting it manually, and you should no longer be facing Error code 126 on your system.
Method #2: For Error code 2
If you are getting Error code 2 after trying to restart the HID service then there could be a couple of reasons why you are facing this error. The main reason is due to unwanted registry changes for the HID service. This could have happened due to recently applied manual hacks or registry cleaners used by you. We will need to check for these changes and revert them if any have been made on your system. Follow the guide below to get you started.
Press Windows + R on your keyboard, type in the following term, and hit Enter on your keyboard.
regedit
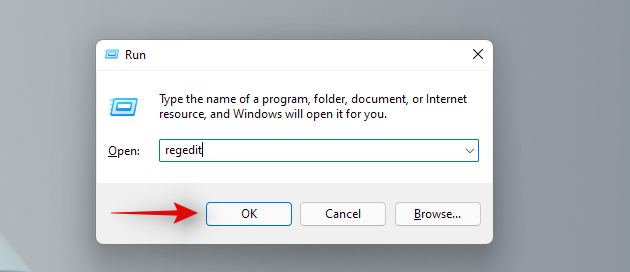
Navigate to the following registry key. You can also copy-paste the same in the address bar at the top of your screen.
Computer\HKEY_LOCAL_MACHINE\SYSTEM\ControlSet001\Services\hidserv
Double click on the ‘Type’ value on your right.
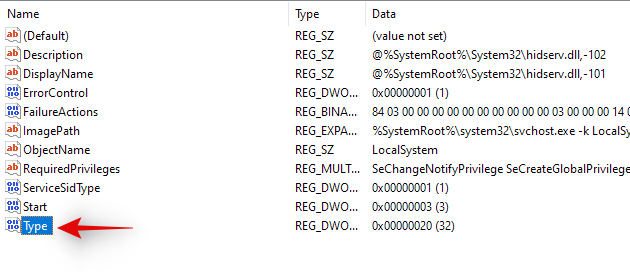
Set the value to ’20’ if it is something different and click on ‘Ok’.
Now click on ‘Parameters’ under Hidserv on your left.
Double click on ServiceDll on your right.
Enter the following path in its Value data field. Even if the same path exists, copy-paste the one below just to be sure. Ensure that there are no spaces at the starting or end of the path below.
%SystemRoot%\System32\hidserv.dll
Once done, repeat the steps above for the following registry locations given below.
Additionally, if folders named ControlSet002 or more exist in the location below, then we recommend repeating the steps above for the Hidserv folder in those locations as well.
Once you have made these changes, restart your system, and HID service should be automatically working on your laptop again. If not, launch the service manually and you should no longer face Error code 2 on your laptop.
Laptop hotkeys can be quite finicky and we hope you were able to get the back up and running again on your system using the guides above. If you face any issues or have any questions for us, feel free to reach out using the comments section below.
Related:
Descobreix com obrir el Tauler de control a Windows 11 amb diverses opcions eficients.
Windows 11 s'ha llançat al públic i Microsoft ha llançat un nou assistent personalitzat per ajudar-vos a incorporar-vos. Windows 11 aporta nombrosos canvis, inclosa la possibilitat d'instal·lar...
Microsoft Teams és una de les eines de col·laboració àmpliament utilitzades amb més de 20 milions d'usuaris actius diaris. El servei ofereix funcions com ara missatgeria instantània, videoconferència i àudio, fitxers...
L'última iteració de Windows és tot el que els entusiastes de la tecnologia volien que fos. Des d'una millor compatibilitat d'aplicacions fins a una interfície d'usuari magnífica, hi ha molt per bavejar. Però hi ha una…
20 de febrer de 2021: Google ara ha bloquejat totes les extensions de Meet que van ajudar amb la visualització de la quadrícula, incloses les que s'esmenten a continuació. Aquestes extensions ja no funcionen i l'única alternativa sembla ser...
Windows 11 Insider Build s'ha deixat anar en estat salvatge i està cridant molt l'atenció tant dels admiradors com dels crítics. El nou disseny és generalment agradable a la vista, però hi ha alguns elements que...
Les reunions en línia eren un refugi per al progrés i l'aprenentatge, però aviat van ser bombardejades per usuaris anònims per interrompre el procés i fer bromes. Això es va anomenar "Zoombombing". Que…
La filtració de Windows 11 i l'Insider Dev Build han donat lloc a milions d'instal·lacions virtuals i natives del sistema operatiu en poc més d'una setmana. Si també heu passat a Windows 11, potser...
Microsoft ha llançat finalment la primera versió de Vista prèvia d'Insider per a Windows 11. Aconseguir-la és bastant senzill des de Windows 10. Només cal que inicieu la sessió amb el vostre compte de Microsoft a Windows Inside...
En l'àmbit de les reunions virtuals i les aplicacions de videoconferència, no es pot negar que Google Meet destaca definitivament. Aquesta aplicació de videotrucades en constant evolució no es frena pel que fa al que té...
Microsoft Teams us ofereix un munt de funcions per personalitzar els vostres xats. Fins i tot podeu amagar els xats d'algú si ja no esteu en contacte amb ells o ja no formen part del vostre equip. Segueix a…
Tot i que les notificacions són essencials en alguns casos, de vegades es converteixen en un element de distracció. Igual que el vostre telèfon, un ordinador també us pot distreure amb notificacions. És per això que Windows 11 inclou...
Google Meet està agafant força a mesura que segueix llançant actualitzacions per provar de competir amb les grans aplicacions de videoconferència del dia. Amb la seva darrera actualització, Google Meet ara pot contenir fins a 250 usos...
Windows 11 s'ha produït des de fa molt de temps i aquest sistema operatiu no està exempt de grans canvis. És natural sentir-se ofès pels canvis, però, en el fons, el sistema operatiu encara és fidel al seu...
Windows 11 ha recorregut un llarg camí des que es va anunciar i les versions beta semblen rebre cada dia més provadors. Windows es va traslladar a les aplicacions UWP per al seu sistema i la botiga de Windows de tornada...
Si teniu problemes de connectivitat, potser voldreu provar d'esborrar la memòria cau DNS. No et preocupis, fer-ho no requereix cap coneixement tècnic per part teva i és bastant fàcil...
El nou sistema operatiu de Microsoft, Windows 11, està aportant molts elements visuals nous als seus menús, carpetes i fins i tot aplicacions. I la Microsoft Store, que es troba al cor de l'Android-to-Windows...
Google Meet és el nou servei de videoconferència llançat per Google que ofereix un paquet d'ús totalment gratuït juntament amb funcions de primera línia, com ara l'encriptació d'extrem a extrem i...
Zoom és un gran client de reunions que us permet xatejar amb fins a 100 membres de manera gratuïta alhora que us permet afegir fons personalitzats, crear subgrups per als vostres participants i utilitzar anotacions durant mi...
Google Meet permet als usuaris dur a terme reunions de grup de fins a 250 participants en una sola trucada, però en un moment donat, el servei només permet veure 16 participants en visualitzar cadascun d'ells...
Aprendréu a veure i esborrar l
Troba "Aquest PC" de manera ràpida i senzilla a Windows 11 i Windows 10 amb aquesta guia completa. Inclou pas a pas les millors opcions.
Descobreix com obrir el Tauler de control a Windows 11 amb diverses opcions eficients.
Si utilitzeu Windows 10 i necessiteu que la bateria duri més, no trobareu la configuració predeterminada a favor vostre. Haureu de caminar una milla més. A continuació, es mostra com maximitzar la durada de la bateria a Windows 10.
Apreneu a fer que Microsoft Windows 11 buidi automàticament la paperera de reciclatge en un moment determinat.
El bloqueig dinàmic de Windows 11 us ajudarà a mantenir segur el vostre ordinador bloquejant-lo després de 30 segons. Aquests són els passos a seguir.
El mode de repòs a Windows 11 és una característica molt útil, aquí teniu com podeu activar-lo i desactivar-lo per a una millor experiència d'usuari.
Utilitzeu el dictat amb puntuació automàtica a Windows 11 per facilitar l'escriptura i estalviar temps en el procés.
Desactivar la cerca de Bing hauria de ser suficient per desfer-se de les cerques ràpides. Podeu fer-ho mitjançant l'Editor del registre de Windows 11s.
Manteniu el Gestor de tasques sempre a la part superior a Windows 11, de manera que sigui fàcil de trobar quan necessiteu llegir l'aplicació. Aquests són els passos a seguir.


