6 måter å oppdatere drivere på Windows 11
Oppdatering av enhetsdrivere er viktig for å fikse feil og forbedre kompatibiliteten i Windows 11. Lær hvordan du effektivt kan oppdatere driverne dine.
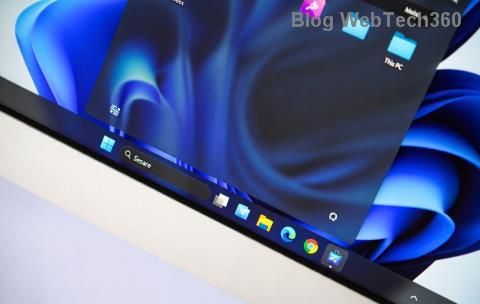
Windows-oppgavelinjen har vært sentrum for all oppmerksomhet siden den fikk sitt nye fornyede utseende med utgivelsen av Windows 11. Du kan nå sentrere oppgavelinjen, nyte det nye handlingssenteret, endre justeringen og plassere den på hver side av skjermen. Dessverre har utrullingen av denne funksjonen vært mindre enn vellykket med flere og flere brukere som sliter med å få oppgavelinjen til å fungere på Windows 11 i noen måneder.
Mens Microsoft har erkjent problemet, utstedt en løsning og jobber for tiden med en løsning, ser det ut til at brukerne fortsatt ikke kan få oppgavelinjen til å fungere igjen. Hvis du er i samme båt, har vi satt sammen en liste over alle tilgjengelige rettelser for å få oppgavelinjen oppe og kjøre igjen på Windows 11. Følg veiledningen nedenfor for å komme i gang.
Innhold
Hvorfor vises ikke oppgavelinjen min?
Windows 11-oppgavelinjen har et nytt utseende som kommer fra en fornyet versjon av funksjonen. Oppgavelinjen er nå avhengig av flere tjenester og selve Start-menyen for å fungere ordentlig. Det ser ut til at oppgraderingsprosessen fra Windows 10 til Windows 11 ser ut til å ødelegge oppgavelinjen avhengig av hvilken versjon av Windows 10 du har installert på systemet og hvilken Windows 11-versjon du oppdaterer til.
I tillegg ser det ut til at en nylig Windows-oppdatering utgitt i forrige måned også forårsaker dette problemet for noen brukere mens andre står overfor det samme på grunn av feil systemtid til tross for at alt er satt opp riktig. Det er mange måter å fikse oppgavelinjen på, og vi anbefaler at du starter med rettelsene nedenfor én etter én.
12 måter å fikse oppgavelinjeproblemer på Windows 11
Bruk metodene nedenfor for å begynne å fikse oppgavelinjen på Windows 11. Hvis du allerede har prøvd å starte systemet på nytt, kan du hoppe over den første metoden.
Fix #1: Start PC-en på nytt
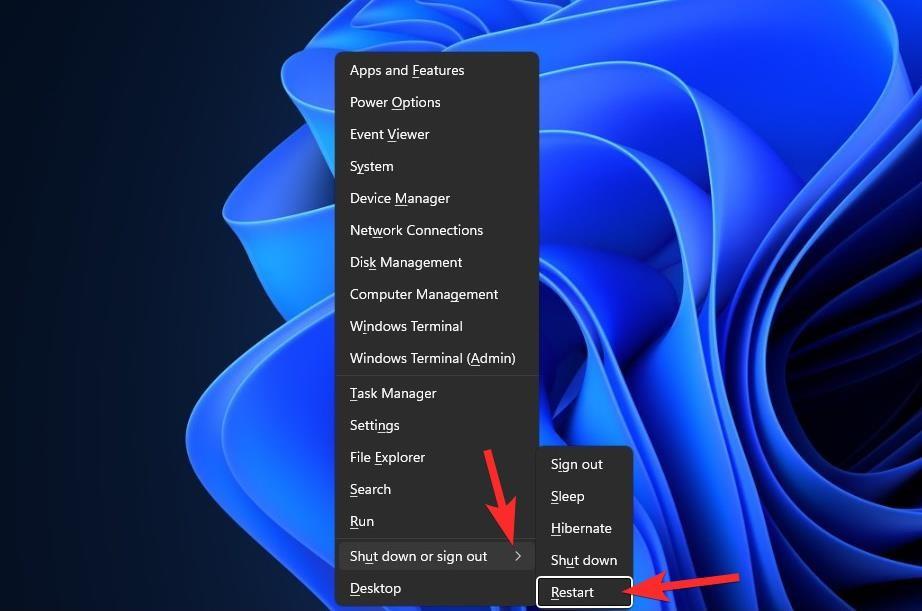
Før du prøver ut noe fancy, er det greit å prøve ut enklere tiltak, som å starte PC-en på nytt eller Windows Utforsker (se nedenfor). Å gjøre det vil gi systemet en myk tilbakestilling, slik at dataene kan lastes inn på nytt og muligens fikse problemer med oppgavelinjen og Start-menyen.
Fix #2: Sørg for at "Skjul oppgavelinjen automatisk" er deaktivert
Trykk Windows + ipå tastaturet og klikk på "Personliggjøring" til venstre.
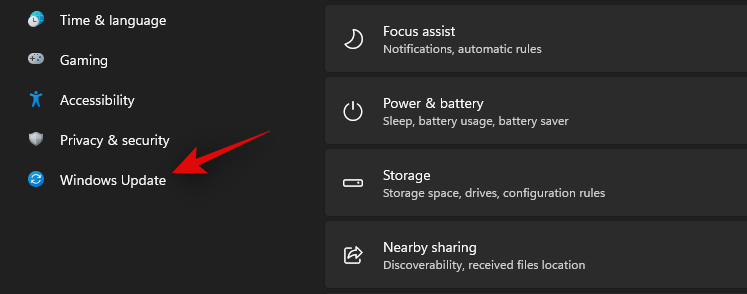
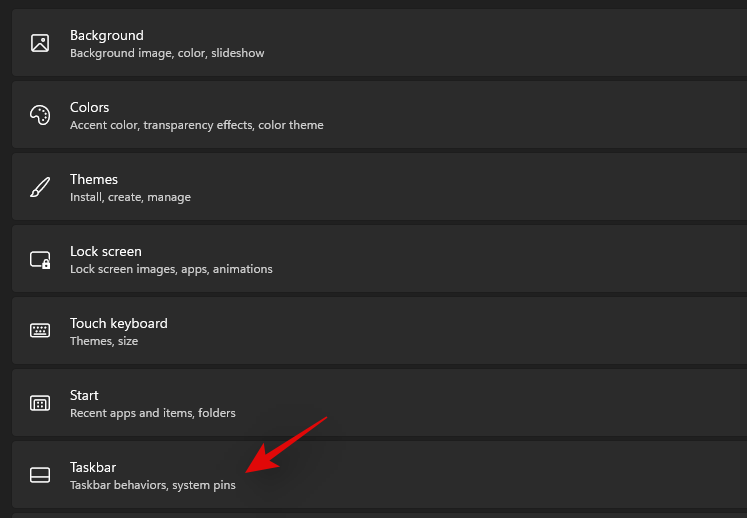
Klikk på "Oppgavelinje".
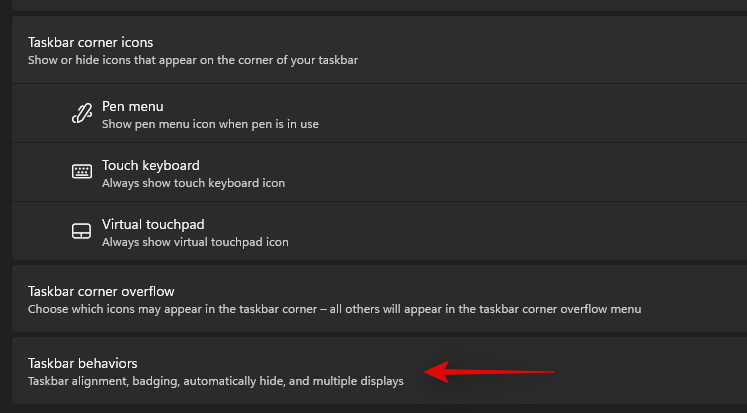
Klikk nå på 'Oppgavelinjeatferd'.
Fjern merket for "Skjul oppgavelinjen automatisk".

Lukk nå Innstillinger-appen, og hvis oppgavelinjen ble automatisk skjult, bør den nå være deaktivert på systemet ditt.
Fix #3: Start nødvendige tjenester på nytt
Som nevnt tidligere har Windows 11 fornyet oppgavelinjen som nå betyr at den er avhengig av at flere tjenester fungerer som de skal på ethvert system. La oss starte alle disse tjenestene på nytt for å sikre at en bakgrunnskonflikt ikke hindrer oppgavelinjen i å fungere ordentlig på systemet ditt.
Trykk Ctrl + Shift + Escpå systemet for å starte Oppgavebehandling. Bytt til "Detaljer"-fanen øverst.
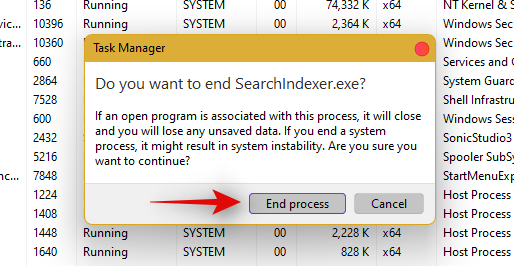
Finn nå følgende kjørende tjenester og velg dem ved å klikke på dem. Trykk "Slett" på tastaturet og bekreft valget ditt ved å velge "Avslutt prosess".
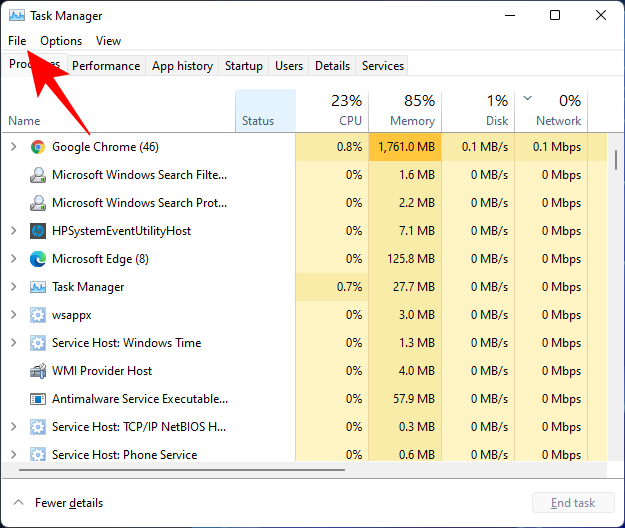
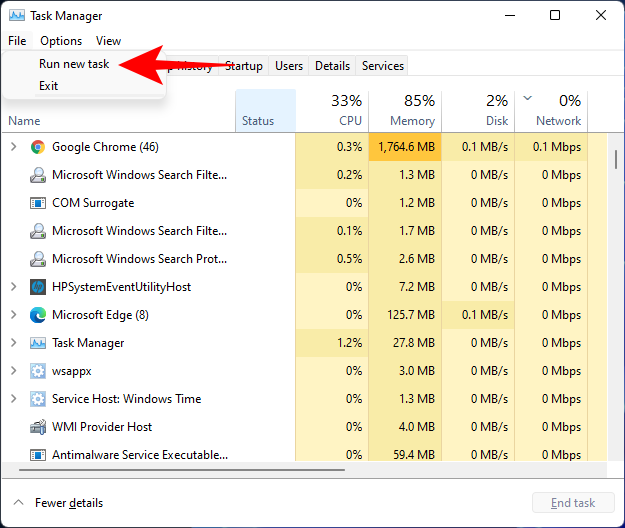
La oss starte Windows Utforsker på nytt nå. Klikk på "Fil" øverst til venstre og velg "Kjør ny oppgave".
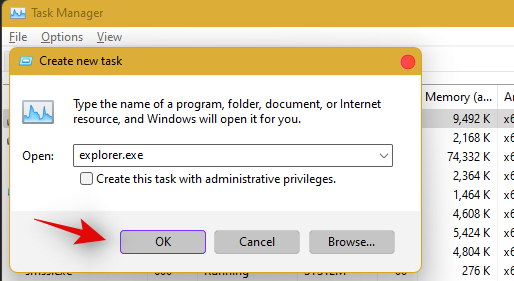
Skriv inn 'explorer.exe' og trykk Enter på tastaturet. Du kan også klikke på "Ok" om nødvendig.
Når explorer er startet på nytt, starter du bare PC-en på nytt for å starte andre tjenester på systemet på nytt.
Oppgavelinjen skal nå gjenopprettes hvis en bakgrunnstjenestekonflikt var årsaken til problemet.
Fix #4: Slett IrisService i Registry og start på nytt
Trykk for Ctrl + Shift + Escå åpne Oppgavebehandling. Klikk deretter på Fil i øverste venstre hjørne.
Velg Kjør ny oppgave .
Skriv cmd og trykk Enter.
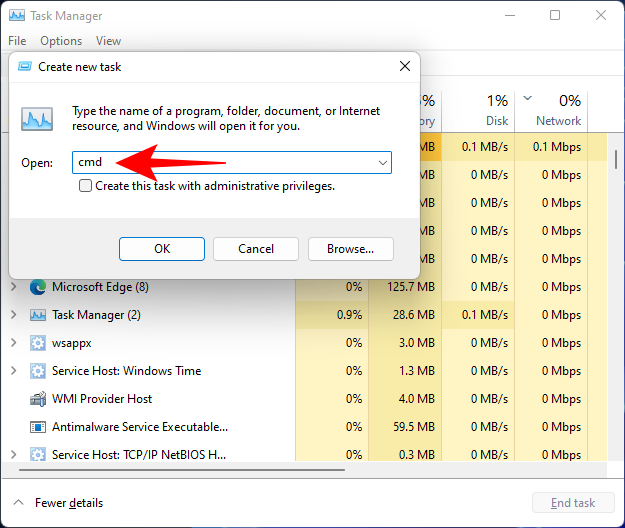
Dette vil åpne en forhøyet forekomst av ledeteksten. Kopier nå følgende kommando og lim den inn i ledeteksten:
reg delete HKCU\SOFTWARE\Microsoft\Windows\CurrentVersion\IrisService /f && shutdown -r -t 0

Trykk deretter Enter. Så snart du gjør det, vil PC-en starte på nytt. Når den er startet opp igjen, skal ting være tilbake til det normale, inkludert oppgavelinjen.
Fix #5: Legg til UndockingDisabled i registret
Trykk for Ctrl + Shift + Escå åpne Oppgavebehandling. Klikk deretter på Fil (øverst i venstre hjørne) og Kjør en ny oppgave .
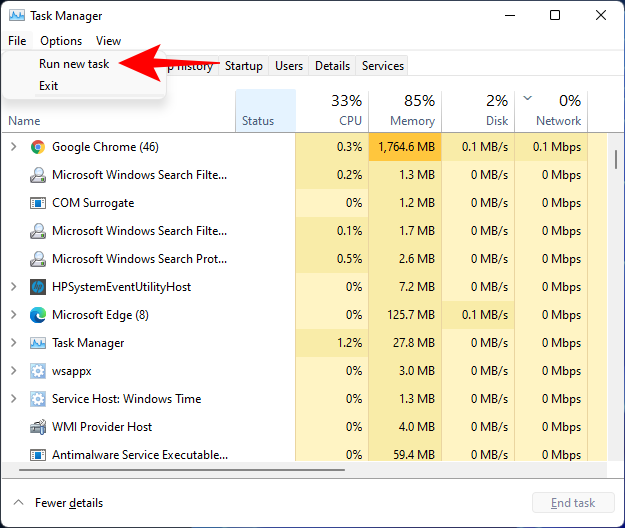
Skriv regedit og trykk Enter.
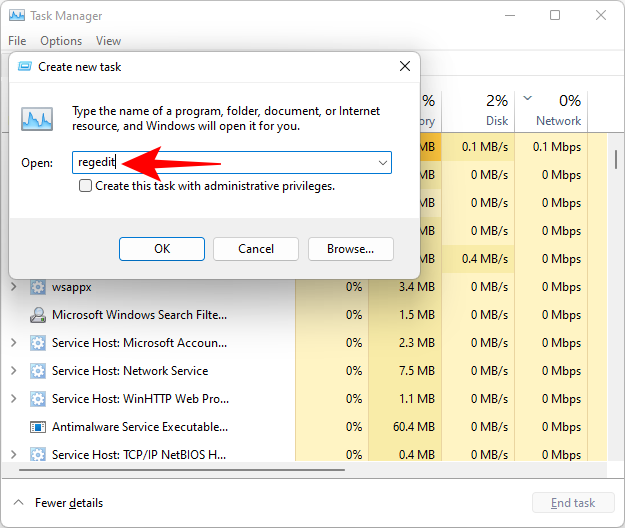
Dette vil åpne Registerredigering. Naviger nå til følgende adresse:
Computer\HKEY_LOCAL_MACHINE\SOFTWARE\Microsoft\Windows\CurrentVersion\Shell\Update\Packages
Alternativt kan du bare kopiere det ovenfor og lime det inn i registerredigeringsadressefeltet, slik:

Når du trykker på Enter, blir du dirigert til den angitte nøkkelen. Høyreklikk på mellomrom til høyre og velg Ny > DWORD (32-biters) verdi .
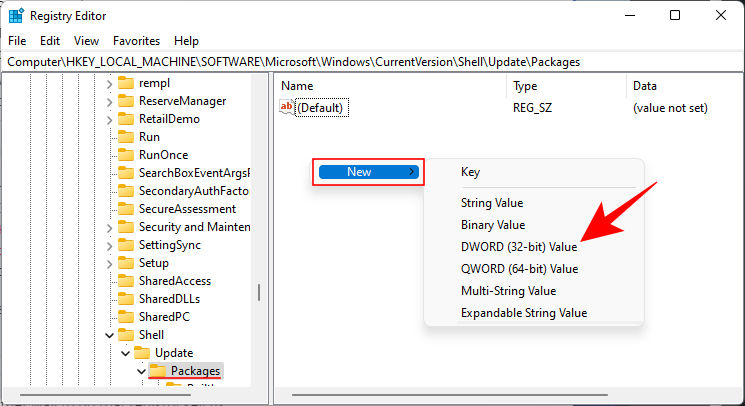
Gi denne nyopprettede DWORD UndockingDisabled et navn .
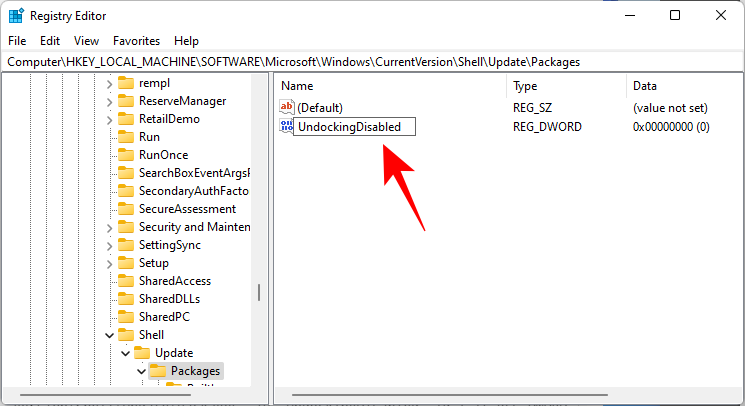
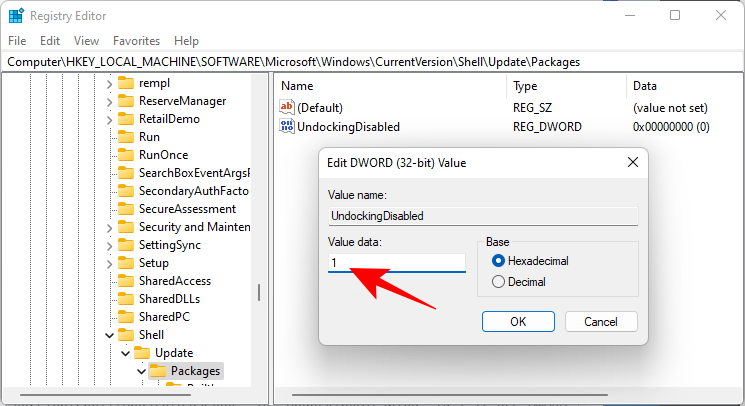
Dobbeltklikk deretter på den og endre "Verdidata" til 1 . Klikk deretter OK .
Start PC-en på nytt for at endringene skal tre i kraft.
Fix #6: Kjør SFC- og DISM-kommandoer
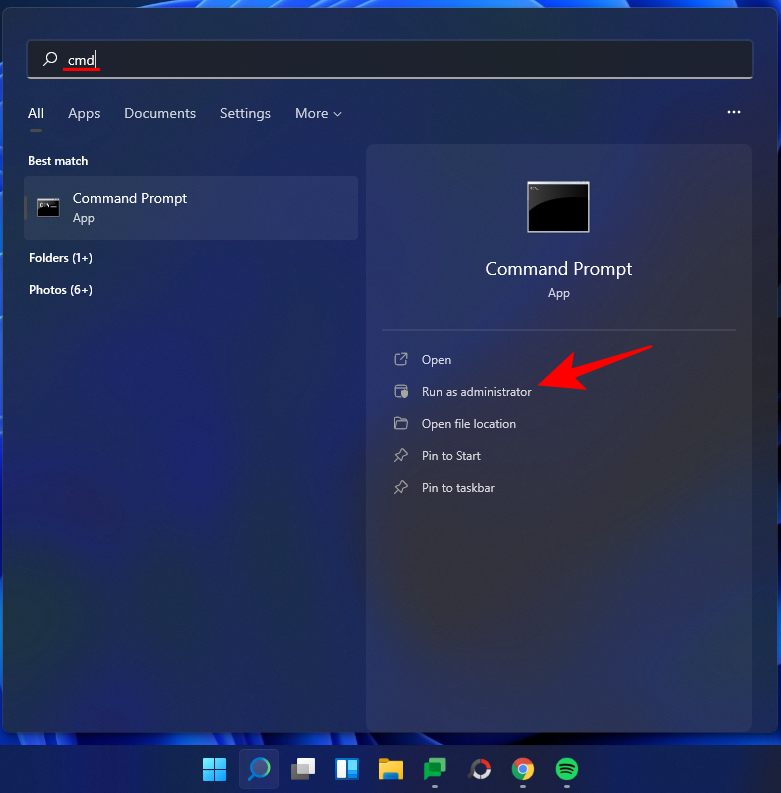
Trykk Start, skriv inn cmd og klikk på Kjør som administrator .
Skriv nå inn følgende kommando:
sfc /scannow
Trykk enter. Vent til SFC fullfører skanningen og fikser eventuelle problemer.

Deretter kjører du følgende DISM-kommando for verktøyet Deployment Image Servicing and Management:
dism /online /cleanup-image /scanhealth
Trykk deretter Enter. Igjen, vent til skanningen er fullført.

Kjør nå følgende DISM-kommando:
dism /online /cleanup-image /restorehealth

Trykk enter. Vent til DISM gjenoppretter helsen.

Til slutt, kjør kommandoen chkdsk for å kjøre Sjekk disk-verktøyet:
chkdsk c: /r
Trykk enter. Kommandoprompt vil sende opp en melding som forteller deg at den "ikke kan låse gjeldende stasjon ... fordi volumet er i bruk av en annen prosess", og be om tillatelse til å planlegge en skanning før neste oppstart. Skriv for Yå overholde.

Og trykk Enter. Start nå datamaskinen på nytt, la Sjekk disk-verktøyet gjøre jobben sin, og sjekk om oppgavelinjen har gjenopptatt normal funksjon.
Fix #7: Installer UWP på nytt
Trykk Ctrl + Shift + Escpå tastaturet for å starte Oppgavebehandling. Klikk på "Fil" og velg "Kjør ny oppgave".
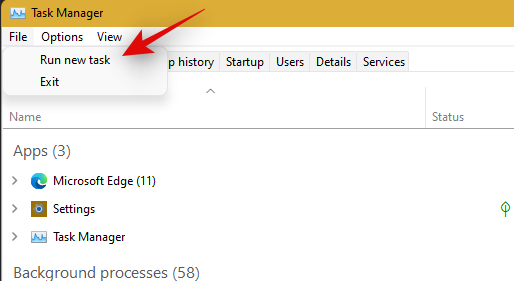
Skriv inn 'PowerShell' og trykk Ctrl + Shift + Enterpå tastaturet.
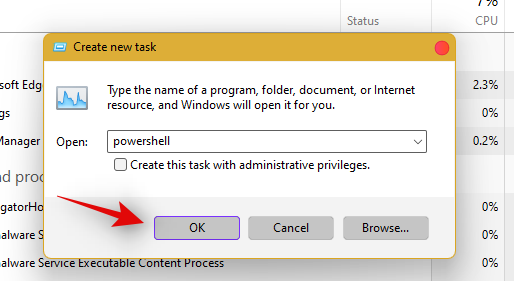
PowerShell vil nå bli lansert som administrator på systemet ditt. Skriv inn følgende kommando:
Get-AppxPackage -AllUsers | Foreach {Add-AppxPackage -DisableDevelopmentMode -Register “$ ($ _. InstallLocation) \ AppXManifest.xml”}
Trykk enter. PowerShell vil kaste opp en løpende liste med meldinger i rødt. Men ikke bekymre deg for det. Bare vent til kommandoen er fullført.

Fix #8: Sjekk UAC og legg til redigeringsregister om nødvendig
UAC er et must for alle moderne apper og funksjoner, inkludert Start-menyen og oppgavelinjen. Du bør først aktivere UAC hvis den er deaktivert og starte systemet på nytt. Hvis oppgavelinjen fortsatt ikke fungerer for deg, anbefaler vi at du prøver å legge til en Xaml Start-menyverdi i Registerredigering.
Å legge til denne verdien ser ut til å starte på nytt og registrere oppgavelinjetjenester som ser ut til å få oppgavelinjen til å fungere igjen på de fleste systemer. Følg veiledningen nedenfor for å komme i gang.
Sjekk og aktiver UAC hvis deaktivert
Trykk Ctrl + Shift + Escpå tastaturet for å starte oppgavebehandlingen. Klikk nå på "Fil" øverst til venstre på skjermen og velg "Kjør ny oppgave".

Skriv inn 'cmd' og trykk Ctrl + Shift + Enterpå tastaturet.
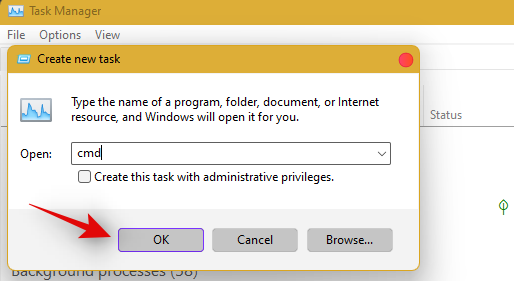
Skriv nå inn følgende kommando og trykk Enter for å utføre kommandoen.
C:\Windows\System32\cmd.exe /k %windir%\System32\reg.exe ADD HKLM\SOFTWARE\Microsoft\Windows\CurrentVersion\Policies\System /v EnableLUA /t REG_DWORD /d 0 /f
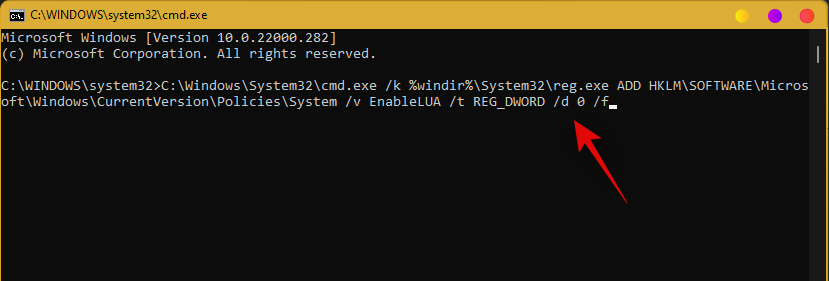
UAC vil nå være aktivert for systemet ditt. Start PC-en på nytt for at endringene skal tre i kraft på systemet ditt. Når den er startet på nytt, skal oppgavelinjen være oppe og kjøre på systemet ditt hvis UAC var problemet for deg. Hvis ikke, bruk veiledningen nedenfor for å utløse oppgavelinjens funksjonalitet på systemet ditt.
Legg til registerverdi
Trykk for Ctrl + Shift + Escå starte oppgavebehandlingen. Klikk nå på "Fil" øverst til venstre og velg "Kjør ny oppgave".

Skriv inn 'cmd' og trykk Ctrl + Shift + Enterpå tastaturet.

Skriv nå inn følgende kommando og trykk Enter på tastaturet.
REG ADD "HKCU\Software\Microsoft\Windows\CurrentVersion\Explorer\Advanced" /V EnableXamlStartMenu /T REG_DWORD /D 1 /F
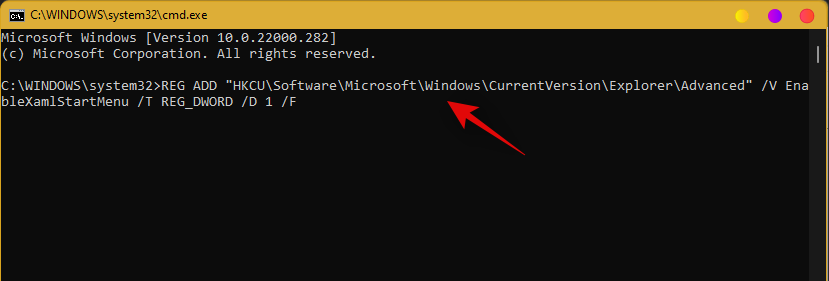
Gå tilbake til oppgavebehandlingen nå, finn Windows Utforsker i listen og høyreklikk på den. Velg Start på nytt for å starte explorer.exe på nytt.
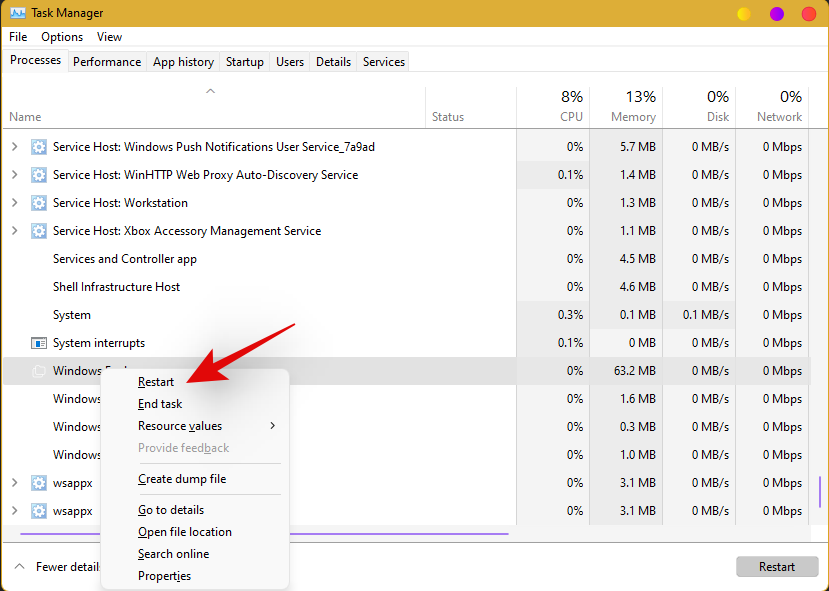
Når du har startet på nytt, prøv å få tilgang til oppgavelinjen. Oppgavelinjen skal nå være tilgjengelig på systemet ditt.
Fix #9: Rediger dato og klokkeslett for å fikse oppgavelinjen
Dato- og klokkeslettinnstillinger ser ut til å være hovedårsaken til problemer med oppgavelinjen i Windows 11. Bruk veiledningen nedenfor for å prøve ut følgende tidsreparasjoner for å se hvilken som fungerer best for deg.
Sørg for at tiden din er riktig synkronisert med tidsserveren
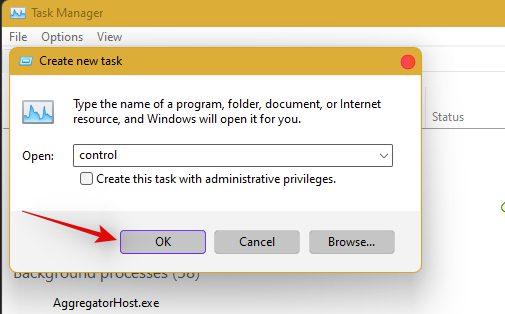
Trykk Ctrl + Shift + Escpå tastaturet og klikk på "Fil". Velg "Kjør ny oppgave".

Skriv inn "Control" og trykk Enter på tastaturet.
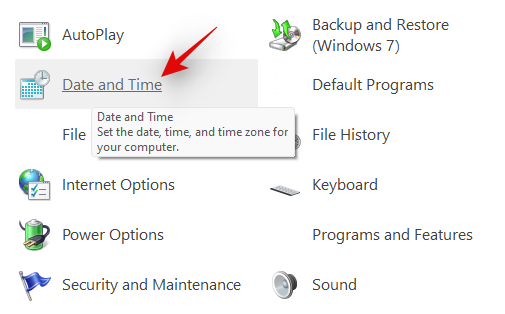
Klikk på "Dato og tid".
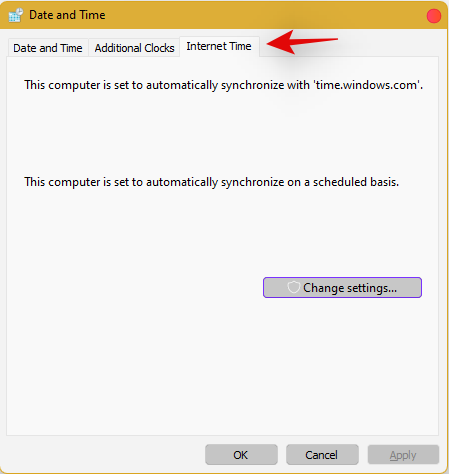
Velg 'Internetttid' fra toppen.
Klikk på 'Endre innstillinger'.
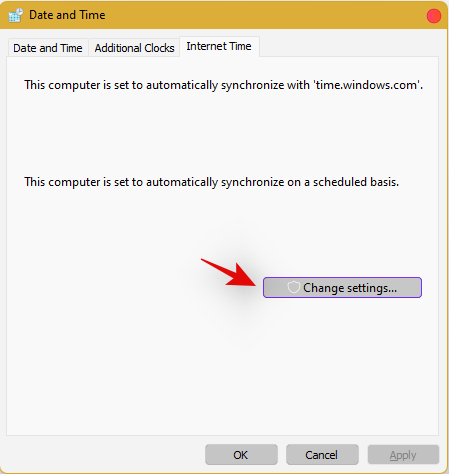
Fjern merket for 'Synkroniser med en Internett-tidsserver'.
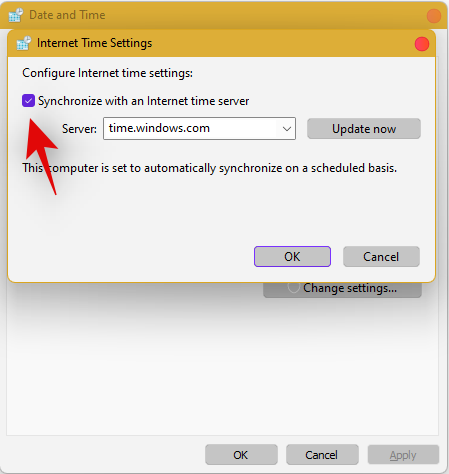
Klikk på "Ok" når du er ferdig.
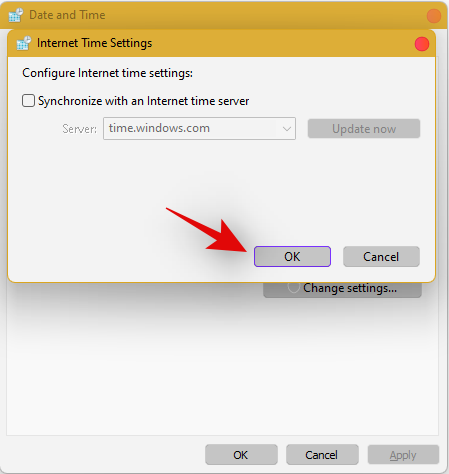
Start PC-en på nytt på dette tidspunktet og sjekk oppgavelinjen. Hvis den fortsatt er deaktivert, ikke bekymre deg, følg trinnene ovenfor og aktiver Synkronisering med en Internett-tidsserver igjen.
Når den er aktivert, trykk Ctrl + Shift + Escpå tastaturet og finn Windows Utforsker i listen på skjermen. Høyreklikk oppføringen og velg "Start på nytt".

Når utforskeren starter på nytt, prøv å bruke oppgavelinjen. Hvis synkronisering var problemet ditt, bør det nå være fikset på systemet ditt. Hvis ikke, fortsett med de andre tidsfiksene nevnt nedenfor.
Endre dato til 1 dag frem i tid
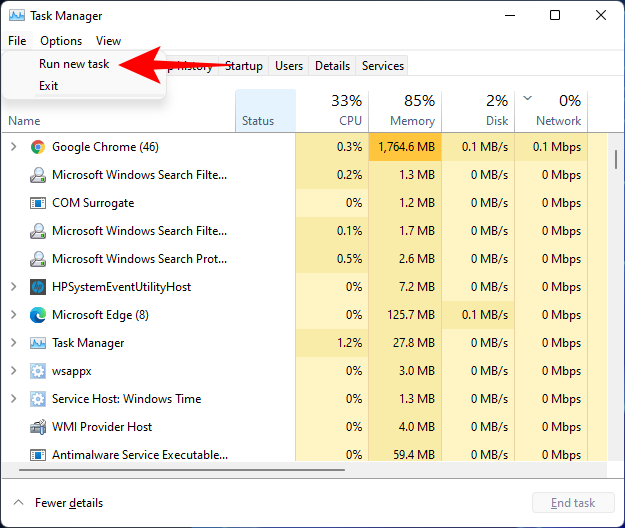
Åpne Oppgavebehandling ved å trykke Ctrl + Shift + Escsamtidig. Klikk deretter på Fil .
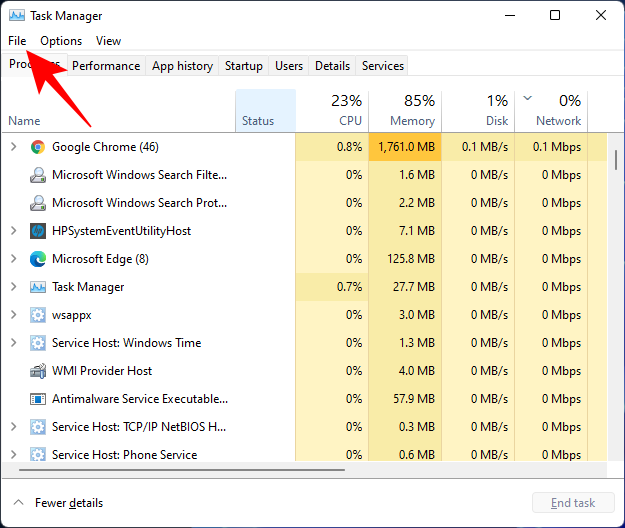
Klikk på Kjør ny oppgave .
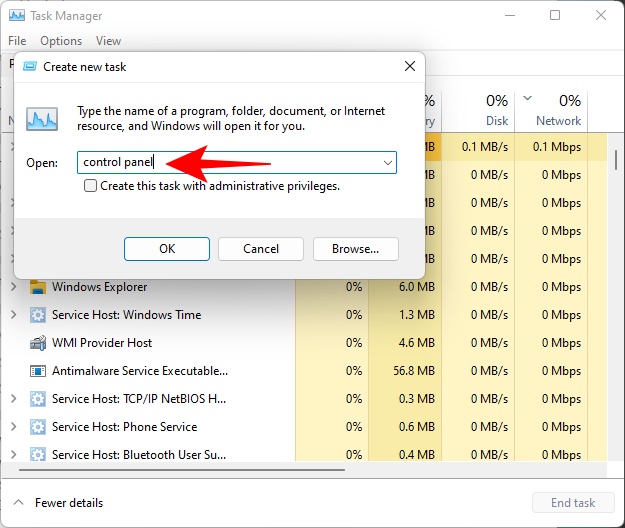
Skriv kontrollpanel og trykk Enter.
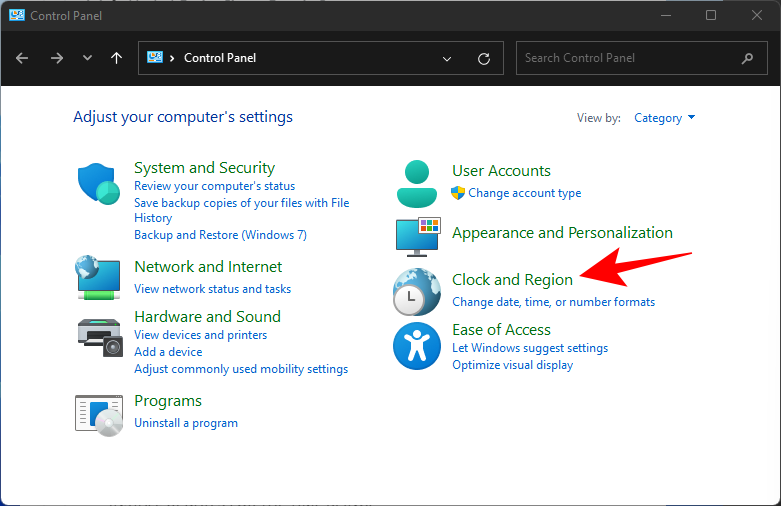
Klikk nå på Klokke og region .
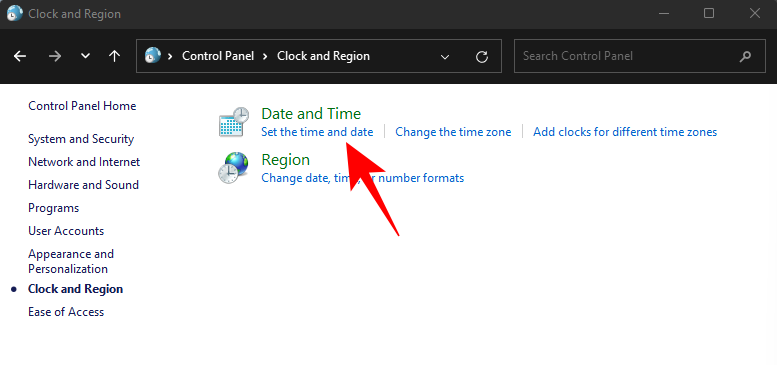
Under «Dato og klokkeslett» klikker du på Still inn tid og dato .
Klikk på kategorien Internett-tid for å bytte til den.
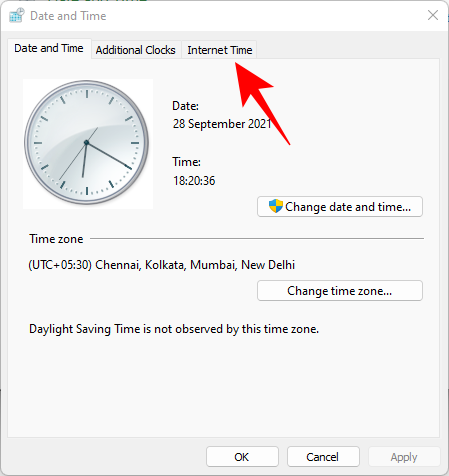
Click on Change settings…
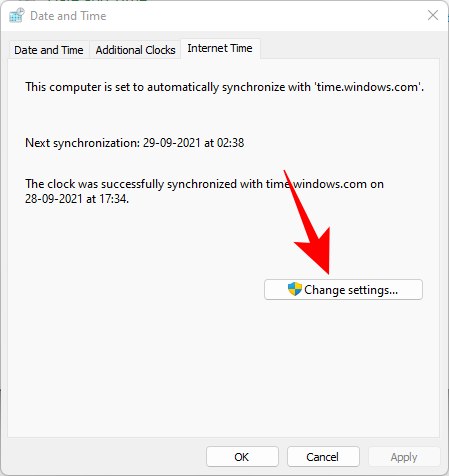
Uncheck Synchronize with an Internet time server, then click OK.
Now click on the Date and Time tab to switch back to it.
Here, click on Change date and time…
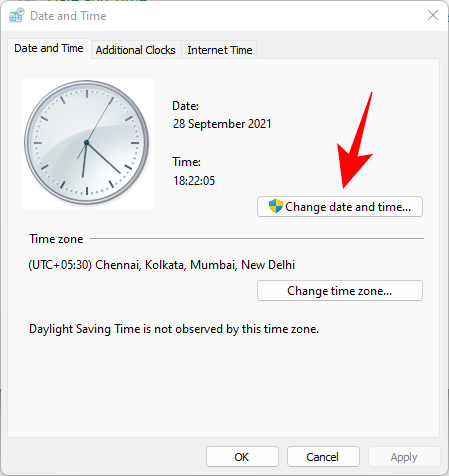
Now change the date and time to reflect tomorrow. As of writing this post, it is the 1st November so we will be changing the date to 2nd November.
Change Dates to last cumulative updates
If you are still unable to get the Taskbar working then you will have to jump through a few hoops to change your date and time multiple times and get the taskbar working on your system. Follow the guide below to get you started.
Press Ctrl + Shift + Esc on your keyboard, click on ‘File’ and select ‘Run new task’.

Type in ‘Control’ and press Enter on your keyboard.

Select ‘Date and Time’.

Switch to ‘Internet time’.

Click on ‘Change Settings’.

Uncheck the box for ‘Synchronize with an Internet Time Server’.

Click on ‘Ok’.

Switch back to ‘Date and Time’. Click on ‘Change Date and Time’ and select your date as 2nd September.
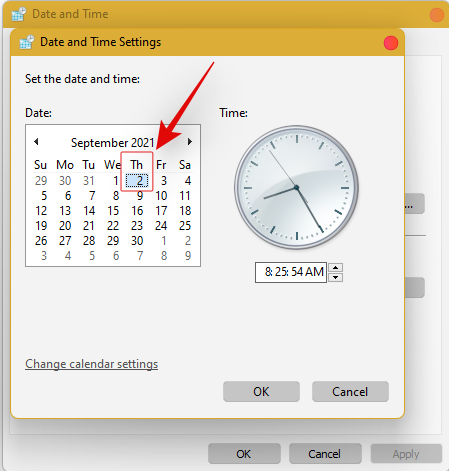
Close all windows and restart your system. Once restarted, open the ‘Date and Time’ dialog box again and change your date to 7th October this time.
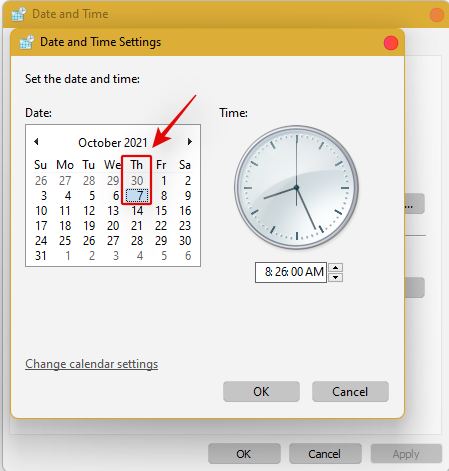
Restart your system again and Taskbar should now be back up and running on your system again. You can now enable synchronization for time again using the steps above on your system.
If synchronizing time does not work, move a month ahead to restore Taskbar
If you are still unable to get Taskbar up and running on your system again you can try the last date change fix. We recommend you use the steps above to change your date and time to a month ahead of your current date. Once changed, restart your system, and the taskbar should be up and running on your system now.
The downside of this fix is that if you revert to your normal date, Taskbar will stop working on your system. Having a mismatched date can cause issues with background syncs for various applications and cause some websites to malfunction. You will also have issues installing and getting the latest Windows Updates, so you will need to check all of these manually when updating in the future.
Fix #10: Uninstall the latest cumulative Windows Update ie: KB5006050
The cumulative update released in September for Windows 11 seems to also cause issues with the taskbar on some desktops and laptops. Use the guide below to uninstall the necessary update from your system.
Press Windows + i and select Windows Update from the left.
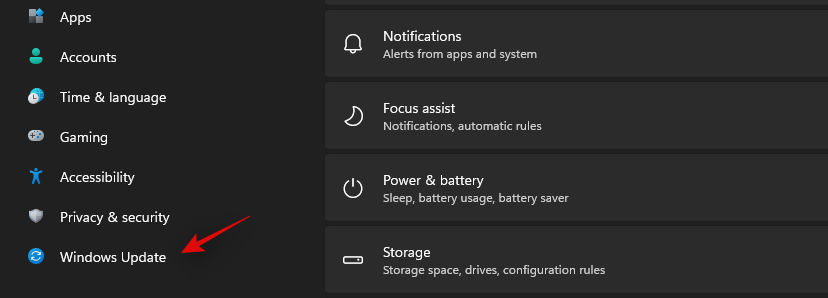
Click on ‘Update history’.
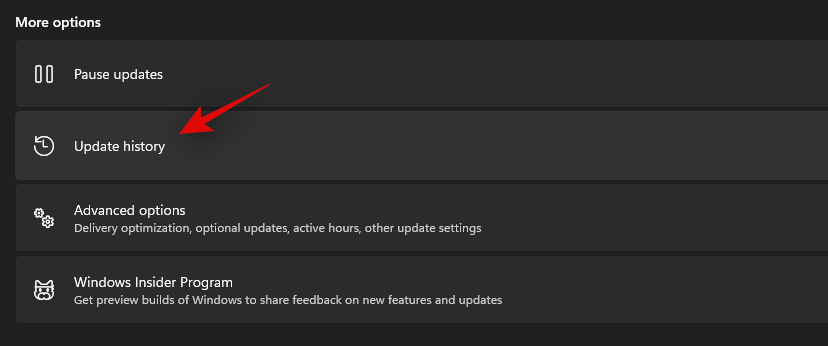
Now select ‘Uninstall updates’.
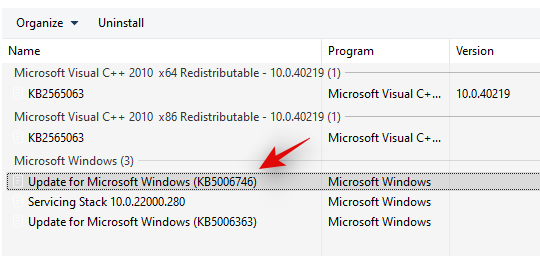
Click and select Windows Cumulative update KB5006050 from the list.
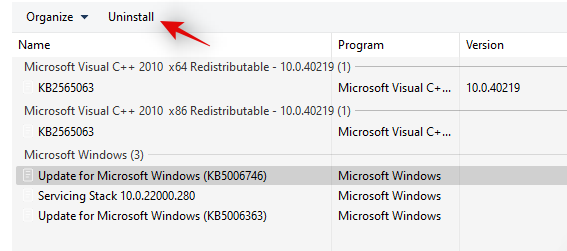
Now click on ‘Uninstall’ at the top and confirm your choice to uninstall the selected update.
Restart your system and taskbar functionality should now be restored on your system.
Fix #11: Restore PC to a previous restore point
If you had the taskbar working at a previous point in time then we recommend you restore your PC to a previously available restore point on your system. Follow the guide below to get you started.
Press Ctrl + Shift + Esc on your keyboard and click on ‘File’. Select ‘Run new task’ once you are done.

Type in CMD and press Ctrl + Shift + Enter on your keyboard.

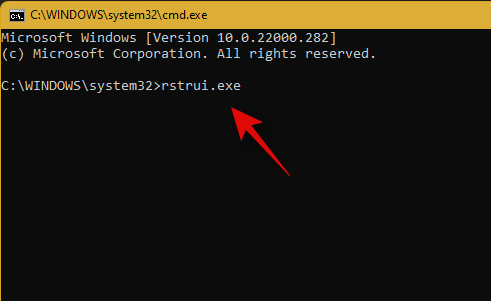
Now type in ‘rstrui.exe’ and press Enter on your keyboard.
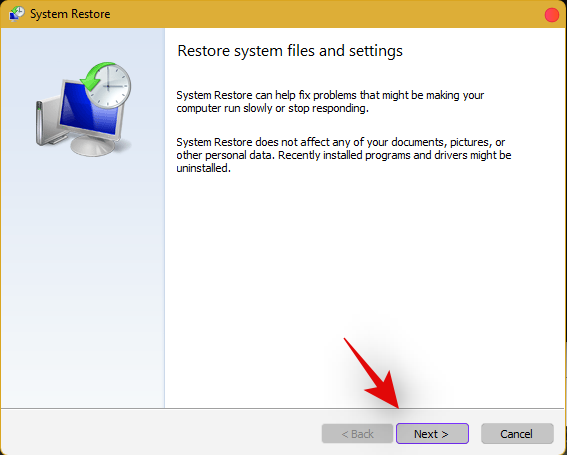
The system restore utility will now launch on your system. Click on ‘Next’.
Select the desired restore point from the list on your screen. Click on ‘Next’ once you are done.
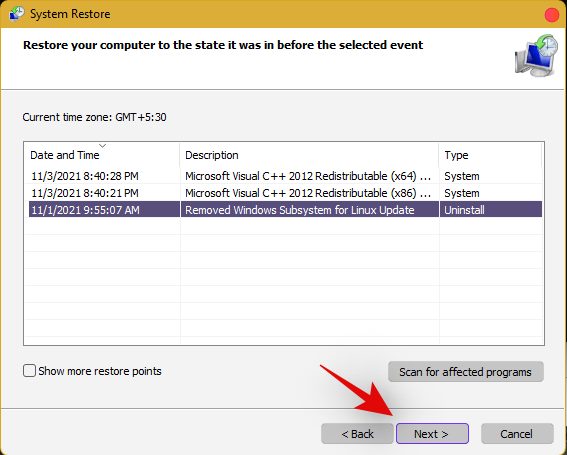
Tip: Click on ‘Scan for affected programs’ to view a list of installed programs that will be removed from your system during the restore process.
Click on ‘Finish’ once the restore finishes and restart your system.
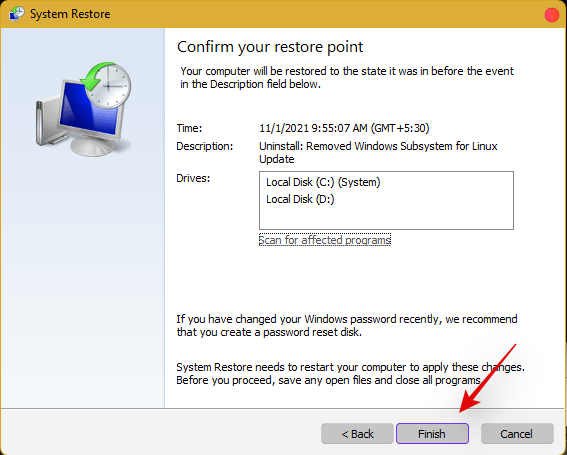
The taskbar should now be back up and running on your system again.
Fix #12: Last Resort: Create a new local admin account and transfer all your data
If by this point Taskbar still fails to work for you then it’s time for some drastic measures. You can create a new local admin account, check if Taskbar is working there, and then transfer all your data to the new account. This will be a tedious process but it is the next best way to get the taskbar working on your system without resetting your PC. Follow the guide below to get you started.
Create a new local admin account
Herre’s how you can create a new local admin account on your system.
Note: Most users facing the taskbar issue are unable to access the Settings app as well. Hence we will be using CMD to add a new local admin account to your PC. However, if the Settings app is available to you then you can use the same to add a new account as well.
Press Ctrl + Shift + Esc on your keyboard, click on ‘File’ and select ‘Run new task’.

Type in ‘cmd’ and press Ctrl + Shift + Enter on your keyboard.

CMD will now be launched as an administrator. Use the command below to add a new local admin account. Replace NAME with the Username of your choice for the new account. You can add a password later once you have confirmed that the taskbar is available in the new account.
net user /add NAME 
Once you have added the new user, use the command below to convert it to an administrator account on your PC. As usual, replace NAME with the Username for the new account you created earlier.
net localgroup Administrators NAME /add

Now type in the following to log out of your current account.
logoff

Once logged out, click on the newly added account to log in to the same. Once logged in, check if the taskbar is available in the new account. If it is, you can use the next section to transfer all your data. However, if the taskbar is still missing then you have no choice but to perform a fresh install of Windows 11 on your PC from a removable USB media drive.
Transfer all your data
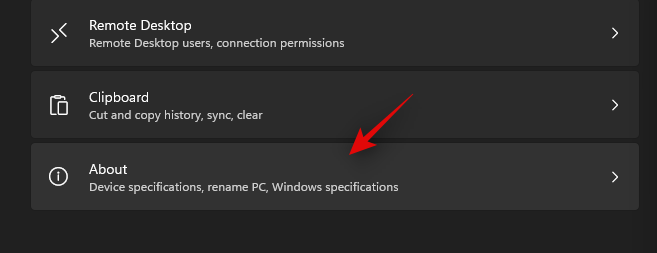
Press Windows + i on your keyboard and click on ‘About’ on your right.
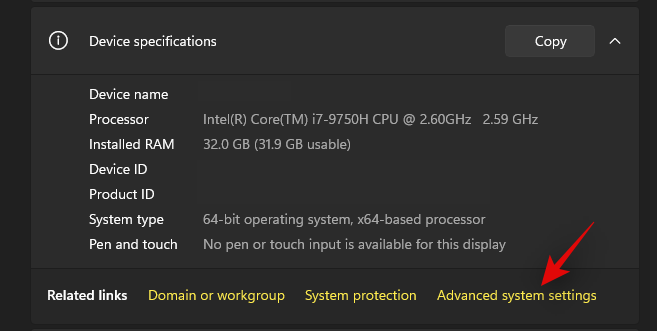
Click on ‘Advanced system settings’.
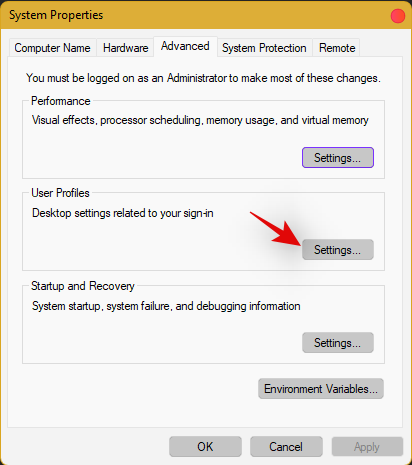
Click on ‘Settings’ under ‘User Profiles’.
Select your original profile by clicking on it and selecting ‘Copy To’.
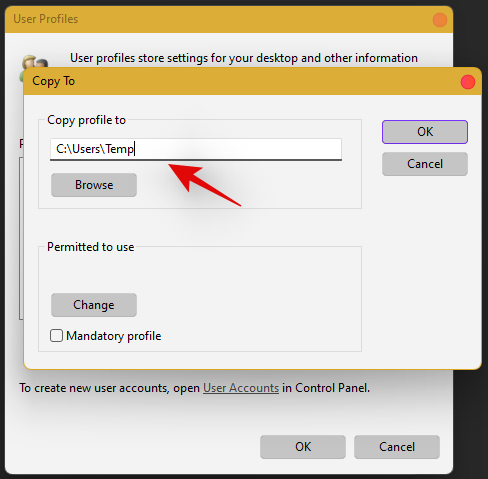
Now enter the following path under ‘Copy profile to’. Rename NAME to the username of your previous profile from where you wish to copy all your data.
C:\Users\NAME
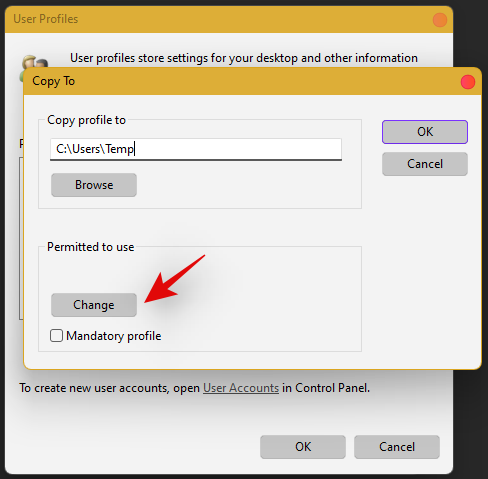
Click on ‘Change’.
Enter the name for your new user profile and press Enter on your keyboard.
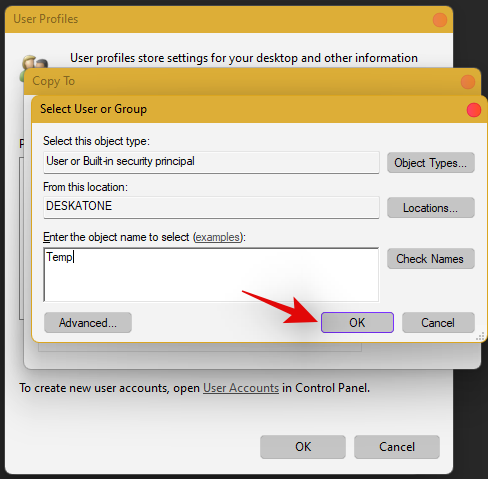
Click on ‘Ok’ once you are done.
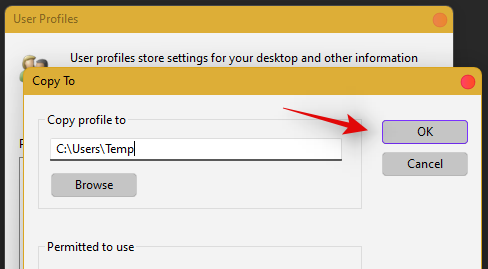
All your data will now be copied over to the new profile where the taskbar is functional on your PC. You can now delete your previous user account and set a password for your new account as well.
Frequently Asked Questions (FAQs):
With so many fixes, you are bound to have a few questions on your mind. Here are some commonly asked ones that should help you get up to speed.
How do I access Windows apps and Settings without a taskbar?
You can use the Task Manager to launch almost any program or Settings page on your system. To launch the desired program, launch the Taskbar > File > Run new task and enter the path to the program you wish to launch. Press Enter if you wish to launch the program normally or press Ctrl + Shift + Enter if you wish to launch the program with administrator privileges.
Is it safe to edit the Registry?
Registry edits are never safe as they have the potential to break your system. Fixes from trusted sources can help you avoid such issues but a good rule of thumb is to always back up your registry before making any edits. This way you can easily restore your Registry values in case some get messed up when editing the Registry.
When will Microsoft fix this issue?
Sadly, Microsoft is yet to release a proper fix for this issue. The company has tried to release a fix in the past cumulative updates to Windows 11 but they have been a hit and miss. We expect Microsoft to completely fix this issue in the upcoming feature update to Windows 11 when the OS gets the ability to run Android apps officially.
Can I update my Windows 11 after fixing the taskbar?
This will depend on the fix that you’re currently using. If you are using a date fix then you won’t be able to install updates until you restore to the current time. This will, however, cause the taskbar to be disabled again and the changes will be carried over after you update your PC. However, if you are using any other fix then you can easily update Windows.
For users with the date fix, you should try updating with the modified time first. If the update gets stuck on ‘Installing 0%’ or ‘Downloading 100%’ then change your date and time to the current date and time and update your PC. Ensure that you do not restart explorer or your PC during this process to keep the current instance of the taskbar alive on your system during the update process. This should help fix the issue for you once Microsoft officially releases an update to fix the issue.
We hope you were able to easily get the taskbar back up and running on your system using the guide above. If you face any more issues, feel free to reach out to us using the comments section below.
Related:
Oppdatering av enhetsdrivere er viktig for å fikse feil og forbedre kompatibiliteten i Windows 11. Lær hvordan du effektivt kan oppdatere driverne dine.
I tilfelle Windows Search bruker eksepsjonelt høye CPU- eller diskressurser, kan du bruke følgende feilsøkingsmetoder på Windows 11. Metodene for å fikse problemet inkluderer enklere metoder ...
20. februar 2021: Google har nå blokkert alle Meet-utvidelser som hjalp med rutenettvisningen, inkludert de som er nevnt nedenfor. Disse utvidelsene fungerer ikke lenger, og det eneste alternativet ser ut til å være...
Den ene skjermen som Windows-brukere har en kollektiv frykt for, er Blue Screen of Death. BSOD har eksistert i flere tiår nå, og endret seg veldig lite gjennom årene, men fortsatt potent nok til å...
Microsoft Teams har, takket være sin dype integrasjon med Microsoft Office 365, blitt den beste løsningen for videosamtaler for millioner av mennesker over hele verden. Til tross for at jeg ikke er den mest brukervennlige...
12. oktober 2021: En stor oppdatering! Vær oppmerksom på at du ikke lenger trenger å erstatte appraiserres.dll-filen for å omgå TPM-kontrollen og fikse installasjonsfeilen når du installerer Windows 11. …
Det har gått noen måneder siden Windows 11 ble utgitt og brukere har migrert til det nye operativsystemet siden den gang. Ettersom flere og flere brukere prøver ut nye problemer med Windows 11, blir feil og innstillinger på disk...
Alle er ganske ivrige etter å få tak i Windows 11-oppdateringen. Men hvis det er én ting som kan ødelegge planene deres for en enkel oppgradering, så er det det fryktede systemet...
Windows 11 har nå blitt utgitt for offentligheten etter at det ble kontroversielt lekket tilbake i juni i år. OS har siden den gang sett en rekke endringer, blant dem har vært den meget velkomne frostede...
Windows-oppgavelinjen har vært sentrum for all oppmerksomhet siden den fikk sitt nye fornyede utseende med utgivelsen av Windows 11. Du kan nå sentrere oppgavelinjen, nyte det nye handlingssenteret, endre det …
Windows 11 vil være ute for offentligheten om noen måneder, og alle har vært på jakt etter å få tak i det nye operativsystemet. Den har en ny startmeny, muligheten til å installere Android-apper naturlig, og...
Microsoft Teams er et flott kommunikasjonsverktøy for brukere på tvers av alle plattformer, men når du er ferdig med å bruke det, er det der appen begynner å bli irriterende. Hvis du ikke bruker Te...
Enhver tjeneste som er tilgjengelig på nettet har sitt eget sett med problemer, og Microsoft Teams er intet unntak. Samarbeidsverktøyet har sett en betydelig vekst i brukerbasen sin midt i COVID-19-pandemen ...
Da Windows 11 ble avslørt for verden, var Snap Layouts det første som fanget alles oppmerksomhet. De var innovative, nye og faktisk nyttige når de jobbet på et Windows-system...
Windows 11 har nettopp blitt utgitt for offentligheten, og det ser ut til å lokke mange nye brukere. Mange brukere har hoppet av skipet og har oppgradert til Windows 11 mens andre er ute etter å ta...
Google Meet har blitt en av de mest omtalte eksterne samarbeidsplattformene som for tiden er tilgjengelige på markedet. Den tilbyr tonnevis av fantastiske funksjoner og kommer med påliteligheten...
Med Zoom som tar over mesteparten av vårt arbeid og til og med sosiale liv, har vi kommet til å stole på det til en viss grad. Zoom lar brukere lage sine egne virtuelle møterom og ha samtale...
Windows 11 ble nylig lekket til offentligheten, og alle rundt om i verden har hastet med å få det nye operativsystemet installert på en virtuell maskin ved hjelp av verktøy som VirtualBox. Windows 11 kommer...
De som er ivrige nok etter å få tak i Windows 11 Dev-bygge via Insider-programmet har sakte begynt å forstå hvorfor de fleste brukere har en tendens til å vente til den stabile utgivelsen er ute. Å være den første…
Zoom har vært goto-videokonferansetjenesten for alle siden pandemien startet. Den lar opptil 500 brukere videochatte med hverandre samtidig, og tjenesten tilbyr til og med gratis tilgang...
Sliter du med webkameraforsinkelser i Zoom og Teams på Windows 11? Oppdag velprøvde løsninger for å jevne ut videosamtaler, forbedre ytelsen og eliminere frustrerende forsinkelser for sømløs fjernarbeid. Oppdatert med de nyeste tipsene.
Sliter du med manglende OneDrive-synkroniseringsikoner i Windows 11? Oppdag raske og effektive feilsøkingstips for å gjenopprette statusen for skysynkronisering og få tilbake sømløs filbehandling. Ingen teknisk ekspertise kreves!
Sliter du med poppende lyd i Windows 11? Oppdag velprøvde løsninger for å gjenopprette krystallklar lyd. Steg-for-steg-guide med tips for å eliminere knitring, statisk støy og avbrudd for sømløs lytting.
Sliter du med uskarpe eller for store fonter på oppgavelinjen i Windows 11? Oppdag velprøvde løsninger for feil i skriftstørrelse, fra DPI-justeringer til registerjusteringer, som sikrer en sømløs skrivebordsopplevelse.
Oppdag hvordan du bruker Diskopprydding-verktøyet i Windows 11 for å frigjøre plass, øke ytelsen og holde PC-en i gang uten problemer. Steg-for-steg-veiledning med tips for maksimal effektivitet.
Oppdag trinnvise instruksjoner for å tilpasse låseskjermklokken i Windows 11 med personlige bilder, fonter og stiler. Forbedre skrivebordsopplevelsen din uten problemer.
Sliter du med feilen «Spillbar-opptak siste 30 sekunder»? Oppdag velprøvde løsninger for å få det umiddelbare avspillingsopptaket tilbake på sporet raskt og enkelt. Slutt på tapte episke øyeblikk!
Sliter du med en ekstern disk som ikke blir oppdaget i Windows 11? Oppdag velprøvde, trinnvise løsninger for å få lagringsplassen din tilbake på nett raskt og problemfritt. Ingen teknisk ekspertise nødvendig!
Oppdag hvordan du offisielt får Windows 11 gratis. Følg denne trinnvise veiledningen for å sjekke kompatibilitet, oppgradere problemfritt og nyte de nyeste funksjonene uten å bruke en krone. Perfekt for PC-brukere som er klare til å modernisere.
Sliter du med tidsavbruddsfeil i Edge-nettlesertilkoblingen? Oppdag velprøvde trinn for å løse dette frustrerende problemet raskt og få tilbake problemfri nettlesing. Viktige tips for Windows-brukere.

