Coa pandemia de COVID-19 que se prolonga, debes estar a ter dificultades para ensinar a distancia desde a túa casa, se xestionar unha sala chea de nenos non é o suficientemente difícil. Afortunadamente, podes sacar o máximo proveito da situación realizando clases en liña e asegurándote de que aínda tes unha relación forte cos teus estudantes cando volva abrir a escola ou a facultade.
Preparamos esta guía "Google Meet for Teachers" para que poidas comezar a organizar clases en liña , reunirte cos teus alumnos, interactuar con eles e continuar coa túa docencia en pouco tempo.
Contidos
Que é Google Meet
Coñecido anteriormente como Hangouts Meet, Google Meet é unha ferramenta de videoconferencia que pode achegarse a Zoom en canto a que che permite falar cos teus amigos, familiares, compañeiros de traballo e moitos máis con ou sen vídeo. Como profesor, podes impartir clases aos teus alumnos de forma remota, gravalas para deixarlles recapitular, compartir o contido da túa pantalla e moito máis coa axuda de Google Meet.
En canto a funcións, a solución de videoconferencia empresarial de Google inclúe reunións de grupos grandes, transmisión en directo, uso compartido de pantalla, silencio, desactivación de vídeo, subtítulos en tempo real e moito máis. Tamén pode xerar ligazóns para que outras persoas se unan a unha reunión, utilizar ID de reunión de 25 caracteres e restrinxir que os membros externos entren nunha reunión en Meet.
Por que debería usar Google Meet como profesor
Con tantas funcións, Google Meet é unha ferramenta perfecta para usar para a aprendizaxe remota. Non só podes impartir as clases como o fixeches nunha aula real, senón que tamén podes compartir o contido da túa pantalla, debuxar sobre un encerado para explicar mellor as cousas, silenciar aos participantes para unha sesión de ensinanza fluida e moito máis.
Como educador, tamén podes chatear cos teus alumnos para discutir determinados temas, fixar a fonte de vídeo dun alumno para interactuar mellor cos alumnos, aumentar a súa asistencia e diversificar os alumnos en diferentes seccións dentro dunha aula.
Estima a túa capacidade de estudante
Ata hai pouco, Google Meet só estaba dispoñible para os usuarios de G Suite, pero agora podes usalo de balde se tes unha conta de Google. O xigante de Mountain View estableceu un límite de participantes por sesión para usar Google Meet con usuarios gratuítos e non gratuítos que reciben asistencia para ata 100 e ata 250 participantes, respectivamente. Aquí tes unha visión xeral detallada de cantos estudantes podes aloxar usando a túa conta de Google:
| Tipo de conta de Google (ou G Suite). |
Número máximo de alumnos por reunión |
| Conta de Google normal (non G Suite). |
100 |
| G Suite Education, G Suite Basic |
100 |
| G Suite Essentials, G Suite Business |
150 |
| G Suite Enterprise Essentials, G Suite Enterprise, G Suite Enterprise for Education |
250 |
Relacionado: límite de Google Meet: número máximo de participantes, duración da chamada e moito máis
Configurando Google Meet para a túa clase
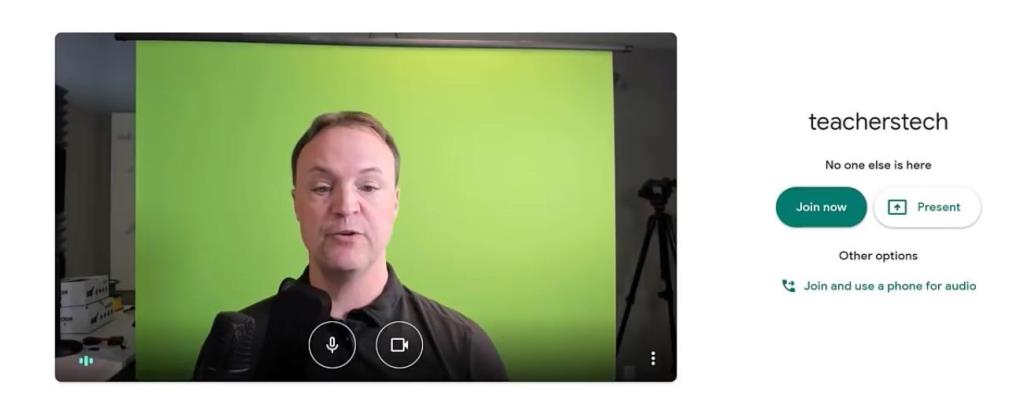
Unha vez que teñas decidido o tipo de conta de Google/G Suite que queres, podes proceder a configurar a túa sesión de Google Meet, que será o equivalente á túa aula para os teus estudantes. Podes comezar a túa sesión de Meet para os teus estudantes accedendo á páxina de inicio de Google Meet , iniciando sesión e facendo clic en "Únete ou inicia unha reunión".
Aparecerá unha pantalla de vista previa na que podes facer clic en "Únete agora" para entrar na reunión. Cando esteas antes da reunión, amosaranse os detalles da reunión, a ligazón de unión e o PIN da reunión para que os teus estudantes se unan á clase virtual.
▶ Como configurar unha videoconferencia e enviar unha invitación en Google Meet
Invita aos teus alumnos e pídelles que se unan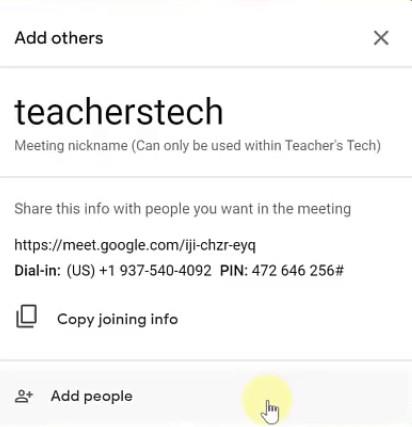
Despois de que remates de configurar unha xanela da aula dentro de Google Meet, agora é o momento de engadir aos teus alumnos á pantalla da reunión. Podes facelo de varias formas que se indican a continuación:
- Envía a ligazón da reunión e o PIN aos teus estudantes mediante unha aplicación de mensaxería ou correo electrónico. Podes copiar estes detalles facendo clic no botón "Copiar información de unión" cando inicies unha reunión.
- Engade manualmente estudantes á túa clase facendo clic en "Engadir persoas" e introducindo o enderezo de correo electrónico ou outra información de contacto dos teus estudantes.
- Os estudantes que non teñan unha conta de Google tamén poden unirse á súa clase mediante a función integrada " Solicitar unirse " a Google Meet.
Relacionado : como xestionar os participantes de Google Meet de forma eficiente
Comparte a túa pantalla cos teus alumnos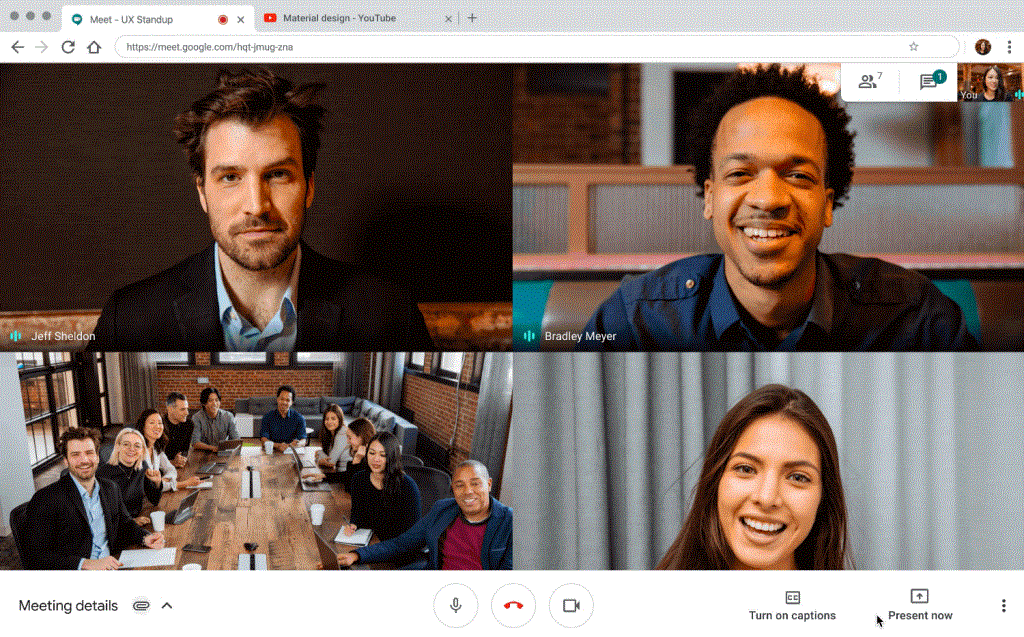
Non só podes falar con todos os teus estudantes nunha clase, senón que tamén podes compartir o contido da túa pantalla mediante a función "Presentar" dentro da pantalla da reunión. Como profesor, podes compartir unha xanela desde o teu ordenador, ou toda a pantalla ou, para simplificar, só unha pestana do navegador.
Para comezar a compartir a túa pantalla, terás que unirte a unha reunión e, a continuación, premer no botón "Presentar agora" na esquina inferior dereita. Aínda que podes compartir toda a pantalla do teu PC ou unha xanela dunha aplicación, a mellor opción é seleccionar a opción "Unha pestana de Chrome", que che axudará a compartir información relevante para a túa clase e nada máis. A continuación ofrécese unha guía detallada sobre como compartir unha única pestana en Google Meet.
▶ Como compartir unha única pestana de Chrome en Google Meet
Toma asistencia da túa aula
Once your classroom is set up and you have added your students to the class, you will need a way to check who all are present during a session and who isn’t. While Zoom has a built-in tool for taking attendance, you will have to download and install the Google Meet Attendance extension on Google Chrome to get things done.
The tool will create a spreadsheet for your classrooms and add the names of existing students and the time at which they logged in directly to the sheets. A detailed guide is given below:
▶ How to take attendance in Google Meet
Mute your students during a session
Handling students can be a tough task, be it in an actual classroom or a virtual one. In order to make all of your students listen to you, you will first need to mute them, similarly to how you would if they were in front of you.
You can mute a student’s microphone by selecting the ‘People’ tab at the top right corner of your Google Meet screen, clicking on the down-arrow adjacent to a student’s name, and hitting the microphone button to mute their microphone. Unfortunately, Meet doesn’t allow you to mute the microphones of all your students but the feature is currently in development.
▶ Can’t mute all on Google Meet? Here are some workarounds
Use a whiteboard inside Google Meet
Google Meet offers a slew of features but perhaps it’s biggest one is how well the service is integrated with other Google services. If you’re a teacher, you can make use of Google Jamboard inside Meet to present your topic on a whiteboard as you would in a classroom. You can use the following guide to learn how to create a whiteboard inside Google Jamboard and share it on Google Meet.
▶ How to use Google Jamboard with Google Meet
Show your video while using a whiteboard
You have learned how easy it is to use a whiteboard inside Google Meet but what if you want your students to see you at the same time. To get this done, you will need to use the same Google account to log in to Google Meet; one to show your face and another to stream what’s on your whiteboard (for best results – on a PC). We have prepared a complete guide for this that you can check out in the link below.
▶ Show your video and use whiteboard simultaneously on Google Meet
Create study groups inside a Meet classroom

Meet doesn’t natively support breakout rooms like Zoom does to create subgroups inside a single class. However, you can manually create multiple stuff groups for your students with the help of Google Slides. You can learn this by following the guide given below to assign your students to different groups and share the group links to each of the groups.
▶ Use breakout rooms in Google Meet
Record your class for students to recap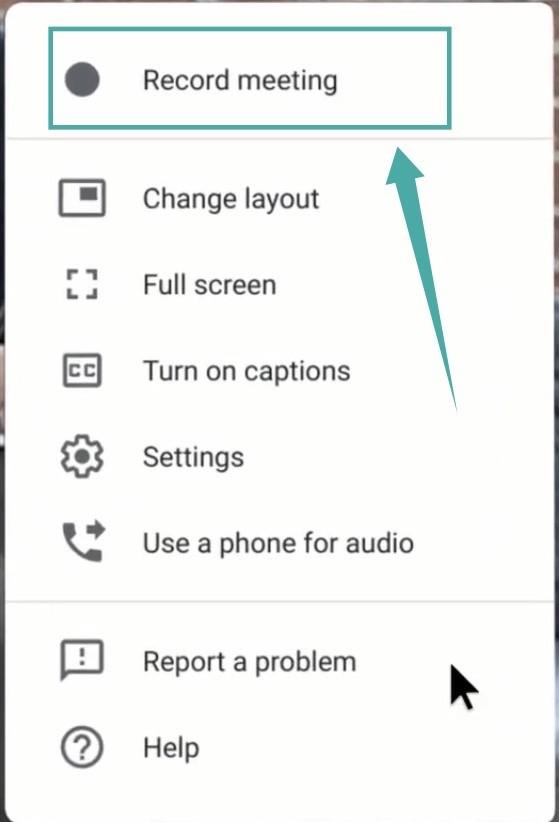
Like other collaborative tools in the market, Google Meet also has its own recording tool to save the proceedings of a meeting. You can use the meeting recorder to save and store your classroom session so that you can share them with your students to give them a recap of what was taught today.
Note: Meet’s recording feature is available for free till the 30th of September 2020 for non-G Suite users and you will need a paid license to record your classes after that.
You can record your class by clicking the 3-dot icon inside the meeting screen and selecting ‘Record Meeting’ from the list of options. Follow the detailed guide linked below to start and stop a recording on Google Meet.
▶ How to record your class session on Google Meet
Protect your classes from anonymous users
As online meetings and classes started to become the norm during the pandemic, there were several instances where sessions were interrupted by anonymous users. Often times than not, these anonymous users played pranks on other members of the meeting, even going to the extent of profanity and showing inappropriate videos.
If you’re a teacher conducting classes over Google Meet, then you can safeguard your class and students by letting Google automatically block access to anonymous users. This means anyone who have not signed in to their Google account won’t be able to access your class even if they have the meeting link and password. Additionally, Google offers a way to block anyone outside your class from trying to join the meeting as well.
The ability to block anonymous users automatically is available for Google Meet users with G Suite for Education or G Suite Enterprise accounts. The guide mentioned below should help you block anonymous users on Meet.
▶ How to block anonymous users on Google Meet
Google Meet Tips for Teachers!
With the above pointers, you can get started with your classes on Google Meet right away but in case you want to perfect the best ways to conduct classes remotely, you might want to check out the tips mentioned below.
See all of your students in a classroom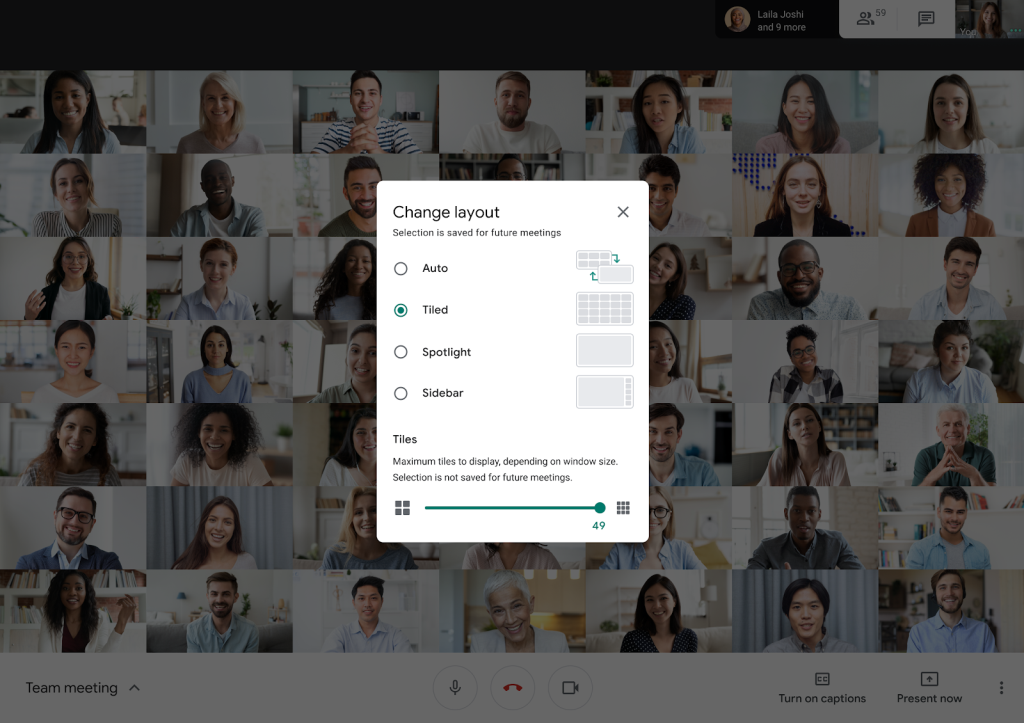
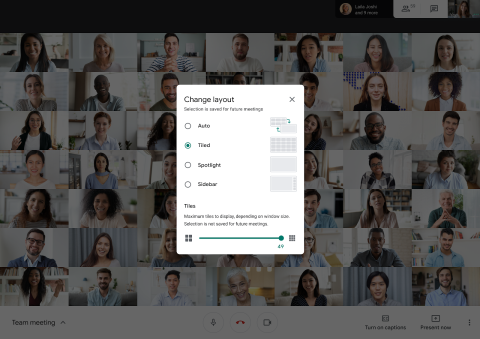
At a given time, Google now lets you view up to 49 people during conference calls on Meet. This means, you don’t have to install the Google Meet Grid View extension on Google Chrome to see all of your students on a screen. You can set the Google Meet to see up to 49 participants on a single screen by following the guide below:
▶ How to see everyone on Google Meet on PC
The new 49-participants layout will show all your students in a 7×7 grid pattern of equal-sized rectangular boxes and will be available to all Google personal account and G Suite users.
Ask your students to use Spotlight view 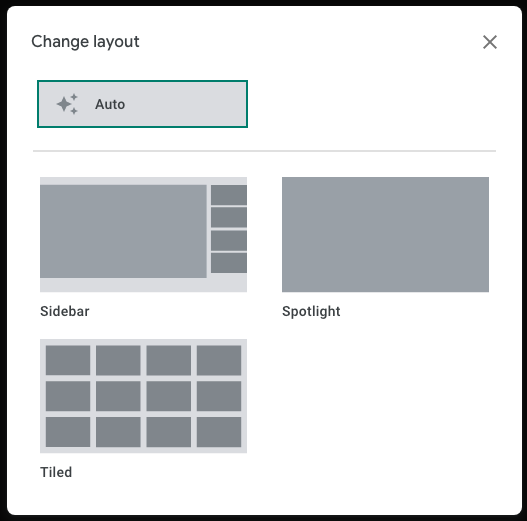
While you have found a way to see all students in your class on the same screen, the same view wouldn’t be useful for your students. Students are better left watching your video feed during a class and although Meet has a Spotlight view feature to highlight the active speaker (in this case, you), you cannot enable that for your students. You, thus, need to ask your students to enable Spotlight as their default video layout after they have joined a Meet session.
To enable Spotlight view, students will have to join you on Meet, click on the ‘More’ icon, then click Change Layout, and select Spotlight from the list of options.
▶ How to change screen layout on Google Meet
Schedule/create classes from within your Gmail account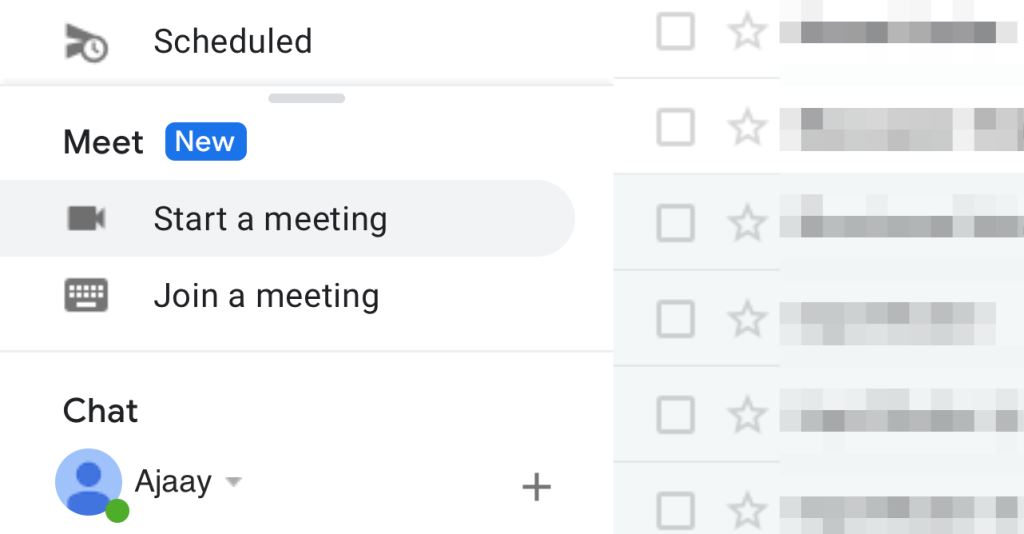
As discussed earlier, Google Meet works best with other Google services and if you use Gmail often, then you might be able to schedule classes or create them faster. Google Meet is available as a section on the left sidebar inside Gmail with two options – Start a meeting and Join a meeting. You can start and schedule your classes on Meet using Gmail by following the link below.
▶ How to use Google Meet on Gmail
Prevent distractions and background noises
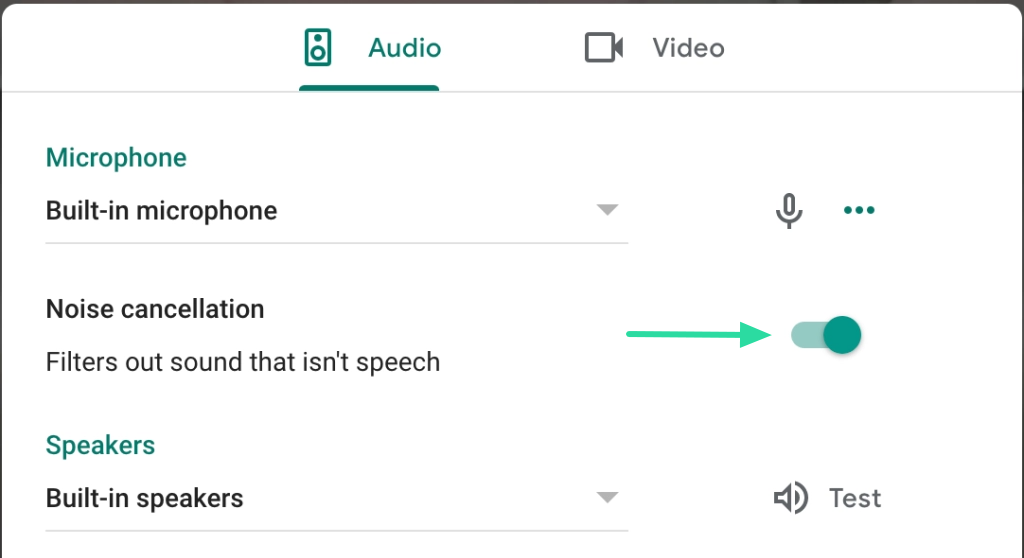
Classrooms are hard to manage with so many students present at a given time. On top of that, would you want something else to distract you while you’re teaching in the class? We don’t think so. Google recently started rolling out a Noise Cancellation feature on Meet which will use machine learning to distinguish your voice from background noises, so that your students can hear you better.
Noise Cancellation is available on Google Meet on the web but will be coming to mobile devices in the new future. If you’re using Meet on the web, you can switch ON Noise Cancellation by clicking the 3-dot icon at the bottom right, selecting ‘Settings’, and clicking on the ‘Noise cancellation’ toggle.
▶ How to enable Noise Cancellation on Google Meet
Use Push To Talk for conducting quizzes
Google Meet is based on two-way audio but if today’s class is all about conducting a quiz or an interactive session with your students, you can Push To Talk inside Google Meet. You can do this by installing the Push To Talk extension on Google Chrome so that you do not need to manually mute and unmute your students during a quiz.
Related: Google Meet Chrome extensions you can try now
Play games together with your students
If making your students do something was hard enough before the pandemic, it’s an even tougher task if you’re required to do so with remote classes. One way you can approach online learning and keep your students interested is by playing games with them.
Be it trivia games, scavenger hunt, Pictionary, or any game that you otherwise would play with your kids in school, you can do the same remotely. Playing games with your students will keep them excited about upcoming classes and help them from feeling missed on social activities with other kids.
▶ How to play Kahoot on Google Meet
▶ 26 games you can play with kids on a video call
Make your class more interactive with Nod
Remote learning while easily accessible does have its demerits and one of them is the inability to interact with your students the same way you would in an actual classroom. Although Google Meet natively doesn’t support being able to lift your hand to speak or react to a discussion or topic within a meeting, you can still do them via an external tool.
Enter Nod – Reactions for Google Meet. This simple Google Chrome extension lets students ‘raise (their) hand’ (like they would in a real classroom) to let the host know that they want to speak or have a question regarding the topic. The extension also adds ways to easily send your reactions to others like clapping, thumbs-up, laughing, wow, and more.
▶ 13 Google Meet Chrome extensions you can try now!
Here are a bunch of other ideas
Setting up your class on Google Meet is a relatively easy job but keeping your students engaged and productive in your class is what’s tough. To do that, you can follow a bunch of activities and take your teaching game to the next level. You can read more about how you can make distance learning fun for the kids in the link below.
▶ 16 ideas interesantes de Google Meet para profesores
Estás preparado para usar Google Meet para as túas necesidades de ensino?
