Google Meet está cobrando forza a medida que segue lanzando actualizacións para tentar competir coas grandes aplicacións de videoconferencia do día. Coa súa última actualización, Google Meet agora pode albergar ata 250 usuarios (require un plan Enterprise). Google Meet tamén será gratuíto , pero aínda non sabemos cantos usuarios se permitirán na versión gratuíta e cal será a duración das reunións.
Google Meet tamén é demandado duramente con fins educativos, onde ter un bo grao de control sobre os participantes (alumnos, xa sabes!) é de suma importancia para a conclusión dunha reunión exitosa. Facendo fincapé nisto, aquí tes os mellores consellos para xestionar os participantes de Google Meet durante unha reunión.
► Como usar Google Meet desde Gmail
Contidos
Fixar un participante

A función de pin en Google Meet permite aos usuarios decidir quen permanece no centro da súa pantalla ocupando máis espazo. De forma predeterminada, Google Meet inicia unha videoconferencia co deseño "Automático". Este deseño permite que Google Meet elixa a mellor opción para a fonte de vídeo da túa reunión, dependendo das presentacións, dos oradores activos, etc.
Non obstante, se desexa manter un participante en particular fixado no centro da pantalla, independentemente do deseño que se utilice, pode anular o predeterminado e "fixalo".
Unha vez fixado, este participante permanecerá resaltado no centro da pantalla ata que se quite.
Como fixar un participante
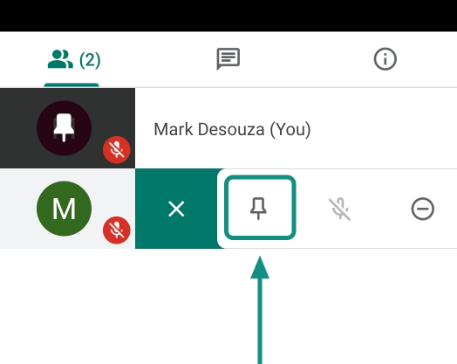
Nun ordenador : pasa o rato sobre a miniatura do participante na fonte de vídeo e fai clic na icona "Finar".
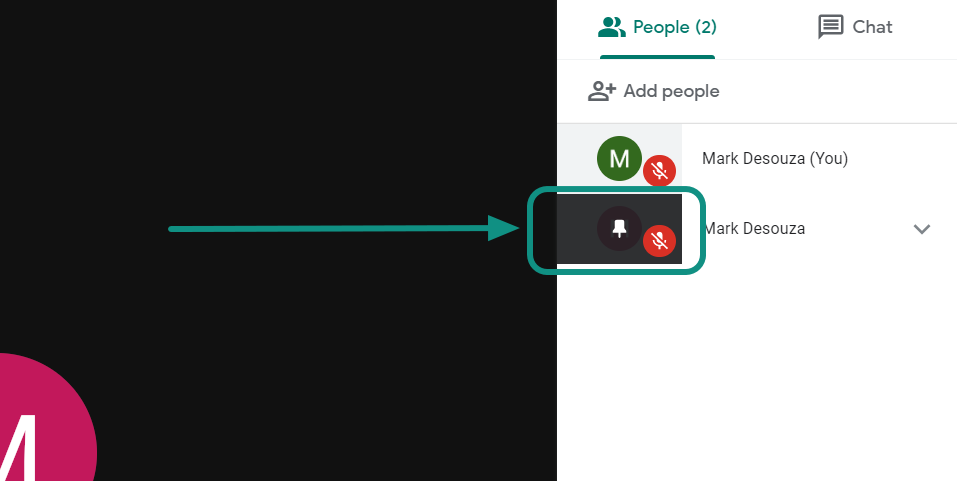
Nun teléfono : converte o teléfono horizontalmente en modo horizontal. Agora toca a miniatura do participante na fonte de vídeo e toca a icona "Pin".
Como quitar a fixación dun participante
Cando fixas a un participante, tamén terás a icona de quitar fixación no lugar da icona de fixar, que podes usar para desfixar o participante.
Silenciar e activar o silencio dun participante

Os anfitrións da reunión poden silenciar a outros participantes mentres están a falar, para crear un mellor fluxo. Non obstante, unha vez silenciado, os participantes deben activar o silencio. Isto significa que se un anfitrión te silencia, non pode activarte, a non ser que ti desactives o silencio.
Google afirma que esta é unha función de seguranza posta en marcha para evitar que outros (o anfitrión) activen o micrófono sen o teu permiso. Sigue esta guía para saber como silenciar un participante nunha reunión de Google Meet.
Como silenciar a un participante (como anfitrión)
Se es anfitrión e queres silenciar a un participante ou participantes, siga esta guía.
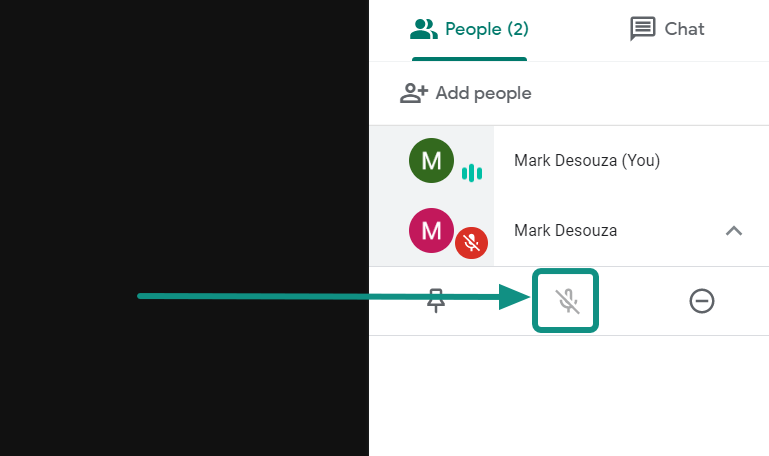
Paso 1: fai clic no nome do participante na tira de película ao lado da fonte de vídeo.
Paso 2: fai clic no botón do micrófono que aparece xunto ao seu nome. Unha vez que se fai clic, o micrófono volverá gris, o que indica que o participante está agora silenciado.
Como activar o silencio dun participante (como anfitrión)
Non podes facelo por motivos de privacidade. Só un usuario pode activar o silencio. Polo tanto, debes pedirlle ao participante que active o son.
Como silenciar e activar o silencio
Como participante, podes decidir se queres ou non activo o teu micrófono.
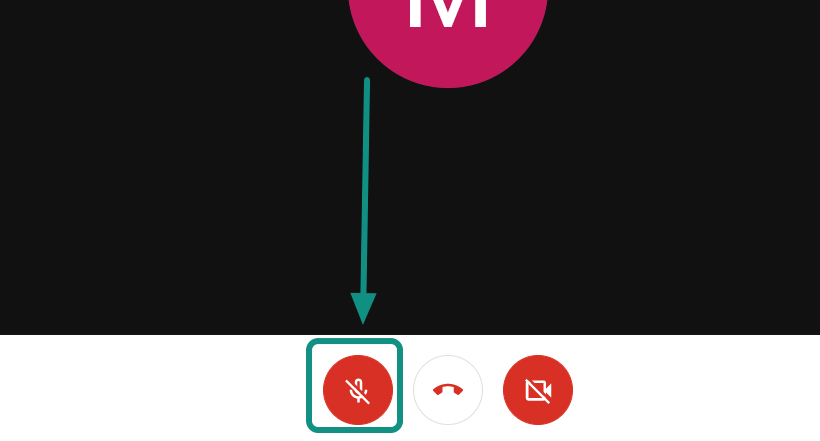
- Para silenciarche , fai clic no botón do micrófono na parte inferior da fonte de vídeo. O botón poñerase en vermello para indicar que o teu micrófono está agora silenciado. Se o botón xa está vermello, significa que foi silenciado por un host.
- Para activar o silencio , simplemente fai clic de novo no botón vermello do micrófono. O botón agora poñerase branco.
Nota: se estás a usar un teléfono para marcar a reunión, podes marcar *6 no teu teclado de marcación para silenciar ou activar o silencio (dependendo do estado no que estea o micrófono) nunha reunión.
Eliminar un participante
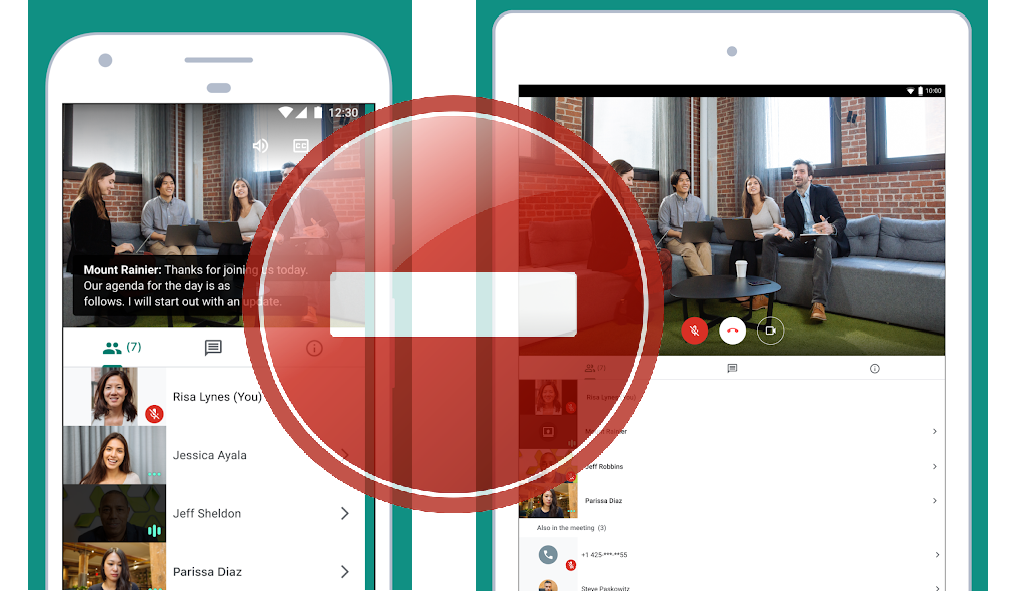
En abril de 2020, Google Meet lanzou unha actualización que permitía SÓ aos anfitrións/os da reunión eliminar a outros participantes se así o desexaban. Isto foi debido a varias queixas sobre o uso indebido dos usuarios da función de eliminación.
Como eliminar un participante
Nun ordenador: para eliminar un participante dunha reunión, primeiro, fai clic no botón "Atrás" para volver á pantalla do participante. Aquí pasa o rato sobre o nome do participante e fai clic no botón "Eliminar" . 
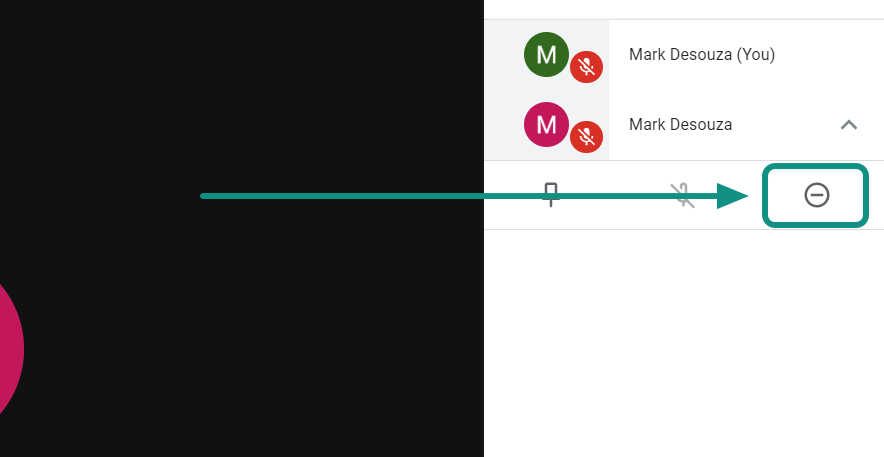
Nun teléfono intelixente: seleccione o participante e toque o seu nome. Toca o  botón "Eliminar" .
Unha vez eliminados, os participantes non poden volver a unirse á chamada a non ser que o anfitrión/anfitrións sexan invitados explícitamente dentro da chamada.
Chatea cos participantes durante unha reunión
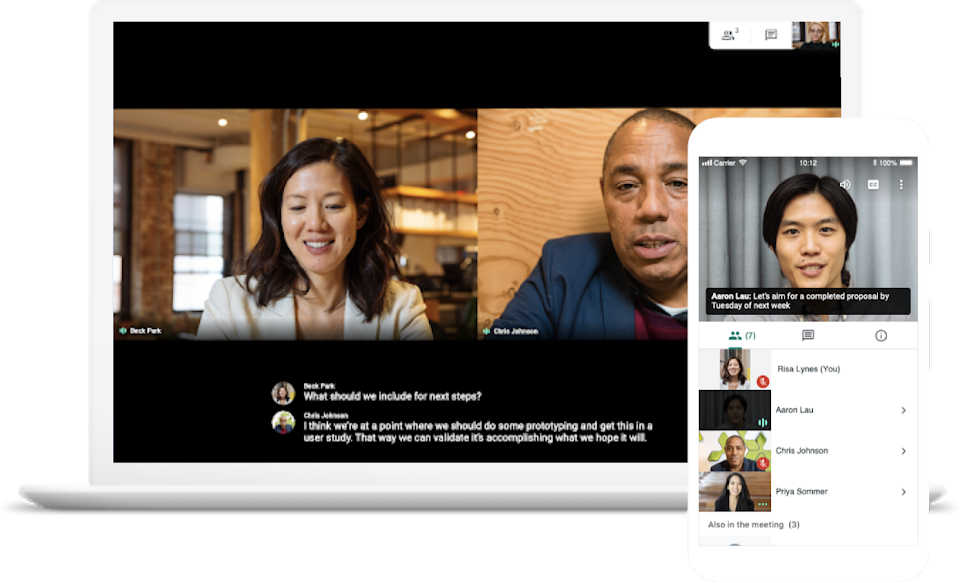
Durante unha videochamada, os participantes poden enviar mensaxes visibles para todos os participantes na chamada. Estas mensaxes só permanecen durante a duración da chamada. Unha vez finalizada a chamada, todas as mensaxes enviadas durante a chamada elimínanse automaticamente. Use a función de mensaxería para enviar ligazóns, documentos de Google, etc.
Como enviar unha mensaxe de chat
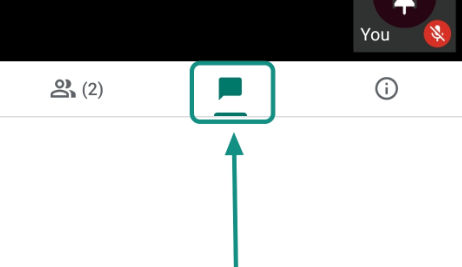
Nun ordenador: pasa o rato sobre a fonte de vídeo e fai clic no botón "Chat" na parte superior dereita da pantalla. Isto abrirá unha barra lateral onde podes ver e enviar mensaxes de chat ao grupo.

On a smartphone: Tap the ‘Chat’ button below the video feed to pull up the chat window.
Note: Participants cannot view messages that were sent before they joined the call.
Add participants to an event
New participants can be added to an event even after it has been created. Once added, you will receive an option to send out Invites to the new invites. If you so choose, invites will only be sent to the participants added at that time, not the entire list. To add new participants follow the guide below.
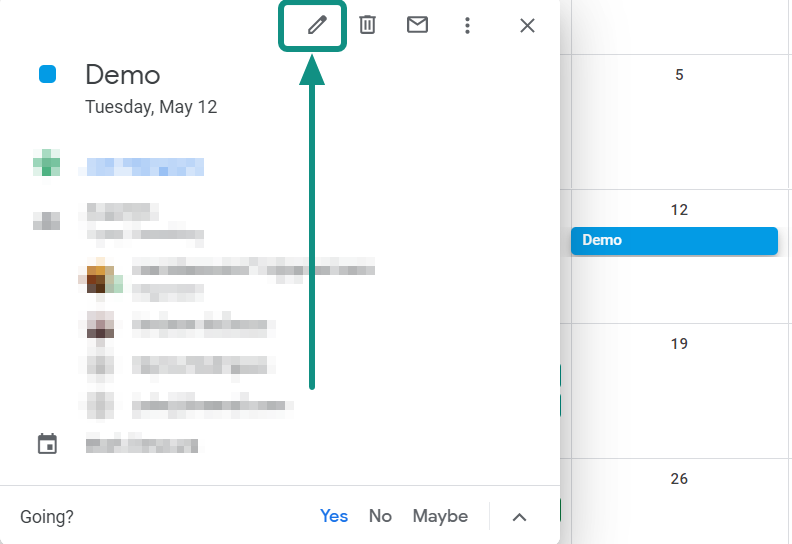
Step 1: Open the event in your Google Calendar. Click the ‘Edit event’ button.
Step 2: Under the ‘Guests’ tab on the left, start typing the names of the participants you would like to add. If you would like to add a participant using their email ID, simply type in their full email ID and hit ‘Enter’.
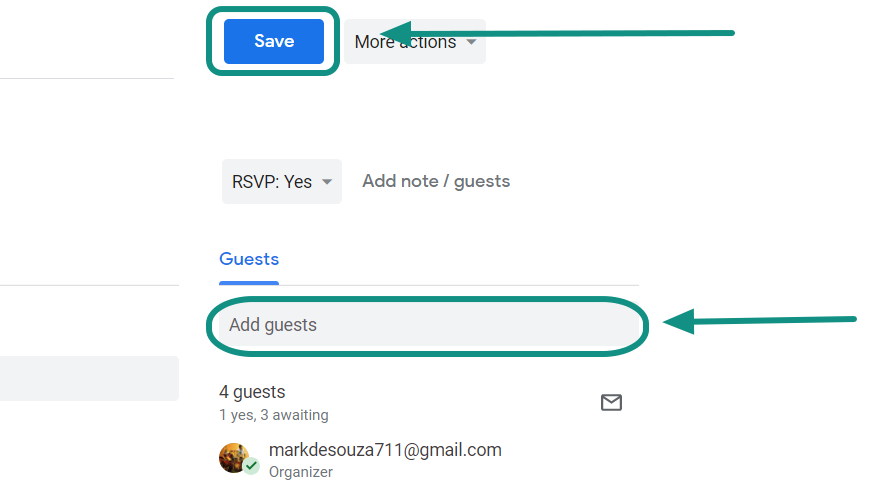
Step 3: Click ‘Save’. You will now get a pop up asking you if you would like to send out invites to the new participants.
Add participants to an ongoing meeting
You can even add new participants to an ongoing meeting, right from the meeting itself. These participants will receive an invite link that they may click on to get redirected to the meeting.
Follow the guide below to add new participants to a meeting.
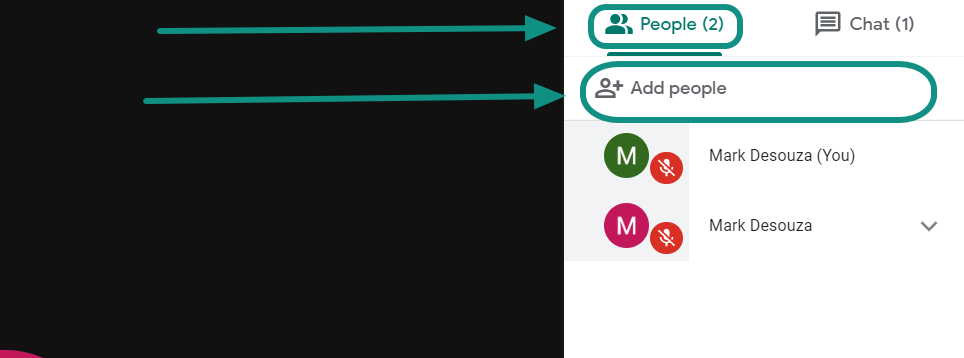
Step 1: Click the ‘People’ tab in the top right corner of the screen.
Step 2: Click ‘Add people’ and start typing the name of the person. If you would like to add a participant using their email ID, simply type in their full email ID and hit ‘Enter’.
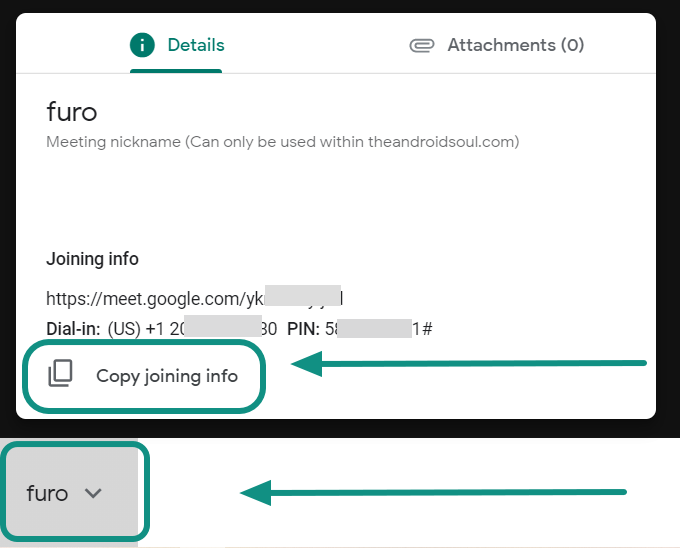
Alternatively, click the meeting ‘nickname’ at the bottom left of the screen and click ‘Copy joining info’. Paste the copied information in an email and send it to the users you would like to add.
Stay connected with participants while presenting

Wouldn’t you like to keep an eye on your students while you are presenting? Unfortunately, once you begin screen sharing, you can no longer look at the participants. Luckily, Google Meet allows you to sign in to multiple devices using the same credentials. This way you could use one device to present and another to watch the class.
Follow this simple guide to set it up.
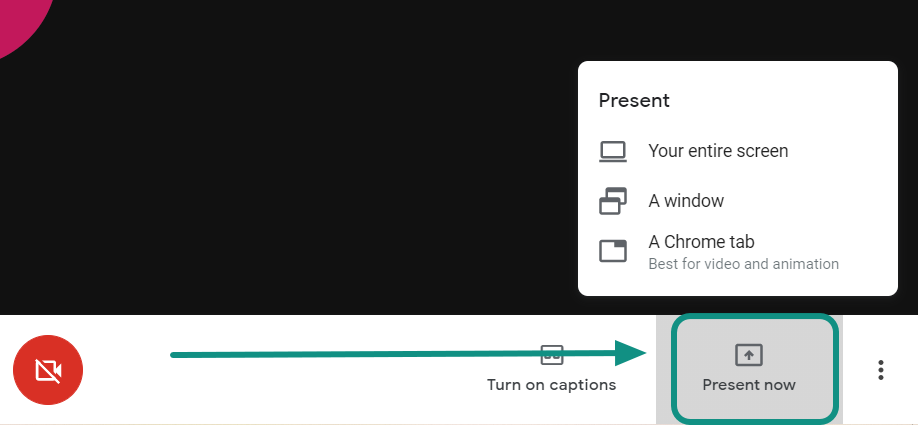
Step 1: Sign in and start a Meeting on device 1. Click ‘Present now’ at the bottom of the screen and select the tab/window you would like to present.
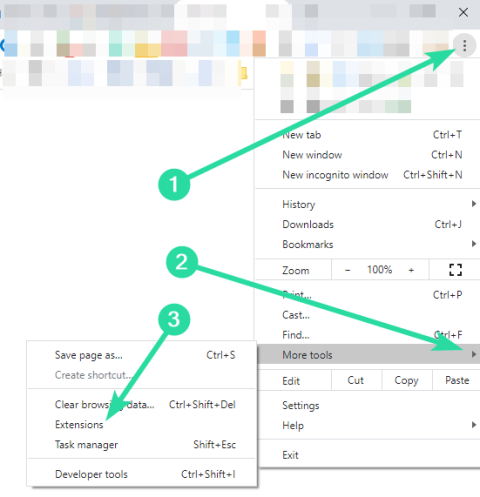
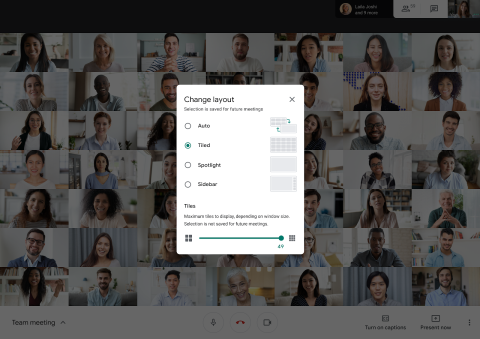
Step 2: Using another device (mobile phone, laptop, tablet), sign in using your own credentials. You can now watch the grid view of the group. You can use the tiled layout (up to 16 participants), or use the unofficial Google Grid Chrome extension to get a view of all the users.
► How to solve Google Meet Grid View not working problem
Create Organizational Units (OU)

Organizational Units help to allot different privileges to different users. This comes in handy, when you would like to restrict the users that can create meetings, mute others, etc.
Creating and editing Organizational Units needs Admin privileges. To create a new Organizational Unit follow these steps below.
Step 1: Sign in to the Google Admin Console using your credentials.
Step 2: Select the ‘Settings’ button and click Directory > Organizational Unit.
Step 3: Click the little + sign to add a new Organizational Unit. Name the unit and click ‘Create’.
How to designate OU’s to users
Now that you have an Organizational Units you need to add users to the unit. All users added to a certain unit will have the same privileges. To add users to the new Organizational Unit, follow the steps below.
Step 1: Sign in to the Google Admin Console using your credentials.
Step 2: Go to the ‘Users’ tab and select the users you would like to add to the new Organizational Unit. Once selected click ‘More’ at the top of the page, and then ‘Change Organizational Unit’.
Step 3: Select the OU you created and hit ‘Change’.
Keep an eye on your chats while presenting

When about to present in a Google Meet meeting you have an option to share the whole screen, a specific browser tab, or a specific window. Once the screen sharing begins, only the selected tab/window is updated on the video feed. This means that if you would like to read the chats tab, you have to keep swapping between tabs. Luckily there is a fix!
Follow this simple guide to keep an eye on your chats while presenting.
Step 1: When presenting, do not share the whole screen. Selecting either a browser tab or a window gives you more control over your privacy.
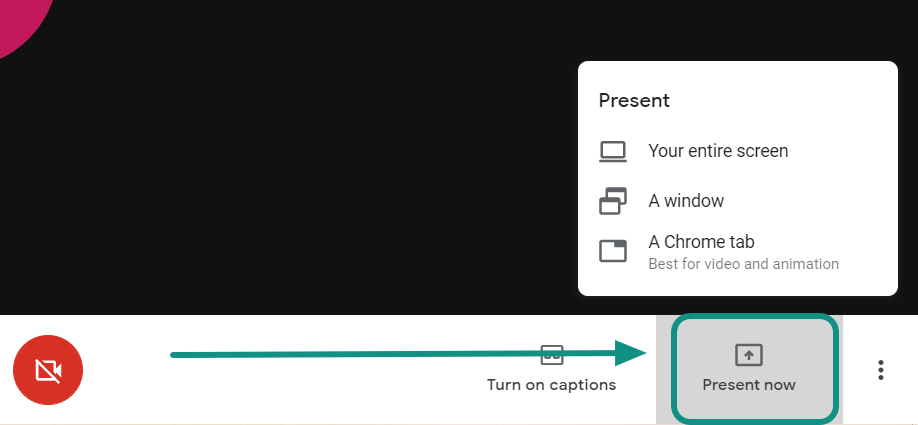
Step 2: If you are using a windowed application, scale down the application so that it fits in the Google Meet window without covering the chat column.
Similarly, if you are sharing a tab on a web browser, first, separate the tab to a new windowed browser. Now scale down the browser so that it fits in the Google Meet window without covering the chat column.
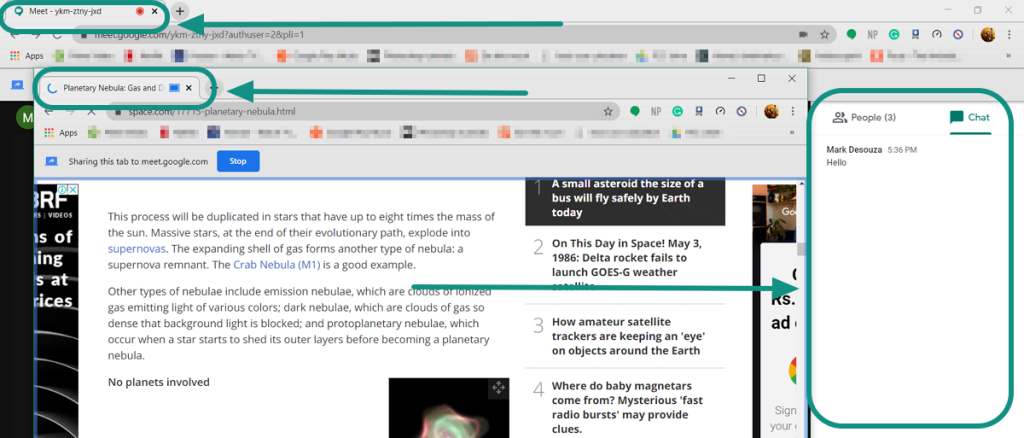
You can now present and keep an eye on your chat column for questions and other discussions.
Prevent participants from creating a meeting without you
As a host, once you leave a meeting, users can still remain in the meeting. If the right settings are not in place, they can even reuse the old meeting room without you.
This is a problem with Educational accounts since teachers would not want students using the room with them in it. The first thing that needs to be done is creating separate Organizational Units for teachers and students.
Step 1: Follow the guide above to create new Organizational Units.
Step 2: Once created separate the students and teachers into the 2 OU’s.
Step 3: In the Meet Admin Console, Select the ‘students OU and go to ‘Meet video settings’. Turn off the ‘Video calling’ option at the bottom.
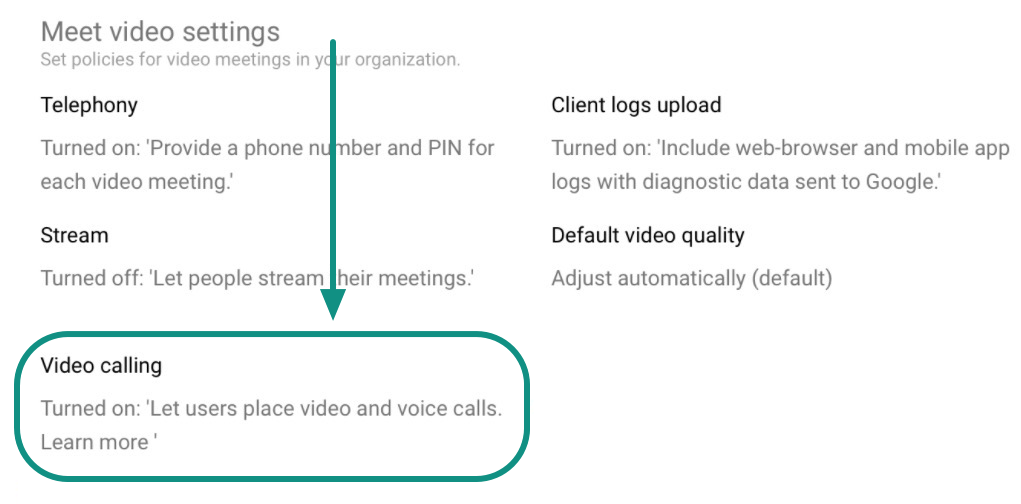
Students will still be able to join meet video calls, but will not be able to create them. Also, once everyone leaves a room, the room will expire and cannot be reused.
Prevent participants from rejoining a meeting after you leave
This is another problem that users are facing. Google Meet allows users to stay back in a meeting even after the host has left. This comes down to how the meeting was created.
When starting a meeting, you are given an option to add a nickname. If you do not add a nickname and simply click ‘Continue’, Google Meet will automatically assign a PIN to your meeting. This PIN does not expire when you leave a meeting.
Follow this simple guide to set up a meeting that expires when the host leaves.
Step 1: Sign in to Google Meet, and click ‘Join or create a meeting’.
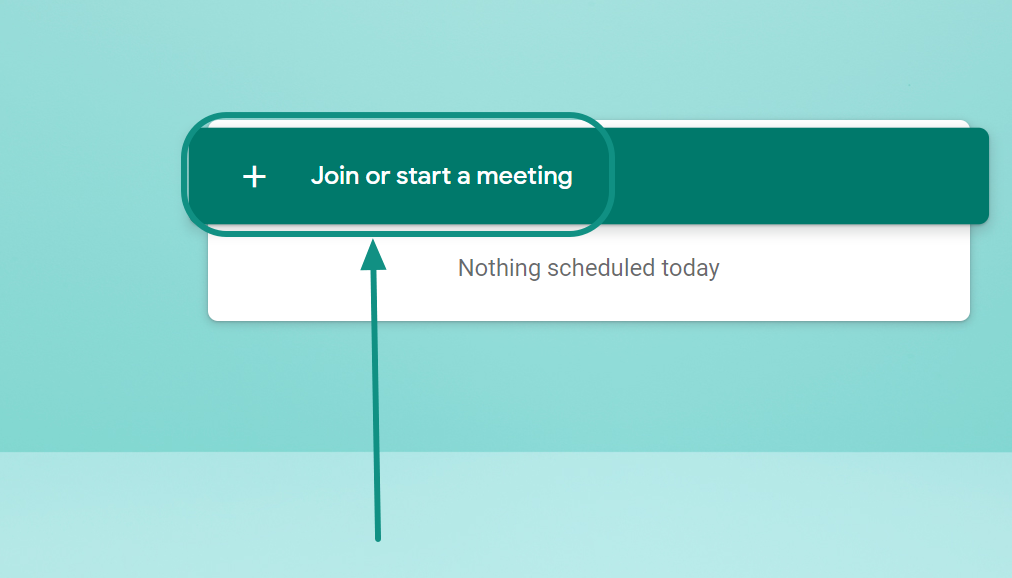
Step 2: Add a nickname to the meeting and hit ‘Continue’.
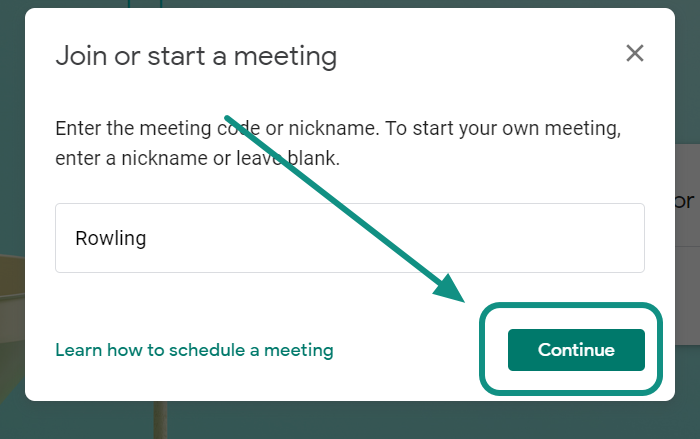
Step 3: Send this nickname to the participants. They need only type in the nickname to get into the meeting.
Now when you leave the meeting, the nickname expires, and the meeting ends with you.
Allow Interoperability

Google Meet supports interoperability with other 3rd-party videoconferencing systems like Cisco, Polycom, Lifesize, Sony, Skype for Business, etc. by allowing users from these services to join a Meet video meeting. The Interoperability function requires users to download and set up the Pexip Infinity gateway.
For a full list of compatible third-party applications and devices, check out the Pexip.com website. Pexip acts as a gateway to allow users to dial into a Google Meet meeting without using a Google Meet client.
To download and learn how to set up Pexip, check out the link below.
► Set up Interoperability on Google Meet
Aínda que isto aínda está lonxe da personalizabilidade doutras aplicacións de videoconferencia como Zoom, é un paso benvido na dirección correcta. Google afirma que está a poñer os seus esforzos para mellorar a experiencia de Gsuite para as contas de educación. Esperamos ver moito máis esforzo nas contas empresariais tamén.
Probaches algún destes consellos? Tes consellos propios? Avísanos nos comentarios a continuación.
