Compartir pantalla é unha utilidade moi útil para videoconferencias. Podes compartir ideas, facer presentacións e mesmo facer enquisas cos teus asistentes usando esta utilidade facilmente. Hoxe en día, a maioría dos servizos permítenche compartir a túa pantalla durante reunións, incluíndo Microsoft Teams. Non obstante, ás veces pode ser difícil atopar esta opción se es un usuario novo.
Entón, se estás loitando por compartir a túa pantalla en Microsoft Teams, entón temos a guía perfecta para ti. Vexamos como podes compartir a túa pantalla en Teams.
Relacionado: Mellores fondos de Microsoft Teams
Contidos
Microsoft Teams: Compartir pantalla no escritorio (Windows e Mac)
Abre Teams no teu escritorio e únete a unha reunión como farías normalmente. Tamén podes iniciar unha reunión instantánea temporal usando a icona da esquina superior dereita para probar temporalmente o uso compartido da pantalla.
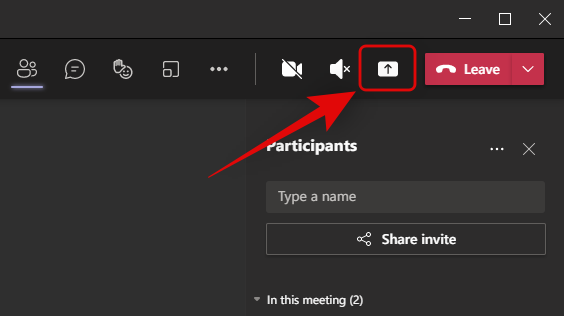
Unha vez nunha reunión, fai clic na icona "Presentar" na esquina superior dereita.
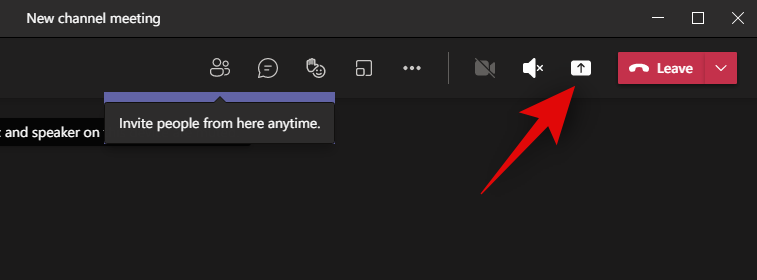
Agora amosaráselle unha lista de todas as fiestras activas no seu escritorio. Fai clic nela para seleccionar a xanela que queres compartir na reunión actual.

E xa está! A xanela seleccionada agora compartirase automaticamente con todos os asistentes. Tamén se converterá na xanela actual do teu escritorio, cun bordo vermello para indicar que se comparte a pantalla.
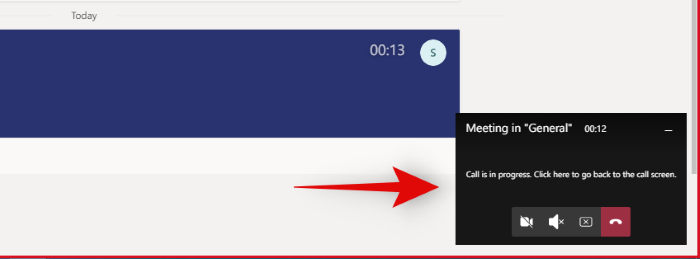
Podes facer clic na notificación na parte inferior dereita para volver á pantalla de chamadas e seguir compartindo a túa pantalla cos asistentes.
Como deixar de compartir pantalla no PC
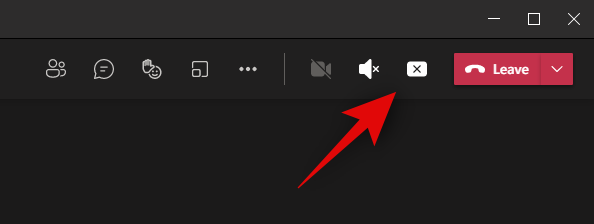
Toca de novo a icona "Presentar" na esquina superior dereita para deixar de compartir a túa pantalla na reunión actual.
Relacionado: Como cambiar a imaxe de perfil en Microsoft Teams
Microsoft Teams: Compartir pantalla en Android ou iPhone
A aplicación móbil para Teams en Android e iOS usa a mesma IU, polo que podes seguir a guía a continuación independentemente do teu SO.
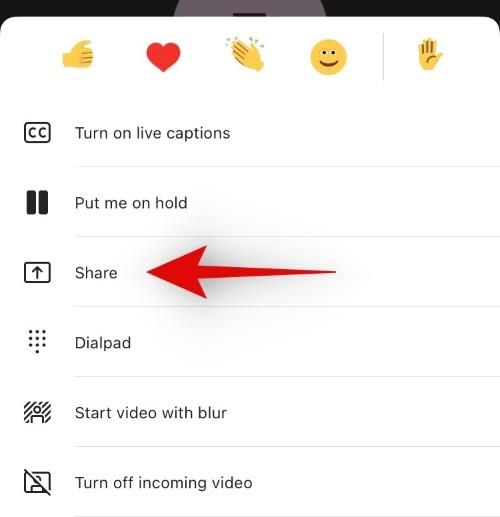
Abre a aplicación Teams e únete a unha reunión como farías normalmente. Unha vez que esteas na reunión, toca a icona do menú "3 puntos" na parte inferior da pantalla.

Agora toca "Compartir".
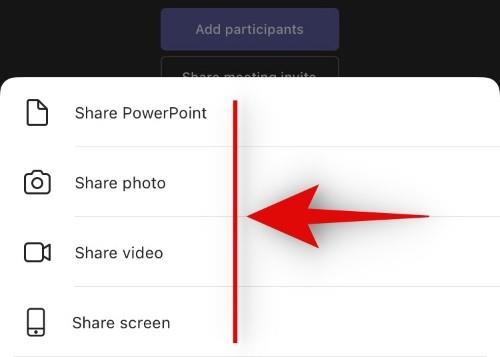
Selecciona o que queres compartir cos asistentes á túa reunión. Podes compartir unha presentación, imaxe, vídeo ou toda a pantalla en particular. Para este exemplo, compartiremos toda a nosa pantalla.
Se estás en iOS, toca "Iniciar emisión" para confirmar a túa elección. Os usuarios de Android poden tocar en "Comezar agora" para confirmar o mesmo.
- Para iOS " data-medium-file="https://cdn.nerdschalk.com/wp-content/uploads/2021/02/teams-screen-sharing-ios-4.jpg" data-large-file="https ://cdn.nerdschalk.com/wp-content/uploads/2021/02/teams-screen-sharing-ios-4.jpg" loading="lazy" data-origin-src="https://cdn.nerdschalk .com/wp-content/uploads/2021/02/teams-screen-sharing-ios-4.jpg">
Para iOS
- Para Android " data-medium-file="https://cdn.nerdschalk.com/wp-content/uploads/2021/02/teams-screen-sharing-android-1.png" data-large-file="https ://cdn.nerdschalk.com/wp-content/uploads/2021/02/teams-screen-sharing-android-1-550x357.png" loading="lazy" data-origin-src="https://cdn .nerdschalk.com/wp-content/uploads/2021/02/teams-screen-sharing-android-1-550x357.png">
Para Android
E xa está! Agora compartirase a pantalla completa do teu teléfono na reunión de Teams.
Como deixar de compartir pantalla no teléfono
Toca o botón "Deixar de presentar" na aplicación Teams na pantalla da reunión para deixar de compartir a túa pantalla coa reunión actual.
Cousas que debes ter en conta ao compartir a pantalla do teu móbil
- Todas as notificacións entrantes estarán visibles na reunión.
- As chamadas e mensaxes entrantes que se mostren nas vistas previas de notificacións tamén se presentarán na reunión.
- Calquera cousa que poidas ver na pantalla tamén será visible para os asistentes á reunión, incluíndo, entre outros, as túas alarmas, os próximos eventos, os puntos de notificación e todas as aplicacións que abras.
- Aínda que se ocultarán os teus contrasinais, os asistentes aínda poderán ver as túas entradas no teclado e as letras breves do teu contrasinal mentres as escribes.
Como a pantalla completa do teu teléfono é visible nunha reunión ao compartir a pantalla, recoméndase que actives a función DND no teu dispositivo. Isto suprimirá todas as notificacións e alertas en segundo plano. Ademais, recoméndase que manteñas abertas en segundo plano as aplicacións que desexes mostrar para acceder facilmente e inicies sesión en calquera servizo previamente para evitar revelar o teu contrasinal.
Relacionado: Como fixar unha mensaxe en Microsoft Teams
Consellos para compartir pantalla en Teams
Ademais de compartir a túa pantalla normal, Teams tamén ofrece algunhas funcións interesantes, como compartir controis mentres presentas, que che axudan a ofrecerche unha ampla gama de funcionalidades cando presentas en Microsoft Teams. Aquí tes algúns consellos e trucos que che poden axudar a mellorar a túa experiencia de uso compartido de pantalla en Microsoft Teams.
Consello n.° 1: dá e toma o control do contido compartido
Presentas moito xunto a outros asistentes en Teams? Entón pode resultar difícil presentar a mesma pantalla mentres colaboras con outra persoa. Teams pensou nisto para ti e así temos a opción de dar ou tomar o control. Esta opción está dispoñible para todos os usuarios de Teams e permítelle asignar o control do material presentado a determinados asistentes na reunión actual. Isto, á súa vez, permite aos asistentes con control presentar, controlar e utilizar a pizarra para o seu beneficio.
Esta é unha función xenial para anfitrións de seminarios web, profesores e persoas similares que poden ter que explicar conceptos ou organizar eventos xunto a outros compañeiros ou socios. Vexamos como pode dar e tomar o control durante as reunións en Microsoft Teams.
Note: While Microsoft has done its best to fix any exploits in this procedure, giving control renders your PC vulnerable to a certain extent. It is recommended that you do not give control of presentations to individuals that you do not trust.
What can attendee with control of the presentation do?
- Change presented files, or add new files.
- Help with the presentation.
- Demonstrate concepts.
- Select, edit and modify the presented content.
How to give control when sharing the screen
Open Microsoft Teams and join a meeting as you normally would. Once joined in, present your screen/window to the meeting. Ensure that the person you wish to give access to your presentation is also joined in on the meeting.
Once you have initiated a presentation, click on ‘Give Control’ in the sharing bar at the top of your screen.

Now select the concerned individual from the list.
And that’s it! You will now have given control of your presentation to the selected attendee.
How to take back control when sharing the screen

Simply click on ‘Take back control’ in the sharing bar at the top of your screen and control privileges will now be revoked for the attendee.
Related: Microsoft Teams Backgrounds Option Missing? Here’s How To Fix
Tip #2: Zoom in on shared content
Did you know you can zoom in on shared content within Microsoft Teams meetings? This can be especially useful when someone is presenting handwritten notes or hard-to-read text characters. You can also use this feature to highlight and save important details from any presentation! Let’s take a look at how you can zoom in on shared content in Microsoft Teams meetings.
How to Zoom when sharing the screen on Microsoft Teams
Method #1: Windows only
You can Zoom in or out of the presented content by using the Pinch gesture on your trackpad.
Method #2: Windows, Mac, and Linux
You can use the following keyboard shortcuts to zoom in or out of the presented content.
Zoom in: Ctrl + ‘+/plus’
Zoom out: Ctrl + ‘-/minus’
Method #3: Windows, Mac, and Linux
Hold down the ‘Ctrl/Cmd’ key on your keyboard and use the scroll up or down gesture on your scroll wheel to Zoom in or out of the presented content in Teams.
Method #4: On Android and iPhone
Mobile users can simply use the pinch gesture directly on their touchscreen to zoom in or out of the presented content. Unlike desktop shortcuts, this is the only option for mobile users to Zoom in or out of content presented in Teams.
Tip #3: Add your mobile phone as a companion device during a meeting
Another nifty feature in Teams is the ability to use your mobile as a companion device when presenting in Meetings. This allows you to essentially have two devices for the same meeting when presenting. You can use one to present content while the other one can be used for other purposes, like sending a live video feed, presenting more content, spotlight, whiteboard, and much more. Here’s how you can use your mobile as a companion device when presenting in Teams.
Required
- Teams app installed on your device: Android | iOS
- Same Microsoft account as your desktop signed in on your mobile device.
Guide
Join a meeting within Teams on your desktop device as you normally would. Once joined in, launch the Teams app on your mobile device as well.
In the mobile app, you’ll get a notification to join the meeting you are already attending on your desktop. Tap on ‘Join’ to get started.
Now choose ‘Add this device’ to use your mobile as your companion device.
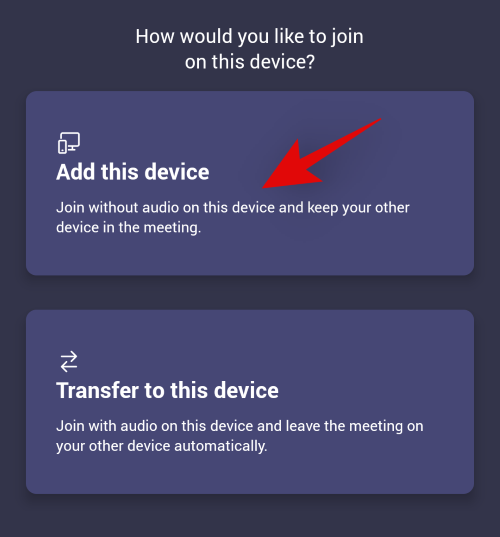
Microsoft will now add your mobile device as an attendee to the current meeting. Your audio will be automatically muted on the mobile device to avoid any interference.
And that’s it! Your mobile device is now added as a companion device for the current meeting. You can now use it to show video feed or present content in the current meeting.
Tip #4: Share the screen in Chats
Yes! Did you know that you can present content in Teams in Chats as well? Most video conferencing services only allow you to present your screens and windows during meetings but Teams goes a step further by allowing you to share your screen in Chats as well. Here’s how you can share your screen in Teams chats!
Note: This feature is only available to desktop users as most shared files can be easily shared from the mobile apps within the Chat.
Open a chat with a group or person where you wish to share your screen. You can do this by selecting a chat from the ‘Chats’ section in the left sidebar.
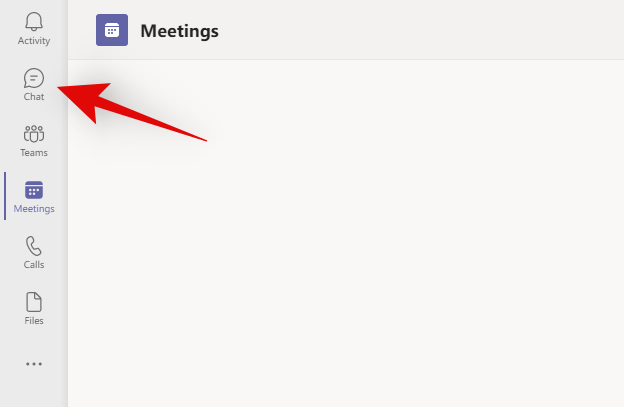
Note: This functionality is unavailable for specific Microsoft Teams’ channels.
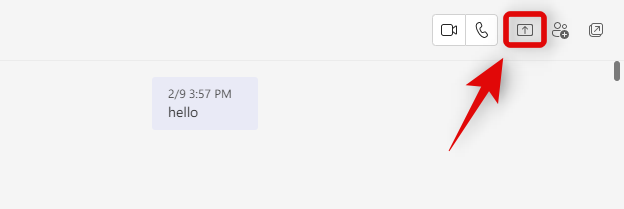
Once the chat is open, click on the ‘Present’ icon in the top right corner of your screen.
Now click and select a window that you wish to share.
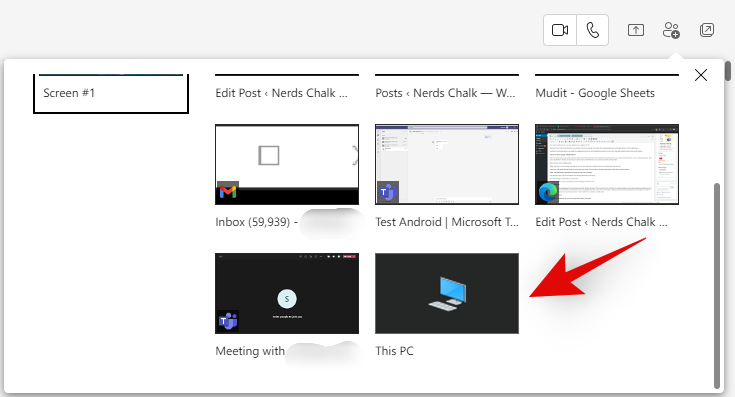
And that’s it! Teams will now automatically start sharing the screen in the selected chat.

Tip #5: Manage notifications
Privacy is of the utmost importance when presenting during public Meetings in Teams. When your entire screen is visible to the meeting attendees, any incoming notifications and their previews will also be visible to them. Hence it is a good idea to turn on the Do Not Disturb mode on your device be it mobile or desktop to ensure that your presentation is not interrupted by sensitive or unwanted notifications. Use one of the guides below to turn on DND on your desktop or mobile device.
On Windows
Click the notification tray icon in the bottom right corner of your screen.

Now click on ‘Expand’.
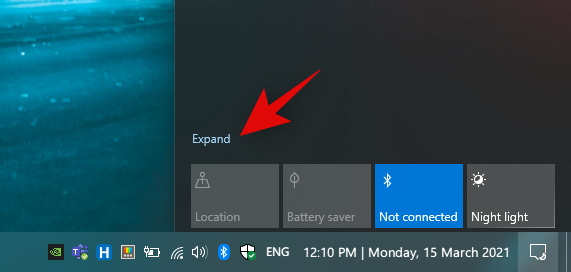
Click on the Focus Assist icon twice to set it to ‘Alarms only’.
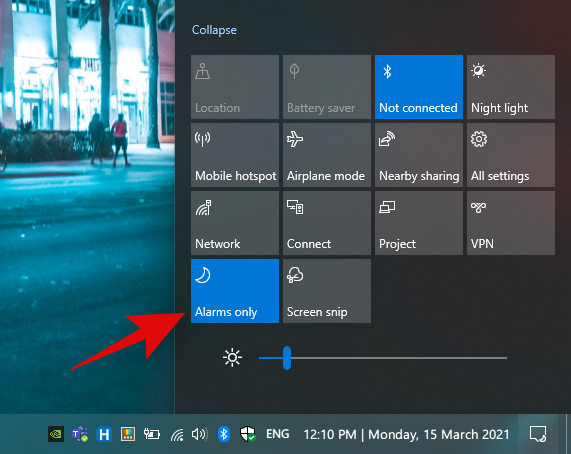
And that’s it! DND has now turned on your Windows PC. Every notification will be silenced on your Windows PC. Needless to say, you should check for any upcoming alarms as they can still bypass focus assist.
On Mac
Click on the ‘Apple’ icon in the top left corner of your screen and then select ‘System preferences’.
Click on ‘Notifications’.
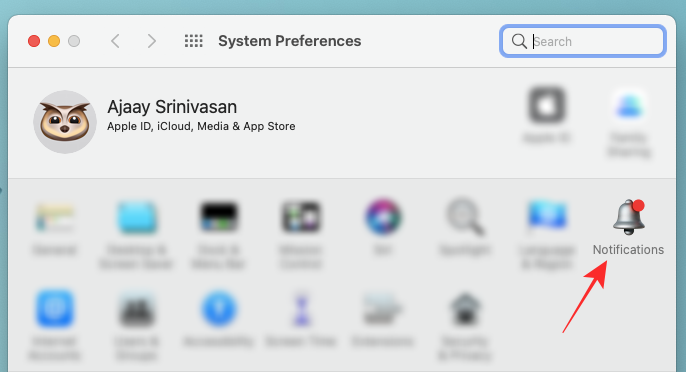
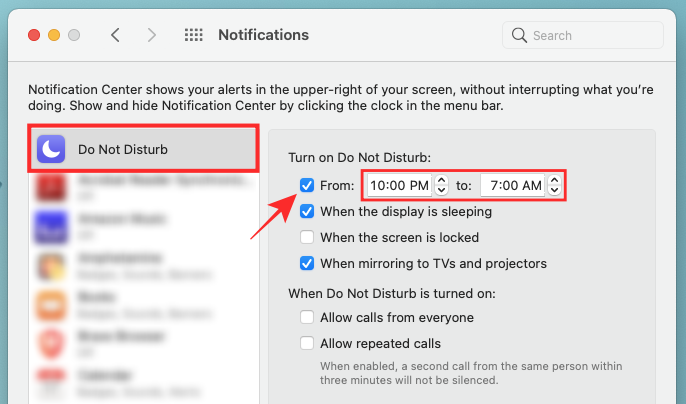
Click and select ‘Do not disturb’ from the left sidebar.
Now check the box for ‘Turn on Do Not Disturb’ and select the time period of the next few hours for good measure.
Exit the Settings app.
And that’s it! All future notifications will now be silenced on your Mac for the specified period of time.
On Android and iPhone
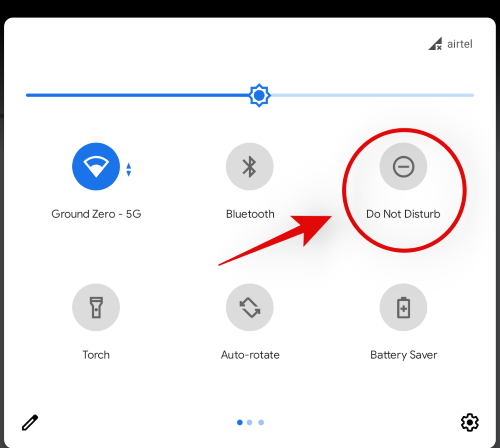
Most mobile devices come with a quick access DND icon for easy activation. If you are on Android, swipe down on your home screen and tap on the DND icon in your notification shade.
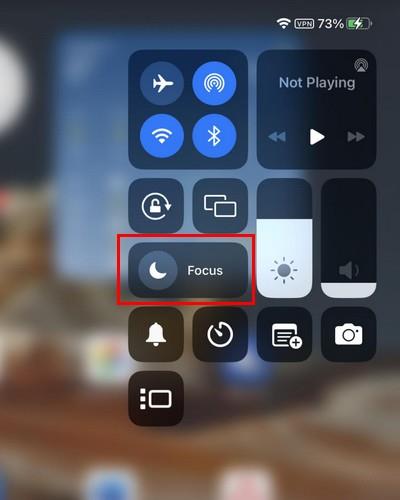
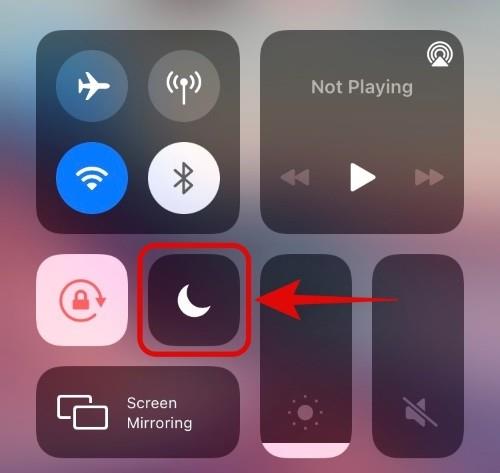
If you are an iOS user, access your Control center and tap on the DND icon.
And that’s it! All calls and messages will now be silenced on your mobile devices until DND is turned off.
Note: Depending on your device settings, some repeated calls might be let through suspecting an emergency. You can edit these settings in the DND section of your Settings app whether you are on Android or iOS.
We hope this guide helped you get familiar with all aspects of screen sharing in Microsoft Teams. If you face any issues or have any more questions for us, feel free to reach out using the comments section below.
RELATED


