É doado imaxinar por que podes querer cambiar o teu nome en Zoom , especialmente para unha reunión divertida na que esteas xogando a un xogo ou a un desafío cos teus amigos. Neses casos, tamén podes chamarte Goku e divertirte un pouco, incluíndo anular o límite de 40 minutos para usuarios gratuítos. Revelar as verdadeiras identidades pode ser moitas veces un problema se coñeces aos teus amigos de Internet que de todos os xeitos non te coñecen, pero espera, aínda poden verte .
Contidos
Como cambiar o teu nome antes de unirte á reunión de Zoom
Se estás a piques de unirte a unha reunión pero queres cambiar a forma en que se mostra o teu nome, podes cambiar o nome pechando sesión na túa conta de Zoom e, a continuación, unirte de novo á reunión cun novo nome. Podes facelo ao unirte ás reunións no teu PC (a través da web ou ao usar o cliente de escritorio) ou no teu teléfono.
Na web
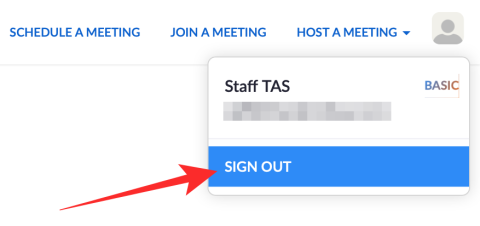
Pecha sesión na túa conta de Zoom facendo clic na túa foto de perfil na esquina superior dereita e seleccionando a opción "Pechar sesión".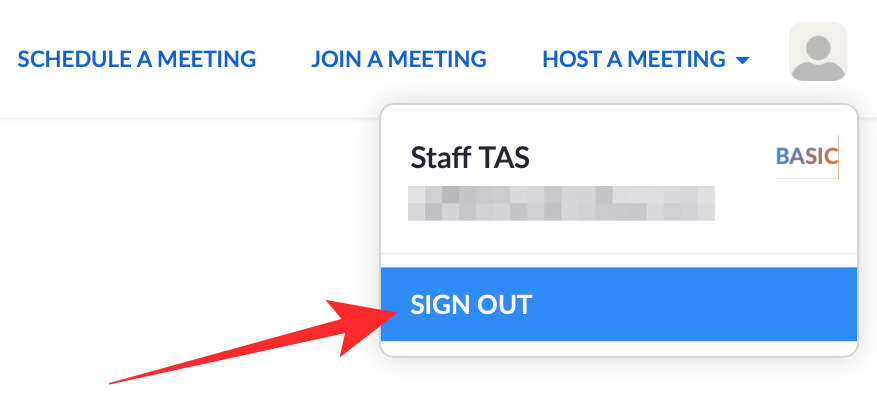
Despois de pechar sesión na túa conta, fai clic na opción "Únete a unha reunión" na parte superior.
Na páxina seguinte, introduce o ID da reunión ou o nome da ligazón persoal e fai clic no botón Unirse.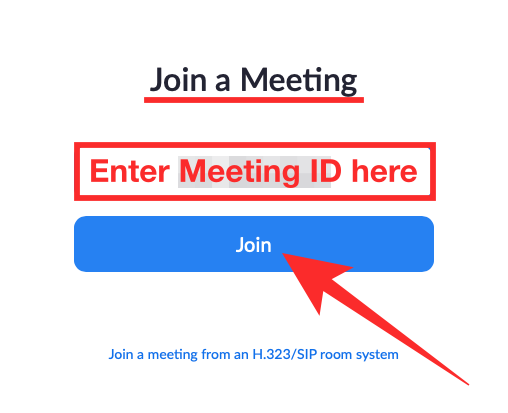
Se queres unirte á reunión desde o teu navegador web, fai clic na ligazón "Únete desde o teu navegador" na parte inferior da páxina seguinte. 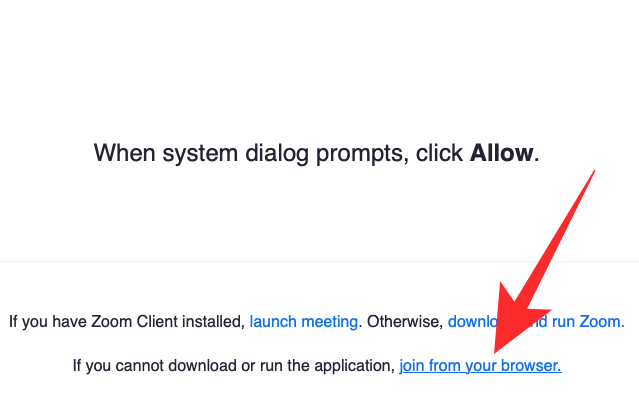
Na seguinte pantalla, podes introducir o nome que queres usar para a reunión en "O teu nome", o código Captcha (se o solicita Zoom) e, a continuación, fai clic en Unirse. 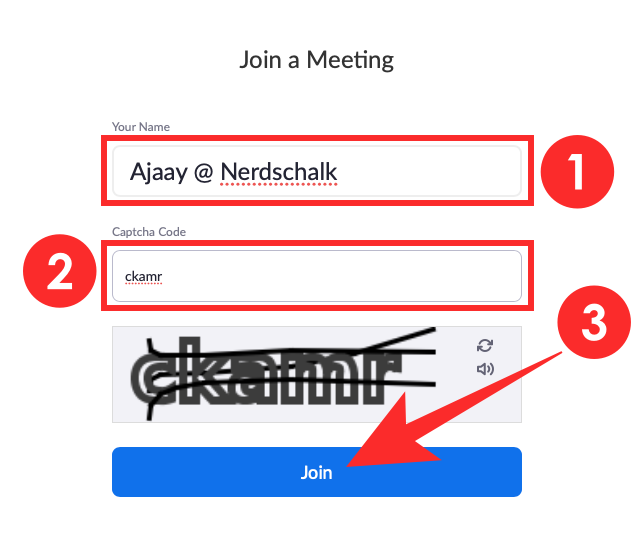 Se a reunión se creou de forma segura, pediráselle que introduza o contrasinal da reunión na seguinte pantalla. Despois de facelo, fai clic no botón "Únete" debaixo da caixa do contrasinal para acceder á pantalla da reunión.
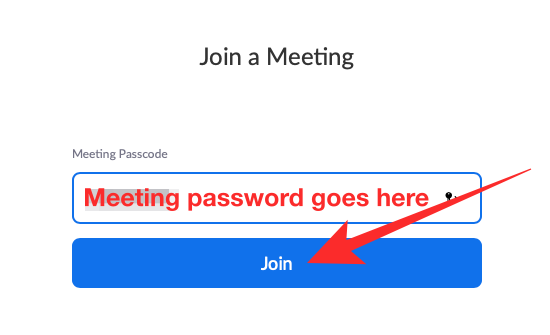
Iso é! Agora terás un novo nome dentro da reunión que podes ver dentro da xanela Participantes como se mostra a continuación.
No PC
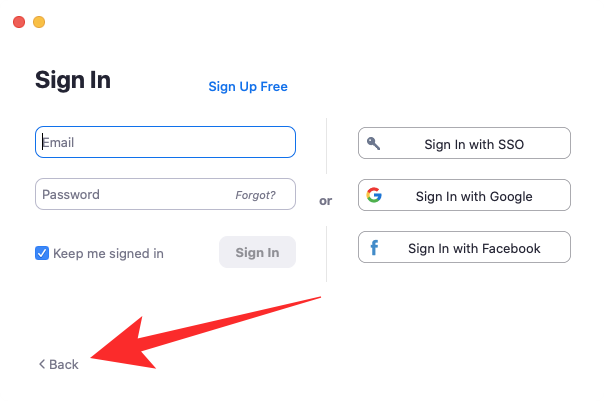
No cliente de escritorio Zoom do teu PC, fai clic na imaxe de perfil na esquina superior dereita e selecciona "Pechar sesión". 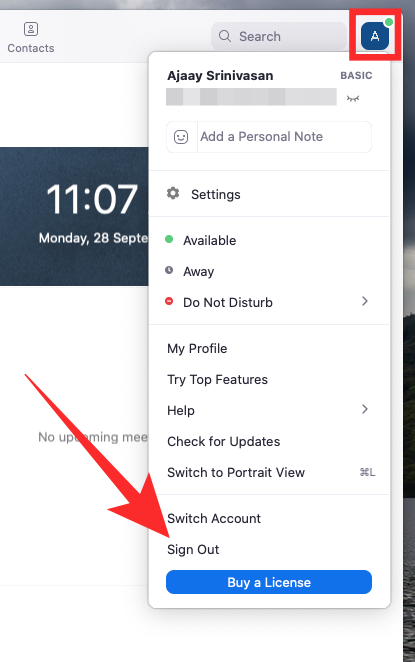 Cando teñas pechada sesión na túa conta, dirixirase á páxina "Iniciar sesión". Para escapar diso e ir á pantalla de unión sen un perfil de Zoom, fai clic na opción "Atrás".
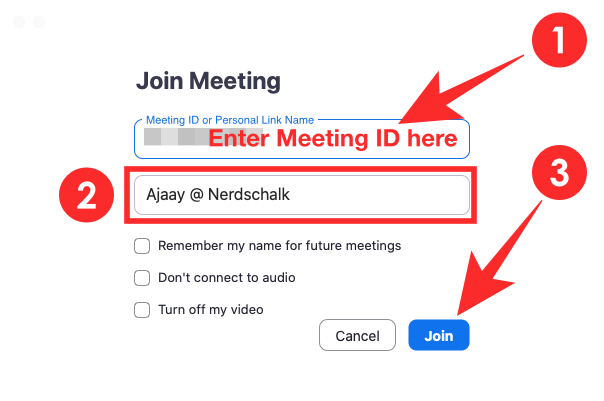
Fai clic no botón "Únete a unha reunión" na seguinte xanela. 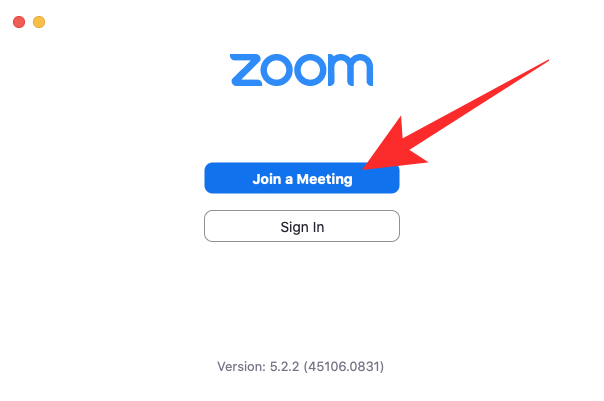 Na seguinte pantalla, introduce o ID da reunión que se compartiu contigo e o nome que queres asignarche durante a sesión da reunión. Despois de introducir estes datos, fai clic no botón "Únete".
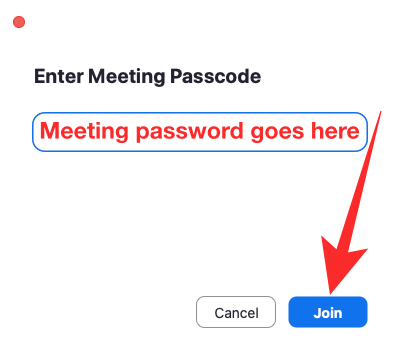
  Pediráselle que introduza o contrasinal da reunión e, despois de facelo, faga clic no botón "Únete".
Agora a pantalla da reunión mostrará o teu nome como o que ti asignaches antes de unirte. Podes verificalo accedendo á pantalla Participantes na parte dereita da xanela da reunión.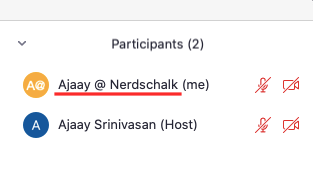
No teléfono
Para cambiar o nome da túa reunión antes do comezo dunha reunión, primeiro debes pechar sesión na túa conta de Zoom. Para iso, abra a aplicación Zoom no seu teléfono, toque a pestana Configuración na parte inferior e, a continuación, seleccione o nome da conta na parte superior. Dentro da pantalla "Os meus perfís", desprázate cara abaixo e toca o botón "Pechar sesión" na parte inferior.
Despois de pechar sesión na súa conta, toque o botón "Únete a unha reunión". Na seguinte pantalla, introduza o ID da reunión e o nome que quere asignarlle á reunión. Despois de introducir estes datos, toque o botón "Únete".
Solicitarase que introduza o contrasinal da reunión. Introduza o contrasinal e toque "Aceptar" ou "Continuar". Despois diso, a pantalla da reunión mostrará o teu nome como o que ti asignaches antes de unirte, que podes ver visitando a lista de participantes.
Como cambiar o teu nome mentres estás nunha reunión
Aquí tes como cambiar o teu nome cando xa estás nunha reunión de Zoom .
Na web
Se queres cambiar o teu nome mentres estás nunha reunión de Zoom, primeiro debes iniciar sesión en Zoom na web e entrar na pantalla da reunión. Na pantalla da reunión, fai clic na pestana "Participantes" na parte inferior da túa pantalla onde obtén outros controis da reunión.
Agora cargarase a lista de participantes no lado dereito. Aquí, pasa o rato sobre o teu nome ata que vexa a opción para seleccionar "Cambiar nome".
Despois de facer clic en "Cambiar nome", pediráselle que introduza un novo nome dentro do cadro de diálogo que aparece. Despois de escoller un novo nome, fai clic no botón "Gardar" debaixo do nome da nova reunión.
O nome da túa nova reunión aparecerá agora dentro da lista de participantes e estará visible para todos os presentes na reunión. 
No PC
Para cambiar o teu nome cando estás nunha reunión no cliente de escritorio de Zoom, entra na pantalla da reunión e fai clic na pestana "Participantes" dos controis da reunión na parte inferior da túa pantalla.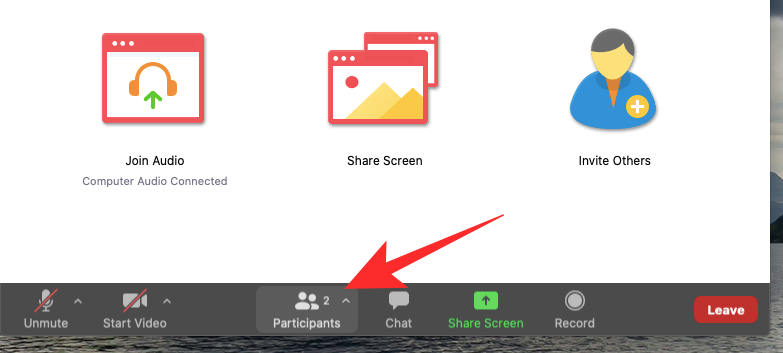
Isto debería abrir a xanela Participantes na parte dereita da xanela da túa reunión. Na xanela, coloque o punteiro do rato enriba do seu nome e prema no botón "Máis".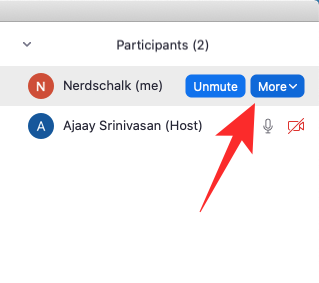
Cando fas clic en 'Máis' ves, aparecerá unha lista de opcións. Aquí, selecciona a opción "Cambiar nome".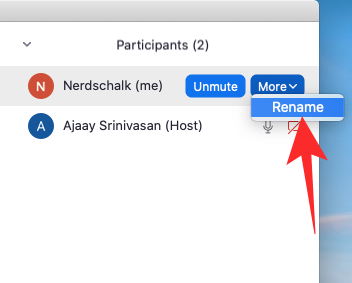
Enter your desired name in the text field and click on ‘Rename’ to confirm your changes.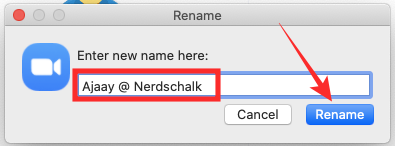
Your new name will now appear inside the Participants window.
On Phone
You can change your name after you have joined the meeting, even on your phone. To do that, tap on the ‘Participants’ tab at the bottom of your screen to bring up the list of participants in your meeting. Now find yourself from the Participants list, tap on it, and select the ‘Rename’ option when it appears.
You can now enter your new name in the dialog that appears on your screen and then confirm the changes by tapping on ‘Done’. Your new name will now appear inside the Participants list for everyone to see.
RELATED: Is Zoom Webinar free?
How to change Zoom name permanently in Profile
Buoyed by the pandemic, Zoom has become one of the biggest remote collaboration tools on the planet. And since we’re still not even close to the end of the pandemic, Zoom’s expected to reign supreme for the foreseeable future.
The service offers a comprehensive free plan that gives you unmatched features including the likes of virtual backgrounds, HD video and audio; up to 100 participants in a single meeting, and way more.
If you have been using Zoom for a while and are looking for a way to change your username on the app, then we have the perfect solution for you. Follow our simple step by step guide that will help you get started in no time.
On the Web
Navigate to zoom.us/signin using your desktop browser and log in to your Zoom account.
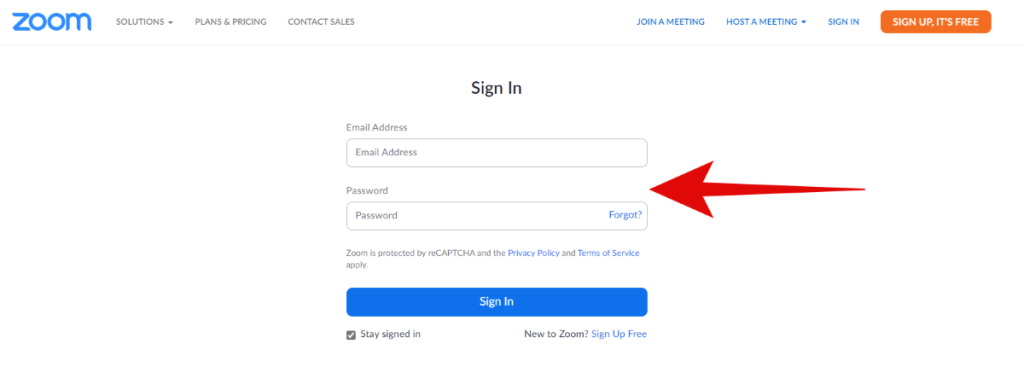
Now click on ‘Profile’ in the left sidebar of your screen.
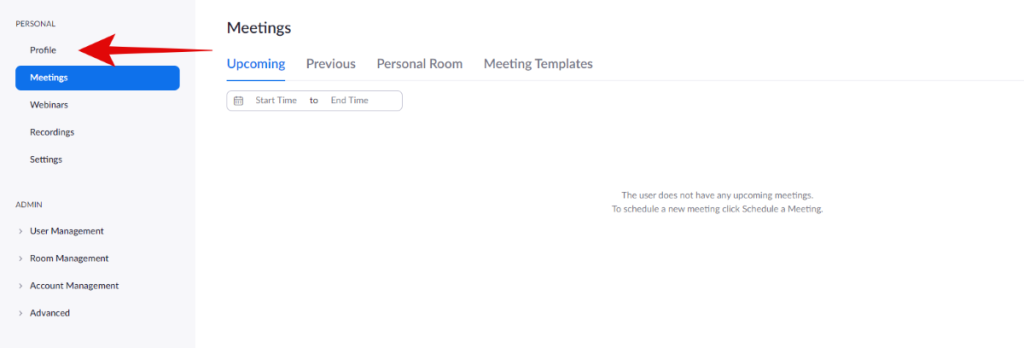
You will now be taken to your profile editing page on Zoom. Click on ‘Edit’ beside your username.

Now enter your desired username in the designated text fields.
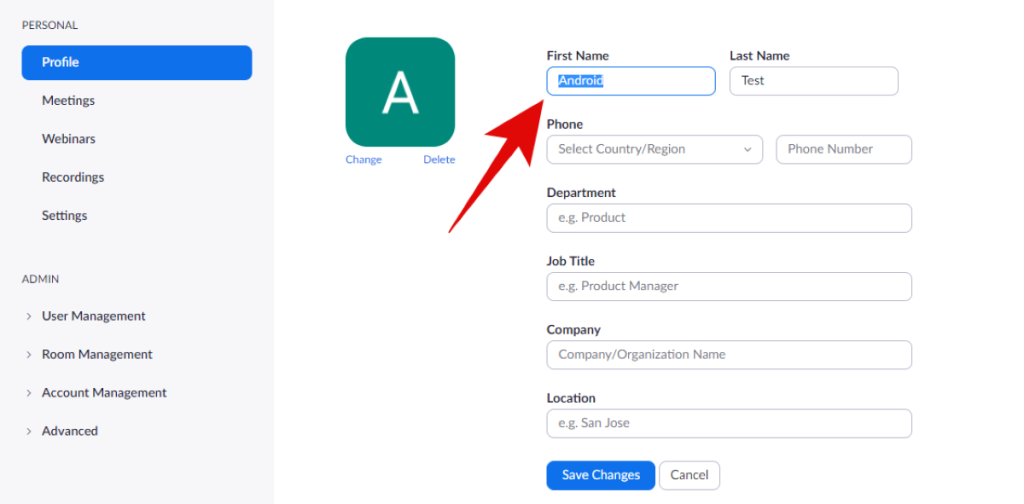
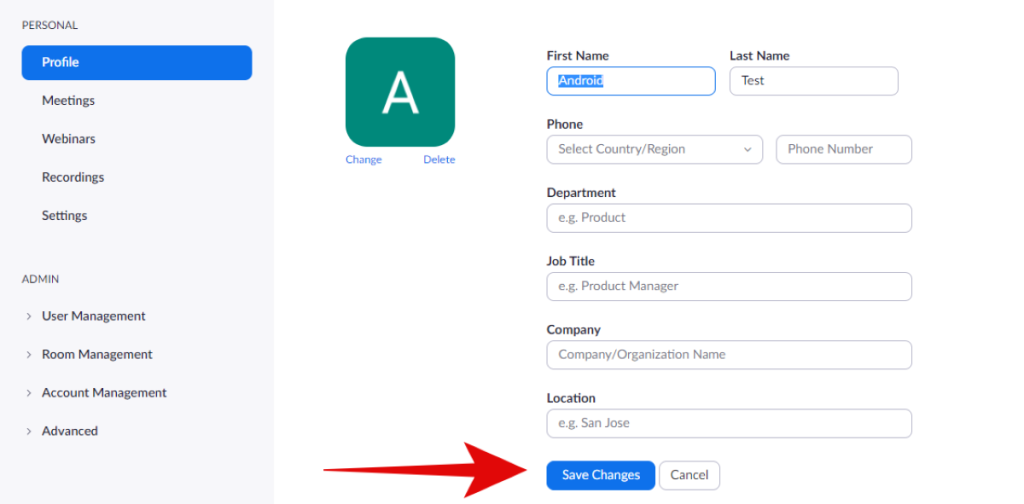
Once you are done, tap on ‘Save Changes’ at the bottom of your screen.
On PC
If you are using the Zoom desktop client, then launch the app and click on your profile icon and select ‘My Profile’. It will take you to your profile page. However, if you are using the Zoom web client to access your account, then follow this link to reach your profile page.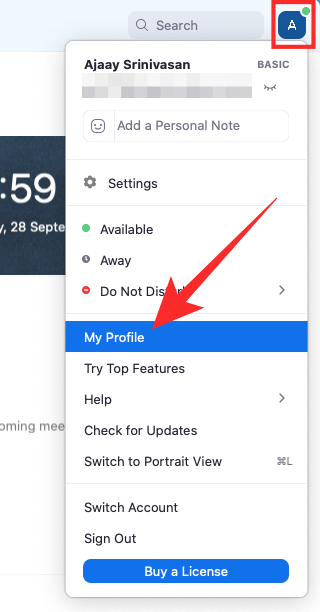
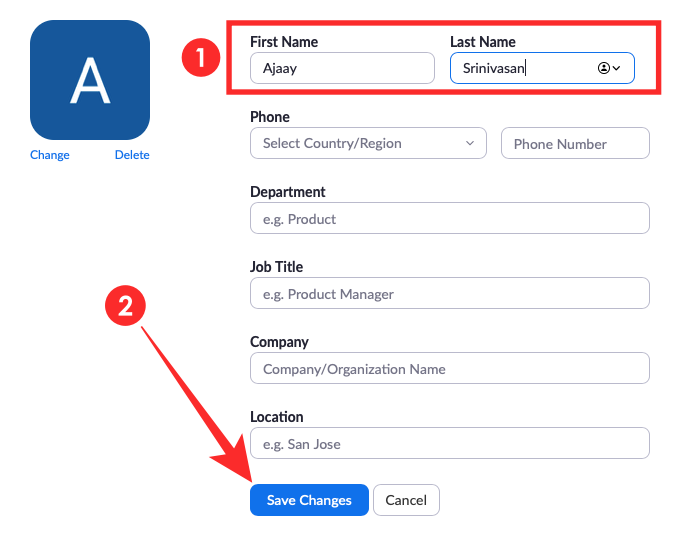
Click ‘Edit’ to the right of your profile picture.
Now type your desired name in the text fields titled ‘First Name’ and ‘Last Name’ and click on ‘Save changes’ at the bottom of your screen once you are done.
On Phone
Open your Zoom app and click on Settings in the bottom right corner of your screen. Inside the Settings screen, tap on your ‘Profile’ at the top of your sidebar and then select the ‘Display Name’ section.
Once selected, enter your desired new name in the two text fields that appear and tap on ‘Ok’ to finalize your name change.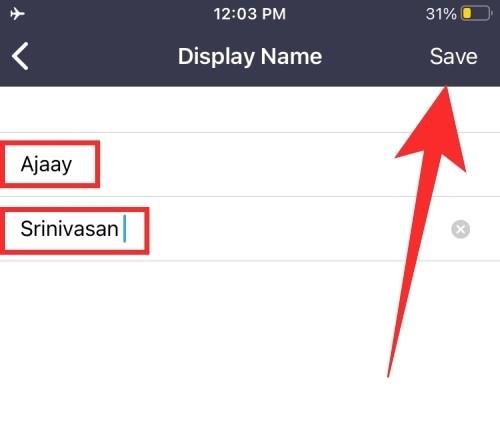
RELATED: Download fun Zoom backgrounds for free
How to change a participant’s name in a meeting
Note: Only hosts can do this from their end. Meeting participants have no control over this change from their end. If you want to change a participant’s name, you will need to contact your host and put in a request with them.
On the Web
To change a participant’s name during a meeting as a host, enter the said meeting, and click on the ‘Participants’ tab from the meeting controls at the bottom. 
This should load up the Participants list on the right-hand side of the window. Here, hover over the participant whose name you want to change and click on the ‘More’ button adjacent to their name. 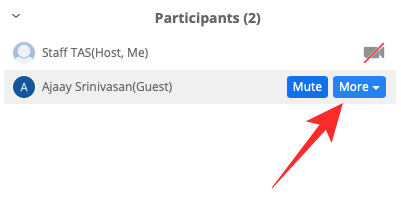
When a list of options appears, select ‘Rename’.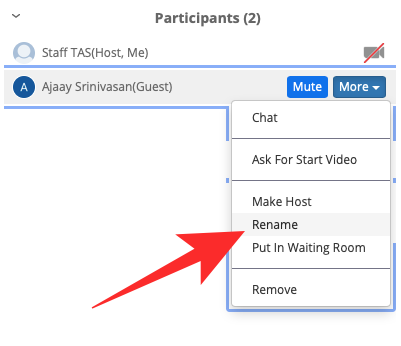
You can now proceed to enter the desired name for the participant and after doing so, click on ‘Save’.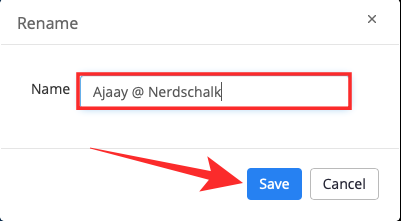
The new name of the participant will now appear inside the Participants list for everyone in the meeting. 
On PC
Method 1
Before changing the name of a participant, enter a meeting on the Zoom desktop client, and click on the ‘Participants’ tab at the bottom of your screen.
Now, hover over the name of the participant that you want to change and click on ‘More’.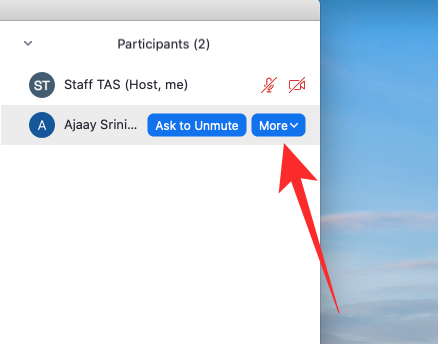
When a list of options appears on the screen, select ‘Rename’.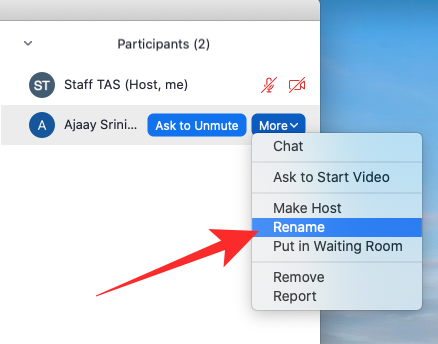
Enter a new name for the participant inside the dialog that appears and click on ‘Rename’ when you are done.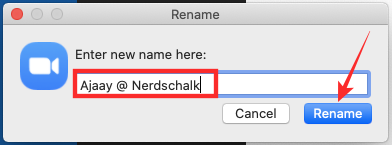
The participant’s new name will now appear on the Participants list for everyone to see. 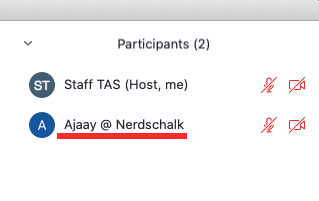
Method 2
Find the concerned participant in the video feed for your meeting and right-click on their name.
Select ‘Rename’ and enter the desired new name in the text fields that appear.
Click on ‘Save’ to save your changes.

On Phone
To change a participant’s name using the Zoom app on your phone, tap on the ‘Participants’ tab at the bottom of the meeting screen to view the names of all the participants. In the Participants list that appears on the next screen, tap on the participant you wish to rename and then select ‘Rename’.
In the dialog that appears on your screen, enter a new name for the participant inside the text field to change the participant name and tap on ‘Done’. The newly-set name will now show up on the Participants screen for everyone.
RELATED: How to schedule a Zoom meeting
How to change Zoom meeting name
Changing your Zoom Meeting name is called Zoom Meeting Topic when it comes to official terms. By default, Zoom will use the following syntax to name a meeting.
The default syntax is used when you have already started a meeting or you use the ‘New Meeting’ option in the Zoom mobile or desktop app. But if you are trying to schedule a meeting, then you can change the Meeting topic while scheduling itself.
Here’s how you can change the Zoom Meeting name easily when in a meeting.
On PC
Open a Zoom meeting. You can create a new meeting or join the one you created earlier. Once you are joined in, click on the ‘information (i)’ icon at the top left corner of your screen.

Now hover your mouse over the default Meeting Topic and click on it.
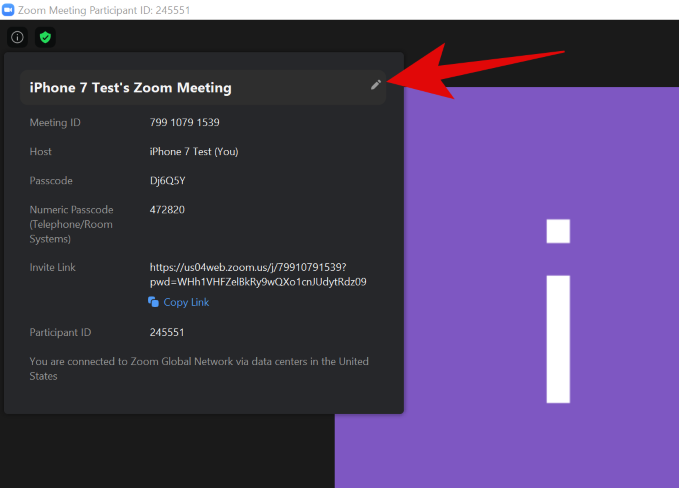
The Meeting Topic will now be editable. Enter your desired Meeting Topic in the designated field.
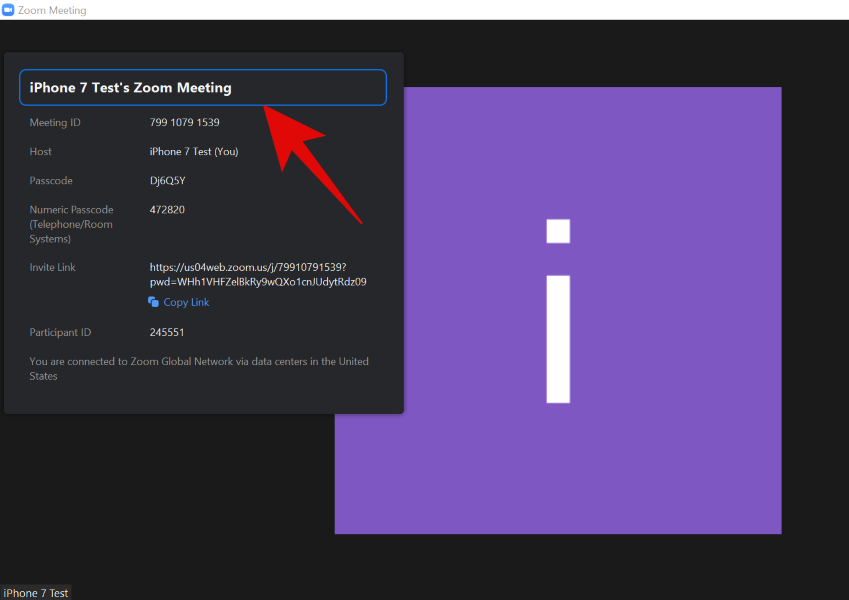
Once you are done, simply click away and the Meeting Topic will be automatically changed. You can now invite your participants and they will be able to see the new meeting topic in their invite.
On iOS
Open a Zoom meeting on your Zoom app. You can create a new meeting or join the one you created earlier. When in, tap on the ‘3-dot’ menu icon in the bottom right corner of your screen.
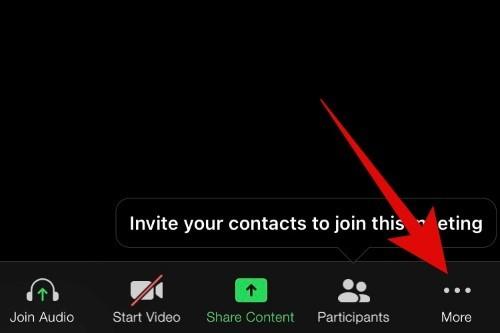
Now tap on ‘Meeting Settings’.
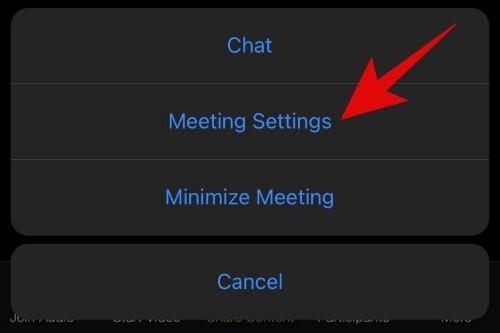
Scroll down and under ‘Host Controls’, tap on ‘Meeting topic’.
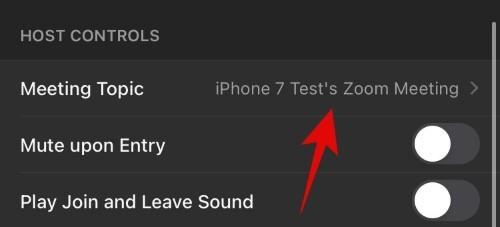
You will now be taken to the topic editing page of Zoom. Enter your desired Meeting Topic for the current meeting.

Tap on ‘Done’ in the top right corner of your screen once you are done.

Tap on ‘Done’ again in the top right corner.
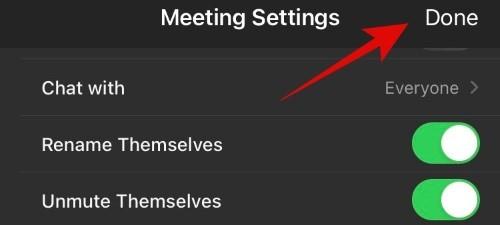
Meeting Topic for your current Meeting will now be changed and every participant you invite will be able to see the new name in their Meeting Invite.
On Android
Open a Zoom meeting on your Zoom app. You can create a new meeting or join the one you created earlier. When in, tap on the ‘3-dot’ menu icon in the bottom right corner of your screen.

Tap on ‘Meeting Settings’.

Now tap on ‘Meeting Topic’ under ‘Host Controls’.
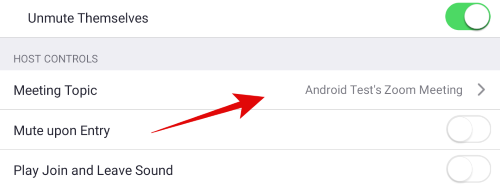
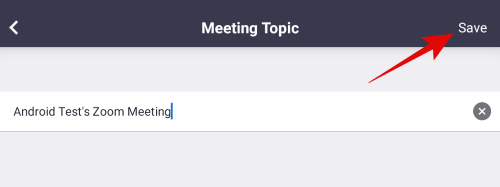
Enter your desired Meeting name in the designated field.
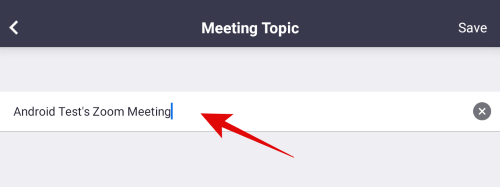
Tap on ‘Save’ in the top right corner of your screen once you are done.
Tap on ‘Close’ in the top left corner.
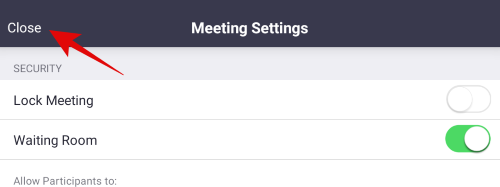
The Meeting name will be changed for your current meeting.
How to change your Personal Link on Zoom
Zoom lets you host a personal URL that can be linked to your personal meeting room. The company itself says that Personal Link can be considered as an alias of your personal meeting URL and its highlight feature is that you can customize it in such a way that it matches your name.
The Personal Link that you create should be between 5 and 40 characters and can be separated and made unique to you using periods as well as links. In order to customize your personal link on Zoom, you will be required to be subscribed to a Zoom Business or Education Plan.
To rename your Personal Link on Zoom, you will need to head over to the Zoom Profile page on the web and inside this page, click on the ‘Customize’ button adjacent to the ‘Personal Link’ section. Inside the text box that appears, you can add your desired personal link using letters, numbers, and periods.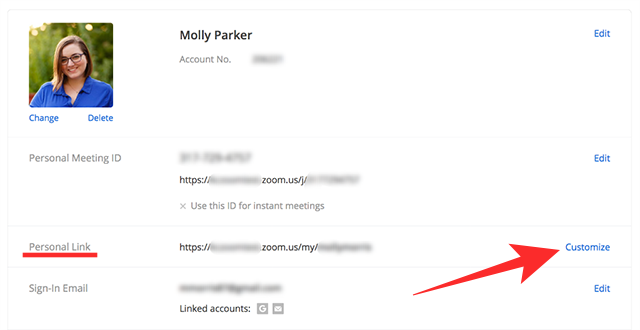
The personal link can contain at least 5 and up to 40 characters and you can personalize it the way you want and even give it your name. Once you have made the necessary changes, click on the ‘Save Changes’ button below to apply the new Personal Link for your Zoom meetings. 
How to change your organization’s caller ID name
If you’re a host of an organization, then you have the ability to change the caller ID name of your company in such a way that all outbound calls from your organization show the same caller ID for each of your users.
To change the caller ID name for your entire organization, go to your account’s Zoom Account Settings and click on the ‘Change’ button adjacent to the current caller ID name. In the box that appears, you can enter a new caller ID name of up to 15 characters.
This name can include only uppercase letters and spaces in between and you won’t be able to add any special characters. After you have entered the desired caller ID name, click on the ‘Save’ button to apply the changes.
How to rename a panelist in a Zoom webinar
Unlike meetings, Webinars on Zoom host two kinds of participants – panelists and attendees. As a host, you can control what your panelists can do inside the webinar session like promote/demote them, mute/unmute, turn OFF video, and also rename them as you like.
To rename a panelist inside a Zoom webinar, start a webinar, and click on the ‘Participants’ tab from the webinar controls at the bottom.
When you do this, a Participants panel will appear on the right side of your screen. On this screen, click on the ‘Panelists’ tab at the top where you will be able to see all the panelists present on the webinar.
In order to change the name of a panelist from this list, you will need to hover over the panelist’s name and click on the ‘More’ button. When a list of options pops up, click on the ‘Rename’ and change the panelist’s name to a desired one. This name will be displayed not just for you but for all the other participants present in the webinar. 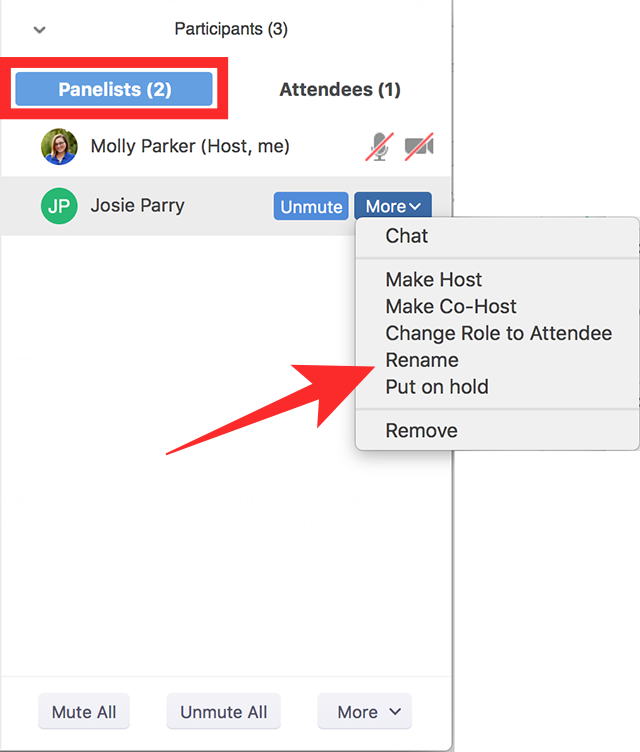
How to rename an attendee in Zoom webinar
While you can change the names of your webinar panelists on Zoom, the same kind of controls are not present for your webinar attendees. Hosts can only be able to chat with attendees, remove them from chat, or designate them as panelists. This is because attendees are view-only participants and can only interact with the host and other panelists using the chat or Q&A section.
The only way you can change the name of an attendee is to promote them to panelists and then renaming them by following the guide above. To promote an attendee, you will need to click on the ‘Participants’ tab from the webinar controls and go to the ‘Attendees’ tab at the top.
Here, hover over the name of the attendee and click on the ‘More’ button when it appears. Select the ‘Promote to panelist’ option from the drop-down menu and the user will now appear inside the ‘Panelists’ tab on the Participants panel.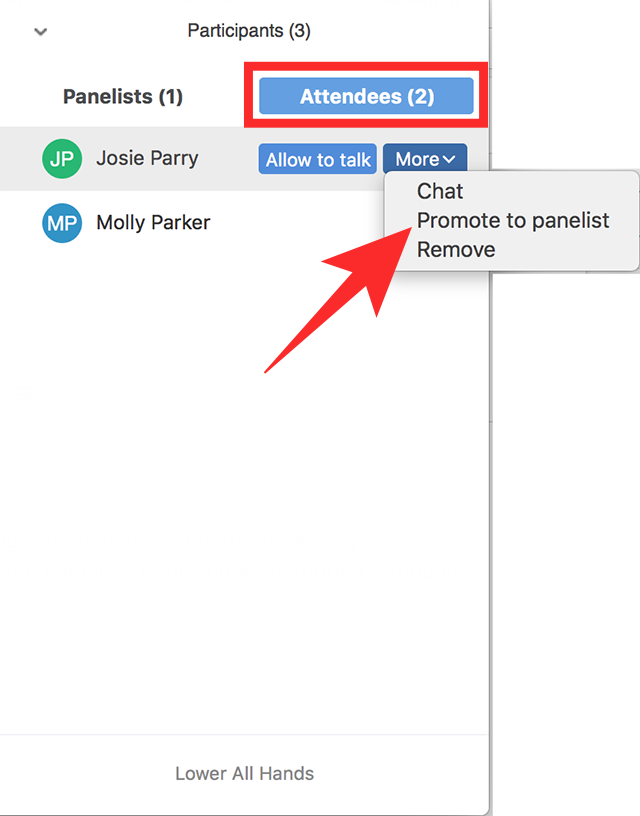
You can then rename them by going to More > Rename from your list of webinar panelists.
How to change your name in Zoom Rooms
Zoom Rooms is a professional-client from Zoom that helps you conduct webinars and more using the service. Follow the guide below to help you change your name in Zoom Rooms.
Start a Zoom Room meeting on your PC as you normally would and click on ‘Participants’ at the bottom of your screen in the calling bar.
You will now get a list of all the participants involved in the meeting. Click on ‘Rename’ at the bottom of the Window.
You will now be shown a text field where you can enter a new username. Enter your desired username and press ‘Ok’ once you are done.
Note: Ensure that you check the box for ‘Remember my name in future meetings’ if you wish to change your Zoom Rooms name permanently.
Zoom will now show you a refreshed list of your meeting participants where your new username should be visible to everyone.
We hope this guide easily helped you change your name in Zoom no matter which device you were using. If you faced any issues, feel free to share your queries with us in the comments section below.


 Se a reunión se creou de forma segura, pediráselle que introduza o contrasinal da reunión na seguinte pantalla. Despois de facelo, fai clic no botón "Únete" debaixo da caixa do contrasinal para acceder á pantalla da reunión.

 Cando teñas pechada sesión na túa conta, dirixirase á páxina "Iniciar sesión". Para escapar diso e ir á pantalla de unión sen un perfil de Zoom, fai clic na opción "Atrás".
 Na seguinte pantalla, introduce o ID da reunión que se compartiu contigo e o nome que queres asignarche durante a sesión da reunión. Despois de introducir estes datos, fai clic no botón "Únete".
  Pediráselle que introduza o contrasinal da reunión e, despois de facelo, faga clic no botón "Únete".


