6 Opravy pro chybu “Aw, Snap!” v Google Chrome
Zjistěte, jak se vypořádat s chybou “Aw, Snap!” v prohlížeči Chrome. Seznam účinných metod k opravě této chyby a přístupu na požadované stránky.
Hlavní panel Windows je středem veškeré pozornosti od doby, kdy dostal svůj nový vylepšený vzhled s vydáním Windows 11. Nyní můžete hlavní panel vycentrovat, užít si nové centrum akcí, změnit jeho zarovnání a umístit jej na obě strany obrazovky. Je smutné, že nasazení této funkce bylo méně než úspěšné a stále více uživatelů se po několik měsíců snažilo zprovoznit svůj hlavní panel ve Windows 11.
Přestože Microsoft uznal problém, vydal řešení a v současné době pracuje na opravě, zdá se, že uživatelům se stále nedaří znovu zprovoznit hlavní panel. Pokud jste na stejné lodi, sestavili jsme seznam všech dostupných oprav, aby se váš hlavní panel v systému Windows 11 znovu zprovoznil. Začněte podle níže uvedeného průvodce.
Obsah
Proč se můj hlavní panel nezobrazuje?
Hlavní panel Windows 11 má nový vzhled, který pochází z přepracovaného pojetí jeho fungování. Hlavní panel nyní spoléhá na několik služeb a samotnou nabídku Start, aby fungoval správně. Zdá se, že proces upgradu z Windows 10 na Windows 11 zřejmě kazí hlavní panel v závislosti na tom, jakou verzi Windows 10 máte nainstalovanou v systému a na kterou verzi Windows 11 aktualizujete.
Kromě toho se zdá, že nedávná aktualizace systému Windows vydaná minulý měsíc také způsobuje tento problém některým uživatelům, zatímco jiní čelí stejnému kvůli nesprávnému systémovému času, přestože mají vše správně nastaveno. Existuje mnoho způsobů, jak opravit hlavní panel, a doporučujeme vám začít s opravami uvedenými níže.
12 způsobů, jak opravit problémy s hlavním panelem ve Windows 11
Pomocí níže uvedených metod začněte opravovat hlavní panel v systému Windows 11. Pokud jste již zkusili restartovat systém, můžete první metodu přeskočit.
Oprava #1: Restartujte PC
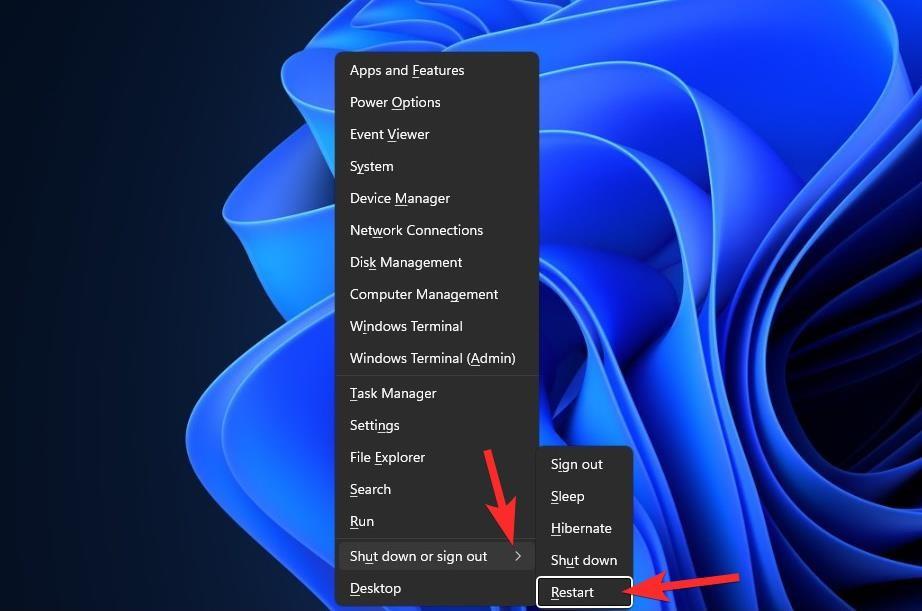
Než vyzkoušíte něco vychytaného, je dobré vyzkoušet jednodušší opatření, jako je restart PC nebo Windows Explorer (viz níže). Pokud tak učiníte, provede se měkký reset systému, který umožní opětovné načtení dat a případně opraví problémy s hlavním panelem a nabídkou Start.
Oprava č. 2: Zajistěte, aby byla vypnuta možnost „Automaticky skrýt hlavní panel“.
Stiskněte Windows + ina klávesnici a klikněte na 'Personalizace' vlevo.
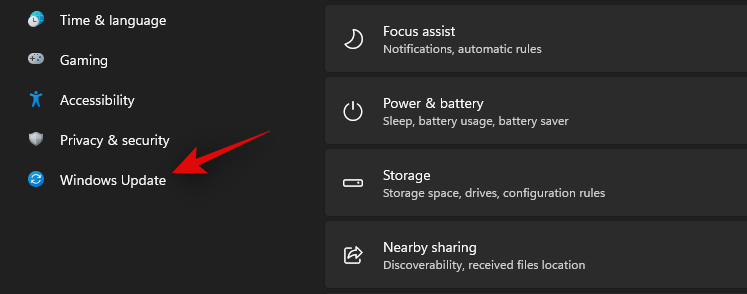
Klikněte na 'Hlavní panel'.
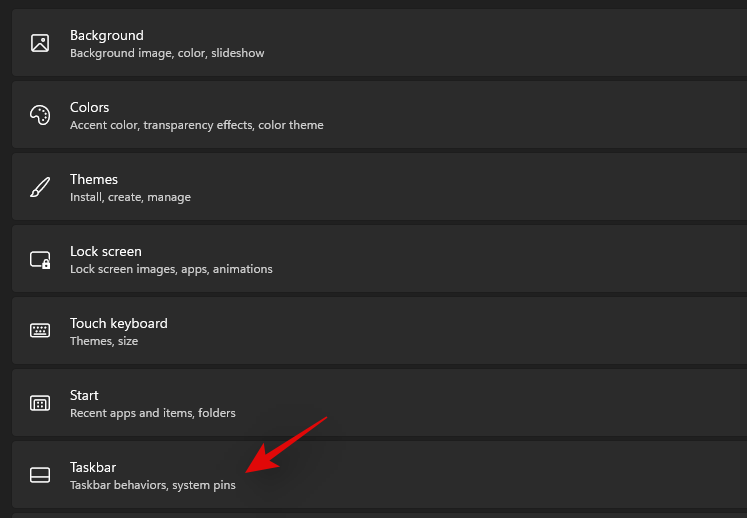
Nyní klikněte na „Chování hlavního panelu“.
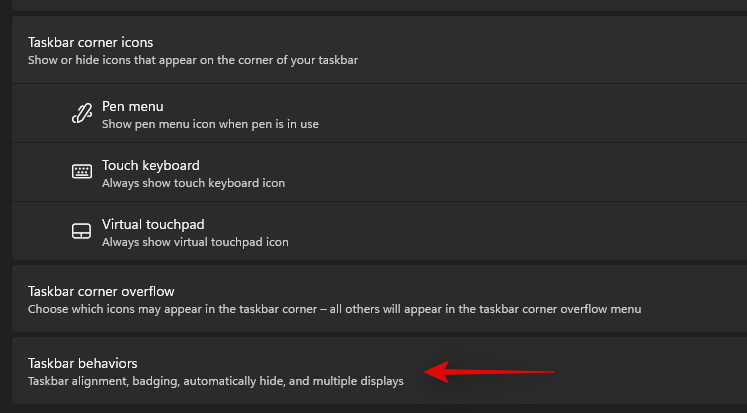
Zrušte zaškrtnutí políčka „Automaticky skrýt hlavní panel“.

Nyní zavřete aplikaci Nastavení a pokud byl hlavní panel automaticky skrytý, měl by být nyní ve vašem systému zakázán.
Oprava č. 3: Restartujte potřebné služby
Jak již bylo zmíněno dříve, Windows 11 přepracoval hlavní panel, což nyní znamená, že se spoléhá na to, že více služeb bude správně fungovat na jakémkoli systému. Pojďme restartovat všechny tyto služby, abychom zajistili, že konflikt na pozadí nebude bránit správnému fungování hlavního panelu ve vašem systému.
Stisknutím Ctrl + Shift + Escna vašem systému spustíte Správce úloh. V horní části přejděte na kartu Podrobnosti.
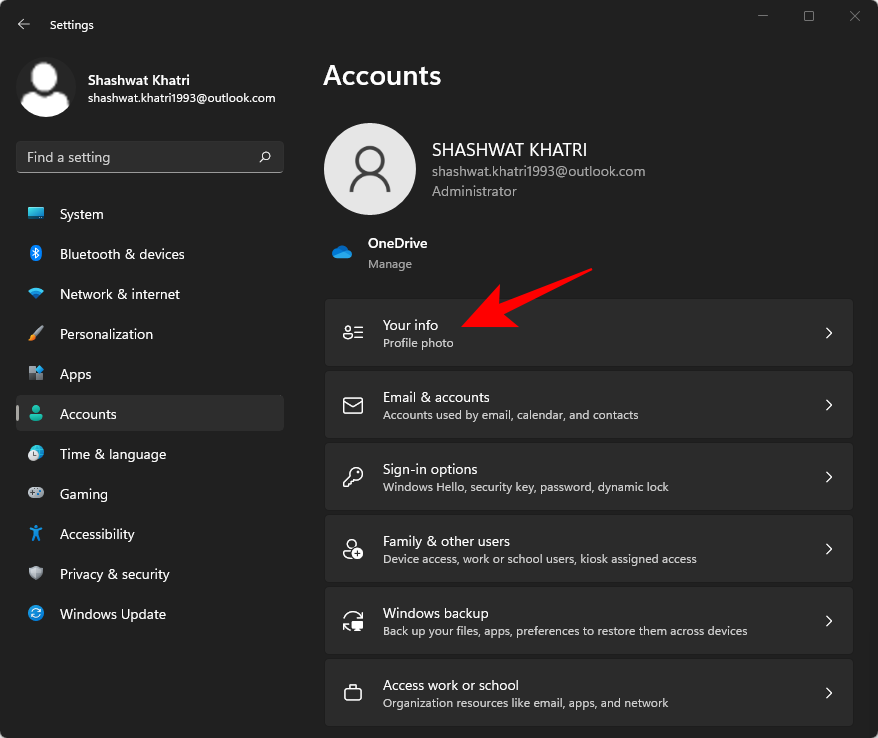
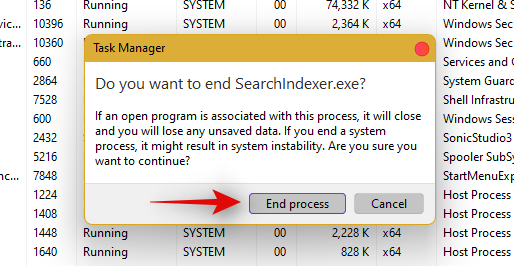
Nyní najděte následující běžící služby a vyberte je kliknutím na ně. Stiskněte na klávesnici 'Smazat' a potvrďte svou volbu výběrem 'Ukončit proces'.
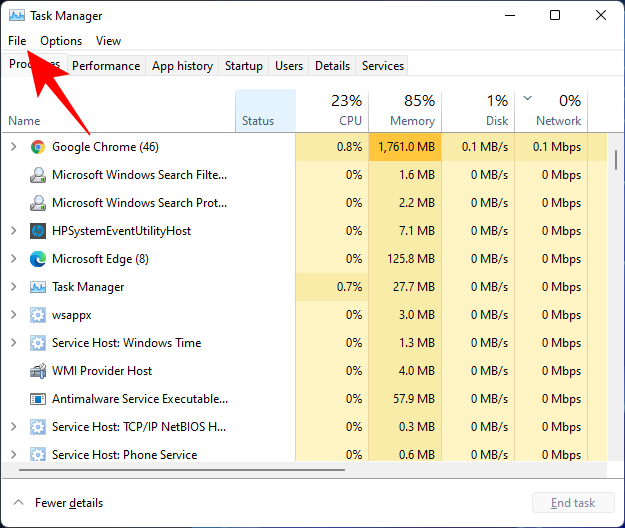
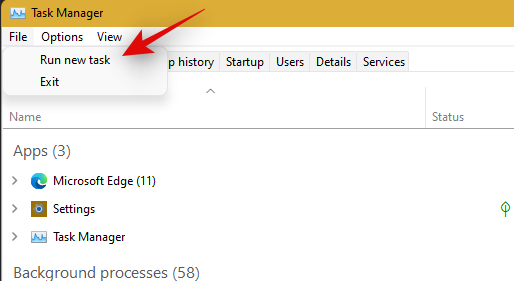
Nyní restartujeme Průzkumníka Windows. Klikněte na 'Soubor' v levém horním rohu a vyberte 'Spustit novou úlohu'.
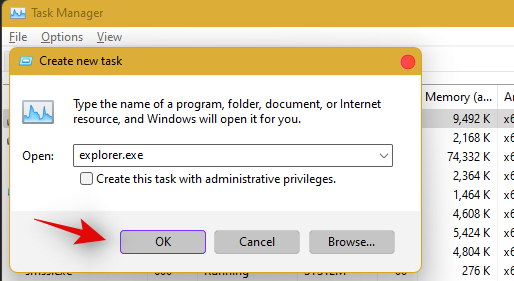
Zadejte 'explorer.exe' a stiskněte Enter na klávesnici. V případě potřeby můžete také kliknout na 'OK'.
Jakmile je průzkumník restartován, jednoduše restartujte počítač a restartujte ostatní služby v systému.
Hlavní panel by měl být nyní obnoven, pokud byl příčinou vašeho problému konflikt služby na pozadí.
Oprava č. 4: Odstraňte službu IrisService v registru a restartujte
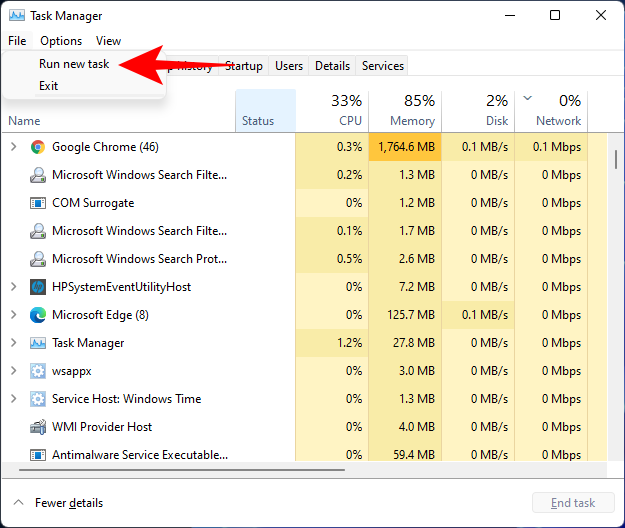
Stisknutím Ctrl + Shift + Escotevřete Správce úloh. Poté klikněte na Soubor v levém horním rohu.
Vyberte Spustit novou úlohu .
Zadejte cmd a stiskněte Enter.
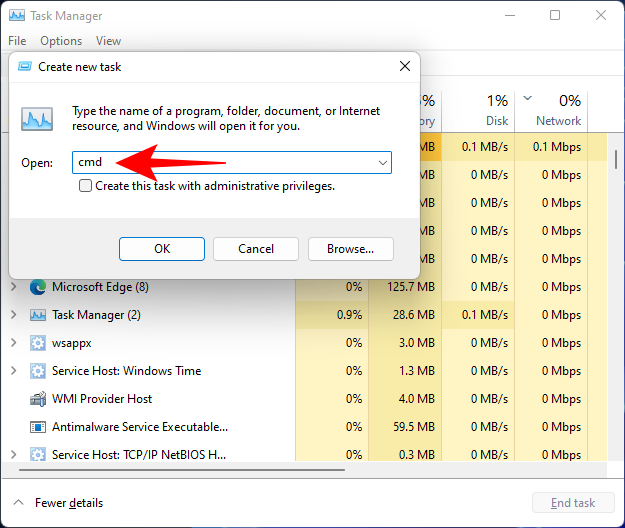
Tím se otevře zvýšená instance příkazového řádku. Nyní zkopírujte následující příkaz a vložte jej do příkazového řádku:
reg delete HKCU\SOFTWARE\Microsoft\Windows\CurrentVersion\IrisService /f && shutdown -r -t 0

Poté stiskněte Enter. Jakmile tak učiníte, váš počítač se restartuje. Po jeho spuštění by se vše mělo vrátit do normálu, včetně hlavního panelu.
Oprava #5: Přidejte UndockingDisabled do registru
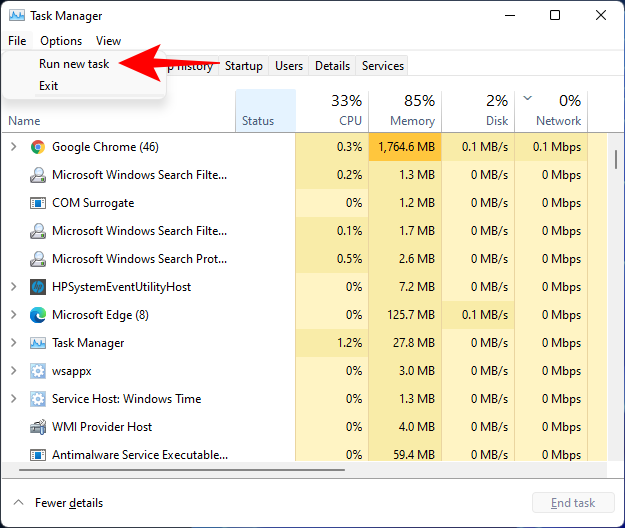
Stisknutím Ctrl + Shift + Escotevřete Správce úloh. Poté klikněte na Soubor (levý horní roh) a Spustit novou úlohu .
Napište regedit a stiskněte Enter.
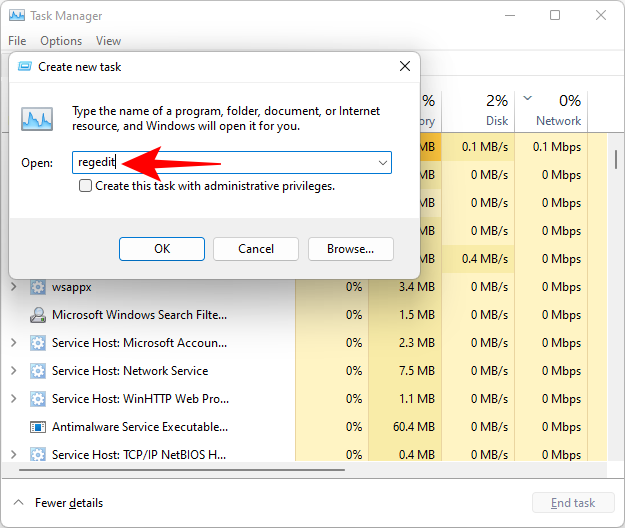
Tím se otevře Editor registru. Nyní přejděte na následující adresu:
Computer\HKEY_LOCAL_MACHINE\SOFTWARE\Microsoft\Windows\CurrentVersion\Shell\Update\Packages
Případně stačí zkopírovat výše uvedené a vložit jej do adresního řádku editoru registru, například:

Jakmile stisknete Enter, budete přesměrováni na zadaný klíč. Vpravo klikněte pravým tlačítkem na mezeru a vyberte Nový > Hodnota DWORD (32bitová) .
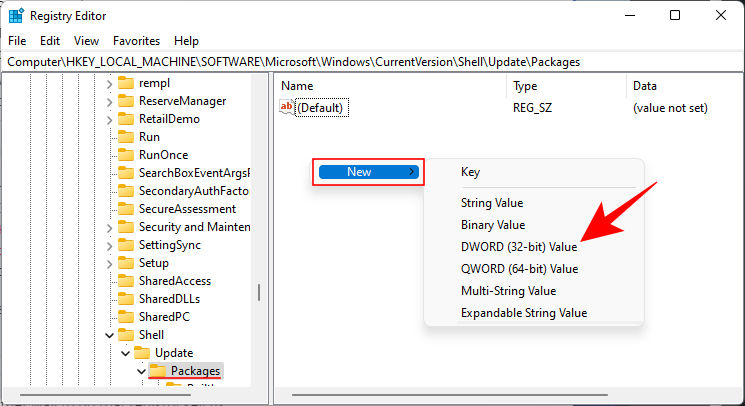
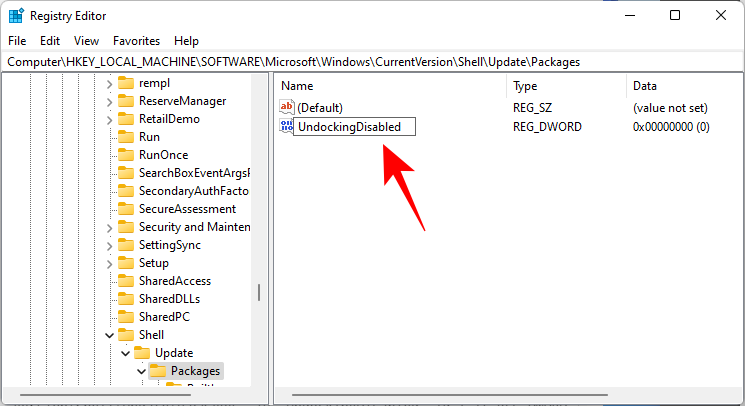
Pojmenujte tento nově vytvořený DWORD UndockingDisabled .
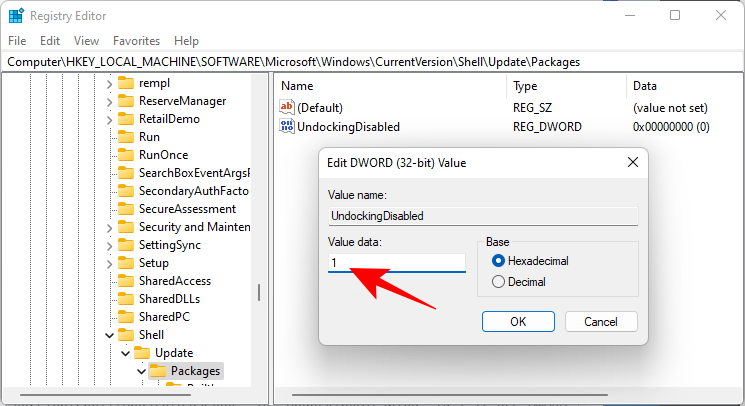
Poté na něj dvakrát klikněte a změňte „Value data“ na 1 . Poté klikněte na OK .
Restartujte počítač, aby se změny projevily.
Oprava č. 6: Spusťte příkazy SFC & DISM
Stiskněte Start, napište cmd a klikněte na Spustit jako správce .
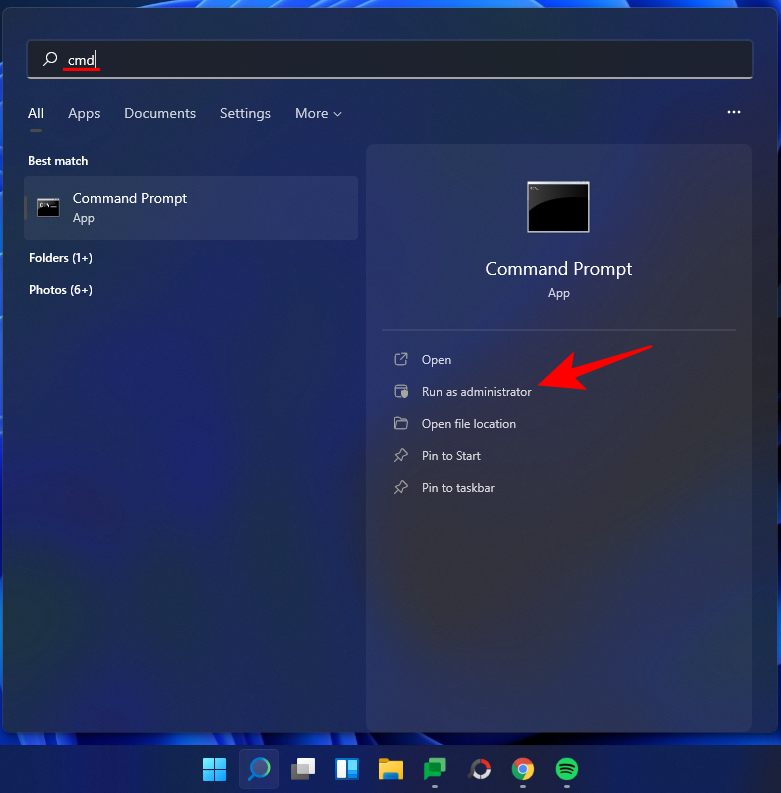
Nyní zadejte následující příkaz:
sfc /scannow
Stiskněte Enter. Počkejte, až SFC dokončí skenování a opraví všechny nalezené problémy.

Dále spusťte následující příkaz DISM pro nástroj Deployment Image Servicing and Management:
dism /online /cleanup-image /scanhealth
Poté stiskněte Enter. Znovu počkejte na dokončení skenování.

Nyní spusťte následující příkaz DISM:
dism /online /cleanup-image /restorehealth

Stiskněte Enter. Počkejte, až DISM obnoví zdraví.

Nakonec spusťte příkaz chkdsk a spusťte nástroj Check Disk:
chkdsk c: /r
Stiskněte Enter. Příkazový řádek zobrazí zprávu, že „nemůže uzamknout aktuální disk... protože svazek používá jiný proces“, a požádá vás o povolení naplánovat kontrolu před dalším spuštěním. Napište, Yabyste vyhověli.

A stiskněte Enter. Nyní restartujte počítač, nechte nástroj Check Disk provést svou práci a zkontrolujte, zda hlavní panel opět normálně funguje.
Oprava č. 7: Přeinstalujte UWP
Stisknutím Ctrl + Shift + Escna klávesnici spustíte Správce úloh. Klikněte na 'Soubor' a vyberte 'Spustit novou úlohu'.
Zadejte „PowerShell“ a stiskněte Ctrl + Shift + Enterna klávesnici.
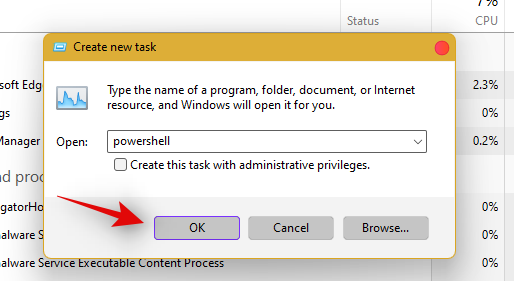
PowerShell se nyní spustí jako správce ve vašem systému. Zadejte následující příkaz:
Get-AppxPackage -AllUsers | Foreach {Add-AppxPackage -DisableDevelopmentMode -Register “$ ($ _. InstallLocation) \ AppXManifest.xml”}
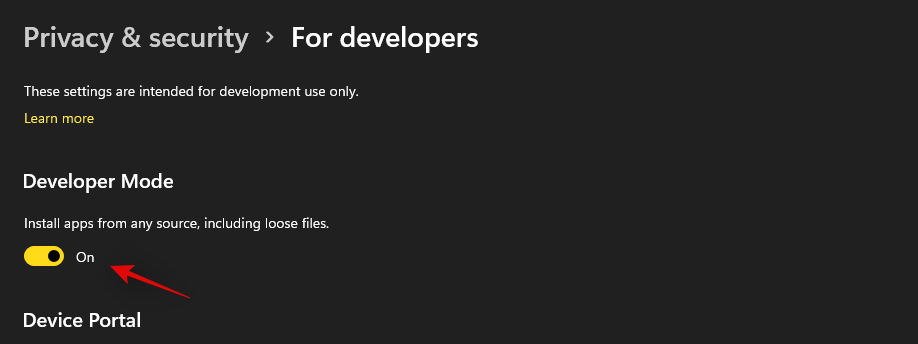
Stiskněte Enter. PowerShell zobrazí běžící seznam zpráv červeně. Ale netrap se tím. Počkejte, až se příkaz dokončí.

Oprava č. 8: Zkontrolujte UAC a v případě potřeby přidejte upravit registr
UAC je nutností pro všechny moderní aplikace a funkce včetně nabídky Start a hlavního panelu. Nejprve byste měli povolit UAC, pokud je zakázáno, a restartovat systém. Pokud pro vás hlavní panel stále nefunguje, doporučujeme vám zkusit přidat hodnotu nabídky Start Xaml do editoru registru.
Zdá se, že přidání této hodnoty restartuje a znovu zaregistruje služby hlavního panelu, což zdá se, že hlavní panel opět funguje na většině systémů. Chcete-li začít, postupujte podle níže uvedeného průvodce.
Zkontrolujte a povolte UAC, pokud je zakázáno
Stisknutím Ctrl + Shift + Escna klávesnici spustíte správce úloh. Nyní klikněte na 'Soubor' v levém horním rohu obrazovky a vyberte 'Spustit novou úlohu'.

Zadejte „cmd“ a stiskněte Ctrl + Shift + Enterna klávesnici.
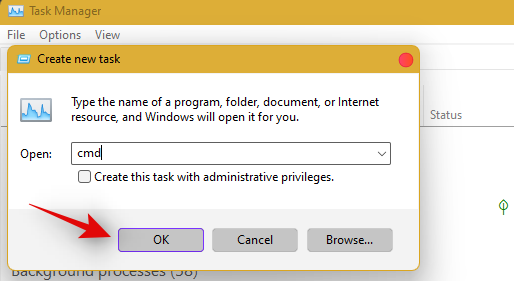
Nyní zadejte následující příkaz a stisknutím klávesy Enter příkaz spusťte.
C:\Windows\System32\cmd.exe /k %windir%\System32\reg.exe ADD HKLM\SOFTWARE\Microsoft\Windows\CurrentVersion\Policies\System /v EnableLUA /t REG_DWORD /d 0 /f
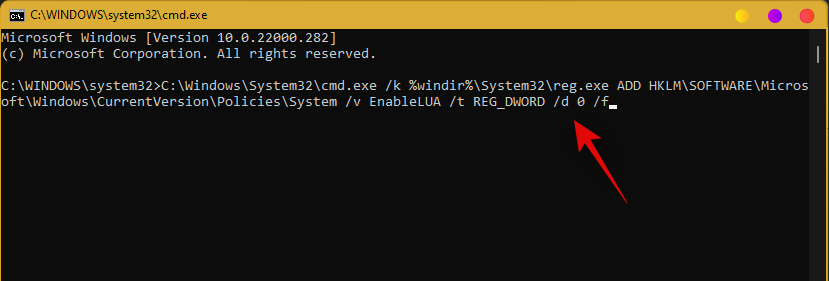
UAC will now be enabled for your system. Restart your PC for the changes to take effect on your system. Once restarted, Taskbar should be up and running on your system if UAC was the issue for you. If not, use the guide below to trigger the taskbar’s functionality on your system.
Add Registry Value
Press Ctrl + Shift + Esc to launch the task manager. Now click on ‘File’ in the top left corner and select ‘Run new task’.

Type in ‘cmd’ and press Ctrl + Shift + Enter on your keyboard.

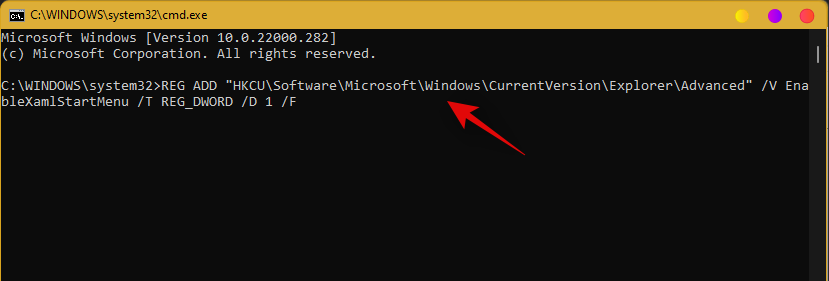
Now type in the following command and press Enter on your keyboard.
REG ADD "HKCU\Software\Microsoft\Windows\CurrentVersion\Explorer\Advanced" /V EnableXamlStartMenu /T REG_DWORD /D 1 /F
Go back to the task manager now, find Windows Explorer in the list, and right-click on it. Select Restart to restart explorer.exe.
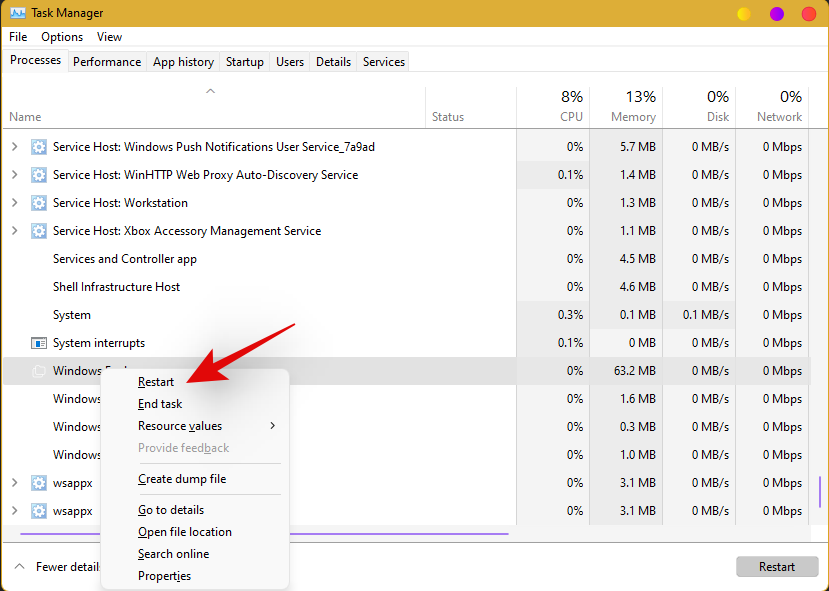
Once restarted, try to access your taskbar. The taskbar should now be available on your system.
Fix #9: Edit date and time to fix Taskbar
Date and Time settings seem to be the major cause of issues with the taskbar in Windows 11. Use the guide below to try out the following time fixes to see which one works the best for you.
Ensure that your time is correctly synchronized with the time server
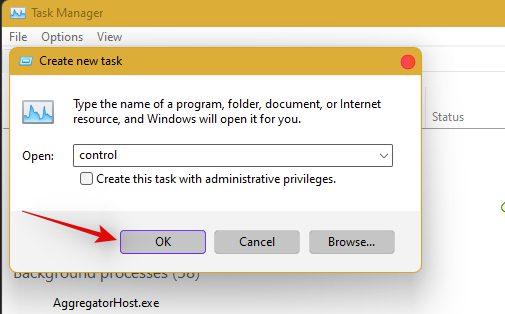
Press Ctrl + Shift + Esc on your keyboard and click on ‘File’. Select ‘Run new task’.

Type in ‘Control’ and hit Enter on your keyboard.
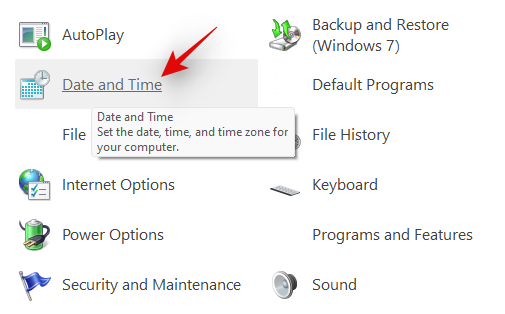
Click on ‘Date and Time’.
Select ‘Internet Time’ from the top.
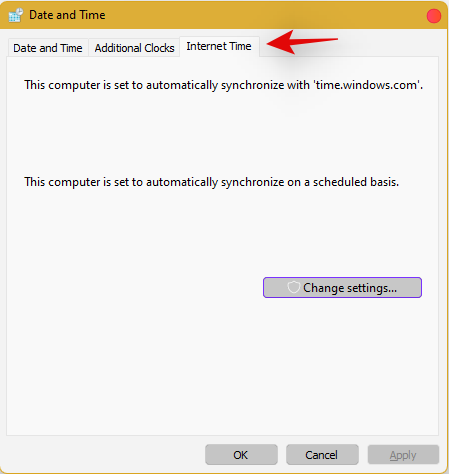
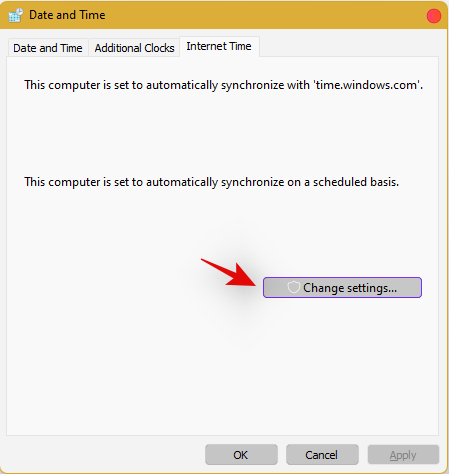
Click on ‘Change Settings’.
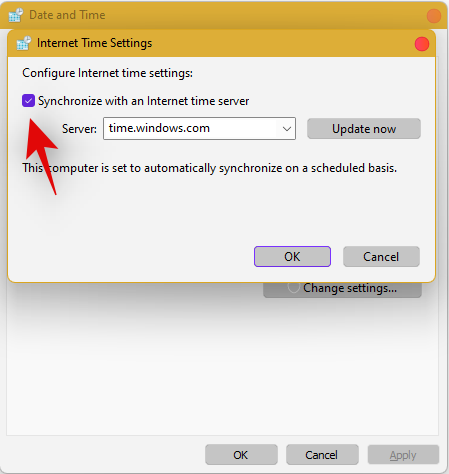
Uncheck the box for ‘Synchronize with an Internet time server’.
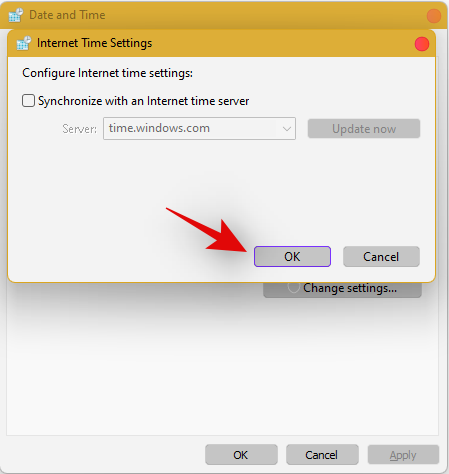
Click on ‘Ok’ once you are done.
Restart your PC at this point and check your taskbar. If it is still disabled, do not fret, follow the steps above and enable Synchronization with an Internet Time Server again.
Once enabled, press Ctrl + Shift + Esc on your keyboard, and find Windows Explorer in the list on your screen. Right-click the listing and select ‘Restart’.

Once explorer restarts, try using the Taskbar. If synchronization was your issue, then it should now be fixed on your system. If not, continue with the other time fixes mentioned below.
Change date to 1 day ahead
Open the Task Manager by pressing Ctrl + Shift + Esc simultaneously. Then click on File.
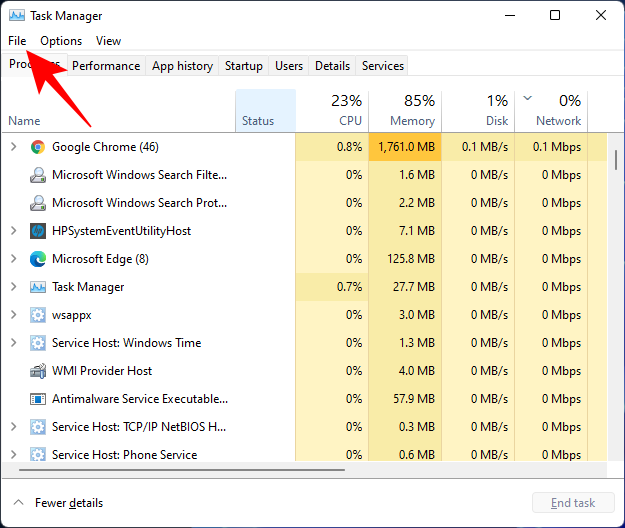
Click on Run new task.
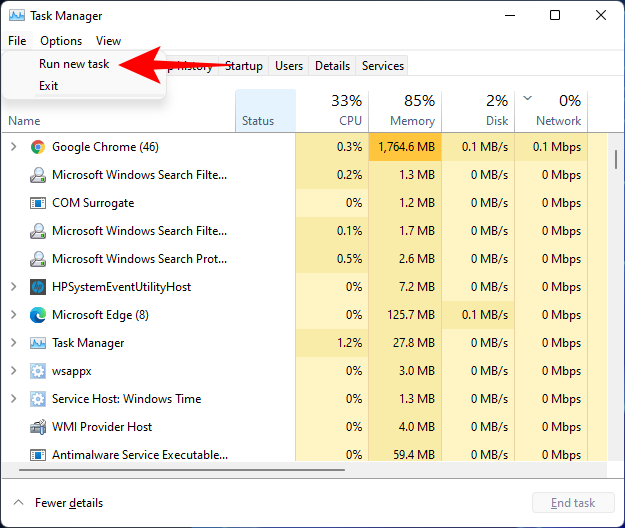
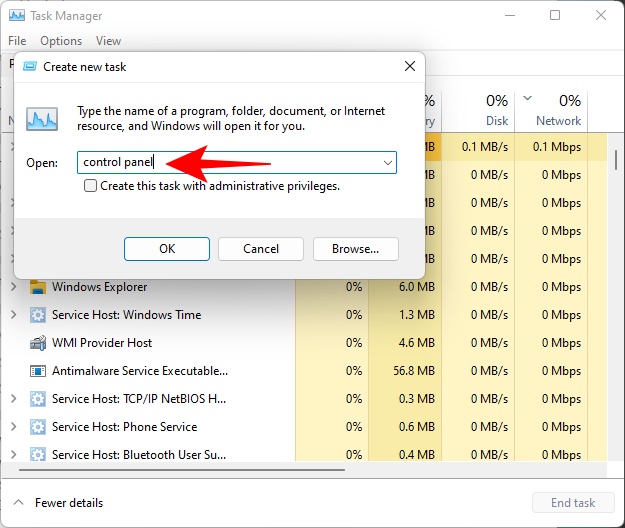
Type control panel and hit Enter.
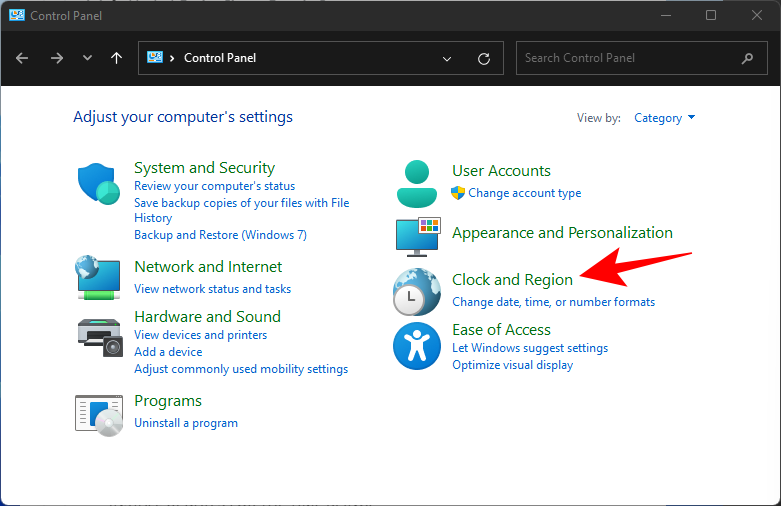
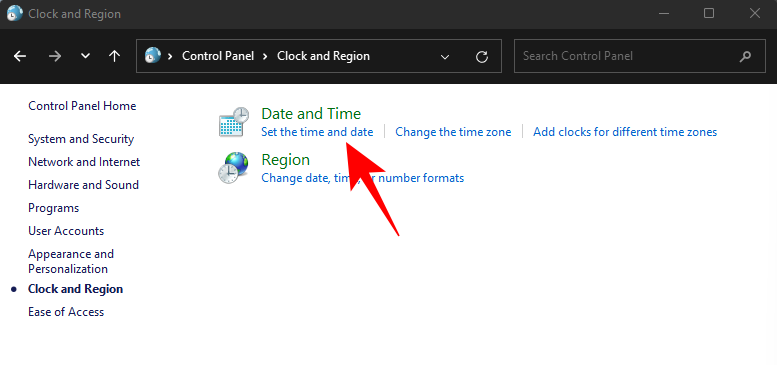
Now click on Clock and Region.
Under “Date and Time”, click on Set the time and date.
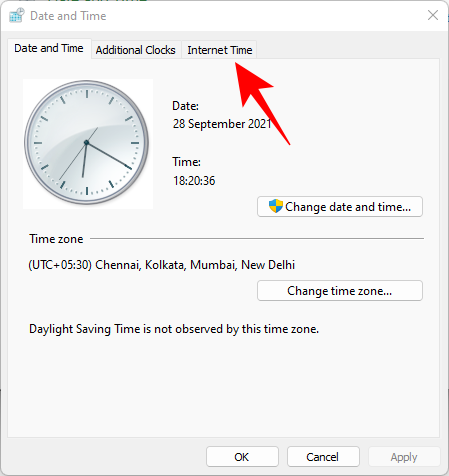
Click on the Internet Time tab to switch to it.
Click on Change settings…
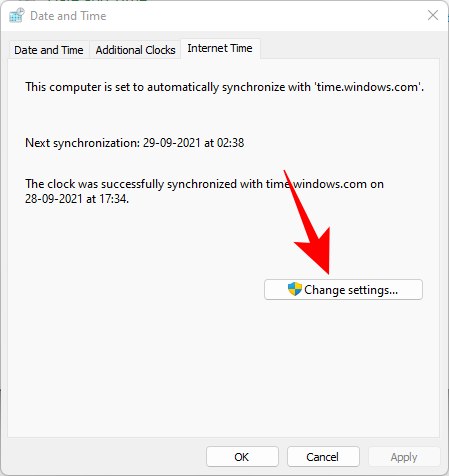
Uncheck Synchronize with an Internet time server, then click OK.
Now click on the Date and Time tab to switch back to it.
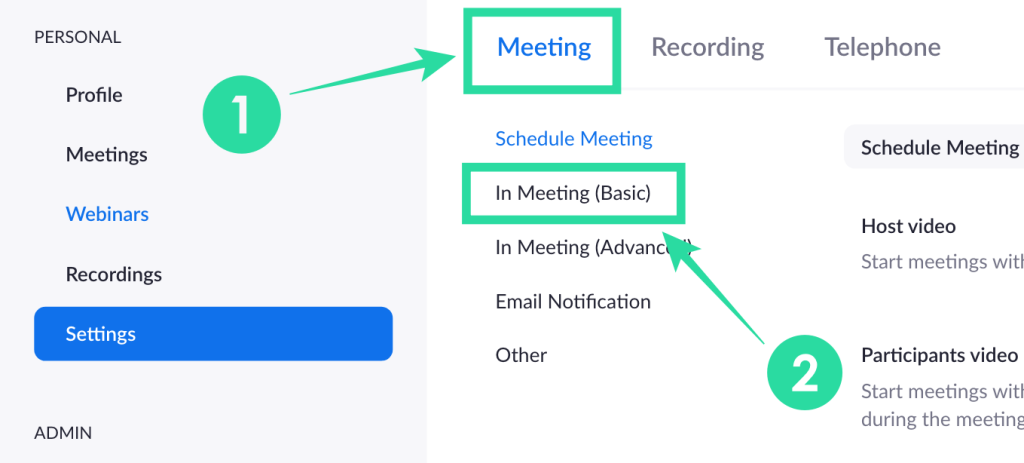
Here, click on Change date and time…
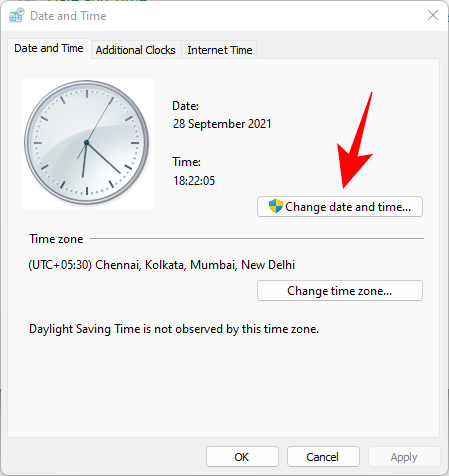
Now change the date and time to reflect tomorrow. As of writing this post, it is the 1st November so we will be changing the date to 2nd November.
Change Dates to last cumulative updates
If you are still unable to get the Taskbar working then you will have to jump through a few hoops to change your date and time multiple times and get the taskbar working on your system. Follow the guide below to get you started.
Press Ctrl + Shift + Esc on your keyboard, click on ‘File’ and select ‘Run new task’.

Type in ‘Control’ and press Enter on your keyboard.

Select ‘Date and Time’.

Switch to ‘Internet time’.

Click on ‘Change Settings’.

Uncheck the box for ‘Synchronize with an Internet Time Server’.

Click on ‘Ok’.

Switch back to ‘Date and Time’. Click on ‘Change Date and Time’ and select your date as 2nd September.
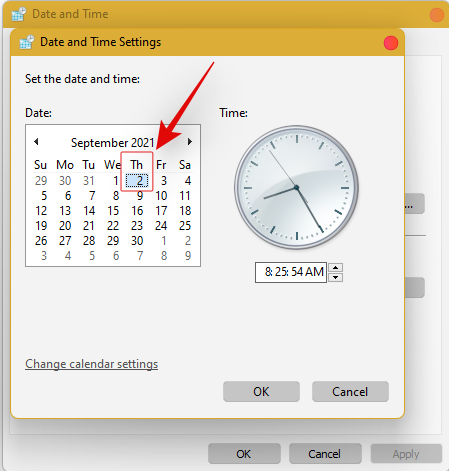
Close all windows and restart your system. Once restarted, open the ‘Date and Time’ dialog box again and change your date to 7th October this time.
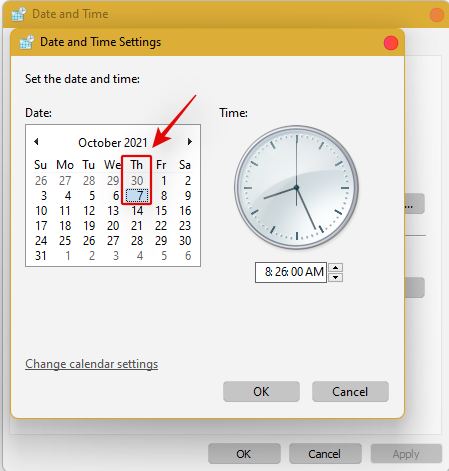
Restart your system again and Taskbar should now be back up and running on your system again. You can now enable synchronization for time again using the steps above on your system.
If synchronizing time does not work, move a month ahead to restore Taskbar
If you are still unable to get Taskbar up and running on your system again you can try the last date change fix. We recommend you use the steps above to change your date and time to a month ahead of your current date. Once changed, restart your system, and the taskbar should be up and running on your system now.
The downside of this fix is that if you revert to your normal date, Taskbar will stop working on your system. Having a mismatched date can cause issues with background syncs for various applications and cause some websites to malfunction. You will also have issues installing and getting the latest Windows Updates, so you will need to check all of these manually when updating in the future.
Fix #10: Uninstall the latest cumulative Windows Update ie: KB5006050
The cumulative update released in September for Windows 11 seems to also cause issues with the taskbar on some desktops and laptops. Use the guide below to uninstall the necessary update from your system.
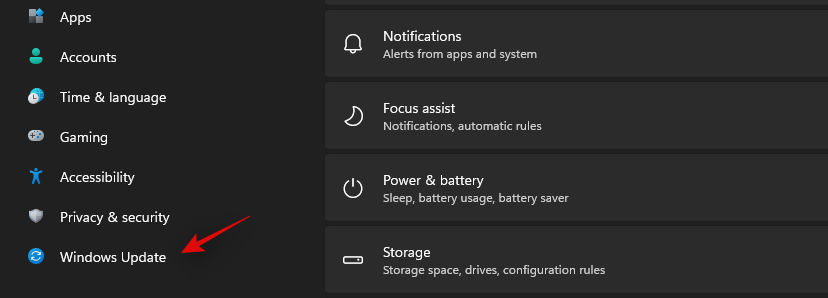
Press Windows + i and select Windows Update from the left.
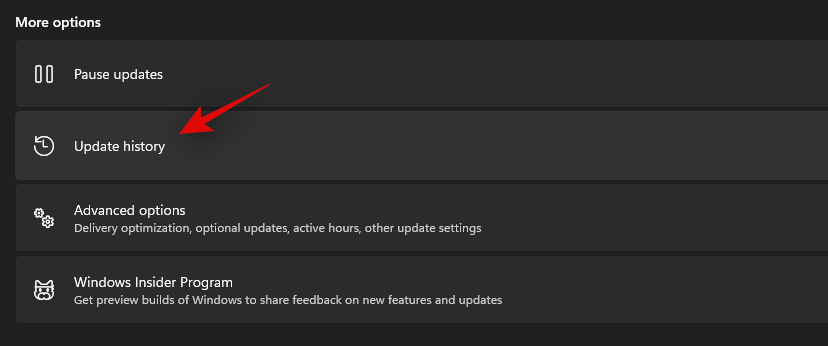
Click on ‘Update history’.
Now select ‘Uninstall updates’.
Click and select Windows Cumulative update KB5006050 from the list.
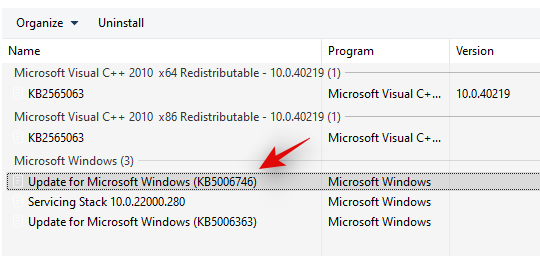
Now click on ‘Uninstall’ at the top and confirm your choice to uninstall the selected update.
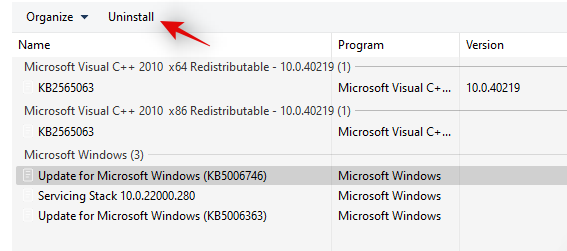
Restart your system and taskbar functionality should now be restored on your system.
Fix #11: Restore PC to a previous restore point
If you had the taskbar working at a previous point in time then we recommend you restore your PC to a previously available restore point on your system. Follow the guide below to get you started.
Press Ctrl + Shift + Esc on your keyboard and click on ‘File’. Select ‘Run new task’ once you are done.

Type in CMD and press Ctrl + Shift + Enter on your keyboard.

Now type in ‘rstrui.exe’ and press Enter on your keyboard.
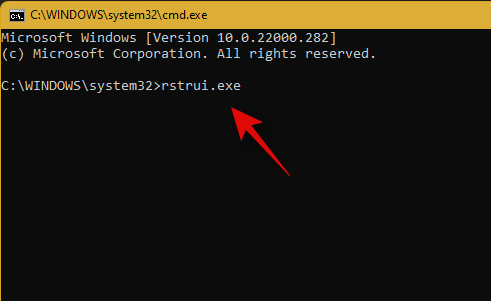
The system restore utility will now launch on your system. Click on ‘Next’.
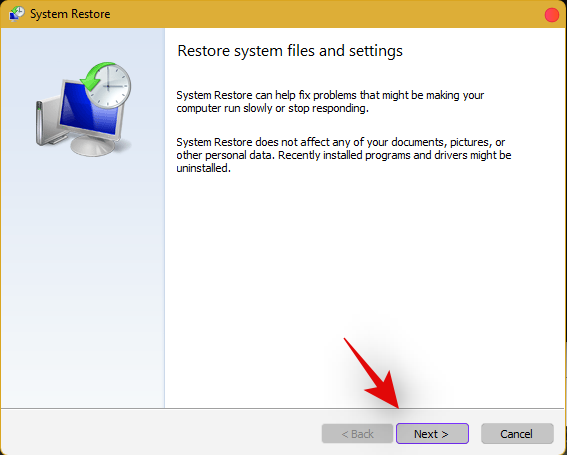
Select the desired restore point from the list on your screen. Click on ‘Next’ once you are done.
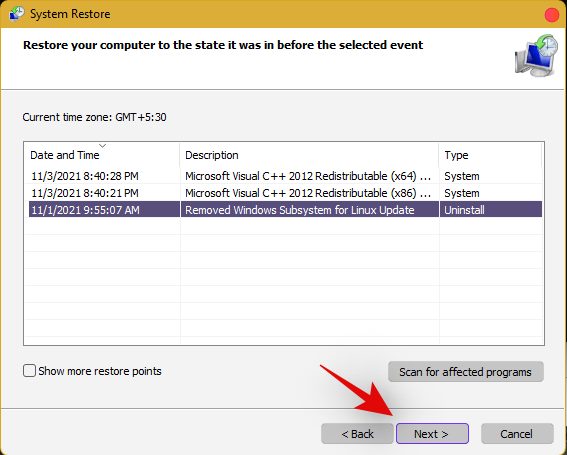
Tip: Click on ‘Scan for affected programs’ to view a list of installed programs that will be removed from your system during the restore process.
Click on ‘Finish’ once the restore finishes and restart your system.
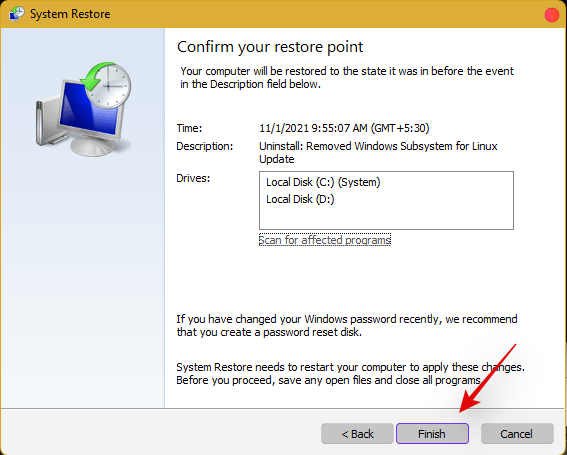
The taskbar should now be back up and running on your system again.
Fix #12: Last Resort: Create a new local admin account and transfer all your data
If by this point Taskbar still fails to work for you then it’s time for some drastic measures. You can create a new local admin account, check if Taskbar is working there, and then transfer all your data to the new account. This will be a tedious process but it is the next best way to get the taskbar working on your system without resetting your PC. Follow the guide below to get you started.
Create a new local admin account
Herre’s how you can create a new local admin account on your system.
Note: Most users facing the taskbar issue are unable to access the Settings app as well. Hence we will be using CMD to add a new local admin account to your PC. However, if the Settings app is available to you then you can use the same to add a new account as well.
Press Ctrl + Shift + Esc on your keyboard, click on ‘File’ and select ‘Run new task’.

Type in ‘cmd’ and press Ctrl + Shift + Enter on your keyboard.

CMD will now be launched as an administrator. Use the command below to add a new local admin account. Replace NAME with the Username of your choice for the new account. You can add a password later once you have confirmed that the taskbar is available in the new account.
net user /add NAME 
Once you have added the new user, use the command below to convert it to an administrator account on your PC. As usual, replace NAME with the Username for the new account you created earlier.
net localgroup Administrators NAME /add

Now type in the following to log out of your current account.
logoff

Once logged out, click on the newly added account to log in to the same. Once logged in, check if the taskbar is available in the new account. If it is, you can use the next section to transfer all your data. However, if the taskbar is still missing then you have no choice but to perform a fresh install of Windows 11 on your PC from a removable USB media drive.
Transfer all your data
Press Windows + i on your keyboard and click on ‘About’ on your right.
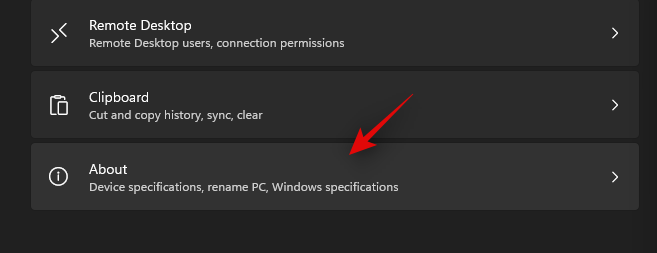
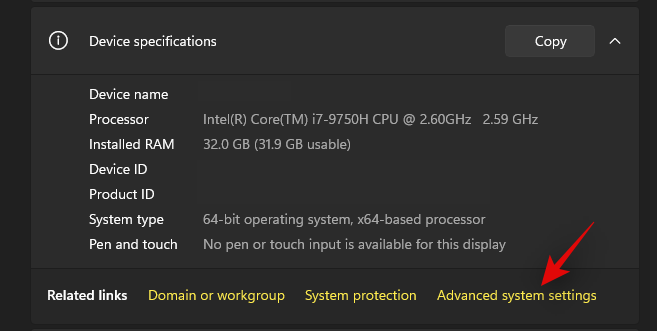
Click on ‘Advanced system settings’.
Click on ‘Settings’ under ‘User Profiles’.
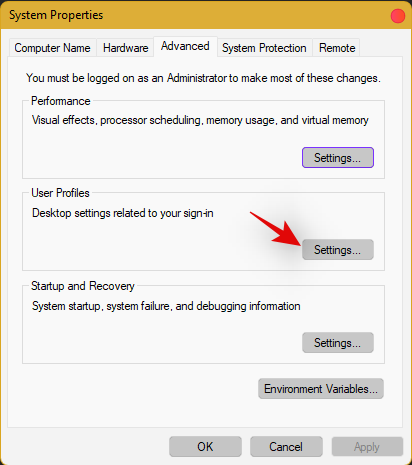
Select your original profile by clicking on it and selecting ‘Copy To’.
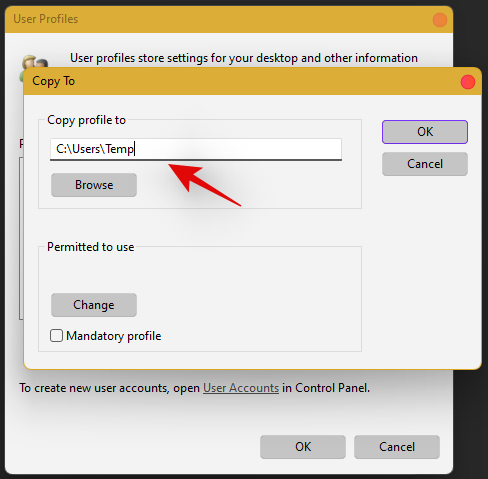
Now enter the following path under ‘Copy profile to’. Rename NAME to the username of your previous profile from where you wish to copy all your data.
C:\Users\NAME
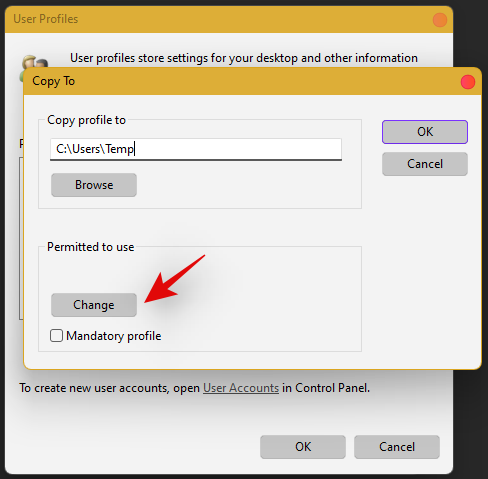
Click on ‘Change’.
Enter the name for your new user profile and press Enter on your keyboard.
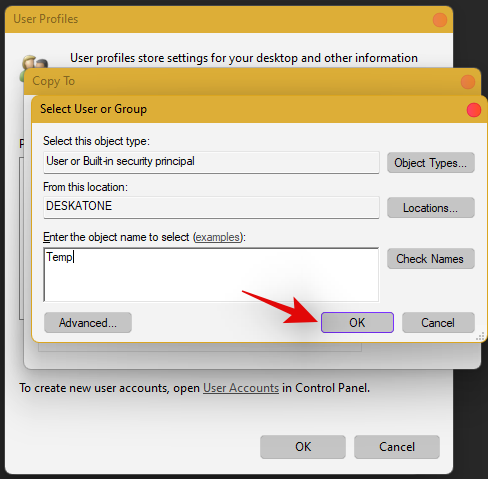
Click on ‘Ok’ once you are done.
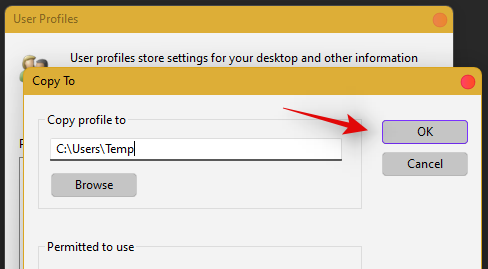
All your data will now be copied over to the new profile where the taskbar is functional on your PC. You can now delete your previous user account and set a password for your new account as well.
Frequently Asked Questions (FAQs):
With so many fixes, you are bound to have a few questions on your mind. Here are some commonly asked ones that should help you get up to speed.
How do I access Windows apps and Settings without a taskbar?
You can use the Task Manager to launch almost any program or Settings page on your system. To launch the desired program, launch the Taskbar > File > Run new task and enter the path to the program you wish to launch. Press Enter if you wish to launch the program normally or press Ctrl + Shift + Enter if you wish to launch the program with administrator privileges.
Is it safe to edit the Registry?
Registry edits are never safe as they have the potential to break your system. Fixes from trusted sources can help you avoid such issues but a good rule of thumb is to always back up your registry before making any edits. This way you can easily restore your Registry values in case some get messed up when editing the Registry.
When will Microsoft fix this issue?
Sadly, Microsoft is yet to release a proper fix for this issue. The company has tried to release a fix in the past cumulative updates to Windows 11 but they have been a hit and miss. We expect Microsoft to completely fix this issue in the upcoming feature update to Windows 11 when the OS gets the ability to run Android apps officially.
Can I update my Windows 11 after fixing the taskbar?
This will depend on the fix that you’re currently using. If you are using a date fix then you won’t be able to install updates until you restore to the current time. This will, however, cause the taskbar to be disabled again and the changes will be carried over after you update your PC. However, if you are using any other fix then you can easily update Windows.
For users with the date fix, you should try updating with the modified time first. If the update gets stuck on ‘Installing 0%’ or ‘Downloading 100%’ then change your date and time to the current date and time and update your PC. Ensure that you do not restart explorer or your PC during this process to keep the current instance of the taskbar alive on your system during the update process. This should help fix the issue for you once Microsoft officially releases an update to fix the issue.
We hope you were able to easily get the taskbar back up and running on your system using the guide above. If you face any more issues, feel free to reach out to us using the comments section below.
Related:
Zjistěte, jak se vypořádat s chybou “Aw, Snap!” v prohlížeči Chrome. Seznam účinných metod k opravě této chyby a přístupu na požadované stránky.
Chcete opravit problémy se zamrzlou nebo uzamčenou obrazovkou iPhonu nebo iPadu? Přečtěte si tento článek a zjistěte snadné metody před tím, než přistoupíte na podporu Apple.
Pokud se snažíte opravit chybu 0x80860010 na vašem PC, zde najdete možné opravy.
Spotify může mít různé běžné chyby, jako je nehrání hudby nebo podcastů. Tento průvodce ukazuje, jak je opravit.
Zjistěte, jak opravit chybu kódu 4008 "neúspěšné připojení k serveru", když se pokoušíte hrát Warhammer 40,000: Darktide, a naučte se, proč se tato chyba objevuje.
Zjistěte, co dělat, když Windows 11 neustále havaruje, s seznamem otestovaných a osvědčených řešení, která vám mohou pomoci problém vyřešit.
Vaše kontingenční tabulka nefunguje? Zde je několik běžných oprav, které by vám měly rychle a snadno pomoci.
Co dělat, když čas počítače se systémem Windows 11 tajemně nezobrazuje správný čas? Vyzkoušejte tato řešení.
Konzole Nintendo Switch je masivně populární hybridní zařízení. Tento článek přináší 12 řešení pro opravu problému s připojením k televizoru.
Máte problém s neustálým vypínáním iPadu? Zde jsou 12 efektivních oprav pro váš problém.
Objevte 5 nejčastějších problémů PS4 a jejich efektivní řešení, která zlepší váš herní zážitek na PlayStationu.
Ovladače zařízení pomáhají opravovat chyby, vytvářet a zlepšovat kompatibilitu periferních zařízení a komponent s aktuálními a novými aktualizacemi OS. Jak aktualizovat ovladače ve Windows 11?
Oprava chyby Video_TDR_Failure (Nvlddmkm.Sys) ve Windows 10. Efektivní metody pro řešení této chyby modré obrazovky smrti.
Je docela nepříjemné, když se váš počítač se systémem Windows 10 neustále zamrzá. Zjistěte, jaké jsou účinné opravy pro náhodné zamrzání Windows 10.
Má vaše telefony Android Wi-Fi neustále přerušovat připojení? Zjistěte, proč se Wi-Fi stále odpojuje a co můžete udělat pro vyřešení problémů s připojením Wi-Fi v systému Android.
V případě, že Windows Search využívá výjimečně vysoké zdroje CPU nebo disku, můžete v systému Windows 11 použít následující metody odstraňování problémů. Mezi metody, jak problém vyřešit, patří jednodušší metody…
20. února 2021: Google nyní zablokoval všechna rozšíření Meet, která pomáhala se zobrazením mřížky, včetně těch níže uvedených. Tato rozšíření již nefungují a zdá se, že jedinou alternativou je…
Jediná obrazovka, ze které mají uživatelé Windows kolektivní strach, je modrá obrazovka smrti. BSOD existuje již desítky let, v průběhu let se mění jen velmi málo, ale stále je dostatečně silný, aby mohl…
Microsoft Teams se díky své hluboké integraci s Microsoft Office 365 stal oblíbeným řešením pro videohovory pro miliony lidí na celém světě. Přestože není uživatelsky nejpřátelštější…
Microsoft Teams je komplexní nástroj, který je v poslední době poměrně populární díky funkcím pro týmovou spolupráci. Služba vám umožňuje vytvářet konkrétní týmy pro vaši organizaci, pozvat di…
Máte potíže s vypnutým zjišťováním sítě ve Windows 11? Objevte osvědčená řešení, která vám pomohou jej bez námahy zapnout, vyřešit běžné problémy a obnovit bezproblémové sdílení sítě. Podrobný návod pro začátečníky i profesionály.
Máte na svém starém počítači problém s chybou „Styl oddílu GPT není podporován“? Objevte osvědčená a podrobná řešení pro převod disků a bezproblémové zprovoznění bootovacího USB disku. Ideální pro uživatele staršího hardwaru.
Zjistěte, jak povolit Auto HDR přes Game Bar ve Windows 11 pro dechberoucí herní grafiku. Postupujte podle našeho jednoduchého podrobného návodu a vylepšete si herní zážitek zářivými barvami a hlubším kontrastem bez problémů.
Máte potíže s nefunkčními makro klávesami ve Windows 11? Objevte osvědčené opravy pro klávesnice Logitech, Razer a další. Podrobné pokyny k řešení problémů, abyste co nejdříve zajistili bezproblémový chod maker. Aktualizováno nejnovějšími opravami z roku 2026.
Máte potíže s chybou ERR_QUIC_PROTOCOL_ERROR v aplikaci Microsoft Edge? Objevte osvědčená a podrobná řešení, která vám pomohou tento nepříjemný problém vyřešit a vrátit se k plynulému prohlížení. Aktualizováno s nejnovějšími tipy pro optimální výkon.
Máte potíže s klávesnicí ve Windows 11? Zjistěte, jak si bez námahy stáhnout nejnovější ovladače klávesnice pro Windows 11 pro všechny modely. Podrobné návody, tipy a řešení problémů, které vám opět zajistí plynulé psaní.
Máte potíže s chybou konfigurace RAID ve Windows 11? Objevte osvědčená, podrobná řešení, která tento nepříjemný problém rychle vyřeší a váš počítač bude opět běžet hladce. Nejsou potřeba žádné technické znalosti!
Zjistěte, jak snadno povolit a používat živé titulky ve Windows 11 pro titulky v reálném čase ve videích, hovorech a dalších věcech. Zlepšete přístupnost a zůstaňte v kontaktu s naším podrobným průvodcem.
Máte problémy se synchronizací Bluetooth ve Windows 11? Objevte podrobná řešení, která obnoví plynulé připojení vašich zařízení. Získejte ještě dnes zpět svůj Bluetooth!
Potýkáte se s obávanou chybou KMODE_EXCEPTION_NOT_HANDLED ve Windows 11? Tento podrobný návod nabízí osvědčená řešení, jak rychle a bezpečně vyřešit modrou obrazovku smrti (BSOD) a obnovit váš počítač.
