6 способів оновити драйвери в Windows 11
Оновлення драйверів у Windows 11 є важливим процесом для виправлення помилок та покращення сумісності пристроїв. Дізнайтеся, як це зробити ефективно.
Протягом багатьох років Windows рекламувала безліч нових функцій і вдосконалень, стверджуючи, що вони доступні лише одним натисканням кнопки «Пуск». Але що робити, якщо для вас перестане відкриватися меню «Пуск»? Ну, може статися так, що меню «Пуск» у Windows 11 раптово перестало працювати для вас, що зробить виконання звичайних завдань трохи обтяжливим.
Якщо меню «Пуск» не відкривається для вас у Windows 11, то існує стільки виправлень, скільки ми могли б придумати, щоб допомогти вам вирішити проблему .
Пов’язано: Як видалити програми в Windows 11
ПРИМІТКА. Якщо 17(!) звичайних виправлень, наведених нижче, не вдалися, спробуйте виправлення №18, наведене нижче в розділі «Останні засоби», в якому йдеться про створення нового користувача за допомогою командного рядка . Це допоможе вам створити нового користувача за допомогою CMD, таким чином, не потребуючи доступу до програми «Налаштування» або меню «Пуск», які можуть не працювати для вас. Тим не менш, виправлення №1 щодо проблеми, спричиненої «Windows Update KB5004300», є новим доповненням, тому, можливо, перевірте це спочатку.
Зміст
Нижче ми включили 20 (!) виправлень, щоб вирішити проблему з меню «Пуск» у Windows 11. 3 з них є загальними виправленнями, які слід спробувати лише після того, як ви впевнені, що 17 основних виправлень не допоможуть.
17 Основні виправлення
Спробуйте спочатку ці виправлення, перш ніж спробувати 3 загальні виправлення (також наведені нижче).
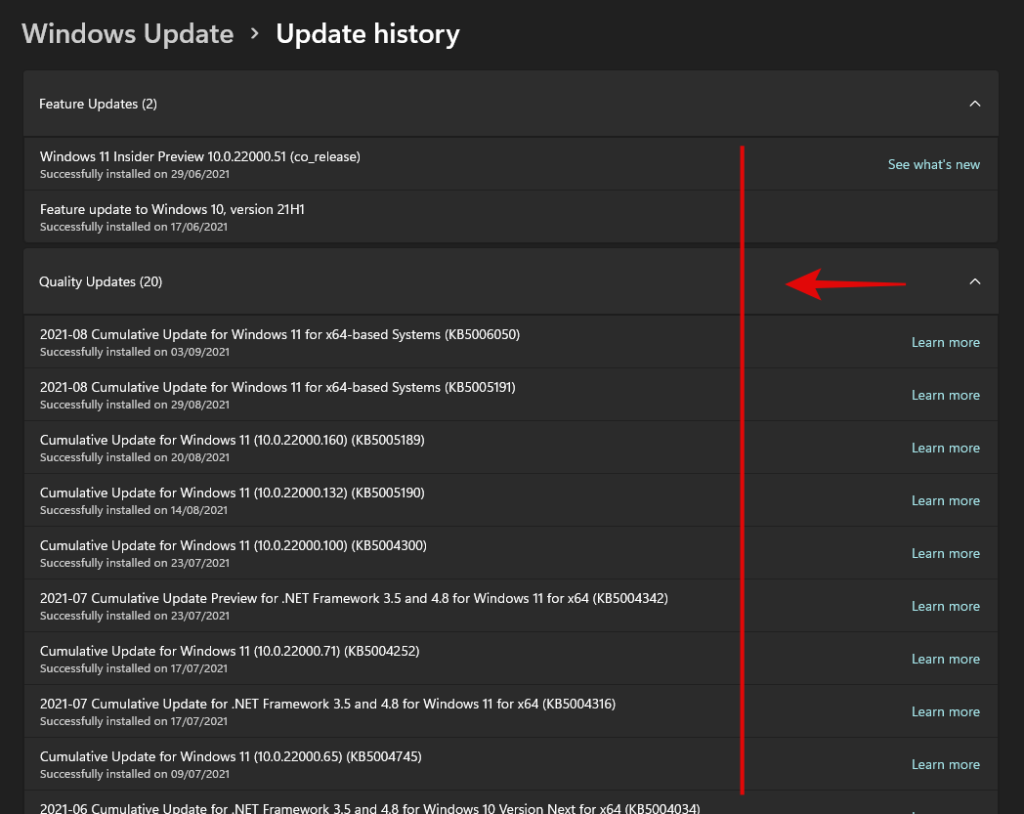
Виправлення №1: Видаліть та переінсталюйте Windows Update KB5004300
Нещодавнє виправлення, виявлене користувачами з орлиними очима, здається, легко виправляє меню «Пуск» у нових оновленнях Windows 11. Схоже, цю проблему спричиняє оновлення Windows, випущене під назвою KB5004300. Видалення та повторна інсталяція на вашому ПК виправить меню «Пуск» і панель завдань. Дотримуйтесь інструкції нижче, щоб почати.
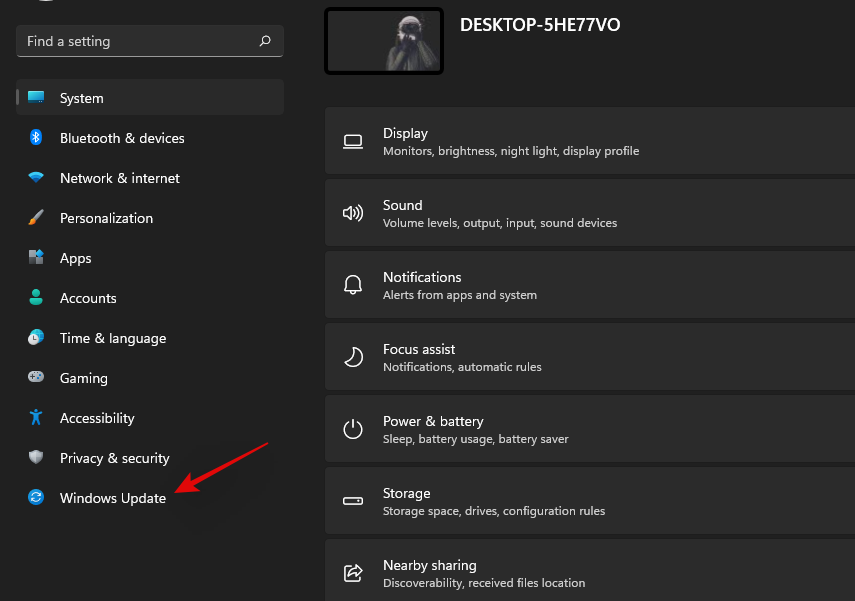
Натисніть Windows + iна клавіатурі, щоб відкрити програму Налаштування. Натисніть «Оновлення Windows» зліва.
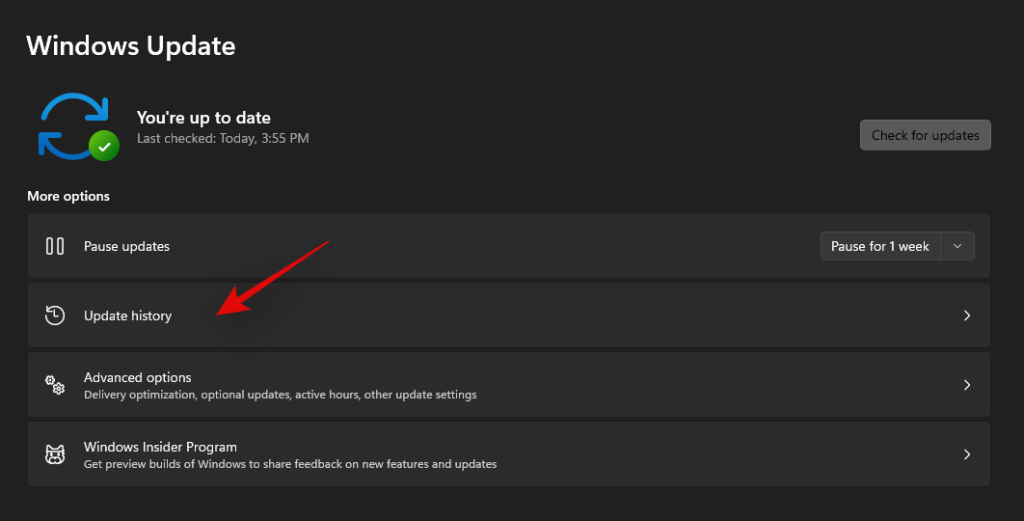
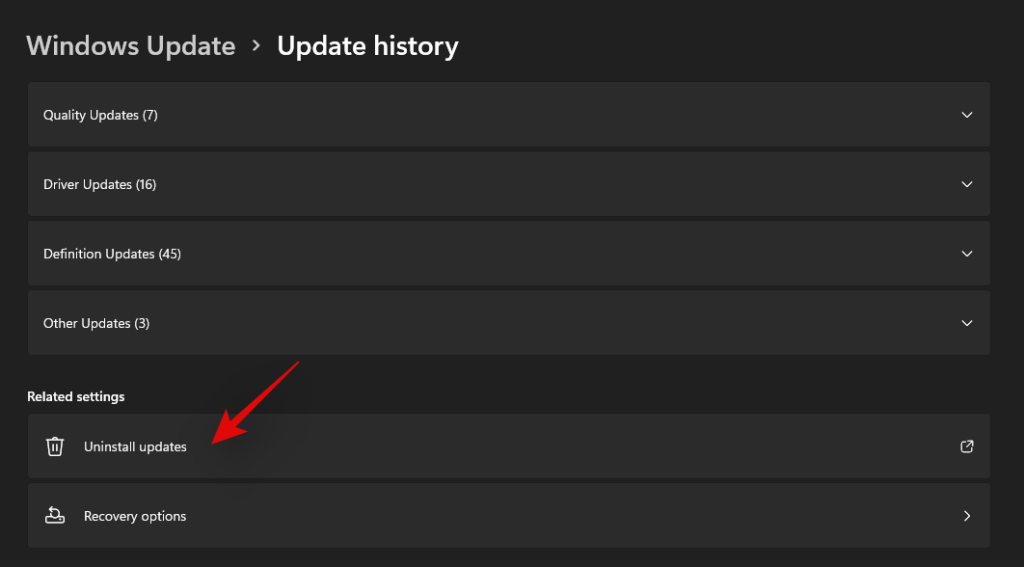
Тепер натисніть «Оновити історію».
Натисніть «Видалити оновлення».
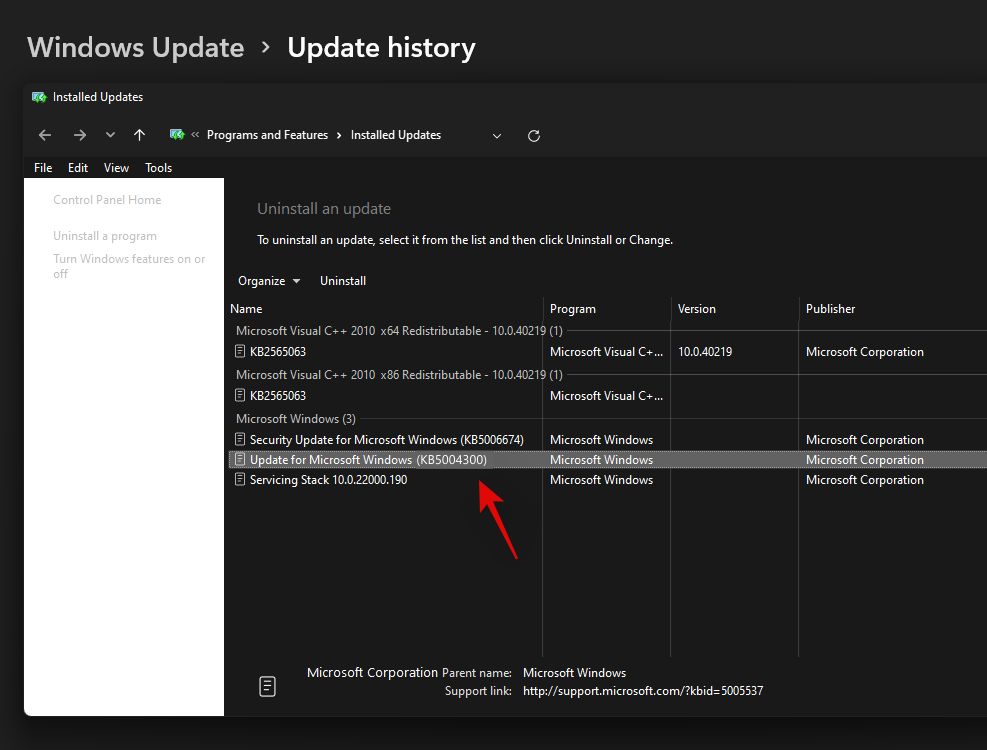
Тепер ви будете перенаправлені в Центр керування. Знайдіть відповідне оновлення KB5004300 у списку, натисніть і виберіть його.
Тепер натисніть «Видалити» вгорі.
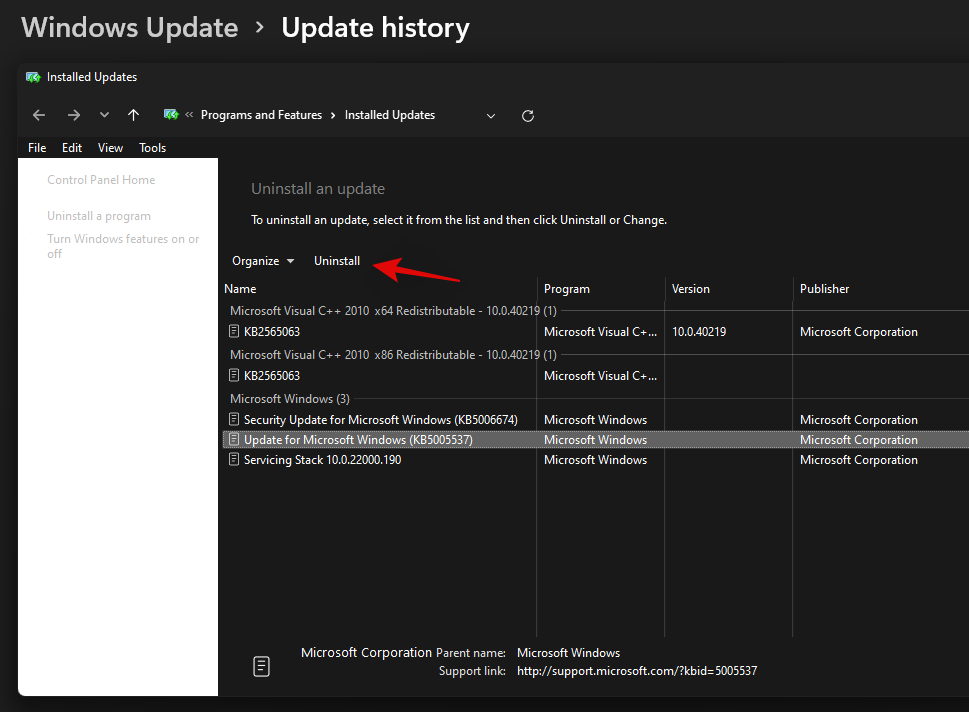
Дотримуйтесь інструкцій на екрані, щоб видалити оновлення зі свого ПК. Після оновлення перезавантажте комп’ютер для повної міри.
Тепер натисніть Windows + iзнову після перезавантаження комп’ютера та знову виберіть Windows Update.

Перевірте наявність оновлень, і тепер у вас буде можливість знову інсталювати Windows Update KB 5004300 на свій ПК.
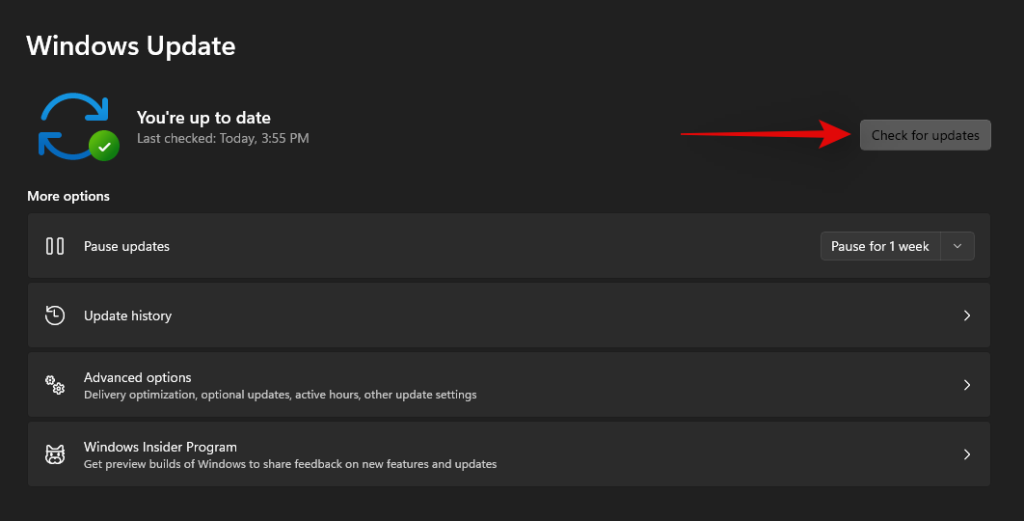
Завантажте та встановіть оновлення, а функції панелі завдань і меню «Пуск» тепер мають бути відновлені в Windows 11.
Виправлення №2: примусово перезапустити службу Iris
Нещодавнє оновлення інсайдерських збірок від Microsoft спричинило серйозні проблеми з панеллю завдань і меню «Пуск» у багатьох користувачів. Якщо ви теж підписалися на канал Insider і зіткнулися з проблемами під час оновлення до номеру збірки 22449 або вище, ви можете скористатися виправленням, зазначеним нижче.
Цей метод видалить значення реєстру для служби Iris, що має примусово перевстановити її після перезапуску. Перевстановлення, здається, допомагає вирішити цю проблему для більшості користувачів. Навіть якщо ви не використовуєте ті самі збірки, це виправлення варте спроби. Дотримуйтесь інструкції нижче, щоб почати.
Примітка. Ця команда негайно перезавантажить ваш ПК. Якщо у вас є якісь поточні роботи у фоновому режимі, переконайтеся, що ви зберегли їх, перш ніж продовжити роботу з цим посібником.
Натисніть Windows + S на клавіатурі та знайдіть CMD. Натисніть «Запуск від імені адміністратора» або натисніть Ctrl + Shift + Enter на клавіатурі.
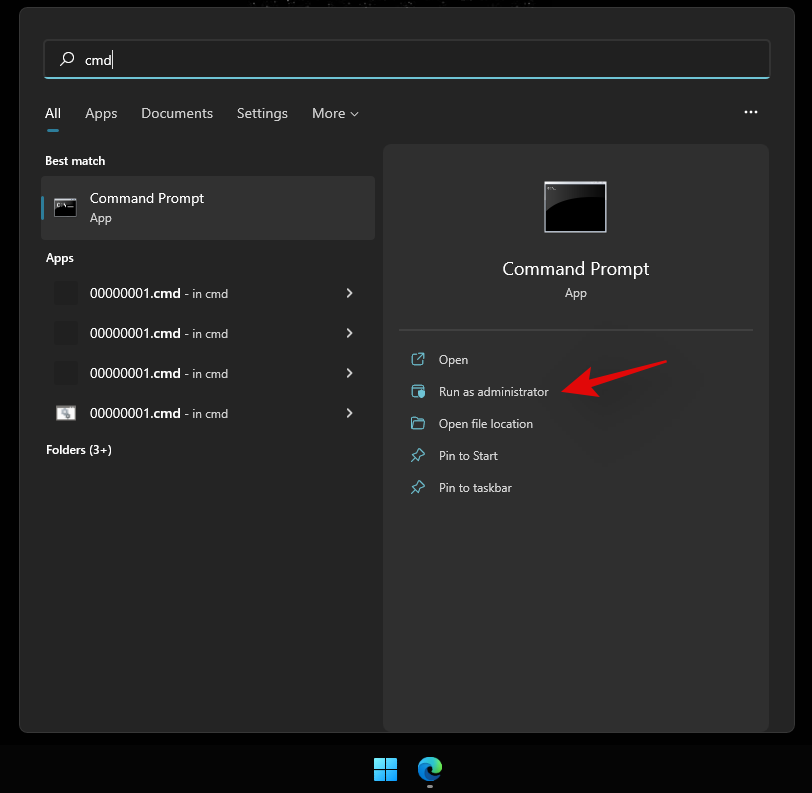
Введіть таку команду та натисніть Enter на клавіатурі.
reg delete HKCU\SOFTWARE\Microsoft\Windows\CurrentVersion\IrisService /f && shutdown -r -t 0

Тепер ваш комп’ютер перезавантажиться. Увійдіть у свій комп’ютер, як зазвичай, і функціональність меню «Пуск» тепер має бути відновлена у вашій системі.
Виправлення №3: перезавантажте ПК
Це, безумовно, найпростіший метод, який спадає на думку, намагаючись вирішити більшість проблем на ПК з Windows 11. Зазвичай, коли ви робите перезавантаження системи, ви, по суті, змушуєте всі процеси, включаючи Windows, перезапустити всі свої служби та процеси. Це також перезапускає процес меню «Пуск», що допоможе вирішити проблему з ним.
Якщо це неочевидно, ось кроки для перезавантаження ПК.
Переконайтеся, що всі ваші програми та файли закриті. Або просто перейдіть на екран робочого столу, натиснувши Windows key + D разом. Тепер натисніть Alt + F4 клавіші разом на клавіатурі, щоб отримати екран «Завершення роботи Windows».
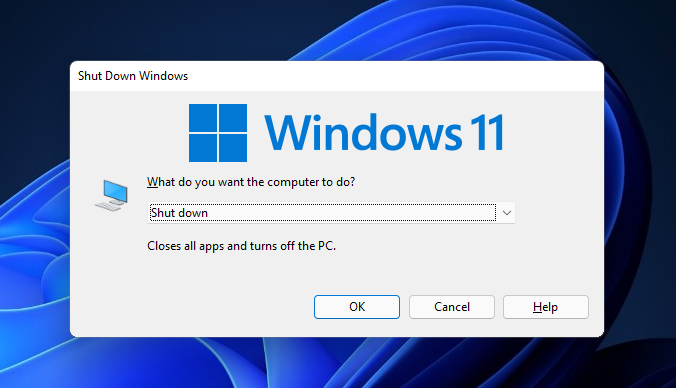
Натисніть на спадне меню, виберіть «Перезапустити» та натисніть кнопку «ОК».
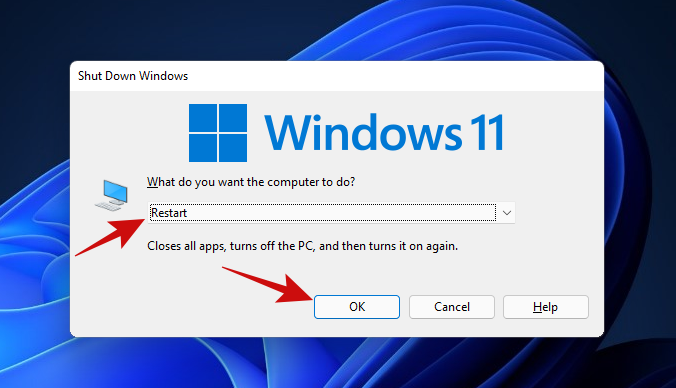
Після перезавантаження комп’ютера ви зможете знову використовувати меню «Пуск». Якщо ви все ще не можете, спробуйте наступний спосіб.
Виправлення №4: перезапустіть Провідник Windows за допомогою диспетчера завдань
Наступне просте виправлення замороженого меню «Пуск» використовує диспетчер завдань. Диспетчер завдань може бути ідеальним інструментом для керування будь-яким запущеним процесом на ПК з Windows.
Якщо у вас є меню «Пуск», яке не хоче реагувати на ваші кліки, виконайте наведені нижче дії, щоб перевірити, чи воно вирішує вашу проблему.
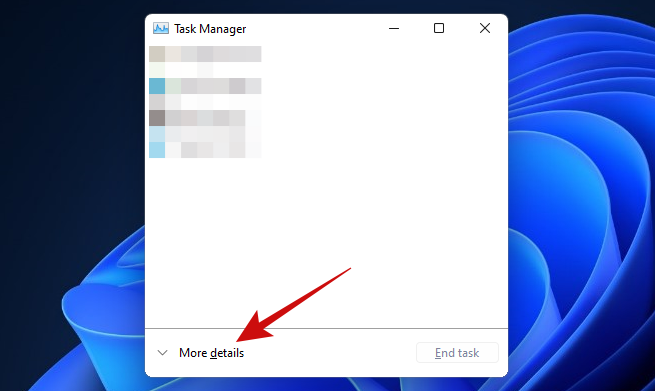
Натисніть Ctrl + Shift + Esc клавіші, щоб запустити диспетчер завдань. Якщо ваш диспетчер завдань виглядає так, натисніть кнопку «Докладніше», щоб отримати доступ до детального перегляду.
Потрапивши в Диспетчер завдань, прокрутіть список Процеси, щоб знайти процес «Провідник Windows». Клацніть правою кнопкою миші на процесі та виберіть опцію «Перезапустити».
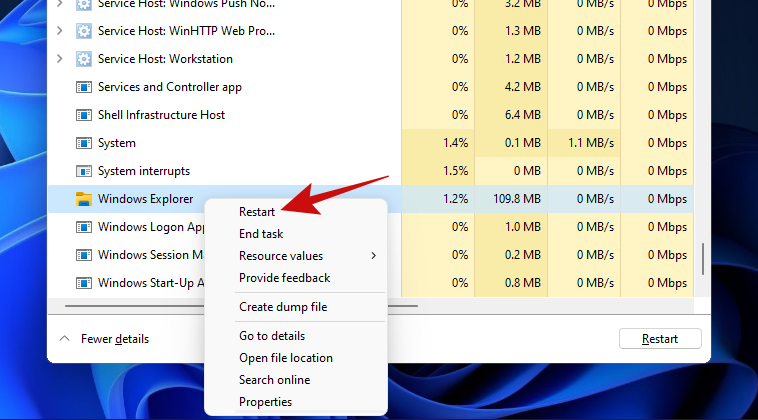
Після натискання Windows має миттєво перезапустити процес Провідника Windows, і це повинно виправити ваше меню «Пуск».
Перезапуск процесу Провідника Windows дуже схожий на перезавантаження ПК. Єдина відмінність полягає в тому, що тут ви перезапускаєте лише один процес, тоді як при перезапуску ви перезапускаєте всі процеси. Крім того, багато людей у минулому успішно виправляли своє меню «Пуск» за допомогою цього методу, тому варто спробувати.
Виправлення №5: Перевірте наявність оновлень для Windows
Якщо ви все ще не можете відкрити меню «Пуск», спробуйте Windows Update. Проблема може бути більш поширеною, ніж ви думаєте, і Microsoft, можливо, випустила виправлення, щоб виправити невідповідне меню «Пуск».
Ось як це можна зробити.
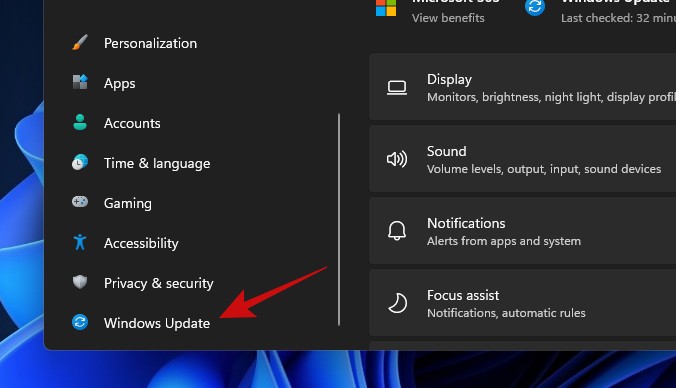
Відкрийте програму Налаштування Win key + i разом із клавішами. Після відкриття натисніть опцію «Оновлення Windows».
Натисніть велику кнопку «Перевірити наявність оновлень», щоб почати перевірку доступних оновлень Windows для вашого ПК. Якщо доступно, дозвольте Windows встановити всі оновлення.
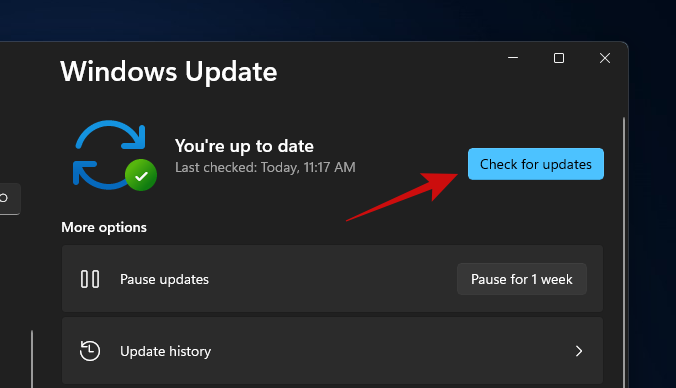
Коли Windows завершить оновлення комп’ютера, просто перезапустіть його та спробуйте відкрити меню «Пуск». Якщо ви все ще не можете відкрити меню «Пуск», ми вважаємо, що настав час скористатися більш розширеними виправленнями.
Виправлення №6: запустіть DISM і SFC
DISM (Обслуговування та керування образами розгортання) і SFC (Перевірка системних файлів) є двома найпотужнішими інструментами для виявлення та відновлення пошкоджених інсталяцій Windows. Ці інструменти можна використовувати з командним рядком або Windows PowerShell. У цьому посібнику ми будемо використовувати їх із командним рядком.
Почнемо з DISM. DISM можна використовувати для отримання нових копій пошкоджених файлів Windows.
Натисніть, Win key + r щоб відкрити вікно «Виконати», введіть cmd, а потім натисніть Ctrl + Shift + Enter разом (замість натискання enter), щоб відкрити командний рядок з підвищеними привілеями.
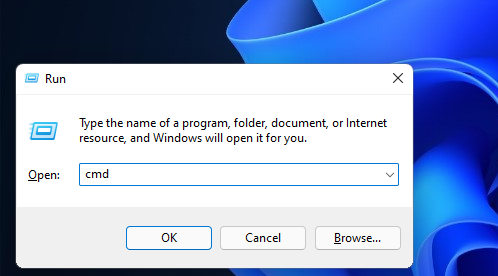
Коли ви перебуваєте в командному рядку, вставте наведений нижче код і натисніть Enter.
DISM /Online /Cleanup-Image /RestoreHealth
Тепер DISM спробує відновити пошкоджені файли (якщо такі є) з поточної інсталяції, запитуючи нову копію цього файлу з оновлення Windows. Весь процес займе приблизно 15-20 хвилин. Ось як команда виглядає в дії.
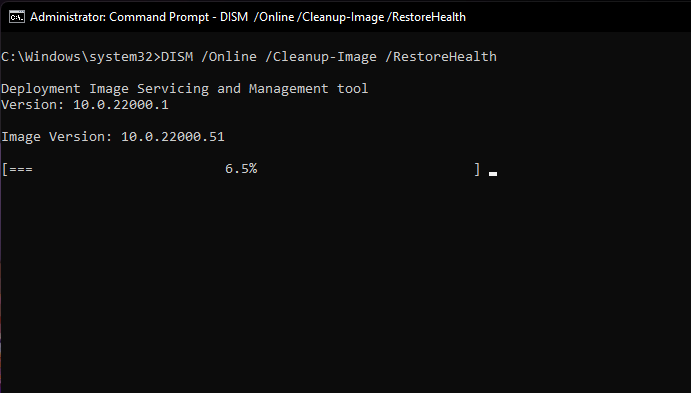
Після того, як команда відновить усі пошкоджені файли, ви побачите щось подібне.
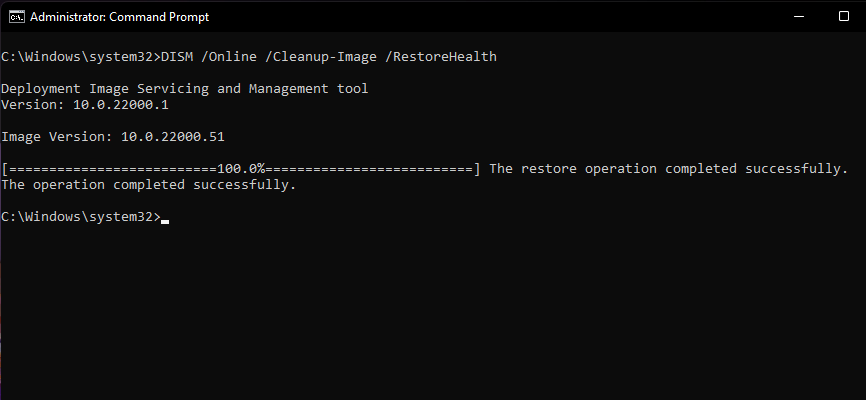
Після завершення цього кроку залиште вікно командного рядка відкритим, щоб запустити наступну команду.
Наступним кроком є перевірка цілісності всіх ваших файлів Windows 11, щоб переконатися, що вони в хорошому стані. Для цього ми скористаємося інструментом SFC.
Ось як.
Вставте наведений нижче код у вікно командного рядка та натисніть Enter.
sfc /scannow
Ось як виглядає команда.
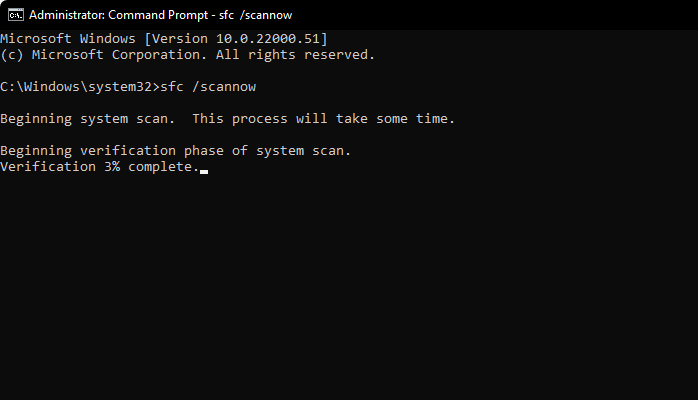
Наведена вище команда займе лише кілька хвилин, щоб завершити сканування цілісності ваших файлів Windows. Після цього результат повинен виглядати так.
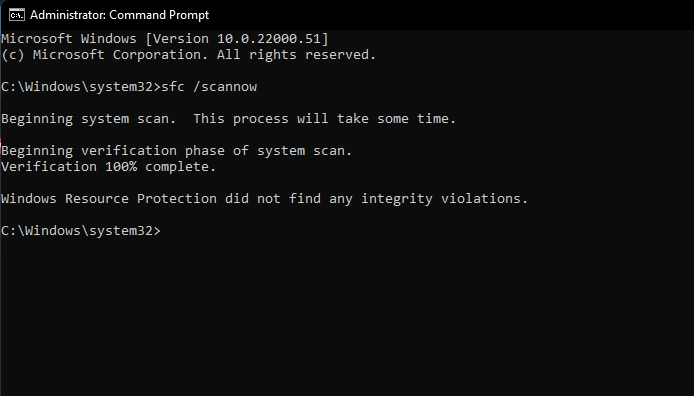
Порада. Щоб цей метод працював, переконайтеся, що ваш комп’ютер має стабільне інтернет-з’єднання.
Тепер настав час для перезавантаження.
Все ще застряг із зламаним меню «Пуск», настав час спробувати наступний метод.
Пов’язано: 6 способів оновити драйвери в Windows 11
Виправлення № 7: перебудувати індекс пошуку
Меню «Пуск» і пошук Windows тісно інтегровані. Проблеми з пошуком та індексуванням могли потрапити в меню «Пуск» і вплинути на нього. Отже, виключимо і цю можливість.
Давайте розглянемо кроки для цього.
Відкрийте вікно Виконати, натиснувши Win key + r. Потім вставте наведений нижче текст у поле Виконати та натисніть клавішу Enter.
control /name Microsoft.IndexingOptions
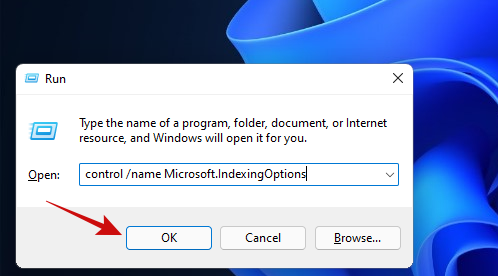
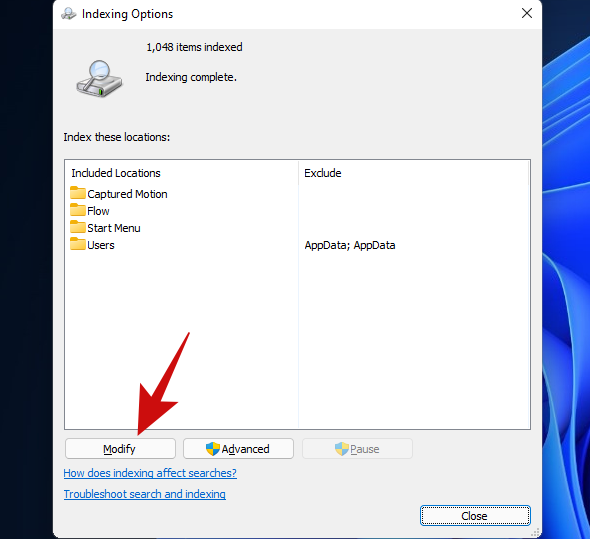
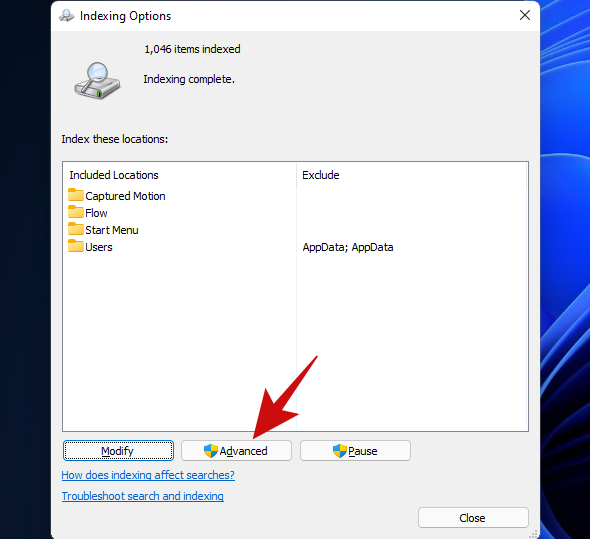
Ви повинні побачити спливаюче вікно під назвою «Параметри індексування». Натисніть кнопку «Змінити».
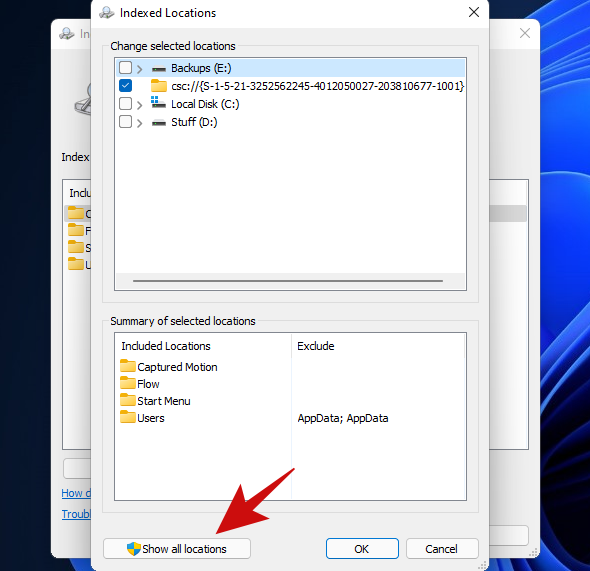
Натисніть кнопку «Показати всі місця».
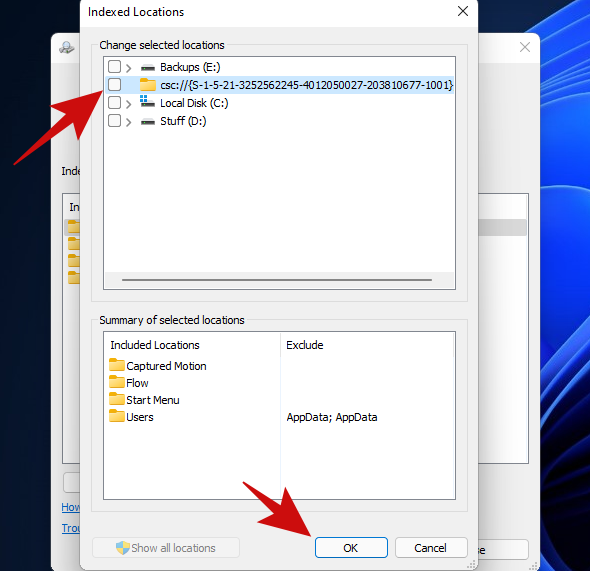
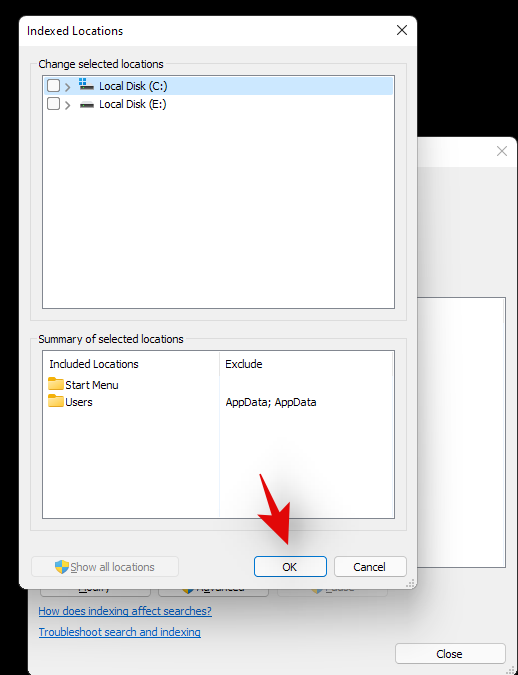
На цьому екрані зніміть прапорці з усіх місць і натисніть кнопку «ОК». У нас було позначено лише одне місцеположення, тому ми зняли галочку лише з одного місця в цьому списку.
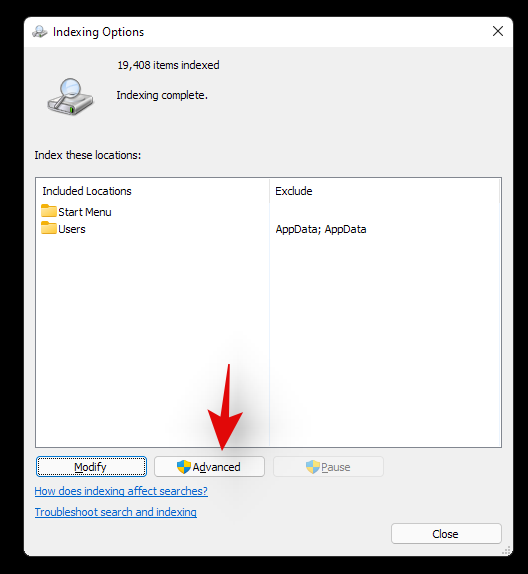
Натисніть кнопку «Додатково».
Натисніть кнопку «Відновити».
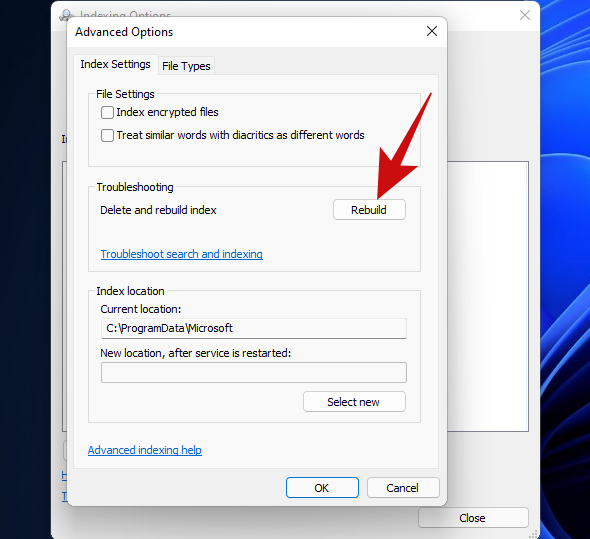
Тепер Windows почне відновлювати індекс пошуку. Будьте впевнені, весь процес тепер буде оброблятися Windows і насправді не вимагає жодного введення користувача, хоча для його завершення потрібно досить багато часу.
Коли Windows відновить пошуковий індекс, перезавантажте комп’ютер. Коли ви знову потрапите в Windows, спробуйте відкрити меню «Пуск». Якщо це все одно не працює, ми вважаємо, що настав час вибрати більш стійкий метод.
Якщо ви встановили будь-які сторонні програми, щоб змінити вигляд або функції вашого меню «Пуск», ми рекомендуємо видалити всі такі програми. Ймовірно, одна з цих програм не сумісна з новим меню «Пуск» Windows 11, тому у вас виникають проблеми з вашою системою. Якщо у вас є одна з наведених нижче програм, ми рекомендуємо вам повернути їх налаштування та видалити їх якомога швидше. Більшість із цих програм були розроблені для Windows 10 і певною мірою несумісні з кодом меню «Пуск» Windows 11. Нещодавнє оновлення Windows 11, ймовірно, порушило їх сумісність, що спричинило збій у меню «Пуск» у вашій системі.
І більше. Якщо видалення програми стороннього розробника, яка змінює ваше меню «Пуск», допомагає відновити його функціональність, ви можете дочекатися сумісного оновлення, щоб знову використовувати програму.
Чи використовували ви злом реєстру, щоб отримати старе меню «Пуск» Windows 10 у Windows 11? Якщо так, то, швидше за все, функціональність цього злому реєстру зламалася з недавнім оновленням Windows 11. У таких випадках ви можете скористатися наведеним нижче посібником, щоб скасувати зміни у вашій системі.
Натисніть Windows + R на клавіатурі та введіть наступне в діалоговому вікні «Виконати».
regedit

Після завершення натисніть Enter на клавіатурі, щоб запустити редактор реєстру. Натомість ви також можете натиснути «Ок».
Тепер скопіюйте та вставте вказану нижче адресу в адресний рядок у верхній частині редактора реєстру та натисніть «Enter» на клавіатурі.
Computer\HKEY_CURRENT_USER\Software\Microsoft\Windows\CurrentVersion\Explorer\Advanced
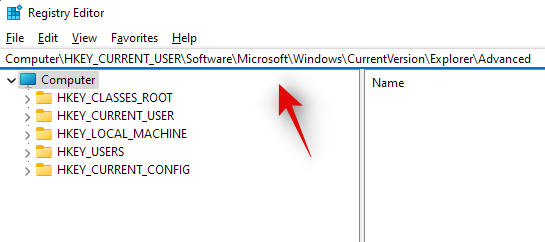
Look for ‘Show_StartClassicMode’ on your right and right-click on it.

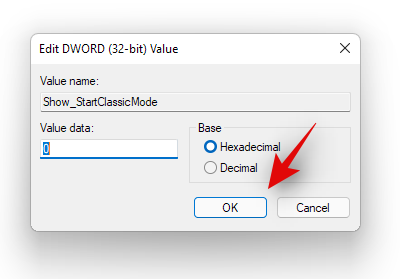
Select ‘Modify’.

Change its value data to ‘0’ and click on ‘Ok’. Do not close the registry editor just yet.
Press Ctrl + Shift + Esc on your keyboard to launch the Task Manager. Now click and switch to the ‘Details’ tab at the top.
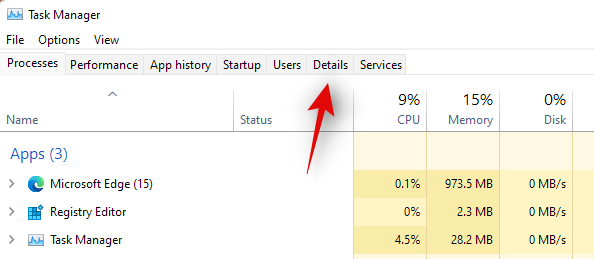
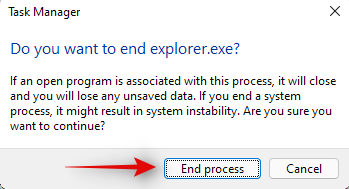
Click and select Explorrer.exe from the list and press Delete on your keyboard.

Confirm your choice by clicking on ‘End Process’.
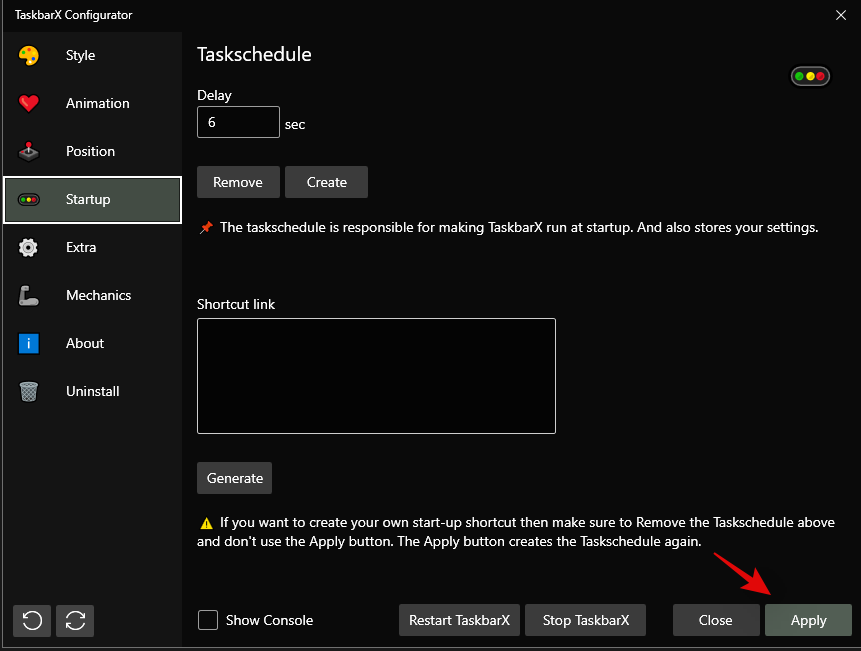
Now click on ‘File’ in the top left corner and select ‘Run new task’.
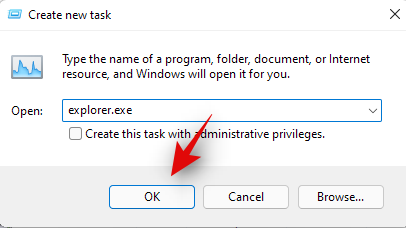
Type in ‘Explorer.exe’ and press Enter on your keyboard. You can also click on ‘Ok’ instead.
Explorer will now be restarted on your system. Switch back to the registry editor and click and select ‘Start_ShowClassicMode’.
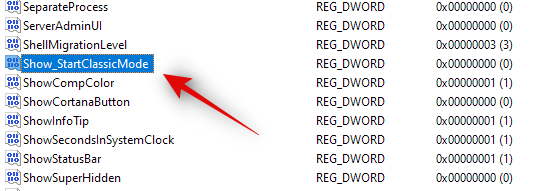
Press Delete on your keyboard and confirm your choice to delete the registry value.

Restart your system for good measure now.
If your Start menu wasn’t working due to a registry hack to get the older start menu then it should be fixed by now. You can check for the same by clicking on the Start menu icon in your taskbar.
Windows 11 has come a long way when compared to its predecessors. Background processes, tasks, and apps are more streamlined now and various features and elements seem to have their own dedicated packages. These dedicated packages make it easier for you to troubleshoot problems with certain features of Windows and even reinstall them in worst-case scenarios. If the start menu is still not working for you then you can reinstall basic elements of Windows 11 which will also reinstall the Start menu module on your system. This should help fix any background conflicts and get the Start menu back up and running on your system. Follow the guide below to get you started.
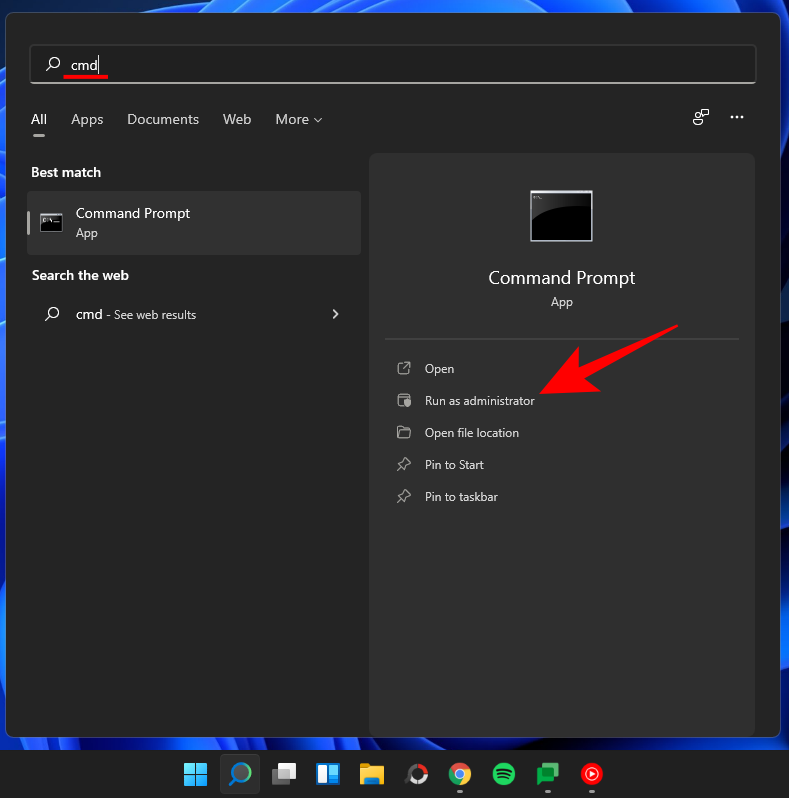
Press Windows + S on your keyboard and search for PowerShell. Click on ‘Run as administrator’ once the app shows up in your search results.
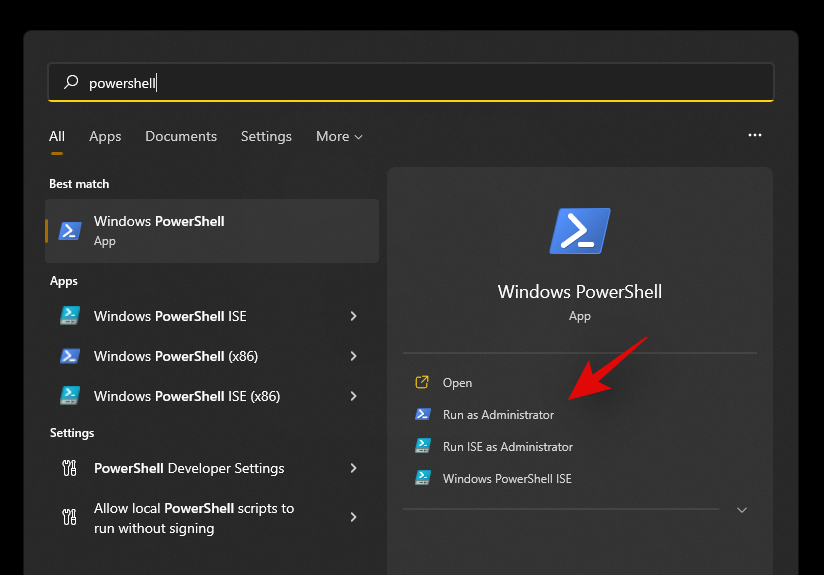
Now type in the following command and press ‘Enter’ on your keyboard.
Get-appxpackage -all *shellexperience* -packagetype bundle |% {add-appxpackage -register -disabledevelopmentmode ($_.installlocation + “\appxmetadata\appxbundlemanifest.xml”)}

Ignore any warnings that you get and continue with the process. Once complete, restart your system for good measure.
Now that the Start menu and other basic features have been reinstalled on your system, let’s rebuild your system’s index to get everything back up and running again. Press Windows + R on your keyboard to open the Run dialog box.
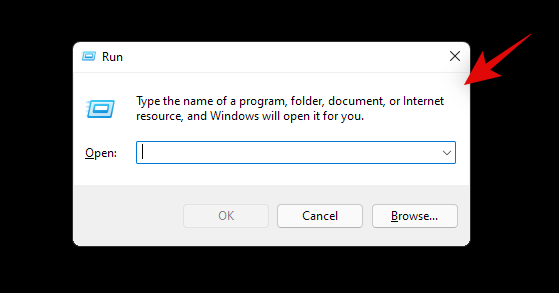
Type in the following command and press Enter on your keyboard.
control /name Microsoft.IndexingOptions
Click on ‘Modify’ and select ‘Show all locations’.
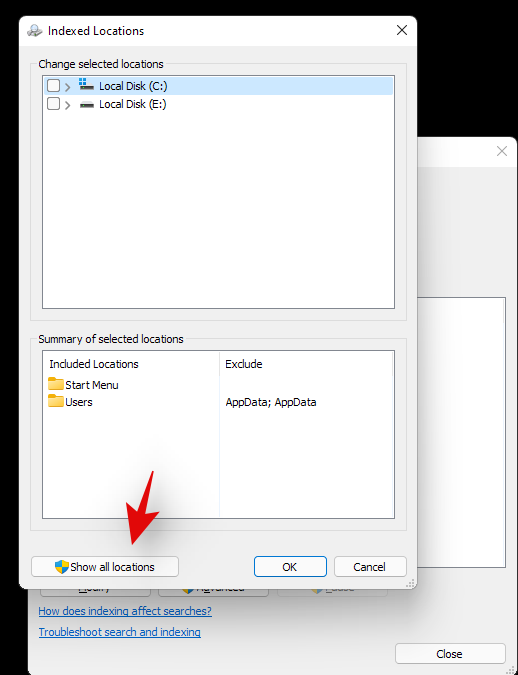
Uncheck all the boxes in the current list.
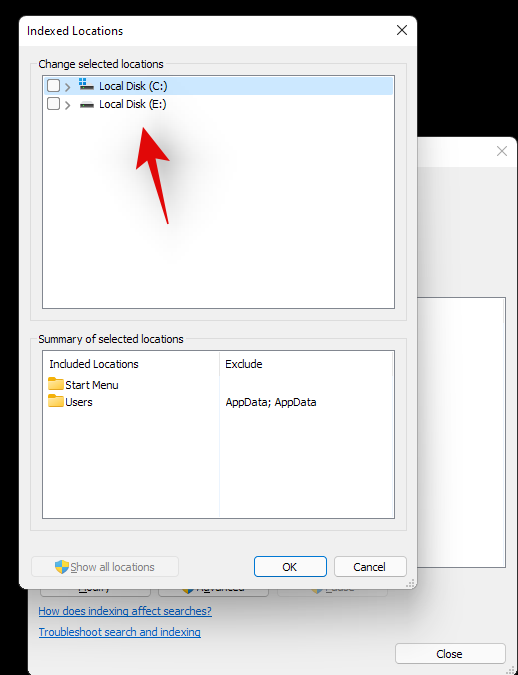
Click on ‘Ok’.
Click on ‘Advanced’ now.
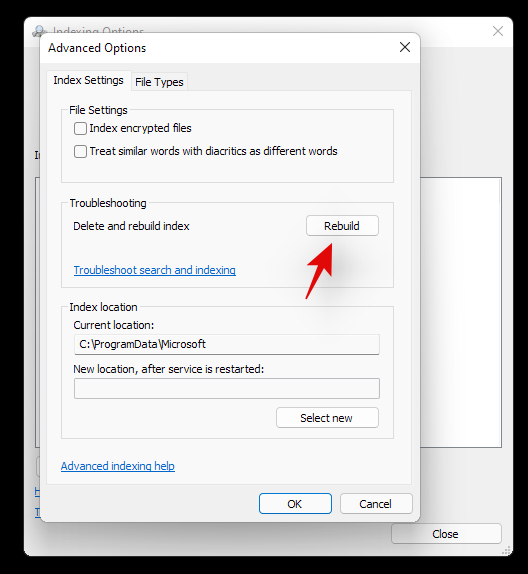
Select ‘Rebuild’ under troubleshooting.
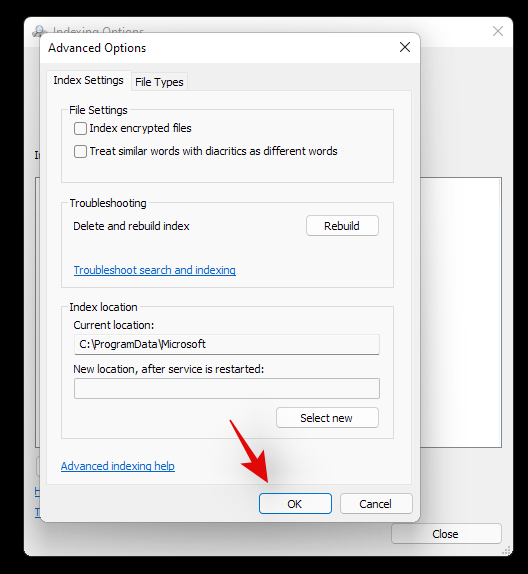
Click on ‘Ok’ once the warning pops up on your screen.
Once the process finishes, we highly recommend you restart your system.
You can now try clicking on the Start icon once your system restarts. Reinstalling the Start menu should help fix any issues with the Start menu on most systems.
Fix #11: Install any pending driver and Windows updates
This might be a bit obvious but you should definitely install any pending driver updates or Windows update on your system. This will help get you up and running on the latest drivers and help your system be compatible with all the hardware installed on your system. While drivers rarely cause issues with Windows features, you can never be too sure. Hence we recommend you install the latest available drivers on your system. You can use the link below to go to our detailed guide for updating drivers on Windows 11. If you are using a pre-built system or a laptop, then we recommend checking your OEM support page for dedicated driver updates as well.
There is a registry value that if modified, can disable your Start menu altogether. If you have been using registry modifiers, cleaners, and more, then it is likely that this registry value was modified which ended up disabling the Start menu on your system. Additionally, the Start menu’s functionality was moved to a Xaml process once Windows 10 was released. This process is known to glitch out
Use the guide below to check if the start menu is disabled on your system and re-enable it if needed.
Press Windows + R on your keyboard and type in the following command given below.
regedit
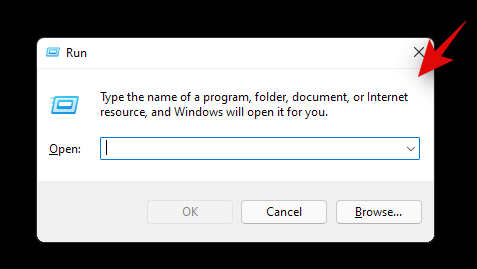
Now press Enter on your keyboard or click on ‘Ok’.
Copy and paste the following address in the address bar at the top of your registry editor.
HKEY_CURRENT_USER\Software\Microsoft\Windows\CurrentVersion\Explorer\Advanced
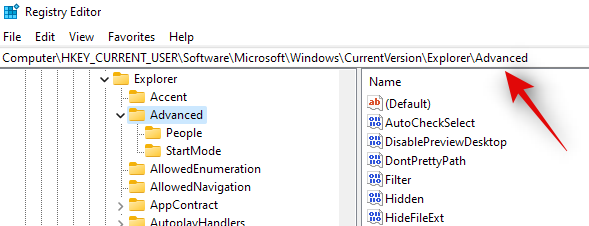
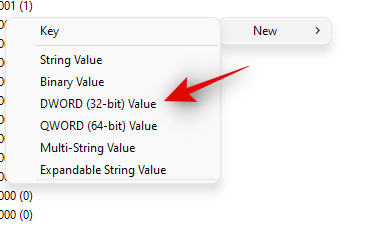
Now right-click on your right tab and select ‘New’.
Select ‘DWORD (32-bit value)’.
Enter the name as ‘EnableXamlStartMenu’.
Enter the value as ‘0’.
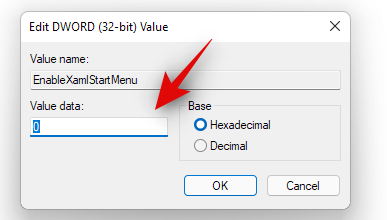
Restart your PC now.
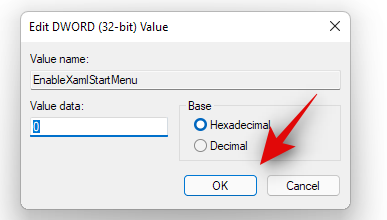
Once restarted try activating the Start menu now. If the Xaml process was facing conflicts, then they should be fixed now and the Start menu should be back up and running on your system again.
Fix #13: Restart Windows background services
If the Start menu still fails to launch then it’s time to restart all background Windows services. Usually restarting the ‘ShellExperienceHost.exe’ is enough but if that does not work for you, you can try restarting all the services listed below. This usually gets the Start menu back up and running on most systems.
Press Ctrl + Shift + Esc on your keyboard to open the ‘Task Manager’. Now click on ‘Details’ at the top to switch to the Details tab.
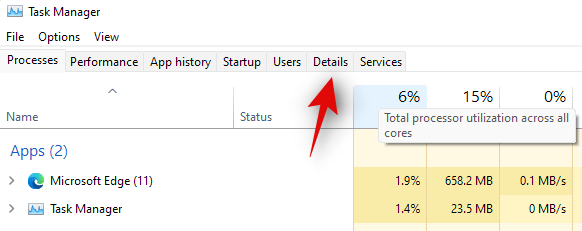
Find ‘StartMenuExperienceHost.exe’ in the list and click and select it.

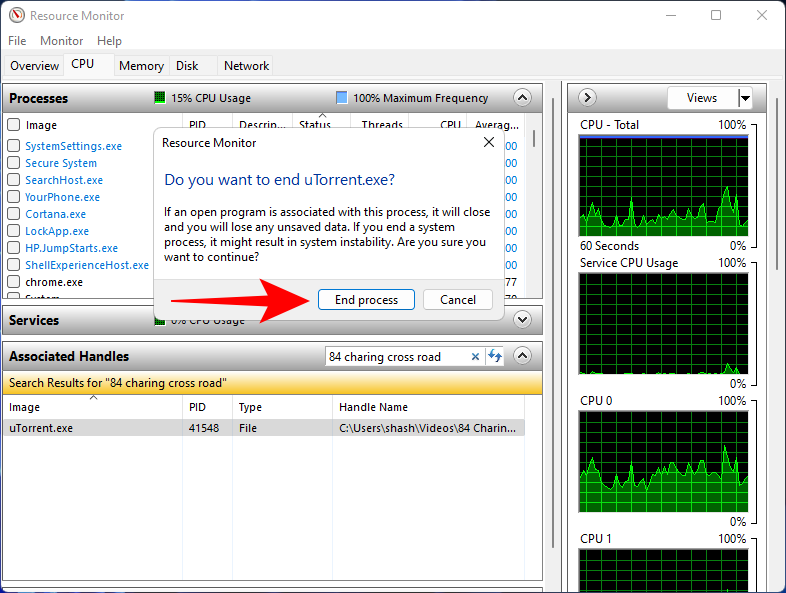
Press Delete on your keyboard or click on ‘End Task’ in the bottom right corner. Click on ‘End Process’ again to confirm your choice.
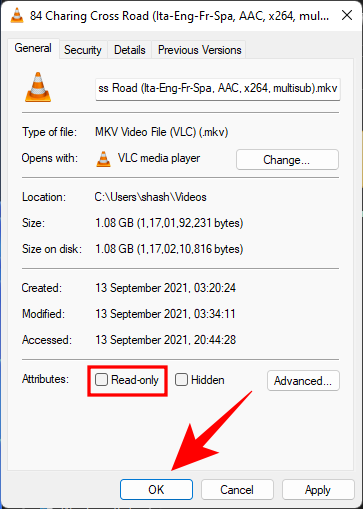
ShellExperienceHost.exe will now be killed. The process should automatically restart within a few seconds. Once restarted, try activating the Start menu on your system. If the menu starts working then you are good to go. However, if it is still not working then use the guide above to restart the following services on your system as well.
And that’s it! If a background process was stopping you from accessing the Start menu then the issue should be fixed for you by now.
Fix #14: Run a Windows Troubleshooter
During a Windows 1909 feature update back in 2019, the Start menu was essentially broken due to a background conflict. To fix this issue for the masses, a troubleshooter was released by Microsoft to help fix this issue. If the Start menu is still not working for you then you can try running this troubleshooter on your system. Use the guide below to download and run the troubleshooter on your system.
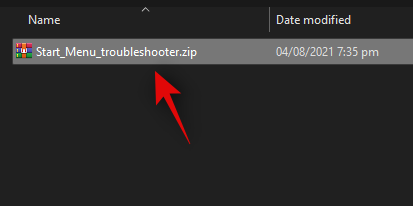
Download the archive linked above to a convenient location on your local storage and extract its contents.
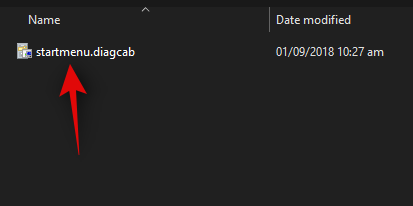
Now copy and paste the ‘startmenu.diagcab’ file on your desktop.
Double click and run the file from your desktop. Click on ‘Advanced’.
Check the box for ‘Apply repairs automatically’. Click on ‘Next’ once you are done.
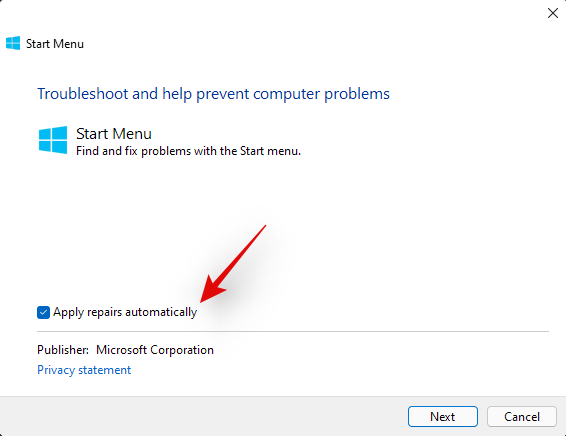
The troubleshooter will now do its thing and try to fix the Start menu on your system. Any errors or issues found will be automatically fixed and the Start menu’s functionality should now be restored on your system.
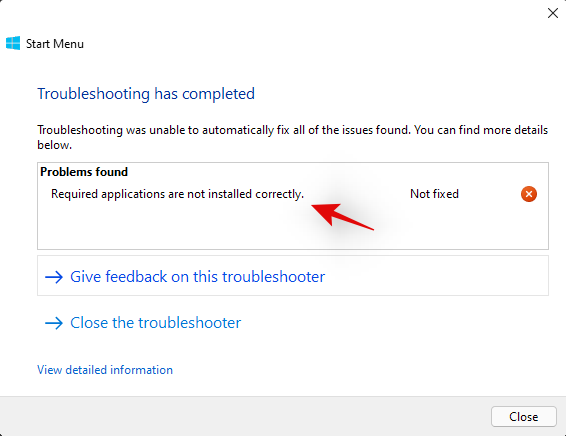
However, if the troubleshooter fails to fix the Start menu then this might indicate a more serious issue on your system. In such cases, let’s verify if Windows is actually able to access and initiate the process for the Start menu on your system. Use the checks below to help you along with the process.
We now need to check if the Start menu is actually available within your install of Windows 11. Let’s create a new local account that will help you verify its functionality. If the Start menu is working in the new account then it is likely an issue with your current user account.
Press Windows + i on your keyboard and click on ‘Accounts’ on your left.
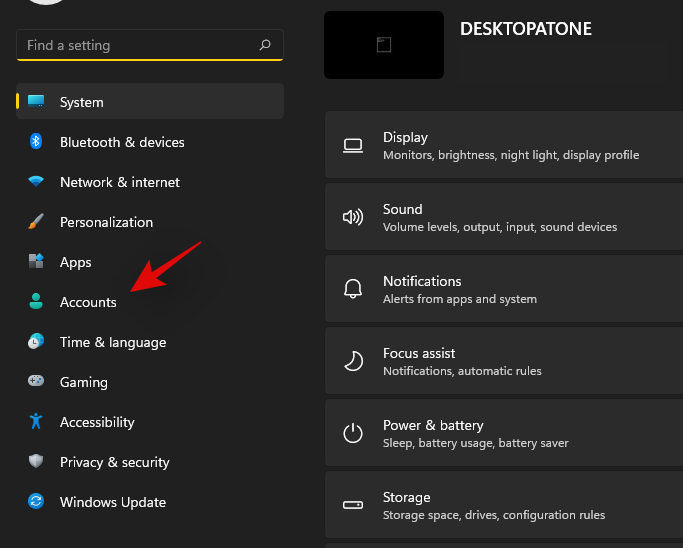
Click on ‘Family & other users’.
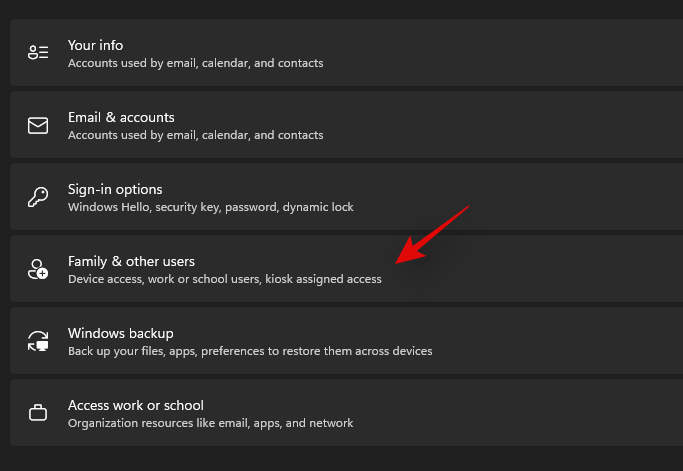
Now click on ‘Add account’ under other users.

Click on ‘I don’t have this person’s sign-in information’.
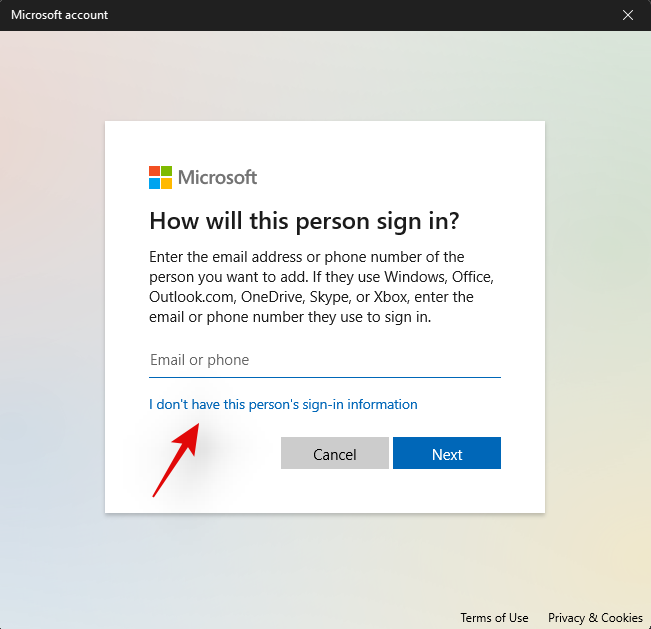
Click on ‘Add a user without a Microsoft Account’.
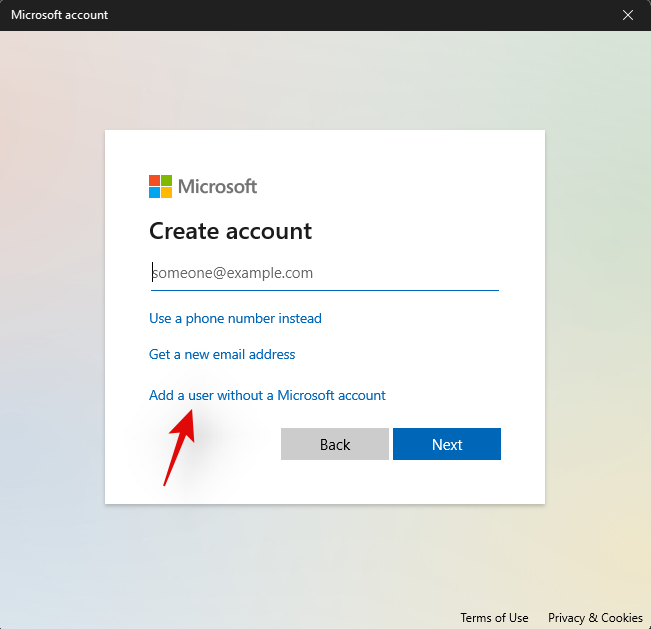
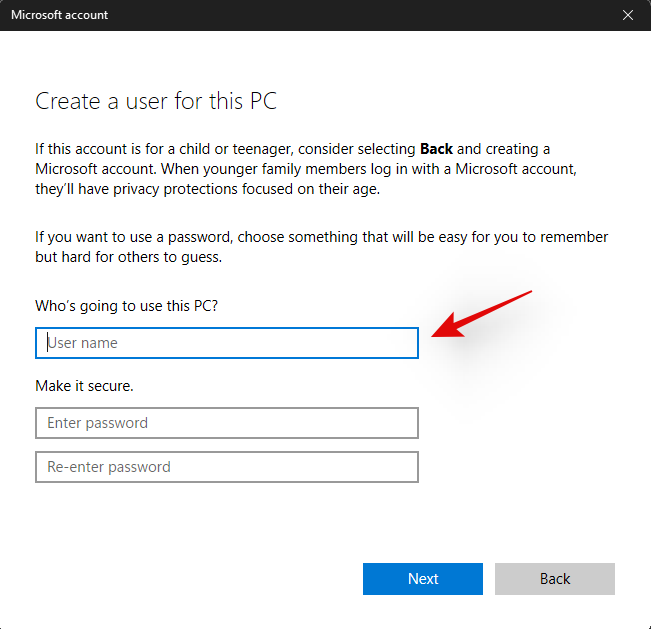
Now enter a username for the new account, and a password if needed.
Click on ‘Next’ once you are done.
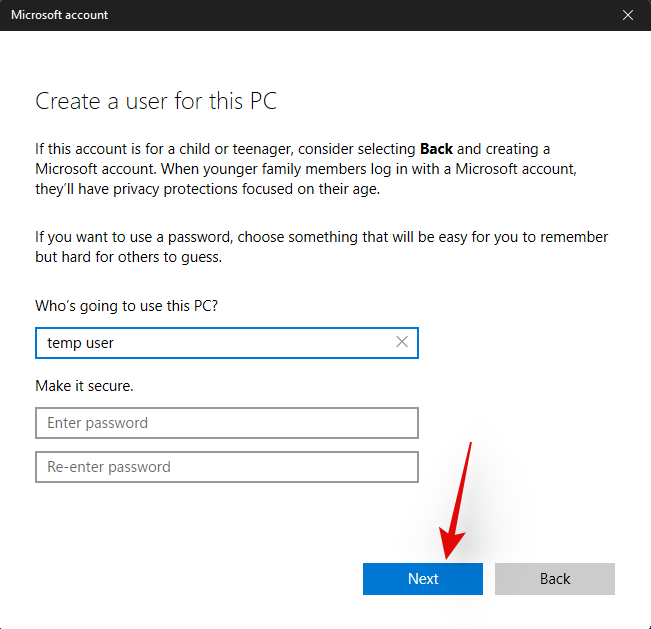
The new user account will now be created. Sign out of your current account and sign in to the new account.
Try to activate the Start menu now in the new temporary local account. If it is working then this is an issue specific to your user account. However, in case the Start menu fails to open, then this might indicate a more serious issue with your Windows 11 installation.
It’s now time to check if the Start menu is working in Safe mode. In case it is, then a third-party app is likely interfering with the Start menu’s functionality. You can remove any third-party apps used to modify the Start menu to try and fix this issue. Follow the guide below to activate Safe mode on Windows 11.
Press Windows + i on your keyboard and select ‘Windows Update’.
Now click on ‘Advanced options’.
Click and select ‘Recovery’.
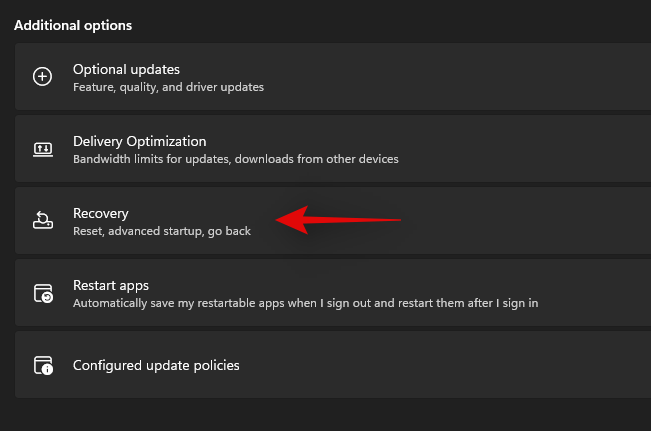
Now click on ‘Restart now’ beside ‘Advanced startup’.

Click on ‘Restart now’ again.
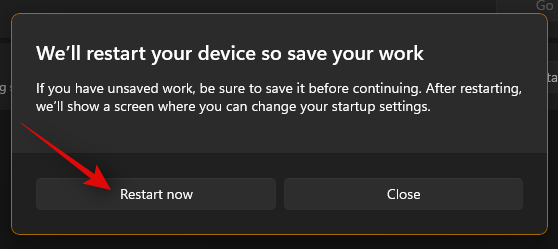
Your PC will now restart to the recovery screen. Click and select ‘Troubleshoot’.
Now click on ‘Advanced options’.
Click on ‘Startup Settings’.
Press ‘F4’ to start your PC in safe mode now.
Once your PC restarts, the safe mode should be active on your system. Now try to activate the start menu. If the menu activates, then it is likely that a third-party app is causing issues on your Windows 11 system. You can try removing apps used to customize the Start menu one by one to find the culprit on your system.
Fix #17: Run a malware and antivirus scan
We recommend you try and run a malware scan before opting for the last resort. If any malware or malicious service is causing issues with the Start menu, then a scan will help solve these issues. Use the guide below to run a malware scan through Windows Defender.
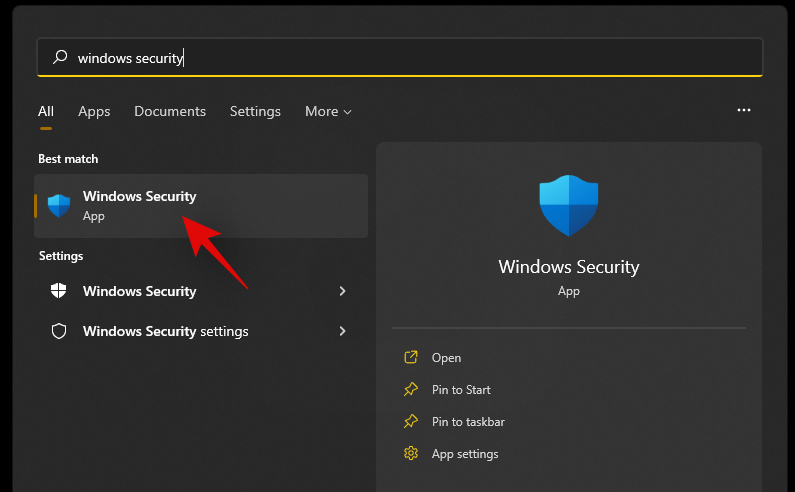
Press Windows + S on your keyboard and search for ‘Windows Security’. Click and launch the app once it shows up in your search results.
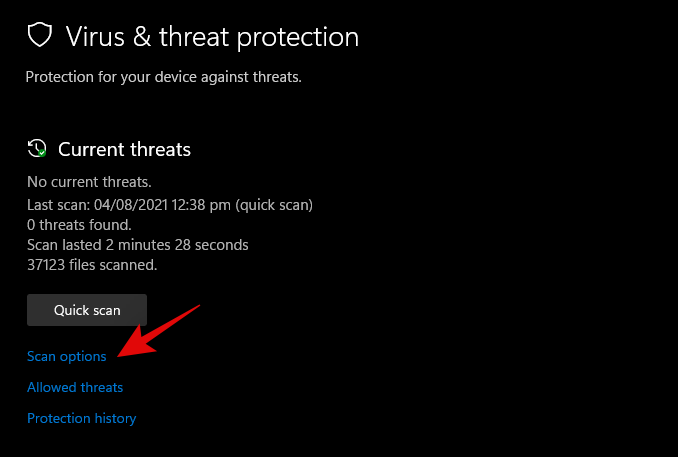
Click on ‘Virus & threat protection’.
Click on ‘Scan options’.
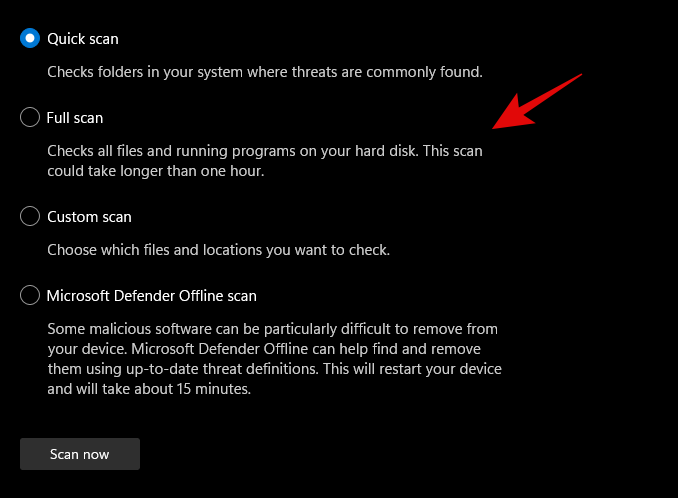
Select ‘Full Scan’.
Finally, click on ‘Scan now’.
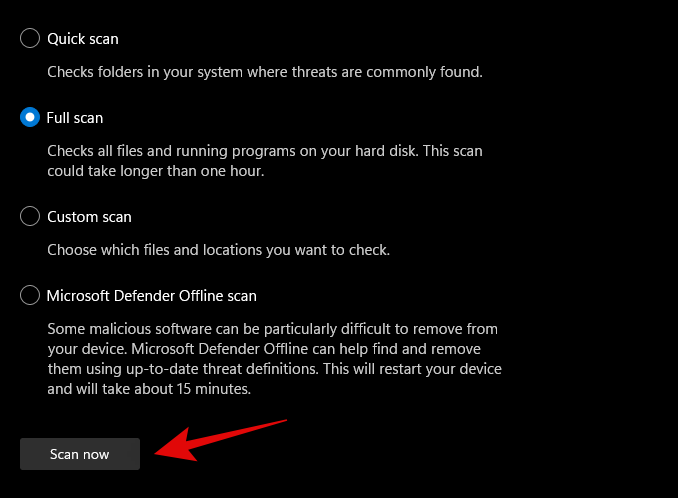
Windows Defender will now scan your entire PC for malware and malicious software. In case any are found, they will be automatically quarantined, and you will be prompted to take the necessary action as soon as possible.
3 General Fixes: Last Resort options
Fix #18: Create a new user via command prompt
If you’re facing an issue where you’re unable to add a local account via Settings to your PC then you can use the command prompt (CMD) for the same. Once added you can try and check if the Start menu is working for you. If it is, you can try the fixes below to restore it in your original account. However, if none of the fixes work for you then you can use the newly created account instead. The new account will be created with administrator privileges so you shouldn’t have problems moving your files and Settings. More on this below.
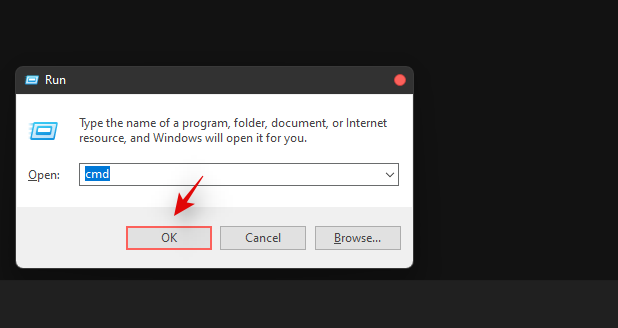
Press Windows + R to bring up the Run dialog box and type in the following. Press Ctrl + Shift + Enter on your keyboard once you are done.
cmd
Type in the following command and press Enter on your keyboard. Replace ‘USER’ with your desired username for the new account. Similarly, replace ‘PASSWORD’ with your desired password.
net user /add USER PASSWORD
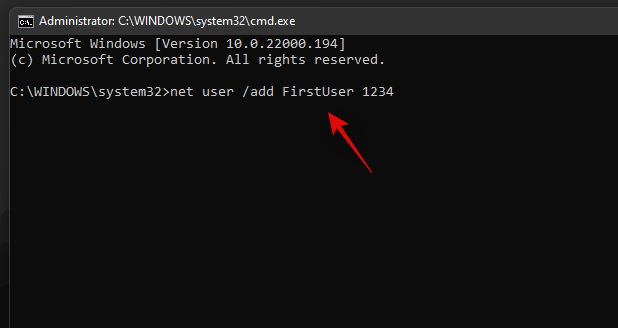
Now execute the following command as well and use the same username as above.
net localgroup administrators USER /add
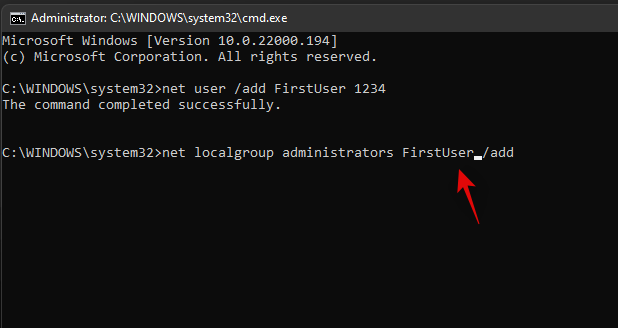
The user will now be added to your PC. Simply restart and log into the new account when the PC restarts.
The start menu should work alright now in the new user account. You can copy your files from the old user account to the new account.
To find your data in the old user account, open Windows Explorer and go to the User folder under the C Drive (or whichever drive you have installed Windows in).
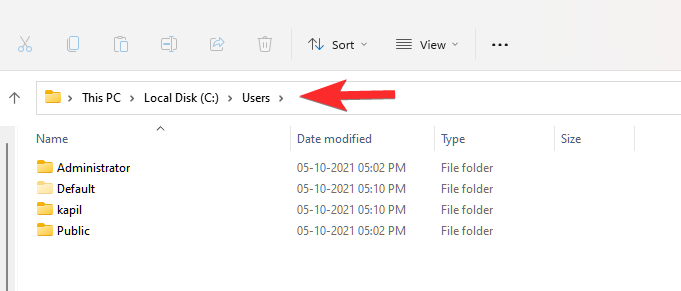
Click on the old user account. Now, copy all the files from here to your new user account that you can also find in the Users folder.
An easy method to transfer files from one user account (old one) to another user account (new one) is to copy the profile. Read more about it here.
Fix #19: Perform a Windows Reset
If you had zero luck with all of the previous methods, we think you should try a Windows Reset. It has been known to solve a host of problems in Windows 11 while keeping your personal files intact. Moreover, resetting Windows to its factory settings can give your PC a fresh start.
Here are the steps.
For this method, you’ll need an elevated PowerShell instance.
Press Win key + r to open the Run box, then type in ‘PowerShell and press Ctrl + Shift + Enter to open PowerShell as administrator.
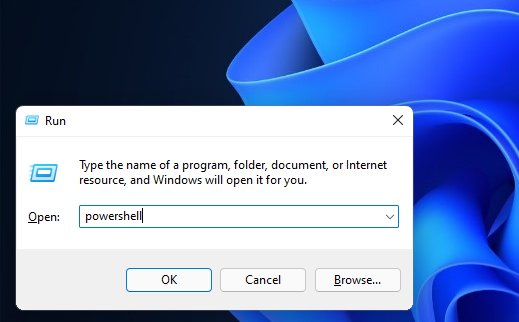
When opened correctly, you should already be inside the C:\Windows\system32 folder.
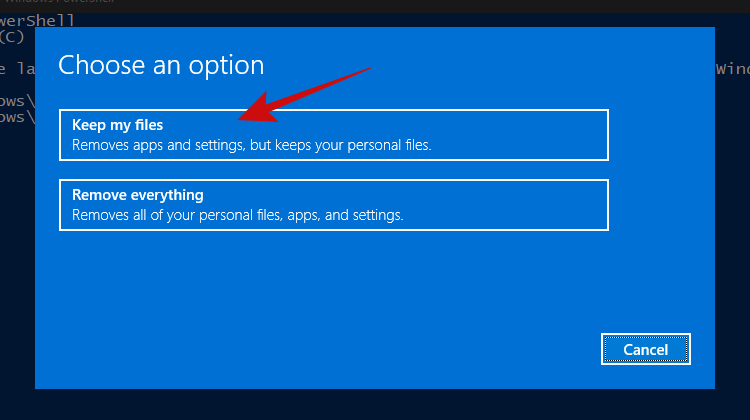
Now type in ‘system reset and press enter. You should be presented with two options, to either keep all your files or to remove everything. Click on ‘Keep my files’.
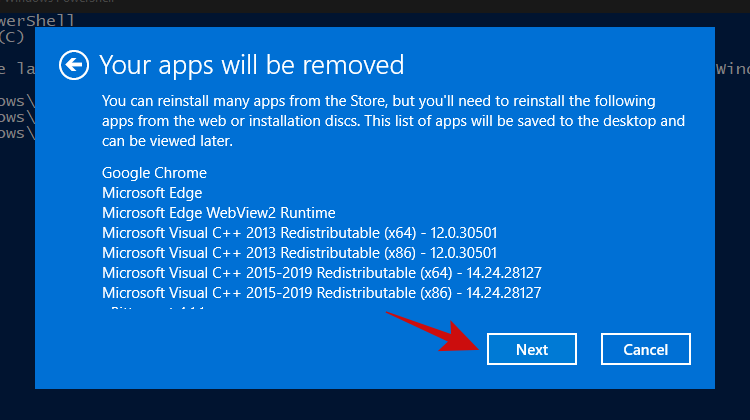
Within a few minutes, Windows should give you a list of apps that’ll be removed from your PC after the reset. Here’s how our list looks.
Once you’ve scrolled through the list of apps, simply click on the ‘Next’ button.
Windows should now start the reset process. Simply follow the instructions and your PC should be reset within a couple of minutes. The Start menu should be working now.
Fix #20: Re-install Windows from scratch
Well, if you’re really considering this method, it’s safe to assume that none of the other methods worked for you. At this point, we think it’s now time to go for a clean installation of Windows 11, which will probably wipe your current Windows partition (if you choose to).
Note: Before proceeding with this method, we recommend making a complete backup of all your files stored inside folders on the Windows drive, such as in Downloads, Documents, and the likes.
Once you have backed up all your files from the Windows drive, let’s take a look at the things you’ll need.
Next, follow our guide on downloading and installing the Windows 11 ISO.
Read: How to Download and Install Official Windows 11 ISO
We hope that after following this guide, you were able to fix the annoying and unresponsive Start menu in Windows 11 and bring it back to life.
If you find yourself stuck at any point in this guide, let us know in the comments below.
Related:
Оновлення драйверів у Windows 11 є важливим процесом для виправлення помилок та покращення сумісності пристроїв. Дізнайтеся, як це зробити ефективно.
На жаль, пісочниця Minecraft від Mojang відома проблемами з пошкодженими світами. Прочитайте наш посібник, щоб дізнатися, як відновити ваш світ та уникнути втрати прогресу.
Якщо ваша камера Zoom перевернута, ви можете скористатися опцією «Повернути на 90°» для правильного відображення. Дізнайтеся більше про налаштування відео Zoom.
Прочитайте цей посібник, щоб дізнатися, чому ви отримуєте повідомлення про помилку. Наразі ви не маєте права зареєструватися в Zoom і як це можна виправити.
Якщо Windows Search використовує надзвичайно високі ресурси ЦП або диска, ви можете скористатися наведеними нижче способами усунення несправностей у Windows 11. Методи вирішення проблеми включають простіші методи…
20 лютого 2021 року: Google заблокував усі розширення Meet, які допомагали у перегляді сітки, включно з переліченими нижче. Ці розширення більше не працюють, і, здається, єдиною альтернативою є…
Єдиний екран, якого користувачі Windows колективно бояться, це блакитний екран смерті. BSOD існує вже протягом десятиліть, змінюючи дуже мало з роками, але все ще достатньо потужний, щоб...
Завдяки глибокій інтеграції з Microsoft Office 365 Microsoft Teams стала найкращим рішенням для відеодзвінків для мільйонів людей по всьому світу. Незважаючи на те, що він не є найбільш зручним для користувачів…
Microsoft Teams — це комплексний інструмент, який останнім часом став досить популярним завдяки своїм функціям спільної роботи в команді. Сервіс дозволяє створювати конкретні команди для вашої організації, запрошувати...
12 жовтня 2021 року: Велике оновлення! Зверніть увагу, що вам більше не потрібно замінювати файл appraiserres.dll, щоб обійти перевірку TPM і виправити помилку встановлення під час встановлення Windows 11. …
З моменту випуску Windows 11 минуло кілька місяців, і з тих пір користувачі переходили на нову ОС. Оскільки все більше і більше користувачів випробовують нові проблеми Windows 11, помилки та налаштування з’являються на диску…
Усі дуже хочуть отримати в свої руки оновлення Windows 11. Але якщо є одна річ, яка може зіграти в їхній план легкого оновлення, так це страшна система…
Windows 11 була випущена для громадськості після того, як у червні цього року сталася суперечлива інформація. З тих пір ОС зазнала численних змін, серед яких були бажані заморожені…
Панель завдань Windows була в центрі уваги відтоді, як вона отримала новий оновлений вигляд з випуском Windows 11. Тепер ви можете центрувати панель завдань, насолоджуватися новим центром дій, змінювати його…
Windows 11 буде доступна для широкого загалу за кілька місяців, і всі прагнуть отримати нову ОС. Він має нове меню «Пуск», можливість самостійно встановлювати програми Android і…
Microsoft Teams — це чудова комунікаційна утиліта для користувачів на всіх платформах, але як тільки ви закінчите її використовувати, ось тут програма починає дратувати. Якщо ви не використовуєте Te…
Будь-яка служба, доступна в Інтернеті, має власний набір проблем, і Microsoft Teams не є винятком. На тлі пандемії COVID-19 кількість користувачів інструменту для співпраці значно зросла…
Коли Windows 11 з’явилася у світі, макети прив’язки були першим, що привернуло загальну увагу. Вони були інноваційними, новими та насправді корисними під час роботи в системі Windows…
Windows 11 щойно була випущена для громадськості, і, здається, вона приваблює багатьох нових користувачів. Багато користувачів перейшли до Windows 11 і оновилися до Windows 11, а інші хочуть скористатися…
Google Meet став однією з найбільш обговорюваних платформ для віддаленої співпраці, які зараз доступні на ринку. Він пропонує безліч дивовижних функцій і забезпечує надійність…
Існує багато причин, чому ваш ноутбук не може підключитися до Wi-Fi, і тому існує багато способів виправити цю помилку. Якщо ваш ноутбук не може підключитися до Wi-Fi, ви можете спробувати наступні способи вирішення цієї проблеми.
Після створення завантажувального USB-накопичувача для встановлення Windows користувачам слід перевірити його працездатність, щоб побачити, чи було створено його успішно.
Кілька безкоштовних інструментів можуть передбачати збої диска до їх виникнення, даючи вам час на резервне копіювання даних та своєчасну заміну диска.
За допомогою правильних інструментів ви можете просканувати свою систему та видалити шпигунське програмне забезпечення, рекламне ПЗ та інші шкідливі програми, які можуть ховатися у вашій системі.
Коли комп’ютер, мобільний пристрій або принтер намагається підключитися до комп’ютера Microsoft Windows через мережу, наприклад, може з’явитися повідомлення про помилку «мережевий шлях не знайдено» — помилка 0x80070035.
Синій екран смерті (BSOD) – це поширена і не нова помилка Windows, яка виникає, коли на комп’ютері виникає якась серйозна системна помилка.
Замість виконання ручних операцій та операцій прямого доступу у Windows, ми можемо замінити їх доступними командами CMD для швидшого доступу.
Як і у Windows 10, ви також можете використовувати стороннє програмне забезпечення, щоб зробити панель завдань Windows 11 прозорою.
Після незліченних годин використання ноутбука та настільної системи колонок у коледжі, багато людей виявляють, що кілька розумних покращень можуть перетворити їхній тісний простір у гуртожитку на найкращий стрімінговий центр, не витрачаючи при цьому багато грошей.
Тачпад ноутбука призначений не лише для вказівки, клацання та масштабування. Прямокутна поверхня також підтримує жести, які дозволяють перемикатися між програмами, керувати відтворенням медіа, файлами та навіть переглядати сповіщення.
