O espazo en disco sempre foi un luxo xa sexa nos vellos tempos de DOS onde todo estaba almacenado nun disquete ou nos tempos modernos nos que nos resulta difícil almacenar as nosas bibliotecas de música nunha única unidade. Dependendo da configuración actual do teu sistema, podes quedar sen espazo facilmente mentres continúas usando o teu sistema.
Este espazo podería usarse para ficheiros temporais, ficheiros de paginación, Windows antigo , arquivos grandes, ficheiros de descarga e moito máis. A mellor forma de liberar espazo adoita ser eliminar os ficheiros máis grandes do teu sistema, pero atopar estes ficheiros pode resultar un reto. Nestes casos, pode usar a nosa guía a continuación para identificar e eliminar os ficheiros máis grandes do seu sistema. Imos comezar.
Relacionado: Como corrixir o uso elevado de CPU ou disco de busca de Windows en Windows 11
Contidos
Libera espazo en Windows 11
Podes comprobar facilmente se hai ficheiros enormes no teu sistema en Windows 11 (ou 10) usando varios métodos. Windows 11 tamén inclúe unha utilidade integrada que che axuda a identificar ficheiros que ocupan grandes cantidades de espazo de almacenamento no teu PC. Siga un dos seguintes métodos que mellor se adapte ás súas necesidades e requisitos actuais.
Método #01: Desinstalar aplicacións que ocupan moito espazo
Preme Windows + i no teu teclado para iniciar a aplicación Configuración e fai clic en "Almacenamento" á túa dereita.
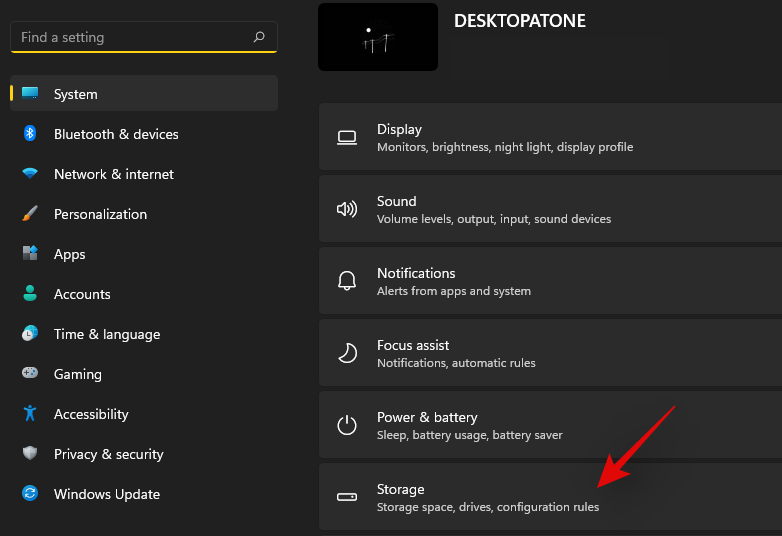
Agora obterás unha lista de todas as categorías que ocupan grandes cantidades de espazo en disco no teu PC. Fai clic na categoría que desexes para comezar. Siga os pasos seguintes dependendo da súa elección.
Fai clic en "Ordenar por" na parte superior.
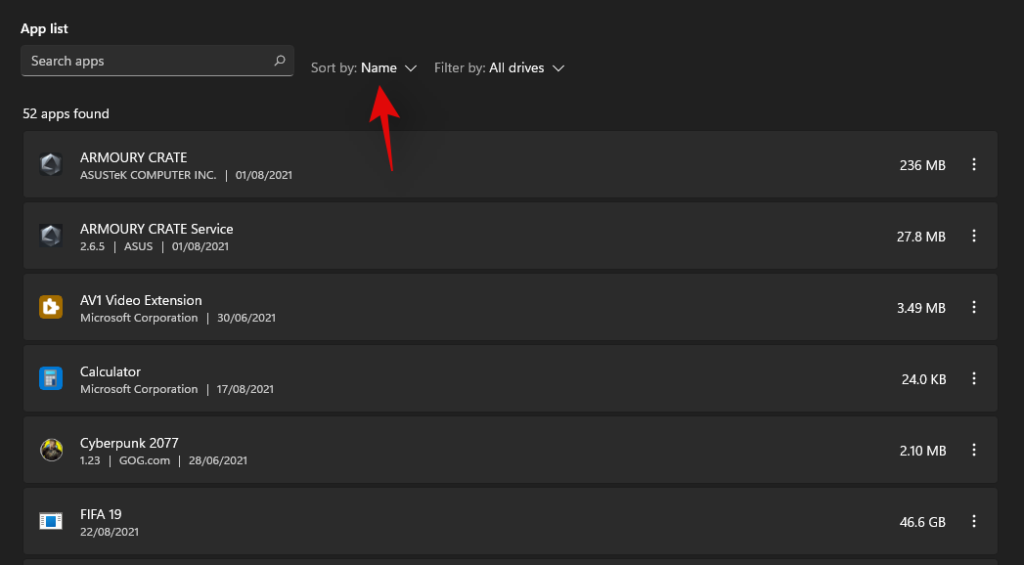
Seleccione 'Tamaño'.
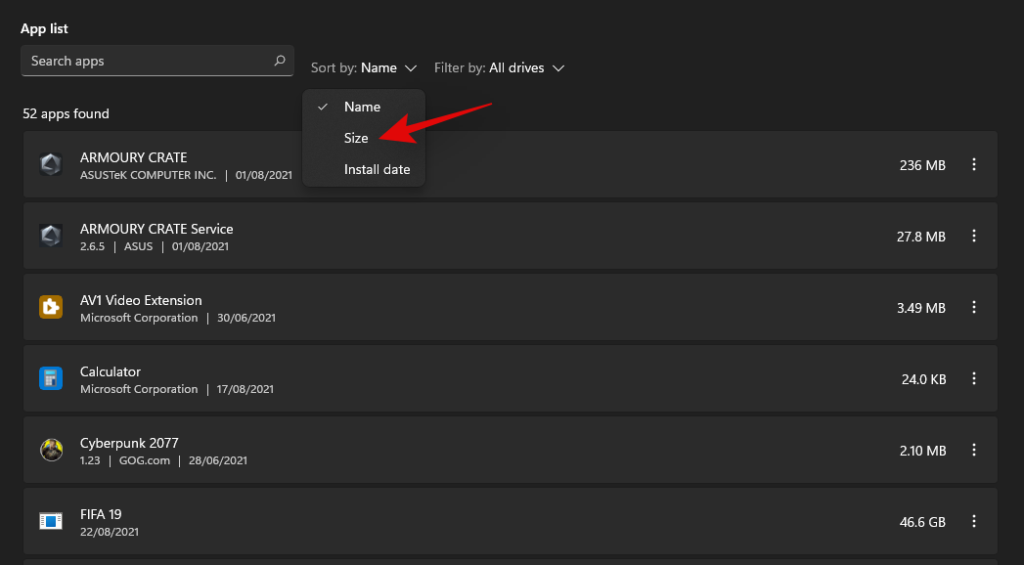
As aplicacións e programas máis grandes do teu sistema aparecerán agora listados en orde descendente. Fai clic na icona do menú "3 puntos" a carón da aplicación que queres eliminar do teu PC.
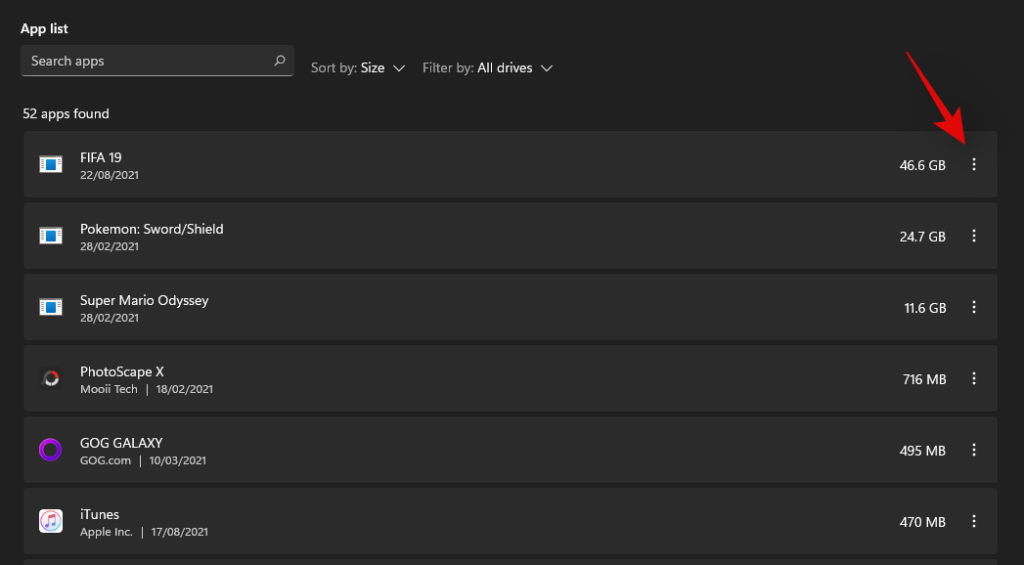
Seleccione 'Desinstalar'.
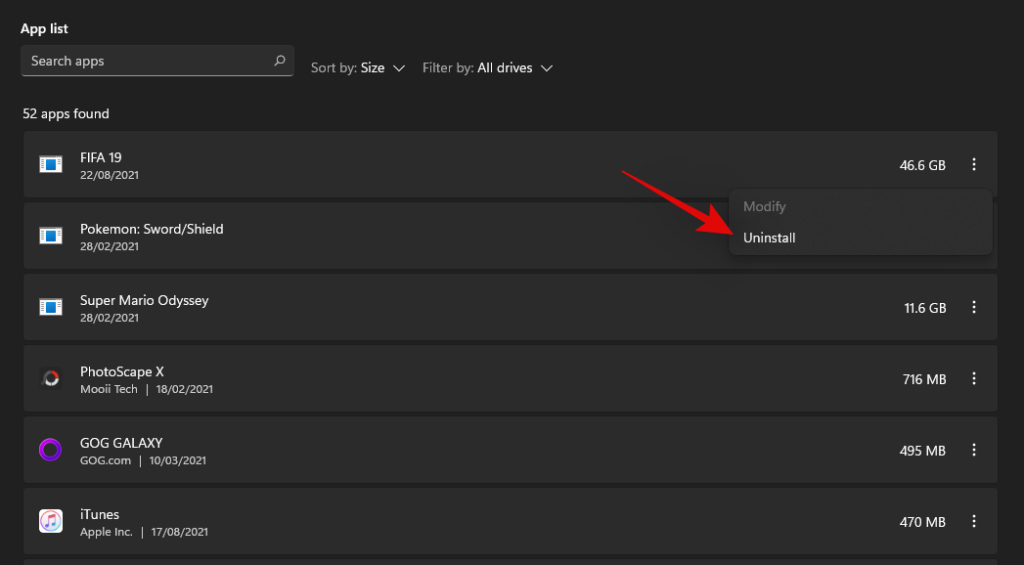
Fai clic de novo en "Desinstalar" para confirmar a túa elección.
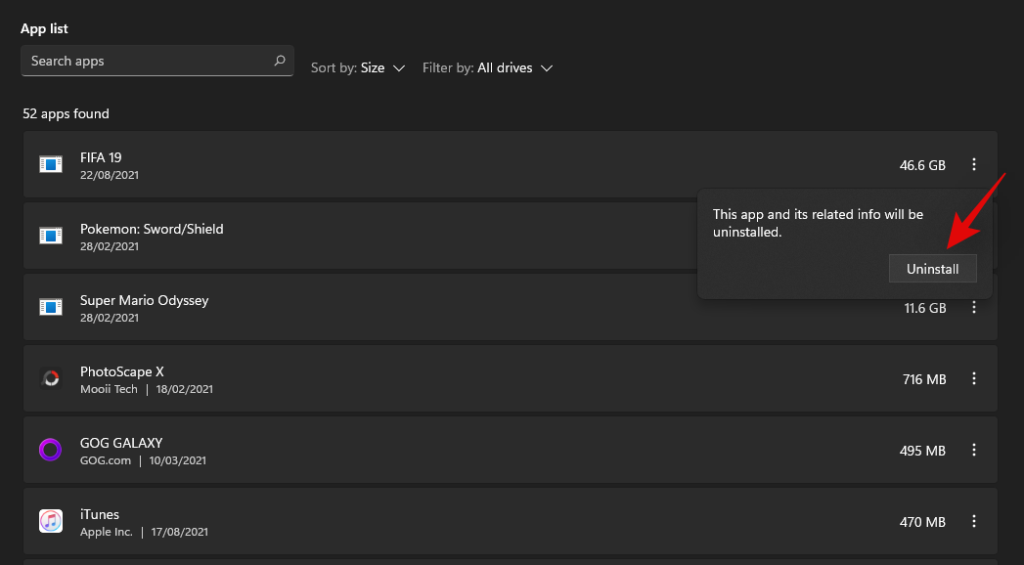
Agora debería desinstalarse a aplicación do teu sistema.
Se foi redirixido ao panel de control
Fai clic e selecciona a aplicación que queres eliminar/desinstalar.
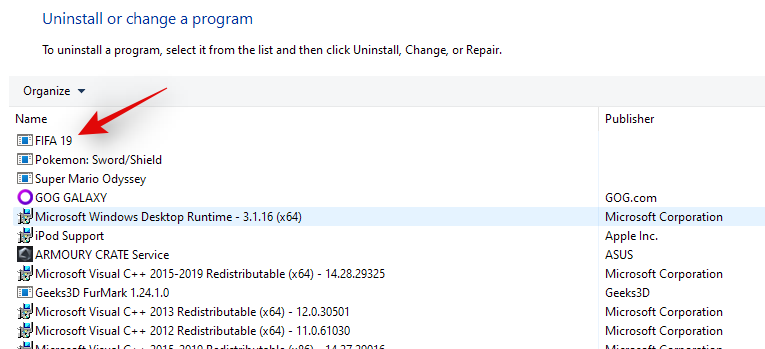
Fai clic en "Desinstalar" na parte superior.
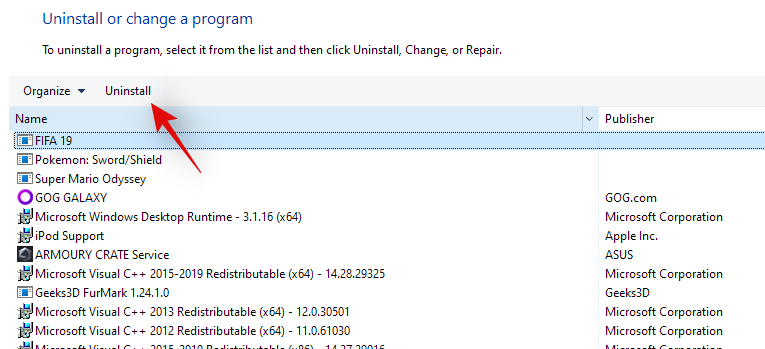
O programa de desinstalación debería iniciarse agora no teu PC. Siga as instrucións en pantalla para eliminar o programa seleccionado do seu sistema.
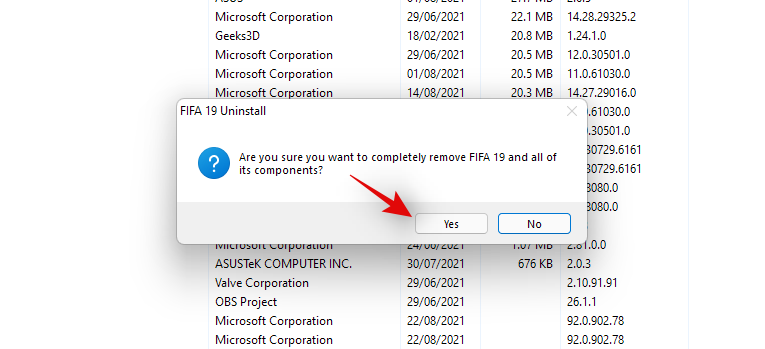
O programa seleccionado agora debería eliminarse do seu sistema.
Relacionado: Como reparar Windows 11 [15 xeitos]
Método n.º 02: libera espazo usando a opción "Arquivos temporais" en Configuración de almacenamento
Os teus ficheiros temporais xa aparecerán listados en orde descendente segundo o seu tamaño. Marque as caixas de todos os ficheiros temporais que desexa eliminar do seu PC.
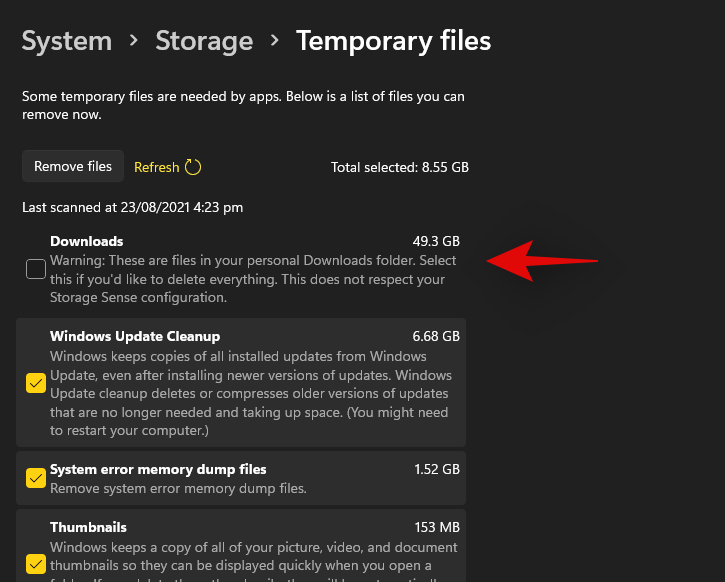
Nota: Se selecciona "Descargas", eliminaranse os ficheiros persoais almacenados no cartafol "Descargas".
Fai clic en "Eliminar ficheiros" na parte superior para eliminar os ficheiros temporais seleccionados do teu PC.
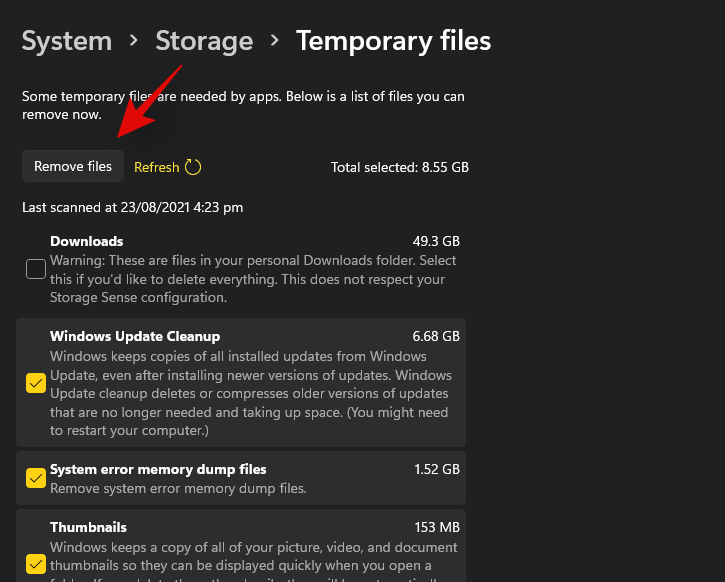
Os ficheiros temporais agora deberían borrarse do seu sistema.
Relacionado: Como eliminar ficheiros temporais en Windows 11
Método #03: libera espazo usando outras opcións en Configuración de almacenamento
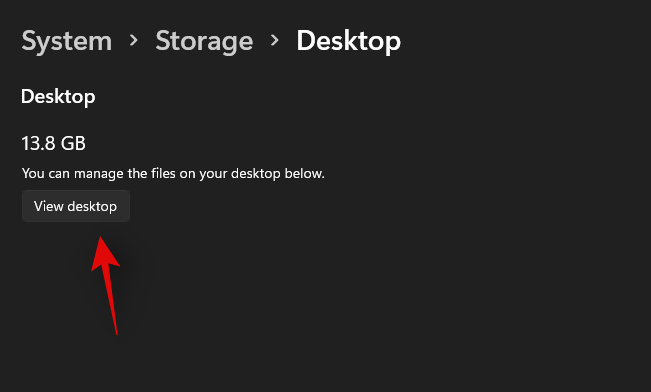
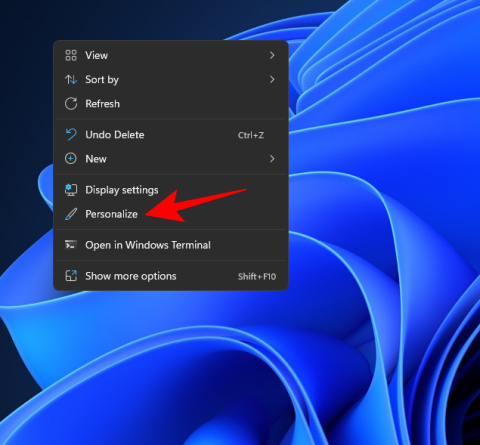
Fai clic en "Ver Escritorio/Música/Documentos/Vídeos" e serás redirixido ao teu escritorio.
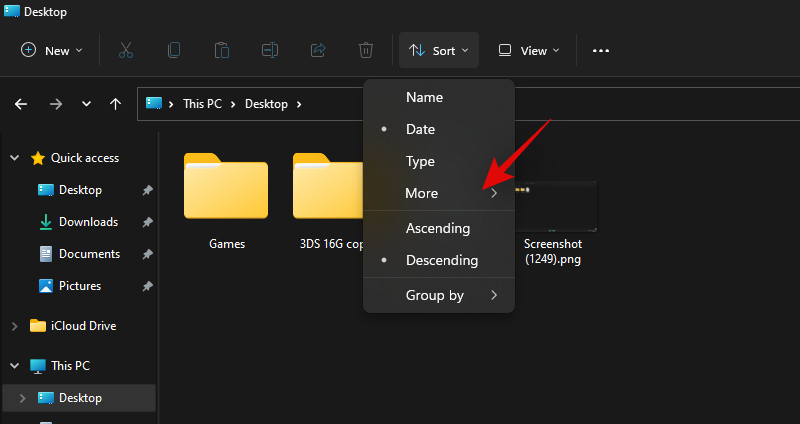
Fai clic en "Ordenar" na parte superior.
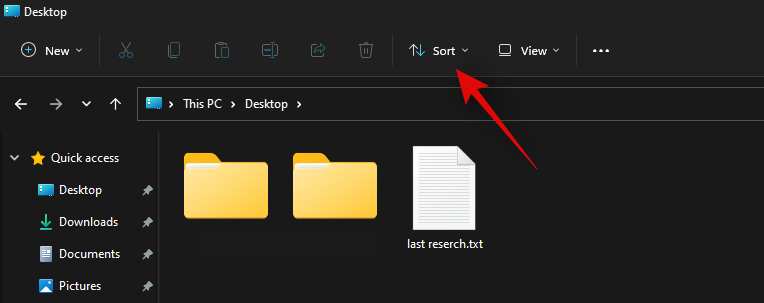
Fai clic en "Máis".
Agora selecciona "Tamaño".
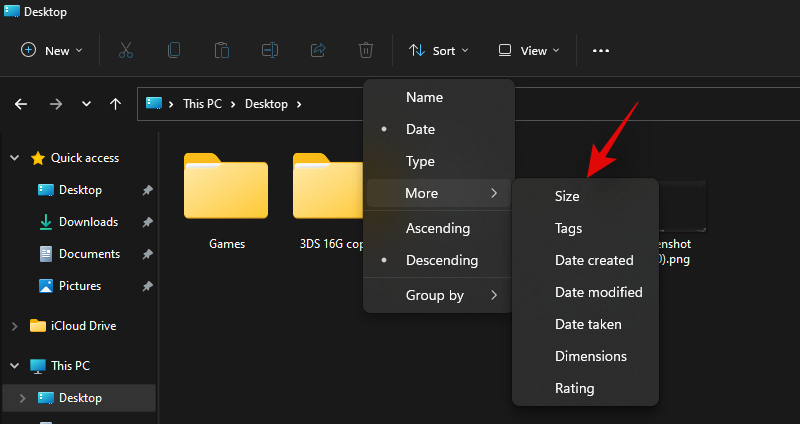
Agora os teus ficheiros listaranse en orde descendente segundo o seu tamaño. Seleccione os ficheiros que desexa eliminar e prema Supr no teclado.
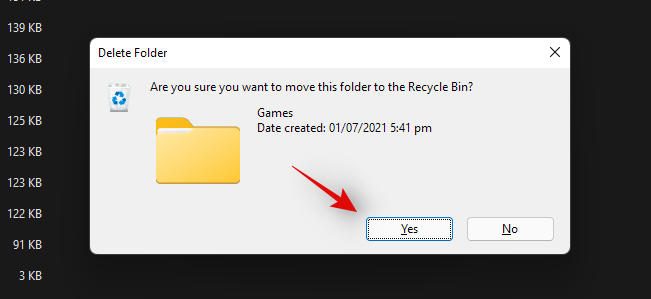
Agora fai clic en "Si" para confirmar a túa elección.
Os ficheiros seleccionados agora deberían eliminarse do cartafol seleccionado.
Método #04: Usando WizDirStat
WizDirStat é unha popular utilidade de código aberto que adoita ser usada para xerar unha representación gráfica do teu espazo de almacenamento local dun xeito sinxelo. Isto fai que sexa máis doado identificar grandes anacos do teu espazo en disco ocupados por un único ficheiro, cartafol ou arquivo, o que á súa vez facilitará que poidas liberar espazo no teu PC. Use a seguinte guía para identificar o que ocupa espazo no seu PC con Windows 11.
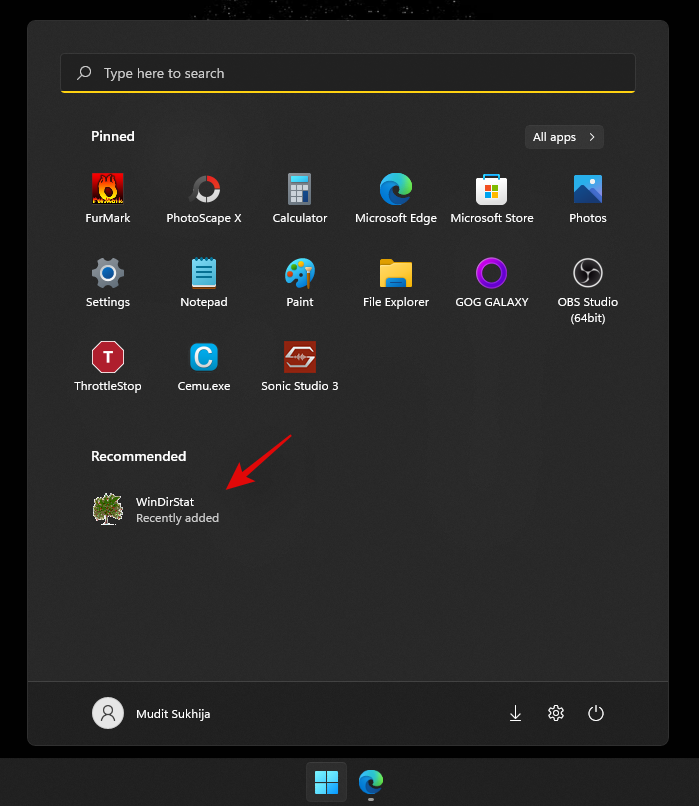
Download and install WinDirStat on your PC using the link above. Once installed, launch the app.
Now select one of the options that best suits your needs. If you only have a single drive installed on your system with a single partition, then you can skip this step. Click on ‘Ok’ once you are done.
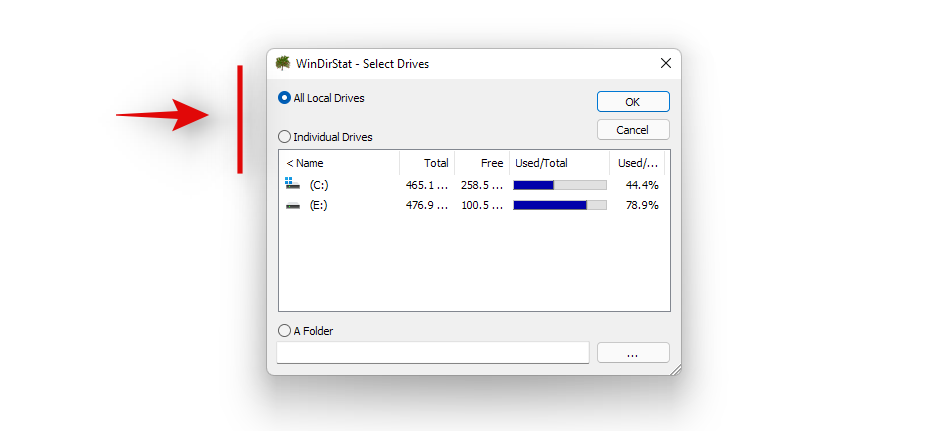
- All Local Drives: This will make WinDirStat analyze all your disks and display their data graphically.
- Individual Drives: Select one of your installed drives to be analyzed for disk space usage. You can select this option and then select the drive you wish to use.
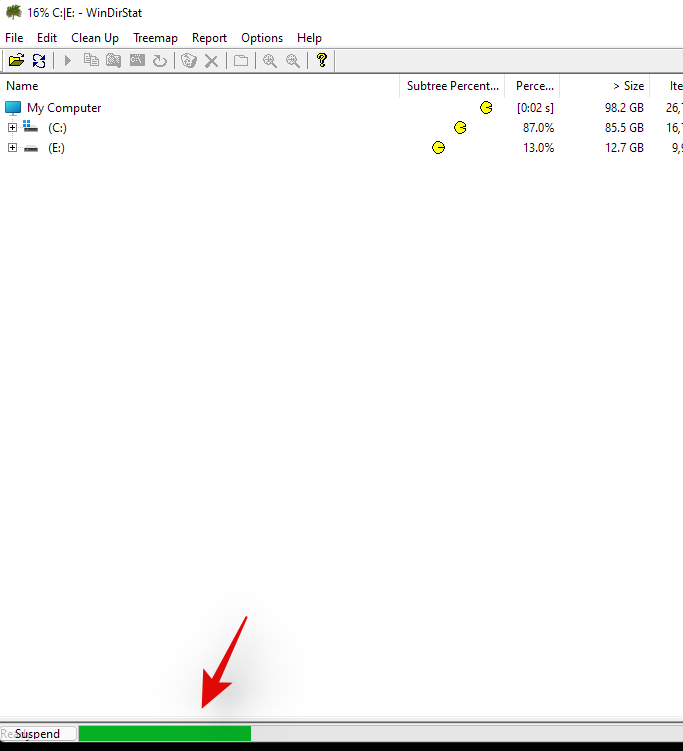
Your drives will now be analyzed and you can track the progress for the same at the bottom of the window.
Once analyzed, a color-coded graphical representation of the disk space usage on the selected drive(s) will be shown on your screen. Simply click on the largest chunks to identify the largest files.
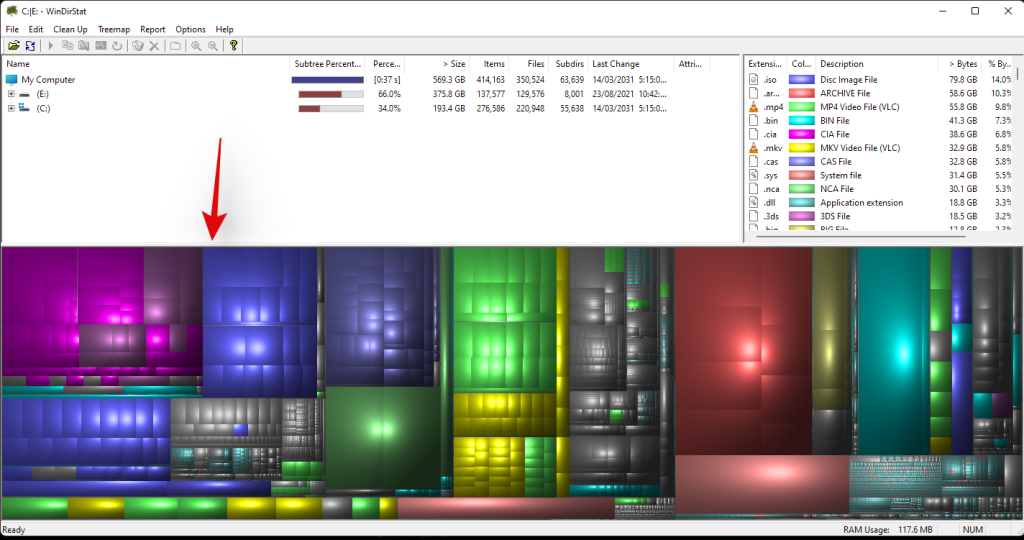
Press Del on your keyboard to delete the file. This will send it to your recycle bin and you can decide its fate when reviewing your recycle bin items. Alternatively, you can use Shift + Del to permanently delete the item from your system.
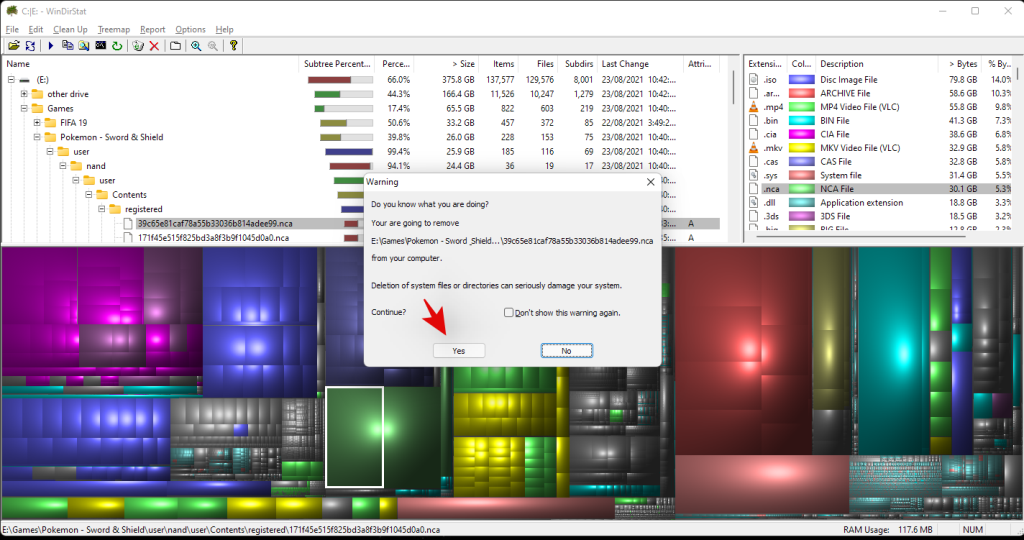
And that’s it! You can repeat the last steps to delete more of the largest files from your system.
Method #05: Using Windows Search to delete large files
Windows Search can also help you identify the larges files on your system in Windows 11. However, this is a hit and miss for now with the new file explorer, and in case the method fails to work for you, then you will need to temporarily switch back to the Windows 10 file explorer. Don’t worry, once you have identified and found the largest files, you can revert the changes and get back to the new Windows 11 file explorer. Use the guides below to get started.
5.1 Search for large files
We will now search for large files based on your criteria.
Press Windows + E on your keyboard to open the file explorer and click on the search box in the top right corner. Search for the following term.
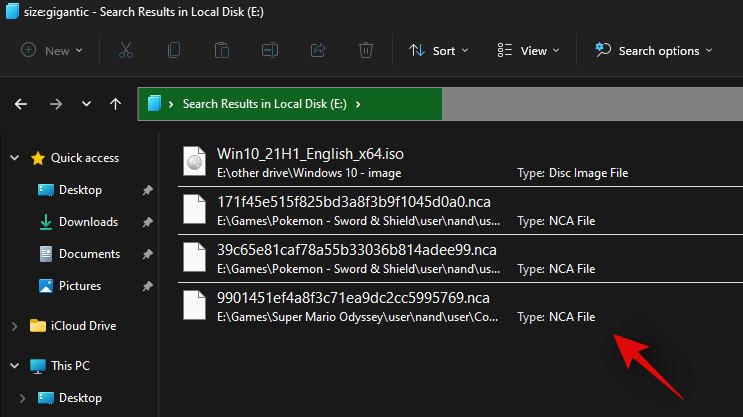
size:gigantic
The results will now be filtered and files larger than 4GB will now be displayed on your screen. Select the unnecessary files that you do not need on your PC and simply delete them to free up some space. If you wish to use a smaller minimum file size, then replace ‘gigantic’ with one of the terms below depending on the size you prefer.
- Large: Files between 128MB and 1GB
- Huge: Files between 1GB to 4GB
- Medium: Files between 1MB to 128MB
And that’s it! You can use Windows Search this way to filter files by their size and find the largest ones currently on your PC.
Note: In case your PC indexes and shows system files as well then we recommend you double check files before deleting them to avoid deleting any vital system files from your system.
You will now have found large files on your PC using Windows Search.
5.2 If the search term does not work for you
If typing in ‘size:gigantic’ does not work for you, then you will need to switch to the old file explorer from Windows 10. Use the guide below to get you started. Once you switch back to the old file explorer, use the guide above to search for large files. Once found, use the subsequent guide below to get the new Windows 11 file explorer back on your system.
Switch to the old file explorer
Press Windows + S on your keyboard and search for ‘Regedit’. Click and launch the app from your search results.
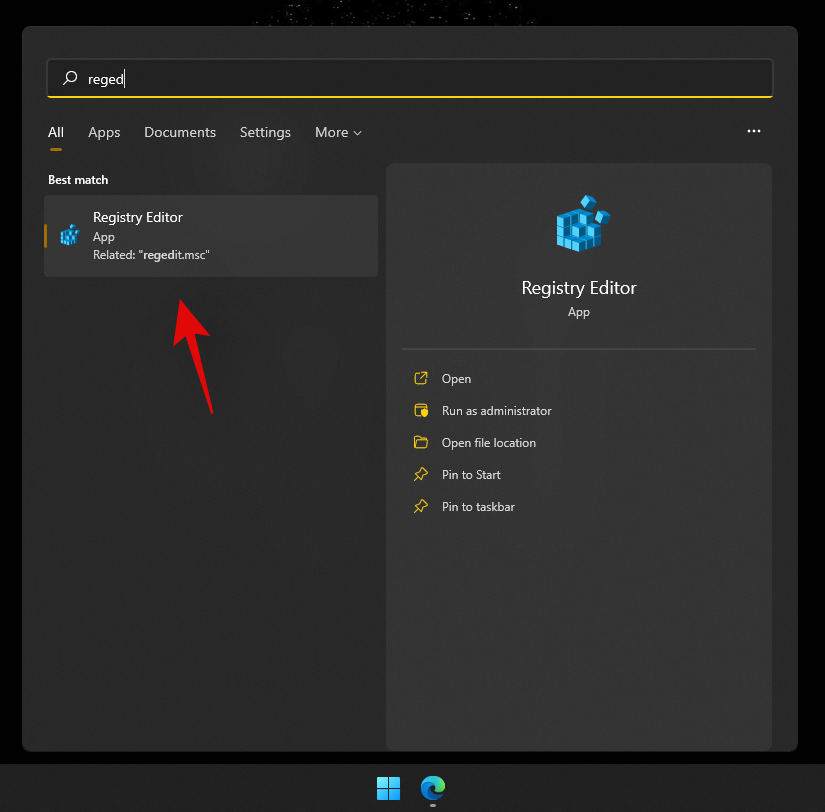
Navigate to the following directory or copy-paste the address below in your address bar.
HKEY_LOCAL_MACHINE\SOFTWARE\Microsoft\Windows\CurrentVersion\Shell Extensions
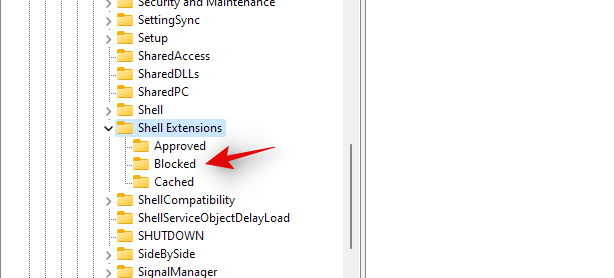
Click on the folder named ‘Blocked’.
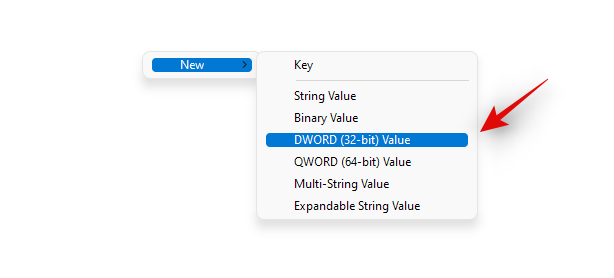
Right-click on an empty area on your right, select ‘New’ and then click on ‘DWORD (32-bit) value’.
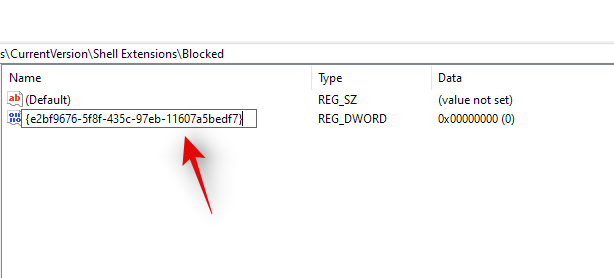
Enter the following name and press Enter on your keyboard. We recommend you copy-paste the same to avoid any naming errors.
{e2bf9676-5f8f-435c-97eb-11607a5bedf7}
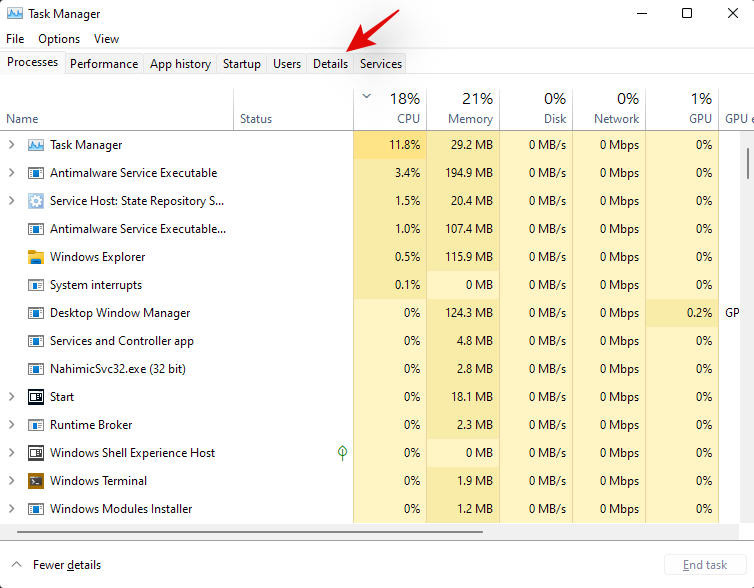
Close the registry editor and press Ctrl + Shift + Esc to open the Task Manager. Switch to the ‘Details’ tab.
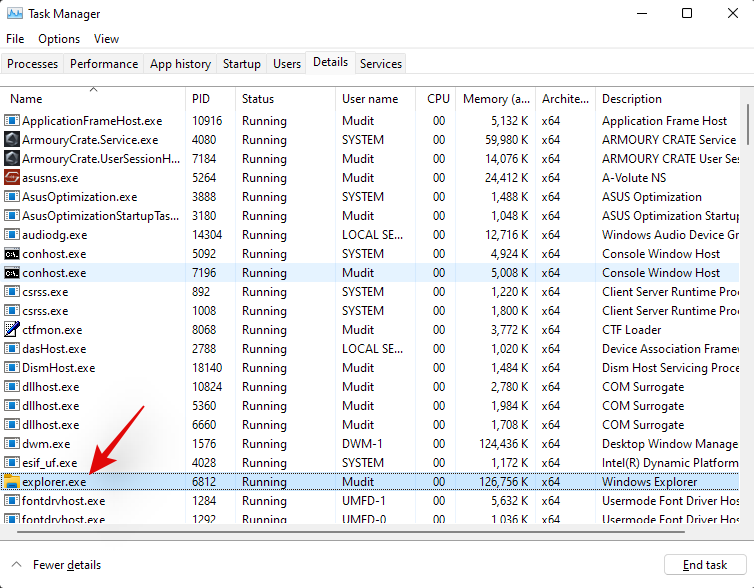
Click on ‘Explorer.exe’ and hit Del on your keyboard.
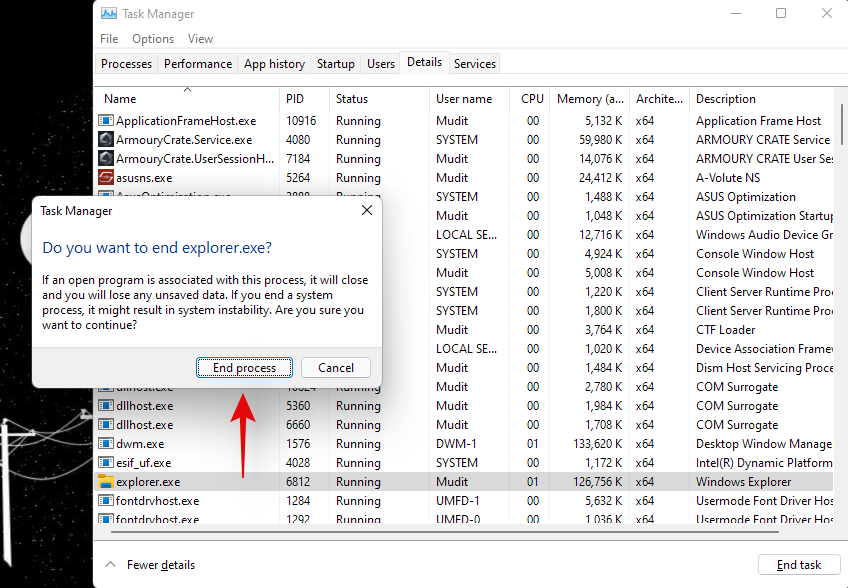
Click on ‘End process’ to confirm your choice.
Click on ‘File’ and select ‘Run new task’.
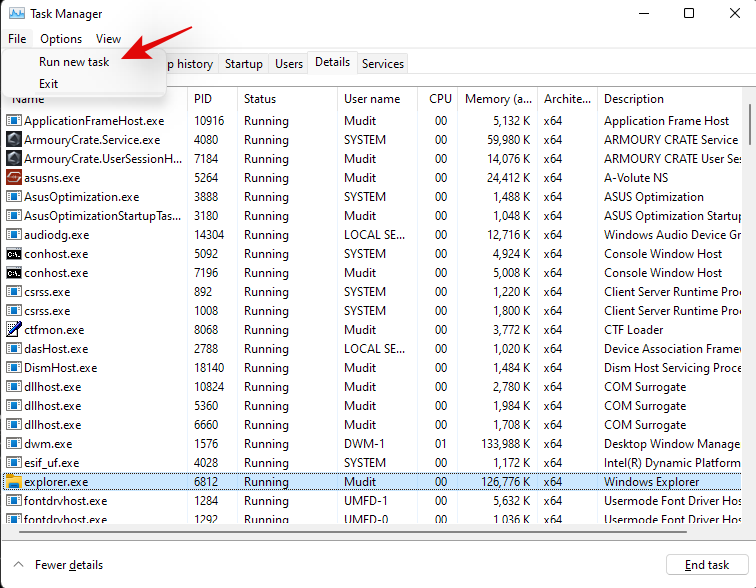
Enter the following in the text box and click on ‘Ok’.
explorer.exe
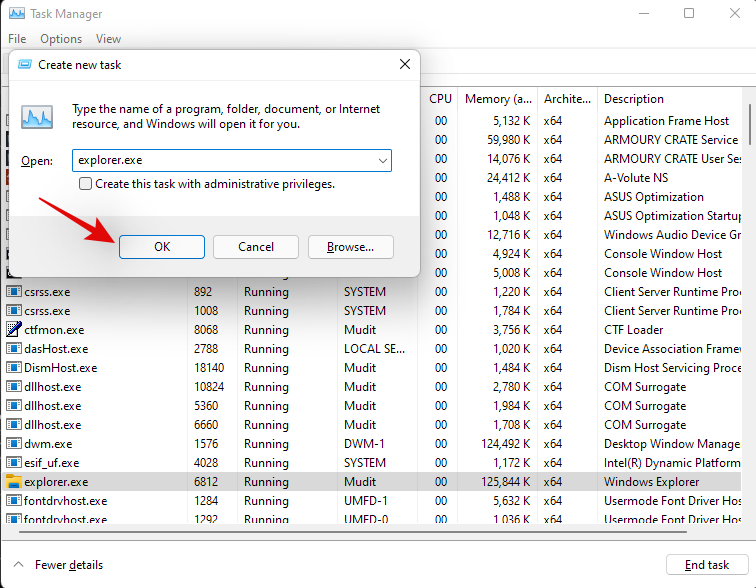
Windows File Explorer will now restart on your system and it should be reverted to the Windows 10 File Explorer. You can open a random folder to check the same. Confirm that you have gone back to the old file explorer and use the guide below to find large files on your system.
Switch to the new file explorer
We can now revert to the old file explorer. Follow the guide below to get you started.
Press Windows + S on your keyboard and search for Regedit. Click and launch the app once it shows up in your search results.

Navigate to the following path below or copy-paste it in your address bar.
HKEY_LOCAL_MACHINE\SOFTWARE\Microsoft\Windows\CurrentVersion\Shell Extensions

Simply click on the DWORD (32-bit) value we had created earlier and hit Del on your keyboard. Click on ‘Yes’ to confirm your choice.

Press Ctrl + Shift + Esc on your keyboard and switch to the ‘Details’ tab.

Click on ‘explorer.exe’ and hit Del on your keyboard.

Click on ‘End process’.

Click on ‘File’ and select ‘Run new task’.

Type in ‘explorer.exe’ and hit Enter on your keyboard.

You can close the task manager and registry editor on your PC now.
And that’s it! You will now have gone back to the new File Explorer on Windows 11.
Method #06: Using CMD (command prompt)
CMD can also help you find large files on your system. Use the guide below to get you started.
Press Windows + E on your keyboard and navigate to a location where you wish to search for large files and click on the address bar at the top.
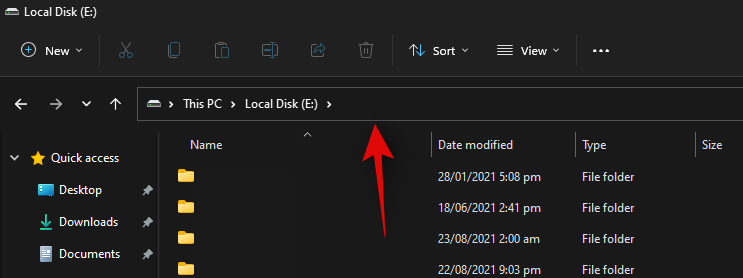
Type in CMD and press Enter on your keyboard.
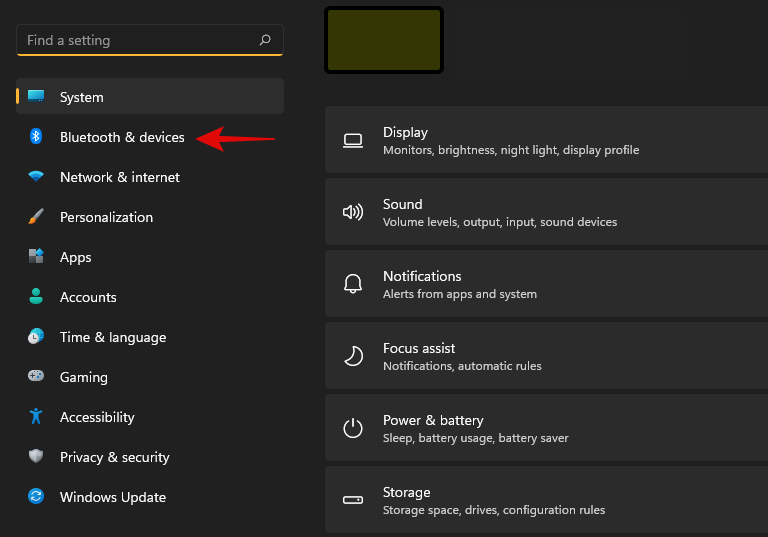
CMD will now be launched in the particular folder. Type in the following command and replace ‘PATH’ with the path we copied to your clipboard.
forfiles /S /M * /C “cmd /c if @fsize GEQ 1073741824 echo @path > largefiles.txt
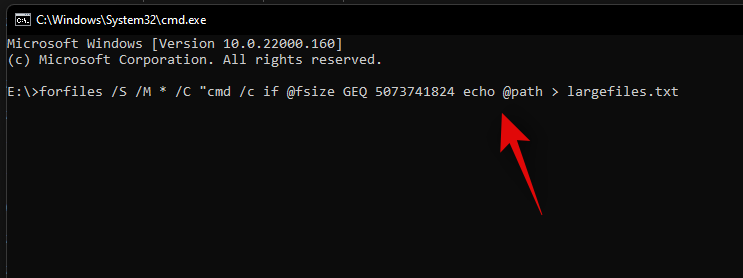
The above command will look for files larger than 1GB on your PC. If you wish to define a larger minimum size, then replace ‘1073741824’ with one of the following options below.
- 2GB: 2147483648
- 5GB: 5368709120
- 10GB: 10737418240
Execute the command with your desired variables and a text file will be created in the same location with a list of all the large files found on your system based on your criteria. You will also find the path for each file on your local storage in the text file.
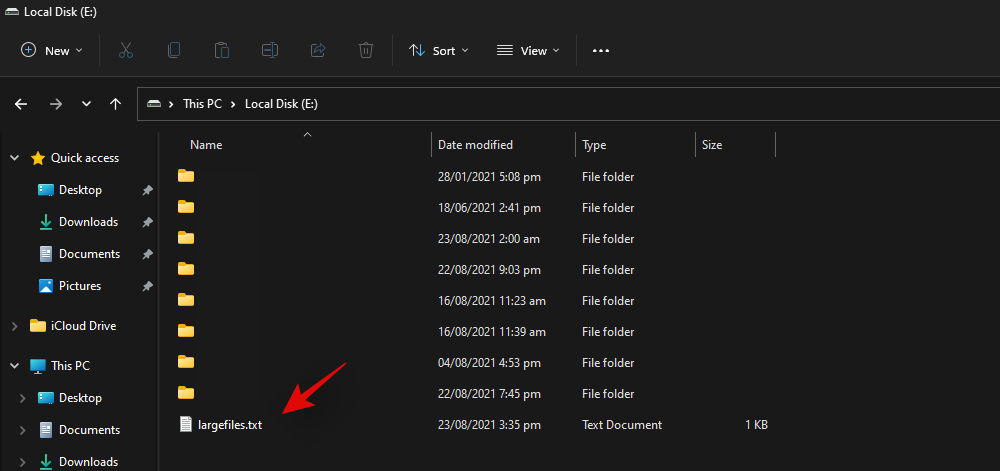
You can use this list to identify the largest files in the current location and then delete them at your discretion to free up some disk space on your system.
Method #07: Using PowerShell
You can also find large files on your system using PowerShell. Just like the command for CMD, PowerShell will scour your local files based on a minimum size and display all the files larger than it. Use the guide below to get you started.
Press Windows + E on your keyboard and navigate to the location where you wish to look for large files. Click on the address bar at the top and type in ‘PowerShell’. Press Enter on your keyboard once you are done.
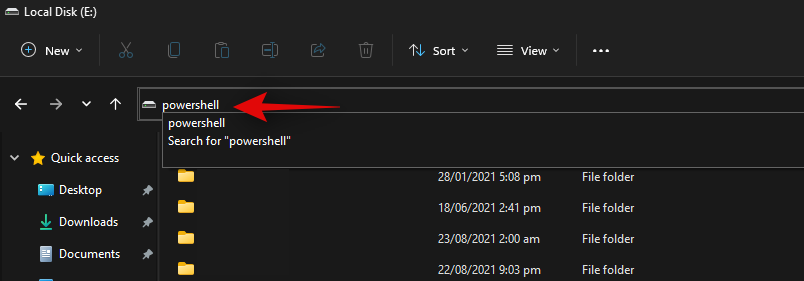
Copy-paste the command below in the PowerShell window and press Enter on your keyboard.
gci -r| sort -descending -property length | select -first 10 name, length
You will now get a list of the top 10 largest files currently taking the most disk space on your system. If you wish to view the top 20 files, then replace ‘select-first 10’ with ‘select-first 20’.
PowerShell will now find and display the 20 largest files on your system along with their size. The file size will be in bytes which can make it a bit difficult to judge the size of files in terms of gigabytes.
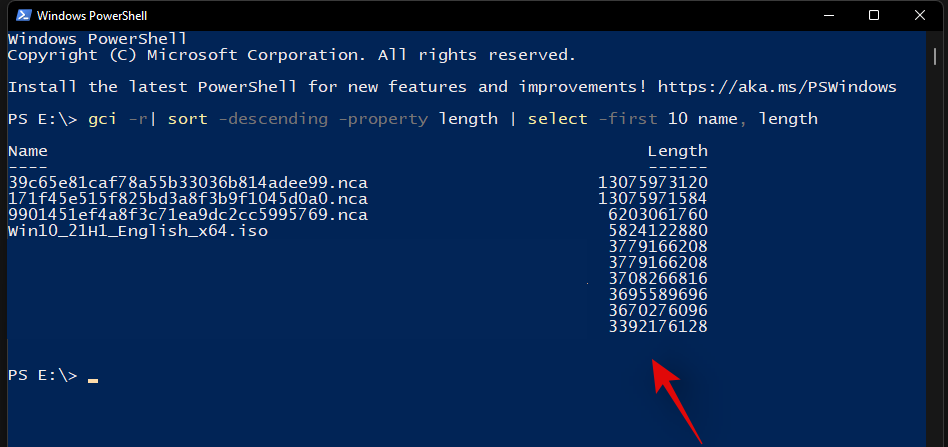
And that’s it! You will now have found the largest files on your PC using PowerShell in Windows 11.
Method #08: Using SpaceSniffer
Space Sniffer é outra popular utilidade de terceiros que se usa para analizar o uso de espazo en disco en Windows 11. Space sniffer pode axudarche a identificar ficheiros grandes usando grandes cantidades de espazo no teu sistema. Tamén podes atopar ficheiros ocultos que ocupan moito espazo no disco no teu PC usando o SpaceSniffer. Use a guía a continuación para comezar.
Descarga SpaceSniffer no teu PC usando a ligazón anterior. Descargarase un .exe portátil no teu sistema. Extrae o arquivo e fai clic co botón dereito no ficheiro .exe.
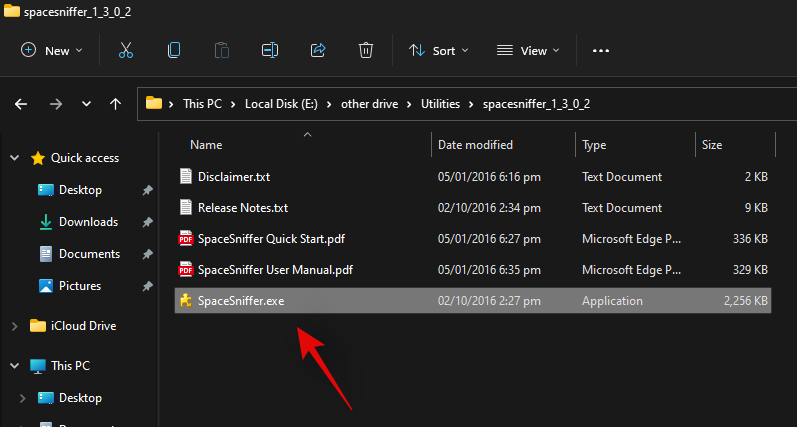
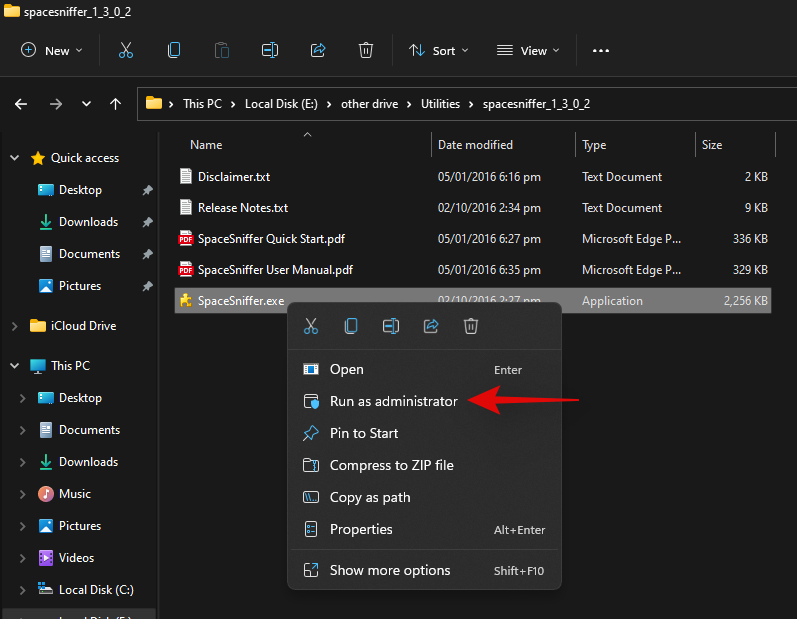
Seleccione "Executar como administrador".
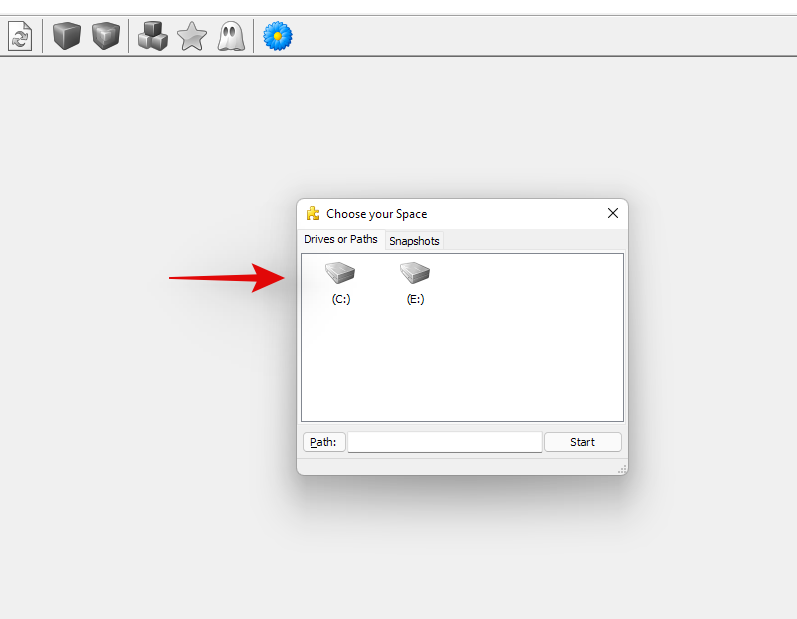
Agora seleccione a unidade que desexa escanear. Se desexa analizar e atopar ficheiros grandes nun directorio en particular, pode introducir o seu camiño no cadro de texto a continuación.
Agora amosaráselle unha representación gráfica do uso de espazo no disco na súa pantalla. Simplemente coloque o rato sobre o anaco máis grande e amosarase o nome do cartafol ou ficheiro que ocupa ese espazo.
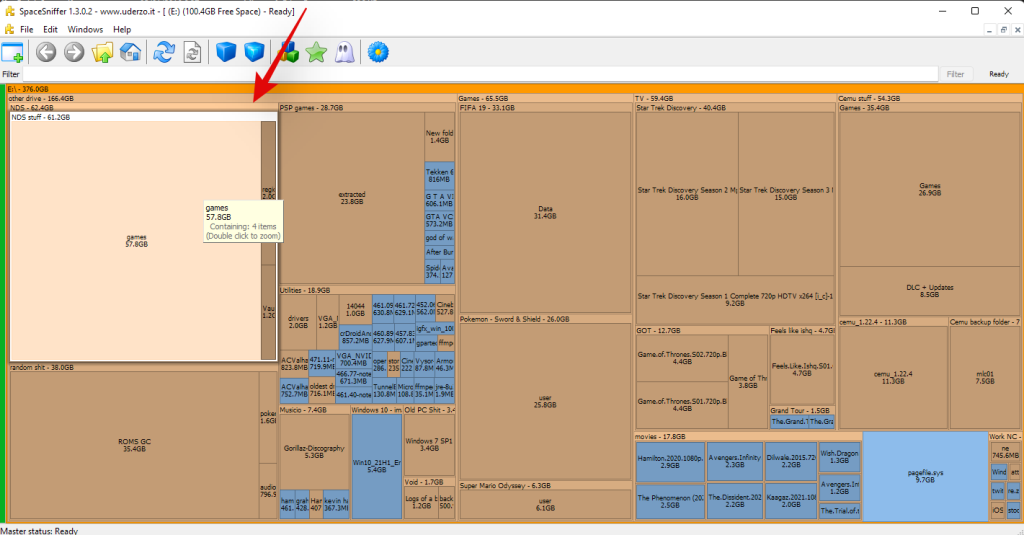
E xa está! Podes usar SpaceSniffer deste xeito para identificar os ficheiros máis grandes do teu sistema simplemente mirando os anacos máis grandes da túa pantalla.
Método #09: Outras ferramentas de terceiros que podes usar para analizar o uso do disco en Windows 11
O mundo das ferramentas de terceiros é un coello. Canto máis busques, máis programas atoparás que afirman que che axudan a atopar e recuperar o teu espazo no disco en Windows 11. Esta enorme selección de programas pode ser bastante desalentadora e desafiante ao principio, polo que é difícil atopar as ferramentas perfectas. que se axusten ás súas necesidades e requisitos actuais. Se non es fan dun dos programas usados anteriormente, pode optar por unha das alternativas que se indican a continuación. Podes atopar algúns detalles sobre cada programa debaixo da súa lista.
Consellos para liberar espazo de almacenamento en Windows 11
Se está esgotando espazo en disco ou ten unha unidade de menor tamaño que non pode actualizar actualmente, pode utilizar os seguintes consellos para aforrar tanto espazo no disco como sexa posible actualmente no seu PC. Imos comezar.
- Use a limpeza de disco
- Executa os comandos SFC e DISM para corrixir erros coas túas unidades
- Desinstalar aplicacións innecesarias
- Elimina ou arquiva ficheiros innecesarios ou non utilizados actualmente
- Use OneDrive ou outros servizos de almacenamento na nube para aforrar espazo
- Usa un dispositivo de almacenamento externo para almacenar as túas bibliotecas
- Libe regularmente a súa papeleira de reciclaxe
- Use Storage Sense en Windows 11
- Desactive a hibernación para eliminar o ficheiro de hibernación
- Reconstruír o seu índice de busca
- Elimina usuarios adicionais creados no teu sistema
E máis. Podes liberar espazo no teu PC usando toneladas de formas, pero cada unha normalmente leva un compromiso. Se buscas evitar compromisos, a mellor opción é actualizar o teu almacenamento. Os SSD son máis baratos que nunca e se estás buscando actualizar o teu almacenamento, entón un SSD M.2 podería ser un gran camiño para o teu sistema.
Nota: os SSD M.2 funcionarán coa súa capacidade anunciada só se tes un slot M.2 compatible no teu sistema. Non todas as ranuras M.2 son iguais e non todas se encamiñan a través dos carrís PCI da túa placa base.
Libera espazo no disco en Windows 11!
Usando os numerosos métodos anteriores, podes atopar facilmente o que ocupa espazo no teu PC e solucionalo con bastante facilidade. Se as solucións baseadas en Windows non che funcionan, proba a usar un software gratuíto como TreeSize (ou outros mencionados anteriormente).
Se aínda necesitas axuda para limpar espazo no teu Windows 11, avísanos na caixa de comentarios a continuación. Explica o teu problema correctamente.
RELACIONADAS






![Como desinstalar McAfee en Windows 11 [5 xeitos] Como desinstalar McAfee en Windows 11 [5 xeitos]](https://blog.webtech360.com/resources8/images31/image-4917-0105182719945.png)

