Case todos os outros fabricantes de PC parecen gustarlle o software de protección do sistema McAfee e rexeitan rotundamente enviar o seu PC sen el. Pero moitas persoas non son especialmente afeccionadas aos produtos McAfee e se es un deles, non hai mellor opción que desinstalar a aplicación.
Nesta guía, cubriremos todos os pasos para desinstalar calquera variante do software de protección do sistema McAfee do teu PC con Windows 11.
Aquí tes como podes comezar.
Relacionado: Como eliminar ficheiros lixo en Windows 11
Contidos
¿Deberías desinstalar McAfee do teu PC?
Ben, esta é unha pregunta complicada, pero o ideal é que non deixes o teu sistema sen un sistema antivirus. Cando elimines McAfee do teu sistema, é conveniente ter a man outro programa AV que poidas instalar inmediatamente.
Aínda que non instales un antivirus de terceiros, Windows 11 inicia automaticamente Windows Defender no teu sistema para obter a máxima protección.
Cando se lanzou inicialmente, Windows Defender era infame por ser un porco de memoria en segundo plano que usaría unha cantidade significativa de recursos e ralentizaría o teu sistema.
Non obstante, Defender percorreu un longo camiño desde o seu lanzamento, e agora en Windows 11, considérase a única utilidade necesaria para protexer o seu sistema.
Así, pode con seguridade eliminar o McAfee do seu sistema, pode confiar totalmente en Windows Defender hoxe. Iso, e se tes outro antivirus nos plans, desinstalar McAfee está ben.
Non se recomenda deixar o sistema sen protección no mundo moderno onde estás constantemente conectado a Internet.
Aquí tes varias formas de eliminar McAfee de Windows 11.
5 xeitos de eliminar McAfee de Windows 11
Método #01: Usando a aplicación Configuración
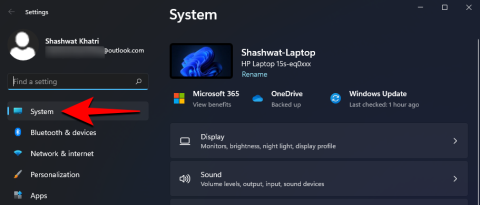
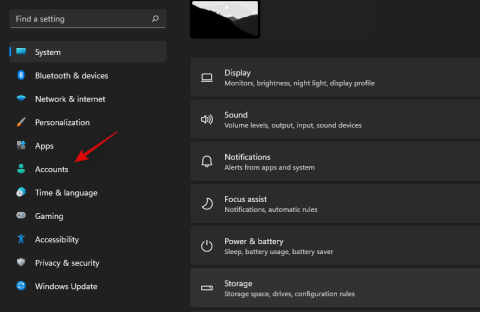
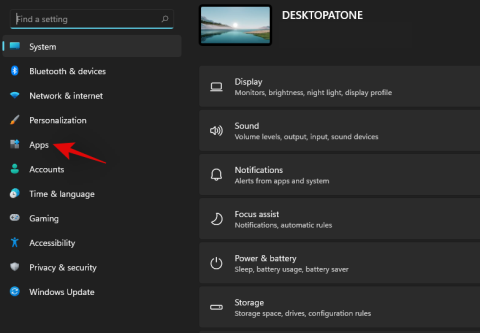
Abre Configuración coa Windows key + icombinación de botóns e fai clic en "Aplicacións".
![Como desinstalar McAfee en Windows 11 [5 xeitos] Como desinstalar McAfee en Windows 11 [5 xeitos]](https://img2.webtech360.com/resources8/images31/image-8781-0105182720019.png)
Fai clic en "Aplicacións e funcións".
![Como desinstalar McAfee en Windows 11 [5 xeitos] Como desinstalar McAfee en Windows 11 [5 xeitos]](https://img2.webtech360.com/resources8/images31/image-6298-0105182720092.png)
Desprácese cara abaixo para atopar o produto McAfee que estás tentando desinstalar e fai clic no menú de tres puntos xunto ao tamaño mencionado.
![Como desinstalar McAfee en Windows 11 [5 xeitos] Como desinstalar McAfee en Windows 11 [5 xeitos]](https://img2.webtech360.com/resources8/images31/image-7367-0105182720178.png)
Fai clic na opción "Desinstalar".
![Como desinstalar McAfee en Windows 11 [5 xeitos] Como desinstalar McAfee en Windows 11 [5 xeitos]](https://img2.webtech360.com/resources8/images31/image-8436-0105182720277.png)
Fai clic de novo no botón "Desinstalar" para activar o desinstalador.
![Como desinstalar McAfee en Windows 11 [5 xeitos] Como desinstalar McAfee en Windows 11 [5 xeitos]](https://img2.webtech360.com/resources8/images31/image-8026-0105182955005.png)
Dentro duns segundos, deberías ver o desinstalador emerxente. Marque as caixas de todos os produtos McAfee instalados desta lista se quere eliminar do seu PC todo o que comeza coa palabra McAfee.
E non esquezas marcar as caixas que din "Eliminar todos os ficheiros..." ou similares, para eliminar completamente todos os rastros dos produtos McAfee do teu PC.
Unha vez feito isto, fai clic no botón "Eliminar".
![Como desinstalar McAfee en Windows 11 [5 xeitos] Como desinstalar McAfee en Windows 11 [5 xeitos]](https://img2.webtech360.com/resources8/images31/image-7022-0105182720444.png)
Fai clic de novo en "Eliminar".
![Como desinstalar McAfee en Windows 11 [5 xeitos] Como desinstalar McAfee en Windows 11 [5 xeitos]](https://img2.webtech360.com/resources8/images31/image-7475-0105182955130.png)
Nuns minutos, o desinstalador debería eliminar todos os produtos McAfee seleccionados do teu PC con Windows 11. Unha vez completada a desinstalación, o desinstalador debería pedirche que reinicies o teu PC.
Garda todo o teu traballo e fai clic no botón "Reiniciar" ou, se prefires reiniciar máis tarde segundo a túa conveniencia, fai clic no botón "Reiniciar máis tarde".
![Como desinstalar McAfee en Windows 11 [5 xeitos] Como desinstalar McAfee en Windows 11 [5 xeitos]](https://img2.webtech360.com/resources8/images31/image-3125-0105182720698.png)
Despois do reinicio, o seu PC debería estar libre de produtos McAfee.
Método #02: Usando MCPR (ferramenta de eliminación de McAfee para o consumidor final)
McAfee ten unha ferramenta de eliminación de produtos para os seus consumidores finais e usuarios individuais, tamén chamada MCPR. MCPR é unha ferramenta que se debe usar en conxunto con todos estes métodos.
A ferramenta MCPR por si mesma está deseñada para eliminar só os sobrantes e os instaladores de recuperación do teu sistema. Non eliminará ningún produto ou extensión de instalación de McAfee. Non obstante, xunto cos outros métodos desta guía, MCPR pode axudarche a borrar do teu sistema todo o relacionado con McAfee. Use a guía a continuación para comezar.
Nota: recoméndase que non use descargas anteriores de MCPR para eliminar as versións máis recentes dos produtos McAfee. Debes descargar unha ferramenta nova cada vez que queiras executar MCPR para asegurarte de que a versión máis recente pode detectar todos os produtos McAfee máis recentes instalados no teu sistema.
Pecha todos os programas do teu sistema e executa o executable MCPR. Fai clic en "Seguinte" na páxina de inicio. "Acepta" o EULA e fai clic en "Seguinte".
![Como desinstalar McAfee en Windows 11 [5 xeitos] Como desinstalar McAfee en Windows 11 [5 xeitos]](https://img2.webtech360.com/resources8/images31/image-6439-0105182720868.gif)
Fonte: McAfee
Verifica a túa identidade mediante o captcha que aparece na túa pantalla. Fai clic en "Seguinte" unha vez que remates.
![Como desinstalar McAfee en Windows 11 [5 xeitos] Como desinstalar McAfee en Windows 11 [5 xeitos]](https://img2.webtech360.com/resources8/images31/image-3092-0105182721013.png)
Fonte: McAfee
Agora MCPR fará as súas cousas e detectará e eliminará todos os instaladores de McAfee, os ficheiros sobrantes e outras cousas que atope no teu sistema. Unha vez rematado, dirixirase á páxina "Eliminación completada". Fai clic en "Reiniciar" para reiniciar o teu sistema.
![Como desinstalar McAfee en Windows 11 [5 xeitos] Como desinstalar McAfee en Windows 11 [5 xeitos]](https://img2.webtech360.com/resources8/images31/image-2229-0105182721078.png)
Fonte: McAfee
When your PC restarts, all McAfee products should have been removed from your system.
Method #03: Using EPR McAfee removal tool (if you have grant number)
McAfee has an EPR tool or End Point Removal tool for all enterprise, organization, business edition users. You will need your dedicated grant number for this guide. However, if you are an end-user looking for a similar tool, then you can use Method #3 instead. Use the guide below to remove all McAfee products from your system using the EPR tool.
Step 1: Download EPR tool
Start by downloading the EPR tool to your local storage. Visit this link and log in to your business account using your grant number and email address.
Once logged in, use the filters to select ‘Utilities and Connectors’ and then download the latest version of EPR to your local storage. Once downloaded, you can use the guide below to run EPR and remove any McAfee products installed on your system.
Step 2: Using EPR tool to uninstall McAfee
You will need to log in to the service portal to use EPR on your system. You can use this detailed guide from McAfee for step-by-step instructions on how you can remove EPR from your system.
A few things to keep in mind would be to run the tool with administrator privileges and to ensure that it is running from your local storage.
Running the tool from a NAS or a network sharing drive won’t be able to properly remove all McAfee products from your system.
Additionally, McAfee recommends that you remove specific products using command line arguments however as you are looking to remove all McAfee products from your system, you are safe to use the ‘–All’ argument when executing commands.
Related: Windows 11 Start Menu Not Working? 17 Ways to fix
Method #04: Using CMD (Command prompt)
You can also try to uninstall McAfee via the CMD if nothing seems to be working for you. Use the guide below to get you started.
Press Windows + S on your keyboard and search for CMD. Click on ‘Run as administrator’ once the app shows up in your search results.
![Como desinstalar McAfee en Windows 11 [5 xeitos] Como desinstalar McAfee en Windows 11 [5 xeitos]](https://img2.webtech360.com/resources8/images31/image-1678-0105182721182.png)
Now enter the following command and press ‘Enter’ on your keyboard.
wmic
![Como desinstalar McAfee en Windows 11 [5 xeitos] Como desinstalar McAfee en Windows 11 [5 xeitos]](https://img2.webtech360.com/resources8/images31/image-1128-0105182721300.png)
Enter the following command to get a list of all installed programs.
product get name
![Como desinstalar McAfee en Windows 11 [5 xeitos] Como desinstalar McAfee en Windows 11 [5 xeitos]](https://img2.webtech360.com/resources8/images31/image-4129-0105182721420.png)
Look for McAfee products in the list on your screen and note down their names.
![Como desinstalar McAfee en Windows 11 [5 xeitos] Como desinstalar McAfee en Windows 11 [5 xeitos]](https://img2.webtech360.com/resources8/images31/image-5198-0105182721512.png)
Once done, enter the following command and press Enter on your keyboard to execute it. Replace ‘PROGRAMNAME’ with the name you noted down earlier.
product where name="PROGRAMNAME" call uninstall
Note: Do not remove the quotes.
![Como desinstalar McAfee en Windows 11 [5 xeitos] Como desinstalar McAfee en Windows 11 [5 xeitos]](https://img2.webtech360.com/resources8/images31/image-577-0105182955246.png)
The selected McAfee program should now be uninstalled from your system. Repeat the steps above for any other McAfee programs on your system.
Method #05: Uninstall McAfee using PowerShell
You can also try to remove the concerned McAfee program from your system via PowerShell.
Press Windows + S on your keyboard and look for PowerShell. Click on ‘Run as administrator’ once the app shows up in your search results.
![Como desinstalar McAfee en Windows 11 [5 xeitos] Como desinstalar McAfee en Windows 11 [5 xeitos]](https://img2.webtech360.com/resources8/images31/image-232-0105182721668.png)
Now enter the following command to get a list of all the programs installed on your system.
Get-WmiObject -Class Win32_Product | Select-Object -Property Name
![Como desinstalar McAfee en Windows 11 [5 xeitos] Como desinstalar McAfee en Windows 11 [5 xeitos]](https://img2.webtech360.com/resources8/images31/image-7648-0105182721754.png)
Note down the product name for the concerned McAfee app. We will be using the ‘Asus Update Checker’ as an example for this guide.
![Como desinstalar McAfee en Windows 11 [5 xeitos] Como desinstalar McAfee en Windows 11 [5 xeitos]](https://img2.webtech360.com/resources8/images31/image-2370-0105182721854.png)
Now enter the following command and replace ‘PRODUCTNAME’ with the name you noted down earlier.
$app = Get-WmiObject -Class Win32_Product `

-Filter "Name = 'PRODUCTNAME'"
Note: Do not remove any of the quotes in the command above when adding your program’s name.
![Como desinstalar McAfee en Windows 11 [5 xeitos] Como desinstalar McAfee en Windows 11 [5 xeitos]](https://img2.webtech360.com/resources8/images31/image-9786-0105182721936.png)
Hit Enter on your keyboard to execute the command and the concerned app will now be removed from your system. Repeat the steps above to remove any other McAfee apps installed on your system.
Can’t uninstall McAfee? How to fix
If you are unable to uninstall McAfee programs from your system then you can use the guide below to troubleshoot uninstallation issues. However, if you still end up facing issues with your system, we would recommend you get in touch with McAfee technical support team ASAP. Here’s a list of checks that you should go through to solve potential uninstallation issues on your system.
Method #01: Change your default AntiVirus First
In case McAfee has been set as your default AV then it is likely the reason you are unable to uninstall it from your system. This could also be an enforced restriction from your organization or admin to ensure that your system is never without protection. Follow the guide below to change your default AV in Windows 11.
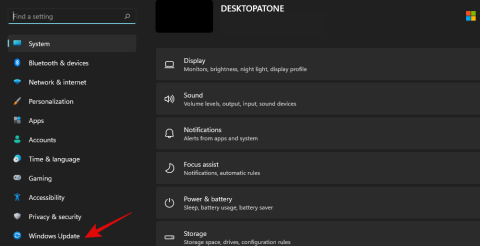
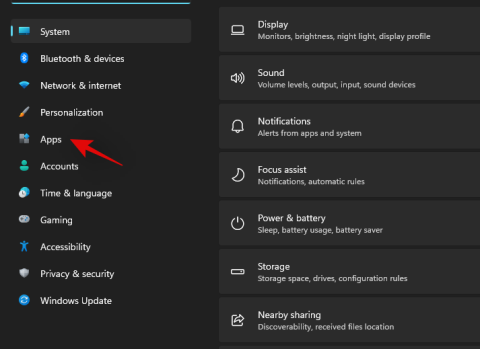
Press Windows + i to launch the Settings app. Now click on ‘Apps’ on your left.
![Como desinstalar McAfee en Windows 11 [5 xeitos] Como desinstalar McAfee en Windows 11 [5 xeitos]](https://img2.webtech360.com/resources8/images31/image-7303-0105182722012.png)
Click on ‘Default Apps’.
![Como desinstalar McAfee en Windows 11 [5 xeitos] Como desinstalar McAfee en Windows 11 [5 xeitos]](https://img2.webtech360.com/resources8/images31/image-6439-0105182722080.png)
Now look below for ‘McAfee’ in the app list. If found click on it and change any associations with default extensions back to Microsoft Defender and its other programs.
![Como desinstalar McAfee en Windows 11 [5 xeitos] Como desinstalar McAfee en Windows 11 [5 xeitos]](https://img2.webtech360.com/resources8/images31/image-5889-0105182722180.png)
Once changed, restart your system for good measure. You can now uninstall McAfee from your system and you shouldn’t face any issues.
Method #02: Check your account privileges
If you are using a company issue machine or a system managed by your organization or educational institute then it is likely that you do not have the required permissions to remove McAfee from your system. It would be a good idea to get in touch with your admin if you wish to remove McAfee from your system as without administrator privileges this won’t be possible. However, in case you can source the grant number and license information from your admin then you will be able to remove the app on your own using the EPR guide at the top.
Method #03: Get in touch with McAfee Support
If you are still unable to remove McAfee programs from your system then it is time to get in touch with the McAfee support team. This likely indicates a unique issue to your system which will need to be individually diagnosed and resolved. You can use the link below to get in touch with the McAfee Support team.
- McAfee Technical Support | Link
- Contact Number: 1 (866) 622-3911 (USA)
How to manually delete McAfee leftover files
It’s now time to check for leftover files and delete the ones that you find. Ideally, McAfee nowadays does a good job cleaning after itself but depending on your Windows and McAfee version, you might still have some leftover folders and data. Use the guide below to check for and remove any leftover McAfee files from your system.
Press Windows + E keys together on your keyboard to open the File Explorer. Now navigate to the following path below. You can also copy-paste the same in your address bar. Delete any files and folders you find that are related to McAfee.
C:\Program Files
![Como desinstalar McAfee en Windows 11 [5 xeitos] Como desinstalar McAfee en Windows 11 [5 xeitos]](https://img2.webtech360.com/resources8/images31/image-2542-0105182722326.png)
Similarly, navigate to the following paths and delete any leftover McAfee files or folders that you find. Simply replace ‘USERNAME’ with your current username within Windows.
C:\Program Files\Common FilesC:\Program Files (x86)C:\Program Files (x86)\Common FilesC:\ProgramDataC:\Users\USERNAMEC:\Users\USERNAME\AppData\LocalC:\Users\USERNAME\AppData\Roaming
Once done, you should be good to check for remaining tasks and services using the guide below.
How to stop and remove leftover tasks and services
Lastly, we can check for remaining tasks and services. While it is unlikely that a modern version of McAfee leftover remaining tasks and services on your system, older versions of McAfee can do so. And if you’re trying to remove a pre-installed version of McAfee from an older system then this could be the case. Here’s how you can check for leftover tasks and services on your system.
1. Check for leftover Tasks
Press Windows + S on your keyboard and search for ‘Task Scheduler’. Click and launch the app once it shows up in your search results.
![Como desinstalar McAfee en Windows 11 [5 xeitos] Como desinstalar McAfee en Windows 11 [5 xeitos]](https://img2.webtech360.com/resources8/images31/image-8339-0105182722420.png)
Look for McAfee tasks in the right tab with ‘Task Scheduler Library’ selected on your left.
![Como desinstalar McAfee en Windows 11 [5 xeitos] Como desinstalar McAfee en Windows 11 [5 xeitos]](https://img2.webtech360.com/resources8/images31/image-5198-0105182955357.png)
If any are found, click and select the task and then hit delete on your keyboard. Click on ‘Yes’ to confirm your choice.
![Como desinstalar McAfee en Windows 11 [5 xeitos] Como desinstalar McAfee en Windows 11 [5 xeitos]](https://img2.webtech360.com/resources8/images31/image-6925-0105182722583.png)
Now double click on ‘Task Scheduler Library’ on your left to expand the section.
![Como desinstalar McAfee en Windows 11 [5 xeitos] Como desinstalar McAfee en Windows 11 [5 xeitos]](https://img2.webtech360.com/resources8/images31/image-4442-0105182722675.png)
Look for a McAfee folder in this category. In case found one, delete all tasks in the contained folder and the folder itself.
![Como desinstalar McAfee en Windows 11 [5 xeitos] Como desinstalar McAfee en Windows 11 [5 xeitos]](https://img2.webtech360.com/resources8/images31/image-9062-0105182955418.png)
And that’s it! You will now have deleted leftover McAfee tasks from your system.
2. Check for leftover Services
Press Windows + S on your keyboard and search for ‘Services’. Click and launch the app from your search results.
![Como desinstalar McAfee en Windows 11 [5 xeitos] Como desinstalar McAfee en Windows 11 [5 xeitos]](https://img2.webtech360.com/resources8/images31/image-8512-0105182722882.png)
Now look for McAfee services in the list on your screen. Once found double-click on the service. As I do not have McAfee installed, we will be using Armoury Crate Service as an example for this guide.
![Como desinstalar McAfee en Windows 11 [5 xeitos] Como desinstalar McAfee en Windows 11 [5 xeitos]](https://img2.webtech360.com/resources8/images31/image-7961-0105182722997.png)
The properties page will now open for the selected service. Make a note of the exact service name on the properties page.
![Como desinstalar McAfee en Windows 11 [5 xeitos] Como desinstalar McAfee en Windows 11 [5 xeitos]](https://img2.webtech360.com/resources8/images31/image-9030-0105182723086.png)
Click on ‘Stop’.
![Como desinstalar McAfee en Windows 11 [5 xeitos] Como desinstalar McAfee en Windows 11 [5 xeitos]](https://img2.webtech360.com/resources8/images31/image-6547-0105182723165.png)
Now click on the drop-down menu and select ‘Disabled’.
![Como desinstalar McAfee en Windows 11 [5 xeitos] Como desinstalar McAfee en Windows 11 [5 xeitos]](https://img2.webtech360.com/resources8/images31/image-1269-0105182723275.png)
Click on ‘Ok’ to save your changes.
![Como desinstalar McAfee en Windows 11 [5 xeitos] Como desinstalar McAfee en Windows 11 [5 xeitos]](https://img2.webtech360.com/resources8/images31/image-7065-0105182723370.png)
Press Windows + S and search for CMD. Click on ‘Run as administrator’.
![Como desinstalar McAfee en Windows 11 [5 xeitos] Como desinstalar McAfee en Windows 11 [5 xeitos]](https://img2.webtech360.com/resources8/images31/image-1787-0105182723478.png)
Enter the following command and replace ‘SERVICE NAME’ with the name you noted down earlier.
sc delete SERVICENAME
![Como desinstalar McAfee en Windows 11 [5 xeitos] Como desinstalar McAfee en Windows 11 [5 xeitos]](https://img2.webtech360.com/resources8/images31/image-4788-0105182723605.png)
The service should now be deleted from your system. Repeat the steps above to delete other McAfee services from your system, if any.
Have a question? Let us know in the comments below.
Related:
![Como desinstalar McAfee en Windows 11 [5 xeitos] Como desinstalar McAfee en Windows 11 [5 xeitos]](https://img2.webtech360.com/resources8/images31/image-8781-0105182720019.png)
![Como desinstalar McAfee en Windows 11 [5 xeitos] Como desinstalar McAfee en Windows 11 [5 xeitos]](https://img2.webtech360.com/resources8/images31/image-6298-0105182720092.png)
![Como desinstalar McAfee en Windows 11 [5 xeitos] Como desinstalar McAfee en Windows 11 [5 xeitos]](https://img2.webtech360.com/resources8/images31/image-7367-0105182720178.png)
![Como desinstalar McAfee en Windows 11 [5 xeitos] Como desinstalar McAfee en Windows 11 [5 xeitos]](https://img2.webtech360.com/resources8/images31/image-8436-0105182720277.png)
![Como desinstalar McAfee en Windows 11 [5 xeitos] Como desinstalar McAfee en Windows 11 [5 xeitos]](https://img2.webtech360.com/resources8/images31/image-8026-0105182955005.png)
![Como desinstalar McAfee en Windows 11 [5 xeitos] Como desinstalar McAfee en Windows 11 [5 xeitos]](https://img2.webtech360.com/resources8/images31/image-7022-0105182720444.png)
![Como desinstalar McAfee en Windows 11 [5 xeitos] Como desinstalar McAfee en Windows 11 [5 xeitos]](https://img2.webtech360.com/resources8/images31/image-7475-0105182955130.png)
![Como desinstalar McAfee en Windows 11 [5 xeitos] Como desinstalar McAfee en Windows 11 [5 xeitos]](https://img2.webtech360.com/resources8/images31/image-3125-0105182720698.png)
![Como desinstalar McAfee en Windows 11 [5 xeitos] Como desinstalar McAfee en Windows 11 [5 xeitos]](https://img2.webtech360.com/resources8/images31/image-6439-0105182720868.gif)
![Como desinstalar McAfee en Windows 11 [5 xeitos] Como desinstalar McAfee en Windows 11 [5 xeitos]](https://img2.webtech360.com/resources8/images31/image-3092-0105182721013.png)
![Como desinstalar McAfee en Windows 11 [5 xeitos] Como desinstalar McAfee en Windows 11 [5 xeitos]](https://img2.webtech360.com/resources8/images31/image-2229-0105182721078.png)
![Como desinstalar McAfee en Windows 11 [5 xeitos] Como desinstalar McAfee en Windows 11 [5 xeitos]](https://img2.webtech360.com/resources8/images31/image-1678-0105182721182.png)
![Como desinstalar McAfee en Windows 11 [5 xeitos] Como desinstalar McAfee en Windows 11 [5 xeitos]](https://img2.webtech360.com/resources8/images31/image-1128-0105182721300.png)
![Como desinstalar McAfee en Windows 11 [5 xeitos] Como desinstalar McAfee en Windows 11 [5 xeitos]](https://img2.webtech360.com/resources8/images31/image-4129-0105182721420.png)
![Como desinstalar McAfee en Windows 11 [5 xeitos] Como desinstalar McAfee en Windows 11 [5 xeitos]](https://img2.webtech360.com/resources8/images31/image-5198-0105182721512.png)
![Como desinstalar McAfee en Windows 11 [5 xeitos] Como desinstalar McAfee en Windows 11 [5 xeitos]](https://img2.webtech360.com/resources8/images31/image-577-0105182955246.png)
![Como desinstalar McAfee en Windows 11 [5 xeitos] Como desinstalar McAfee en Windows 11 [5 xeitos]](https://img2.webtech360.com/resources8/images31/image-232-0105182721668.png)
![Como desinstalar McAfee en Windows 11 [5 xeitos] Como desinstalar McAfee en Windows 11 [5 xeitos]](https://img2.webtech360.com/resources8/images31/image-7648-0105182721754.png)
![Como desinstalar McAfee en Windows 11 [5 xeitos] Como desinstalar McAfee en Windows 11 [5 xeitos]](https://img2.webtech360.com/resources8/images31/image-2370-0105182721854.png)
![Como desinstalar McAfee en Windows 11 [5 xeitos] Como desinstalar McAfee en Windows 11 [5 xeitos]](https://img2.webtech360.com/resources8/images31/image-9786-0105182721936.png)
![Como desinstalar McAfee en Windows 11 [5 xeitos] Como desinstalar McAfee en Windows 11 [5 xeitos]](https://img2.webtech360.com/resources8/images31/image-7303-0105182722012.png)
![Como desinstalar McAfee en Windows 11 [5 xeitos] Como desinstalar McAfee en Windows 11 [5 xeitos]](https://img2.webtech360.com/resources8/images31/image-6439-0105182722080.png)
![Como desinstalar McAfee en Windows 11 [5 xeitos] Como desinstalar McAfee en Windows 11 [5 xeitos]](https://img2.webtech360.com/resources8/images31/image-5889-0105182722180.png)
![Como desinstalar McAfee en Windows 11 [5 xeitos] Como desinstalar McAfee en Windows 11 [5 xeitos]](https://img2.webtech360.com/resources8/images31/image-2542-0105182722326.png)
![Como desinstalar McAfee en Windows 11 [5 xeitos] Como desinstalar McAfee en Windows 11 [5 xeitos]](https://img2.webtech360.com/resources8/images31/image-8339-0105182722420.png)
![Como desinstalar McAfee en Windows 11 [5 xeitos] Como desinstalar McAfee en Windows 11 [5 xeitos]](https://img2.webtech360.com/resources8/images31/image-5198-0105182955357.png)
![Como desinstalar McAfee en Windows 11 [5 xeitos] Como desinstalar McAfee en Windows 11 [5 xeitos]](https://img2.webtech360.com/resources8/images31/image-6925-0105182722583.png)
![Como desinstalar McAfee en Windows 11 [5 xeitos] Como desinstalar McAfee en Windows 11 [5 xeitos]](https://img2.webtech360.com/resources8/images31/image-4442-0105182722675.png)
![Como desinstalar McAfee en Windows 11 [5 xeitos] Como desinstalar McAfee en Windows 11 [5 xeitos]](https://img2.webtech360.com/resources8/images31/image-9062-0105182955418.png)
![Como desinstalar McAfee en Windows 11 [5 xeitos] Como desinstalar McAfee en Windows 11 [5 xeitos]](https://img2.webtech360.com/resources8/images31/image-8512-0105182722882.png)
![Como desinstalar McAfee en Windows 11 [5 xeitos] Como desinstalar McAfee en Windows 11 [5 xeitos]](https://img2.webtech360.com/resources8/images31/image-7961-0105182722997.png)
![Como desinstalar McAfee en Windows 11 [5 xeitos] Como desinstalar McAfee en Windows 11 [5 xeitos]](https://img2.webtech360.com/resources8/images31/image-9030-0105182723086.png)
![Como desinstalar McAfee en Windows 11 [5 xeitos] Como desinstalar McAfee en Windows 11 [5 xeitos]](https://img2.webtech360.com/resources8/images31/image-6547-0105182723165.png)
![Como desinstalar McAfee en Windows 11 [5 xeitos] Como desinstalar McAfee en Windows 11 [5 xeitos]](https://img2.webtech360.com/resources8/images31/image-1269-0105182723275.png)
![Como desinstalar McAfee en Windows 11 [5 xeitos] Como desinstalar McAfee en Windows 11 [5 xeitos]](https://img2.webtech360.com/resources8/images31/image-7065-0105182723370.png)
![Como desinstalar McAfee en Windows 11 [5 xeitos] Como desinstalar McAfee en Windows 11 [5 xeitos]](https://img2.webtech360.com/resources8/images31/image-1787-0105182723478.png)
![Como desinstalar McAfee en Windows 11 [5 xeitos] Como desinstalar McAfee en Windows 11 [5 xeitos]](https://img2.webtech360.com/resources8/images31/image-4788-0105182723605.png)





![Como desinstalar McAfee en Windows 11 [5 xeitos] Como desinstalar McAfee en Windows 11 [5 xeitos]](https://blog.webtech360.com/resources8/images31/image-4917-0105182719945.png)
