As actualizacións de Windows sempre foron unha molestia notoria para moitos usuarios desde os días de Windows XP. Afortunadamente, a entrega de actualizacións de Windows mellorou drasticamente nos últimos anos e moi poucas actualizacións de funcións tenden a causar problemas importantes hoxe en día.
Podes configurar Windows para que descargue e actualice automaticamente en segundo plano e mesmo que se reinicie durante as túas horas de inactividade. Todo isto é xenial, pero que pasa se se instala unha actualización que non precisa? Ou que pasa se recibe unha actualización que degrada o rendemento da súa máquina? Ben, neste caso, podes desinstalar as actualizacións de Windows en Windows 11. Pero aquí tes un par de cousas que debes ter en conta antes de desinstalar as actualizacións do teu PC con Windows 11.
Relacionado: Como desactivar as actualizacións en Windows 11
Contidos
Por que desinstalar as actualizacións de Windows?
Pode haber varias razóns polas que desexa desinstalar as actualizacións de Windows, aquí están algunhas das máis comúns. Se está a solucionar erros despois dunha actualización recente de Windows, tamén pode pasar por esta lista.
No caso de que teñas algún problema deste tipo no teu sistema, podes probar a desinstalar a última actualización de Windows para tentar solucionar o problema.
- Rendemento xeral do sistema degradado
- Actualizacións de controladores defectuosas
- Funcionalidade rota das funcións de Windows
- Recursos mal xestionados en segundo plano
- Uso elevado de CPU ou disco
- Actualización non desexada do controlador que estabas tentando evitar
- Comportándose mal Windows Security ou UAC
- Configuración da rexión incorrecta que non se pode cambiar
- Faltan opcións ou configuracións en Windows 11
e máis. Pode haber toneladas de problemas aos que pode enfrontarse ao instalar unha nova actualización para Windows 11, especialmente se está subscrito á canle beta ou privilexiada. Nestes casos, pode tentar desinstalar a actualización en cuestión usando a guía desta publicación.
Relacionado: Como cancelar unha actualización pendente de Windows Insider
É seguro desinstalar as actualizacións de Windows?
Si, sempre que non force a eliminación manual das actualizacións de Windows ou use unha utilidade obsoleta, debería estar seguro ao desinstalar as actualizacións de Windows do seu sistema. Non obstante, debes ter en conta que Microsoft usa actualizacións de Windows para ofrecer parches de seguridade, correccións rápidas e moito máis para axudar a protexer o teu sistema contra as últimas ameazas e vulnerabilidades de seguranza.
A eliminación das actualizacións de Windows tamén desinstalará estes parches que á súa vez acabarán facendo o teu sistema vulnerable ás ameazas en liña. Este é especialmente o caso se estás buscando desinstalar actualizacións de seguranza recentes.
Polo tanto, aínda que pode desinstalar calquera actualización con seguridade, recoméndase que reverta os cambios en canto se solucione o erro. Se o teu erro ou erro persiste despois de reinstalar a actualización, podes esperar ata que Microsoft publique unha actualización e unha corrección posterior.
Relacionado: Como eliminar Bing de Windows 11
Como atopar as actualizacións que queres eliminar
Podemos eliminar as actualizacións mediante varios métodos, pero para atopar a actualización que desexa eliminar, cómpre identificala no seu PC. A cada actualización de Microsoft asígnaselle un número de KB que axuda a determinar e identificar a actualización nos ordenadores de consumo, así como nos servidores de Microsoft. Podemos utilizar este número para a nosa vantaxe e eliminar a actualización en cuestión do seu sistema mediante unha das guías seguintes. Vexa como pode identificar as actualizacións recentes de Windows instaladas no seu PC.
Método #01: Usando Configuración
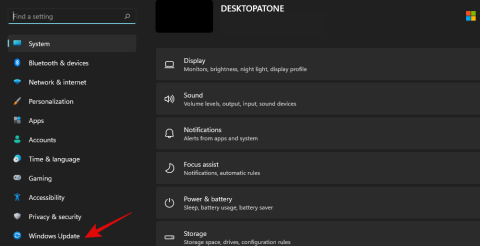
Preme Windows + ino teu teclado e selecciona "Actualización de Windows" á túa esquerda.
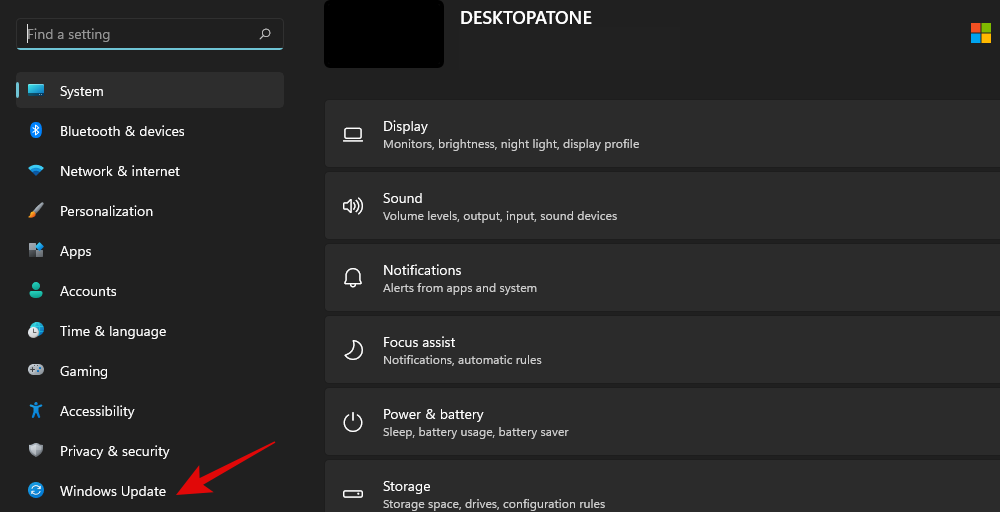
Fai clic en "Actualizar historial" agora.
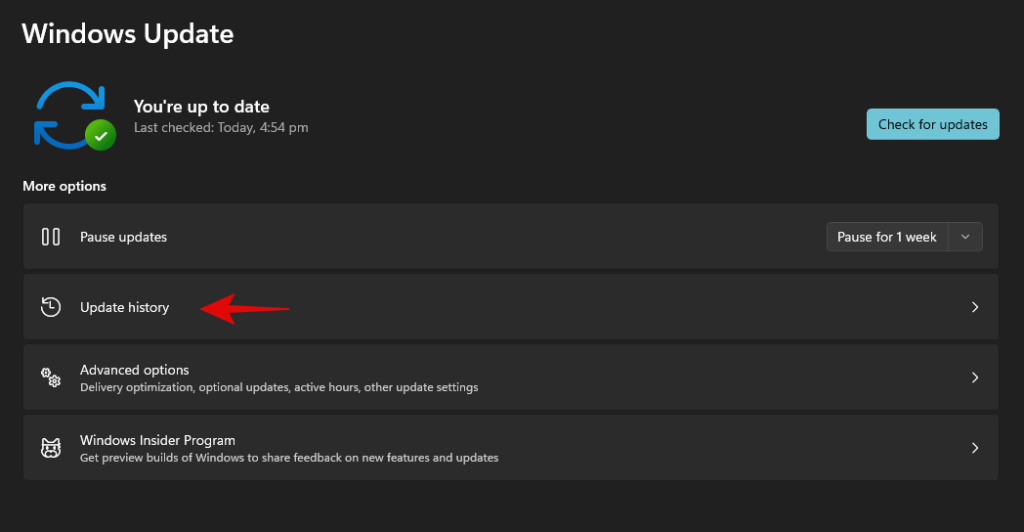
Agora obterás unha lista das actualizacións de Windows instaladas recentemente no teu sistema.
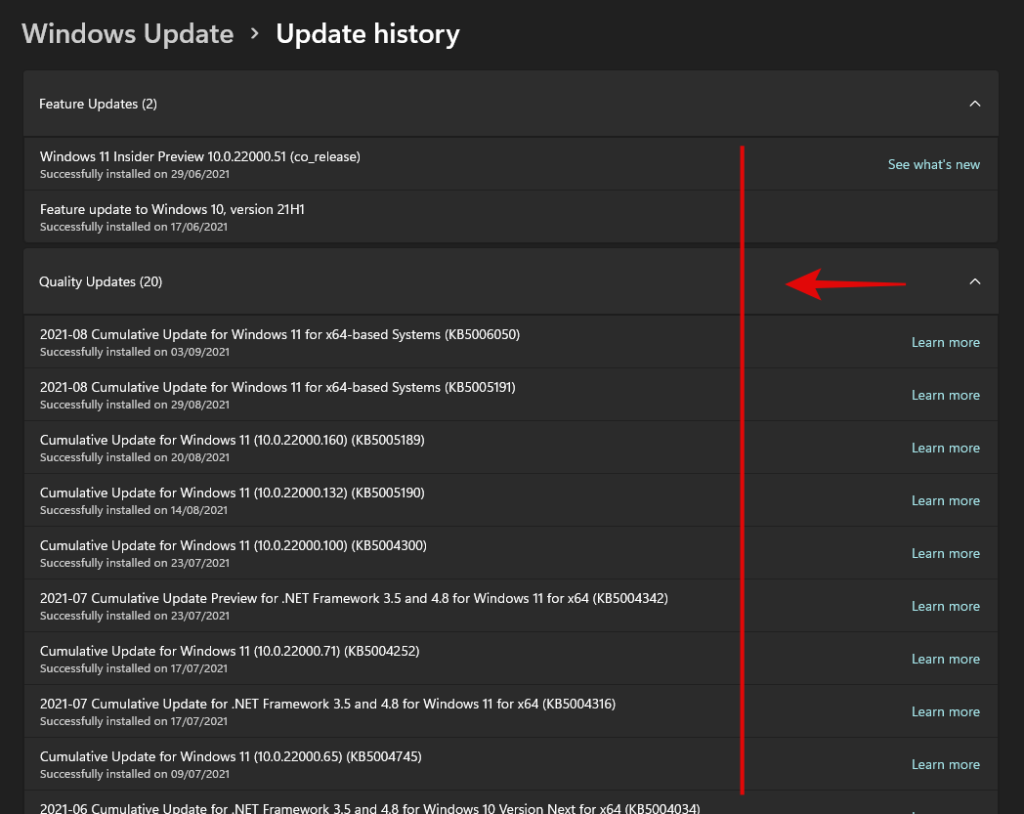
Simplemente anote o número de KB da actualización que queres eliminar do teu PC.
Método #02: Usando CMD
Preme Windows + Sno teu teclado e busca CMD. Fai clic en "Executar como administrador" unha vez que a aplicación apareza nos teus resultados de busca.
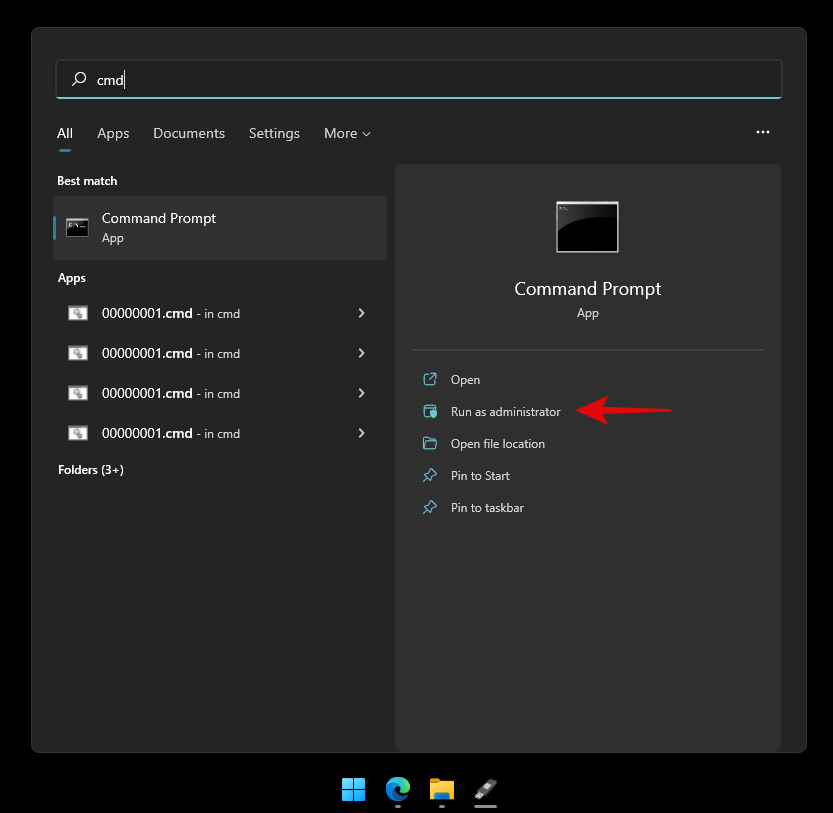
Escriba o seguinte comando e prema Intro no seu teclado.
wmic qfe list brief /format:table
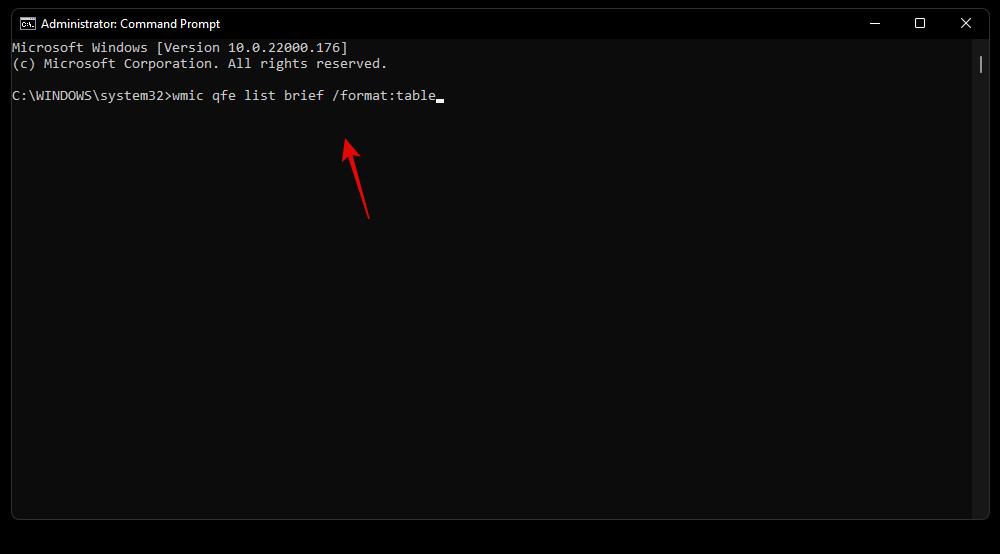
Agora obterás unha lista de todas as actualizacións recentes de Windows instaladas no teu PC. Fai clic e expande a categoría en cuestión da lista a continuación.
- Actualizacións de calidade: actualizacións de funcións para Windows 11 que introducen cambios importantes no sistema operativo.
- Actualizacións de controladores: actualizacións de controladores xenéricos/OEM para os seus periféricos e compoñentes entregados mediante a actualización de Windows.
- Actualizacións de definicións: actualizacións de definicións de seguranza para axudar a Microsoft Defender a identificar e poñer en corentena as ameazas no seu sistema.
- Other updates: Updates for Microsoft products, features, and other OEM features specific to your device. Windows features and experience packs will also be updated in this category.
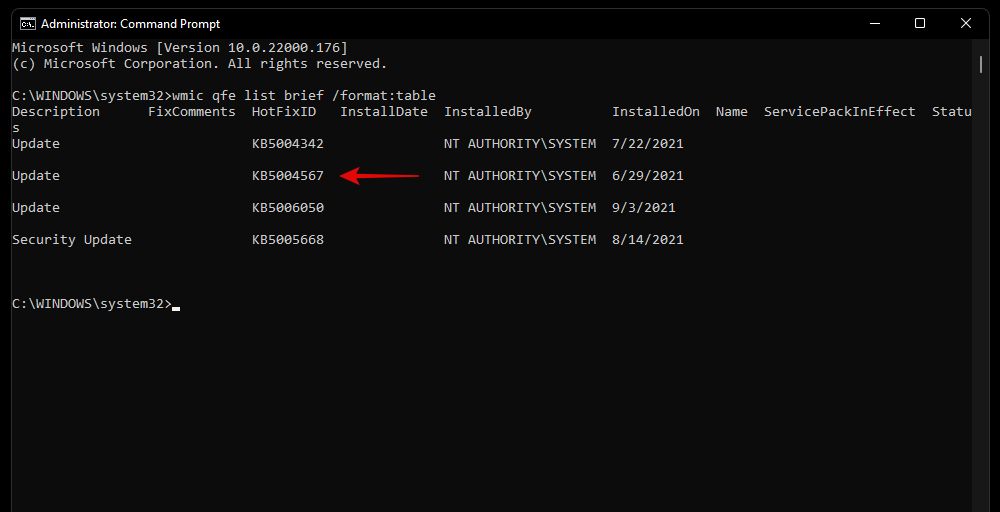
Identify the update you wish to remove and note down its ‘HotFixID’. We will be using this ID to remove the concerned update using the guide below.
How to remove Windows updates from your PC
You can remove Windows updates from your PC using either of the methods below. If you are locked out of Windows or unable to boot to your desktop then we recommend using the Windows RE method or the CMD method. If you can access your desktop then you can use the Settings app to easily remove updates from your system. Use the guides below to get you started depending on your preferences.
Method #01: Using Settings
Press Windows + i on your keyboard and click on ‘Windows update’ in the left sidebar.

Click on ‘Update history’.

Scroll to the bottom and click on ‘Uninstall updates’.
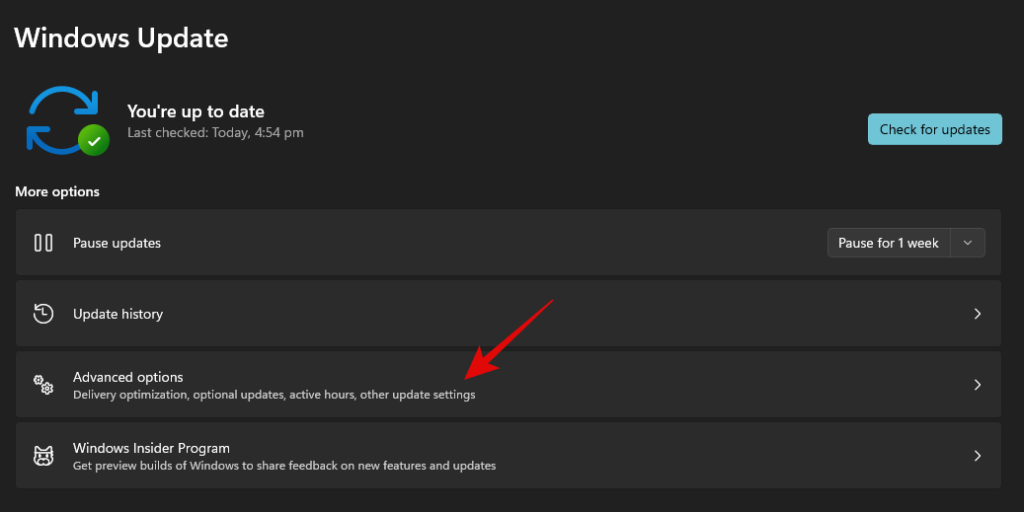
You will now be redirected to the Control Panel where you will find a list of recent updates that can be removed from your system.

Select the update you wish to remove and click on ‘Uninstall’ at the top.

Follow the on-screen instructions to uninstall the concerned update from your PC.
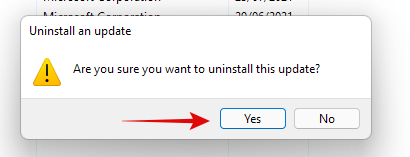
You can now restart your PC and any issues that you were facing due to the update should now be fixed.
Method #02: Using Windows update troubleshooter
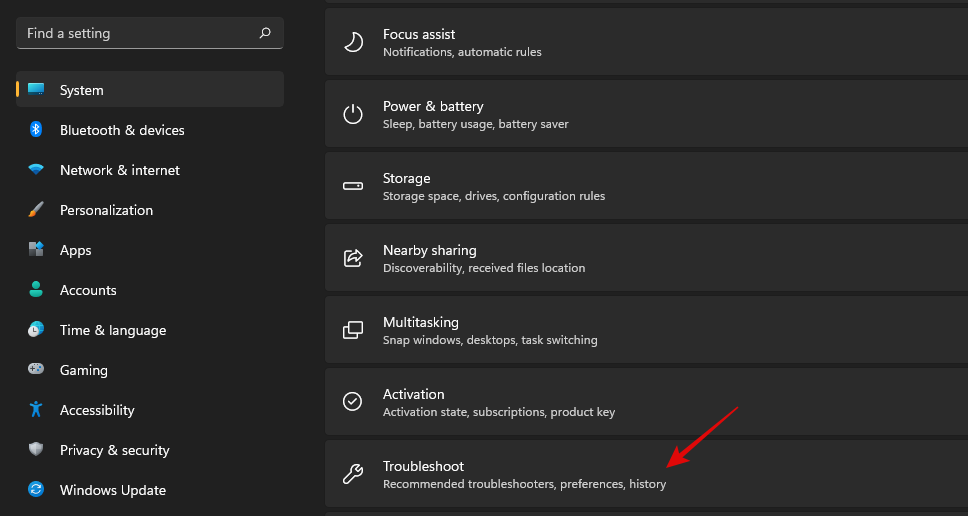
Press Windows + i on your keyboard and click on ‘Troubleshoot’.
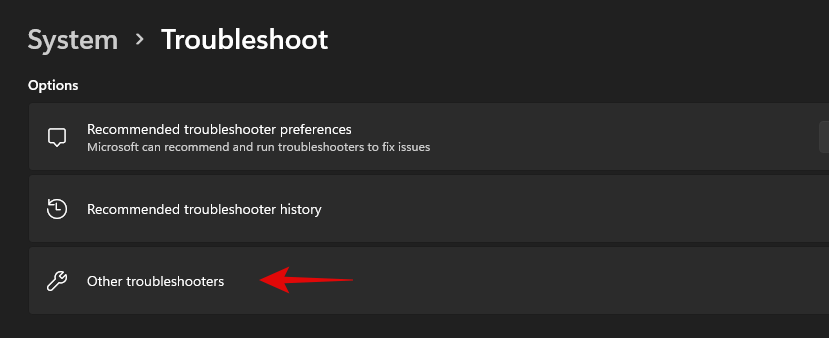
Click on ‘Other troubleshooters’.
Click on ‘Run’ beside Windows Update.
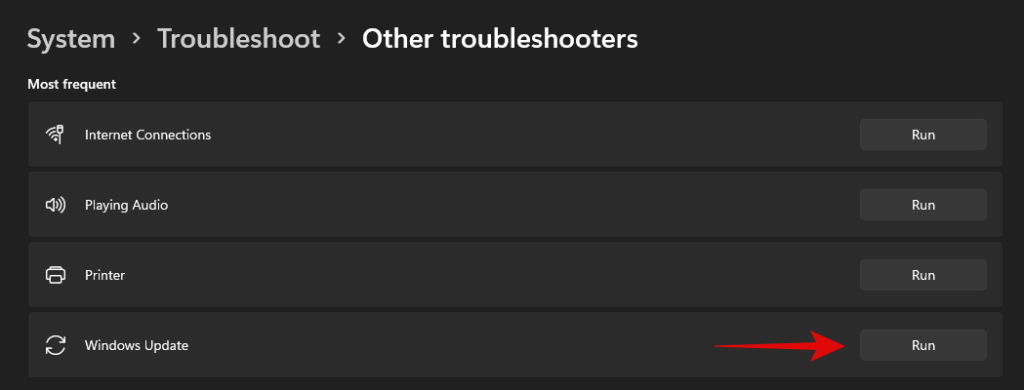
Windows troubleshooter will now look for issues with and caused by, Windows Updates on your PC. If any are found, the troubleshooter will automatically resolve the problem. If a recent update is found to be the culprit then the troubleshooter will give you the option to select and uninstall the necessary Windows Update. Follow the subsequent on-screen instructions to completely remove the update.
Once done, click on ‘Close’.
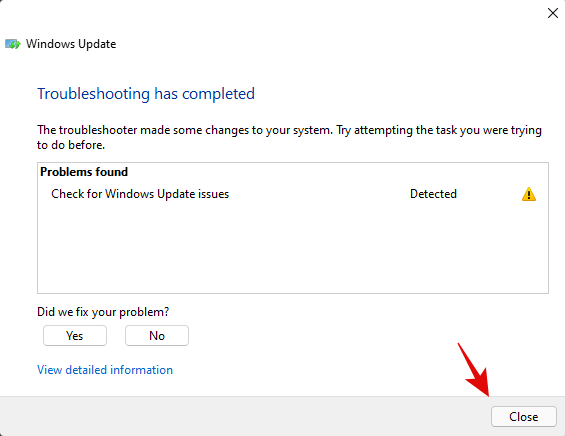
Restart your PC for good measure and the problem should now be fixed at this point. If not, you can use the PowerShell method below to manually uninstall the desired Windows Update from your system.
Method #03: Using PowerShell or CMD
Press Windows + S on your keyboard and search for PowerShell. Click on ‘Run as administrator’ once the app shows up in your search results.
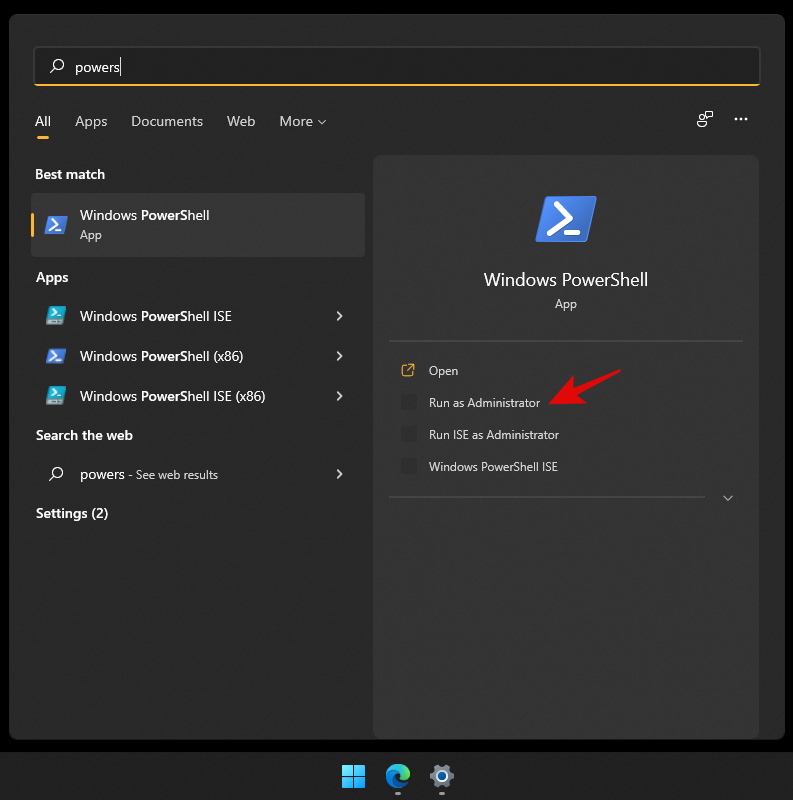
Type in the following command and press Enter on your keyboard to execute it.
wmic qfe list brief /format:table

You will now get a list of all the recently installed Windows Updates on your system in a table format. Note down the KB number for the selected Windows Update.
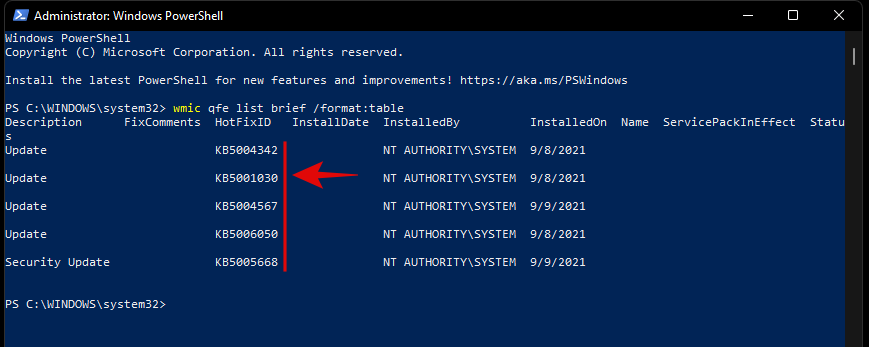
Note: You only need the number and not the letters before it.
Once done, type in the command below and execute it. Replace ‘NUMBER’ with the KB number you noted down earlier.
wusa /uninstall /kb:NUMBER
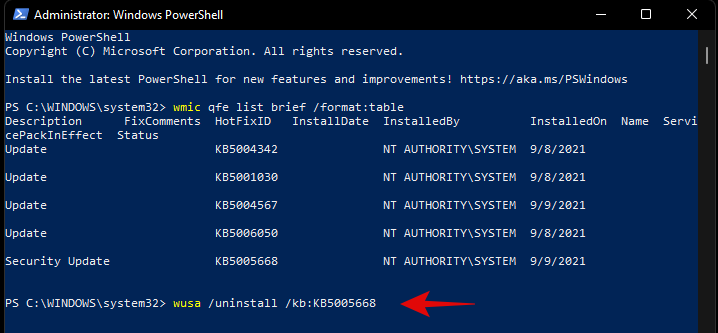
Once prompted, confirm your choice.
If prompted for a restart, we recommend you restart your system at the earliest while saving your work in the background.
If however, you do not wish to receive confirmations before uninstallation and a restart, then you can use the command below.
wusa /uninstall /kb:NUMBER /quiet
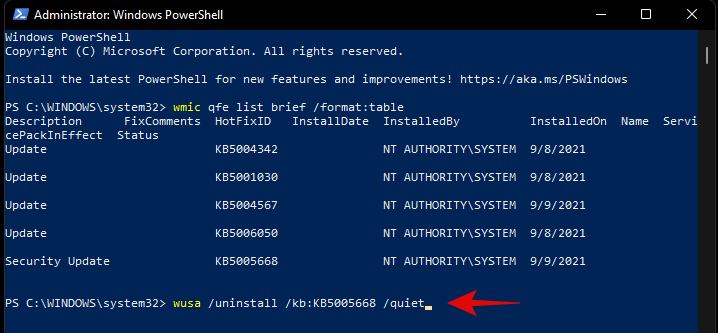
While the command above won’t prompt for confirmations, it will wait for your apps to shut down normally in the background. If you are looking to force close your apps and restart your system immediately, then you can use the command given below.
wusa /uninstall /kb:NUMBER /quiet /forcerestart
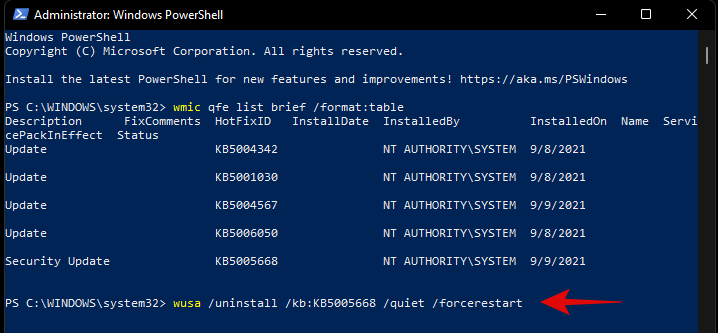
Subsequently, if you only wish to confirm a restart, then you can use the command below.
wusa /uninstall /kb:NUMBER /quiet /promptrestart
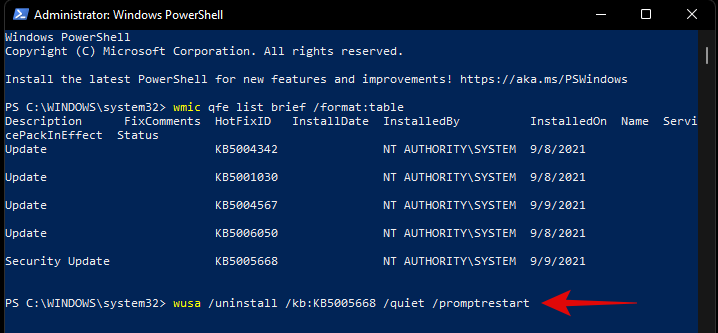
And that’s it! The problematic Windows Update should now be uninstalled from your PC.
Method #04: From Windows RE
Windows Recovery Environment also allows you to uninstall conflicting updates. Use the guide below to get you started. If you are facing a BSOD and are already in the Recovery Environment, then you can skip the first few steps of this guide.
Press Windows + i on your keyboard and select Windows Update from your left.
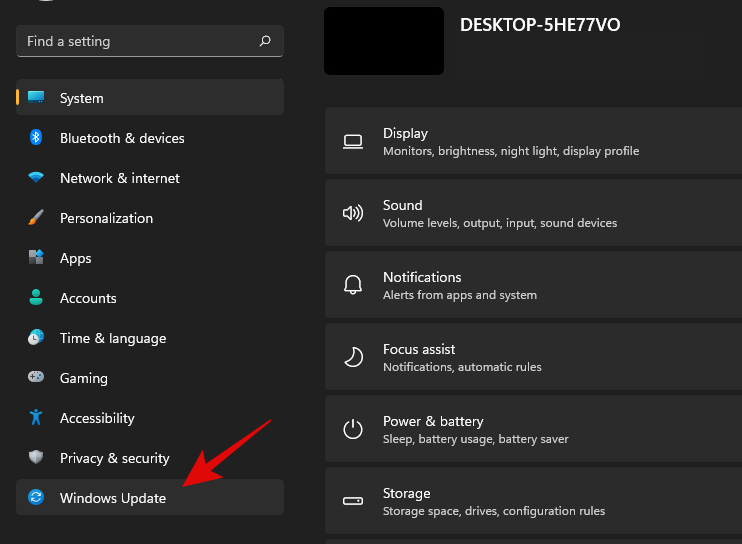
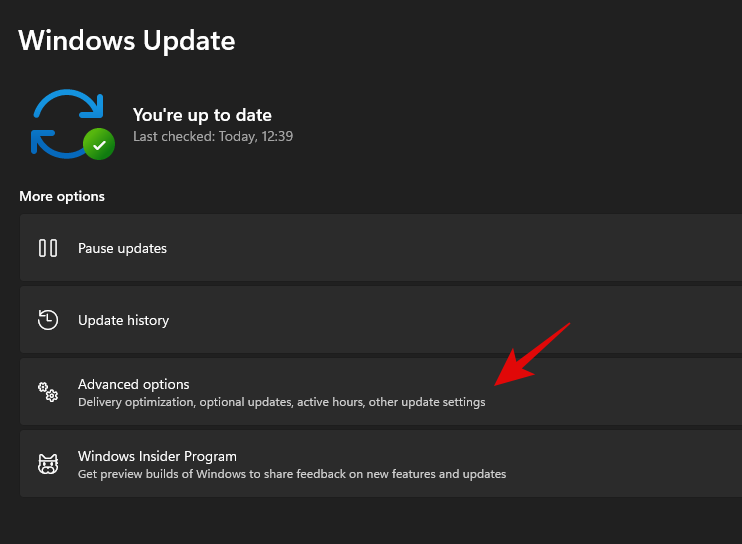
Click on ‘Advanced options’ now.
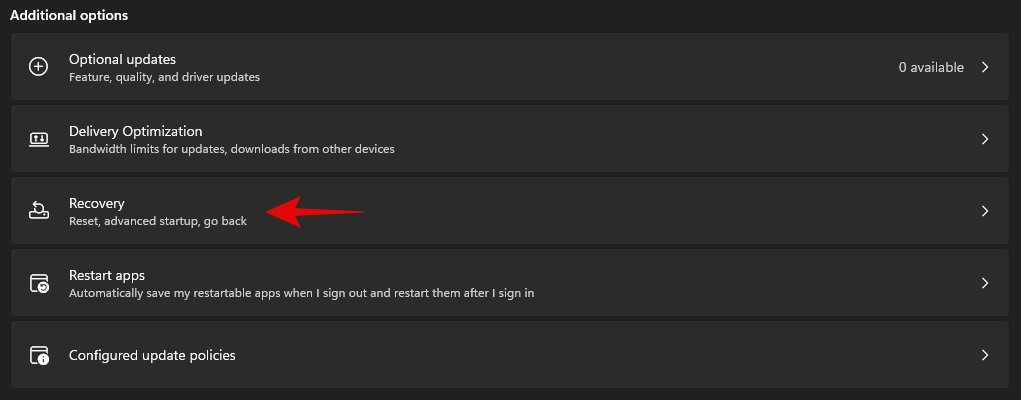
Select ‘Recovery’.
Click on ‘Restart now’ beside Advanced Startup.

You will now boot into the recovery environment. Click on ‘Troubleshoot’.
Now click on ‘Advanced Options’.
Select ‘Uninstall updates’.
Click and select the type of update you wish to install from the options on your screen.
- Uninstall latest quality update
- Uninstall latest feature update
Note: In case you are confused, feature updates refer to major updates to your Windows system that include new features, updated integrations, and sometimes new UI. Quality updates on the other hand encompass everything else including Security updates, Driver updates, Intelligence updates, Telemetry updates, and more.
Click on your administrator account and log in with your password.
Click on ‘Uninstall quality/feature’ update to confirm your choice.
Click on ‘Done’ once the process finishes.
Restart your PC and boot into Windows normally. You shouldn’t face any more issues caused by a problematic Windows update.
Method #05: Using DISM
DISM or Deployment Image Servicing and Management tool is an administrative tool within Windows that helps repair your Windows image and even mount images if needed. DISM supports image formats like .wim, .vhd, and more.
The tool can help you fix issues with your Windows installation and even remove problematic Windows updates. If you are looking to remove windows updates using DISM, then you can follow the steps below to get you started.
Note: DISM can be accessed via CMD and thus, you can use this guide from a recovery environment or an installation media as well. Follow the guide above to get CMD working on your lock screen or within Windows Recovery Environment.
Launch CMD and type in the following command. Press Enter on your keyboard once you are done.
dism /online /get-packages /format:table
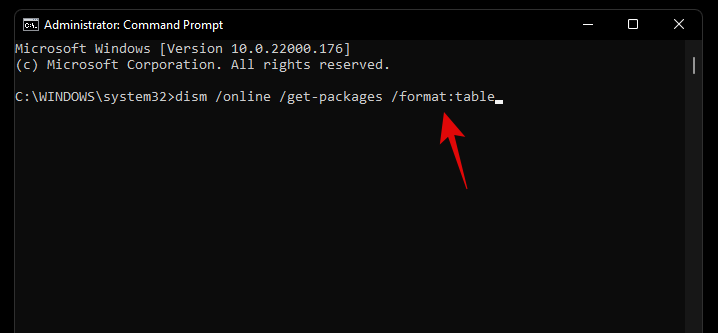
Unlike the WUSA commands we used earlier with PowerShell and CMD, you will need to note down the entire name of the Windows Update package we need to remove. Unfortunately, this includes special characters, spaces, and everything else included in the name. Thankfully you can easily copy the entire name to your clipboard by selecting it with your mouse and then using the keyboard shortcut. Once done, type in the command below and replace NAME with the package name you noted down earlier.
Note: This includes the term ‘Package_for_’ prefixed before some updates.
dism /online /Remove-Package /PackageName:NAME

The selected Windows Update will now be uninstalled from your system. In some cases, you will be prompted to restart your system, type in ‘Y’, and hit Enter on your keyboard to restart your system immediately.
How to stop receiving an update
While removing an update can help you, this does not mean that the broken Windows Update will stop showing up in your Updates section. This can be annoying and if you have automatic updates then you run the risk of automatically installing the problematic update in the background. In all such cases, you can try blocking Windows Updates on your system using the guides below depending on your preferences.
Method #01: Stop OEM driver updates through Windows update
OEM driver updates are delivered through Windows updates as well depending on their importance. Security vulnerabilities and bugs that have been recently found in components like CPU, GPU, or your wireless card, are instantly patched through such updates.
However, if you do not wish to install an OEM driver update provided by Windows update, then you can follow the guide below to block your OEM driver updates.
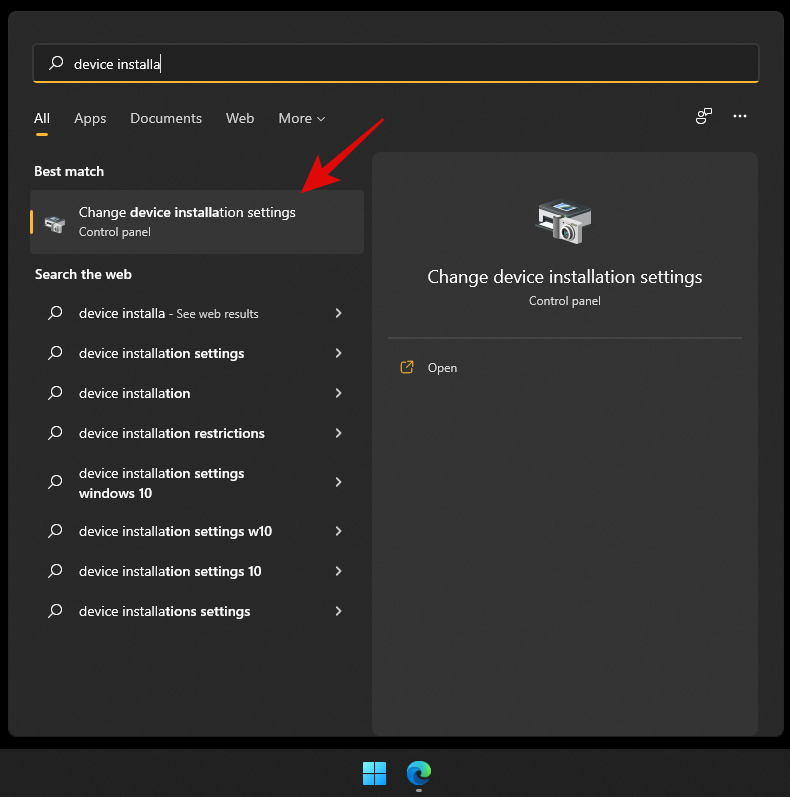
Press Windows + S on your keyboard and search for ‘Change device installation settings’. Click and launch the app from your search results.
Select ‘No’.
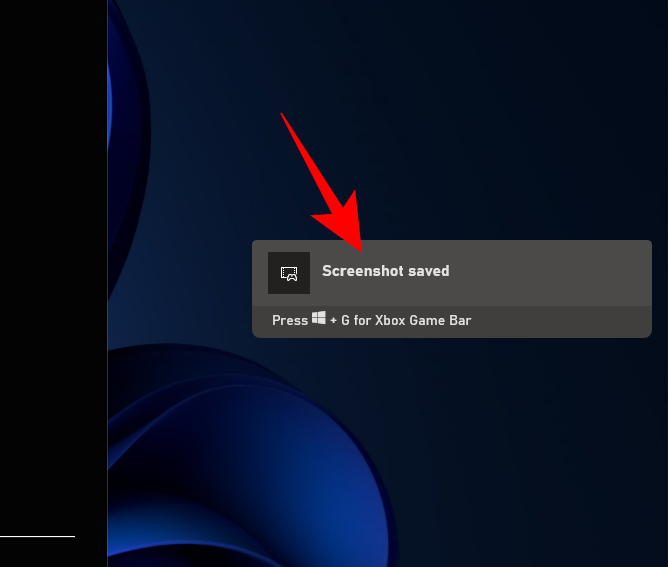
Click on ‘Save changes’.
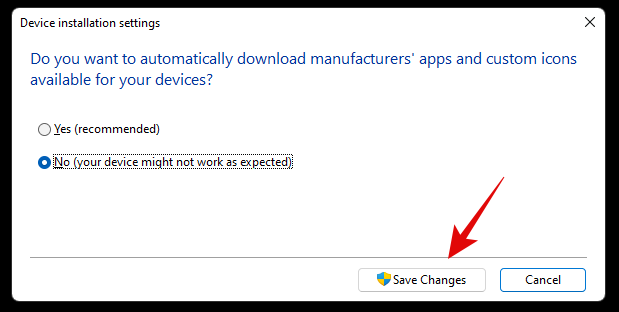
The changes will now be saved and you will no longer receive OEM driver updates through Windows Update.
Related: 6 Ways to Update Drivers on Windows 11
Method #02: Stop updates for Microsoft products
If you have been receiving constant updates for new Microsoft features and old products that keep messing up your system, then you can use the guide below to disable updates for Microsoft products via Windows Update.
Press Windows + i on your keyboard to open the Settings app and select ‘Windows Update’ from the left sidebar.

Click on ‘Advanced options’.

Now turn off the toggle for ‘Receive updates for other Microsoft products’ at the top.
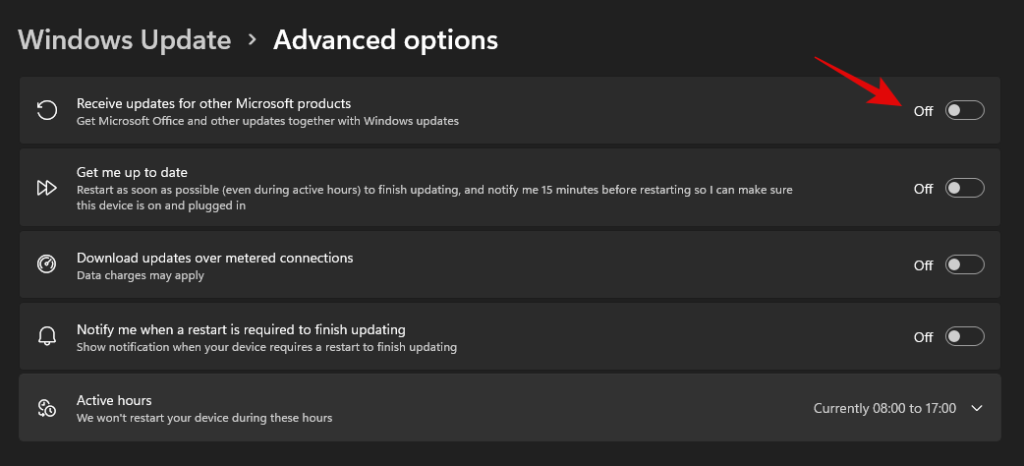
You will no longer receive updates for Microsoft products installed on your system via Windows update.
Method #03: Change active hours for background download and installation for updates
If you’re just looking to dismiss updates so that they don’t interfere with your work hours, then this is the perfect option for you. You can decide when Windows can download and update your PC in the background which will prevent Windows from interfering with your work hours. Follow the guide below to get you started.
Press Windows + i on your keyboard and click on ‘Windows Update’ on your left.

Click on ‘Advanced options’.

Now turn off the toggle for ‘Get me up to date’.
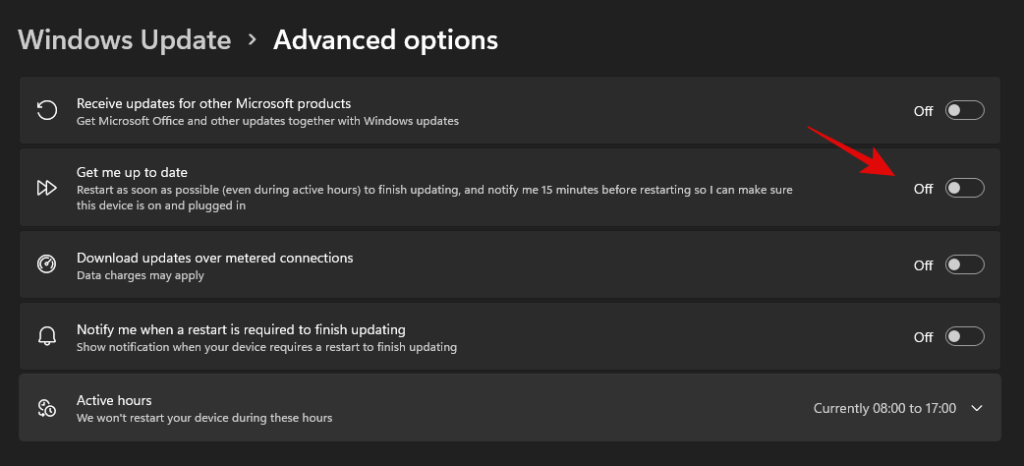
Click on ‘Active hours’.
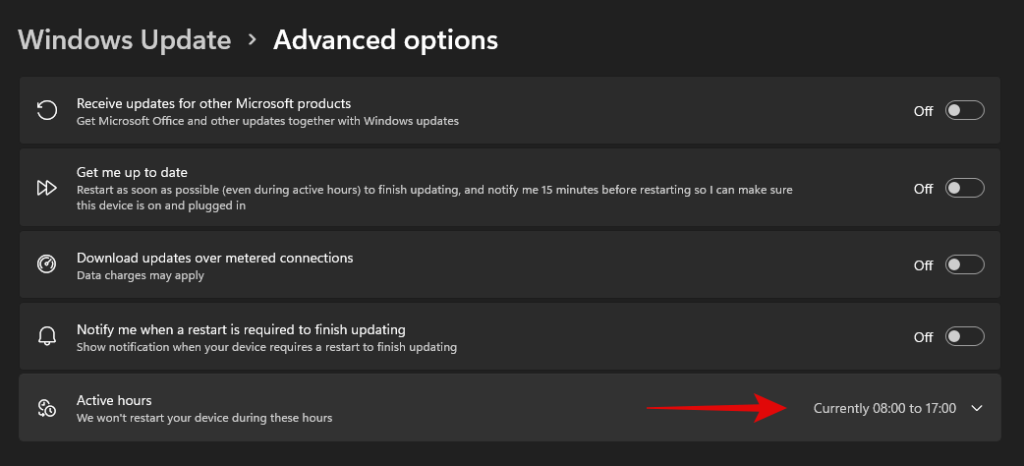
Click on the drop-down menu and select ‘Manually’.
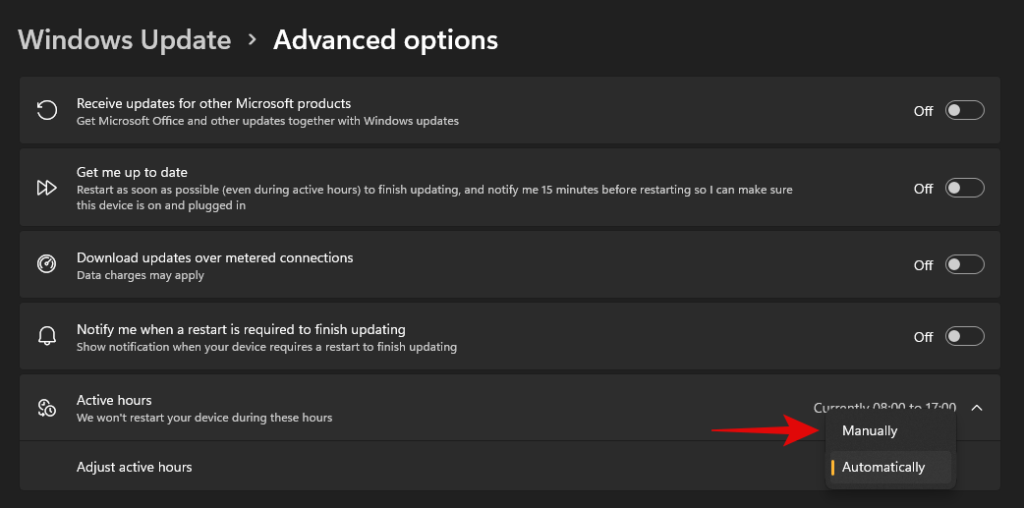
Define your desired start and end time. Windows won’t download updates and restart your PC during these hours.

And that’s it! Active hours should now be enabled for your system.
Method #04: Block Windows updates that you never wish to install
If you are receiving forced Windows updates that you don’t ever wish to install on your system then you can use a dedicated Windows troubleshooter to solve your issue.
This can be helpful in case you are trying to stop an update that disables a certain feature on your system that you don’t want disabled. This could be access to voltage controls, clock speed controls, turbo controls, fan controls, RGB control, and more. Follow the guide below to get you started.
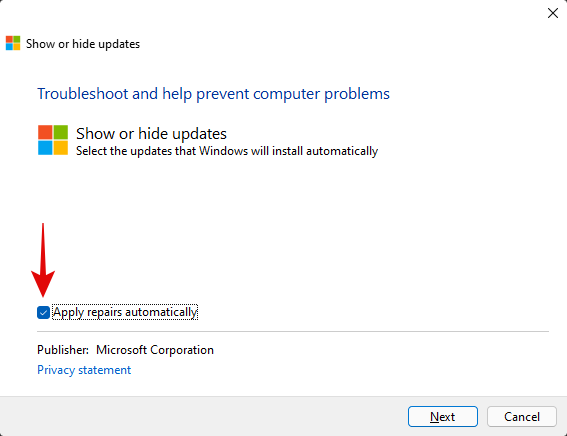
Download the Windows Update Show Hide troubleshooter using the link above and launch it on your PC. Click on ‘Advanced’.
Uncheck the option for ‘Apply repairs automatically’.
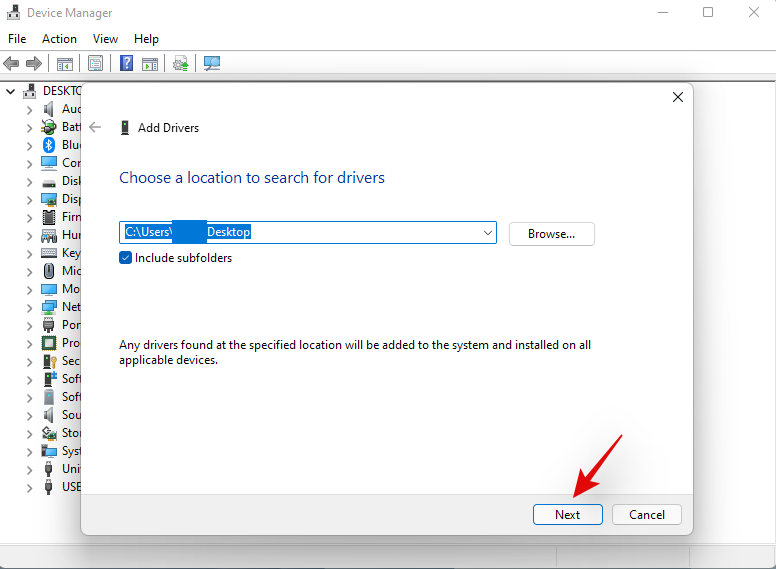
Click on ‘Next’.
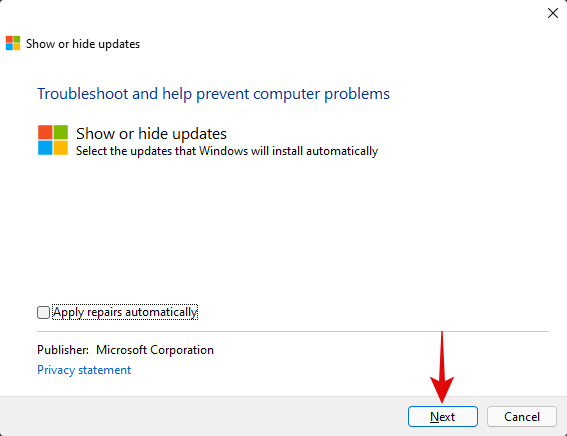
The troubleshooter will now look for pending updates and display them on your screen. Click on ‘Hide updates’.
Check the boxes for all the updates you don’t wish to receive on your PC.
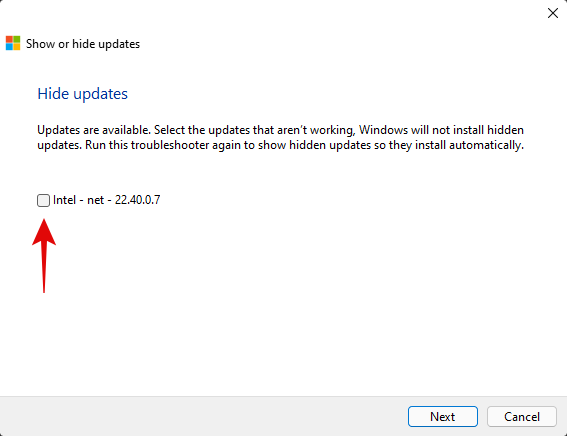
Click on ‘Next’.
Ensure that ‘Hide updates’ is selected and click on ‘Next’.
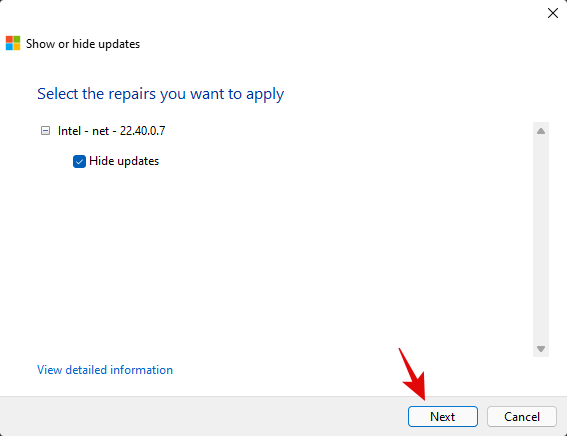
The troubleshooter will now hide the necessary Windows updates from your PC which in turn will prevent them from ever being downloaded on your PC. Click on ‘Close’.
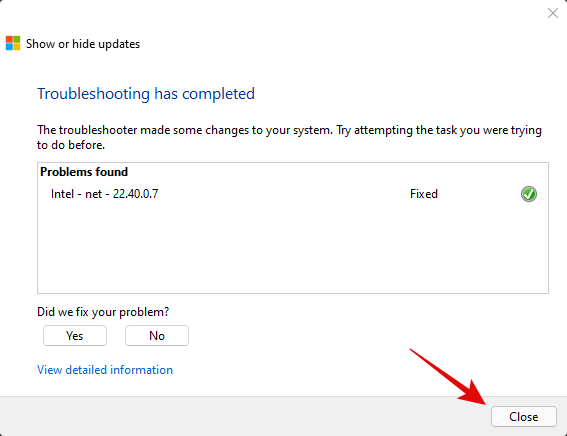
And that’s it! You will now have blocked the necessary updates on Windows 11.
Can you turn off Windows updates?
Yes, you can use certain workarounds and tricks to disable Windows updates on your PC. However, this isn’t recommended as you will lose out on important security patches which would leave you vulnerable to online threats including hackers, malware, adware, and more.
Hence we recommend you keep your PC updated or at least opt to install the latest security updates on your PC. Even if you are losing out on features it’s usually because of a hardware security vulnerability that would compromise your system.
However, if you still wish to disable Windows Updates on your PC, you can use this dedicated guide from us. If you face any issues, feel free to drop a comment.
Can’t uninstall Windows updates? Try these fixes!
If you are unable to install updates on your PC, then you can try the following fixes. However, if you are still unable to uninstall updates then this might indicate an issue with your Windows installation in which case resetting your PC might be the best option.
Follow the guides below to get you started.
Method #01: Reset Windows components and try again
If you have been unable to uninstall updates then you can try resetting your windows components. This will help fix corrupted system files in the background that might be preventing you from uninstalling updates on your system. We will be using a modified script from Mircosoft to help reset all components of Windows 11. The script was originally developed for Windows 10 or higher and hence will need some edits to work properly on Windows 11. This script will perform the following tasks on your system when executed;
- Remove older Windows updates folder
- Re-register Windows update files
- Reset your network connection
Follow the steps below to run the script on your system and reset Windows update components on your PC.
Download the script using the link above to your local storage and extract it to a convenient location. Once extracted right click on the script.
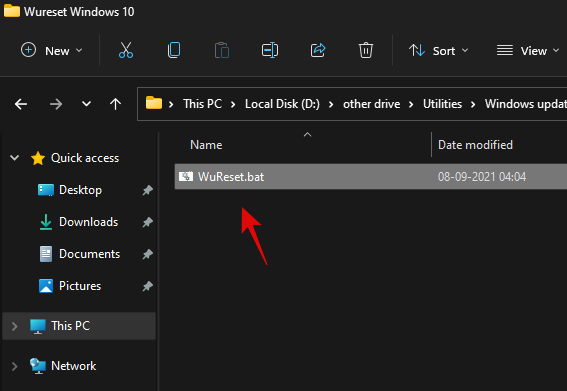
Click on ‘Show more options’.
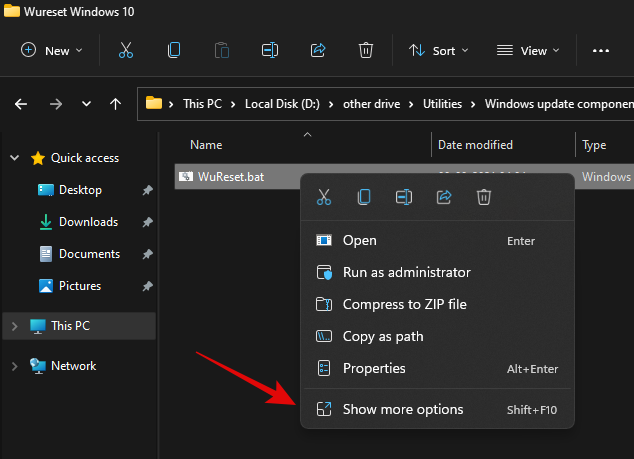
Select ‘Rename’.
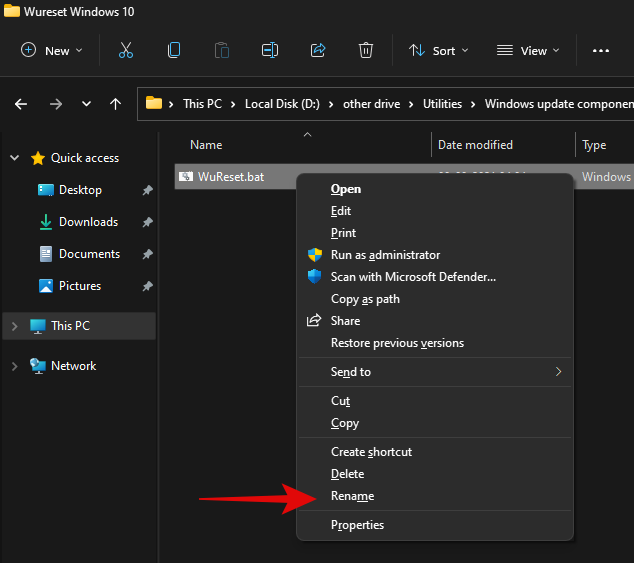
Replace ‘.bat’ with ‘.txt’.
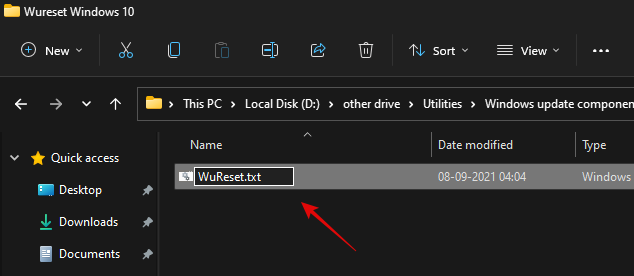
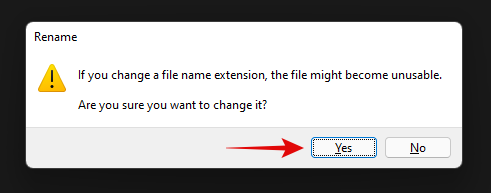
Click on ‘Yes’ to confirm your choice.
Now double click and open the file and it should open in your notepad. Once opened, scroll to the ‘:Reset’ section for resetting network commands and add the following line after the first delete command as shown below.
del /s /q /f "%SYSTEMROOT%\Logs\WindowsUpdate\*"
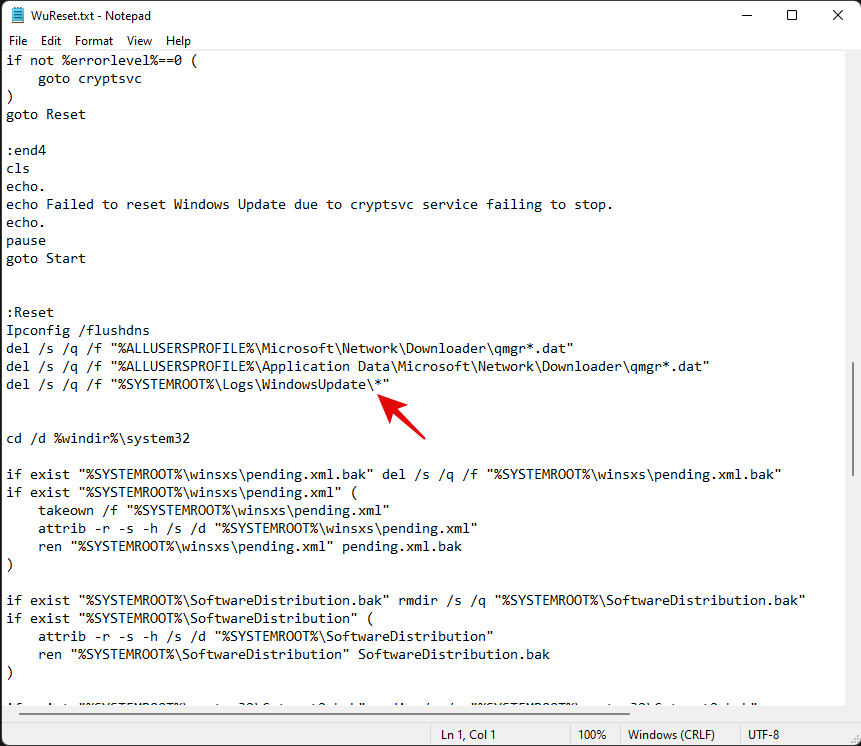
Unha vez engadido, preme Ctrl + Sno teu teclado. Asegúrese de que non hai cambios de formato nin espazos antes ou despois da liña. O ficheiro agora gardarase no teu sistema xunto cos cambios recentes. Agora engadiremos algún código para restablecer as políticas de actualización de Windows no teu sistema. Copia as liñas de abaixo e pégaas despois dos comandos do teu sistema. Asegúrate de que hai dúas liñas baleiras dispoñibles en cada extremo do código, como se mostra a continuación.
:: Windows Update policies resetting
reg delete "HKCU\SOFTWARE\Policies\Microsoft\Windows\WindowsUpdate" /f
reg delete "HKCU\SOFTWARE\Microsoft\Windows\CurrentVersion\Policies\WindowsUpdate" /f
reg delete "HKLM\SOFTWARE\Policies\Microsoft\Windows\WindowsUpdate" /f
reg delete "HKLM\SOFTWARE\Microsoft\Windows\CurrentVersion\Policies\WindowsUpdate" /f
gpupdate /force
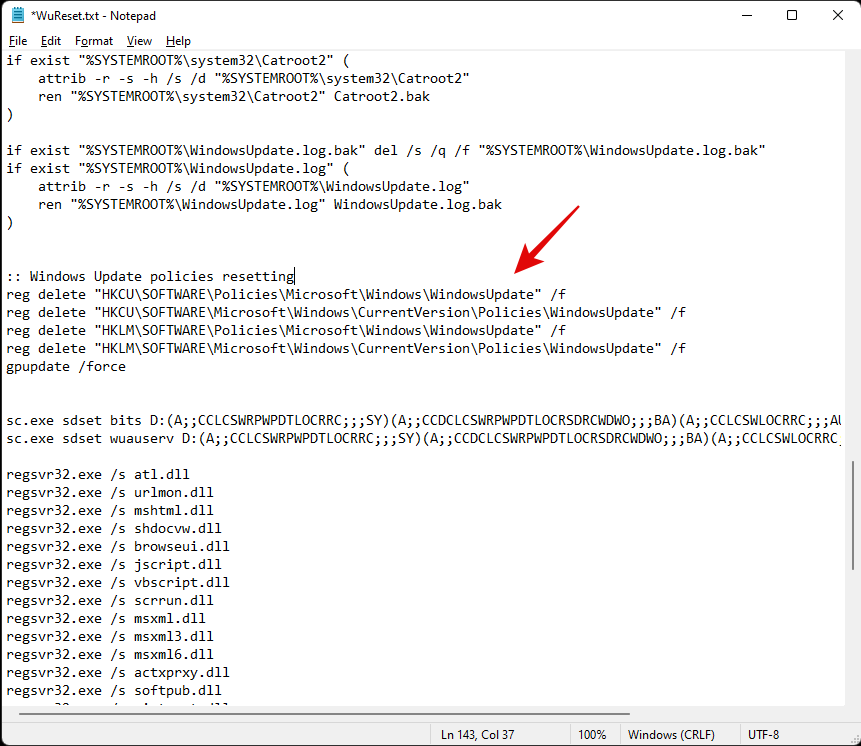
Por último, imos engadir algunhas liñas para asegurarnos de que o tipo de inicio deste servizo está configurado como "Automático". Copia o código a continuación e engade as liñas despois dos teus comandos de reinicio de winsock pero antes dos comandos de inicio do teu servizo, como se mostra a continuación. Copia e pega o código na súa localización respectiva.
:: Set the startup type as automatic
sc config wuauserv start= auto
sc config bits start= auto
sc config DcomLaunch start= auto
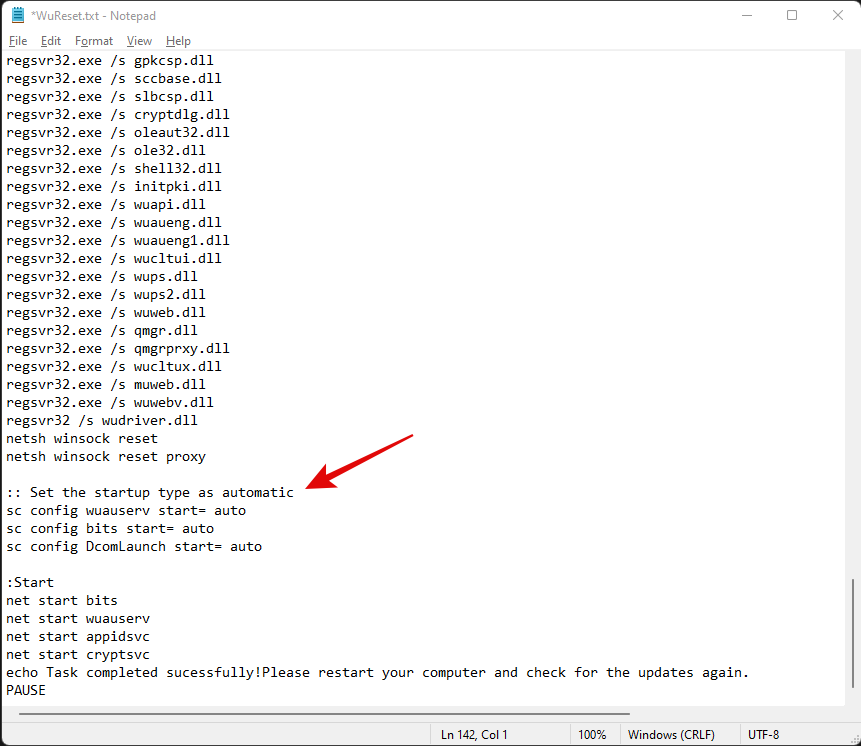
Unha vez que remates, preme Ctrl + Sno teu teclado para gardar os cambios. Pecha o ficheiro e fai clic co botón dereito sobre el de novo e selecciona "Mostrar máis opcións".
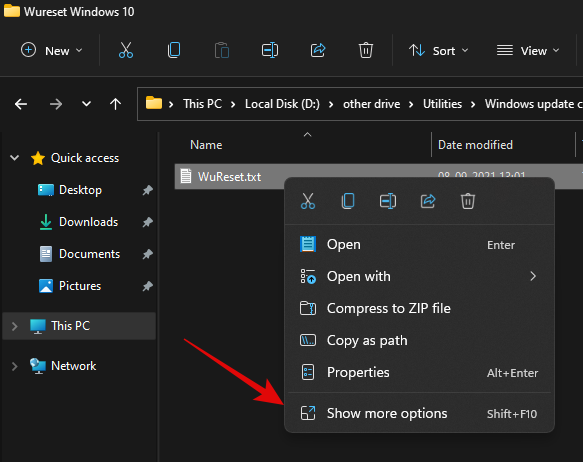
Fai clic en "Renomear".
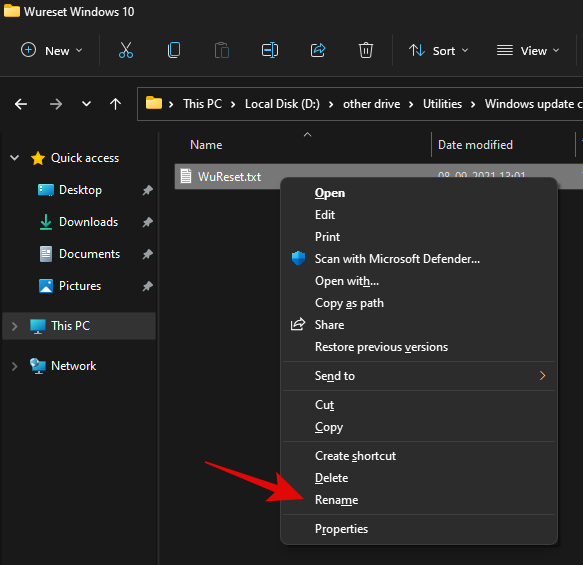
Substitúe '.txt' por '.bat'.
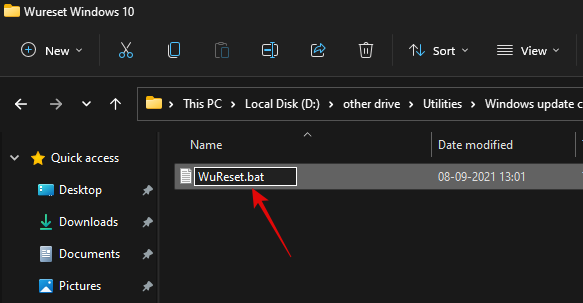
Unha vez feito isto, fai clic co botón dereito no ficheiro e selecciona "Executar como administrador".
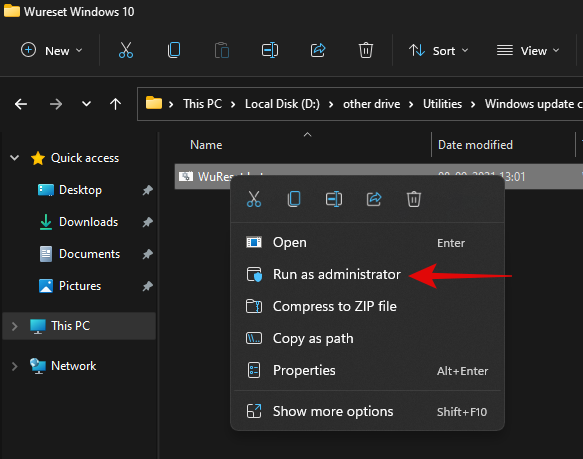
O script por lotes agora executarase no teu PC e fará as súas cousas. Unha vez finalizado o proceso, pediráselle que reinicie o PC. Recomendamos encarecidamente que reinicie o seu PC o máis cedo despois de executar este script. Despois dun reinicio, a actualización de Windows debería restablecerse e un novo inicio debería axudarche a instalar facilmente as actualizacións pendentes de Windows no teu PC.
Método #02: use DISM para desinstalar os paquetes en cuestión
Se aínda non pode desinstalar paquetes específicos de Windows Update, simplemente use o método DISM para eliminar as actualizacións en cuestión do seu PC. Este método forza elimina todas as actualizacións de Windows dispoñibles do teu PC sen ningún problema. Recibirás unha lista de todas as actualizacións dispoñibles nun formato de táboa, o que debería facilitarche moito atopar o culpable no teu PC. Simplemente siga a guía da parte superior para comezar.
Método #03: executa os comandos SFC e DISM
Neste punto, se Windows aínda non actualiza o seu sistema, entón estás enfrontando un problema máis grave do que anticipamos anteriormente. Isto pode indicar a corrupción dos ficheiros a nivel do sistema ou a falta de ficheiros do sistema no seu sistema. Nestes casos, pode executar comprobacións SFC e DISM para corrixir ficheiros danados e restaurar os ficheiros do sistema que faltan. Siga a guía a continuación para comezar.
Preme Windows + Sno teu teclado e busca CMD. Fai clic en "Executar como administrador" unha vez que apareza nos teus resultados de busca.
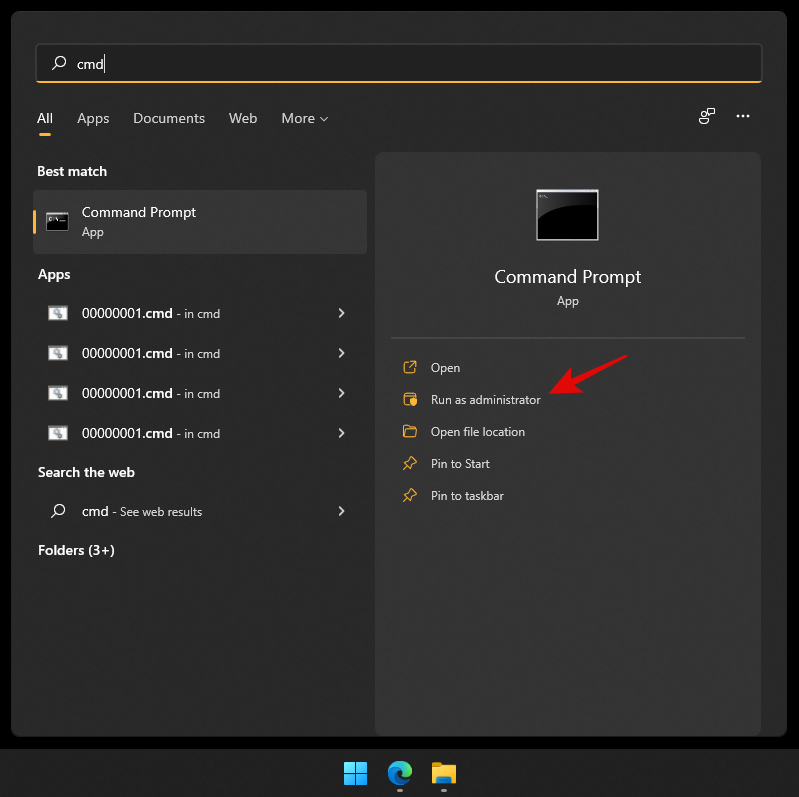
Escriba o seguinte comando e prema Intro no seu PC.
sfc /scannow
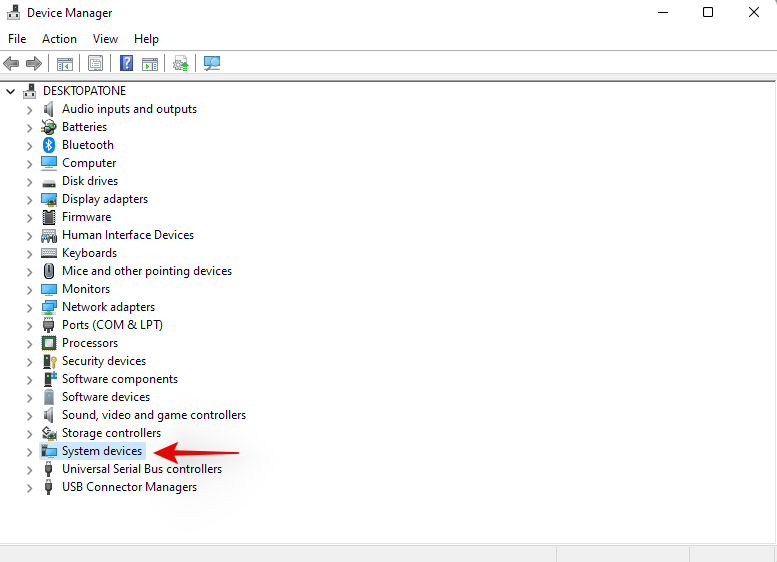
Unha vez que se complete a exploración SFC, escriba o seguinte comando e execútao.
DISM /Online /Cleanup-Image /RestoreHealth
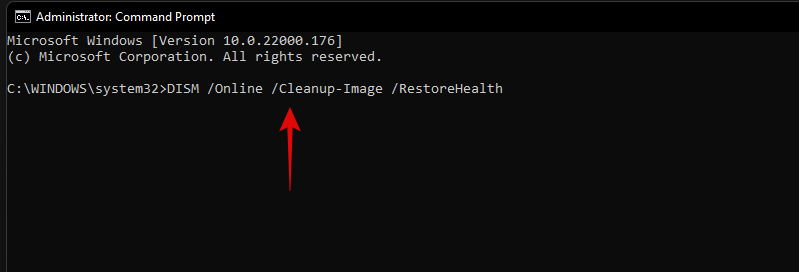
Recomendámosche que reinicies o teu PC unha vez que remate o proceso.
Método #04: Último recurso: restablece o teu PC
Se nada parece funcionar para ti, quizais sexa o momento dunha nova instalación de Windows 11 no teu sistema. Tamén podes tentar poñerte en contacto co teu equipo de asistencia, pero se nada funciona, a mellor opción é reiniciar o teu PC. Na maioría dos casos, un restablecemento mentres se manteñen os ficheiros locais debería axudar a que a actualización de Windows funcione no seu sistema.
Windows 11 conéctase aos servidores de actualización e actualiza as túas definicións de seguranza e controladores durante OOBE. Windows solucionará todos os problemas de actualización e reinstalará os servizos necesarios no seu sistema para que a actualización de Windows se execute de novo no seu sistema durante este proceso.
► Podes usar esta guía dedicada de nós para restablecer o teu PC con Windows 11 .
Agardamos que puideses desinstalar facilmente as actualizacións do teu PC con Windows 11 usando a guía anterior. Se tes algún problema, non dubides en deixar un comentario a continuación.
Relacionados:






![Como desinstalar McAfee en Windows 11 [5 xeitos] Como desinstalar McAfee en Windows 11 [5 xeitos]](https://blog.webtech360.com/resources8/images31/image-4917-0105182719945.png)
