Como compartir a gravación de Zoom
Coa maioría das persoas illadas, Zoom asumiu como a seguinte mellor utilidade para interactuar cos teus compañeiros de traballo e clientes. Se levas un tempo a usalo, saberás...
Zoom, a aplicación de videoconferencia máis usada, inclúe un montón de opcións de personalización para configurar a túa videochamada como che guste. Unha destas personalizacións é a posibilidade de engadir un fondo virtual á túa fonte de vídeo.
Ademais de ser unha forma divertida e colorida de presentarse nunha reunión, estes fondos virtuais proporcionan unha sensación extra de privacidade ao cubrir os seus antecedentes persoais. Cando está activado, superpoñen ao usuario sobre un fondo falso, bloqueando así calquera efecto persoal que poida ter ao seu redor.
Contidos
Onde podo usar a función de fondo virtual de Zoom?
Zoom ofrece actualmente a posibilidade de aplicar fondos virtuais para reunións cando esteas usando algún dos seguintes dispositivos:
Actualización [24 de setembro de 2020] : como se presentou anteriormente para unha actualización do 21 de setembro de 2020, Zoom comezou a lanzar unha serie de funcións novas para a súa aplicación de Android. Entre as novas funcións estará a posibilidade de aplicar Fondos Virtuais durante as reunións que poderás facer directamente desde un dispositivo Android. Non obstante, a nova función requirirá que executes Android 8 ou superior e un procesador con 8 núcleos ou superior. Zoom incluíu inicialmente o soporte para os seguintes procesadores: Qualcomm 835, Samsung Exynos 9810 e Huawei Kirin 980.
Podes botar unha ollada aos dispositivos compatibles e aos requisitos do sistema necesarios para usar Fondo virtual en Zoom facendo clic aquí .
Como activar os fondos virtuais
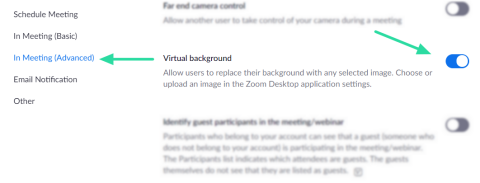
Por defecto, Zoom mantén activada a configuración dos fondos virtuais. Non obstante, se desexa localizar esta configuración, debe facelo desde o portal web de Zoom . Inicia sesión coas túas credenciais e vai a "Configuración" no panel lateral esquerdo.
Nota : terás que activar na web independentemente de como esteas a usar Zoom, no teléfono ou no teu PC.
Aquí, en "En reunión (avanzado)", busque "Fondos virtuais". Se está desactivado, ti e todos os demais nunha reunión (na que es o anfitrión) non poderás aplicar un fondo virtual.
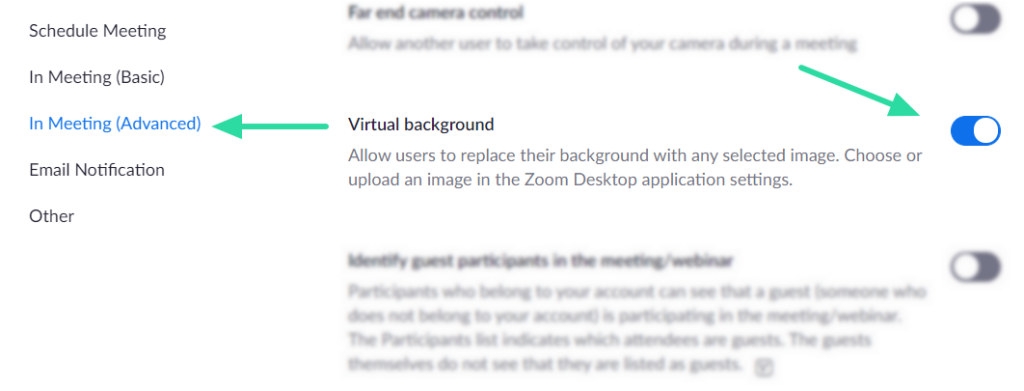
Cando se realicen cambios nesta configuración, os usuarios deben pechar sesión e volver iniciar sesión na aplicación de escritorio para que os cambios se reflictan na súa conta. Unha vez activado, verá a opción dispoñible na pestana "Vídeo". Continúa lendo para saber como engadir un fondo virtual á túa chamada de Zoom.
Hai que ter en conta que Zoom non permite o uso de fondos virtuais na súa aplicación móbil.
Que tipos de fondos podes usar?
Zoom permítelle configurar un fondo virtual para substituír o fondo real. Zoom ten os seus propios fondos virtuais, pero tamén podes engadir o teu. Estes fondos deben axustarse ás seguintes especificacións:
Imaxe
Vídeos
Como usar Zoom Virtual Background no teu PC
Unha vez que teña activado "Fondos virtuais" no portal web de Zoom , pode acceder á configuración directamente desde a propia aplicación.
Antes do comezo dunha reunión
Para engadir un fondo virtual a todas as túas reunións de Zoom, inicia sesión no cliente de escritorio de Zoom coas túas credenciais.
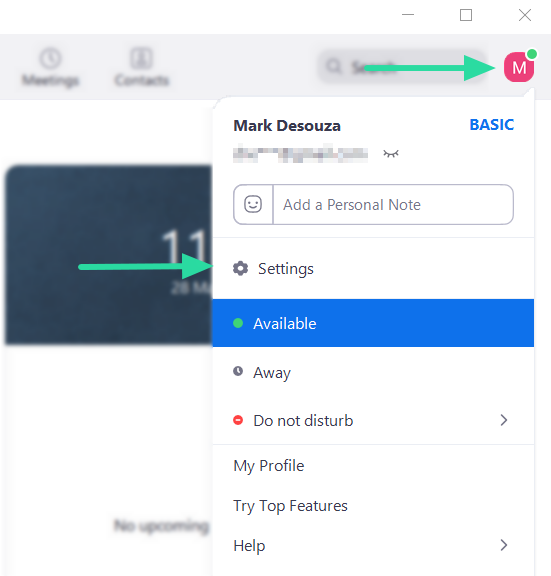
Agora fai clic na imaxe do teu perfil na esquina superior dereita da aplicación. Seleccione "Configuración" para abrir o panel de configuración do zoom.
Toca "Fondos virtuais" no panel lateral esquerdo. Aquí podes escoller entre os fondos virtuais de Zoom. Nota: Se estás a usar fondos virtuais por primeira vez, terás que descargar o "Paquete de fondos virtuais intelixentes". Isto iniciarase automaticamente cando escolla un fondo para configurar.
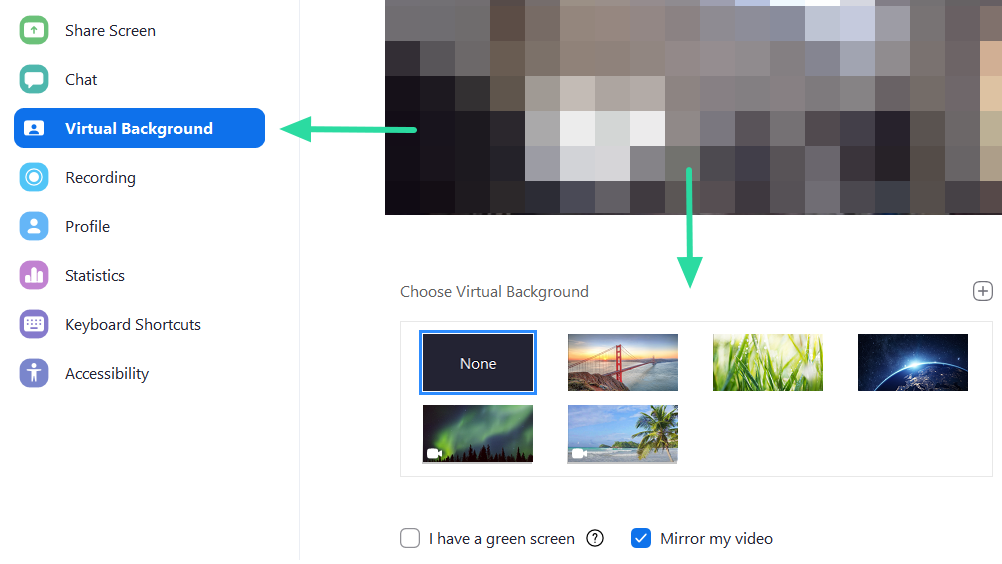
Recoméndase empregar a opción "Espello o meu vídeo" na parte inferior xa que normalmente é así como usamos as cámaras.
Seleccione un fondo virtual que elixa. Verás unha pequena vista previa do fondo virtual no propio panel de Configuración. Só tes que pechar o panel de Configuración para aplicar os cambios.
Durante unha reunión
Tamén podes cambiar (ou engadir) un fondo virtual mentres estás nunha reunión de Zoom. Para facelo, primeiro debes ter activados os fondos virtuais na túa conta.
While in a meeting, click on the upward arrow button next to ‘Stop Video’, then click ‘Virtual Backgrounds’. This will bring you to the Virtual Background settings. Select a background and simply close the settings window to apply the changes.

How to use Zoom Virtual Background on your phone
Unlike on the PC, you cannot apply or change your virtual background on Zoom before entering a meeting. If you’re using Zoom on your phone (Android or iOS), you can only apply Virtual Background on Zoom after you enter the meeting screen.
To use Zoom Virtual Background on your phone, open the Zoom app and start/join a meeting. Inside the meeting screen, tap on the ‘More’ button from the meeting controls at the bottom and then select the ‘Virtual Background’ option. If you don’t see the meeting controls at the bottom of the screen, tap anywhere on the screen to bring it up.
You will now be taken to the Virtual Background screen on Zoom where you can select from a bunch of preset backgrounds already provided by Zoom. Tap on any one of them to apply as your virtual background and then tap on ‘Close’ to return to the meeting screen.
How to add a Custom Background
Zoom allows you to customize your background by adding any image (read the image restrictions above) of your choice! To do so, you will need to upload the image to the Zoom app.
On your PC
Follow the guide above to go to Profile > Settings > Virtual Background. Now click the + next to ‘Choose Virtual Background’ and select ‘Add Image’.
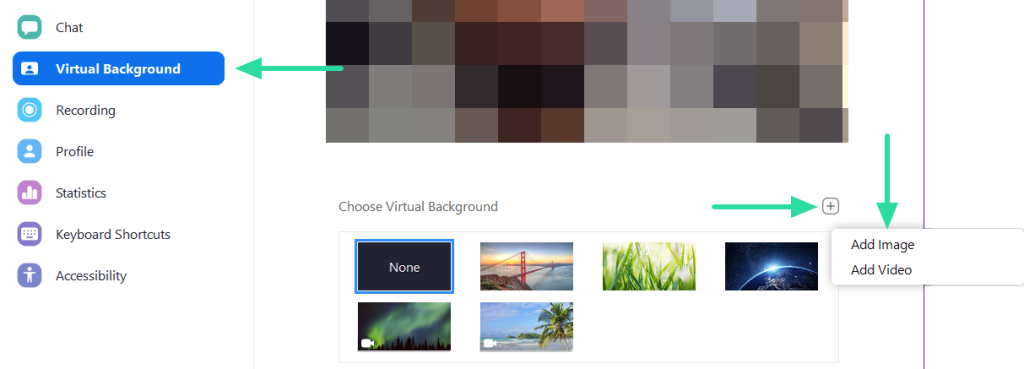
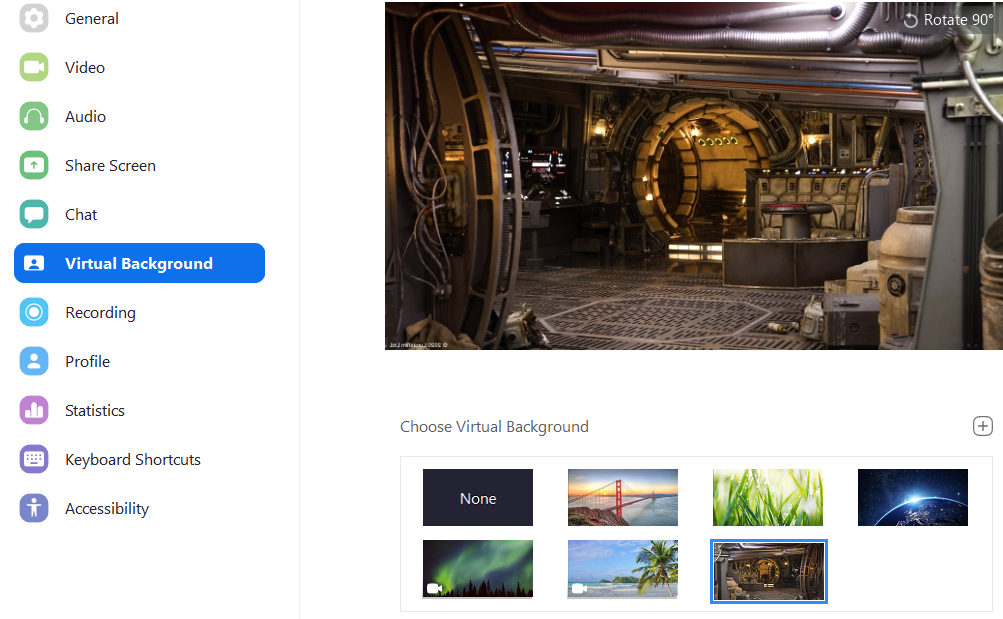
Locate the image you would like to add and click ‘Open’.
The image will automatically be set as your Virtual background. Once added, this image will be available to apply as your background whenever you like. Note: If you use the ‘Mirror my video’ option, the virtual background that you apply will also be mirrored.
On your Phone
To add a custom virtual background while using the Zoom app on your phone, you will need to first open the app and then enter a meeting. Inside the meeting screen, tap anywhere on your screen to bring up the meeting controls, then tap on the ‘More’ button from the bottom right corner and select the ‘Virtual Background’ option that pops up.
When you will be taken to Virtual Background screen, tap on the ‘+’ button at the far right portion in the list of virtual background options and select an image to set as your background for the meeting. The newly selected picture will be your virtual background for the rest of the meeting.
Related:
How to add a Video Background
If you would like to take it one step further, you could add a Virtual Video Background. These backgrounds are basically videos that keep looping. So instead of a static background, you could be sitting on a beach, with a breeze blowing through the trees!
To set a video as a background, follow the same steps as above, to go to Profile > Settings > Virtual Background. Here, select a video background. You can distinguish the video backgrounds by the video camera icon on them.
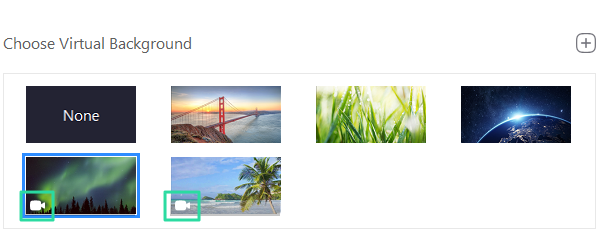
You can also add your own custom video background, by following the steps mentioned in ‘How to add a Custom Background‘. Just make sure the video adheres to the specifications mentioned above!
You can preview the video backgrounds in the little video panel in the Settings window. Select the video background you like and close the Settings panel to apply the changes.
Related: How to auto change your Zoom background at regular intervals with this trick
How to disable Virtual Background
On your PC
If you want to remove your Virtual background and go back to your regular background, you can do so by going to Profile > Settings > Virtual Background and selecting ‘None’ as a background.
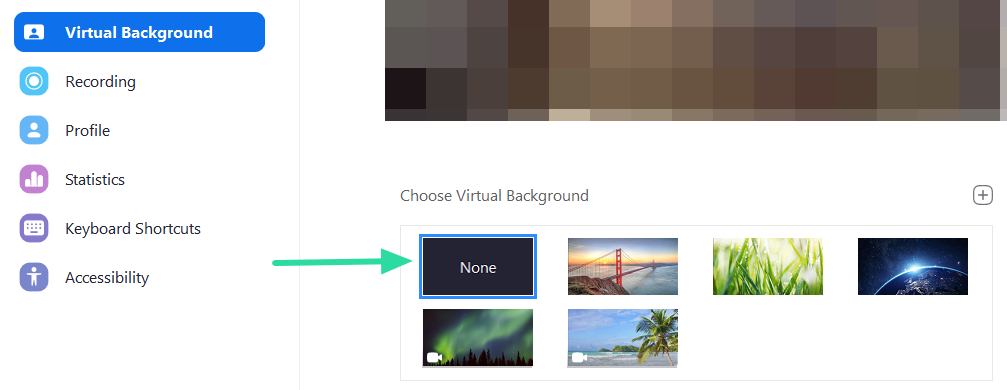
You can also disable your Virtual background during a meeting by clicking on the upward arrow button next to ‘Stop Video’, and then ‘Virtual Backgrounds’. Select ‘None’ and close the Settings tab. Your background will now go back to your surroundings.
On your Phone
You can also disable the Virtual Background feature if you’re using the Zoom app on your iPhone or Android device. To do this, go to the meeting screen, tap on the ‘More’ button and then select the ‘Virtual Background’ option from the menu that pops up. In the next screen, tap on the ‘None’ option and then hit ‘Close’ to disable any virtual background that you applied previously.
How to remove Custom Backgrounds
If you have added a custom background to your Zoom meeting, the image that you have used will be saved in your app. This way if you want to use it again, you do not need to re-upload the image.
If you would like to remove the image from your saved backgrounds in the Zoom app, log in to the desktop app and go to Profile > Settings > Virtual Background. Here, along with Zoom’s own Virtual Backgrounds, you will find the images that you have uploaded. To remove your custom background, hover over the image, and click on the ‘x’ that appears in the top right corner of the image.
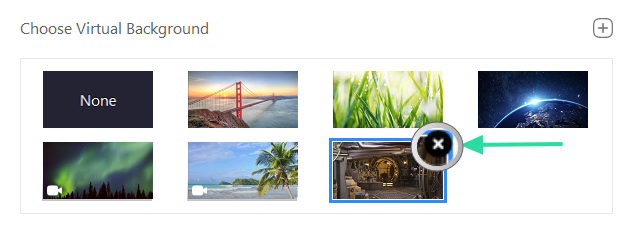
To reuse this image as a background, you will need to reupload the image by following the guide above under ‘How to add a Custom Background‘.
How to add a GIF as a Background
Yes! You can even set a GIF as a Virtual Background to your Zoom meeting! GIFs are a fun way to express yourself in a meeting and lighten the mood. Check out our article below, which details how you can use a GIF to create a Virtual Background in a Zoom meeting.
► How to use GIF for Zoom background
Why don’t I see the Virtual Background option?
If you have followed the above steps to enable Virtual Backgrounds in Zoom, but still do not see the option, when using the desktop app, there could be a few reasons for this.
As mentioned above, when you enable/disable Virtual Backgrounds in the Zoom web portal, you must sign out of the desktop client and then sign back in, for the changes to take effect.
The first thing to check is whether your Admin, or owner of the account has disabled Virtual Backgrounds. To find out if Virtual Backgrounds has been disabled by your admin, follow the steps above in ‘How to enable Virtual backgrounds‘ to go to Zoom web portal > Settings > In Meeting (Advanced) > Virtual Background.
If the setting is greyed out and you cannot make changes, it means your Zoom admin has disabled it. If this is the case, you will need to contact them and request them to enable the option.
If you are a participant (not the host), and do not see the option for ‘Virtual Backgrounds’ within a Zoom meeting, it could be because the host of the meeting has disabled them for all participants in that meeting. In this case, simply contact the host and let them know.
Another reason could be that your device does not meet the system requirements for using Zoom Virtual Backgrounds. For a comprehensive list of system requirements, check out the Zoom support page on system requirements for Virtual Background.
Why do I not have Virtual Background on my phone?
To achieve the best virtual background effect on your phone, Zoom demands that your phone meets the system requirements since the feature requires image processing and rendering power.
The company has thus mentioned that only a select bunch of iPhones and iPads will be able to use the new Virtual Background. As for those using Zoom’s Android app, the feature requires you to run a certain version of Android and the device should be powered by a high-performing processor.
If you’re using Zoom on iOS, you need to consider the following device requirements before trying to use the Virtual Background feature:
If you’re using Zoom on Android, you need to consider the following device requirements before trying to use the Virtual Background feature:
Why can’t I add a Custom Virtual Background?
If you’re having problems while adding a custom image or video as your background, it could be for a couple of reasons. First check that the image/video meets the requirements to be used as a background as mentioned above in ‘What types of backgrounds can you use?’
If the image/video is in the right format, but you are still experiencing problems, check out our article below.
► 7 ways to fix Zoom virtual background not working problem
We hope this article has helped you set your own Virtual Background on Zoom. What are some of your favorite Zoom backgrounds? Let us know in the comments below.
Related:
Coa maioría das persoas illadas, Zoom asumiu como a seguinte mellor utilidade para interactuar cos teus compañeiros de traballo e clientes. Se levas un tempo a usalo, saberás...
Zoom, a aplicación de videoconferencia máis usada, inclúe un montón de opcións de personalización para configurar a túa videochamada como che guste. Unha destas personalizacións é a capacidade...
Queres eliminar os pases caducados e ordenar Apple Wallet? Siga como explico neste artigo como eliminar elementos de Apple Wallet.
Tanto se es un adulto como un mozo, podes probar estas aplicacións para colorear para liberar a túa creatividade e calmar a túa mente.
Este tutorial móstrache como resolver un problema co teu dispositivo Apple iPhone ou iPad que mostra a localización incorrecta.
Consulta como podes activar e xestionar o Non molestar no iPad para que te concentres no que hai que facer. Aquí están os pasos a seguir.
Consulta as diferentes formas en que podes facer máis grande o teclado do teu iPad sen unha aplicación de terceiros. Vexa tamén como cambia o teclado cunha aplicación.
Estás enfrontando o iTunes que non detecta o erro do iPhone ou iPad no teu PC con Windows 11? Proba estes métodos comprobados para solucionar o problema agora.
Sentes que o teu iPad non está a facer traballo rápido? Non podes actualizar ao iPadOS máis recente? Busca aquí os sinais que indican que debes actualizar o iPad.
Buscas os pasos para activar o gardado automático en Excel? Le esta guía sobre como activar o Gardado automático en Excel en Mac, Windows 11 e iPad.
Vexa como pode manter os seus contrasinais en Microsoft Edge baixo control e evitar que o navegador garde contrasinais futuros.
Chrome pode fallar e non mostrarche as imaxes. Descubre os consellos útiles que debes seguir para solucionar o problema de que Chrome non mostra imaxes.
