Гоогле Меет је нова алатка за даљинску сарадњу у граду која нуди могућности видео и аудио конференција заједно са убедљивим функцијама као што су енд-то-енд енкрипција, ХД аудио, ХД видео и још много тога. Гоогле Меет је потпуно бесплатан за коришћење током пандемије, што значи да га већ користи много организација и корисника, укључујући наставнике , широм света.
Ако сте тек почели да користите Гоогле Меет и имате проблема са микрофоном, онда нисте сами. Многи корисници су пријавили да не могу да користе своје микрофоне из различитих разлога, а ми смо саставили листу неких од најчешћих поправки које можете користити да решите свој проблем. Хајде да их погледамо.
Повезано: Како да промените своје име на Гоогле Меет-у на иПхоне-у, Андроид-у и рачунару
Садржај
Уверите се да микрофон није искључен
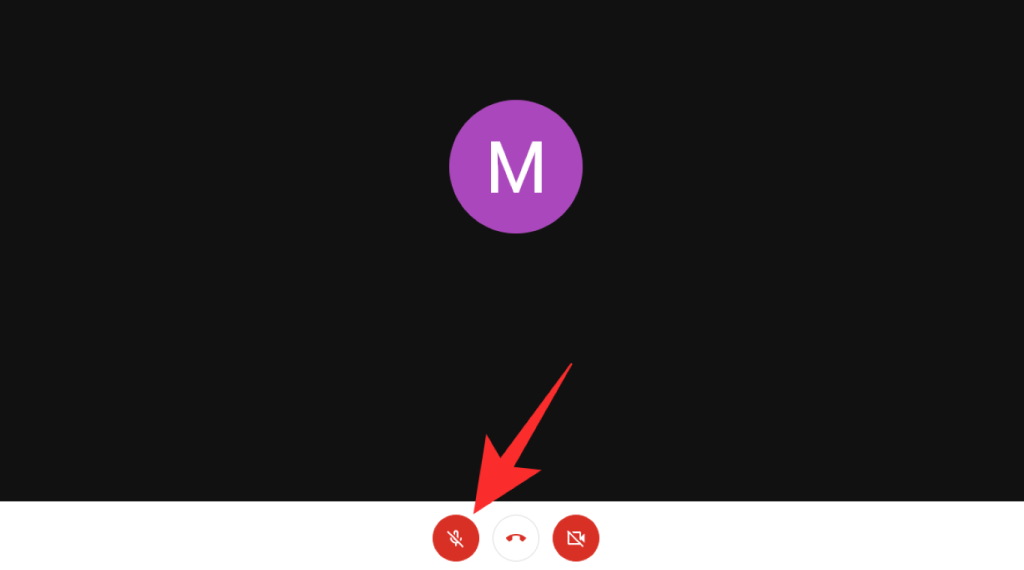
Понекад би проблем могао да буде прилично једноставан, можда ћете једноставно бити искључени током Гоогле Меет састанка и не знате за то. Проверите икону микрофона на дну екрана на траци за позиве. Ако је црвена, звук на Гоогле Меет-у је искључен. Једноставно кликните на икону да бисте се укључили. Ово ће омогућити члановима вашег састанка да вас чују гласно и јасно.
Проверите хардверску везу ако имате спољни микрофон
Ако користите спољни микрофон, било да је прикључен на слушалице или одвојено, прво треба да проверите физичке везе слушалица/микрофона са вашим системом. Почните тако што ћете проверити жицу за било какве резове или необичне кривине. Било какве неравнине на жици такође могу указивати на унутрашње кривине жице које могу узроковати оштећење микрофона и спречавају његово правилно функционисање.
Ако све изгледа нормално, покушајте да искључите слушалице/микрофон са система, а затим их поново повежите. Ово не само да ће ресетовати везу на крају вашег система, већ ће се и решити свих проблема са хардверским повезивањем који би могли да спречавају ваш микрофон да ради исправно.
Повезано: Како блокирати анонимне кориснике на Гоогле Меет-у
Уверите се да је уређај за унос изабран у Гоогле Цхроме-у
Цхроме такође има функцију избора који ће се микрофон користити за пружање аудио улаза различитим уређајима. Ако имате проблема са микрофоном са Гоогле Меет-ом, велике су шансе да тачан улаз микрофона није изабран у Цхроме-у. Можете одабрати жељени улазни уређај пратећи водич испод.
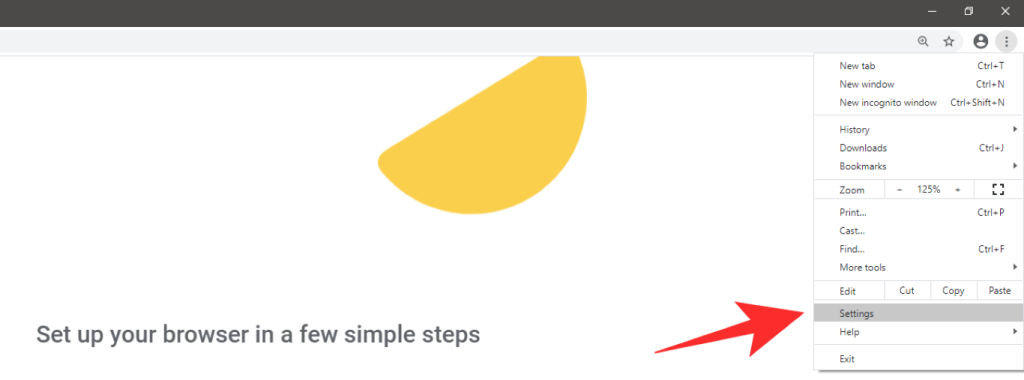
Отворите Цхроме, кликните на икону менија са 3 тачке у горњем десном углу прегледача.

Изаберите „ Подешавања “.
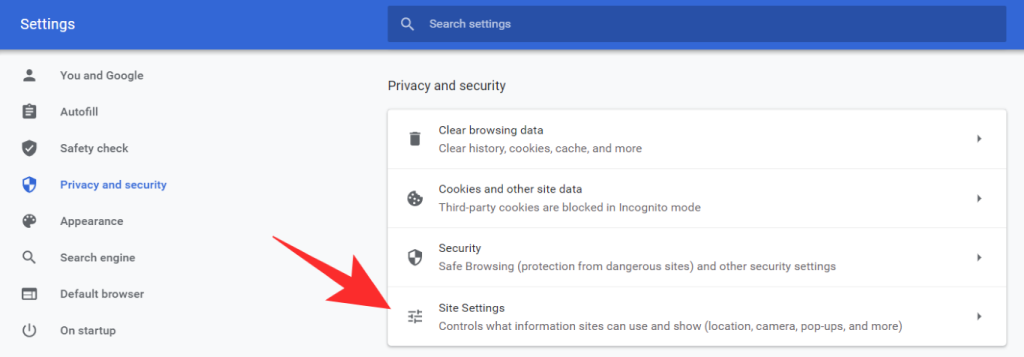
Сада изаберите „ Приватност и безбедност “ са леве бочне траке.

Изаберите „ Подешавања сајта “.
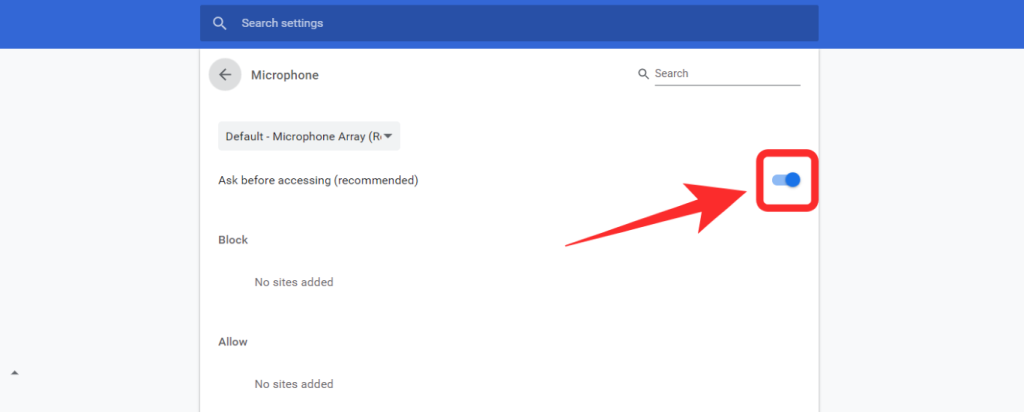
Сада кликните на „ Микрофон “ на следећем екрану.

Ако је прекидач на врху засивљен и поред њега пише „ Блокирано “, укључите прекидач да бисте били сигурни да пише „ Питај пре приступа (препоручено) “.
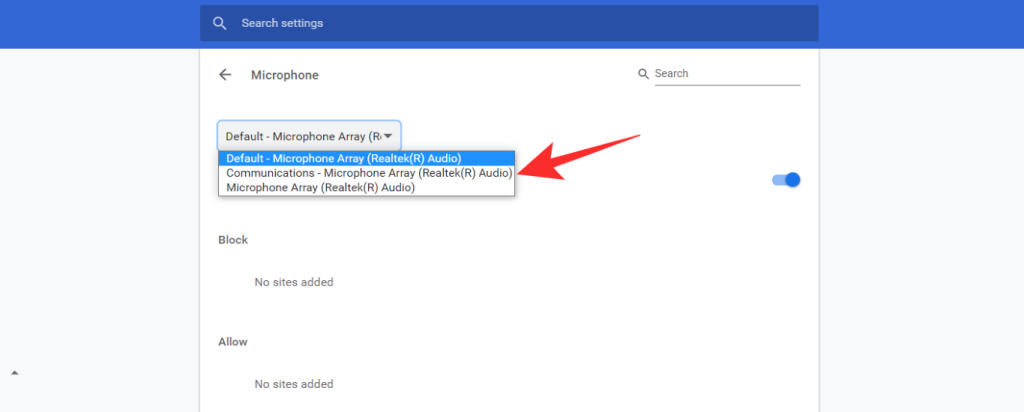
Сада кликните на падајући мени на врху и изаберите жељени микрофон који желите да користите у Гоогле Меет-у.
Затворите картицу „ Подешавања “ да бисте сачували подешавања.
Сада ћете моћи да користите микрофон који сте изабрали током Гоогле Меет састанака што би требало да реши проблем са микрофоном.
Повезано: Виртуелна позадина Гоогле Меет-а: Најновије вести, проширење за Цхроме и све што знамо до сада
Уверите се да је приступ микрофону дозвољен (Виндовс и Мац)
Ако и даље не можете да користите микрофон у Гоогле Меет-у, велике су шансе да је Цхроме-у или прегледачу који користите одбијен приступ микрофону.
На Виндовс-у
Виндовс је представио нову функцију за контролу апликација које користе ваш микрофон за повећање опција приватности. Ако не можете да користите микрофон у Гоогле Меет-у, требало би да проверите дозволе за микрофон у Виндовс-у. Хајде да погледамо како то можете учинити.
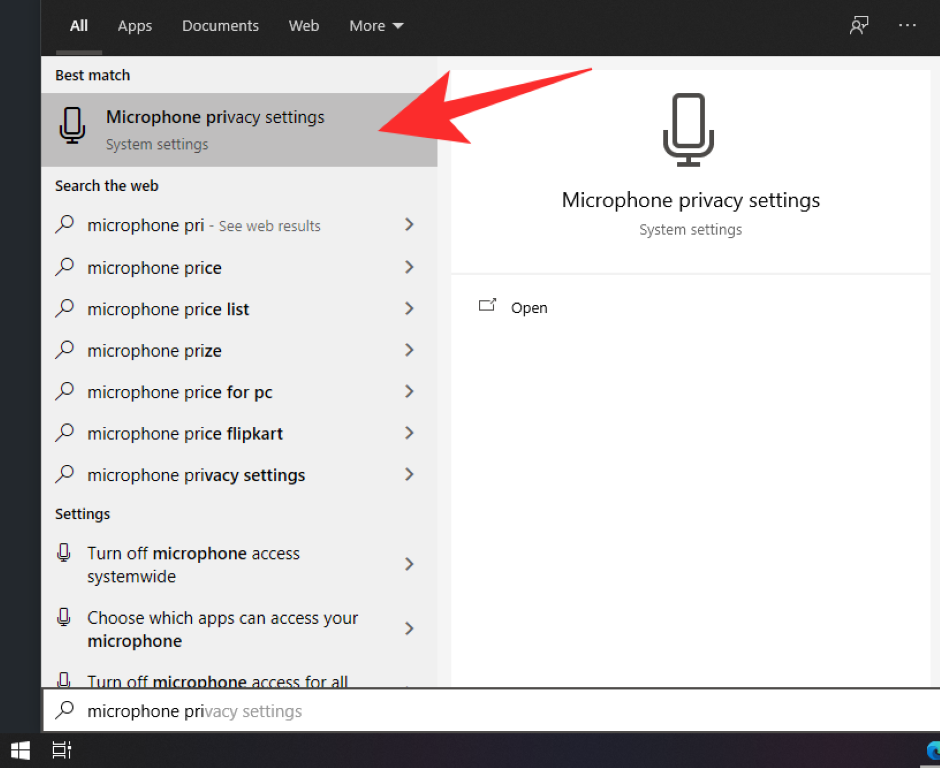
Отворите свој Старт мени тако што ћете кликнути на икону Старт у доњем левом углу и откуцати и потражити „ Подешавања приватности микрофона “. Кликните на прву опцију подешавања која се појављује на екрану.
Уверите се да је прекидач на врху за „ Дозволи апликацијама да приступе вашем микрофону “ омогућен на вашем уређају. Ако није, укључите прекидач да бисте га омогућили.
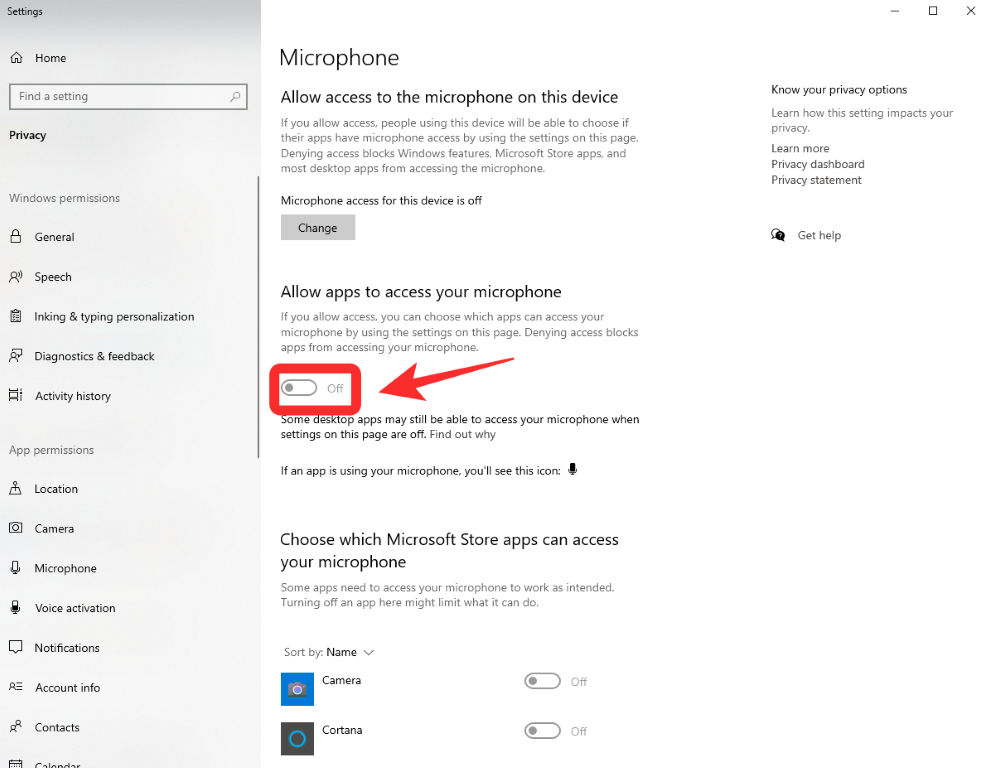
Напомена: У оквиру „ Одаберите које апликације могу да приступе вашем микрофону “ потражите Цхроме и уверите се да је прекидач поред њега укључен. Ако не, онда га укључите једноставним кликом на њега.
На Мац-у
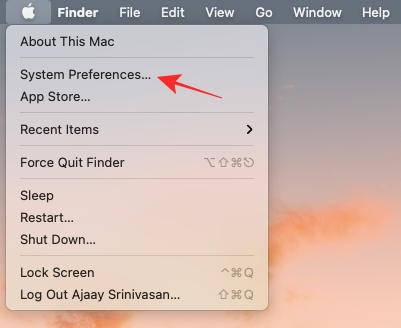
Као и на Виндовс-у, мораћете да дате дозволу апликацији/прегледачу за коришћење микрофона. Дозволама за микрофон можете приступити тако што ћете прво отворити апликацију Систем Преференцес на свом Мац-у тако што ћете кликнути на апликацију са Доцк-а или тако што ћете кликнути на икону Аппле-а на траци менија, а затим изабрати „Систем Преференцес“.
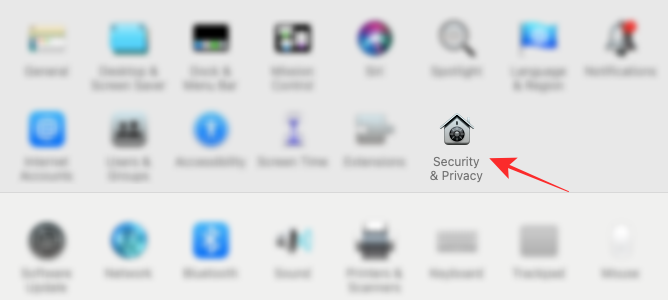
Унутар подешавања система изаберите опцију Безбедност и приватност.
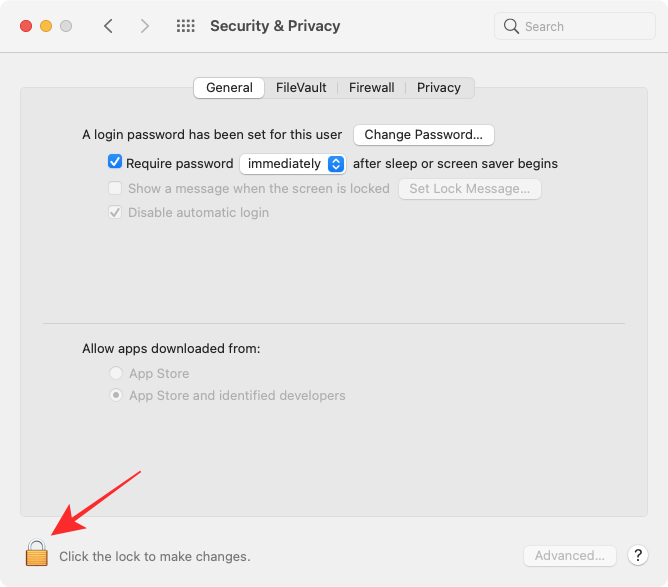
Ако је икона закључавања у доњем левом углу закључана, мораћете да је откључате да бисте променили своје дозволе. За ово кликните на икону Лоцк и унесите лозинку/ПИН вашег Мац-а.
Изаберите картицу Приватност на врху, а затим кликните на опцију Микрофон са леве бочне траке.
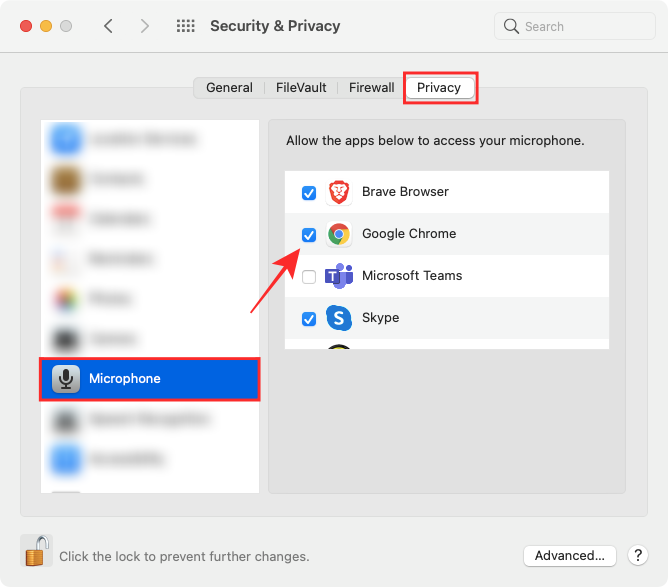
Означите поље поред апликације претраживача на којој желите да омогућите микрофон. Након што ово урадите, затворите претраживач и покрените га поново.
Сада би требало да можете лако да користите микрофон током састанака на Гоогле Меет-у.
Проверите нивое јачине звука микрофона (Виндовс и Мац)
И Виндовс и мацОС омогућавају корисницима да подесе ниво јачине звука за микрофоне својих система баш као што би то учинили на својим аудио излазним уређајима. Ако вам је ниво микрофона низак, други у Гоогле Меет позиву неће моћи да вас чују како треба. Стога се саветује да проверите нивое микрофона када се суочите са таквом ситуацијом.
На Виндовс-у
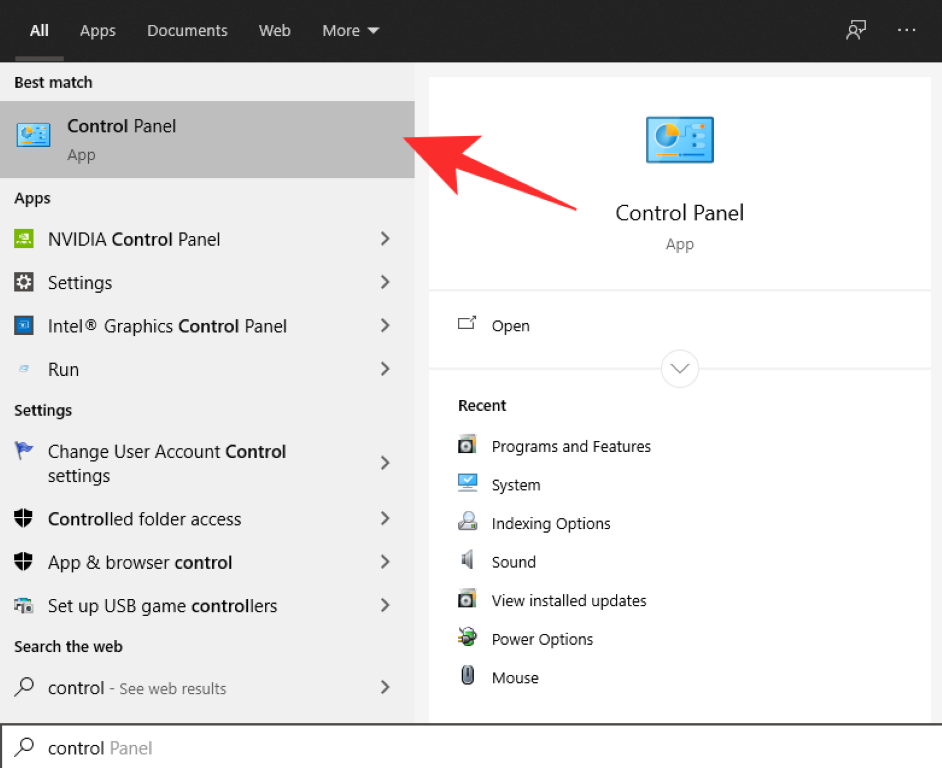
Можете да проверите нивое микрофона у оперативном систему Виндовс 10 тако што ћете отворити контролну таблу на рачунару помоћу менија Старт.
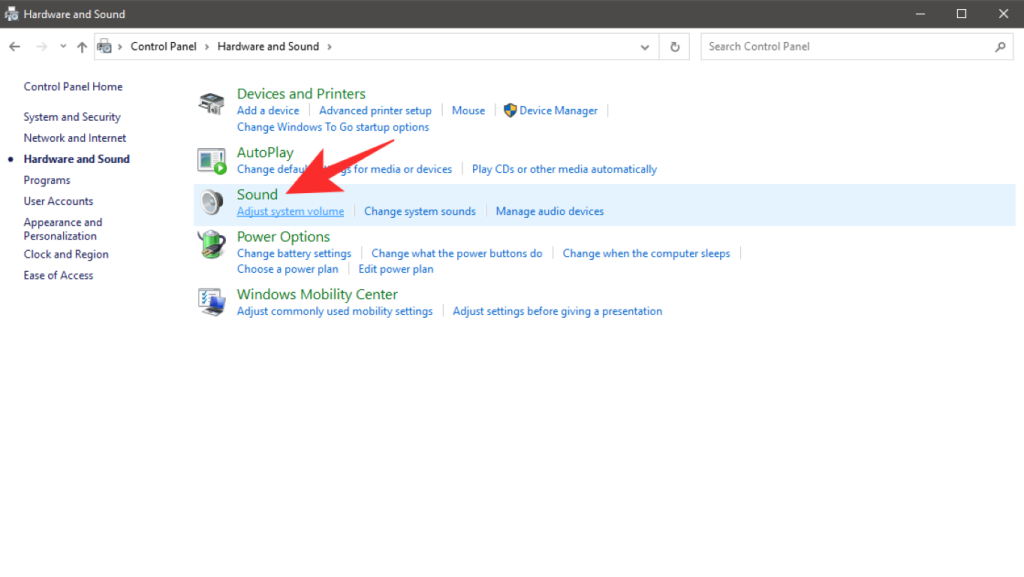
Унутар контролне табле идите на „Хардвер и звук“ са леве бочне траке и изаберите опцију „Звук“ на панелу са десне стране.
Када се појави прозор Звук, изаберите картицу „Снимање“ на врху. Овде ћете видети листу свих улазних уређаја који су повезани на ваш систем.
Унутар картице Снимање изаберите микрофон који користите за Гоогле Меет позиве, а затим кликните на дугме „Својства“ на дну овог прозора.
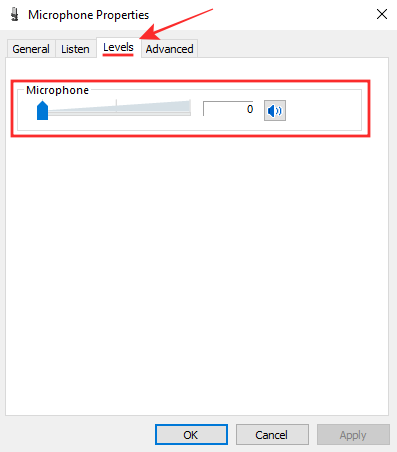
Када се на екрану појави прозор са својствима микрофона, кликните на картицу „Нивои“ на врху.
Испод ове картице требало би да видите клизач унутар одељка „Микрофон“. Превуците овај клизач удесно у зависности од тога колико желите да ваша осетљивост микрофона буде висока. Што више вучете клизач микрофона удесно, јачина звука микрофона ће бити већа и то би требало да помогне другима да вас боље слушају на Гоогле Меет-у.
Када извршите потребне промене, кликните на дугме „Примени“, а затим на „ОК“ да бисте то потврдили. Започните/придружите се позиву на Гоогле Меет-у да бисте видели да ли ваш микрофон ради исправно.
на Мац-у
Да бисте проверили јачину звука микрофона на Мац-у, можете да отворите „Систем Преференцес“ на траци менија, Доцк-а или Лаунцхпад-а.

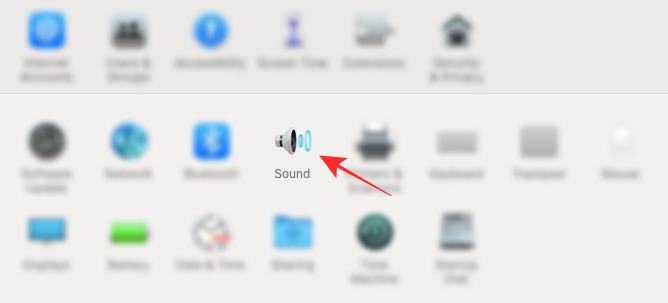
Унутар подешавања система кликните на плочицу „Звук“.
Када се екран звука учита, кликните на картицу „Унос“ на врху, изаберите микрофон који користите за Гоогле Меет позиве и превуците клизач „Јачина уноса“ удесно да бисте повећали јачину звука.
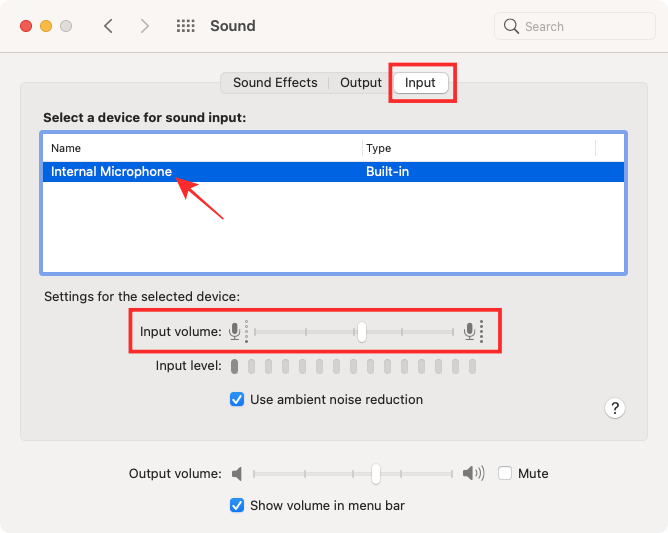
Уверите се да је ниво јачине звука адекватан тако што ћете нешто изговорити, а затим проверите да ли се ваш глас чује на индикатору 'Инпут левел' на истом екрану.
Поново покрените Гоогле Цхроме
A simple restart of your browser can also fix microphone issues. This can clear the cache, restart extensions in the background and more importantly free up any extra space that could be causing issues with your microphone. While restarting might simply close and reopen the app, it doesn’t always get rid of all the background processes and extensions running for chrome.
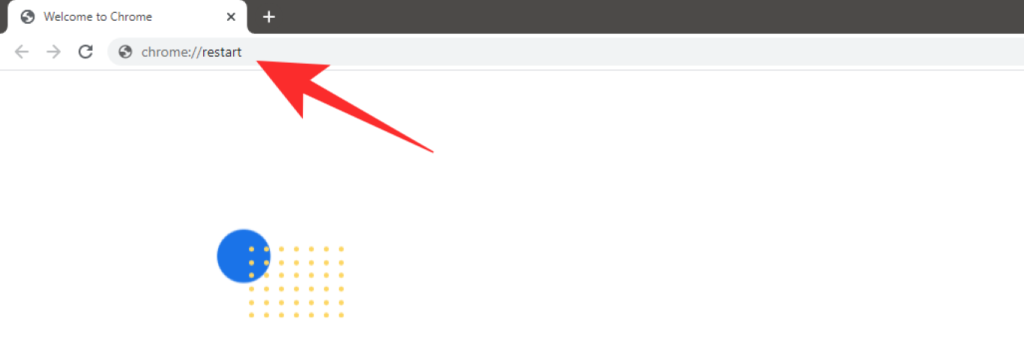
To properly restart your browser, open a new tab and type ‘chrome://restart’ in your URL bar. This will restart chrome completely which should get rid of any conflicting background processes that might be interfering with the functioning of your microphone.
Related: How to remove Meet Tab from Gmail completely
Restart your System
If restarting your browser does not help solve your microphone issues then you can try restarting your system. This will get rid of your system’s cache files and background processes that might be interfering with the functioning of your microphone. It will also release charge from the capacitors of your system which should take care of any conflicting electronics that might be preventing your microphone from working (only external mics).
If you have an external microphone, then turn off your system, wait for 20 seconds and then start your system again. If you have an in-built microphone or a headset then simply use the restart command from your Power Menu.
Restart your Microphone using CLI (Mac only)
Mac systems use an integrated optimization system that helps microphones work seamlessly across different devices. If you are unable to use your microphone on your Mac then you can try restarting the microphone using CLI. Use the guide below to restart your microphone.
Note: You will need administrator privileges to complete this process.
On your Mac system, open the Application folder in your Launchpad, select ‘Utilities’ and launch ‘Terminal’. You can also open the Terminal app from the Launchpad or Spotlight.
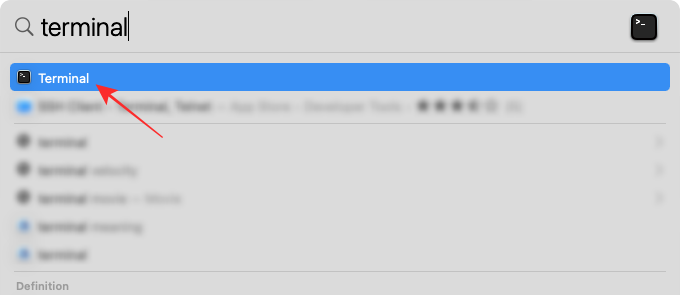
Enter the following command in Terminal:
sudo killall coreaudiod
… and hit Enter to execute it.
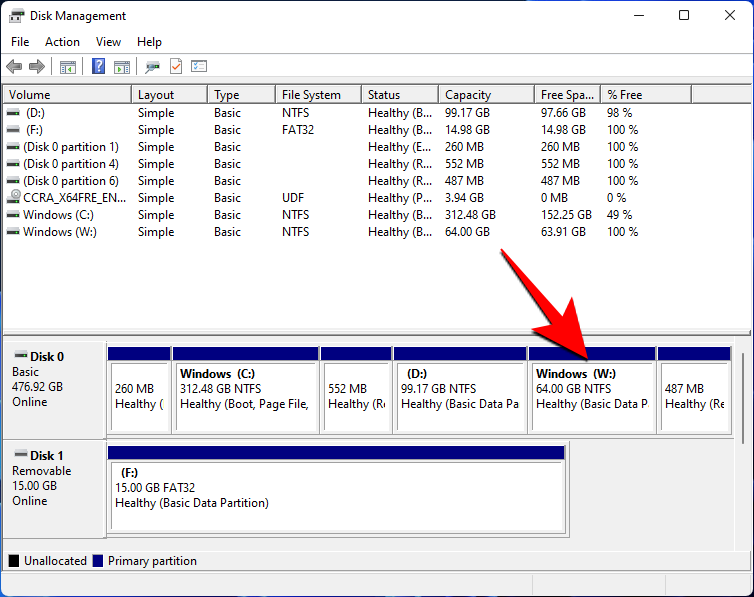
Now enter your credentials in the dialog box to restart the service and press Enter.
You should try joining your meeting on Google Meet again and your microphone issues should now be resolved.
Troubleshoot your Microphone on Windows
If something goes wrong with your computer’s microphone, Windows will be able to tell what might be the issue you’re facing and might even fix it for you, if possible. This is done using the native Troubleshoot tool that’s available on Windows 10 which you can use to solve problems related to your computer’s microphone.
For this, open the Windows Settings app from the Start menu or Action Center.
Inside Windows Settings, go to System and click on the ‘Sound’ tab from the left sidebar.
On this screen, click on the ‘Troubleshoot’ button under the ‘Test your microphone’ section.
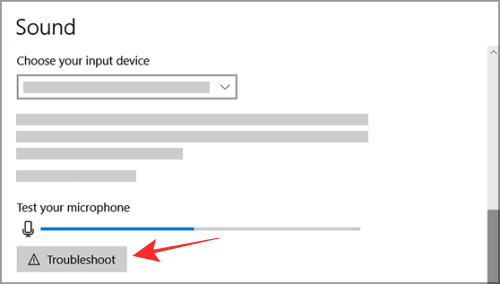
If there’s a problem with your microphone, the tool should be able to detect it and you can then follow the on-screen instructions to get it resolved.
Restart Windows Audio Service
If you have a Windows PC, you can try restarting the Windows audio service to fix the microphone issues that you are facing in Google Meet. Follow the guide below to help you get started.
Press the key combination ‘Windows+R’ on your keyboard simultaneously. This should bring up your ‘Run’ dialog box.
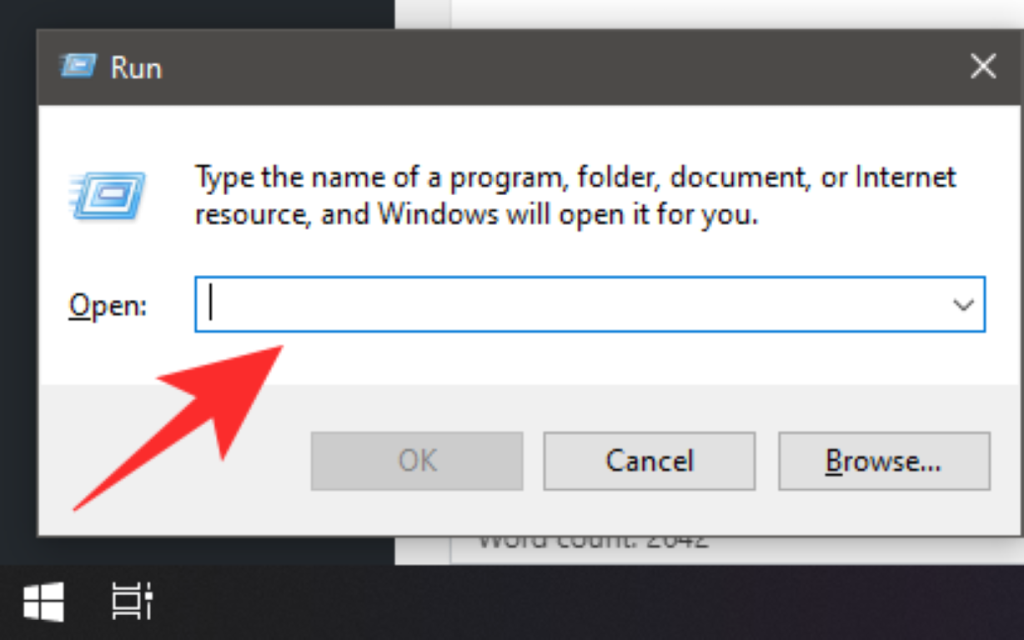
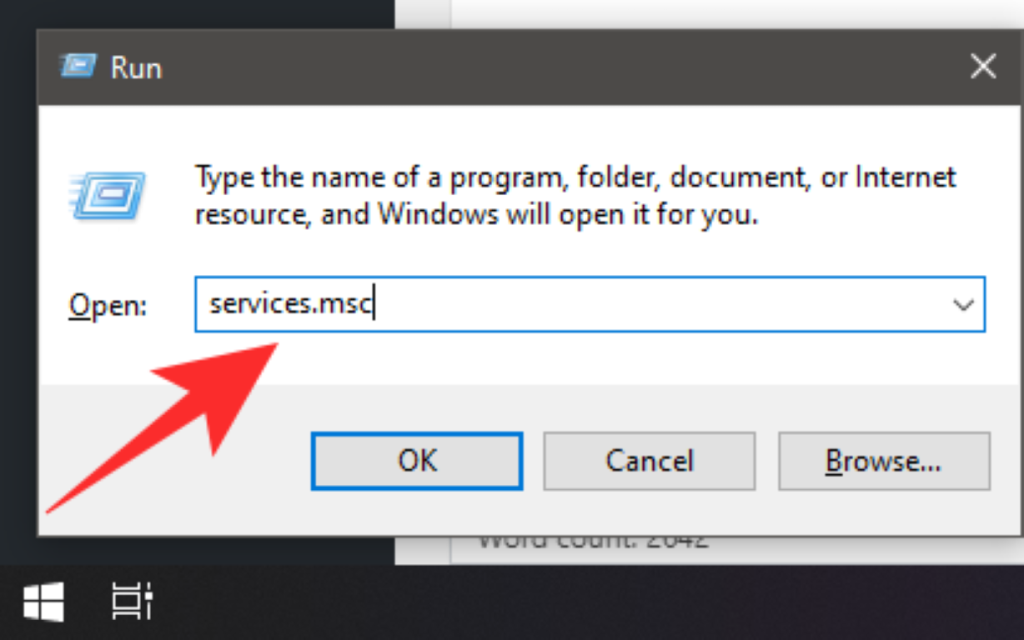
Now type ‘services.msc’ in the Run dialog box and hit Enter on your keyboard to execute the command. This will open the services window on your PC.
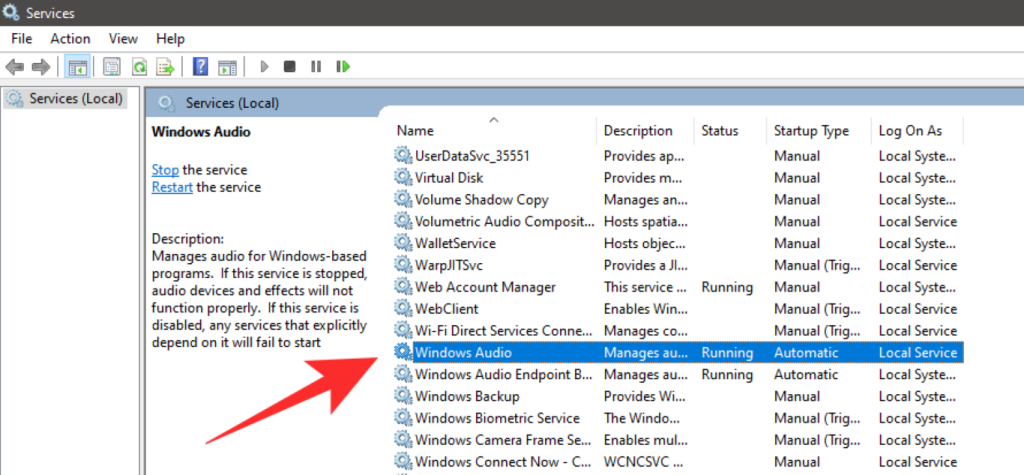
Now find ‘Windows Audio‘ in the list.
Right-click on the service and click on ‘Properties’ from the sub-menu that appears.
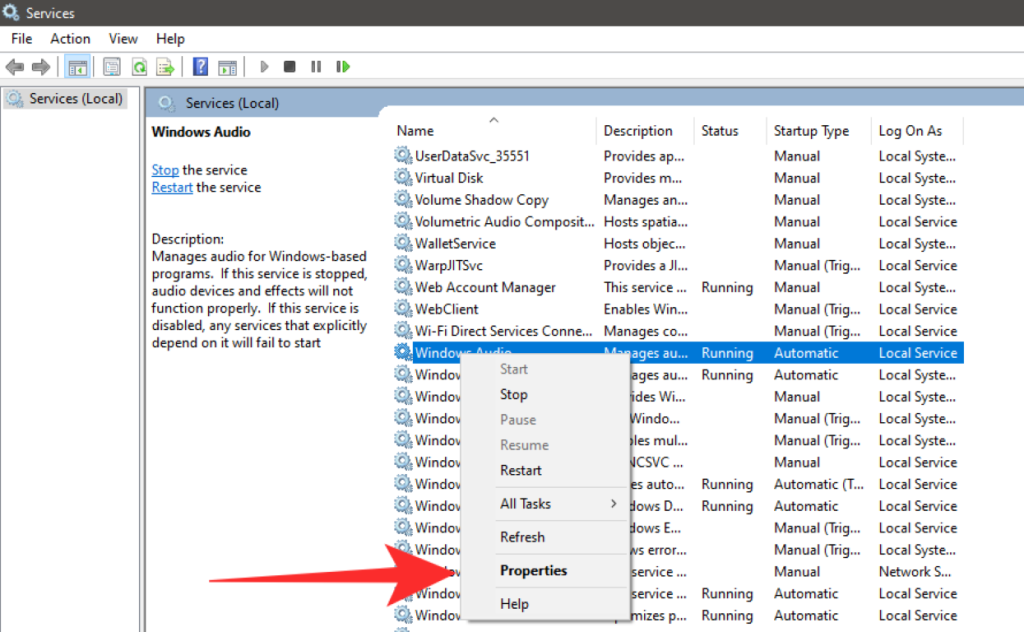
Click on ‘Stop’. This will stop the service.
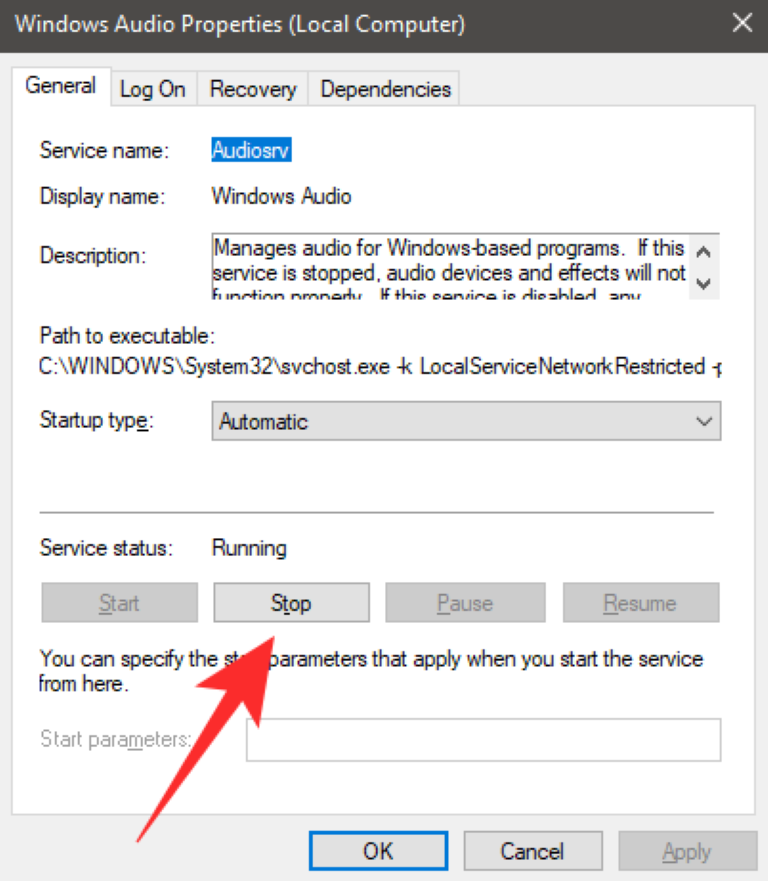
Once stopped, wait for a few seconds and then click on ‘Start‘ again.
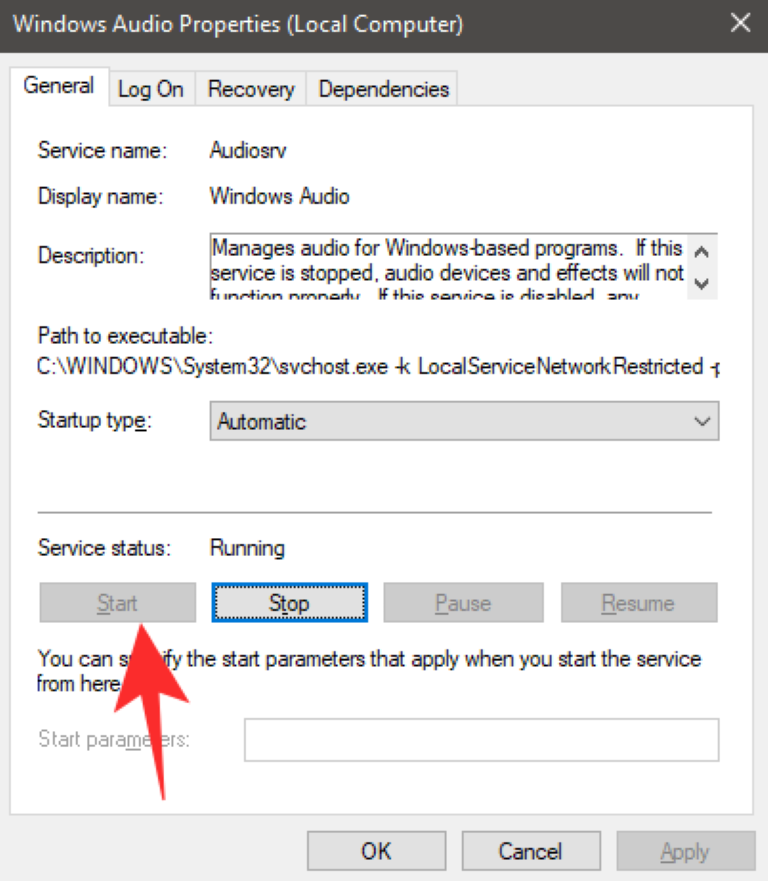
My OEM add-ons restart the service automatically which can be the case for you.
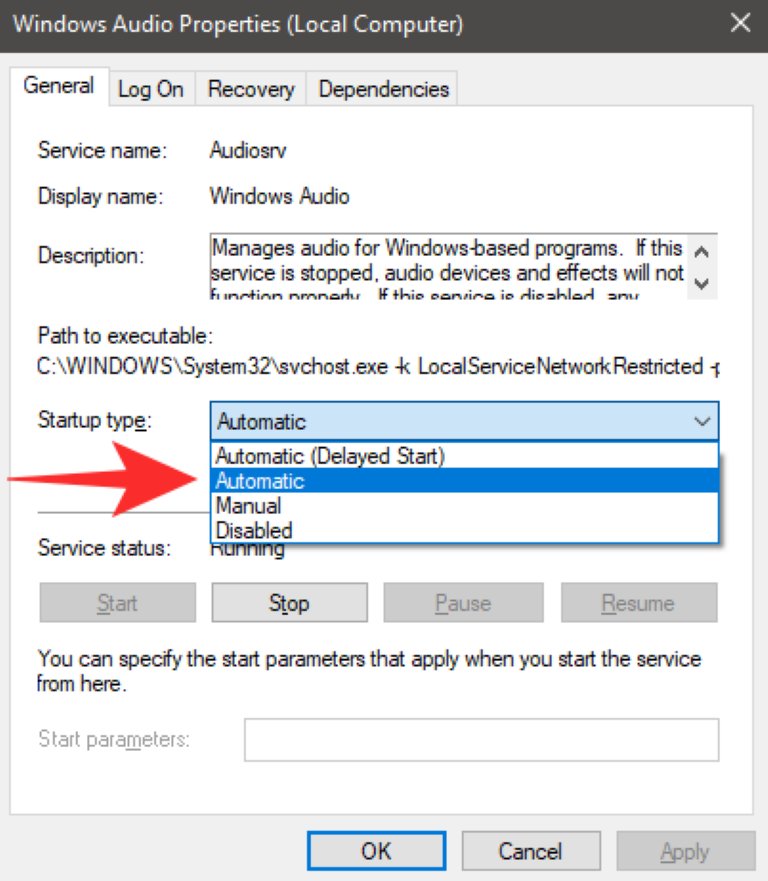
Note: In the properties window, under the ‘General’ tab, click on the drop-down menu beside the ‘Startup Type’ option and select ‘Automatic’ if not selected. Click on ‘Apply’ in the bottom right corner to apply your changes.
Restart your system.
The Windows audio service will now be automatically restarted on your system’s next bootup which should solve any microphone issues that you were having with Google Meet.
Switch to a Wired Headset
If you are using a Bluetooth headset with an in-built microphone then chances are that Meet services are conflicting with the wireless tech required for your headset to function properly. This is a known issue and many people trying to use a Bluetooth headset with Google Meet around the world are facing the same issue.
Google is expected to fix the issue with future updates, but for now, the only workaround seems to be to use a wired headset with an in-built microphone or to use an external microphone. This will solve all your audio issues with Google Meet and allow you to use the microphone properly.
Free Up System Memory
Real-time audio streaming and input require a decent amount of memory and processing power. If you are on a low-powered system and intermittently face microphone issues now and then, it could be there is not enough free memory for the microphone to work properly with Google Meet.
Google Chrome also uses a significant amount of your RAM and processing power which could also be interfering with your Google Meet experience. To fix these issues, you should start by closing any background applications that could be using the resources of your system.
You should also close any background tabs in Chrome other than Google Meet. This should solve your microphone issues with Google Meet.
Ensure that your Microphone is selected in Windows Settings
Windows also give you the ability to select your default microphone. If a different microphone has been selected in Windows audio settings than the one that you wish to use with Google Meet then it could be conflicting with the background services which could be the cause of your microphone issues. Follow the simple guide below to select your desired microphone as your default audio input device.
Open the Control Panel.
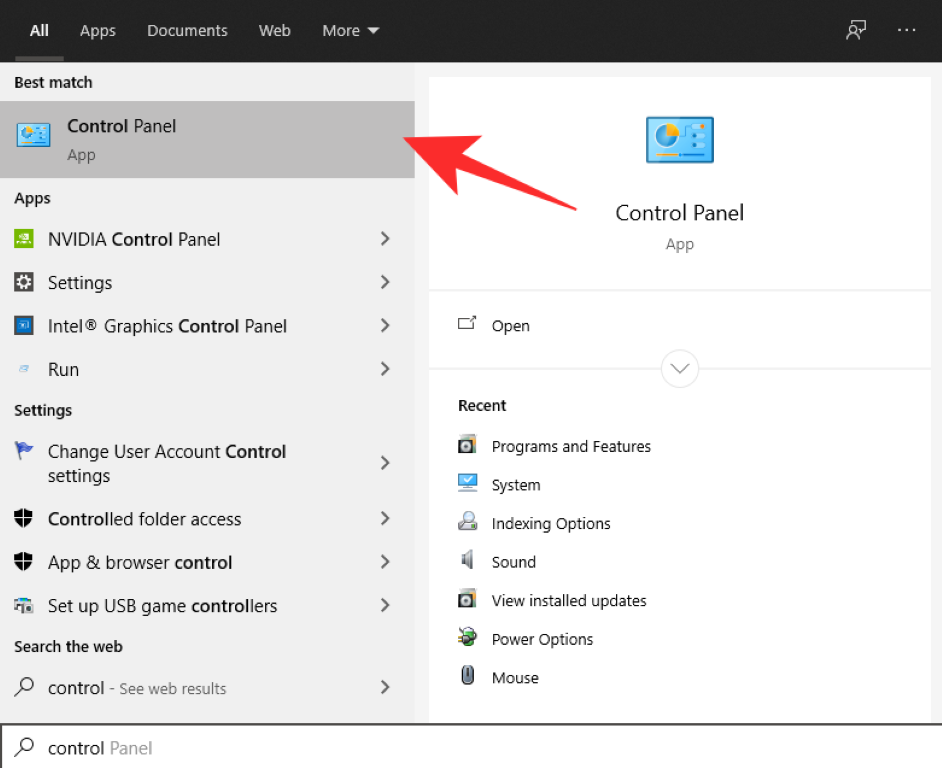
Click on the ‘Hardware and Sound’ category and select ‘Sound’ to open up your sound settings.

Now select the ‘Recording’ tab at the top.
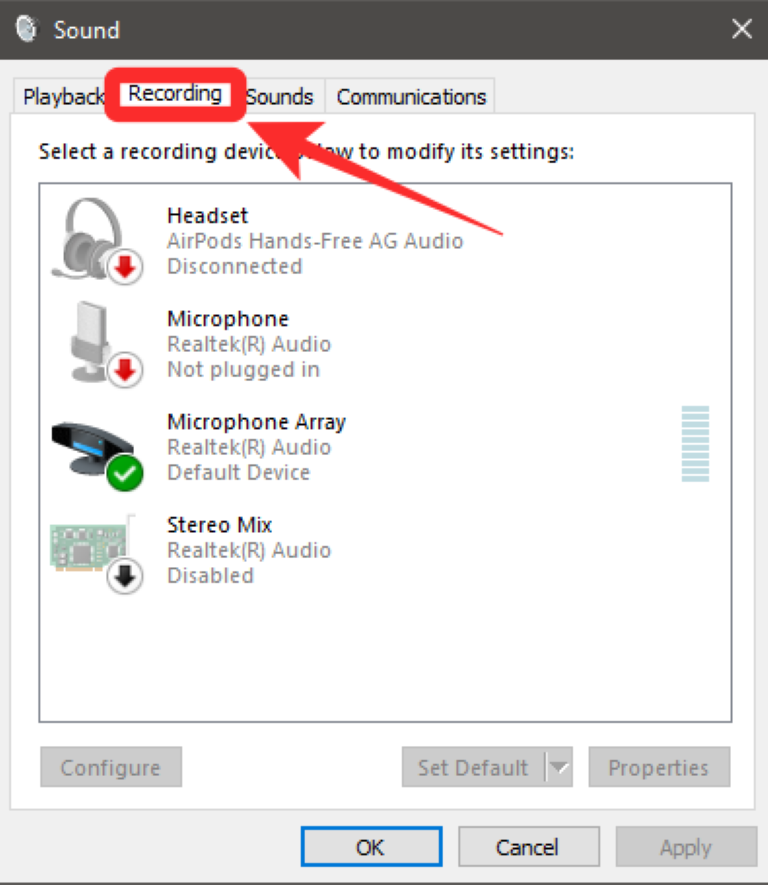
You will now be able to see a list of all the audio input devices connected to your system. Select the microphone that you want to use as your default audio input device and right-click on it.
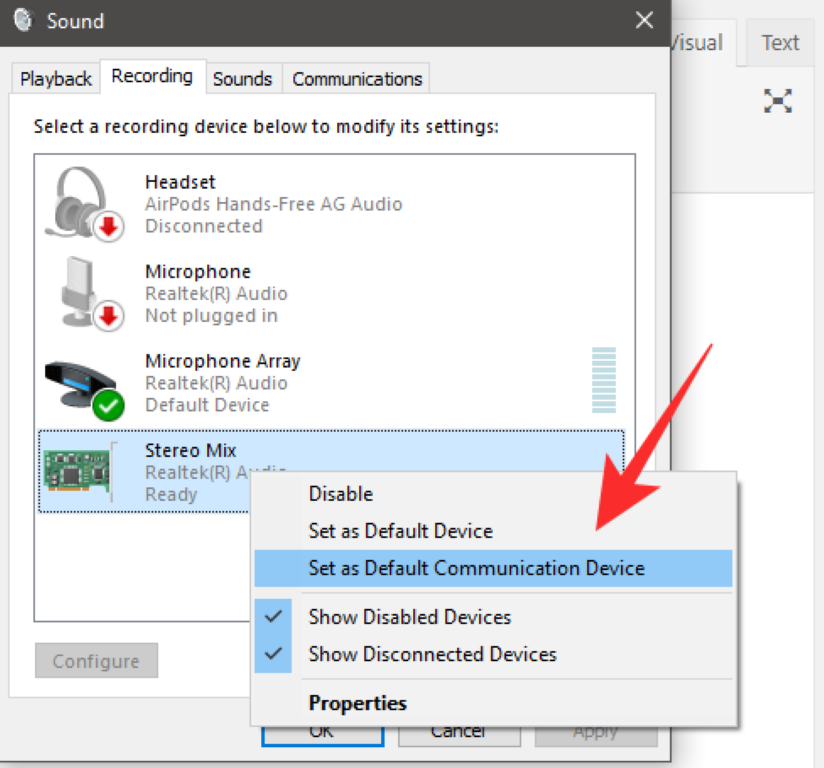
Select ‘Set as default communication device’ from the submenu that appears to start using that microphone as your default audio input device.
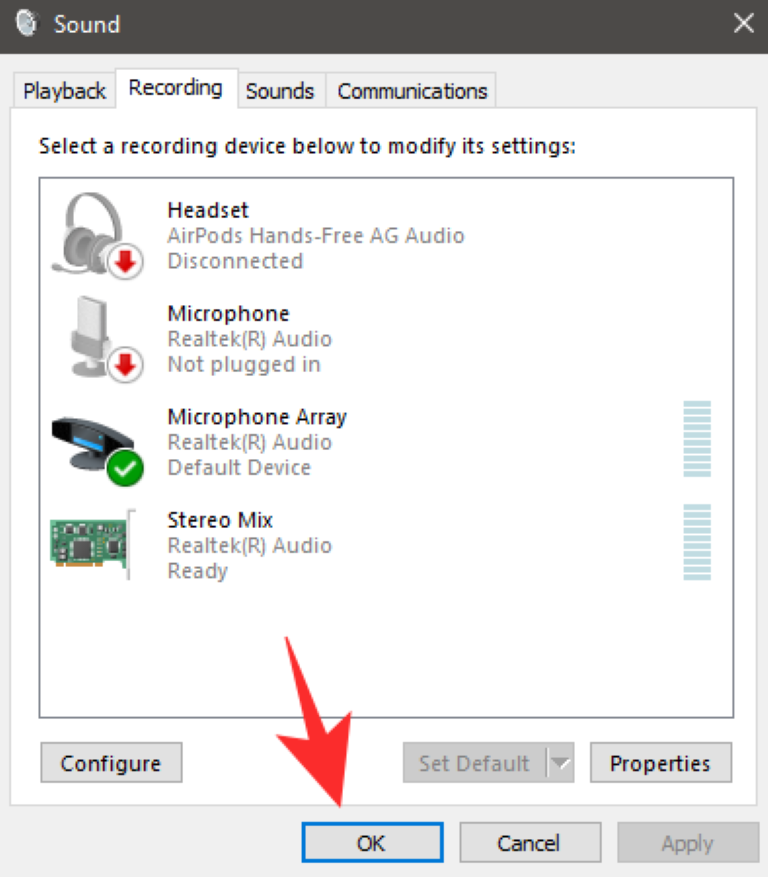
Once done, click on ‘Ok’ at the bottom right corner and close the window.
Your microphone should now be able to work without any issues during meetings on Google Meet.
Update your Microphone drivers (Windows only)
Sometimes your microphone drivers on your Windows system could be outdated which might be preventing your microphone to work properly in Google Meet. You should try to update your microphone drivers to fix these issues. Follow the guide below to help you easily update or reinstall your microphone drivers on Windows 10.
Type ‘Device Manager’ in your taskbar search bar and open the first application that shows up in the search results with the same name.
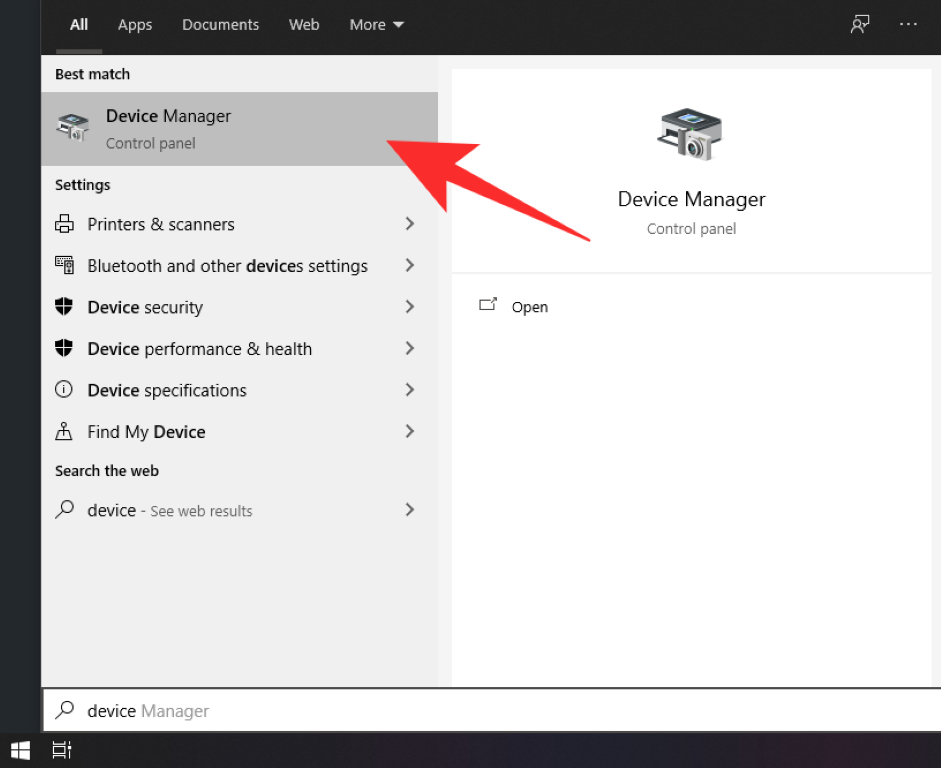
Now click on the drop-down menu beside ‘Audio Inputs and outputs’
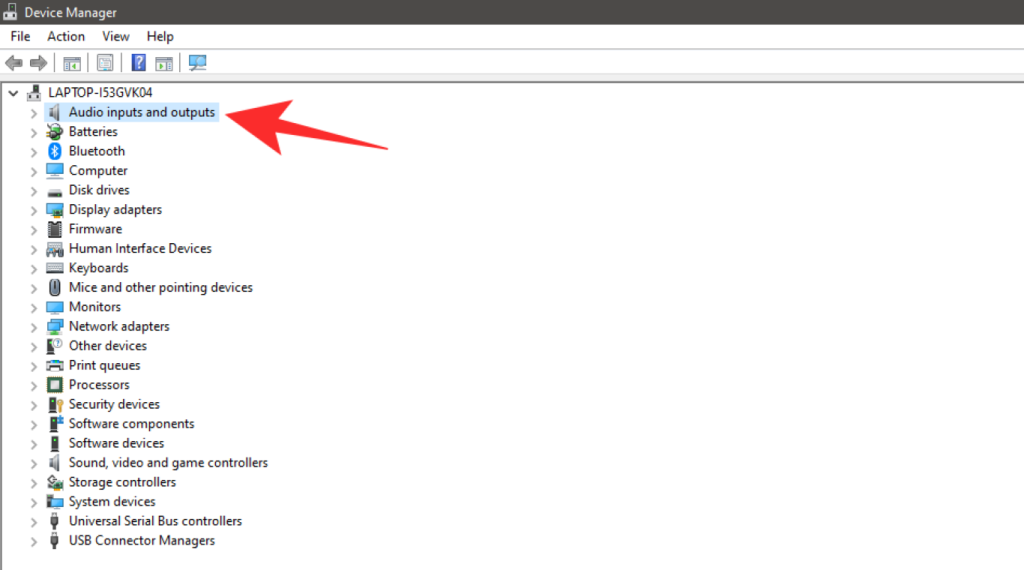
Select the microphone that you wish to use with Google Meet.
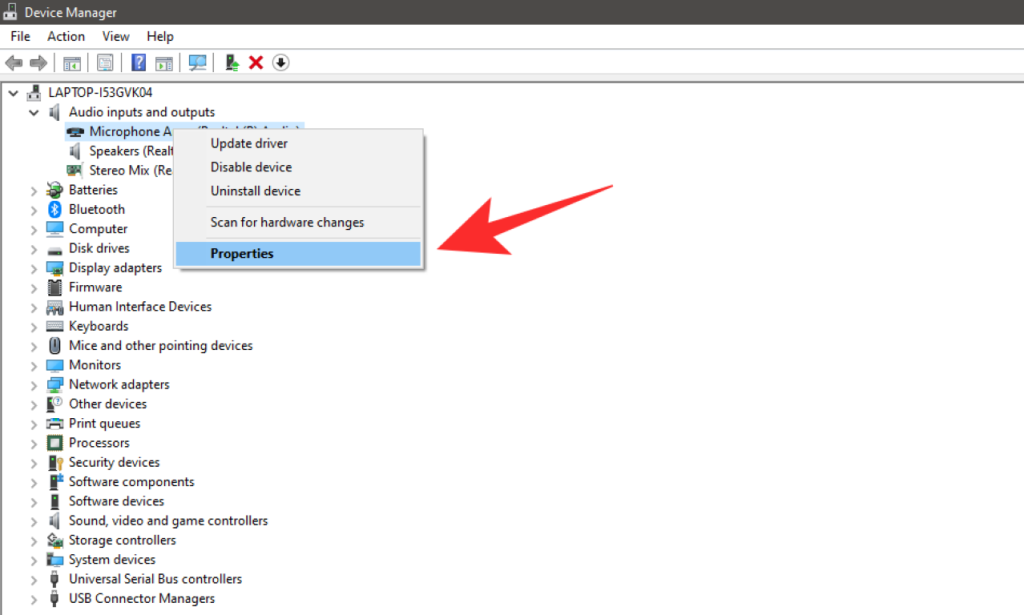
Right-click on the microphone and select ‘Properties’.
Now click on the ‘Driver’ tab at the top to open up driver options for your device. Now if the option for ‘Update Driver’ is not greyed out, click on it to update the drivers for your device.
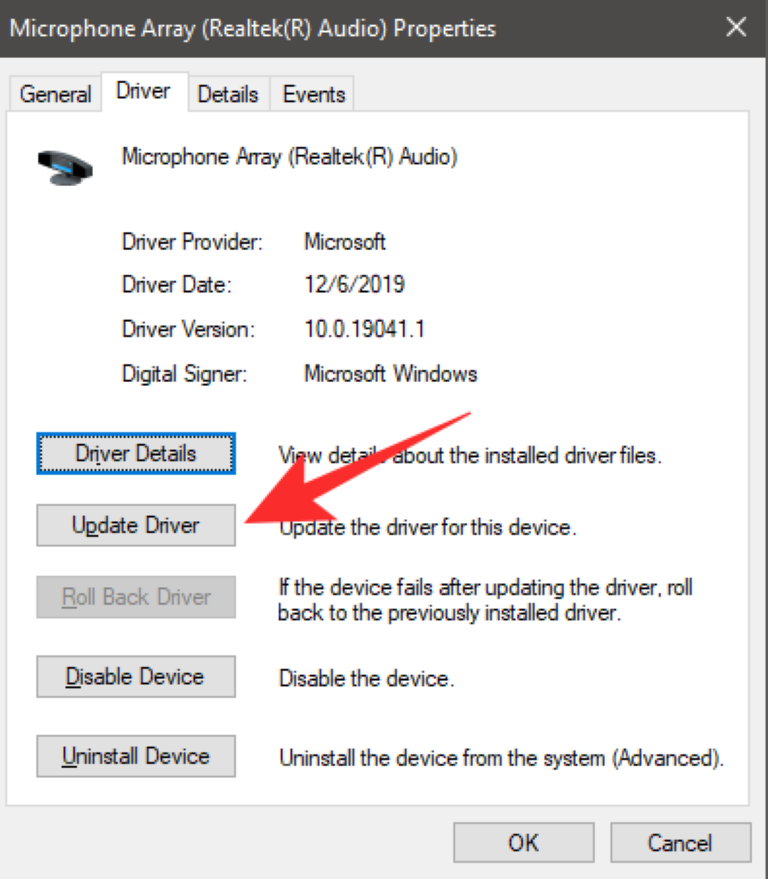
Your microphone drivers will now be updated and you should now be able to use the concerned microphone with Google Meet. Although most microphones are plug-and-play in today’s day and age, this could still help solve your issue depending on your microphone.
Disable Audio Enhancements
There is an option to enable audio enhancements for the microphone on Windows. While this helps improve audio quality for your microphone, this setting is known to interfere with the functioning of Microsoft Meet.
If you are having issues with your microphone, then chances are that audio enhancements have been enabled for your microphone in Windows. Follow the guide below to help you disable audio enhancements for your microphone.
Open the control panel on your Windows PC, click on ‘Hardware and Sound’, and select Sound. This will open the sound settings for your Windows system.

Click on the ‘Recording’ tab at the top of your screen, select the microphone you wish to use during Google Meet meetings from the list, right-click on it, and select ‘Properties’.
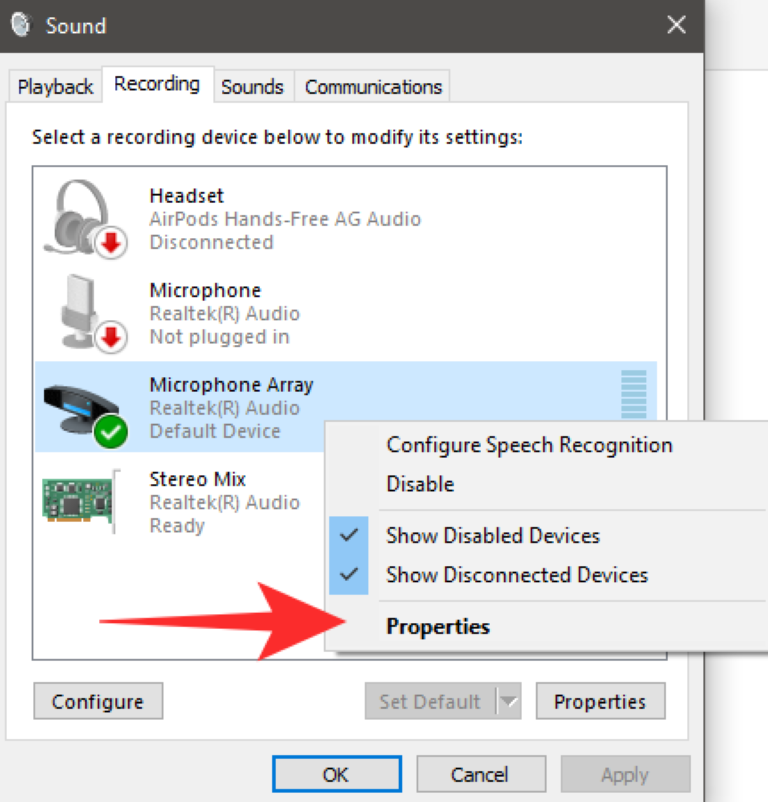
Now in the Microphone Properties window, select the ‘Advanced’ tab from the list at the top. Under the ‘Single Enhancements’ option, uncheck the box beside ‘Enable audio enhancements’.
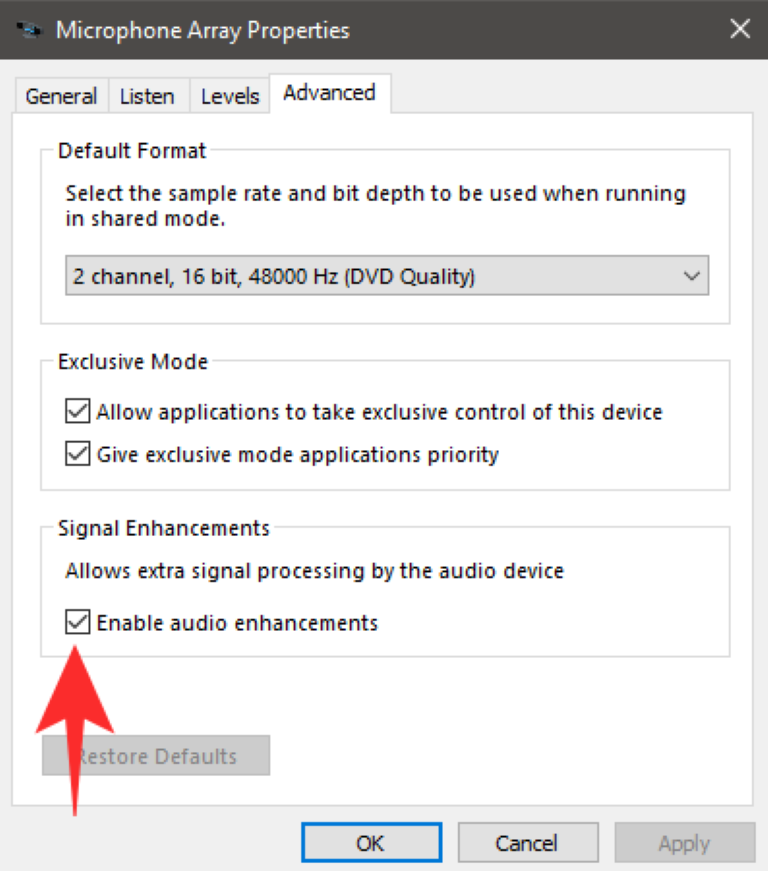
Audio enhancements will now be disabled for the microphone in question. You should now be able to use your microphone during Google Meet meetings.
Clear Google Chrome’s Cache
You can try to clear the cache on Google Chrome to fix your microphone settings. This will get rid of any stored temporary files that might be interfering with the Google Meet extension. Follow the guide below to clear the cache on Google Chrome.
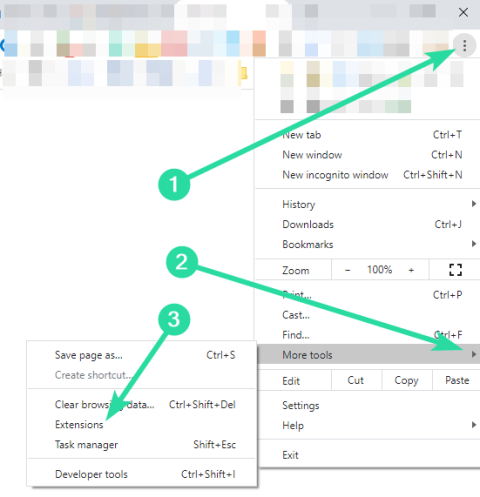
Open Google Chrome, click on the ‘3-dot’ menu icon in the top right corner.
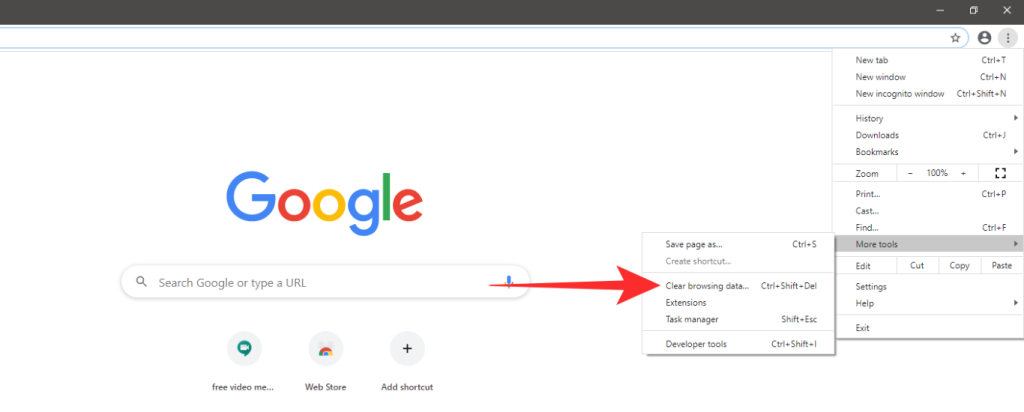
Select ‘More Tools’.
Now select ‘Clear browsing data’.

In the next window, select ‘All-time’ in the time range drop-down menu.
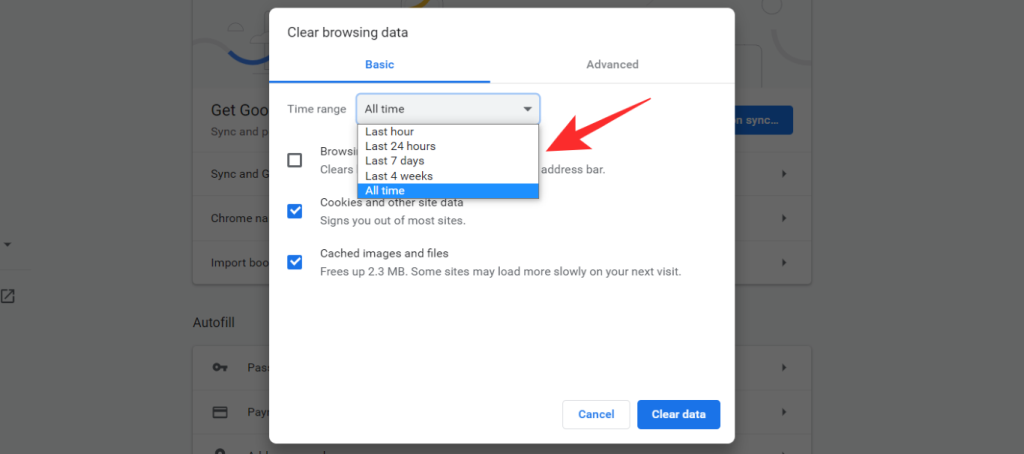
Uncheck the box for ‘Browsing History‘.
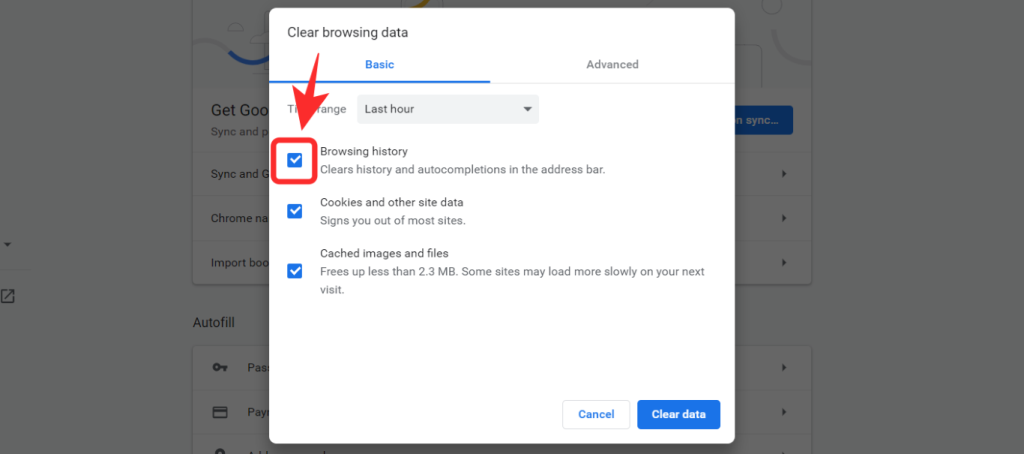
Lastly, click on ‘Clear data’ to clear all the cache files.
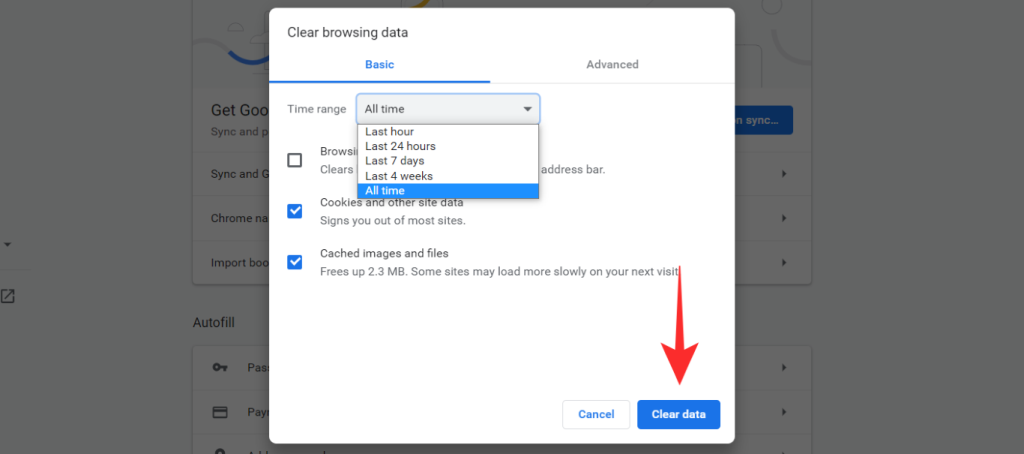
Your cache files will now be cleared and you should now be able to use the microphone in Google Meet.
Close FaceTime from the background
Many users on Mac systems have reported Facetime interfering with Google Meet which causes the microphone to malfunction. If you use Facetime regularly then you should try closing the application in the background before joining a meeting in Google Meet. This should help solve any audio input issues that you were facing with the Google Meet extension.
Sign OUT, then back IN into your Google account
Some users having issues with microphones in Google Meet have reported that signing out of your Google account and signing in again has helped solve this issue. You can try this method to see if it fixes your issue.
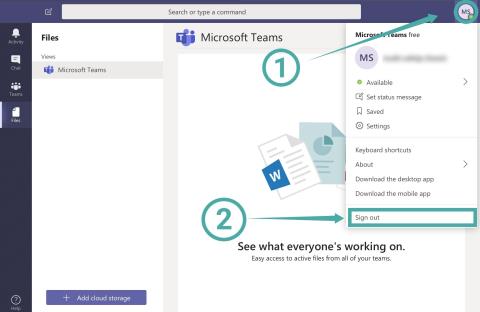
To sign out, simply click on your profile icon in the top right corner of your browser and click on Sign out. Simply sign in to your account again now and try to join a meeting on Google Meet. You should now be able to use your microphone during Google Meet meetings.
Disable Experimental Flags on Google Chrome
If you have enabled any experimental flags in Google Chrome then chances are that they are preventing your microphone from working properly in Google Chrome. You should disable any experimental flags and try to use your microphone again.
Simply type ‘chrome://flags’ in your URL bar and hit enter to access the flags page. Now scroll through the options and disable any enabled tabs by click on the drop-down menu beside it and select ‘Disable’.
Update Google Chrome
Google Meet and its corresponding extension for Chrome was recently given a new overhaul by Google chrome to support the recent influx of users. If you are using an older version of Google Chrome then chances are that it is incompatible with the latest version of Google Meet and the Google Meet extension.
Download the latest stable build of Google Chrome from this link and install it on your system. You should then be able to use your microphone in Google Meet without any issues.
Manually Update Google Meet extension
If nothing seems to work, you can try updating your Google Chrome extensions manually. Simply follow the guide below to help you get started.
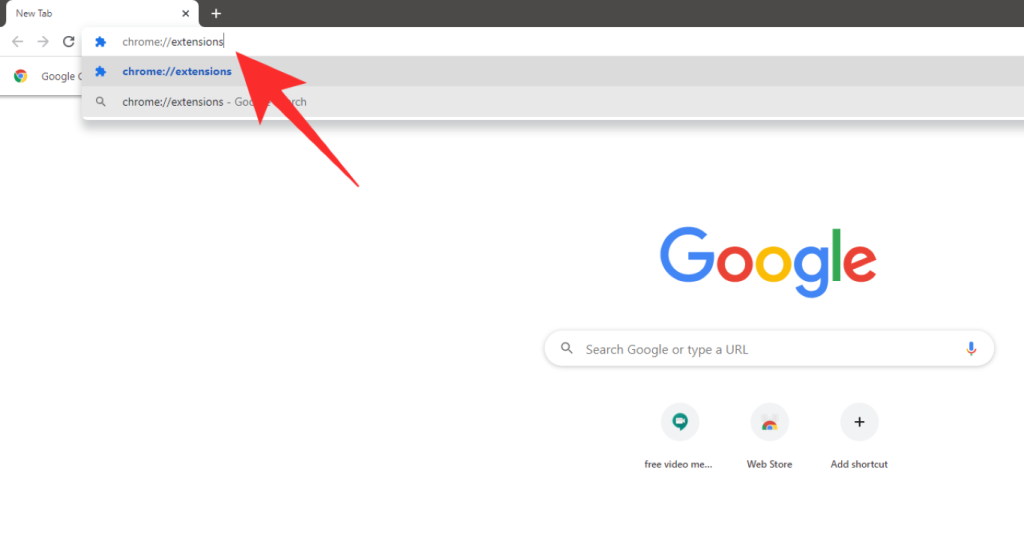
Open Google Chrome on your system and type ‘chrome://extensions’ in your URL bar and hit Enter.
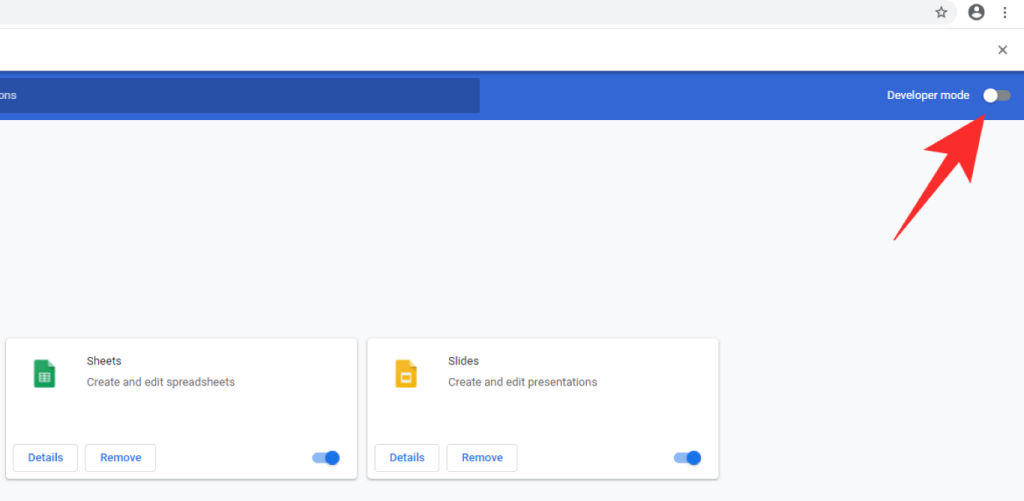
The extensions settings page will now open up. In the top right corner, turn on the toggle for ‘Developer Mode’.
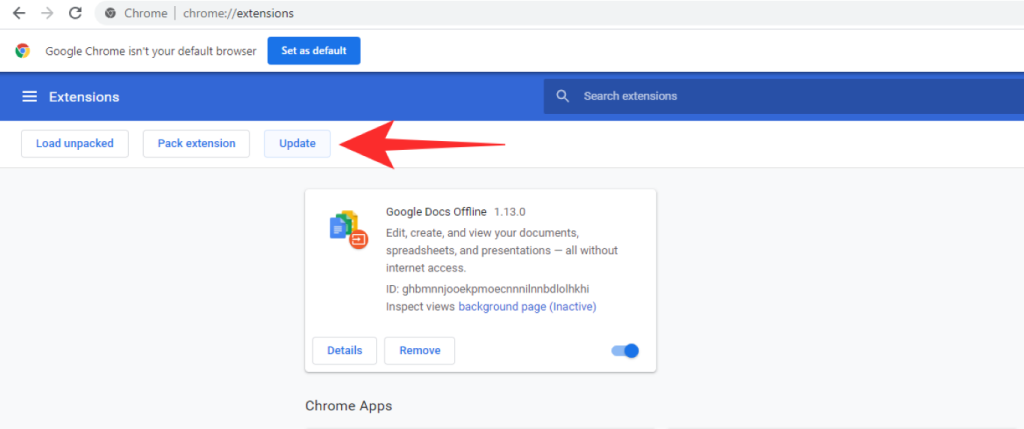
Now simply click on ‘Update’ and chrome will manually update all the extensions installed on your system including Google Meet.
You should now be able to use the microphone freely in Google Meet without any persistent issues.
We hope these fixes helped you solve your microphone issues with Google Meet. If you have any suggestions for us, feel free to get in touch with us using the comments section below.
RELATED:


