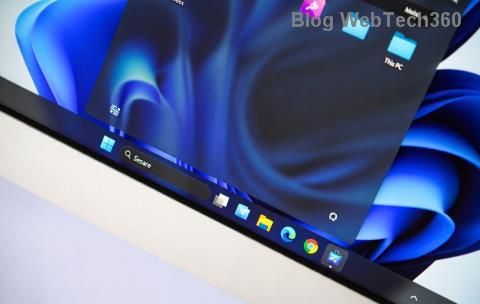
Виндовс трака задатака је била у центру пажње откако је добила свој нови преуређени изглед издавањем Виндовс-а 11. Сада можете да центрирате траку задатака, уживате у новом акционом центру, промените његово поравнање и поставите је на обе стране екрана. Нажалост, примена ове функције је била мање него успешна са све више корисника који се неколико месеци боре да њихова трака задатака ради на Виндовс 11.
Иако је Мицрософт признао проблем, издао решење и тренутно ради на поправци, чини се да корисници и даље не могу да натерају траку задатака да поново ради. Ако сте у истом чамцу, онда смо саставили листу свих доступних поправки да би се трака задатака поново покренула и поново покренула у оперативном систему Виндовс 11. Пратите водич испод да бисте започели.
Садржај
Зашто се моја трака задатака не приказује?
Трака задатака у оперативном систему Виндовс 11 има нови изглед који потиче од преуређеног погледа на његово функционисање. Трака задатака се сада ослања на неколико услуга и сам мени Старт да би исправно функционисао. Чини се да процес надоградње са Виндовс 10 на Виндовс 11 квари траку задатака у зависности од тога коју верзију оперативног система Виндовс 10 сте инсталирали на свом систему и на коју верзију оперативног система Виндовс 11 ажурирате.
Поред тога, чини се да недавно ажурирање оперативног система Виндовс објављено прошлог месеца такође узрокује овај проблем за неке кориснике, док се други суочавају са истим због неусклађеног системског времена упркос томе што су све исправно подешено. Постоји много начина да поправите траку задатака и препоручујемо вам да почнете са исправкама у наставку једну по једну.
12 начина да решите проблеме са траком задатака у оперативном систему Виндовс 11
Користите методе у наставку да бисте почели да поправљате траку задатака у оперативном систему Виндовс 11. Ако сте већ покушали да поново покренете систем, онда можете прескочити први метод.
Исправка #1: Поново покрените рачунар
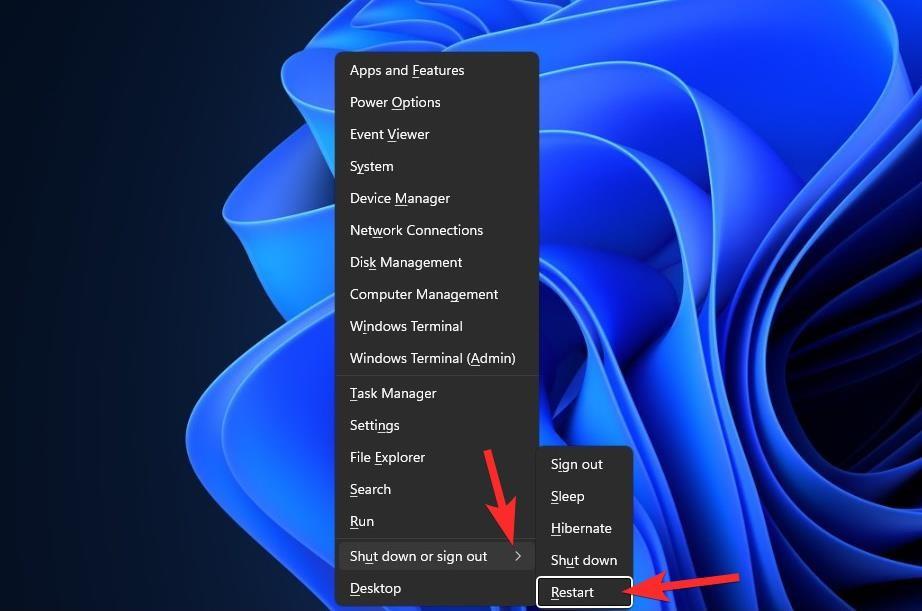
Пре него што испробате било шта отмено, добро је да испробате једноставније мере, као што је поновно покретање рачунара или Виндовс Екплорер-а (погледајте доле). Ово ће омогућити вашем систему меко ресетовање, омогућавајући поновно учитавање података и, евентуално, решавање проблема са траком задатака и Старт менијем.
Исправка #2: Уверите се да је „Аутоматски сакриј траку задатака“ онемогућено
Притисните Windows + iна тастатури и кликните на 'Персонализација' са леве стране.
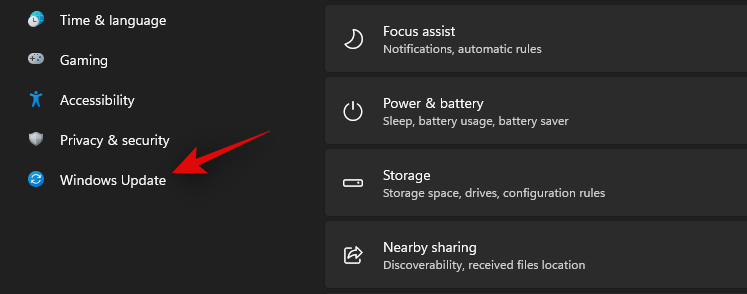
Кликните на 'Таскбар'.
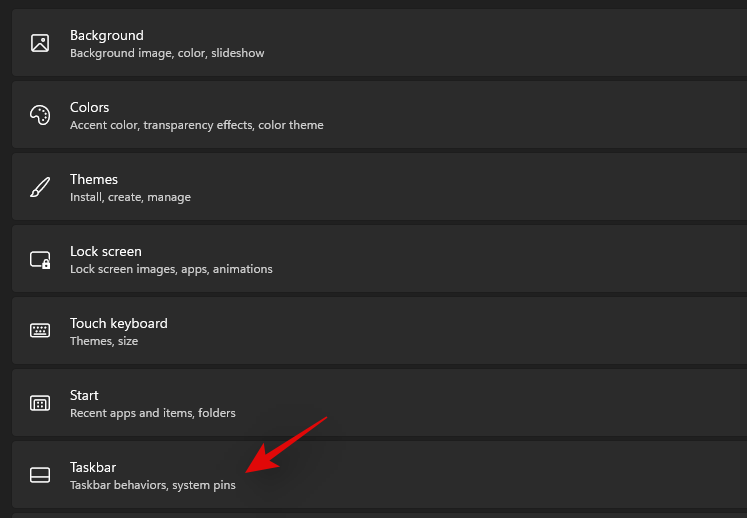
Сада кликните на „Понашање на траци задатака“.
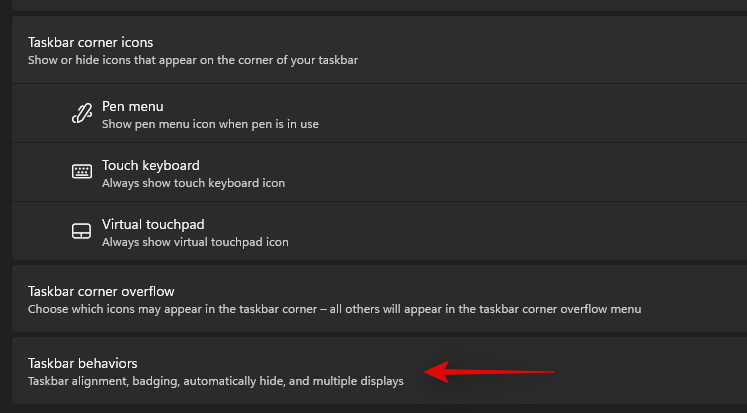
Опозовите избор у пољу за потврду „Аутоматски сакриј траку задатака“.

Сада затворите апликацију Подешавања и ако је трака задатака била аутоматски скривена, сада би требало да буде онемогућена на вашем систему.
Поправка #3: Поново покрените неопходне услуге
Као што је раније поменуто, Виндовс 11 је преуредио траку задатака што сада значи да се ослања на више услуга да би исправно функционисали на било ком систему. Хајде да поново покренемо све ове услуге да бисмо били сигурни да конфликт у позадини не спречава вашу траку задатака да исправно ради на вашем систему.
Притисните Ctrl + Shift + Escна свом систему да покренете Таск Манагер. Пређите на картицу „Детаљи“ на врху.
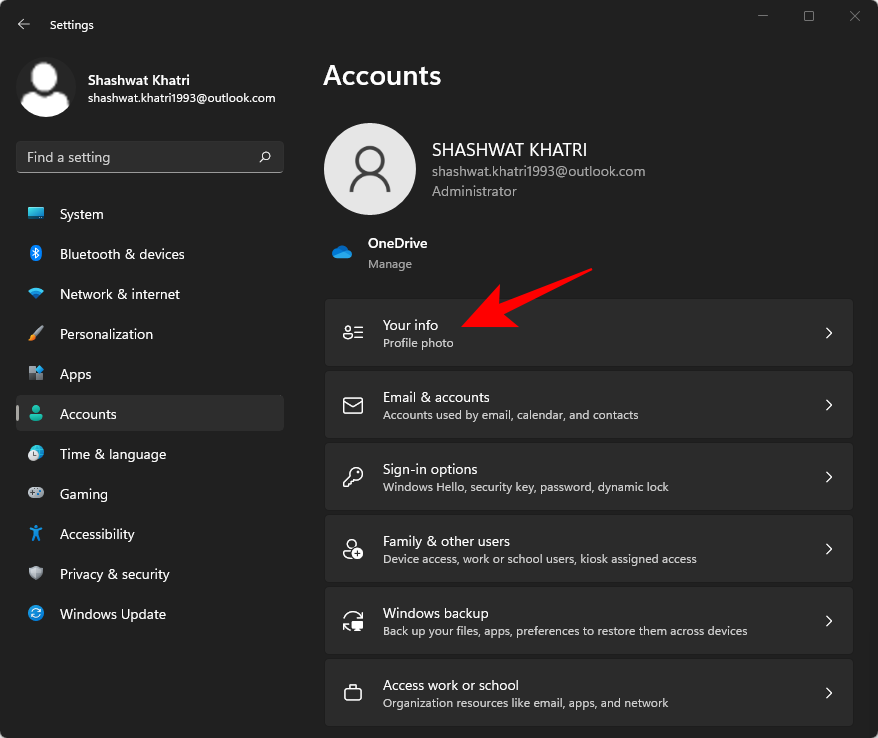
Сада пронађите следеће покренуте услуге и изаберите их кликом на њих. Притисните 'Делете' на тастатури и потврдите свој избор одабиром 'Заврши процес'.
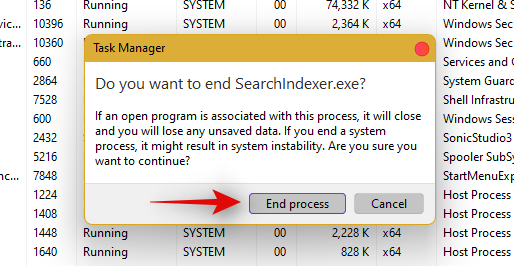
- Екплорер.еке
- СхеллЕкпериенцеХост.еке
- СеарцхИндекер.еке
- СеарцхХост.еке
- РунтимеБрокер.еке
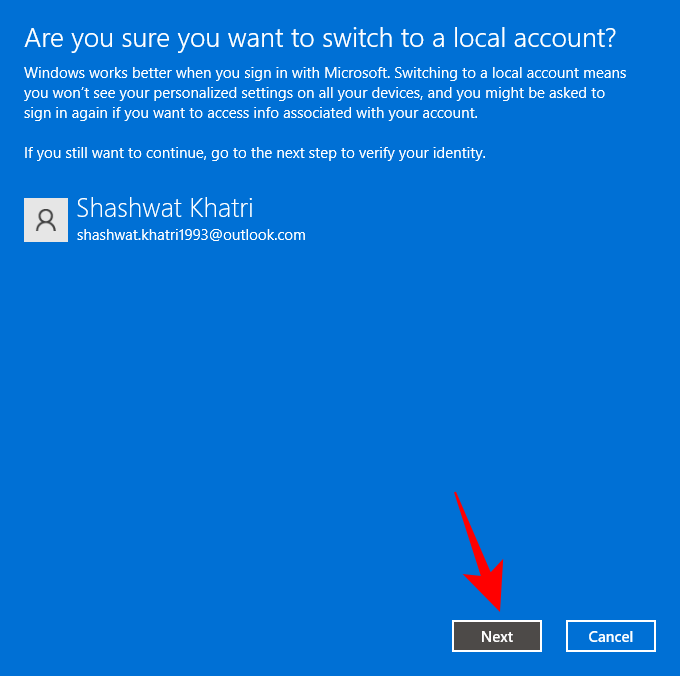
Хајде да сада поново покренемо Виндовс Екплорер. Кликните на „Датотека“ у горњем левом углу и изаберите „Покрени нови задатак“.
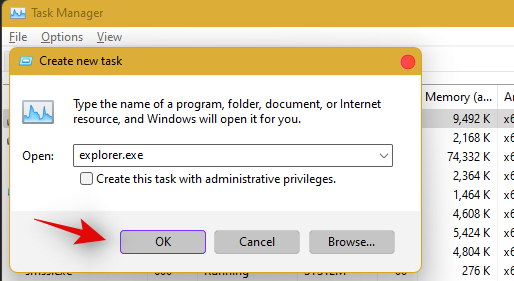
Унесите „екплорер.еке“ и притисните Ентер на тастатури. Такође можете кликнути на 'У реду' ако је потребно.
Када се истраживач поново покрене, једноставно поново покрените рачунар да бисте поново покренули друге услуге на вашем систему.
Трака задатака би сада требало да се врати ако је узрок вашег проблема био сукоб услуге у позадини.
Поправка #4: Избришите ИрисСервице у регистру и поново покрените
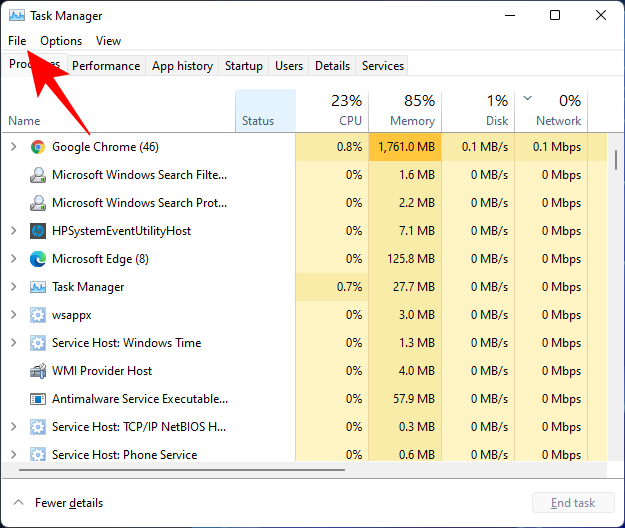
Притисните Ctrl + Shift + Escда отворите Таск Манагер. Затим кликните на Датотека у горњем левом углу.
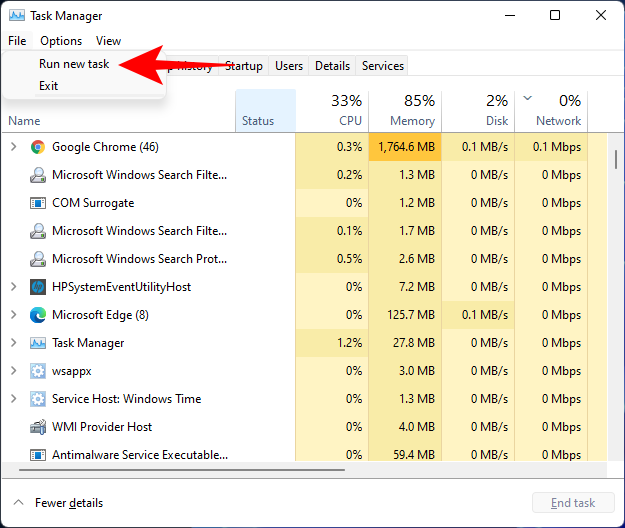
Изаберите Покрени нови задатак .
Откуцајте цмд и притисните Ентер.
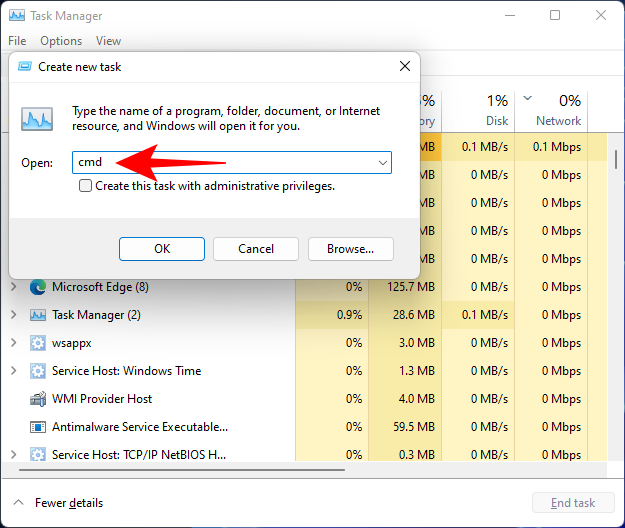
Ово ће отворити повишену инстанцу командне линије. Сада копирајте следећу команду и налепите је у командну линију:
reg delete HKCU\SOFTWARE\Microsoft\Windows\CurrentVersion\IrisService /f && shutdown -r -t 0

Затим притисните Ентер. Чим то урадите, рачунар ће се поново покренути. Када се поново покрене, ствари би требало да се врате у нормалу, укључујући траку задатака.
Исправка #5: Додајте УндоцкингДисаблед у регистар
Притисните Ctrl + Shift + Escда отворите Таск Манагер. Затим кликните на Датотека (горњи леви угао) и Покрени нови задатак .
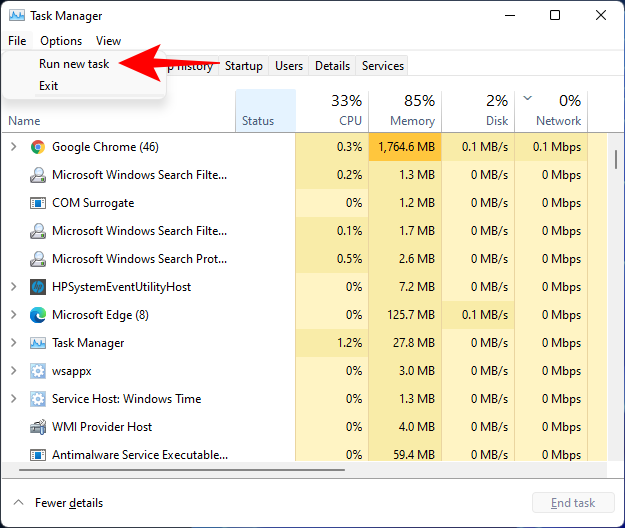
Унесите регедит и притисните Ентер.
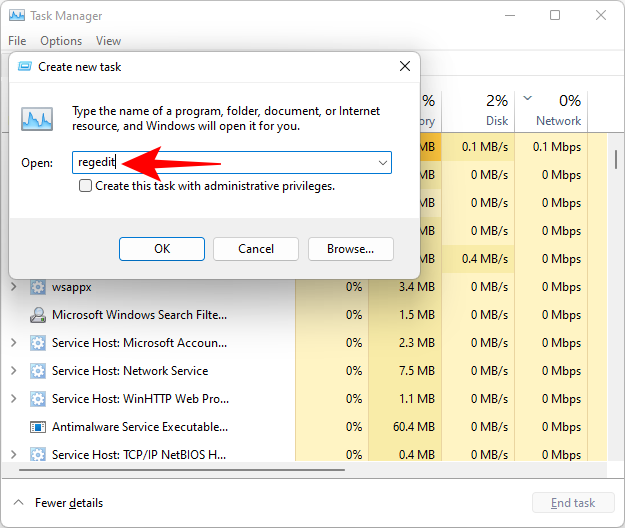
Ово ће отворити уређивач регистра. Сада идите на следећу адресу:
Computer\HKEY_LOCAL_MACHINE\SOFTWARE\Microsoft\Windows\CurrentVersion\Shell\Update\Packages
Алтернативно, само копирајте горенаведено и налепите га у адресну траку уређивача регистра, на следећи начин:

Када притиснете Ентер, бићете преусмерени на наведени тастер. Десно кликните десним тастером миша на размак и изаберите Ново > ДВОРД (32-битна) вредност .
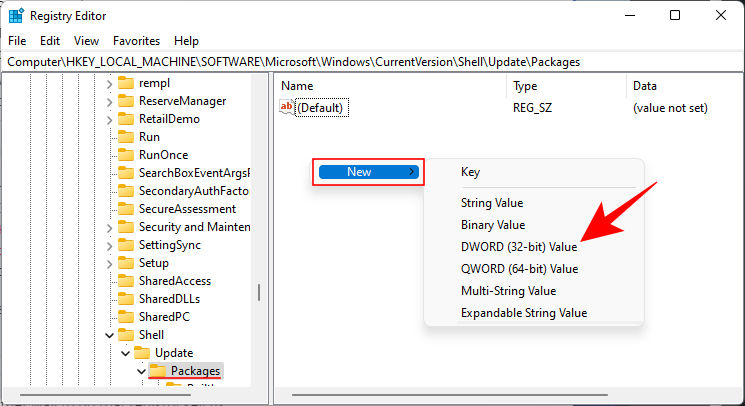
Именујте овај новостворени ДВОРД УндоцкингДисаблед .
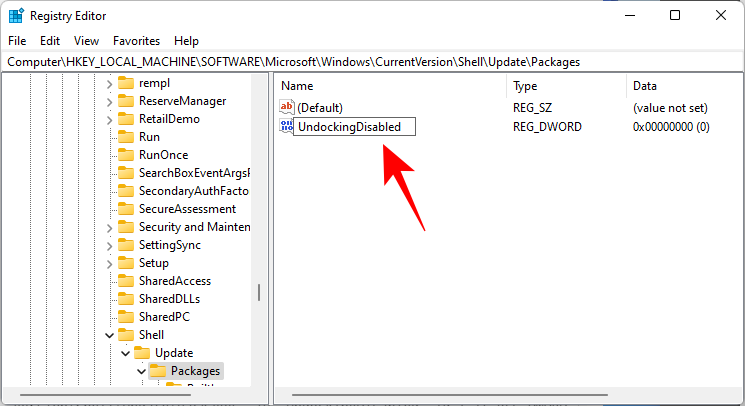
Затим двапут кликните на њега и промените „Подаци о вредности“ на 1 . Затим кликните на ОК .
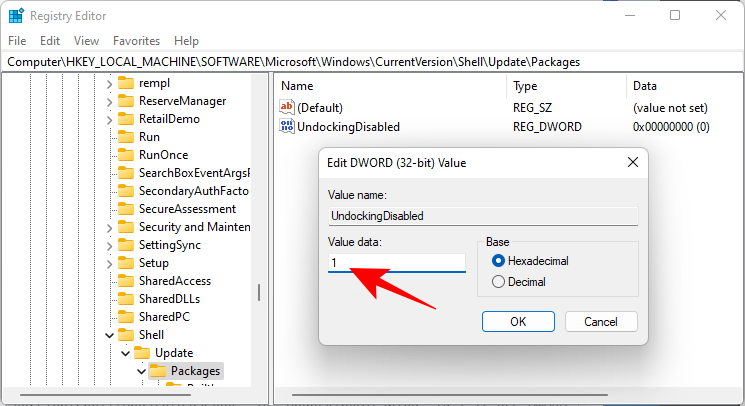
Поново покрените рачунар да би промене ступиле на снагу.
Поправка #6: Покрените СФЦ & ДИСМ команде
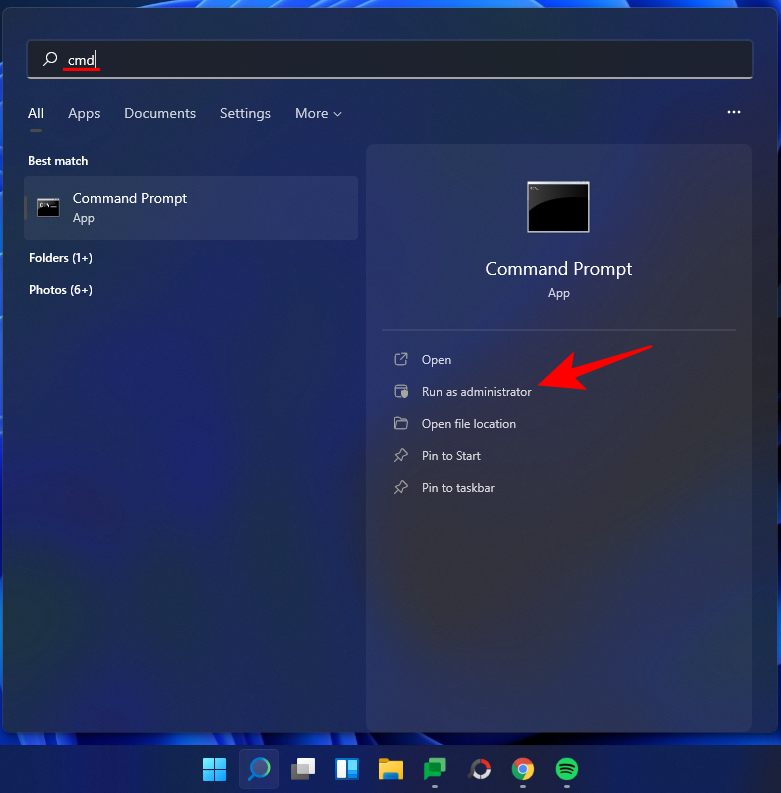
Притисните Старт, откуцајте цмд и кликните на Покрени као администратор .
Сада откуцајте следећу команду:
sfc /scannow
Притисните ентер. Сачекајте да СФЦ заврши скенирање и реши све пронађене проблеме.

Следеће, покрените следећу ДИСМ команду за алатку за сервисирање и управљање сликама за примену:
dism /online /cleanup-image /scanhealth
Затим притисните Ентер. Опет, сачекајте да се скенирање заврши.

Сада покрените следећу ДИСМ команду:
dism /online /cleanup-image /restorehealth

Притисните ентер. Сачекајте да ДИСМ поврати здравље.

На крају, покрените команду цхкдск да бисте покренули услужни програм Цхецк Диск:
chkdsk c: /r
Притисните ентер. Командна линија ће приказати поруку која вам говори да „не може да закључа тренутни диск... јер волумен користи други процес“, и затражиће вашу дозволу да закаже скенирање пре следећег покретања. Унесите Yда бисте се придржавали.

And press Enter. Now restart your computer, let the Check Disk tool do its job, and check if the taskbar has resumed normal functioning.
Fix #7: Reinstall UWP
Press Ctrl + Shift + Esc on your keyboard to launch the Task Manager. Click on ‘File’ and select ‘Run new task’.
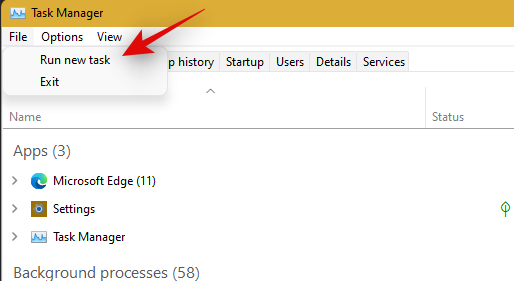
Type in ‘PowerShell’ and press Ctrl + Shift + Enter on your keyboard.
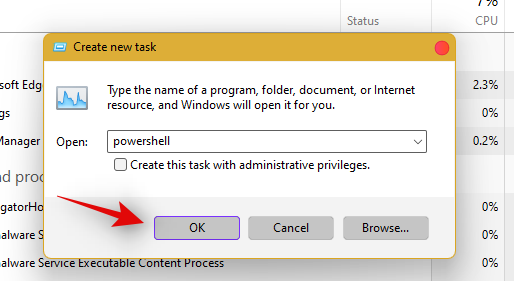
PowerShell will now be launched as an administrator on your system. Type the following command:
Get-AppxPackage -AllUsers | Foreach {Add-AppxPackage -DisableDevelopmentMode -Register “$ ($ _. InstallLocation) \ AppXManifest.xml”}
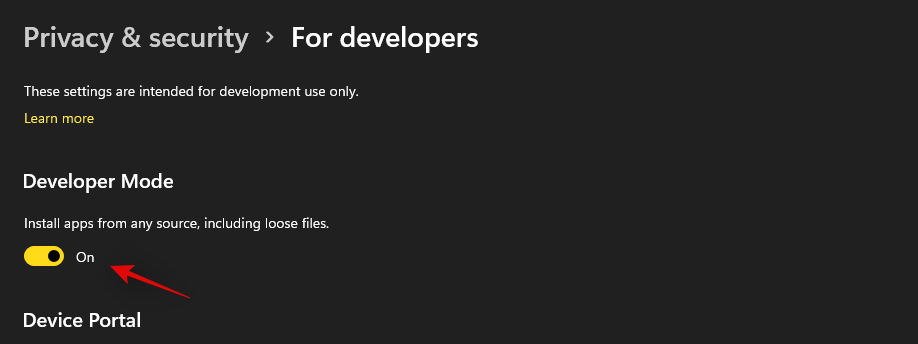
Press Enter. PowerShell will throw up a running list of messages in red. But don’t worry about it. Just wait for the command to finish executing.

Fix #8: Check UAC and add edit Registry if needed
UAC is a must-have for all modern apps and features including the Start Menu and the taskbar. You should first enable UAC if it is disabled and restart your system. If the Taskbar still fails to work for you, then we recommend you try adding a Xaml Start menu value to your Registry Editor.
Adding this value seems to restart and re-register Taskbar services which seem to get Taskbar working again on most systems. Follow the guide below to get you started.
Check and enable UAC if disabled
Press Ctrl + Shift + Esc on your keyboard to launch the task manager. Now click on ‘File’ in the top left corner of your screen and select ‘Run new task’.

Type in ‘cmd’ and press Ctrl + Shift + Enter on your keyboard.
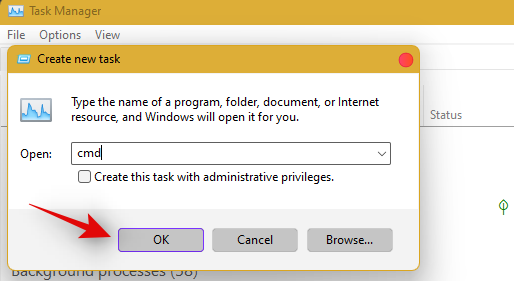
Now type in the following command and press Enter to execute the command.
C:\Windows\System32\cmd.exe /k %windir%\System32\reg.exe ADD HKLM\SOFTWARE\Microsoft\Windows\CurrentVersion\Policies\System /v EnableLUA /t REG_DWORD /d 0 /f
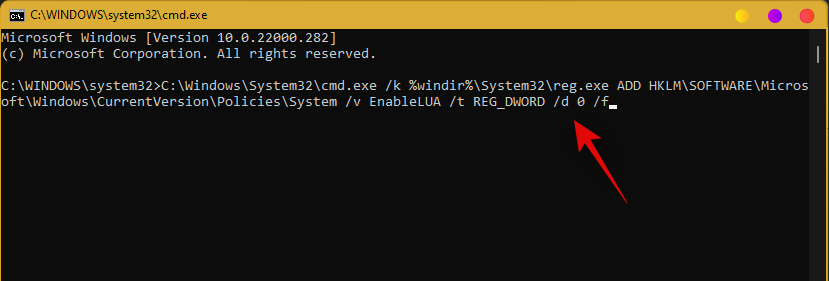
UAC will now be enabled for your system. Restart your PC for the changes to take effect on your system. Once restarted, Taskbar should be up and running on your system if UAC was the issue for you. If not, use the guide below to trigger the taskbar’s functionality on your system.
Add Registry Value
Press Ctrl + Shift + Esc to launch the task manager. Now click on ‘File’ in the top left corner and select ‘Run new task’.

Type in ‘cmd’ and press Ctrl + Shift + Enter on your keyboard.

Now type in the following command and press Enter on your keyboard.
REG ADD "HKCU\Software\Microsoft\Windows\CurrentVersion\Explorer\Advanced" /V EnableXamlStartMenu /T REG_DWORD /D 1 /F
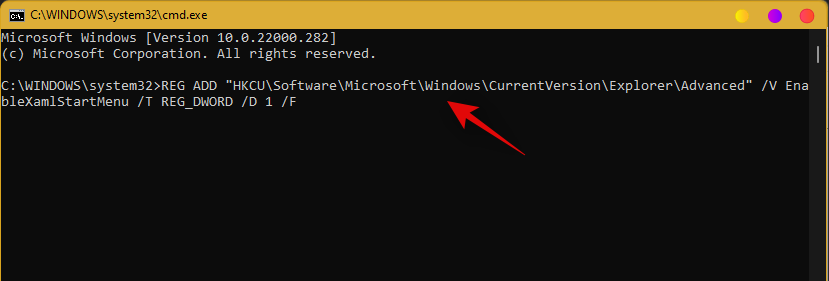
Go back to the task manager now, find Windows Explorer in the list, and right-click on it. Select Restart to restart explorer.exe.
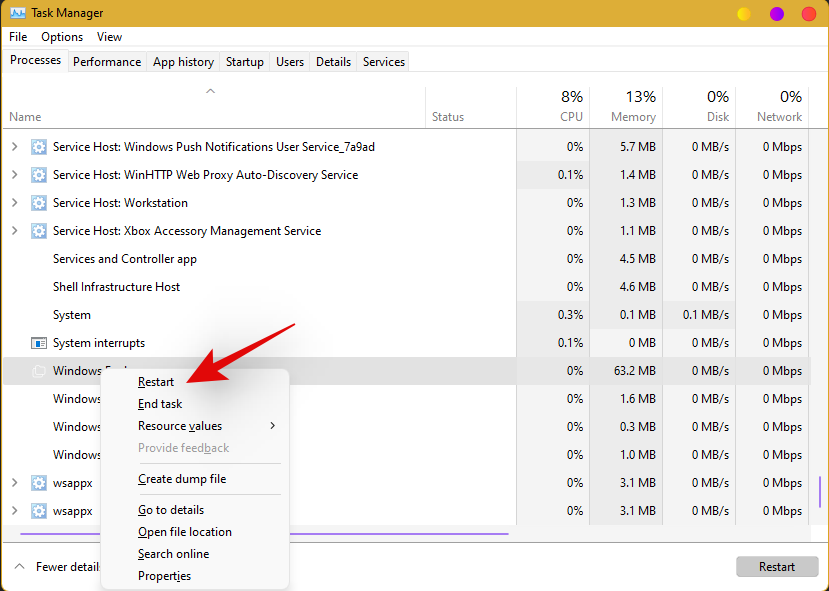
Once restarted, try to access your taskbar. The taskbar should now be available on your system.
Fix #9: Edit date and time to fix Taskbar
Date and Time settings seem to be the major cause of issues with the taskbar in Windows 11. Use the guide below to try out the following time fixes to see which one works the best for you.
Ensure that your time is correctly synchronized with the time server
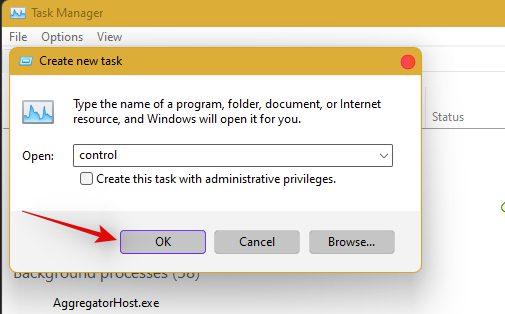
Press Ctrl + Shift + Esc on your keyboard and click on ‘File’. Select ‘Run new task’.

Type in ‘Control’ and hit Enter on your keyboard.
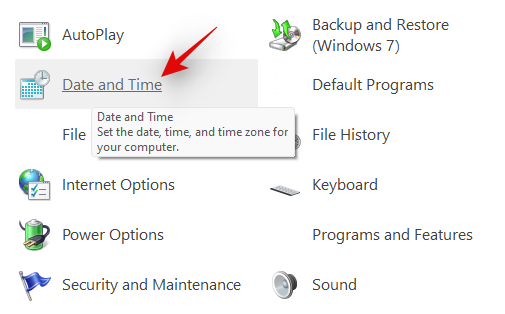
Click on ‘Date and Time’.
Select ‘Internet Time’ from the top.
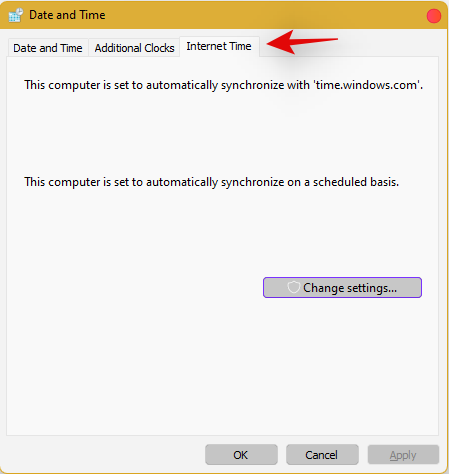
Click on ‘Change Settings’.
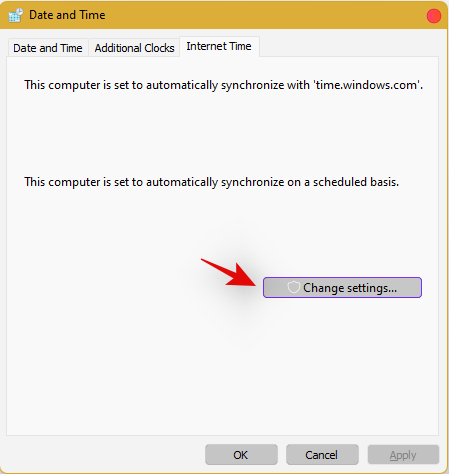
Uncheck the box for ‘Synchronize with an Internet time server’.
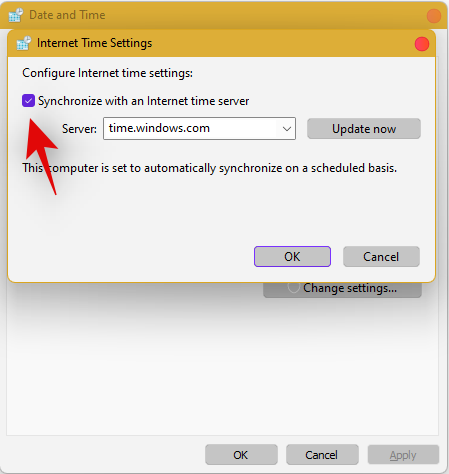
Click on ‘Ok’ once you are done.
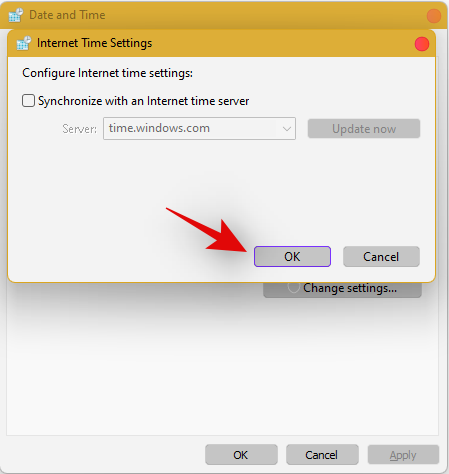
Restart your PC at this point and check your taskbar. If it is still disabled, do not fret, follow the steps above and enable Synchronization with an Internet Time Server again.
Once enabled, press Ctrl + Shift + Esc on your keyboard, and find Windows Explorer in the list on your screen. Right-click the listing and select ‘Restart’.

Once explorer restarts, try using the Taskbar. If synchronization was your issue, then it should now be fixed on your system. If not, continue with the other time fixes mentioned below.
Change date to 1 day ahead
Open the Task Manager by pressing Ctrl + Shift + Esc simultaneously. Then click on File.
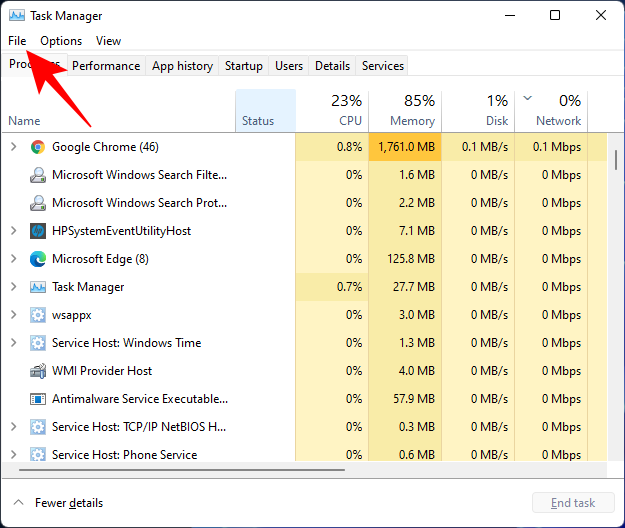
Click on Run new task.
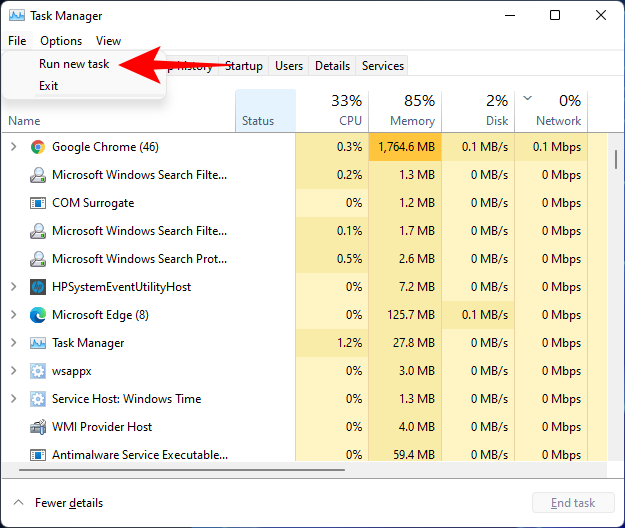
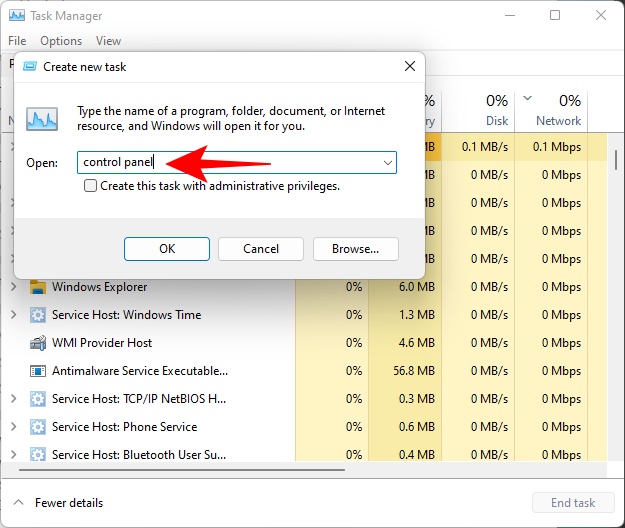
Type control panel and hit Enter.
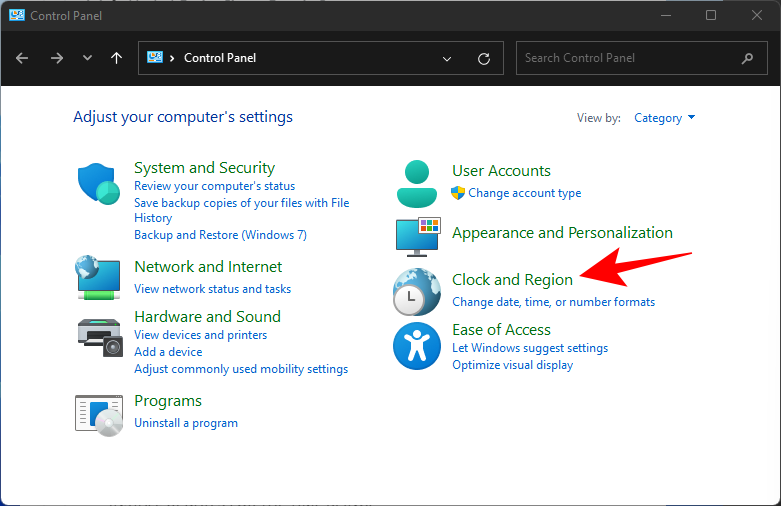
Now click on Clock and Region.
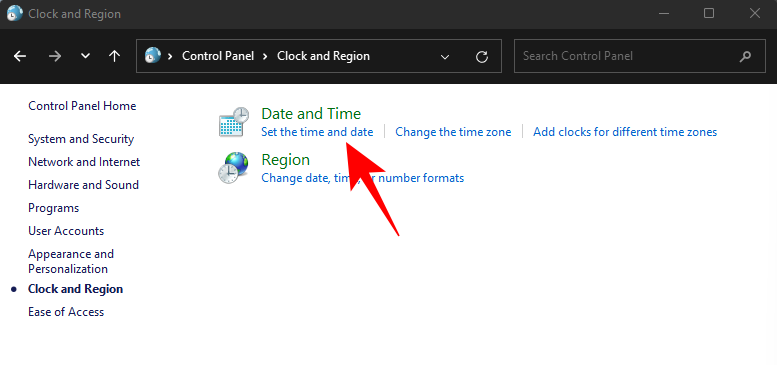
Under “Date and Time”, click on Set the time and date.
Click on the Internet Time tab to switch to it.
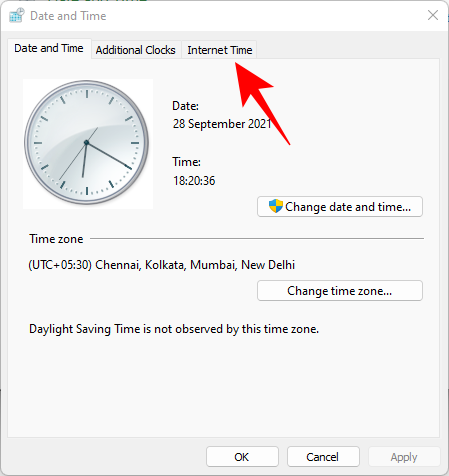
Click on Change settings…
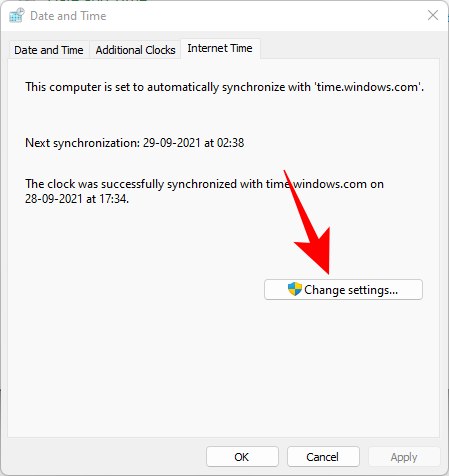
Uncheck Synchronize with an Internet time server, then click OK.
Now click on the Date and Time tab to switch back to it.
Here, click on Change date and time…
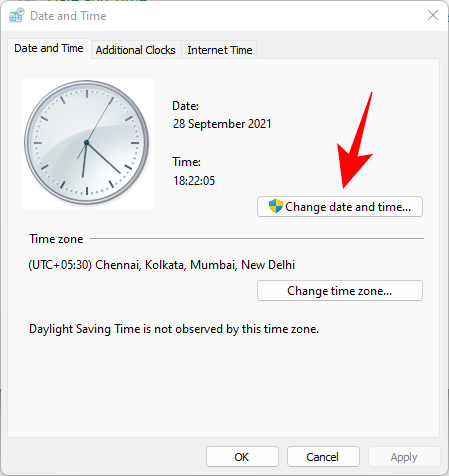
Now change the date and time to reflect tomorrow. As of writing this post, it is the 1st November so we will be changing the date to 2nd November.
Change Dates to last cumulative updates
If you are still unable to get the Taskbar working then you will have to jump through a few hoops to change your date and time multiple times and get the taskbar working on your system. Follow the guide below to get you started.
Press Ctrl + Shift + Esc on your keyboard, click on ‘File’ and select ‘Run new task’.

Type in ‘Control’ and press Enter on your keyboard.

Select ‘Date and Time’.

Switch to ‘Internet time’.

Click on ‘Change Settings’.

Uncheck the box for ‘Synchronize with an Internet Time Server’.

Click on ‘Ok’.

Switch back to ‘Date and Time’. Click on ‘Change Date and Time’ and select your date as 2nd September.
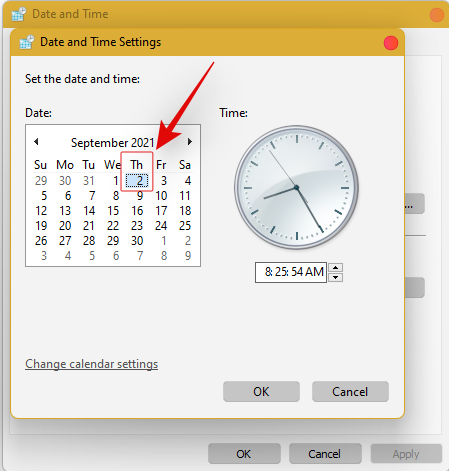
Close all windows and restart your system. Once restarted, open the ‘Date and Time’ dialog box again and change your date to 7th October this time.
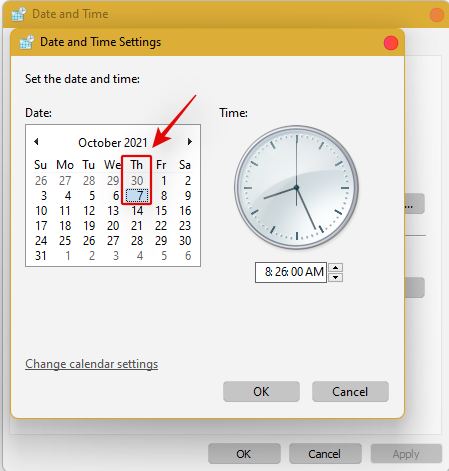
Restart your system again and Taskbar should now be back up and running on your system again. You can now enable synchronization for time again using the steps above on your system.
If synchronizing time does not work, move a month ahead to restore Taskbar
If you are still unable to get Taskbar up and running on your system again you can try the last date change fix. We recommend you use the steps above to change your date and time to a month ahead of your current date. Once changed, restart your system, and the taskbar should be up and running on your system now.
The downside of this fix is that if you revert to your normal date, Taskbar will stop working on your system. Having a mismatched date can cause issues with background syncs for various applications and cause some websites to malfunction. You will also have issues installing and getting the latest Windows Updates, so you will need to check all of these manually when updating in the future.
Fix #10: Uninstall the latest cumulative Windows Update ie: KB5006050
The cumulative update released in September for Windows 11 seems to also cause issues with the taskbar on some desktops and laptops. Use the guide below to uninstall the necessary update from your system.
Press Windows + i and select Windows Update from the left.
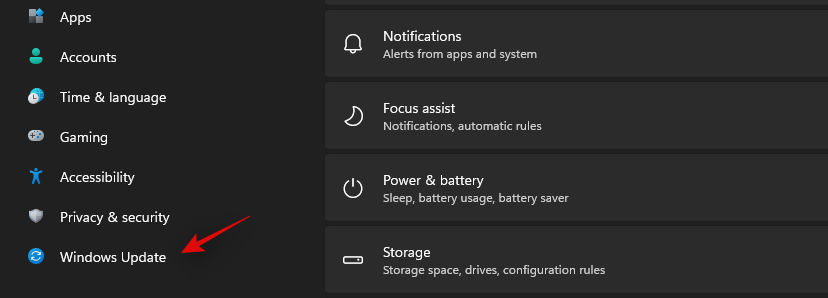
Click on ‘Update history’.
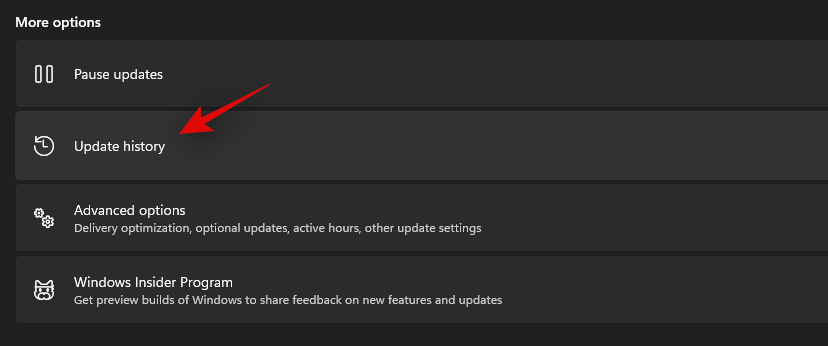
Now select ‘Uninstall updates’.
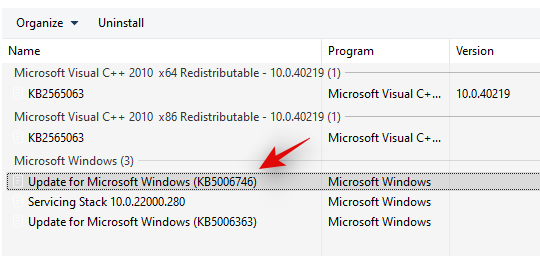
Click and select Windows Cumulative update KB5006050 from the list.
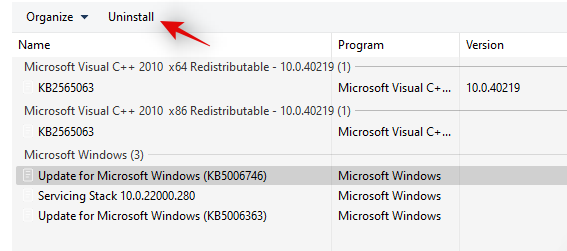
Now click on ‘Uninstall’ at the top and confirm your choice to uninstall the selected update.
Restart your system and taskbar functionality should now be restored on your system.
Fix #11: Restore PC to a previous restore point
If you had the taskbar working at a previous point in time then we recommend you restore your PC to a previously available restore point on your system. Follow the guide below to get you started.
Press Ctrl + Shift + Esc on your keyboard and click on ‘File’. Select ‘Run new task’ once you are done.

Type in CMD and press Ctrl + Shift + Enter on your keyboard.

Now type in ‘rstrui.exe’ and press Enter on your keyboard.
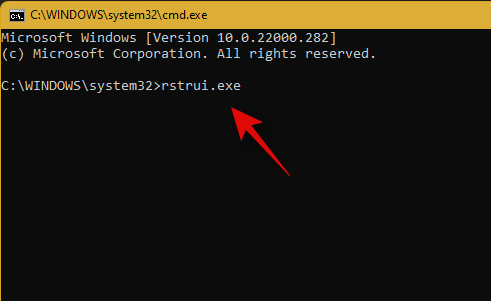
The system restore utility will now launch on your system. Click on ‘Next’.
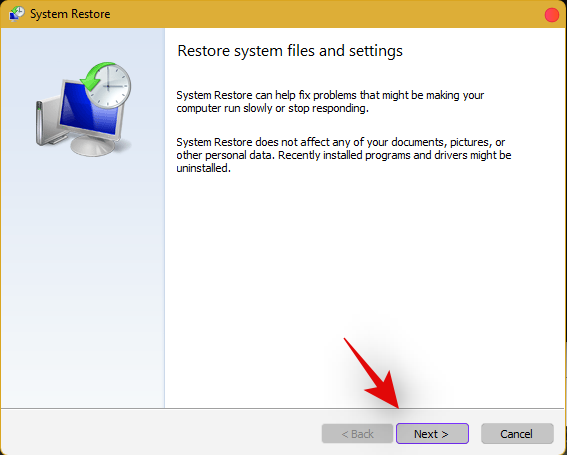
Select the desired restore point from the list on your screen. Click on ‘Next’ once you are done.
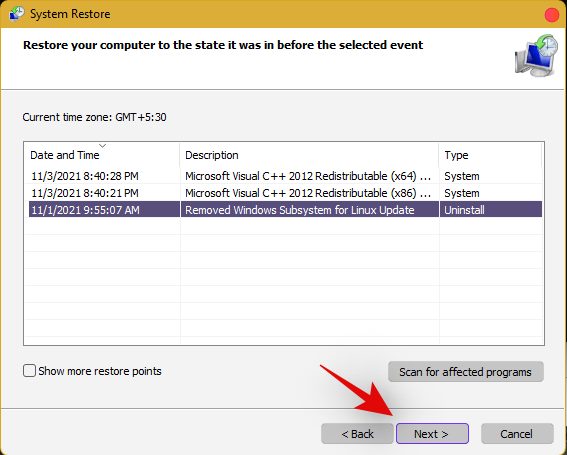
Tip: Click on ‘Scan for affected programs’ to view a list of installed programs that will be removed from your system during the restore process.
Click on ‘Finish’ once the restore finishes and restart your system.
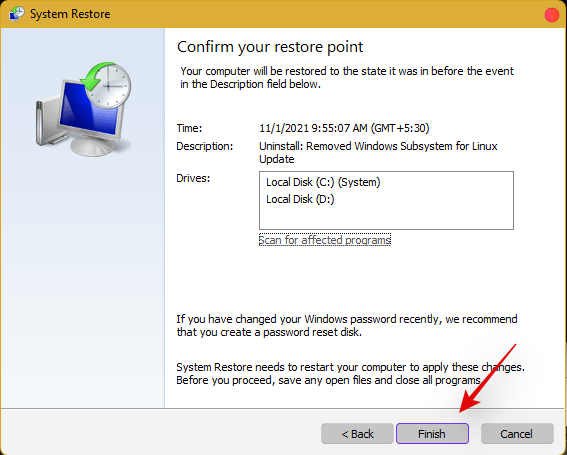
The taskbar should now be back up and running on your system again.
Fix #12: Last Resort: Create a new local admin account and transfer all your data
If by this point Taskbar still fails to work for you then it’s time for some drastic measures. You can create a new local admin account, check if Taskbar is working there, and then transfer all your data to the new account. This will be a tedious process but it is the next best way to get the taskbar working on your system without resetting your PC. Follow the guide below to get you started.
Create a new local admin account
Herre’s how you can create a new local admin account on your system.
Note: Most users facing the taskbar issue are unable to access the Settings app as well. Hence we will be using CMD to add a new local admin account to your PC. However, if the Settings app is available to you then you can use the same to add a new account as well.
Press Ctrl + Shift + Esc on your keyboard, click on ‘File’ and select ‘Run new task’.

Type in ‘cmd’ and press Ctrl + Shift + Enter on your keyboard.

CMD will now be launched as an administrator. Use the command below to add a new local admin account. Replace NAME with the Username of your choice for the new account. You can add a password later once you have confirmed that the taskbar is available in the new account.
net user /add NAME 
Once you have added the new user, use the command below to convert it to an administrator account on your PC. As usual, replace NAME with the Username for the new account you created earlier.
net localgroup Administrators NAME /add

Now type in the following to log out of your current account.
logoff

Once logged out, click on the newly added account to log in to the same. Once logged in, check if the taskbar is available in the new account. If it is, you can use the next section to transfer all your data. However, if the taskbar is still missing then you have no choice but to perform a fresh install of Windows 11 on your PC from a removable USB media drive.
Transfer all your data
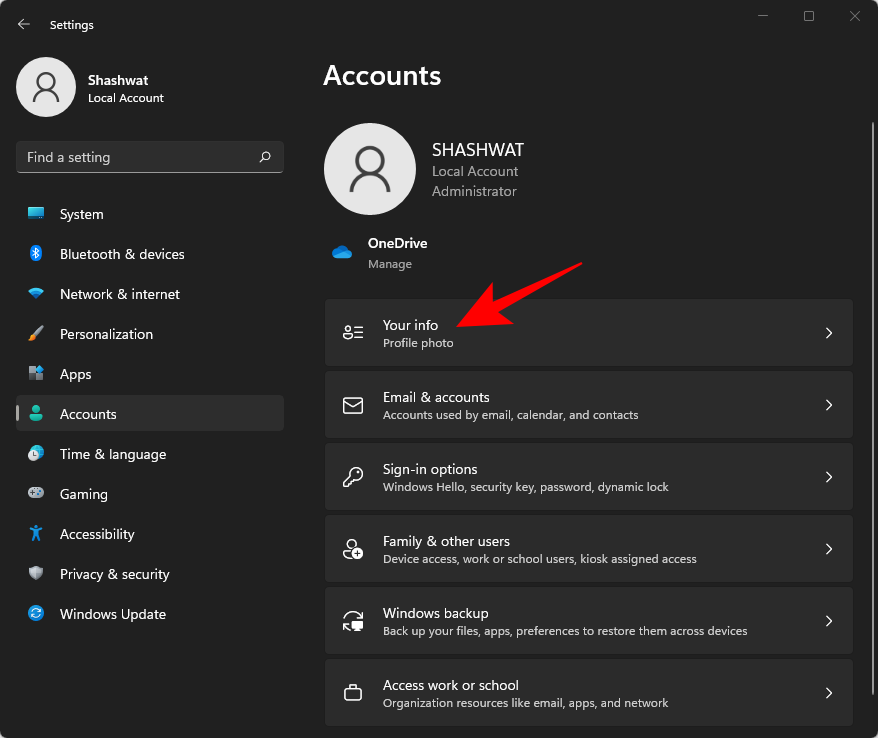
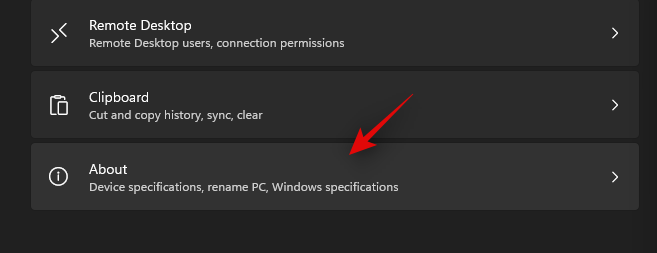
Press Windows + i on your keyboard and click on ‘About’ on your right.
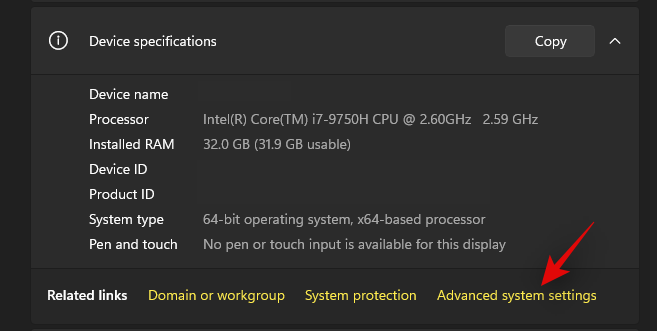
Click on ‘Advanced system settings’.
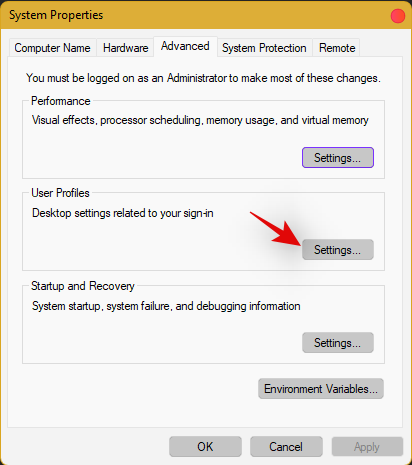
Click on ‘Settings’ under ‘User Profiles’.
Select your original profile by clicking on it and selecting ‘Copy To’.
Now enter the following path under ‘Copy profile to’. Rename NAME to the username of your previous profile from where you wish to copy all your data.
C:\Users\NAME
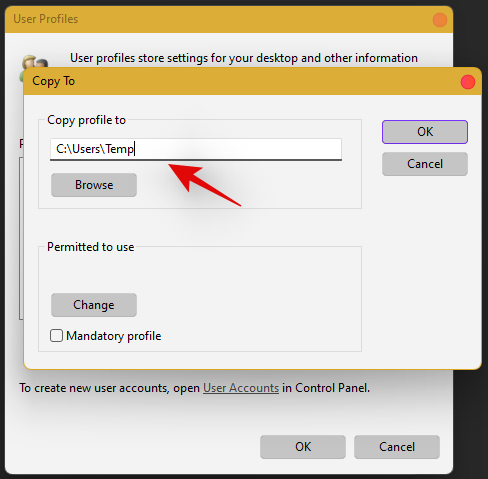
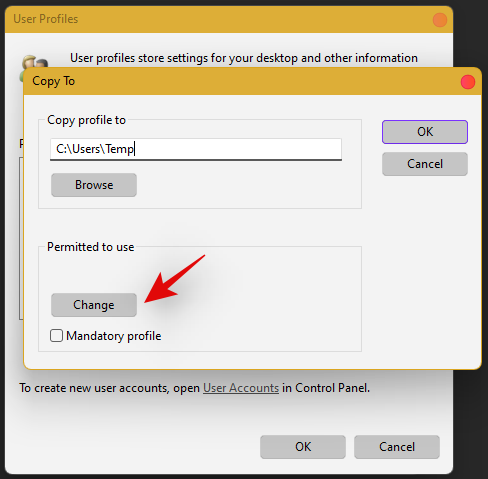
Click on ‘Change’.
Enter the name for your new user profile and press Enter on your keyboard.
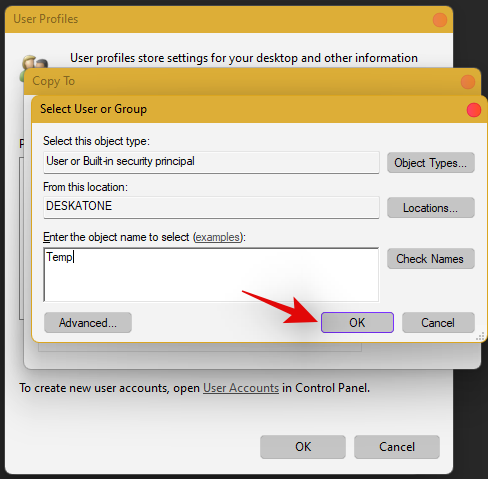
Click on ‘Ok’ once you are done.
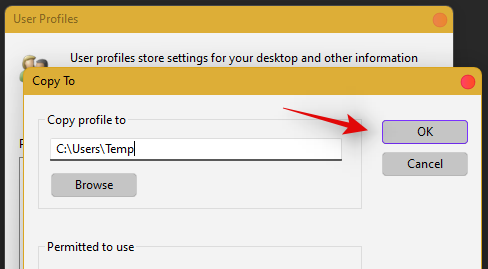
All your data will now be copied over to the new profile where the taskbar is functional on your PC. You can now delete your previous user account and set a password for your new account as well.
Frequently Asked Questions (FAQs):
With so many fixes, you are bound to have a few questions on your mind. Here are some commonly asked ones that should help you get up to speed.
How do I access Windows apps and Settings without a taskbar?
You can use the Task Manager to launch almost any program or Settings page on your system. To launch the desired program, launch the Taskbar > File > Run new task and enter the path to the program you wish to launch. Press Enter if you wish to launch the program normally or press Ctrl + Shift + Enter if you wish to launch the program with administrator privileges.
Is it safe to edit the Registry?
Registry edits are never safe as they have the potential to break your system. Fixes from trusted sources can help you avoid such issues but a good rule of thumb is to always back up your registry before making any edits. This way you can easily restore your Registry values in case some get messed up when editing the Registry.
When will Microsoft fix this issue?
Sadly, Microsoft is yet to release a proper fix for this issue. The company has tried to release a fix in the past cumulative updates to Windows 11 but they have been a hit and miss. We expect Microsoft to completely fix this issue in the upcoming feature update to Windows 11 when the OS gets the ability to run Android apps officially.
Can I update my Windows 11 after fixing the taskbar?
This will depend on the fix that you’re currently using. If you are using a date fix then you won’t be able to install updates until you restore to the current time. This will, however, cause the taskbar to be disabled again and the changes will be carried over after you update your PC. However, if you are using any other fix then you can easily update Windows.
For users with the date fix, you should try updating with the modified time first. If the update gets stuck on ‘Installing 0%’ or ‘Downloading 100%’ then change your date and time to the current date and time and update your PC. Ensure that you do not restart explorer or your PC during this process to keep the current instance of the taskbar alive on your system during the update process. This should help fix the issue for you once Microsoft officially releases an update to fix the issue.
We hope you were able to easily get the taskbar back up and running on your system using the guide above. If you face any more issues, feel free to reach out to us using the comments section below.
Related:


