Melna Mīts: Wukong Kļūdas – Mēģināmas Labojumus
Uzziniet, kā tikt galā ar Melna Mīts: Wukong kļūdām, lai jūs varētu baudīt šo aizraujošo darbības RPG bez pārtraukumiem.
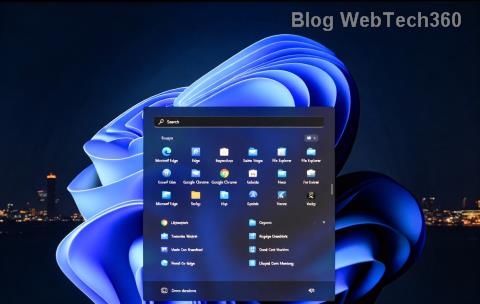
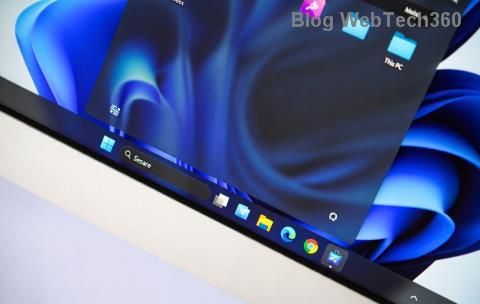
Windows uzdevumjosla ir bijusi visas uzmanības centrā, kopš tā ieguva savu jauno pārveidoto izskatu, izlaižot operētājsistēmu Windows 11. Tagad varat centrēt savu uzdevumjoslu, izbaudīt jauno darbību centru, mainīt tās līdzinājumu un novietot to abās ekrāna pusēs. Diemžēl šīs funkcijas ieviešana nav bijusi veiksmīga, jo arvien vairāk lietotāju dažus mēnešus cenšas panākt, lai uzdevumjosla darbotos operētājsistēmā Windows 11.
Lai gan Microsoft ir atzinis šo problēmu, izdevis risinājumu un pašlaik strādā pie labojuma, šķiet, ka lietotāji joprojām nevar atjaunot uzdevumjoslu. Ja atrodaties tajā pašā laivā, mēs esam izveidojuši visu pieejamo labojumu sarakstu, lai uzdevumjosla atkal darbotos un darbotos operētājsistēmā Windows 11. Lai sāktu darbu, izpildiet tālāk sniegtos norādījumus.
Saturs
Kāpēc mana uzdevumjosla netiek rādīta?
Operētājsistēmas Windows 11 uzdevumjoslai ir jauns izskats, kas izriet no tās darbības pārveidošanas. Lai uzdevumjosla darbotos pareizi, tagad tā ir atkarīga no vairākiem pakalpojumiem un pašas izvēlnes Sākt. Šķiet, ka jaunināšanas process no Windows 10 uz Windows 11 izjauc uzdevumjoslu atkarībā no tā, kuru Windows 10 versiju esat instalējis savā sistēmā un uz kuru Windows 11 versiju veicat atjaunināšanu.
Turklāt šķiet, ka šo problēmu dažiem lietotājiem rada arī nesen izdotais Windows atjauninājums, kas tika izdots pagājušajā mēnesī, savukārt citi saskaras ar to pašu, jo sistēmas laiks nav saskaņots, neskatoties uz to, ka viss ir iestatīts pareizi. Ir daudz veidu, kā labot uzdevumjoslu, un mēs iesakām sākt ar tālāk norādītajiem labojumiem pa vienam.
12 veidi, kā novērst uzdevumjoslas problēmas operētājsistēmā Windows 11
Izmantojiet tālāk norādītās metodes, lai sāktu uzdevumjoslas labošanu operētājsistēmā Windows 11. Ja jau esat mēģinājis restartēt sistēmu, varat izlaist pirmo metodi.
1. labojums: restartējiet datoru
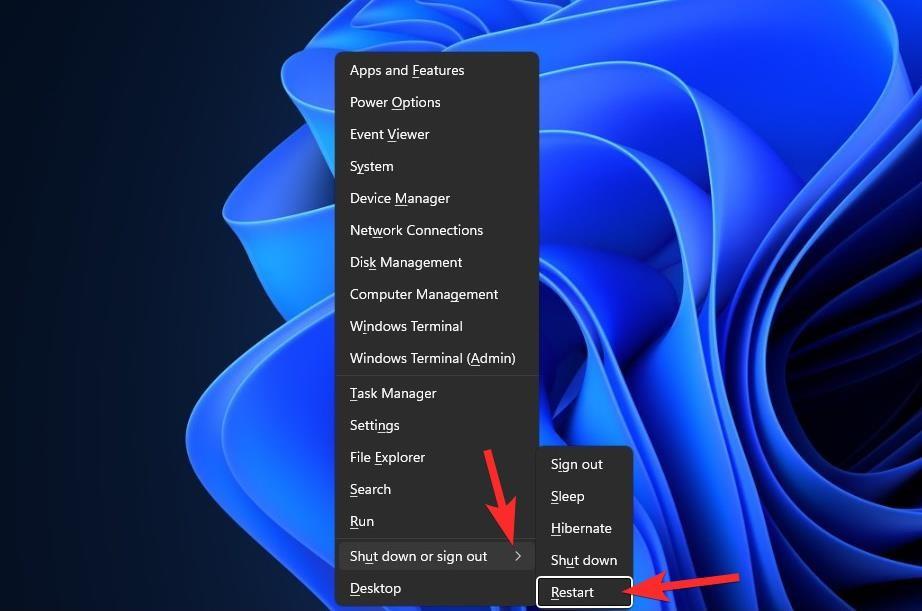
Pirms izmēģināt kaut ko izdomātu, ieteicams izmēģināt vienkāršākus pasākumus, piemēram, datora vai Windows Explorer restartēšanu (skatiet tālāk). To darot, jūsu sistēma tiks automātiski atiestatīta, ļaujot datiem atkārtoti ielādēt un, iespējams, novērst problēmas ar uzdevumjoslu un izvēlni Sākt.
2. labojums: pārliecinieties, vai ir atspējota opcija “Automātiski paslēpt uzdevumjoslu”.
Nospiediet Windows + iuz tastatūras un kreisajā pusē noklikšķiniet uz "Personalizēšana".
Noklikšķiniet uz "Uzdevumjosla".
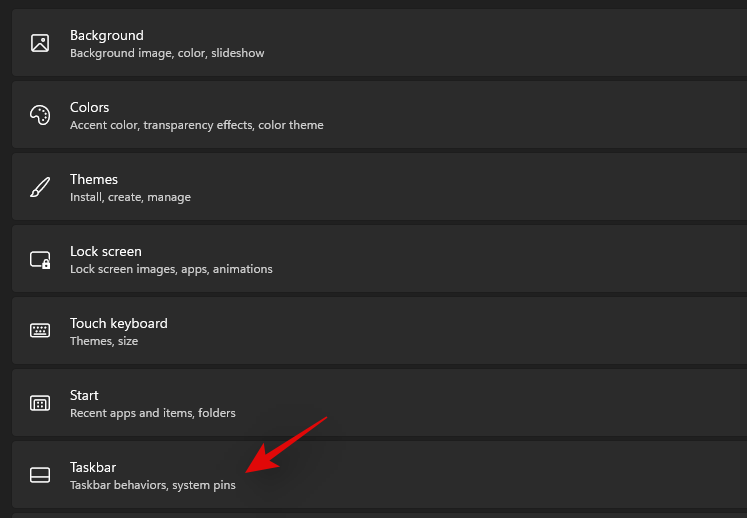
Tagad noklikšķiniet uz “Uzdevumjoslas darbības”.
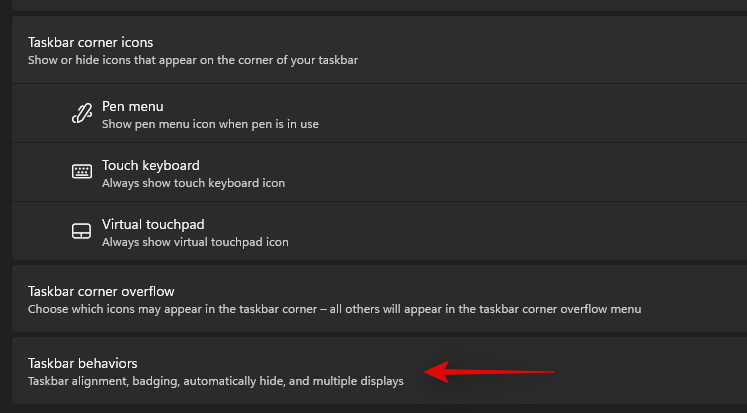
Noņemiet atzīmi no izvēles rūtiņas “Automātiski paslēpt uzdevumjoslu”.

Tagad aizveriet lietotni Iestatījumi un, ja jūsu uzdevumjosla tika automātiski paslēpta, tā tagad ir jāatspējo jūsu sistēmā.
3. labojums: restartējiet nepieciešamos pakalpojumus
Kā minēts iepriekš, sistēma Windows 11 ir pārveidojusi uzdevumjoslu, kas tagad nozīmē, ka tā ir atkarīga no vairākiem pakalpojumiem, lai pareizi darbotos jebkurā sistēmā. Restartēsim visus šos pakalpojumus, lai nodrošinātu, ka fona konflikts netraucē uzdevumjoslai pareizi darboties jūsu sistēmā.
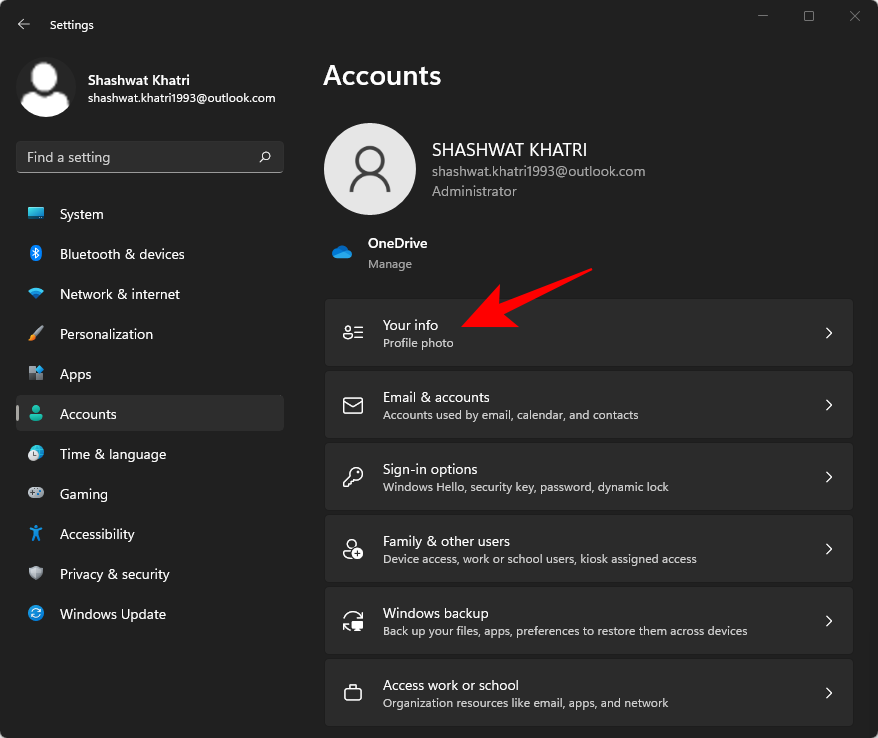
Nospiediet Ctrl + Shift + Escuz savas sistēmas, lai palaistu uzdevumu pārvaldnieku. Pārslēdzieties uz cilni “Detaļas” augšpusē.
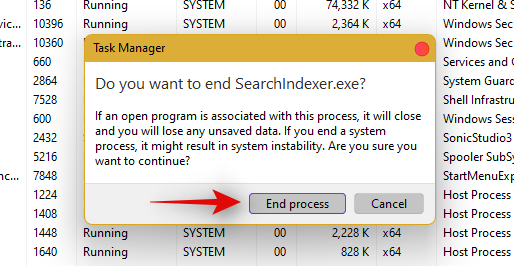
Tagad atrodiet tālāk norādītos darbojošos pakalpojumus un atlasiet tos, noklikšķinot uz tiem. Nospiediet tastatūras taustiņu "Dzēst" un apstipriniet savu izvēli, atlasot "Beigt procesu".
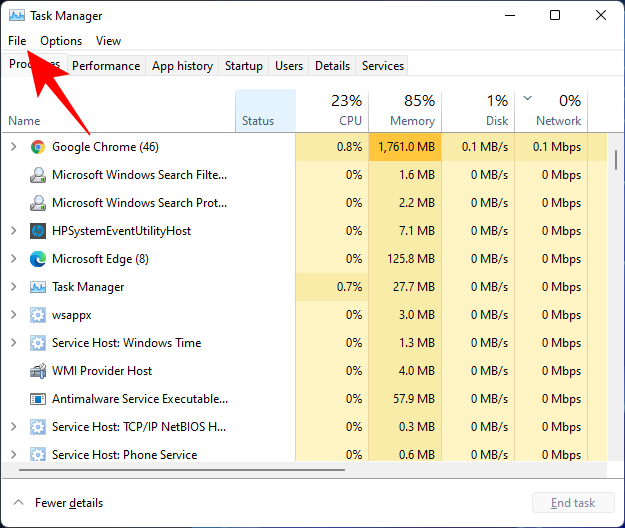
Tagad restartēsim Windows Explorer. Noklikšķiniet uz "Fails" augšējā kreisajā stūrī un atlasiet "Palaist jaunu uzdevumu".
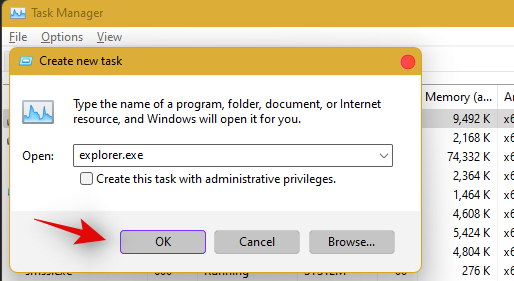
Ievadiet “explorer.exe” un nospiediet tastatūras taustiņu Enter. Ja nepieciešams, varat arī noklikšķināt uz "Labi".
Kad Explorer ir restartēts, vienkārši restartējiet datoru, lai restartētu citus sistēmas pakalpojumus.
Tagad uzdevumjosla ir jāatjauno, ja problēmas cēlonis bija fona pakalpojumu konflikts.
4. labojums: izdzēsiet IrisService reģistrā un restartējiet
Nospiediet, Ctrl + Shift + Esclai atvērtu uzdevumu pārvaldnieku. Pēc tam augšējā kreisajā stūrī noklikšķiniet uz Fails .
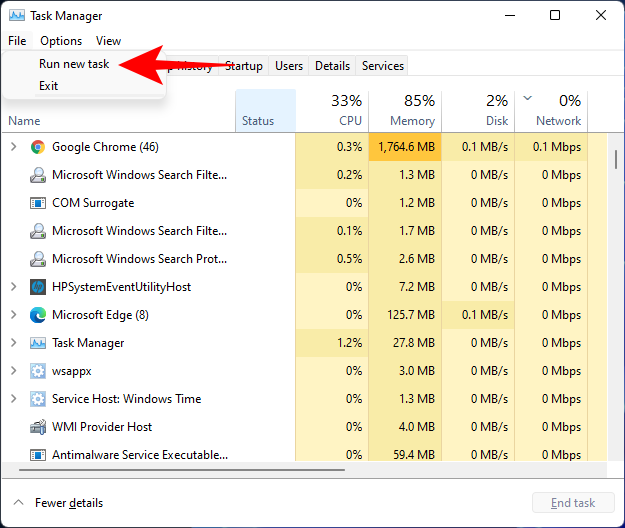
Atlasiet Palaist jaunu uzdevumu .
Ierakstiet cmd un nospiediet taustiņu Enter.
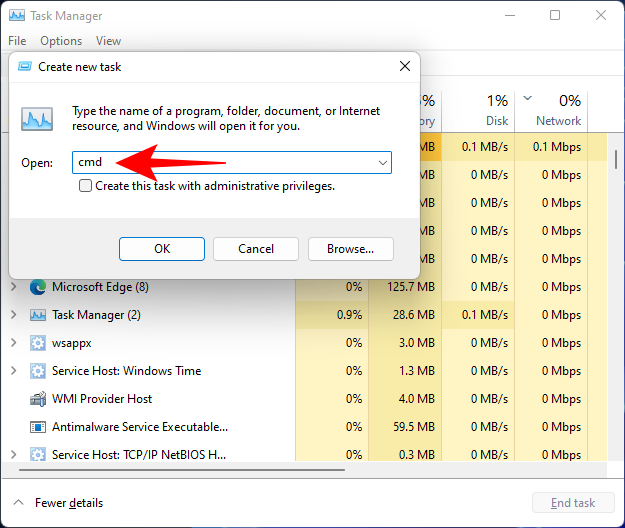
Tas atvērs paaugstinātu komandu uzvednes gadījumu. Tagad nokopējiet šo komandu un ielīmējiet to komandu uzvednē:
reg delete HKCU\SOFTWARE\Microsoft\Windows\CurrentVersion\IrisService /f && shutdown -r -t 0

Pēc tam nospiediet taustiņu Enter. Tiklīdz jūs to izdarīsit, jūsu dators tiks restartēts. Kad tā ir sākta dublēšana, visam vajadzētu atgriezties normālā stāvoklī, tostarp uzdevumjoslai.
5. labojums: pievienojiet reģistrā UndockingDisabled
Nospiediet, Ctrl + Shift + Esclai atvērtu uzdevumu pārvaldnieku. Pēc tam noklikšķiniet uz Fails (augšējā kreisajā stūrī) un Palaist jaunu uzdevumu .
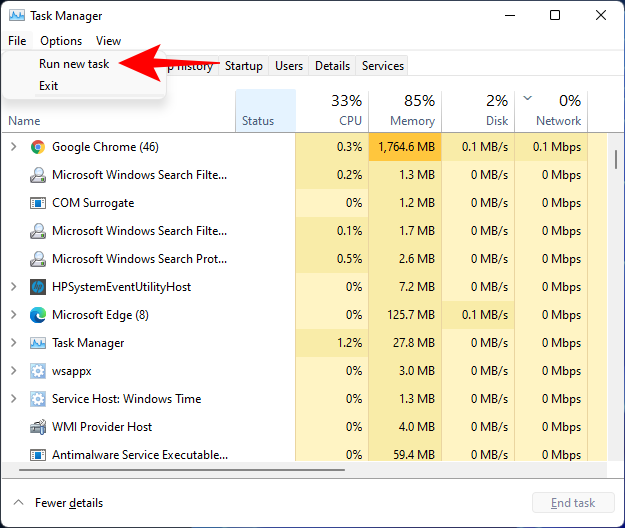
Ierakstiet regedit un nospiediet taustiņu Enter.
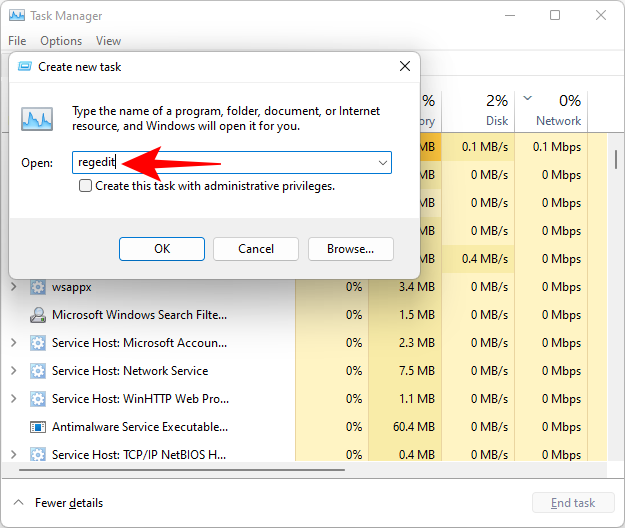
Tas atvērs reģistra redaktoru. Tagad dodieties uz šo adresi:
Computer\HKEY_LOCAL_MACHINE\SOFTWARE\Microsoft\Windows\CurrentVersion\Shell\Update\Packages
Alternatīvi, vienkārši nokopējiet iepriekš minēto un ielīmējiet to reģistra redaktora adreses joslā, piemēram:

Nospiežot taustiņu Enter, jūs tiksit novirzīts uz norādīto taustiņu. Labajā pusē ar peles labo pogu noklikšķiniet uz vietas un atlasiet Jauns > DWORD (32 bitu) vērtība .
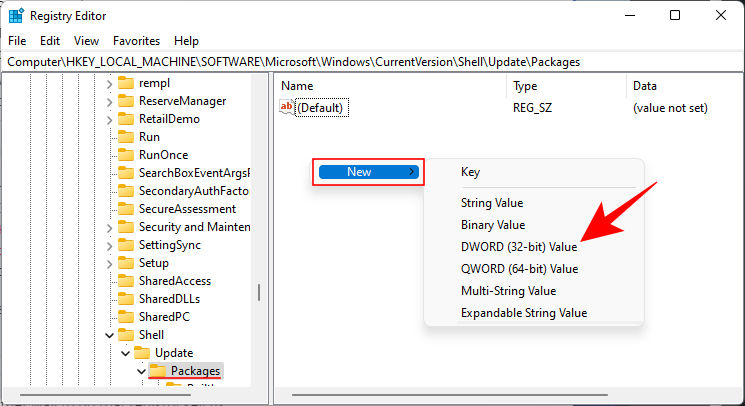
Nosauciet šo jaunizveidoto DWORD UndockingDisabled .
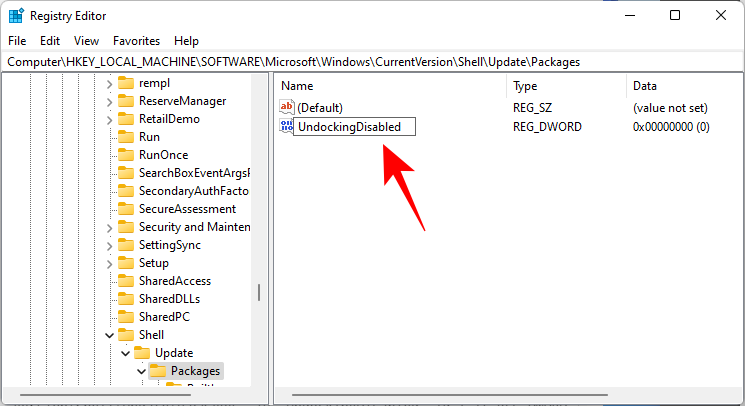
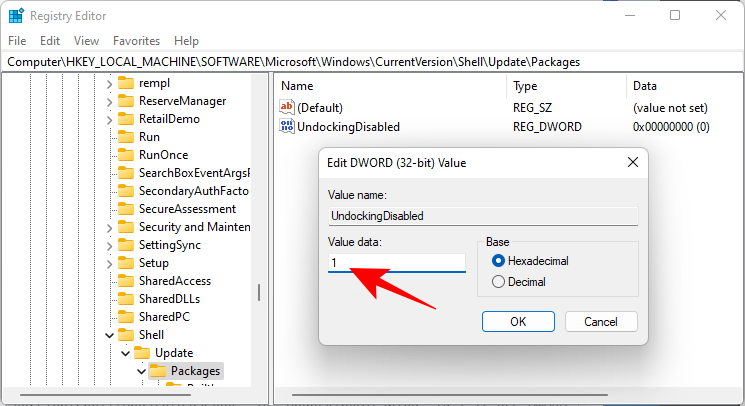
Pēc tam veiciet dubultklikšķi uz tā un mainiet "Vērtības dati" uz 1 . Pēc tam noklikšķiniet uz Labi .
Restartējiet datoru, lai izmaiņas stātos spēkā.
6. labojums: palaidiet SFC un DISM komandas
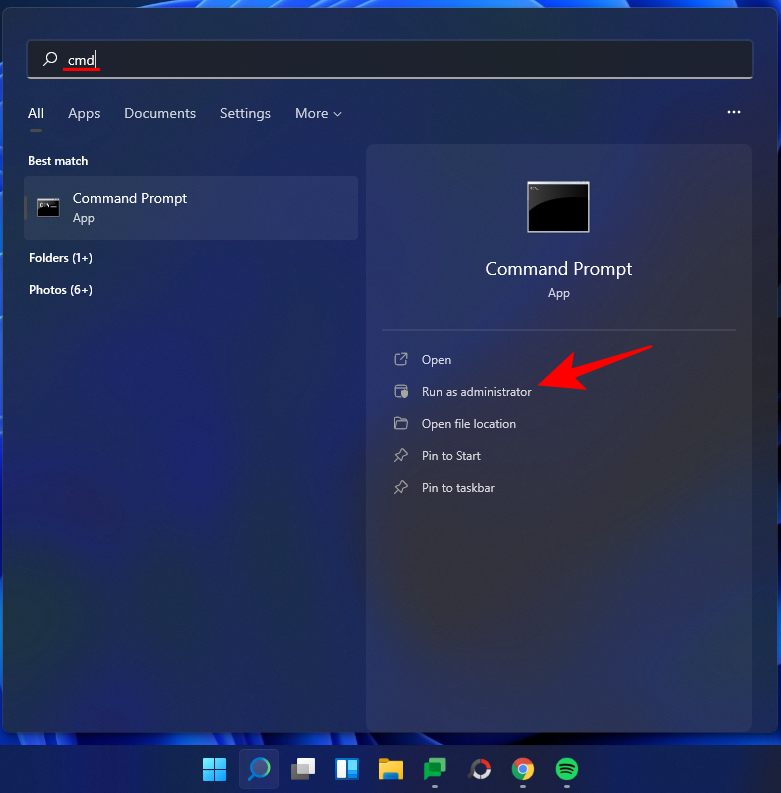
Nospiediet Sākt, ierakstiet cmd un noklikšķiniet uz Palaist kā administratoram .
Tagad ierakstiet šādu komandu:
sfc /scannow
Nospiediet Enter. Pagaidiet, līdz SFC pabeigs skenēšanu un novērsīs visas atrastās problēmas.

Tālāk palaidiet šo DISM komandu izvietošanas attēla apkalpošanas un pārvaldības rīkam:
dism /online /cleanup-image /scanhealth
Pēc tam nospiediet taustiņu Enter. Vēlreiz pagaidiet, līdz skenēšana tiks pabeigta.

Tagad palaidiet šādu DISM komandu:
dism /online /cleanup-image /restorehealth

Nospiediet Enter. Pagaidiet, līdz DISM atjauno veselību.

Visbeidzot, palaidiet komandu chkdsk, lai palaistu utilītu Check Disk:
chkdsk c: /r
Nospiediet Enter. Komandu uzvedne parādīs ziņojumu, kurā teikts, ka “nevar bloķēt pašreizējo disku… jo sējumu izmanto cits process”, un lūgs jūsu atļauju ieplānot skenēšanu pirms nākamās palaišanas. Ierakstiet, Ylai atbilstu.

Un nospiediet taustiņu Enter. Tagad restartējiet datoru, ļaujiet rīkam Check Disk veikt savu darbu un pārbaudiet, vai uzdevumjosla ir atsākusi normālu darbību.
7. labojums: atkārtoti instalējiet UWP
Nospiediet Ctrl + Shift + Escuz tastatūras, lai palaistu uzdevumu pārvaldnieku. Noklikšķiniet uz "Fails" un atlasiet "Palaist jaunu uzdevumu".
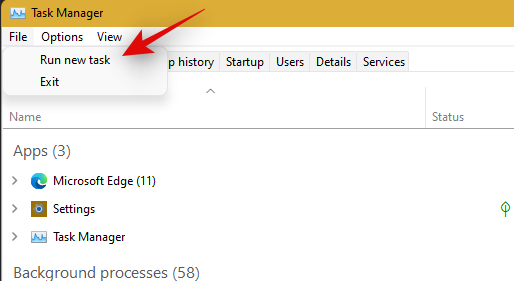
Ierakstiet “PowerShell” un nospiediet Ctrl + Shift + Entertastatūru.
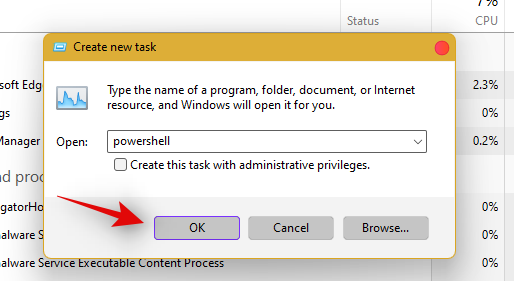
PowerShell tagad tiks palaists kā administrators jūsu sistēmā. Ierakstiet šādu komandu:
Get-AppxPackage -AllUsers | Foreach {Add-AppxPackage -DisableDevelopmentMode -Register “$ ($ _. InstallLocation) \ AppXManifest.xml”}
Nospiediet Enter. PowerShell parādīs ziņojumu sarakstu sarkanā krāsā. Bet neuztraucieties par to. Vienkārši pagaidiet, līdz komanda beidz izpildīt.

Labojums Nr. 8: pārbaudiet UAC un, ja nepieciešams, pievienojiet rediģēšanas reģistru
UAC ir obligāta visām mūsdienu lietotnēm un funkcijām, tostarp izvēlnei Sākt un uzdevumjoslai. Vispirms ir jāiespējo UAC, ja tas ir atspējots, un restartējiet sistēmu. Ja uzdevumjosla joprojām nedarbojas, iesakām mēģināt pievienot Xaml Start izvēlnes vērtību savam reģistra redaktoram.
Šķiet, ka, pievienojot šo vērtību, tiek restartēti un atkārtoti reģistrēti uzdevumjoslas pakalpojumi, kuru dēļ uzdevumjosla atkal darbojas lielākajā daļā sistēmu. Izpildiet tālāk sniegtos norādījumus, lai sāktu darbu.
Pārbaudiet un iespējojiet UAC, ja tas ir atspējots
Nospiediet Ctrl + Shift + Esctastatūru, lai palaistu uzdevumu pārvaldnieku. Tagad ekrāna augšējā kreisajā stūrī noklikšķiniet uz "Fails" un atlasiet "Palaist jaunu uzdevumu".

Ierakstiet “cmd” un nospiediet Ctrl + Shift + Entertastatūru.
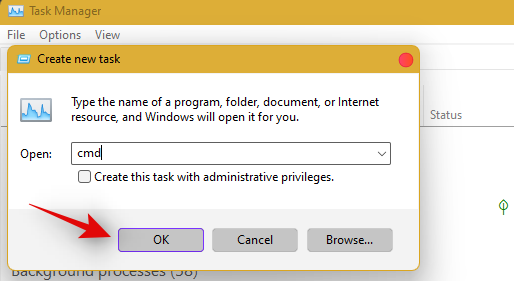
Tagad ierakstiet šo komandu un nospiediet taustiņu Enter, lai izpildītu komandu.
C:\Windows\System32\cmd.exe /k %windir%\System32\reg.exe ADD HKLM\SOFTWARE\Microsoft\Windows\CurrentVersion\Policies\System /v EnableLUA /t REG_DWORD /d 0 /f
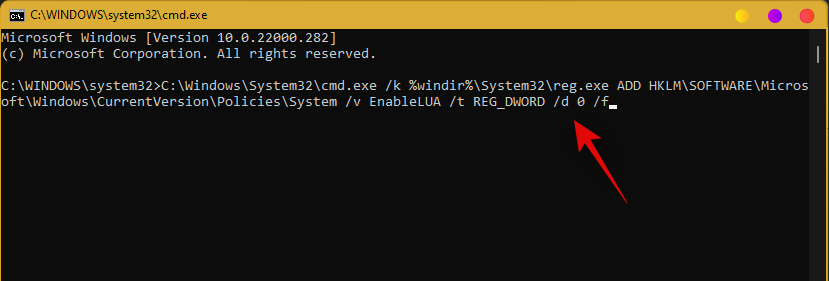
UAC will now be enabled for your system. Restart your PC for the changes to take effect on your system. Once restarted, Taskbar should be up and running on your system if UAC was the issue for you. If not, use the guide below to trigger the taskbar’s functionality on your system.
Add Registry Value
Press Ctrl + Shift + Esc to launch the task manager. Now click on ‘File’ in the top left corner and select ‘Run new task’.

Type in ‘cmd’ and press Ctrl + Shift + Enter on your keyboard.

Now type in the following command and press Enter on your keyboard.
REG ADD "HKCU\Software\Microsoft\Windows\CurrentVersion\Explorer\Advanced" /V EnableXamlStartMenu /T REG_DWORD /D 1 /F
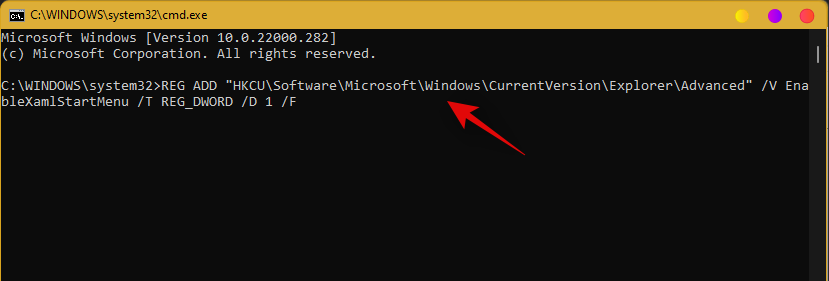
Go back to the task manager now, find Windows Explorer in the list, and right-click on it. Select Restart to restart explorer.exe.
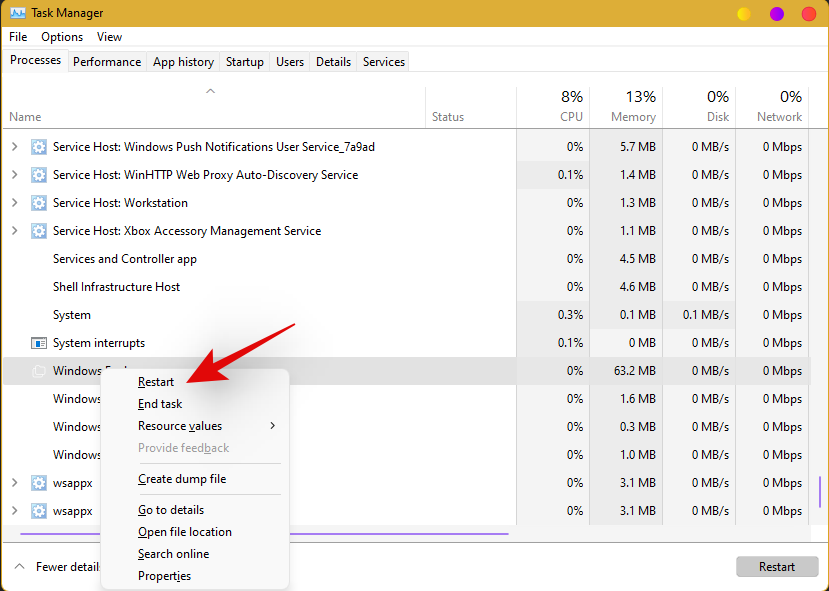
Once restarted, try to access your taskbar. The taskbar should now be available on your system.
Fix #9: Edit date and time to fix Taskbar
Date and Time settings seem to be the major cause of issues with the taskbar in Windows 11. Use the guide below to try out the following time fixes to see which one works the best for you.
Ensure that your time is correctly synchronized with the time server
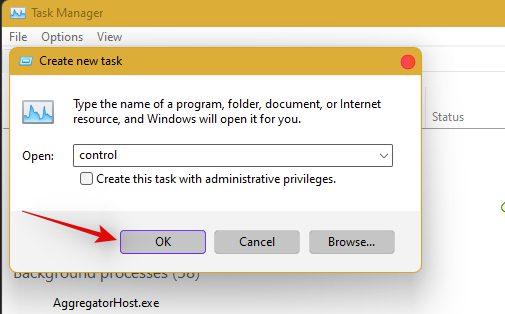
Press Ctrl + Shift + Esc on your keyboard and click on ‘File’. Select ‘Run new task’.

Type in ‘Control’ and hit Enter on your keyboard.
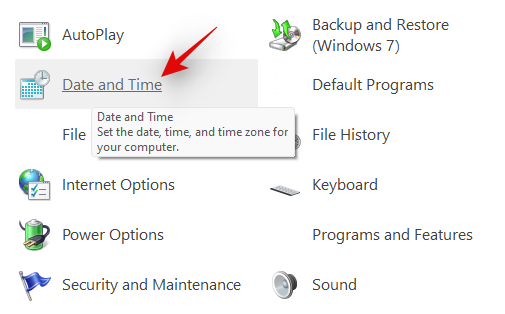
Click on ‘Date and Time’.
Select ‘Internet Time’ from the top.
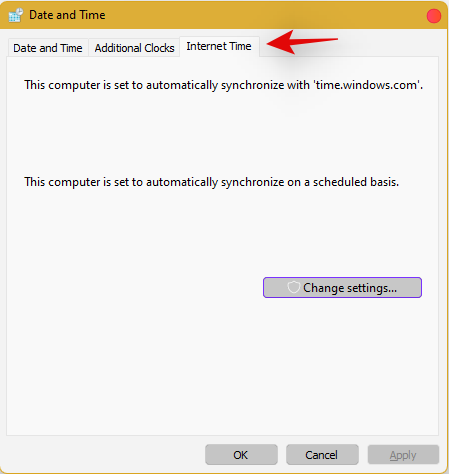
Click on ‘Change Settings’.
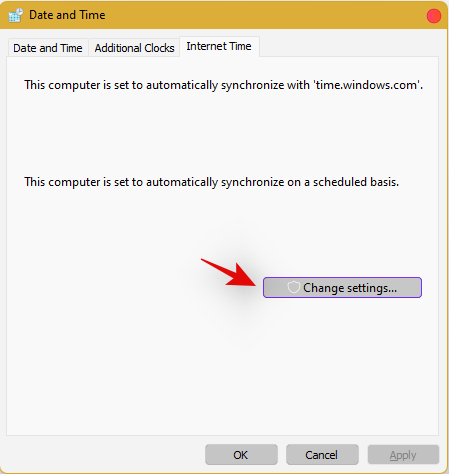
Uncheck the box for ‘Synchronize with an Internet time server’.
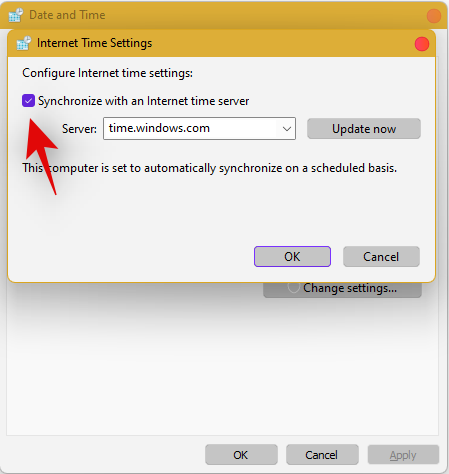
Click on ‘Ok’ once you are done.
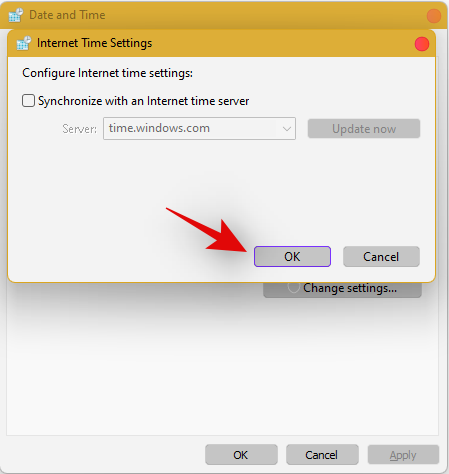
Restart your PC at this point and check your taskbar. If it is still disabled, do not fret, follow the steps above and enable Synchronization with an Internet Time Server again.
Once enabled, press Ctrl + Shift + Esc on your keyboard, and find Windows Explorer in the list on your screen. Right-click the listing and select ‘Restart’.

Once explorer restarts, try using the Taskbar. If synchronization was your issue, then it should now be fixed on your system. If not, continue with the other time fixes mentioned below.
Change date to 1 day ahead
Open the Task Manager by pressing Ctrl + Shift + Esc simultaneously. Then click on File.
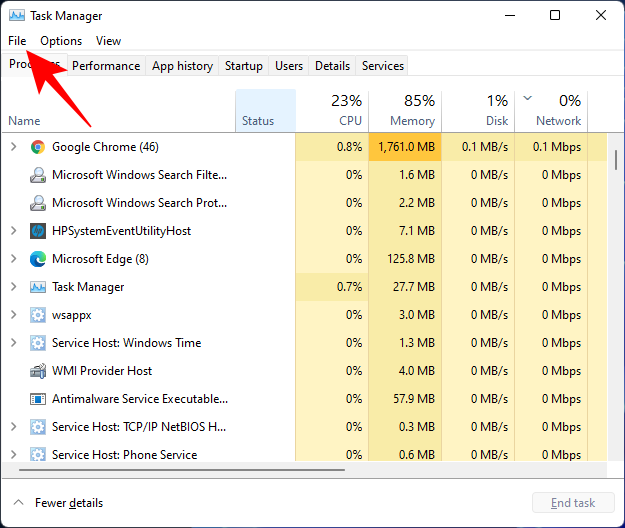
Click on Run new task.
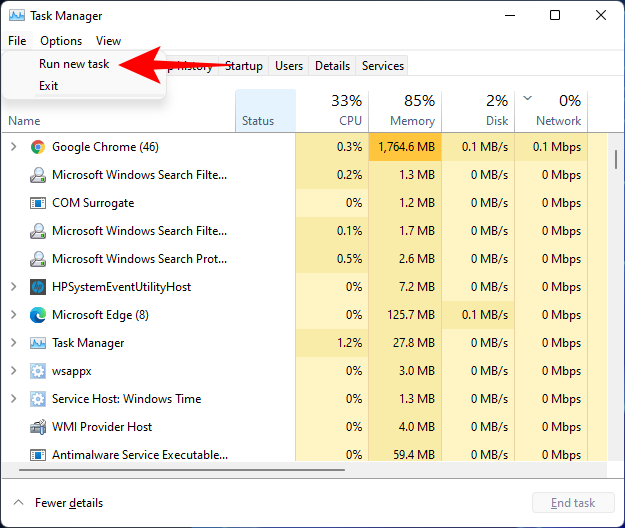
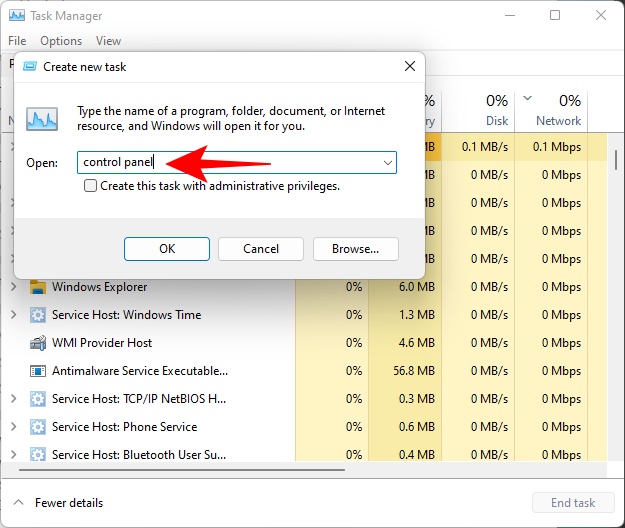
Type control panel and hit Enter.
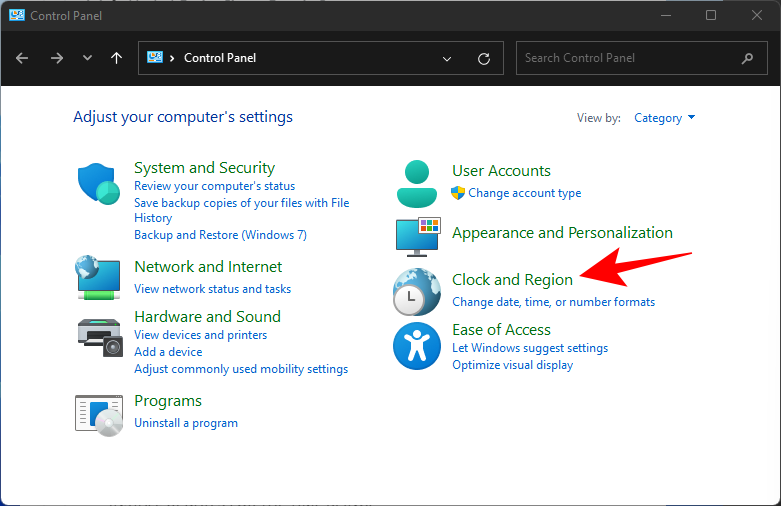
Now click on Clock and Region.
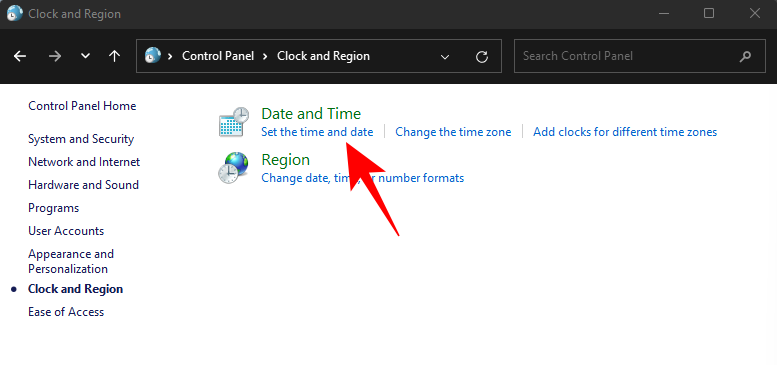
Under “Date and Time”, click on Set the time and date.
Click on the Internet Time tab to switch to it.
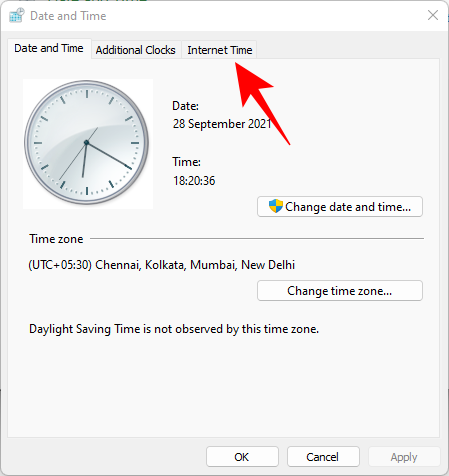
Click on Change settings…
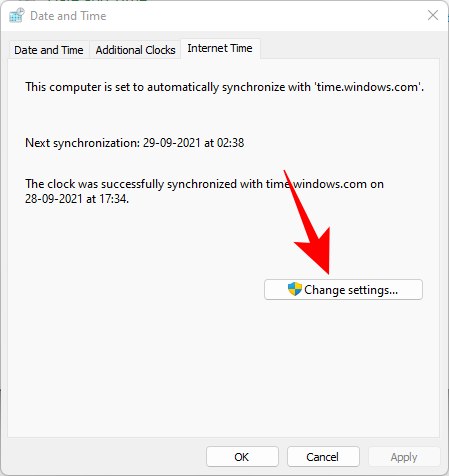
Uncheck Synchronize with an Internet time server, then click OK.
Now click on the Date and Time tab to switch back to it.
Here, click on Change date and time…
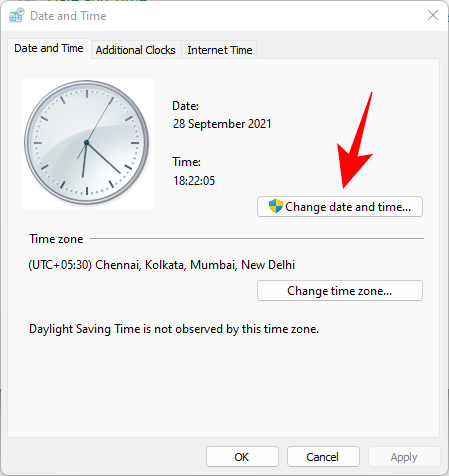
Now change the date and time to reflect tomorrow. As of writing this post, it is the 1st November so we will be changing the date to 2nd November.
Change Dates to last cumulative updates
If you are still unable to get the Taskbar working then you will have to jump through a few hoops to change your date and time multiple times and get the taskbar working on your system. Follow the guide below to get you started.
Press Ctrl + Shift + Esc on your keyboard, click on ‘File’ and select ‘Run new task’.

Type in ‘Control’ and press Enter on your keyboard.

Select ‘Date and Time’.

Switch to ‘Internet time’.

Click on ‘Change Settings’.

Uncheck the box for ‘Synchronize with an Internet Time Server’.

Click on ‘Ok’.

Switch back to ‘Date and Time’. Click on ‘Change Date and Time’ and select your date as 2nd September.
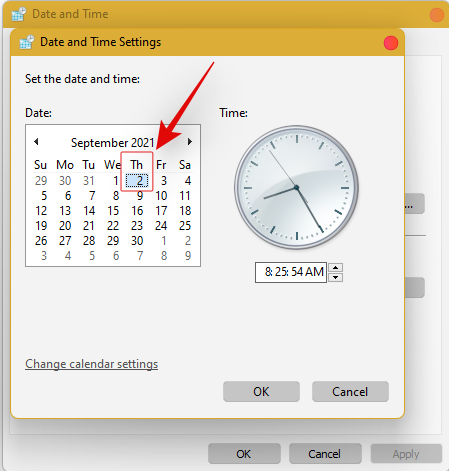
Close all windows and restart your system. Once restarted, open the ‘Date and Time’ dialog box again and change your date to 7th October this time.
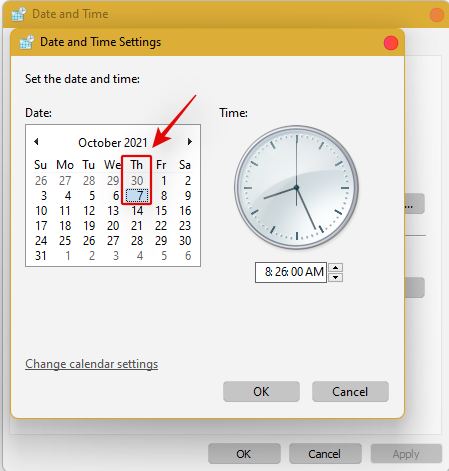
Restart your system again and Taskbar should now be back up and running on your system again. You can now enable synchronization for time again using the steps above on your system.
If synchronizing time does not work, move a month ahead to restore Taskbar
If you are still unable to get Taskbar up and running on your system again you can try the last date change fix. We recommend you use the steps above to change your date and time to a month ahead of your current date. Once changed, restart your system, and the taskbar should be up and running on your system now.
The downside of this fix is that if you revert to your normal date, Taskbar will stop working on your system. Having a mismatched date can cause issues with background syncs for various applications and cause some websites to malfunction. You will also have issues installing and getting the latest Windows Updates, so you will need to check all of these manually when updating in the future.
Fix #10: Uninstall the latest cumulative Windows Update ie: KB5006050
The cumulative update released in September for Windows 11 seems to also cause issues with the taskbar on some desktops and laptops. Use the guide below to uninstall the necessary update from your system.
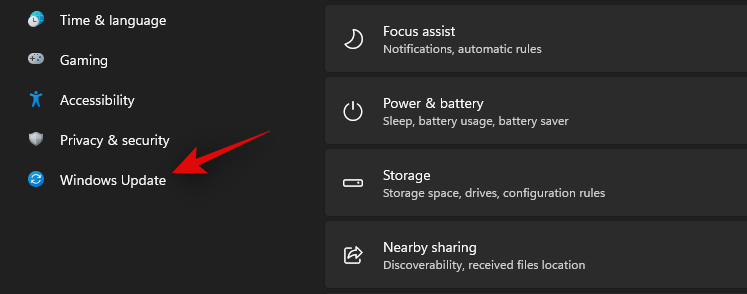
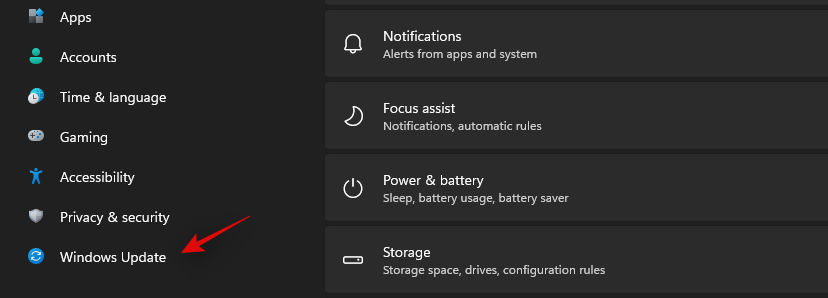
Press Windows + i and select Windows Update from the left.
Click on ‘Update history’.
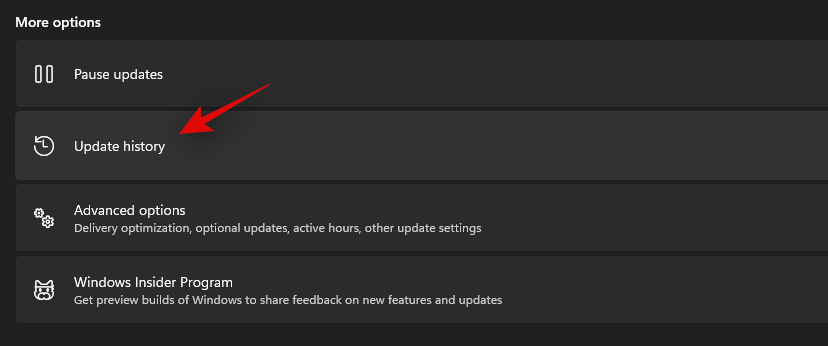
Now select ‘Uninstall updates’.
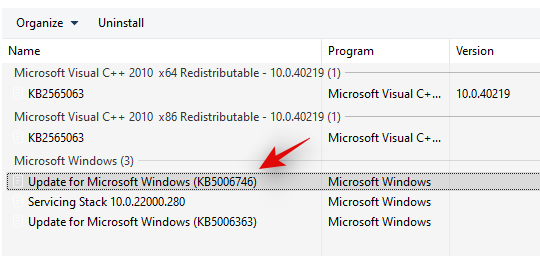
Click and select Windows Cumulative update KB5006050 from the list.
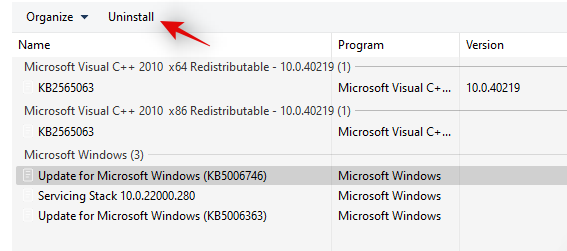
Now click on ‘Uninstall’ at the top and confirm your choice to uninstall the selected update.
Restart your system and taskbar functionality should now be restored on your system.
Fix #11: Restore PC to a previous restore point
If you had the taskbar working at a previous point in time then we recommend you restore your PC to a previously available restore point on your system. Follow the guide below to get you started.
Press Ctrl + Shift + Esc on your keyboard and click on ‘File’. Select ‘Run new task’ once you are done.

Type in CMD and press Ctrl + Shift + Enter on your keyboard.

Now type in ‘rstrui.exe’ and press Enter on your keyboard.
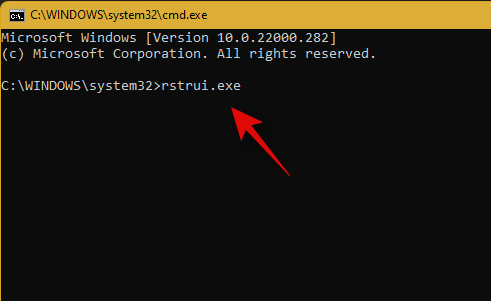
The system restore utility will now launch on your system. Click on ‘Next’.
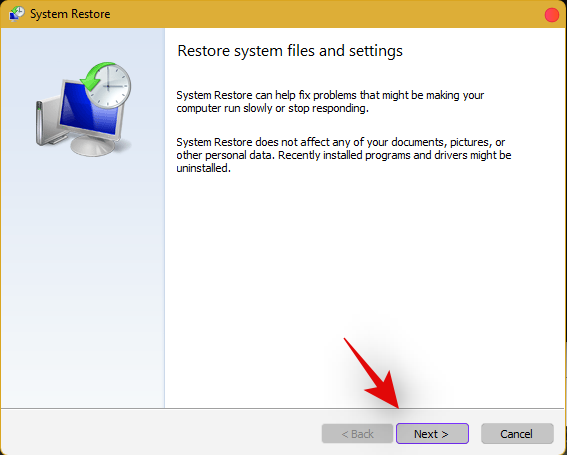
Select the desired restore point from the list on your screen. Click on ‘Next’ once you are done.
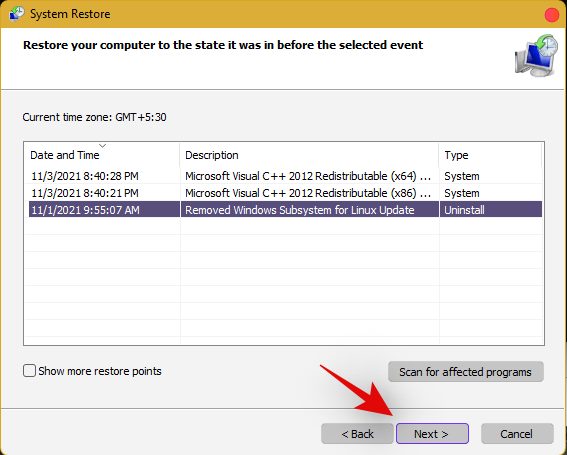
Tip: Click on ‘Scan for affected programs’ to view a list of installed programs that will be removed from your system during the restore process.
Click on ‘Finish’ once the restore finishes and restart your system.
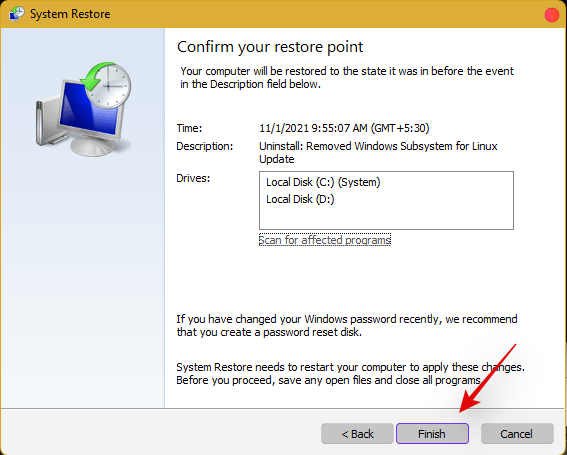
The taskbar should now be back up and running on your system again.
Fix #12: Last Resort: Create a new local admin account and transfer all your data
If by this point Taskbar still fails to work for you then it’s time for some drastic measures. You can create a new local admin account, check if Taskbar is working there, and then transfer all your data to the new account. This will be a tedious process but it is the next best way to get the taskbar working on your system without resetting your PC. Follow the guide below to get you started.
Create a new local admin account
Herre’s how you can create a new local admin account on your system.
Note: Most users facing the taskbar issue are unable to access the Settings app as well. Hence we will be using CMD to add a new local admin account to your PC. However, if the Settings app is available to you then you can use the same to add a new account as well.
Press Ctrl + Shift + Esc on your keyboard, click on ‘File’ and select ‘Run new task’.

Type in ‘cmd’ and press Ctrl + Shift + Enter on your keyboard.

CMD will now be launched as an administrator. Use the command below to add a new local admin account. Replace NAME with the Username of your choice for the new account. You can add a password later once you have confirmed that the taskbar is available in the new account.
net user /add NAME 
Once you have added the new user, use the command below to convert it to an administrator account on your PC. As usual, replace NAME with the Username for the new account you created earlier.
net localgroup Administrators NAME /add

Now type in the following to log out of your current account.
logoff

Once logged out, click on the newly added account to log in to the same. Once logged in, check if the taskbar is available in the new account. If it is, you can use the next section to transfer all your data. However, if the taskbar is still missing then you have no choice but to perform a fresh install of Windows 11 on your PC from a removable USB media drive.
Transfer all your data
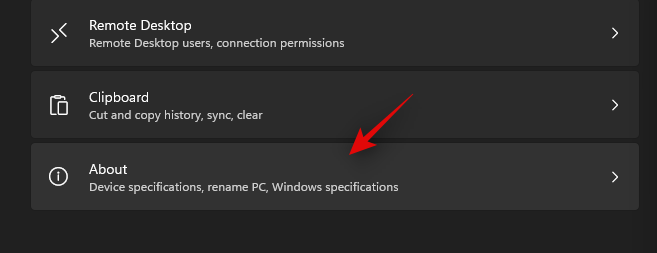
Press Windows + i on your keyboard and click on ‘About’ on your right.
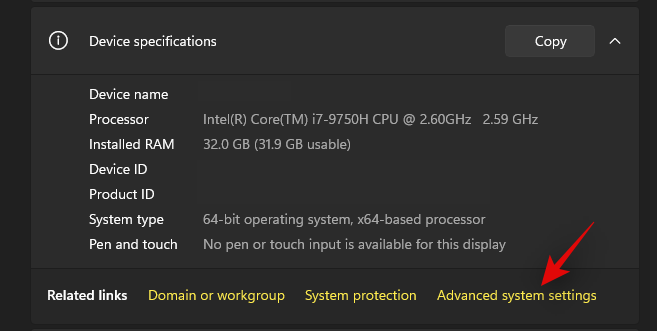
Click on ‘Advanced system settings’.
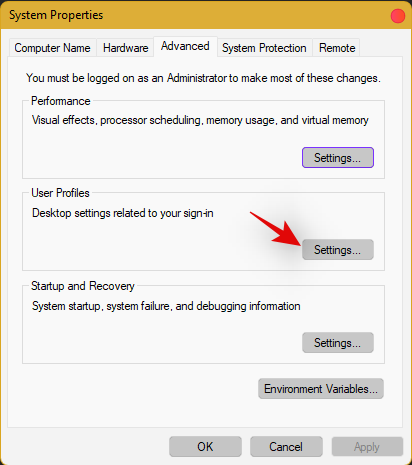
Click on ‘Settings’ under ‘User Profiles’.
Select your original profile by clicking on it and selecting ‘Copy To’.
Now enter the following path under ‘Copy profile to’. Rename NAME to the username of your previous profile from where you wish to copy all your data.
C:\Users\NAME
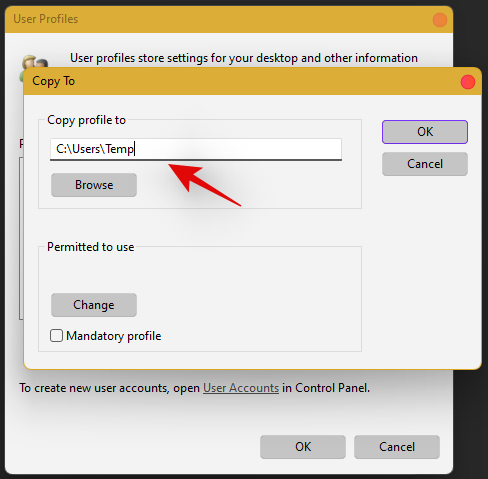
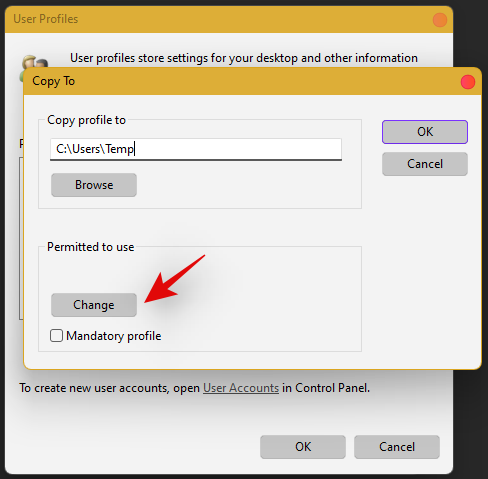
Click on ‘Change’.
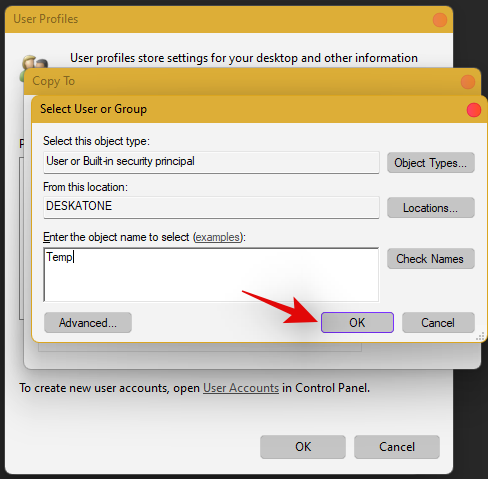
Enter the name for your new user profile and press Enter on your keyboard.
Click on ‘Ok’ once you are done.
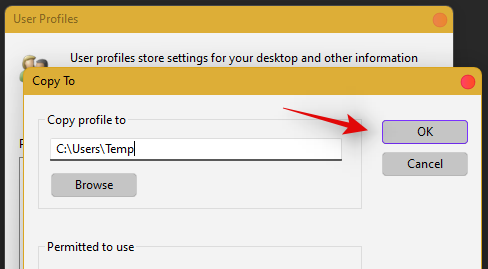
All your data will now be copied over to the new profile where the taskbar is functional on your PC. You can now delete your previous user account and set a password for your new account as well.
Frequently Asked Questions (FAQs):
With so many fixes, you are bound to have a few questions on your mind. Here are some commonly asked ones that should help you get up to speed.
How do I access Windows apps and Settings without a taskbar?
You can use the Task Manager to launch almost any program or Settings page on your system. To launch the desired program, launch the Taskbar > File > Run new task and enter the path to the program you wish to launch. Press Enter if you wish to launch the program normally or press Ctrl + Shift + Enter if you wish to launch the program with administrator privileges.
Is it safe to edit the Registry?
Registry edits are never safe as they have the potential to break your system. Fixes from trusted sources can help you avoid such issues but a good rule of thumb is to always back up your registry before making any edits. This way you can easily restore your Registry values in case some get messed up when editing the Registry.
When will Microsoft fix this issue?
Sadly, Microsoft is yet to release a proper fix for this issue. The company has tried to release a fix in the past cumulative updates to Windows 11 but they have been a hit and miss. We expect Microsoft to completely fix this issue in the upcoming feature update to Windows 11 when the OS gets the ability to run Android apps officially.
Can I update my Windows 11 after fixing the taskbar?
This will depend on the fix that you’re currently using. If you are using a date fix then you won’t be able to install updates until you restore to the current time. This will, however, cause the taskbar to be disabled again and the changes will be carried over after you update your PC. However, if you are using any other fix then you can easily update Windows.
For users with the date fix, you should try updating with the modified time first. If the update gets stuck on ‘Installing 0%’ or ‘Downloading 100%’ then change your date and time to the current date and time and update your PC. Ensure that you do not restart explorer or your PC during this process to keep the current instance of the taskbar alive on your system during the update process. This should help fix the issue for you once Microsoft officially releases an update to fix the issue.
We hope you were able to easily get the taskbar back up and running on your system using the guide above. If you face any more issues, feel free to reach out to us using the comments section below.
Related:
Uzziniet, kā tikt galā ar Melna Mīts: Wukong kļūdām, lai jūs varētu baudīt šo aizraujošo darbības RPG bez pārtraukumiem.
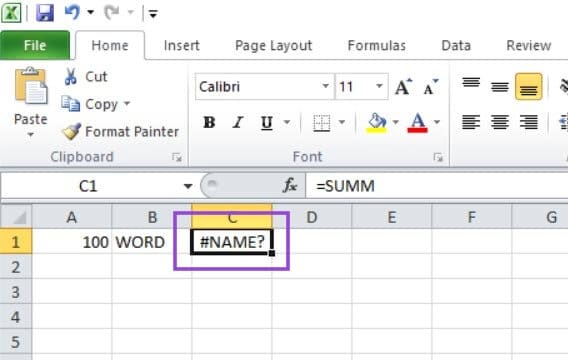
Uzziniet par izplatītām Excel formula kļūdām, piemēram, #VALUE! un #NAME!, kāpēc tās notiek un kā tās novērst.
Ja sistēma Windows Search izmanto īpaši lielus CPU vai diska resursus, varat izmantot tālāk norādītās problēmu novēršanas metodes operētājsistēmā Windows 11. Problēmas novēršanas metodes ietver vienkāršākas metodes...
2021. gada 20. februāris: Google tagad ir bloķējis visus Meet paplašinājumus, kas palīdzēja izveidot režģa skatu, tostarp tālāk minētos. Šie paplašinājumi vairs nedarbojas, un šķiet, ka vienīgā alternatīva ir…
Viens ekrāns, no kura Windows lietotājiem ir kolektīvas bailes, ir Blue Screen of Death. BSOD pastāv jau vairākus gadu desmitus, gadu gaitā mainoties ļoti maz, taču joprojām ir pietiekami spēcīgs, lai...
Microsoft Teams, pateicoties tā dziļajai integrācijai ar Microsoft Office 365, ir kļuvusi par populāru videozvanu risinājumu miljoniem cilvēku visā pasaulē. Neskatoties uz to, ka neesat lietotājam visdraudzīgākais…
Microsoft Teams ir visaptverošs rīks, kas pēdējā laikā ir bijis diezgan populārs, pateicoties tā komandas sadarbības funkcijām. Pakalpojums ļauj izveidot konkrētas komandas savai organizācijai, uzaicināt di…
2021. gada 12. oktobris: liels atjauninājums! Lūdzu, ņemiet vērā, ka jums vairs nav jāaizstāj fails appraiserres.dll, lai apietu TPM pārbaudi un labotu instalēšanas kļūdu, instalējot sistēmu Windows 11.…
Ir pagājuši daži mēneši kopš Windows 11 izlaišanas, un kopš tā laika lietotāji ir migrējuši uz jauno OS. Tā kā arvien vairāk lietotāju izmēģina Windows 11 jaunas problēmas, kļūdas un iestatījumi tiek diskā…
Windows 11 tagad ir izlaista sabiedrībai pēc tam, kad tā tika pretrunīgi vērtēta šī gada jūnijā. Kopš tā laika operētājsistēmā ir notikušas daudzas izmaiņas, starp kurām ir bijušas ļoti apsveicamās, matētas…
Windows uzdevumjosla ir bijusi visas uzmanības centrā, kopš tā ieguva savu jauno izskatu, izlaižot Windows 11. Tagad varat centrēt savu uzdevumjoslu, izbaudīt jauno darbību centru, mainīt to...
Windows 11 būs publiski pieejams pēc dažiem mēnešiem, un visi ir ļoti vēlējušies iegūt jauno OS. Tajā ir jauna sākuma izvēlne, iespēja instalēt Android lietotnes sākotnēji un…
Microsoft Teams ir lieliska saziņas utilīta lietotājiem visās platformās, taču, kad esat pabeidzis to lietot, lietotne sāk kļūt kaitinoša. Ja jūs neizmantojat Te…
Jebkuram tiešsaistē pieejamam pakalpojumam ir savas problēmas, un Microsoft Teams nav izņēmums. Covid-19 pandēmas laikā sadarbības rīka lietotāju skaits ir ievērojami palielinājies…
Kad sistēma Windows 11 tika atklāta pasaulei, Snap Layouts bija pirmā lieta, kas piesaistīja ikviena uzmanību. Tie bija novatoriski, jauni un faktiski noderīgi, strādājot ar Windows sistēmu…
Windows 11 tikko tika izlaists sabiedrībai, un šķiet, ka tas vilina daudz jaunu lietotāju. Daudzi lietotāji ir pārgājuši uz priekšu un jauninājuši uz Windows 11, kamēr citi vēlas izmantot…
Google Meet ir kļuvusi par vienu no visvairāk apspriestajām attālās sadarbības platformām, kas pašlaik ir pieejamas tirgū. Tas piedāvā daudzas pārsteidzošas funkcijas un nodrošina uzticamību…
Tā kā Zoom pārņem lielāko daļu mūsu darba un pat sabiedriskās dzīves, mēs esam sākuši uz to paļauties diezgan lielā mērā. Tālummaiņa ļauj lietotājiem izveidot savas virtuālās sanāksmju telpas un sarunāties…
Windows 11 nesen tika nopludināts sabiedrībai, un visi visā pasaulē steidzas, lai jaunā OS instalēta virtuālajā mašīnā, izmantojot rīkus Liike VirtualBox. Windows 11 nāk...
Tie, kuri pietiekami vēlas apgūt Windows 11 izstrādātāju versiju, izmantojot programmu Insider, ir pamazām sākuši saprast, kāpēc vairums lietotāju mēdz gaidīt, līdz tiks izlaista stabilā versija. Būt pirmajam…
Uzziniet, kā droši iestatīt Windows 11 reģistra dublējumu, izmantojot soli pa solim sniegtas instrukcijas. Viegli aizsargājiet sistēmas iestatījumus un izvairieties no izplatītām kļūdām, lai nodrošinātu drošu datora lietošanas pieredzi.
Vai rodas problēmas ar tīkla drukāšanu operētājsistēmās Windows 10 un Windows 11? Atklājiet pārbaudītus, soli pa solim sniegtus risinājumus, lai nodrošinātu netraucētu printeru koplietošanu mājas vai biroja tīklā. Vairs nekādu vilšanos — drukājiet bez piepūles jau šodien!
Vai operētājsistēmā Windows 11 Pro rodas problēmas ar fona maiņas kļūdām? Atklājiet pārbaudītus, soli pa solim sniegtus risinājumus, lai atjaunotu darbvirsmas personalizāciju. Ātri izlabojiet problēmu un atgūstiet pielāgotu pieredzi!
Vai rodas problēmas ar fontu ielādi Windows 11 lietotnēs? Atklājiet pārbaudītus, soli pa solim sniegtus risinājumus, lai novērstu fontu problēmas Microsoft Store lietotnēs, pārlūkprogrammās un citur. Panākiet perfektu teksta atveidošanu acumirklī!
Vai rodas problēmas ar Battle.net aģenta miega kļūdu operētājsistēmā Windows 11? Atklājiet pārbaudītas problēmu novēršanas darbības, lai atrisinātu šo kaitinošo problēmu un vienmērīgi atgrieztos pie spēlēm. Atjaunināts ar jaunākajiem labojumiem.
Vai rodas problēmas ar PowerShell izpildes politikas kļūdām operētājsistēmā Windows 11? Atklājiet detalizētus risinājumus, lai droši un efektīvi palaistu skriptus. Atvadieties no kaitinošajiem ierobežojumiem un uzlabojiet savu skriptēšanas spēli jau šodien.
Atklājiet soli pa solim sniegtu ceļvedi par Windows 11 mobilā tīklāja iestatīšanu 2026. gadā. Viegli kopīgojiet internetu, palieliniet produktivitāti un uzturiet savienojumu, atrodoties ceļā, izmantojot mūsu vienkāršos ekspertu padomus.
Vai rodas problēmas ar izslēgtu tīkla noteikšanu operētājsistēmā Windows 11? Atklājiet pārbaudītus risinājumus, lai to bez piepūles iespējotu, novērstu bieži sastopamas problēmas un atjaunotu netraucētu tīkla koplietošanu. Soli pa solim sniegta rokasgrāmata gan iesācējiem, gan profesionāļiem.
Vai vecajā datorā rodas problēma ar kļūdu “GPT nodalījuma stils netiek atbalstīts”? Atklājiet pārbaudītus, soli pa solim sniegtus risinājumus, lai konvertētu diskus un nodrošinātu netraucētu sāknējamā USB diska darbību. Lieliski piemērots mantotas aparatūras lietotājiem.
Uzziniet, kā operētājsistēmā Windows 11 iespējot automātisko HDR, izmantojot spēļu joslu, lai iegūtu elpu aizraujošu spēļu grafiku. Izpildiet mūsu vienkāršo soli pa solim sniegto rokasgrāmatu, lai uzlabotu savu spēļu pieredzi ar košām krāsām un dziļāku kontrastu bez liekām problēmām.
