Í mörg ár hefur Windows verið að kynna fjöldann allan af nýjum eiginleikum og endurbótum og halda því fram að þeir séu aðeins einn smellur á Start valmyndinni í burtu. En hvað ef Start valmyndin hættir að opnast fyrir þig? Jæja, það getur gerst að Start valmyndin á Windows 11 hætti skyndilega að virka fyrir þig, og gerir það að verkum að venjuleg verkefni eru svolítið erfið.
Ef upphafsvalmyndin er ekki að opnast fyrir þig á Windows 11, þá eru eins margar lagfæringar og okkur dettur í hug til að hjálpa þér að leysa vandamálið .
Tengt: Hvernig á að fjarlægja forrit á Windows 11
ATHUGIÐ: Ef 17(!) venjulegu lagfæringarnar sem gefnar eru upp hér að neðan mistakast fyrir þig, reyndu þá Fix #18 sem gefinn er hér að neðan undir hlutanum „Síðasta úrræði“ sem fjallar um að búa til nýjan notanda í gegnum skipanalínuna . Þetta hjálpar þér að búa til nýjan notanda með CMD, þannig án þess að þurfa að fá aðgang að Stillingar appinu eða Start valmyndinni, sem gæti ekki verið að virka fyrir þig. Sem sagt, lagfæring #1 um vandamálið af völdum 'Windows Update KB5004300' er ný viðbót, svo kannski athugaðu þetta fyrst.
Innihald
Við höfum látið fylgja með alls 20 (!) lagfæringar til að leysa vandamálið með Start Menu á Windows 11 hér að neðan. 3 þeirra eru almennar lagfæringar sem ætti að prófa aðeins eftir að þú ert viss um að 17 aðal lagfæringarnar séu ekki til hjálpar.
17 Aðal lagfæringar
Prófaðu þessar lagfæringar fyrst áður en þú prófar 3 almennu lagfæringarnar (einnig gefnar upp hér að neðan).
Lagfæring #1: Fjarlægðu og settu aftur upp Windows Update KB5004300
Nýleg lagfæring sem arnareygir notendur uppgötvaði virðist auðveldlega laga byrjunarvalmyndina á nýjum Windows 11 uppfærslum. Windows Update sem gefið er út undir nafninu KB5004300 virðist valda þessu vandamáli. Að fjarlægja og setja það sama upp aftur á tölvunni þinni mun laga Start valmyndina og verkefnastikuna fyrir þig. Fylgdu leiðbeiningunum hér að neðan til að koma þér af stað.
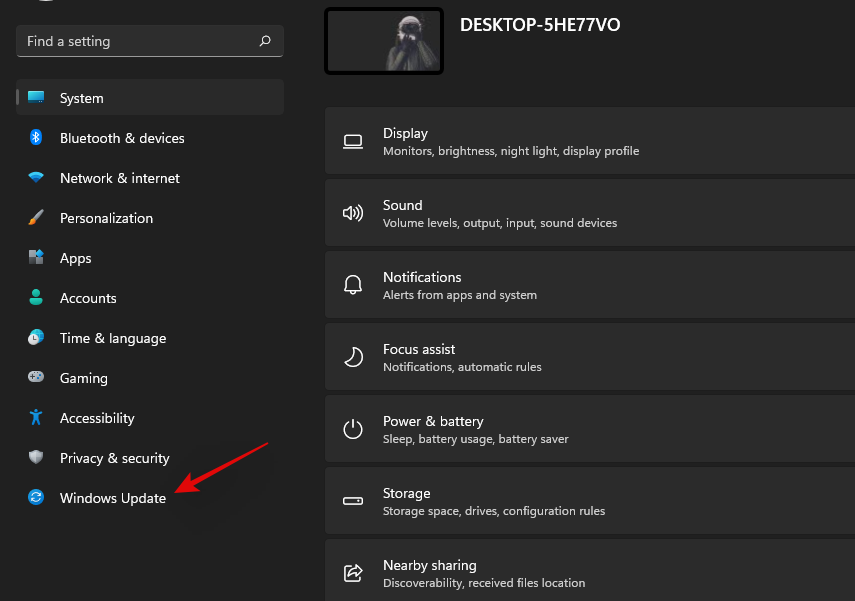
Ýttu Windows + iá lyklaborðið þitt til að opna Stillingar appið. Smelltu á 'Windows Update' vinstra megin.
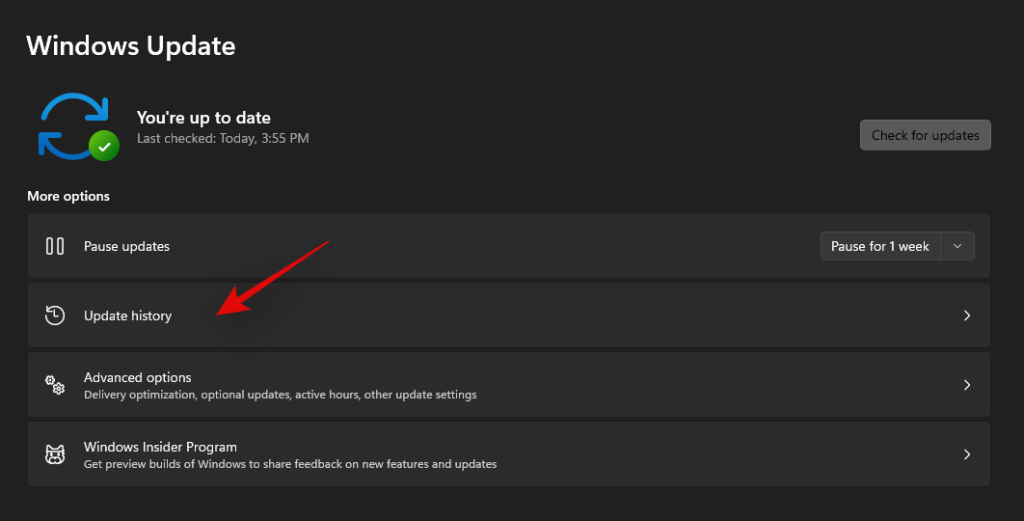
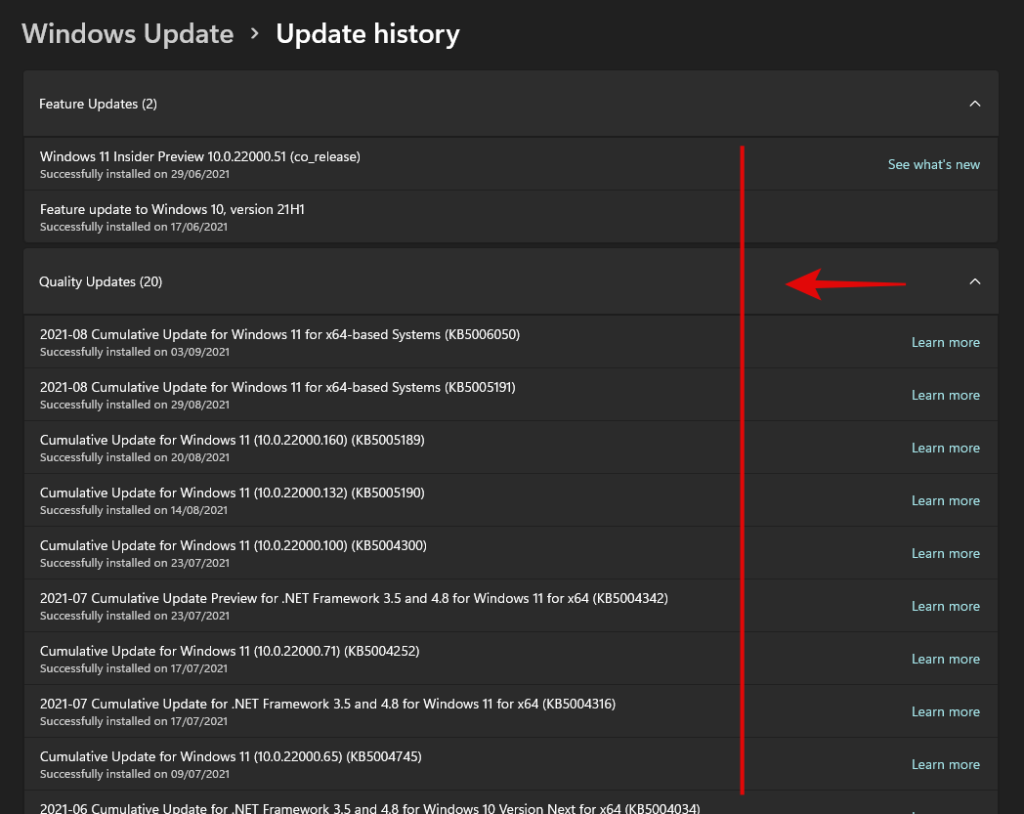
Smelltu nú á 'Uppfæra sögu'.
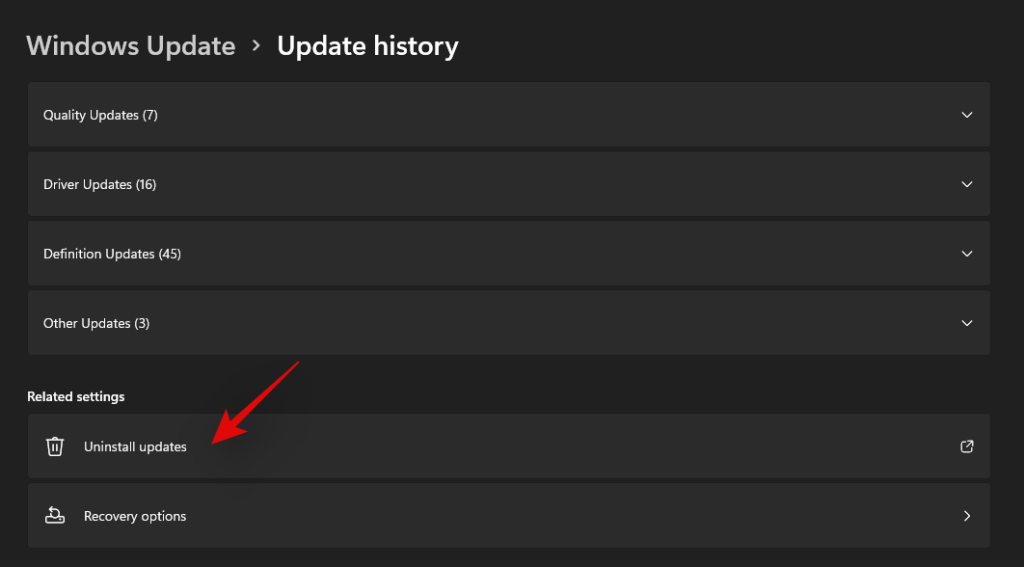
Smelltu á 'Fjarlægja uppfærslur'.
Þér verður nú vísað á stjórnstöðina. Finndu viðkomandi KB5004300 uppfærslu á listanum og smelltu og veldu hana.
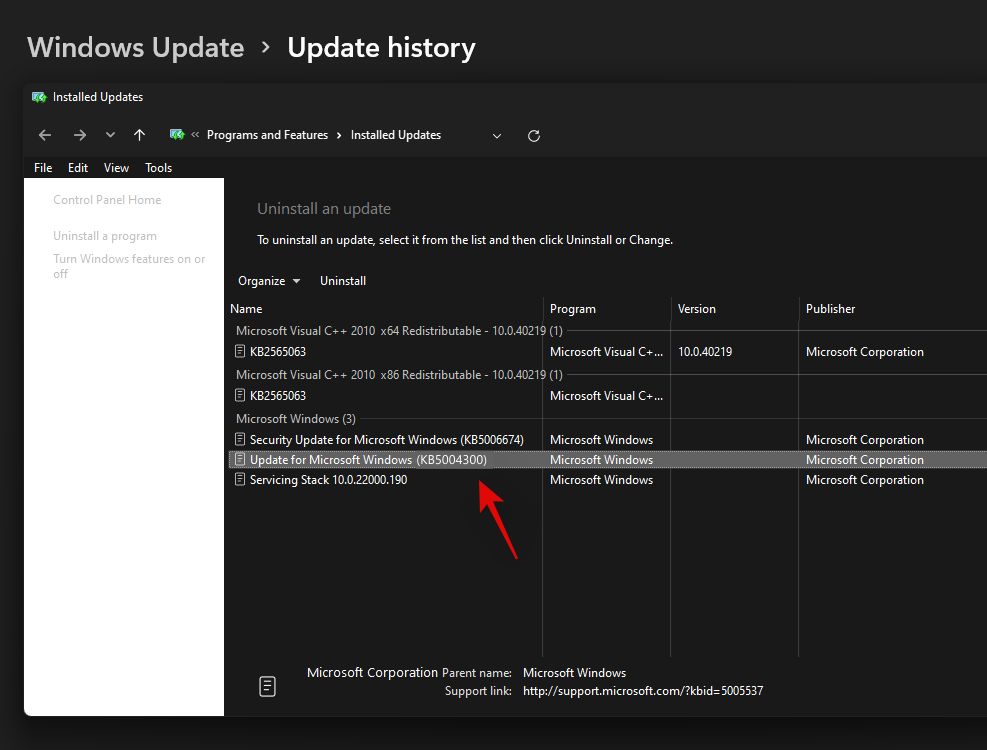
Smelltu nú á 'Fjarlægja' efst.
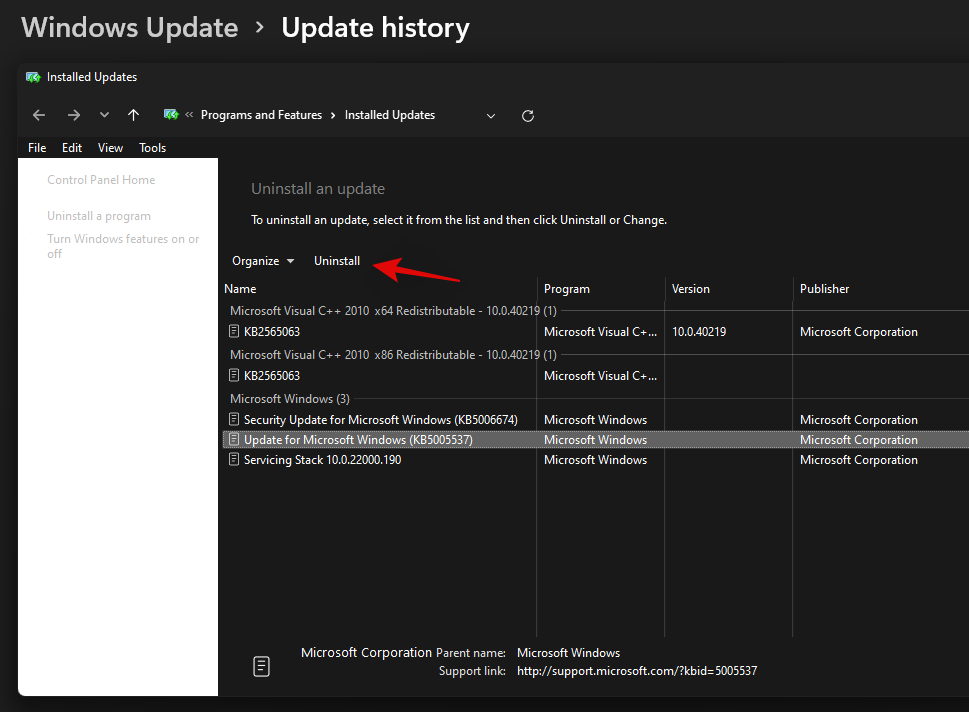
Fylgdu leiðbeiningunum á skjánum til að fjarlægja uppfærsluna af tölvunni þinni. Þegar það hefur verið uppfært skaltu endurræsa tölvuna þína til góðs.
Ýttu nú Windows + iaftur þegar tölvan þín endurræsir og veldu Windows Update aftur.

Leitaðu að uppfærslum og þú ættir nú að hafa möguleika á að setja upp Windows Update KB 5004300 á tölvunni þinni aftur.
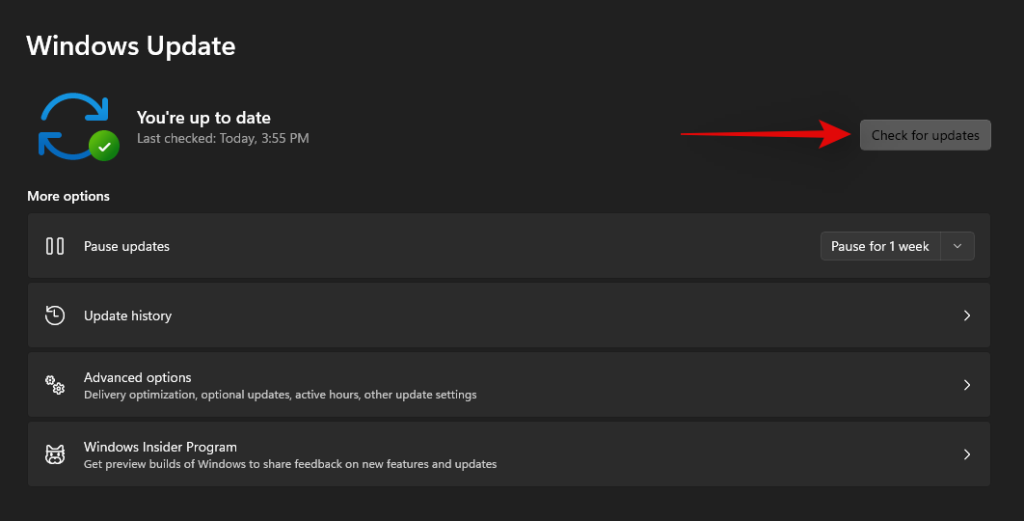
Hladdu niður og settu upp uppfærsluna og virkni verkefnastikunnar og upphafsvalmyndarinnar ætti nú að vera endurheimt í Windows 11.
Lagfæring #2: Þvingaðu endurræsingu Iris Service
Nýleg uppfærsla á innherjabyggingunum frá Microsoft hefur valdið miklum vandræðum með verkstikuna og Start valmyndina fyrir marga notendur. Ef þú ert líka áskrifandi að Insider rásinni og hefur átt í vandræðum við uppfærslu í byggingarnúmer 22449 eða hærra þá geturðu notað lagfæringuna sem nefnd er hér að neðan.
Þessi aðferð mun eyða skráningargildinu fyrir Iris þjónustuna sem ætti að þvinga hana upp aftur við endurræsingu. Enduruppsetning virðist hjálpa til við að laga þetta vandamál fyrir flesta notendur. Jafnvel þó þú sért ekki í sömu smíðum, þá er þessi lagfæring þess virði að reyna. Fylgdu leiðbeiningunum hér að neðan til að koma þér af stað.
Athugið: Þessi skipun mun strax endurræsa tölvuna þína. Ef þú ert með einhverja viðvarandi vinnu í bakgrunni, vertu viss um að vista það áður en þú heldur áfram með þessa handbók.
Ýttu Windows + S á lyklaborðið og leitaðu að CMD. Smelltu á 'Hlaupa sem stjórnandi' eða ýttu Ctrl + Shift + Enter á á lyklaborðinu þínu.
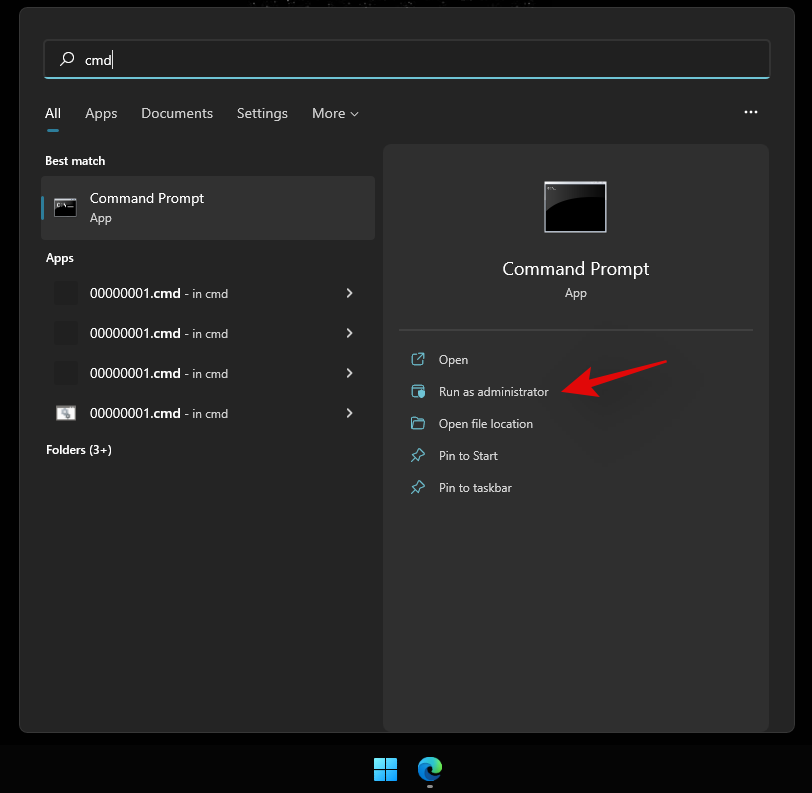
Sláðu inn eftirfarandi skipun og ýttu á Enter á lyklaborðinu þínu.
reg delete HKCU\SOFTWARE\Microsoft\Windows\CurrentVersion\IrisService /f && shutdown -r -t 0

Tölvan þín mun nú endurræsa. Skráðu þig inn á tölvuna þína eins og venjulega og virkni Start valmyndarinnar ætti nú að vera endurheimt á vélinni þinni.
Lagfæring #3: Endurræstu tölvuna þína
Þetta er lang einfaldasta aðferðin sem kemur upp í hugann þegar reynt er að laga flest vandamál á Windows 11 tölvu. Venjulega, þegar þú endurræsir kerfið, þvingarðu í raun alla ferla, þar á meðal Windows, til að endurræsa alla þjónustu sína og ferla. Þetta endurræsir einnig ferlið Start valmyndarinnar sem mun hjálpa til við að laga vandamálið með henni.
Ef það er ekki augljóst, hér eru skrefin til að endurræsa tölvuna þína.
Gakktu úr skugga um að öll forritin þín og skrár séu lokuð. Eða farðu einfaldlega á skjáborðsskjáinn með því að ýta Windows key + D saman. Ýttu nú Alt + F4 tökkunum saman á lyklaborðinu þínu til að fá „Slökktu á Windows“ skjánum.
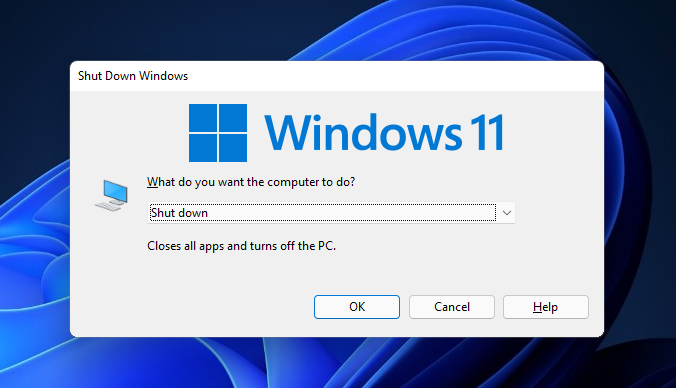
Smelltu á fellilistann, veldu 'Endurræsa' og ýttu á 'OK' hnappinn.
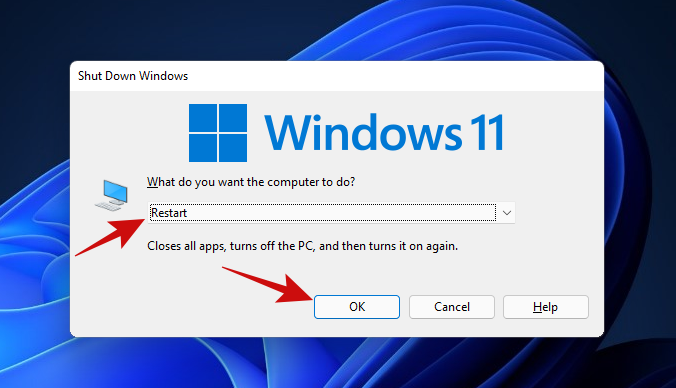
Þegar tölvan þín endurræsir ættirðu að geta notað Start valmyndina aftur. Ef þú getur það samt ekki skaltu prófa næstu aðferð.
Lagfæring #4: Endurræstu Windows Explorer með Task Manager
Næsta auðveld leiðrétting fyrir frosna upphafsvalmynd notar Task Manager. Verkefnastjórinn getur verið hið fullkomna tæki til að stjórna hvaða ferli sem er í gangi á Windows tölvu.
Ef þú ert með Start valmynd sem vill ekki svara smellunum þínum skaltu fylgja skrefunum sem nefnd eru hér að neðan til að sjá hvort það lagar vandamálið þitt.
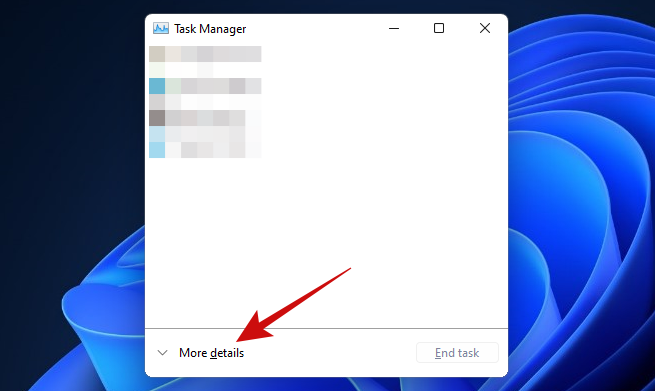
Ýttu á Ctrl + Shift + Esc takkana til að kveikja á Task Manager. Ef Verkefnastjórinn þinn lítur svona út skaltu smella á hnappinn 'Frekari upplýsingar' til að fá aðgang að ítarlegu yfirlitinu.
Þegar þú ert kominn inn í Task Manager skaltu fletta í gegnum vinnslulistann til að finna 'Windows Explorer' ferlið. Hægrismelltu á ferlið og smelltu á 'Endurræsa' valmöguleikann.
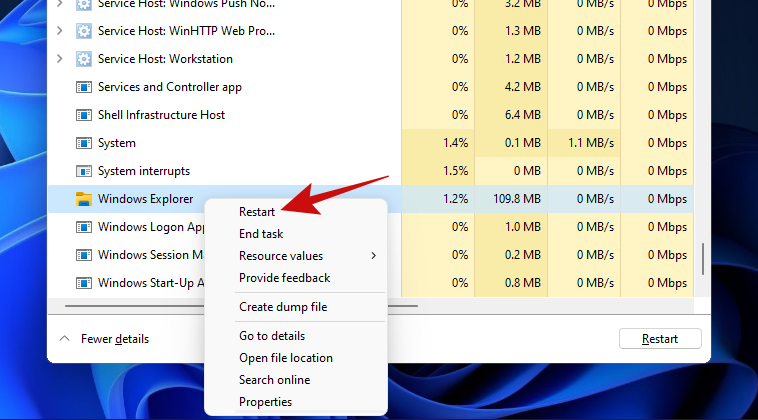
Þegar smellt er á, ætti Windows að endurræsa Windows Explorer ferlið á augabragði og það ætti að laga upphafsvalmyndina þína.
Að endurræsa Windows Explorer ferlið er nokkuð svipað og að endurræsa tölvuna þína. Eini munurinn er sá að hér ertu aðeins að endurræsa eitt ferli, en með endurræsingu endurræsirðu öll ferli. Auk þess hefur mörgum áður gengið vel að laga Start valmyndina sína með þessari aðferð, sem gerir þetta þess virði að prófa.
Lagfæring #5: Leitaðu að uppfærslum á Windows
Ef þú getur samt ekki fengið Start valmyndina til að opna ættirðu að prófa Windows Update. Vandamálið gæti verið víðtækara en þú heldur og Microsoft gæti hafa gefið út flýtileiðréttingu til að laga upphafsvalmyndina sem svarar ekki.
Hér er hvernig þú getur gert það.
Opnaðu Stillingar appið með Win key + i lyklum saman. Þegar það hefur verið opnað skaltu smella á 'Windows Update' valkostinn.
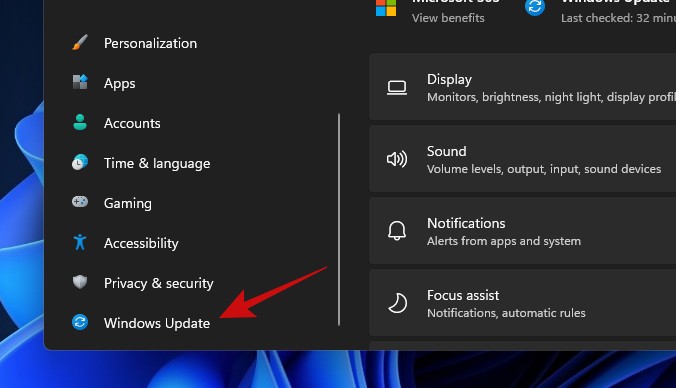
Smelltu á stóra 'Athuga að uppfærslum' hnappinn til að byrja að leita að tiltækum uppfærslum á Windows fyrir tölvuna þína. Ef það er tiltækt, láttu Windows setja upp allar uppfærslur.
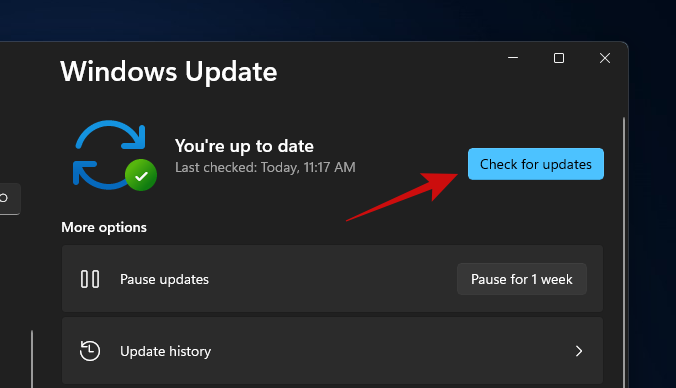
Þegar Windows er búið að uppfæra tölvuna þína skaltu einfaldlega endurræsa hana og reyna að opna Start valmyndina. Ef þú getur enn ekki opnað Start valmyndina, teljum við að það sé kominn tími til að fara í fullkomnari lagfæringar.
Lagfæring #6: Keyrðu DISM og SFC
DISM (Deployment Image Servicing and Management) og SFC (System File Checker) eru tvö af öflugustu verkfærunum til að bera kennsl á og gera við skemmdar Windows uppsetningar. Þessi verkfæri er hægt að nota með annaðhvort Command Prompt eða Windows PowerShell. Fyrir þessa handbók munum við nota þær með skipanalínunni.
Byrjum á DISM. DISM er hægt að nota til að grípa ný afrit af skemmdum Windows skrám.
Ýttu á Win key + r til að opna Run reitinn, sláðu inn cmd og ýttu síðan Ctrl + Shift + Enter saman (í stað þess að ýta á Enter) til að opna upphækkaða skipanalínu.
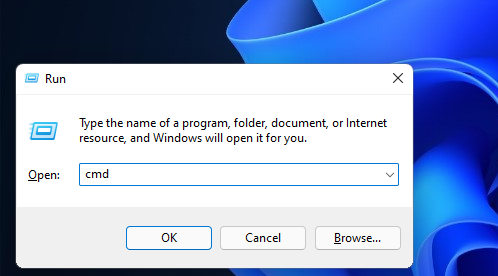
Þegar þú ert kominn inn í Command Prompt, límdu kóðann hér að neðan og ýttu á Enter.
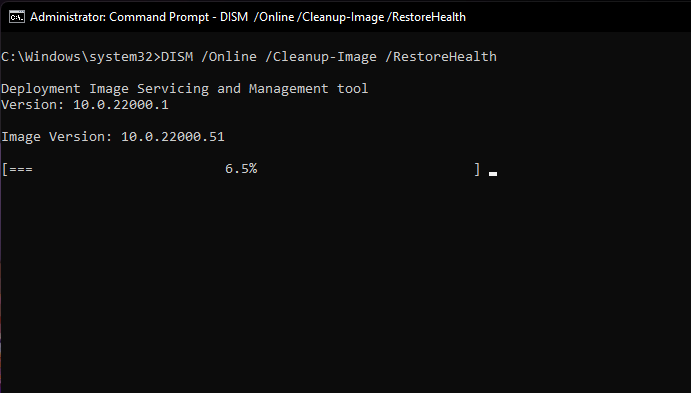
DISM /Online /Cleanup-Image /RestoreHealth
DISM mun nú reyna að endurheimta skemmdu skrárnar (ef einhverjar eru) úr núverandi uppsetningu með því að biðja um nýtt afrit af þeirri skrá frá Windows uppfærslu. Allt ferlið mun taka um ~15-20 mínútur. Svona lítur skipunin út í verki.
Þegar skipunin hefur endurheimt allar skemmdu skrárnar ættirðu að sjá eitthvað eins og þetta.
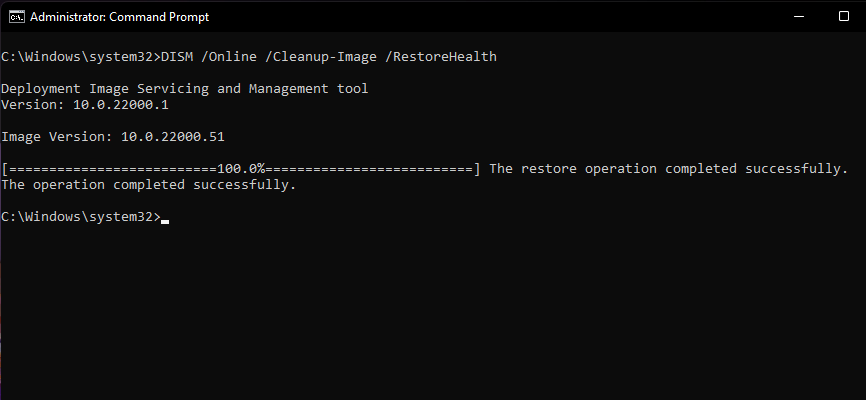
Þegar þú hefur lokið þessu skrefi, haltu stjórnskipunarglugganum opnum til að keyra næstu skipun.
Næsta skref er að sannreyna heilleika allra Windows 11 skránna til að ganga úr skugga um að þær séu í góðu formi. Til þess munum við nota SFC tólið.
Hér er hvernig.
Límdu kóðann hér að neðan í Command Prompt glugganum og ýttu á Enter.
sfc /scannow
Svona lítur skipunin út.
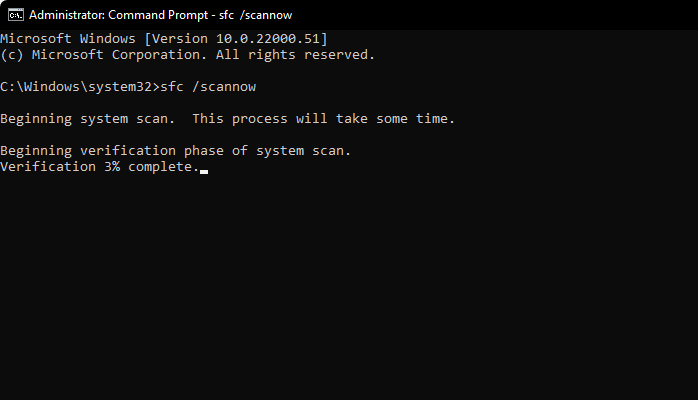
Ofangreind skipun mun aðeins taka nokkrar mínútur að klára að skanna heilleika Windows skránna þinna. Þegar þessu er lokið ætti útkoman að líta svona út.
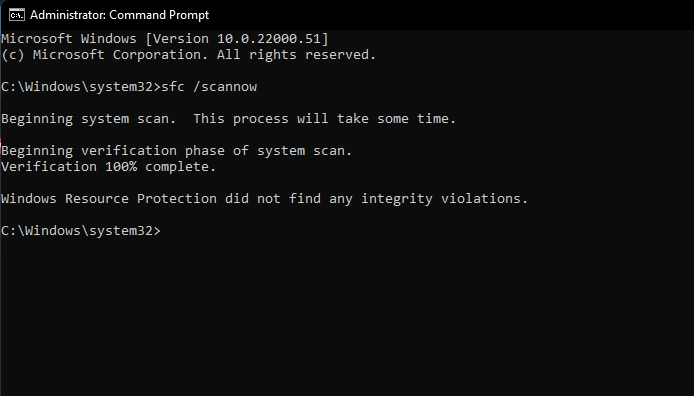
Ábending: Gakktu úr skugga um að tölvan þín sé með stöðuga nettengingu til að þessi aðferð virki.
Nú er kominn tími á endurræsingu.
Enn fastur með bilaða Start valmynd, það er kominn tími til að prófa næstu aðferð.
Svipað: 6 leiðir til að uppfæra ökumenn á Windows 11
Lagfæring #7: Endurbyggðu leitarvísitölu
Byrjunarvalmyndin og Windows leitin eru nátengd. Vandamál með leit og flokkun gætu hafa smeygt sér inn í Start valmyndina og haft áhrif á hana. Svo, við skulum útiloka þennan möguleika líka.
Við skulum skoða skrefin til að gera það.
Opnaðu Run reitinn með því að ýta á Win key + r. Límdu síðan textann fyrir neðan í Run reitinn og ýttu á Enter.
control /name Microsoft.IndexingOptions
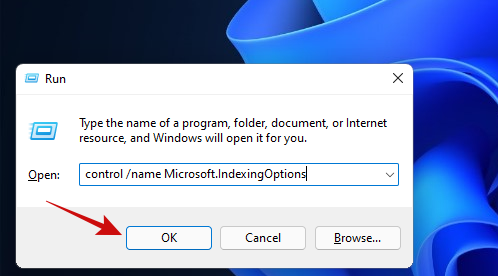
Þú ættir að sjá sprettiglugga sem ber titilinn 'Flokkunarvalkostir' opnast. Smelltu á hnappinn 'Breyta'.
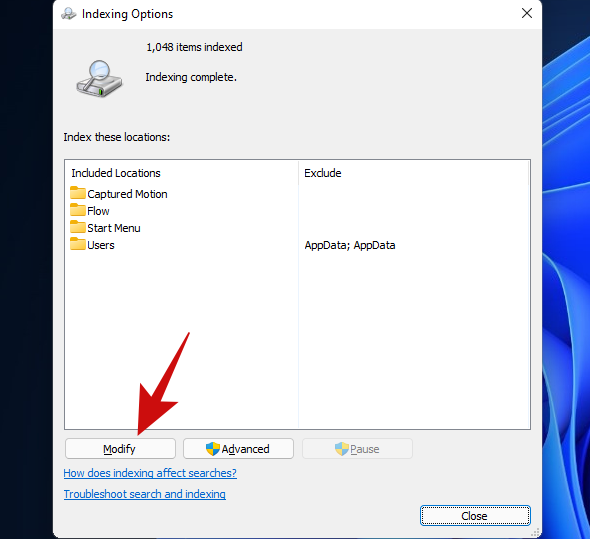
Smelltu á hnappinn 'Sýna allar staðsetningar'.
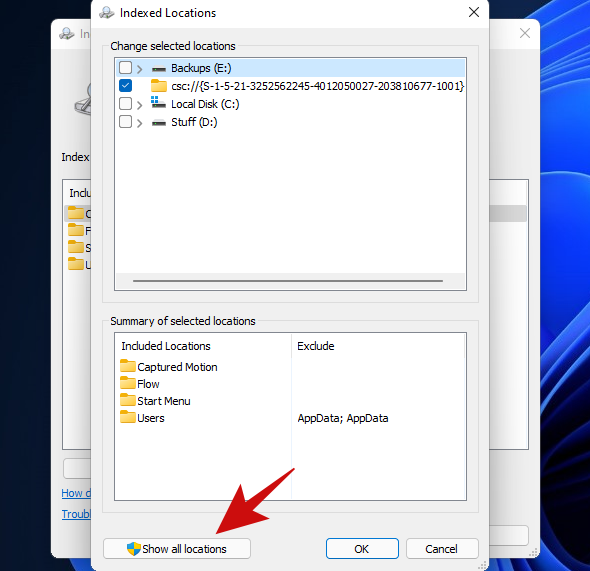
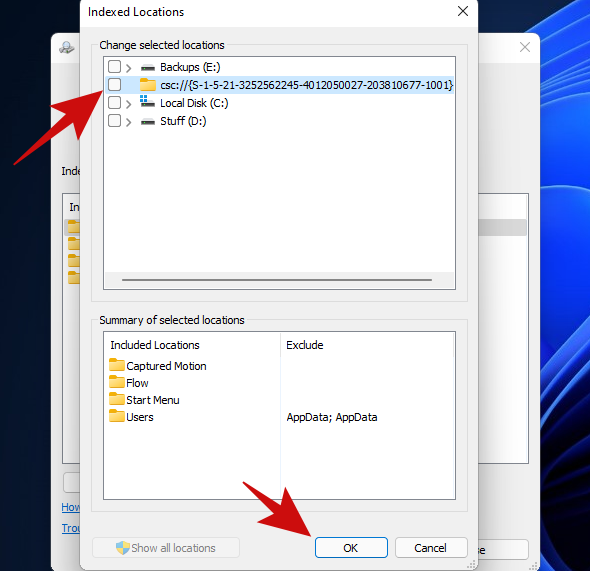
On this screen, uncheck all the locations and click on the ‘OK’ button. Ours had only one location ticked, so we unticked just one location on this list.
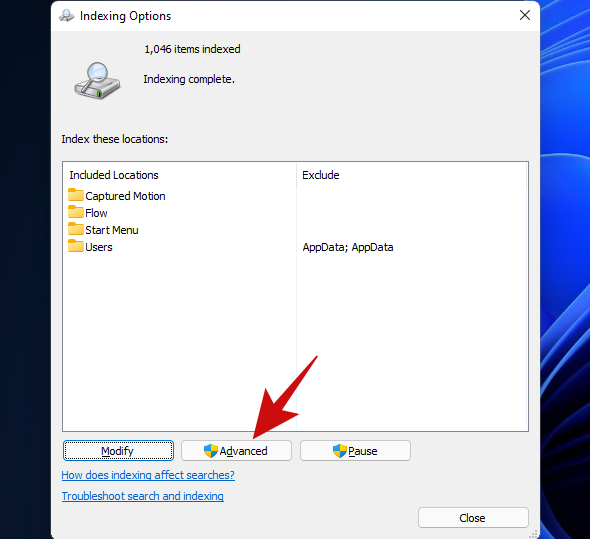
Click on the ‘Advanced’ button.
Click on the ‘Rebuild’ button.
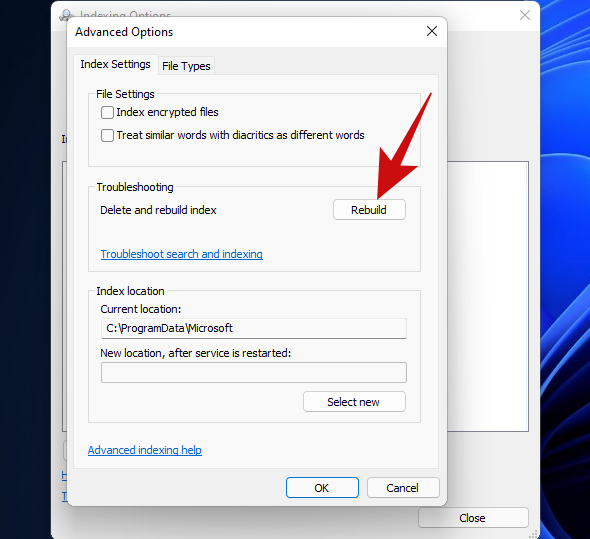
Windows will now start rebuilding the Search Index. Rest assured, the entire process will now be handled by Windows and doesn’t really require any user input, although it does take quite a bit of time to complete.
When Windows has rebuilt your Search Index, restart your PC. Once you’re inside Windows again, try opening the Start menu. If it still doesn’t work, we think it’s time to opt for a more resilient method.
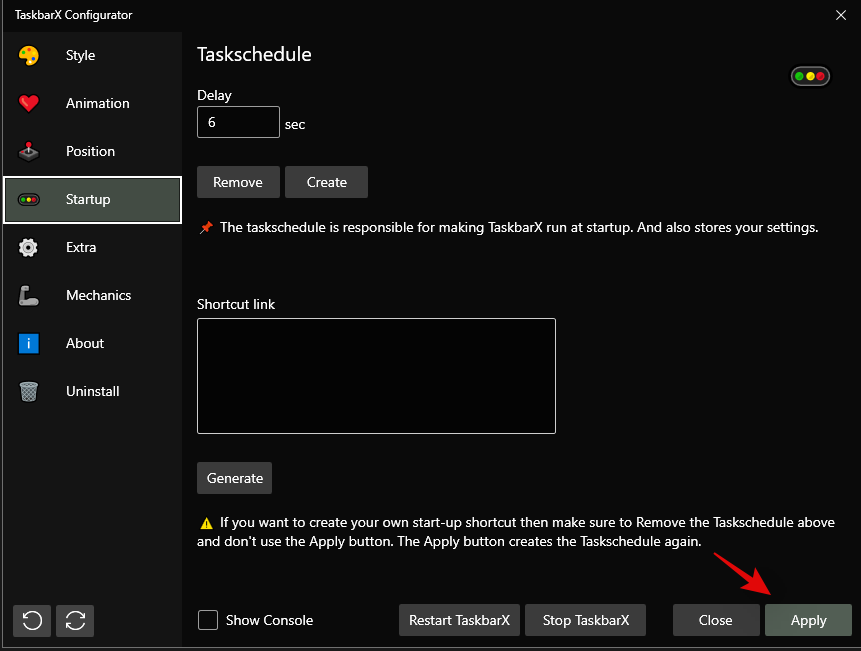
If you have installed any third-party programs to modify the look or functions of your start menu then we recommend removing all such programs. Likely, one of these programs is not compatible with the new Windows 11 start menu which is why you are facing issues with your system. If you have one of the following apps mentioned below, then we recommend you revert their settings and uninstall them as soon as possible. Most of these apps were designed for Windows 10 and are incompatible with the Windows 11 Start menu code to a certain extent. A recent Windows 11 update likely broke their compatibility causing the start menu to glitch out on your system.
- Open Shell
- Classic Start
- WinAero Tasbar
- TaskbarX
And more. If removing a third-party app that modifies your start menu helps restore its functionality then you can wait for a compatible update to use the app again.
Did you use a registry hack to get the older Windows 10 start menu on Windows 11? If so then it is likely that this registry hack’s functionality broke with a recent Windows 11 update. In such cases, you can use the guide below to revert the changes on your system.
Press Windows + R on your keyboard and type in the following in the Run dialog box.
regedit

Press Enter on your keyboard once you are done to launch the registry editor. You can also click on ‘Ok’ instead.
Now copy and paste the address given below in the address bar at the top of the registry editor and press ‘Enter’ on your keyboard.
Computer\HKEY_CURRENT_USER\Software\Microsoft\Windows\CurrentVersion\Explorer\Advanced
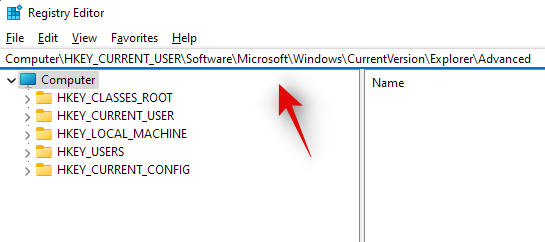
Look for ‘Show_StartClassicMode’ on your right and right-click on it.

Select ‘Modify’.

Change its value data to ‘0’ and click on ‘Ok’. Do not close the registry editor just yet.
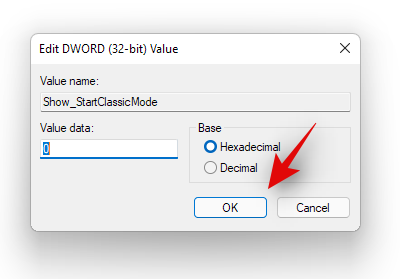
Press Ctrl + Shift + Esc on your keyboard to launch the Task Manager. Now click and switch to the ‘Details’ tab at the top.
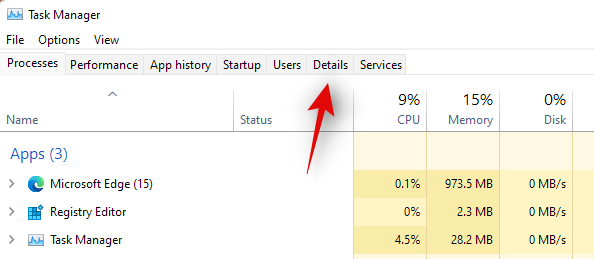
Click and select Explorrer.exe from the list and press Delete on your keyboard.

Confirm your choice by clicking on ‘End Process’.
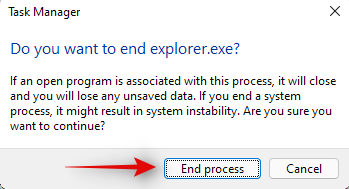
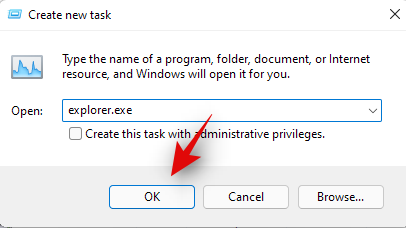
Now click on ‘File’ in the top left corner and select ‘Run new task’.
Type in ‘Explorer.exe’ and press Enter on your keyboard. You can also click on ‘Ok’ instead.
Explorer will now be restarted on your system. Switch back to the registry editor and click and select ‘Start_ShowClassicMode’.
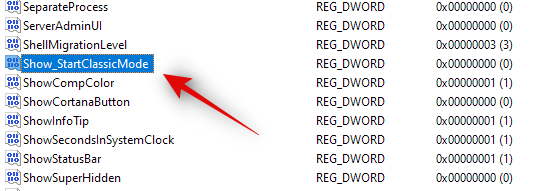
Press Delete on your keyboard and confirm your choice to delete the registry value.

Restart your system for good measure now.
If your Start menu wasn’t working due to a registry hack to get the older start menu then it should be fixed by now. You can check for the same by clicking on the Start menu icon in your taskbar.
Windows 11 has come a long way when compared to its predecessors. Background processes, tasks, and apps are more streamlined now and various features and elements seem to have their own dedicated packages. These dedicated packages make it easier for you to troubleshoot problems with certain features of Windows and even reinstall them in worst-case scenarios. If the start menu is still not working for you then you can reinstall basic elements of Windows 11 which will also reinstall the Start menu module on your system. This should help fix any background conflicts and get the Start menu back up and running on your system. Follow the guide below to get you started.
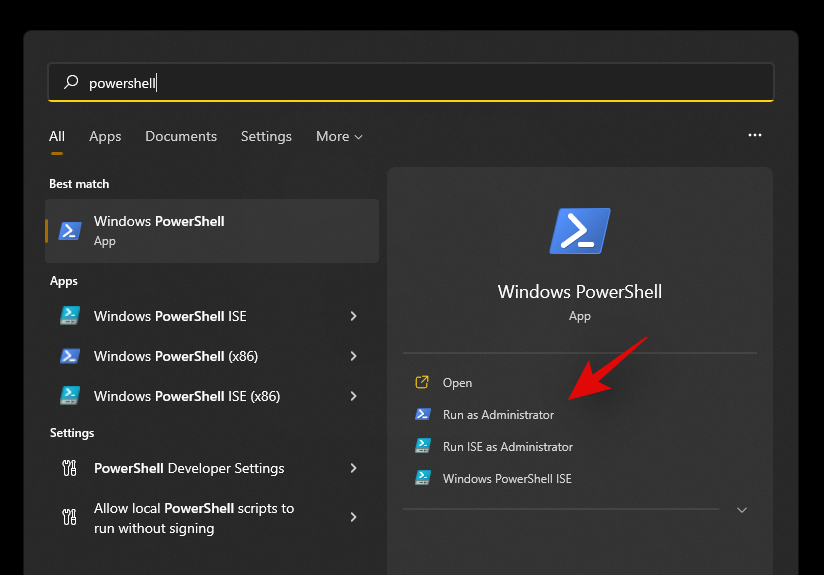
Press Windows + S on your keyboard and search for PowerShell. Click on ‘Run as administrator’ once the app shows up in your search results.
Now type in the following command and press ‘Enter’ on your keyboard.
Get-appxpackage -all *shellexperience* -packagetype bundle |% {add-appxpackage -register -disabledevelopmentmode ($_.installlocation + “\appxmetadata\appxbundlemanifest.xml”)}

Ignore any warnings that you get and continue with the process. Once complete, restart your system for good measure.
Now that the Start menu and other basic features have been reinstalled on your system, let’s rebuild your system’s index to get everything back up and running again. Press Windows + R on your keyboard to open the Run dialog box.
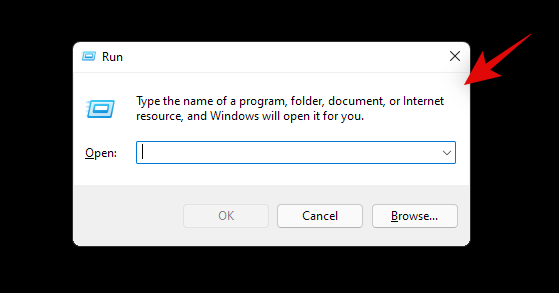
Type in the following command and press Enter on your keyboard.
control /name Microsoft.IndexingOptions
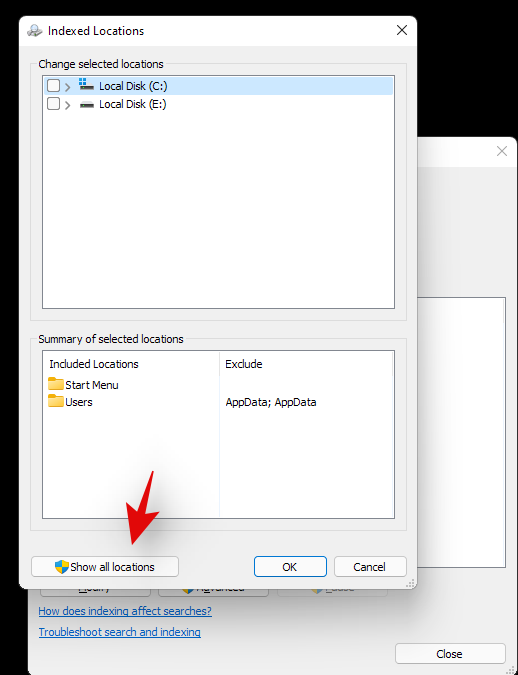
Click on ‘Modify’ and select ‘Show all locations’.
Uncheck all the boxes in the current list.
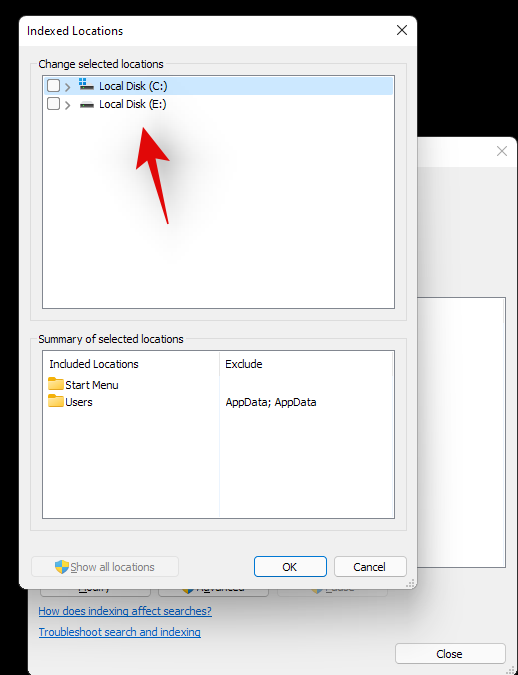
Click on ‘Ok’.
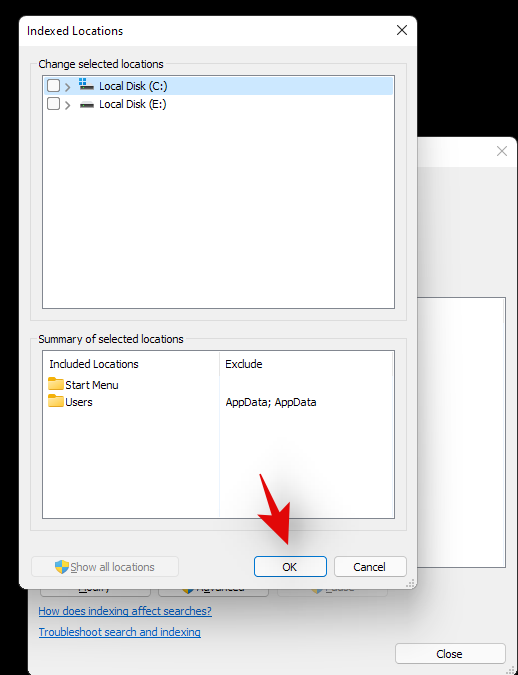
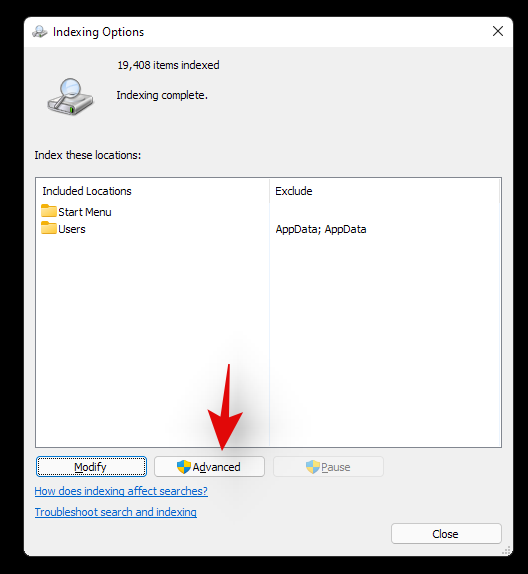
Click on ‘Advanced’ now.
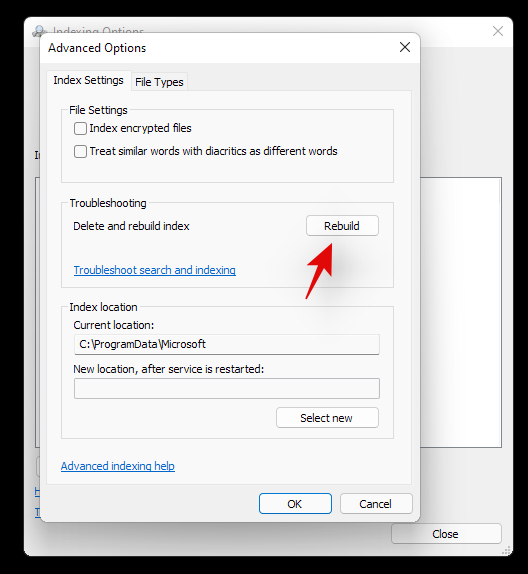
Select ‘Rebuild’ under troubleshooting.
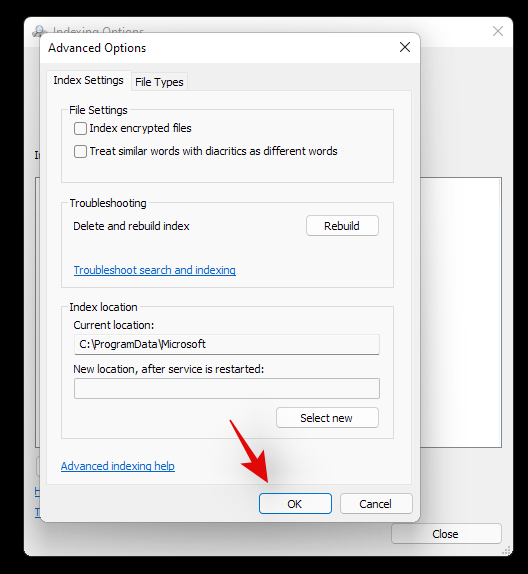
Click on ‘Ok’ once the warning pops up on your screen.
Once the process finishes, we highly recommend you restart your system.
You can now try clicking on the Start icon once your system restarts. Reinstalling the Start menu should help fix any issues with the Start menu on most systems.
Fix #11: Install any pending driver and Windows updates
This might be a bit obvious but you should definitely install any pending driver updates or Windows update on your system. This will help get you up and running on the latest drivers and help your system be compatible with all the hardware installed on your system. While drivers rarely cause issues with Windows features, you can never be too sure. Hence we recommend you install the latest available drivers on your system. You can use the link below to go to our detailed guide for updating drivers on Windows 11. If you are using a pre-built system or a laptop, then we recommend checking your OEM support page for dedicated driver updates as well.
There is a registry value that if modified, can disable your Start menu altogether. If you have been using registry modifiers, cleaners, and more, then it is likely that this registry value was modified which ended up disabling the Start menu on your system. Additionally, the Start menu’s functionality was moved to a Xaml process once Windows 10 was released. This process is known to glitch out
Use the guide below to check if the start menu is disabled on your system and re-enable it if needed.
Press Windows + R on your keyboard and type in the following command given below.
regedit
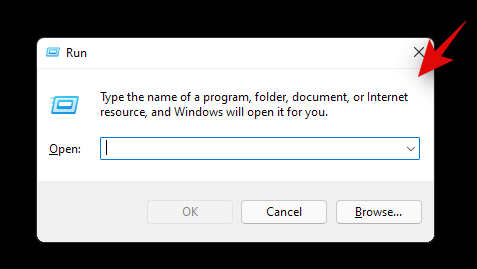
Now press Enter on your keyboard or click on ‘Ok’.
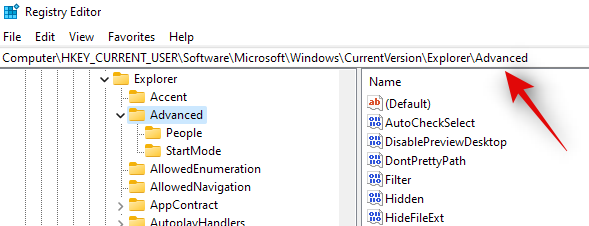
Copy and paste the following address in the address bar at the top of your registry editor.
HKEY_CURRENT_USER\Software\Microsoft\Windows\CurrentVersion\Explorer\Advanced
Now right-click on your right tab and select ‘New’.
Select ‘DWORD (32-bit value)’.
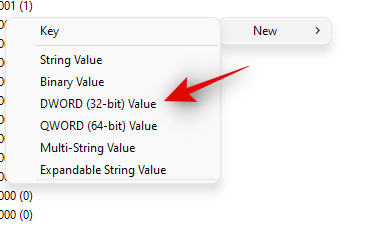
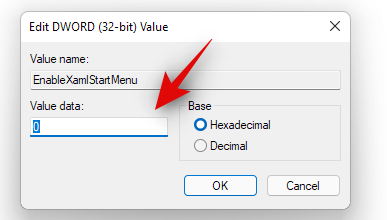
Enter the name as ‘EnableXamlStartMenu’.
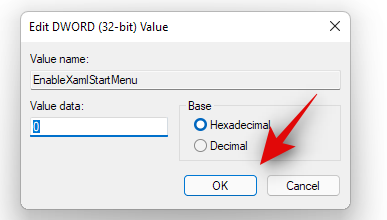
Enter the value as ‘0’.
Restart your PC now.
Once restarted try activating the Start menu now. If the Xaml process was facing conflicts, then they should be fixed now and the Start menu should be back up and running on your system again.
Fix #13: Restart Windows background services
If the Start menu still fails to launch then it’s time to restart all background Windows services. Usually restarting the ‘ShellExperienceHost.exe’ is enough but if that does not work for you, you can try restarting all the services listed below. This usually gets the Start menu back up and running on most systems.
Press Ctrl + Shift + Esc on your keyboard to open the ‘Task Manager’. Now click on ‘Details’ at the top to switch to the Details tab.
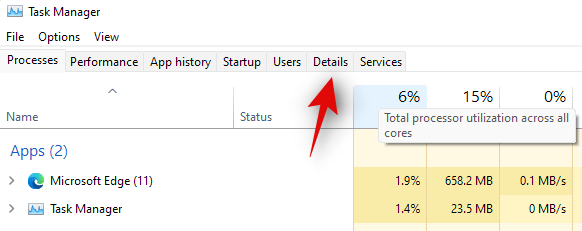
Find ‘StartMenuExperienceHost.exe’ in the list and click and select it.

Press Delete on your keyboard or click on ‘End Task’ in the bottom right corner. Click on ‘End Process’ again to confirm your choice.
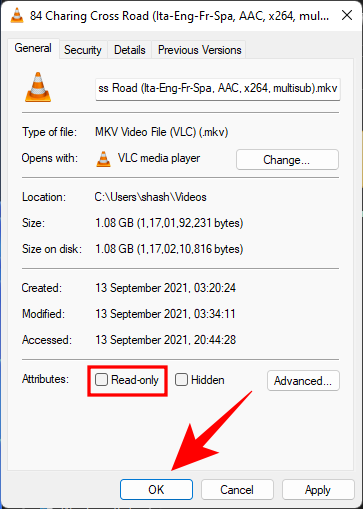
ShellExperienceHost.exe will now be killed. The process should automatically restart within a few seconds. Once restarted, try activating the Start menu on your system. If the menu starts working then you are good to go. However, if it is still not working then use the guide above to restart the following services on your system as well.
- SearchIndexer.exe
- SearchHost.exe
- RuntimeBroker.exe
And that’s it! If a background process was stopping you from accessing the Start menu then the issue should be fixed for you by now.
Fix #14: Run a Windows Troubleshooter
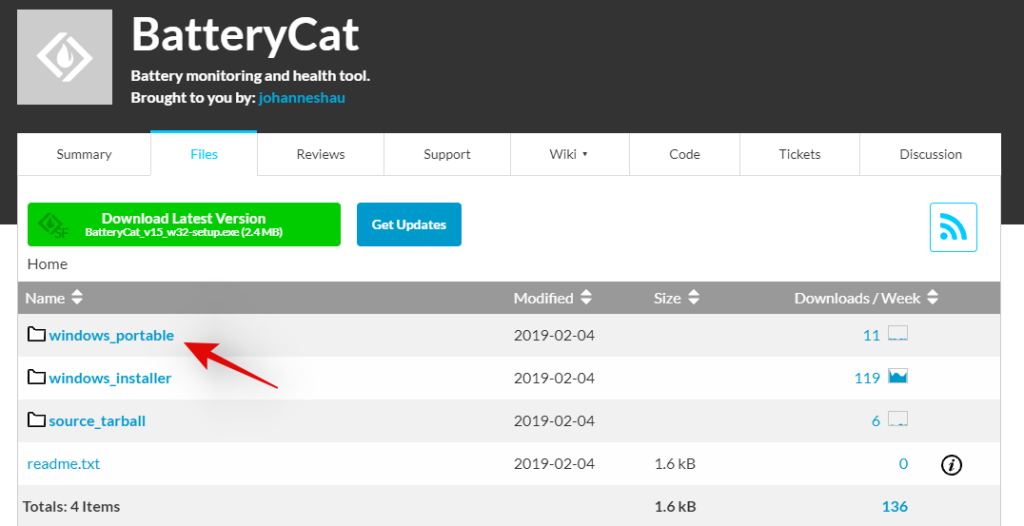
During a Windows 1909 feature update back in 2019, the Start menu was essentially broken due to a background conflict. To fix this issue for the masses, a troubleshooter was released by Microsoft to help fix this issue. If the Start menu is still not working for you then you can try running this troubleshooter on your system. Use the guide below to download and run the troubleshooter on your system.
Download the archive linked above to a convenient location on your local storage and extract its contents.
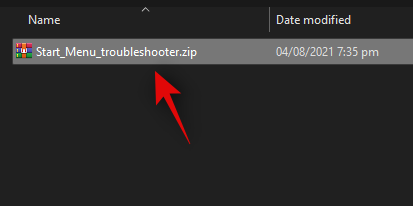
Now copy and paste the ‘startmenu.diagcab’ file on your desktop.
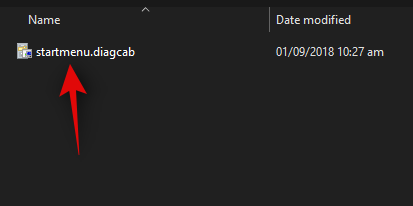
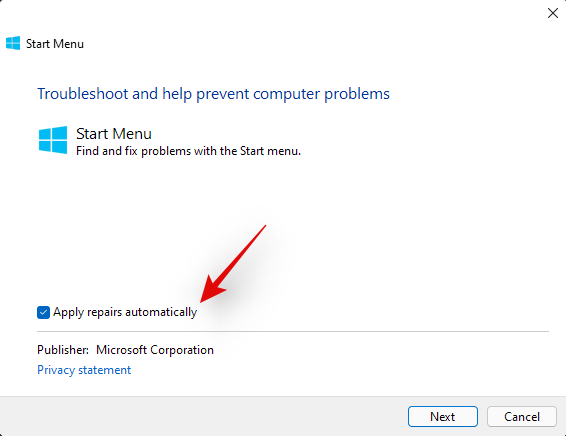
Double click and run the file from your desktop. Click on ‘Advanced’.
Check the box for ‘Apply repairs automatically’. Click on ‘Next’ once you are done.
The troubleshooter will now do its thing and try to fix the Start menu on your system. Any errors or issues found will be automatically fixed and the Start menu’s functionality should now be restored on your system.
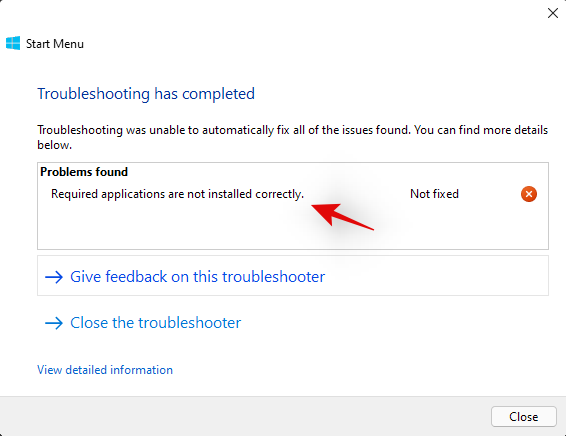
However, if the troubleshooter fails to fix the Start menu then this might indicate a more serious issue on your system. In such cases, let’s verify if Windows is actually able to access and initiate the process for the Start menu on your system. Use the checks below to help you along with the process.
We now need to check if the Start menu is actually available within your install of Windows 11. Let’s create a new local account that will help you verify its functionality. If the Start menu is working in the new account then it is likely an issue with your current user account.
Press Windows + i on your keyboard and click on ‘Accounts’ on your left.
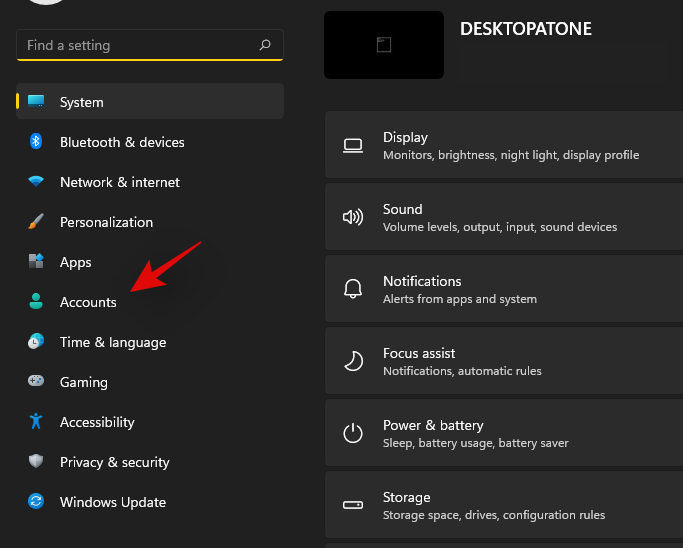
Click on ‘Family & other users’.
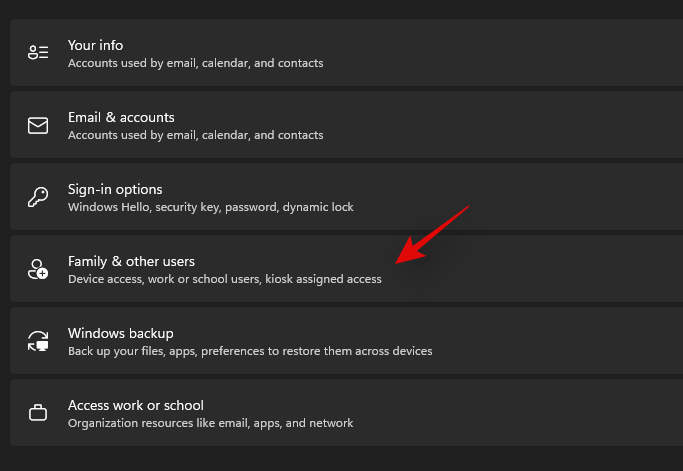
Now click on ‘Add account’ under other users.

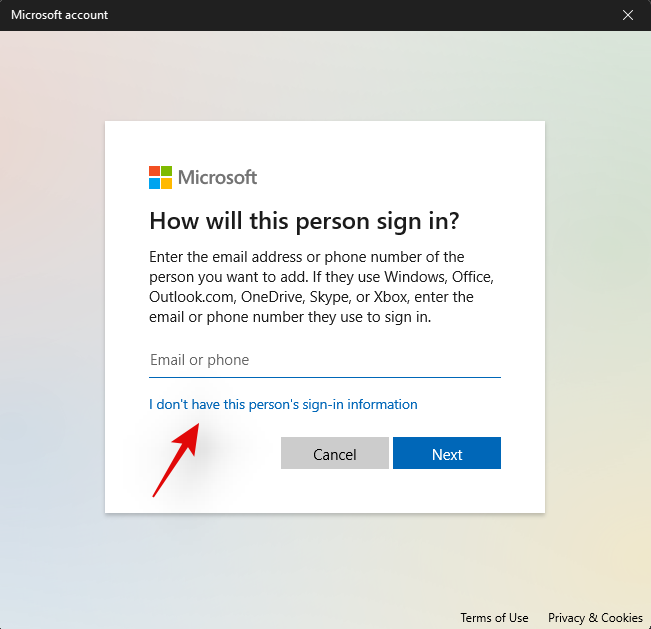
Click on ‘I don’t have this person’s sign-in information’.
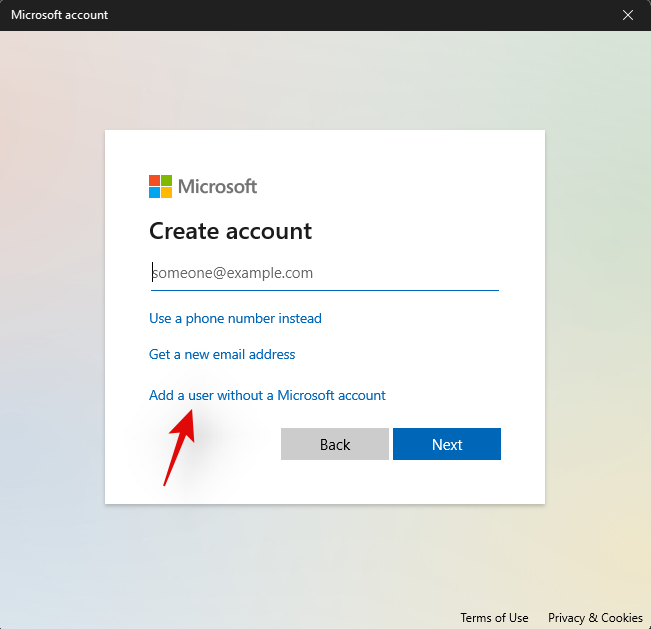
Click on ‘Add a user without a Microsoft Account’.
Now enter a username for the new account, and a password if needed.
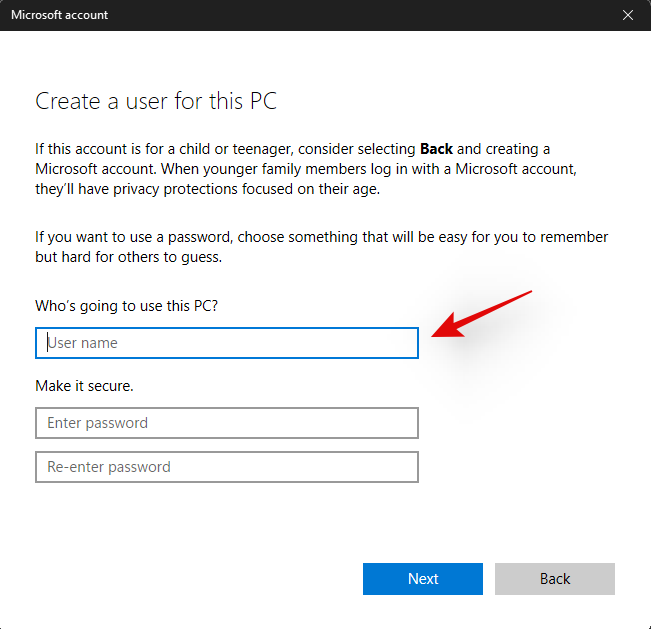
Click on ‘Next’ once you are done.
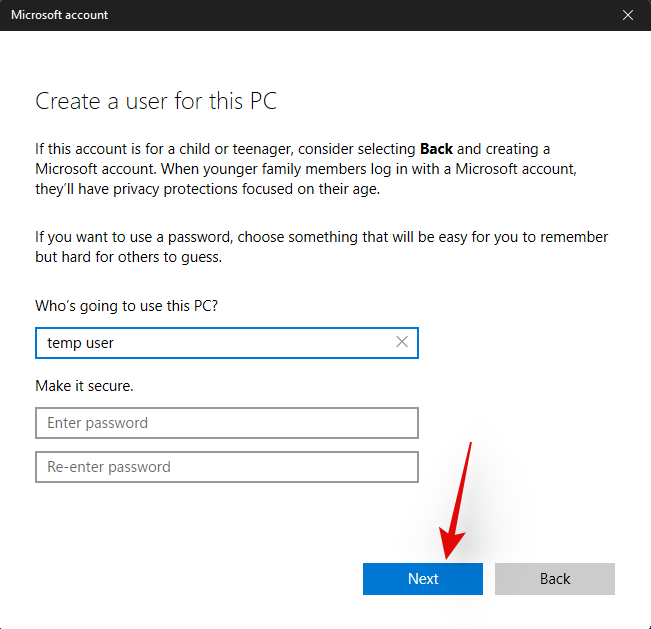
The new user account will now be created. Sign out of your current account and sign in to the new account.
Try to activate the Start menu now in the new temporary local account. If it is working then this is an issue specific to your user account. However, in case the Start menu fails to open, then this might indicate a more serious issue with your Windows 11 installation.
It’s now time to check if the Start menu is working in Safe mode. In case it is, then a third-party app is likely interfering with the Start menu’s functionality. You can remove any third-party apps used to modify the Start menu to try and fix this issue. Follow the guide below to activate Safe mode on Windows 11.
Press Windows + i on your keyboard and select ‘Windows Update’.
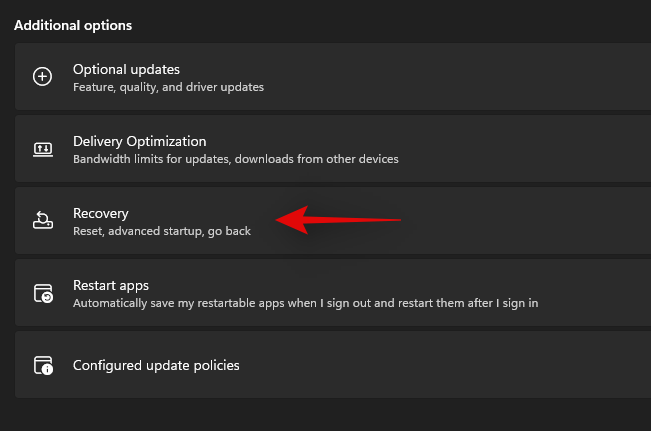
Now click on ‘Advanced options’.
Click and select ‘Recovery’.
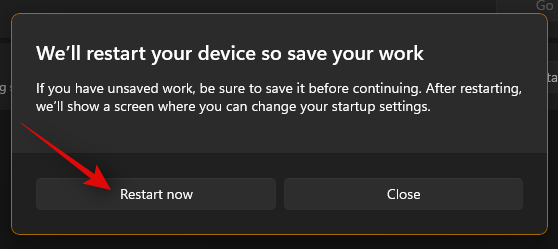
Now click on ‘Restart now’ beside ‘Advanced startup’.

Click on ‘Restart now’ again.
Your PC will now restart to the recovery screen. Click and select ‘Troubleshoot’.
Now click on ‘Advanced options’.
Click on ‘Startup Settings’.
Press ‘F4’ to start your PC in safe mode now.
Once your PC restarts, the safe mode should be active on your system. Now try to activate the start menu. If the menu activates, then it is likely that a third-party app is causing issues on your Windows 11 system. You can try removing apps used to customize the Start menu one by one to find the culprit on your system.
Fix #17: Run a malware and antivirus scan
We recommend you try and run a malware scan before opting for the last resort. If any malware or malicious service is causing issues with the Start menu, then a scan will help solve these issues. Use the guide below to run a malware scan through Windows Defender.
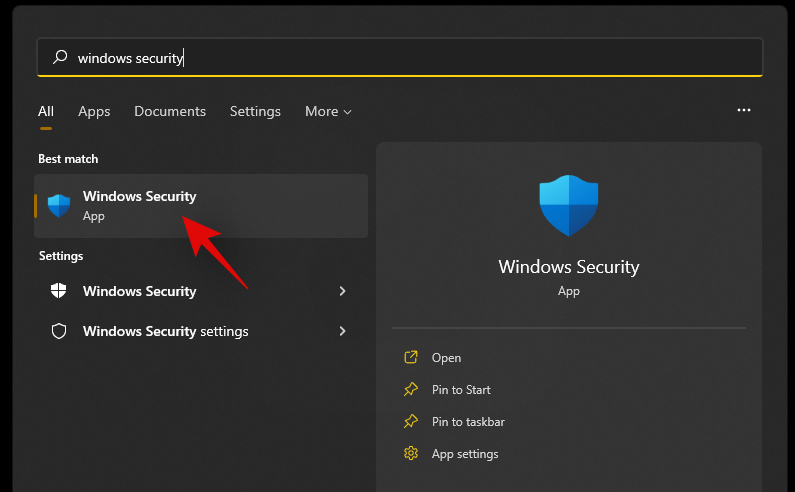
Press Windows + S on your keyboard and search for ‘Windows Security’. Click and launch the app once it shows up in your search results.
Click on ‘Virus & threat protection’.
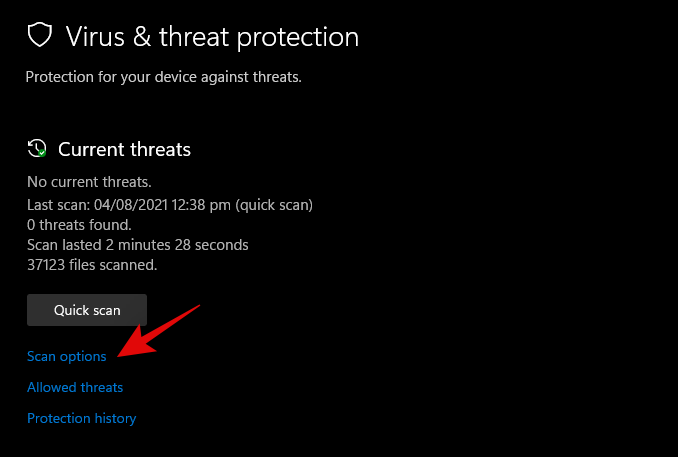
Click on ‘Scan options’.
Select ‘Full Scan’.
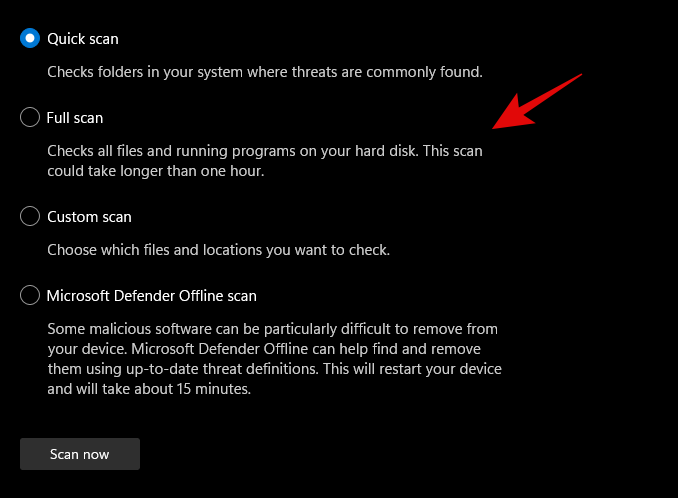
Finally, click on ‘Scan now’.
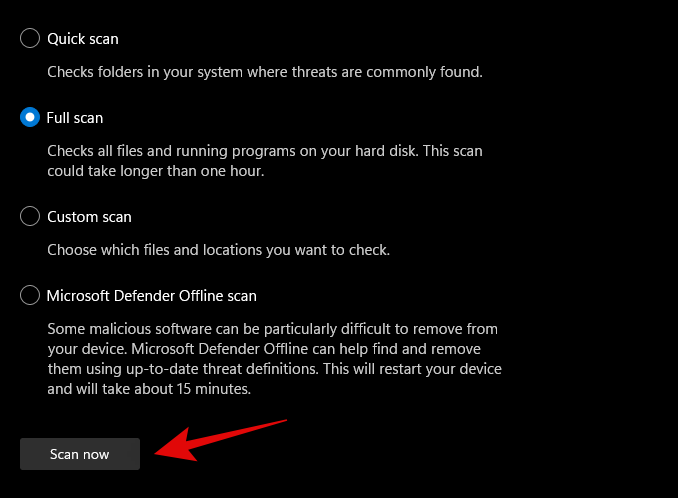
Windows Defender will now scan your entire PC for malware and malicious software. In case any are found, they will be automatically quarantined, and you will be prompted to take the necessary action as soon as possible.
3 General Fixes: Last Resort options
Fix #18: Create a new user via command prompt
If you’re facing an issue where you’re unable to add a local account via Settings to your PC then you can use the command prompt (CMD) for the same. Once added you can try and check if the Start menu is working for you. If it is, you can try the fixes below to restore it in your original account. However, if none of the fixes work for you then you can use the newly created account instead. The new account will be created with administrator privileges so you shouldn’t have problems moving your files and Settings. More on this below.
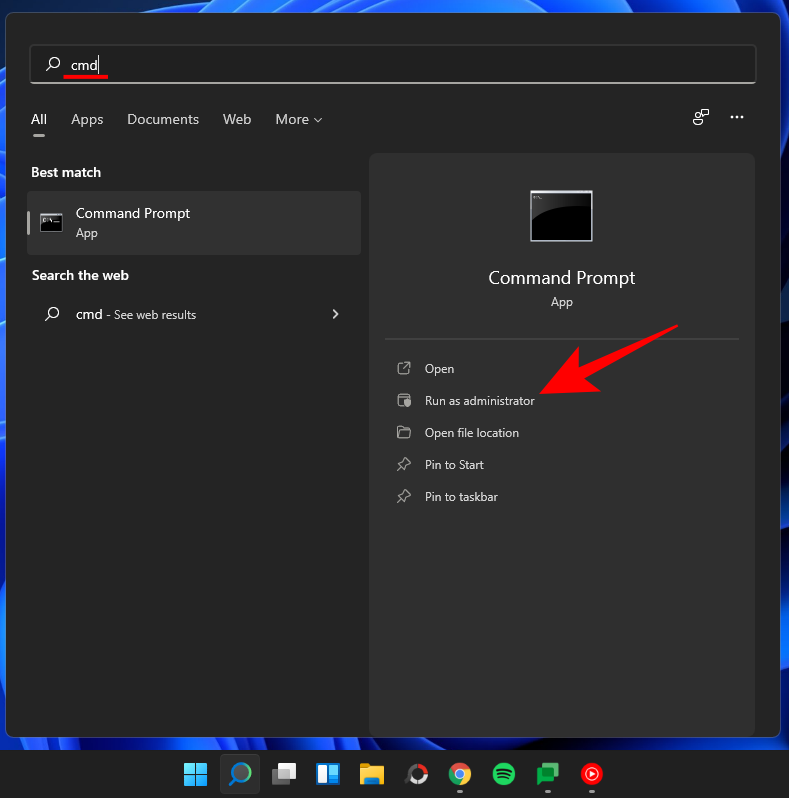
Press Windows + R to bring up the Run dialog box and type in the following. Press Ctrl + Shift + Enter on your keyboard once you are done.
cmd
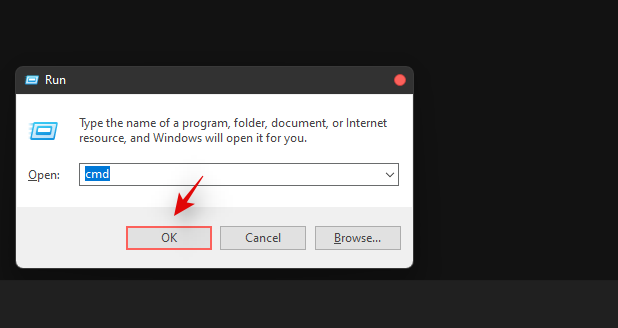
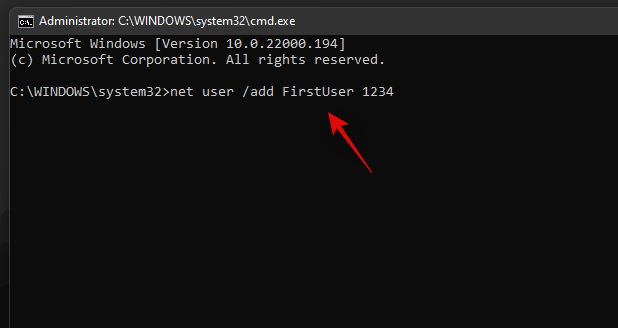
Type in the following command and press Enter on your keyboard. Replace ‘USER’ with your desired username for the new account. Similarly, replace ‘PASSWORD’ with your desired password.
net user /add USER PASSWORD
Now execute the following command as well and use the same username as above.
net localgroup administrators USER /add
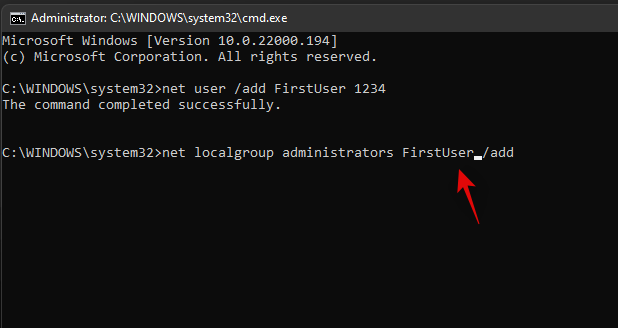
The user will now be added to your PC. Simply restart and log into the new account when the PC restarts.
The start menu should work alright now in the new user account. You can copy your files from the old user account to the new account.
To find your data in the old user account, open Windows Explorer and go to the User folder under the C Drive (or whichever drive you have installed Windows in).
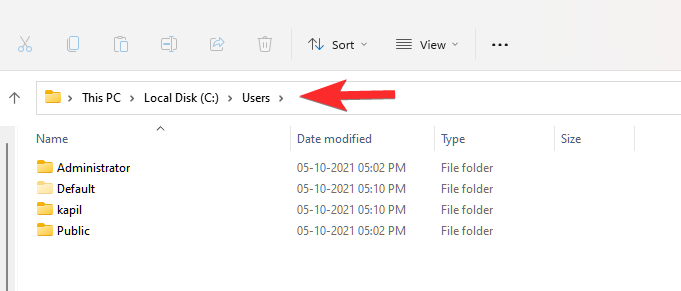
Click on the old user account. Now, copy all the files from here to your new user account that you can also find in the Users folder.
An easy method to transfer files from one user account (old one) to another user account (new one) is to copy the profile. Read more about it here.
Fix #19: Perform a Windows Reset
If you had zero luck with all of the previous methods, we think you should try a Windows Reset. It has been known to solve a host of problems in Windows 11 while keeping your personal files intact. Moreover, resetting Windows to its factory settings can give your PC a fresh start.
Here are the steps.
For this method, you’ll need an elevated PowerShell instance.
Press Win key + r to open the Run box, then type in ‘PowerShell and press Ctrl + Shift + Enter to open PowerShell as administrator.
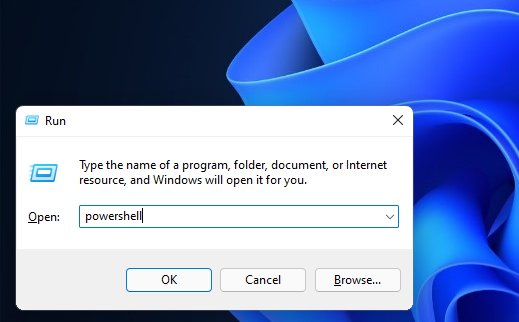
When opened correctly, you should already be inside the C:\Windows\system32 folder.
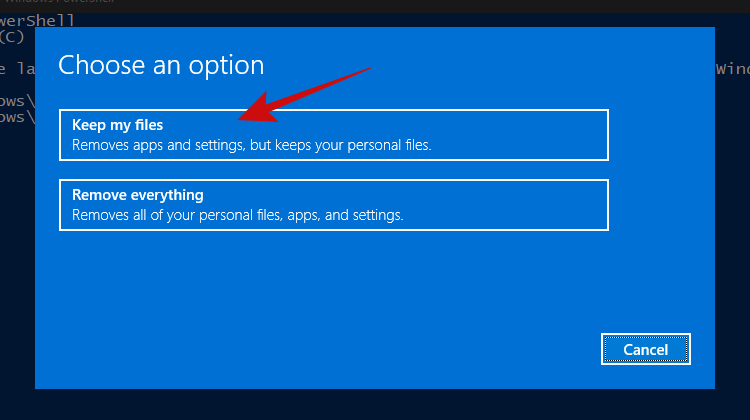
Now type in ‘system reset and press enter. You should be presented with two options, to either keep all your files or to remove everything. Click on ‘Keep my files’.
Within a few minutes, Windows should give you a list of apps that’ll be removed from your PC after the reset. Here’s how our list looks.
Once you’ve scrolled through the list of apps, simply click on the ‘Next’ button.
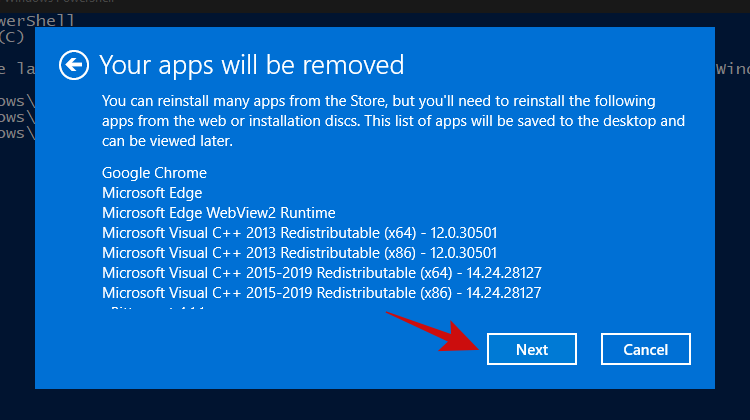
Windows should now start the reset process. Simply follow the instructions and your PC should be reset within a couple of minutes. The Start menu should be working now.
Fix #20: Re-install Windows from scratch
Well, if you’re really considering this method, it’s safe to assume that none of the other methods worked for you. At this point, we think it’s now time to go for a clean installation of Windows 11, which will probably wipe your current Windows partition (if you choose to).
Note: Before proceeding with this method, we recommend making a complete backup of all your files stored inside folders on the Windows drive, such as in Downloads, Documents, and the likes.
Once you have backed up all your files from the Windows drive, let’s take a look at the things you’ll need.
- A USB stick of 8GB or more (no external hard drives, unless you want to lose all your precious data)
- Rufus
Next, follow our guide on downloading and installing the Windows 11 ISO.
Read: How to Download and Install Official Windows 11 ISO
We hope that after following this guide, you were able to fix the annoying and unresponsive Start menu in Windows 11 and bring it back to life.
If you find yourself stuck at any point in this guide, let us know in the comments below.
Related:


