Android: Kako proslijediti SMS poruku

Ovaj vodič pokazuje kako proslijediti SMS poruku s Android uređaja koristeći Google Messaging aplikaciju.
Iako su obavijesti u nekim slučajevima bitne, ponekad postaju element koji ometa. Baš kao i vaš telefon, računalo vas također može odvući obavijestima. To je razlog zašto Windows 11 uključuje značajku Focus Assist, koja vam omogućuje da izbjegnete obavijesti koje vas ometaju. Koristeći ovu značajku, svoj posao možete obavljati s punom koncentracijom umjesto da vas ometaju nasumične poruke i obavijesti. Obavijesti također mogu naštetiti vašoj produktivnosti i stoga ih morate potisnuti u pravo vrijeme.
Samo nekoliko klikova može sakriti sve obavijesti, upozorenja i poruke na vašem računalu. Ako ste nedavno nadogradili svoj sustav na Windows 11 i ne možete shvatiti novo korisničko sučelje, ovaj će vam članak pomoći s opsežnim vodičem o tome kako koristiti Focus Assist u sustavu Windows 11 da biste se riješili obavijesti.
Povezano: Kako napraviti snimke zaslona na Windows 11
Sadržaj
Što je Focus Assist na Windows 11?
Focus Assist jednostavno je način rada Ne ometaj za vaše računalo – baš kao i oni koje imate na svojim telefonima. To je zgodna značajka u sustavu Windows 11 koja vam omogućuje da se riješite nepotrebnih obavijesti, poruka i upozorenja. Značajka Focus Assist omogućuje vam da prilagodite svoj popis prioriteta umjesto da blokirate svoje računalo od svih obavijesti.
Ometanje može naštetiti vašoj produktivnosti. Stoga, sa značajkom Focus Assist, možete sakriti sve obavijesti, upozorenja i poruke dok radite na nečem važnom. Umjesto da vas upozore, otići će ravno u akcijski centar. Skrivene obavijesti možete vidjeti u akcijskom centru u svoje vrijeme.
Kako Focus Assist radi u sustavu Windows 11?
Focus Assist pruža vam fleksibilnost odabira kada želite blokirati smetnje kao što su poruke, obavijesti i upozorenja. Pomoć za fokusiranje možete uključiti u bilo kojem trenutku ili također možete zakazati vremenski raspon u postavkama koje će automatski uključiti pomoć pri fokusiranju.
Značajka Focus Assist omogućuje vam stvaranje popisa prioriteta kako biste bili sigurni da nećete propustiti nijednu obavijest od najvažnijih osoba u vašem kontaktu. Ljudi na vašoj listi prioriteta uvijek vas mogu kontaktirati, čak i kada se bavite nekim važnim poslom. U slučaju da vam je potrebna potpuna koncentracija tijekom rada, možete se odlučiti i za blokiranje svih obavijesti. Za pregled svih blokiranih obavijesti koje ste primili dok ste radili, otvorite akcijski centar svog sustava.
Povezano: Kako zaustaviti skočne prozore u sustavu Windows 11
Kako omogućiti Focus Assist
Focus Assist je prema zadanim postavkama isključen. Ali ako ga želite omogućiti da prestane primati obavijesti, slijedite korake u nastavku.
Metoda #1: Korištenje postavki
Kliknite na ikonu Pretraživanje , koja izgleda kao povećalo na programskoj traci.
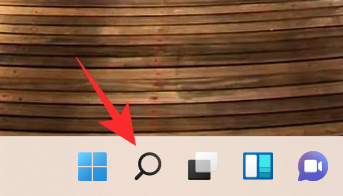
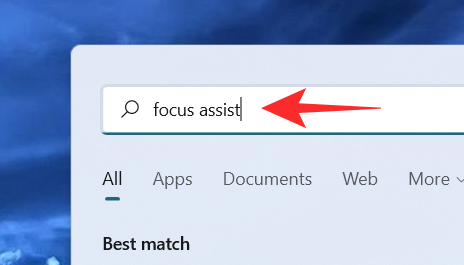
Upišite pomoć za fokusiranje u traku za pretraživanje.
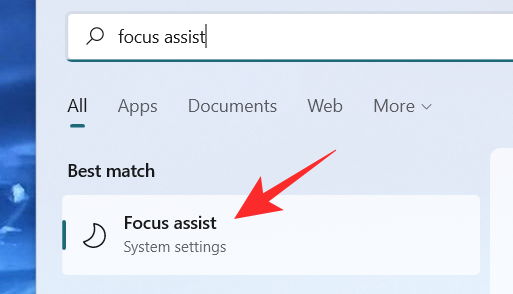
Kliknite na postavke sustava Focus Assist .
Na zaslonu se pojavljuje prozor postavki sustava Focus Assist. Pod Focus Assist odaberite jednu od ovih opcija:
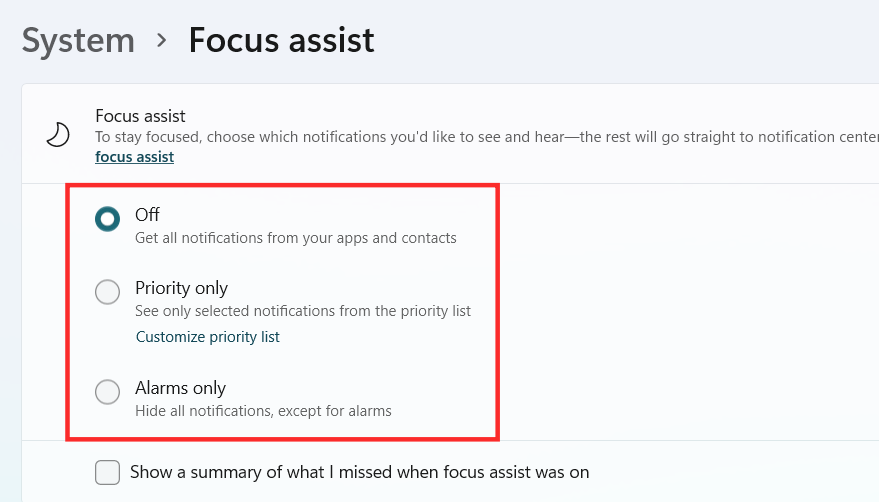
Focus Assist bi sada trebao biti omogućen u sustavu Windows 11, ovisno o izboru koji ste napravili.
Metoda #2: Korištenje akcijskog centra
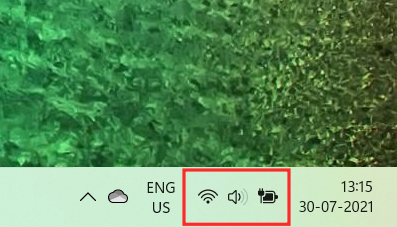
Kliknite na Akcijski centar koji prikazuje ikonu Wifi, glasnoća i baterija zajedno.
Odmah ispod Bluetooth ikone možete vidjeti ikonu Focus Assist koja izgleda kao polumjesec.
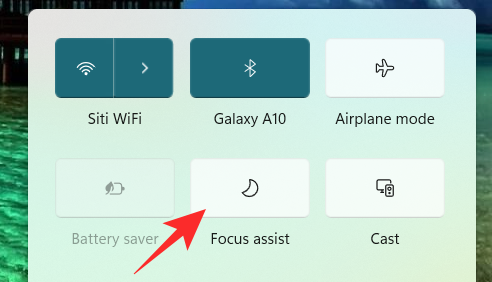
Prema zadanim postavkama, značajka Focus Assist bit će onemogućena. Kliknite na njega i značajka će se izravno postaviti na Samo prioritet .
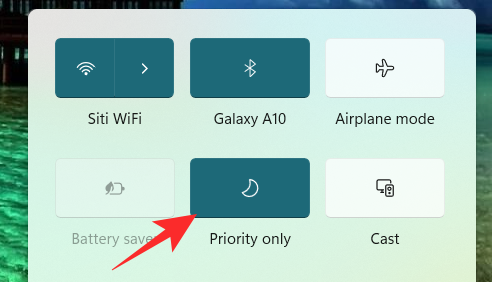
Ponovno kliknite na nju da biste funkciju Focus Assist postavili na Samo alarmi .
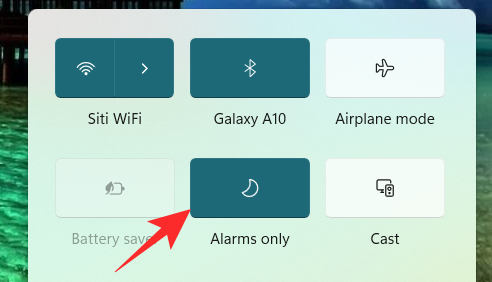
Da biste onemogućili značajku Focus Assist, ponovno je kliknite.
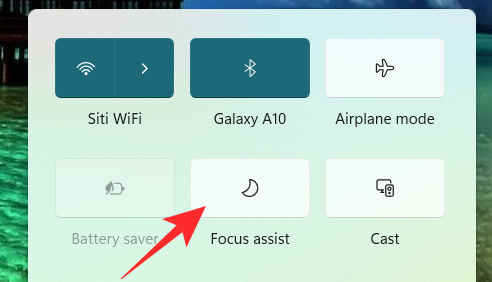
Samo klikom na ikonu Focus Assist na Akcijskom centru možete promijeniti njegovu funkciju na isključeno, samo prioritet i samo alarme. Međutim, da biste izvršili druge potrebne promjene u postavkama Focus Assist iz akcijskog centra, desnom tipkom miša kliknite ikonu Focus Assist u akcijskom centru i kliknite Idi na postavke .
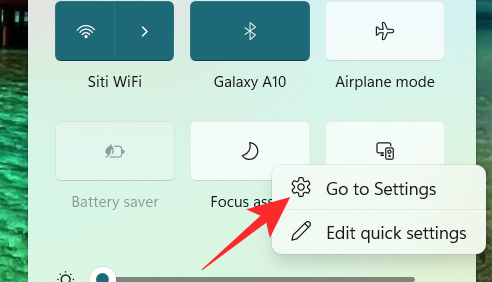
To će vas odvesti u aplikaciju Postavke gdje možete jednostavno izvršiti sve namjeravane promjene. I to je to! Pomoć pri fokusiranju sada bi trebala biti omogućena u sustavu Windows 11 izravno iz akcijskog centra.
Metoda #3: Korištenje uređivača grupnih pravila
Također možete omogućiti način rada za pomoć pri fokusiranju pomoću uređivača grupnih pravila u slučaju da ste administrator. Koristite vodič u nastavku koji će vam pomoći u procesu.
Pritisnite Windows + Rna tipkovnici i upišite sljedeće u dijaloški okvir Pokreni. Pritisnite enter na tipkovnici da otvorite uređivač grupnih pravila.
gpedit.msc
Dođite do sljedećeg čvora spomenutog u nastavku.
User configuration > Administrative Templates > Start Menu and Taskbar > Notifications
Pronađite i dvaput kliknite vrijednost "Isključi mirne sate" s desne strane.
Sada odaberite jednu od sljedećih opcija ovisno o vašim trenutnim potrebama u gornjem lijevom kutu prozora sa svojstvima.
I to je to! Pomoć pri fokusiranju sada će biti omogućena ili onemogućena u uređivaču grupnih pravila, ovisno o vašim željama. Nažalost, ne možete prilagoditi ponašanje Focus Assist kao administrator. Ta sposobnost još uvijek leži na korisniku. Možete omogućiti ili onemogućiti mogućnost korištenja Focus Assist za sustav samo pomoću uređivača pravila grupe.
Kako koristiti Focus Assist
Focus Assist ima različite postavke i mogućnosti prilagodbe koje vam mogu pomoći da promijenite njegovo ponašanje prema vašim trenutnim potrebama. Upotrijebite jedan od vodiča u nastavku koji najbolje odgovara vašim trenutnim zahtjevima.
Metoda #1: Omogućite način rada samo za alarme
Način rada Samo alarmi u prozoru Focus Assist omogućuje vam da sakrijete sve obavijesti osim alarma. Slijedite dolje navedene korake kako biste omogućili način rada samo za alarme.
Kliknite na ikonu Traži na programskoj traci.

Tip Focus Assist

Kliknite na Focus Assist .

Pod Focus Assist kliknite na Samo alarmi da prestanete primati obavijesti, osim alarma.
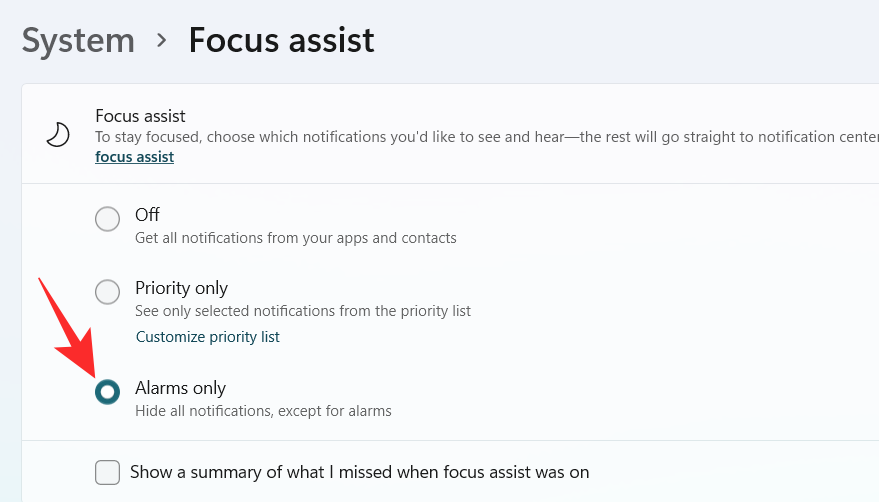
I to je to! Sada ćete biti informirani samo o alarmima na vašem sustavu. Sve ostale obavijesti bez obzira na njihov prioritet bit će utišane unutar Windows 11.
Metoda #2: Omogućite prioritet samo s prilagođenim popisom
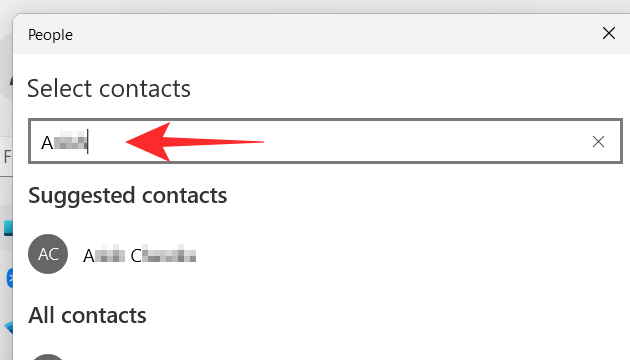
Na ekranu će se pojaviti prozor Ljudi . Odaberite željene osobe upisivanjem njihovih imena u traku za pretraživanje.
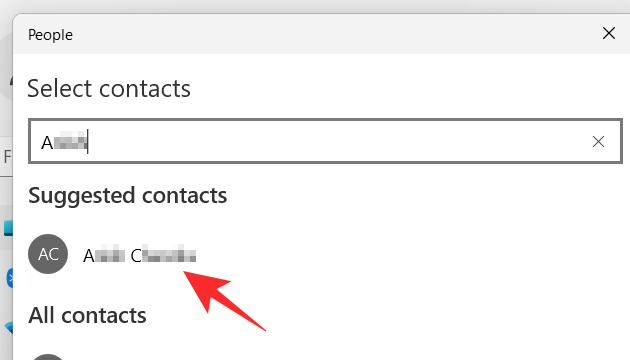
Kliknite na ime osobe.
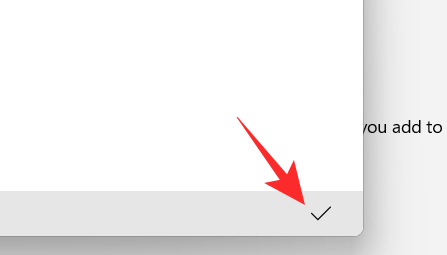
Kliknite na gumb za kvačicu u donjem desnom kutu prozora Ljudi.
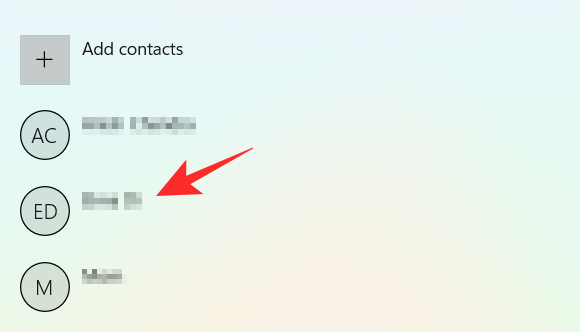
Vaš popis prioriteta je stvoren. Sada, ako želite ukloniti kontakt s popisa prioriteta, kliknite kontakt pod Osobe .
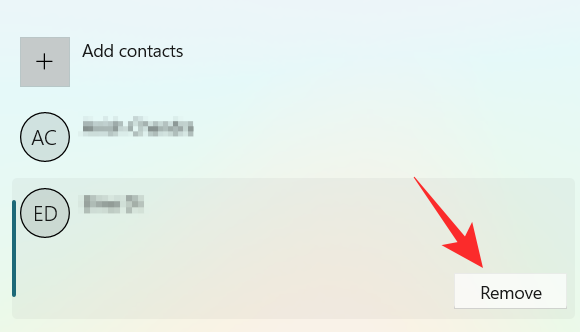
Kliknite na Ukloni .
Sada, u odjeljku Aplikacije , možete odabrati aplikacije koje mogu probiti vaše mirne sate. Da biste dopustili aplikacijama da prikazuju obavijesti, kliknite gumb Dodaj aplikaciju .
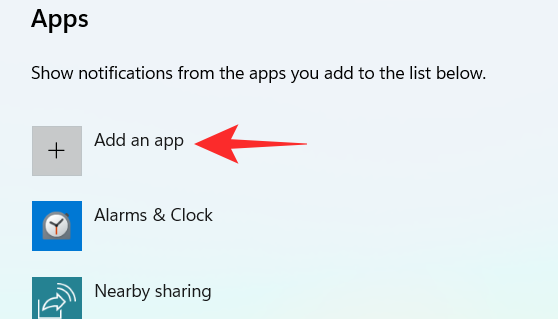
Na zaslonu se pojavljuje popis aplikacija. Kliknite na aplikaciju koju želite dodati na svoj popis prioriteta.
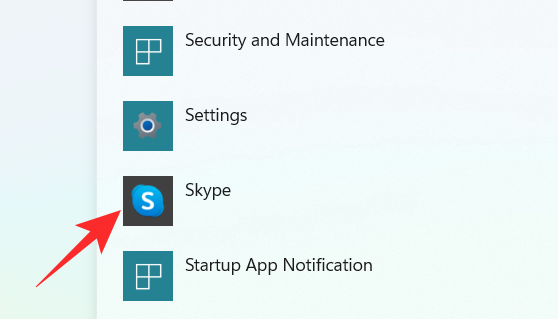
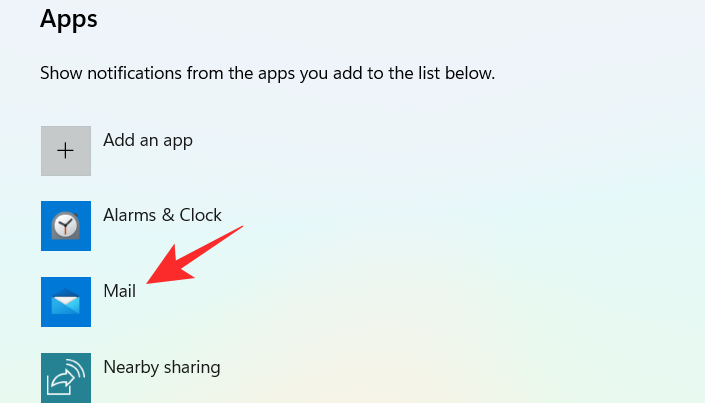
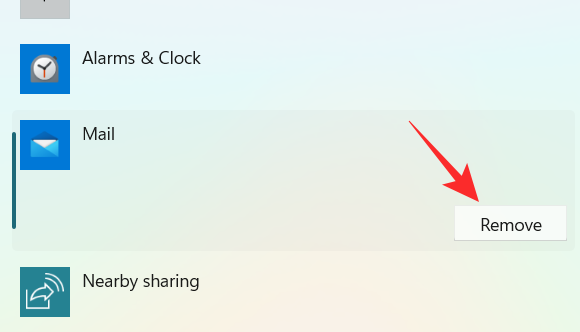
Nastavite s ovim postupkom dok ne završite s odabirom aplikacija. U slučaju da želite ukloniti aplikaciju s popisa prioriteta, jednostavno kliknite na aplikaciju u odjeljku Aplikacija .
Kliknite na Ukloni .
I tako možete prilagoditi popis prioriteta u Focus Assist-u i koristiti ga u svoju korist za primanje obavijesti samo od važnih kontakata.
Metoda br. 3: Omogućite sažetak obavijesti kada je pomoć za fokusiranje onemogućena
Kliknite na ikonu Traži na programskoj traci.

Tip Focus Assist

Kliknite na Focus Assist .

Kliknite na željenu opciju Samo prioritet ili Samo alarmi .
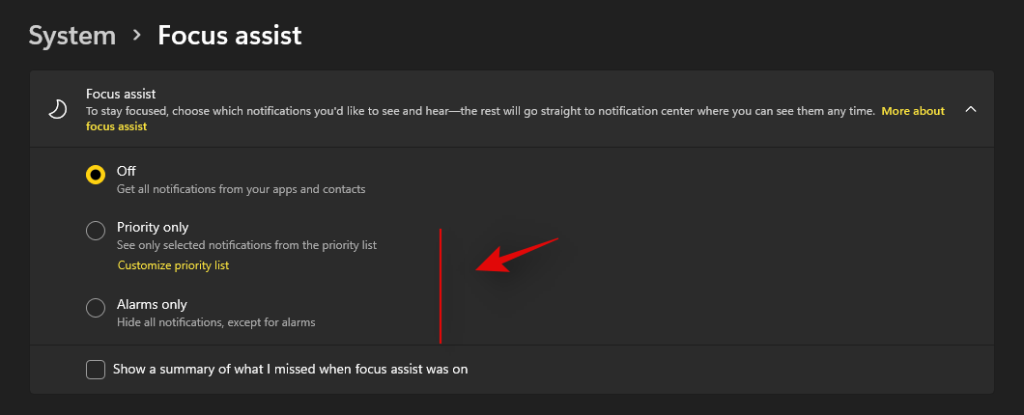
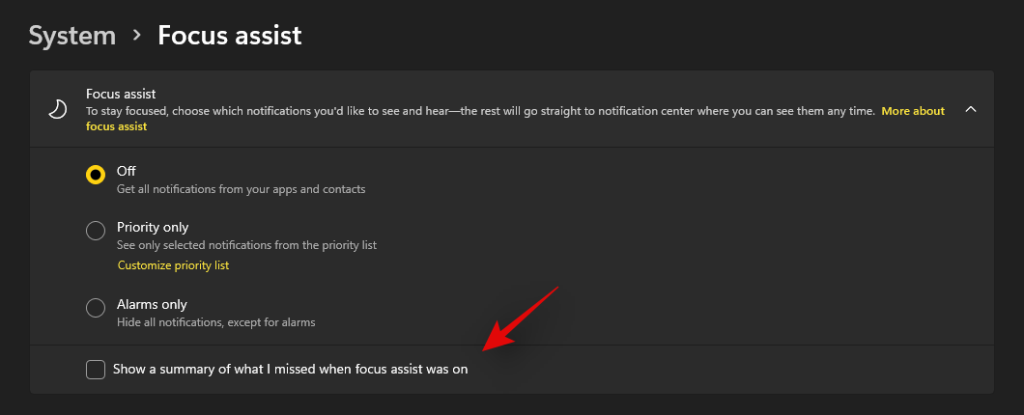
Označite okvir Prikaži sažetak onoga što sam propustio kada je bila uključena pomoć za fokusiranje .
Metoda #4: Omogućite ili onemogućite automatska pravila pomoći pri fokusiranju
The Automatic rules in Focus assist allow you to determine the conditions that can activate the Focus assist automatically. There are four different automatic rules in the Focus Assist settings window that can be customized. Check out the steps mentioned below to customize automatic rules in Focus assist.
Click on the Search icon on the taskbar.

Type Focus assist

Click on Focus Assist.

Under the Automatic rules section, there are four sections. Turn on the toggle switch for the option you want to choose.
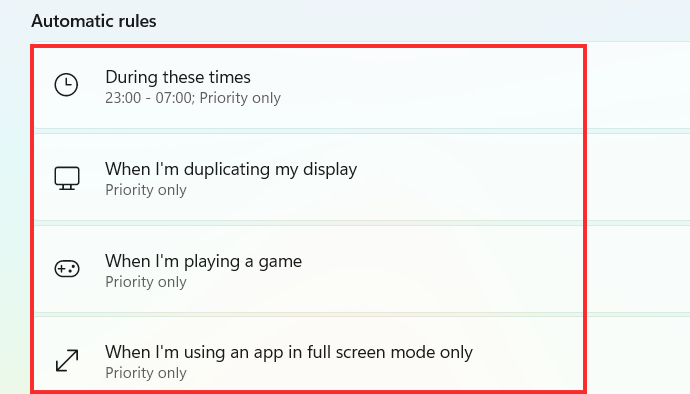
Now, let’s have a look at how to customize the above-mentioned options under Automatic rules.
1. During these times
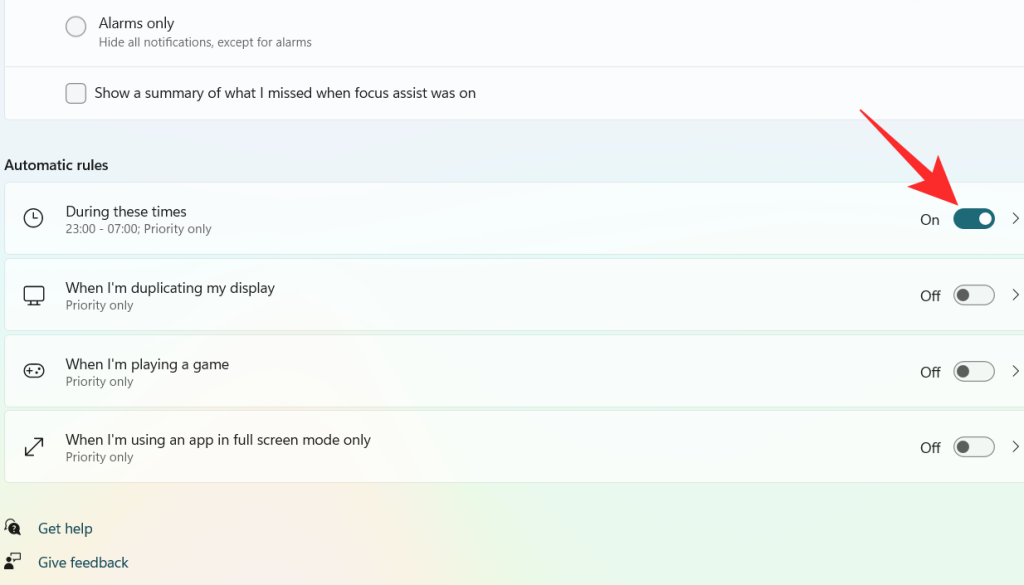
Turn on the toggle switch, which is extreme right to the During these times tab.
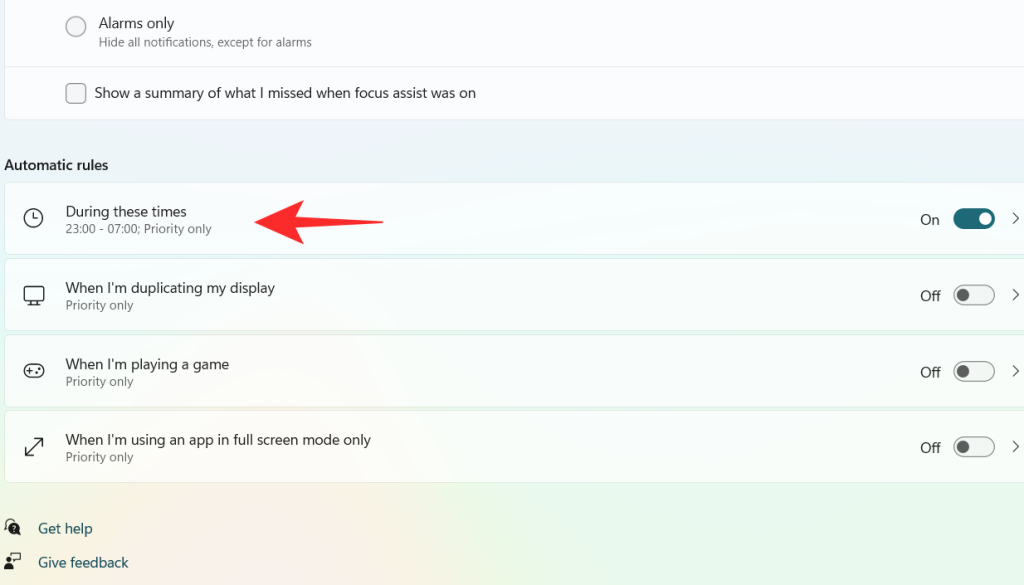
Click on the During these times tab.
Click on the box under Start time.
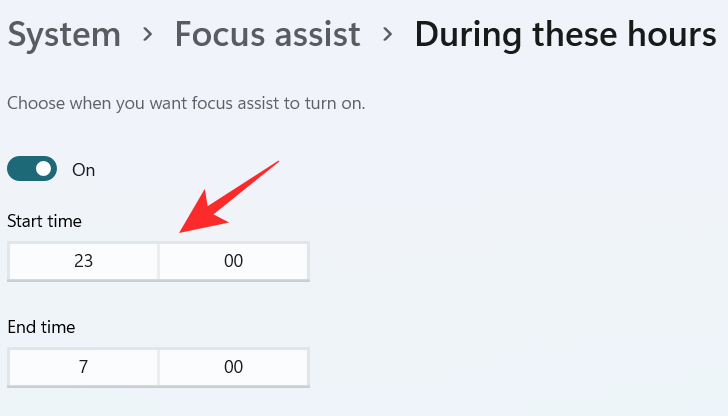
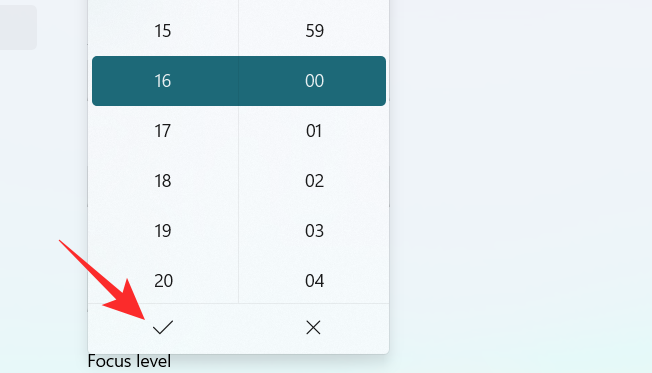
Select the time when you want the Focus Assist to turn on and click on the tick on the bottom of the dropdown menu.
Click on the box under End time.
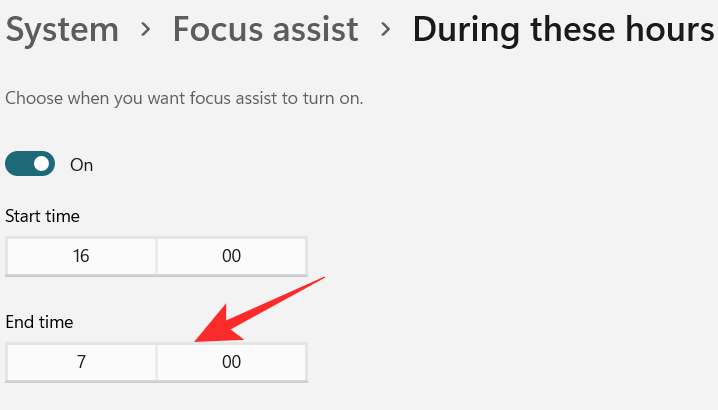
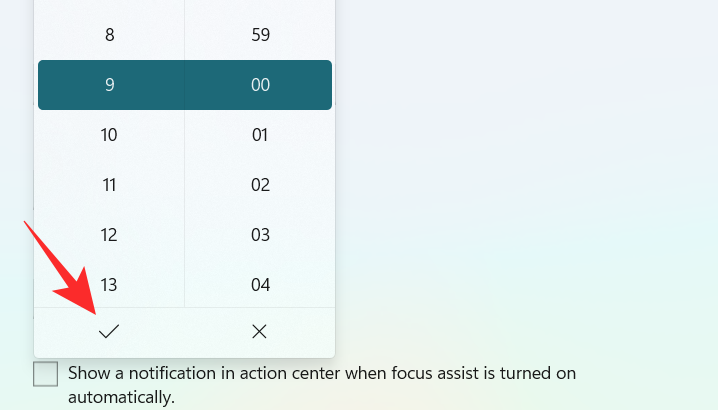
Select the time when you want the Focus Assist to turn off and click on the tick on the bottom of the dropdown menu.
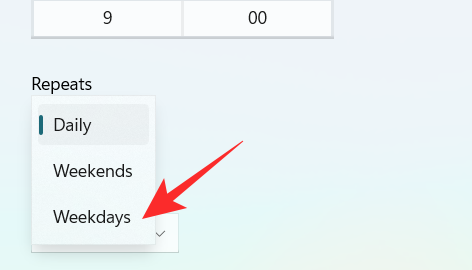
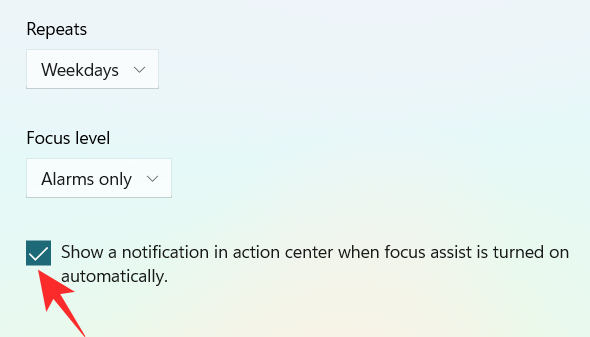
Click on the box under Repeats.
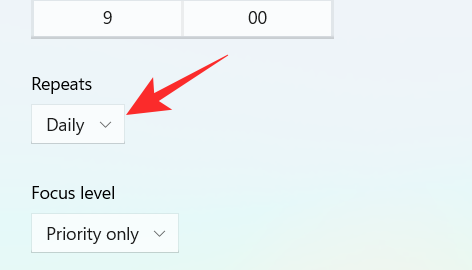
A small dropdown menu appears. Set the schedule to Daily, Weekends, or Weekdays.
Click on the box under Focus level.
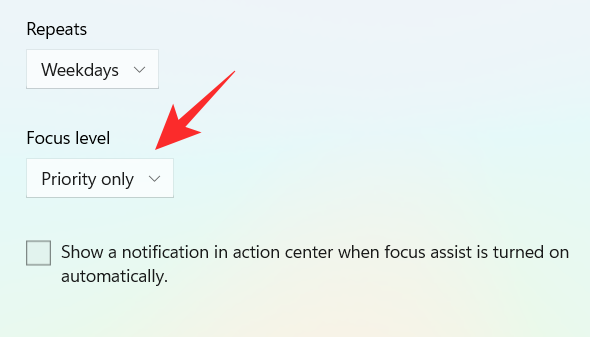
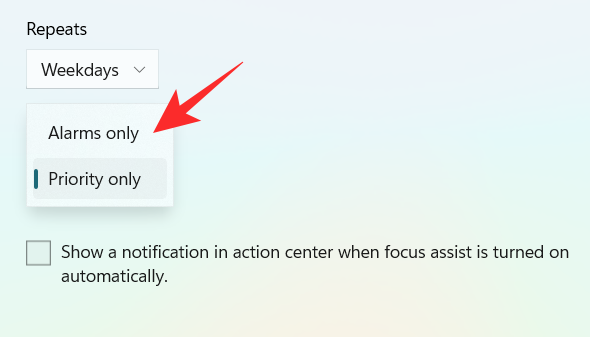
A small dropdown menu appears. Choose between Alarm only or Priority only.
Finally, to get a notification when the Focus assist is turned on, check the box “Show a notification in action center when Focus assist is turned on automatically“.
2. When I’m duplicating my display
Turn on the toggle switch, which is extreme right to the When I’m duplicating my display tab.
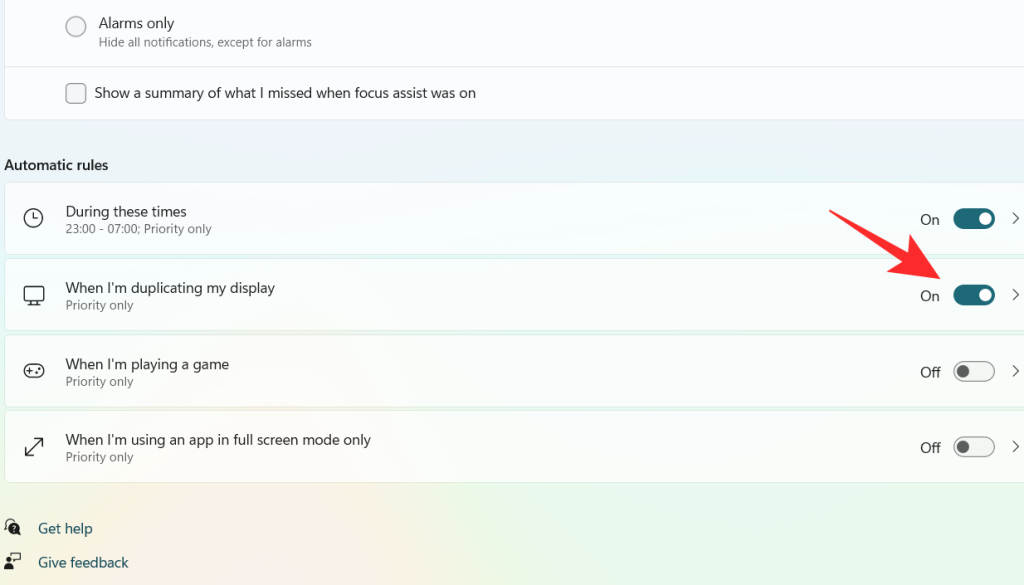
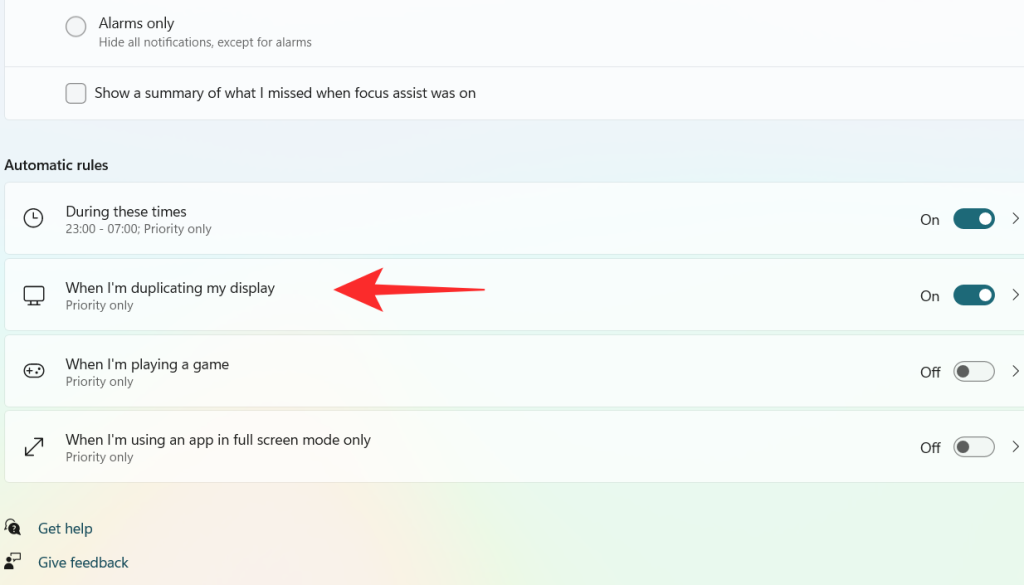
Click on the When I’m duplicating my display tab.
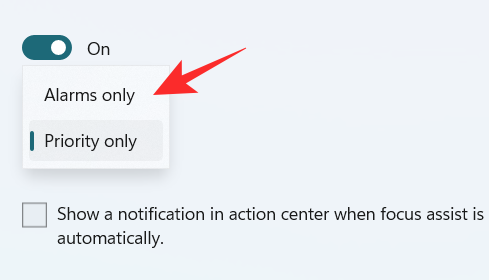
Click on the box under Focus level.
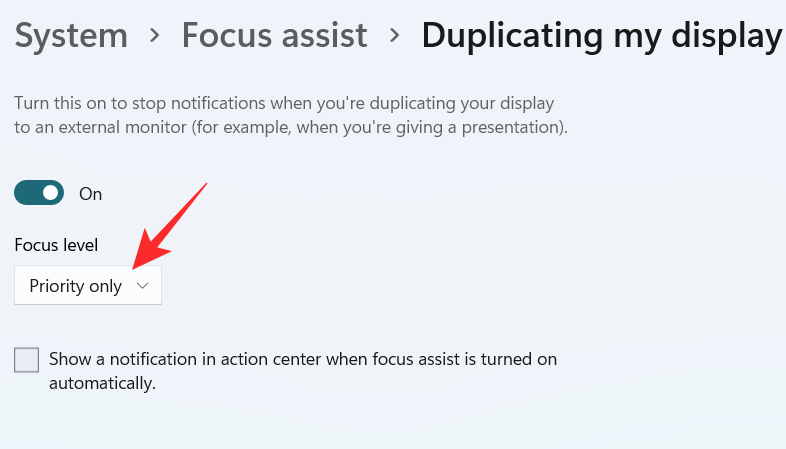
A dropdown menu appears, click on your desired option between Priority only and Alarms only.
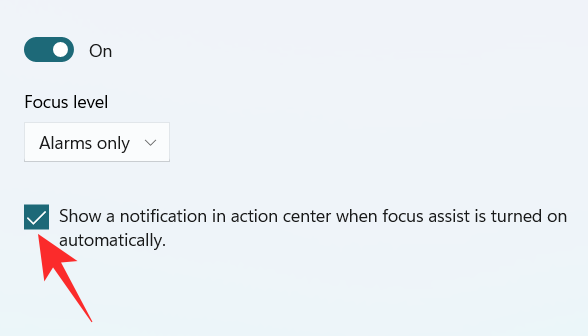
To get a notification when the Focus assist is turned on, check the box “Show a notification in action center when Focus assist is turned on automatically“
3. When I’m playing a game
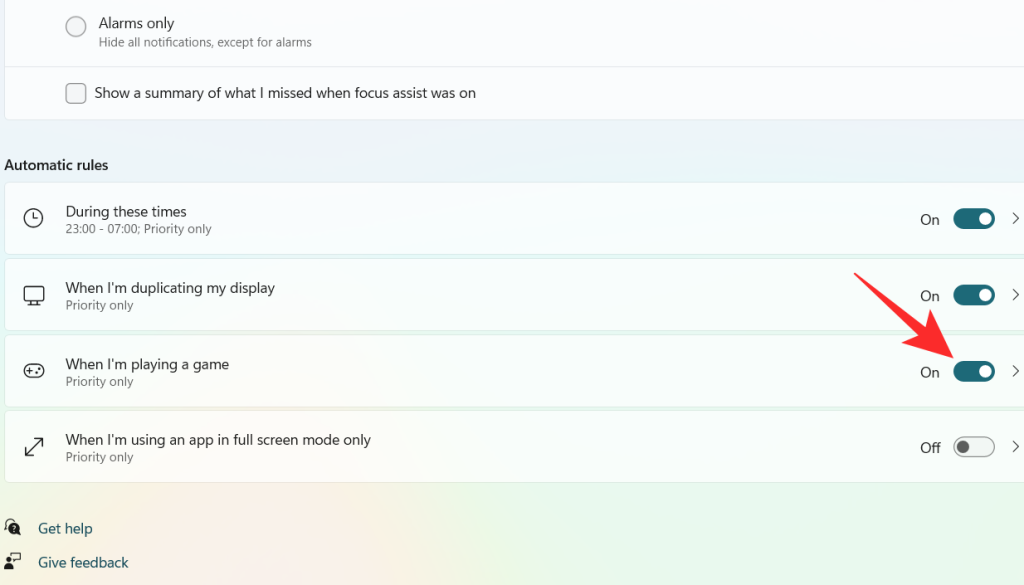
Turn on the toggle switch, which is extreme right to the When I’m playing a game tab.
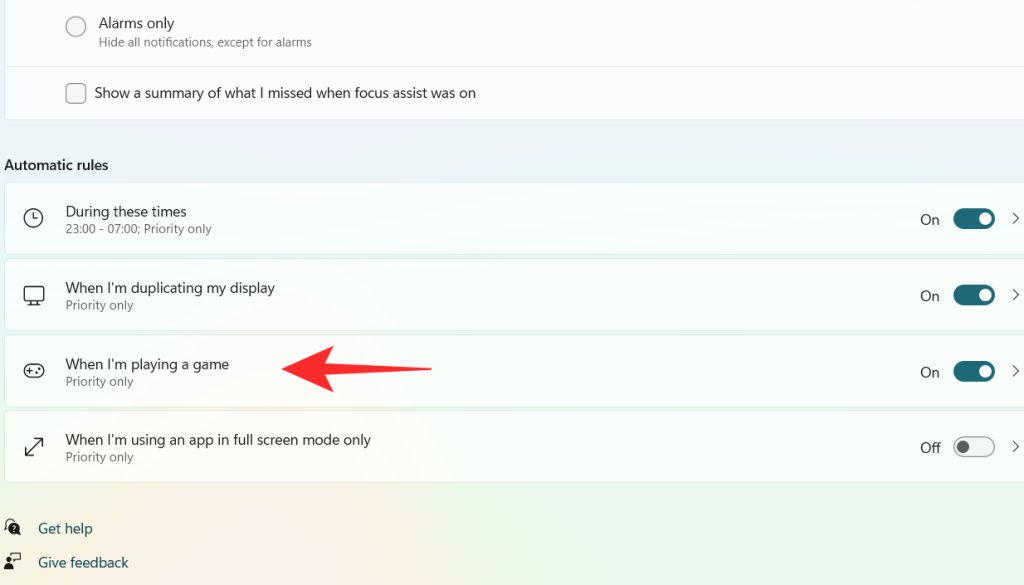
Click on the When I’m playing a game tab
Click on the box under Focus Level.
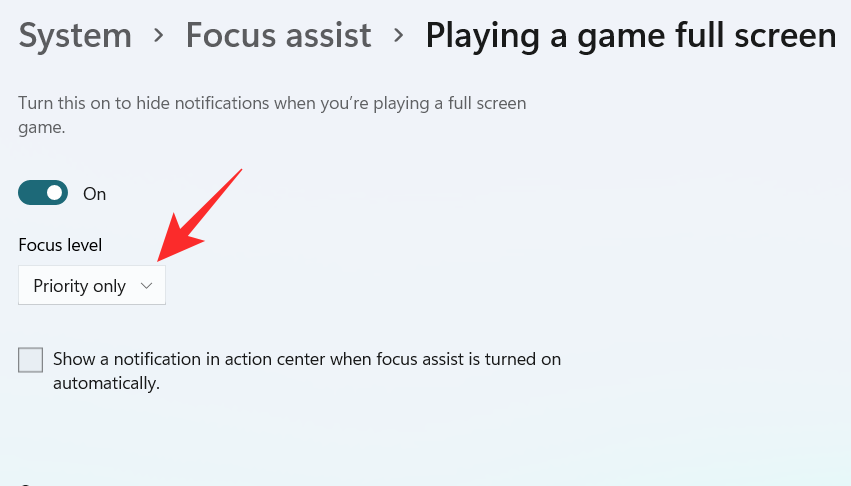
A dropdown menu appears, click on your desired option between Priority only and Alarms only.

To get a notification when the Focus assist is turned on, check the box “Show a notification in action center when Focus assist is turned on automatically“

4. When I’m using an app in full-screen mode only
Turn on the toggle switch, which is extreme right to the When I’m using an app in full-screen mode only tab.
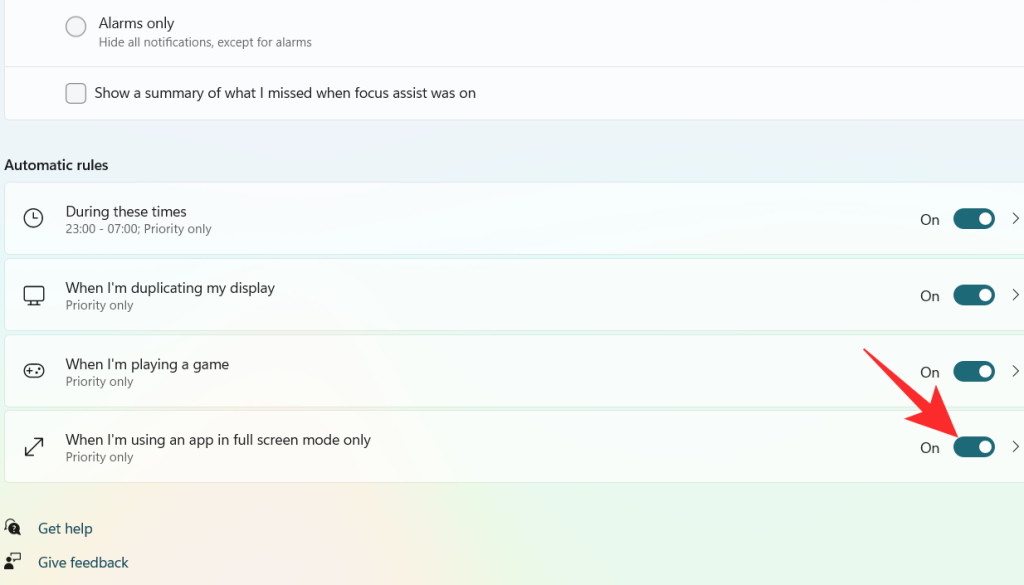
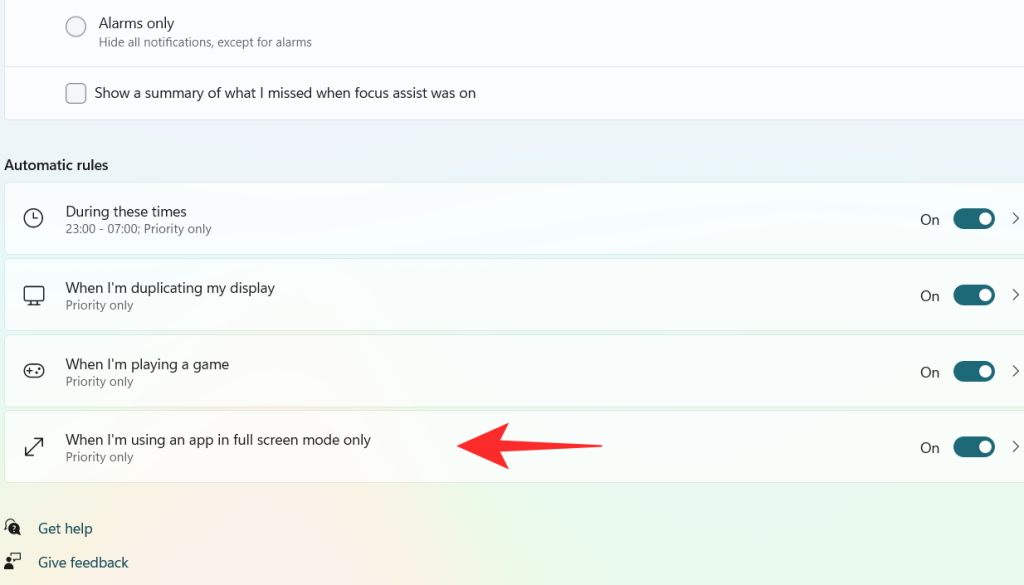
Click on the When I’m using an app in full-screen mode only tab
Click on the box under Focus Level.
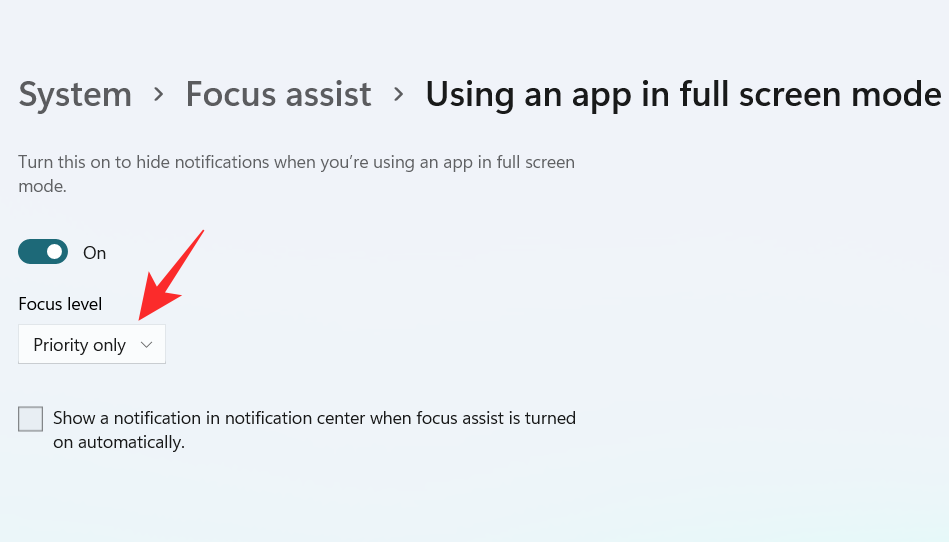
A dropdown menu appears, click on your desired option between Priority only and Alarms only.

To get a notification when the Focus assist is turned on, check the box “Show a notification in action center when Focus assist is turned on automatically“.

Using the above customizations, you can schedule and control Focus assist’s behavior according to your workflow for maximum efficiency no matter the task at hand.
Can you remove the Focus Assist icon from the Action Center?
Yes, you can easily remove the Focus Assist icon from the Action Center. Windows 11 brings a host of new cosmetic and UI changes and one of them has been the ability to customize your action center. You can now add or remove icons from the action center depending on your needs and opt for a more minimal or productive look depending on your workflow.
For now, you can only add and remove certain system modules but in the future, some users expect Microsoft to add the support for third-party apps as well. This would be a much welcome change that would allow you to manage dedicated system settings managed by third-party apps directly from your action center.
Customize your Focus assist icon in the action center
Depending on your current needs you can either remove or add the Focus assist module to the action center. Use one of the guides below depending on your current requirements.
1. Remove it
Click on the Action Center which shows the icon of Wifi, volume, and battery together.

Right-click on an empty place or on any icon and click on Edit quick settings.
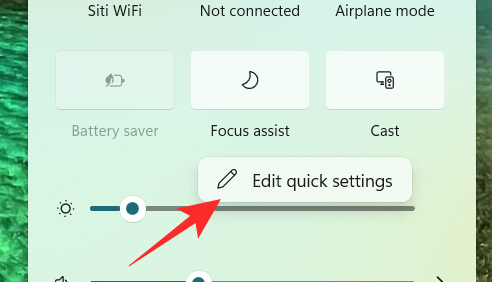
Click on the unpin symbol at the top right corner of the Focus Assist icon to remove the Focus Assist icon from the Action Center.
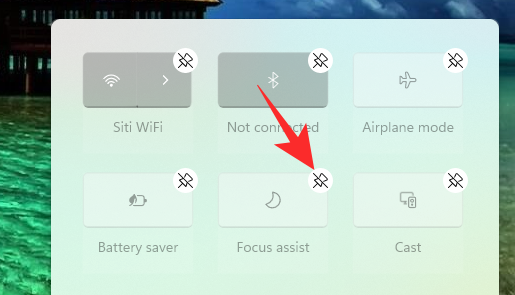
The Focus assist module should now have been removed from your action center. If not, we recommend you restart explorer.exe or your PC for the changes to take effect.
2. Restore it
Click on the Action Center which shows the icon of Wifi, volume, and battery together.

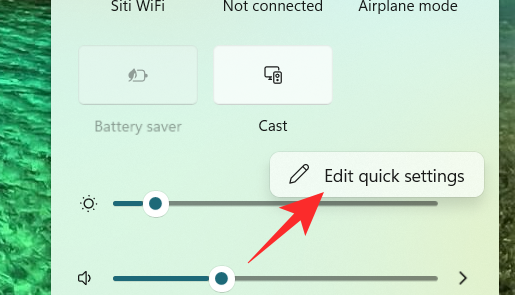
Right-click on an empty place or on any icon and click on Edit quick settings.
Now, click on the Add button at the bottom of the action center.
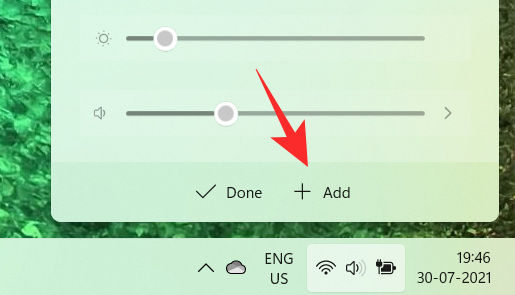
A list of different settings appears. Click on Focus Assist from the list and you will get to see the Focus Assist icon on the Action Center again.
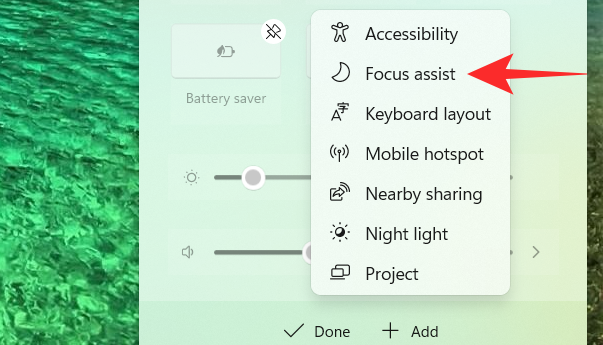
And that’s how you can add the Focus assist module back in the action center.
Focus assist keeps turning on automatically Issue: How to fix
If Focus assist keeps turning on automatically then there could be a couple of reasons for this behavior. Depending on its cause we can either fix it or use a workaround to manage the issue. Let’s find out why Focus assist keeps turning on automatically on your system.
Fix #1: Check Automatic Rules
Are you having this issue when projecting to a secondary display? Or when sharing your screen with a public computer? Then it is likely that focus assist is getting turned on automatically due to the default automatic rules in Windows 11.
By default, focus assist will silence all notifications in such scenarios to help maintain your privacy. But this can be counterproductive in case you are just trying to use a bigger display from a portable system like a laptop or an NUC.
It could also be that scheduled Focus assist was turned on your system by mistake which will enable and disable Focus assist automatically during certain hours. If any of these situations sounds like what you are facing then you can use the guide below to disable all automatic rules that enable Focus assist during certain scenarios and workflows on Windows 11. Let’s get started.
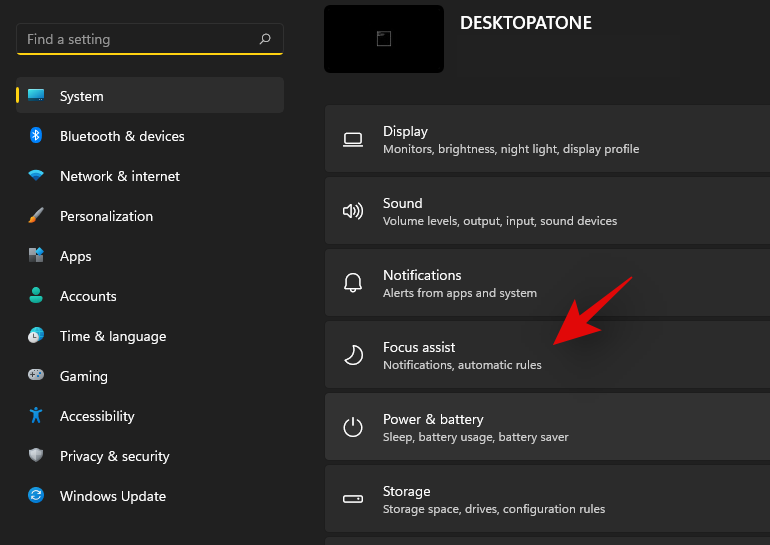
Press Windows + i on your keyboard to open the Settings app. Ensure ‘System’ is selected on your left and then click on ‘Focus Assist’ on your right.
Go down to automatic rules and turn off the following toggles.
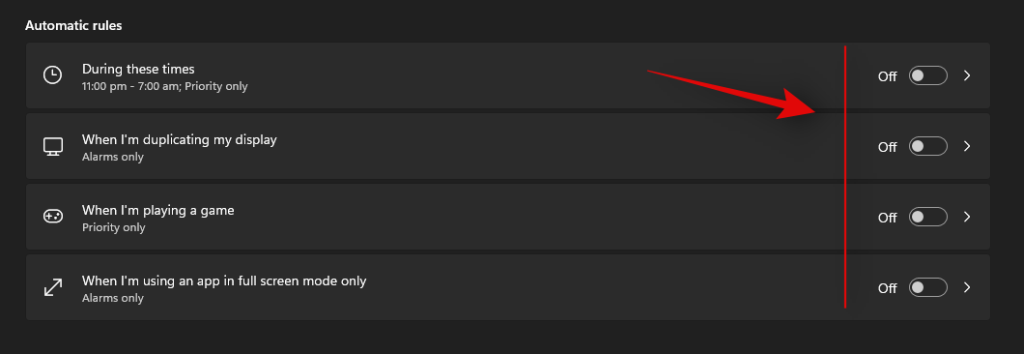
Once these rules are disabled, Windows 11 will not turn on Focus assist automatically on your system.
Fix #2: Turn of GeForce Overlay
This is another way to solve Focus assist misbehaving on your system. If you have a dGPU from Nvidia and are using the GeForce experience app then we recommend disabling its overlay option and restarting your system. With the automatic rule for ‘When I’m using an app in full-screen mode only’ turned on, Windows will mistake the Nvidia overlay detection on your desktop for a full-screen app which will trigger the Focus assist settings in return. You can also disable this automatic rule in case you wish to keep the Geforce Experience overlay enabled on your system.
Focus assist greyed out, option missing or not working; How to fix
Is the focus assist option missing from Windows 11 settings app? Is the module greyed out in the action center? This is a known bug that shows up occasionally with every feature update of Windows. Even certain versions of Windows 10 faced huge issues with this bug until a fix was released.
Fix #1: Enable in Group Policy Editor
If Focus assist seems to be missing from your system then it is likely disabled using the group policy editor. If your PC is managed by your organization or your workplace then it is likely disabled by your administrator. If you have access to the group policy editor then you can use the guide below to enable focus assist on your system. However, in case you have limited access, then you might need to get in touch with your administrator to enable Focus assist on your system.
Press Windows + R on your keyboard to bring up the Run dialog box and type in the following command to launch the Group Policy Editor. Click on ‘Ok’ once you are done.
gpedit.msc
Navigate to the following node.
User configuration > Administrative Templates > Start Menu and Taskbar > Notifications
Double click on ‘Turn off Quiet Hours’ on your right.
Click and select ‘Disabled’ in the top left corner.
Click on ‘Ok’ to save your changes.
And that’s it! Focus assist should now be enabled on your system in case it was disabled using the group policy editor.
Fix #2: Reinstall and repair default Windows UWP apps and system apps
If Focus assist is still missing from your system then let’s check if all the necessary apps and utilities are installed properly on your system. Use the guide below to check and repair Windows 11’s basic apps and functionality on your system.
Press Windows + S and search for PowerShell. Click on ‘Run as administrator’ once it shows up in your search results.
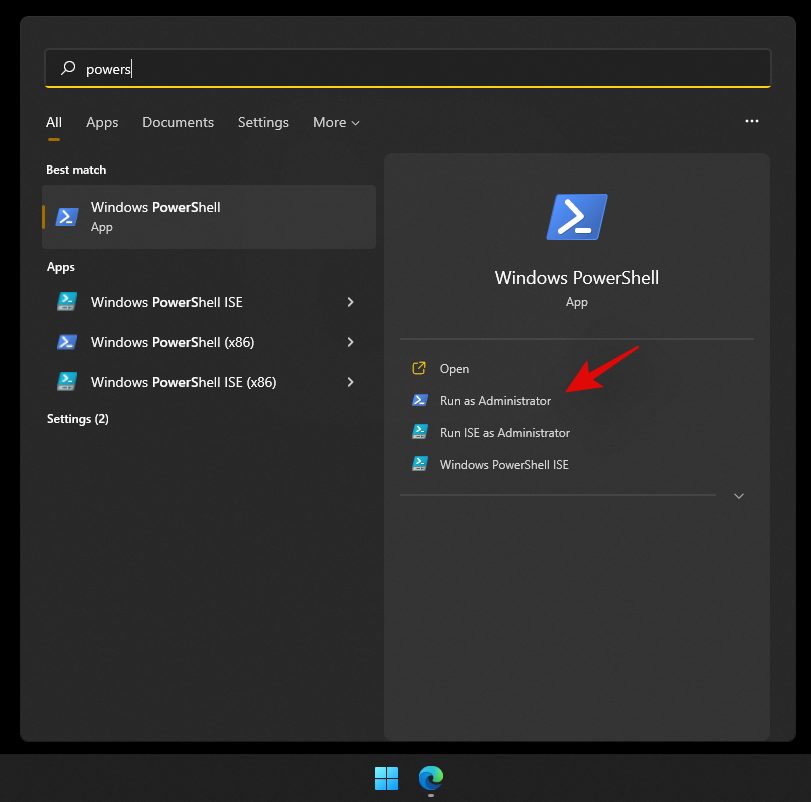
Once PowerShell is launched, execute the following command to reinstall all UWP apps and check and repair other default utilities required by Windows 11 in the background.
Get-AppXPackage -AllUsers | Foreach {Add-AppxPackage -DisableDevelopmentMode -Register "$ ($ _. InstallLocation) \ AppXManifest.xml"}

Wait for the process to finish and restart your PC for good measure. If Focus assist was corrupted or missing from your system, then this fix should help solve all your issues.
Fix #3: Check for a Windows Update
Haven’t updated in a while? We recommend checking for recent Windows Updates. While updates rarely disable major features like Focus assist, a new feature update installation can help refresh your registry, fix mismatched values and more importantly iron out bugs that could be preventing you from accessing Focus assist on your system. Use the guide below to check for recent Windows updates on your system.
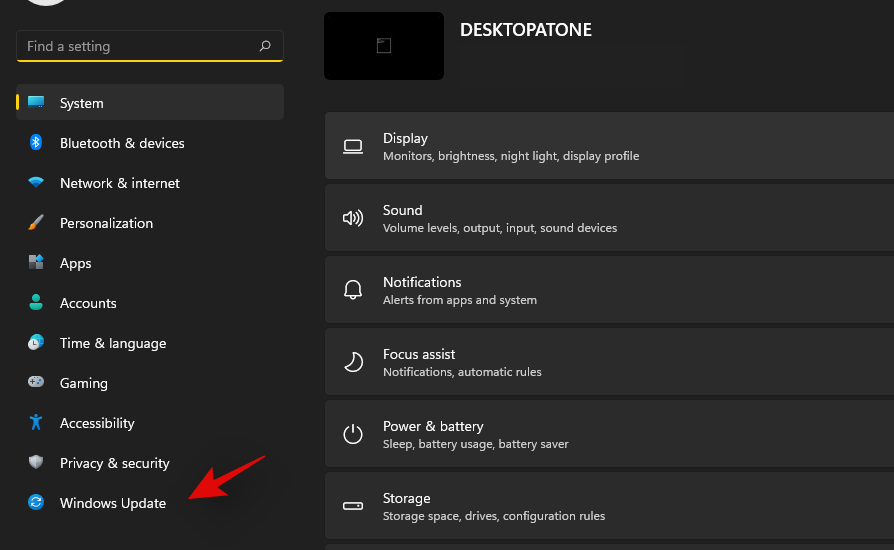
Press Windows + i on your keyboard to open the Settings app and click on ‘Windows Update’ on your left.
Click on ‘Check for updates’.

In case any new updates show up, let them install on your system and restart if prompted. In case you are using a metered connection then you will need to click on ‘Download now’ manually to avoid any unexpected data charges.
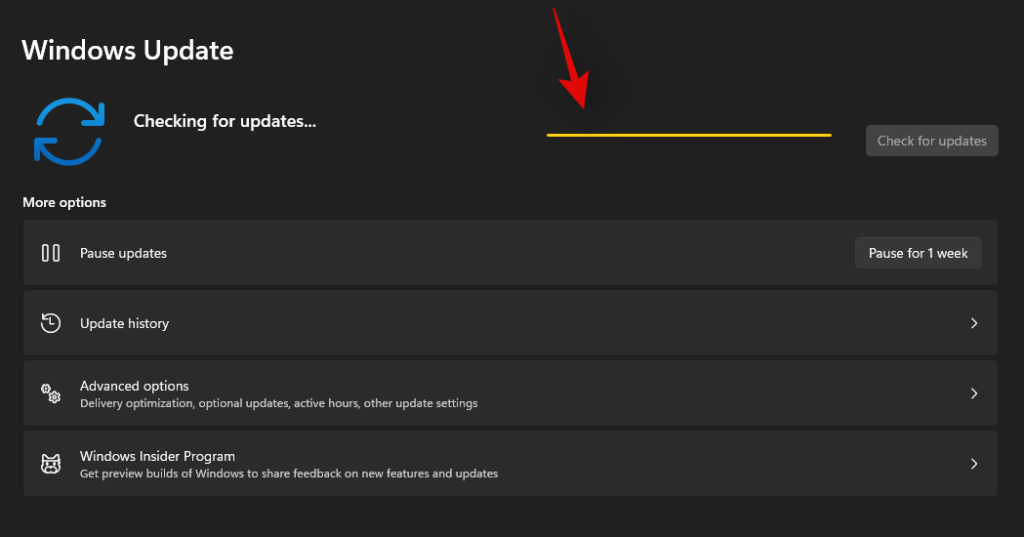
Once the necessary Windows updates are installed on your system, Focus assist should be restored in your action center and the Settings app.
Last Resort: Reset your PC
If Focus assist is still missing from your PC then this indicates a corrupted Windows installation on your system. The best way to fix this without wasting much time on troubleshooting would be to simply reset your PC while keeping all your files intact. This will refresh the entire Windows 11 installation and reinstall all the apps which should help restore functionality for all Windows features including Focus assist. Follow the guide below to reset your PC while keeping your files.
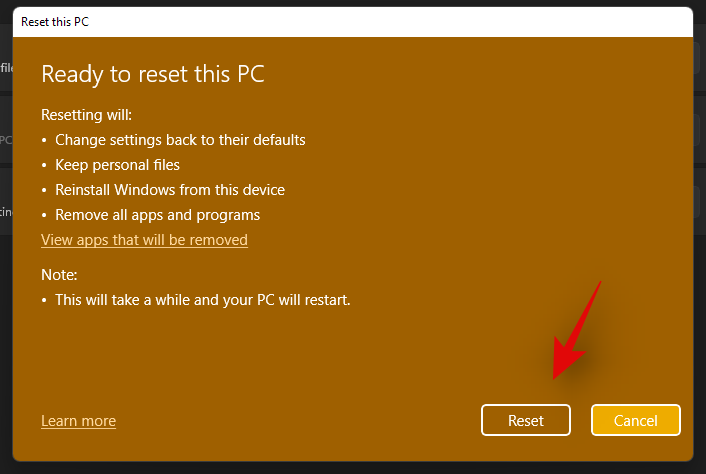
Note: The reset process will remove all installed applications and only retain files stored manually on your local storage. A list of all the removed apps will be available in .txt format on your desktop once your PC has been reset.
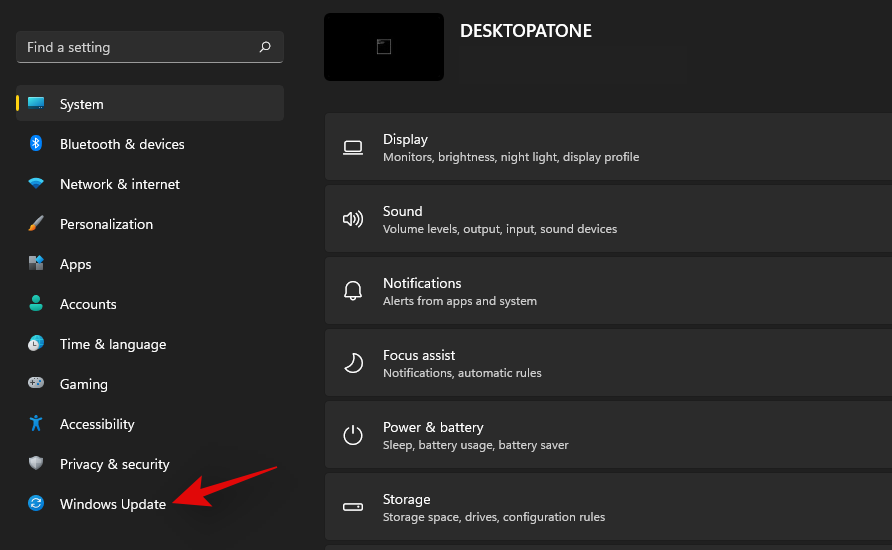
Press Windows + i on your keyboard and click on ‘Windows Update’ on your left.
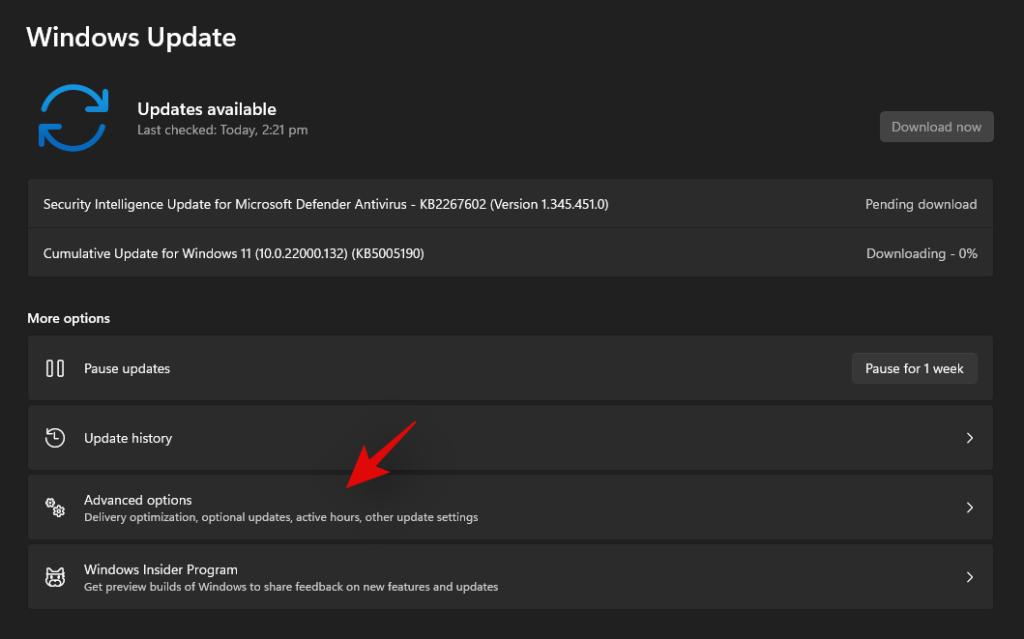
Click on ‘Advanced options’.
Click and select ‘Recovery’.
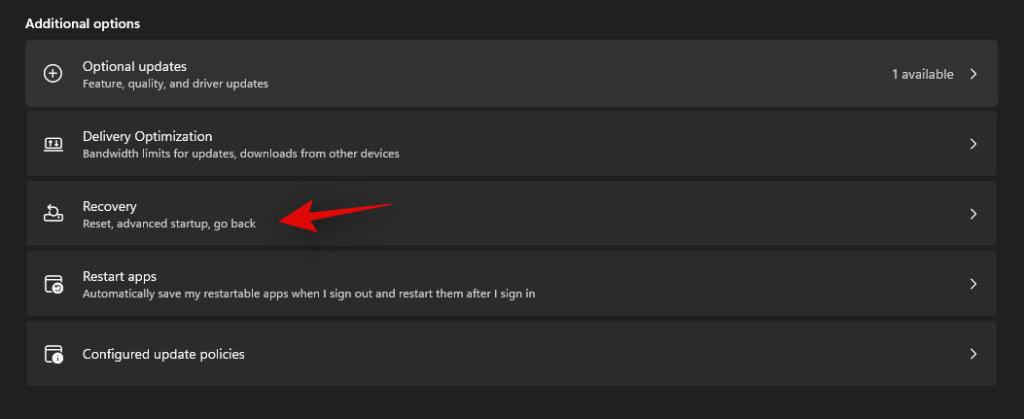
Click on ‘Reset PC’ beside Reset this PC.

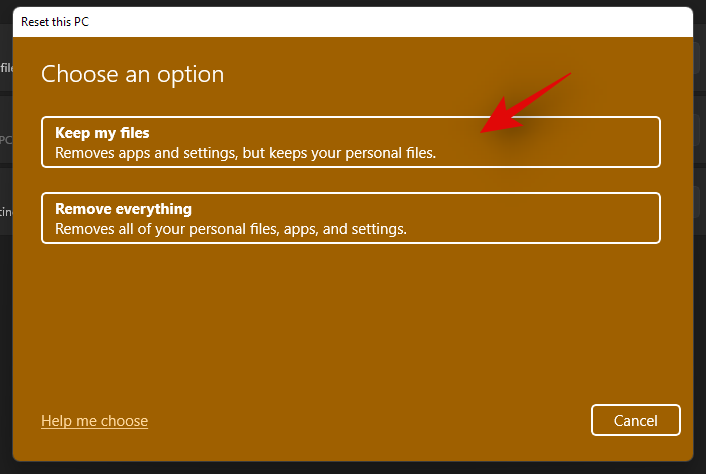
Click on ‘Keep my files’.
Windows will now process all the files on your local storage. Click on ‘Reset’.
Note: If you are using Windows 11 Pro or higher then you will get the option to use a local installation/recovery media to reinstall Windows 11 as well. However, this option will be missing for Windows 11 Home users.
Windows will now reset your PC while retaining all your files. Your PC will restart several times during this process. This is completely normal and you should let Windows do its thing. If you are using a laptop or a portable NUC, then ensure that your unit is plugged into the power at all times during this process.
How to turn off Focus assist permanently
Do you wish to turn off Focus assist permanently in all scenarios? Then you can use the guide below to do so. The best way to disable Focus assist is by using the group policy editor. But in case you are using Windows 11 Home Edition, then you can use the first method in this guide to disable Focus assist permanently.
Method #1: Disable all settings and rules
Once you disable all the settings and rules for Focus assist, the feature should be turned off automatically on your system. Use the guide below to get you started.
Press Windows + i on your keyboard to open the Settings app and click on ‘Focus assist’ on your right.

Click and select ‘Off’ at the top.
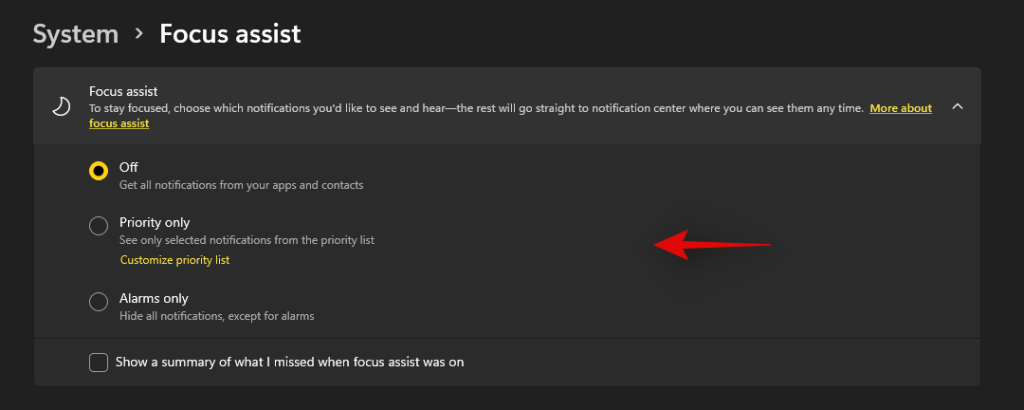
Uncheck the box for ‘Show a summary of what I missed when focus assist was on’.

Subsequently, disable all the toggles under ‘Automatic rules’ as shown below.

We also recommend turning off notifications for unnecessary apps using the guide after this section to avoid unnecessary notifications from interrupting you when focus assist is disabled.
Method #2: Using Group Policy Editor
The group policy editor will permanently disable focus assist on your system and even prevent you from accessing it in your settings. However, this method will only work on Windows 11 Pro or higher versions. In case you have the Windows 11 home edition, you can use the guide above to disable Focus assist instead.
Press Windows + R and type in the following to open Froup Policy EDitor. Click on ‘Ok’ once done.
gpedit.msc
Navigate to the following node.
User configuration > Administrative Templates > Start Menu and Taskbar > Notifications
Find and double-click on ‘Turn on Quiet Hours’ on your right.
Select ‘Enabled’ in the top left and click on ‘Ok’.
Focus assist will now be permanently disabled on the selected system. We recommend you restart your system or explorer.exe in case the changes do not take place immediately.
Is there any other way to disable notifications?
Yes, you can disable notifications individually on a per-app basis in Windows 11 to customize the notifications you receive. This is another way to ensure that you are only notified about the apps and notifications that you intended. Customizing your notifications this way will also allow you to retain the full functionality of the focus assist mode without having to disable certain rules to avoid mismatched scenarios in your workflow.
However, the only downside to managing your notifications this way is that you have to keep enabling and disabling notifications for apps every few months depending on your new installs and uninstalls. You can use the guide below to disable notifications on a per-app basis in Windows 11.
Disable notifications permanently on a per-app basis
Here’s how you can disable notifications on a per-app basis in Windows 11.
Press Windows + i on your keyboard to open the Settings app and then click on ‘Notifications’ on your right.
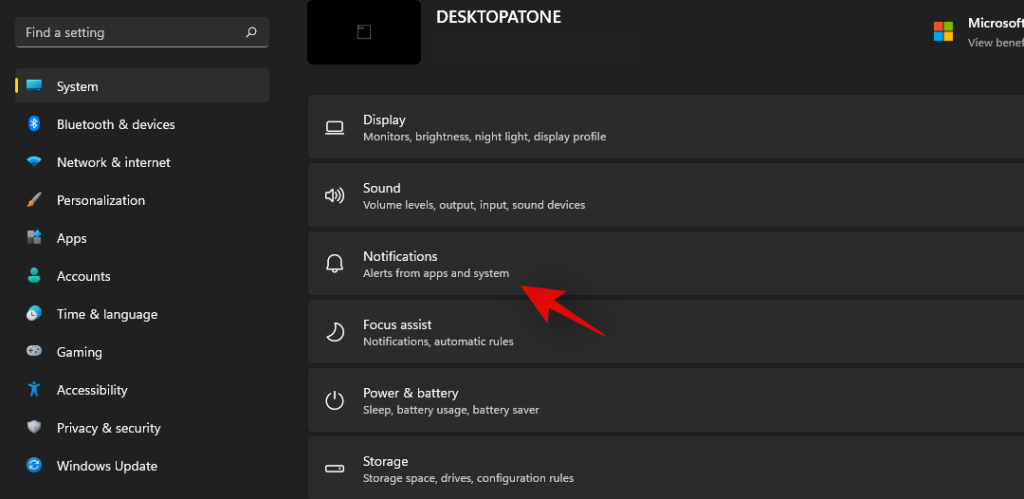
You will now get a list of all the apps that have the permission to deliver notifications on your system. Scroll the list to find the necessary apps and turn off the toggle beside them to disable notifications.
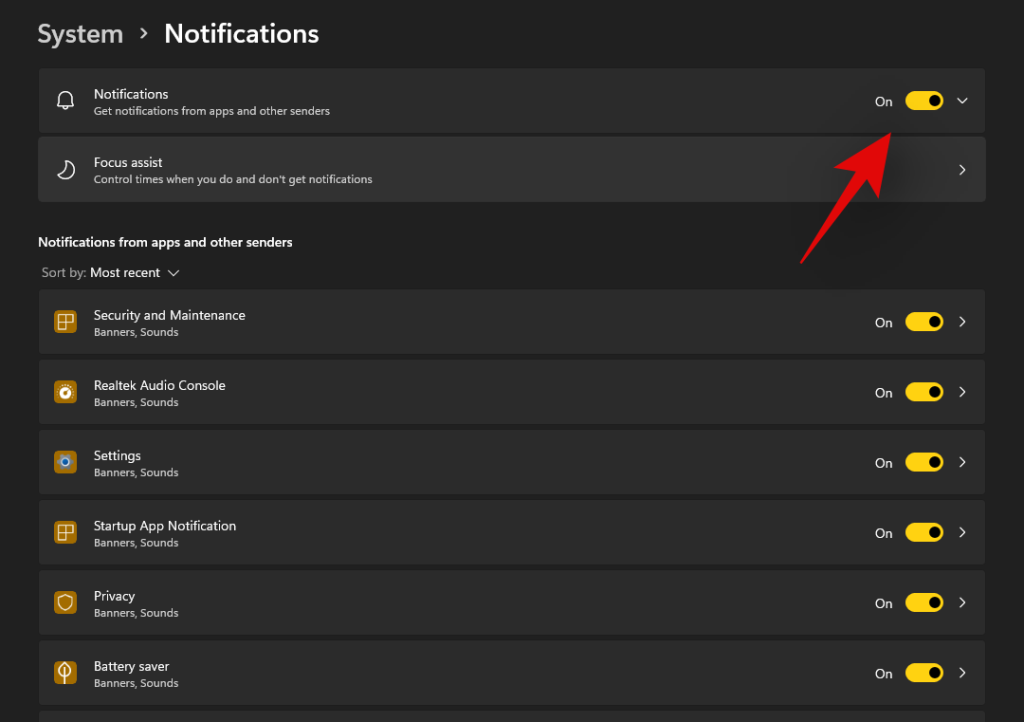
Repeat the steps above for all the intended apps to disable notifications.
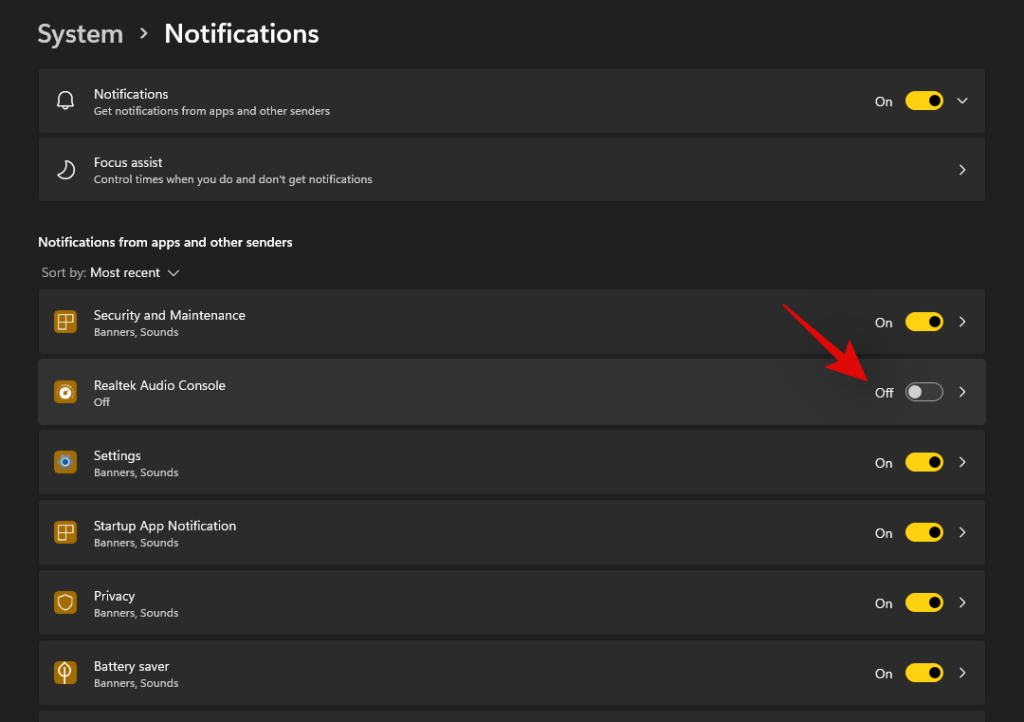
Close the Settings app and notifications for the selected apps should now be permanently disabled on your system.
Can you customize notifications in Windows 11?
Well, not exactly. Windows 11 currently has very limited options when it comes to customizing your notifications. You can not change the look, behavior, or color palette of your notifications without changing the accent color of your overall UI. However, you can customize the way your notifications sound. You can set a nice quiet notification sound that does not interrupt your workflow or opt for a quirky take that makes for a few good laughs each time you get a notification. The choice is completely up to you. Use the guide below to customize your Windows 11 notification sounds.
Required
Guide
Let’s start by first placing the .wav file in a compatible media folder so that you can set it as your default notification sound in Windows 11. Navigate to the concerned .wav file and copy it to your clipboard.
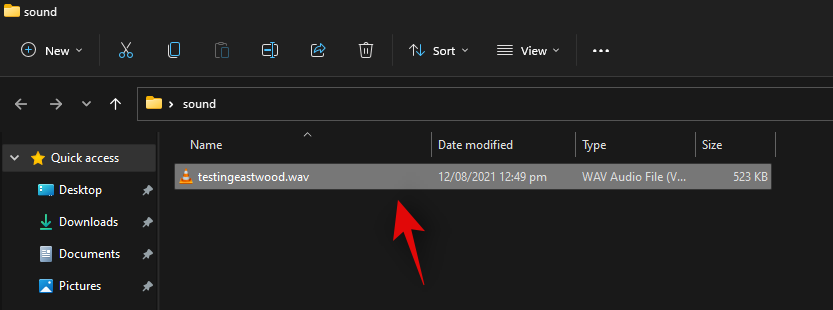
Now navigate to the following path given below. Paste your .wav file in this location. Click on ‘Continue’ when you will be prompted for administrator permission.
C:\Windows\media
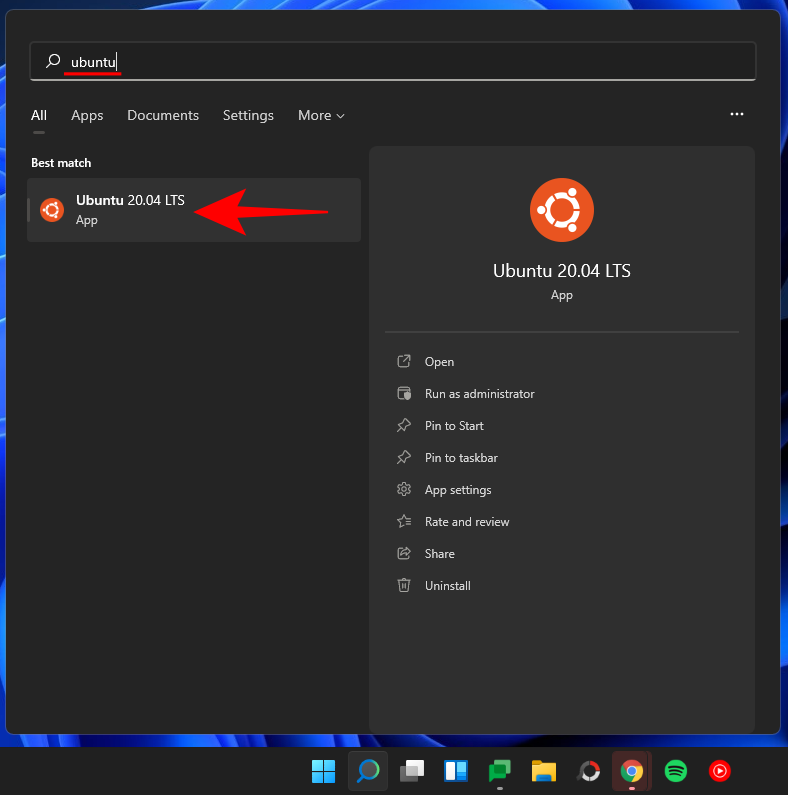
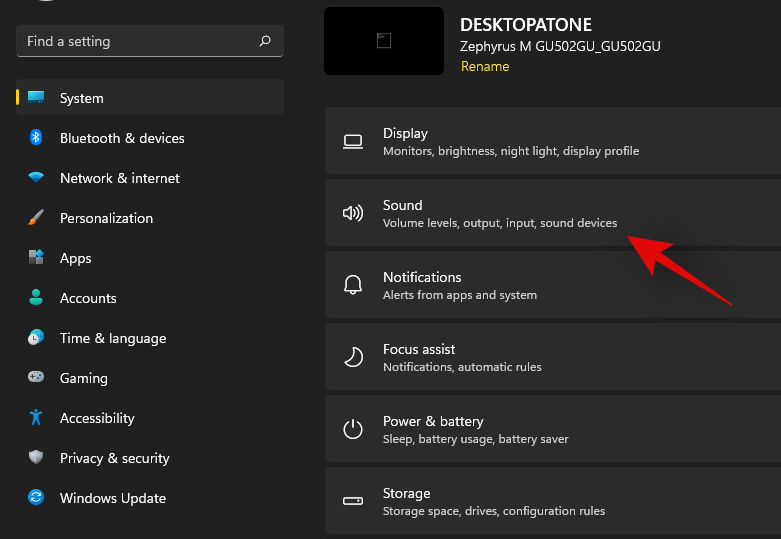
We can now use the .wav file as our default notification sound. Press Windows + i on your keyboard to open the Settings app and then click on ‘Sound’ on your right.
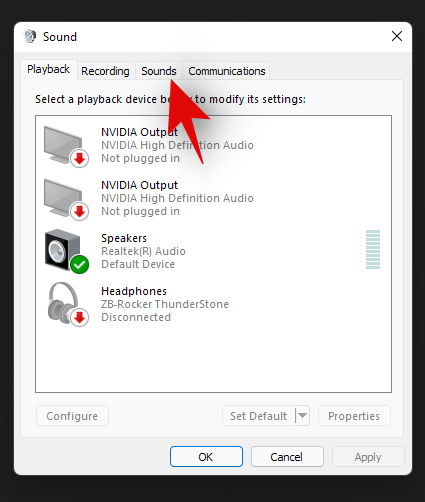
Scroll to the bottom and click on ‘More sound settings’.

Click and switch to the ‘Sounds’ tab at the top.
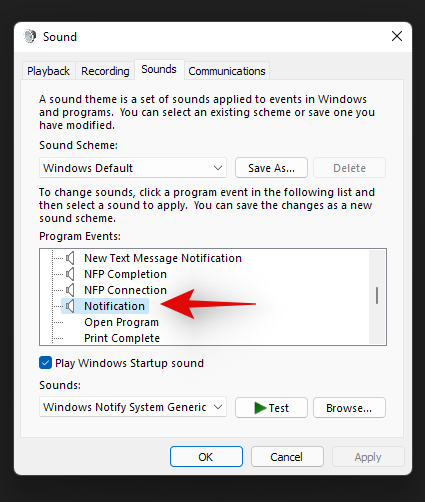
Under ‘Program Events’ scroll the list and find ‘Notifications’. Click on ‘Notifications’ to select it.
Now click on the drop-down arrow under Sounds and select the .wav file we pasted in the Media folder.
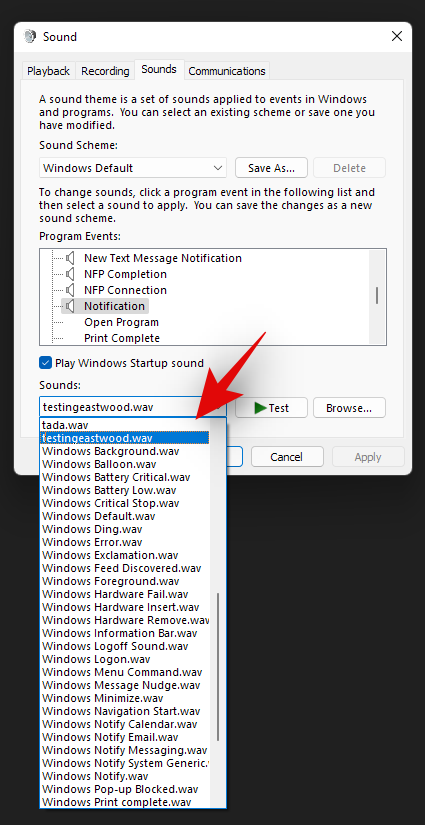
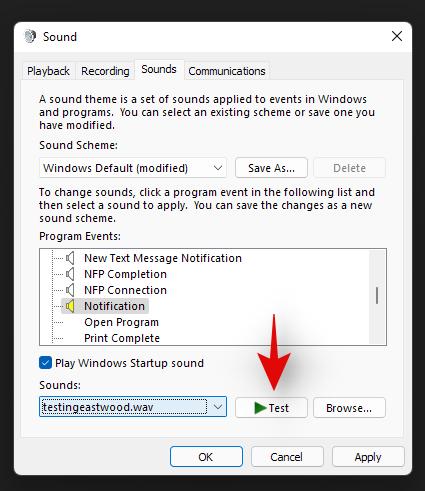
You can click on ‘Test’ to test your custom notification sound.
Click on ‘Ok’ to save your changes.
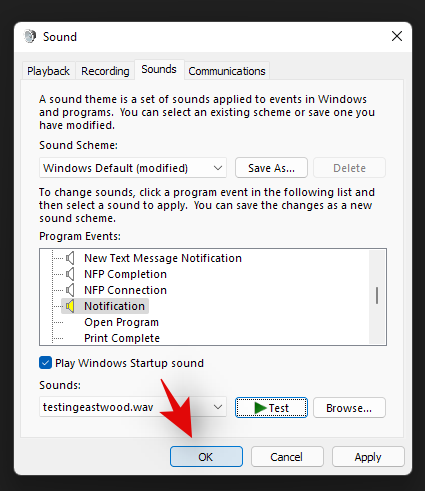
And that’s it! You will now have set a custom sound as your default notification sound in Windows 11.
Distractions from notifications are a huge problem especially when you are into some important work. Using the steps mentioned above, now, you can easily get rid of unnecessary notifications and work peacefully with full concentration.
Related:
Ovaj vodič pokazuje kako proslijediti SMS poruku s Android uređaja koristeći Google Messaging aplikaciju.
Ovaj vodič će vam pokazati kako izbrisati fotografije i videozapise s Facebooka koristeći PC, Android ili iOS uređaj.
Snimke zaslona su najbolji način za snimanje zaslona u sustavu Windows 11. Otkrijte različite metode korištenja Print Screen, Snip & Sketch i više!
Saznajte kako promijeniti boju trake zadataka u sustavu Windows 11 pomoću jednostavnih metoda. Prilagodite izgled svog radnog prostora korištenjem postavki sustava i alata treće strane.
U ovom vodiču saznajte kako promijeniti pozadinu na Windows 11 koristeći razne metode. Idealno za korisnike svih razina.
Microsoft Teams jedna je od najistaknutijih platformi za video konferencije za tvrtke u današnjem dobu pandemije. U ovom vodiču naučite kako blokirati kontakte i upravljati komunikacijom u Microsoft Teamsu.
Ako se pitate gdje je "Moje računalo" u sustavu Windows 11, ovaj vodič će vam pružiti sve potrebne informacije i korake za povratak njegove ikone na radnu površinu.
Tijekom posljednjih mjesec dana gotovo sve sposobne organizacije i obrazovne institucije zatražile su pomoć raznih softvera za video pozive. Saznajte koliko podataka koristi Zoom i kako smanjiti korištenje podataka.
Upravljački programi uređaja pomažu u ispravljanju grešaka, stvaranju i poboljšanju kompatibilnosti perifernih uređaja i komponenti s trenutnim i novim ažuriranjima OS-a.
Za one koji koriste Windows, upravljačka ploča je suputnik kroz godine. Ovaj članak nudi 9 načina za otvaranje upravljačke ploče u sustavu Windows 11.
Saznajte kako jednostavno staviti profilnu sliku umjesto videa na Zoomu, za vrijeme sastanaka ili unaprijed. Ovo uključuje korake za PC i mobilne uređaje.
Zoom je jedna od najpopularnijih aplikacija za daljinsku suradnju. Uslugu koriste mnoge tvrtke tijekom ovog vremena izolacije, a velike su šanse da ako radite od kuće onda...
Windows 11 je pušten javnosti, a Microsoft je izdao novog personaliziranog pomoćnika koji će vam pomoći da se uključite. Windows 11 donosi brojne promjene uključujući mogućnost instaliranja…
Microsoft Teams nudi vam mogućnost upravljanja i suradnje s više timova istovremeno iz udobnosti vašeg kauča. To vam omogućuje da s lakoćom upravljate velikim projektima na daljinu dok…
Microsoft Teams jedan je od široko korištenih alata za suradnju s više od 20 milijuna aktivnih korisnika dnevno. Usluga nudi značajke poput razmjene trenutnih poruka, video i audio konferencija, datoteka...
Najnovija iteracija sustava Windows sve je što su tehnološki entuzijasti željeli da bude. Od bolje kompatibilnosti aplikacija do prekrasnog korisničkog sučelja, ima puno toga za sliniti. Ali postoji…
U slučaju da Windows Search koristi iznimno visoke resurse procesora ili diska, tada možete koristiti sljedeće metode rješavanja problema u sustavu Windows 11. Metode za rješavanje problema uključuju jednostavnije metode...
Nova aplikacija Fotografije za Windows 11 bila je dobrim dijelom dobrodošao dodatak. Dolazi s obnovljenim korisničkim sučeljem, novim Video Editorom s ogromnom bibliotekom efekata, novim korisničkim sučeljem za uvoz i integracijom…
20. veljače 2021.: Google je sada blokirao sva proširenja za Meet koja su pomogla s prikazom mreže, uključujući ona navedena u nastavku. Ova proširenja više ne rade i čini se da je jedina alternativa…
Windows 11 Insider Build pušten je u divljinu i privlači veliku pozornost obožavatelja i kritičara. Novi dizajn općenito je ugodan oku, ali ima nekoliko elemenata koji…
Mučite se s frustrirajućom petljom upita za lozinku za Outlook u sustavu Windows 11? Otkrijte provjerena, detaljna rješenja kako biste ponovno preuzeli kontrolu nad svojom e-poštom bez beskrajnih skočnih prozora. Ažurirano s najnovijim rješenjima za besprijekornu produktivnost.
Otkrijte pouzdane izvore za kupnju legalnog ključa za Windows 11 Pro u 2026. godini. Dobijte stručne savjete o izbjegavanju krivotvorina, osiguravanju originalnih licenci i uživanju u aktivaciji bez problema za vrhunsku produktivnost.
Mučite se sa strašnom greškom "Iznimka sistemske niti nije obrađena" u sustavu Windows 11? Ovaj sveobuhvatni vodič vodi vas kroz provjerena rješenja, od osnovnih ponovnih pokretanja do naprednih ažuriranja upravljačkih programa, kako bi vaše računalo ponovno radilo glatko. Recite zbogom frustrirajućim plavim ekranima!
Mučite se s kašnjenjem unosa u preglednicima na Windowsima 11? Otkrijte provjerena rješenja za uklanjanje kašnjenja, poboljšanje odziva i uživanje u besprijekornom surfanju webom. Detaljna rješenja unutra.
Imate problema s greškom "Odabrani disk je GPT stila particije" tijekom instalacije sustava Windows? Otkrijte provjerena rješenja kako biste bez napora riješili ovaj problem s GPT-om u odnosu na MBR i pokrenite svoj sustav i pokrenite ga glatko.
Otkrijte kako bez napora omogućiti način rada za razvojne programere u sustavu Windows 11. Ovaj sveobuhvatni vodič vodi vas kroz korake, prednosti i savjete za otključavanje naprednih značajki za razvojne programere i napredne korisnike.
Imate problema s izgubljenim aktivacijskim ključem za Windows 11? Otkrijte najbolje načine za njegov brz i jednostavan oporavak, štedeći vam vrijeme i gnjavažu. Uključeni su detaljni vodiči za jednostavnu ponovnu aktivaciju.
Mučite se s frustrirajućom greškom upravljačkog programa filtra registra sustava Windows 11? Otkrijte provjerena, detaljna rješenja kako biste je brzo ispravili i ponovno omogućili nesmetan rad sustava. Nije potrebno tehničko znanje!
Otkrijte kako koristiti glasovno tipkanje u sustavu Windows 11 za dokumente kako biste povećali produktivnost. Detaljan vodič za postavljanje, savjete i napredne značajke za besprijekorno diktiranje.
Imate problema s nedostatkom uređaja za skeniranje otiska prsta u sustavu Windows 11? Otkrijte provjerena, detaljna rješenja za jednostavno vraćanje biometrijske prijave. Vratite se sigurnom otključavanju otiskom prsta u tren oka.

