A maioría das personalizacións do teu PC pódense facer desde Windows, pero só se pode acceder a determinadas funcións desde a BIOS, como a virtualización, o overclock (nalgúns casos), o contrasinal de inicio e moito máis. Máis importante aínda, a prioridade de arranque do teu PC só se pode xestionar desde o BIOS, o que é fundamental para Windows 11. Pero, e se cambiaches algo no BIOS recentemente sen ter en conta coidadosamente e agora non podes cambialo de novo? Ou peor aínda, o teu PC non se está a iniciar en absoluto debido a ese cambio parvo.
Non te preocupes, temos a solución para ti.
Pero antes de mencionar os pasos para restablecer a BIOS á configuración de fábrica, vexamos o que é realmente a BIOS e por que debería restablecela.
Contidos
Que é a BIOS?
Usados indistintamente, BIOS ou UEFI é unha peza de software crítica para un PC, xa que se encarga de garantir que todos os compoñentes estean en estado funcional antes de que se inicie o sistema operativo. Ademais, contén varias opcións para xestionar todo o hardware do teu PC, como os portos USB, a cámara web integrada, os ventiladores, os discos duros e moito máis.
A BIOS entra en acción xusto despois de premer o botón de acendido e unha vez que probou todos os compoñentes nun ambiente previo ao arranque, carga o sistema operativo e entrégalle o control.
Por que deberías restablecer a BIOS?
Algúns dos motivos polos que é posible que necesites restablecer a BIOS implican desfacer os cambios recentes nel, como revertir o menú de inicio ao seu estado orixinal, cambiar do modo Legacy, activar o arranque seguro ou incluso eliminar o contrasinal de inicio (o máis común). razón de todo). Ademais, os seguintes motivos tamén poden obrigar a alguén a restablecer a súa BIOS.
- Cambios de tensión incorrectos
- Valores de overclock incompatibles
- Os novos compoñentes de hardware non se recoñecen.
- Os valores da BIOS non se gardan a pesar de facer varios cambios.
- Sen sinal de visualización
- O cambio automático entre iGPU e dGPU non funciona.
- Corrixe os erros do código postal cun sistema preconstruído.
De calquera xeito, sen importar o motivo polo que queres restablecer a túa BIOS, aquí tes os distintos métodos para restablecer a BIOS no teu PC.
Método # 1: Manteña premido o botón de acendido
Esta é unha función integrada na maioría dos sistemas modernos para axudarche a saír das situacións difíciles e das configuracións do BIOS que seguen provocando un bucle de arranque. Se o teu PC ou portátil comprou nos últimos 5 anos, é probable que tamén teñas esta función. Manter premido o botón de acendido durante máis de 10 segundos debería axudarche a restablecer o teu BIOS automaticamente. Esta é unha función de seguridade que che axuda a saír das configuracións defectuosas que acaban provocando un bucle de arranque no teu sistema.
Os bucles de arranque causados pola configuración da BIOS tamén se poden resolver mediante este método, xa que restablecerá a BIOS automaticamente, o que en primeiro lugar non requiriría que arrinque a BIOS. Non obstante, teña en conta que este seguro está deseñado para reverter os valores de voltaxe e overclock e non restablecer o contrasinal da BIOS. Se estás tentando restablecer o teu BIOS porque esqueciches o teu contrasinal, este método non che servirá de nada.
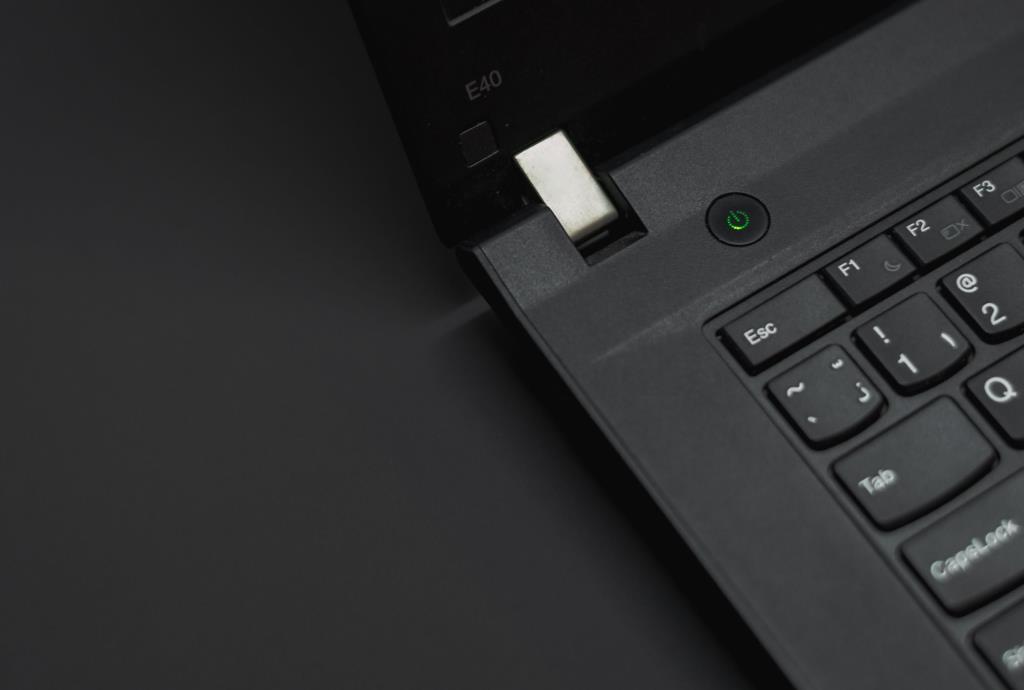
Mantén premido o botón de acendido do teu sistema durante máis de 10 segundos. Se usas un portátil, cárgueo e manteña premido o botón de acendido ata que se apaguen as luces de carga. Solta o botón de acendido unha vez feito. O portátil debería comezar a cargarse de novo.
Isto indica que a BIOS restableceuse no teu sistema. Non obstante, se estás nun sistema de escritorio, terás que confiar na pantalla da túa placa base (se existe). Ademais, recomendámosche que consultes o teu sitio web de soporte OEM para restablecer o teu BIOS. A combinación de teclas para restablecer o teu BIOS pode variar lixeiramente dependendo do teu fabricante.
Método #2: restablece desde a BIOS
Se podes entrar na BIOS sen problemas, podes restablecer a BIOS usando a opción "Cargar valores predeterminados da configuración". Algúns ordenadores poden incluso chamalo "Restablecer valores predeterminados" ou "Configurar valores predeterminados", ou algo semellante, dependendo do fabricante. Redacción diferente, mesmo resultado.
Mentres continúa, asegúrese de que o seu PC estea conectado á toma de corrente.
Aquí tes como podes restablecer a túa BIOS usando este método.
Opción 1: Acceda á BIOS desde o escritorio
Mentres estea en Windows, toque a Wintecla e faga clic na icona "Poder". Manteña premida a tecla Maiús e fai clic na opción "Reiniciar".
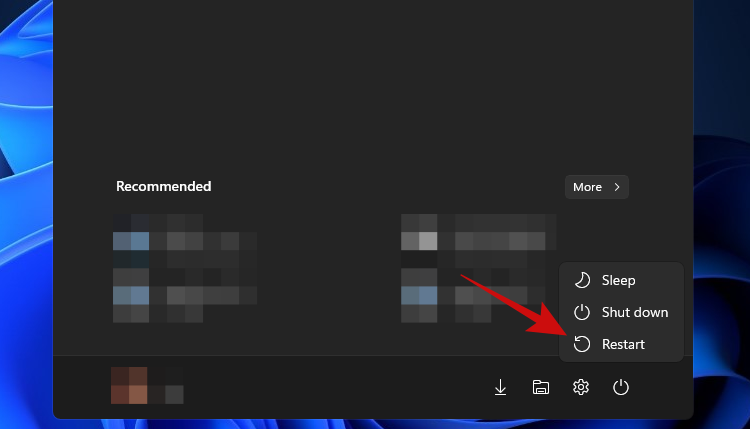
Como alternativa, tamén deberías poder acceder á pantalla de Inicio avanzado desde a aplicación Configuración > Actualización de Windows > Opcións avanzadas > Recuperación > e facendo clic en "Reiniciar agora" en Inicio avanzado.
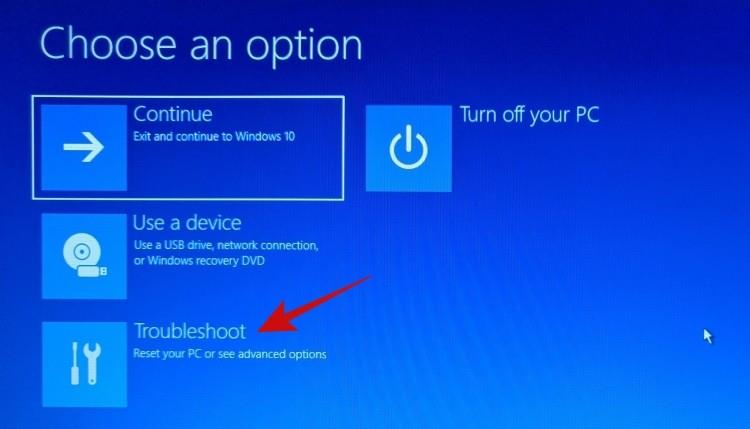
O teu PC debería iniciarse nunha pantalla azul cunha morea de opcións. Fai clic en "Solucionar problemas".
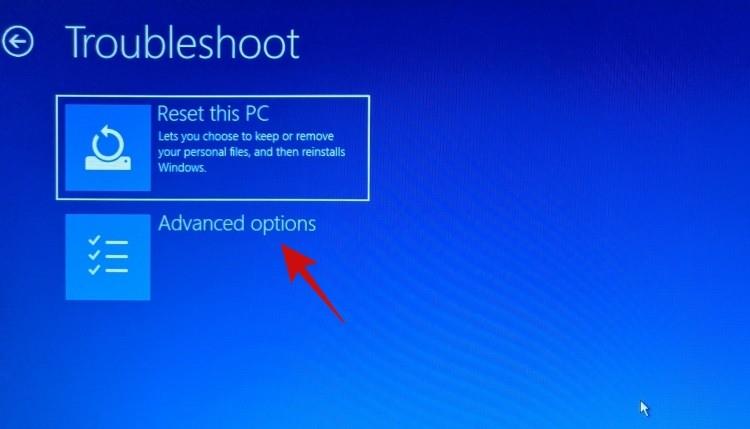
Fai clic en "Opcións avanzadas".
E, finalmente, seleccione "Configuración do firmware UEFI".
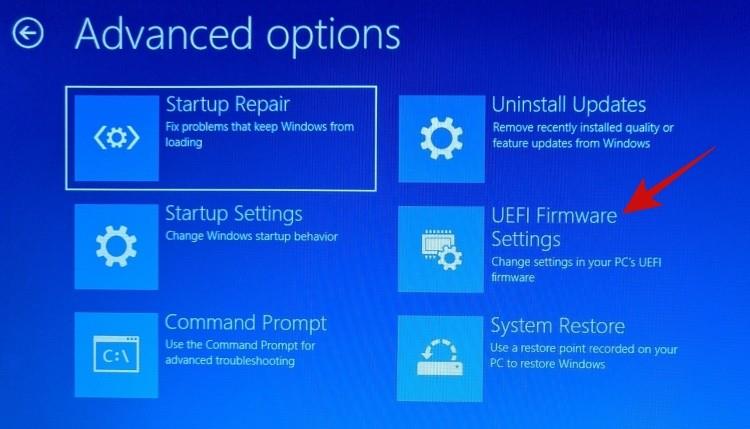
Fai clic en "Reiniciar".
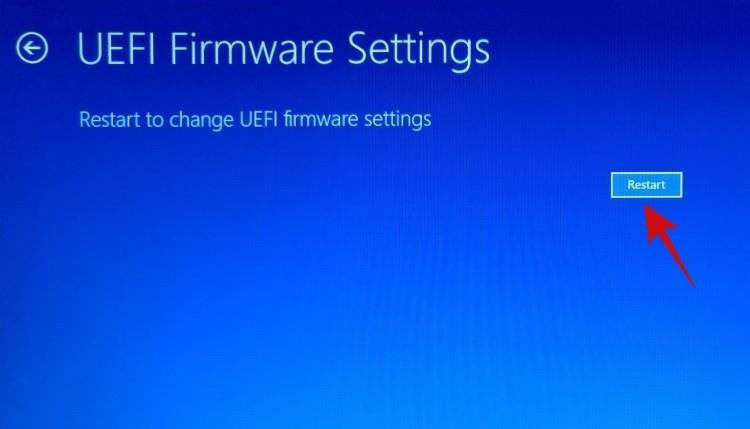
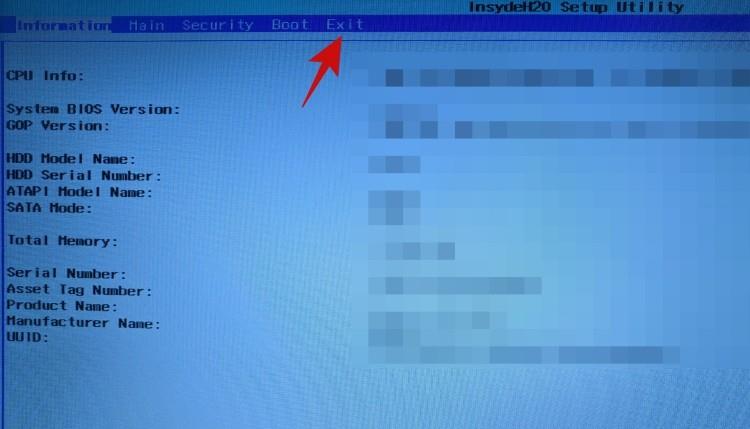
Agora o teu PC debería iniciarse na pantalla UEFI.
Nota: A nosa pantalla da BIOS pode parecer diferente á túa.
Tivemos que utilizar as teclas de frecha para navegar ata a sección 'Saír', onde se atopa a opción de restablecemento por defecto.
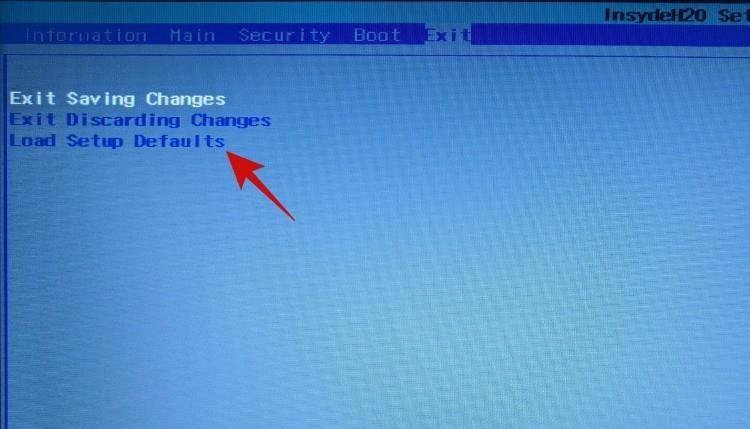
E así se ve a opción. Resalte a opción "Cargar valores predeterminados da configuración" e prema Intro.
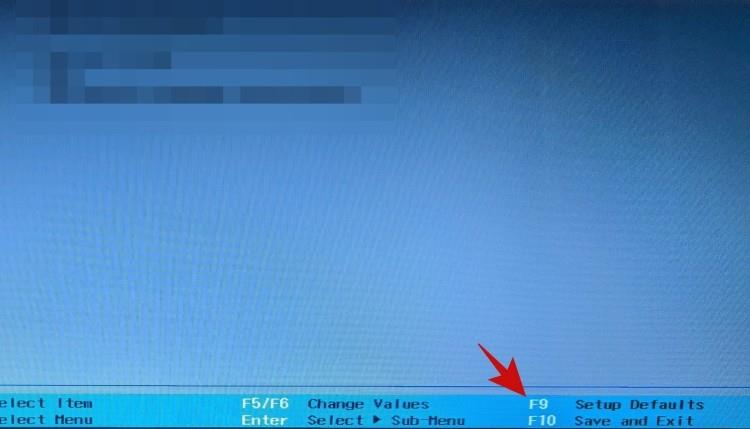
Alternatively, the same option can also be found at the bottom of our screen, which reads ‘Setup Defaults’. Pressing the F9 key will also trigger the option.
Once selected, the BIOS should confirm the change. Simply highlight the ‘Yes’ option and hit enter.
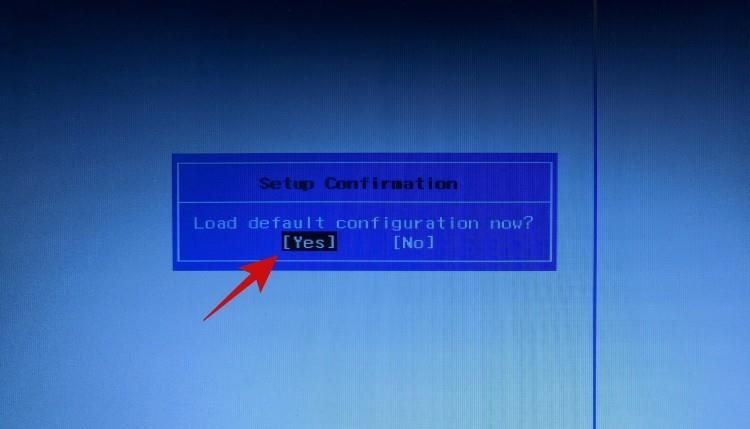
The BIOS should be reset within seconds.
Option #2: Access BIOS from the splash screen
Unlike the previous option, this one doesn’t rely on Windows. All you need to do is press the right key while your PC is booting and you should be inside BIOS.
Each OEM has a different key, so we have put together a list of keys for each OEM. Pick the one which works for you.
- Acer:
Del or F2
- ASRock, Intel, Origin PC, Samsung, Toshiba:
F2
- Asus:
Del, F10 or F9
- Dell:
F2 or F12
- BIOStar, EVGA, Gigabyte, MSI, Zotac:
Del
- HP:
F10
- Lenovo:
F2, Fn + F2, F1 or Enter followed by F1
- Microsoft Surface: Press and hold volume up
This may take a couple of tries but once you’ve managed to get inside the BIOS, navigate to the last tab and select ‘Load Setup Defaults’ to reset the BIOS.
Method #3: Reset via CMOS
Option #1: Clear CMOS by disconnecting the battery
This method requires disconnecting a small coin-sized battery connected to the motherboard for ~8-10 minutes and connecting it back again.
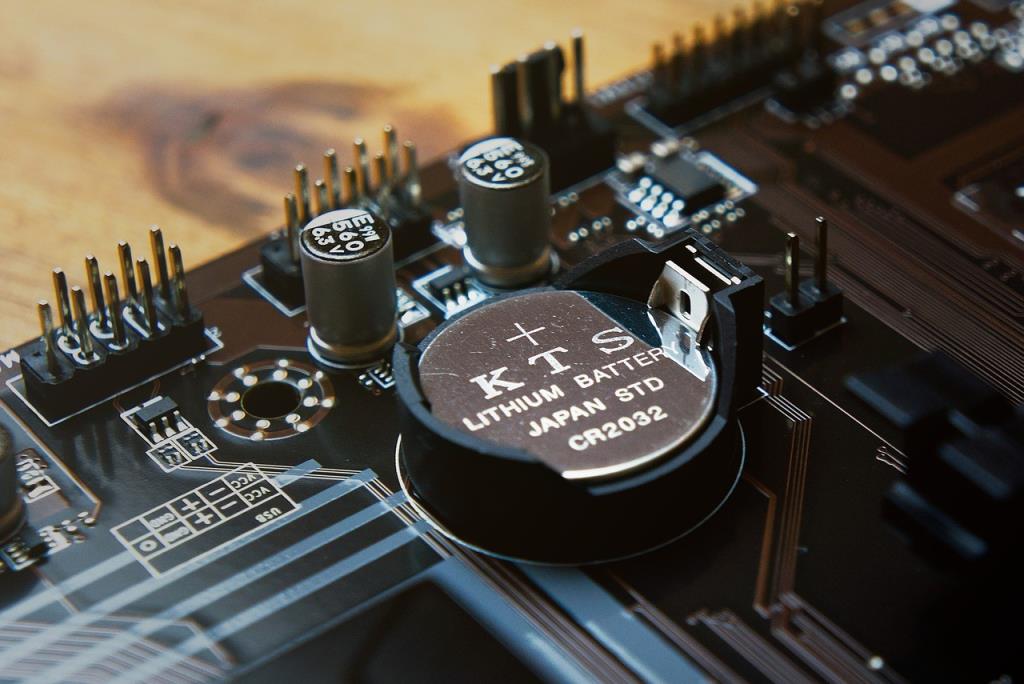
If it isn’t obvious by now, you need to get inside your PC case if you’re on a desktop and laptop users will need to take off the back panel of the laptop. Desktop users should unplug their PC from the power outlet before proceeding, while laptop users will need to first open the backplate, and then disconnect the battery while making sure the charger isn’t plugged in.
Locating the CMOS battery is simple. Look for a coin-sized battery on your motherboard. Some motherboards have a dedicated battery compartment while others will connect to the battery with a tiny two-pin connector with a short wire that plugs into the motherboard.
Once you’ve located the CMOS battery, disconnect it for the said period, connect it back again, connect the battery (laptop users only), plug in the charger/power cable, and turn on your PC.
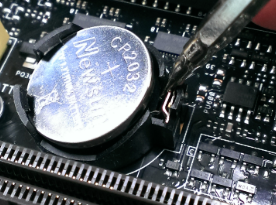
Source: ASUS
Try getting back into the BIOS. It should now be completely reset.
What happens behind the scenes is that when the CMOS battery is disconnected, the motherboard can not keep the faulty BIOS settings in the BIOS chip, and hence resets to the default settings when the battery is connected again.
Option #2: Clear CMOS with a jumper
Another method to reset BIOS involves shorting the CLEAR CMOS jumper on the motherboard. The jumper can be easily found on all desktop motherboards but sadly, it isn’t available on laptops, which means this method is a no-go for laptops.
For those with a desktop, you can use this detailed guide from ASUS to help you guide through the process.
As always, no two motherboards are the same and your model and milage could vary vastly. Hence, if you aren’t sure about the pins on your motherboard then we recommend you avoid doing this yourself and visit your nearest service center instead. Shorting the wrong pins can cause serious issues with your system. Your manufacturer could also have a dedicated guide for your motherboard so it might be worth a shot to check out the support site before visiting the nearest service center.
Note: Remember to always put the jumper back (to its original position) or your BIOS will keep resetting itself with every boot.
And you’re done.
Can you reset the BIOS password?
This depends on whether you remember your last password or not. In case you remember the last password then you can simply use the Security >Change Boot Password option in your BIOS menu to change your password. You will be asked to enter your old password to verify your identity upon which you should be able to easily change your password. However, if you do not remember your old password then you will need to reset your BIOS using one of the methods above. Resetting the BIOS will remove all your changes in the BIOS including your previous password. The ideal way to reset your BIOS, in this case, would be to remove the CMOS battery, but you can opt for a different method if you like.
Clearing CMOS did not reset BIOS, what to do?
If clearing or reseating the CMOS battery did not help reset your BIOS then you can try one of the following fixes below.
1. Check for specific Button
Some motherboards come with a dedicated button to reset CMOS. While this shouldn’t stop your from resetting your BIOS using the above methods, you can try using the specific button in case your OEM has placed in-built restrictions for resetting CMOS. We recommend you consult your OEM support manual as well in case you find a dedicated button on your motherboard. This will help you correctly clear the CMOS as you might be required to hold down the button for a specific period of time.
2. Discharge every capacitor
When you disconnect your system and components from the power supply we recommend you give them enough time to discharge capacitors. It would also be a good idea to hold down the power button with everything disconnected to discharge your capacitors. You can then try following the guide to reset your BIOS and in case charged capacitors were the cause of your issue then this should help you reset your BIOS.
3. Use a different tool to short your pins
In case you are using a paper clip or a screwdriver to short your pins, we recommend you try a different tool in case you were unable to clear the CMOS. Sometimes material coatings on your tool can prevent the pins from properly shorting on your systems. Using a different tool might give you a better chance at clearing your CMOS.
4. Contact your manufacturer
Lastly, if nothing seems to be working for you then we recommend you get in touch with your manufacturer. There might be a specific way to clear the CMOS on your system which might require assistance from a support technician. Getting in touch with your manufacturer will help you determine how you can exactly clear the CMOS and reset the BIOS on your system.
Cleared CMOS but facing issues? Try these fixes!
Clearing the CMOS can help you reset the BIOS but also sometimes cause issues on your system especially if you are using a laptop. Cached data that is lost when clearing your CMOS can introduce irregularities in the working of Windows and the worst case cause major issues. If you are unable to boot into Windows or if you are unable to get your display working after clearing the CMOS then do not worry, these are known issues that can be easily fixed. Use the sections below to troubleshoot your issues depending on the current state of your system.
1. If Windows won’t boot
If you are unable to boot into Windows then this is likely due to boot order issues or changes within your BIOS. We recommend you boot into your BIOS menu and change the following settings depending on the components you are currently using in your system.
- Boot order
- Boot priority
- Check your storage mode settings
Once you have correctly set the above-listed settings, you should be able to boot back into Windows normally on your system.
2. If Display won’t show anything
This is likely a bit more of a serious issue than expected. If your display is unable to get a signal from your system but you do not get any postcode errors then there are mainly two fixes you can try at this point. You can firstly try to use an external display and boot into safe mode. If however, your external display is also unable to receive any signals then you might need to get in touch with your support technician as you will now need to flash BIOS to your motherboard. However, if you get a display signal on your external display then you can try reflashing the BIOS on your system again via a USB. This should help reset connections, drivers, and cache in the background which should restore the display signal to your default display.
3. If different postcode errors show up each time
This is the most serious issue that you can face when removing or clearing the CMOS by removing the battery. Different postcode errors indicate that your CMOS battery connector or the jumper pins might have been damaged. It could also be that your capacitors weren’t discharged properly so you should first try removing and reseating the battery again. This should help solve issues caused by incorrectly seated batteries. However, if you continue to face random postcode errors then we recommend you get in touch with a support technician at the earliest.
These are all the ways to reset the BIOS on your PC.
If you find yourself stuck at any point in this guide, holler at us in the comments and we’d be happy to help.
Related:


