O último lanzamento de Microsoft para Windows, chamado Windows 11, está a chamar moitas cabezas agora mesmo. Pregúntase por que? Débese a que a actualización inclúe unha revisión visual completa en comparación co seu sucesor, Windows 10. Aínda máis, inclúe moitas funcións útiles novas que están configuradas para darlle un gran impulso á túa produtividade.
Entón, como se pode poñer as mans en Windows 11? Ben, Microsoft en realidade non lanzou a actualización para miles de millóns de usuarios de Windows en todo o mundo, xa que aínda está na súa fase de proba e está previsto que se lance aos usuarios a principios de 2022.
Entón, por que o rumor agora? Débese a que Microsoft acaba de lanzar a súa primeira versión de proba, coñecida como Vista previa para as masas. E, rapaces, son persoas que se animan a sacar Windows 11 a dar unha volta!
Contidos
Obrigatorio
Antes de continuar con esta guía, probablemente deberías comprobar se o teu PC admite as versións de Windows 11. Aquí tes unha páxina de Microsoft que explica os requisitos do sistema de Windows 11 .
Ademais, asegúrate de activar TPM 2.0 e Secure Boot tamén no teu PC. Podes comprobar se o TPM xa está activado ou non no teu PC: utiliza esta guía .
Paso 1: Obtén os ficheiros ISO para Windows 11
Se estás buscando instalar Windows 11 por ti mesmo, sen usar o menú do programa Windows Insider en Configuración, necesitarás antes que nada unha ISO. Fai clic na seguinte ligazón para saber como descargar o ficheiro ISO da compilación Windows 11 Insider.
A partir do 30 de xuño de 2021, só se publicou a versión da canle Dev de Windows 11. Entón, iso é todo o que podes descargar e instalar neste momento.
Para obter unha versión mellor e máis fiable que sexa fácil de actualizar máis tarde, incluída a actualización á versión estable de Windows 11 máis tarde, xa que non pode actualizar a versión estable de Dev, agarde a versión beta de Windows 11 que sairá en xullo. 2021.
Non obstante, se a ferramenta non funciona para ti, como fai de cando en vez, terás que buscar na web para coller unha ISO de compilación de Windows 11 Insider (evita a ISO filtrada). Si, reddit.com pode ser de axuda.
Paso 2: crea unha unidade USB de arranque con Windows 11 ISO
Colle un Pen Drive (almacenamento mínimo de 8 GB) e usa o software Rufus para crear unha unidade USB de arranque que che permitirá instalar Windows 11 desde UEFI. Si, fai clic na seguinte ligazón para atopar unha guía para isto.
O anterior levarache só un tempo, probablemente 15-30 minutos. Volve a esta páxina para saber como instalar Windows 11 usando a túa pen drive de arranque desde arriba.
Está ben, entón conseguiches a túa copia e configuraches a túa unidade USB con Rufus, pero que segue? Non te preocupes, temos cuberto.
Esta guía que aparece a continuación cubrirá todos os pasos necesarios para que o teu PC funcione coa última versión de Windows Insider Preview.
Imos a el.
Paso 3: Instala Windows 11
Coa túa unidade USB de arranque Windows 11 inserida agora no teu PC, é hora de iniciar o sistema usando a pen drive para que poidamos instalar o Windows 11 usando a pen drive.
Podemos facelo desde o menú de arranque ou desde o menú UEFI/BIOS se prefires algunha GUI que te guíe. O acceso á BIOS/UEFI pódese facer de dúas formas, explorémolos todos aquí.
Coa unidade USB de arranque con bolígrafo Windows 11 conectada, apaga o PC. Agora, acéndeo: despois de premer o botón de acendido, continúa premendo o botón Esc (ou F11 ou F12) e verás o menú de inicio.
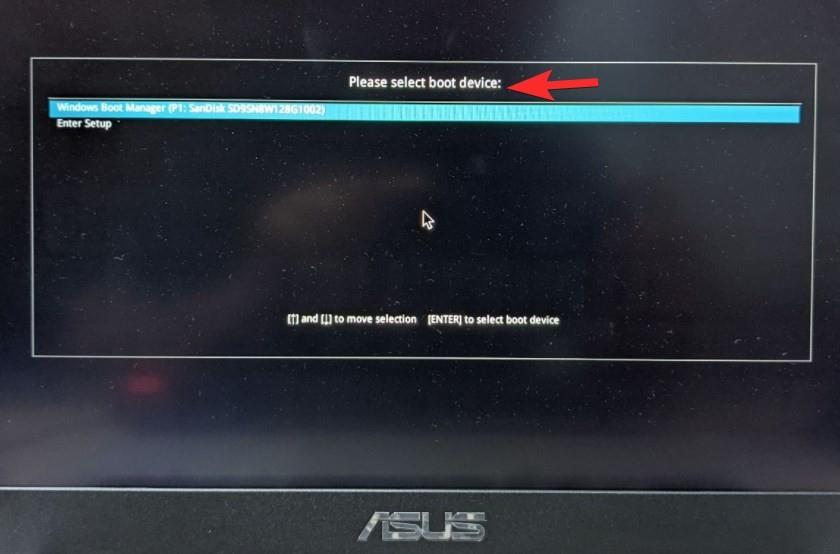
Non mostra un pen drive porque esquecemos inserir un ao facer esta foto.
Mostrarache as opcións desde as que podes arrincar. Por exemplo, o teu SSD/disco duro e a pen drive de inicio.
Move a selección ao pen drive de inicio e prema a tecla Intro para iniciar o sistema usando o pen drive.
En breve, verá o logotipo de Windows e despois a pantalla de configuración de Windows 11. É dicir, todo o que queda agora é instalar Windows 11. O que é doado. Seleccione a edición de Windows 11, a partición do disco duro e faga clic en Instalar. Iso é.
Cando remate a instalación, o teu PC debería reiniciarse automaticamente e deberías poder ver a carga da configuración de Windows 11 Insider Preview.
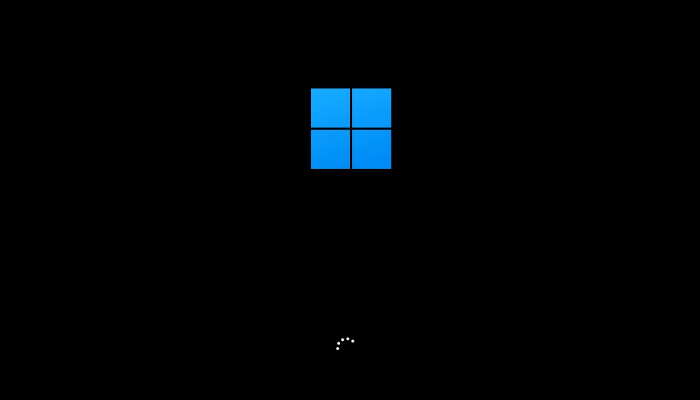
Con só un par de clics, a túa compilación de Windows 11 debería estar en funcionamento.
Hai dous métodos para acceder á pantalla UEFI/BIOS desde onde podes escoller a pen drive para iniciar o teu sistema. Un deles é o uso de software, que é o menú de inicio avanzado, e o segundo é o truco do hardware, onde prememos a tecla necesaria cando o dispositivo se está a iniciar. Imos discutir os dous métodos.
Método #3.2.1: Arrancar na BIOS coa PC activada (truco de software)
Asumindo que o teu PC estea acendido, o que tes que facer é facer clic no botón "Inicio" na parte inferior esquerda.
A continuación, fai clic na icona "Poder".
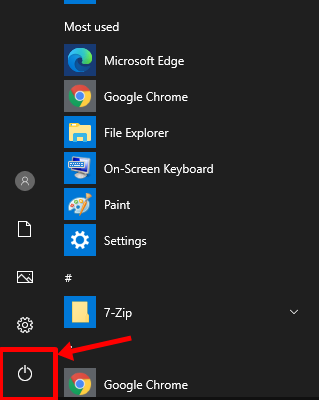
Alí atoparás as opcións para "Durmir", "Apagar" e "Reiniciar".
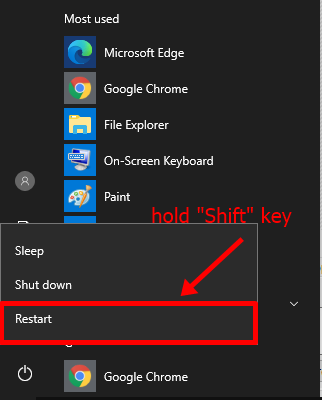
Mantén premida a tecla Maiúsculas do teu teclado e fai clic en "Reiniciar". Se se fai correctamente, o teu PC debería iniciarse nunha pantalla azul cunha morea de opcións, en lugar do teu escritorio.
(Como alternativa, pode acceder ao inicio avanzado accedendo a Configuración > Actualización e seguridade > Recuperación > "Reiniciar agora" en "Inicio avanzado".)
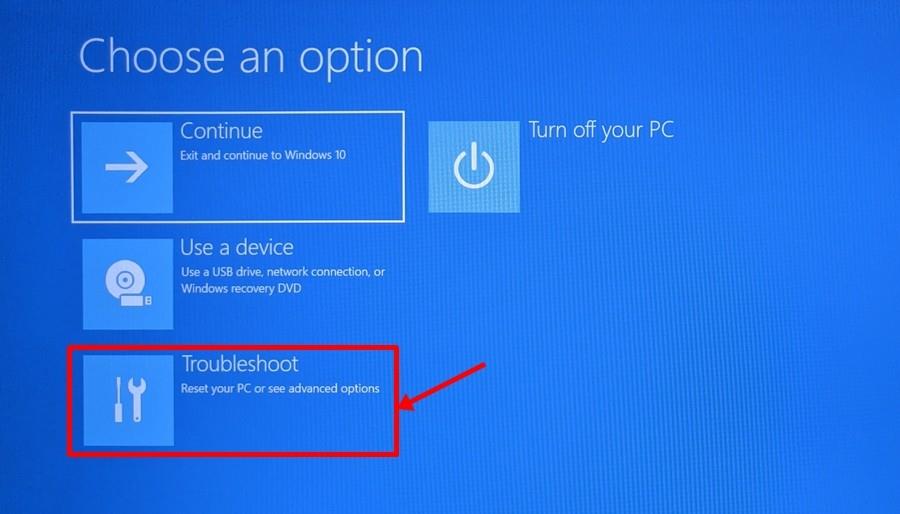
En Inicio avanzado, faga clic en "Solucionar problemas".
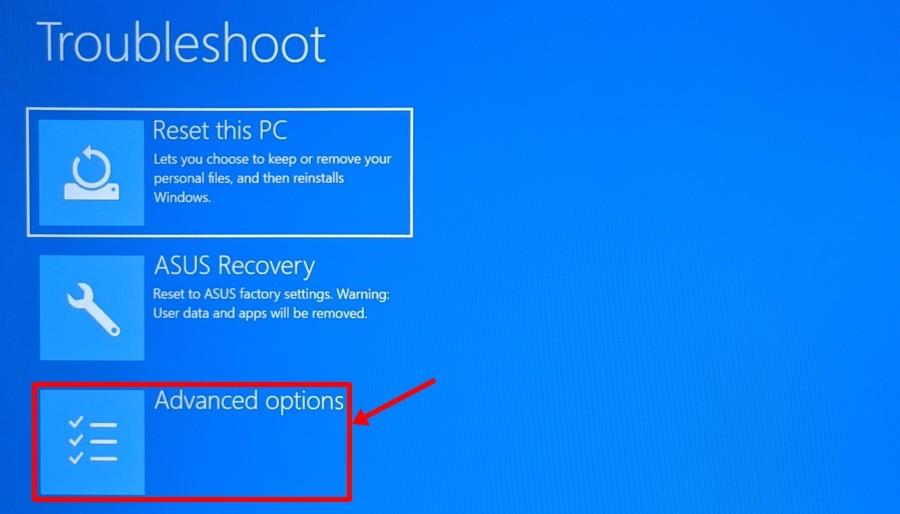
Agora, fai clic en "Opcións avanzadas".
Fai clic en "Configuración do firmware UEFI".
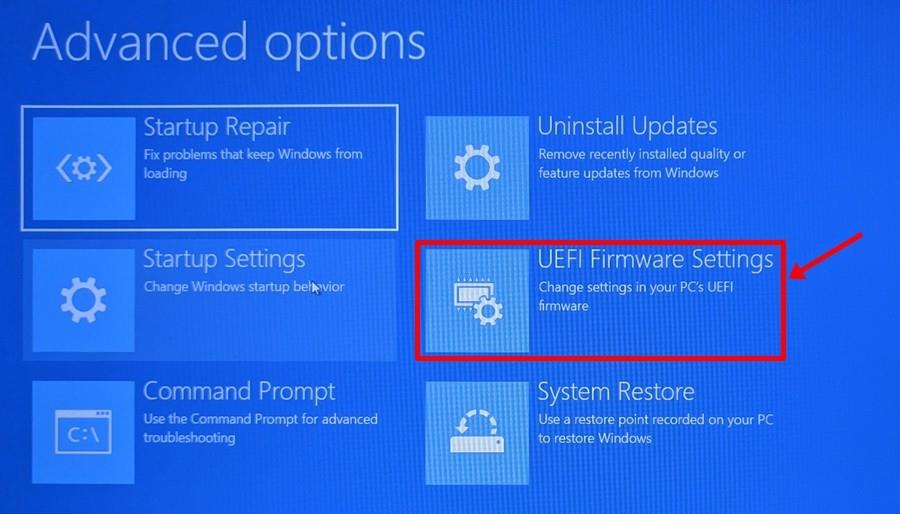
E despois fai clic en "Reiniciar".
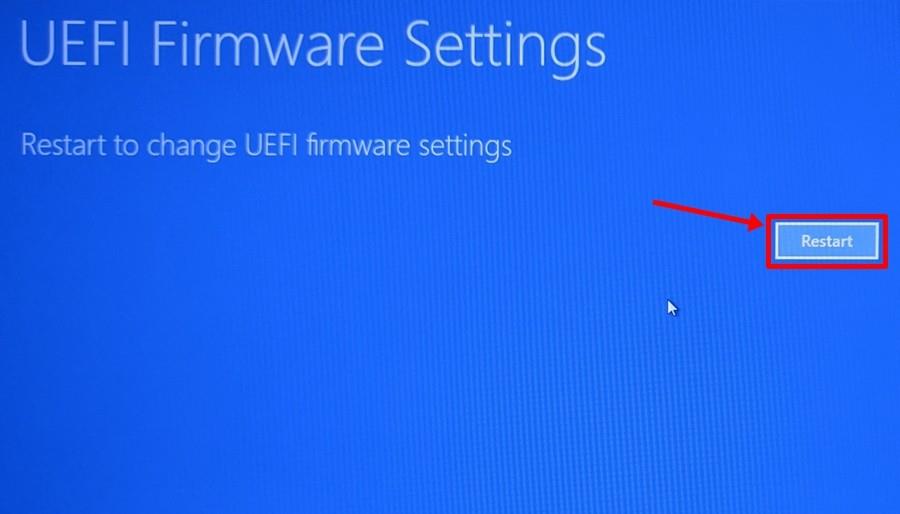
Unha vez dentro da UEFI/BIOS, vai abaixo para instalar desde UEFI/BIOS.
Método #3.2.2: Iniciar na BIOS cando o PC está acendido (truco de hardware)
Premendo a tecla dereita do teclado cando aparece o logotipo do OEM cando o PC está acendido, pode acceder facilmente á pantalla UEFI/BIOS.
What key do you have to press? Well, it depends from OEM to OEM. Here’s a handy list, though.
- Acer: Del or F2
- ASRock, Intel, Origin PC, Samsung, Toshiba: F2
- Asus: Del, F10 or F9
- Dell: F2 or F12
- Biostar, EVGA, Gigabyte, MSI: Del
- HP: F10
- Lenovo: F2, Fn + F2, F1 or Enter then F1
- Microsoft Surface: Press and hold volume up
- Zotac: Del
Once inside the UEFI/BIOS, jump below for installing from UEFI/BIOS.
After accessing the UEFI/BIOS screen using either of methods 3.2.1 and 3.2.2, follow this step.
In the UEFI menu on our Asus laptop, we have a many called “Boot Priority” on the Dashboard/EZ Mode of BIOS. Yours might be a little different, so look for something that says “Boot Menu/Priority”.
Here’s what our Boot Priority section looks like with the USB drive plugged in.
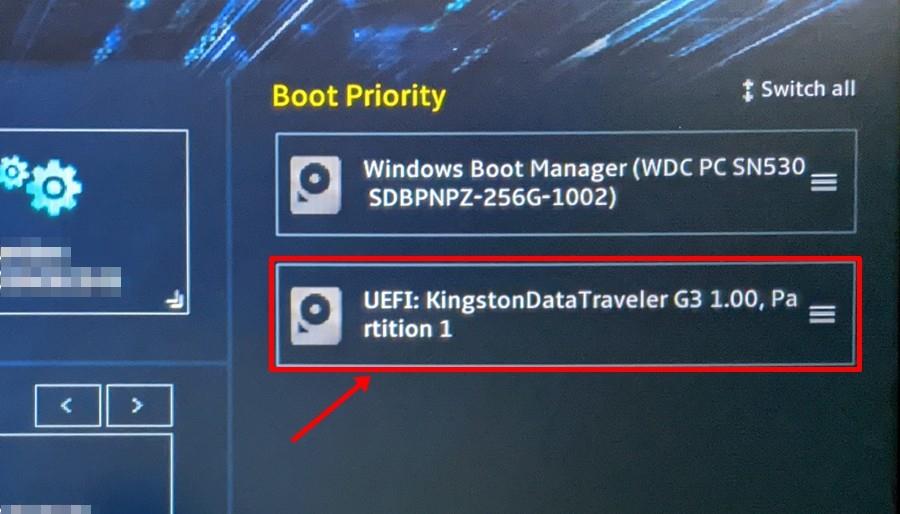
Now, all you have to do is drag your USB drive (ours is a Kingston Data Traveler G3) to the top of the list by clicking and holding on 3 horizontal lines icon and moving it up.
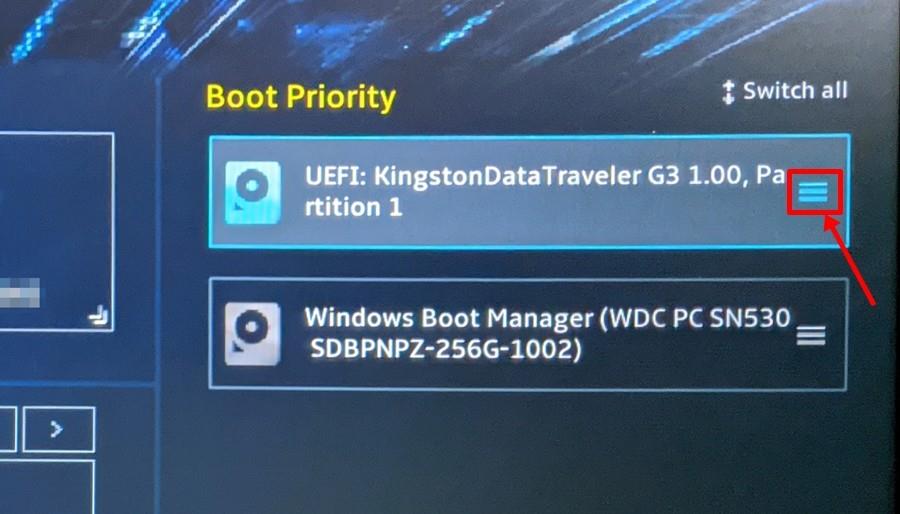
Again, you need to bring the USB drive entry to the top of the list. The correct boot priority order should now look like the screenshot above. (Our Kingston pen drive is now at the top of the Boot Priority list.)
After that, all that’s left is to save the changes that we just made to the BIOS boot priority menu by pressing the “F10” key.
Click Save and Exit to save the changes and restart the device.
Your PC should now restart automatically, and you should be able to see the Windows 11 Insider Preview setup loading up.

With just a couple of clicks, your Windows 11 build should be up and running.
More help on booting into UEFI and BIOS:
- If you still can’t find your OEM in the above list, we recommend trying different keys, as one of these will definitely work.
- While trying to boot into the Windows setup, you may see some text like “Press any key to boot from CD or DVD…” for a few seconds. As soon as you see this, just press any key to initiate setup.
- Some laptops/PCs boot in an instant, and it is highly likely you might miss your chance to get inside UEFI/BIOS. Solution? If your PC shows some kind of animation or a boot video, quickly tap either “Esc”, “Tab” or “Pause Break” key, and then start tapping your respective UEFI/BIOS hotkey. We recommend keeping an eye on the text on the screen as almost all of these PCs mention pressing a specific key on the screen to pause the boot sequence and get into UEFI/BIOS.
Why is my bootable Windows 11 pen drive not detected in BIOS or UEFI?
A PC with UEFI will have a hard time booting from a USB stick that contains either Windows or Linux in the MBR partition scheme as it simply won’t show up in the Boot Menu. You’d have to first manually switch to MBR/Legacy/SATA mode (depending on your PC) in BIOS to proceed with the install.
Also, make sure that you prepared the bootable install USB drive in the correct manner and that it’s working alright. You can write Windows 11 on to pen drive again if you think the data might have got corrupted or some other issue could have come into play when you were creating the bootable pen drive. Use Step 2 above again for this.
Installing Windows 11 without bootable USB Drive
But before we begin, see if you still have the Windows 11 ISO you just downloaded to prepare the USB drive. If you do, let’s take a look at how you can use that ISO to upgrade your current Windows installation to Windows 11. But keep in mind, you may not be able to dual boot Windows 11 with any other OS using this method as you can do that using a bootable drive only.
Let’s take a look at an easier way to install Windows 11.
Right-click the Windows 11 ISO and click “Mount” or just double-click if you’re on Windows.
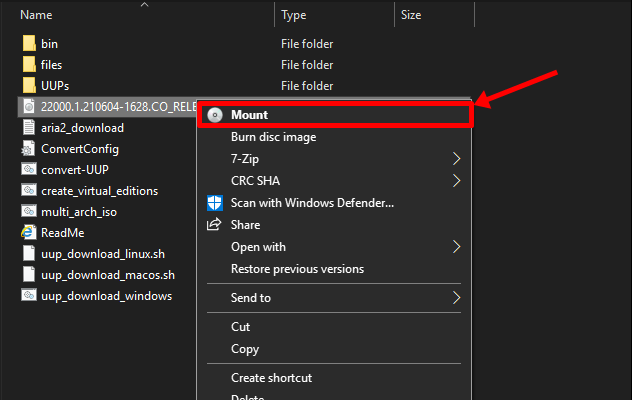
As soon as you do that, Windows will mount the ISO on a virtual drive and open the ISO in the same window. In the now opened ISO folder, there’ll be a file called “setup”. Double-click on it.
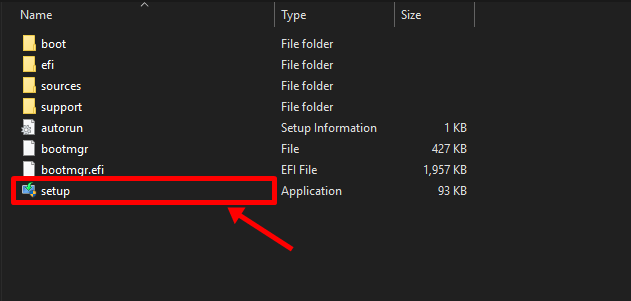
Wait for a few seconds and you’ll see the Windows 11 setup starting up.

Once the setup has done its initial processing, you’ll be greeted with a window similar to the image below. Click on “Next”.
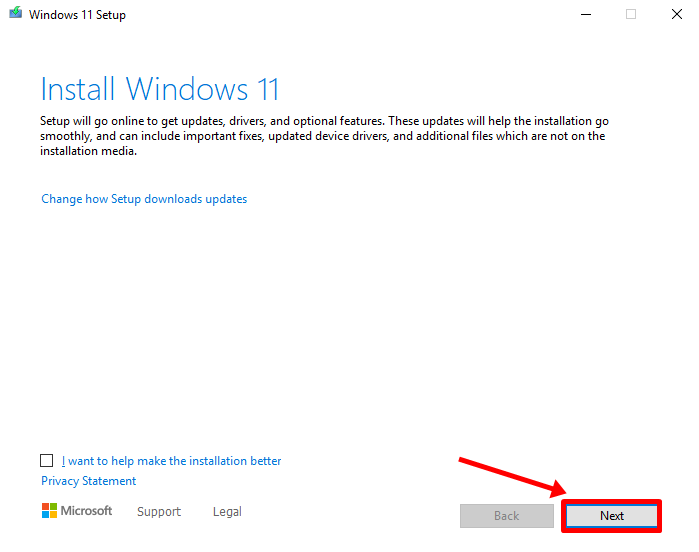
And from this point onwards, the setup will take over and upgrade a few things as needed.
After maybe some 15 minutes later, your own Windows 11 experience should be ready to roll.
Let us know how the installation process went for you.
NOTE: If you don’t have access to a spare PC, we suggest waiting for this release out as the current Insider Preview build is pre-Beta and should not be considered as a daily driver just yet. Even though things may be running just fine right now, no one really knows when or how badly things may break in the coming days.
You can get in touch with us anytime using the comments box below if you need any help in this regard.


