Do mesmo xeito que nós, se tamén usas o teu ordenador a diario para navegar por Internet, ver vídeos en YouTube ou simplemente traballar en liña, seguro que o teu ordenador pode ter creado unha enorme cantidade de caché de Internet na unidade do teu sistema. Tamén coñecidos como ficheiros temporais, estes ficheiros poden reducir o espazo libre total dispoñible para o usuario e tamén poden provocar un desgaste adicional da unidade do sistema se non se limpa regularmente.
Afortunadamente, hai un par de formas de abordar este problema. Siga lendo a continuación.
Contidos
Que son os ficheiros temporais?
Antes de mergullarnos nos métodos para desfacerse deles, primeiro imos descubrir cales son realmente.
Cando navegas por Internet, o teu navegador descarga esencialmente unha morea de datos de Internet para renderizar páxinas web e as súas imaxes. O mesmo ocorre mentres ves vídeos de YouTube, o teu navegador descarga intelixentemente todo o vídeo en anacos e reproduceo. Unha vez que peches o navegador, parte de todos estes ficheiros descargados permanecen no teu PC como caché para darlle acceso instantáneo aos teus sitios web e vídeos favoritos.
Tamén se crean cando tentas extraer un arquivo, xa que primeiro extrae o arquivo a unha localización temporal segura e despois cópiase onde o extraiches orixinalmente.
Estes son os que se chaman ficheiros temporais. Podes necesitalos ou non máis tarde, pero ocupan espazo na unidade do teu sistema.
Método #1: borrar o cartafol temporal
Este método remóntase aos tempos de Windows XP, cando os ordenadores adoitaban enviarse con eses pequenos discos duros xiratorios de 80 ou 120 GB e estamos seguros de que aínda hoxe é un método habitual para borrar ficheiros temporais para moitos usuarios.
Vexamos como borrar os ficheiros temporais usando este método.
Preme o Win key + rbotón combinado para abrir o cadro de diálogo Executar. A continuación, escriba "temp", seguido dunha entrada.
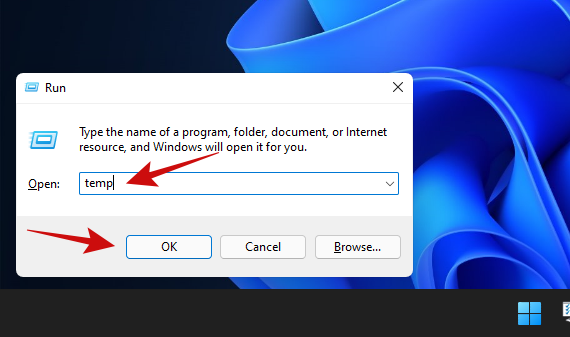
Se recibe unha solicitude que di "Non tes acceso ao cartafol", fai clic en "Si" e acepta outras solicitudes ata que o contido do cartafol temporal estea visible. Así é o noso cartafol temporal.
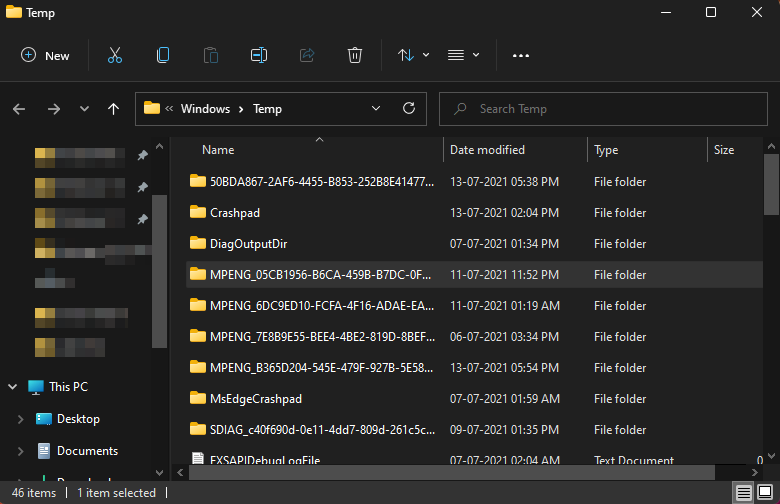
Só tes que seleccionar todos estes ficheiros e cartafoles e elimínaos. Ah, e non te esquezas de limpar a papeleira despois diso e deberías estar listo.
Volve aos tempos de Windows XP, non?
Consello: ás veces, podes ver unha alerta que indica que o ficheiro está en uso e non se pode eliminar. A corrección para isto é sinxela. Proba a eliminar estes ficheiros cando remates de traballar no teu PC e pechaches todos os ficheiros e aplicacións.
Método #2: Usando a utilidade Limpeza de disco
A limpeza de disco estivo enviada con Windows durante moito tempo para cumprir un único propósito: limpar unidades/particións de todos os ficheiros lixo, ficheiros eliminados, actualizacións de Windows non utilizadas e cousas similares que pode atopar. A utilidade é bastante lixeira e inclúe unha interface de usuario sinxela, pero fai ben o seu traballo.
Aquí tes como podes usalo.
Abra o menú Inicio e escriba "Limpeza de disco". Fai clic en calquera das opcións destacadas.
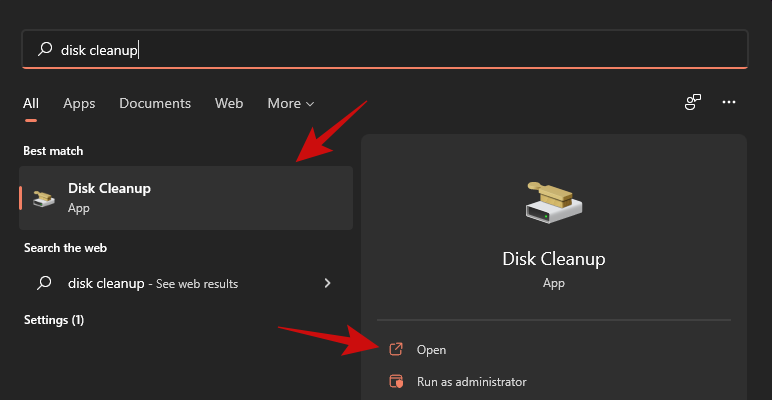
A utilidade agora debería estar diante de ti. Simplemente faga clic no menú despregable, seleccione a unidade na que quere executar a limpeza e faga clic en "Aceptar".
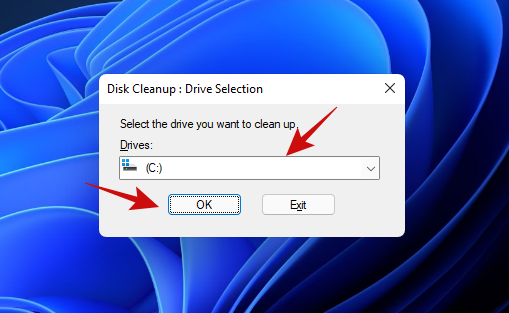
A utilidade escaneará a unidade seleccionada e presentará unha caixa de diálogo como se mostra a continuación. Desprázate pola lista e selecciona todo o que queres eliminar e fai clic en "Aceptar".
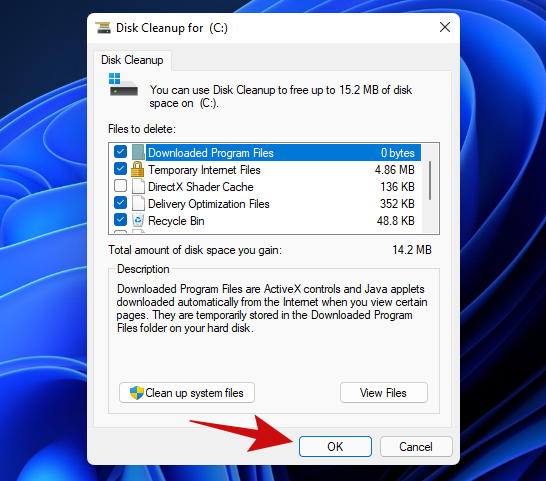
Consello: O botón "Limpar ficheiros do sistema" da pantalla superior permítelle desfacerse dos antigos puntos de restauración do sistema e outros ficheiros do sistema innecesarios para liberar aínda máis espazo. Recomendamos probalo.
Despois de facer clic en "Aceptar", a utilidade Limpeza de disco comezará a eliminar todos os elementos inútiles do seu disco. Despois da limpeza, deberías gañar uns poucos GB de espazo libre na túa unidade.
Método #3: desde a aplicación Configuración
Windows volveuse moito máis intelixente e Windows 11 non é unha excepción. A aplicación Configuración integrada inclúe todas as ferramentas para xestionar todas as unidades de disco do teu PC. Vexamos os pasos para borrar os ficheiros temporais do teu PC usando a aplicación Configuración de Windows 11.
Abre o menú "Inicio" e fai clic na pequena icona da engrenaxe que aparece resaltada. Alternativamente, tamén podes usar o Win key + icombo para abrir Configuración.

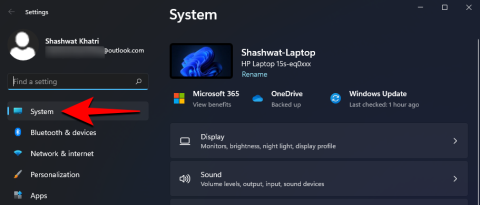
Fai clic en Sistema e despois en "Almacenamento" como se mostra a continuación.
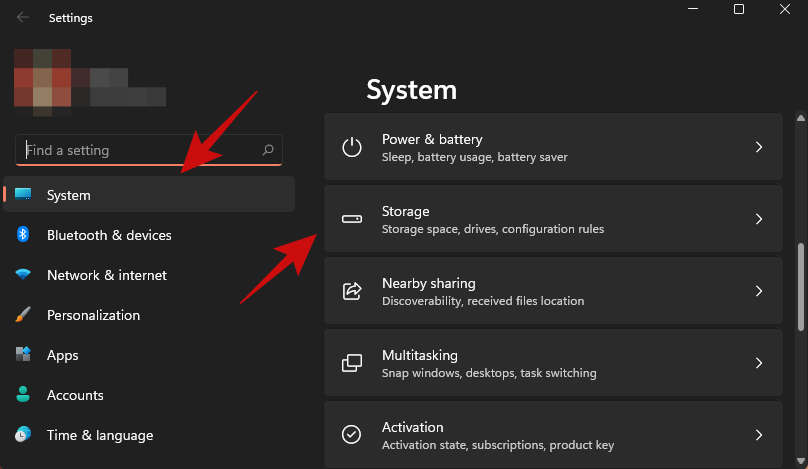
Agora deberías poder ver unha estimación aproximada do espazo que ocupan os ficheiros temporais na unidade do teu sistema (o de Windows 11). O noso PC amosa preto de 95 MB de espazo como refén dos ficheiros temporais.
Fai clic na opción Ficheiros temporais para ir un nivel máis profundo e descubrir que partes de Windows crearon cantos ficheiros temporais.
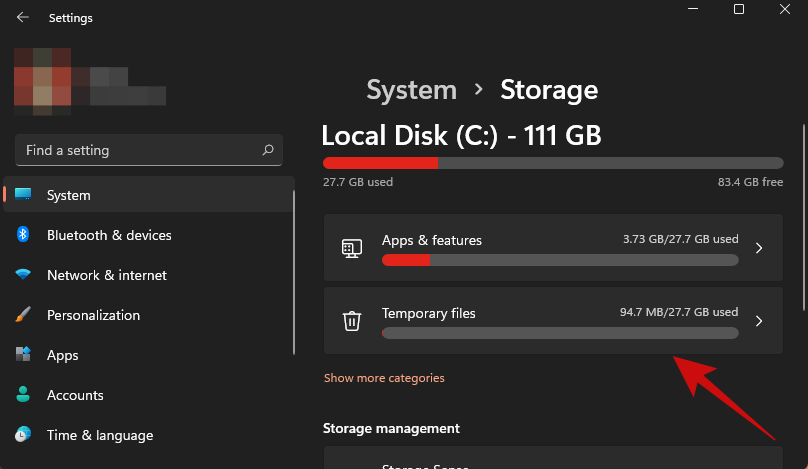
Así é como se ve a pantalla.
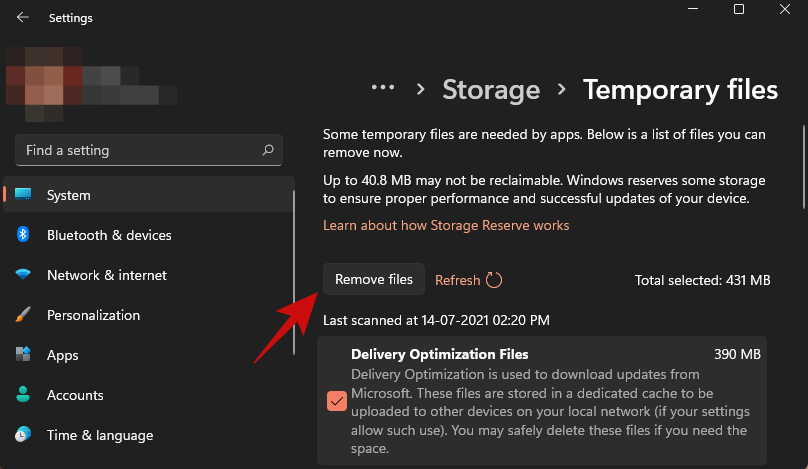
Resulta que o noso PC tiña preto de 500 MB de caché. Podes simplemente pasar pola lista e marcar os elementos que queres eliminar. Unha vez feito isto, fai clic no botón "Eliminar ficheiros" para iniciar a limpeza.
Método #4: Usando Storage Sense
Windows tamén ofrece unha ferramenta adicional chamada "Storage Sense", que realiza de forma intelixente toda a limpeza por si só ou segundo o período definido por vostede. Tamén tes a opción de executar a ferramenta baixo demanda.
A idea detrás desta ferramenta é manter Windows funcionando sen problemas xestionando automaticamente o almacenamento e os ficheiros temporais creados polas aplicacións.
Aquí tes como podes comezar a limpar ficheiros temporais con Storage Sense.
Abre o menú Inicio e escribe "Sentido de almacenamento" e fai clic en calquera das opcións que se destacan a continuación.
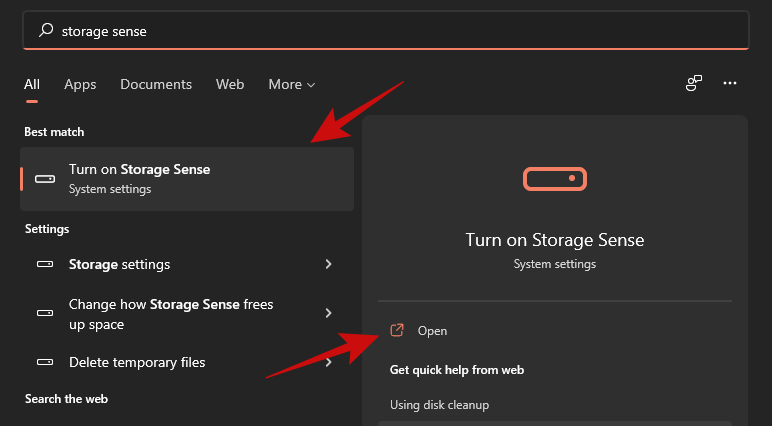
Agora deberías estar dentro das opcións de almacenamento en Configuración do sistema. Desprácese un pouco cara abaixo para atopar a opción chamada "Sentido de almacenamento" e fai clic nela. Así se ve.
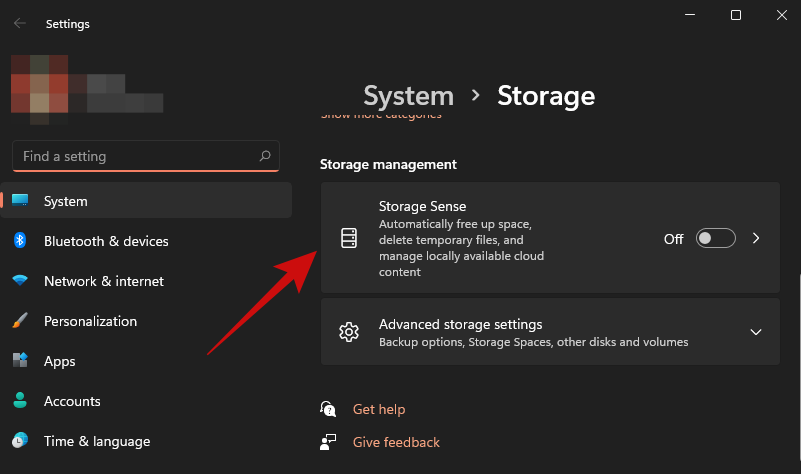
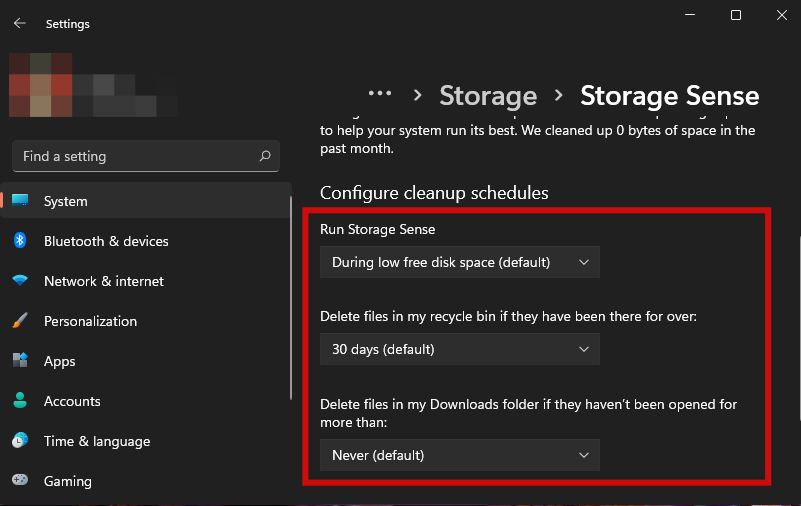
Dentro, deberías poder atopar un interruptor para Storage Sense xunto con algunhas opcións máis para definir cando se debería executar Storage Sense para cartafoles como Descargas, Papelera de reciclaxe e cando debería executarse Storage Sense.
Despois de activar a "Limpeza automática de contido de usuario", recomendámosche encarecidamente que pases por estas opcións e que selecciones o que che funciona mellor antes de pechar a aplicación.
Unha vez activado, pode executar Storage Sense cando queira desprazándose cara abaixo e facendo clic no botón que se mostra a continuación.
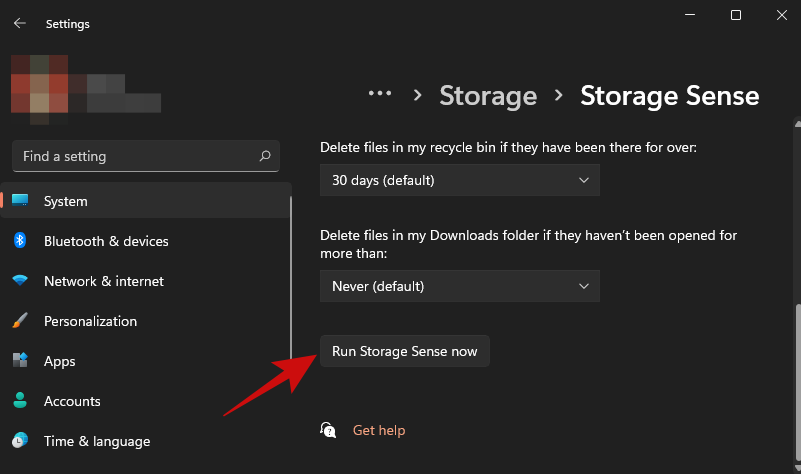
Tip: As you may have already noticed, Storage Sense can automatically delete files from the Downloads folder. If you don’t want that to happen, set the ‘Delete files in Downloads folder’ option to ‘Never’.
Method #5: Using Command Prompt
This is another one of those power methods that only a handful of people know. Command Prompt on Windows can be used to perform a whole lot of activities, one such activity is deleting files and folders.
Remember we shared how you can open the temp folder and clean the files in Windows in Method #1? This method gives you the same results but with fewer steps. Here’s how.
Open the Start menu and type in ‘Command Prompt’. Make sure to run the app as an administrator, as shown below.

Once opened, paste the below command and hit enter.
del /q/f/s %TEMP%\*
You should see a lot of text scroll by in an instant. Don’t worry, it’s just the command doing its thing. Once it stops, you should see something like this.
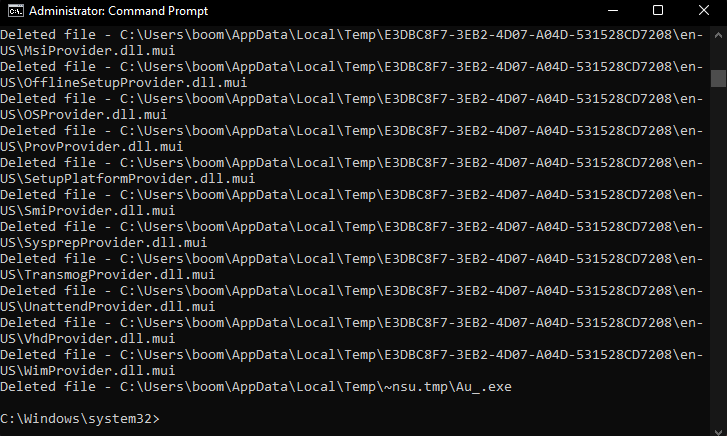
And that’s about it! All your temporary files should be gone by now.
Method #5: Use Third-Party Cleaners
You can also use third-party cleaners to get rid of temporary files on Windows 11. These cleaners are designed to check for leftover and temporary files so that they can be deleted from your system. Moreover, these cleaners also help identify files of uninstalled programs that are no longer needed on your system.
You can then remove these files at your discretion. We recommend opting for CCleaner as it is a long-standing utility for Windows that receives regular updates and has been trusted by users for the past few years. Use the link below to download and install CCleaner on your system.
Once installed, run the app and follow the onscreen instructions to remove all unnecessary files from your PC. Please note that we do not recommend running the registry cleaner for now until Windows 11 is out of the beta channel and until a stable version is released to the public. Additionally, we recommend waiting for a CCleaner update compatible with Windows 11 to avoid removing registry keys that will break important background tasks for Windows 11.
Method #6: Manually delete leftover files
It’s now time to manually delete leftover files from previously uninstalled programs from your Windows 11 system. Some programs tend to leave behind user data files, save files, settings, downloadables, and temporary data on your system so that it is easier to install and run the program in the future. However, these leftover files can sometimes cause conflicts with existing programs or simply end up taking extra space on your system. You can use the guide below to delete leftover files from common locations in Windows 11.
Press Windows + E on your keyboard to open the File Explorer. Now navigate to the following path given below. You can also copy-paste the given bath in the address bar at the top to directly visit the desired directory.
C:\Users\USERNAME\AppData\Local

Note: If you are copy-pasting the path above, then ensure that you replace ‘USERNAME’ with the current username of the profile that you are signed in with on Windows 11.
Look for temporary leftover files from previously uninstalled programs and select each desired folder. Press delete on your keyboard and confirm your choice by clicking on ‘Yes’. In case UAC is enabled on your system, provide the necessary information to delete the files.

Similarly, navigate to the following paths given below and manually delete all leftover files from previous programs that you find in the given directories.
C:\Users\USERNAME\AppData\Roaming
C:\ProgramData
C:\Program Files (x86)
C:\Program Files (x86)\Common Files
C:\Program Files
C:\Program Files\Common Files
In case you installed removed programs on a different drive, we recommend checking their install locations as well. In case you find any leftover data, you can delete it as well.
You will now have manually cleared leftover files from Windows 11 that weren’t removed at the time of uninstallation of certain programs.
Method #7: Delete Windows Store Cache
Windows Store has come a long way with the introduction of Windows 11. You now get accessed to a revamped UI, new titles, and the ability to install Android apps on your system. However, for optimum performance, Windows Store tends to download and store certain data on your local storage. This data can over time accumulate and take up significant storage on your system. The size of this cache could exponential if Windows Store fails to regularly clear the cache in the background. If you find Windows Store to be sluggish and a lot of unidentified temporary data on your local storage, then it is likely the Windows Store cache. Use the guide below to clear Windows Store Cache on your system.
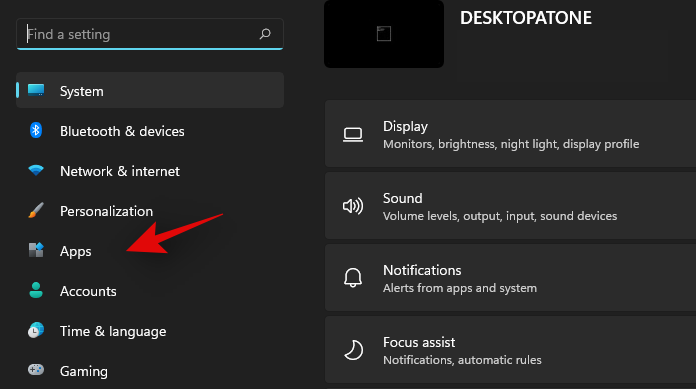
Press Windows + I on your keyboard to open the Settings app on your system. Now click and ‘Apps’ on your left.
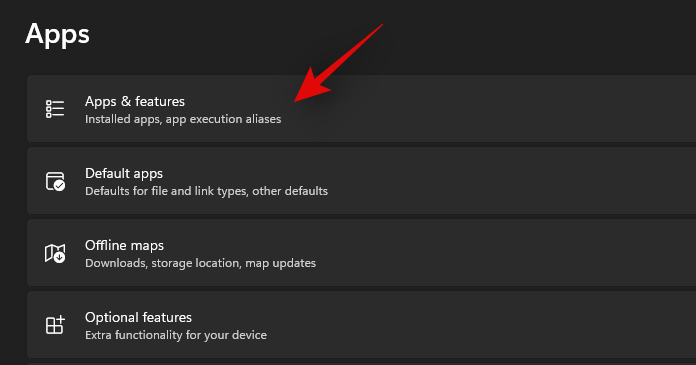
Click and select ‘Apps & features’.
Find ‘Microsoft Store’ in this list and click on the ‘3-dot’ icon beside it.

Now click and select ‘Advanced Options’.
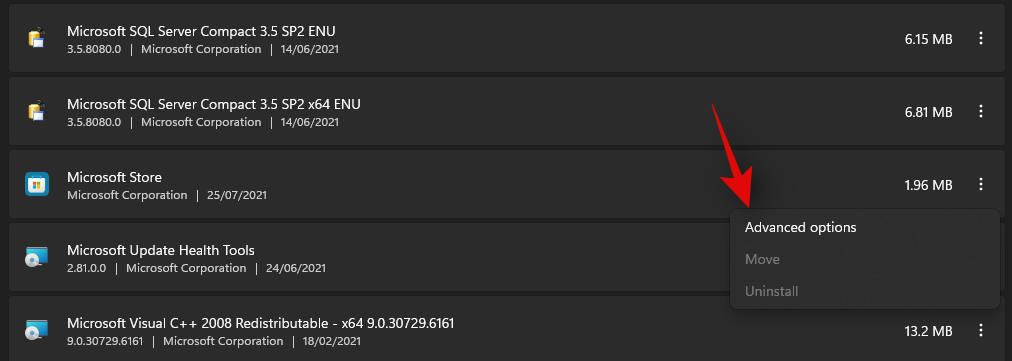
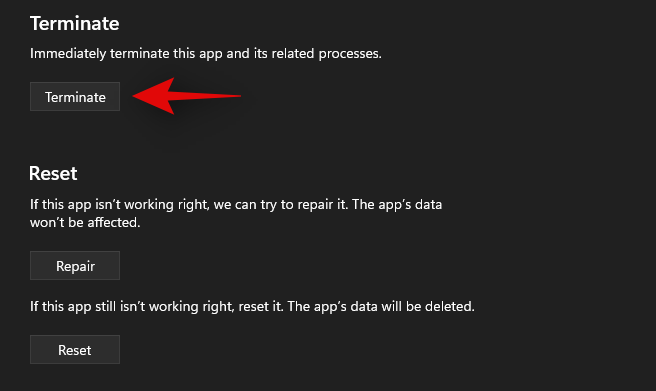
Scroll to the bottom and click on ‘Terminate’ first.
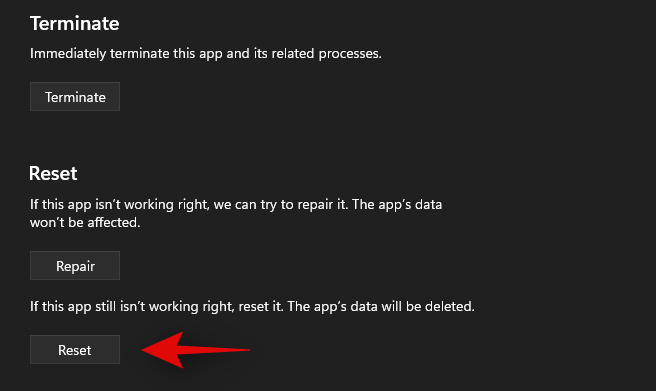
Now click on ‘Reset’.
Confirm your choice by clicking on ‘Reset’ again.
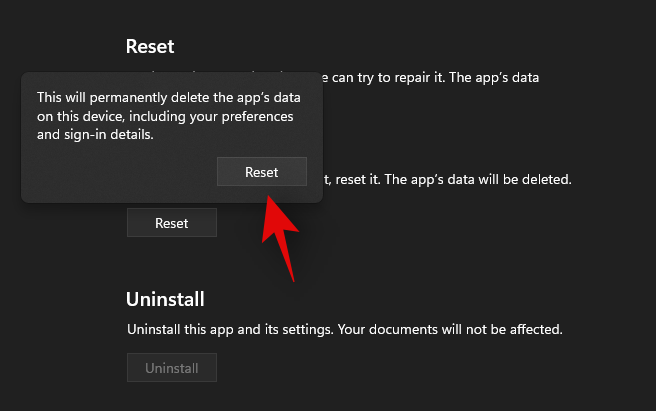
Windows Store will now be reset and any leftover files and cache will now be deleted from your local storage.
Method #8: Delete your browser cache and local files
Clearing your browser cache and local files is another great way to regain some storage space on your system. If you haven’t done this in a few months, then we definitely recommend clearing your browser cache and local files. Use the guide below to get you started. You can clear cache and files for most modern browsers easily. We will be covering the procedure for Microsoft Edge and Google Chrome in this guide.
For Microsoft Edge
Open Edge and click on the ‘3-dot’ menu icon in the top right corner.
Click and select ‘Settings’.
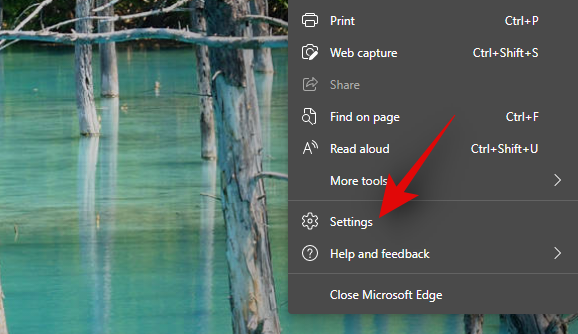
Now click on ‘Privacy, Search, and services’ on your left.

Click on ‘Choose what to clear’ under ‘Clear browsing data’.

Click and check the boxes for all the checkboxes on your screen. We recommend leaving the boxes for Passwords unchecked. If you do not wish to sign back into each service that you use, then we recommend that you leave the box for ‘Cookies and other site data’ unchecked as well.
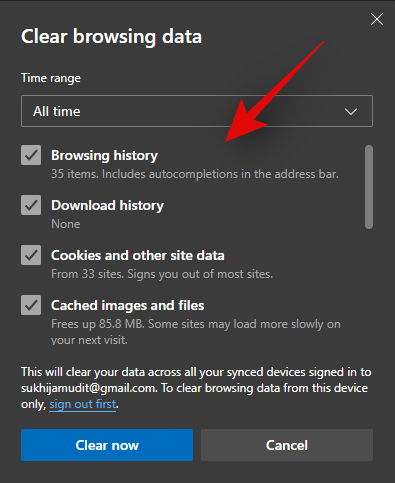
Click on the drop-down menu at the top and select ‘All time’.
Now click on ‘Clear now’.
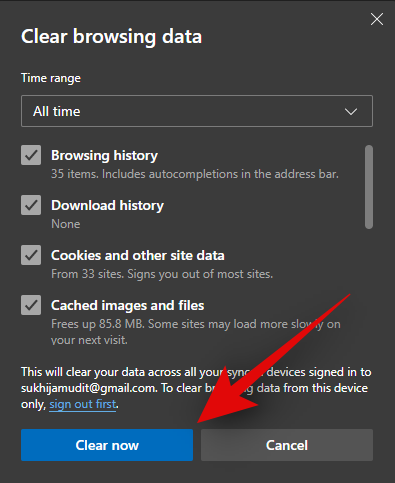
And that’s it! The selected browsing data will now be cleared from your local storage which should help you free up some space on your PC.
For Google Chrome
Open Google Chrome and click on the ‘3-dot’ menu icon in the top right corner of your screen.

Click and select ‘Settings’.
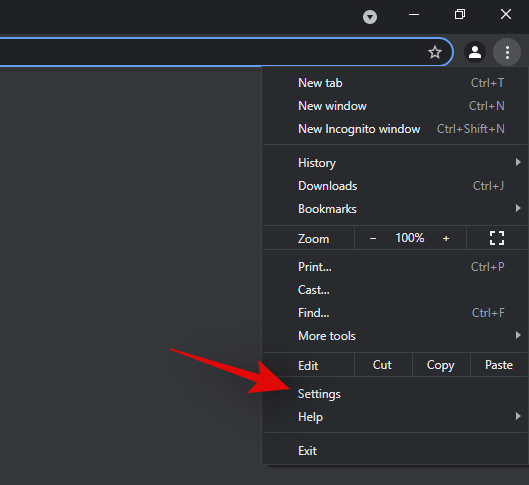
Select ‘Privacy and security’ on your left.
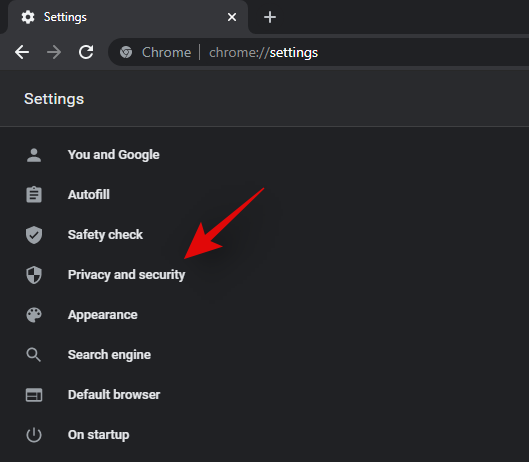
Now click on ‘Clear browsing data’.
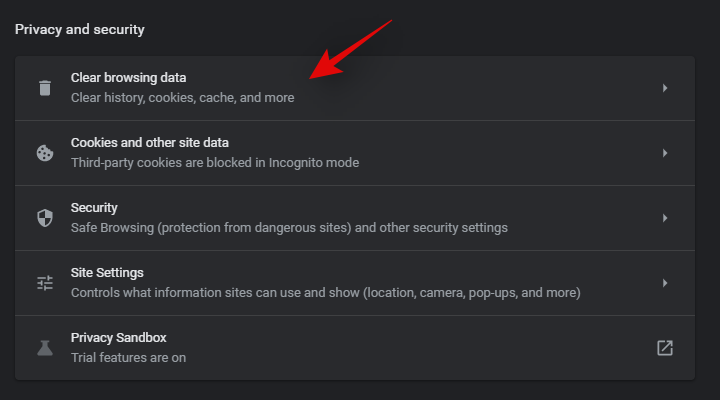
Click on ‘Advanced’ at the top.
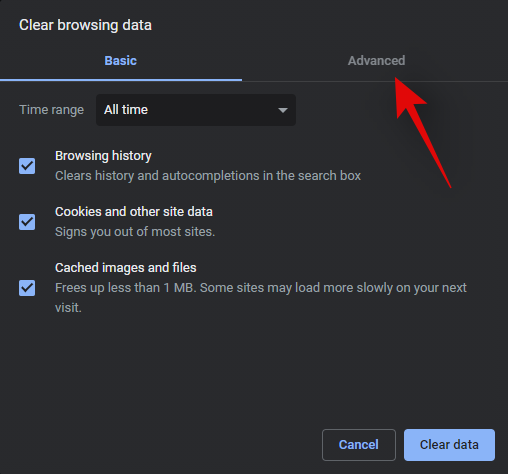
Now click on the drop-down menu and select ‘All time’.

Check the boxes for all the data that you wish to delete from your local storage.
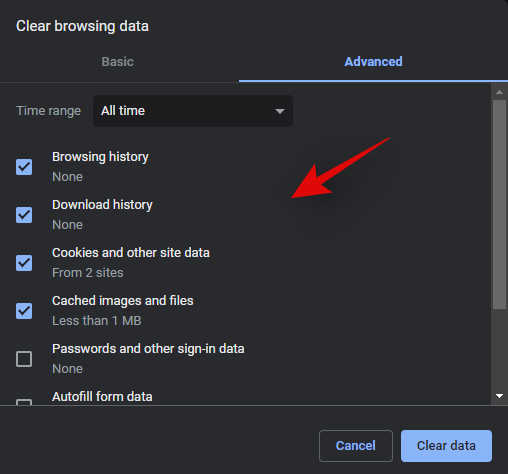
Click on ‘Clear data’ once you are done.
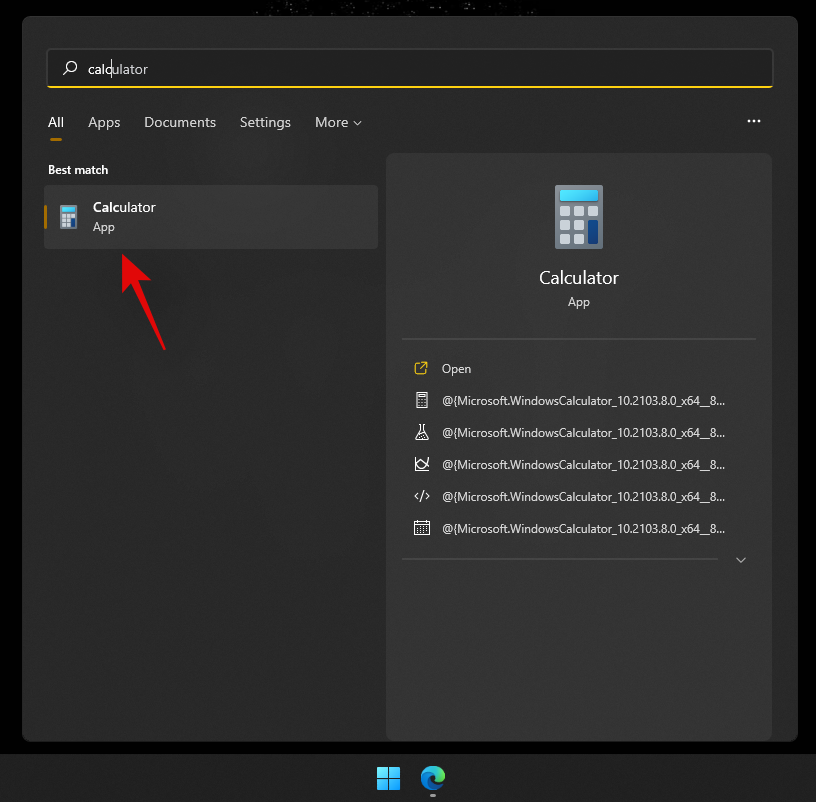
And that’s it! You will now have cleared all your temporary browser and cache data from Google Chrome on your Windows 11 system.
Method #9: Clear Prefetch
Prefetch is a memory management system introduced back in Windows XP as a way to reduce boot times and program launch times on modern systems. Prefetch stores important launch data for Windows and programs in an easily accessible location that can be directly accessed by your RAM and CPU.
Prefetch, however, can end up storing a lot of temporary files over time and if you are facing temporary file storage issues, then it would be a good idea to clear your Prefetch folder. Clearing the prefetch folder does not reset anything and only will increase your boot time for the first or second restart on your system. Use the guide below to clear the Prefetch folder on your Windows 11 system.
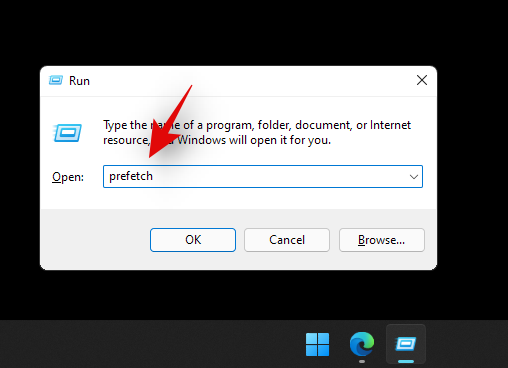
Press Windows + R on your keyboard to launch the Run dialog box. Type in ‘Prefetch’ and press Enter on your keyboard.
Click on ‘Continue’ when prompted to access the prefetch folder. You will now be in the prefetch folder. Simply select all the files in the folder and press ‘Delete’ on your keyboard. Confirm your choice to delete all the files from your system.

Click on ‘Yes’ to confirm your choice.

Clear your recycle bin and restart your PC for good measure.
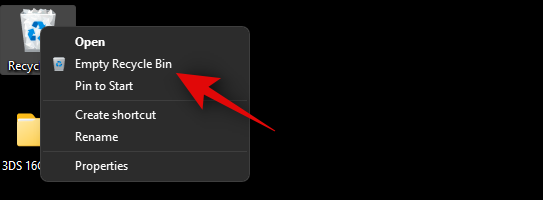
And that’s it! You will now have cleared the prefetch folder on your system which should help free up some storage space on your system.
Method #10: Clear your File Explorer History
File Explorer history accumulates minimal data over time however, it can end up being quite huge in size if Windows fails to regularly clear this cache. If you are unable to identify the data taking up storage space on your system then you can try clearing your File Explorer history in Windows 11 as well. Use the guide below to clear File Explorer history.
Press Windows + E on your keyboard to open the File Explorer on your system. Click on the ‘3-dot’ menu icon in the top right corner of your screen.

Select ‘Options’.
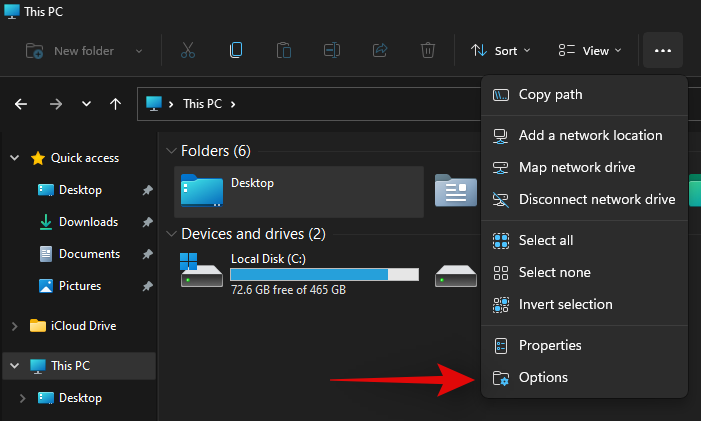
Click on ‘Clear’ under ‘Privacy’.

Click on ‘Ok’.
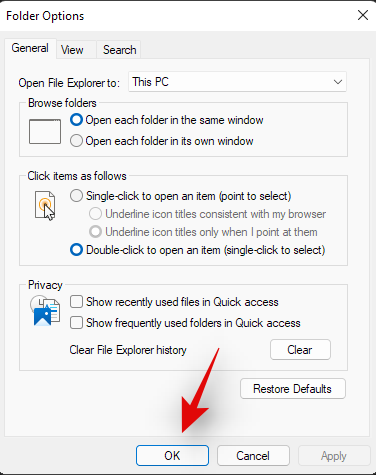
And that’s it! You will now have cleared the File Explorer history from your Windows 11 system.
F.A.Qs
Let’s quickly address some queries that you may have after deleting a whole bunch of files in Windows 11.
Is it okay to delete these files?
Yes, it’s absolutely fine to delete these files. But it is recommended to delete them when you have completed all your work. Temp files are created by applications that are currently open, and deleting them while the parent app is open, may create unwanted complications for the app.
Why are temporary files created?
These files are created by various apps to hold the data being processed while they finish their task. For example, while working on a word document, all the changes are stored on a temp file. The changes are only transferred to the original document when you save the file and close the app.
What happens when I delete these files?
Apart from freeing up space and getting a tiny speed boost, nothing really happens when you delete these files. These files will be re-created when you reopen apps the next time.
Will deleting these files remove any Windows updates?
No. Once the updates are applied, the Windows update files can be removed from your PC. It is only advisable to keep Windows update files in case you need to uninstall an update.
Is it okay to delete previous installations of Windows?
If you don’t plan on reverting to the older version of Windows, you can get rid of the files from the previous Windows installation.
Will deleting these files speed up my PC?
You’ll notice a very slight speed boost. In case you haven’t cleared temp files in ages, and your system drive is almost filled to the brim with junk files, only then you may notice a significant speed boost, only because your system drive now has more room to breathe than before.
When can I delete these temporary files?
The best time to delete temporary files is right after you’ve closed the app. This way, you won’t encounter any alerts saying that the ‘file is being used’, and you don’t risk damaging any data being used by the app.
We hope these methods would be sufficient to help you reclaim the space held back by junk files on your PC. It’s also good practice to periodically clean these temporary files to increase the lifespan of your disk drives while maintaining optimum PC health.
Se te atopas atascado nalgún momento durante esta guía, avísanos nos comentarios a continuación.
Relacionados:


