O teclado é un dos periféricos principais dun PC e debe funcionar correctamente se vai ter algunha interacción significativa co seu ordenador. Pero se algunhas teclas funcionan mal, é posible que non teñas máis remedio que desactivar o teclado.
Manter o teclado desactivado tamén é unha boa medida de seguridade se vas ir a AFK, xa sexa no traballo, na escola ou na casa. Saber como facelo é aínda máis importante se tes fillos ou mascotas na casa, para que non te quedes un borrón de tonterías accidentalmente ao premer as teclas accidentalmente.
Aquí analizamos varias formas de desactivar o teu teclado, xa sexa un teclado de portátil integrado ou externo, e obter máis control sobre o teu teclado.
Relacionado: Como cambiar o teclado en Android
Contidos
Desactiva temporalmente o teclado co Xestor de dispositivos
Podes desactivar o teu teclado para a túa sesión actual desde o Xestor de dispositivos. Aquí tes como:
Desactiva o teclado incorporado do teu portátil
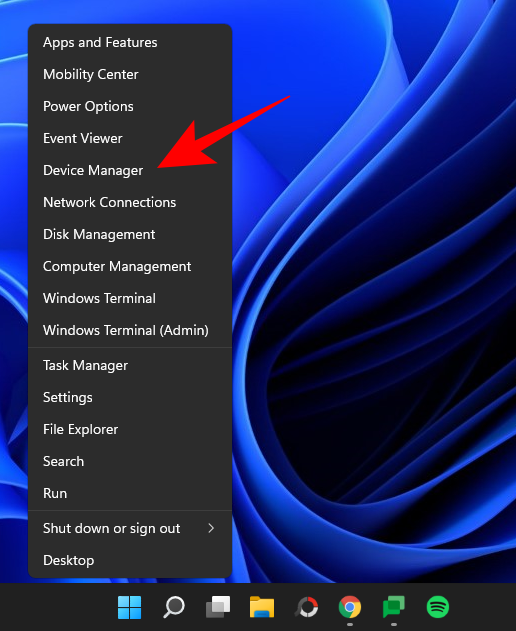
Fai clic co botón dereito no menú Inicio e selecciona Xestor de dispositivos .
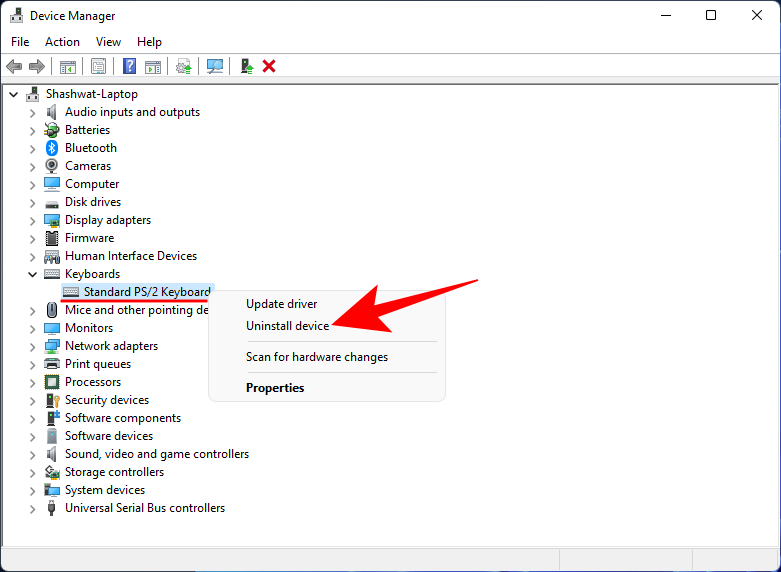
A continuación, fai clic na frecha antes de Teclados para expandilo.
Fai clic co botón dereito do rato no teu teclado PS/2 (teclado incorporado) e selecciona Desinstalar dispositivo .
Cando se lle solicite, prema de novo en Desinstalar .
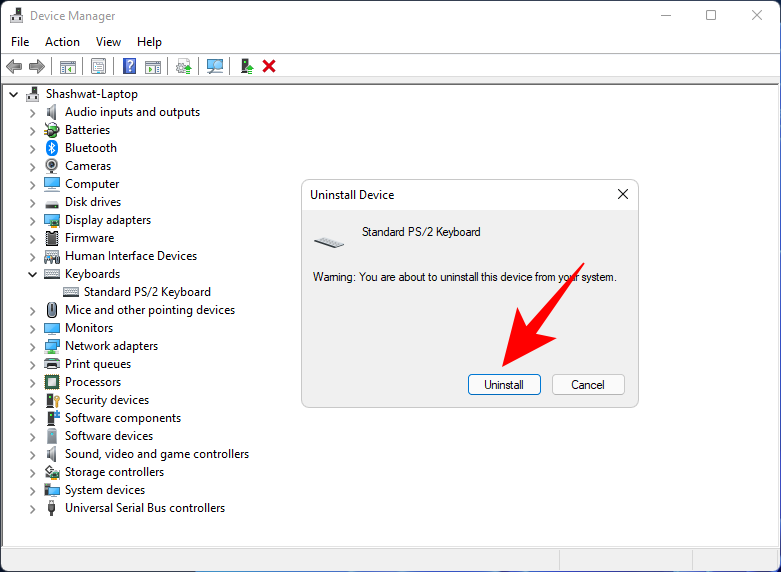
O teu teclado agora está desactivado ata o próximo reinicio.
Desactivar o teclado externo
Se tes un teclado externo conectado e queres desactivalo, vai á mesma rama de Teclados en "Xestor de dispositivos" que antes e selecciona o teu teclado USB. Probablemente se chame Dispositivo de teclado HID .
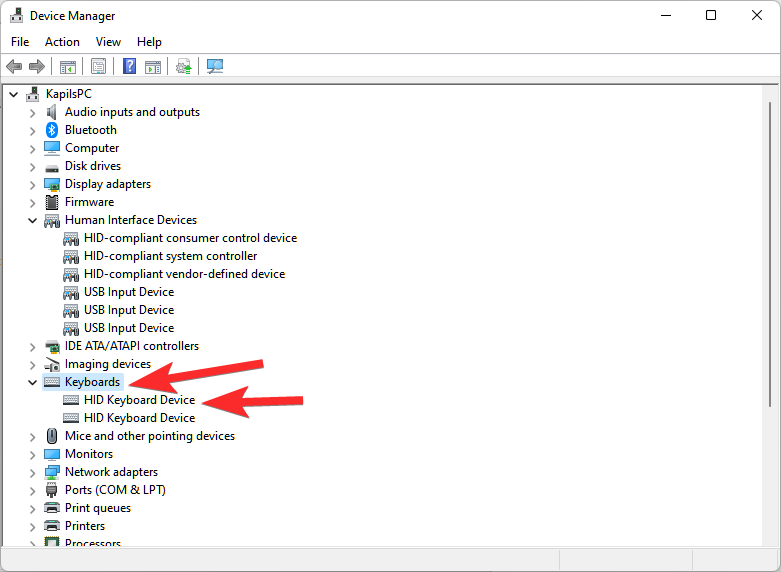
Fai clic co botón dereito sobre el e selecciona Desinstalar dispositivo .
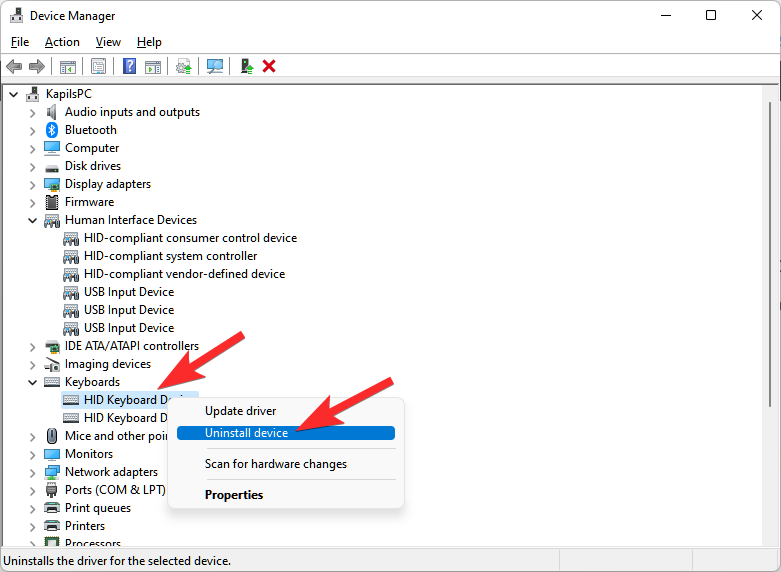
O teu teclado externo agora está desactivado polo momento. Unha vez que reinicie o sistema, Windows detectará que faltan os controladores do dispositivo e instalalos automaticamente para que o teclado estea habilitado de novo. Entón, para unha solución máis permanente, consulte a continuación.
Como desactivar permanentemente o teu teclado
Hai algunhas formas de desactivar permanentemente o teclado, principalmente evitando que Windows instale controladores de teclado. Vexamos todas as formas en que o teclado pode permanecer desactivado mesmo despois dun reinicio.
Relacionado: 6 mellores aplicacións de teclado para Android que todo adicto aos mensaxes de texto precisa
Evita que Windows instale controladores de teclado mediante o Editor de políticas de grupo
Para evitar que Windows instale controladores de teclado despois do reinicio, activaremos unha restrición de instalación do dispositivo mediante o Editor de políticas de grupo. Aquí tes como:
Primeiro, abre o Xestor de dispositivos (seleccionao despois de facer clic co botón dereito en Inicio). Expande a rama Teclados .
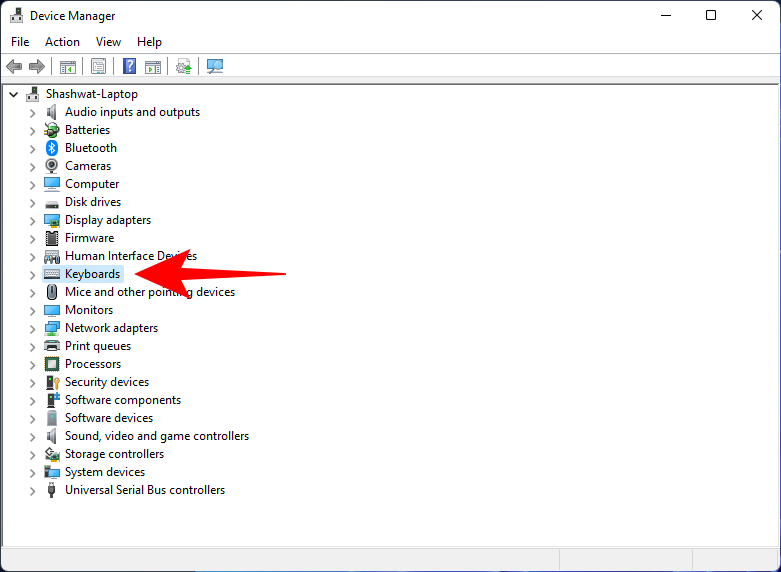
Fai clic co botón dereito do rato no teu teclado e selecciona Propiedades .
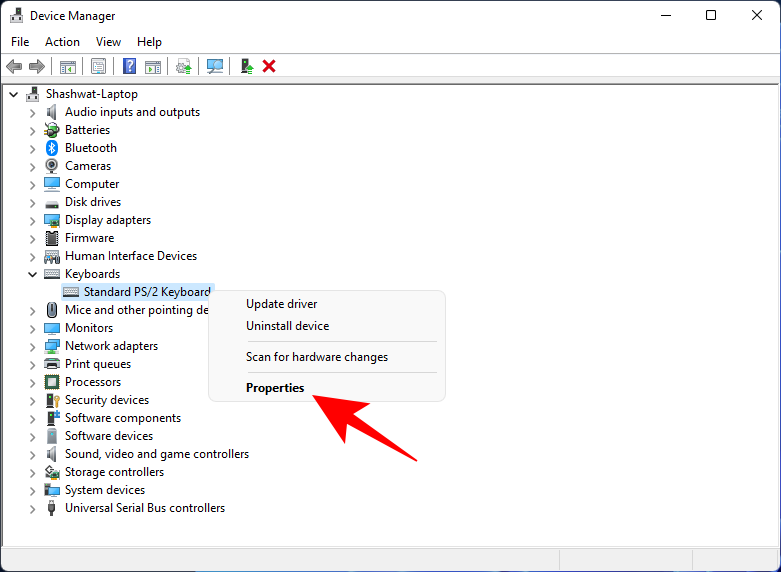
Cambia á pestana Detalles .
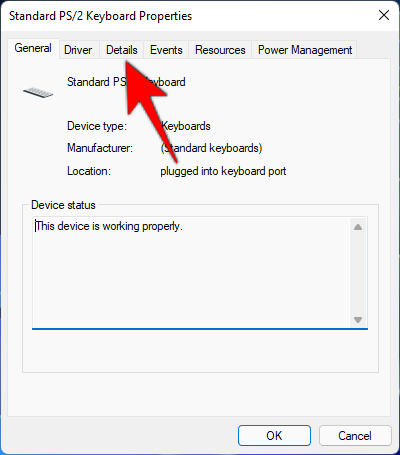
En "Propiedade", faga clic no menú despregable e seleccione ID de hardware .
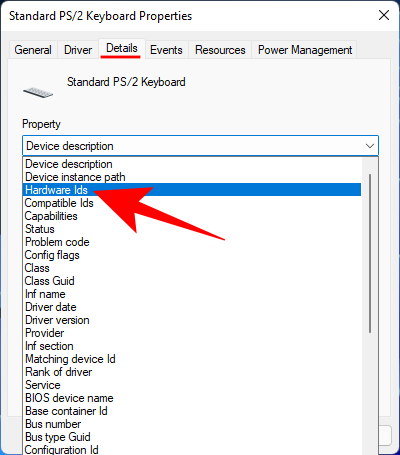
Verá tres valores de hardware baixo el.
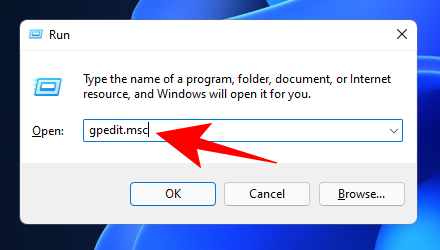
Mantén aberta esta xanela. Agora abra a caixa de diálogo EXECUTAR premendo Win + R, escriba gpedit.msc e prema Intro.
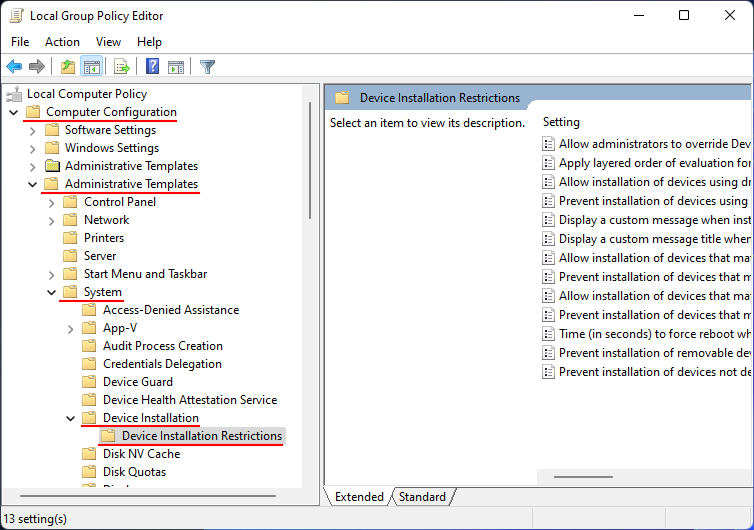
Agora, vai a Configuración do ordenador > Modelos administrativos > Sistema > Instalación do dispositivo > Restricións de instalación do dispositivo .
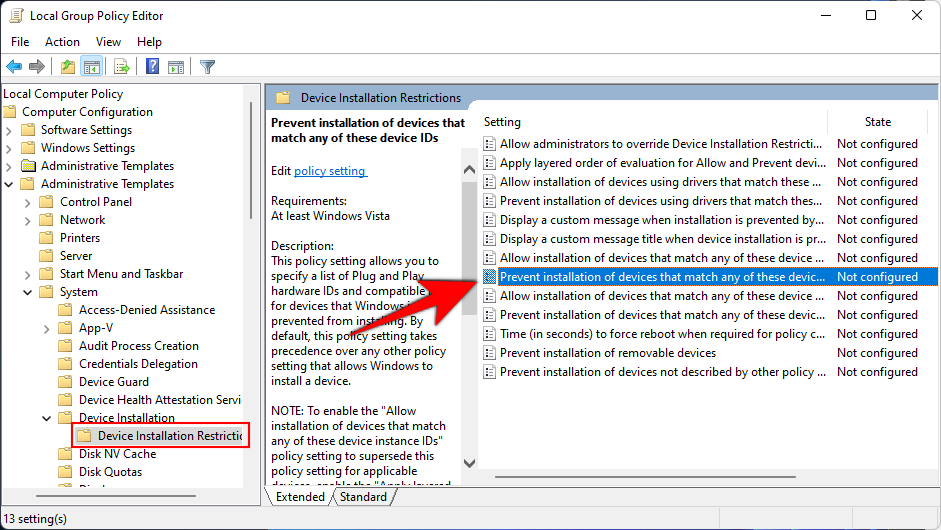
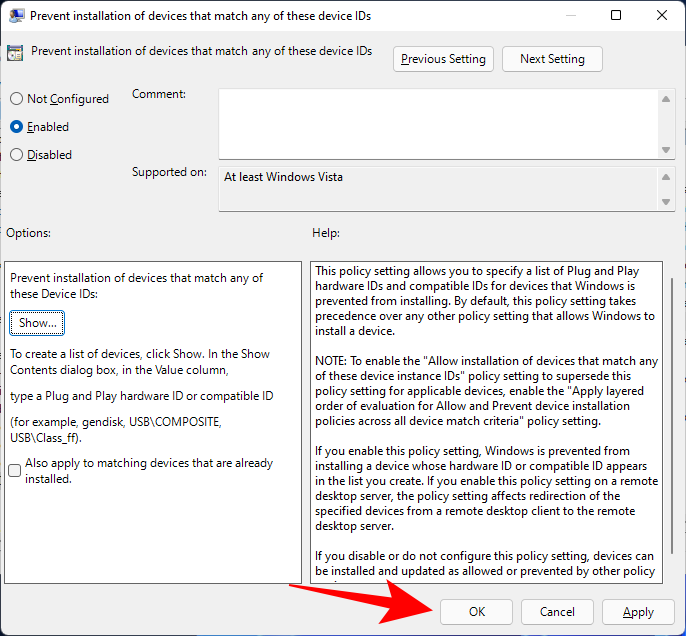
Na parte dereita, fai dobre clic en Impedir a instalación de dispositivos que coincidan con calquera destes ID de dispositivo .
Seleccione Activado .
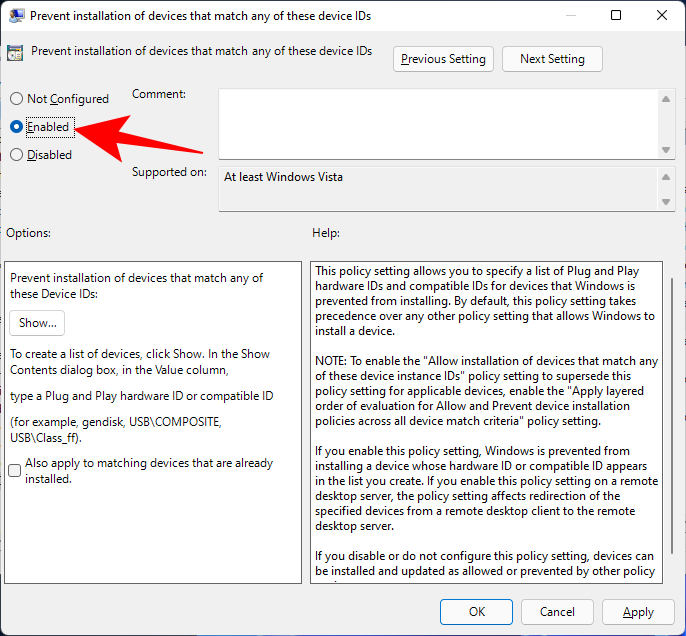
A continuación, en "Opcións", fai clic en Mostrar .
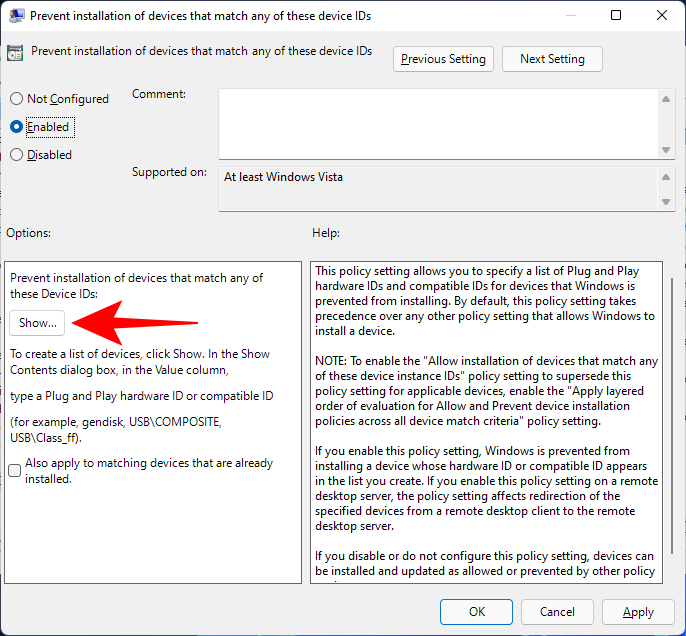
Isto abrirá unha xanela "Mostrar contido".

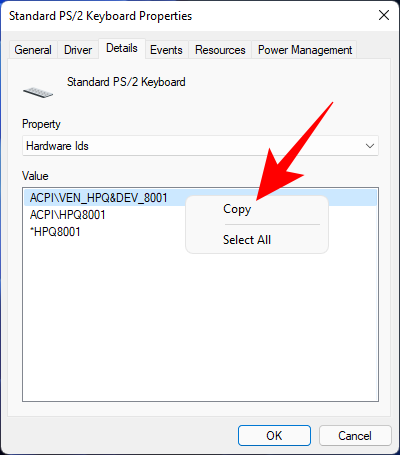
Now go back to the Keyboard properties window that you opened from the Device Manager before, right-click on the first value in the list and select Copy.
Then return to the ‘Show Contents’ window and click under ‘Value’. Then paste the hardware ID in that box (Ctrl + V).
Click OK.
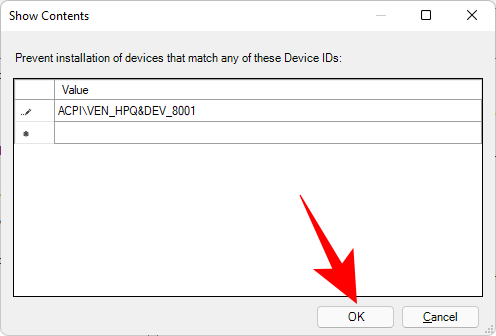
Click OK again.
Now, go back to the Keyboards branch in Device Manager, right-click your keyboard and select Uninstall device.
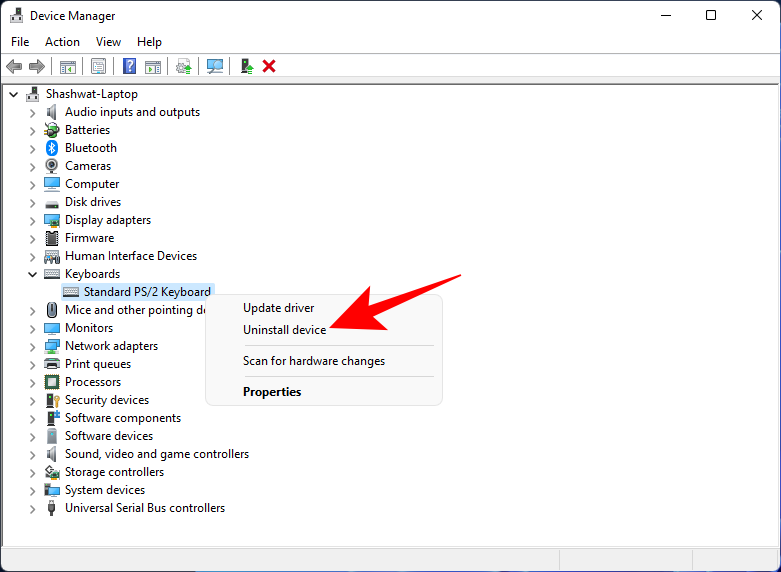
This will disable the keyboard, and this time when your restart your PC, your keyboard device won’t install automatically, thereby permanently disabling your keyboard.
If your keyboard still works after reboot, try copy-pasting other available hardware IDs for the device installation restriction policy.
Stop automatic keyboard update with System Properties
Windows has a separate feature that automatically updates hardware drivers when they are missing. But if you want to disable your keyboard for good, you don’t want this to happen. So, in order to disable this feature, we’re going to take the help of System Properties. Here’s how:
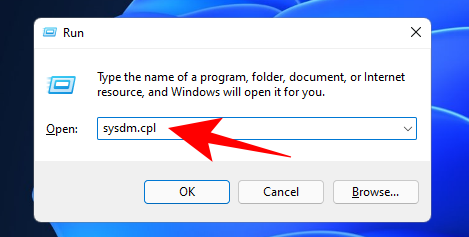
Press Win + R to open the RUN dialog box, type sysdm.cpl, and hit Enter.
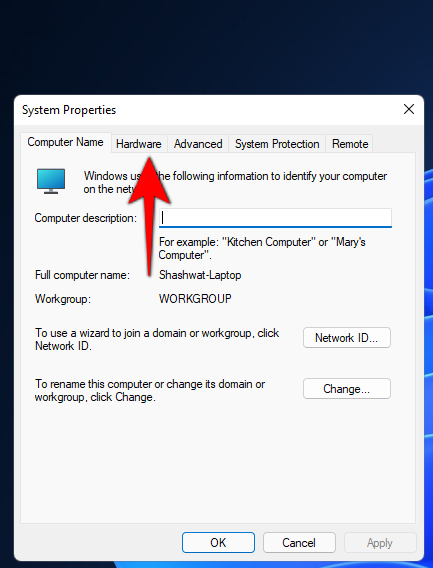
Switch to the Hardware tab.
Click on Device Installation Settings.
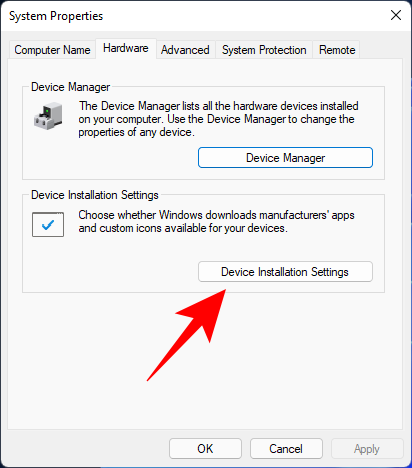
Choose No.
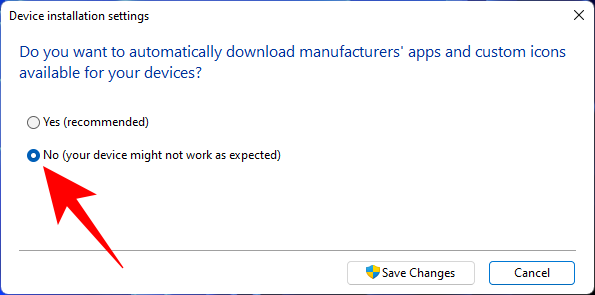
Then click Save Changes.

Click OK on the ‘System Properties’ window.
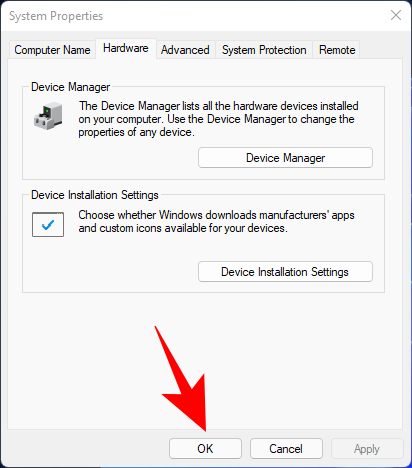
Now, whenever you restart your PC after disabling your keyboard drivers from Device Manager, it will stay disabled.
Use the wrong driver for your keyboard (so it doesn’t work)
This rather ingenious workaround to keep your keyboard permanently disabled is not really advisable, especially if your touchpad and keyboard use the same driver. It is also known to cause BSOD on Windows, so take this route only if all other methods have failed and you absolutely need to disable your keyboard.
Here’s how to install incompatible drivers for your keyboard so it loses functionality and is permanently disabled:
Open Device Manager as shown before (right-click Start and choose Device Manager). Expand the Keyboards branch, right-click on your keyboard driver, and select Update Driver.
Select Browse my computer for driver software.
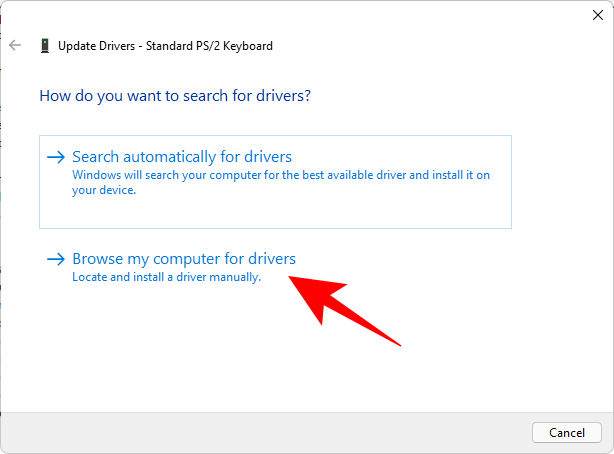
Select Let me pick from a list of available drivers on my computer.
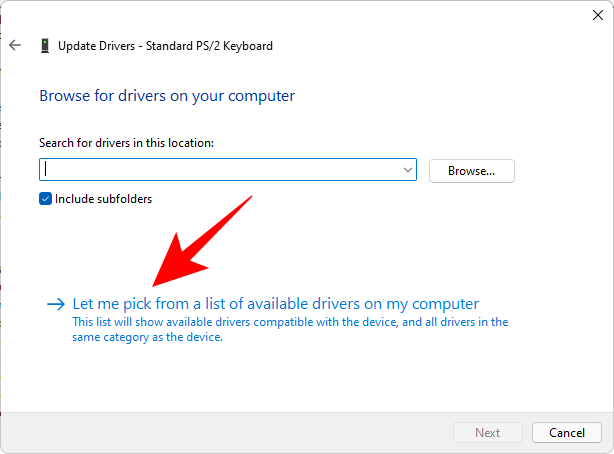
Make sure there’s no check before Show compatible hardware.
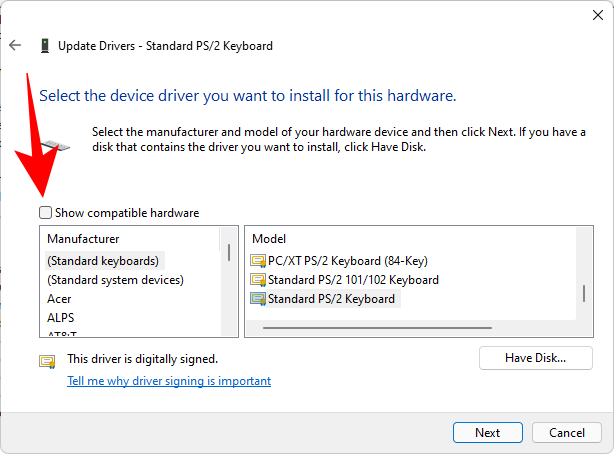
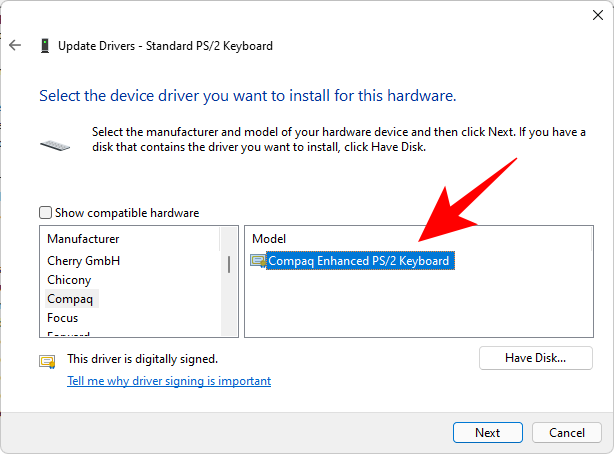
Now, scroll through the list of manufacturers on the left and select any manufacturer other than your own. For example, we have an HP computer, but we’re selecting Compaq as the manufacturer.

Then select a model on the right.
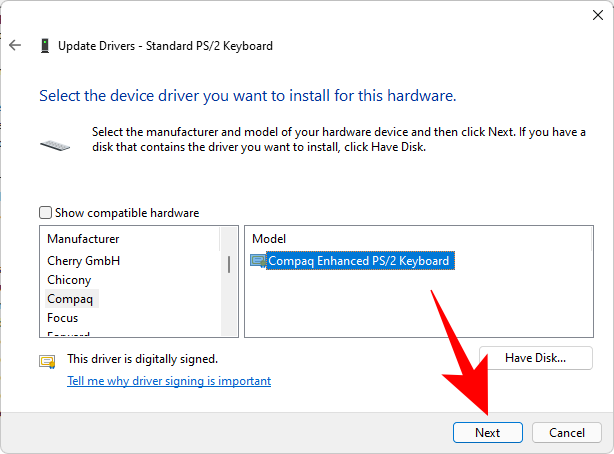
Click Next.
When prompted, click Yes.
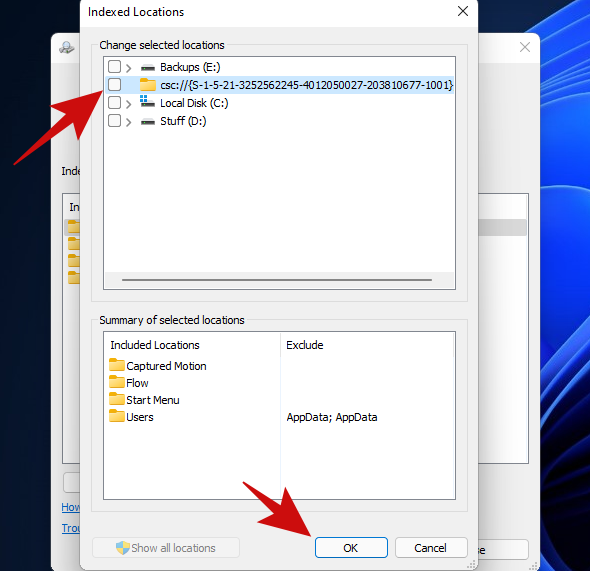
Restart your computer.
Your keyboard will now stop working. If you ever want to start using it again, simply go to Update drivers and select Search automatically for drivers.
Disable PS/2 port service from the Command Prompt
As most laptops are internally connected through the PS/2 ports, you can also disable the service that controls this port and effectively disable the keyboard. Here’s how you can do so:
Press Start, type cmd, and click on Run as administrator.
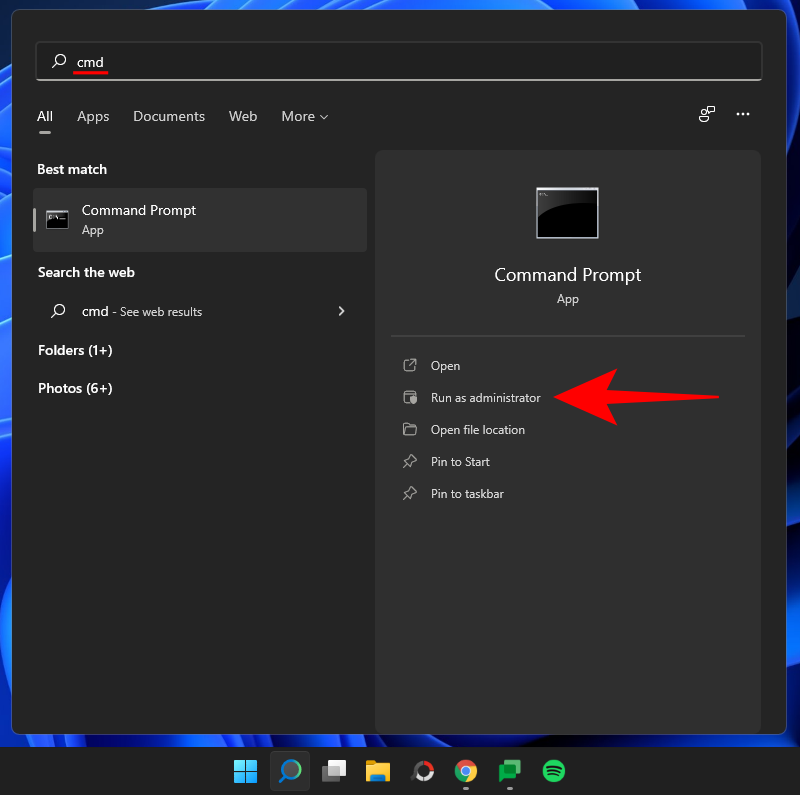
Type in the following command to disable the PS/2 port service:
sc config i8042prt start= disabled

Press Enter. Once you get the “ChangeServiceConfig SUCCESS” message, you can be sure that your PS/2 port service is now disabled and your keyboard won’t work the next time you reboot your system.

If you want to re-enable the PS/2 port service, type the following command:
sc config i8042prt start= auto

Then press Enter.
Use third-party applications to disable keyboard
Disabling the keyboard, either temporarily or permanently, does have its issues, especially if you’re on a laptop and do not have an external keyboard connected. Besides, disabling the entire keyboard because a few keys are causing you trouble can seem like overkill. That is where third-party applications come in to solve the problem. Let’s take a look at some of them.
Keyboard Locker
Though this is an old application, Keyboard Locker still gets the job done easily as locking the keyboard is its sole purpose.
Download: Keyboard Locker
Download the application from the above link and extract its contents with an archive tool. Then double-click keyboardlock.exe to start it.
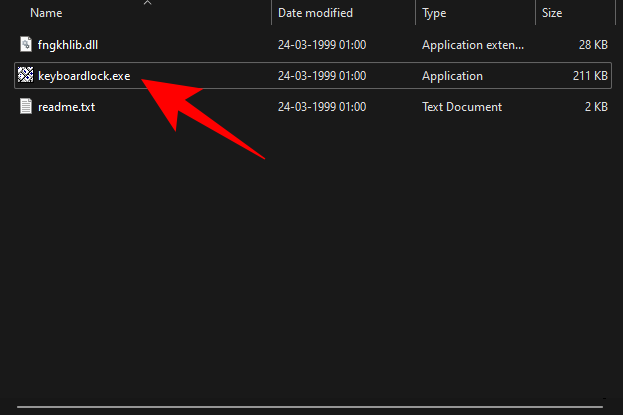
By default, the application runs and minimizes in the system tray. You can find Keyboard Locker in the system tray.
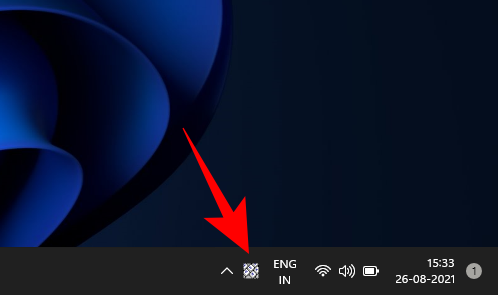
If you don’t find it there, click on the upward arrow towards the right of the taskbar to find it.
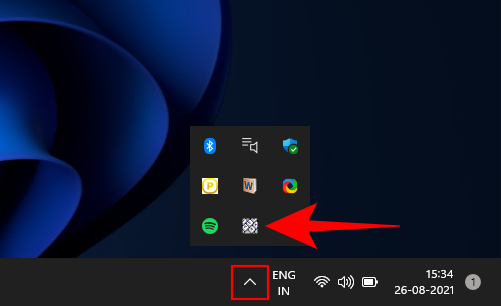
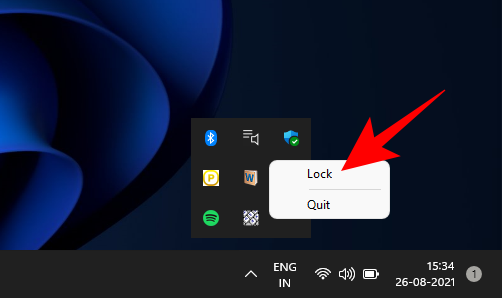
Right-click on it and select Lock to lock your keyboard.
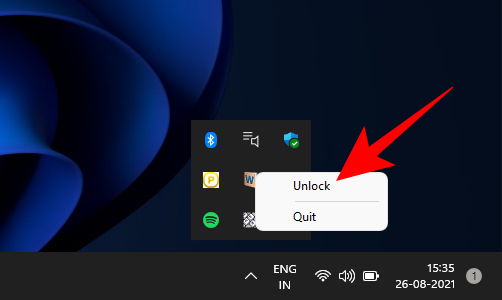
When you want to unlock it, right-click on it again and select Unlock.
BlueLife KeyFreeze
BlueLife KeyFreeze is another application that simplifies disabling your keyboard when you’re AFK.
Download: BlueLife KeyFreeze
Unzip the contents of the downloaded file with an archive tool. Then, to disable the keyboard, double-click on KeyFreeze.exe (KeyFreeze_x64.exe for 64-bit architecture).
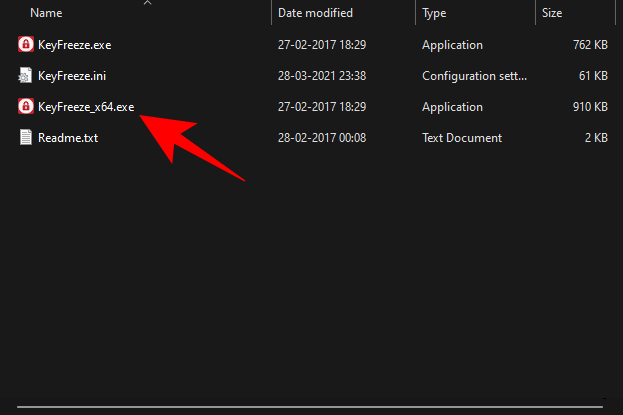
You will have 5 seconds to cancel the lock command.

After this, the application will lock the keyboard. By default, it will also lock the mouse. Use the default hotkey Ctrl + Alt + F to disable the lock.
Now, to configure KeyFreeze so that only the keyboard gets locked, firstly, right-click on the padlock towards the right of the taskbar and select Options.
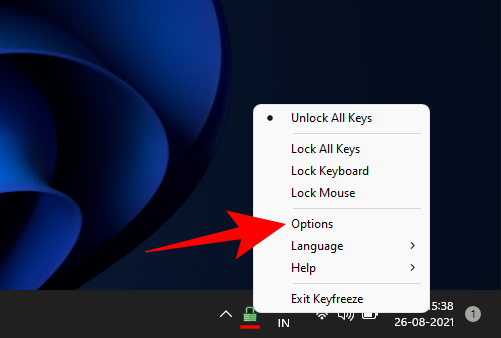
Uncheck Lock mouse keys.
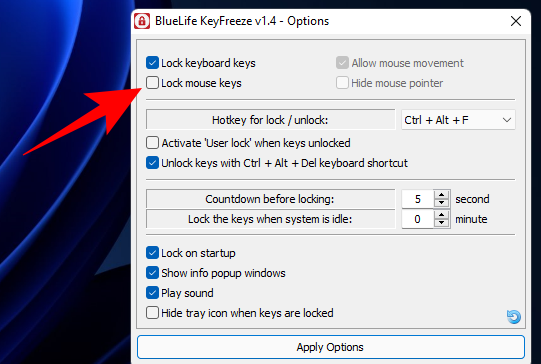
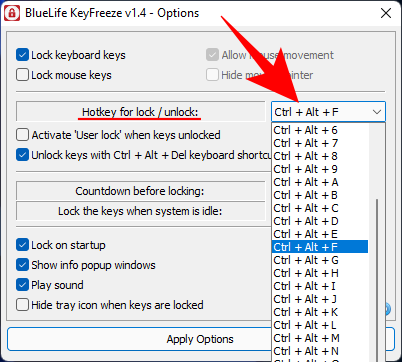
You can also change the hotkey for lock/unlock here.
When you’re satisfied with your selected configuration, click on Apply options.
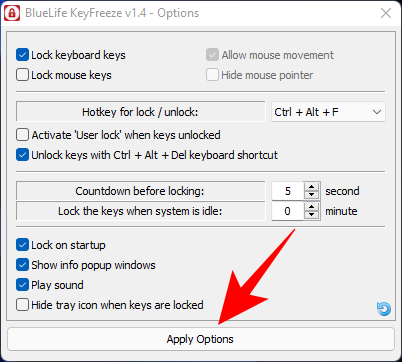
This will ensure that only the keyboard will lock the next time you press the KeyFreeze hotkey.
KeyboardLock
This is another keyboard locker that lets you disable the keyboard, and even lets you password protect the function.
Download: KeyboardLock
Download the application from the above link and extract its contents. Then double-click the KeyboardLock.exe file.
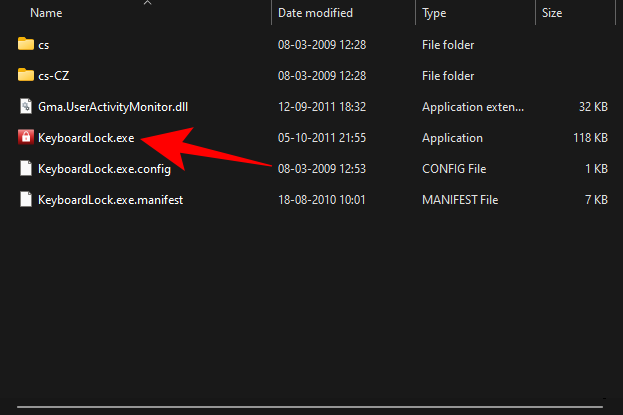
In the application, you will see the password that you have to type to lock/unlock your keyboard and mouse. Press Start to go ahead with it.
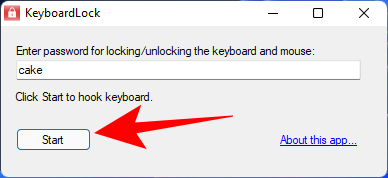
Then type the given password to lock it.
Now, whenever you need to unlock, simply type the password again and the keyboard and mouse will be unlocked. The only problem with this application is that it doesn’t give you an option to not lock the mouse.
Frequently Asked Questions (FAQs)
Let’s go through a few common questions that people tend to ask when looking to disable their keyboards.
How to disable Keyboard shortcuts or hotkeys?
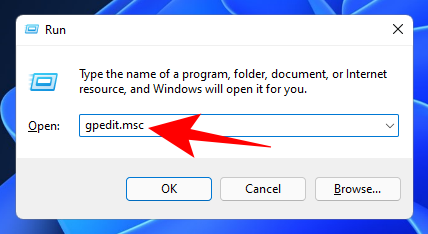
To disable Keyboard hotkeys on Windows 11, press Win + R to open the RUN window, type gpedit.msc, and hit Enter.
Then navigate to Computer Configuration > User Configuration > Administrative Templates > Windows Components > File Explorer.
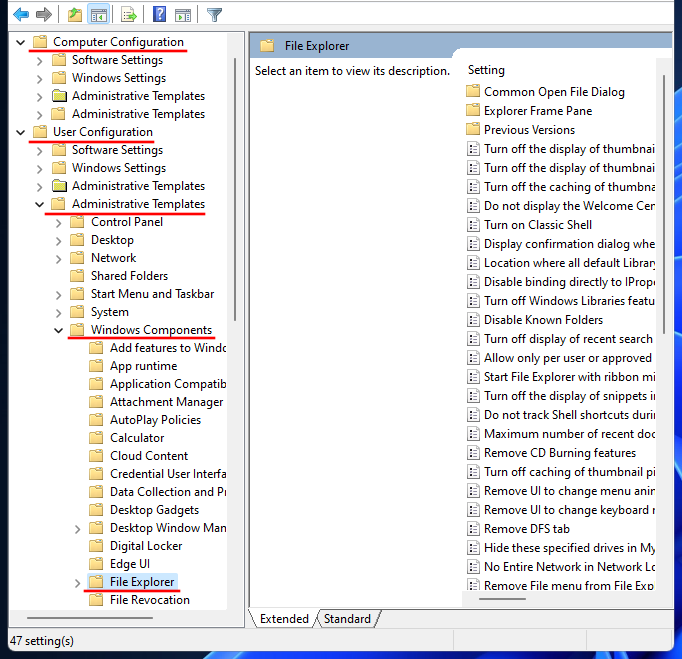
On the right, scroll down to find Turn off Windows Key hotkeys and double-click it.
Select Enabled and hit OK.
How to enable laptop keyboard after disabling?
Enabling your laptop keyboard after disabling will mostly depend on how it was disabled in the first place. If you’ve installed an incompatible driver, you will have to update drivers and install a compatible driver. If you have turned off a service, turn it back on. If you’ve specified the hardware ID in the Group Policy Editor to not install drivers upon startup, delete its value from the same. Finally, if you’ve only temporarily disabled it from the Device Manager, simply reboot. All these ways are mentioned in our guide above so make sure to undo the changes if you’ve disabled the keyboard from those methods.
So these were all the ways that you can disable your keyboard both temporarily and permanently. Doing so becomes necessary if you have two keyboards and you want one not to interrupt with the other, or if you have a problematic keyboard that registers random keys when none have been made. Whatever the case may be, we hope you found this article useful in solving your keyboard problems on Windows 11.
RELATED


