Windows 11 percorreu un longo camiño desde que se anunciou e as versións beta parecen estar recibindo máis e máis probadores cada día. Windows pasou ás aplicacións UWP para o seu sistema e
Windows Store cando se lanzou Windows 10. Esta foi unha transición moi benvida na súa maior parte, pero as aplicacións UWP traen consigo os seus propios erros. Un problema destacado que parece aparecer ocasionalmente cunha actualización de Windows é o erro "ms-resource:AppName". Estás enfrontando o mesmo problema? Aquí tes todo o que necesitas saber sobre iso.
Contidos
Cal é o erro "ms-resource:AppName"?
O erro "ms-resource:AppName" refírese a un problema con Explorer.exe e ShellExperienceHost.exe no seu sistema na maioría dos casos. Ás veces, este erro tamén é causado por unha aplicación UWP que se comporta mal. Este erro ocorre cando a aplicación non se inicia cando está previsto ou Windows se ve obrigado a usar unha caché danada ao enumerar as túas aplicacións.
Se a aplicación se comporta mal, atoparás que a aplicación ten "ms-resource:AppName" como nome na maioría dos lugares, incluíndo o menú Inicio, a barra de tarefas, a lista de aplicacións e moito máis. Non obstante, se os teus procesos explorer.exe e shellexperiencehost.exe se comportan mal, enfrontaráste a este erro só no menú Inicio na maioría dos casos.
Aquí tes como podes identificar o teu problema e solucionalo en consecuencia.
Relacionado: Atallos de Windows 11: A nosa lista completa
Identifica o teu problema
Comeza identificando a aplicación en cuestión e fixala no menú Inicio. Se a aplicación xa está fixada, podes omitir este paso. Asegúrate de que a aplicación mostra "ms-resource:AppName" como nome no menú Inicio.
Agora preme Windows + Rno teu teclado para iniciar o cadro de diálogo Executar. Escriba o seguinte comando e prema Intro no seu teclado.
shell:appsfolder
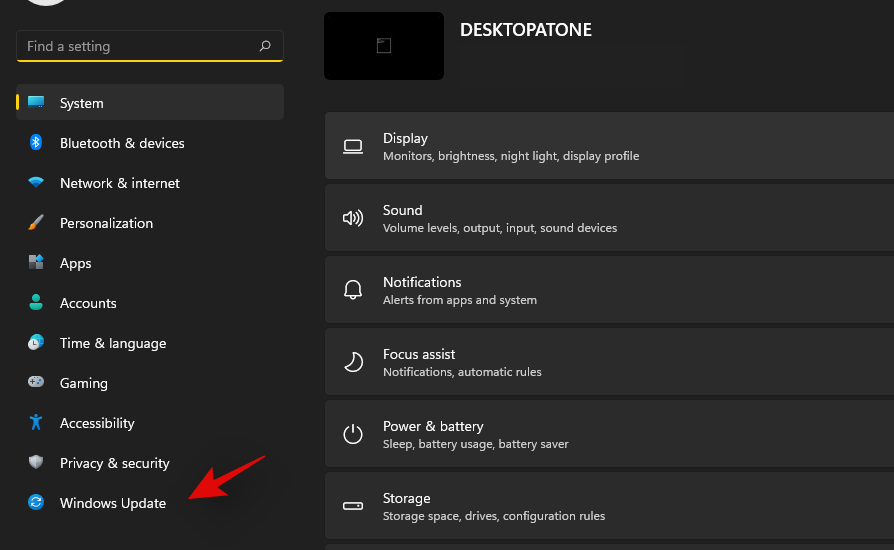
Comprobe o nome da aplicación UWP en cuestión neste cartafol. Se obtén "ms-resource:AppName" como nome da aplicación, afronta este erro en todas partes e pode seguir as correccións posteriores desta guía para o seu problema.
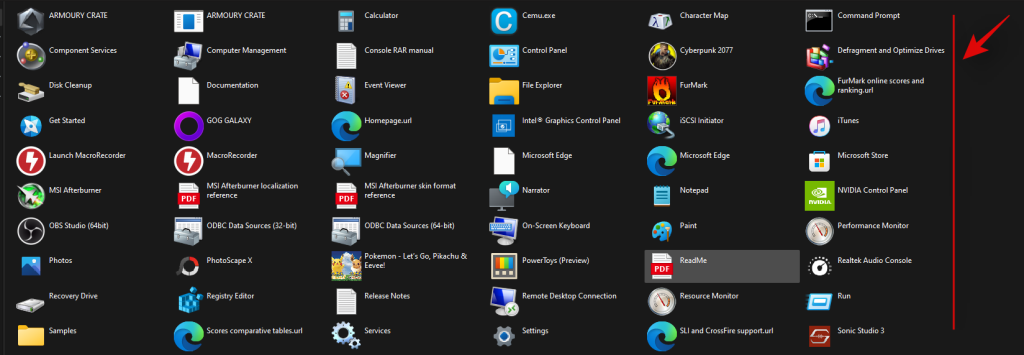
Non obstante, se a aplicación mostra o seu nome correcto neste cartafol, isto indica un problema con Explorer.exe e ShellExperienceHost.exe no teu sistema. Podes usar a primeira guía nestes casos. Imos comezar.
Como corrixir o erro "ms-resource:AppName".
Podes corrixir este erro actualizando a túa caché, reiniciando o proceso afectado ou reparando a aplicación en cuestión, así como a Microsoft Store. Siga unha das seguintes guías dependendo da súa análise da aplicación afectada.
Nota: aínda que este problema se pode replicar, non podemos probar todas as situacións. Polo tanto, recoméndase que se todas as túas aplicacións mostran este erro no Explorador de Windows, podes probar a primeira corrección na sección "Se atopas o erro só no menú Inicio".
Se só se enfronta a este erro no menú Inicio, siga a seguinte guía.
Preme Windows + Sno teu teclado e busca PowerShell. Preme Ctrl + Shift + Enterno teu teclado unha vez que apareza nos teus resultados de busca.
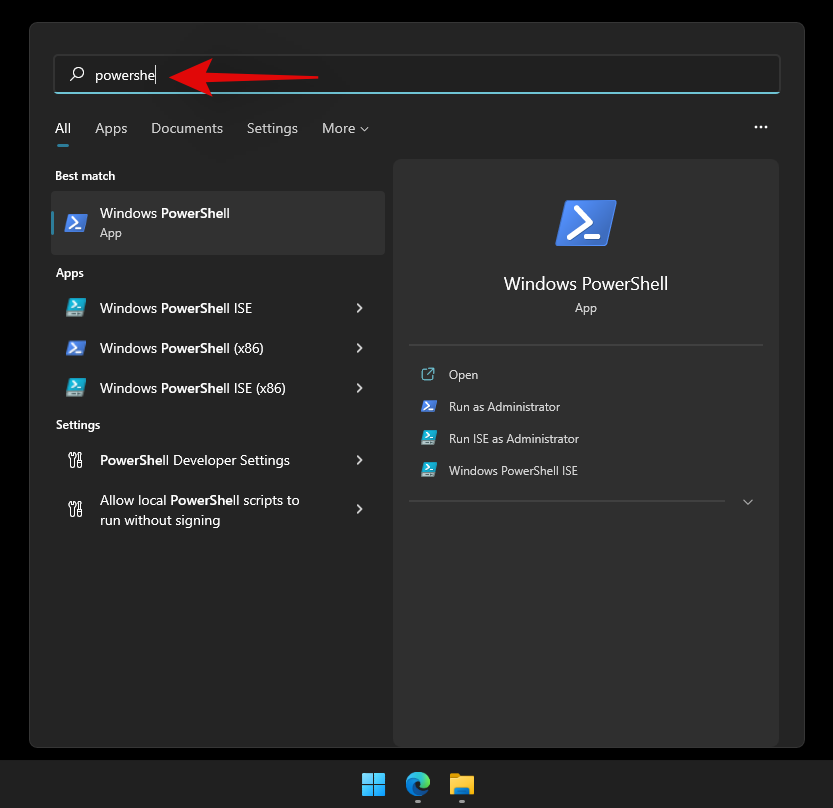
PowerShell lanzarase agora como administrador no teu sistema. Escriba o seguinte comando e prema Intro no seu teclado.
Get-AppxPackage -all *HolographicFirstRun* | Remove-AppPackage -AllUsers
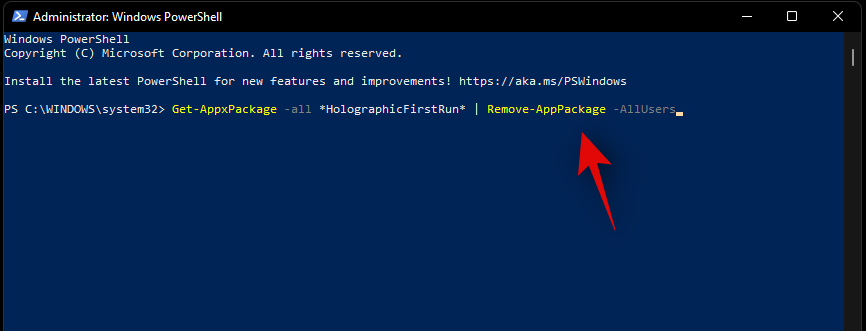
Unha vez executado, recomendámosche que garde todo o teu traballo e reinicie o sistema. Unha vez reiniciado, preme Ctrl + Shift + Escno teu teclado para iniciar o Xestor de tarefas. Fai clic e cambia á pestana "Detalles" na parte superior.
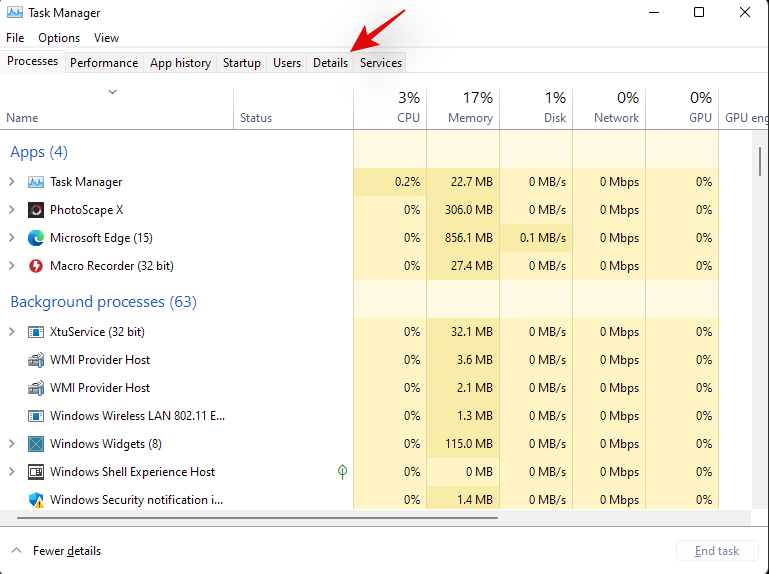
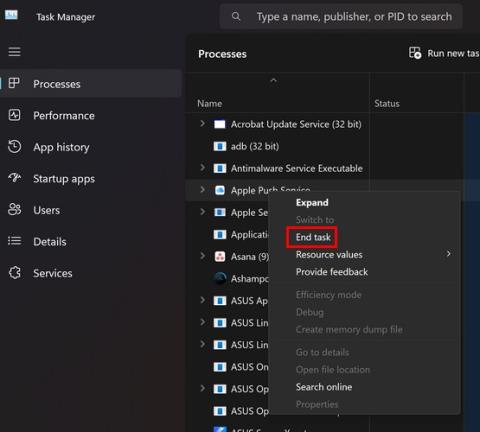
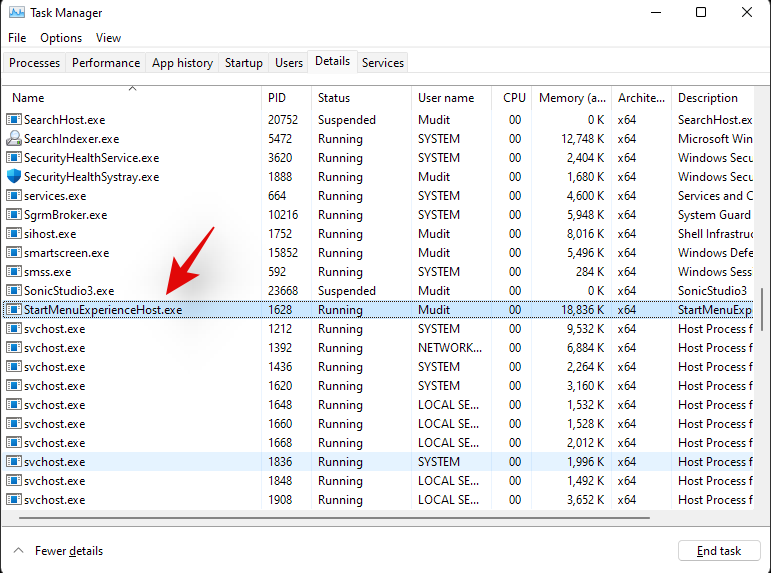
Busca "ShellExperienceHost.exe", fai clic nel e preme Delno teu teclado. Se non tes o proceso en execución, podes seleccionar "StartMenuExperienceHost.exe".
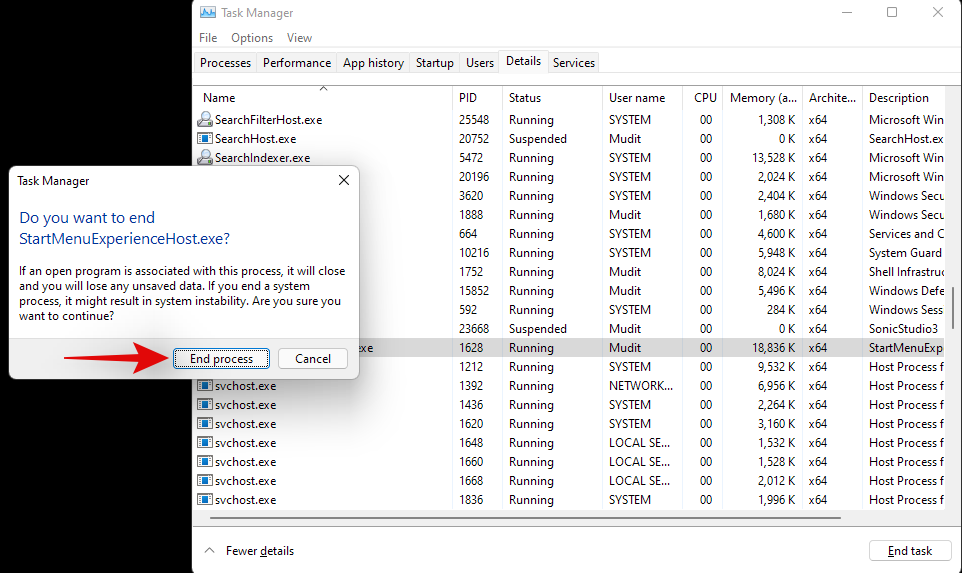
Fai clic en "Finalizar proceso" para confirmar a túa elección.
Agora repita o paso anterior para rematar tamén os seguintes procesos.
- StartMenuExperienceHost.exe
- Explorer.exe
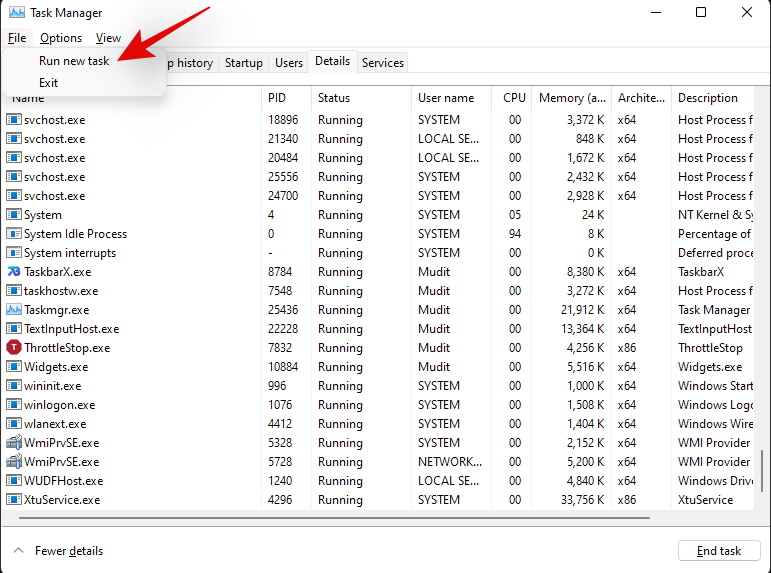
Unha vez feito isto, fai clic en "Arquivo" na esquina superior esquerda.
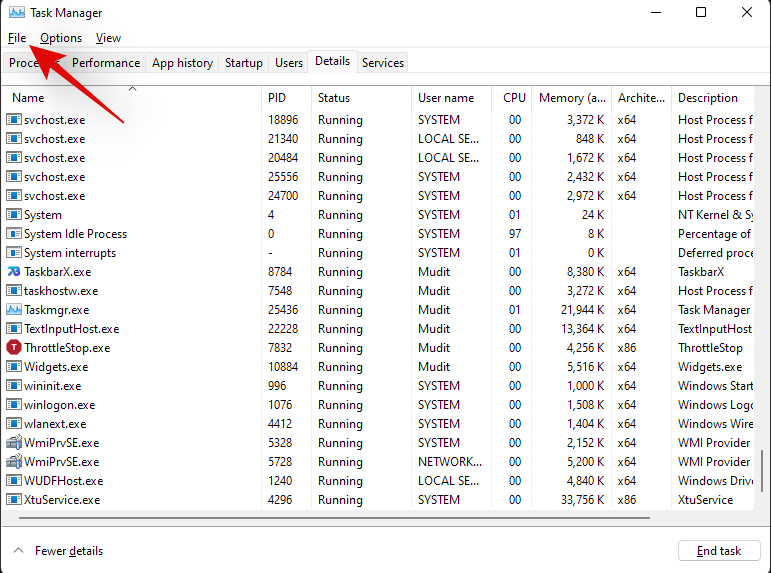
Seleccione "Executar nova tarefa".
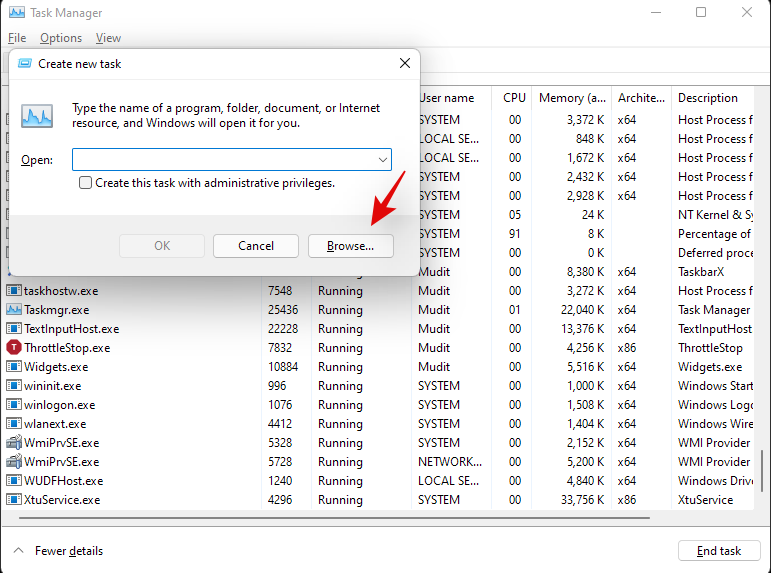
Fai clic en "Examinar".
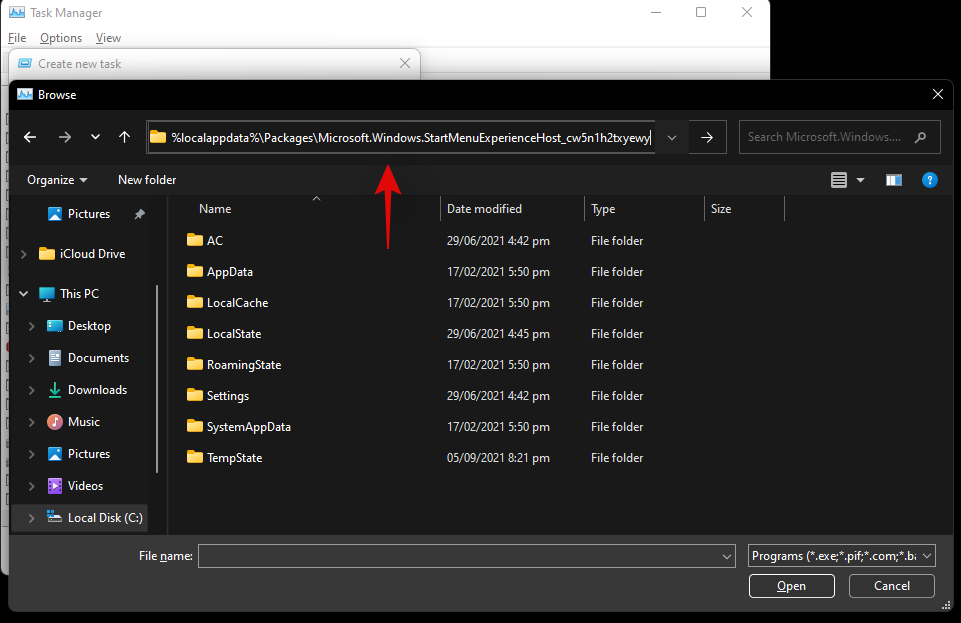
Navega ata o seguinte directorio. Tamén pode copiar e pegar o mesmo na barra de enderezos na parte superior da xanela "Examinar".
%localappdata%\Packages\Microsoft.Windows.StartMenuExperienceHost_cw5n1h2txyewy
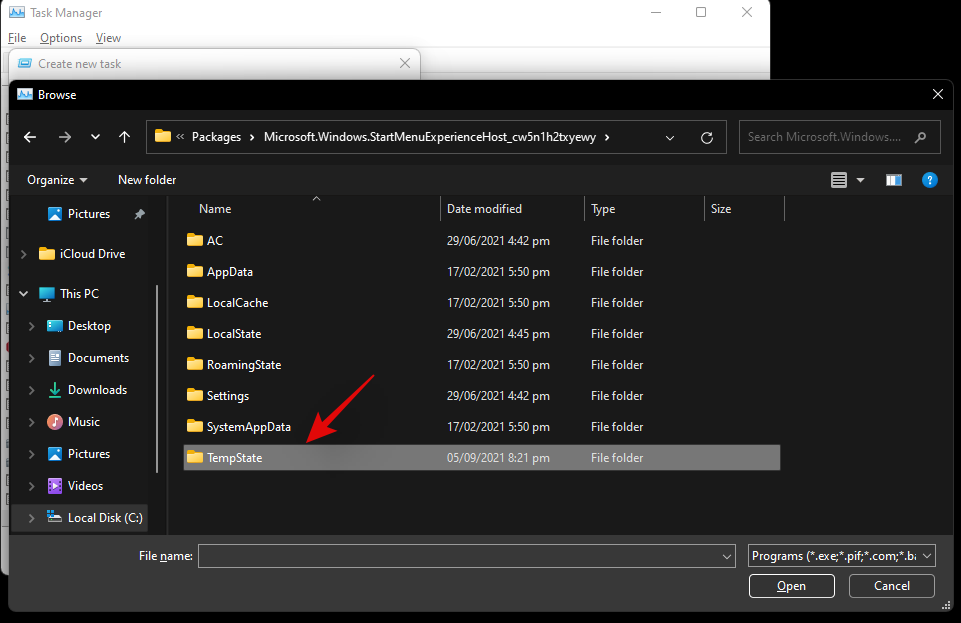
Seleccione o cartafol chamado "TempState" e elimínao permanentemente do seu sistema.
Confirme a súa elección facendo clic en "Si".
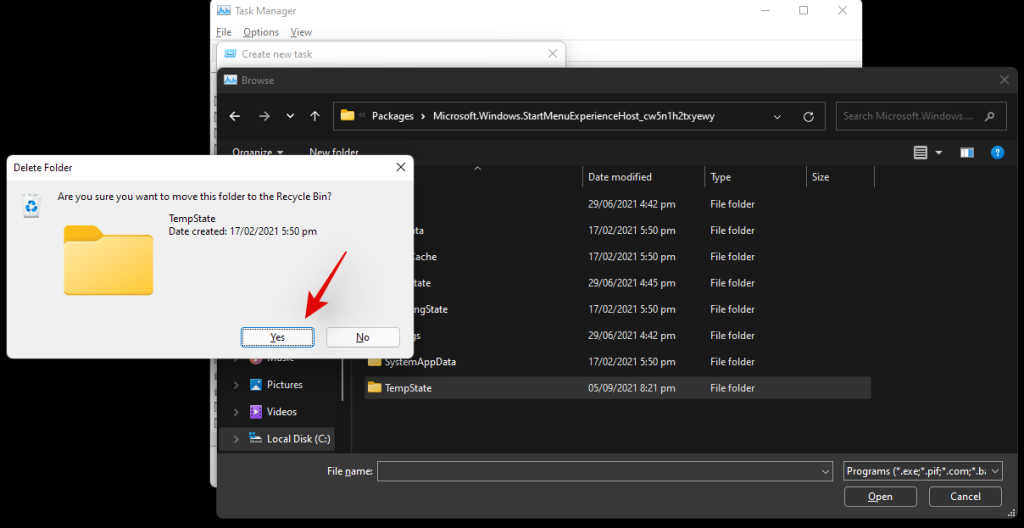
Fai clic de novo en "Ficheiro" e selecciona "Executar nova tarefa". Escribe o seguinte termo e preme Intro no teu teclado.
explorer.exe
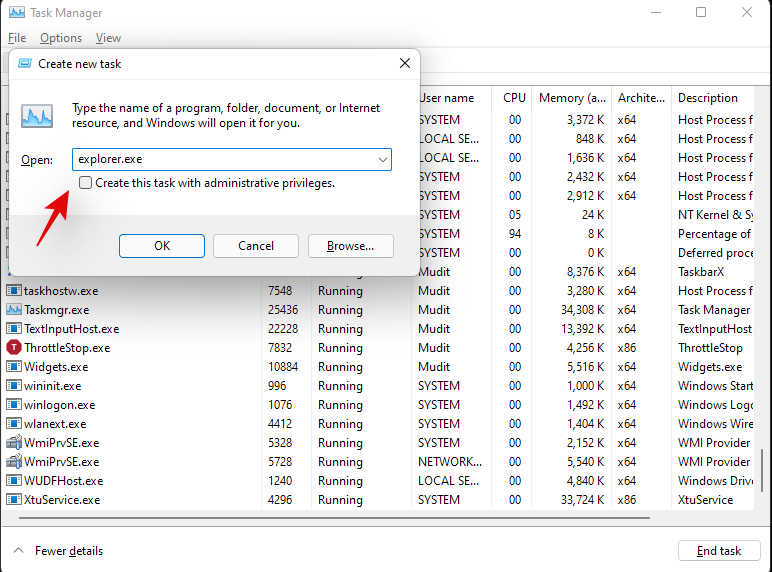
Agora Explorer debería reiniciarse no seu sistema xunto co proceso StartMenuExperienceHost.exe. Agora recomendámosche que reinicies o teu sistema. Despois dun reinicio, o "ms-resource:AppName" agora debería estar solucionado no seu sistema.
Caso 2: se recibe o erro en todas partes
Se estás enfrontando o ms-resource:AppName en todas partes, podes probar as correccións que se mencionan a continuación. O ideal é que unha reparación ou reinstalación da aplicación en cuestión solucione este problema por ti, pero se non, podes optar polas correccións máis serias que se mencionan a continuación. Imos comezar.
Método #01: Repare a aplicación
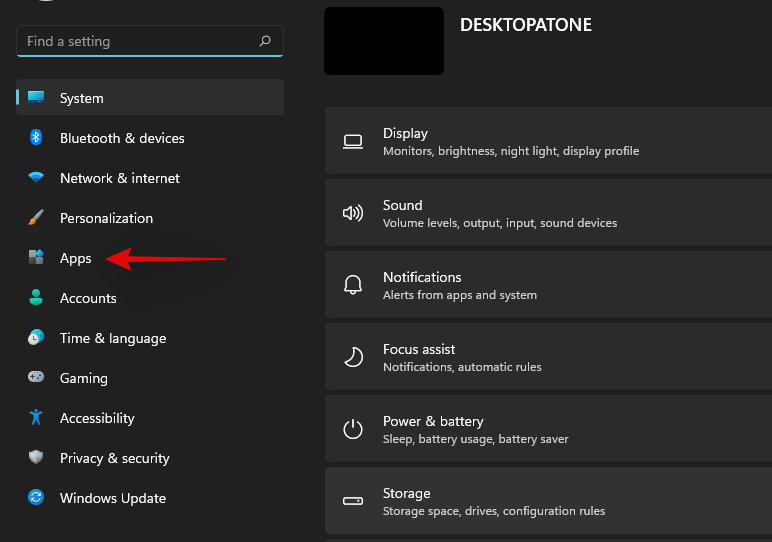
Preme Windows + ino teu teclado e fai clic en "Aplicacións" á túa esquerda.
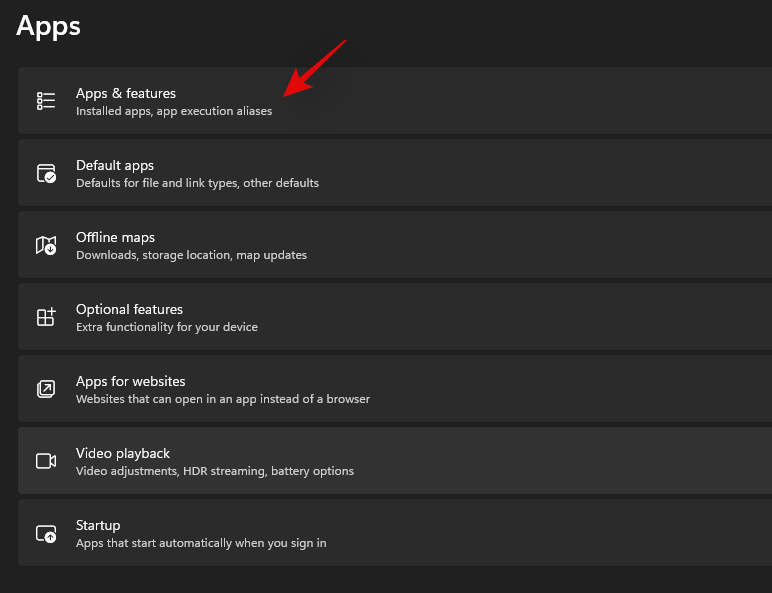
Agora fai clic en "Aplicacións e funcións".
Desprázate pola lista e busca a aplicación afectada actualmente. Fai clic no menú "3 puntos" ao lado.
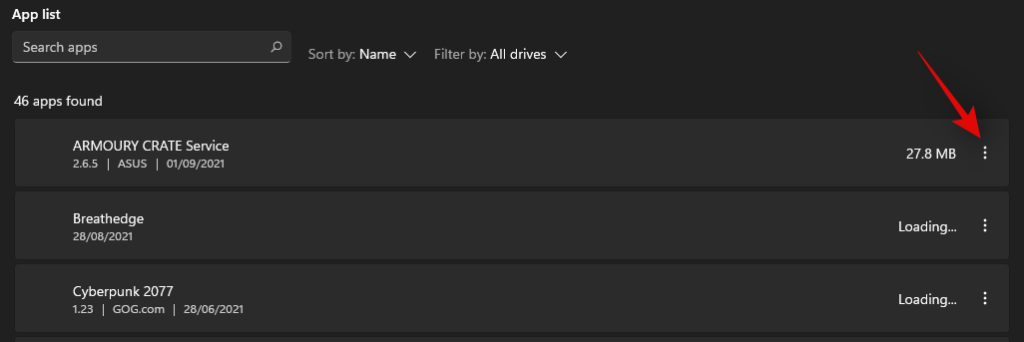
Nota: se estás a buscar unha aplicación do sistema afectada por este erro, desafortunadamente, non aparecerá na túa lista de aplicacións. Nestes casos, pode simplemente reinstalar a aplicación do sistema usando a guía a continuación.
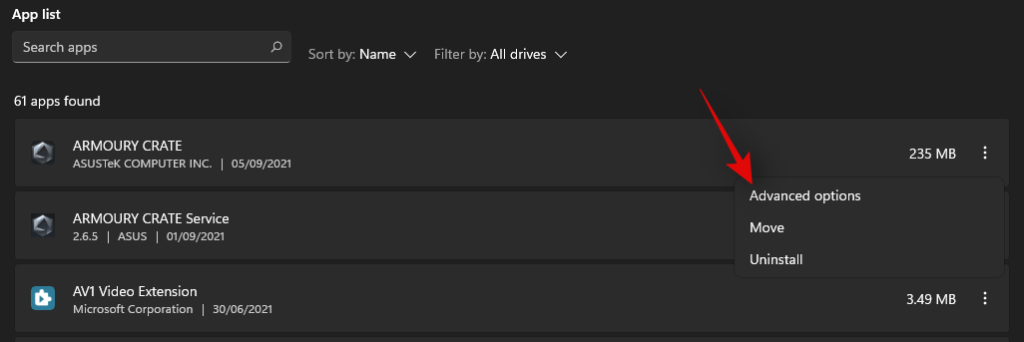
Seleccione "Opcións avanzadas".
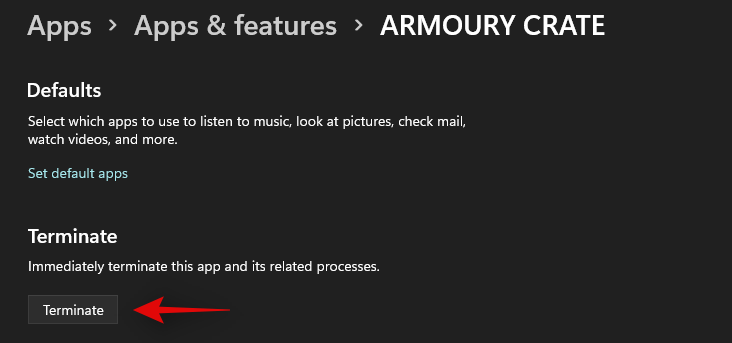
Fai clic en "Terminar".
Agora fai clic en "Reparar".
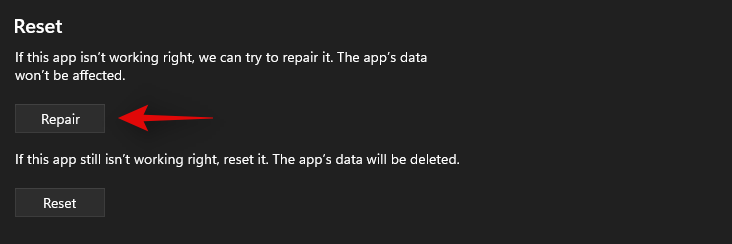
Windows will now do its best to repair the concerned app in the background.
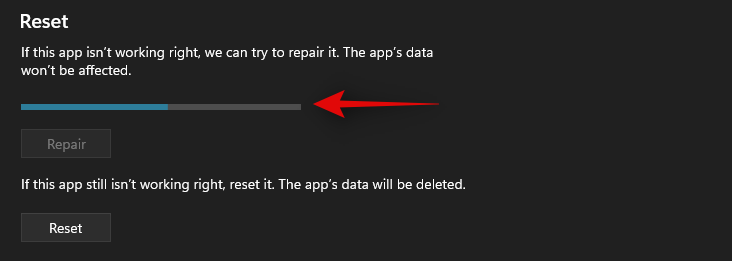
Go to the previous page and repeat the steps above to repair the Microsoft Store app as well as shown below.

Once both apps are repaired, try accessing the affected app again. The issue should now be fixed for you.
Method #02: Reset the app
If repairing the app did nothing for you, then you can reset the app using the guide below.
Press Windows + i on your keyboard and select ‘Apps’ from the left sidebar.

Click on ‘Apps & features’.

Click on the ‘3-dot’ menu beside the affected app.

Select ‘Advanced opitons’.

Click on ‘Terminate’ and then click on ‘Reset’.
Click on ‘Reset’ again to confirm your choice.
Reset the Microsoft Store app as well by using the steps above.

You can now try and access the affected app, which should now be fixed in most cases.
Method #03: Uninstall and reinstall the concerned app
If a Reset and Repair did not work for you, then you can try reinstalling the app on your system. This method works for both system and third-party apps. Follow the steps below to get you started.
Press Windows + S on your keyboard and search for PowerShell. Hit Ctrl + Shift + Enter on your keyboard once it shows up in your search results.
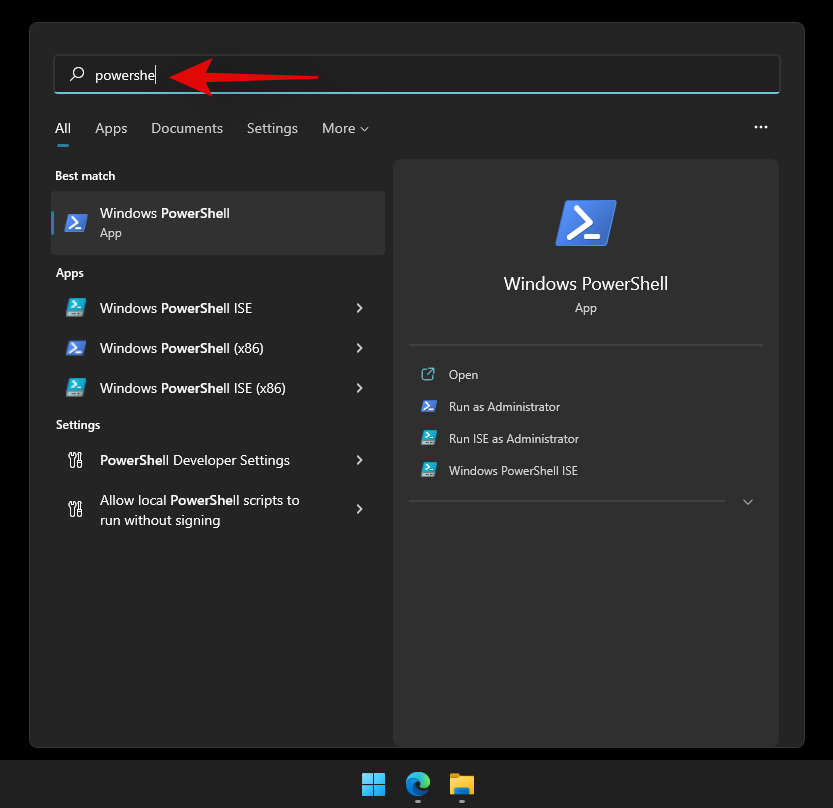
PowerShell will now launch as an administrator on your system. Type in the following command and press Enter on your keyboard.
Get-AppxPackage | Select Name, PackageFullName
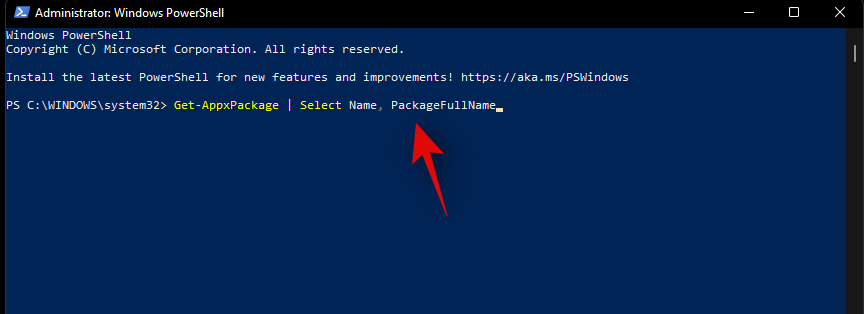
You will now get a list of all the apps on your system. Find the concerned app in the list and copy its entire name.
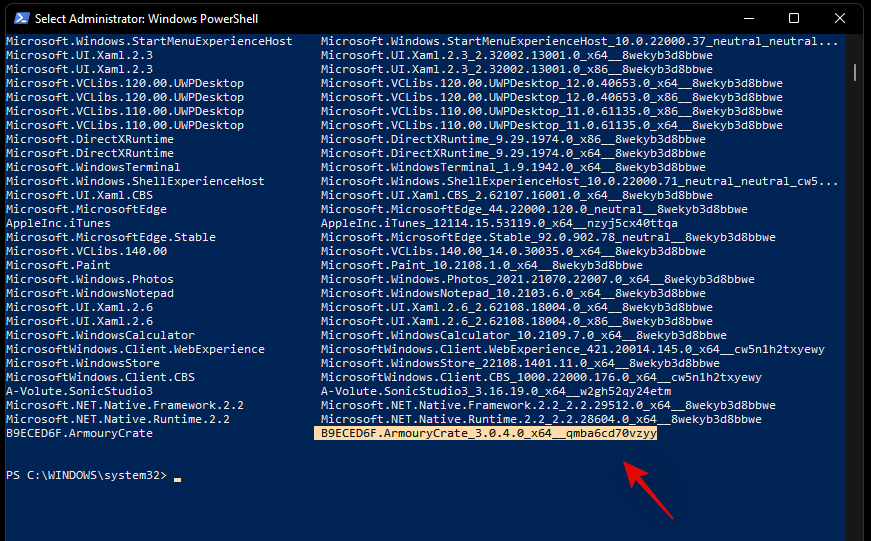
Open notepad and paste the package name in your clipboard and save the text file to a convenient location on your local storage for later reference. Type in the following command and press Enter on your keyboard. Replace NAME with the package name you copied to your clipboard earlier.
Get-AppxPackage NAME | Remove-AppxPackage
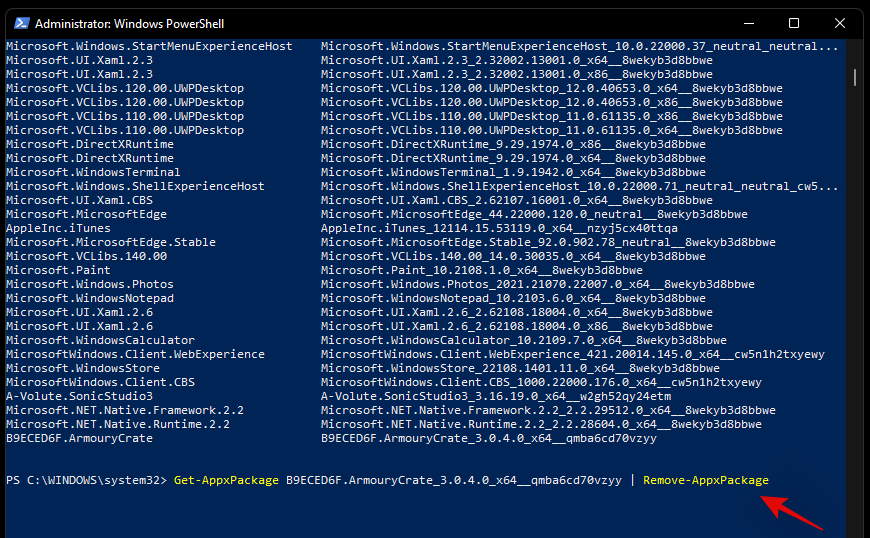
The selected app will now be uninstalled from your system. We recommend you restart your system at this point before reinstalling the app using the steps below. Once your system restarts, open the Notepad file we saved earlier and copy the Package Name to your clipboard.
Now launch PowerShell as an administrator using the steps above. Once launched, type in the command below and press Enter on your keyboard to execute it. Replace NAME with the package name we copied to your clipboard.
Add-AppxPackage -register "C:\Program Files\WindowsApps\NAME\appxmanifest.xml" -DisableDevelopmentMode

The selected app will now be reinstalled on your system. We will now need to refresh Windows UI to detect the new app properly. The best way to do this is by restarting your system.
Restart your system and the ms-resource:AppName error should now be fixed on your system.
Method #04: Reinstall all missing system apps
If the error persists on your system then let’s try uninstalling and reinstalling all missing system apps on your system. If you recently used a cleaner or uninstaller on your system then it is likely that a critical system app was also removed during this process which is causing this issue. We can fix such errors by checking and reinstalling any missing system apps on your system. Follow the guide below to get you started.
Press Windows + S on your keyboard and search for PowerShell on your system. Hit Ctrl + Shift + Enter on your keyboard once it shows up in your results.

PowerShell will now run as administrator on your system. Type in the following command on your system and hit Enter to execute it.
Get-AppXPackage -allusers | Foreach {Add-AppxPackage -DisableDevelopmentMode -Register "$($_.InstallLocation)\AppXManifest.xml"}
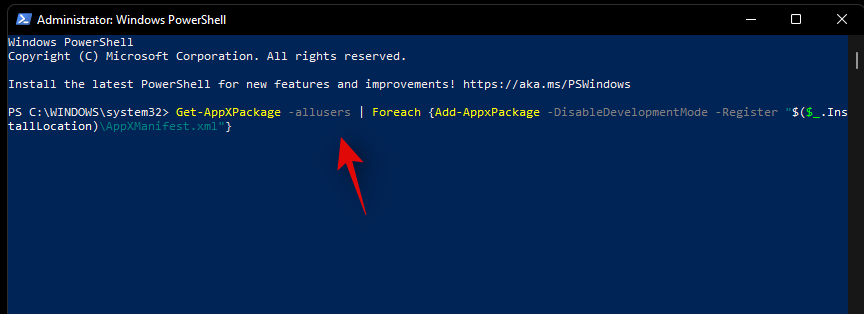
Windows will now check all your system apps and reinstall any missing apps. Apps that already exist will show up as a red text error in PowerShell which can be ignored.
Restart your system and the ms-resource:AppName should now be fixed on your system.
Method #05: Run SFC & DISM commands
SFC and DISM commands can help fix issues with your disks and Windows image. If a corrupted file or a disk error is causing this issue on your system then these commands can help fix such errors. Follow the guides below to get you started.
Check and fix Disk errors
An SFC scan can help you scan and fix errors with your disk. Follow the guide below to get you started.
Press Windows + R on your keyboard and type in CMD. Press Ctrl + Shift + Enter on your keyboard to run CMD as an administrator on your system.
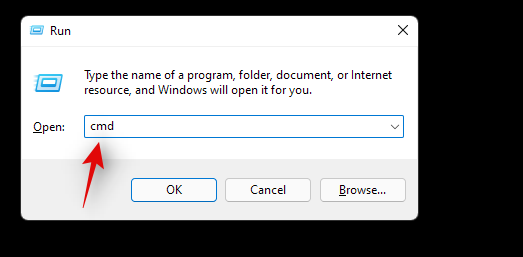
Now type in the following command and press Enter on your keyboard.
sfc /scannow
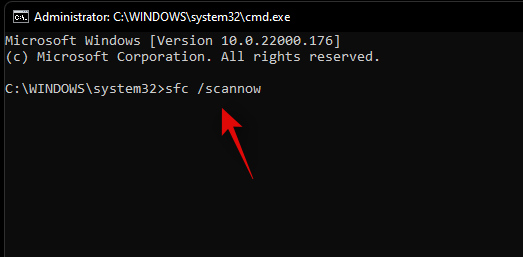
Windows will now do its thing, scan your disk and fix any errors it finds.
Check for corrupted system files and replace them
DISM can help you scan for corrupted system files on your system and replace them if needed. This DISM command will also help you repair your system image if it has been corrupted. Follow the guide below to get you started.
Press Windows + S on your keyboard, search for CMD and click on ‘Run as administrator’.
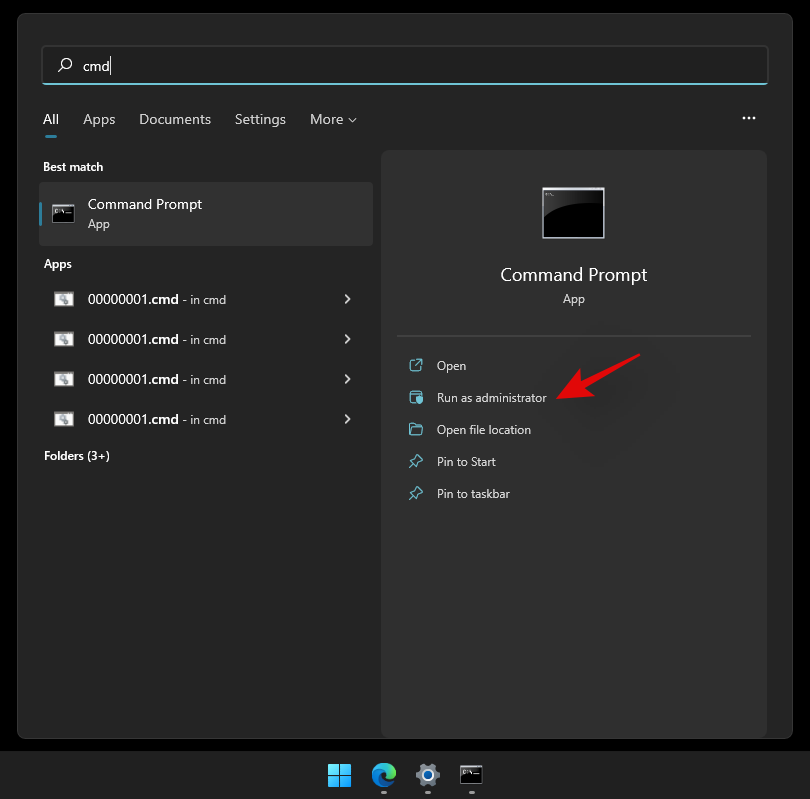
CMD will now launch as administrator on your system. Type in the following command and press Enter on your keyboard.
DISM /Online /Cleanup-Image /RestoreHealth

Once the process finishes, restart your system and the error should be fixed on your system.
Still facing ‘ms-resource:AppName’ error? Last Resort you can try
If you are still facing the ms-resource:AppName error on your system then this indicates a more serious issue with your Windows image. You will now have to repair your Windows installation to fix this issue. We recommend you first try to Reset your PC while retaining your data.
Related: How to Repair Windows 11 [15 Ways]
The above will help fix your issue in most cases. However, if the error persists then we recommend proceeding with a fresh installation of Windows 11 on your system. Your error will be definitely solved after a fresh installation of Windows 11. You can use this comprehensive guide from us to reset your Windows 11 PC in multiple ways.
Related: How to Reset Windows 11
We hope you were able to fix ms-resource:AppName error on your system using the guide above. If you have any more questions, feel free to reach out to us using the comments section below.
Related:


