Windows é o sistema operativo de consumo máis popular na era actual. Pero pode haber momentos en que necesites cambiar entre sistemas operativos para usar unha función determinada ou simplemente probar outras alternativas. Limpar a unidade de arranque e instalar un novo sistema operativo pode ser engorroso, contraproducente e demorar moito.
Sabías que non é a única forma de instalar un sistema operativo novo no teu sistema? A virtualización en Windows 11 a través de Hyper-V de Microsoft permítelle instalar sistemas operativos convidados na súa máquina e cambiar entre eles ao instante para facilitar o acceso. Podes probar novos sistemas operativos deste xeito e finalizar o que mellor se adapte aos teus requisitos actuais.
Vexamos brevemente a virtualización e como podes activala desde a túa BIOS se estás en Windows 11.
Contidos
Que é a virtualización na BIOS?
A virtualización é unha función en Windows de Microsoft que usa un hipervisor interno, Hyper-V, para permitirche instalar varios sistemas operativos convidados no teu PC. A continuación, pode cambiar facilmente entre estes sistemas operativos sen necesidade de limpar unha unidade ou crear particións separadas.
Podes usar ferramentas como VirtualBox para xestionar os teus sistemas operativos e emular o ambiente correspondente para que case calquera SO funcione no teu PC. Podes moverte facilmente entre as túas máquinas virtuais e hosts, e incluso transferir datos entre eles dependendo da ferramenta que esteas a usar.
Relacionado: Como actualizar os controladores en Windows 11
Por que necesitas virtualización?
Pode haber moitas razóns polas que necesitas virtualización. Podes ser un programador que busca codificar unha aplicación para varios sistemas operativos ou un xogador que busca executar xogos antigos. As posibilidades son infinitas, pero aquí tes algunhas formas en que podes usar a virtualización para a túa vantaxe, dependendo dos teus intereses.
- Codificar en diferentes ambientes na mesma máquina
- Executar programas e xogos legados
- Navega de forma anónima
- Usa instantáneas para acceder aos datos infectados
- Use a súa máquina virtual como o seu propio servidor privado
As posibilidades son infinitas. Se queres activar a virtualización no teu sistema, podes usar a seguinte guía para comprobar e activar a virtualización no teu PC se está dispoñible.
Como comprobar se o teu PC admite a virtualización
O teu PC debe admitir a virtualización para que poidas activalo. Se o teu sistema foi fabricado nos últimos 5 anos, é probable que admita a virtualización. Vexa como pode comprobar se o seu PC admite a virtualización.
Método #01: Usando o Xestor de tarefas
Preme Ctrl + Shift + Escno teu teclado para iniciar o xestor de tarefas e cambia á pestana "Rendemento".
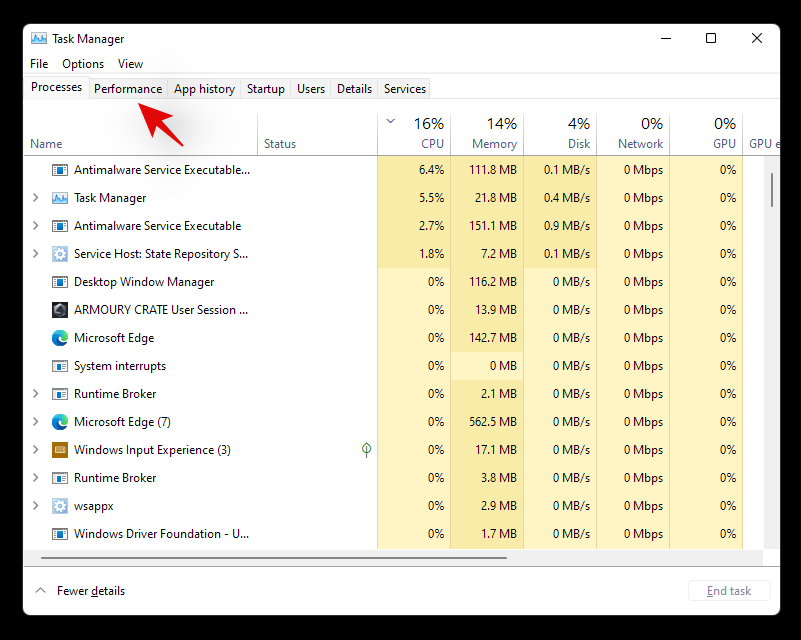
Agora busca a virtualización á túa dereita.
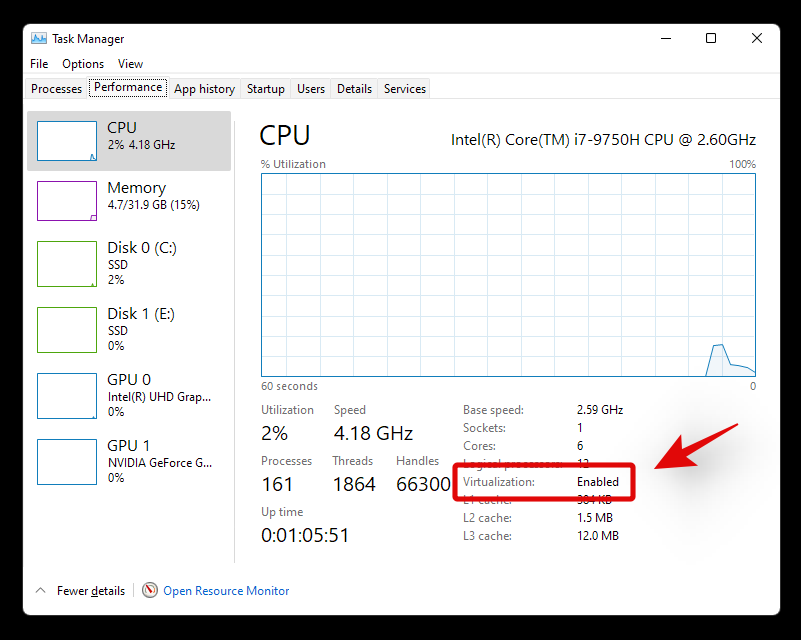
Se a virtualización está dispoñible, a opción aparecerá aquí co seu estado actual ao lado.
E así é como podes usar o xestor de tarefas para comprobar a virtualización.
Método #02: Usando CMD
Preme Windows + Sno teu teclado e busca CMD. Fai clic en "Executar como administrador".
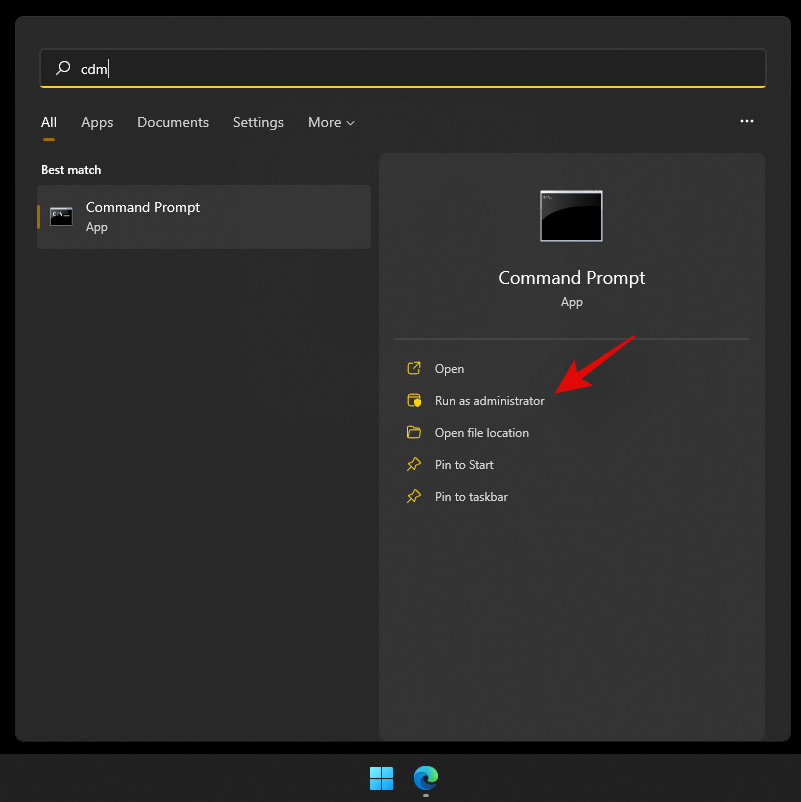
Agora escriba o seguinte comando unha vez que apareza CMD na súa pantalla.
systeminfo

Agora recibirá un informe do seu sistema. Se a virtualización está activada, atoparás unha sección dedicada a Hyper-V con todos os seus detalles actuais.

Non obstante, no caso de que a virtualización estea desactivada, atoparás unha opción que indica o mesmo na parte inferior.
Relacionado: Como corrixir a pantalla negra da morte de Windows 11 | Pantalla negra verde da morte
Como activar a virtualización desde a BIOS
A virtualización pódese activar desde a súa BIOS mediante a sección de seguridade. Controlar a túa función de virtualización a través da túa BIOS é a forma ideal de evitar que usuarios malintencionados instalen sistemas operativos convidados no teu PC ou portátil. Use a seguinte guía para activar a virtualización na súa BIOS.
Entra na BIOS e activa a virtualización
Use the guide below to enter BIOS on your system depending on your laptop manufacturer or your motherboard manufacturer. Ensure that you are running the latest BIOS available from your OEM to avoid any issues when installing guest operating systems.
On Acer
- Key for newer systems: F2 or Delete
- Key for older systems: F1 or Ctrl + Alt + Esc
Turn on your system and press one of the corresponding keys above to enter the BIOS depending on your system. If your unit was manufactured in the past 5 years then F2 is the key for you. Older systems will need to try out both the key combinations to find out which one works the best for you.
Use the arrow keys and enter ‘System Configuration’.
Select ‘Virtualization technology.
Highlight ‘Enabled’ and press Enter on your keyboard.
Press F10 and click/select ‘Yes’. This option will save all your changes and exit the BIOS.
The BIOS will now be exited and your system will restart normally into Windows. Virtualization should now be enabled on your system and you can find out the same using our guide at the top.
On Dell
- Key for newer systems: F2 when Dell logo shows up during boot.
- Key for older systems: Ctrl + Alt + Enter, or Delete key, or Fn + Esc, or Fn + F1
- Alternate Keys: F1, F3, F12, or Delete
Power on your Dell unit and press one of the corresponding keys above depending on your unit to enter the BIOS. Once you are in the BIOS, double click on ‘Virtualization Support’ on your left.
Check the box for ‘Enable Virtualization Technology’ on your right.
Click on ‘Apply’ in the bottom right corner of your screen.
Your system will now restart with Virtualization enabled in the BIOS. You can now easily install guest operating systems and you shouldn’t face any issues during the process.
On Asus
- Key for newer systems: F2
- Key for older systems: Delete or Insert
- Alternate Keys: F10
Restart your system and press one of the corresponding keys above to enter the BIOS. Switch to the ‘Advanced mode’ to access additional BIOS settings. You can use the F7 key to do this on most Asus systems. Now navigate to the ‘Advanced’ section of the BIOS menu.

Find and enable the following listings in the ‘Advanced’ menu.
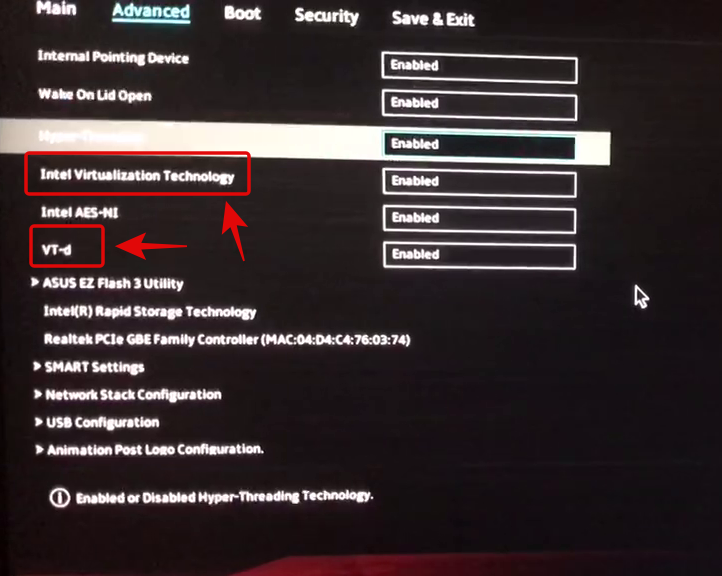
- Intel Virtualization Technology or AMD equivalent
- VT-d
Once enabled, switch to the ‘Save & Exit’ tab and save all your changes before exiting the BIOS menu.
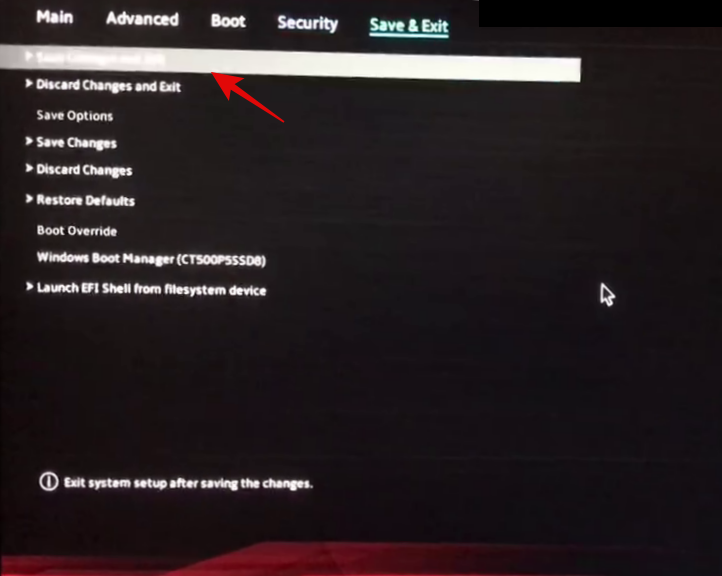
Virtualization should be enabled within the Boot menu on your Asus system.
On HP
- Key for newer systems: F10 or Esc
- Key for older systems: F1, F2, F6 or F11
- Alternate Keys: F10 or F12
Restart your system and use one of the keys above to access the BIOS on your HP system. Switch to the ‘Advanced’ tab once you are in the BIOS menu.
Use the arrow keys and select ‘Device Configuration’.
Scroll to the bottom and check the box for Virtualization Technology (VT-d or VT-x).
Click on ‘Save’ in the bottom right corner.
Select ‘Yes’ to confirm your choice.
You can now exit the BIOS menu and boot into Windows normally. Virtualization should now be enabled on your system.
On Lenovo
- Key for newer systems: F1 or F2
- Key for older systems: Ctrl + Alt + F3, Ctrl + Alt + Ins, or Fn + F1
- Alternate Keys: n/a
On Thinkpads
Restart your Lenovo Thinkpad and use one of the corresponding keys above to enter the BIOS menu.
Once in the BIOS, use the arrow keys to navigate to the ‘Security’ tab and select ‘Virtualization’.
Press Enter with ‘Disabled’ highlighted and select ‘Enabled’ instead.
Press F10 on your keyboard and confirm your choice by selecting ‘Yes’. This will save all the changes you made and exit the BIOS.
You will now have enabled virtualization on your Lenovo Thinkpad.
On other Lenovo products
Power on your system and use one of the keys above to access the boot menu. Once you are in the boot menu, switch to the ‘Configuration’ tab at the top.
Now select ‘Intel Virtualization Technology’ or AMD equivalent by pressing Enter on your keyboard. Select ‘Enabled’ once prompted.
Press F10 on your keyboard and confirm your choice by selecting ‘Yes’.
Virtualization should now be enabled on your Lenovo system.
Related: How to Fix 100% Disk Usage issue on Windows 11
In case you are unable to access the BIOS menu on your system, then you can use the guide below to trigger it from within Windows 11 itself. Fast startup or Fast boot technology from OEMs will sometimes prevent key inputs from being detected at the splash screen. This in turn prevents you from accessing the BIOS menu when the system is booting. Use the guide below instead to access the BIOS menu from Windows 11 on any system.
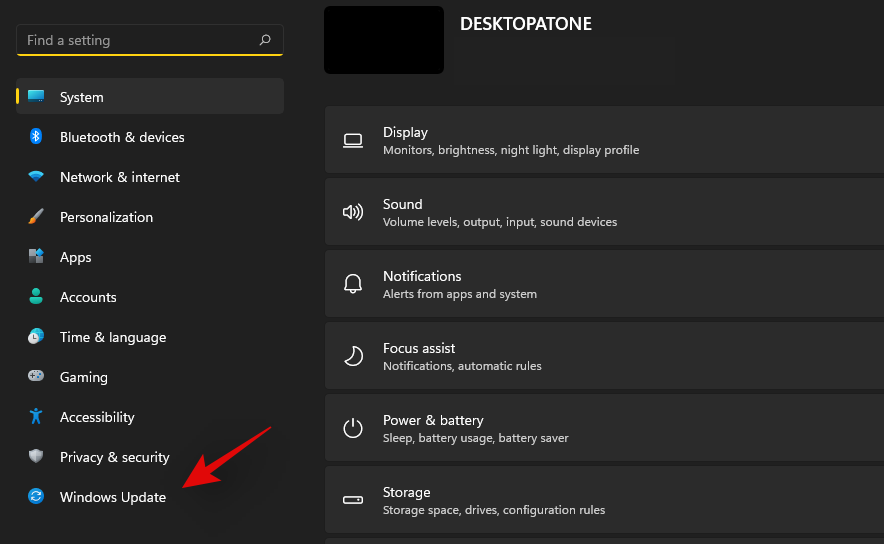
Press Windows + i on your keyboard and select ‘Windows Update’ from your left.
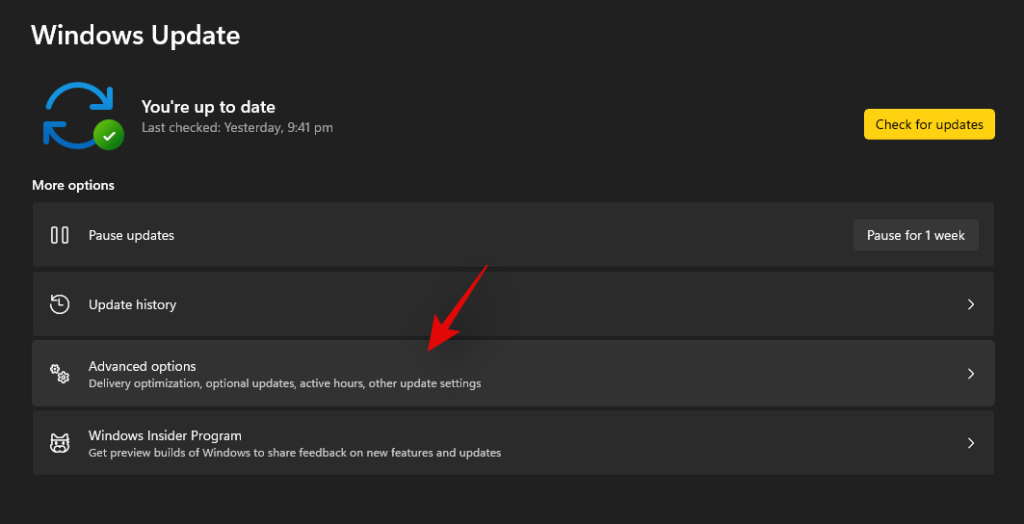
Click on ‘Advanced options’.
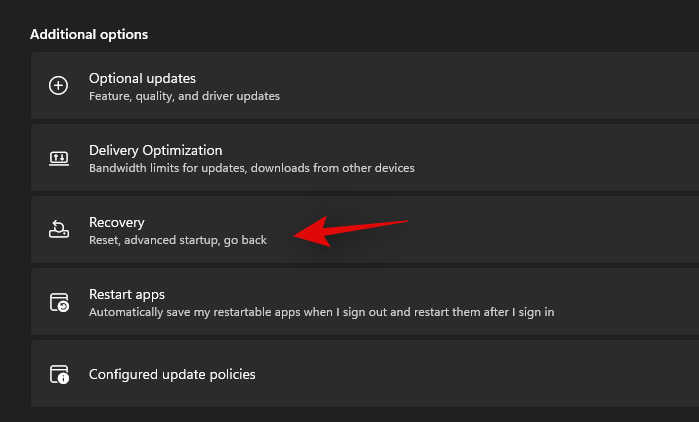
Click on ‘Recovery’.
Click on ‘Restart now’ beside Advanced startup.

Windows will now restart and boot into the recovery environment. Select ‘Troubleshoot’.
Select ‘Advanced options’.
Select ‘UEFI Firmware Settings’.
Click on ‘Restart’.
Your PC will now restart and automatically boot into the BIOS menu. You can now use the corresponding guide above to activate virtualization on your system.
What can I do If I don’t have virtualization?
In case virtualization is missing from your system then chances are that your unit has already exceeded its intended lifespan. Most modern CPUs nowadays come with in-built virtualization technology to help run virtual machines and systems on any laptop or desktop. However, if your CPU does not have the option for virtualization then there isn’t much you can do about it.
Virtualization is a hardware feature that depends on your CPUs architecture and core count as well. In such cases, you will need to upgrade your CPU and motherboard to get virtualization on your system.
Other ways to enable virtualization
There are other ways to enable virtualization on Windows 11 as well. In case the BIOS menu method does not work for you, you can use one of the guides below to enable virtualization on your system.
Method #01: Using CMD
Press Windows + S on your keyboard and search for CMD. Click on ‘Run as administrator’ once it shows up in the search results.
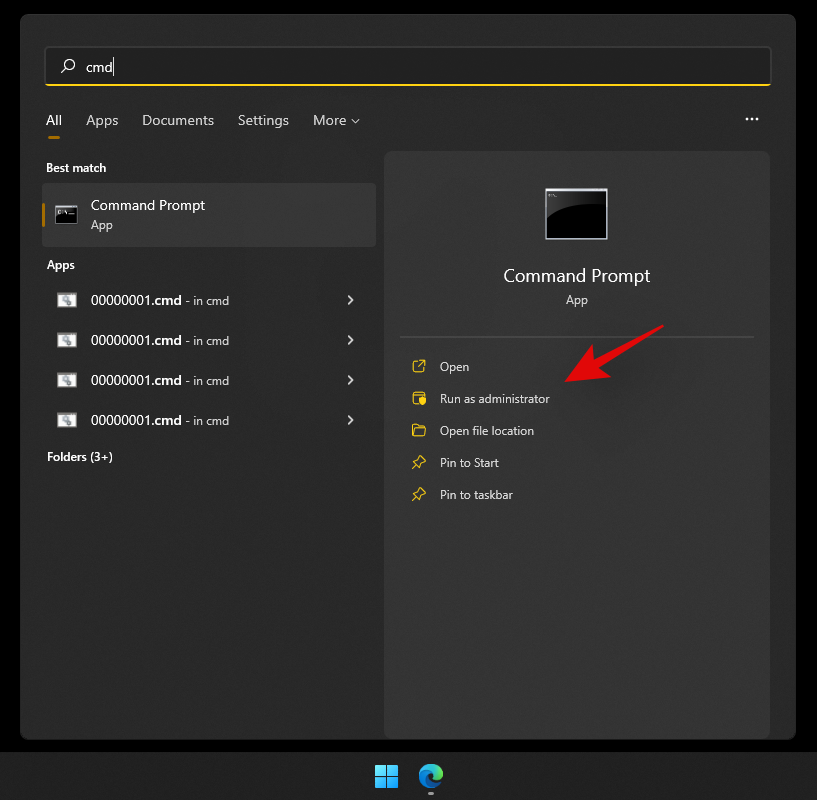
Type in the command below in CMD and press Enter on your keyboard to execute it. Once executed, the command will download and install all Hyper-V features to your PC.
Dism /online /Enable-Feature /FeatureName:HypervisorPlatform

DISM will now do its thing and install all the necessary features to your system. Now use the command below to install another virtualization-related feature to your PC.
Dism /online /Enable-Feature /FeatureName:VirtualMachinePlatform
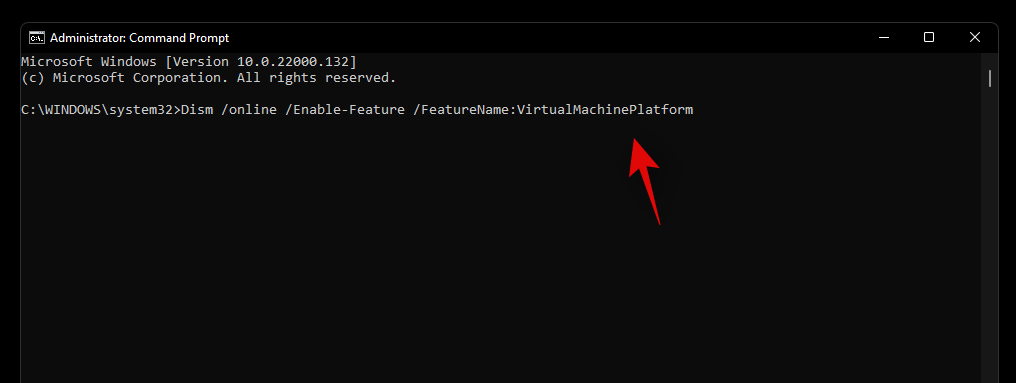
Once installed, you will be prompted to restart your system. Type in ‘Y’ and press Enter on your keyboard to restart your system.
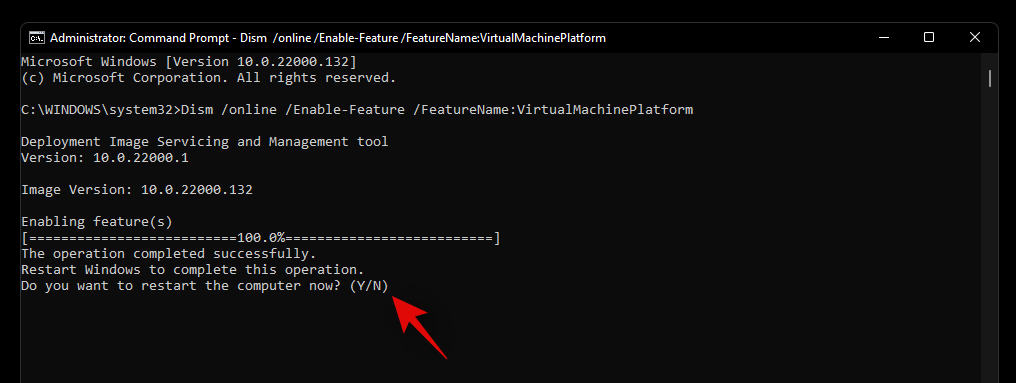
Once your system restarts, virtualization should be enabled and ready to use.
Method #02: Using Windows Features
Press Windows + i on your keyboard and click on ‘Apps’ on your left.
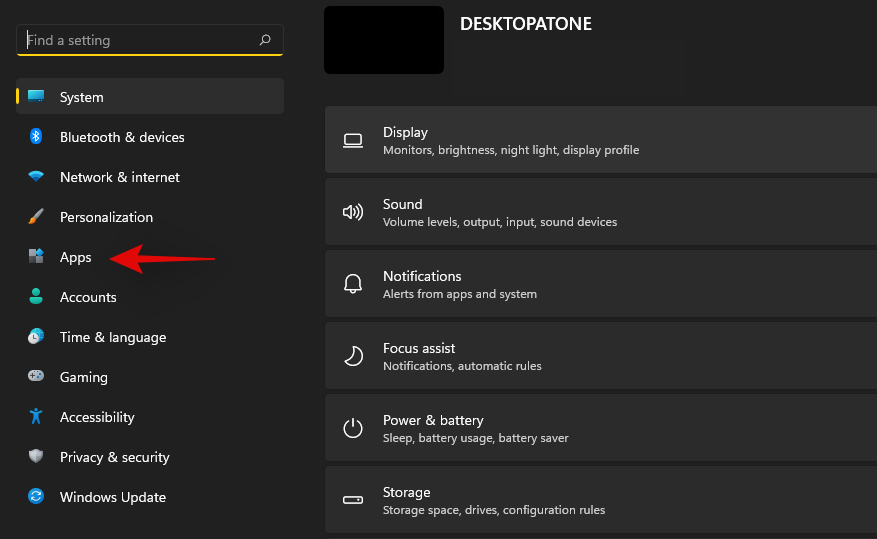
Click and select ‘Optional features’.
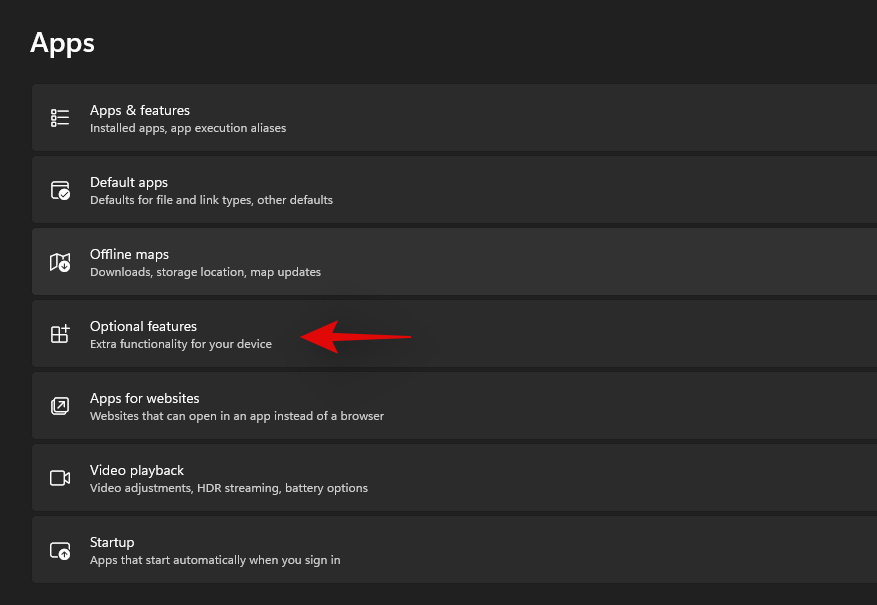
Scroll to the bottom and click on ‘More Windows features’.
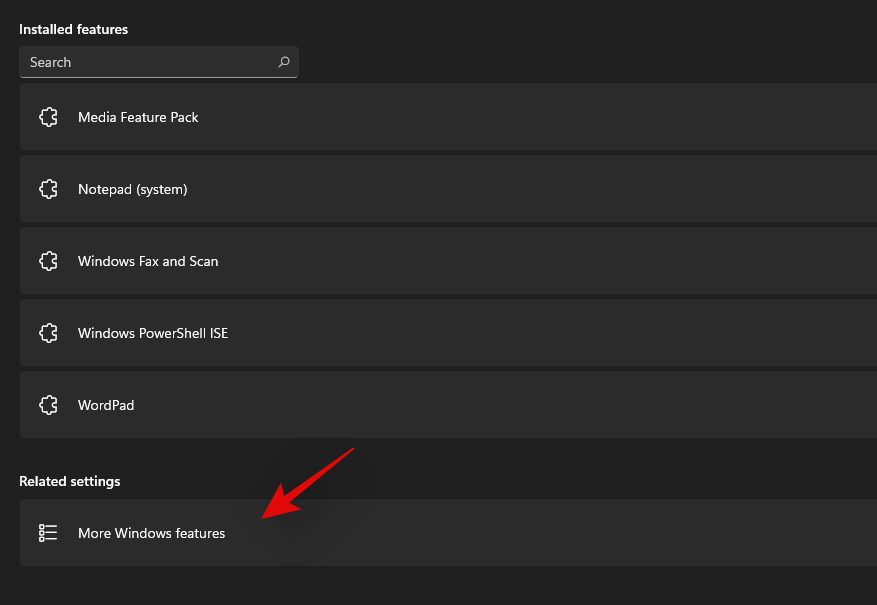
You will now get a list of features that can be and are already installed on your system. Check the boxes for the following listings.
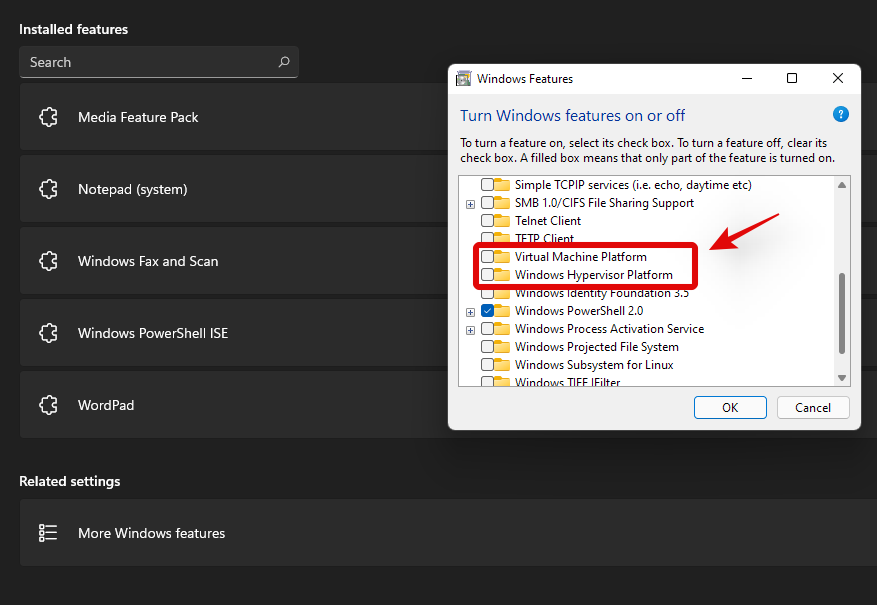
- Virtual Machiene Platform
- Windows Hypervisor Platform
Click on ‘Ok’ and the features will now be downloaded and installed on your system.
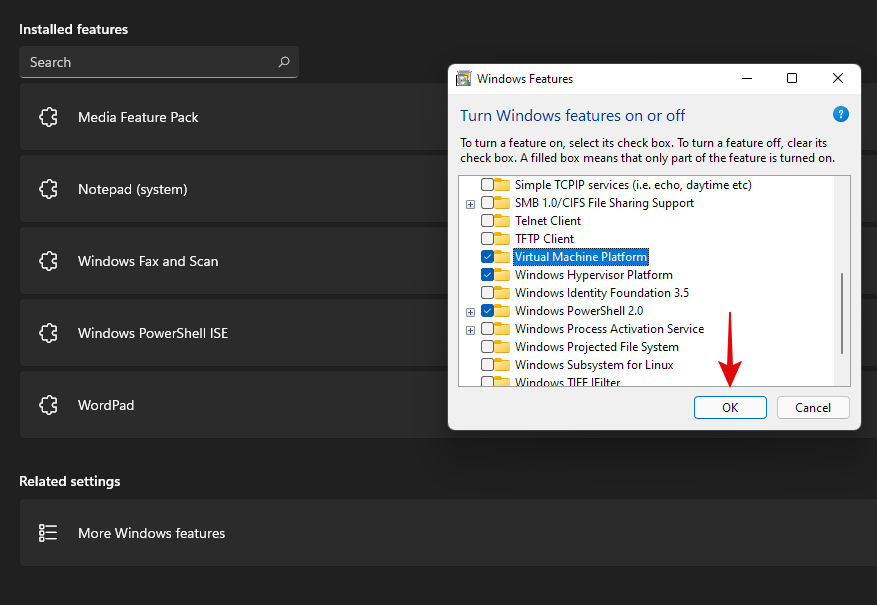
Once installed, click on ‘Restart’ to restart your system.
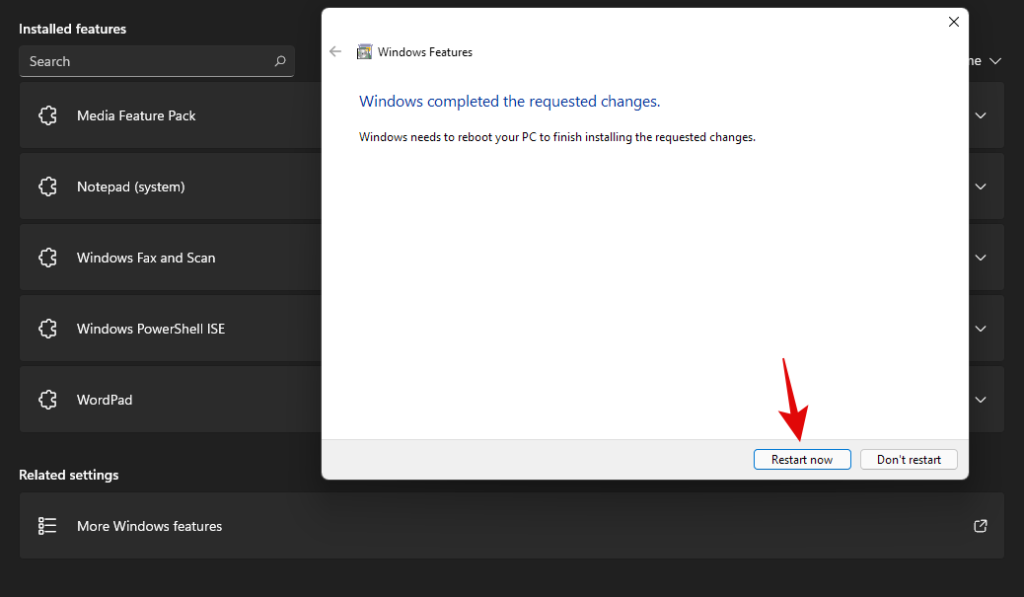
And that’s it! Virtualization should now be enabled on your system once it has restarted.
Method #03: Using PowerShell
Press Windows + S on your keyboard and search for PowerShell. Click on ‘Run as administrator’ once it shows up in your search results.
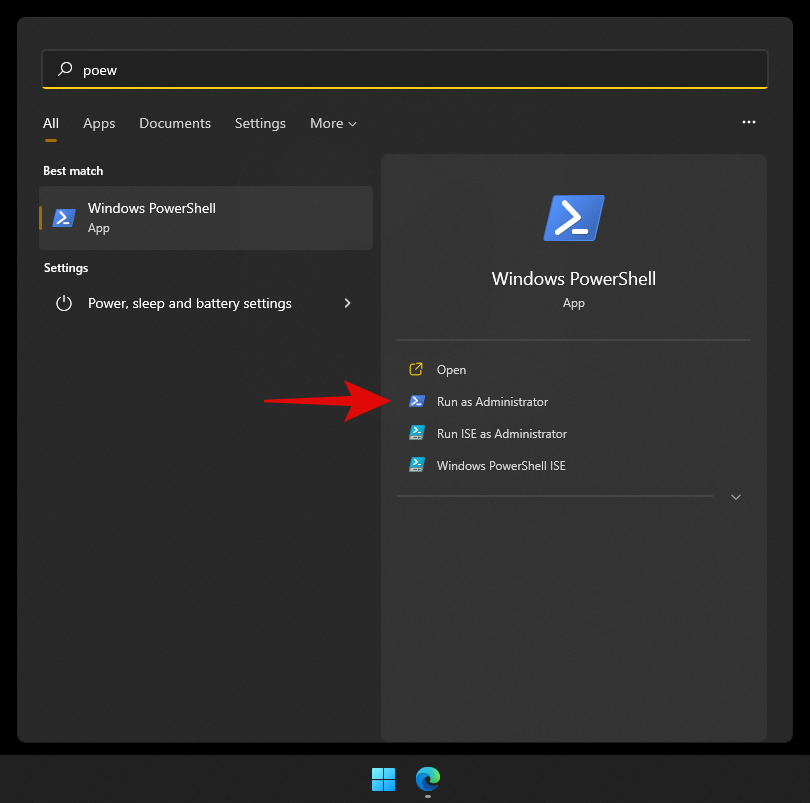
Type in the following command and press Enter.
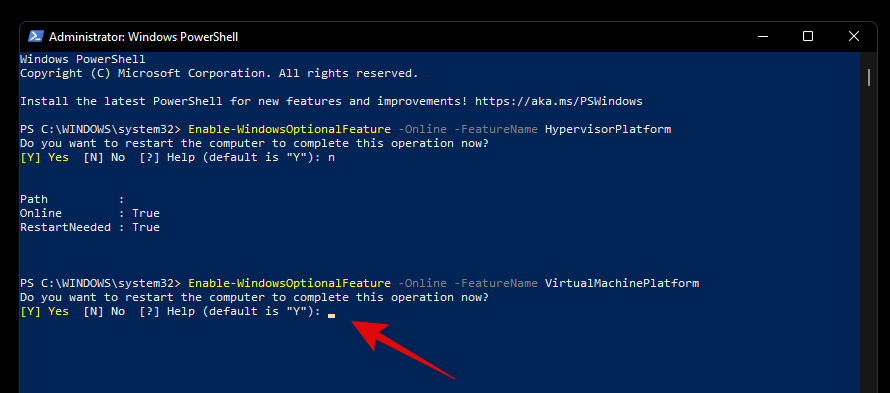
Enable-WindowsOptionalFeature -Online -FeatureName HypervisorPlatform

PowerShell will now install the necessary virtualization files on your system.

Once installed, you will be prompted for a restart. Type in ‘N’ and press Enter on your keyboard.

Now enter the following command and execute it.
Enable-WindowsOptionalFeature -Online -FeatureName VirtualMachinePlatform
You will now be prompted to restart your system. This time, type in ‘Y’ to restart your system.
Once your system restarts, virtualization should now be enabled within Windows.
Should you keep virtualization enabled when not in use?
No, keeping virtualization turned on is not a good idea especially when using work systems. Virtualization allows you to install multiple guest operating systems on your PC which can be used by a malicious user to their advantage in case virtualization is always enabled on your system.
However, in case you need to have virtualization always enabled, then we recommend locking down your USB ports and other peripherals in the BIOS so that malicious users can not take advantage of virtualization always being enabled on your system.
We hope this guide helped you easily enable virtualization within the BIOS of your system. If you face any issues or have any more questions for us, feel free to reach out using the comments below.
RELATED


