As capturas de pantalla sempre foron a forma de capturar a túa pantalla en Windows e a plataforma sempre ofreceu unha clave PrtSc dedicada para capturar a túa pantalla cun só clic. Pero a medida que Windows avanzou ao longo dos anos, tamén o teñen as formas en que podes facer unha captura de pantalla. Agora tes a posibilidade de usar varias formas de capturar a túa pantalla, xa sexa a tecla PrtSc, Snip & Sketch ou software de terceiros. Aquí tes todas as formas en que podes facer capturas de pantalla en Windows 11.
Contidos
Método #01: Usando a tecla Imprimir pantalla (PrtSc).
A tecla Print Screen ou PrtSc, como di no teu teclado, é unha tecla física dedicada desde hai moito tempo nos teclados de Windows que che permite capturar a túa pantalla cun simple clic. Co paso dos anos, a funcionalidade de PrtSc foi incorporada a Windows e introducíronse cada vez máis formas de tomar varios tipos de atallos. Aquí tes todo o que necesitas saber sobre a clave PrtSc e como facer capturas de pantalla usándoa.
Que ocorre cando preme a tecla PrtSc?
Premendo a tecla PrtSc pídelle a Windows que capture a súa pantalla. Dependendo da combinación de teclas que uses, podes capturar toda a pantalla, a túa xanela activa ou unha parte da túa pantalla. Use a seguinte guía para facer capturas de pantalla facilmente no seu PC con Windows 11 usando a tecla PrtSc.
Fai unha captura de pantalla completa usando a tecla Imprimir pantalla (botón PrtSc)
Se queres facer unha captura de pantalla completa de toda a túa pantalla, preme simultaneamente as teclas Windows + PrtSc do teu teclado. Isto capturará a pantalla completa e a captura de pantalla almacenarase na seguinte localización.
C:/Usuarios//Imaxes/Capturas de pantalla
As túas capturas de pantalla serán nomeadas e numeradas automaticamente e almacenaranse en formato PNG.
Captura unha parte da pantalla usando a tecla PrtSc.
Se desexa capturar unha parte da súa pantalla usando PrtSc, prema Windows + Shift + S no teclado.
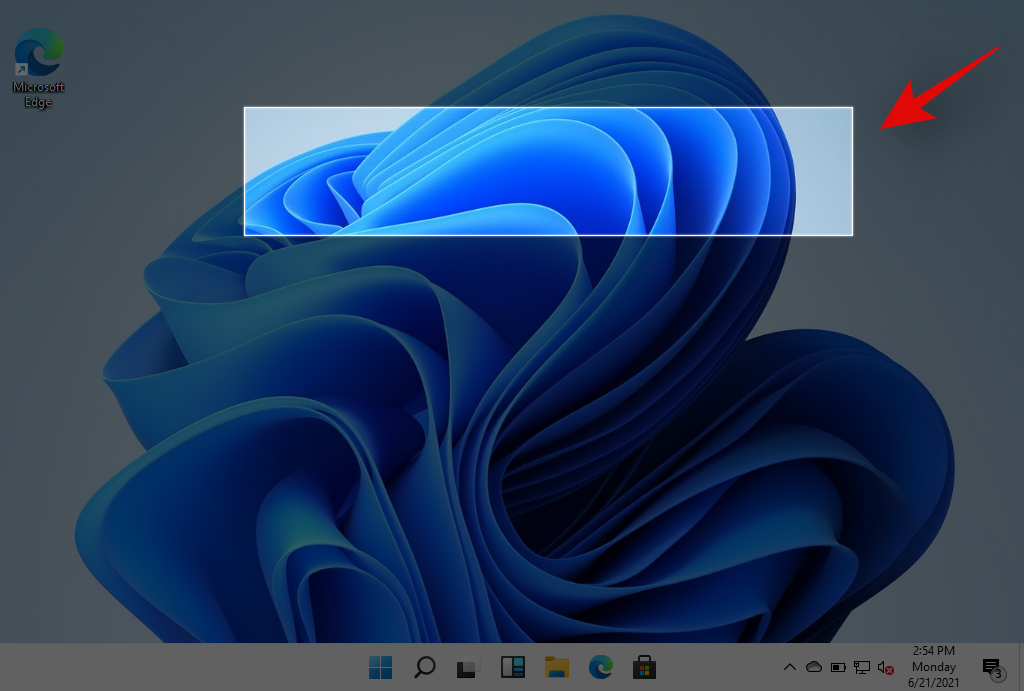
Agora obterás unha ferramenta de selección rectangular. Simplemente fai clic e debuxa na pantalla para copiar a área capturada no portapapeis. Esta captura pódese pegar en calquera campo de texto compatible, como cando se redacta un correo electrónico, ou nun sitio para compartir imaxes, ou nun editor de imaxes para crear novas imaxes. Tamén pode engadir a súa área capturada como unha nova capa en calquera editor de imaxes compatible no seu PC.
Captura a xanela activa no portapapeis con PrtSc
Tamén pode capturar a xanela activa actualmente no seu PC con Windows 11 premendo simultaneamente as teclas Alt + PrtSc . Isto capturará a xanela activa actualmente e copiarase no portapapeis. Despois podes usar a guía para gardar as capturas de pantalla capturadas e gardalas como imaxe. Se desexa cargar a un sitio de almacenamento na nube ou usalo nun IM, simplemente pegue a captura copiada no lugar desexado e cargarase automaticamente nos servidores.
Onde están as miñas capturas de pantalla da tecla Imprimir pantalla?
As túas capturas de pantalla gárdanse no teu almacenamento local ou cópianse directamente no portapapeis, dependendo da túa elección. Se decidiches capturar a túa pantalla enteira, as túas capturas de pantalla almacenaranse en formato PNG na seguinte localización do teu PC.
C:/Usuarios/Nome de usuario/Imaxes/Capturas de pantalla
Non obstante, se decidiu capturar unha parte da súa pantalla ou capturar unha xanela activa, a captura copiarase temporalmente no portapapeis. Eliminarase se copias outra cousa e terás que capturalo de novo. Nestes casos, pode gardar a captura pegándoa nun lenzo en branco e creando a súa propia imaxe ou pegándoa nun campo compatible para crear/cargar unha imaxe a partir del. Use a guía a continuación para gardar as capturas de pantalla capturadas no seu almacenamento local en formato PNG ou JPEG.
Como gardar as capturas de pantalla das teclas de impresión da pantalla capturadas no portapapeis como PNG ou JPEG
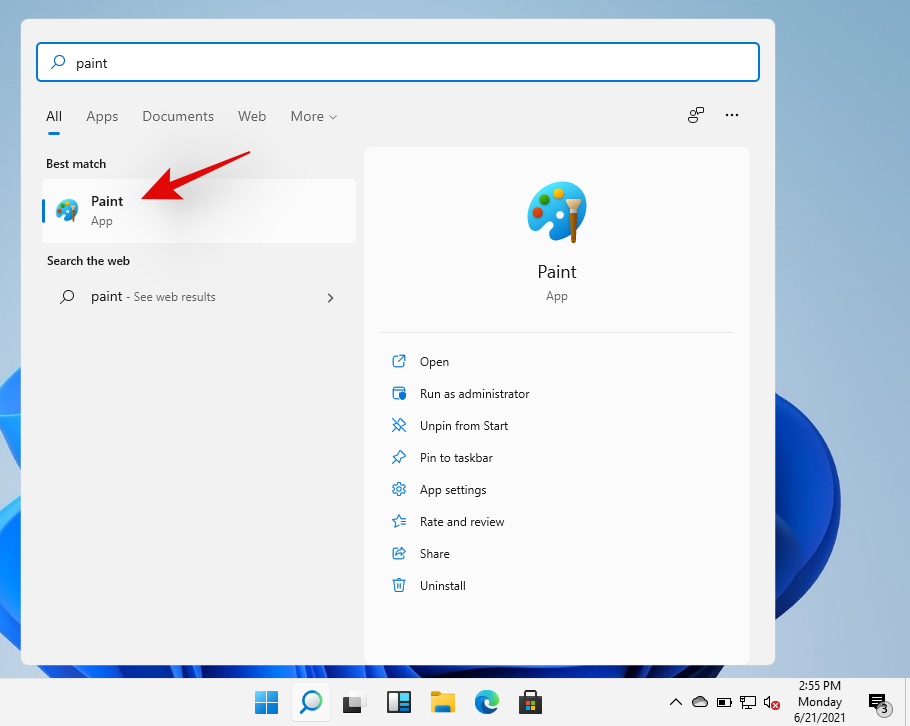
Captura calquera xanela activa ou parte da pantalla como farías normalmente. Unha vez capturado, abra paint no seu PC con Windows 11. O xeito máis sinxelo de facelo sería premer Windows + S no teclado e despois buscar Paint.
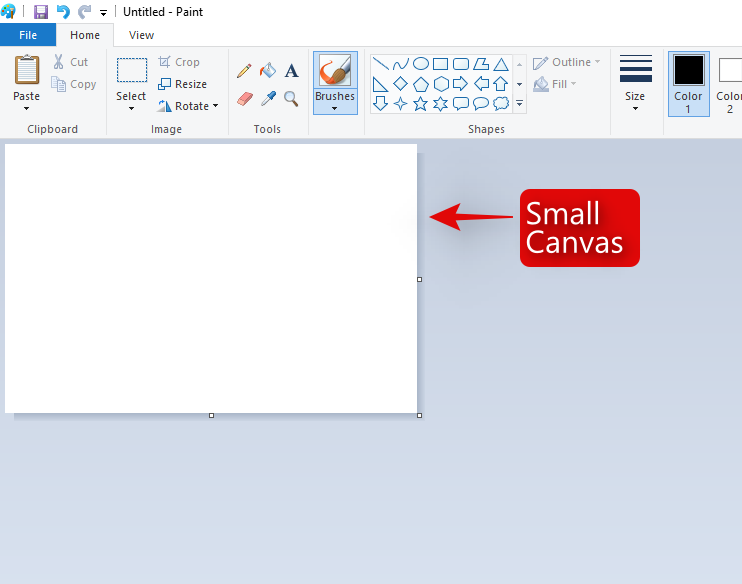
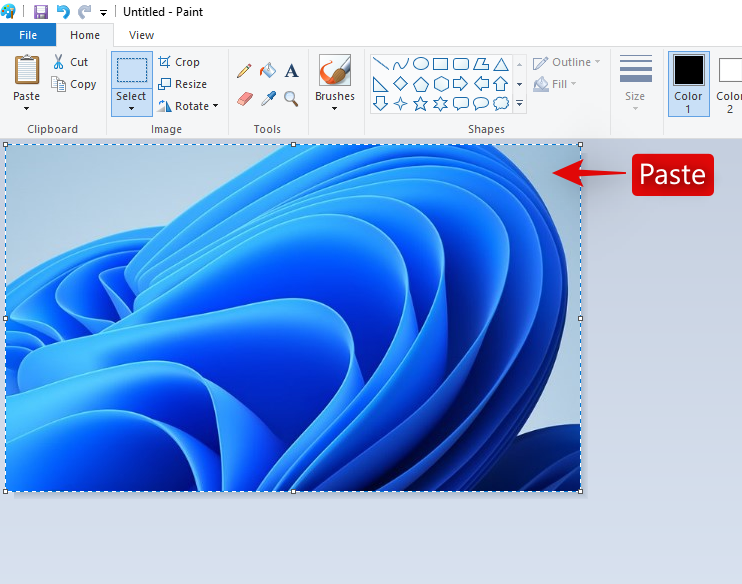
Unha vez que se lance Paint, reduce o tamaño do teu lenzo a un tamaño relativamente menor que a captura.
Agora preme "Ctrl + V" no teu teclado para pegar a captura.
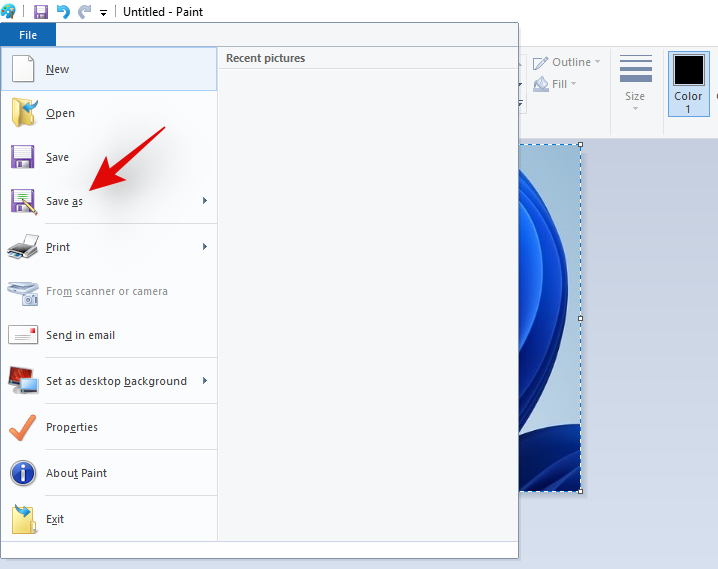
Fai clic en "Ficheiro" na esquina superior esquerda e selecciona "Gardar como".
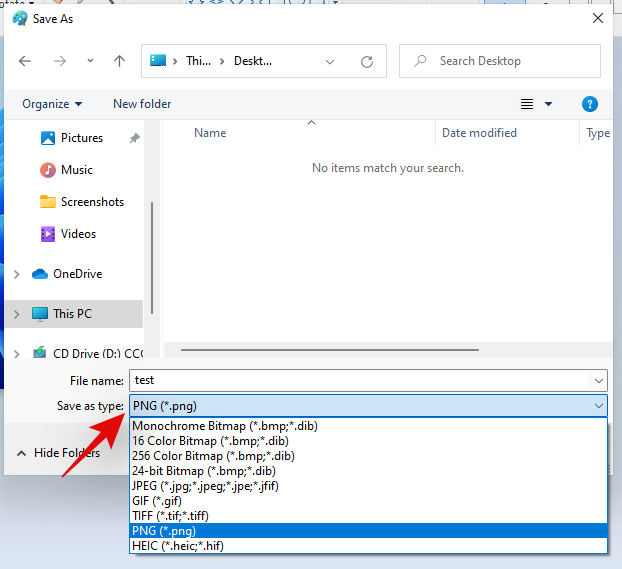
Navegador ata o lugar onde desexa gardar a captura. Agora introduza o nome desexado e prema e seleccione o formato de ficheiro desexado no menú despregable debaixo del.
Unha vez realizada a súa elección, prema en 'Gardar'.
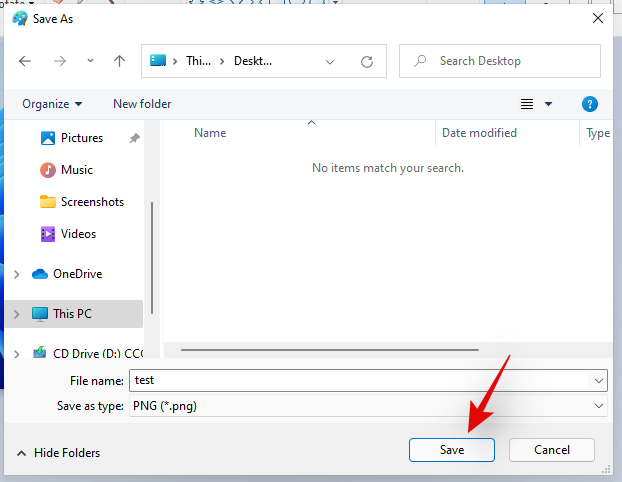
E xa está! Agora gardarase a captura no lugar desexado no formato que escolla vostede.
Método #02: Usando a aplicación Snip e Sketch
Snip & Sketch é a nova e mellorada ferramenta de captura de pantalla de Microsoft, destinada a ser a sucesora da probada ferramenta Snipping. Snip & Sketch permíteche facer moito máis que capturar a túa pantalla. Pode capturar áreas específicas, debuxar de forma libre a súa área de captura e incluso anotar as súas capturas directamente na propia aplicación. Snip & Sketch estivo moi integrado en Windows 11 e pódese activar desde case calquera lugar da pantalla. Aquí tes todo o que necesitas saber sobre Snip & Sketch e como podes sacarlle o máximo proveito.
Nota: Se queres anotar as túas capturas usando Snip & Sketch, terás que iniciar a súa aplicación dedicada instalada no teu PC e despois facer a captura como se mostra a continuación. Se capturas a túa pantalla mediante Snip & Sketch usando o atallo do teclado, copiarase a captura no teu portapapeis.
Activa Snip & Sketch desde a aplicación
Esta é de lonxe a forma máis sinxela e básica de activar Snip & Sketch no teu sistema Windows. Só tes que premer "Windows + S" no teu teclado para abrir a Busca de Windows 11 e despois buscar "Recortar e debuxar". Non terás que escribir o nome completo para que apareza a aplicación.
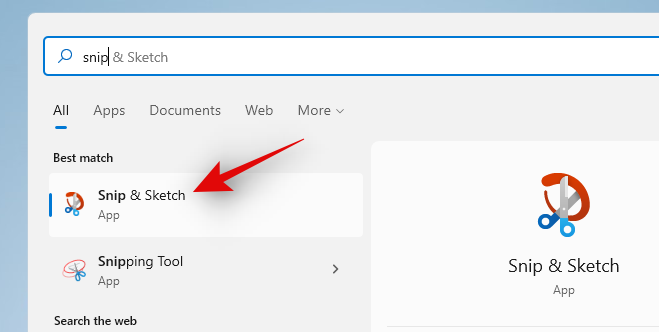
Unha vez que aparece, simplemente fai clic e inicia a aplicación
E xa está! Agora activaches Snip e Sketch. Use a guía a continuación para capturar a súa pantalla a través do método desexado.
Activa Snip & Sketch usando un atallo de teclado
Tamén podes activar Snip & Sketch no teu sistema Windows 11 usando un atallo de teclado. Preme "Windows + Maiús + S" no teu teclado para abrir a barra de ferramentas de recorte. Agora podes usar o rato para capturar a pantalla, sen embargo, queiras. Use a guía detallada a continuación para sacar o máximo proveito de todas as funcións que ofrece Snip & Sketch.
Podes capturar a túa pantalla de varias formas usando Snip & Sketch igual que PrtSc, pero con máis facilidade e menos atallos de teclado para lembrar. Siga unha das seguintes guías que mellor se adapte ás súas necesidades e requisitos actuais.
Captura de forma libre
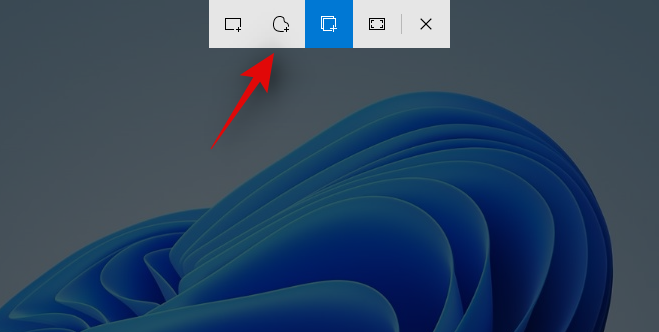
Esta é a segunda icona da esquerda na parte superior da pantalla na barra de ferramentas de recorte. Fai clic na icona "Freeform" como se mostra a continuación para activar a captura de Freeform.
Now click and drag your mouse in any shape and form to capture your screen. Snip & Sketch will do its best to create a cohesive capture from your freeform shape.
And that’s it! You will now have made a freeform capture of your screen.
Window Capture
There can be times where you only wish to capture a certain window instead of your entire screen. Drawing the shape of a window in freeform or rectangular capture can be challenging and hence there is a dedicated option to capture any active window. Use the guide below to get you started.
Activate Snip & Sketch on your PC through the desired method and then click on the 3rd icon from the left at the top of your screen in the snipping toolbar.

Now move your mouse to the window you wish to capture and click anywhere in the window.
And that’s it! The selected window will now be captured with a simple click.
Fullscreen Capture
You can also easily make a full-screen capture on your device by using the Snip & Sketch tool. Activate the snipping toolbar using your desired method.
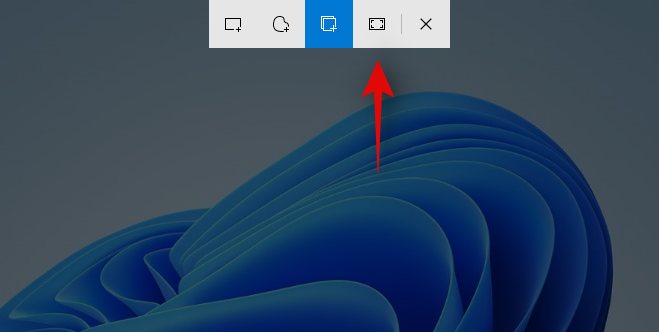
Once activated, click on the 2nd icon from the right in your snipping toolbar at the top of your screen. And that’s it! With a simple click, your entire screen will be captured and stored to your desired location be it the Snip & Sketch app or your clipboard.
Rectangular capture
This is the default tool activated when you activate Snip & Sketch on your Windows 11 PC. This tool allows you to capture your screen in any rectangular shape and form.
Start by activating Snip & Sketch on your desktop.
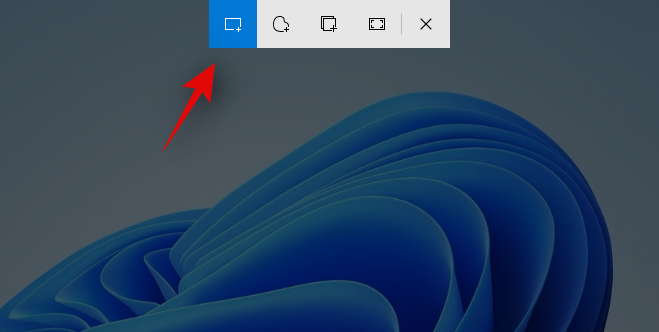
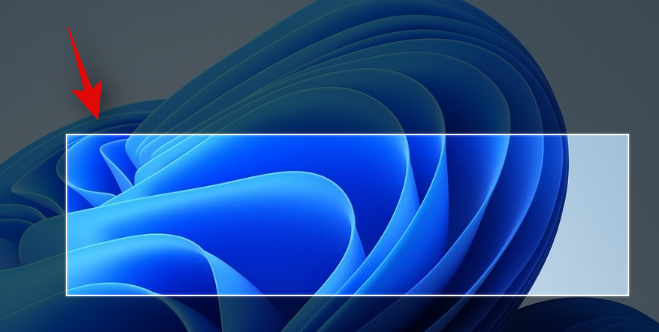
Now click and drag on the desired area that you wish to capture.
Once you let go of the left click, the selected area will be automatically captured by Snip & Sketch.
You can also annotate your captures using the Snip & Sketch app. Sadly this can not be done using the Snip & Sketch toolbar activated using the keyboard shortcut and you will need to launch the app if you wish to annotate your captures. Use the guide below to get you started.
How to annotate in Snip & Sketch
Press ‘Windows + S’ on your keyboard to bring up the Windows search and then search and launch Snip & Sketch on your system. Once launched, press ‘Ctrl + N’ on your keyboard to create a new capture.
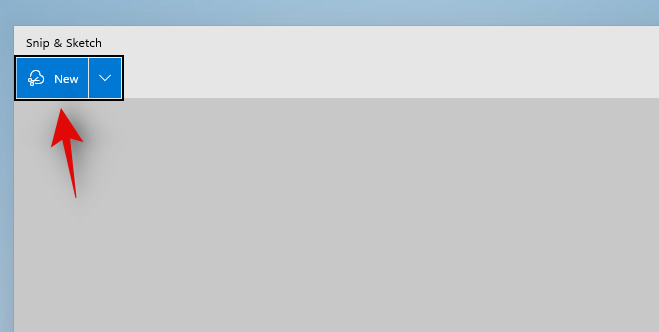
Now capture your screen in the desired form using the guides above.
Once you’ve made your capture, it will automatically be added to the Snip & Sketch app with annotation tools at the top of your canvas.
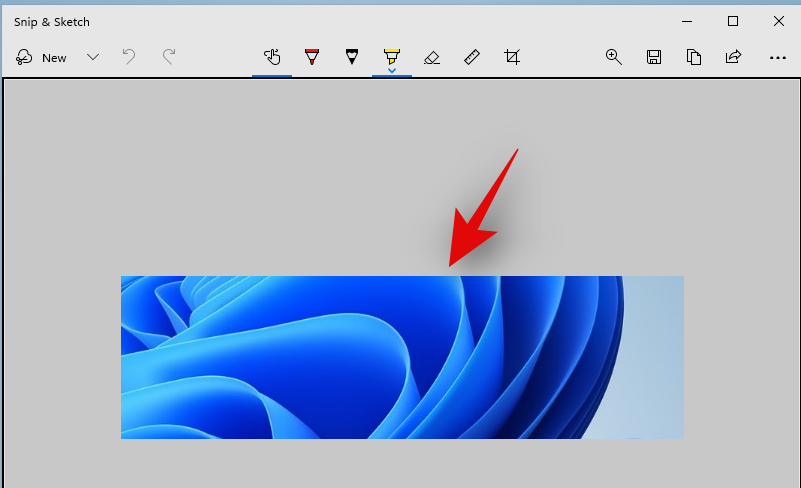
You can now use one of the following annotation tools to your advantage and create the capture that you wish.
Touch Writing
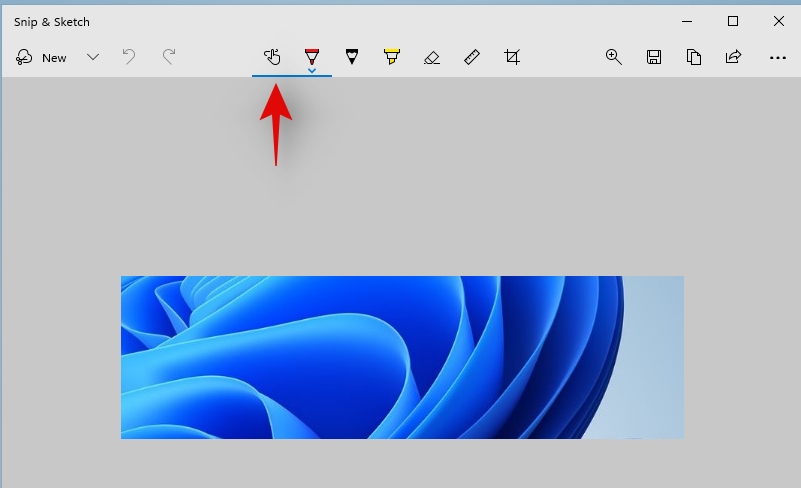
This is an option specific to tablet users or users with a touch screen or pen input device. This option can be used in Snip & Sketch to easily switch between your desired input devices to easily annotate on your screen. This option works in conjunction with one of the tools mentioned below depending on your choice.
Ball Point Pen
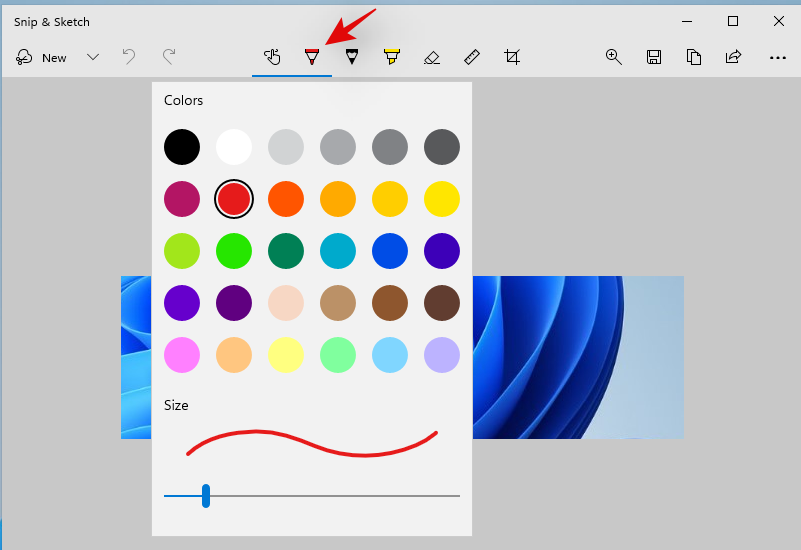
This tool simulates the input of a ballpoint pen. You can click on the drop-down arrow under it to select the color of your choice for this input as well as change the line width using the slider at the bottom.
Pencil
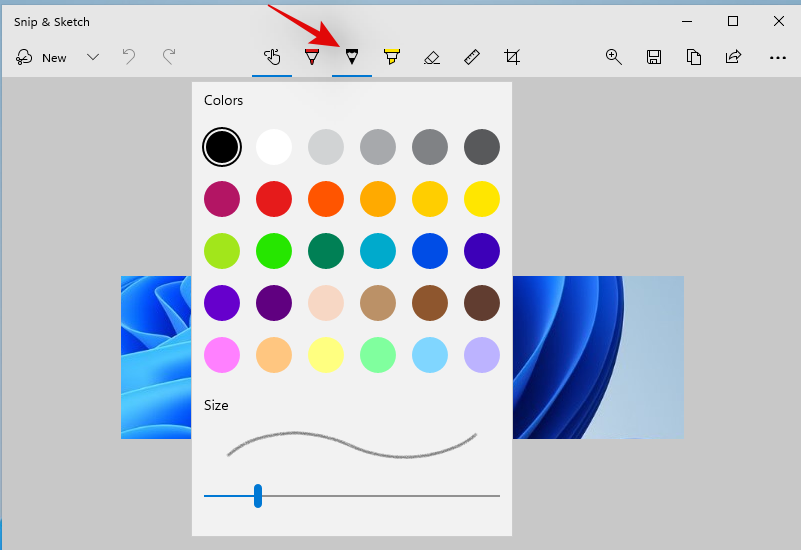
This tool simulates the strokes of a pencil on your canvas when annotating your capture. Simply click on the Pencil tool to start using it. Just like the Vall point pen, you can click on the drop-down arrow under the Pencil tool to change its color and width using the slider at the bottom.
Highlighter
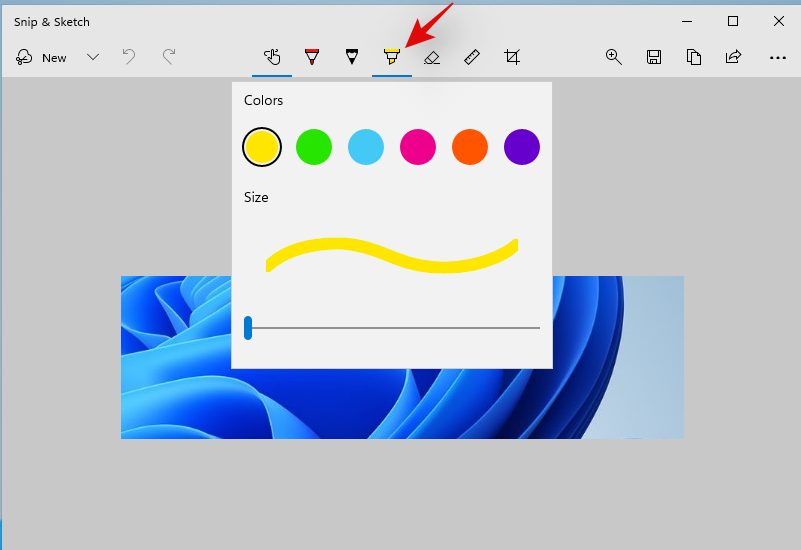
As you may have guessed, this tool simulates a paper highlighter which can be used to annotate important things in your screen capture. Similar to the tools above, click and select the highlight tool to use during annotation. You can then click the drop-down arrow to change its color and size.
Eraser
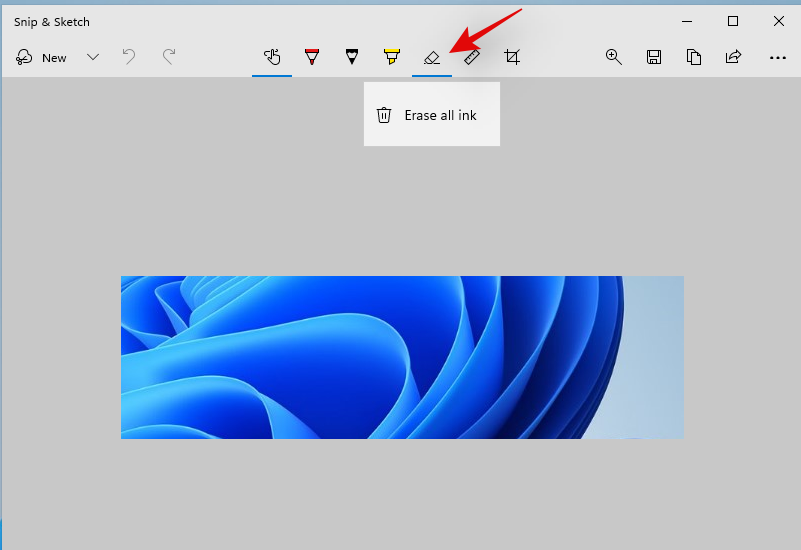
Made a mistake? You can use this tool to easily erase any annotation you’ve made on your screen capture. Simply click on the eraser tool and click and drag over any previous annotation to erase it from your screen capture. In addition to this, if you would like to remove all your annotations, then click the drop-down arrow under the eraser tool and select ‘Erase all ink’. This will erase all the annotations you’ve made on your screen capture.
Ruler
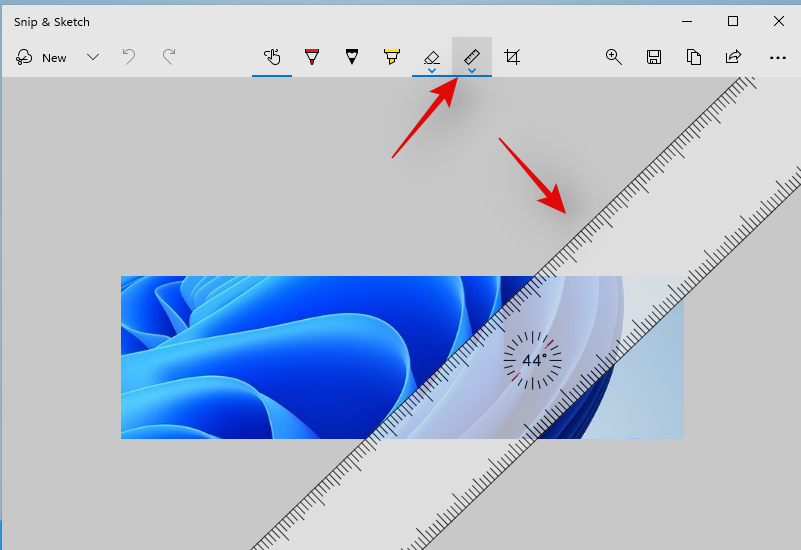
Drawing straight lines can be tough when annotating images digitally. Thankfully, the ruler tool is here to help you do exactly that. Click and select the Ruler Tool from the toolbar at the top and a ruler should show up on your screen. Now move the ruler to the desired position. You can also right-click on the ruler to rotate it to your desired orientation. Once you’ve placed the ruler in the desired location, select an input tool from the drop and click and drag your cursor along the ruler. You should now have a straight line at the desired location in your annotation.
Image Crop
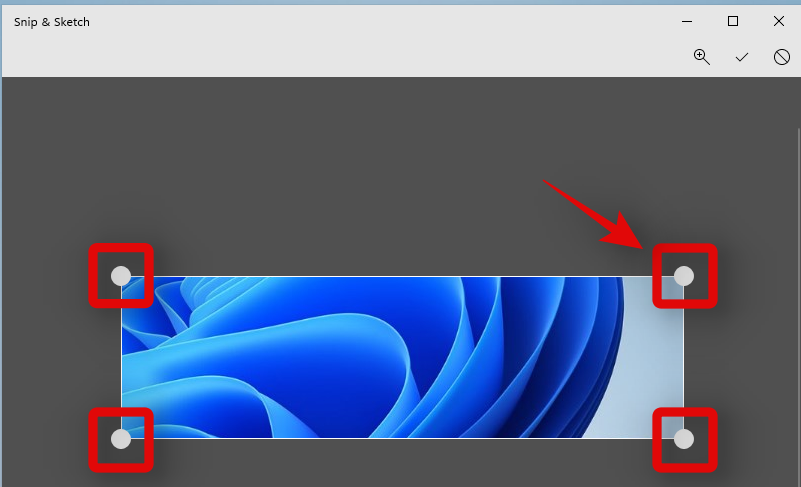
Did your screen capture get slightly messed up? You can always use the Image crop option to further crop and enhance your screen capture. Click the tool at the top of your screen and then click and drag one of the corners to crop your image to its desired size.
Method #03: Use the snipping tool
In addition to the PrtSc key and the Snip & Sketch tool, Windows 11 also comes bundled with the Snipping Tool, to help you capture your screen easily. The snipping tool is an older tool that will soon be phased out from existence in favor of Snip & Sketch. But for now, both of these are available on your system so you can use the snipping tool to capture your screen as well. Follow the guide below to get you started.
How to use the snipping tool
The snipping tool can no longer be activated using keyboard shortcuts in Windows 11. You will now have to launch it from your apps from the Start menu or the Windows Search and then capture your screen using the Snipping tool. Use the guide below to get you started.
Press ‘Windows + S’ on your keyboard and search for the ‘Snipping Tool’.
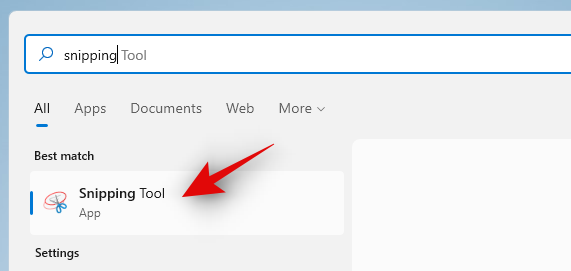
Click and launch the app once it shows up in your search results. Now click on ‘New’ if you wish to make a rectangular screen capture.
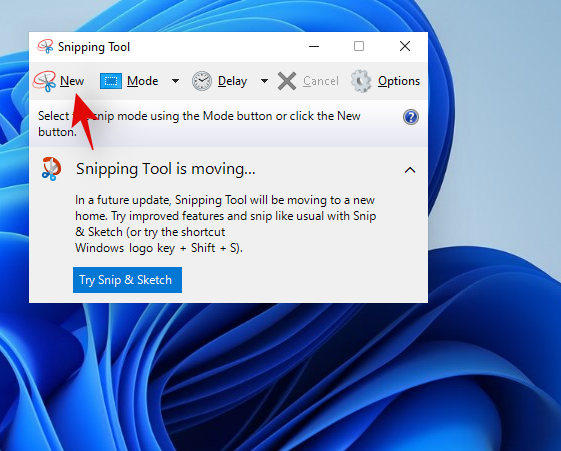
If you wish to capture a window or a freeform shape, then click on ‘Mode’ and select your desired option.
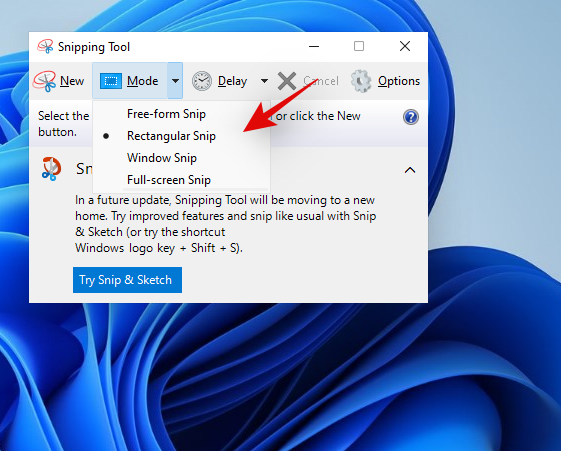
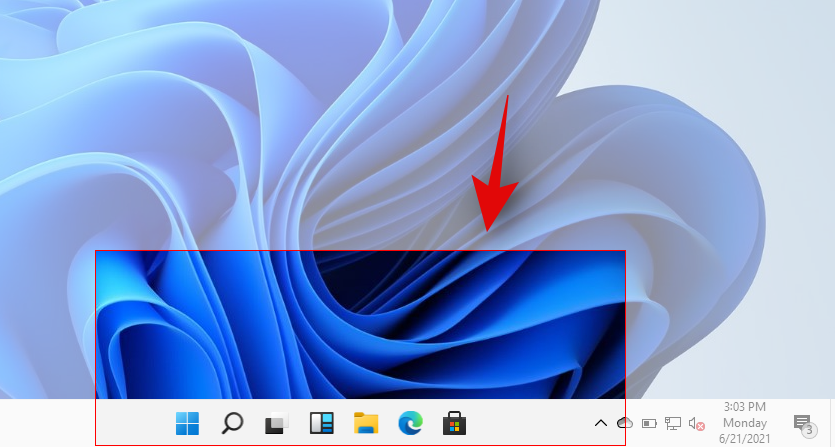
Click and drag your mouse on the screen to capture a portion of it depending on the tool selected by you.
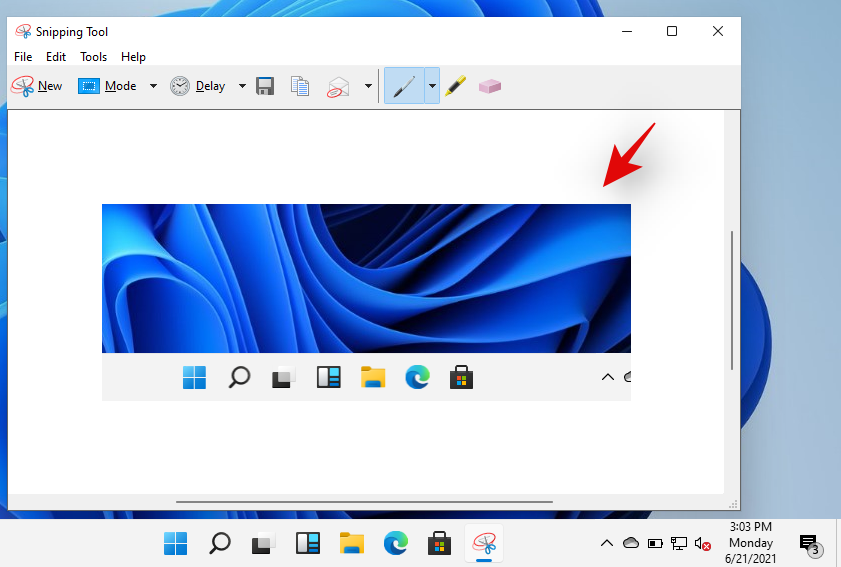
The capture will now be added to the Snipping tool and you can now edit and save it according to your preferences.
You can use the following tools below to your advantage in the Snipping Tool.
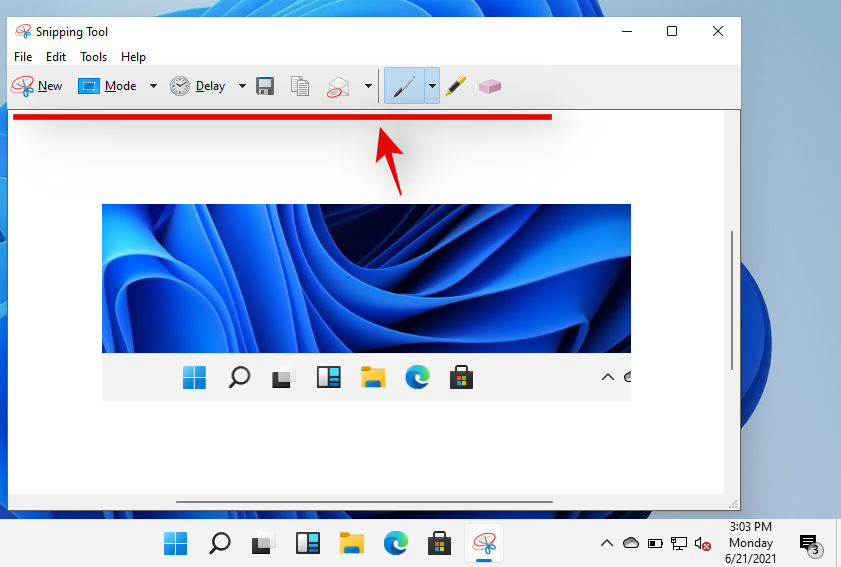
- Delay: This option will trigger a delayed screen capture after your set time. This can be quite useful if you wish to capture your screen after performing a few tasks. This feature can also be used to capture options that show up when hovering over a certain element in Windows 11.
- Save Snip: Click this icon to immediately save your current screen capture in the Snipping Tool.
- Copy: This option will help you copy your screen capture to your clipboard which can then be pasted in any compatible text field.
- Send Snip: You can use this option to easily share your screen capture with someone from within the Snipping tool.
- Pen: Click and select ‘Pen’ to add annotations to your screen capture. You can click the drop-down arrow to select one of the default presets for the pen tool. You can also click on ‘Customize’ to change each aspect of the pen according to your liking.
- Highlighter: Click and select this tool to highlight important aspects of your screen capture.
- Eraser: Made a mistake? Use the Eraser tool to get rid of any wrong annotations in your screen capture.
How to take a screenshot and upload it automatically on Imgur too
To do this, you will need to use third-party screen capturing software. We recommend you use ShareX, it is quite comprehensive, allows you to capture various forms of content and the ability to directly upload to Imgur is always welcome if you share a lot of images regularly. Download and install ShareX on your system using the link below and follow one of the guides depending on your current requirements for screen capturing.
Default ShareX Keyboard shortcuts
- Capture a specific area: Ctrl + Print Screen
- Capture entire screen: Print Screen
- Capture active window: Alt + Print Screen
- Start/Stop screen recording: Shift + Print Screen
- Start/Stop screen recording in GIF format: Ctrl + Shift + Print Screen
- You can create many more as you want
Note that ShareX will take over the shortcut keys from Windows, which is fine actually, but if you were copying screenshots to the clipboard as mentioned in Method #1 above, it won’t work anymore. Unless, of course, you change the shortcut combination in ShareX hotkey settings and use different keys.
Take a screenshot and directly upload it to Imgur
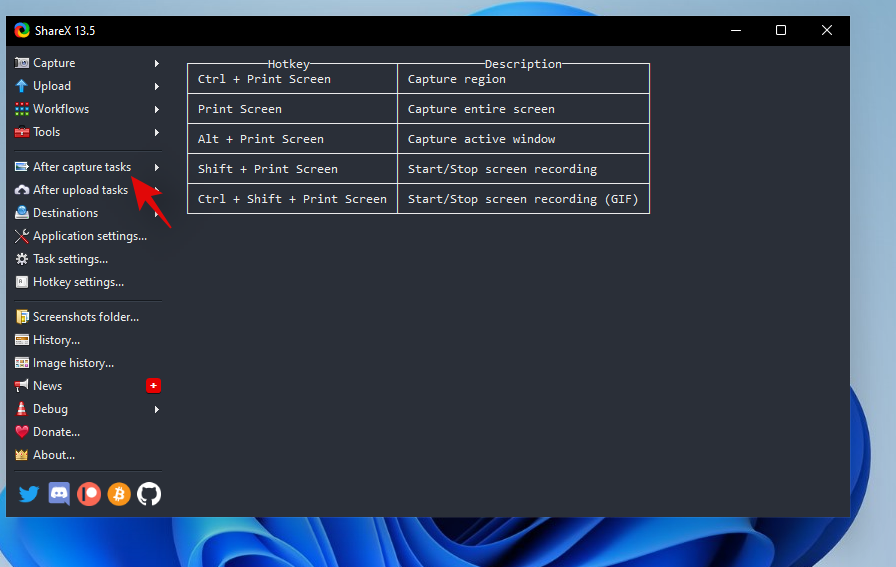
Launch ShareX on your system and click on ‘After Capture Tasks’ on your left.
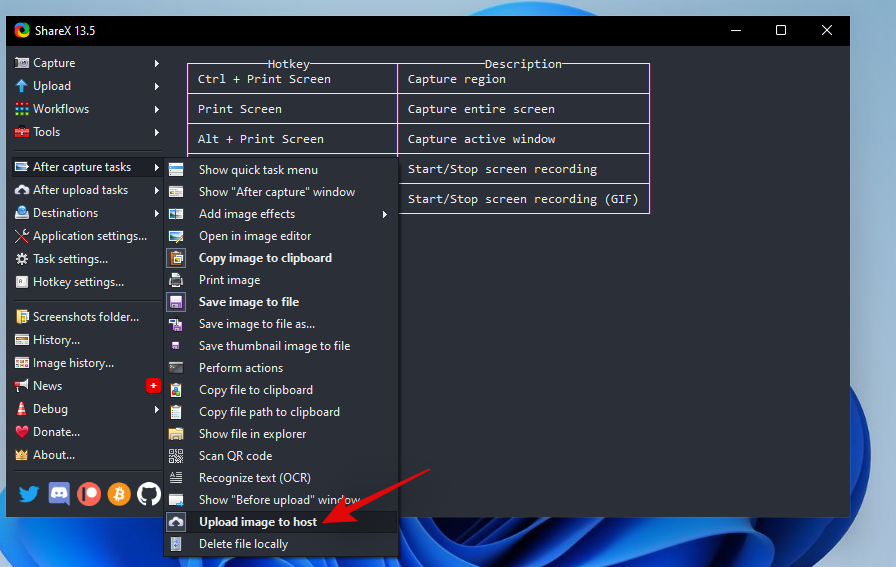
Now click and select ‘Upload Image to host’.
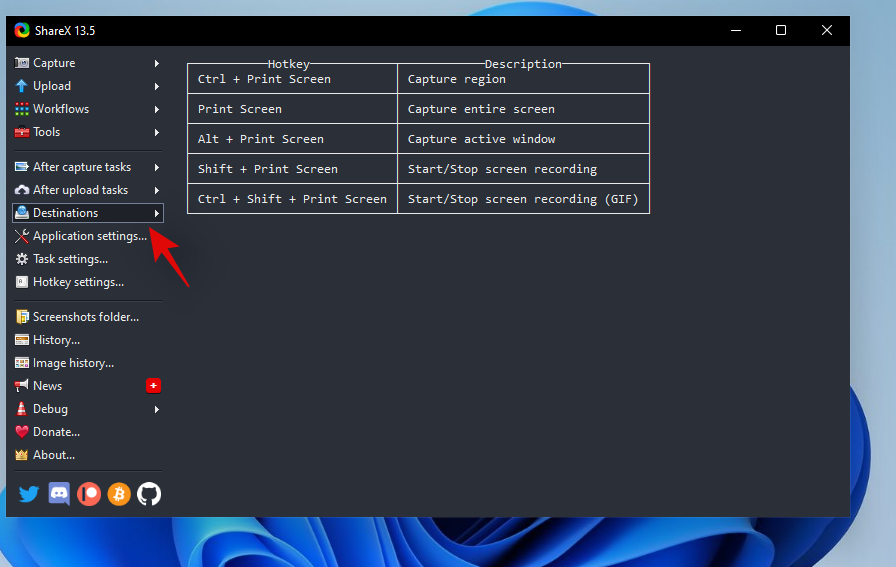
Click on ‘Destinations’ on your left.
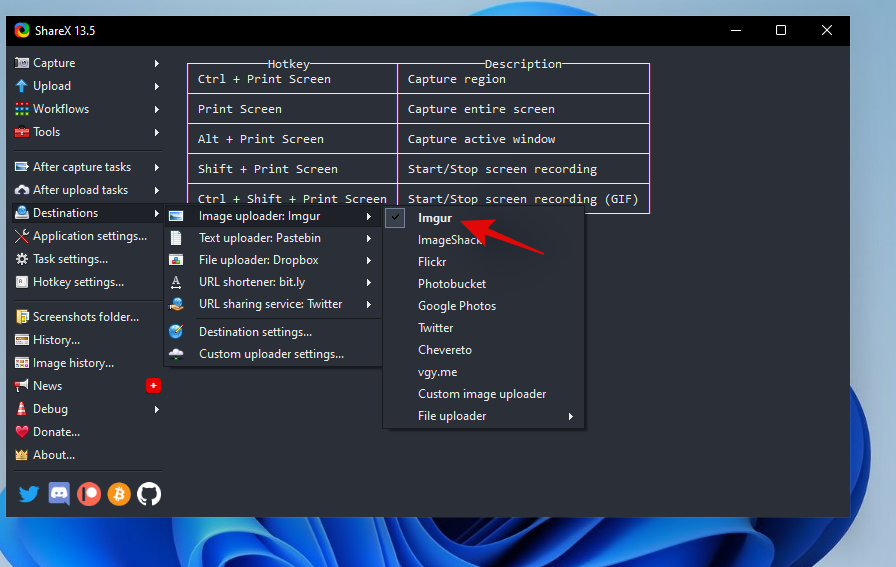
Now highlight ‘Image Uploader’ and select ‘Imgur’.
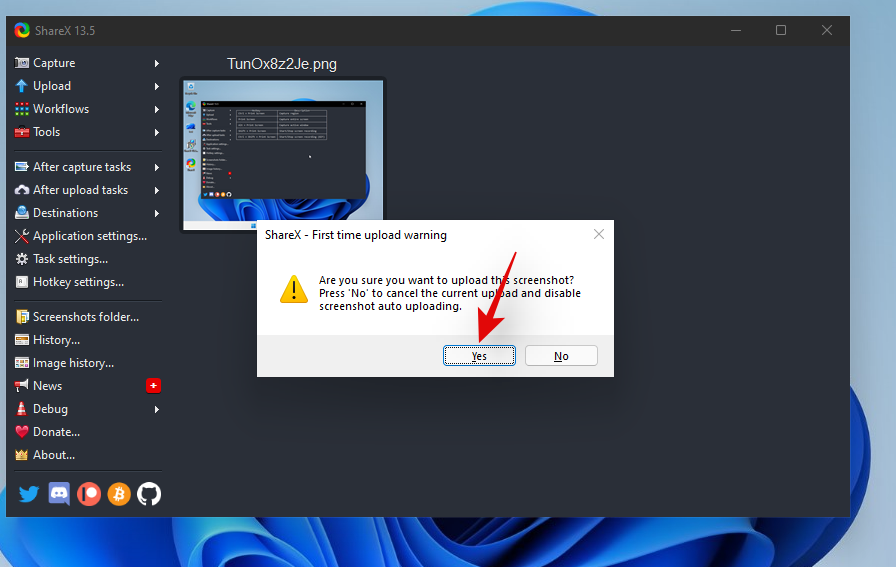
You can now capture your screen using ShareX and you should get a window confirming your upload. Click on ‘Yes’ to confirm your choice.
Once the upload is complete, you can access its shareable link by clicking on the notification you get or from the history section in ShareX.
How to screen record using ShareX
You can use the keyboard shortcut ‘Shift + PrtSc’ to start screen recording using ShareX on your PC. You will get a notification sound indicating that the screen recording has been started. You can now carry on with your work and record your screen as desired. ShareX will now open up and prompt you to install ‘FFmpeg on your device. Click on ‘Yes’ to proceed with the installation.
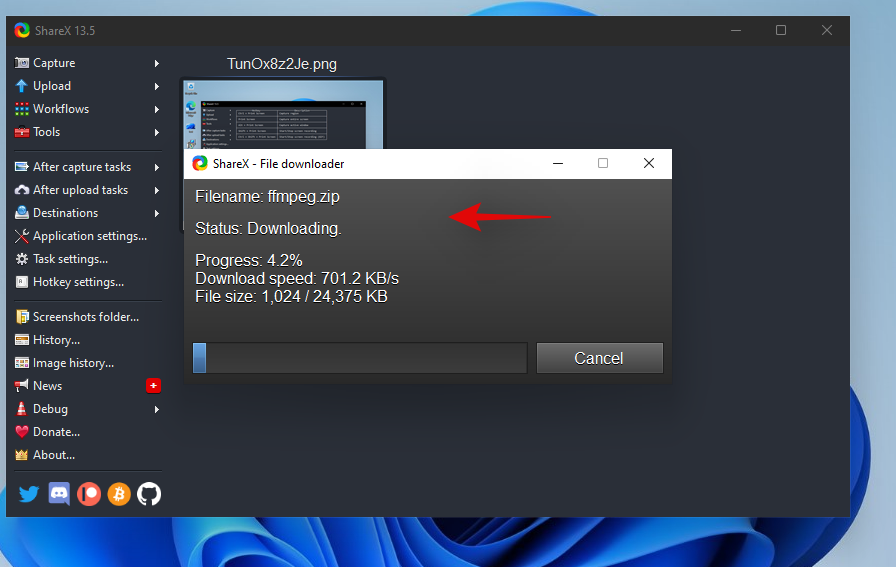
Once the installation is complete, you will be able to screen record any active window by clicking and selecting it. Press the same key combination again to stop the current recording. Once the recording finishes, you will find it in the following directory.
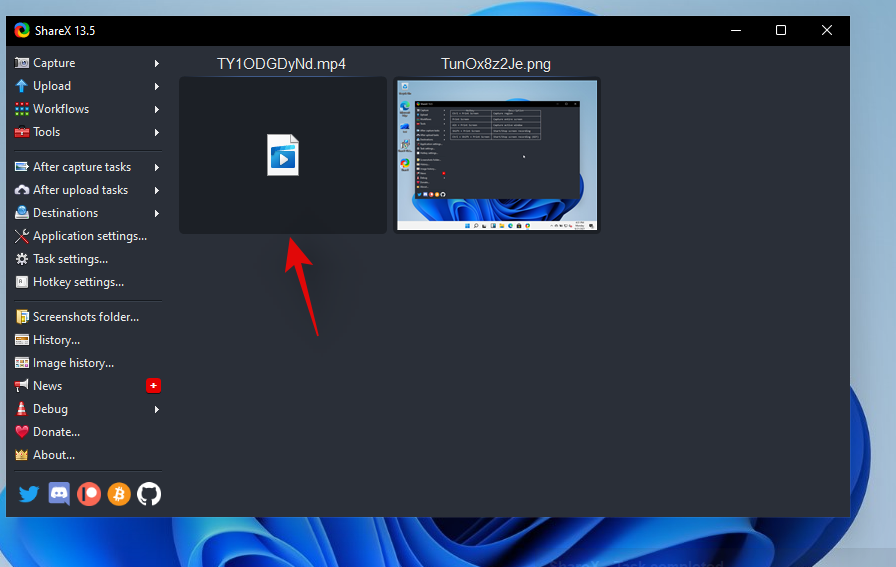
Documents/ShareX/Screenshots/Date
How to screen record to a GIF using ShareX
Mp4 is not an ideal video-sharing format in today’s day and age if you are looking to save data. Instead, you can opt for GIFs which can not only help you save data but also time. ShareX allows you to easily screen record any window on your screen and then automatically saves it in the .GIF format. This can be quite useful if you screen record your workflow and share regular explainers with your colleagues or staff. To start recording your screen as a GIF, press ‘Ctrl+Shift+PrtSc’ on your keyboard.
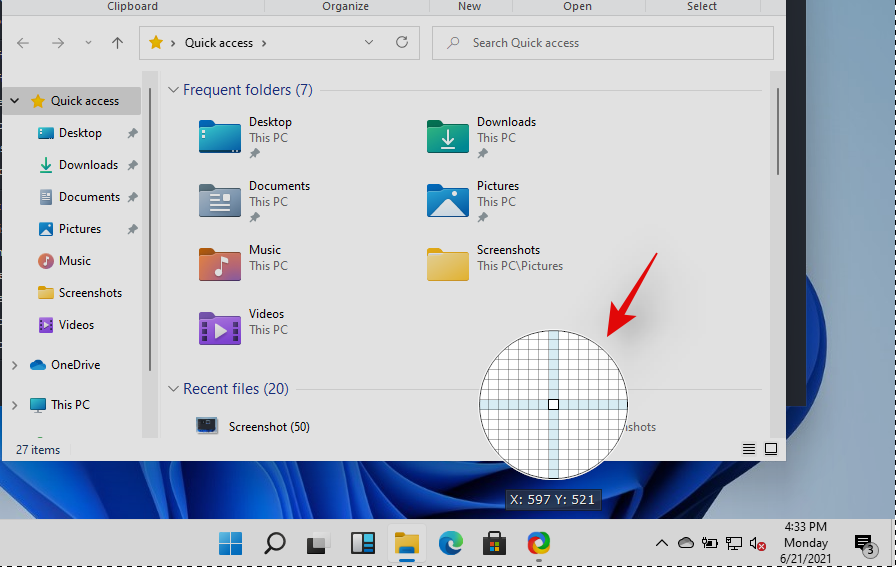
Click and select the window you wish to record and ShareX should automatically start recording. Press the same key combination on your keyboard to stop recording. You can also click on ‘Stop’ in the bottom left corner of the window to stop the recording. Once stopped, you will find the GIF in the following default directory.
Documents/ShareX/Screenshots/Date
How to screen copy text from screen using ShareX OCR feature
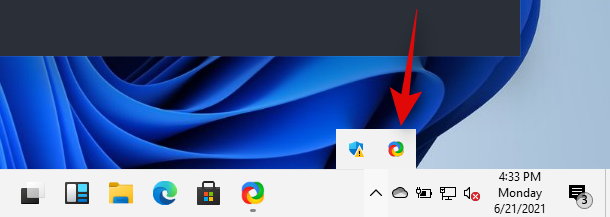
You can also use the OCR feature in ShareX to capture text from almost anywhere on the screen. This can be quite useful if you are looking to copy text from images, OS elements, or more. Sadly, by default, OCR does not have a dedicated hotkey and instead, you will need to use the taskbar icon to use it. Right-click the ShareX taskbar icon.
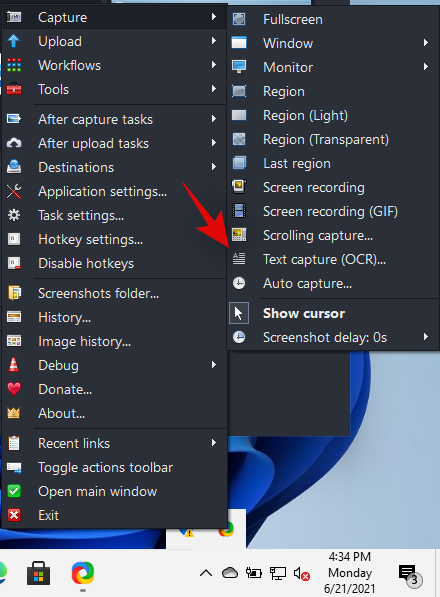
Select ‘Capture’ and click on ‘Text Capture (OCR)’.
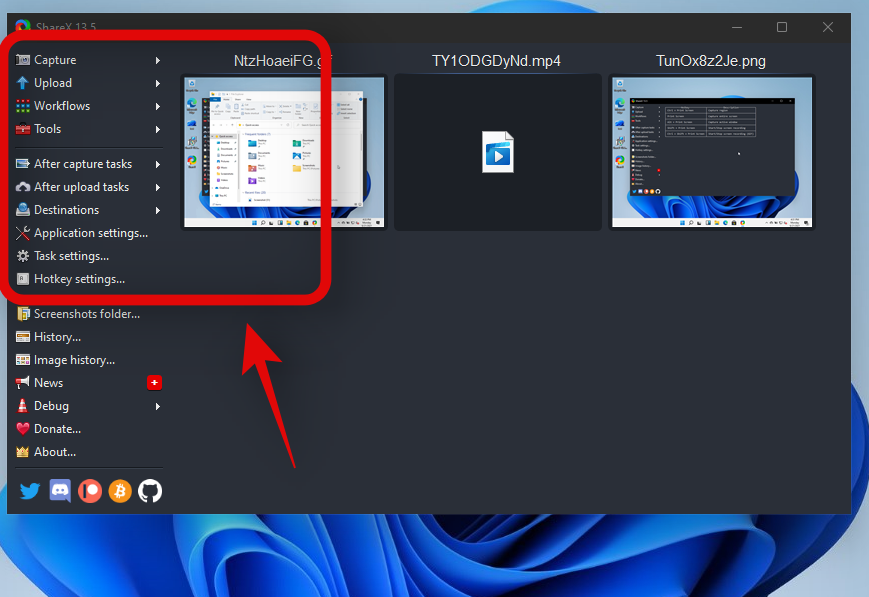
Click and draw on an area where you wish to source the text.
ShareX will now automatically identify the text in the selected area and present it to you in a text editor.
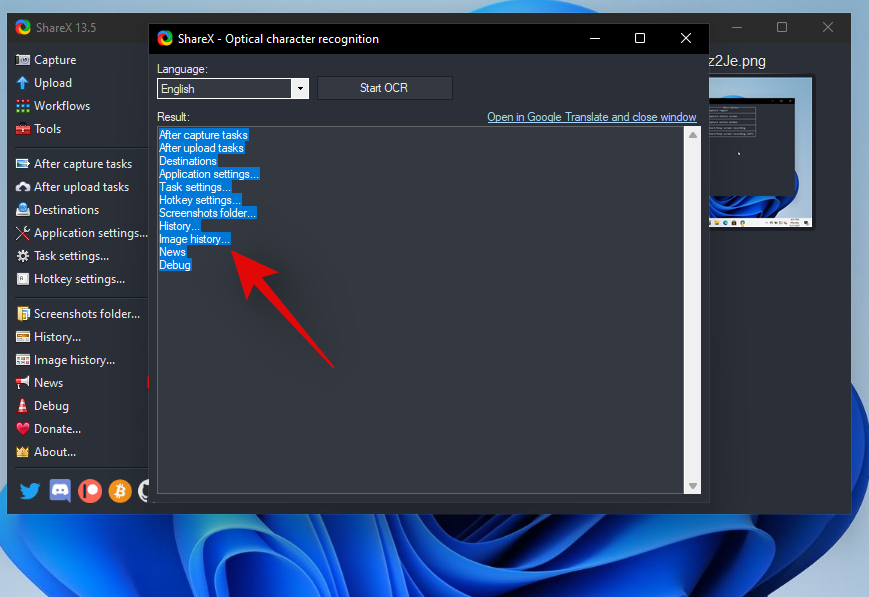
This text can now be copied to your clipboard and can be pasted in any compatible text field.
How to capture the last region again using ShareX
You can easily capture your last region again in ShareX, The program gives you a dedicated option for the same. Follow the guide below to capture your last captured region using ShareX.
Right-click on the ShareX icon in your taskbar.

Select ‘Capture’ and click on ‘Last Region’.
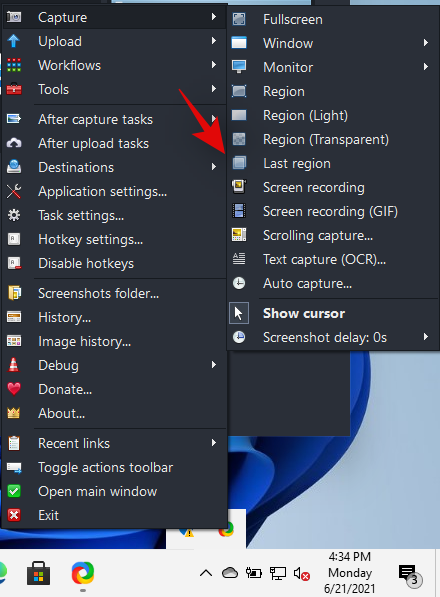
And that’s it! Your last region will be automatically captured and stored in your default Screenshots folder location.
Windows 11 Screenshots: Tips to know
Here are some additional tips that may help you regarding taking screenshots on Windows 11.
Where is the PrtSc key
Well, this can be a bit tricky depending on the type of keyboard that you are using. You can use a section below relevant to your device to find the PrtSc key on your keyboard.
- Full-Sized Keyboards: It’s the easiest to find your PrtSc key on a full-sized keyboard. Look towards the top of your arrow keys near the ‘Delete’ key and you will find the PrtSC & SysRq key at the top beside the Scroll Lock key.
- Compact Keyboards: On most compact keyboard, you will find the PrtSC key located near your arrow keys at the bottom, usually wedged between your RAlt & RCtrl. If you do not find your PrtSc there, then it is likely wedged in the Fn key row or the Number key row.
- Laptops: This is the trickiest part. Each laptop has its own slightly different keyboard unless you opted for an industry-standard specifically. In most cases, you will find the PrtSc in the top right corner of your keyboard but if you do not, you will need to search the entire keyboard. In some cases, the PrtSc is clubbed with another key under a single keycap and you might be required to press the Fn key to activate it.
I can’t find the PrtSc key on my keyboard
Well, if you can’t find the PrtSc key on your keyboard then you will have to get in touch with your OEM. While it is highly unlikely that the key was omitted from your keyboard, there is a slight chance of this in case you opted for an extremely compact keyboard for your setup. In addition to this, many keyboards tend to club the PrtSC with another key so you might find it clubbed together with another key on your keyboard like scroll lock or more. Hence we recommend getting in touch with your OEM to find the PrtSc key on your specific model.
We hope this guide helped you learn about all the ways in which you can take a screenshot in Windows 11. If you face any issues or have any more questions for us, feel free to reach out to us using the comments section below.


