Os nosos ordenadores forman parte da nosa vida privada e poden estar tan desordenados ou organizados como queiramos. Aqueles que queiran un pouco de organización poden ter que facer o necesario para xestionar os seus ficheiros de antemán, permitíndolles atopar ficheiros facilmente sempre que sexa necesario e evitando a acumulación de lixo innecesario .
Pero aqueles que gardan os seus ficheiros gardados quere ou non teñen que traballar máis tarde (quizais aínda máis) cando necesitan atopar un único orixinal entre un montón de duplicados ou desfacerse de todos para recuperar o espazo perdido. e acelerar as cousas . É dicir, a non ser que estean usando aplicacións para automatizar o proceso.
Entón, se a túa lea converteuse en demasiado para tolerar e necesitas unha aplicación para atopar e eliminar ficheiros duplicados, aquí tes algunhas recomendacións das que podes beneficiarte.
Tamén podes limpar ficheiros duplicados no teu PC usando ferramentas nativas de Windows como Busca, Parámetros de busca, Símbolo de comandos, etc. Comprobe a ligazón a continuación para iso.
Relacionado: Como atopar ficheiros duplicados en Windows 11 usando a Busca de Windows, o símbolo do sistema e moito máis [Consellos e guías!]
Non obstante, ás veces as opcións dispoñibles nativamente poden non ser suficientes. Por exemplo, se non sabes onde buscar ficheiros duplicados, hai unha gran probabilidade de que nunca os atopes.
Afortunadamente para todos nós, é por iso que existen aplicacións de busca de ficheiros duplicados, e que ben son! Pero non todos son similares: algúns teñen máis funcións, outros teñen unha mellor GUI e outros aínda o teñen todo, aínda que a un prezo. Aquí tes algunhas recomendacións para axudarche a limpar o teu PC facilmente.
Contidos
6 Mellores aplicacións de busca de ficheiros duplicados
- Buscador de ficheiros duplicados Auslogics
- CCleaner
- Buscador de duplicados sinxelo
- Buscador de ficheiros duplicados
- Busca nos meus ficheiros
- Limpador de duplicados gratuíto
1. Como usar "Auslogics Duplicate File Finder"
O buscador de ficheiros duplicados de Ausloics é facilmente a nosa mellor opción para este fin. Ten unha GUI limpa e opcións suficientes para buscar ficheiros duplicados incluso nas áreas remotas do teu PC.
Descarga : Auslogics Duplicate File Finder
Teña coidado ao instalar a aplicación. O instalador tentará instalar tamén outros programas Auslogics se non tes coidado, así que non te esquezas de desmarcar as caixas cando apareza a pantalla.
En canto o inicie, a aplicación levarao directamente á pantalla de busca para seleccionar os tipos de ficheiros que desexa buscar e as unidades nas que buscalos.
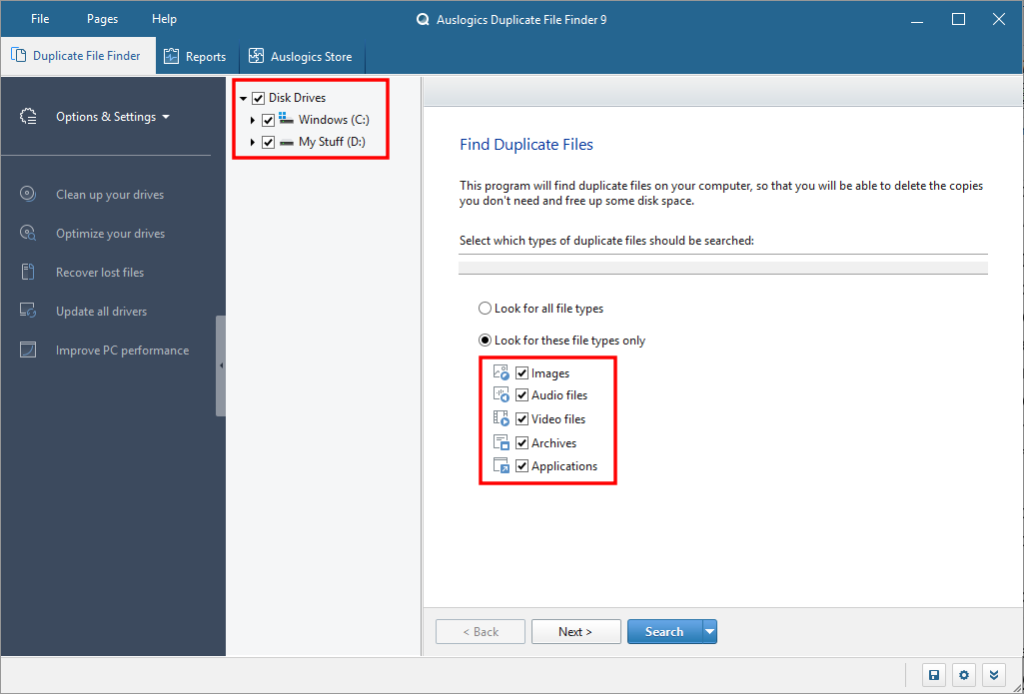
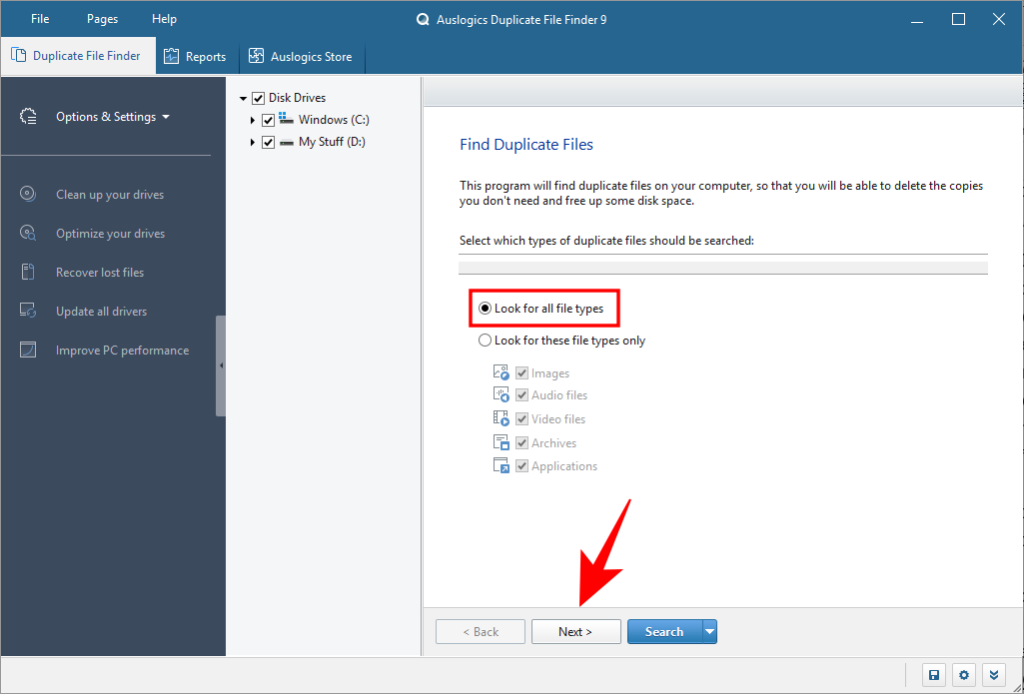
Por defecto, os tipos de ficheiros seleccionados son Imaxes, Arquivos de audio, Arquivos de vídeo, Arquivos e Aplicacións. Para buscar todos os tipos de ficheiros, seleccione a opción anterior: busque todos os tipos de ficheiros . A continuación, fai clic en Seguinte .
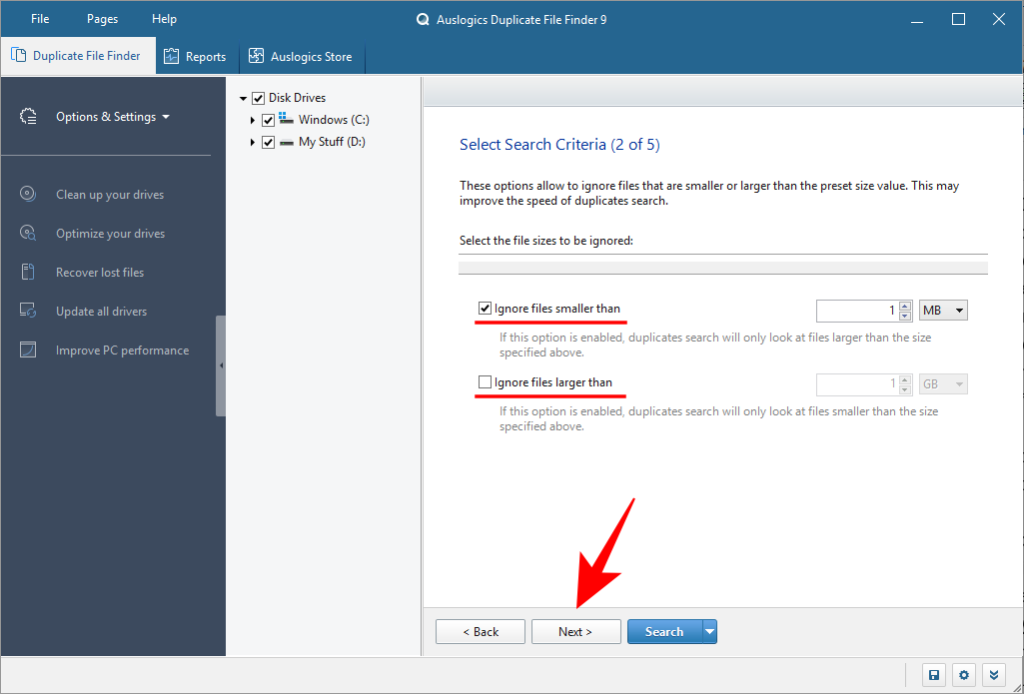
A seguinte pantalla permítelle seleccionar o intervalo de ficheiros para buscar. Por defecto, a busca será "Ignorar ficheiros de menos de 1 MB". Podes cambiar o rango como creas oportuno. A continuación, fai clic en Seguinte .
A seguinte pantalla permitirache personalizar aínda máis a túa busca, escollendo ignorar os nomes dos ficheiros, as datas, os ficheiros ocultos e os subcartafoles. Fai clic en Seguinte para continuar.
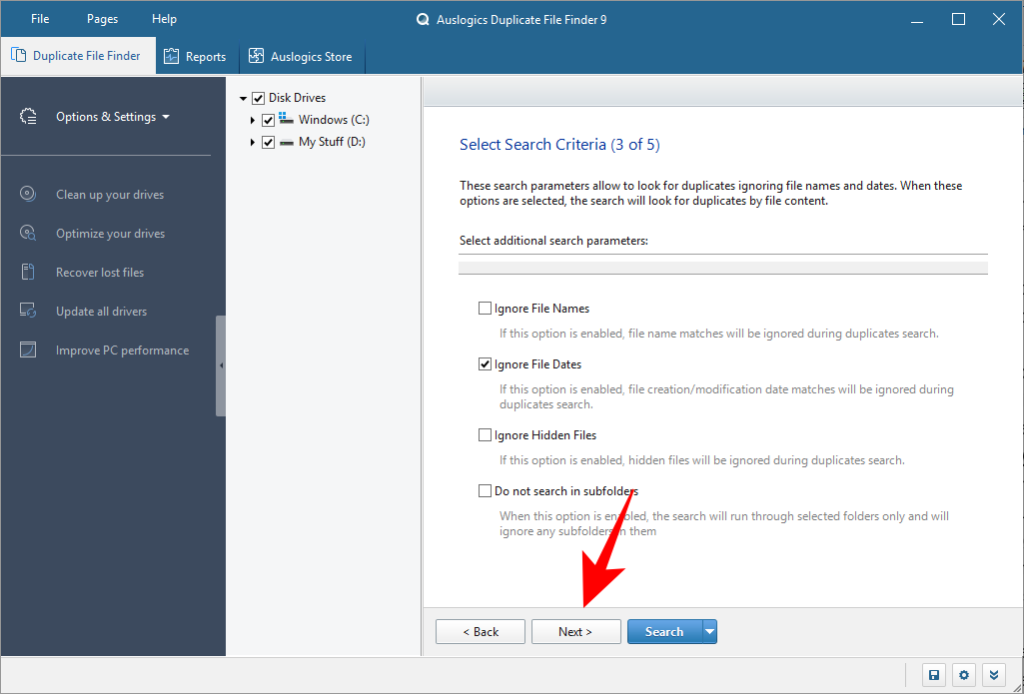
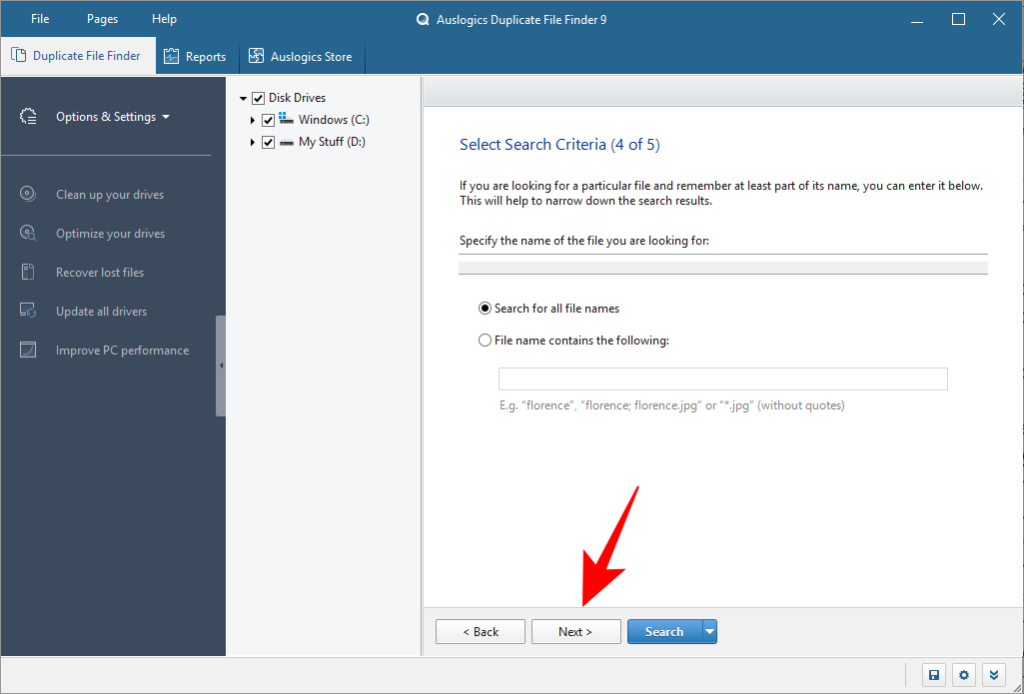
A seguinte pantalla permitirache restrinxir a túa busca buscando ficheiros cun nome determinado ou incluso un fragmento del. Recomendamos buscar todos os nomes de ficheiros (predeterminado) e premer en Seguinte .
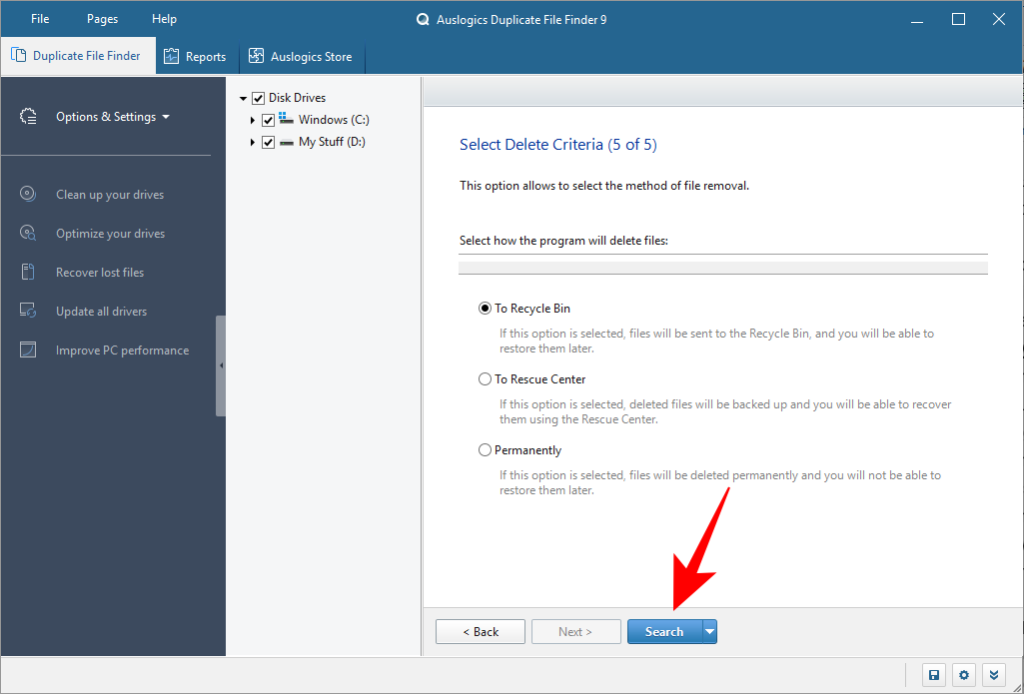
A última pantalla permítelle seleccionar como o programa eliminará os ficheiros, se os colocará na "Lixa de reciclaxe", facer unha copia de seguridade dos ficheiros, eliminalos e permitir a recuperación a través do "Centro de rescate" ou eliminalos "de forma permanente". Unha vez que teñas revisado a configuración de busca, fai clic en Buscar .
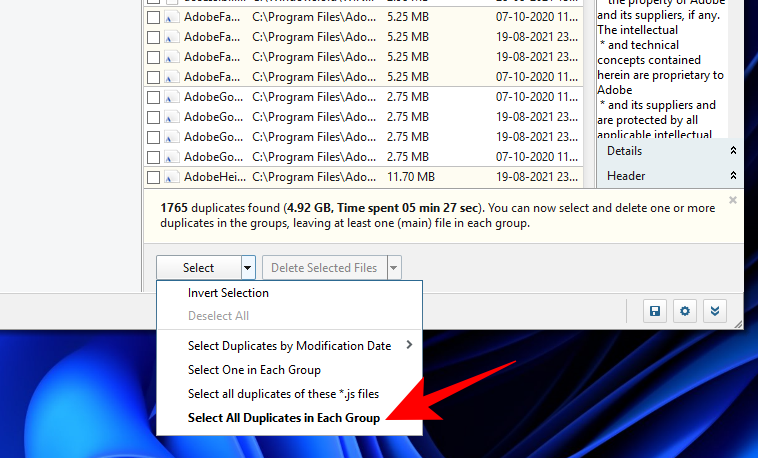
Dependendo do número de ficheiros no teu sistema e da configuración de busca, isto pode levar algún tempo. Unha vez completada a busca, atoparás unha lista de ficheiros e os seus duplicados. Para seleccionar só os duplicados, fai clic na frecha situada ao lado de "Seleccionar" na parte inferior.
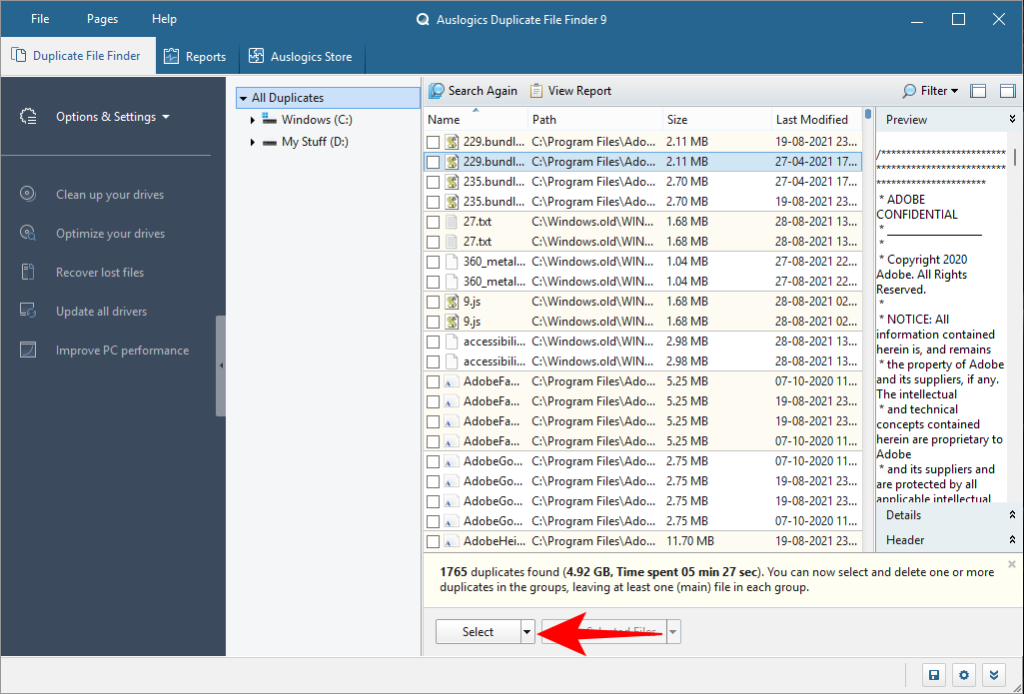
Seleccione unha opción ("Recoméndase seleccionar todos os duplicados en cada grupo").
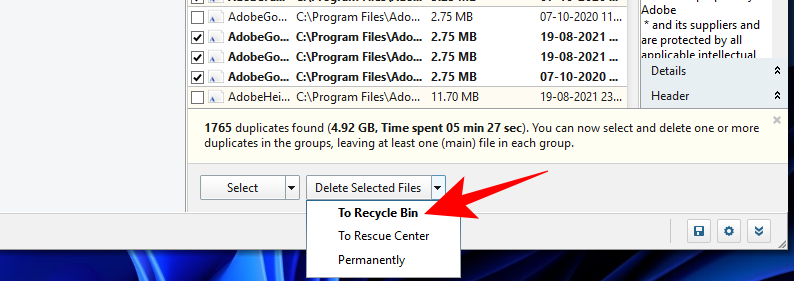
A continuación, faga clic na frecha ao lado de "Eliminar ficheiros seleccionados" e escolla como quere borralos ("Recoméndase á papeleira".
Agora vai adiante e fai clic en Eliminar ficheiros seleccionados .
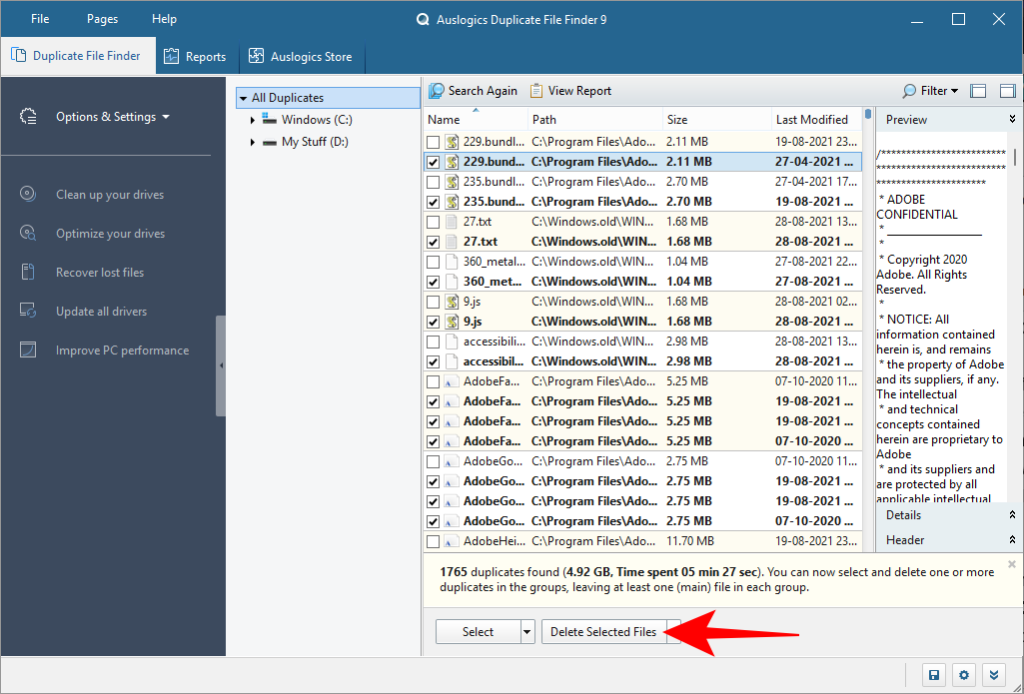
Auslogics Duplicate File Finder, coas súas opcións de configuración de busca sinxelas pero eficaces e a súa IU limpa, é a ferramenta perfecta para buscar ficheiros duplicados no seu PC e eliminalos no proceso.
2. Como usar "CCleaner"
Se algunha vez buscaches produtos de limpeza do sistema, coñeces CCleaner e, atrevémonos a dicir, a súa reputación como un programa introductor de malware en lugar de un programa de limpeza de malware. Pero esas polémicas están ben no pasado, e está a construírse de novo.
Descarga : CCleaner
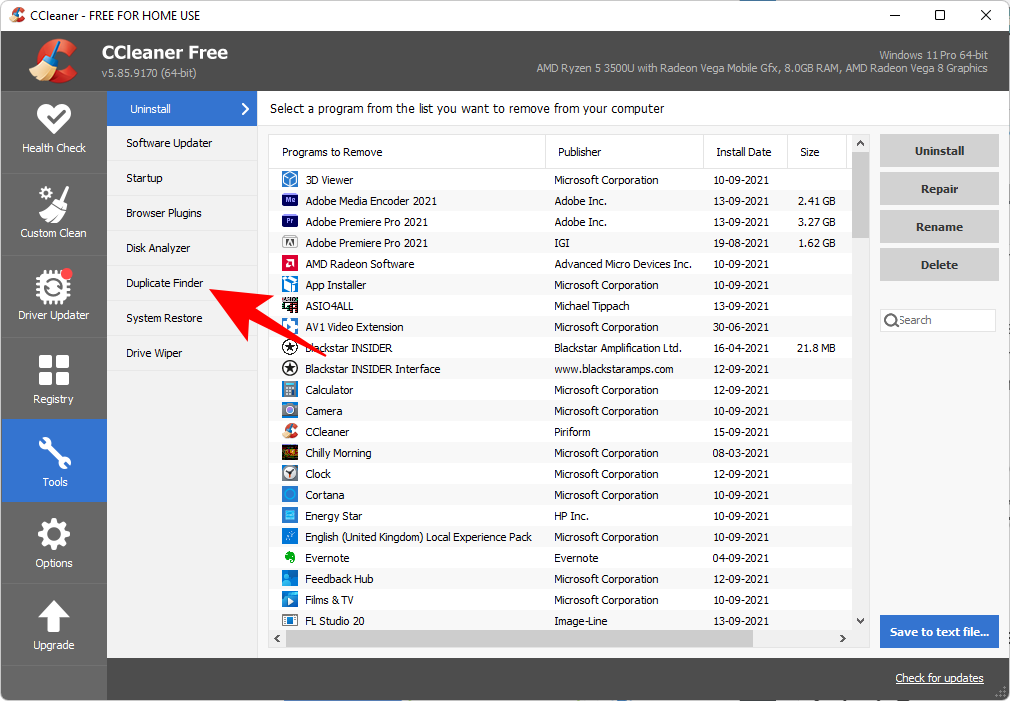
CCleaner aínda é unha das ferramentas máis populares que teñen unha funcionalidade todo-en-un, incluíndo un "Buscador de duplicados". Abre a aplicación e fai clic na opción Ferramentas no panel esquerdo.

A continuación, seleccione Buscador de duplicados .
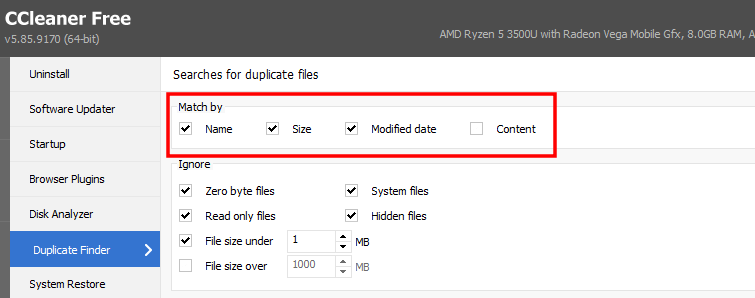
Atoparás todas as opcións de configuración de busca na mesma pantalla. O nome, o tamaño, a data e as opcións de contido están na parte superior.
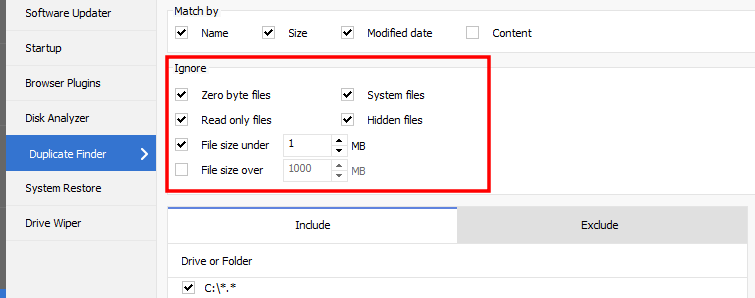
As opcións para ignorar os ficheiros polos seus parámetros están no medio.
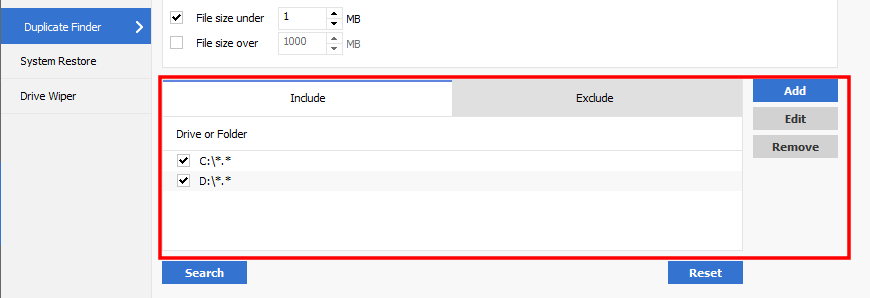
E as unidades e cartafoles para incluír/excluír están na parte inferior.
Unha vez que selecciones a túa configuración de busca, fai clic en Buscar .
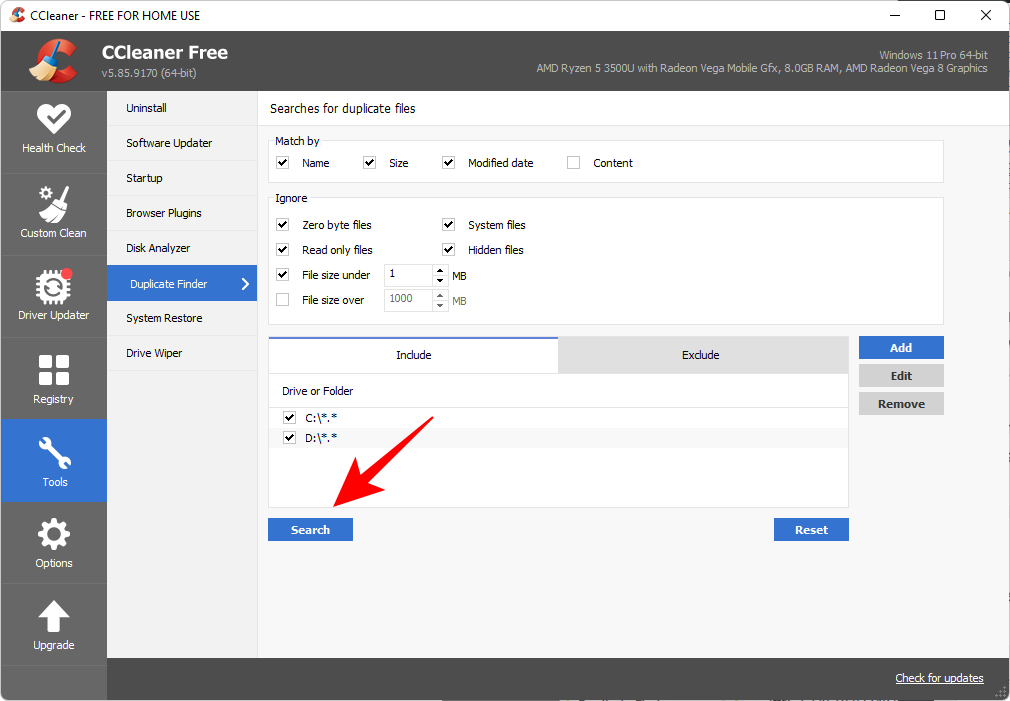
CCleaner agora iniciará a busca e mostrará os ficheiros duplicados a medida que se atopen. Unha vez completada a busca, fai clic en Aceptar .
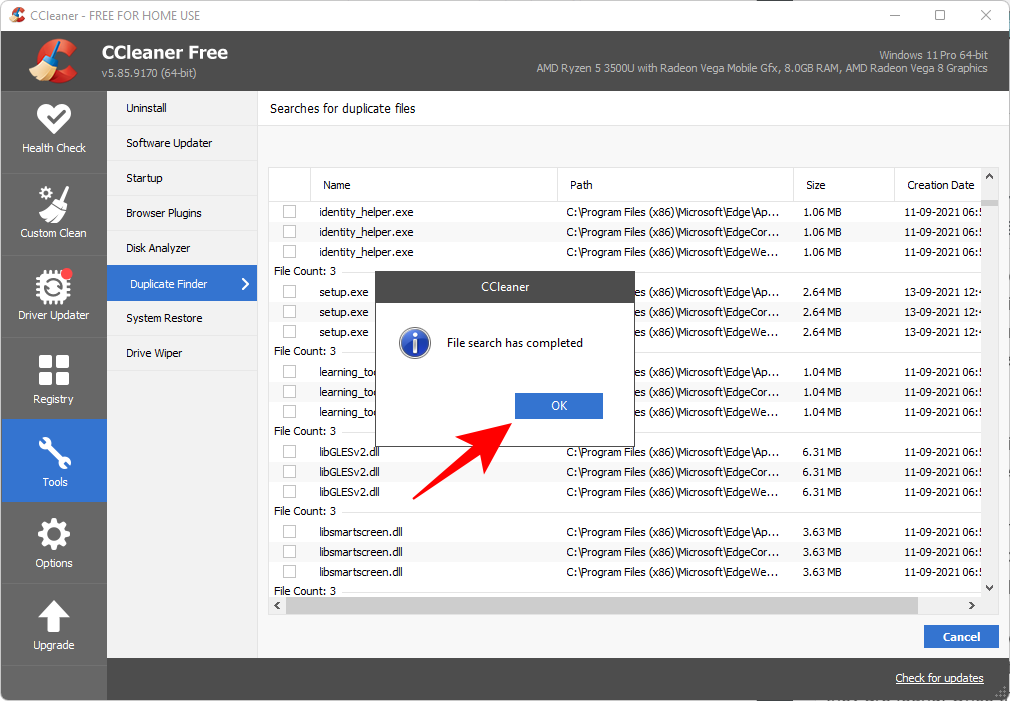
Now select the files that you would like to delete. This has to be done manually as there is no option to select duplicates in each category. But it also forces you to be careful while deleting because once these files are deleted, they’re gone for good. So be careful while making your selection. Then click on Delete selected.
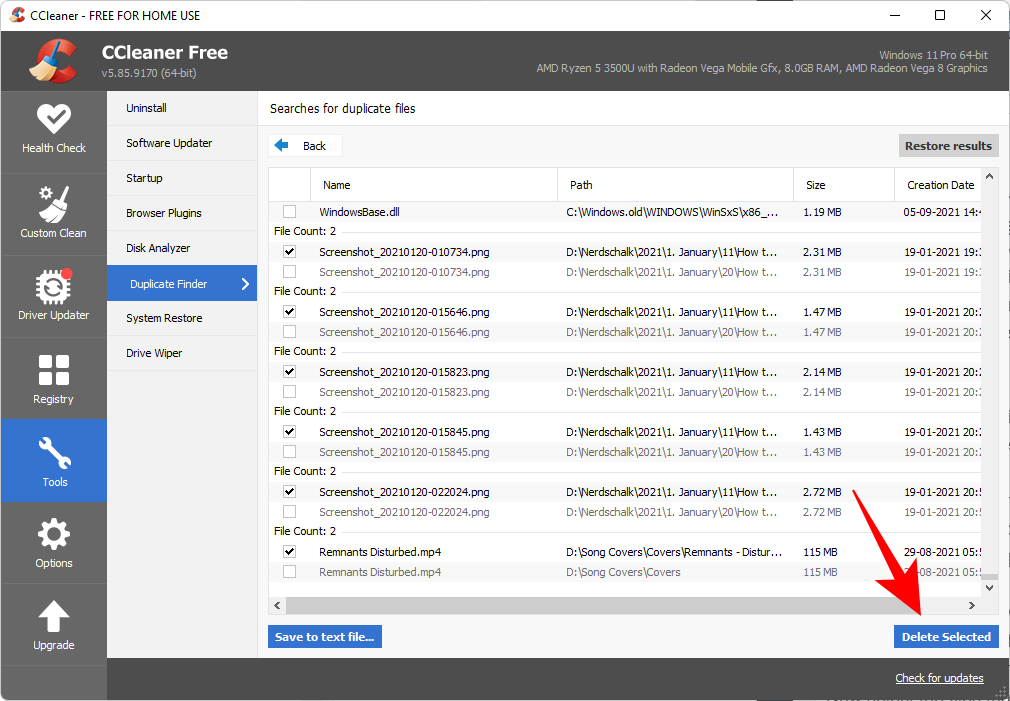
Despite its reputation, CCleaner is still one of the more popular tools to find duplicate files, even if it doesn’t offer enough options for the purpose of deletion.
3. How to use ‘Easy Duplicate Finder’
The name says it all! – an application that lets you find duplicate files with ease. This is all possible thanks to sophisticated algorithms that dig through your PC for any and all files hiding in duplicity.
Download: Easy Duplicate Finder
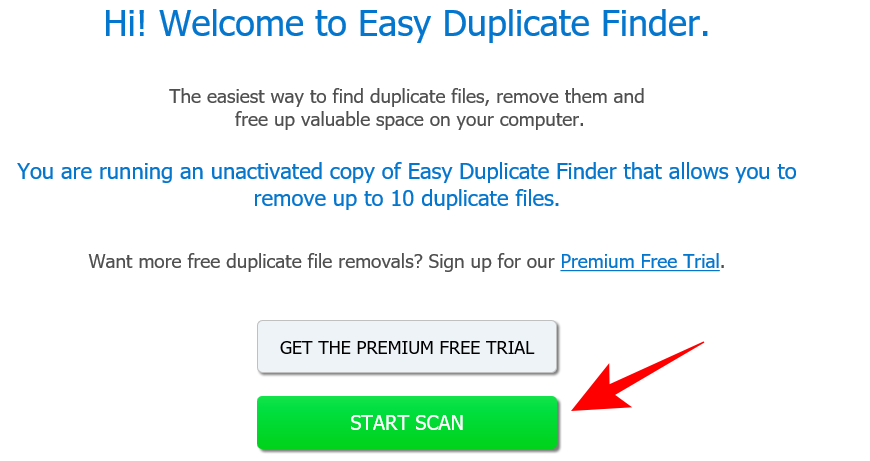
Before we begin, know that the application only allows you to remove up to 10 duplicate files, a very small amount even by trial-version standards. You can, if you wish, sign up for a free Premium trial and notch up that number.
Or you could just keep using the unactivated free version. Simply go ahead and click on Start Scan.
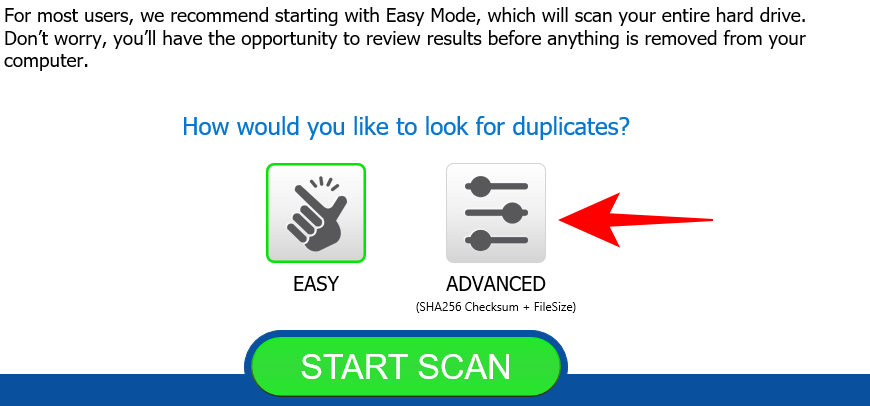
If you don’t have the time to configure the settings, the Easy option will take care of things for you. Or, you could specify what to search, what to exclude, and all things related to duplicate files search. For this, click on Advanced.
The Scan Mode at the top lets you select from a number of scan options. Choose one that fits your purpose.
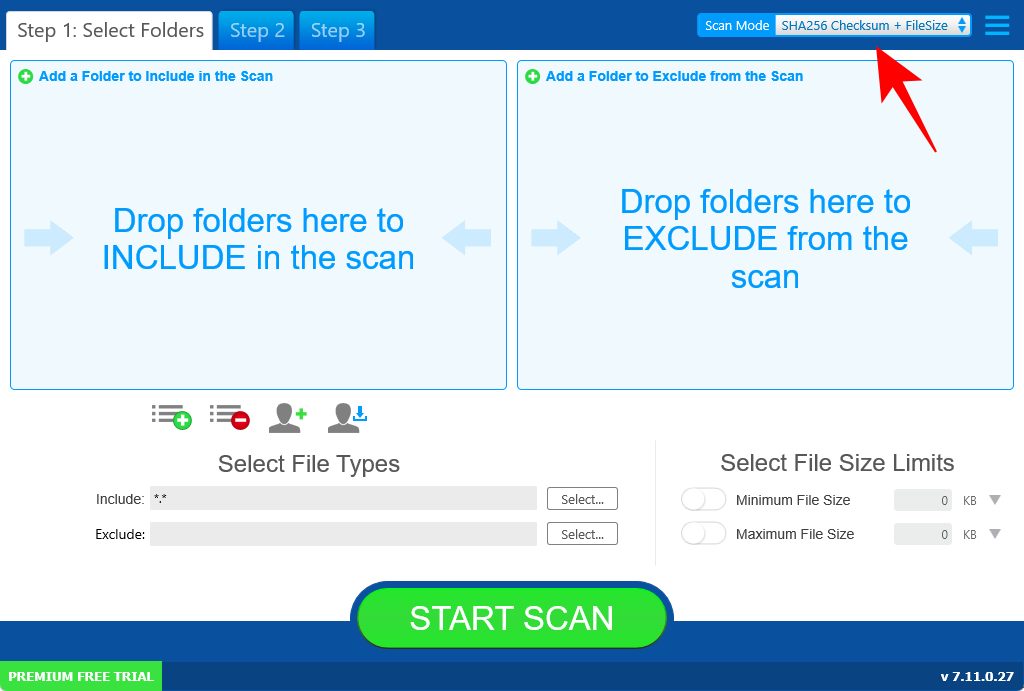
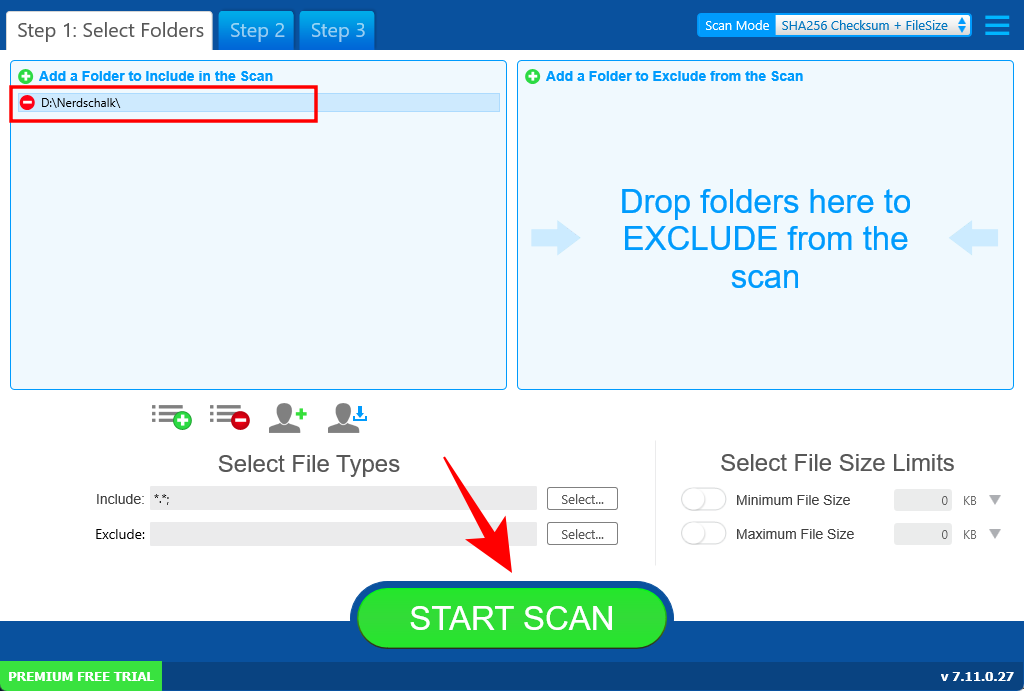
The option to limit the search by file size is towards the bottom right. It’s advisable to keep things set to default. Then drag and drop the folders that you want to scan in the left square. Once you’ve specified your settings, click on Start Scan.
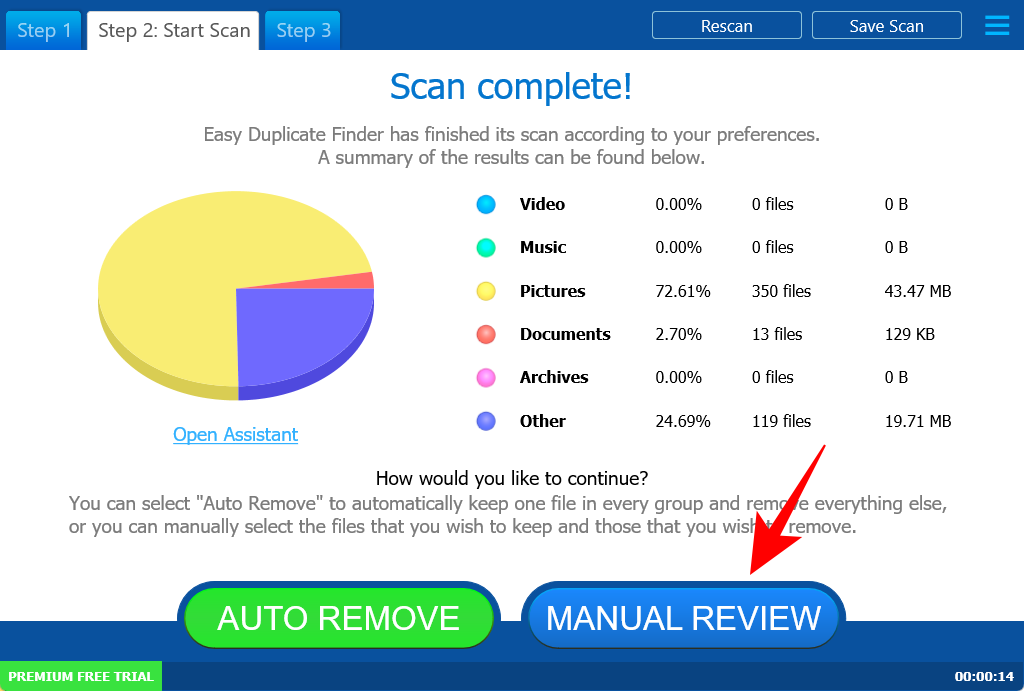
As soon as the scan is complete, you’ll see options to either ‘Auto Remove’ or ‘Manual Review’. We recommend the latter to ensure that you’re not deleting some important system files in the process (just in case).
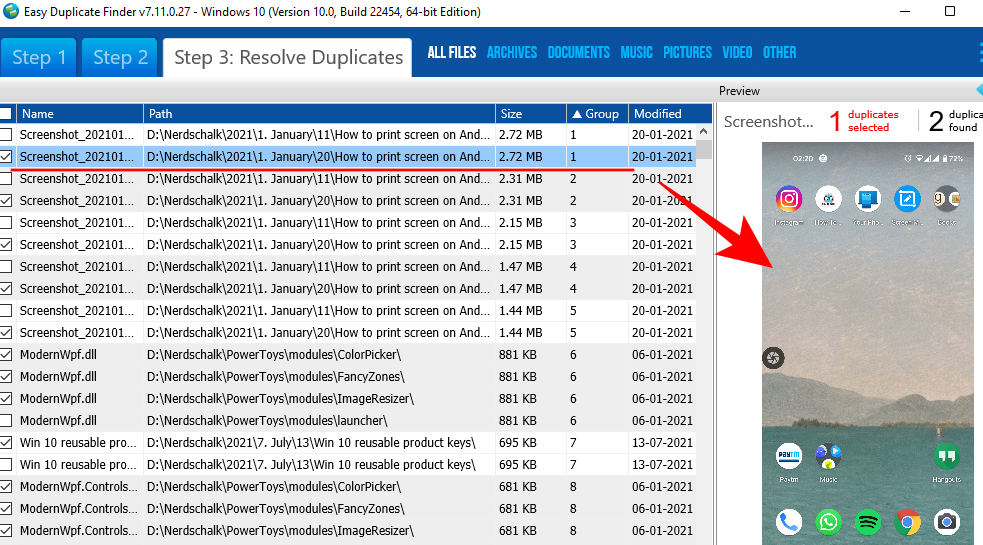
The duplicate files will be selected automatically. You can look through the different categories by selecting one from the top.

Click on a file to highlight it and see its preview in the right panel.
Once you’ve looked through the files to be deleted, go ahead and click on the Trash icon.

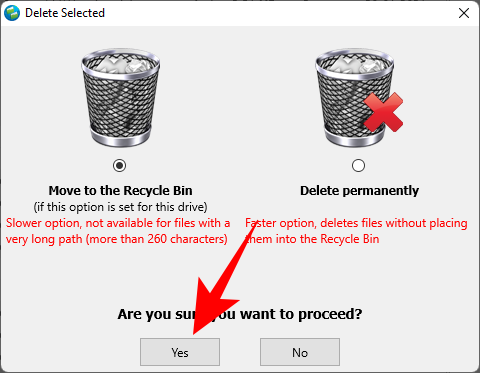
Now choose whether you want to move the files to the Recycle bin or delete them permanently. Then click on Yes.
4. How to use ‘Duplicate Files Finder’
This application has been around for a while now, and it’s more than evident with the antiquated interface. Safe to say it hasn’t been updated in some time, but that’s only because it doesn’t need to. This titular duplicate files finder is lightweight and quite adept at detecting duplicate copies.
Download: Duplicate FilesFinder
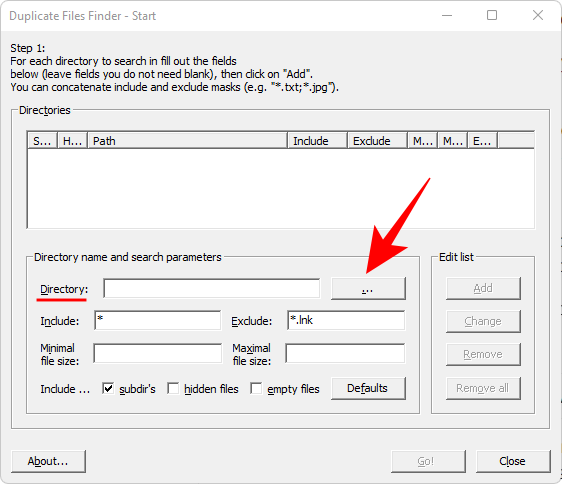
The application has a single screen that contains all the necessary options to customize your search. The main thing that you need to do is to click on the ellipsis button next to the Directory field.
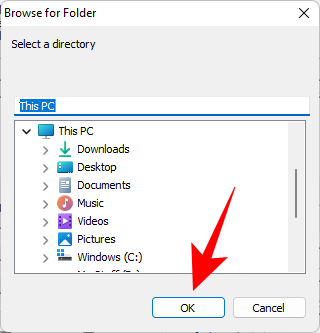
And choose which drive or folder you want to scan, then click OK.
The rest of the options are quite self-explanatory and are no different from what we’ve seen in other duplicate file finders. Once you’ve specified your search (or left the fields that you don’t need blank), click on Add.
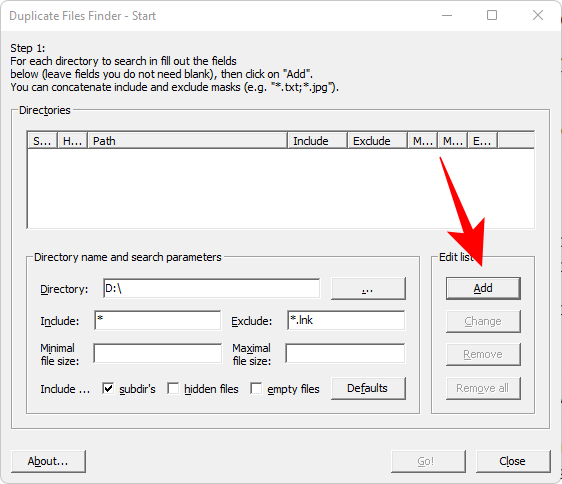
Then click on Go! to start the search.
Once the scan is complete, you’ll get a list of duplicate files. To delete a file (or multiple files), select them, right-click and choose Delete all duplicates to this file.
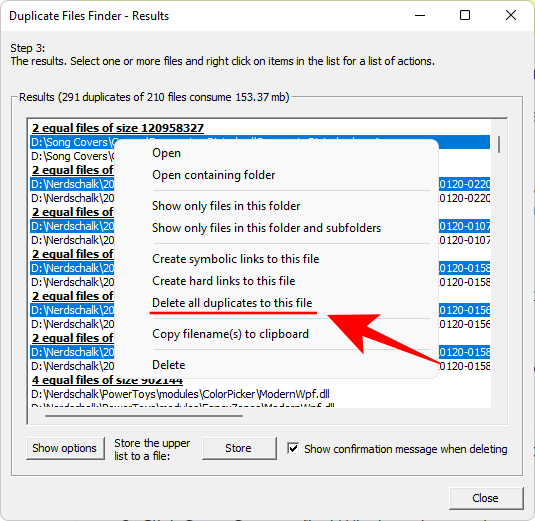
Duplicate Files Finder may look like an application out of the dark ages, but it is a convenient little lightweight tool that has more options than most so-called ‘file finders’ of the day.
5. How to use ‘SearchMyFiles’
If you liked the simplicity of the nominal Duplicate Files Finder, you may also dig SearchMyFiles. Just like the previous entry, this portable program may make you nostalgic about Windows versions of yore. But its search algorithms and search options are at par with the best in the industry today.
Download: SearchMyFiles
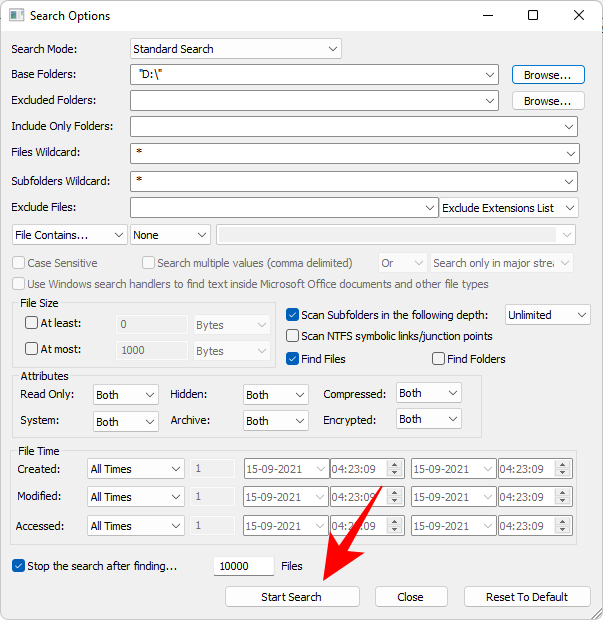
There’s no installation required here. Simply extract the contents from the downloaded zip file and run the application. There are tons of search options available on SearchMyFiles. Select from 5 different Search Modes, add the Base Folders to scan, and go through all the major options to narrow down your search.
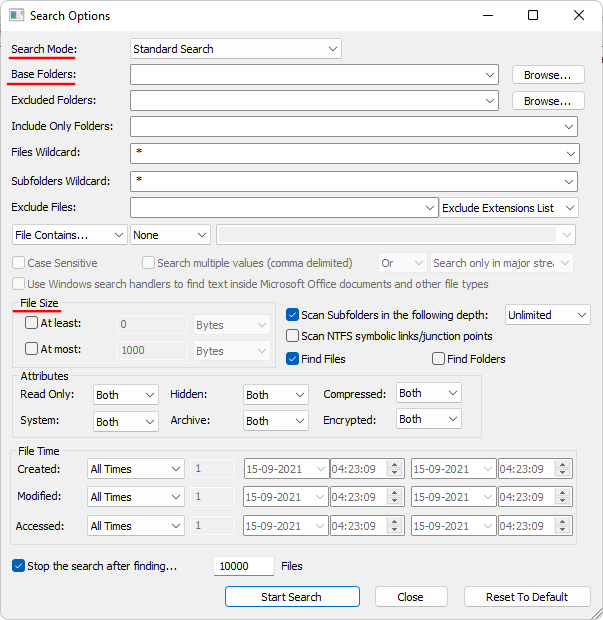
Besides the run-of-the-mill options to include/exclude folders and subfolders and file size range, you can narrow down the hunt further with options to search based on file attributes, date created, modified, and accessed.
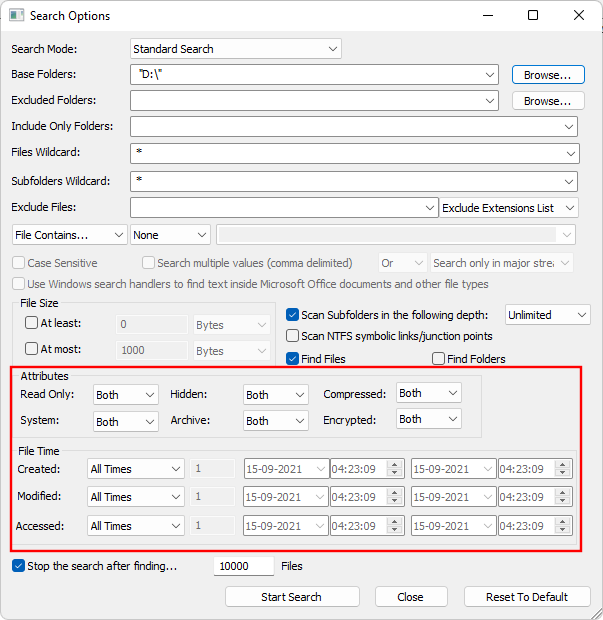
Or, you could leave them all set to default and get going with the scan by clicking on Start Search.
Once the search is complete, select the files that you want to delete (hold Ctrl and click on the files). Then hit the Delete button. When asked to confirm, click Yes.
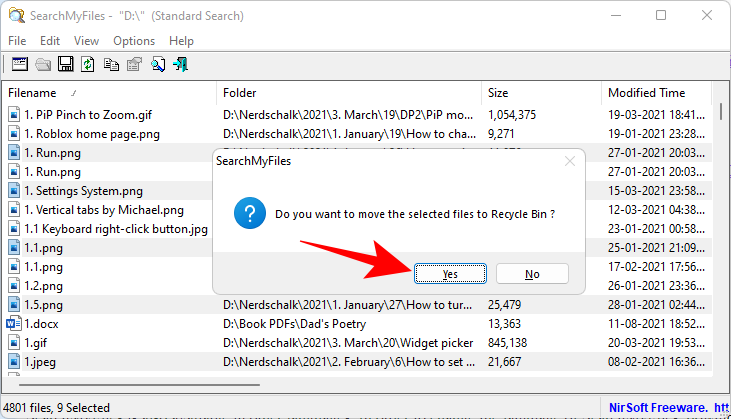
Aside from its outdated look, the only thing holding this program back is the unavailability of an option to select duplicate files to delete with a single click. If that doesn’t bother you, then this is a gem right here, in our books at least.
6. How to use ‘Duplicate Cleaner Free’
This is another one of those programs that only give you a week’s worth of trial, after which you’ve got to purchase it to keep using. But as a one-time duplicate file cleaner, the free version gets the job done just with some class.
Download: Duplicate Cleaner Free
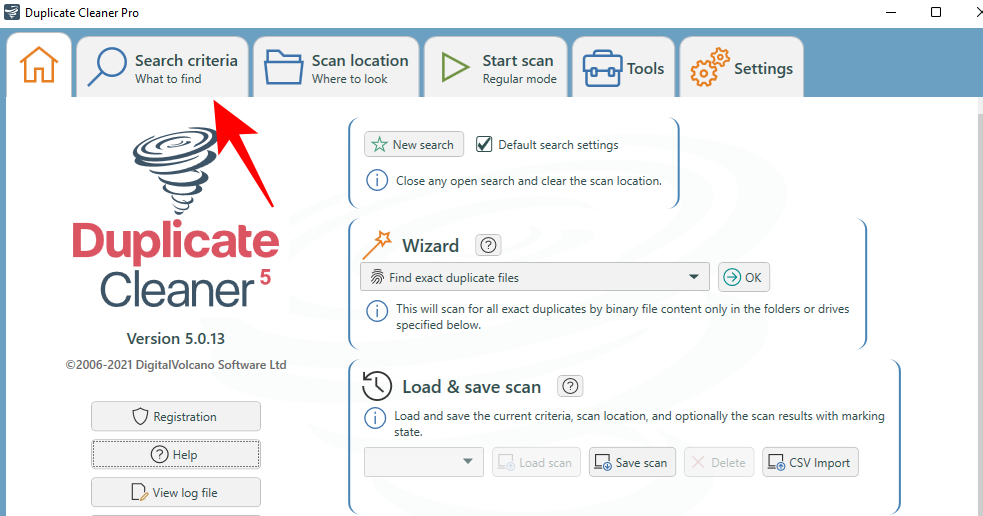
Run the application and click on Search criteria to begin.
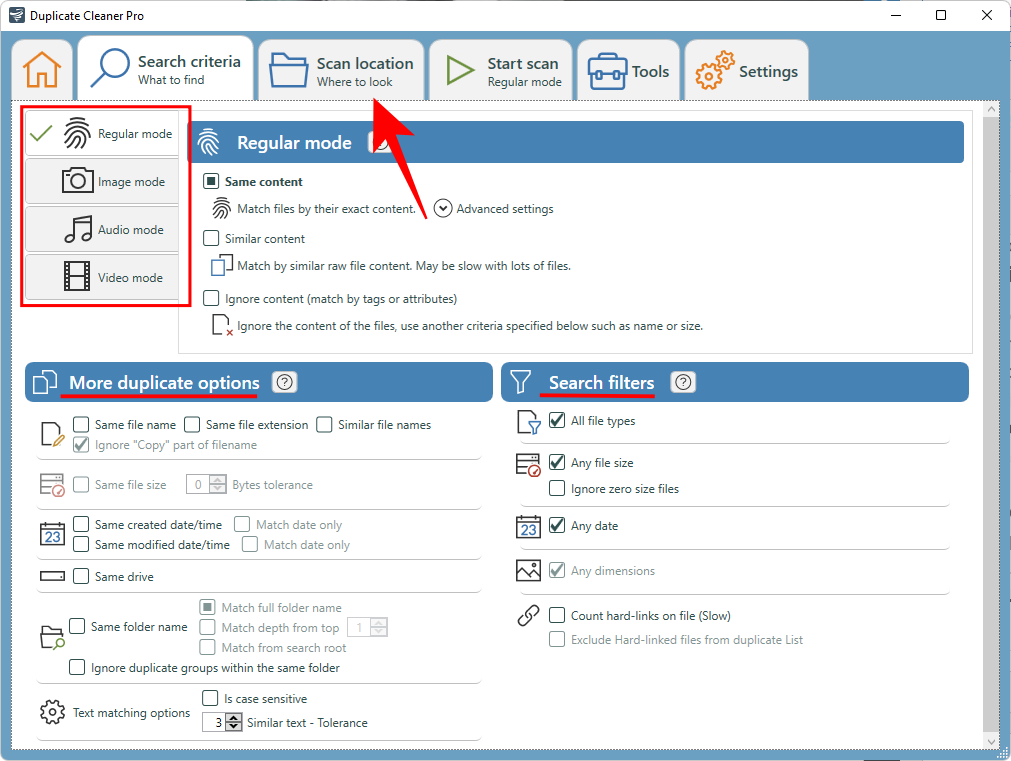
You have four modes to choose from on the left – Regular, Image, Audio, and Video mode. Each has its mode-specific set of options, which is quite an intelligent feature that’s nonexistent on some other programs. Tweak your search settings and filters, then click on Scan Location.
Now, drag and drop the drive/folder to scan, or pick from the left panel by selecting the drive/folder and clicking on the arrow to its right.
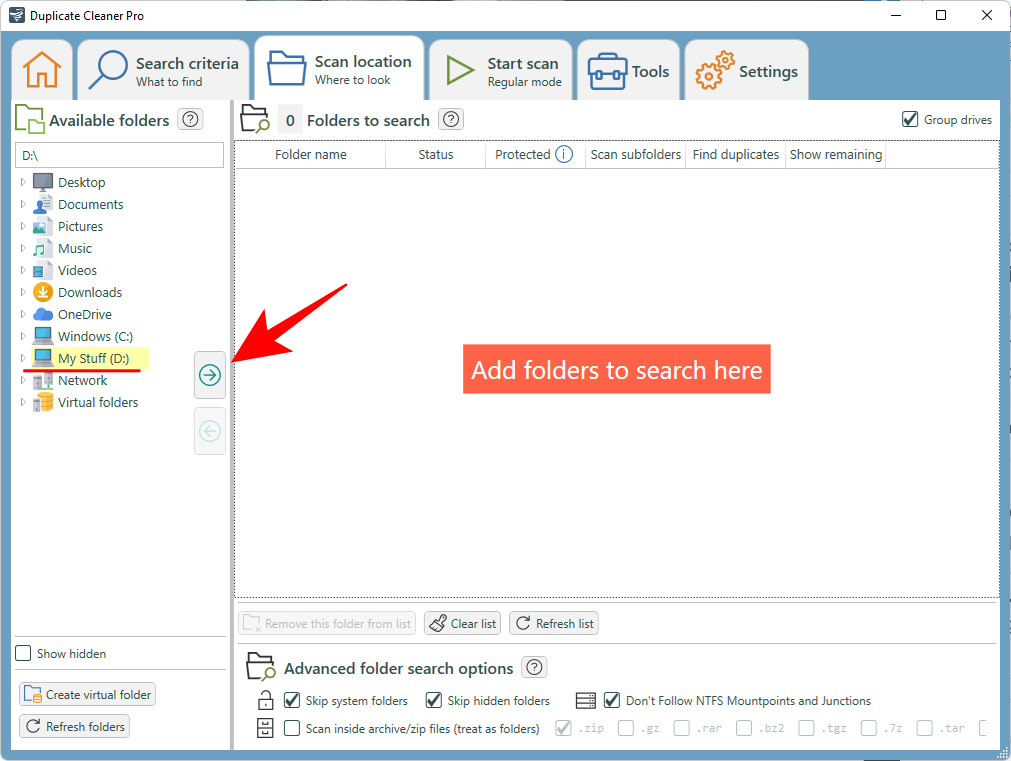
The advanced folder search options are provided at the bottom. Once you’re satisfied with your settings, click on Start scan at the top.
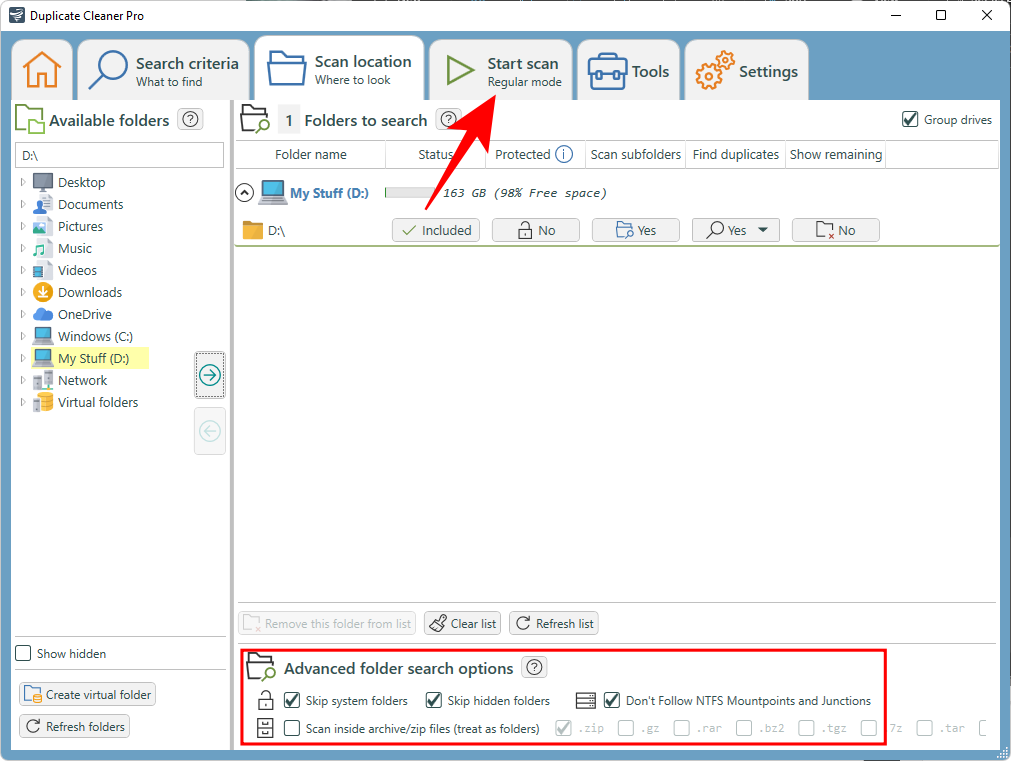
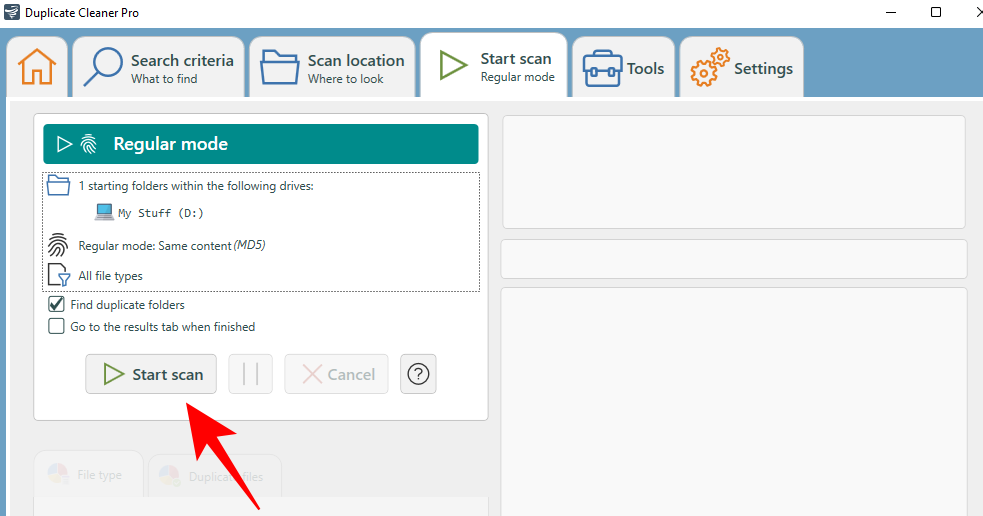
Now click on Start scan.
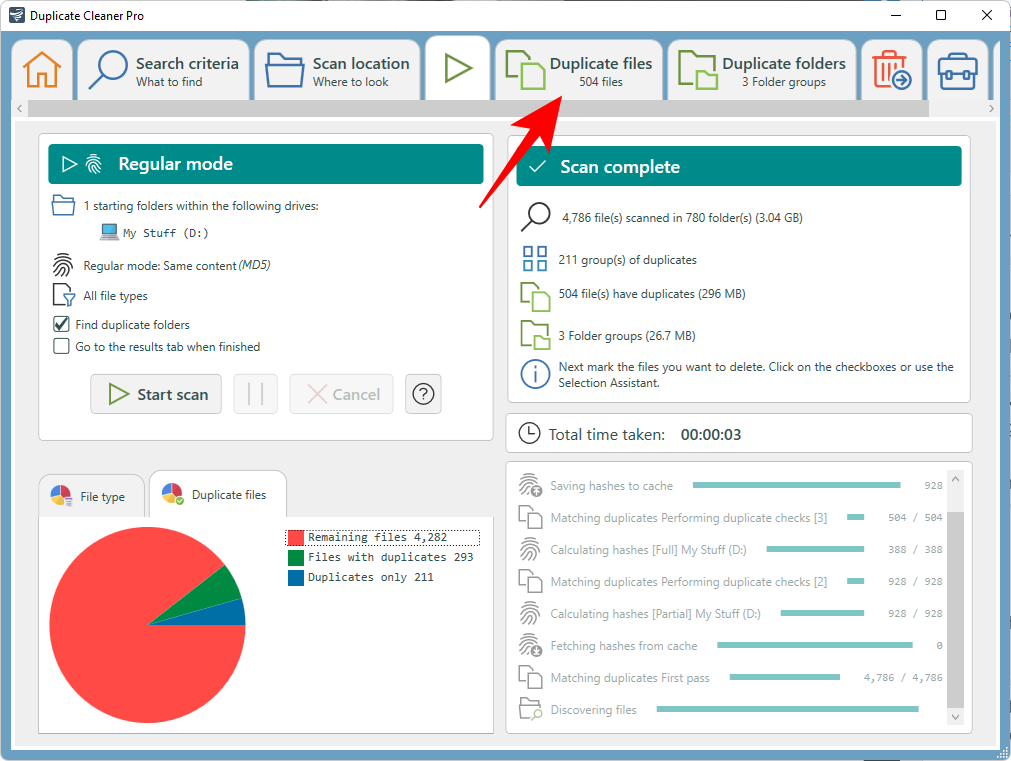
Once the scan is complete, you’ll see the details of the scan as well as a graphical representation of duplicate file types towards the left.
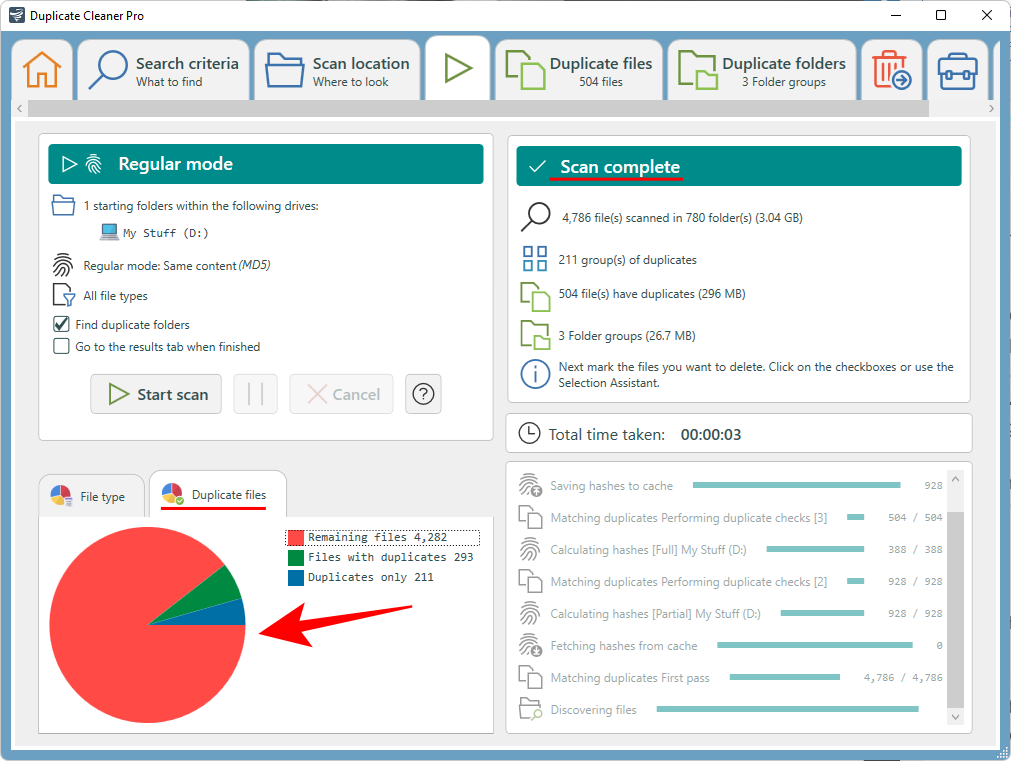
The visual reference may not be a deal-breaker on its own, but it’s a nice little touch that makes this otherwise banal process less of a chore. Click on the Duplicate files tab to switch to it.
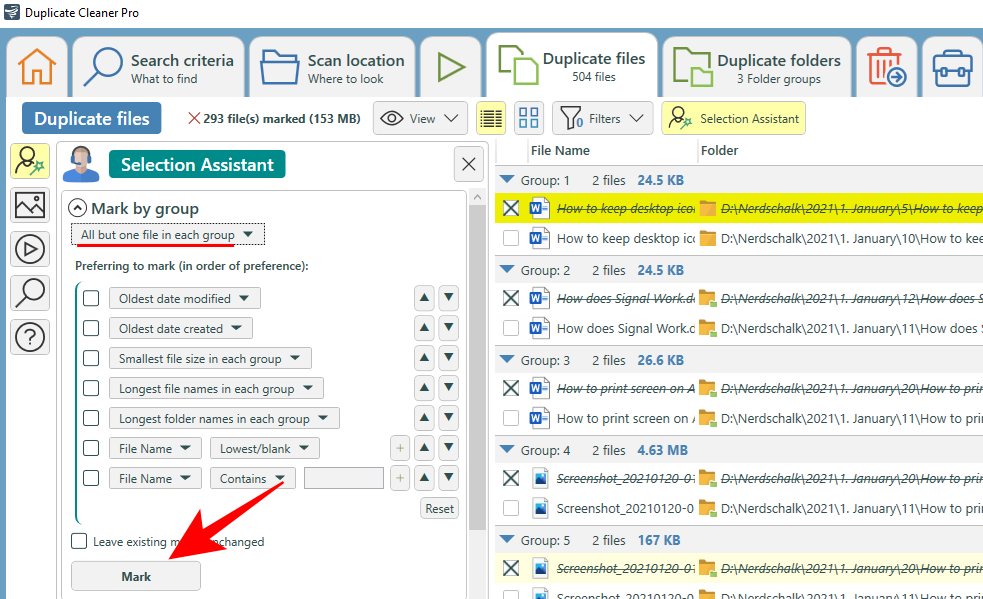
You’ll find the duplicate files are organized by group and the options to select files are found towards the left. By default, the ‘Mark by group’ option is set to ‘All but one file in each group’. This is the recommended option as it will mark the duplicates to delete and leave the original intact. Click on Mark to continue.
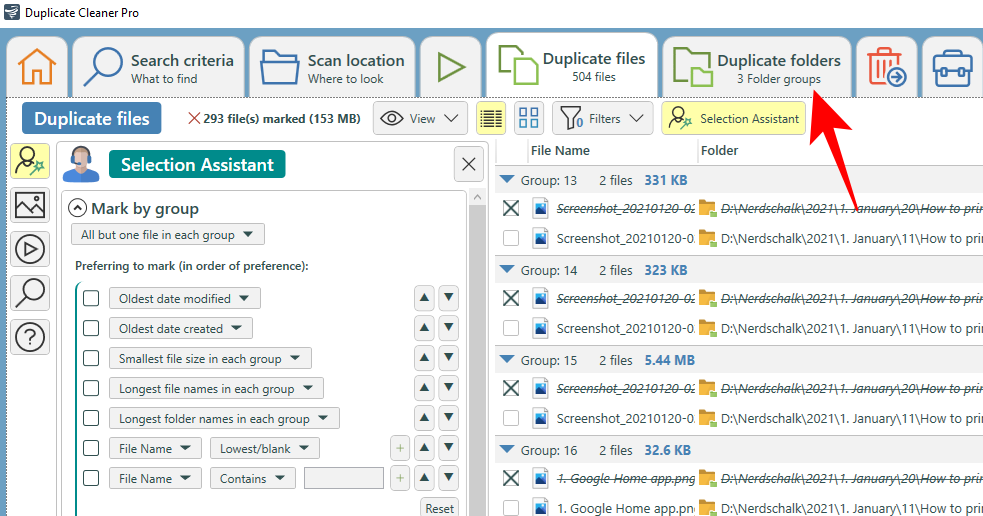
Now switch to the Duplicate folders tab.
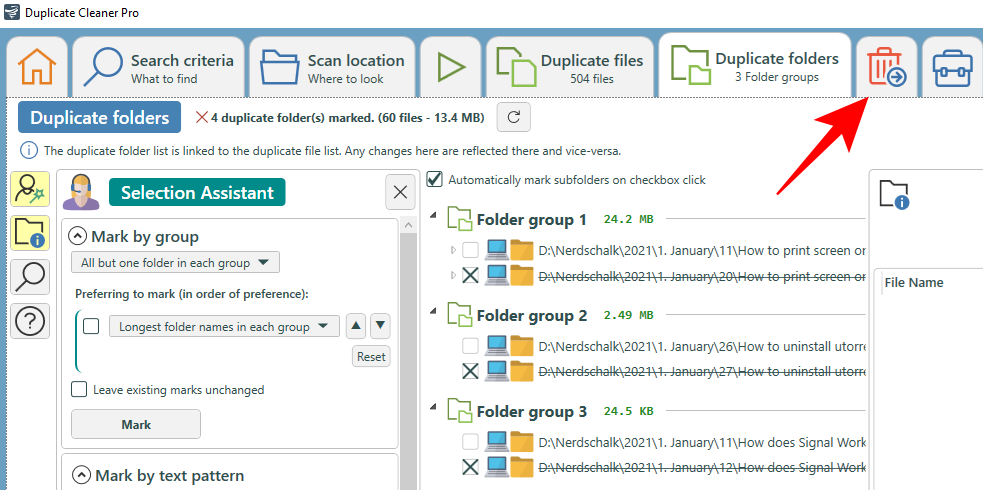
Review how the duplicate folders are marked in each group. Once satisfied, click on the trash icon at the top.
Here too you’ll get a few options to choose from besides the usual Delete function, such as moving and copying files, renaming them, and exporting them. But if removing them is your sole need, go ahead and click on Delete files.
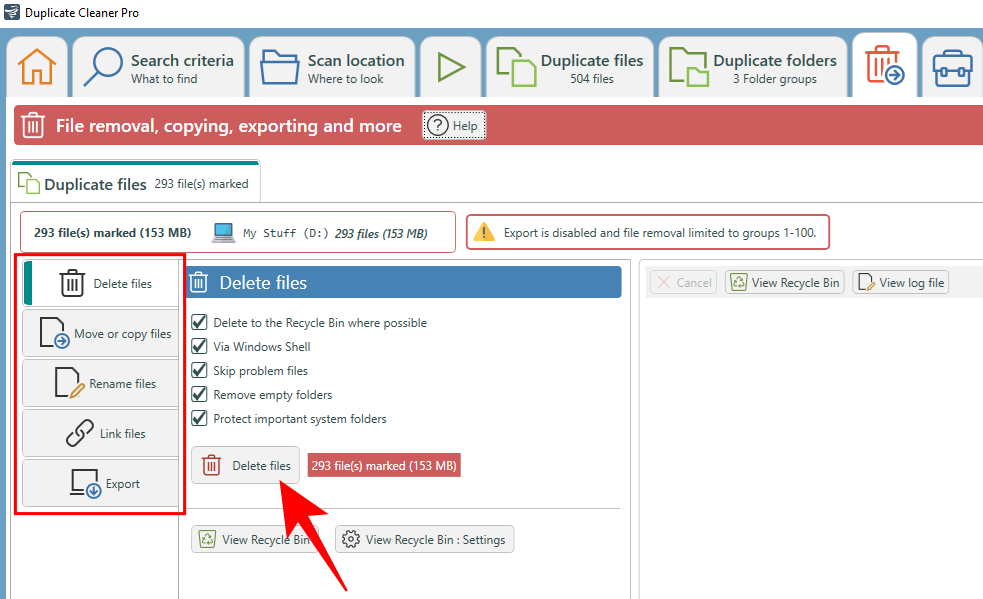
Were it not for the fact that one only gets a 7-day free trial for this program, it would have been our main recommendation. But this is too good an application to not try out, and if you want to keep deep cleaning your PC of duplicate files every now and then, you can even consider purchasing it.
So these were our top picks for the best duplicate file finders and cleaners for Windows. Some of these might look antiquated, but make no mistake about their ability to dig out unnecessary duplicates. We hope you found the right one for your PC.
RELATED


