6 viisi draiverite värskendamiseks Windows 11-s
Kuidas värskendada draivereid Windows 11-s probleemide lahendamiseks ja seadmete ühilduvuse tagamiseks.
Windowsi tegumiriba on olnud kogu tähelepanu keskpunktis alates sellest, kui see sai uue uuendatud välimuse pärast Windows 11 väljalaskmist. Nüüd saate oma tegumiriba tsentreerida, nautida uut tegevuskeskust, muuta selle joondust ja asetada see mõlemale poole ekraani. Kahjuks on selle funktsiooni juurutamine olnud vähem edukas, kuna üha rohkem kasutajaid on püüdnud mõne kuu jooksul oma tegumiriba Windows 11-s tööle saada.
Kuigi Microsoft on probleemi tunnistanud, väljastanud lahenduse ja töötab praegu selle paranduse kallal, näib, et kasutajad ei saa tegumiriba uuesti tööle. Kui olete samas paadis, oleme koostanud loendi kõigist saadaolevatest parandustest, et teie tegumiriba uuesti Windows 11-s tööle saada. Alustamiseks järgige allolevat juhendit.
Sisu
Miks mu tegumiriba ei kuvata?
Windows 11 tegumiribal on uus välimus, mis tuleneb selle toimimise uuendamisest. Tegumiriba toetub nüüd õigeks tööks mitmele teenusele ja menüüle Start. Näib, et Windows 10 versioonile Windows 11 versioonile ülemineku protsess ajab tegumiriba sassi, sõltuvalt sellest, millise Windows 10 versiooni olete oma süsteemi installinud ja millisele Windows 11 versioonile värskendate.
Lisaks näib, et mõne kasutaja jaoks põhjustab selle probleemi ka hiljutine eelmisel kuul välja antud Windowsi värskendus, samas kui teised seisavad silmitsi samaga, kuna süsteemiaeg ei sobi, hoolimata sellest, et kõik on õigesti seadistatud. Tegumiriba parandamiseks on palju viise ja soovitame teil alustada ükshaaval allolevatest parandustest.
12 võimalust Windows 11 tegumiriba probleemide lahendamiseks
Kasutage allolevaid meetodeid, et alustada Windows 11 tegumiriba parandamist. Kui olete juba proovinud süsteemi taaskäivitada, võite esimese meetodi vahele jätta.
Parandus nr 1: taaskäivitage arvuti
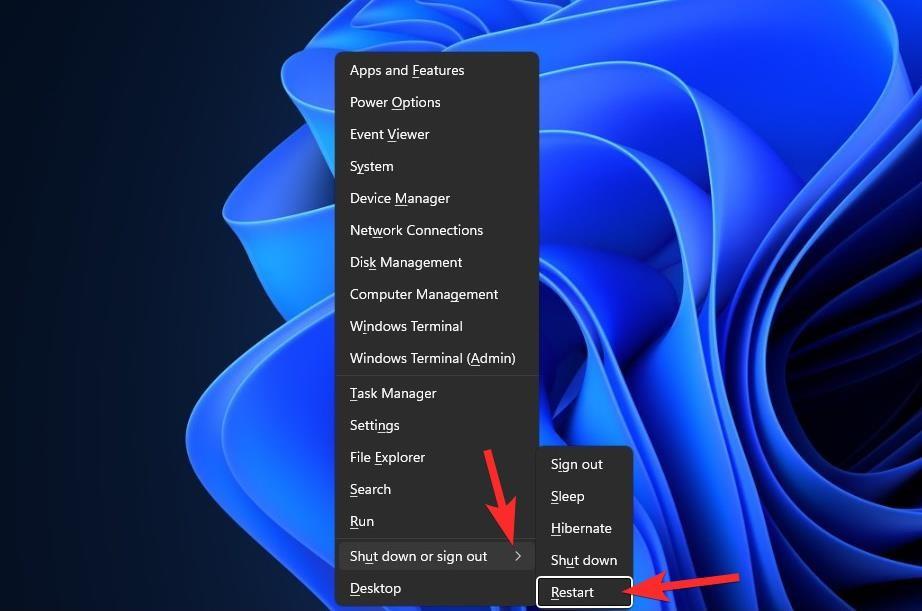
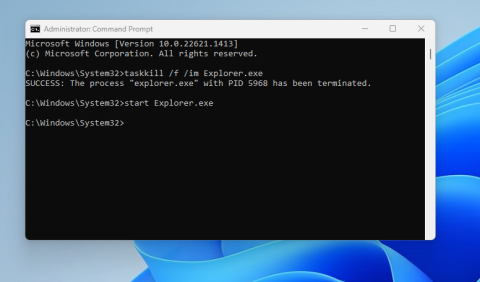
Enne millegi uhke proovimist on hea proovida lihtsamaid meetmeid, nagu arvuti või Windows Exploreri taaskäivitamine (vt allpool). Seda tehes lähtestatakse teie süsteem pehmelt, võimaldades andmete uuesti laadimist ja võib-olla lahendada tegumiriba ja menüü Start probleeme.
Parandus nr 2: veenduge, et käsk „Peida tegumiriba automaatselt” oleks keelatud
Vajutage Windows + ioma klaviatuuril ja klõpsake vasakul asuval valikul Isikupärastamine.
Klõpsake "Tegumiriba".
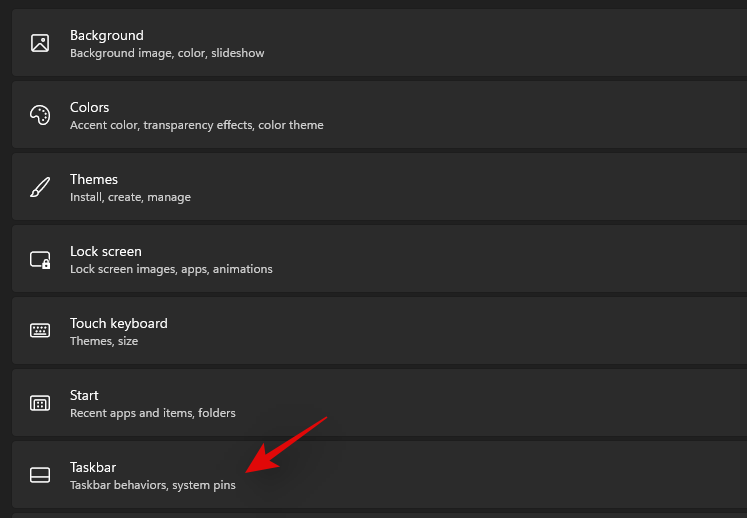
Nüüd klõpsake "Tegumiriba käitumised".
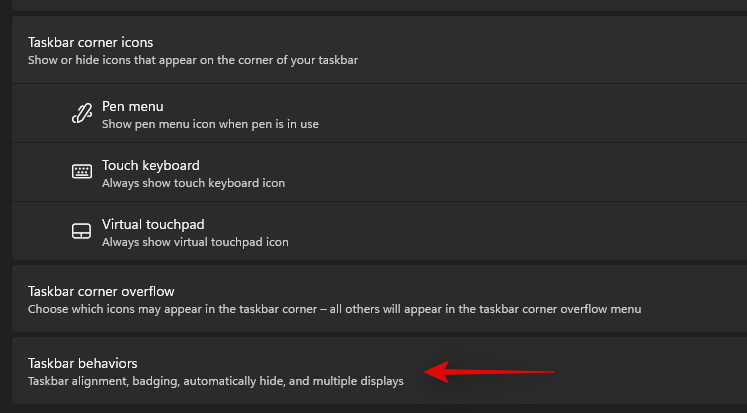
Tühjendage märkeruut „Peida tegumiriba automaatselt”.

Nüüd sulgege rakendus Seaded ja kui teie tegumiriba peideti automaatselt, tuleks see nüüd teie süsteemis keelata.
Parandus nr 3: taaskäivitage vajalikud teenused
Nagu varem mainitud, on Windows 11 tegumiriba uuendanud, mis tähendab nüüd, et mis tahes süsteemis töötab see mitmel teenusel. Taaskäivitagem kõik need teenused tagamaks, et taustakonflikt ei takista tegumiriba teie süsteemis korralikult töötamast.
Ctrl + Shift + EscTegumihalduri käivitamiseks vajutage oma süsteemi nuppu. Lülituge ülaosas vahekaardile „Üksikasjad”.
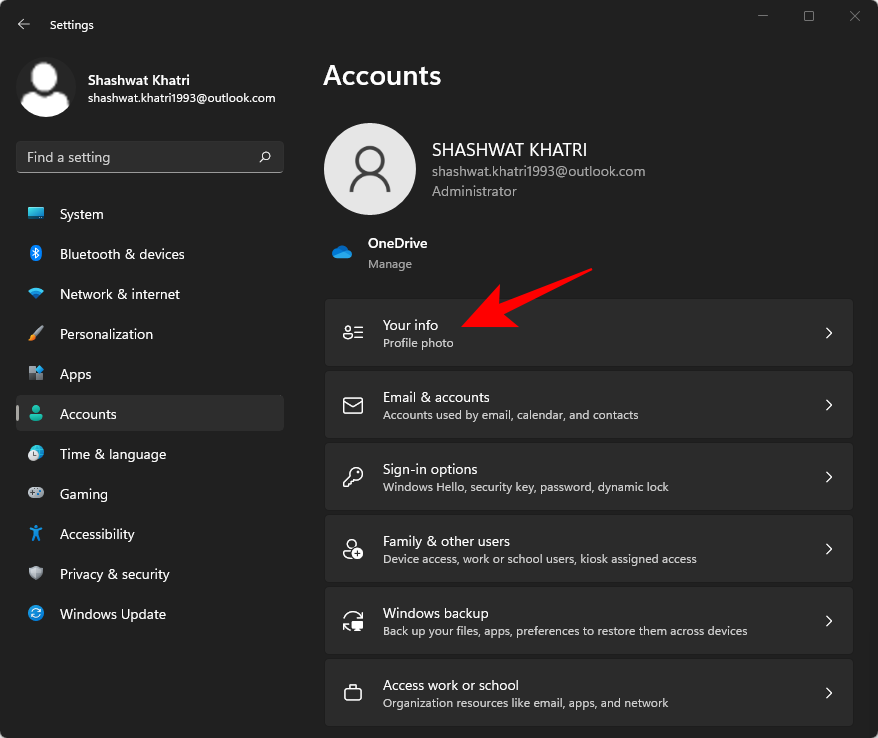
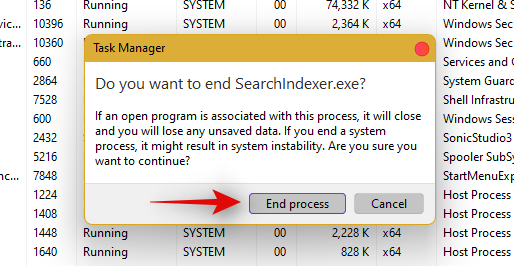
Nüüd otsige üles järgmised töötavad teenused ja valige need neile klõpsates. Vajutage oma klaviatuuril "Kustuta" ja kinnitage oma valik, valides "Lõpeta protsess".
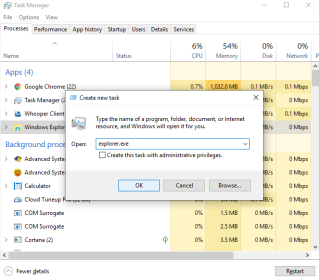
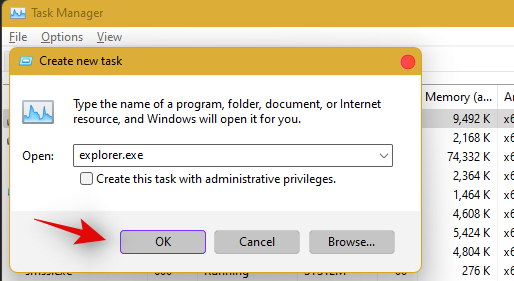
Taaskäivitame nüüd Windows Exploreri. Klõpsake vasakus ülanurgas nuppu "Fail" ja valige "Käivita uus ülesanne".
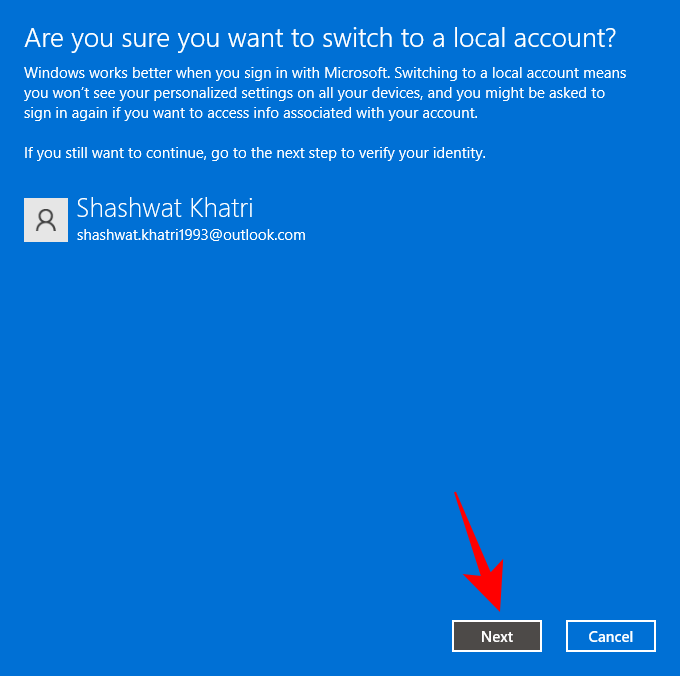
Sisestage "explorer.exe" ja vajutage klaviatuuril sisestusklahvi. Vajadusel võite klõpsata ka "OK".
Kui explorer on taaskäivitatud, taaskäivitage lihtsalt arvuti, et taaskäivitada süsteemi muud teenused.
Tegumiriba tuleks nüüd taastada, kui teie probleemi põhjuseks oli taustateenuste konflikt.
Parandus nr 4: kustutage IrisService registrist ja taaskäivitage
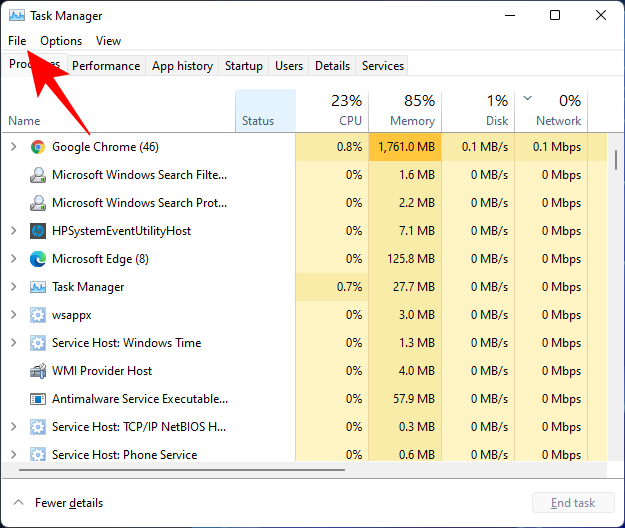
Ctrl + Shift + EscTegumihalduri avamiseks vajutage . Seejärel klõpsake vasakus ülanurgas nuppu Fail .
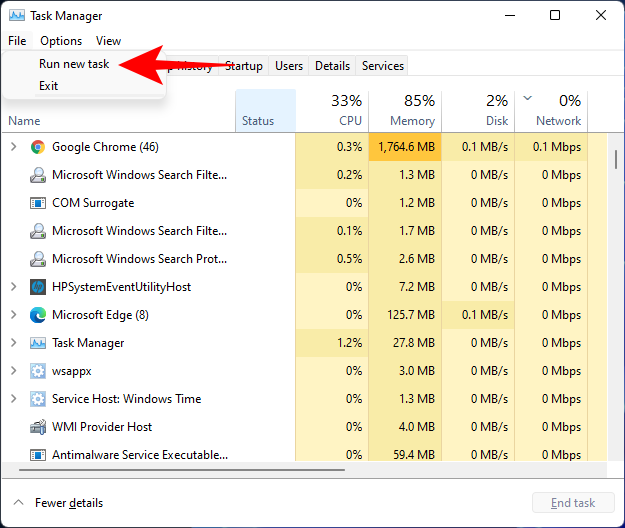
Valige Käivita uus ülesanne .
Tippige cmd ja vajutage sisestusklahvi.
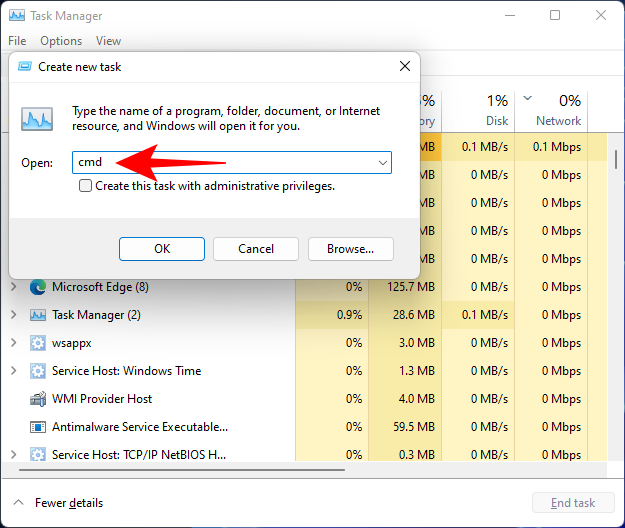
See avab käsurea kõrgendatud eksemplari. Nüüd kopeerige järgmine käsk ja kleepige see käsureale:
reg delete HKCU\SOFTWARE\Microsoft\Windows\CurrentVersion\IrisService /f && shutdown -r -t 0

Seejärel vajutage sisestusklahvi. Niipea kui te seda teete, taaskäivitub teie arvuti. Kui see on uuesti käivitatud, peaksid asjad, sealhulgas tegumiriba, normaliseeruma.
Parandus nr 5: lisage registrisse UndockingDisabled
Ctrl + Shift + EscTegumihalduri avamiseks vajutage . Seejärel klõpsake nuppu Fail (vasakus ülanurgas) ja käivitage uus ülesanne .
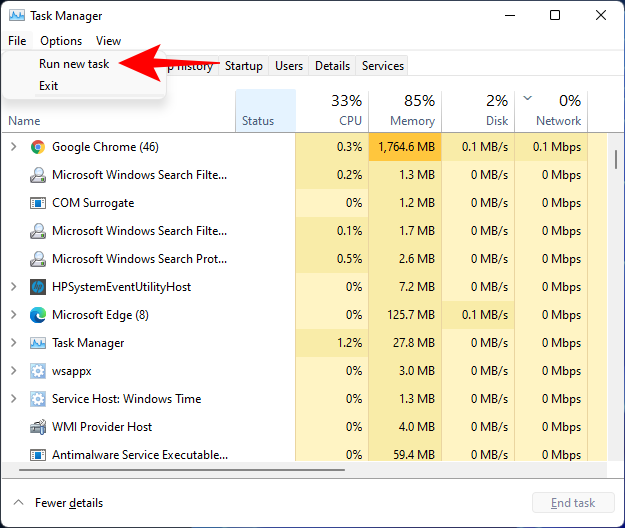
Tippige regedit ja vajutage sisestusklahvi.
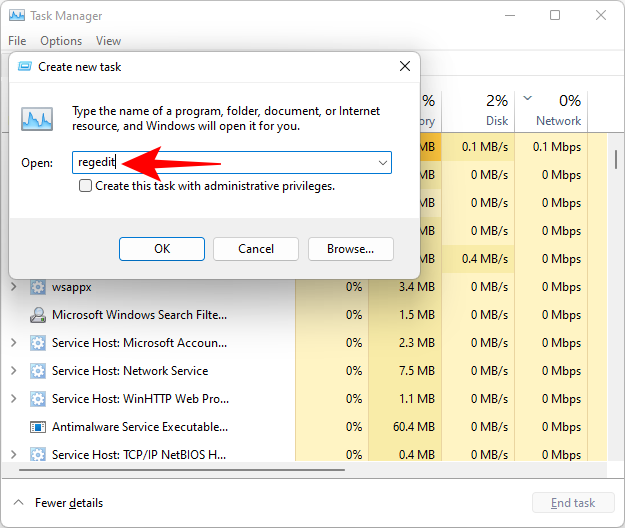
See avab registriredaktori. Nüüd navigeerige järgmisele aadressile:
Computer\HKEY_LOCAL_MACHINE\SOFTWARE\Microsoft\Windows\CurrentVersion\Shell\Update\Packages
Teise võimalusena kopeerige ülaltoodud ja kleepige see registriredaktori aadressiribale järgmiselt:

Kui vajutate sisestusklahvi, suunatakse teid määratud klahvile. Paremklõpsake parempoolsel ruumil ja valige Uus > DWORD (32-bitine) väärtus .
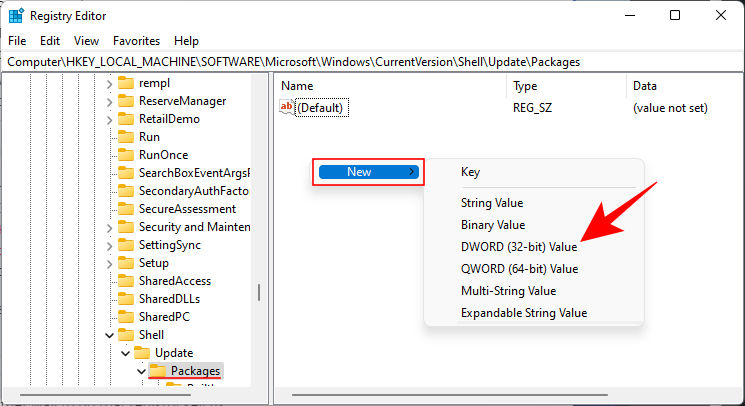
Nimetage see äsja loodud DWORD UndockingDisabled .
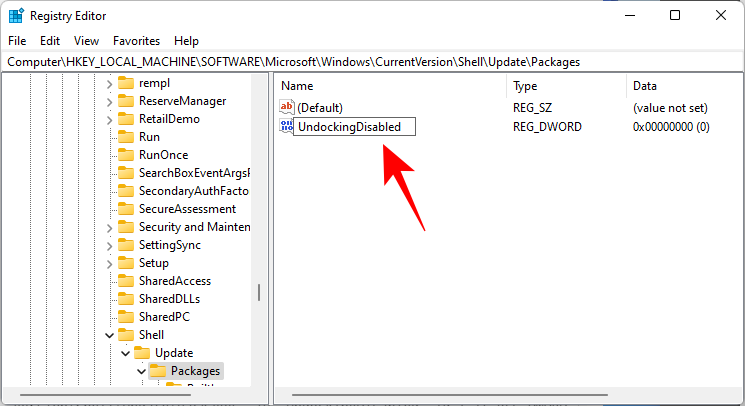
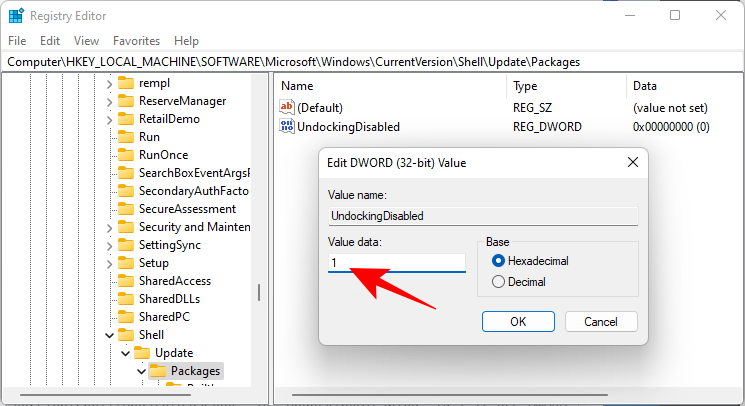
Seejärel topeltklõpsake sellel ja muutke "Väärtuse andmed" väärtuseks 1 . Seejärel klõpsake nuppu OK .
Muudatuste jõustumiseks taaskäivitage arvuti.
Parandus nr 6: käivitage SFC- ja DISM-käsud
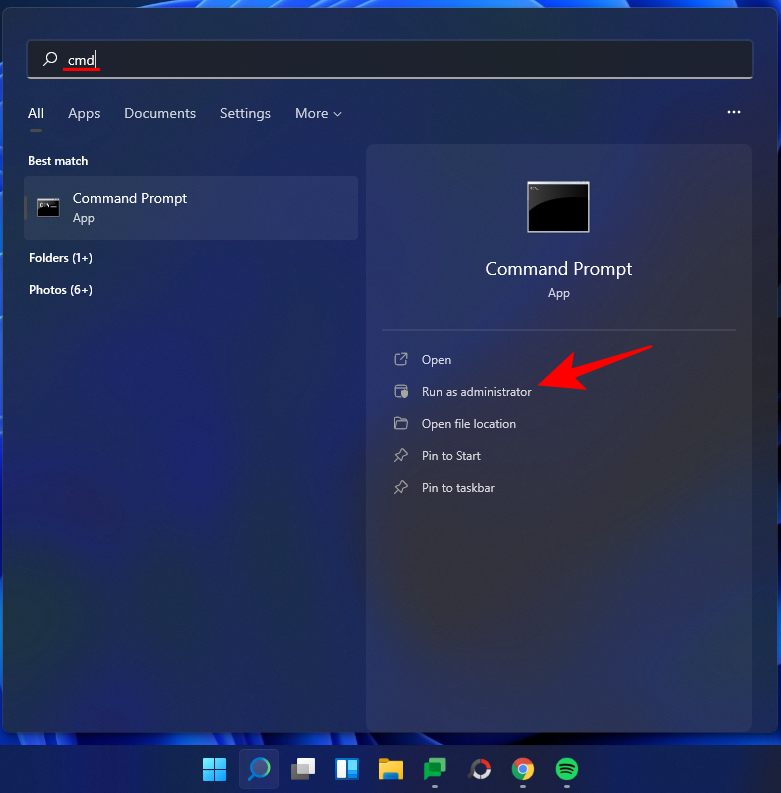
Vajutage nuppu Start, tippige cmd ja klõpsake käsul Käivita administraatorina .
Nüüd tippige järgmine käsk:
sfc /scannow
Vajutage sisestusklahvi. Oodake, kuni SFC skannimise lõpetab ja leitud probleemid lahendab.

Järgmisena käivitage juurutuspildi teenindamise ja haldamise tööriista jaoks järgmine DISM-käsk:
dism /online /cleanup-image /scanhealth
Seejärel vajutage sisestusklahvi. Jällegi oodake, kuni skannimine on lõppenud.

Nüüd käivitage järgmine DISM-käsk:
dism /online /cleanup-image /restorehealth

Vajutage sisestusklahvi. Oodake, kuni DISM taastab tervise.

Lõpuks käivitage utiliidi Check Disk käivitamiseks käsk chkdsk:
chkdsk c: /r
Vajutage sisestusklahvi. Käsuviip kuvab teate, mis ütleb, et see "ei saa praegust draivi lukustada ... kuna helitugevust kasutab teine protsess", ja küsib teilt luba skannimise ajastamiseks enne järgmist käivitamist. Tippige Yjärgimiseks.

Ja vajutage sisestusklahvi. Nüüd taaskäivitage arvuti, laske tööriistal Check Disk oma töö teha ja kontrollige, kas tegumiriba on taastanud normaalset toimimist.
Parandus nr 7: installige UWP uuesti
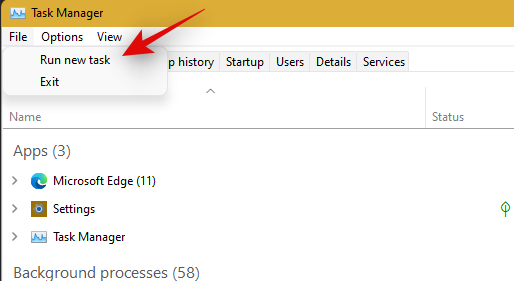
Ctrl + Shift + EscTegumihalduri käivitamiseks vajutage klaviatuuril. Klõpsake "Fail" ja valige "Käivita uus ülesanne".
Sisestage "PowerShell" ja vajutage Ctrl + Shift + Enterklaviatuuril.
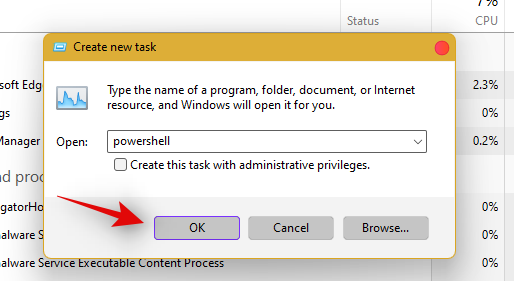
PowerShell käivitatakse nüüd teie süsteemi administraatorina. Tippige järgmine käsk:
Get-AppxPackage -AllUsers | Foreach {Add-AppxPackage -DisableDevelopmentMode -Register “$ ($ _. InstallLocation) \ AppXManifest.xml”}
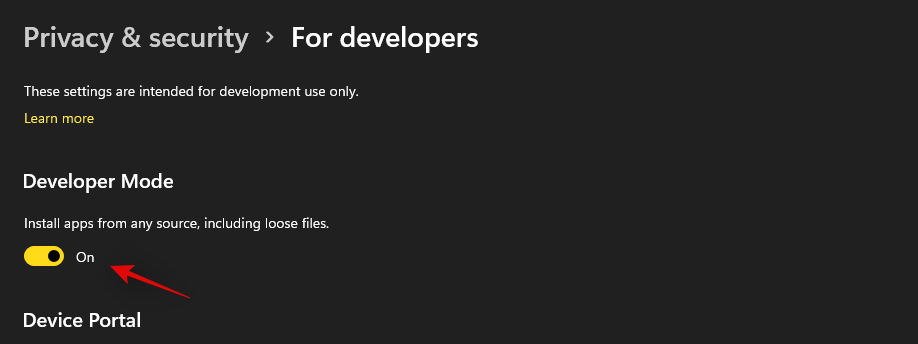
Vajutage sisestusklahvi. PowerShell kuvab punasega jooksva sõnumite loendi. Aga ära selle pärast muretse. Lihtsalt oodake, kuni käsk lõpetab täitmise.

Parandus nr 8: kontrollige UAC-d ja lisage vajadusel registrit
UAC on kõigi kaasaegsete rakenduste ja funktsioonide, sealhulgas Start-menüü ja tegumiriba jaoks kohustuslik. Peaksite esmalt lubama UAC, kui see on keelatud, ja taaskäivitage süsteem. Kui tegumiriba ikka ei tööta, soovitame teil proovida lisada registriredaktorisse Xamli menüü Start väärtus.
Näib, et selle väärtuse lisamine taaskäivitab ja registreerib tegumiriba teenused, mis näivad panevat tegumiriba enamikus süsteemides uuesti tööle. Alustamiseks järgige allolevat juhendit.
Kontrollige ja lubage UAC, kui see on keelatud
Ctrl + Shift + EscTegumihalduri käivitamiseks vajutage klaviatuuril. Nüüd klõpsake ekraani vasakus ülanurgas nuppu "Fail" ja valige "Käivita uus ülesanne".

Tippige "cmd" ja vajutage Ctrl + Shift + Enterklaviatuuril.
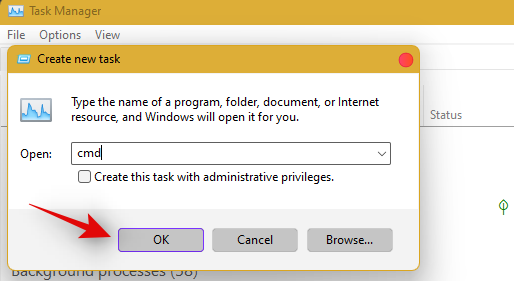
Nüüd tippige järgmine käsk ja vajutage käsu täitmiseks sisestusklahvi.
C:\Windows\System32\cmd.exe /k %windir%\System32\reg.exe ADD HKLM\SOFTWARE\Microsoft\Windows\CurrentVersion\Policies\System /v EnableLUA /t REG_DWORD /d 0 /f
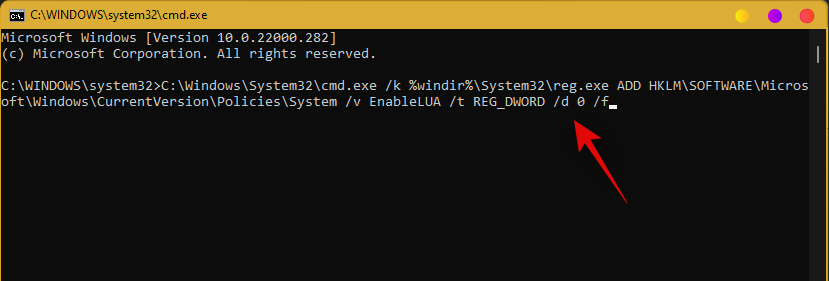
UAC will now be enabled for your system. Restart your PC for the changes to take effect on your system. Once restarted, Taskbar should be up and running on your system if UAC was the issue for you. If not, use the guide below to trigger the taskbar’s functionality on your system.
Add Registry Value
Press Ctrl + Shift + Esc to launch the task manager. Now click on ‘File’ in the top left corner and select ‘Run new task’.

Type in ‘cmd’ and press Ctrl + Shift + Enter on your keyboard.

Now type in the following command and press Enter on your keyboard.
REG ADD "HKCU\Software\Microsoft\Windows\CurrentVersion\Explorer\Advanced" /V EnableXamlStartMenu /T REG_DWORD /D 1 /F
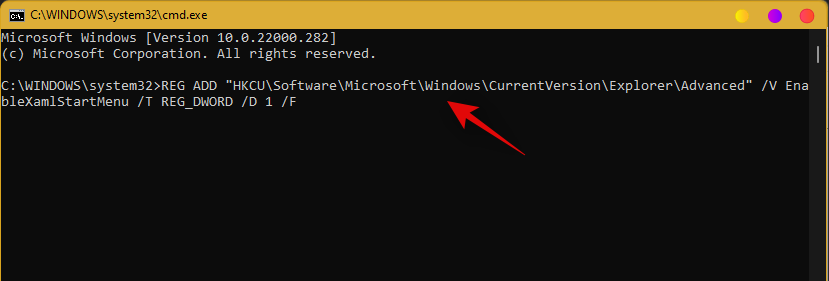
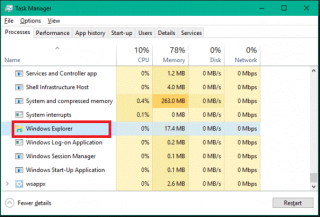
Go back to the task manager now, find Windows Explorer in the list, and right-click on it. Select Restart to restart explorer.exe.
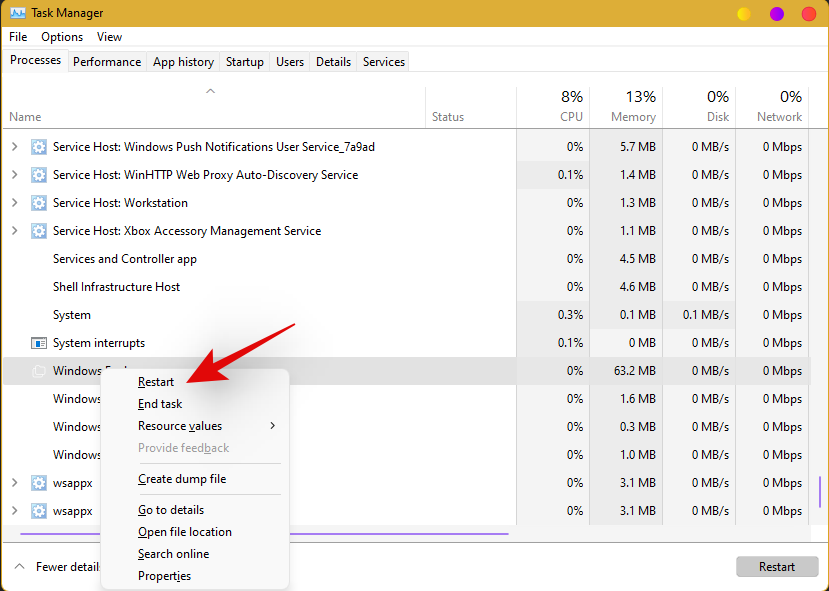
Once restarted, try to access your taskbar. The taskbar should now be available on your system.
Fix #9: Edit date and time to fix Taskbar
Date and Time settings seem to be the major cause of issues with the taskbar in Windows 11. Use the guide below to try out the following time fixes to see which one works the best for you.
Ensure that your time is correctly synchronized with the time server
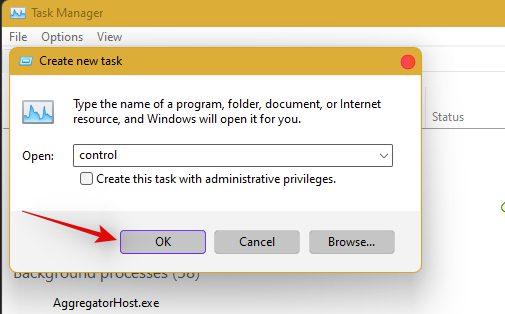
Press Ctrl + Shift + Esc on your keyboard and click on ‘File’. Select ‘Run new task’.

Type in ‘Control’ and hit Enter on your keyboard.
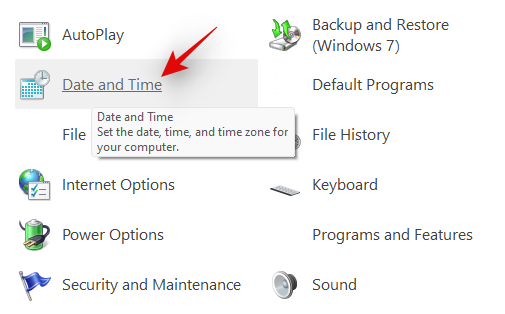
Click on ‘Date and Time’.
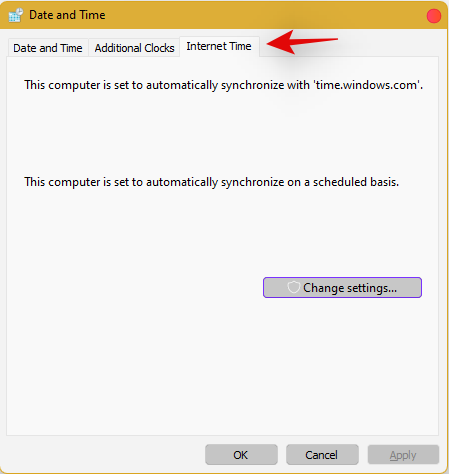
Select ‘Internet Time’ from the top.
Click on ‘Change Settings’.
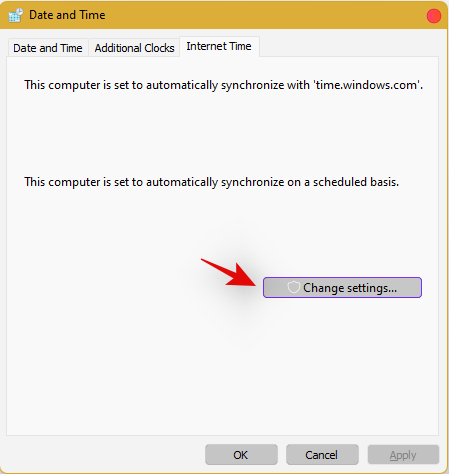
Uncheck the box for ‘Synchronize with an Internet time server’.
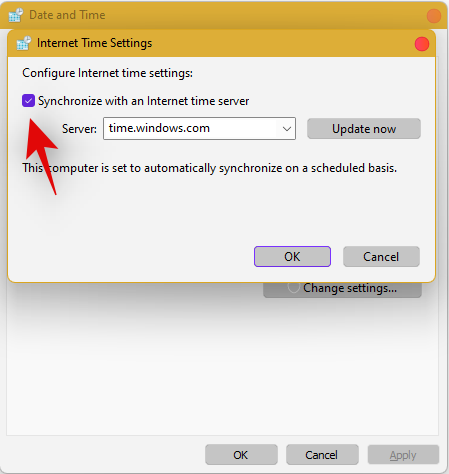
Click on ‘Ok’ once you are done.
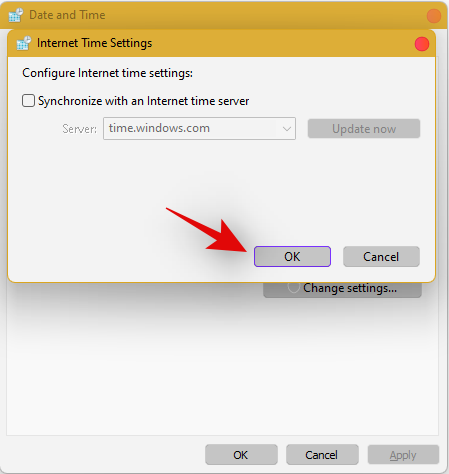
Restart your PC at this point and check your taskbar. If it is still disabled, do not fret, follow the steps above and enable Synchronization with an Internet Time Server again.
Once enabled, press Ctrl + Shift + Esc on your keyboard, and find Windows Explorer in the list on your screen. Right-click the listing and select ‘Restart’.

Once explorer restarts, try using the Taskbar. If synchronization was your issue, then it should now be fixed on your system. If not, continue with the other time fixes mentioned below.
Change date to 1 day ahead
Open the Task Manager by pressing Ctrl + Shift + Esc simultaneously. Then click on File.
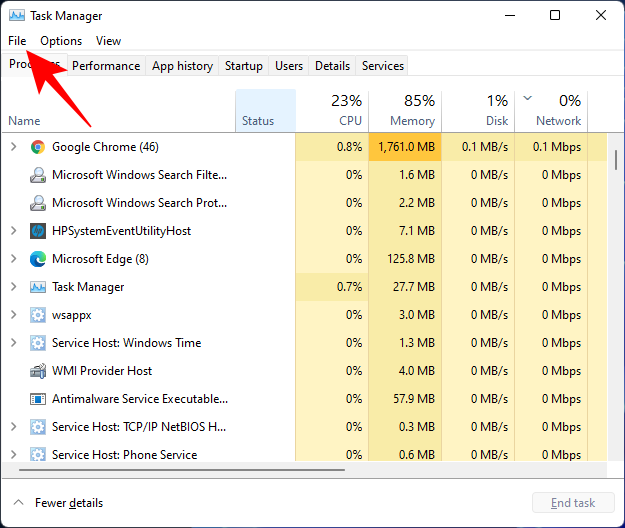
Click on Run new task.
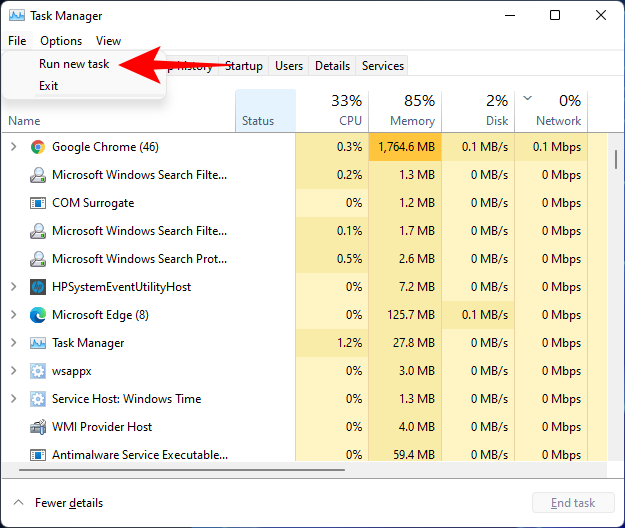
Type control panel and hit Enter.
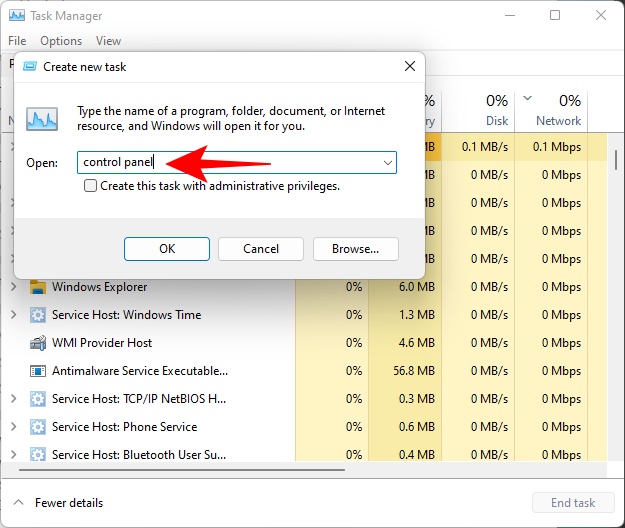
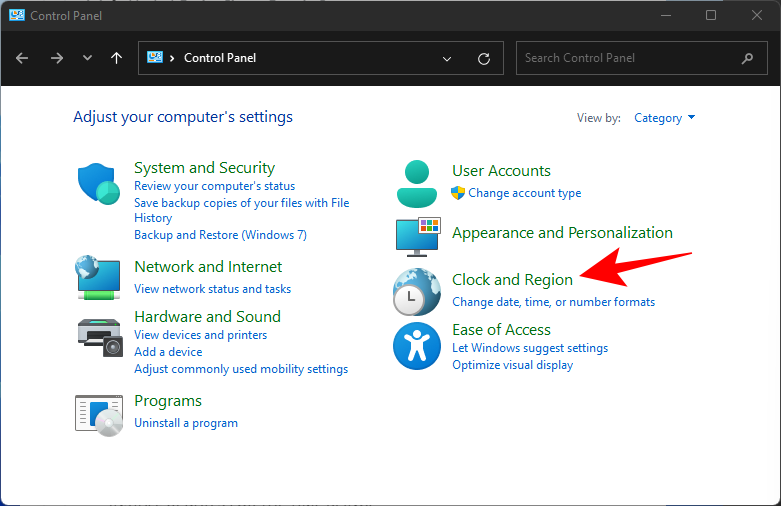
Now click on Clock and Region.
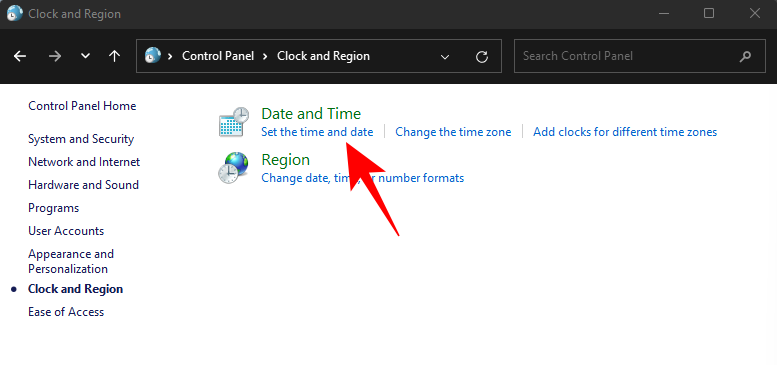
Under “Date and Time”, click on Set the time and date.
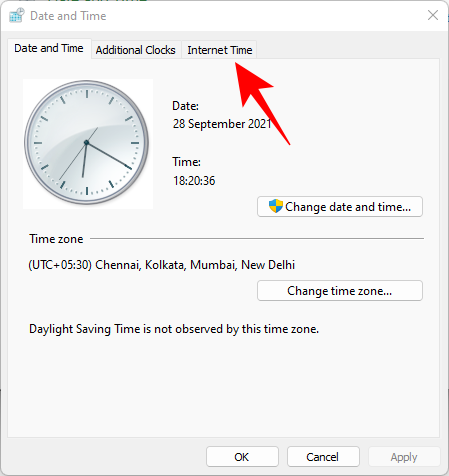
Click on the Internet Time tab to switch to it.
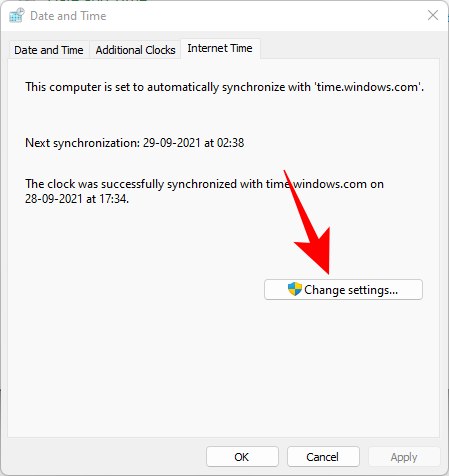
Click on Change settings…
Uncheck Synchronize with an Internet time server, then click OK.
Now click on the Date and Time tab to switch back to it.
Here, click on Change date and time…
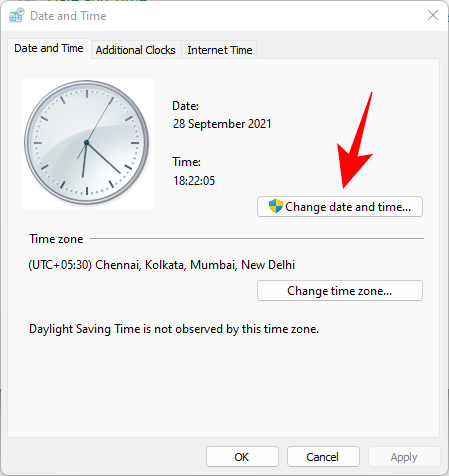
Now change the date and time to reflect tomorrow. As of writing this post, it is the 1st November so we will be changing the date to 2nd November.
Change Dates to last cumulative updates
If you are still unable to get the Taskbar working then you will have to jump through a few hoops to change your date and time multiple times and get the taskbar working on your system. Follow the guide below to get you started.
Press Ctrl + Shift + Esc on your keyboard, click on ‘File’ and select ‘Run new task’.

Type in ‘Control’ and press Enter on your keyboard.

Select ‘Date and Time’.

Switch to ‘Internet time’.

Click on ‘Change Settings’.

Uncheck the box for ‘Synchronize with an Internet Time Server’.

Click on ‘Ok’.

Switch back to ‘Date and Time’. Click on ‘Change Date and Time’ and select your date as 2nd September.
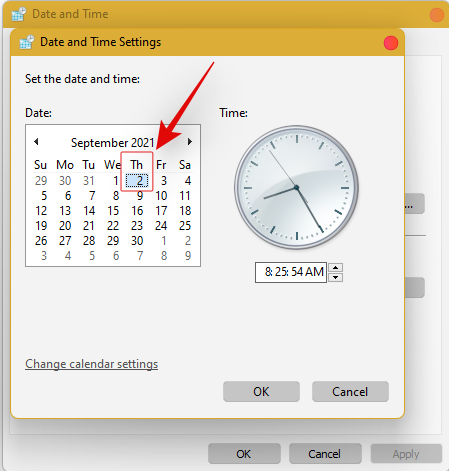
Close all windows and restart your system. Once restarted, open the ‘Date and Time’ dialog box again and change your date to 7th October this time.
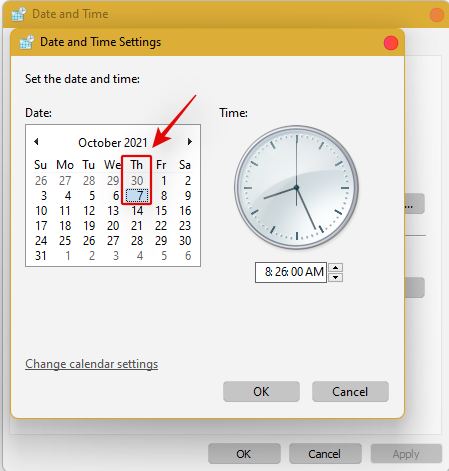
Restart your system again and Taskbar should now be back up and running on your system again. You can now enable synchronization for time again using the steps above on your system.
If synchronizing time does not work, move a month ahead to restore Taskbar
If you are still unable to get Taskbar up and running on your system again you can try the last date change fix. We recommend you use the steps above to change your date and time to a month ahead of your current date. Once changed, restart your system, and the taskbar should be up and running on your system now.
The downside of this fix is that if you revert to your normal date, Taskbar will stop working on your system. Having a mismatched date can cause issues with background syncs for various applications and cause some websites to malfunction. You will also have issues installing and getting the latest Windows Updates, so you will need to check all of these manually when updating in the future.
Fix #10: Uninstall the latest cumulative Windows Update ie: KB5006050
The cumulative update released in September for Windows 11 seems to also cause issues with the taskbar on some desktops and laptops. Use the guide below to uninstall the necessary update from your system.
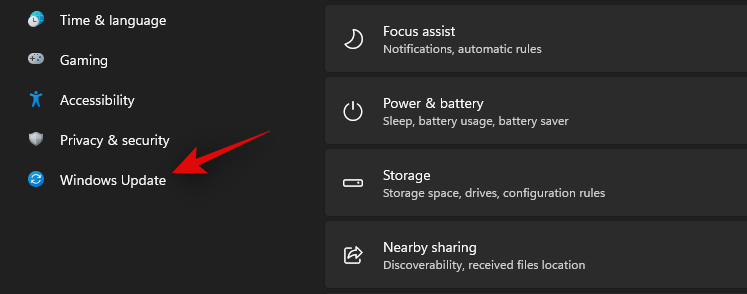
Press Windows + i and select Windows Update from the left.
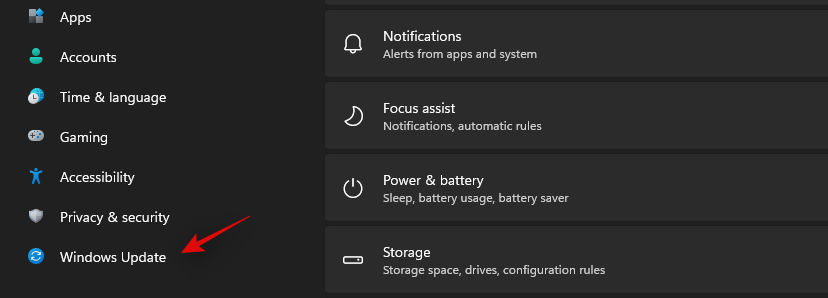
Click on ‘Update history’.
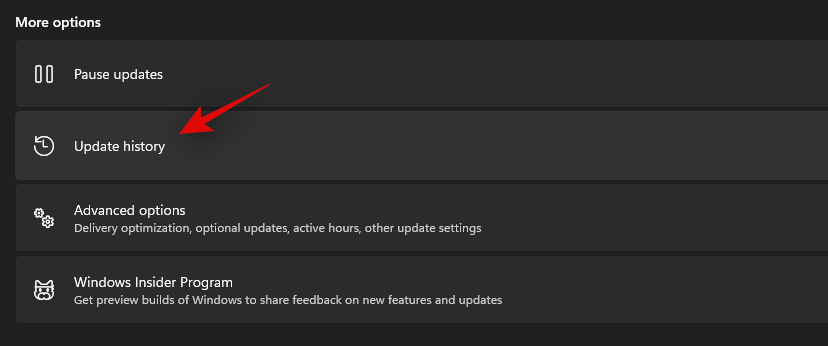
Now select ‘Uninstall updates’.
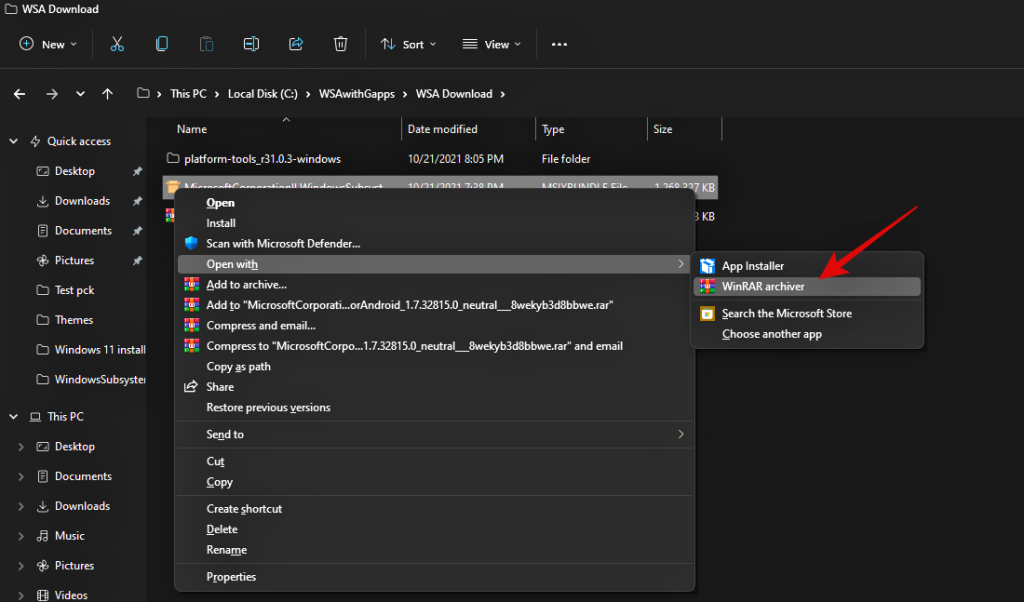
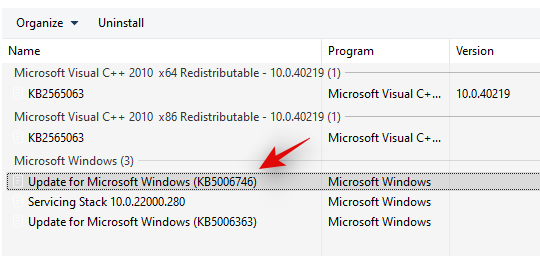
Click and select Windows Cumulative update KB5006050 from the list.
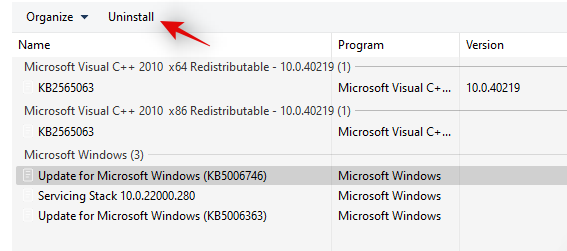
Now click on ‘Uninstall’ at the top and confirm your choice to uninstall the selected update.
Restart your system and taskbar functionality should now be restored on your system.
Fix #11: Restore PC to a previous restore point
If you had the taskbar working at a previous point in time then we recommend you restore your PC to a previously available restore point on your system. Follow the guide below to get you started.
Press Ctrl + Shift + Esc on your keyboard and click on ‘File’. Select ‘Run new task’ once you are done.

Type in CMD and press Ctrl + Shift + Enter on your keyboard.

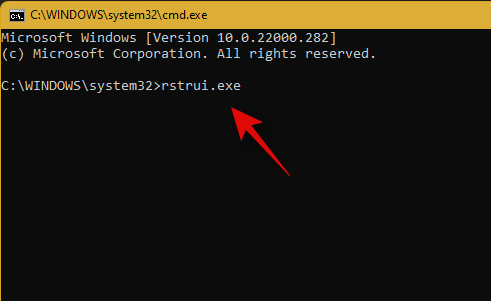
Now type in ‘rstrui.exe’ and press Enter on your keyboard.
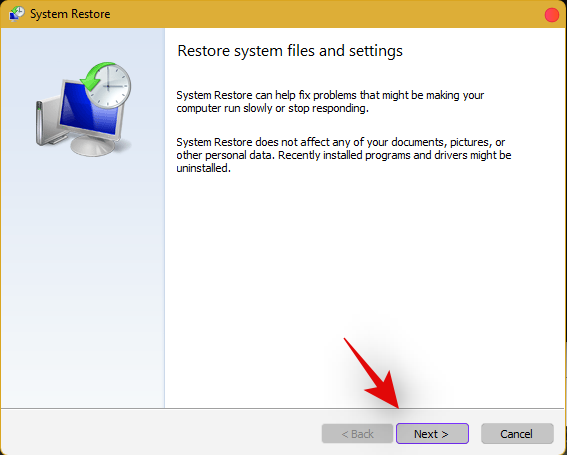
The system restore utility will now launch on your system. Click on ‘Next’.
Select the desired restore point from the list on your screen. Click on ‘Next’ once you are done.
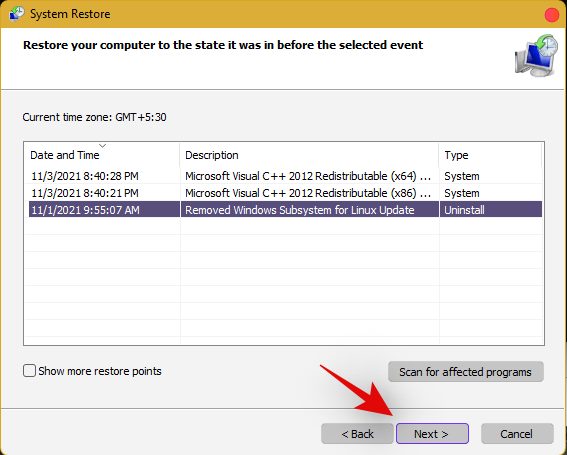
Tip: Click on ‘Scan for affected programs’ to view a list of installed programs that will be removed from your system during the restore process.
Click on ‘Finish’ once the restore finishes and restart your system.
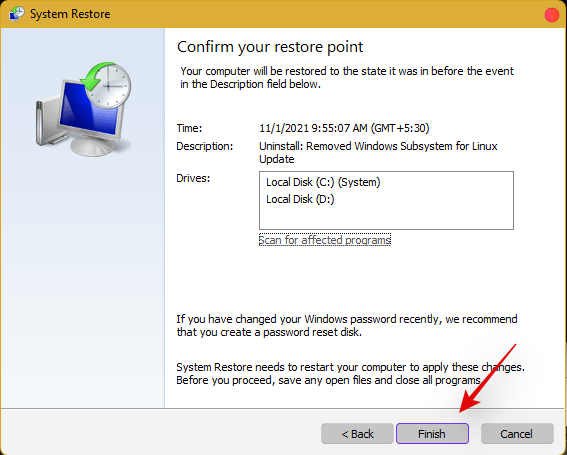
The taskbar should now be back up and running on your system again.
Fix #12: Last Resort: Create a new local admin account and transfer all your data
If by this point Taskbar still fails to work for you then it’s time for some drastic measures. You can create a new local admin account, check if Taskbar is working there, and then transfer all your data to the new account. This will be a tedious process but it is the next best way to get the taskbar working on your system without resetting your PC. Follow the guide below to get you started.
Create a new local admin account
Herre’s how you can create a new local admin account on your system.
Note: Most users facing the taskbar issue are unable to access the Settings app as well. Hence we will be using CMD to add a new local admin account to your PC. However, if the Settings app is available to you then you can use the same to add a new account as well.
Press Ctrl + Shift + Esc on your keyboard, click on ‘File’ and select ‘Run new task’.

Type in ‘cmd’ and press Ctrl + Shift + Enter on your keyboard.

CMD will now be launched as an administrator. Use the command below to add a new local admin account. Replace NAME with the Username of your choice for the new account. You can add a password later once you have confirmed that the taskbar is available in the new account.
net user /add NAME 
Once you have added the new user, use the command below to convert it to an administrator account on your PC. As usual, replace NAME with the Username for the new account you created earlier.
net localgroup Administrators NAME /add

Now type in the following to log out of your current account.
logoff

Once logged out, click on the newly added account to log in to the same. Once logged in, check if the taskbar is available in the new account. If it is, you can use the next section to transfer all your data. However, if the taskbar is still missing then you have no choice but to perform a fresh install of Windows 11 on your PC from a removable USB media drive.
Transfer all your data
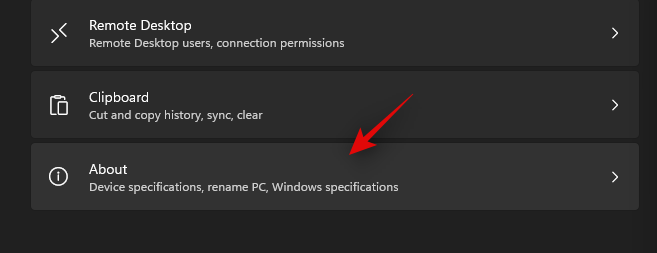
Press Windows + i on your keyboard and click on ‘About’ on your right.
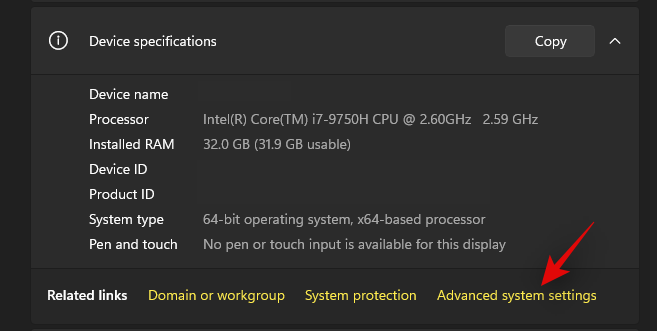
Click on ‘Advanced system settings’.
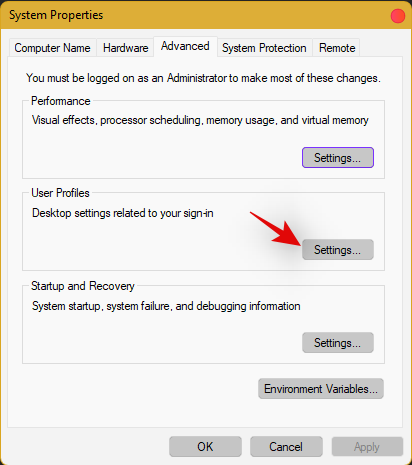
Click on ‘Settings’ under ‘User Profiles’.
Select your original profile by clicking on it and selecting ‘Copy To’.
Now enter the following path under ‘Copy profile to’. Rename NAME to the username of your previous profile from where you wish to copy all your data.
C:\Users\NAME
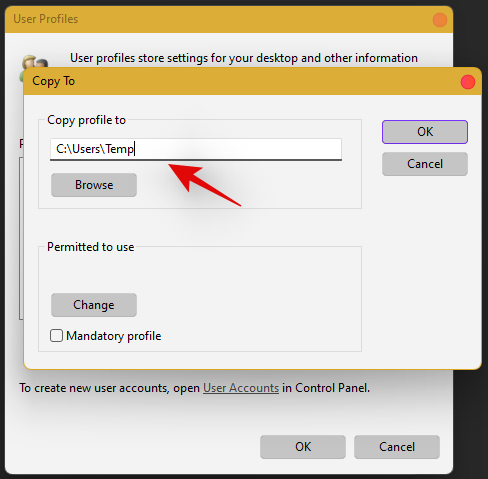
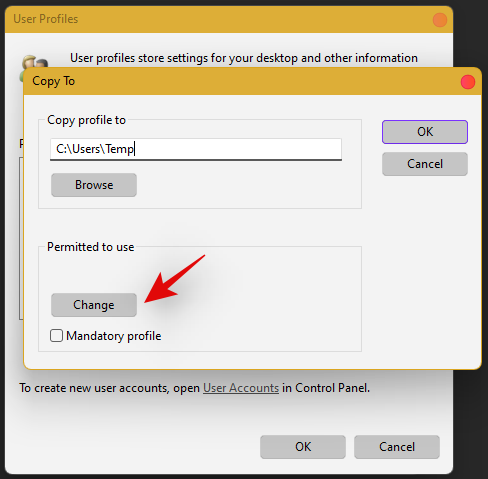
Click on ‘Change’.
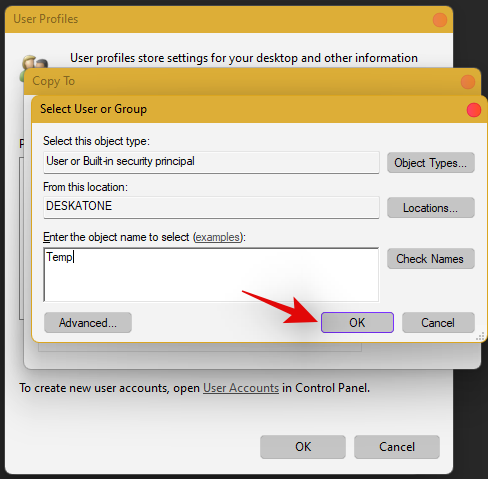
Enter the name for your new user profile and press Enter on your keyboard.
Click on ‘Ok’ once you are done.
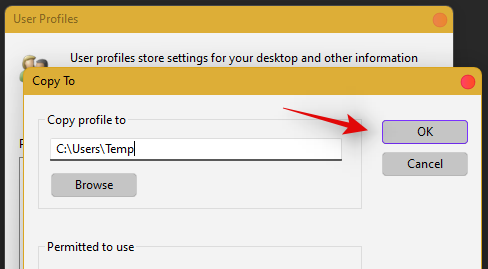
All your data will now be copied over to the new profile where the taskbar is functional on your PC. You can now delete your previous user account and set a password for your new account as well.
Frequently Asked Questions (FAQs):
With so many fixes, you are bound to have a few questions on your mind. Here are some commonly asked ones that should help you get up to speed.
How do I access Windows apps and Settings without a taskbar?
You can use the Task Manager to launch almost any program or Settings page on your system. To launch the desired program, launch the Taskbar > File > Run new task and enter the path to the program you wish to launch. Press Enter if you wish to launch the program normally or press Ctrl + Shift + Enter if you wish to launch the program with administrator privileges.
Is it safe to edit the Registry?
Registry edits are never safe as they have the potential to break your system. Fixes from trusted sources can help you avoid such issues but a good rule of thumb is to always back up your registry before making any edits. This way you can easily restore your Registry values in case some get messed up when editing the Registry.
When will Microsoft fix this issue?
Sadly, Microsoft is yet to release a proper fix for this issue. The company has tried to release a fix in the past cumulative updates to Windows 11 but they have been a hit and miss. We expect Microsoft to completely fix this issue in the upcoming feature update to Windows 11 when the OS gets the ability to run Android apps officially.
Can I update my Windows 11 after fixing the taskbar?
This will depend on the fix that you’re currently using. If you are using a date fix then you won’t be able to install updates until you restore to the current time. This will, however, cause the taskbar to be disabled again and the changes will be carried over after you update your PC. However, if you are using any other fix then you can easily update Windows.
For users with the date fix, you should try updating with the modified time first. If the update gets stuck on ‘Installing 0%’ or ‘Downloading 100%’ then change your date and time to the current date and time and update your PC. Ensure that you do not restart explorer or your PC during this process to keep the current instance of the taskbar alive on your system during the update process. This should help fix the issue for you once Microsoft officially releases an update to fix the issue.
We hope you were able to easily get the taskbar back up and running on your system using the guide above. If you face any more issues, feel free to reach out to us using the comments section below.
Related:
Kuidas värskendada draivereid Windows 11-s probleemide lahendamiseks ja seadmete ühilduvuse tagamiseks.
Kui Windows Search kasutab erakordselt suuri protsessori- või kettaressursse, saate Windows 11-s kasutada järgmisi tõrkeotsingu meetodeid. Probleemi lahendamise meetodid hõlmavad lihtsamaid meetodeid...
Üks ekraan, mida Windowsi kasutajad kollektiivselt kardavad, on surma sinine ekraan. BSOD on olnud kasutusel juba aastakümneid, aastate jooksul väga vähe muutunud, kuid siiski piisavalt võimas, et…
12. oktoober 2021: suur uuendus! Pange tähele, et te ei pea enam asendama faili appraiserres.dll, et TPM-i kontrollist mööda minna ja Windows 11 installimisel installitõrke parandada. …
Windows 11 väljalaskmisest on möödunud paar kuud ja sellest ajast alates on kasutajad uuele OS-ile üle läinud. Kuna üha rohkem kasutajaid proovib Windows 11 uusi probleeme, plaaditakse vigu ja sätteid ...
Kõik soovivad Windows 11 värskendusega tutvuda. Kuid kui on üks asi, mis võib nende lihtsa uuendamise plaane rikkuda, on see kardetud süsteem…
Windows 11 on nüüd avalikkusele avaldatud pärast seda, kui see tänavu juunis vastuoluliselt lekitati. Sellest ajast peale on operatsioonisüsteemis toimunud arvukalt muudatusi, mille hulgas on olnud väga teretulnud härmatis…
Windowsi tegumiriba on olnud kogu tähelepanu keskpunktis alates sellest ajast, kui see sai Windows 11 väljalaskmisega uue uuendatud välimuse. Nüüd saate tegumiriba tsentreerida, nautida uut tegevuskeskust, muuta selle…
Kui Windows 11 maailmale avalikustati, oli Snap Layouts esimene asi, mis kõigi tähelepanu köitis. Need olid uuenduslikud, uued ja Windowsi süsteemi kallal töötamisel tegelikult kasulikud...
Windows 11 on äsja avalikkusele avaldatud ja tundub, et see meelitab palju uusi kasutajaid. Paljud kasutajad on hüppanud ja uuendanud Windows 11-le, samal ajal kui teised otsivad ...
Kuna Zoom võtab üle suurema osa meie tööst ja isegi sotsiaalsest elust, oleme hakanud sellele üsna palju toetuma. Zoom võimaldab kasutajatel luua oma virtuaalseid koosolekuruume ja vestelda…
Windows 11 lekitati hiljuti avalikkuse ette ja kõik üle maailma on kiirustanud uut OS-i VirtualBoxi tööriistade abil virtuaalmasinasse installima. Windows 11 tuleb…
Need, kes on piisavalt innukad, et Windows 11 Dev-i koostamist Insider Program kaudu käsile võtta, on hakanud aeglaselt mõistma, miks enamik kasutajaid kipub ootama, kuni stabiilne väljalase ilmub. Olles esimene…
Zoom on kiiresti tõusnud, et saada kõige populaarsemaks videokonverentsirakenduseks selles äris ja seda vääriliselt. Sellel on õiged funktsioonid, see pakub piisavalt jõulist tasuta versiooni ja on palju…
Windows 11, mis on juhtumisi kuulsa Windowsi operatsioonisüsteemi sarja uusim täiendus, on suutnud isegi arendaja eelvaates palju silmailu püüda. Paljud entusiastid kiirustavad…
Lõikamistööriist on olnud Windowsi pikaajaline oluline lisand, mis on suutnud ellu jääda paljude versioonide puhul, mida avalikkus algul eriti vastu ei võtnud. Kui sa oled …
05. aprill 2020: Zoomi olekulehel kuvatakse nüüd nende veebikliendi praegune olek töökorras. See oli varem hoolduses. Ja me näeme seda. Kui sa…
Kodust töötamisega harjudes õpime aeglaselt õppima parimaid tavasid, mis võivad meie tootlikkusele käegakatsutavat tõuke anda. Videokõnede tööriistad, nagu Zo…
2021. aasta oktoobri esimesel nädalal tõi Microsoft ametlikult välja Windows 11 stabiilse järgu. Kõik uued tooted, mis väljastati pärast avalikustamist, käitavad kohe karbist välja võttes operatsioonisüsteemi Windows 11 ja Windows…
Windows 11 on Windowsi uus iteratsioon linnas. See toob kaasa uue ja täiustatud kasutajaliidese, täiustatud teenused, Microsoft Edge'i integratsiooni ja mis veelgi olulisem, uue ja täiustatud menüü Start. Praeguseks on see…
Kui teie Windows 10 explorer ei tööta, oleme teid kaitsnud. Lugege ajaveebi, et leida lahendus, kui failiuurija ei tööta.
Kuidas värskendada draivereid Windows 11-s probleemide lahendamiseks ja seadmete ühilduvuse tagamiseks.
File Explorer on Windows 10 põhifunktsioon, mis võimaldab hõlpsasti leida ja hallata faile. Õppige, kuidas konfigureerida File Explorer avama "Seda arvutit" alates arvuti käivitamisest.
Kuidas kasutada Windows 11 otsingut tõhusalt ja kiiresti. Hanki kasulikud näpunäited ja parimad praktikad Windows 11 otsingufunktsiooni jaoks.
Iga arvutiga ühendatud seadet ja selle sees olevaid komponente haldavad seadmedraiverid. Draiverite värskendamine Windows 10-s on oluline mitmesuguste probleemide vältimiseks.
Kas näete File Explorer ei reageeri veateadet? Siit leiate tõhusad lahendused, et lahendada Windows 10 mittetöötava File Exploreri probleem.
Kuidas saada Windows 10-s abi - leidke parimad lahendused pea iga küsimusele, mis teil Microsoft Windows 10 kohta on.
Failiuurija ei reageeri tõrge Windows 10-s. File Explorer või Windows Exploreri protsess ei tööta operatsioonisüsteemis Windows 10. Hangi uued lahendused.
Uuri, kuidas tuua tagasi "Minu arvuti" ikoon Windows 11-s ja avada see lihtsalt, et pääseda oma failidele ja seadetele.
Kas te ei saa Windows 11 arvutis faile ja kaustu avada? Siit leiate teavet selle kohta, kuidas parandada, et Explorer.exe ei laadita käivitamisel ja tööle naasta.


![Windows 11 rohelise ekraani vea parandamine [8 võimalust] Windows 11 rohelise ekraani vea parandamine [8 võimalust]](https://blog.webtech360.com/resources8/images31/image-5564-0105182715287.png)
![[Värskendus: 8. november] Snipping Tool ei tööta Windows 11-s? Kuidas parandada tõrke või otsetee probleeme „See rakendus ei saa avada”. [Värskendus: 8. november] Snipping Tool ei tööta Windows 11-s? Kuidas parandada tõrke või otsetee probleeme „See rakendus ei saa avada”.](https://blog.webtech360.com/resources8/images31/image-6552-0105182756436.jpg)
![Kuidas Zoom 403 keelatud veast mööda minna [Värskendus: Zoom parandas probleemi] Kuidas Zoom 403 keelatud veast mööda minna [Värskendus: Zoom parandas probleemi]](https://blog.webtech360.com/resources8/images31/image-2646-0105182808274.png)


