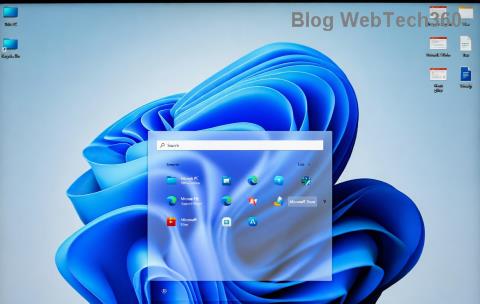
Windows proceslinjen har været centrum for al opmærksomhed, siden den fik sit nye fornyede udseende med udgivelsen af Windows 11. Du kan nu centrere din proceslinje, nyde det nye handlingscenter, ændre dets justering og placere det på hver side af din skærm. Desværre har implementeringen af denne funktion været mindre end vellykket med flere og flere brugere, der kæmper for at få deres proceslinje til at fungere på Windows 11 i et par måneder.
Selvom Microsoft har erkendt problemet, udstedt en løsning og i øjeblikket arbejder på en rettelse, ser det ud til, at brugerne stadig ikke er i stand til at få proceslinjen til at fungere igen. Hvis du er i samme båd, så har vi samlet en liste over alle tilgængelige rettelser for at få din proceslinje op og køre igen på Windows 11. Følg guiden nedenfor for at komme i gang.
Indhold
Hvorfor vises min proceslinje ikke?
Windows 11 proceslinjen har et nyt udseende, der kommer fra en fornyet version af dens funktion. Proceslinjen er nu afhængig af flere tjenester og selve Start-menuen for at fungere korrekt. Det ser ud til, at opgraderingsprocessen fra Windows 10 til Windows 11 ser ud til at ødelægge proceslinjen afhængigt af hvilken version af Windows 10 du har installeret på dit system, og hvilken Windows 11-version du opdaterer til.
Derudover ser en nylig Windows-opdatering udgivet i sidste måned også ud til at forårsage dette problem for nogle brugere, mens andre står over for det samme på grund af uoverensstemmende systemtid på trods af at alt er sat korrekt op. Der er mange måder at rette din proceslinje på, og vi anbefaler, at du starter med rettelserne nedenfor én efter én.
12 måder at løse proceslinjeproblemer på Windows 11
Brug metoderne nedenfor til at begynde at reparere din proceslinje på Windows 11. Hvis du allerede har prøvet at genstarte dit system, kan du springe den første metode over.
Fix #1: Genstart pc
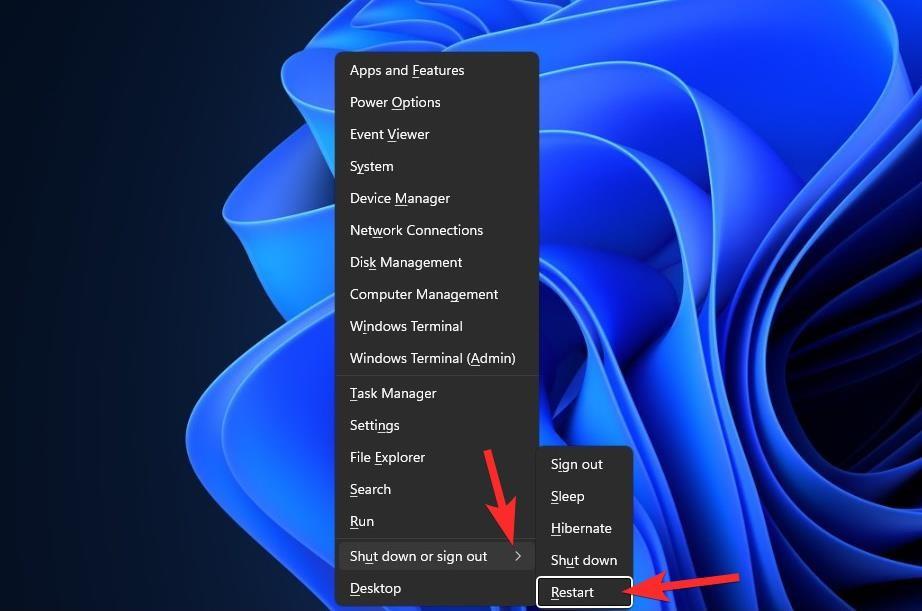
Før du afprøver noget fancy, er det godt at prøve enklere foranstaltninger, såsom at genstarte pc'en eller Windows Stifinder (se nedenfor). Hvis du gør det, får dit system en blød nulstilling, så dataene kan genindlæses og muligvis løse problemer med proceslinjen og startmenuen.
Fix #2: Sørg for, at 'Skjul automatisk proceslinjen' er deaktiveret
Tryk Windows + ipå dit tastatur og klik på 'Personalisering' til venstre.
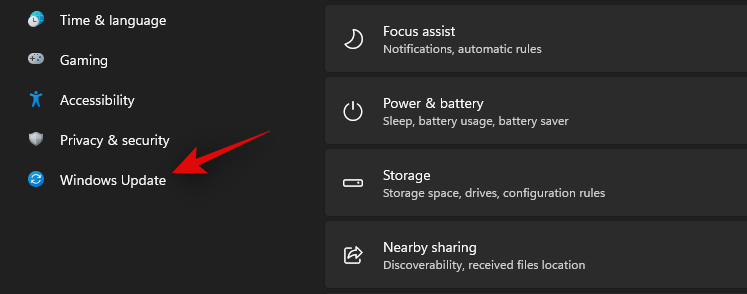
Klik på 'Proceslinje'.
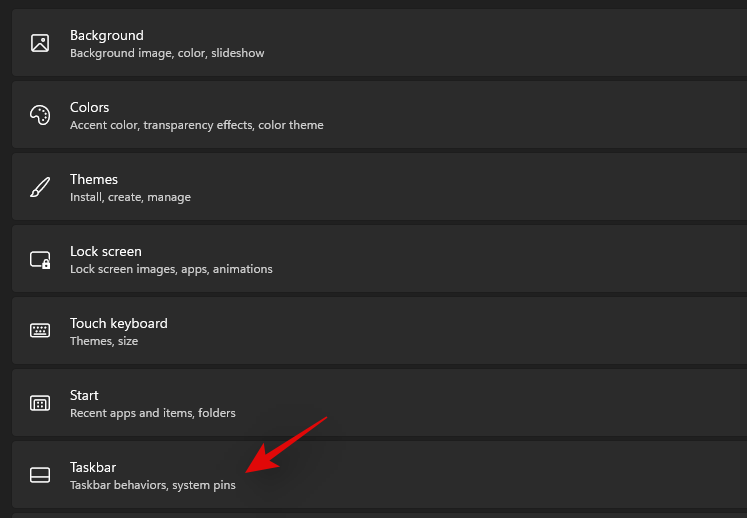
Klik nu på 'Proceslinjeadfærd'.
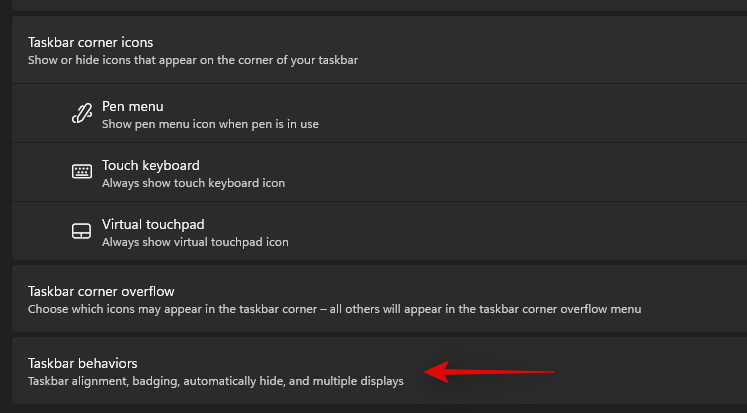
Fjern markeringen i afkrydsningsfeltet for 'Skjul automatisk proceslinjen'.

Luk nu Indstillinger-appen, og hvis din proceslinje automatisk blev skjult, skulle den nu være deaktiveret på dit system.
Fix #3: Genstart nødvendige tjenester
Som tidligere nævnt har Windows 11 fornyet proceslinjen, hvilket nu betyder, at den er afhængig af flere tjenester for at fungere korrekt på ethvert system. Lad os genstarte alle disse tjenester for at sikre, at en baggrundskonflikt ikke forhindrer din proceslinje i at fungere korrekt på dit system.
Tryk Ctrl + Shift + Escpå dit system for at starte Task Manager. Skift til fanen 'Detaljer' øverst.
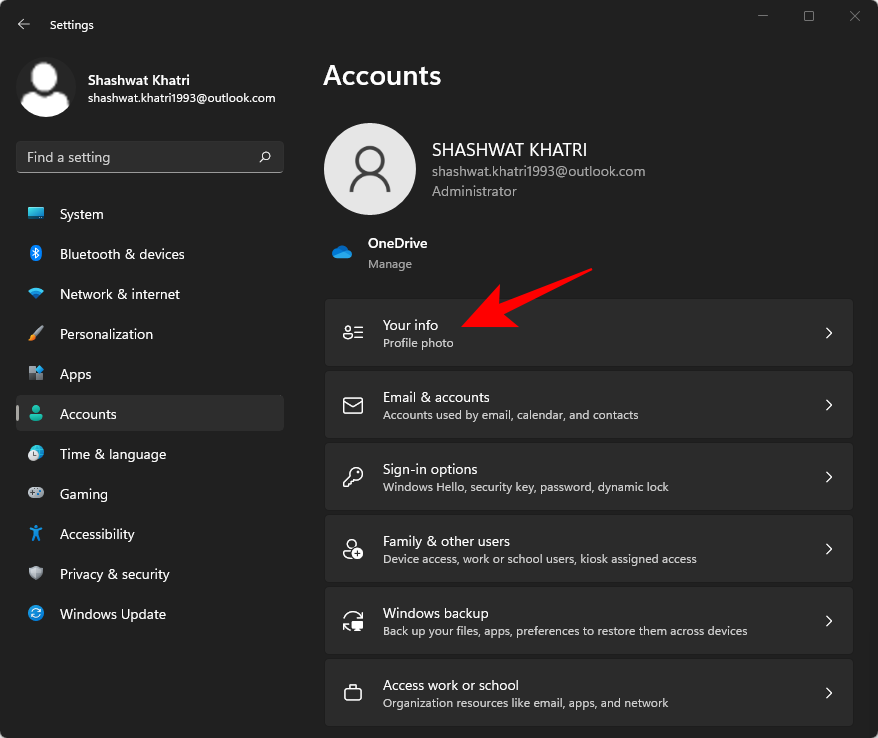
Find nu følgende kørende tjenester og vælg dem ved at klikke på dem. Tryk på 'Slet' på dit tastatur og bekræft dit valg ved at vælge 'Afslut proces'.
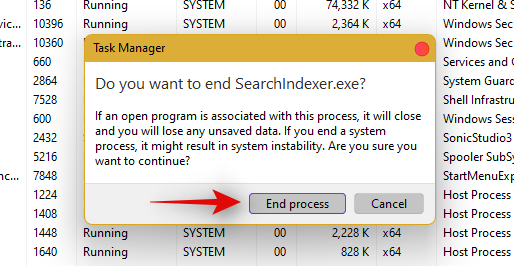
- Explorer.exe
- ShellExperienceHost.exe
- SearchIndexer.exe
- SearchHost.exe
- RuntimeBroker.exe
Lad os genstarte Windows Stifinder nu. Klik på 'Filer' i øverste venstre hjørne og vælg 'Kør ny opgave'.
Indtast 'explorer.exe' og tryk på Enter på dit tastatur. Du kan også klikke på 'Ok', hvis det er nødvendigt.
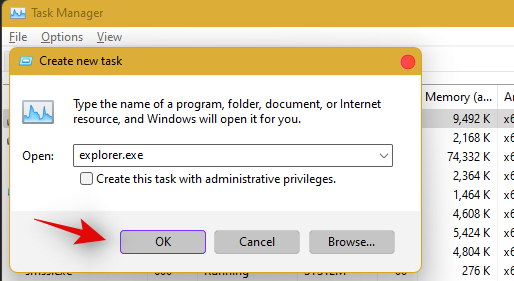
Når Explorer er genstartet, skal du blot genstarte din pc for at genstarte andre tjenester på dit system.
Proceslinjen skulle nu gendannes, hvis en baggrundstjenestekonflikt var årsagen til dit problem.
Rette #4: Slet IrisService i registreringsdatabasen og genstart
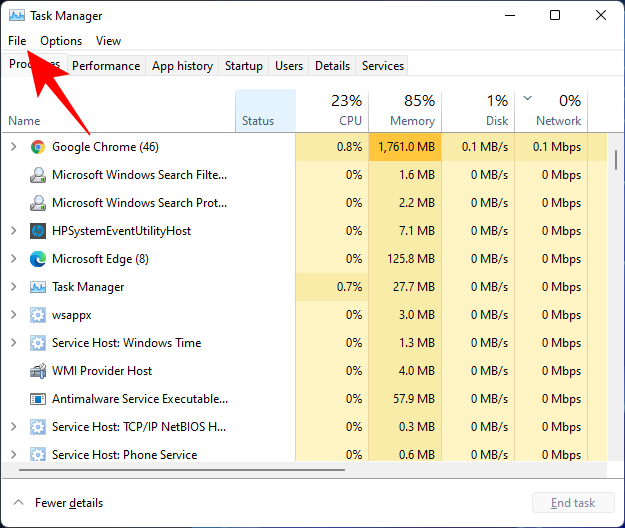
Tryk på for Ctrl + Shift + Escat åbne Task Manager. Klik derefter på Fil i øverste venstre hjørne.
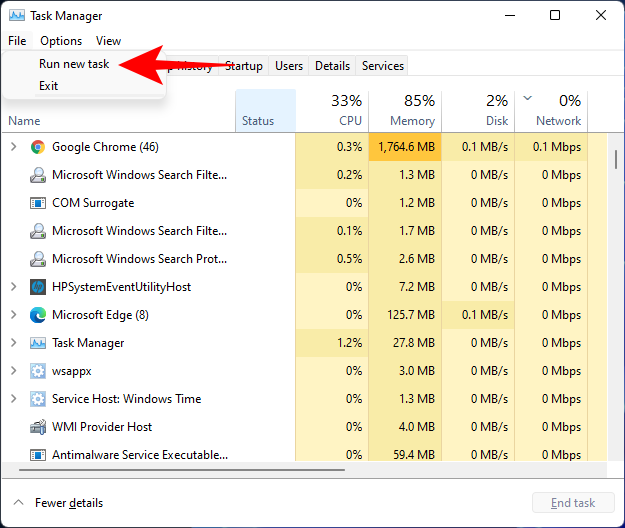
Vælg Kør ny opgave .
Skriv cmd og tryk på Enter.
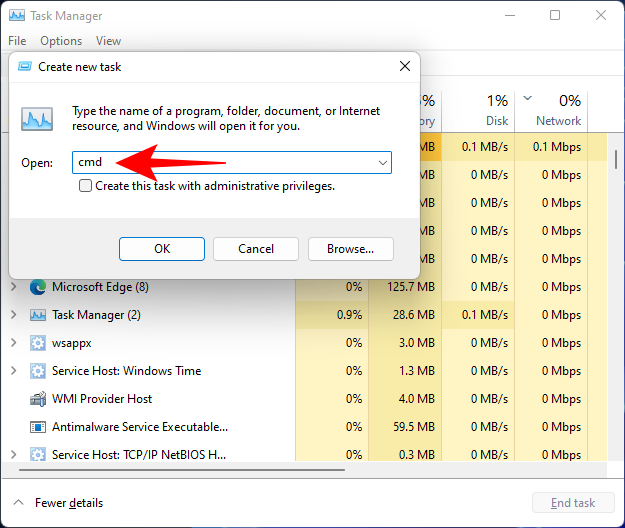
Dette åbner en forhøjet forekomst af kommandoprompten. Kopier nu følgende kommando og indsæt den i kommandoprompten:
reg delete HKCU\SOFTWARE\Microsoft\Windows\CurrentVersion\IrisService /f && shutdown -r -t 0

Tryk derefter på Enter. Så snart du gør det, genstarter din pc. Når det først er startet sikkerhedskopiering, skulle tingene være tilbage til det normale, inklusive proceslinjen.
Fix #5: Tilføj UndockingDisabled i registreringsdatabasen
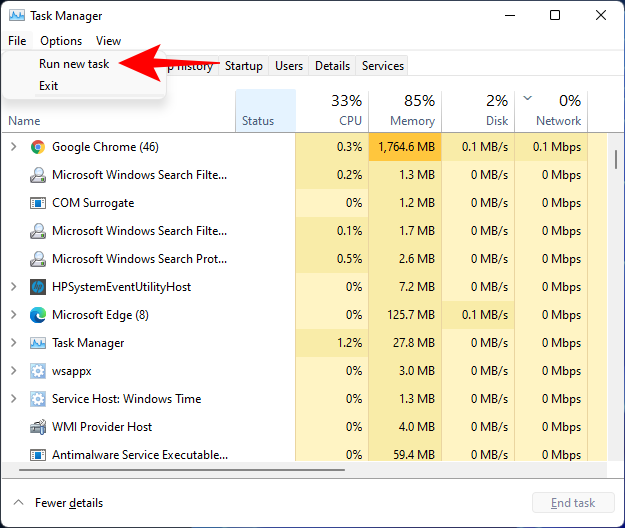
Tryk på for Ctrl + Shift + Escat åbne Task Manager. Klik derefter på Filer (øverst til venstre) og Kør en ny opgave .
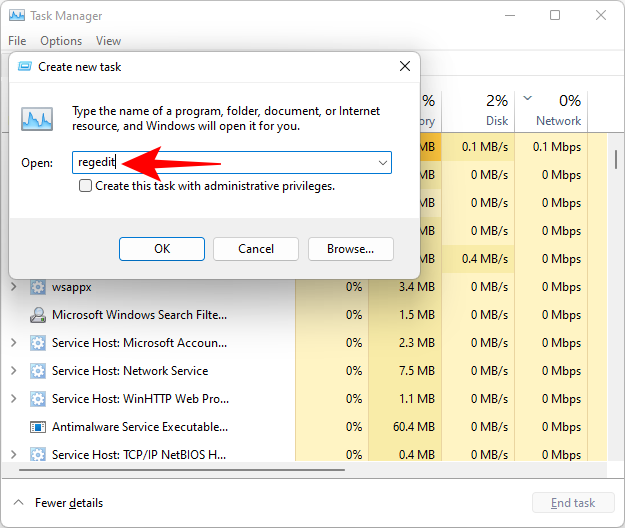
Skriv regedit og tryk på Enter.
Dette åbner registreringseditoren. Naviger nu til følgende adresse:
Computer\HKEY_LOCAL_MACHINE\SOFTWARE\Microsoft\Windows\CurrentVersion\Shell\Update\Packages
Alternativt kan du bare kopiere ovenstående og indsætte det i registreringseditorens adresselinje, sådan:

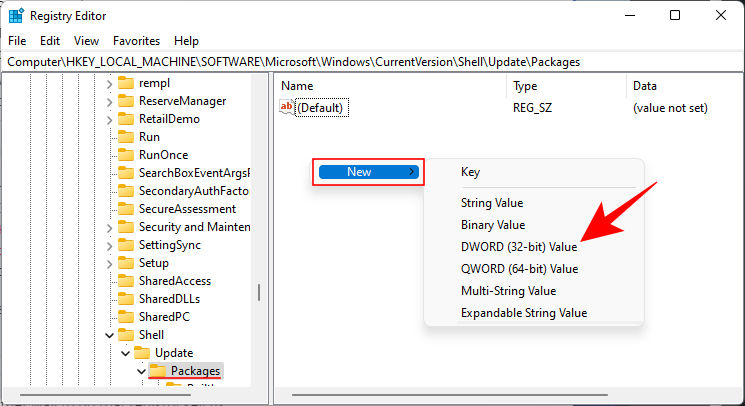
Når du trykker på Enter, bliver du dirigeret til den angivne nøgle. Til højre skal du højreklikke på mellemrum og vælge Ny > DWORD (32-bit) værdi .
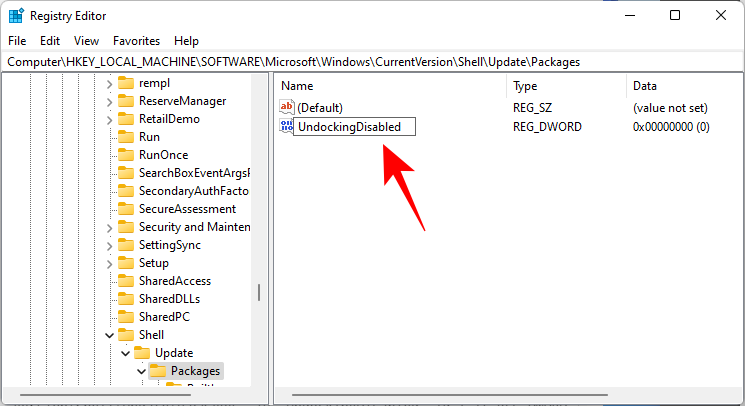
Navngiv denne nyoprettede DWORD UndockingDisabled .
Dobbeltklik derefter på den og skift "Værdidata" til 1 . Klik derefter på OK .
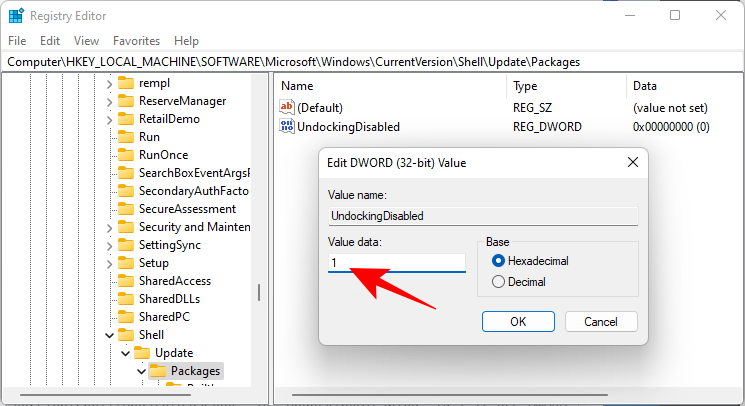
Genstart din pc, for at ændringerne træder i kraft.
Fix #6: Kør SFC & DISM kommandoer
Tryk på Start, skriv cmd og klik på Kør som administrator .
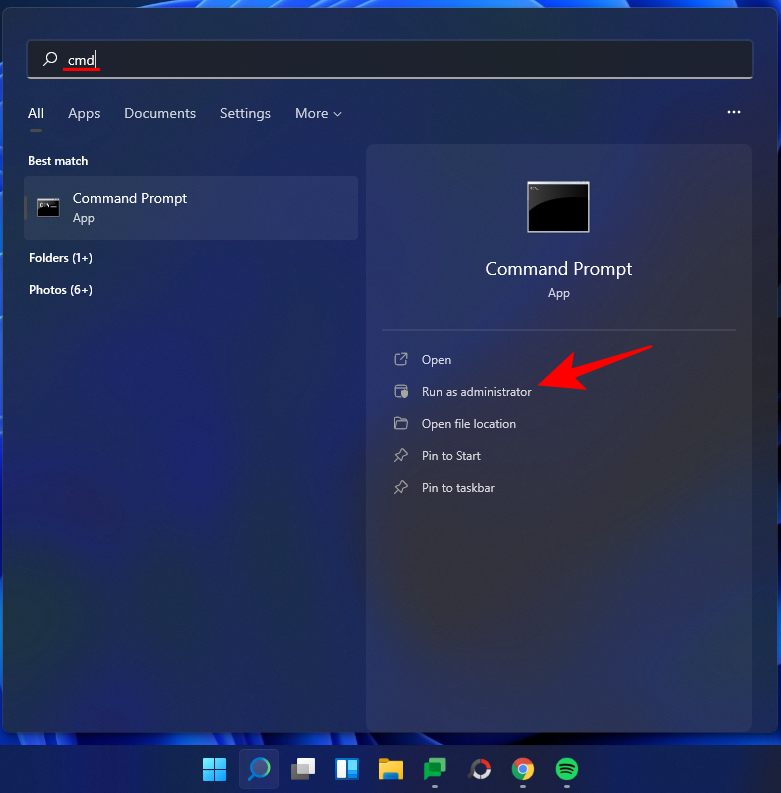
Skriv nu følgende kommando:
sfc /scannow
Tryk på Enter. Vent på, at SFC afslutter scanningen og løser eventuelle fundne problemer.

Dernæst skal du køre følgende DISM-kommando for værktøjet Deployment Image Servicing and Management:
dism /online /cleanup-image /scanhealth
Tryk derefter på Enter. Vent igen på, at scanningen er fuldført.

Kør nu følgende DISM-kommando:
dism /online /cleanup-image /restorehealth

Tryk på Enter. Vent på, at DISM genopretter helbredet.

Til sidst skal du køre chkdsk-kommandoen for at køre Check Disk-værktøjet:
chkdsk c: /r
Tryk på Enter. Kommandoprompt vil sende en besked op, der fortæller dig, at det "ikke kan låse det nuværende drev ... fordi diskenheden er i brug af en anden proces", og bede om din tilladelse til at planlægge en scanning før næste opstart. Skriv for Yat overholde.

Og tryk på Enter. Genstart nu din computer, lad Check Disk-værktøjet gøre sit arbejde, og kontroller, om proceslinjen er genoptaget til normal funktion.
Fix #7: Geninstaller UWP
Tryk Ctrl + Shift + Escpå dit tastatur for at starte Task Manager. Klik på 'Filer' og vælg 'Kør ny opgave'.
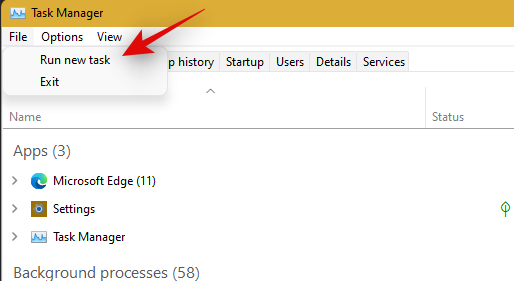
Indtast 'PowerShell' og tryk Ctrl + Shift + Enterpå dit tastatur.
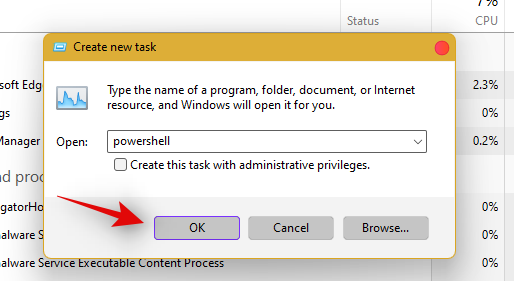
PowerShell vil nu blive lanceret som administrator på dit system. Skriv følgende kommando:
Get-AppxPackage -AllUsers | Foreach {Add-AppxPackage -DisableDevelopmentMode -Register “$ ($ _. InstallLocation) \ AppXManifest.xml”}
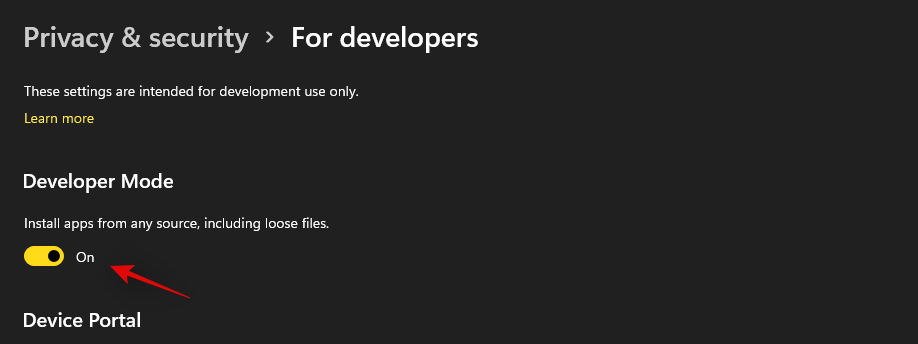
Tryk på Enter. PowerShell vil vise en kørende liste over meddelelser i rødt. Men du skal ikke bekymre dig om det. Bare vent på, at kommandoen er færdig med at udføre.

Rette #8: Tjek UAC og tilføj rediger registreringsdatabasen, hvis det er nødvendigt
UAC is a must-have for all modern apps and features including the Start Menu and the taskbar. You should first enable UAC if it is disabled and restart your system. If the Taskbar still fails to work for you, then we recommend you try adding a Xaml Start menu value to your Registry Editor.
Adding this value seems to restart and re-register Taskbar services which seem to get Taskbar working again on most systems. Follow the guide below to get you started.
Check and enable UAC if disabled
Press Ctrl + Shift + Esc on your keyboard to launch the task manager. Now click on ‘File’ in the top left corner of your screen and select ‘Run new task’.

Type in ‘cmd’ and press Ctrl + Shift + Enter on your keyboard.
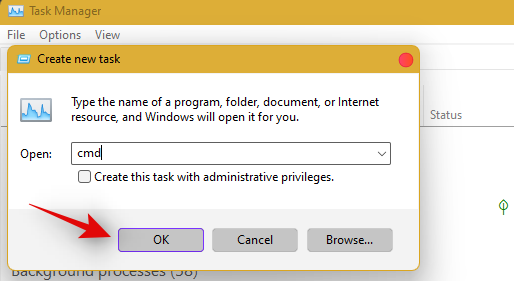
Now type in the following command and press Enter to execute the command.
C:\Windows\System32\cmd.exe /k %windir%\System32\reg.exe ADD HKLM\SOFTWARE\Microsoft\Windows\CurrentVersion\Policies\System /v EnableLUA /t REG_DWORD /d 0 /f
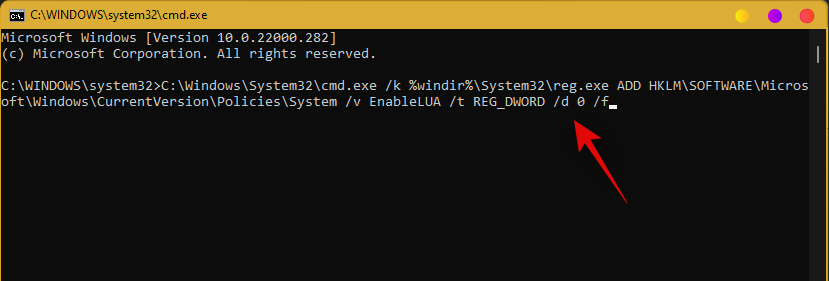
UAC will now be enabled for your system. Restart your PC for the changes to take effect on your system. Once restarted, Taskbar should be up and running on your system if UAC was the issue for you. If not, use the guide below to trigger the taskbar’s functionality on your system.
Add Registry Value
Press Ctrl + Shift + Esc to launch the task manager. Now click on ‘File’ in the top left corner and select ‘Run new task’.

Type in ‘cmd’ and press Ctrl + Shift + Enter on your keyboard.

Now type in the following command and press Enter on your keyboard.
REG ADD "HKCU\Software\Microsoft\Windows\CurrentVersion\Explorer\Advanced" /V EnableXamlStartMenu /T REG_DWORD /D 1 /F
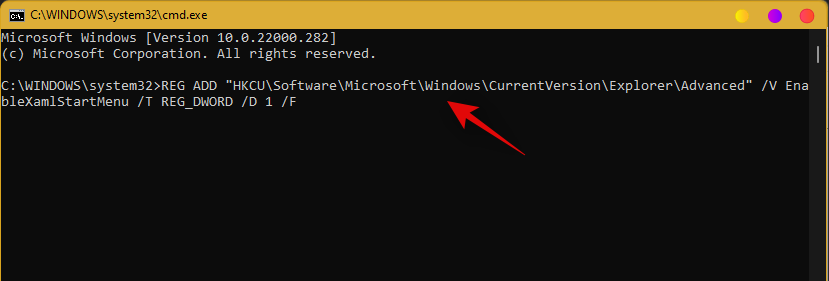
Go back to the task manager now, find Windows Explorer in the list, and right-click on it. Select Restart to restart explorer.exe.
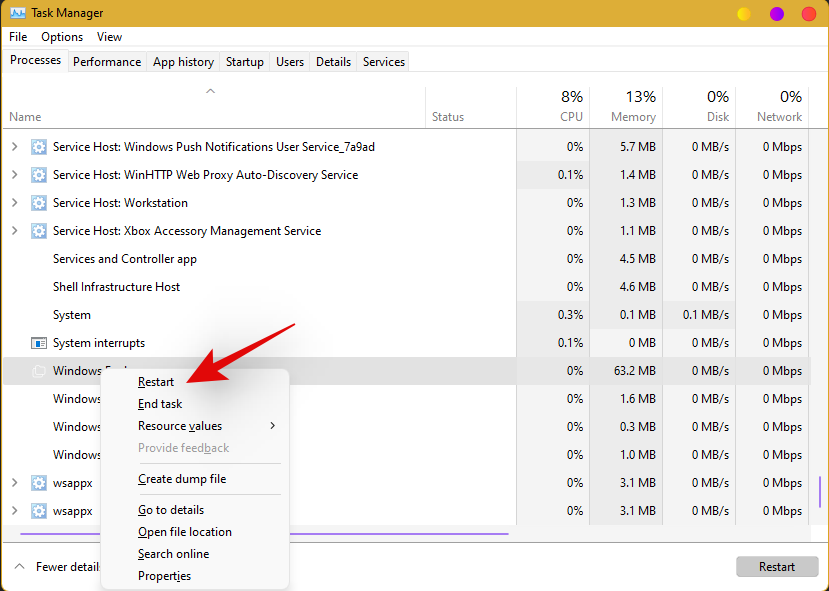
Once restarted, try to access your taskbar. The taskbar should now be available on your system.
Fix #9: Edit date and time to fix Taskbar
Date and Time settings seem to be the major cause of issues with the taskbar in Windows 11. Use the guide below to try out the following time fixes to see which one works the best for you.
Ensure that your time is correctly synchronized with the time server
Press Ctrl + Shift + Esc on your keyboard and click on ‘File’. Select ‘Run new task’.

Type in ‘Control’ and hit Enter on your keyboard.
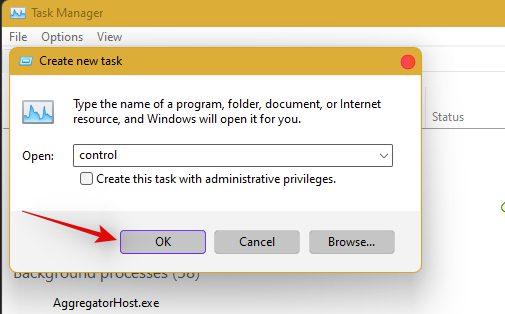
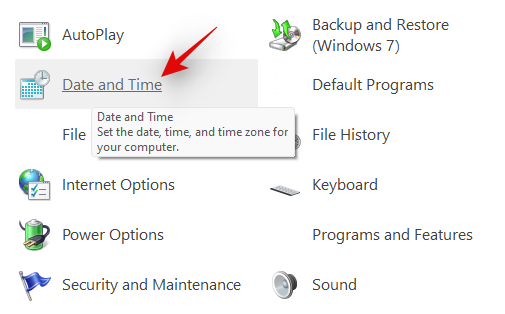
Click on ‘Date and Time’.
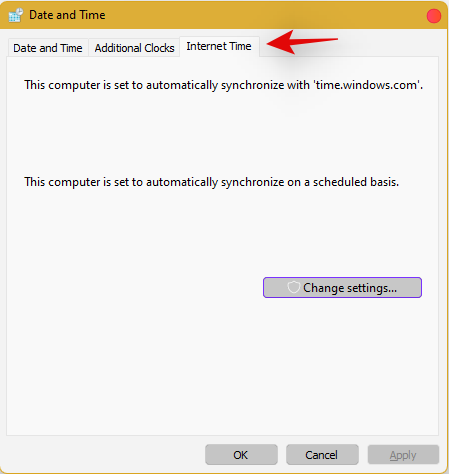
Select ‘Internet Time’ from the top.
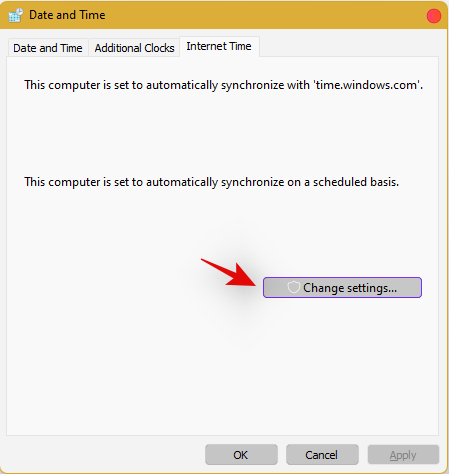
Click on ‘Change Settings’.
Uncheck the box for ‘Synchronize with an Internet time server’.
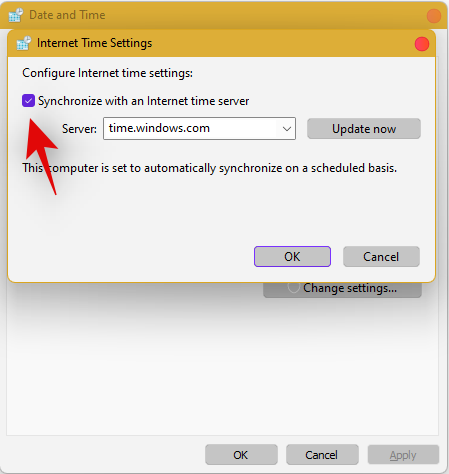
Click on ‘Ok’ once you are done.
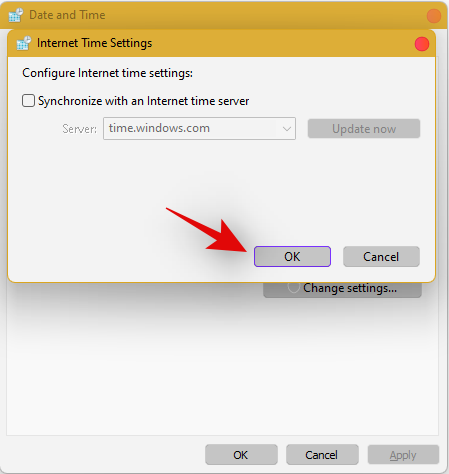
Restart your PC at this point and check your taskbar. If it is still disabled, do not fret, follow the steps above and enable Synchronization with an Internet Time Server again.
Once enabled, press Ctrl + Shift + Esc on your keyboard, and find Windows Explorer in the list on your screen. Right-click the listing and select ‘Restart’.

Once explorer restarts, try using the Taskbar. If synchronization was your issue, then it should now be fixed on your system. If not, continue with the other time fixes mentioned below.
Change date to 1 day ahead
Open the Task Manager by pressing Ctrl + Shift + Esc simultaneously. Then click on File.
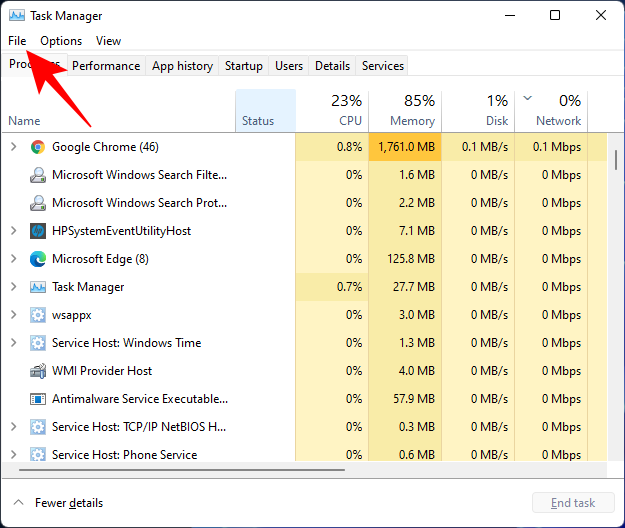
Click on Run new task.
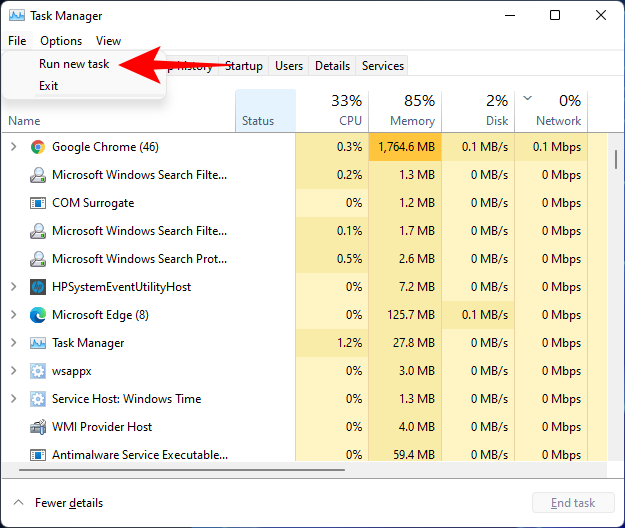
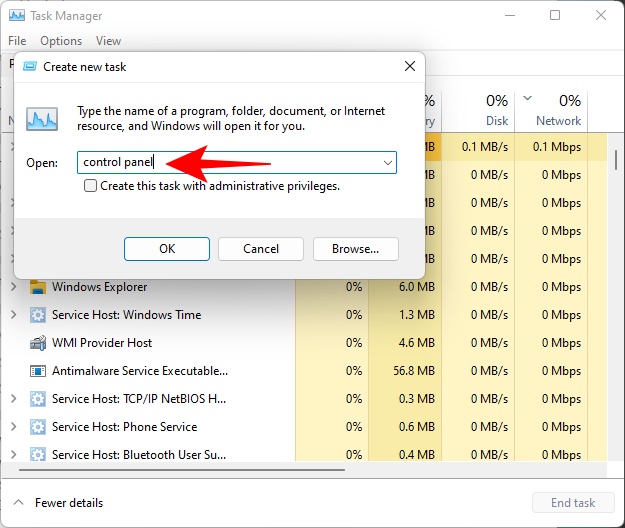
Type control panel and hit Enter.
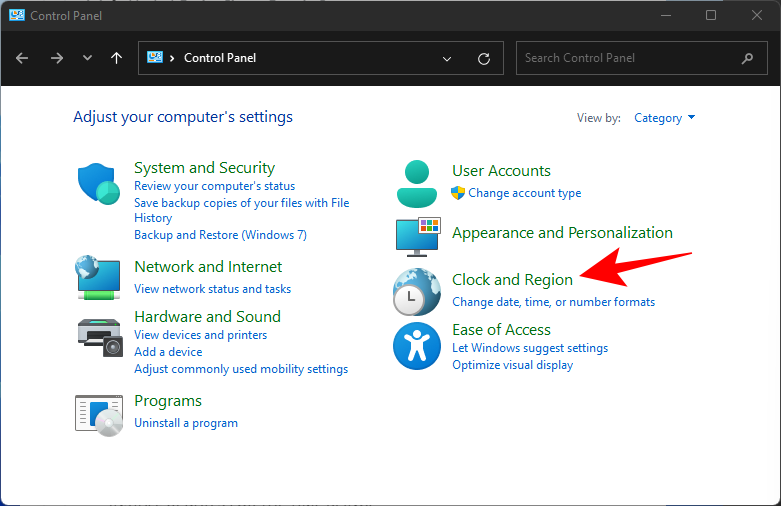
Now click on Clock and Region.
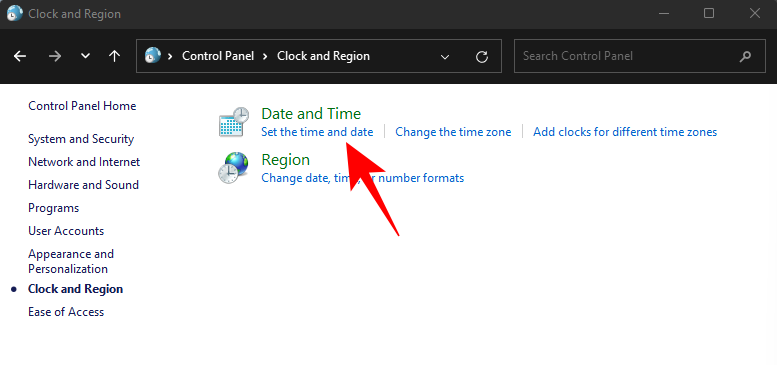
Under “Date and Time”, click on Set the time and date.
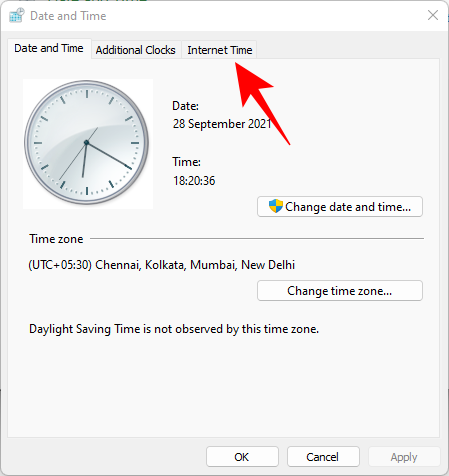
Click on the Internet Time tab to switch to it.
Click on Change settings…
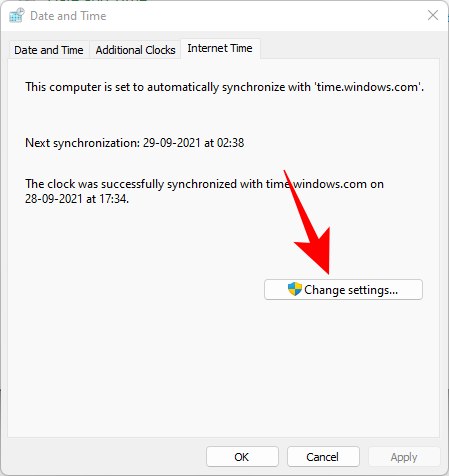
Uncheck Synchronize with an Internet time server, then click OK.
Now click on the Date and Time tab to switch back to it.
Here, click on Change date and time…
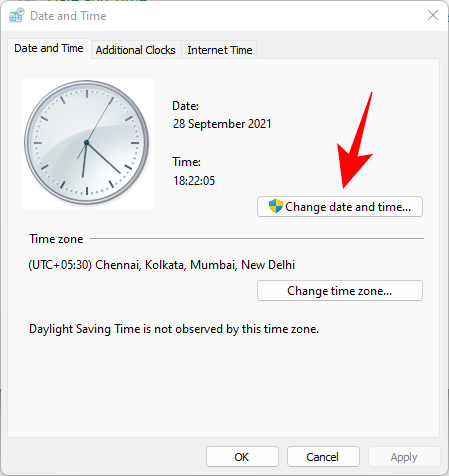
Now change the date and time to reflect tomorrow. As of writing this post, it is the 1st November so we will be changing the date to 2nd November.
Change Dates to last cumulative updates
If you are still unable to get the Taskbar working then you will have to jump through a few hoops to change your date and time multiple times and get the taskbar working on your system. Follow the guide below to get you started.
Press Ctrl + Shift + Esc on your keyboard, click on ‘File’ and select ‘Run new task’.

Type in ‘Control’ and press Enter on your keyboard.

Select ‘Date and Time’.

Switch to ‘Internet time’.

Click on ‘Change Settings’.

Uncheck the box for ‘Synchronize with an Internet Time Server’.

Click on ‘Ok’.

Switch back to ‘Date and Time’. Click on ‘Change Date and Time’ and select your date as 2nd September.
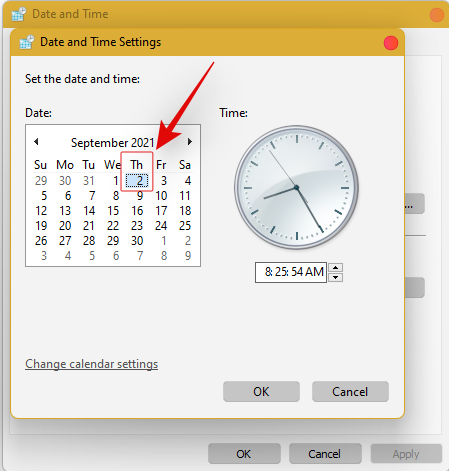
Close all windows and restart your system. Once restarted, open the ‘Date and Time’ dialog box again and change your date to 7th October this time.
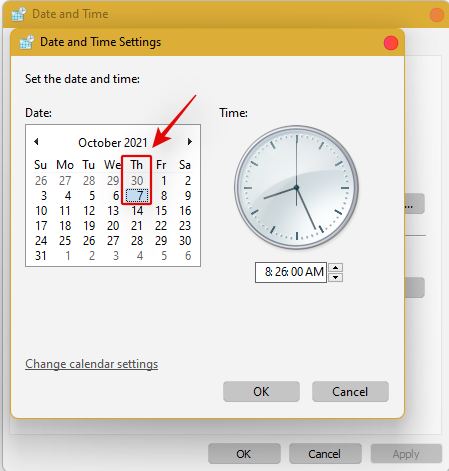
Restart your system again and Taskbar should now be back up and running on your system again. You can now enable synchronization for time again using the steps above on your system.
If synchronizing time does not work, move a month ahead to restore Taskbar
If you are still unable to get Taskbar up and running on your system again you can try the last date change fix. We recommend you use the steps above to change your date and time to a month ahead of your current date. Once changed, restart your system, and the taskbar should be up and running on your system now.
The downside of this fix is that if you revert to your normal date, Taskbar will stop working on your system. Having a mismatched date can cause issues with background syncs for various applications and cause some websites to malfunction. You will also have issues installing and getting the latest Windows Updates, so you will need to check all of these manually when updating in the future.
Fix #10: Uninstall the latest cumulative Windows Update ie: KB5006050
The cumulative update released in September for Windows 11 seems to also cause issues with the taskbar on some desktops and laptops. Use the guide below to uninstall the necessary update from your system.
Press Windows + i and select Windows Update from the left.
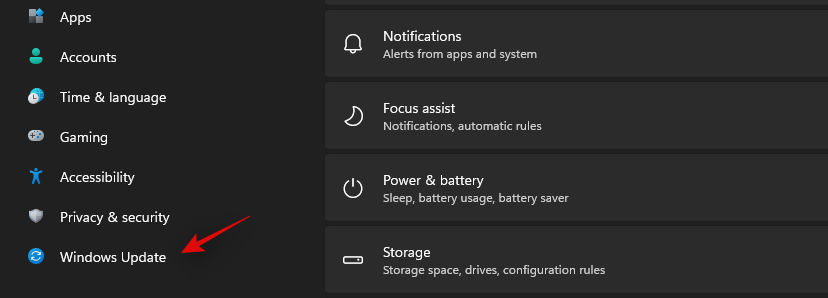
Click on ‘Update history’.
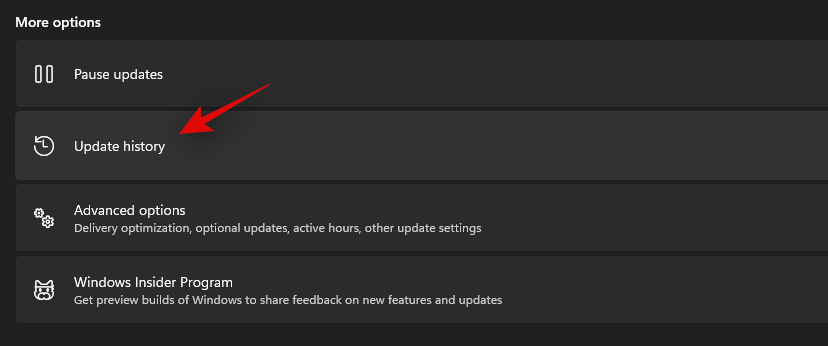
Now select ‘Uninstall updates’.
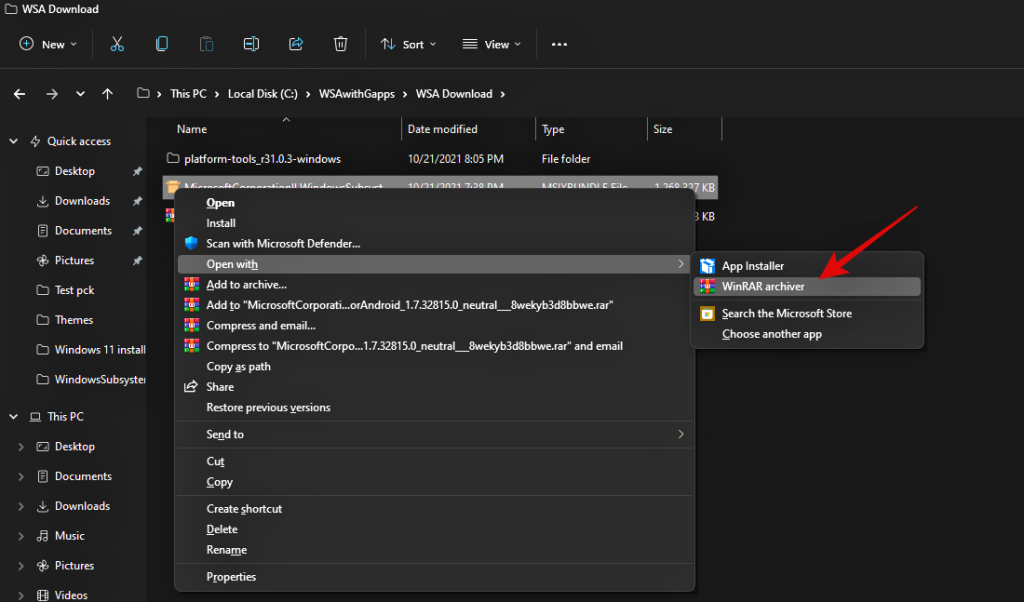
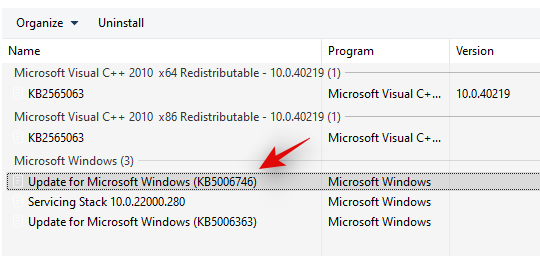
Click and select Windows Cumulative update KB5006050 from the list.
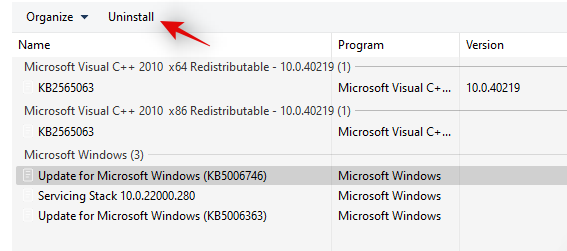
Now click on ‘Uninstall’ at the top and confirm your choice to uninstall the selected update.
Restart your system and taskbar functionality should now be restored on your system.
Fix #11: Restore PC to a previous restore point
If you had the taskbar working at a previous point in time then we recommend you restore your PC to a previously available restore point on your system. Follow the guide below to get you started.
Press Ctrl + Shift + Esc on your keyboard and click on ‘File’. Select ‘Run new task’ once you are done.

Type in CMD and press Ctrl + Shift + Enter on your keyboard.

Now type in ‘rstrui.exe’ and press Enter on your keyboard.
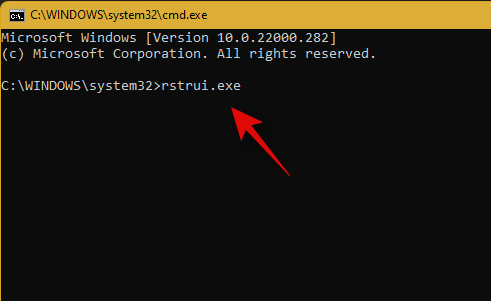
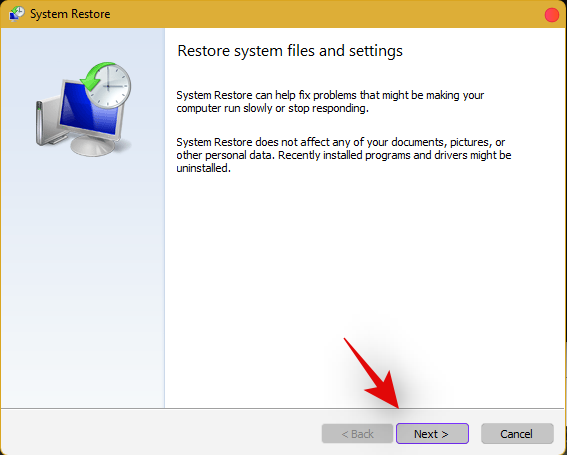
The system restore utility will now launch on your system. Click on ‘Next’.
Select the desired restore point from the list on your screen. Click on ‘Next’ once you are done.
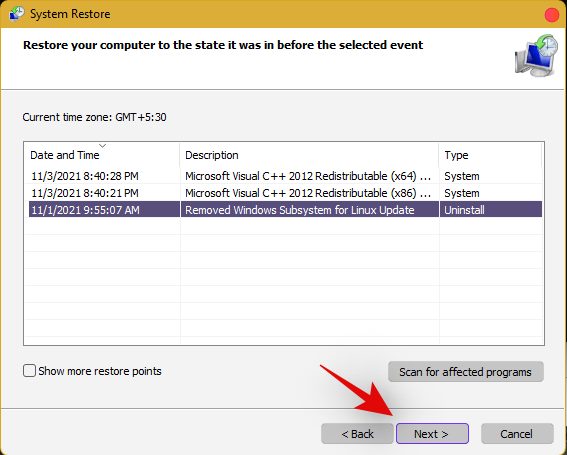
Tip: Click on ‘Scan for affected programs’ to view a list of installed programs that will be removed from your system during the restore process.
Click on ‘Finish’ once the restore finishes and restart your system.
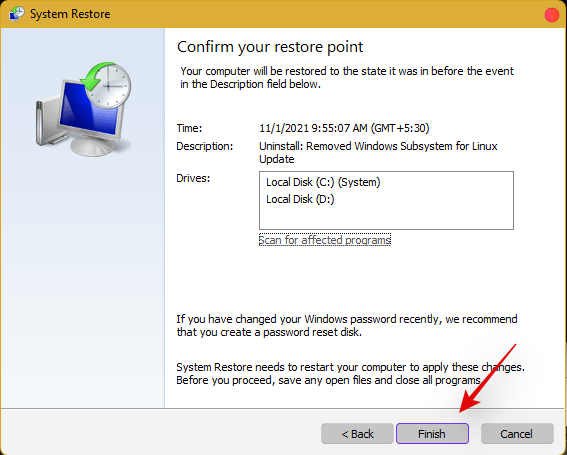
The taskbar should now be back up and running on your system again.
Fix #12: Last Resort: Create a new local admin account and transfer all your data
If by this point Taskbar still fails to work for you then it’s time for some drastic measures. You can create a new local admin account, check if Taskbar is working there, and then transfer all your data to the new account. This will be a tedious process but it is the next best way to get the taskbar working on your system without resetting your PC. Follow the guide below to get you started.
Create a new local admin account
Herre’s how you can create a new local admin account on your system.
Note: Most users facing the taskbar issue are unable to access the Settings app as well. Hence we will be using CMD to add a new local admin account to your PC. However, if the Settings app is available to you then you can use the same to add a new account as well.
Press Ctrl + Shift + Esc on your keyboard, click on ‘File’ and select ‘Run new task’.

Type in ‘cmd’ and press Ctrl + Shift + Enter on your keyboard.

CMD will now be launched as an administrator. Use the command below to add a new local admin account. Replace NAME with the Username of your choice for the new account. You can add a password later once you have confirmed that the taskbar is available in the new account.
net user /add NAME 
Once you have added the new user, use the command below to convert it to an administrator account on your PC. As usual, replace NAME with the Username for the new account you created earlier.
net localgroup Administrators NAME /add

Now type in the following to log out of your current account.
logoff

Once logged out, click on the newly added account to log in to the same. Once logged in, check if the taskbar is available in the new account. If it is, you can use the next section to transfer all your data. However, if the taskbar is still missing then you have no choice but to perform a fresh install of Windows 11 on your PC from a removable USB media drive.
Transfer all your data
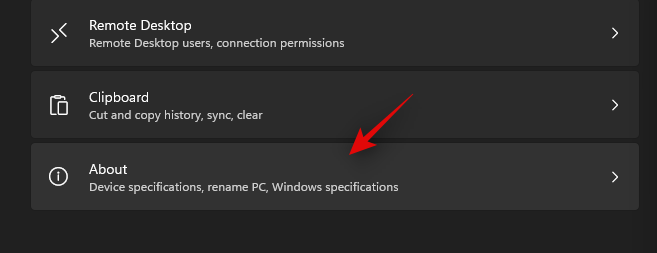
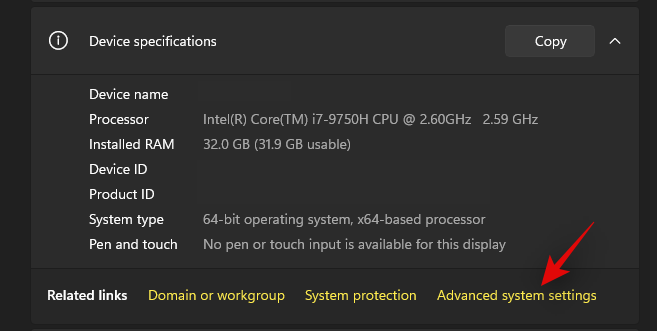
Press Windows + i on your keyboard and click on ‘About’ on your right.
Click on ‘Advanced system settings’.
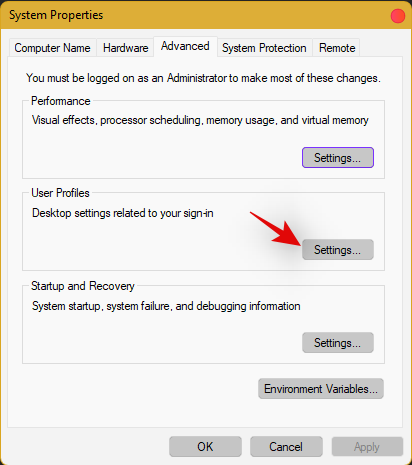
Click on ‘Settings’ under ‘User Profiles’.
Select your original profile by clicking on it and selecting ‘Copy To’.
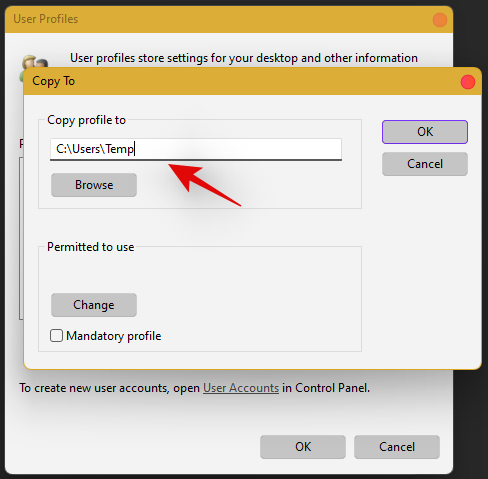
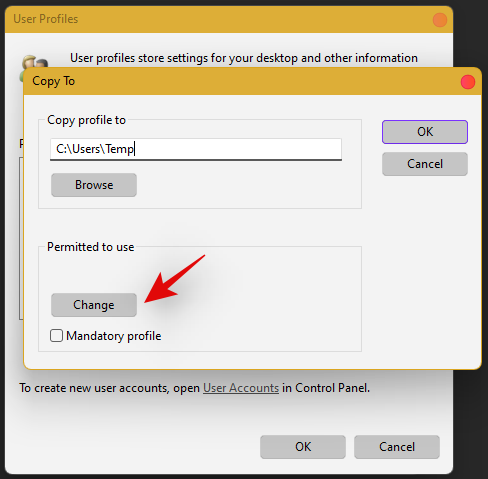
Now enter the following path under ‘Copy profile to’. Rename NAME to the username of your previous profile from where you wish to copy all your data.
C:\Users\NAME
Click on ‘Change’.
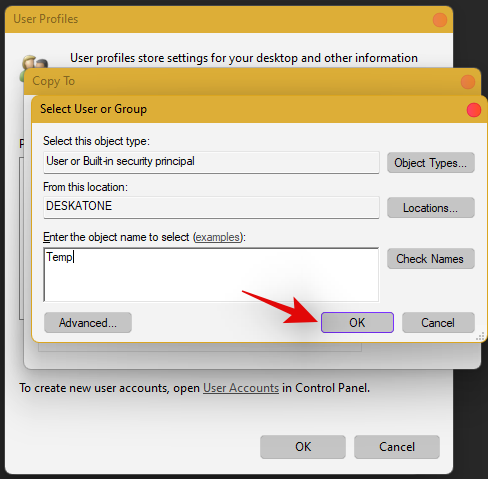
Enter the name for your new user profile and press Enter on your keyboard.
Click on ‘Ok’ once you are done.
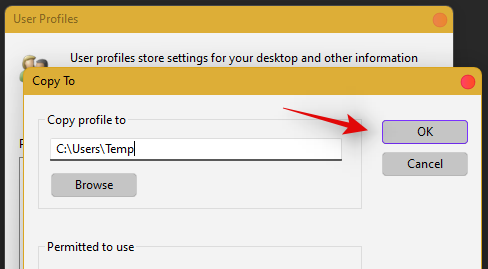
All your data will now be copied over to the new profile where the taskbar is functional on your PC. You can now delete your previous user account and set a password for your new account as well.
Frequently Asked Questions (FAQs):
With so many fixes, you are bound to have a few questions on your mind. Here are some commonly asked ones that should help you get up to speed.
How do I access Windows apps and Settings without a taskbar?
You can use the Task Manager to launch almost any program or Settings page on your system. To launch the desired program, launch the Taskbar > File > Run new task and enter the path to the program you wish to launch. Press Enter if you wish to launch the program normally or press Ctrl + Shift + Enter if you wish to launch the program with administrator privileges.
Is it safe to edit the Registry?
Registry edits are never safe as they have the potential to break your system. Fixes from trusted sources can help you avoid such issues but a good rule of thumb is to always back up your registry before making any edits. This way you can easily restore your Registry values in case some get messed up when editing the Registry.
When will Microsoft fix this issue?
Sadly, Microsoft is yet to release a proper fix for this issue. The company has tried to release a fix in the past cumulative updates to Windows 11 but they have been a hit and miss. We expect Microsoft to completely fix this issue in the upcoming feature update to Windows 11 when the OS gets the ability to run Android apps officially.
Can I update my Windows 11 after fixing the taskbar?
This will depend on the fix that you’re currently using. If you are using a date fix then you won’t be able to install updates until you restore to the current time. This will, however, cause the taskbar to be disabled again and the changes will be carried over after you update your PC. However, if you are using any other fix then you can easily update Windows.
For users with the date fix, you should try updating with the modified time first. If the update gets stuck on ‘Installing 0%’ or ‘Downloading 100%’ then change your date and time to the current date and time and update your PC. Ensure that you do not restart explorer or your PC during this process to keep the current instance of the taskbar alive on your system during the update process. This should help fix the issue for you once Microsoft officially releases an update to fix the issue.
We hope you were able to easily get the taskbar back up and running on your system using the guide above. If you face any more issues, feel free to reach out to us using the comments section below.
Related:
