Ndërsa njoftimet janë thelbësore në disa raste, ndonjëherë ato bëhen një element shpërqendrimi. Ashtu si telefoni juaj, një kompjuter gjithashtu mund t'ju shpërqendrojë me njoftime. Kjo është arsyeja pse Windows 11 përfshin funksionin Focus Assist, i cili ju lejon të shmangni njoftimet shpërqendruese. Duke përdorur këtë veçori, ju mund ta bëni punën tuaj me përqendrim të plotë në vend që të shpërqendroheni nga mesazhet dhe njoftimet e rastësishme. Njoftimet gjithashtu mund të dëmtojnë produktivitetin tuaj dhe kështu, ato duhet të shtypen në kohën e duhur.
Vetëm disa klikime mund të fshehin të gjitha njoftimet, sinjalizimet dhe mesazhet në kompjuterin tuaj. Nëse e keni përmirësuar së fundmi sistemin tuaj në Windows 11 dhe nuk jeni në gjendje të kuptoni ndërfaqen e re të ndërfaqes, ky artikull do t'ju ndihmojë me një udhëzues gjithëpërfshirës se si të përdorni Focus Assist në Windows 11 për të hequr qafe njoftimet.
Të ngjashme: Si të bëni pamje nga ekrani në Windows 11
Përmbajtja
Çfarë është Focus Asistenca në Windows 11?
Focus Assist është thjesht një modalitet "Mos shqetëso" për kompjuterin tuaj – ashtu si ato që keni në telefonat tuaj. Është një veçori e dobishme në Windows 11 që ju lejon të hiqni qafe njoftimet, mesazhet dhe sinjalizimet e panevojshme. Funksioni i Ndihmës së Fokusit ju mundëson të personalizoni listën tuaj të përparësive në vend që të pengoni kompjuterin tuaj nga të gjitha njoftimet.
Shpërqëndrimi mund të shkaktojë dëm në produktivitetin tuaj. Prandaj, me veçorinë Focus Assist, ju mund të fshehni të gjitha njoftimet, sinjalizimet dhe mesazhet ndërsa jeni duke punuar për diçka të rëndësishme. Në vend që t'ju paralajmërojnë, ata do të shkojnë direkt në qendrën e veprimit. Ju mund t'i shikoni njoftimet e fshehura në qendrën e veprimit në kohën tuaj.
Si funksionon Focus Help në Windows 11?
Focus Assist ju ofron fleksibilitetin për të zgjedhur se kur të bllokoni shpërqendrimet si mesazhet, njoftimet dhe sinjalizimet. Mund të aktivizoni Focus Assist në çdo kohë ose mund të planifikoni gjithashtu një interval kohor në Cilësimet, i cili do të aktivizojë automatikisht Ndihmën e Fokusimit.
Funksioni i Ndihmës së Fokusit ju lejon të krijoni një listë prioritare për t'u siguruar që të mos humbisni asnjë njoftim nga njerëzit më të rëndësishëm në kontaktin tuaj. Personat në listën tuaj prioritare mund t'ju kontaktojnë gjithmonë, edhe kur jeni në ndonjë punë të rëndësishme. Në rast se keni nevojë për përqendrim të plotë gjatë punës, mund të zgjidhni gjithashtu të bllokoni të gjitha njoftimet. Për të parë të gjitha njoftimet e bllokuara që keni marrë gjatë kohës që keni qenë në punë, hapni qendrën e veprimit të sistemit tuaj.
Të ngjashme: Si të ndaloni pop-up-et në Windows 11
Si të aktivizoni Focus Help
Focus Assist është çaktivizuar si parazgjedhje. Por nëse doni ta aktivizoni që të ndalojë marrjen e njoftimeve, ndiqni hapat e mëposhtëm.
Metoda # 1: Përdorimi i cilësimeve
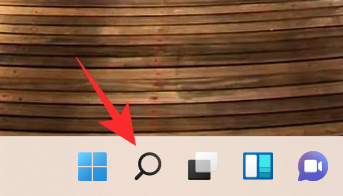
Klikoni në ikonën Search , e cila duket si një xham zmadhues në shiritin e detyrave.
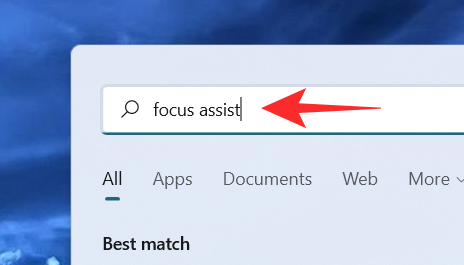
Shkruani fokusin ndihmës në shiritin e kërkimit.
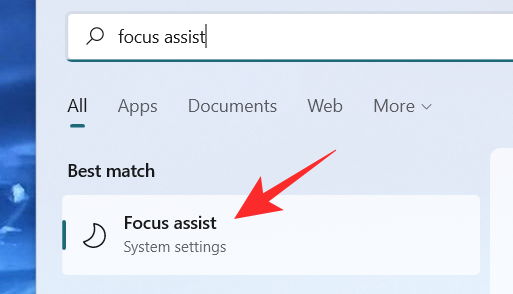
Klikoni në cilësimet e sistemit të Focus Assist .
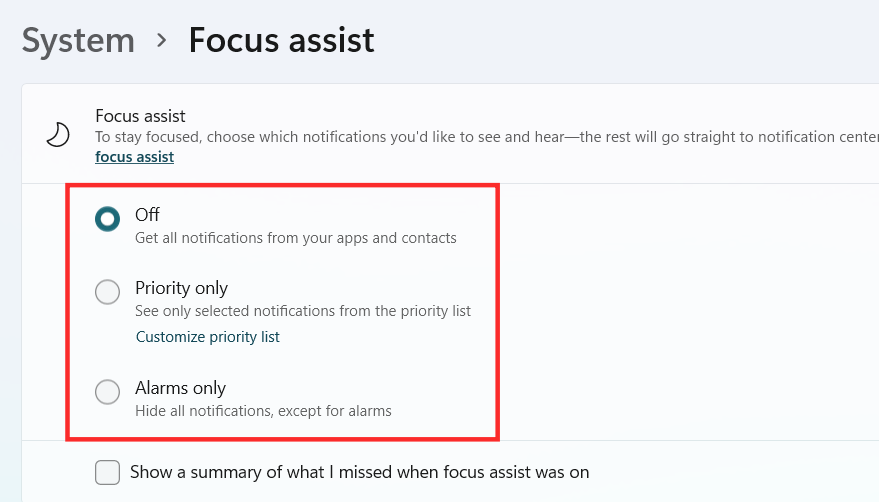
Dritarja e cilësimeve të sistemit të Focus Assist shfaqet në ekran. Nën Focus Assist , zgjidhni një nga këto opsione:
- Joaktiv – Çaktivizon funksionin Focus Assist dhe ju lejon të merrni njoftime nga aplikacionet dhe kontaktet.
- Vetëm alarmet – Ky funksion i shtyp të gjitha njoftimet, përveç alarmit.
- Vetëm prioritet – Ky funksion lejon njoftimet vetëm nga lista juaj e prioriteteve që duhet të personalizoni.
Focus Assist tani duhet të aktivizohet brenda Windows 11 në varësi të zgjedhjes që keni bërë.
Metoda #2: Përdorimi i Qendrës së Veprimit
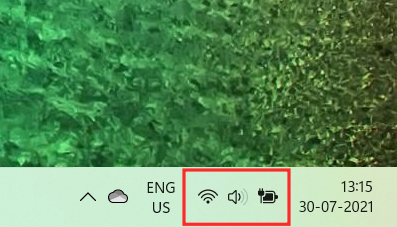
Klikoni në Qendrën e Veprimit që tregon ikonën e Wifi, volumin dhe baterinë së bashku.
Vetëm poshtë ikonës Bluetooth, mund të shihni ikonën e Focus Assist e cila duket si një gjysmëhënës.
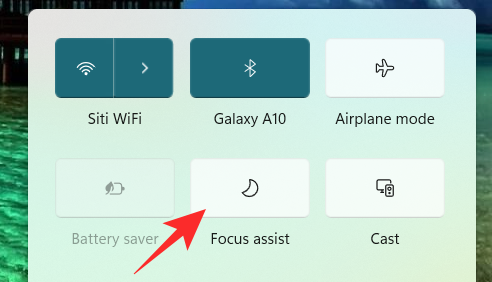
Si parazgjedhje, veçoria Focus Assist do të çaktivizohet. Klikoni mbi të dhe funksioni do të vendoset drejtpërdrejt në " Vetëm Prioritet" .
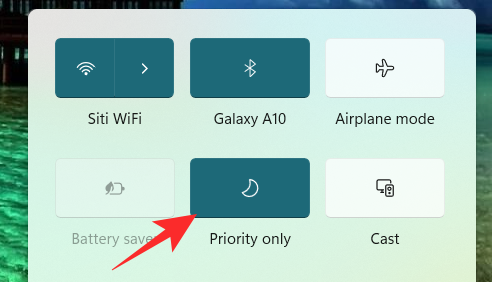
Klikoni përsëri mbi të, për të vendosur veçorinë e Focus Assist në " Vetëm Alarmet" .
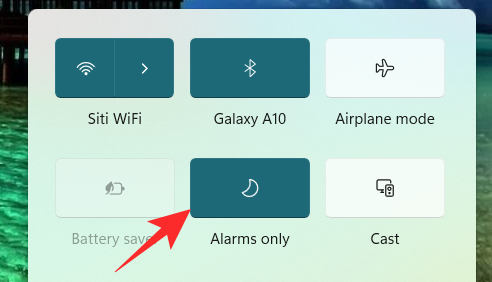
Për të çaktivizuar funksionin Focus Assist, klikoni përsëri mbi të.
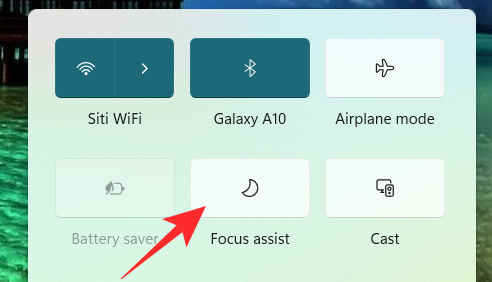
Thjesht duke klikuar në ikonën Focus Assist në Qendrën e Veprimit, mund ta ndryshoni funksionin e tij në joaktive, vetëm prioritet dhe vetëm alarme. Megjithatë, për të bërë ndryshime të tjera të nevojshme në cilësimet e Focus Assist nga Qendra e Veprimit, kliko me të djathtën në ikonën Focus Assist në Qendrën e Veprimit dhe kliko te Shko te Cilësimet .
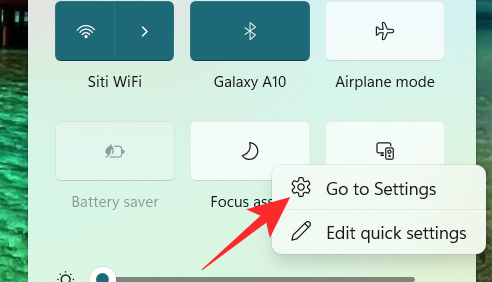
Kjo do t'ju çojë te aplikacioni "Cilësimet" ku mund të bëni lehtësisht të gjitha ndryshimet e synuara. Dhe kjo eshte! Ndihma e fokusit tani duhet të aktivizohet brenda Windows 11 direkt nga qendra e veprimit.
Metoda # 3: Përdorimi i Redaktuesit të Politikave të Grupit
Mund të aktivizoni gjithashtu modalitetin e ndihmës së Fokusit duke përdorur Redaktuesin e Politikave të Grupit në rast se jeni administrator. Përdorni udhëzuesin e mëposhtëm për t'ju ndihmuar me procesin.
Shtypni Windows + Rnë tastierën tuaj dhe shkruani sa vijon në kutinë e dialogut Run. Shtypni enter në tastierën tuaj për të hapur Redaktuesin e Politikave të Grupit.
gpedit.msc
Navigoni në nyjen e mëposhtme të përmendur më poshtë.
User configuration > Administrative Templates > Start Menu and Taskbar > Notifications
Gjeni dhe klikoni dy herë mbi vlerën "Çaktivizo orët e qeta" në të djathtën tënde.
Tani zgjidhni një nga opsionet e mëposhtme në varësi të nevojave tuaja aktuale në këndin e sipërm majtas të dritares së pronave.
- Aktivizo: Kjo do të aktivizojë Focus asistence në sistemin e zgjedhur.
- Çaktivizo: Kjo do të çaktivizojë Ndihmën e fokusimit për sistemin e zgjedhur.
Dhe kjo eshte! Ndihma e fokusimit tani do të aktivizohet ose çaktivizohet nga Redaktori i Politikave të Grupit në varësi të preferencave tuaja. Fatkeqësisht, nuk mund ta personalizoni sjelljen e ndihmës Focus si administrator. Kjo aftësi qëndron ende tek përdoruesi. Mund të aktivizoni ose çaktivizoni vetëm aftësinë për të përdorur Focus Assist për një sistem duke përdorur Redaktuesin e Politikave të Grupit.
Si të përdorni ndihmën e fokusit
Ndihma e fokusit ka cilësime të ndryshme dhe opsione personalizimi që mund t'ju ndihmojnë të ndryshoni sjelljen e saj sipas nevojave tuaja aktuale. Përdorni një nga udhëzuesit më poshtë që i përshtatet më së miri kërkesave tuaja aktuale.
Metoda # 1: Aktivizo modalitetin "Vetëm alarmet".
Modaliteti "Vetëm alarmet" në dritaren e Focus Assist ju lejon të fshehni të gjitha njoftimet përveç alarmit. Ndiqni hapat e përmendur më poshtë për të aktivizuar modalitetin "Vetëm alarmet".
Klikoni në ikonën e kërkimit në shiritin e detyrave.

Lloji Focus asistence

Klikoni në Focus Assist .

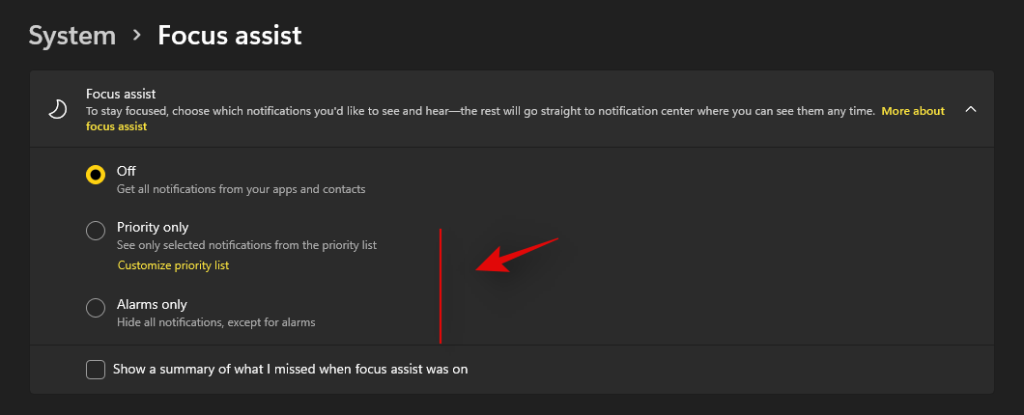
Nën Focus Assist, klikoni në Alarms Only për të ndaluar marrjen e njoftimeve, përveç alarmeve.
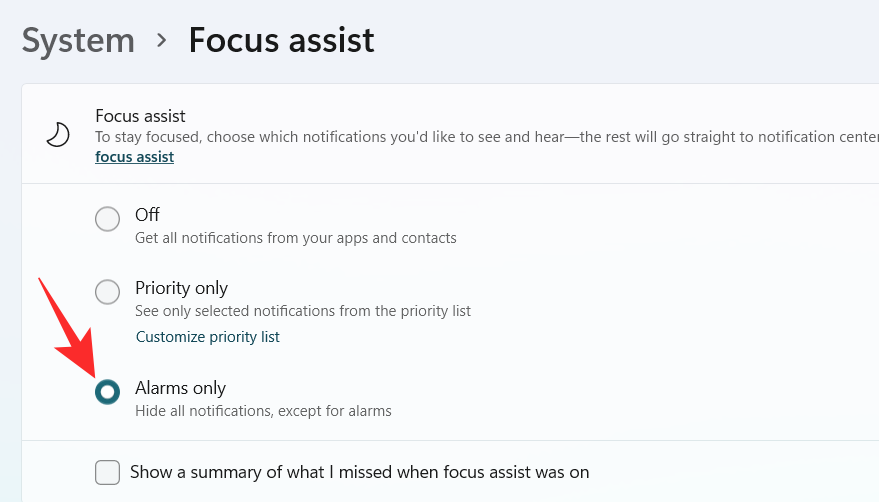
Dhe kjo eshte! Tani do të informoheni vetëm për alarmet në sistemin tuaj. Të gjitha njoftimet e tjera pa marrë parasysh prioritetin e tyre, do të mbyllen në heshtje brenda Windows 11.
Metoda # 2: Aktivizo Prioritetin vetëm me një listë të personalizuar
Njerëzit dritare do të shfaqet në ekran. Zgjidhni njerëzit tuaj të preferuar duke shkruar emrat e tyre në shiritin e kërkimit.
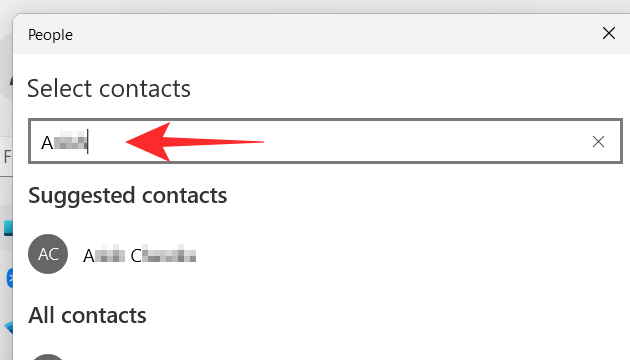
Klikoni mbi emrin e personit.
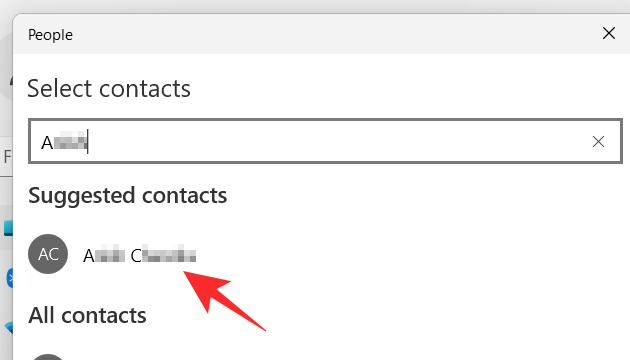
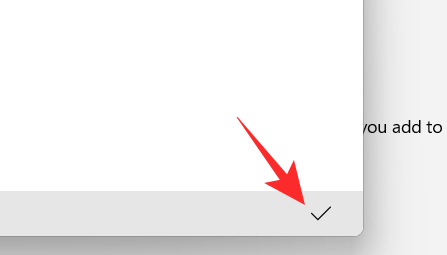
Klikoni në butonin e shënimit në këndin e poshtëm djathtas të dritares "Njerëzit".
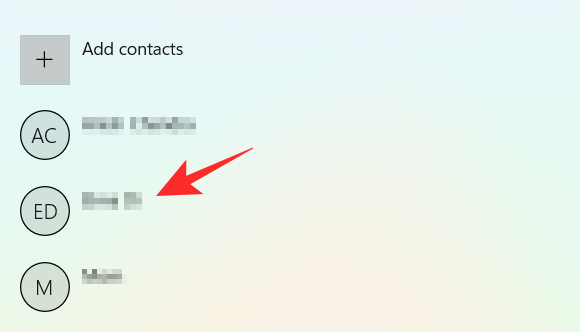
Lista juaj e prioriteteve është krijuar. Tani, nëse doni të hiqni një kontakt nga lista juaj prioritare, klikoni mbi kontaktin nën Njerëzit .
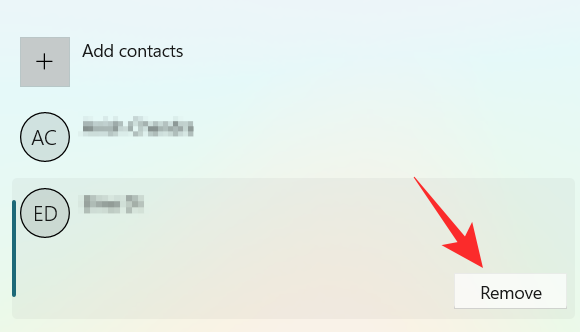
Klikoni në Hiq .
Tani, në seksionin " Aplikacionet" , mund të zgjidhni aplikacionet që mund të kalojnë orët tuaja të qeta. Për të lejuar që aplikacionet të shfaqin njoftime, klikoni në butonin Shto një aplikacion .
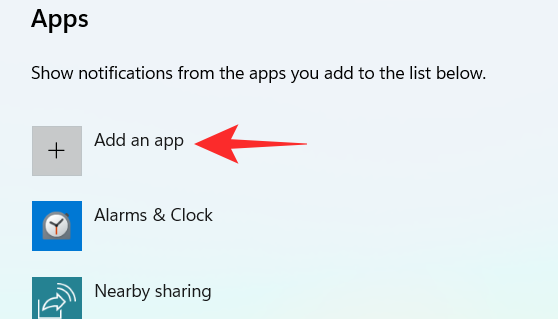
Një listë e aplikacioneve shfaqet në ekranin tuaj. Klikoni në aplikacionin që dëshironi të shtoni në listën tuaj të prioriteteve.
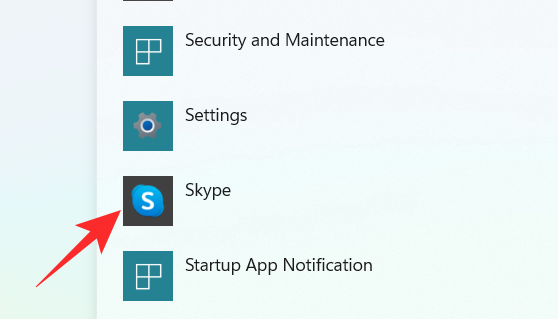
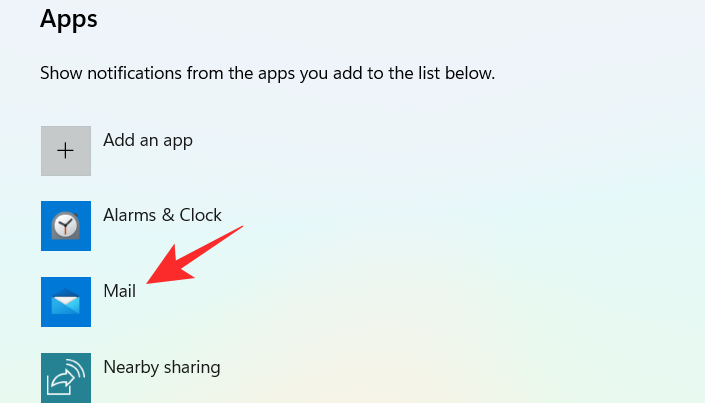
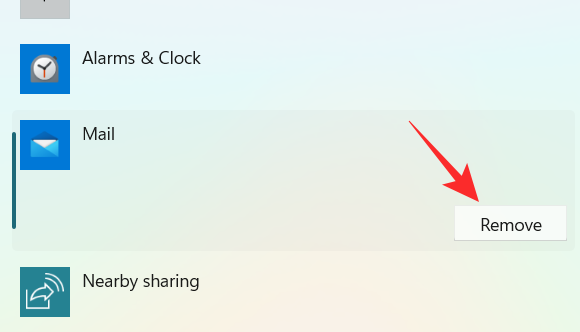
Vazhdoni këtë proces derisa të keni mbaruar zgjedhjen e aplikacioneve. Në rast se dëshironi të hiqni një aplikacion nga lista juaj prioritare, thjesht mund të klikoni në aplikacionin nën seksionin e aplikacionit .
Klikoni në Hiq .
Dhe kështu mund ta personalizoni listën e prioriteteve në Focus Help dhe ta përdorni atë në avantazhin tuaj për të marrë njoftime vetëm nga kontakte të rëndësishme.
Metoda #3: Aktivizo përmbledhjen e njoftimeve kur Focus Assist është i çaktivizuar
Klikoni në ikonën e kërkimit në shiritin e detyrave.

Lloji Focus asistence

Klikoni në Focus Assist .

Klikoni në opsionin tuaj të dëshiruar Vetëm Prioritet ose Vetëm Alarmet .
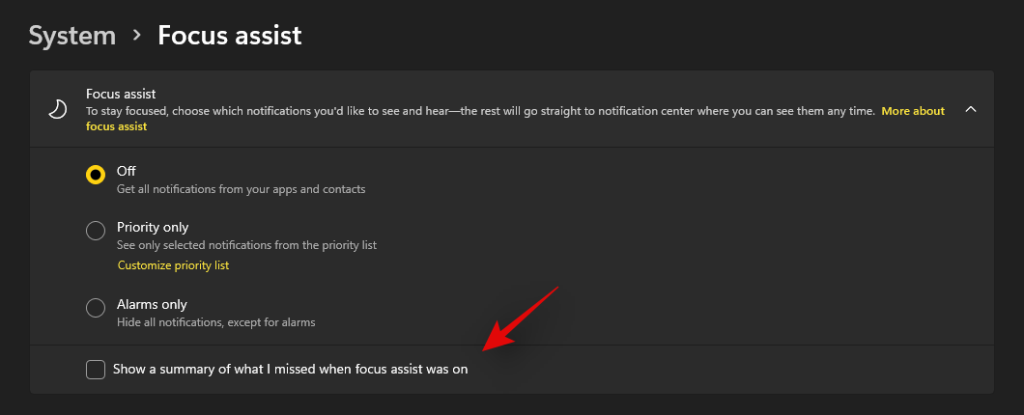
Zgjidhni kutinë Trego një përmbledhje të asaj që humba kur Fokusimi ishte aktiv .
Metoda # 4: Aktivizo ose çaktivizo rregullat e ndihmës automatike të Fokusit
Rregullat automatike në Focus Assist ju lejojnë të përcaktoni kushtet që mund të aktivizojnë automatikisht Ndihmën e Fokusit. Ekzistojnë katër rregulla të ndryshme automatike në dritaren e cilësimeve të Focus Assist që mund të personalizohen. Shikoni hapat e përmendur më poshtë për të personalizuar rregullat automatike në Focus Assist.
Klikoni në ikonën e kërkimit në shiritin e detyrave.

Lloji Focus asistence

Klikoni në Focus Assist .

Në seksionin e rregullave automatike , ka katër seksione. Aktivizoni çelësin e ndërrimit për opsionin që dëshironi të zgjidhni.
- Gjatë këtyre kohërave – Ky funksion ju lejon të caktoni një interval kohor të caktuar në varësi të cilës funksioni Focus Assist ndizet ose fiket automatikisht.
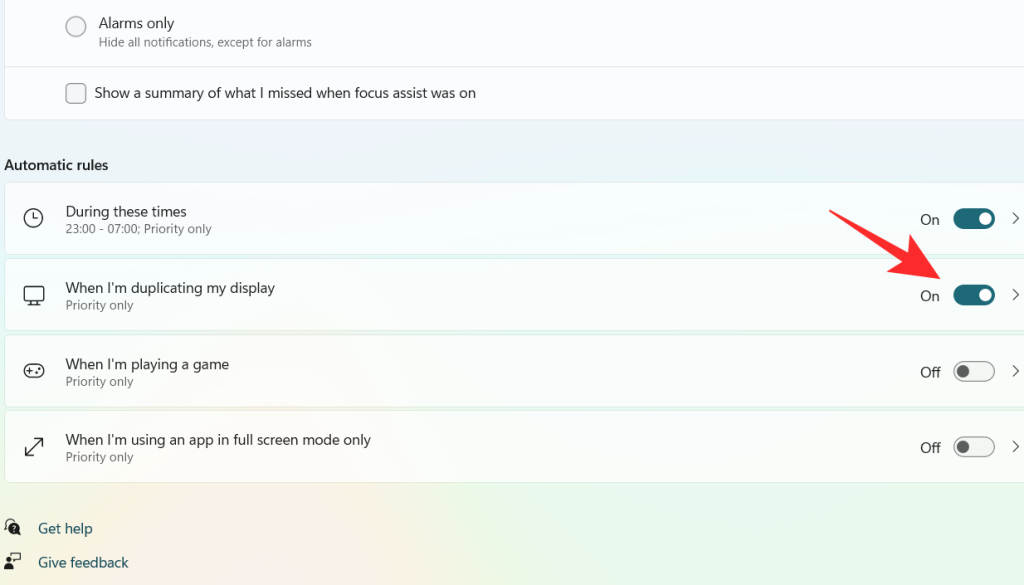
- Kur po kopjoj ekranin tim – Ky funksion aktivizon automatikisht Focus Assist kur zbulon se ekrani juaj po ndahet. Ky funksion mund të përdoret veçanërisht për të parandaluar shfaqjen e njoftimeve kur jeni në mes të një prezantimi.
- Kur jam duke luajtur një lojë – Ndërsa jeni duke luajtur lojëra në modalitetin e ekranit të plotë, ky funksion lejon Focus Assist të shtypë njoftimet që të mos shfaqen në ekran.
- Kur përdor një aplikacion vetëm në modalitetin e ekranit të plotë – Ky funksion mundëson që Focus Assist të aktivizohet automatikisht kur zbulon se po përdorni një aplikacion në modalitetin e ekranit të plotë. Nuk do të merrni asnjë njoftim derisa të hapni një aplikacion në modalitetin e ekranit të plotë.
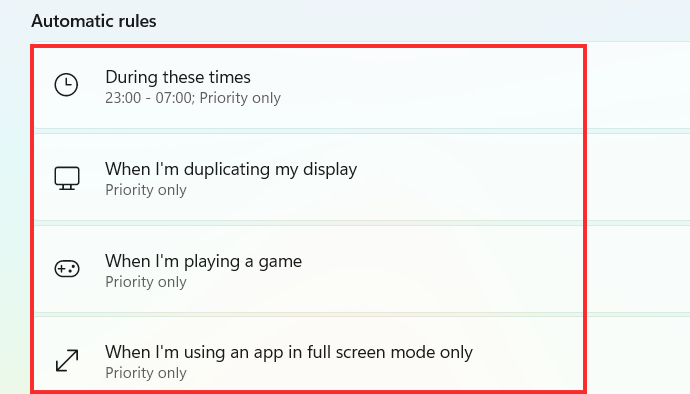
Tani, le të hedhim një vështrim se si të personalizojmë opsionet e sipërpërmendura nën Rregullat Automatike.
1. Gjatë këtyre kohërave
Aktivizoni çelësin e ndërrimit, i cili është skaji djathtas në skedën Gjatë këtyre kohërave .
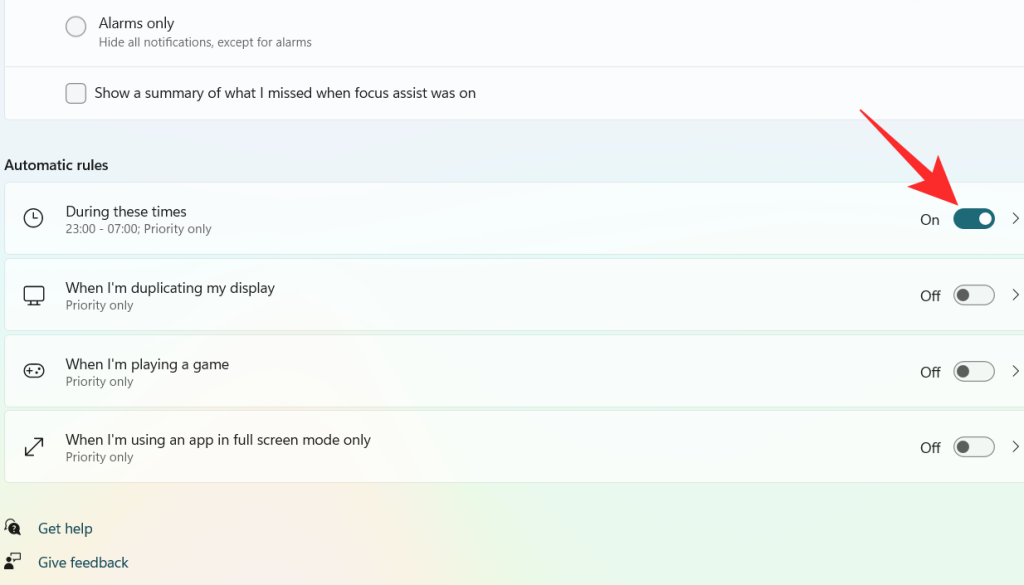
Klikoni në skedën Gjatë këtyre kohërave .
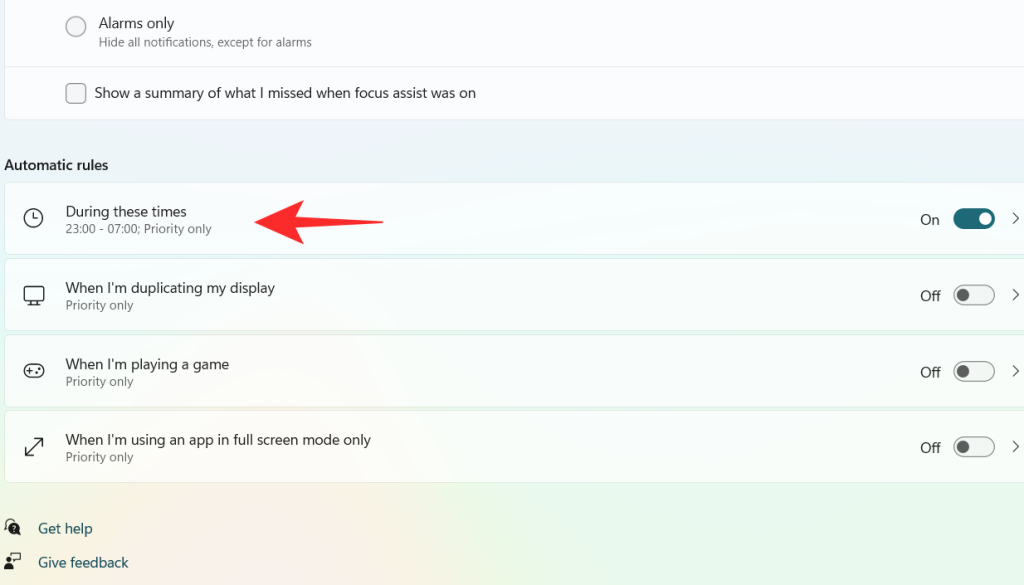
Klikoni në kutinë nën Ora e fillimit .
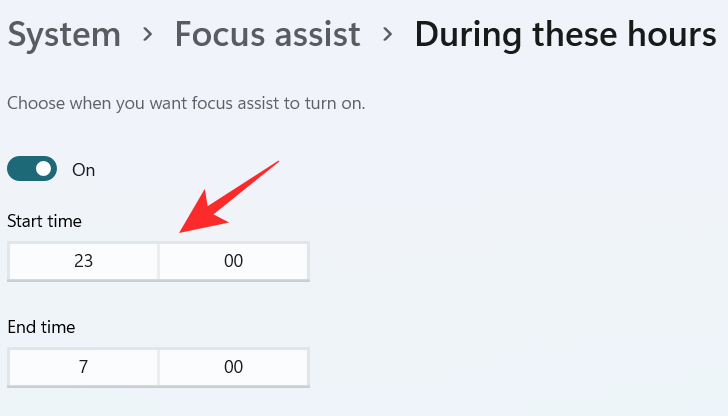
Zgjidhni kohën kur dëshironi që Focus Assist të aktivizohet dhe klikoni në shenjën në fund të menysë rënëse.
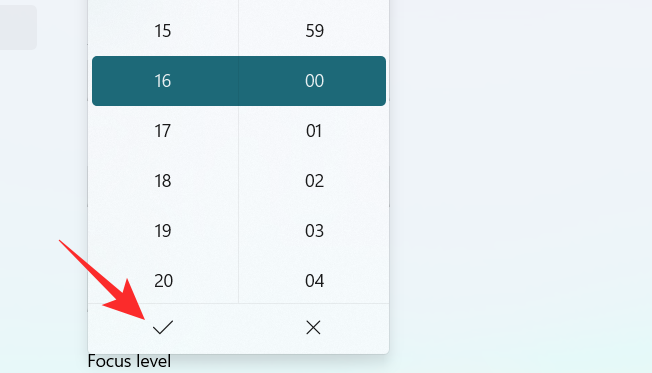
Klikoni në kutinë nën Koha e përfundimit .
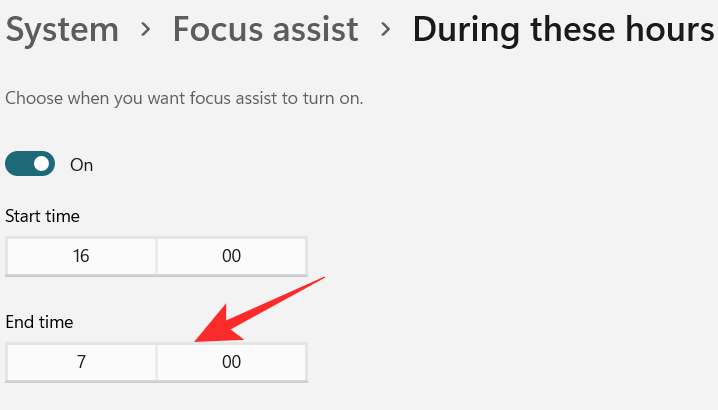
Zgjidhni kohën kur dëshironi që Focus Assist të fiket dhe klikoni në shenjën në fund të menysë rënëse.
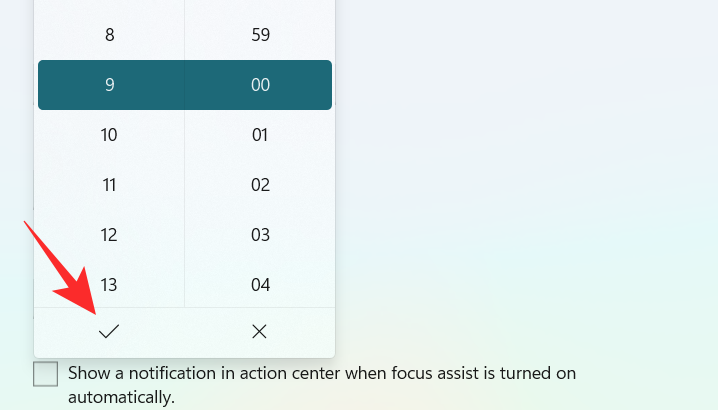
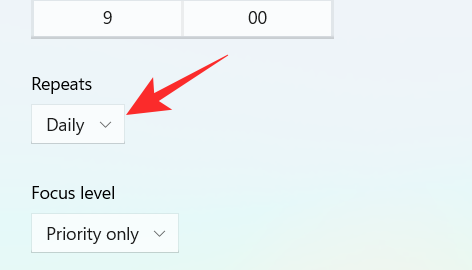
Klikoni në kutinë nën Përsëritjet .
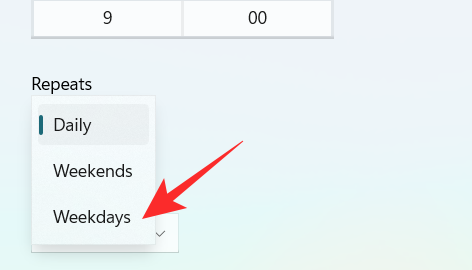
Shfaqet një menu e vogël rënëse. Cakto orarin në Ditore, Fundjavë ose Ditë të Javës .
Klikoni në kutinë nën nivelin e fokusit .
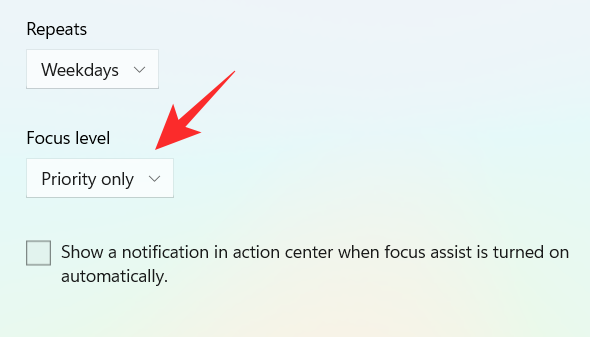
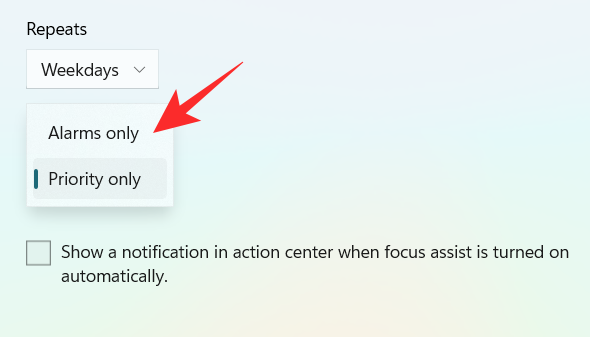
Shfaqet një menu e vogël rënëse. Zgjidhni midis " Vetëm alarm" ose " Vetëm me përparësi" .
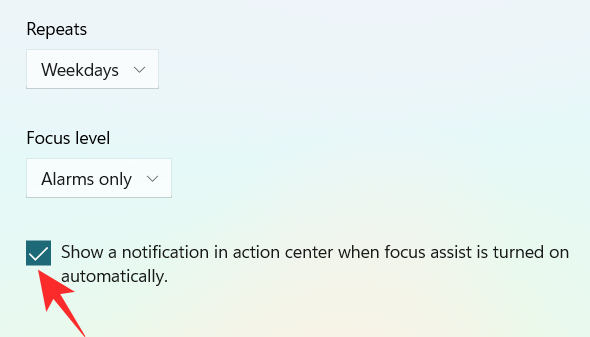
Së fundi, për të marrë një njoftim kur Ndihma e Fokusimit është e ndezur, kontrolloni kutinë " Shfaq një njoftim në qendrën e veprimit kur Ndihma e fokusimit aktivizohet automatikisht ".
2. Kur po kopjoj ekranin tim
Aktivizoni çelësin e ndërrimit, i cili është ekstremi djathtas në skedën Kur po dubliko ekranin tim .
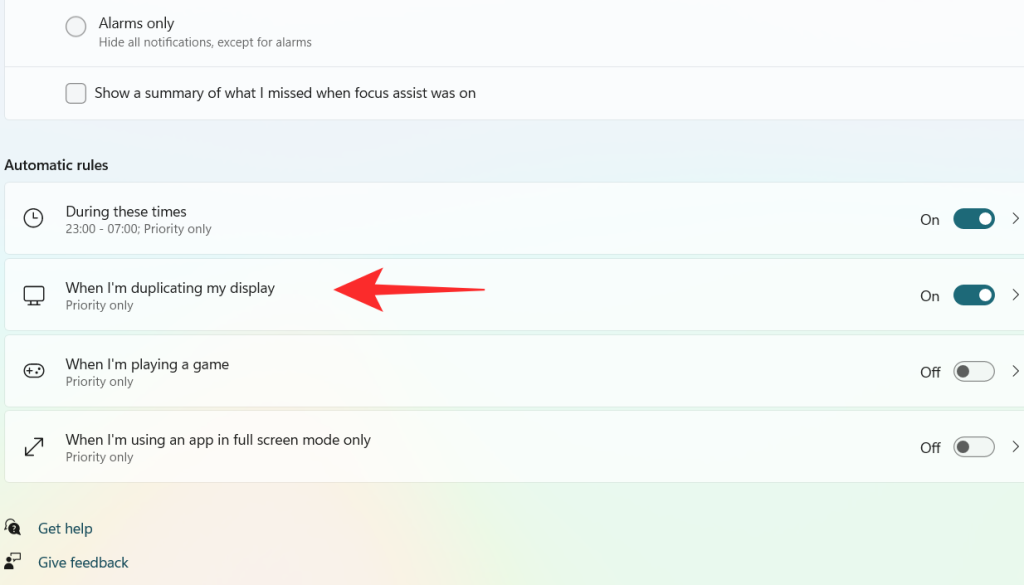
Klikoni në skedën Kur po dubliko ekranin tim .
Klikoni në kutinë nën nivelin e fokusit .
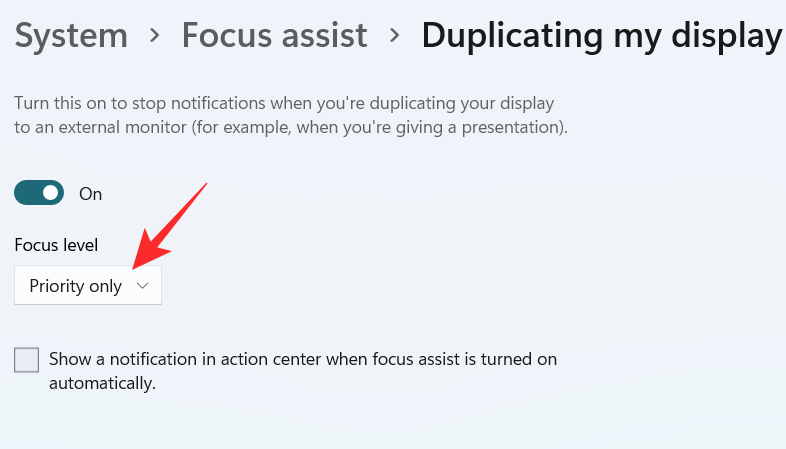
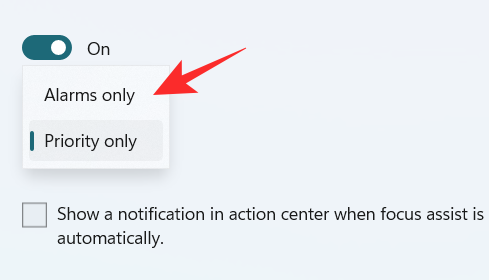
Shfaqet një menu rënëse, klikoni në opsionin tuaj të dëshiruar midis " Vetëm Prioriteti" dhe " Vetëm Alarmet" .
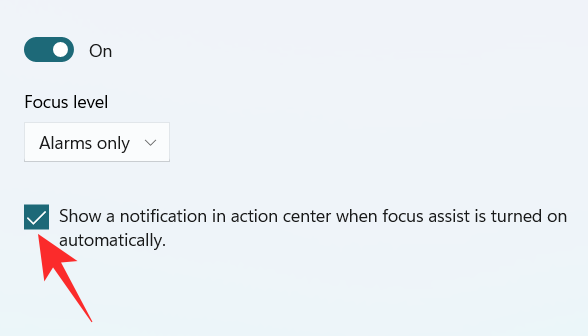
Për të marrë një njoftim kur Ndihma e Fokusimit është e ndezur, kontrolloni kutinë " Shfaq një njoftim në qendrën e veprimit kur Ndihma e fokusimit aktivizohet automatikisht "
3. Kur jam duke luajtur një lojë
Aktivizoni çelësin e ndërrimit, i cili është ekstremi djathtas në skedën Kur jam duke luajtur një lojë .
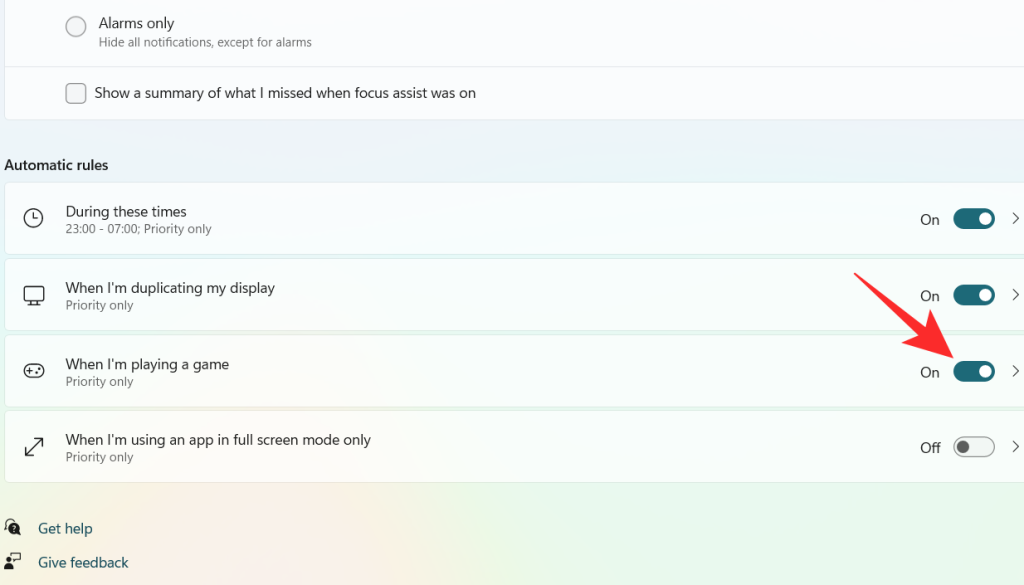
Klikoni në skedën Kur jam duke luajtur një lojë
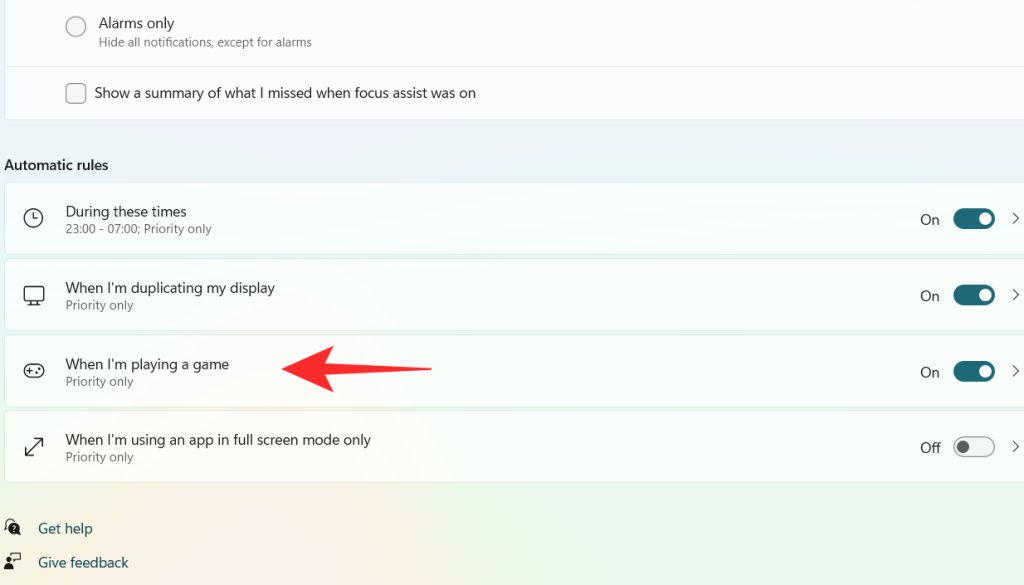
Klikoni në kutinë nën Niveli i fokusit .
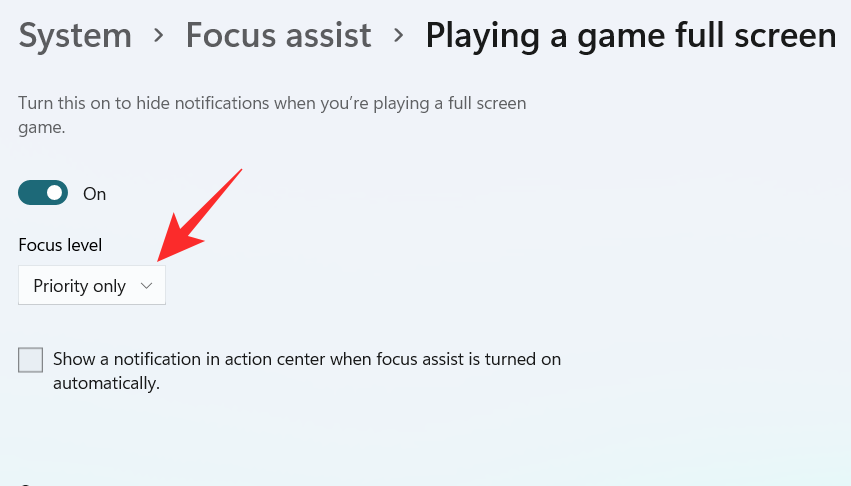
Shfaqet një menu rënëse, klikoni në opsionin tuaj të dëshiruar midis " Vetëm Prioriteti" dhe " Vetëm Alarmet" .

Për të marrë një njoftim kur Ndihma e Fokusimit është e ndezur, kontrolloni kutinë " Shfaq një njoftim në qendrën e veprimit kur Ndihma e fokusimit aktivizohet automatikisht "

4. Kur përdor një aplikacion vetëm në modalitetin e ekranit të plotë
Aktivizoni çelësin e ndërrimit, i cili është ekstremi djathtas në skedën Kur po përdor një aplikacion vetëm në modalitetin e ekranit të plotë .
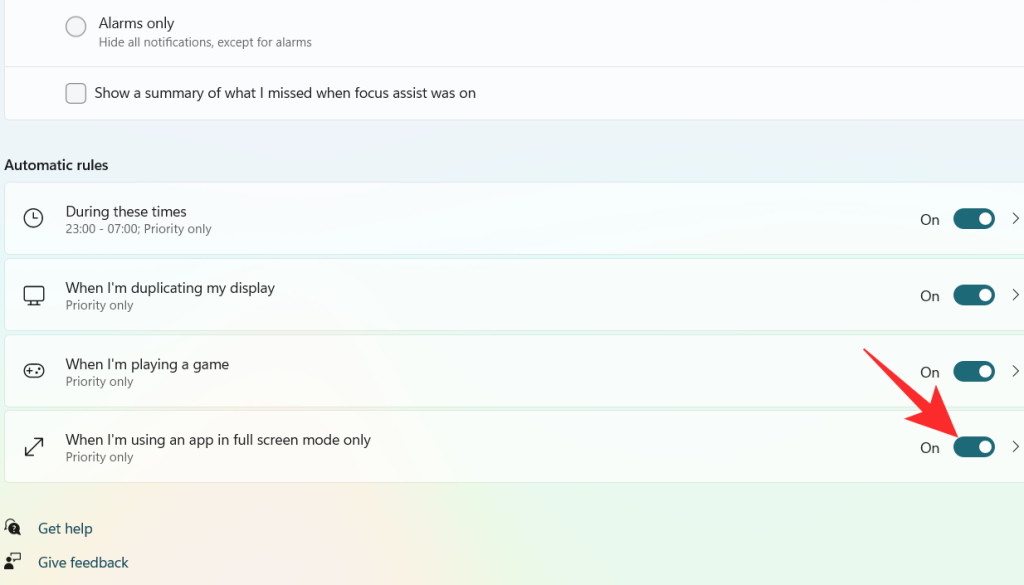
Click on the When I’m using an app in full-screen mode only tab
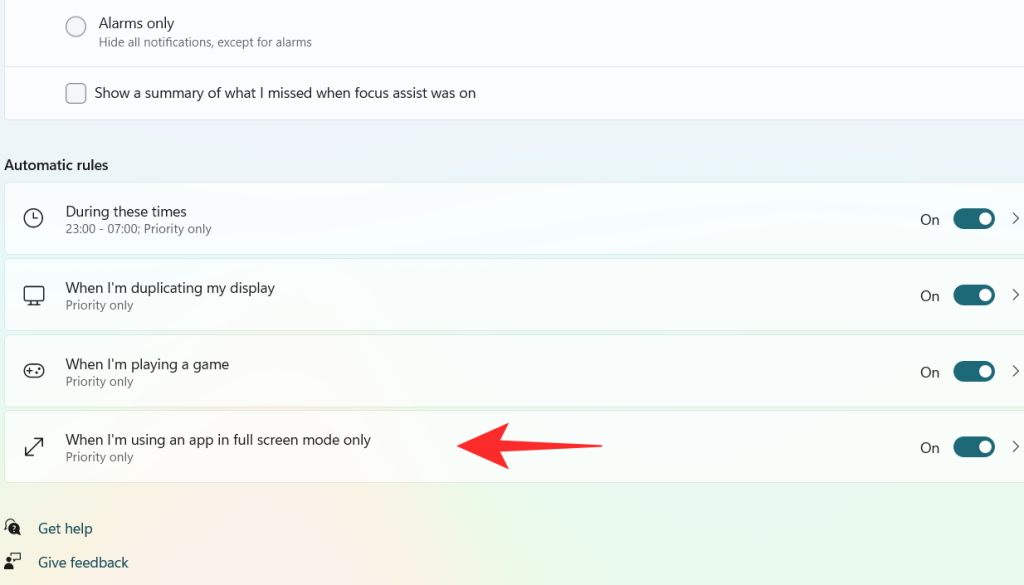
Click on the box under Focus Level.
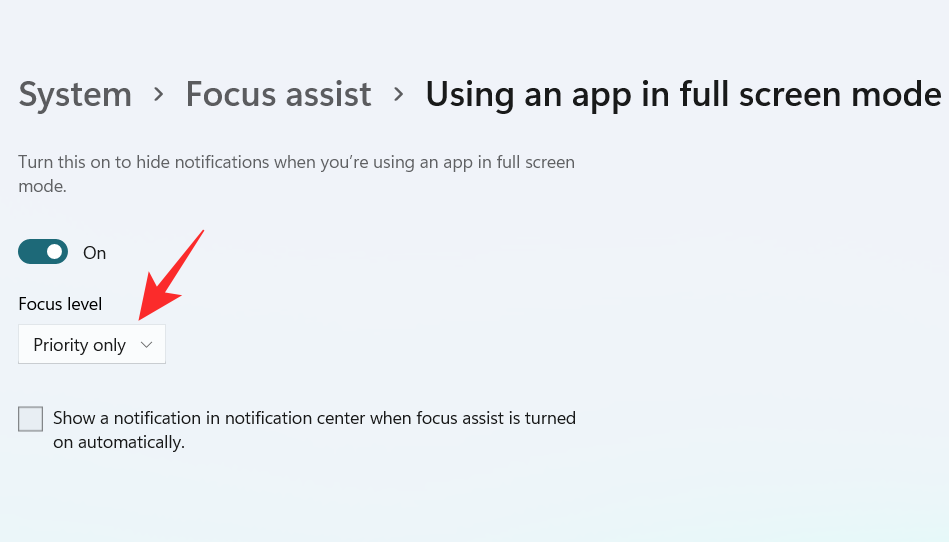
A dropdown menu appears, click on your desired option between Priority only and Alarms only.

To get a notification when the Focus assist is turned on, check the box “Show a notification in action center when Focus assist is turned on automatically“.

Using the above customizations, you can schedule and control Focus assist’s behavior according to your workflow for maximum efficiency no matter the task at hand.
Can you remove the Focus Assist icon from the Action Center?
Yes, you can easily remove the Focus Assist icon from the Action Center. Windows 11 brings a host of new cosmetic and UI changes and one of them has been the ability to customize your action center. You can now add or remove icons from the action center depending on your needs and opt for a more minimal or productive look depending on your workflow.
For now, you can only add and remove certain system modules but in the future, some users expect Microsoft to add the support for third-party apps as well. This would be a much welcome change that would allow you to manage dedicated system settings managed by third-party apps directly from your action center.
Customize your Focus assist icon in the action center
Depending on your current needs you can either remove or add the Focus assist module to the action center. Use one of the guides below depending on your current requirements.
1. Remove it
Click on the Action Center which shows the icon of Wifi, volume, and battery together.

Right-click on an empty place or on any icon and click on Edit quick settings.
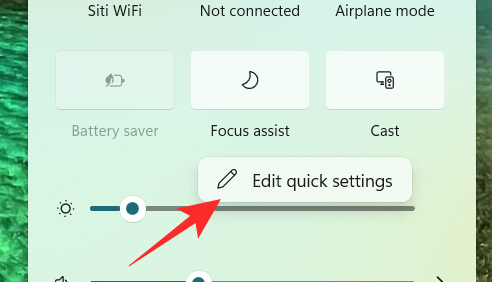
Click on the unpin symbol at the top right corner of the Focus Assist icon to remove the Focus Assist icon from the Action Center.
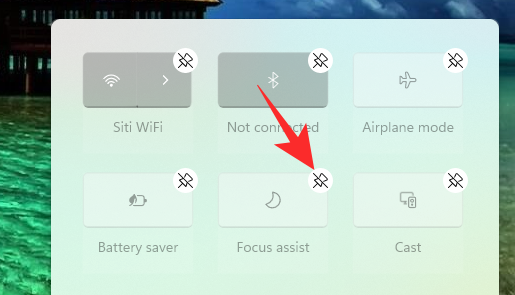
The Focus assist module should now have been removed from your action center. If not, we recommend you restart explorer.exe or your PC for the changes to take effect.
2. Restore it
Click on the Action Center which shows the icon of Wifi, volume, and battery together.

Right-click on an empty place or on any icon and click on Edit quick settings.
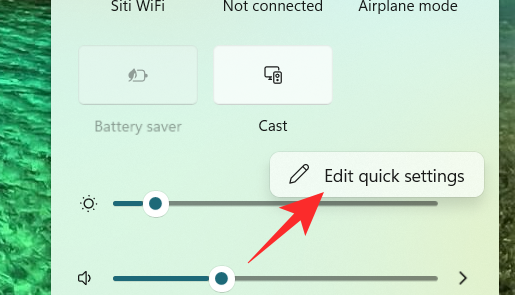
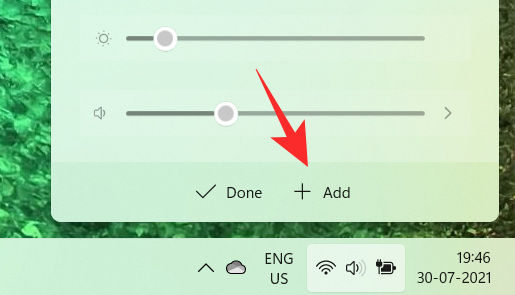
Now, click on the Add button at the bottom of the action center.
A list of different settings appears. Click on Focus Assist from the list and you will get to see the Focus Assist icon on the Action Center again.
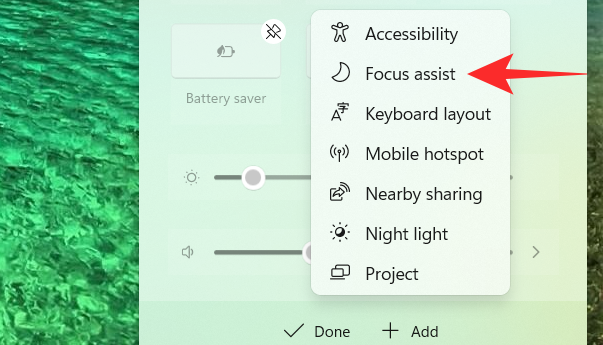
And that’s how you can add the Focus assist module back in the action center.
Focus assist keeps turning on automatically Issue: How to fix
If Focus assist keeps turning on automatically then there could be a couple of reasons for this behavior. Depending on its cause we can either fix it or use a workaround to manage the issue. Let’s find out why Focus assist keeps turning on automatically on your system.
Fix #1: Check Automatic Rules
Are you having this issue when projecting to a secondary display? Or when sharing your screen with a public computer? Then it is likely that focus assist is getting turned on automatically due to the default automatic rules in Windows 11.
By default, focus assist will silence all notifications in such scenarios to help maintain your privacy. But this can be counterproductive in case you are just trying to use a bigger display from a portable system like a laptop or an NUC.
It could also be that scheduled Focus assist was turned on your system by mistake which will enable and disable Focus assist automatically during certain hours. If any of these situations sounds like what you are facing then you can use the guide below to disable all automatic rules that enable Focus assist during certain scenarios and workflows on Windows 11. Let’s get started.
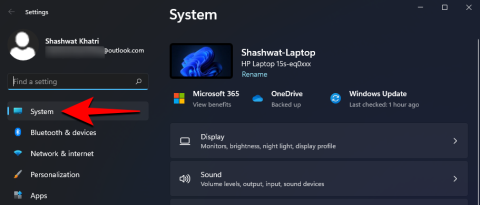
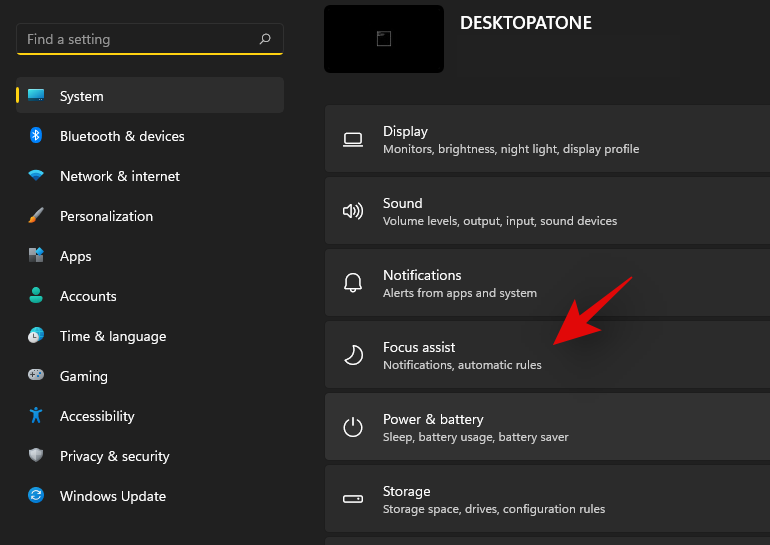
Press Windows + i on your keyboard to open the Settings app. Ensure ‘System’ is selected on your left and then click on ‘Focus Assist’ on your right.
Go down to automatic rules and turn off the following toggles.
- During these times
- When I’m duplicating my display
- When I’m playing a game
- When I’m using an app in full-screen mode only
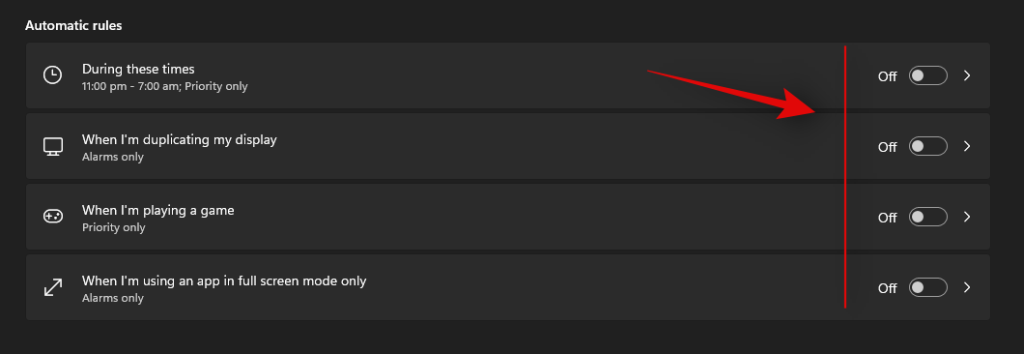
Once these rules are disabled, Windows 11 will not turn on Focus assist automatically on your system.
Fix #2: Turn of GeForce Overlay
This is another way to solve Focus assist misbehaving on your system. If you have a dGPU from Nvidia and are using the GeForce experience app then we recommend disabling its overlay option and restarting your system. With the automatic rule for ‘When I’m using an app in full-screen mode only’ turned on, Windows will mistake the Nvidia overlay detection on your desktop for a full-screen app which will trigger the Focus assist settings in return. You can also disable this automatic rule in case you wish to keep the Geforce Experience overlay enabled on your system.
Focus assist greyed out, option missing or not working; How to fix
Is the focus assist option missing from Windows 11 settings app? Is the module greyed out in the action center? This is a known bug that shows up occasionally with every feature update of Windows. Even certain versions of Windows 10 faced huge issues with this bug until a fix was released.
Fix #1: Enable in Group Policy Editor
If Focus assist seems to be missing from your system then it is likely disabled using the group policy editor. If your PC is managed by your organization or your workplace then it is likely disabled by your administrator. If you have access to the group policy editor then you can use the guide below to enable focus assist on your system. However, in case you have limited access, then you might need to get in touch with your administrator to enable Focus assist on your system.
Press Windows + R on your keyboard to bring up the Run dialog box and type in the following command to launch the Group Policy Editor. Click on ‘Ok’ once you are done.
gpedit.msc
Navigate to the following node.
User configuration > Administrative Templates > Start Menu and Taskbar > Notifications
Double click on ‘Turn off Quiet Hours’ on your right.
Click and select ‘Disabled’ in the top left corner.
Click on ‘Ok’ to save your changes.
And that’s it! Focus assist should now be enabled on your system in case it was disabled using the group policy editor.
Fix #2: Reinstall and repair default Windows UWP apps and system apps
If Focus assist is still missing from your system then let’s check if all the necessary apps and utilities are installed properly on your system. Use the guide below to check and repair Windows 11’s basic apps and functionality on your system.
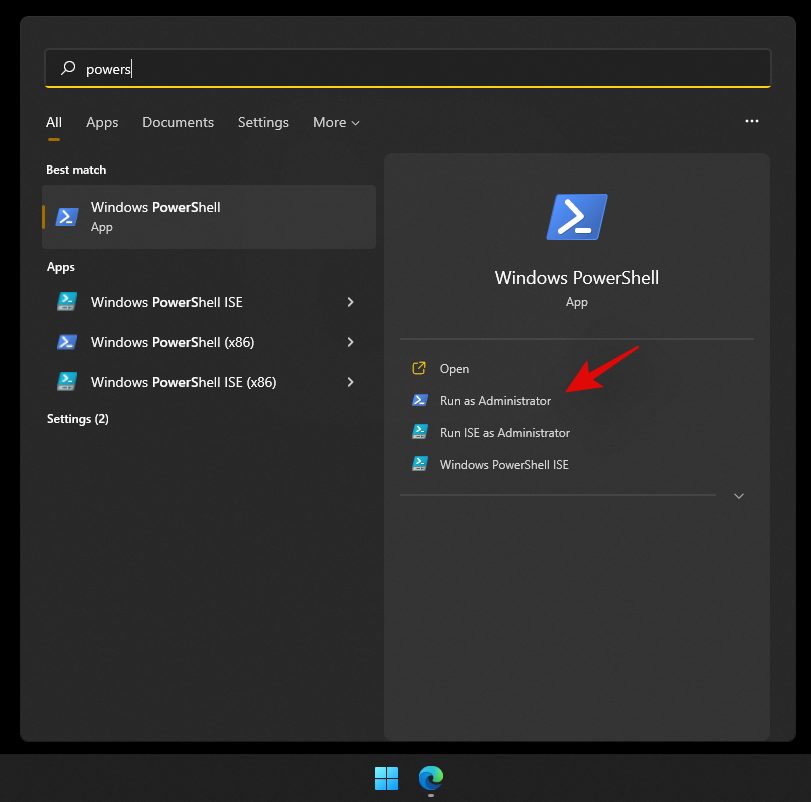
Press Windows + S and search for PowerShell. Click on ‘Run as administrator’ once it shows up in your search results.
Once PowerShell is launched, execute the following command to reinstall all UWP apps and check and repair other default utilities required by Windows 11 in the background.
Get-AppXPackage -AllUsers | Foreach {Add-AppxPackage -DisableDevelopmentMode -Register "$ ($ _. InstallLocation) \ AppXManifest.xml"}

Wait for the process to finish and restart your PC for good measure. If Focus assist was corrupted or missing from your system, then this fix should help solve all your issues.
Fix #3: Check for a Windows Update
Haven’t updated in a while? We recommend checking for recent Windows Updates. While updates rarely disable major features like Focus assist, a new feature update installation can help refresh your registry, fix mismatched values and more importantly iron out bugs that could be preventing you from accessing Focus assist on your system. Use the guide below to check for recent Windows updates on your system.
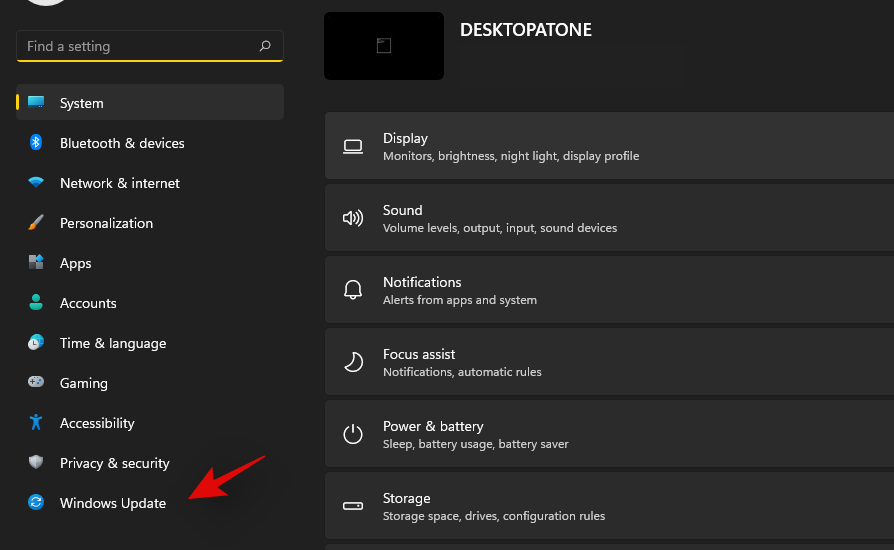
Press Windows + i on your keyboard to open the Settings app and click on ‘Windows Update’ on your left.
Click on ‘Check for updates’.

In case any new updates show up, let them install on your system and restart if prompted. In case you are using a metered connection then you will need to click on ‘Download now’ manually to avoid any unexpected data charges.
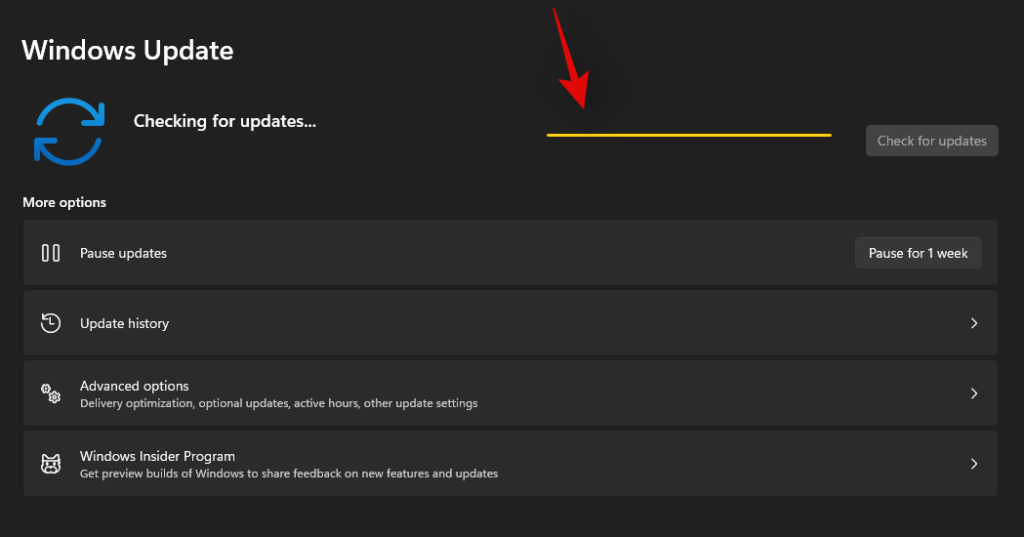
Once the necessary Windows updates are installed on your system, Focus assist should be restored in your action center and the Settings app.
Last Resort: Reset your PC
If Focus assist is still missing from your PC then this indicates a corrupted Windows installation on your system. The best way to fix this without wasting much time on troubleshooting would be to simply reset your PC while keeping all your files intact. This will refresh the entire Windows 11 installation and reinstall all the apps which should help restore functionality for all Windows features including Focus assist. Follow the guide below to reset your PC while keeping your files.
Note: The reset process will remove all installed applications and only retain files stored manually on your local storage. A list of all the removed apps will be available in .txt format on your desktop once your PC has been reset.
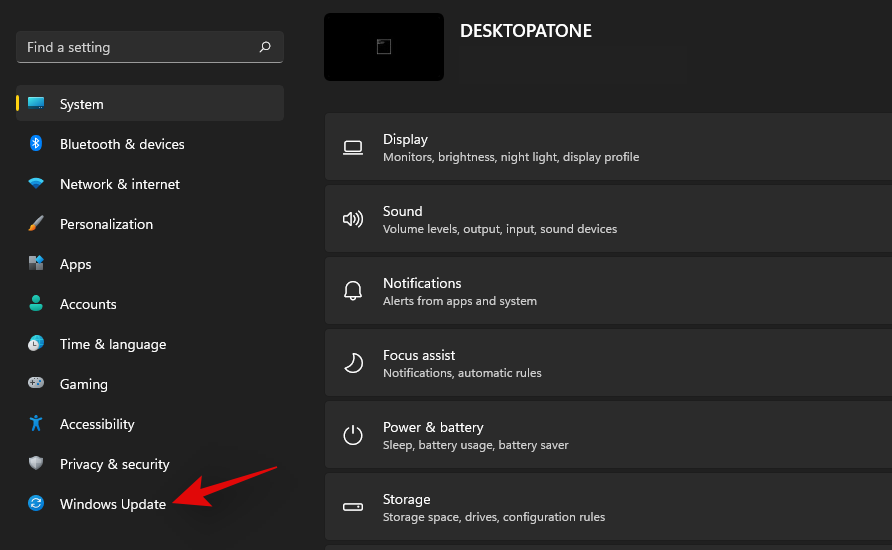
Press Windows + i on your keyboard and click on ‘Windows Update’ on your left.
Click on ‘Advanced options’.
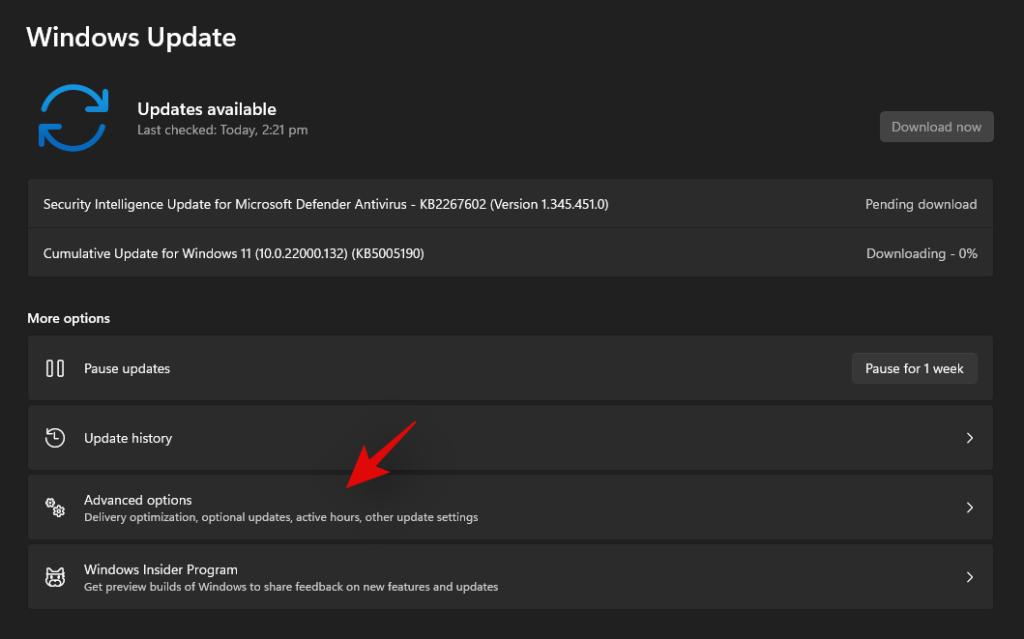
Click and select ‘Recovery’.
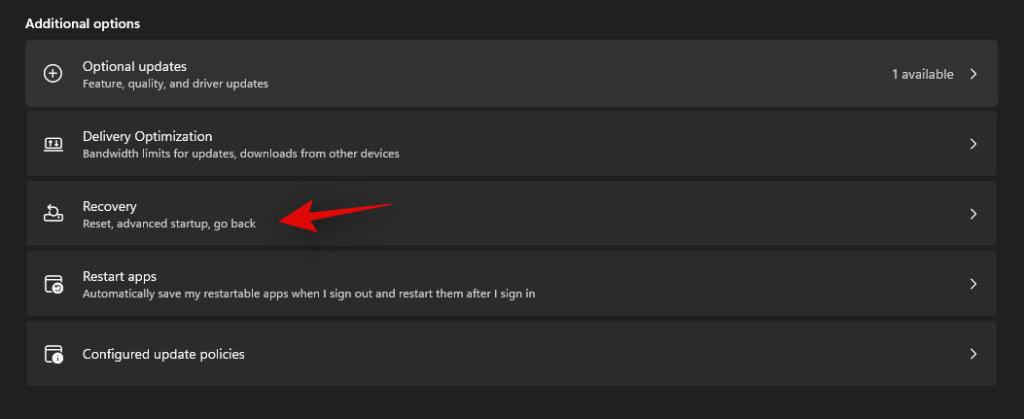
Click on ‘Reset PC’ beside Reset this PC.

Click on ‘Keep my files’.
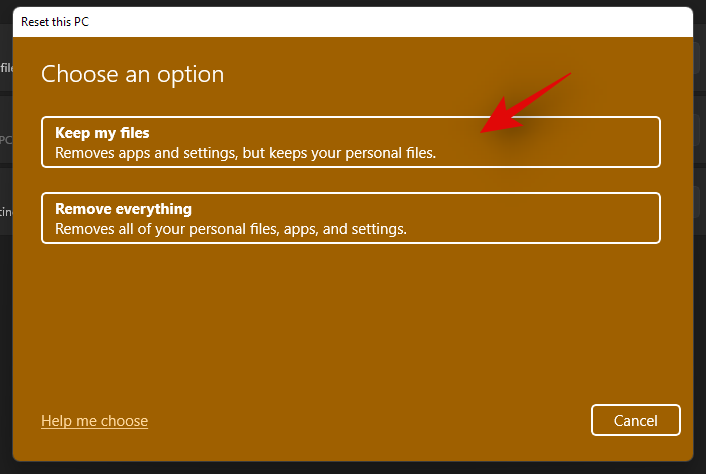
Windows will now process all the files on your local storage. Click on ‘Reset’.
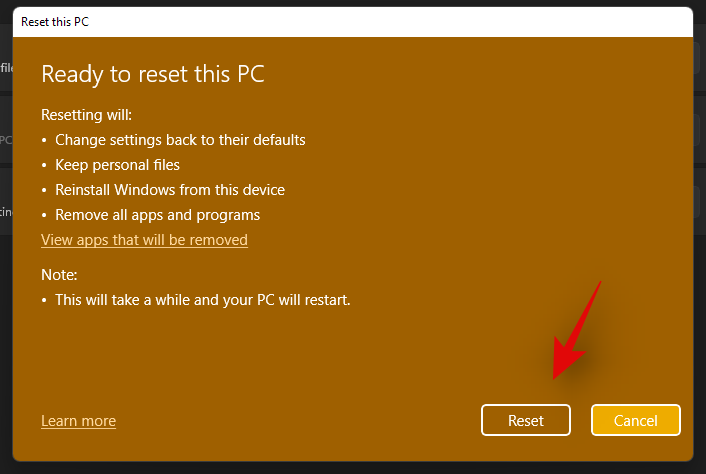
Note: If you are using Windows 11 Pro or higher then you will get the option to use a local installation/recovery media to reinstall Windows 11 as well. However, this option will be missing for Windows 11 Home users.
Windows will now reset your PC while retaining all your files. Your PC will restart several times during this process. This is completely normal and you should let Windows do its thing. If you are using a laptop or a portable NUC, then ensure that your unit is plugged into the power at all times during this process.
How to turn off Focus assist permanently
Do you wish to turn off Focus assist permanently in all scenarios? Then you can use the guide below to do so. The best way to disable Focus assist is by using the group policy editor. But in case you are using Windows 11 Home Edition, then you can use the first method in this guide to disable Focus assist permanently.
Method #1: Disable all settings and rules
Once you disable all the settings and rules for Focus assist, the feature should be turned off automatically on your system. Use the guide below to get you started.
Press Windows + i on your keyboard to open the Settings app and click on ‘Focus assist’ on your right.

Click and select ‘Off’ at the top.
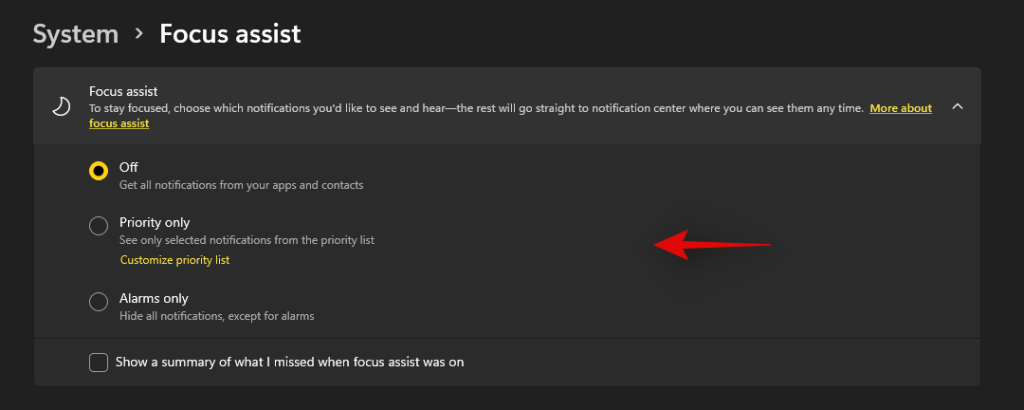
Uncheck the box for ‘Show a summary of what I missed when focus assist was on’.

Subsequently, disable all the toggles under ‘Automatic rules’ as shown below.

We also recommend turning off notifications for unnecessary apps using the guide after this section to avoid unnecessary notifications from interrupting you when focus assist is disabled.
Method #2: Using Group Policy Editor
The group policy editor will permanently disable focus assist on your system and even prevent you from accessing it in your settings. However, this method will only work on Windows 11 Pro or higher versions. In case you have the Windows 11 home edition, you can use the guide above to disable Focus assist instead.
Press Windows + R and type in the following to open Froup Policy EDitor. Click on ‘Ok’ once done.
gpedit.msc
Navigate to the following node.
User configuration > Administrative Templates > Start Menu and Taskbar > Notifications
Find and double-click on ‘Turn on Quiet Hours’ on your right.
Select ‘Enabled’ in the top left and click on ‘Ok’.
Focus assist will now be permanently disabled on the selected system. We recommend you restart your system or explorer.exe in case the changes do not take place immediately.
Is there any other way to disable notifications?
Yes, you can disable notifications individually on a per-app basis in Windows 11 to customize the notifications you receive. This is another way to ensure that you are only notified about the apps and notifications that you intended. Customizing your notifications this way will also allow you to retain the full functionality of the focus assist mode without having to disable certain rules to avoid mismatched scenarios in your workflow.
However, the only downside to managing your notifications this way is that you have to keep enabling and disabling notifications for apps every few months depending on your new installs and uninstalls. You can use the guide below to disable notifications on a per-app basis in Windows 11.
Disable notifications permanently on a per-app basis
Here’s how you can disable notifications on a per-app basis in Windows 11.
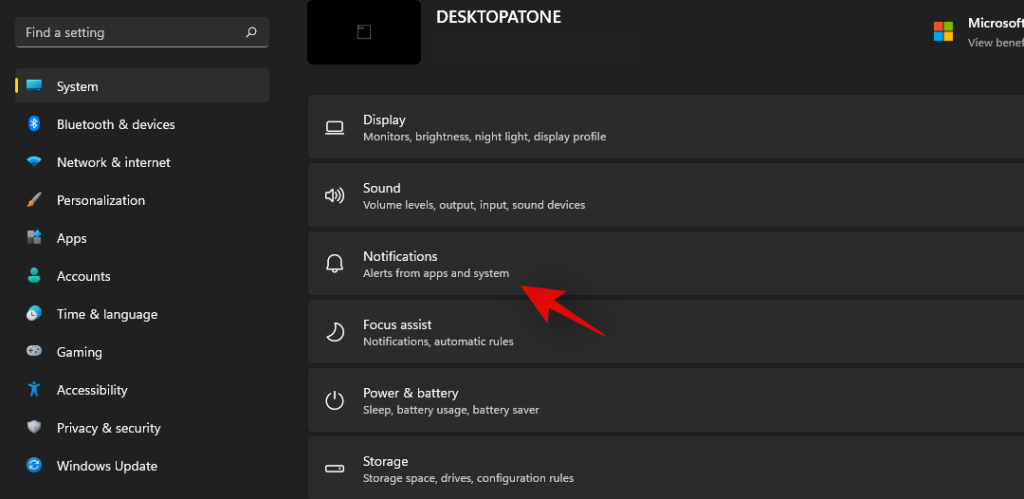
Press Windows + i on your keyboard to open the Settings app and then click on ‘Notifications’ on your right.
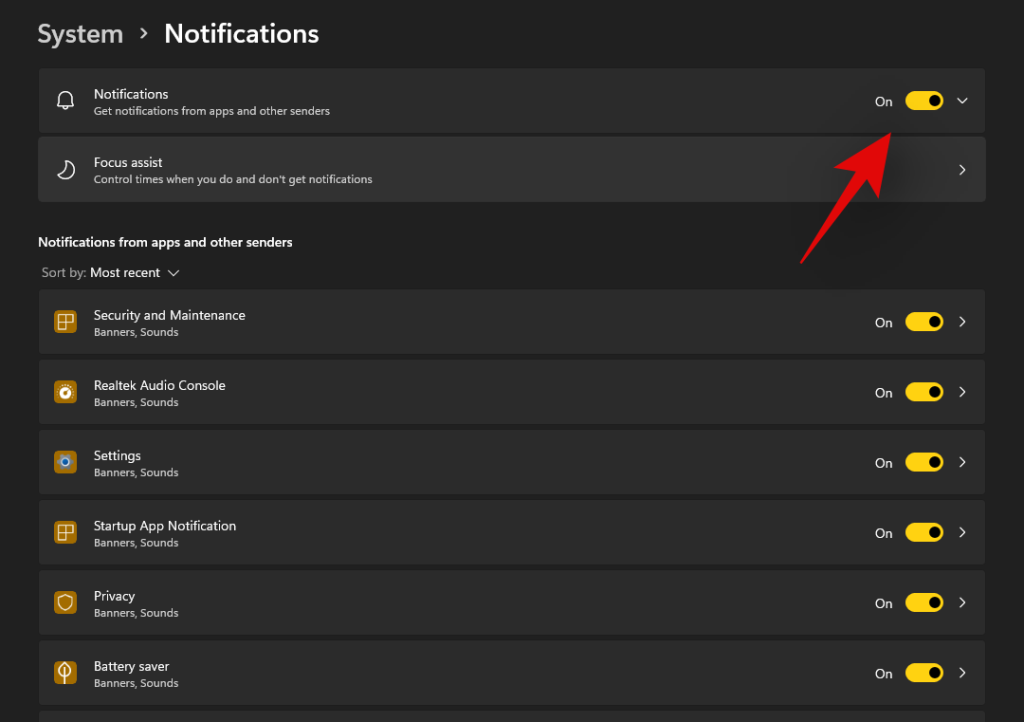
You will now get a list of all the apps that have the permission to deliver notifications on your system. Scroll the list to find the necessary apps and turn off the toggle beside them to disable notifications.
Repeat the steps above for all the intended apps to disable notifications.
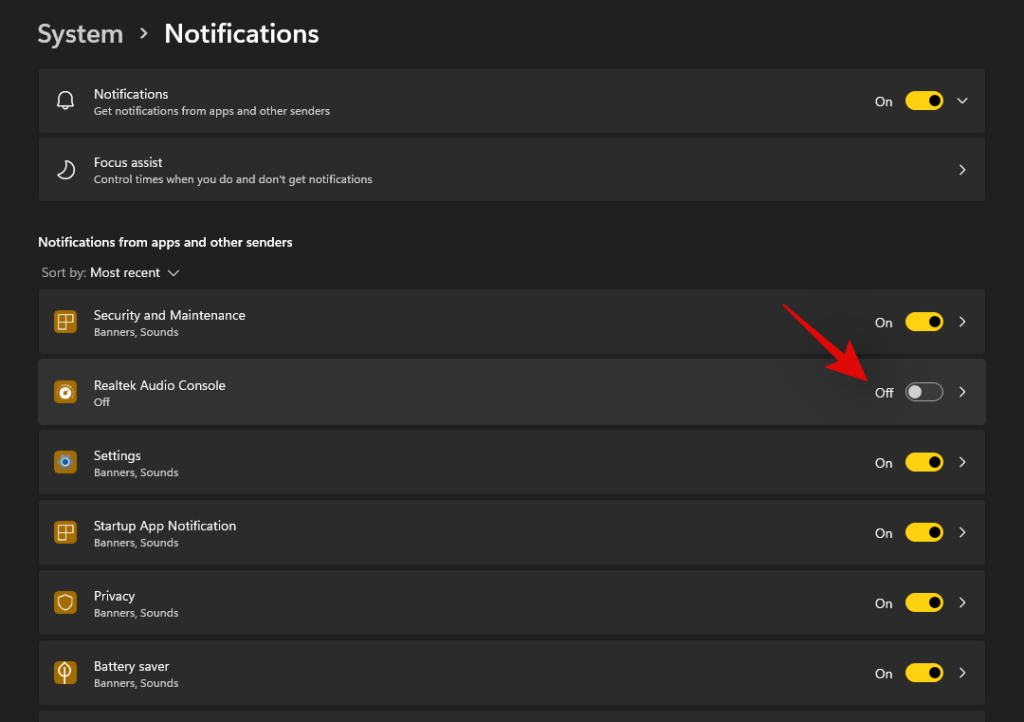
Close the Settings app and notifications for the selected apps should now be permanently disabled on your system.
Can you customize notifications in Windows 11?
Well, not exactly. Windows 11 currently has very limited options when it comes to customizing your notifications. You can not change the look, behavior, or color palette of your notifications without changing the accent color of your overall UI. However, you can customize the way your notifications sound. You can set a nice quiet notification sound that does not interrupt your workflow or opt for a quirky take that makes for a few good laughs each time you get a notification. The choice is completely up to you. Use the guide below to customize your Windows 11 notification sounds.
Required
- A .wav file for the sound you wish to set as your custom notification on Windows 11
Guide
Let’s start by first placing the .wav file in a compatible media folder so that you can set it as your default notification sound in Windows 11. Navigate to the concerned .wav file and copy it to your clipboard.
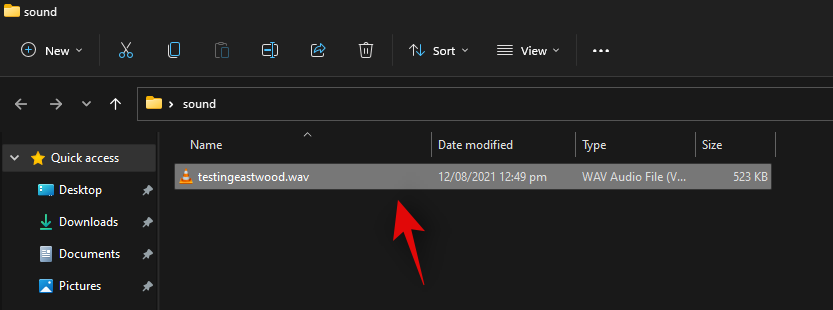
Now navigate to the following path given below. Paste your .wav file in this location. Click on ‘Continue’ when you will be prompted for administrator permission.
C:\Windows\media
We can now use the .wav file as our default notification sound. Press Windows + i on your keyboard to open the Settings app and then click on ‘Sound’ on your right.
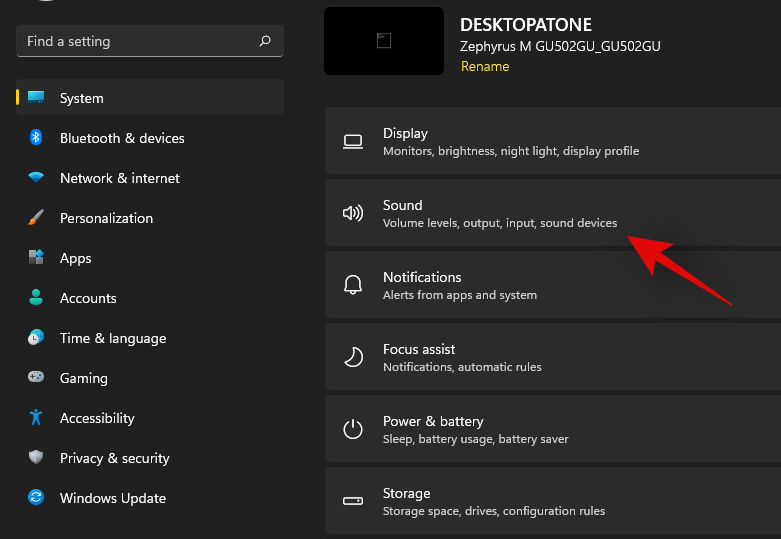
Scroll to the bottom and click on ‘More sound settings’.

Click and switch to the ‘Sounds’ tab at the top.
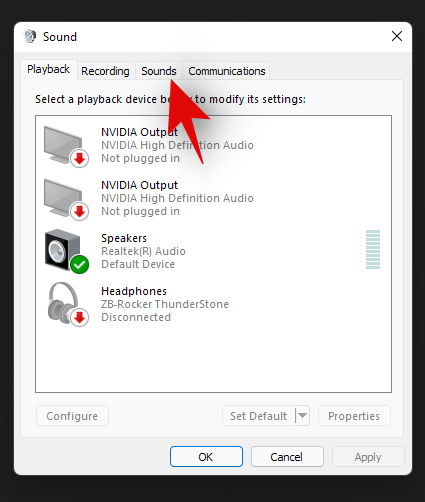
Under ‘Program Events’ scroll the list and find ‘Notifications’. Click on ‘Notifications’ to select it.
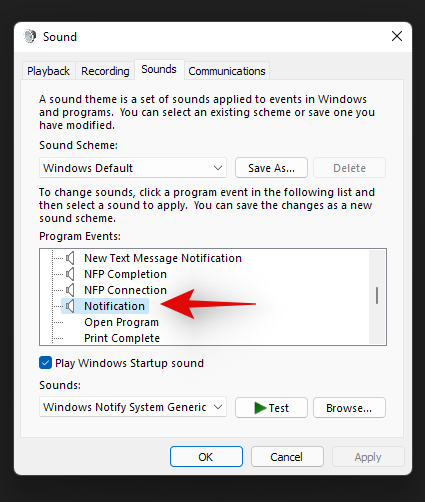
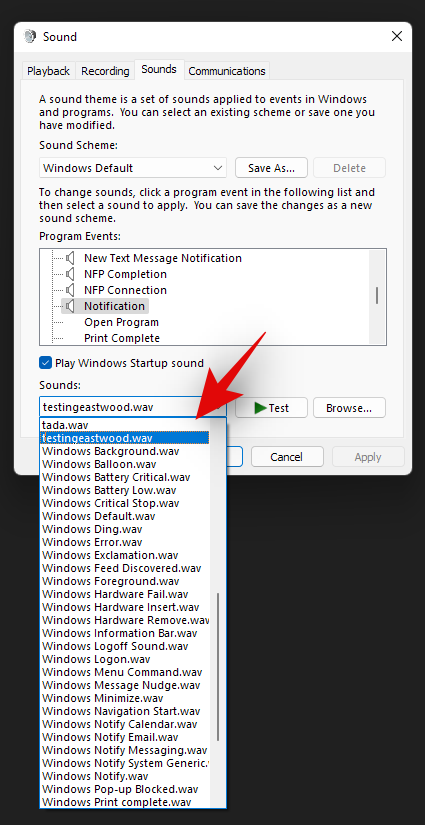
Now click on the drop-down arrow under Sounds and select the .wav file we pasted in the Media folder.
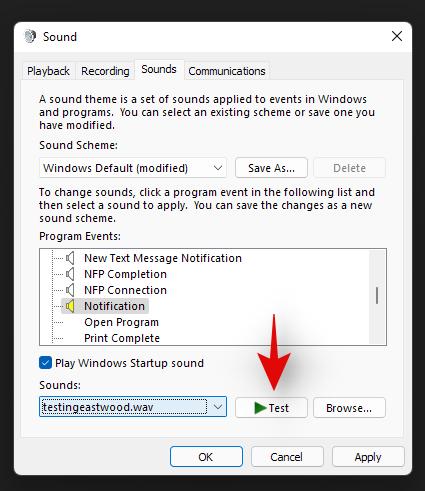
You can click on ‘Test’ to test your custom notification sound.
Click on ‘Ok’ to save your changes.
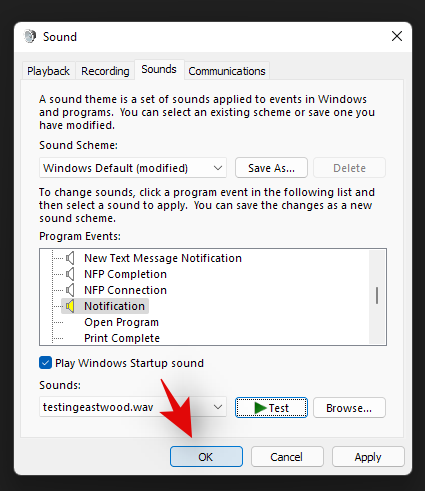
And that’s it! You will now have set a custom sound as your default notification sound in Windows 11.
Distractions from notifications are a huge problem especially when you are into some important work. Using the steps mentioned above, now, you can easily get rid of unnecessary notifications and work peacefully with full concentration.
Related:


