Butonat e nxehtë të laptopit janë mjete thelbësore kur përpiqeni të përdorni funksionet bazë në pajisjen tuaj. Ato ju lejojnë të kontrolloni volumin, rregulloni ndriçimin , ndriçimin e tastierës, sjelljen e tastierës me prekje dhe shumë më tepër. Në varësi të pajisjes suaj, mund të keni çelësa të nxehtë shtesë për funksione të dedikuara si aktivizimi i rrotullimit të tastit n, çaktivizimi i tastierës me prekje, çaktivizimi i tastierës , aktivizimi i modalitetit të aeroplanit, ndryshimi i modaliteteve të energjisë dhe shumë më tepër.
Megjithatë, laptopi juaj mund të përfundojë duke humbur funksionalitetin dhe efikasitetin e tij në rast se çelësat tuaj të nxehtë nuk punojnë. Kjo do t'ju detyronte të ndryshoni/redaktoni çdo cilësim duke përdorur opsionet e tyre të dedikuara në aplikacionin "Cilësimet e Windows", i cili mund të jetë mjaft i rëndë. Nëse çelësat e nxehtë të laptopit nuk funksionojnë në laptopin tuaj, atëherë mund të përdorni metodat e mëposhtme për të rregulluar çelësat tuaj të nxehtë.
Të ngjashme: Si të zhvendosni shiritin e detyrave në krye në Windows 11
Përmbajtja
Pse nuk funksionojnë çelësat kryesorë?
Çelësat e nxehtësisë në laptopin tuaj mund të ndalojnë së punuari për disa arsye, por meqenëse Windows 11 është mjaft i ri, arsyeja më e zakonshme duket të jetë konfliktet e drejtuesve dhe konfliktet e shërbimeve OEM në sfond. Kjo është për shkak se shumica e drejtuesve të lëshuar aktualisht nga OEM janë të dizajnuar për Windows 10. Windows 11 prezanton disa ndryshime të ndryshme në sfond dhe mënyrën e trajtimit të drejtuesve, gjë që duket se prish funksionalitetin për çelësat kryesorë në shumë pajisje të ndryshme.
Njësitë më të prekura duket se janë nga Asus dhe Lenovo për shkak të shërbimeve të tyre të dedikuara si Armory Crate Service që duhet të përditësohen për Windows 11. Kjo nuk do të thotë se prodhuesit e tjerë janë të përjashtuar nga kjo çështje, shumë njësi Dell dhe Acer gjithashtu duket se humbasin funksionalitetin e tyre të tasteve kryesore me Windows 11.
Nëse zotëroni ndonjë nga këto pajisje ose nëse çelësat kryesorë të laptopit tuaj nuk funksionojnë në përgjithësi në Windows 11, atëherë mund të përdorni metodat e mëposhtme për të provuar të rregulloni problemin tuaj. Le të fillojmë.
Të ngjashme: Si të krijoni një pikë rivendosjeje në Windows 11
Si të rregulloni çelësat kryesorë në laptopët Windows 11
Mund të përdorni metodat e mëposhtme për të provuar që tastiet kryesore të funksionojnë përsëri në laptop. Metodat janë renditur sipas rendit të prioritetit të tyre dhe rregullimet më të zakonshme janë renditur në krye. Mund të filloni me rregullimin e parë dhe të kaloni nëpër listë për të provuar të gjeni rregullimin që funksionon për sistemin tuaj. Le të fillojmë.
Metoda # 1: Kontrolloni për përditësime OEM
Nëse keni një mjet të dedikuar të tastierës që menaxhon çelësat tuaj të nxehtë në sfond, si shërbimi Armory Crate ose programi Synaptics, atëherë mund të provoni dhe të përditësoni drejtuesit tuaj nga faqja e internetit e OEM-së tuaj. Këto shërbime janë të ndryshme nga drejtuesit specifikë të tastierës dhe ato ekzekutojnë shërbime dhe detyra në sfond që ndihmojnë në aktivizimin e tasteve kryesore në laptop.
Nëse ndonjë prej këtyre shërbimeve është i prishur ose nuk funksionon, atëherë ju rekomandojmë të kontrolloni për përditësimet më të fundit ose të riinstaloni versionin aktual në laptop. Përdorni lidhjet më poshtë për të vizituar faqen e mbështetjes për OEM-in tuaj dhe kontrolloni për përditësimet më të fundit të shërbimeve. Pasi t'i gjeni, klikoni dhe shkarkoni ato në memorien tuaj lokale dhe instaloni sa më shpejt në laptopin tuaj.
Pasi të instalohen, çelësat kryesorë duhet të fillojnë të punojnë përsëri në laptopin tuaj. Ne ju rekomandojmë të rinisni laptopin tuaj për të shmangur çdo konflikt me versionet e instaluara më parë në sfond. Nëse çelësat tuaj të nxehtë ende nuk funksionojnë, atëherë mund të përdorni udhëzuesin më poshtë për të rivendosur dhe rifreskuar shërbimet tuaja OEM në laptop.
Të ngjashme: Si të riparoni Windows 11
Metoda # 2: Sigurohuni që shërbimet OEM po funksionojnë siç duhet
Nëse shërbimet tuaja OEM duket se nuk po funksionojnë në sfond, këtu janë disa metoda për zgjidhjen e problemeve për të rivendosur funksionalitetin e tyre. Le të fillojmë.
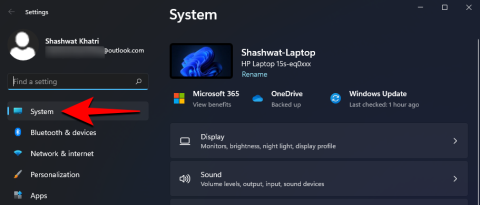
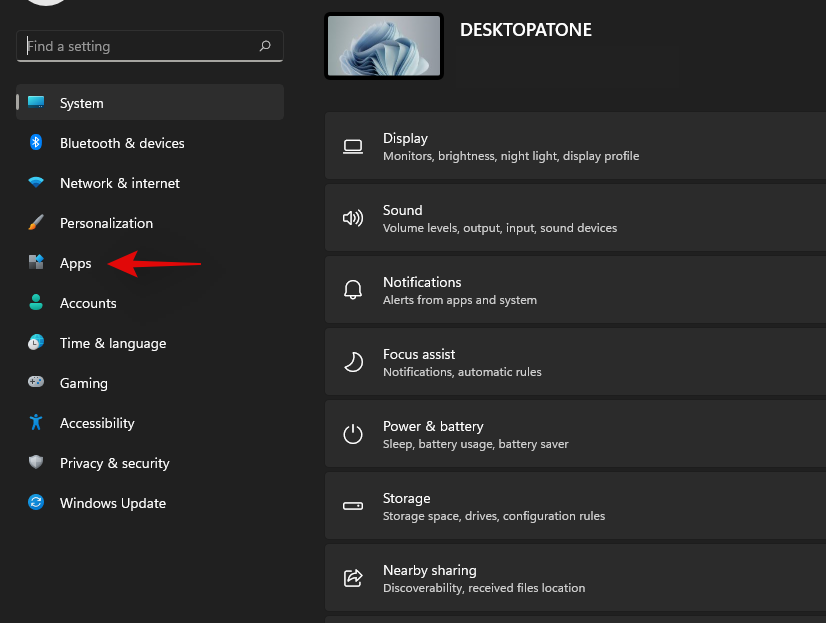
Shtypni Windows + inë tastierën tuaj dhe klikoni "Aplikacionet" në të majtë.
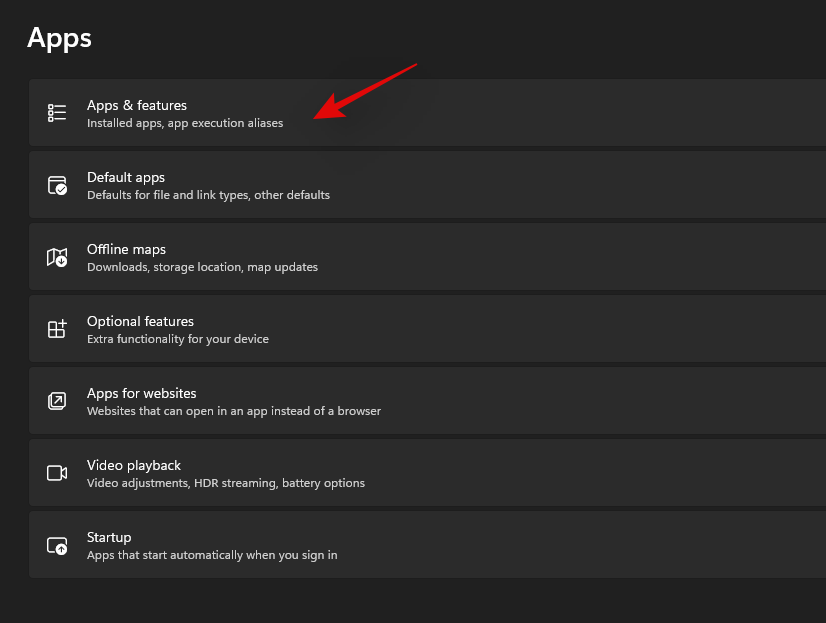
Klikoni në "Aplikacionet dhe veçoritë".
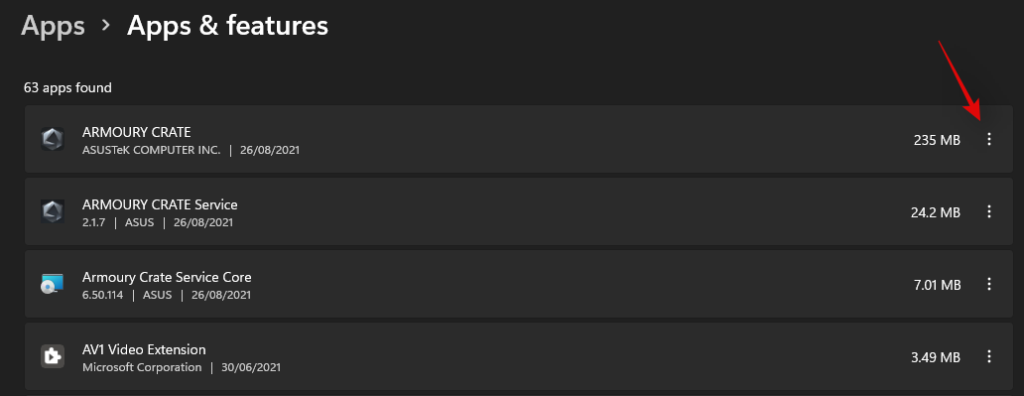
Gjeni aplikacionin përkatës në këtë listë dhe klikoni në ikonën e menysë "3-pika" pranë tij.
Zgjidhni "Opsionet e avancuara".
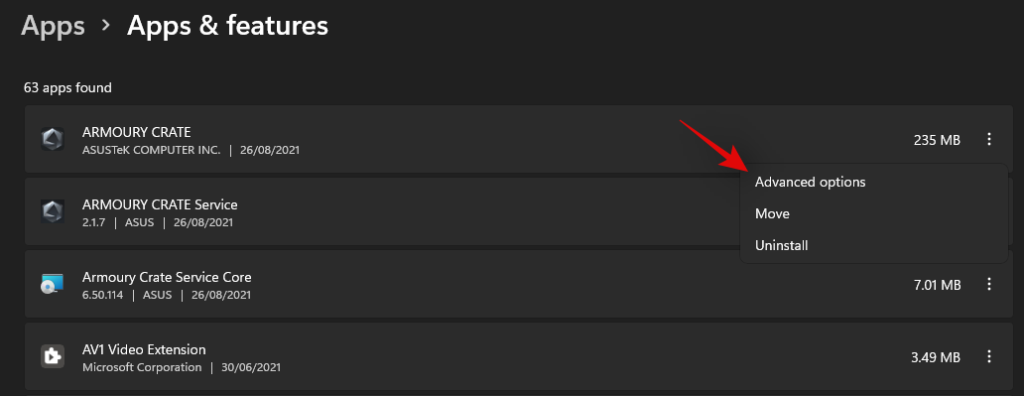
Tani ndiqni një nga seksionet më poshtë në varësi të asaj që dëshironi të bëni me aplikacionin e zgjedhur.
2.1 Aktivizo funksionalitetin e sfondit
Klikoni në menynë rënëse nën "Lejet e aplikacioneve në sfond" dhe zgjidhni "E optimizuar me energji" ose "Gjithmonë".
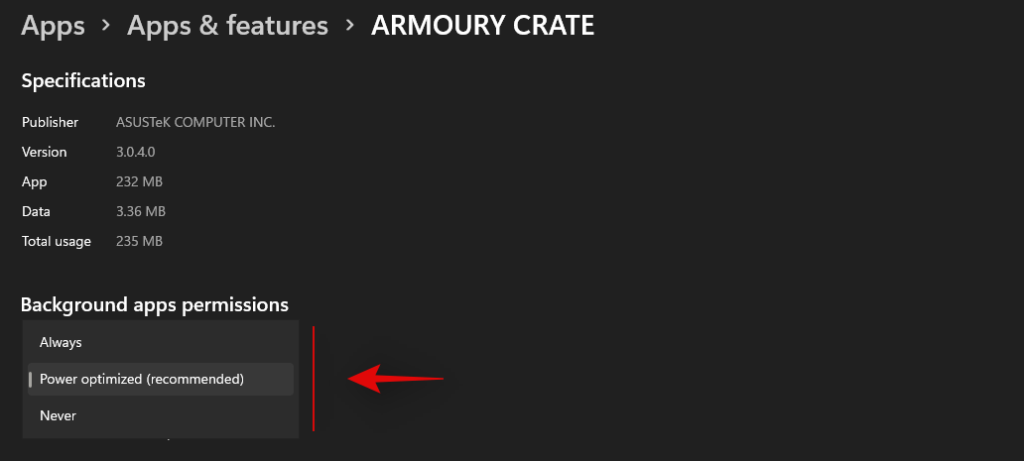
"E optimizuar me energji" do të lejojë që aplikacioni të funksionojë në sfond në varësi të planit aktual të energjisë. "Gjithmonë" nga ana tjetër do t'i japë aplikacionit lejen për të qëndruar aktiv dhe për të punuar në sfond, pavarësisht nga plani aktual i zgjedhur i energjisë.
2.2 Riparoni aplikacionin
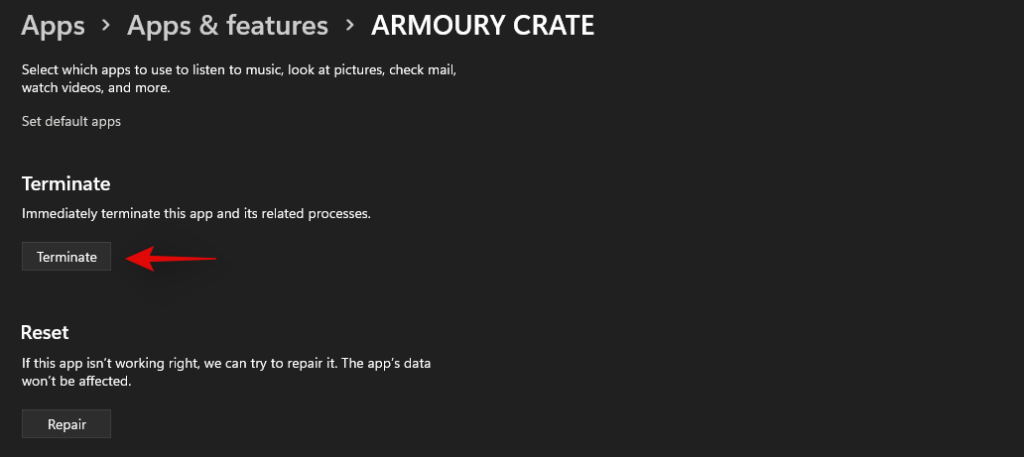
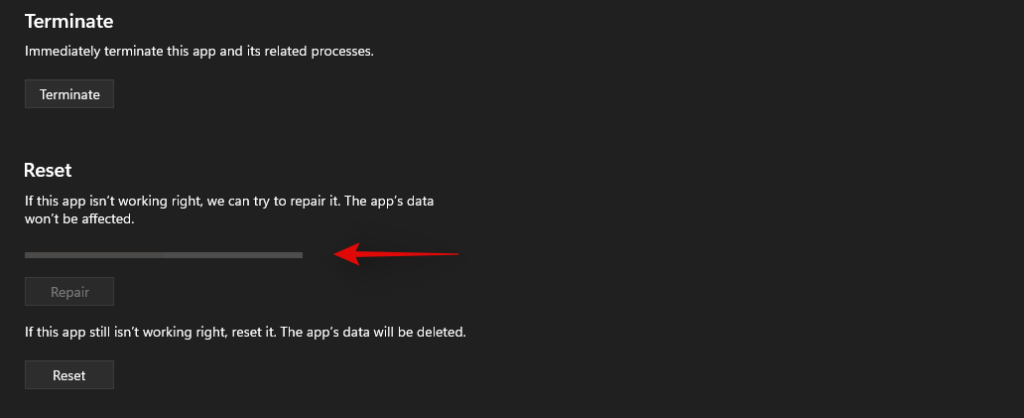
Windows 11 gjithashtu ju lejon të riparoni aplikacionin tuaj. Thjesht lëvizni në fund dhe klikoni në 'Terminate' së pari.
Tani klikoni në 'Riparim'.
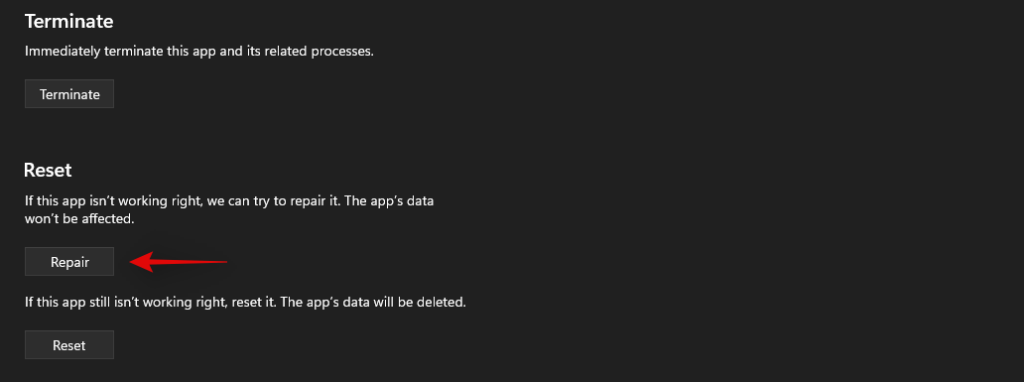
Prisni që Windows të bëjë gjënë e tij, sapo të shfaqet një shenjë kontrolli pranë opsionit, provoni të hapni aplikacionin përkatës në laptop.
Testoni çelësat tuaj të nxehtë tani, nëse një problem i vogël ose konflikt po bënte që aplikacioni të mos funksiononte në sfond, atëherë funksionaliteti i tasteve kryesore duhet të rikthehet tani në laptop.
2.3 Rivendosni aplikacionin
Nëse metodat e mësipërme nuk funksionuan për ju, atëherë mund të rivendosni aplikacionin OEM. Kjo do të rivendosë të dhënat e tij dhe do t'ju japë një fillim të ri sikur aplikacioni të ishte instaluar sapo në laptop. Kjo duhet të ndihmojë në rivendosjen e funksionalitetit tuaj të çelësit të nxehtë në shumicën e rasteve. Sidoqoftë, mbani në mend se të dhënat e aplikacionit tuaj do të rivendosen, gjë që do t'ju detyrojë të identifikoheni përsëri në aplikacion nëse është e mundur. Për më tepër, çdo ndryshim ose personalizim që keni bërë në aplikacion do të rivendoset gjithashtu. Ndiqni hapat e mëposhtëm për të filluar.
Klikoni në 'Terminate' për të mbyllur aplikacionin.

Tani klikoni në 'Rivendos'.

Klikoni përsëri në 'Rivendos' për të konfirmuar zgjedhjen tuaj.

Aplikacioni tani do të rivendoset në laptop. Ne ju rekomandojmë të rinisni laptopin tuaj për një masë të mirë dhe të provoni të përdorni përsëri çelësat tuaj të nxehtë. Nëse aplikacioni nuk funksiononte siç duhet në Windows 11, atëherë funksionaliteti juaj i çelësit kryesor duhet të rikthehet tani në laptop.
Metoda # 3: Përditësoni drejtuesit
Një arsye tjetër për mosfunksionimin e tastierës suaj do të jenë drejtuesit e vjetëruar. Nëse nuk i keni përditësuar drejtuesit e tastierës tuaj në të kaluarën, ka të ngjarë që kjo është arsyeja pse çelësat e tastierës tuaj nuk funksionojnë në Windows 11. Windows 11 menaxhon dhe instalon drejtuesit tuaj ndryshe, për më tepër, në disa raste, Windows 11 dihet se zëvendësoni drejtuesin e tastierës OEM në favor të një drejtuesi gjenerik në rast se është më i fundit.
Nëse çelësat kryesorë nuk po funksionojnë ende për ju, atëherë ju rekomandojmë të përditësoni drejtuesit tuaj dhe të instaloni drejtuesit më të fundit të tastierës të disponueshme nga OEM-i juaj. Thjesht vizitoni faqen tuaj OEM duke përdorur një nga lidhjet më poshtë dhe shkarkoni drejtuesin përkatës në ruajtjen tuaj lokale.
Pasi të keni shkarkuar, instaloni drejtuesin dhe rinisni laptopin tuaj. Mohoni çdo përditësim të drejtuesit të tastierës të ofruar nga Windows 11 dhe çelësat tuaj të nxehtë duhet të fillojnë të punojnë përsëri. Përdorni lidhjet e mëposhtme për të filluar.
Nëse drejtuesit e tastierës tuaj janë ende të vjetëruar dhe çelësat kryesorë nuk funksionojnë, atëherë mund të jetë koha të kontrolloni për përditësime të drejtuesve përmes Windows. OEM juaj ka të ngjarë t'ju dërgojë përditësimet më të fundit të drejtuesve përmes Windows Updates. Kontrolloni për përditësimet e drejtuesve të tastierës në përditësimet e Windows në laptop duke përdorur udhëzuesin më poshtë. Fillimisht do të sigurohemi që laptopi juaj po merr përditësime të drejtuesve përmes Windows Update. Ndiqni udhëzuesin më poshtë për të filluar.
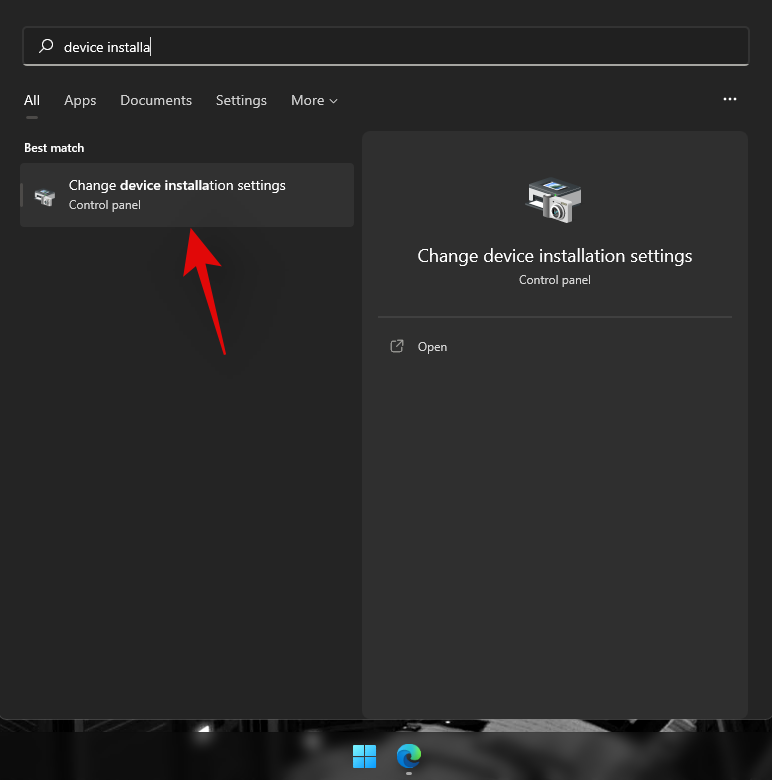
Shtypni Windows + Snë tastierë dhe kërkoni "Ndrysho cilësimet e instalimit të pajisjes". Klikoni dhe hapni aplikacionin sapo të shfaqet në rezultatet e kërkimit tuaj.
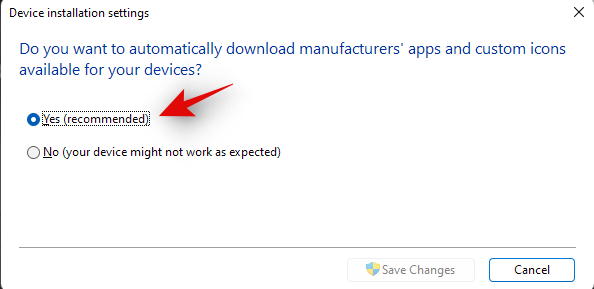
Zgjidhni 'Po (rekomandohet)'.
Klikoni në "Ruaj ndryshimet".
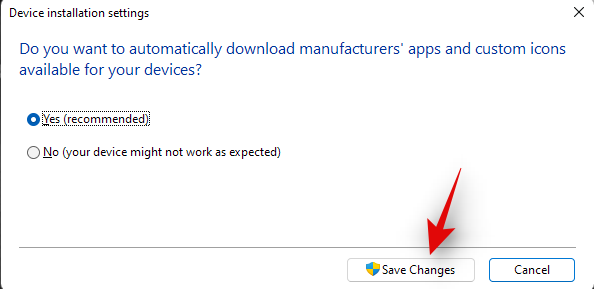
Prisni që Windows të aktivizojë përditësimet e shoferit për laptopin tuaj. Pasi të aktivizohet, mbyllni dritaren e cilësimeve të instalimit të pajisjes dhe shtypni Windows + inë tastierën tuaj. Zgjidhni "Windows Update" nga e majta juaj.
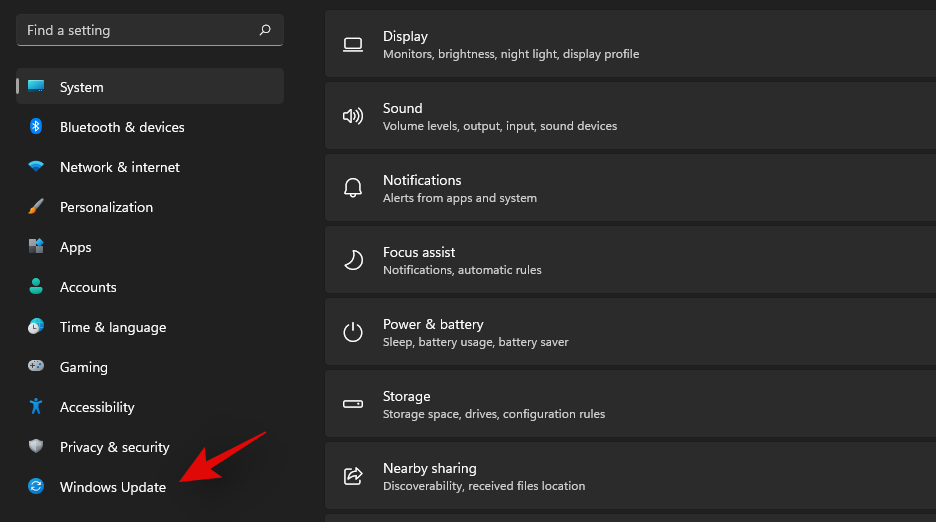
Klikoni në "Kontrollo përditësimet" në krye dhe instaloni çdo përditësim që shfaqet.
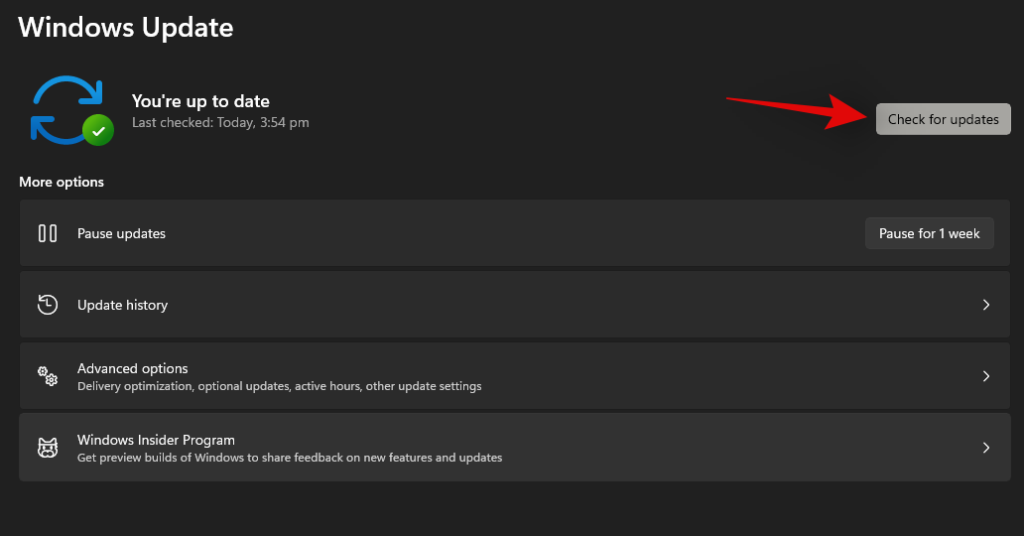
Pasi të instalohet, klikoni në "Opsionet e avancuara" në fund.
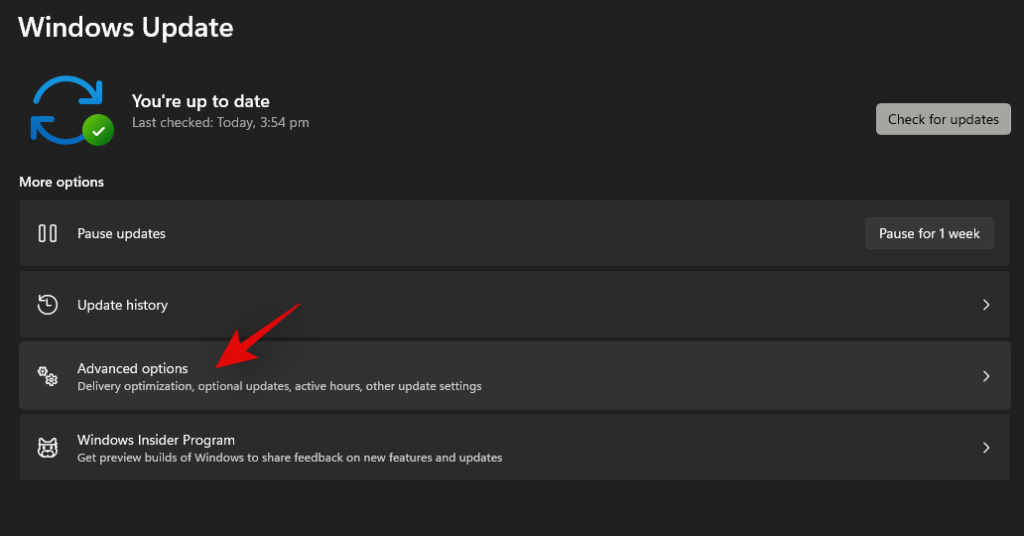
Tani klikoni në 'Përditësimet opsionale'.
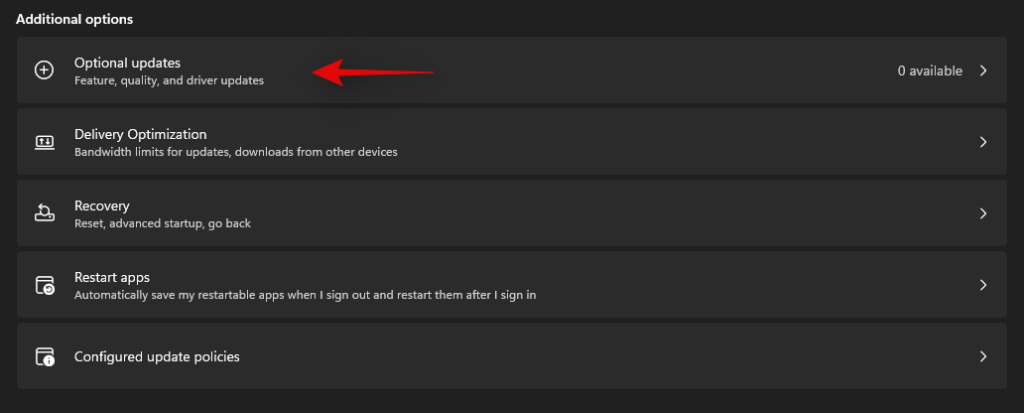
Klikoni dhe zgjeroni 'Përditësimet e drejtuesve (n)' ku n përfaqëson numrin aktual të përditësimeve të drejtuesve të disponueshëm për laptopin tuaj. Kontrolloni kutinë për çdo drejtues të tastierës që shfaqet në këtë listë. Klikoni në "Shkarko dhe instalo" në fund të ekranit tuaj. Rinisni laptopin tuaj për një masë të mirë edhe nëse nuk kërkohet nga një përditësim i Windows.
Dhe kjo eshte! Drejtuesit e fundit të tastierës suaj duhet të instalohen tani në laptopin tuaj, gjë që do të ndihmojë në rivendosjen e funksionalitetit të çelësave të nxehtë për ju. Nëse jo, mund të vazhdoni me rregullimet e mëposhtme për të provuar të rregulloni çelësat tuaj të nxehtë.
Metoda # 4: Riinstaloni drejtuesit e tastierës
Nëse asnjë nga metodat e mësipërme nuk funksionon për ju, atëherë është koha të riinstaloni drejtuesit e tastierës. Ndërsa drejtuesit rrallë hasin konflikte në sfond, instalimet e gabuara, komponentët e papajtueshëm dhe përditësimet e gabuara mund të ngatërrojnë drejtuesit e tastierës, veçanërisht nëse keni ndriçim të personalizuar RGB të menaxhuar nga një program OEM.
Secili prej këtyre aplikacioneve përdor një mënyrë të ndryshme për t'u lidhur me dritën e prapme të tastierës për t'ju ndihmuar ta personalizoni atë sipas nevojave tuaja. Këto mënyra për t'u lidhur me sistemin nuk luajnë mirë me aplikacionet e tjera të palëve të treta që menaxhojnë hartën, paraqitjen e tastierës dhe më shumë. Riinstalimi i drejtuesit të tastierës tuaj mund të ndihmojë në rregullimin e shumicës së problemeve të tilla, dhe ju mund ta bëni këtë duke instaluar një drejtues të dedikuar nga OEM-i juaj ose duke përdorur një drejtues të përgjithshëm me burim nga Windows. Le të fillojmë.
4.1 Riinstaloni drejtuesin e përgjithshëm të tastierës
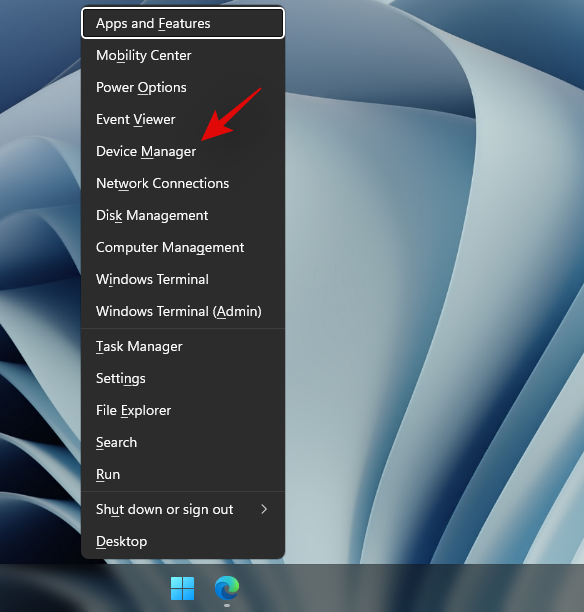
Shtypni Windows + Xnë tastierën tuaj dhe klikoni "Menaxheri i pajisjes".
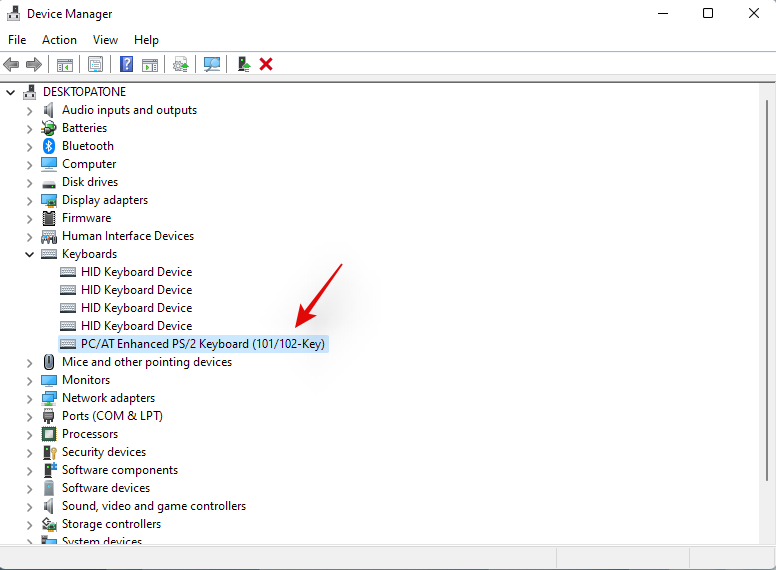
Pasi të hapet, gjeni tastierën tuaj të interesuar në listë dhe kliko me të djathtën mbi të. Nëse nuk mund ta gjeni tastierën tuaj ose keni listime të shumta, atëherë mund t'i zgjidhni dhe çinstaloni të gjitha. Pasi të çinstalohen, drejtuesit e mbetur do të hiqen ndërsa të nevojshmet do të rishkarkohen automatikisht.
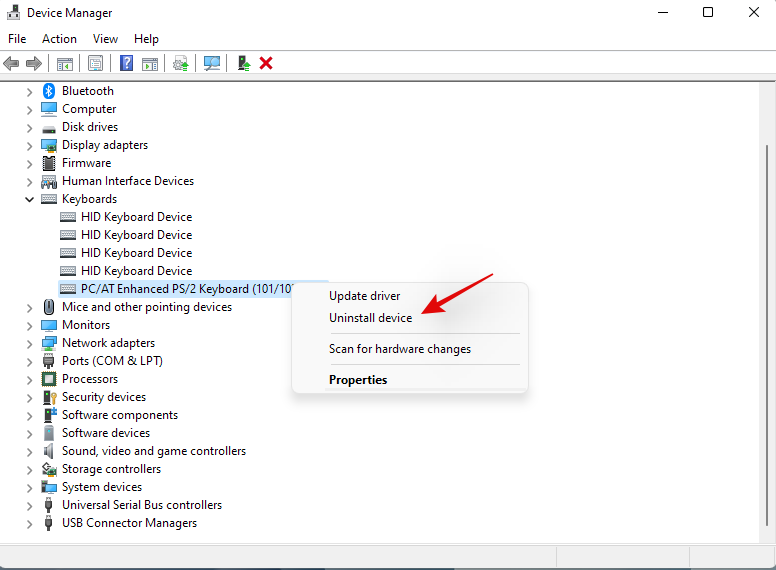
Klikoni në 'Çinstaloni pajisjen'.
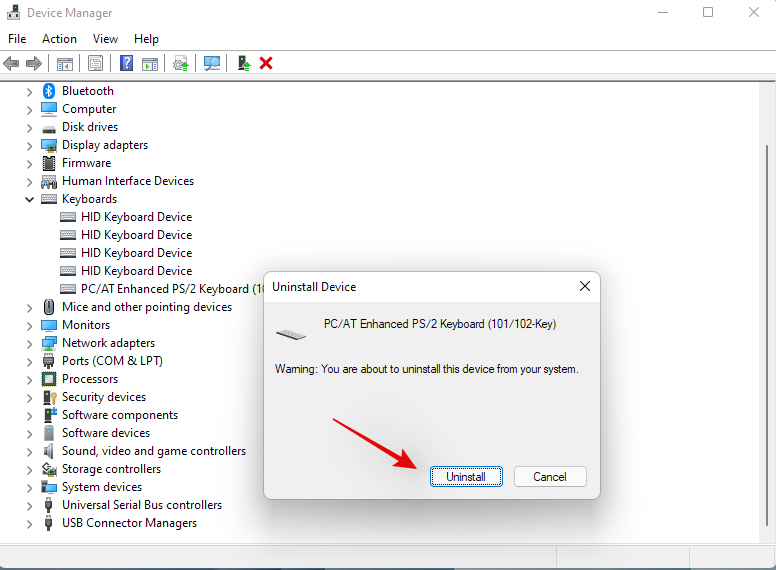
Klikoni përsëri në 'Uninstall' për të konfirmuar zgjedhjen tuaj.
Rinisni laptopin nëse kërkohet dhe përsëritni hapat e mësipërm për të hequr të gjithë drejtuesit e nevojshëm të tastierës të instaluar në sistemin tuaj. Pasi të çinstalohet, kliko me të djathtën në një zonë të zbrazët dhe zgjidh "Skano për ndryshimet e harduerit". Ju gjithashtu mund të klikoni në ikonën e dedikuar për të njëjtën gjë në shiritin tuaj të veglave.

Windows tani do të kërkojë drejtues të përgjithshëm që mungojnë për tastierën tuaj origjinale dhe do t'i riinstalojë ato automatikisht në laptop.
Sidoqoftë, nëse drejtuesit tuaj nuk gjenden nga Windows, atëherë mund të përdorni udhëzuesin më poshtë për të instaluar manualisht drejtuesit e dedikuar të tastierës nga OEM-i juaj.
4.2 Riinstaloni drejtuesit e tastierës me dorë
Shkarkoni dhe instaloni drejtuesit e nevojshëm të tastierës në ruajtjen tuaj lokale. Sigurohuni që ta keni nxjerrë skedarin paraprakisht në rast se keni shkarkuar një arkiv. Ju duhet të gjeni një skedar .inf brenda të cilit është drejtuesi që do të instalojmë manualisht në sistemin tuaj. Ndiqni hapat e mëposhtëm për të filluar.
Shtypni Windows + Xnë tastierën tuaj dhe zgjidhni 'Device Manager'.

Tani zgjeroni seksionin "Tastiera" dhe kliko me të djathtën në tastierën tuaj në fjalë. Nëse keni shumë pajisje HID nën "Tastiera", atëherë ju rekomandojmë të çinstaloni të gjithë drejtuesit e panevojshëm për të shmangur konfliktet.
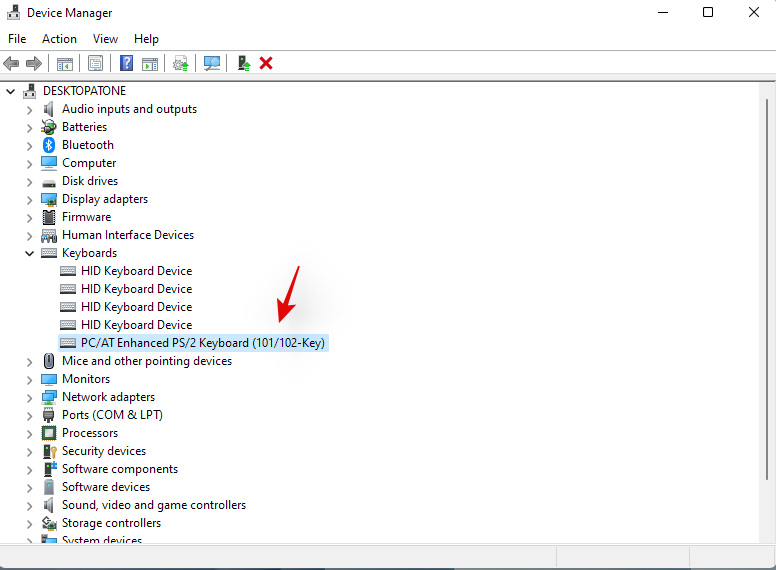
Zgjidhni "Çinstaloni pajisjen".

Kontrolloni kutinë për "Përpjekje për të hequr drejtuesin për këtë pajisje" nëse opsioni është i disponueshëm. Klikoni në 'Uninstall' për të konfirmuar zgjedhjen tuaj.

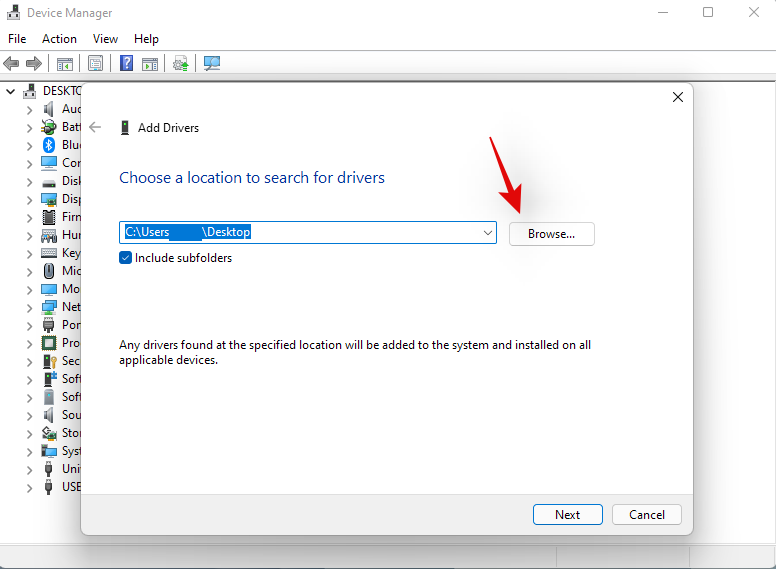
Tastiera e zgjedhur tani do të çinstalohet nga sistemi juaj. Tastiera juaj do të ndalojë së punuari pasi drejtuesi përkatës të jetë çinstaluar. Kjo është sjellje normale dhe funksionaliteti i tastierës suaj duhet të rikthehet pasi të riinstalojmë drejtuesit e nevojshëm. Përsëritni hapat e mësipërm për të gjitha pajisjet HID që dëshironi të hiqni. Pasi të jenë hequr pajisjet e nevojshme, klikoni në ikonën "Shto drejtuesit" në shiritin tuaj të veglave.

Klikoni në 'Shfleto'.
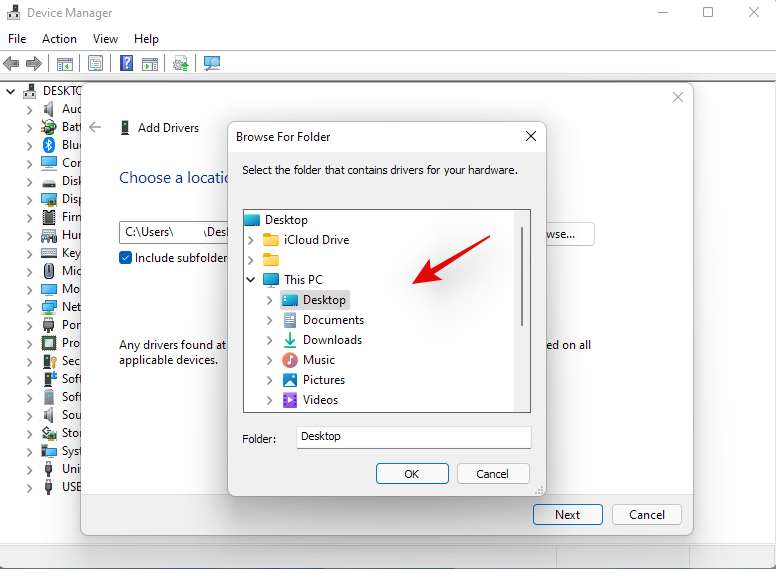
Navigoni te dosja ku keni ruajtur drejtuesit tuaj OEM dhe klikoni "OK".
Kontrolloni kutinë për "Përfshi nëndosjet" vetëm për të qenë të sigurt. Klikoni "Next" pasi të keni mbaruar.
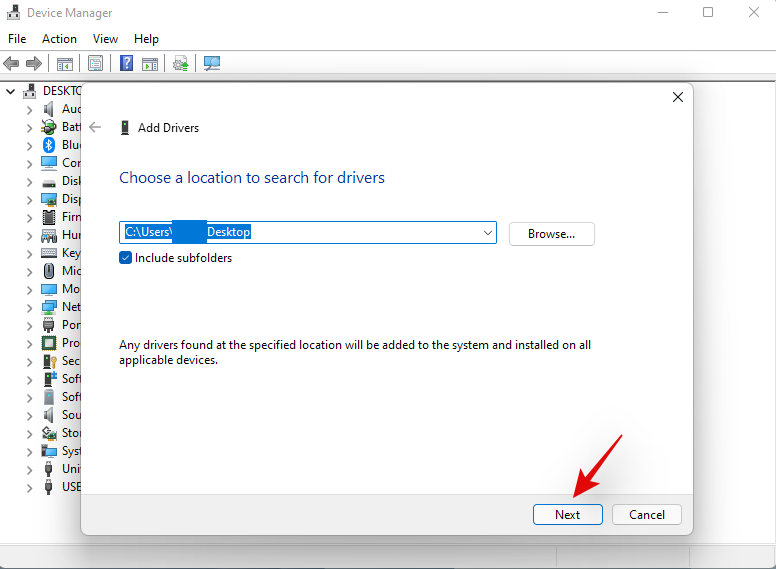
Windows tani do të skanojë vendndodhjen për drejtues të pajtueshëm dhe do t'i instalojë automatikisht në sistemin tuaj.
Pasi të jetë instaluar, ju rekomandojmë të rinisni laptopin tuaj për një masë të mirë.
Dhe kjo eshte! Funksionaliteti juaj i çelësit të nxehtë tani duhet të rikthehet në sistemin tuaj nëse një konflikt i drejtuesit të sfondit po shkaktonte probleme në sistemin tuaj.
Shënim: Mos instaloni asnjë drejtues tastiere përmes Windows Update në të ardhmen për të shmangur humbjen e funksionimit të tastierës kryesore.
Metoda # 5: Çaktivizo modalitetin e lojës
Modaliteti i lojërave brenda Windows dihet se shkakton probleme në disa laptopë. Modaliteti i lojërave të Microsoft është bërë më i zgjuar dhe modaliteti automatikisht përpiqet të zbatojë cilësimet më të mira periferike për përvojën tuaj të lojërave. Kjo përfshin rregullimin e audios, cilësimet e miut, aktivizimin e kthimit të tastit n në tastierën tuaj, kyçjen e tastit të Windows dhe shumë më tepër.
Megjithatë, aktivizimi automatik i këtyre cilësimeve kërkon lidhjen me drejtuesit dhe mjetet e dedikuara të cilat shpesh menaxhohen nga OEM-i juaj. Kjo mund të krijojë konflikte në sfond, të cilat mund t'ju pengojnë të përdorni tastet kryesore në Windows 11. Përdorni udhëzuesin më poshtë për të çaktivizuar modalitetin e lojës në laptop.
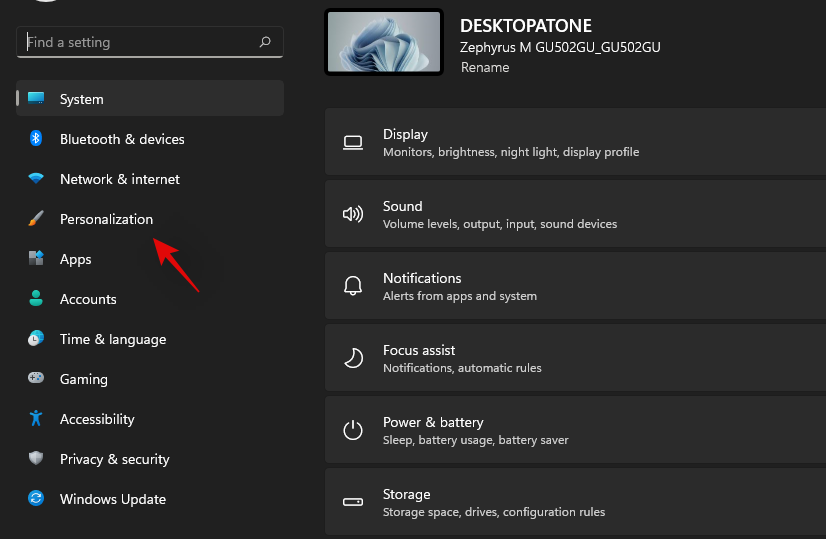
Shtypni Windows + inë tastierën tuaj dhe klikoni "Personalizimi" në të majtë.
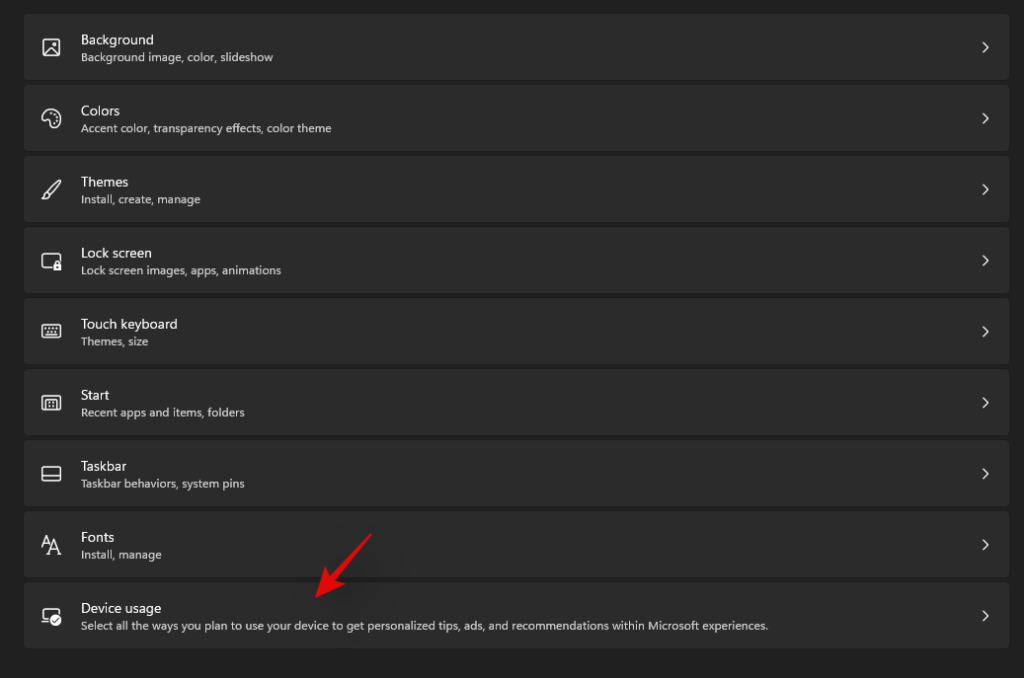
Klikoni në 'Përdorimi i pajisjes'.
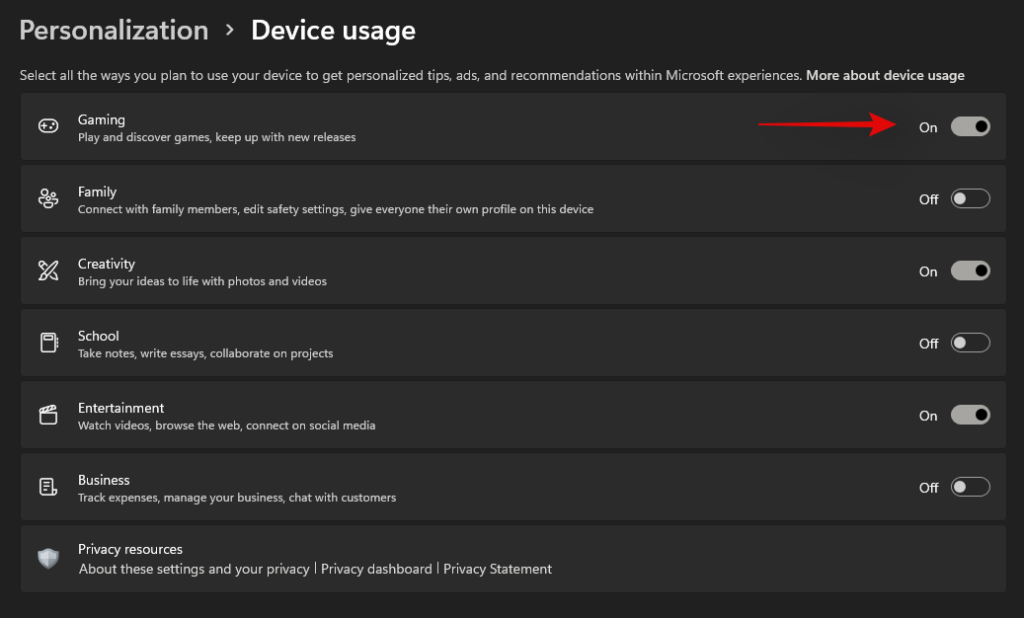
Çaktivizo çelësin për "Lojërat".
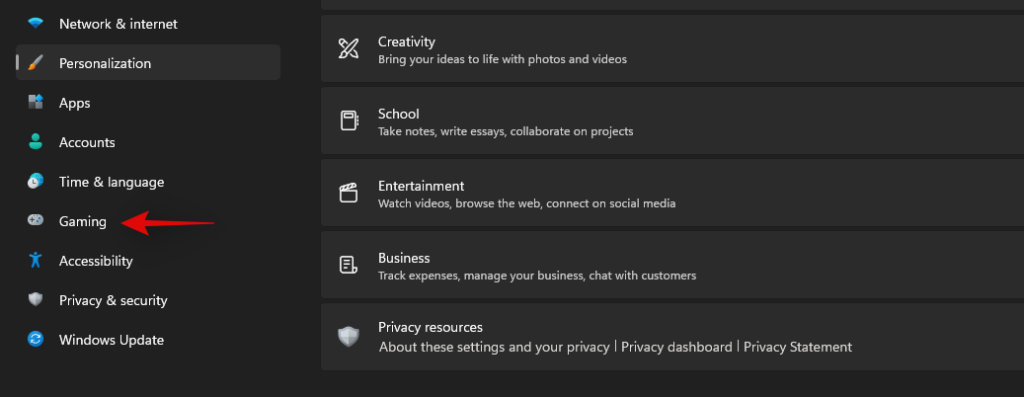
Klikoni në 'Lojërat' në të majtë tani.
Klikoni në "Mënyra e lojës" në të djathtën tuaj.

Çaktivizoni çelësin për "Modalitetin e lojës" në krye të ekranit tuaj.

Mbyllni aplikacionin Cilësimet dhe rinisni laptopin tuaj.
Nëse çelësat tuaj të nxehtë fillojnë të punojnë pas një rinisjeje, atëherë modaliteti i lojës ka të ngjarë të ndërhyjë me çelësat tuaj të nxehtë në sfond.
Metoda # 6: Rinis shërbimin HID
Ju gjithashtu mund të rinisni shërbimin tuaj HID i cili duhet të ndihmojë në rinisjen e të gjitha pajisjeve tuaja HID ose të Ndërfaqes Njerëzore. Kjo përfshin tastierën tuaj dhe rinisja e shërbimit HID duhet të ndihmojë në rregullimin e çelësave tuaj të nxehtë nëse softueri ose hartuesi juaj i personalizuar nuk mund të lidhej me shërbimin HID. Përdorni udhëzuesin më poshtë për të filluar.
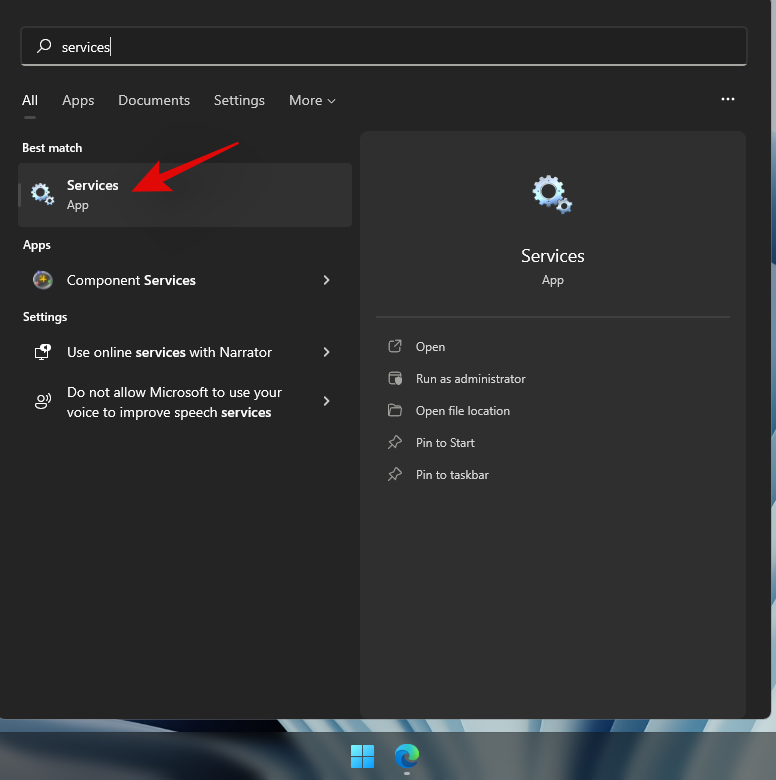
Shtypni Windows + Sdhe kërkoni për "Shërbimet". Klikoni dhe hapni aplikacionin sapo të shfaqet në rezultatet e kërkimit tuaj.
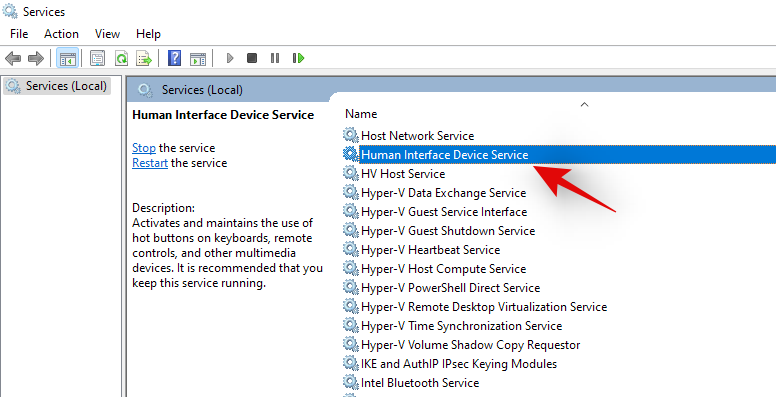
Kërkoni "Shërbimi i pajisjes së ndërfaqes njerëzore" dhe kliko me të djathtën mbi të.
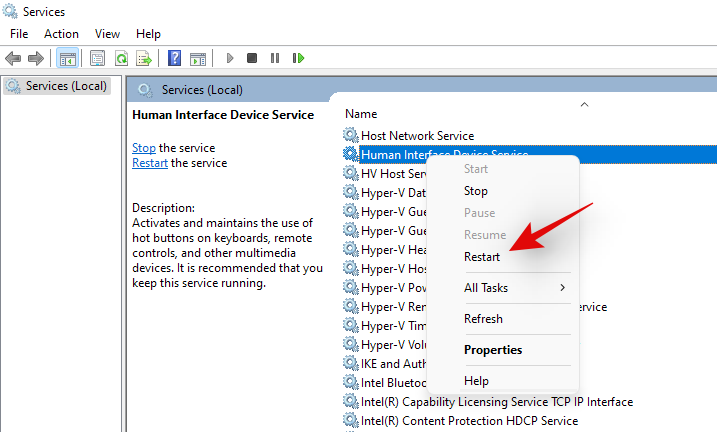
Zgjidhni "Rinisni".
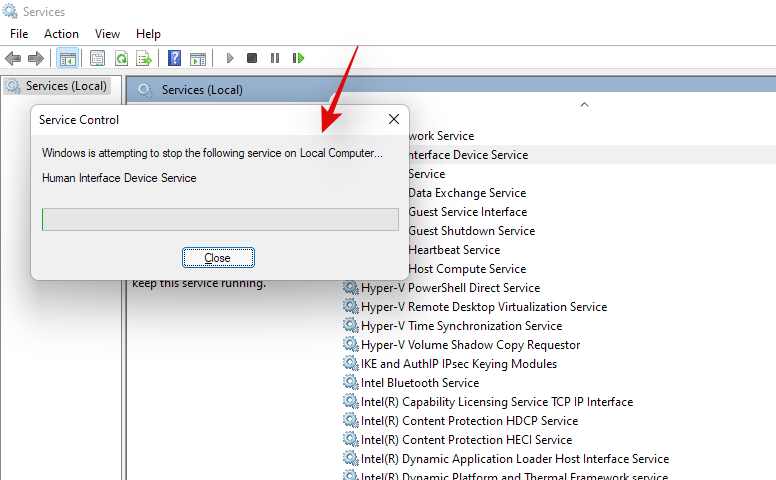
Windows tani do të rifillojë shërbimin tuaj HID.
Mund të provoni të testoni çelësat tuaj të nxehtë tani. Nëse një konflikt në sfond po e pengonte softuerin tuaj të personalizuar të lidhej me shërbimin HID, atëherë ky problem tani duhet të zgjidhet dhe funksionaliteti juaj i çelësit të nxehtë tani duhet të rikthehet.
Metoda # 7: Çaktivizoni çelësat e filtrit
Filter keys are another culprit within Windows that is known to cause issues on many devices. Ideally, Filter keys is an accessibility feature meant to be used so that you can avoid brief repeated key inputs which is quite useful for users with anxiety, hyperactivity, hand tremors, and other similar conditions.
However, if this feature has been enabled by mistake, then it could prevent Windows from detecting your hotkey inputs and combinations. You can check if Filter keys are enabled on your system and disable them using the guide below.
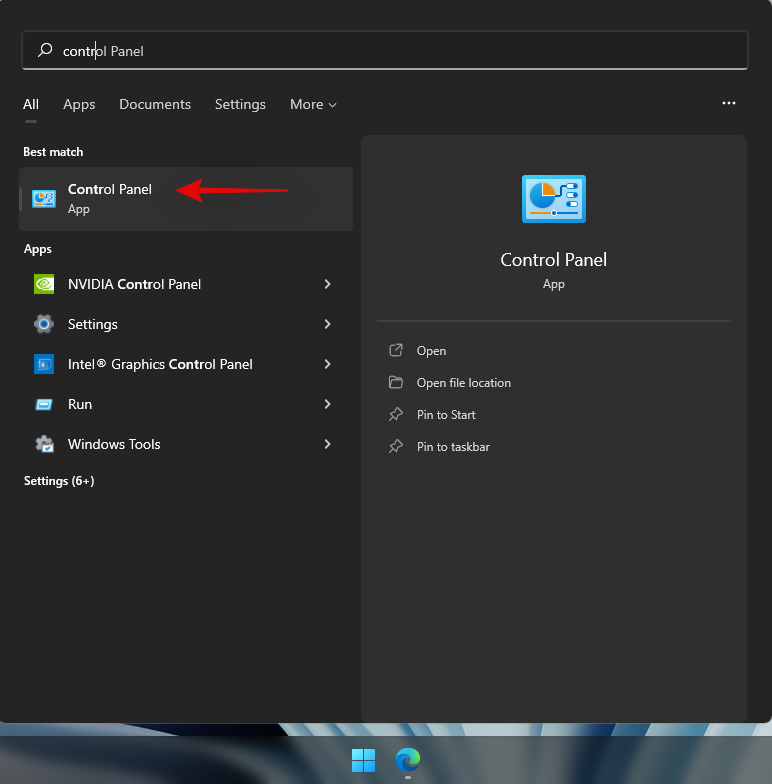
Press Windows + S and search for Control Panel. Click and launch the app once it shows up in your search results.
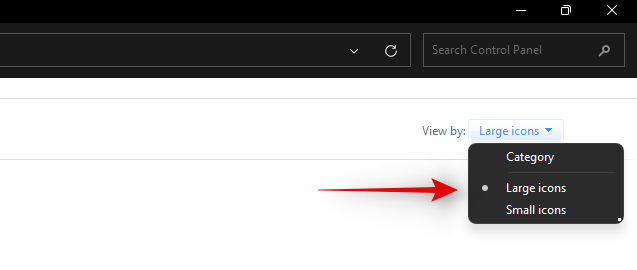
Switch to ‘Large icons’ by clicking on the drop-down menu in the top right corner.
Click on ‘Ease of Access Center’.

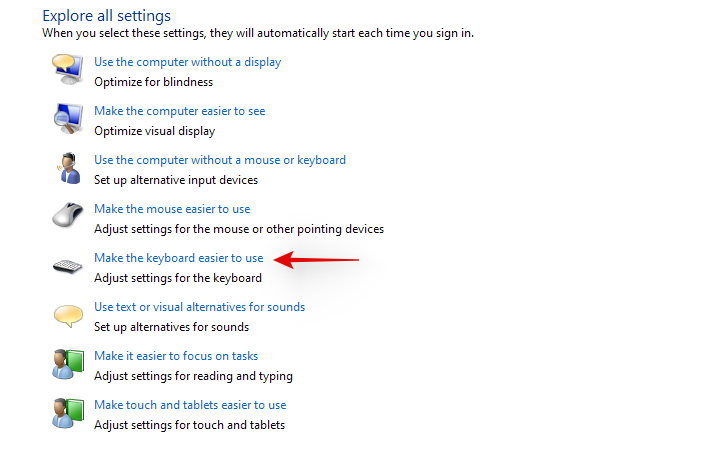
Click on ‘Make the keyboard easier to use’.
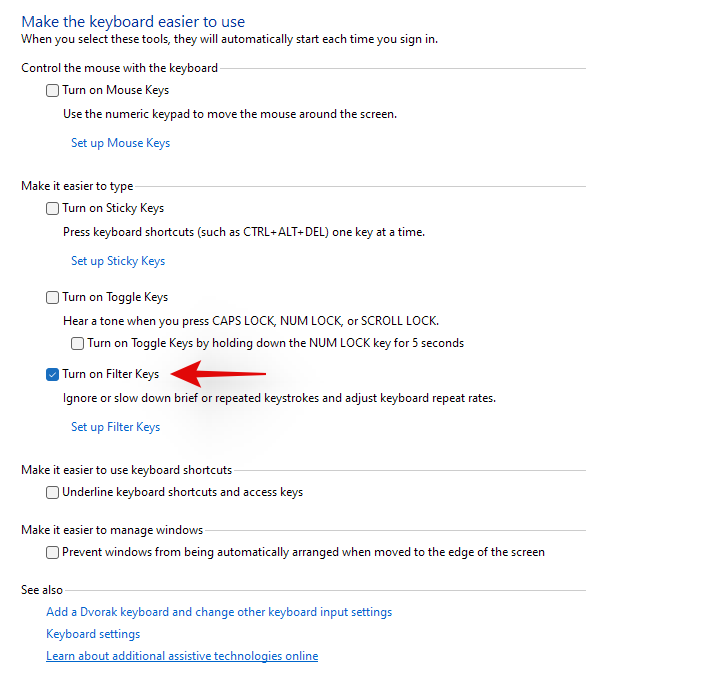
Now uncheck the box for ‘Turn on filter keys’.
Click on ‘Ok’ at the bottom.
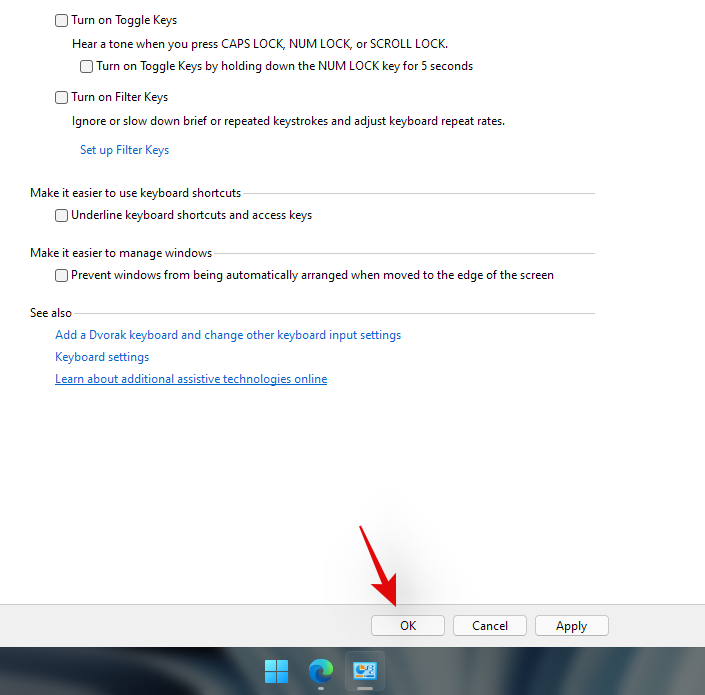
And that’s it! Filter keys should now be disabled on your system. Check your hotkey combinations and their functionality should now be restored on your system.
Method #8: Disable Function (Fn) lock if available
Fn lock is a feature in most laptops that allows you to lock and use the Fn keys and their functionality. Most systems use Fn keys as alternate keys mapped to functions and utilities that will be needed to manage your system. For example, F7 could be used to increase brightness and F8 could be used to decrease brightness. If directly pressing these keys helps you manage your brightness then the Fn lock is disabled on your laptop.
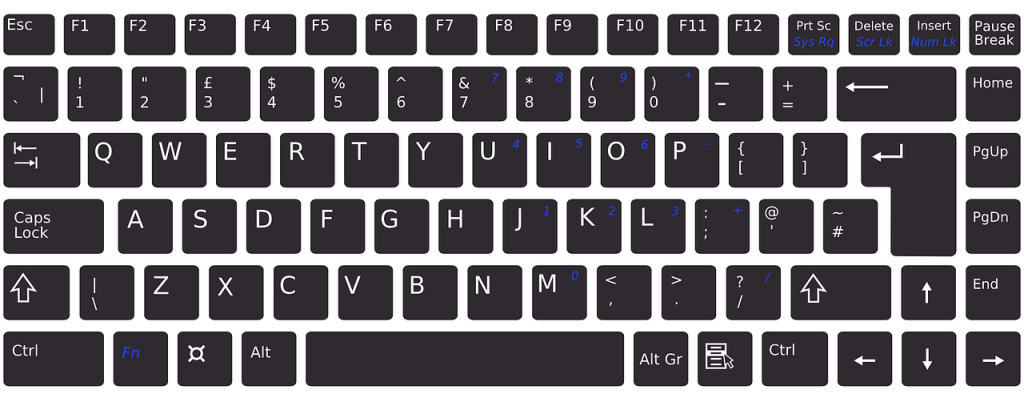
However, if hitting F7 and F8 registers as the respective key then the Fn lock is enabled on your device. In such cases, your Fn keys will behave normally and you will need to use Fn + F7 or F8 combination to adjust your brightness. You can disable or toggle this lock using keyboard shortcuts on most laptops. Look for an ‘Fn Lock’ icon on one of your keys and pres Fn + the respective key, on your keyboard. This should help disable Fn lock on your keyboard if enabled, and restore your hotkeys functionality.
In case a key combination is not available on your device, then you will most likely need to access your BIOS. Most manufacturers allow you to disable and enable Fn lock from the BIOS for easy access. Simply press F2 on your splash screen once your laptop is booting to enter the BIOS menu. Once in the BIOS menu, find the relevant option and toggle the Fn lock for your laptop.
In case a BIOS menu option is also not available to you then your laptop most likely uses the default Fn lock combination which is ‘Fn + Esc’ on your keyboard. This will help toggle the Fn lock on your system which should help restore your hotkeys.
Method #9: Check the on-screen keyboard
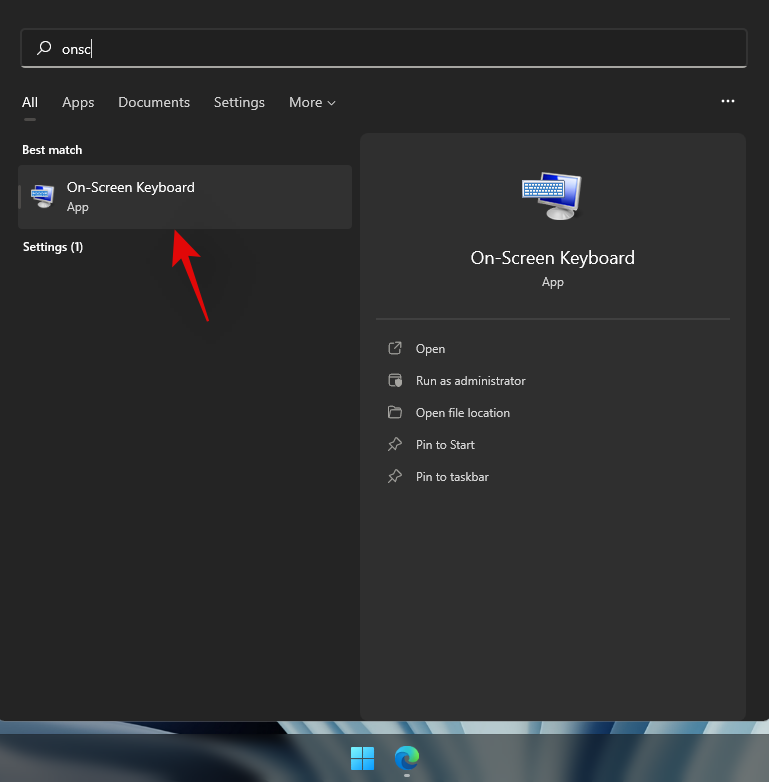
On-Screen keyboard within Windows can help you determine if your hotkeys have actually stopped working or you are facing a software issue. Start by launching the on-screen keyboard on your laptop using the taskbar icon. If the icon is hidden, press Windows + S on your keyboard and search for ‘On-Screen Keyboard’. Click and launch the app from your search results.
Now try using a hotkey that does not use Fn keys on your keyboard as they would be unavailable on your on-screen keyboard. If not try testing out each key and see if it still works on your laptop.
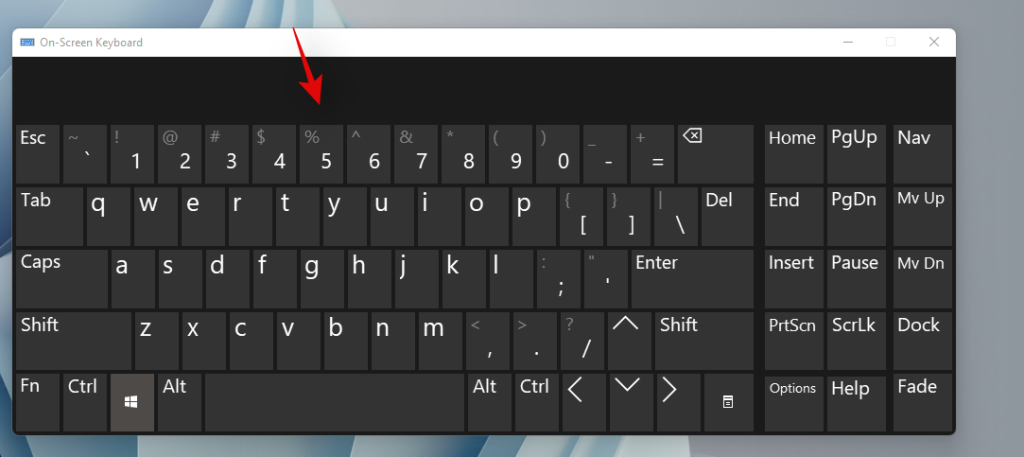
If all your keys seem to be registering with hotkeys working via the on-screen keyboard, then this indicates a hardware issue with your keyboard. In such cases, we recommend you get in touch with your OEM support team and try to solve your issue. If however, you are unable to activate your hotkeys via the on-screen keyboard as well, then you can use the fixes below to try and solve your issue.
Method #10: Use Windows troubleshooter
If hotkeys still fail to work on your system then it’s time to run a dedicated Windows troubleshooter. Windows troubleshooters have become highly advanced in the past few years and they can help fix most issues with your system nowadays. Use the guide below to run a keyboard troubleshooter on Windows 11.
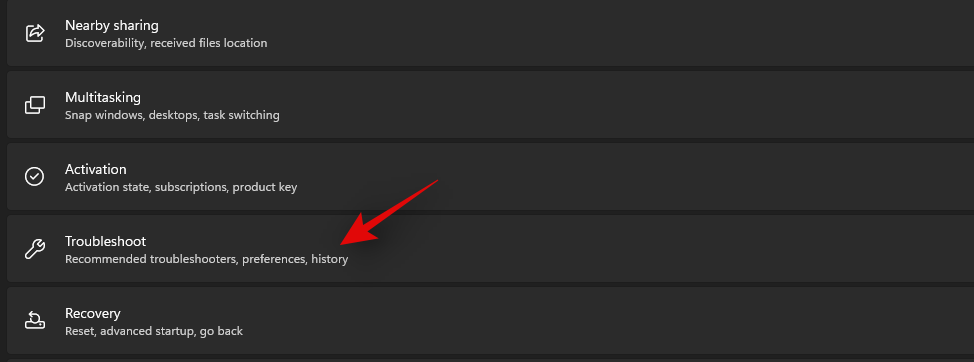
Press Windows + i on your keyboard and click on ‘Troubleshoot’ on your right.
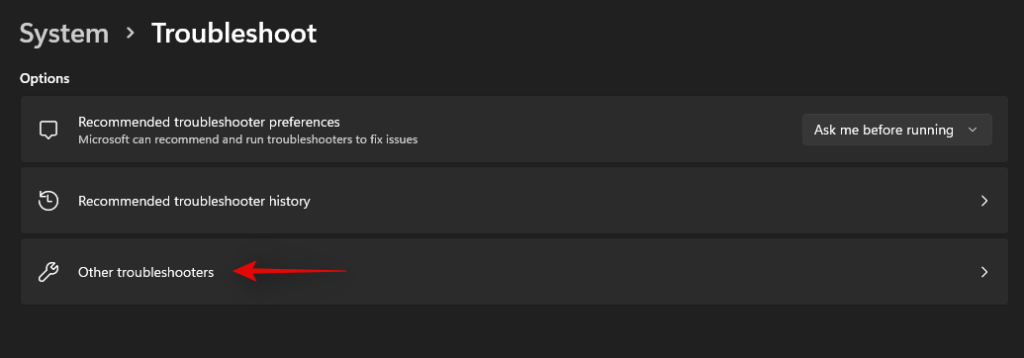
Now click on ‘Other troubleshooters’.
Scroll down and click on ‘Run’ beside ‘Keyboard’.

Windows troubleshooter will now do its thing and try to find issues with your keyboard.
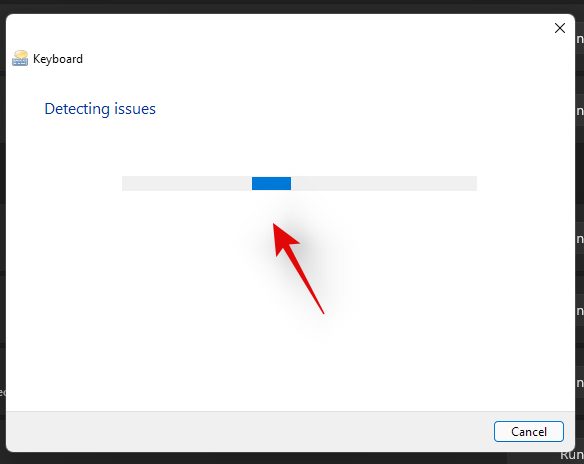
If any are found, follow the on-screen instructions to apply the relevant fixes. However, if the troubleshooter does not find anything then you can use the methods below to try and get your hotkeys working again.
Method #11: Run SFC scan
If hotkeys still aren’t working on your laptop then this might indicate an issue with your Windows installation. Let’s try to fix Windows system files and Windows 11 image on your laptop to try and fix hotkeys on your system. Use the guide below to get you started.
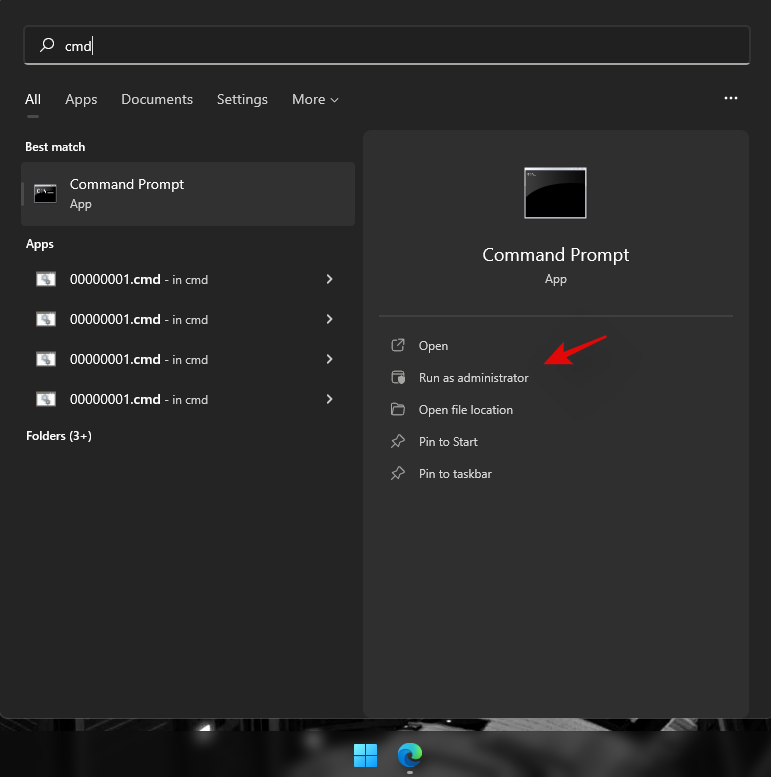
Press Windows + S on your keyboard and search for ‘CMD’. Click on ‘Run as administrator’ once it shows up in your search results.
Now type in the following command and press Enter on your keyboard to execute it.
sfc /scannow

Windows will now scan and verify all of your system files and replace corrupted ones with fresh system files. If a corrupted Windows 11 installation broke your hotkeys functionality, then this should help fix it on your laptop.
Method #12: Run DISM fixes to restore Windows image
If you got the following message after running the SFC scan above, then it is highly important to run the DISM commands to fix your Windows 11 image.
“Windows Resource Protection found corrupt files but was unable to fix some (or all) of them”
Additionally, if the SFC scan is completed successfully but your hotkeys still do not work, then you can use the DISM commands to try and fix your Windows image as well. This will restore system files and solve background conflicts that might be preventing you from using your hotkeys. Follow the steps below to get you started.
Press Windows + S on your keyboard, search for CMD and click on ‘Run as administrator’ once it shows up in your search results.

Type in the following command and press Enter on your keyboard to execute it.
DISM /Online /Cleanup-Image /RestoreHealth

Wait for the process to complete and restart your laptop for good measure.
If a corrupted Windows image was the cause of your issue, then hotkey functionality should now be restored on your laptop.
Method #13: Uninstall any third-party tools
If you have any third-party tools customizing your keyboard then we recommend you disable or uninstall them at once. This includes the likes of key mappers, macro customizers, keyboard backlighting customizers, keyboard layout changes, and more. Such apps use different ways to hook into your keyboard drivers via Windows and any one of these could be outdated and not compatible with Windows 11 on your system.
We recommend you uninstall any such tools from your system at the earliest and remove any additional leftover configuration files if available. You should also check for driver updates to your keyboard and roll back to a previously known driver to revert any major changes applicable to your system. Use the guide below to roll back your keyboard driver.
13.1 How to rollback your keyboard driver
Press Windows + X on your keyboard and click on ‘Device manager’.

Find the desired keyboard in your list of devices and right-click on it once found.

Select ‘Properties’.
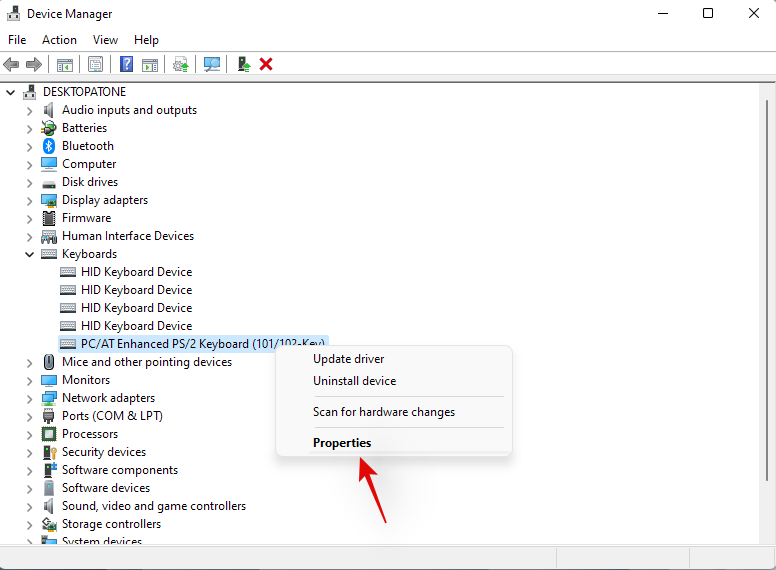
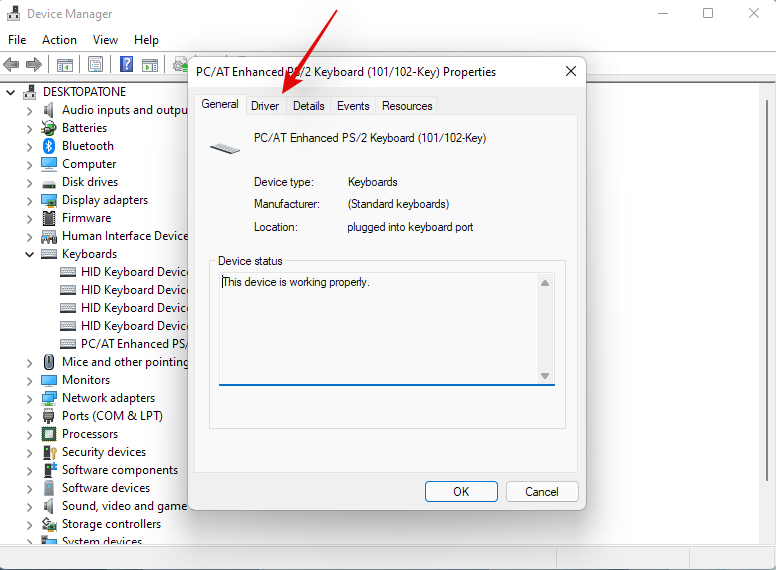
Click and switch to the Driver tab.
Click on ‘Rollback driver’ if available.
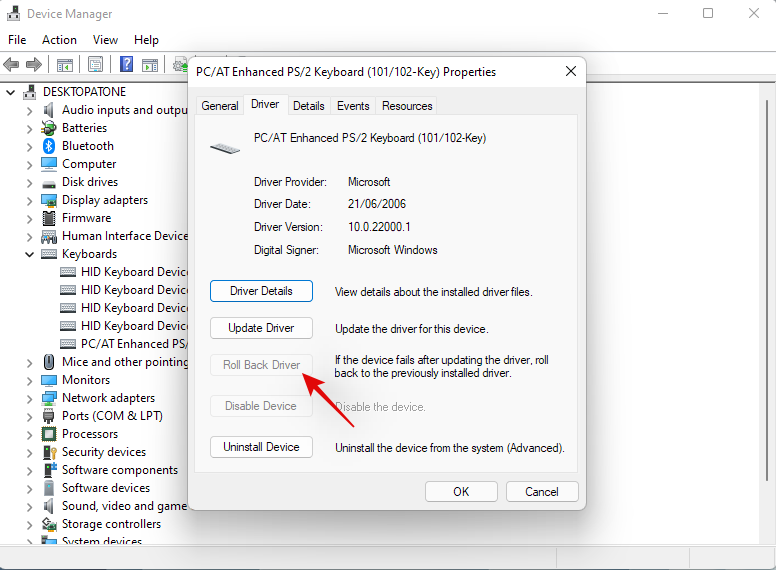
Follow the on-screen instructions to finish rolling back your driver.
Restart your system if prompted.
Once the driver is reverted to its previous iteration hotkeys should start working on your system again.
However, if you don’t have the option to roll back your driver then you will need to uninstall the installed drivers for your keyboard and hope that Windows sources the correct drivers when it scans for new hardware on your system. If you have dedicated drivers available for your keyboard on your OEM support site, then you can install them manually. Follow Method #10 below to reinstall your keyboard drivers manually or through Windows in this case.
Method #14: Connect to a different USB port (external keyboards only)
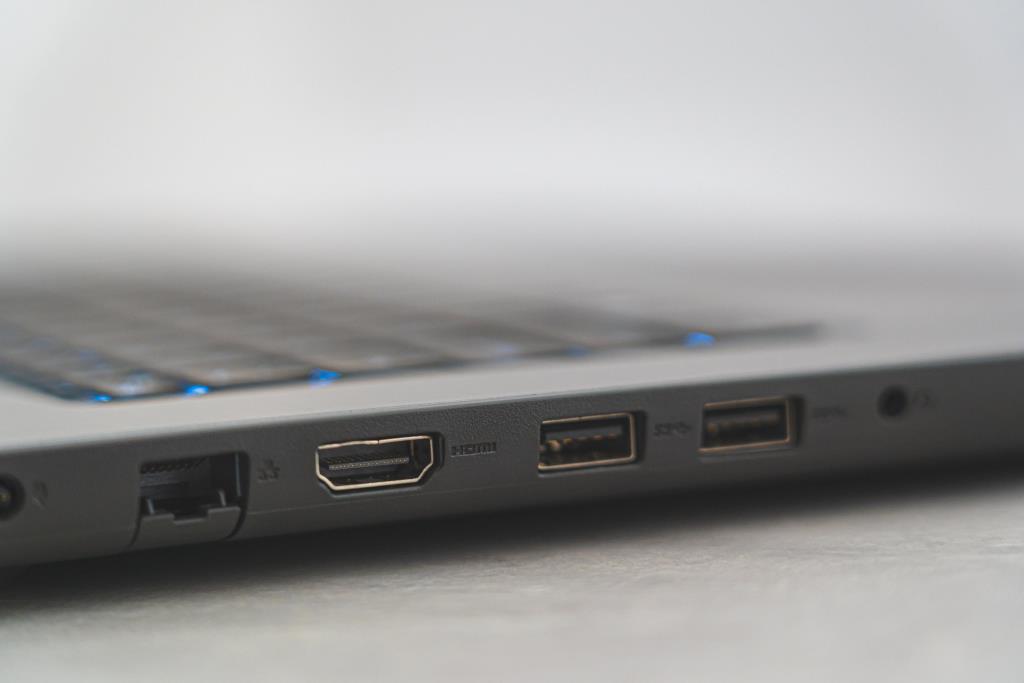
If you are using an external keyboard then we recommend using a different USB port. Depending on your keyboard you might need a USB 2.0 or USB 3.0 port for compatibility and keyboard layout reasons. Additionally, if your keyboard uses fancy backlighting and other custom features then it likely requires a USB 3.0 port on your system to power all of its features.
In contrast, if you are trying to use a legacy keyboard via adapters then you will likely need to test USB 2.0 and USB 1.2 for best performance depending on your unit. Moreover, we recommend you ensure that your laptop is plugged into power so that it can power your USB ports properly.
If however, your external keyboard still fails to work then you can try reinstalling its drivers on your system using the guide in this post.
Method #15: Check GPO and re-enable hotkeys if disabled
If you are using Windows Pro or higher that has been issued by your organization or your educational institute then it is likely that hotkeys have been disabled on your system by your administrator. This could be a side effect due to a recent change, or it could be your new company policy.
Administrators tend to disable third-party apps on company-issued and education systems which also, in turn, disables hotkey functionality for most laptops. You can fix this issue by contacting your administrator and whitelisting your hotkey app in case you don’t have access to the Group Policy Editor. However,
If you are an administrator, with access to GPO, then you can use the guide below to re-enable hotkeys on your system.
Press Windows + R on your keyboard, type in the following term, and press Enter on your keyboard.
gpedit.msc
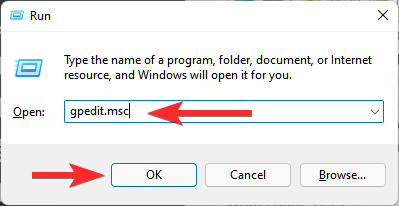
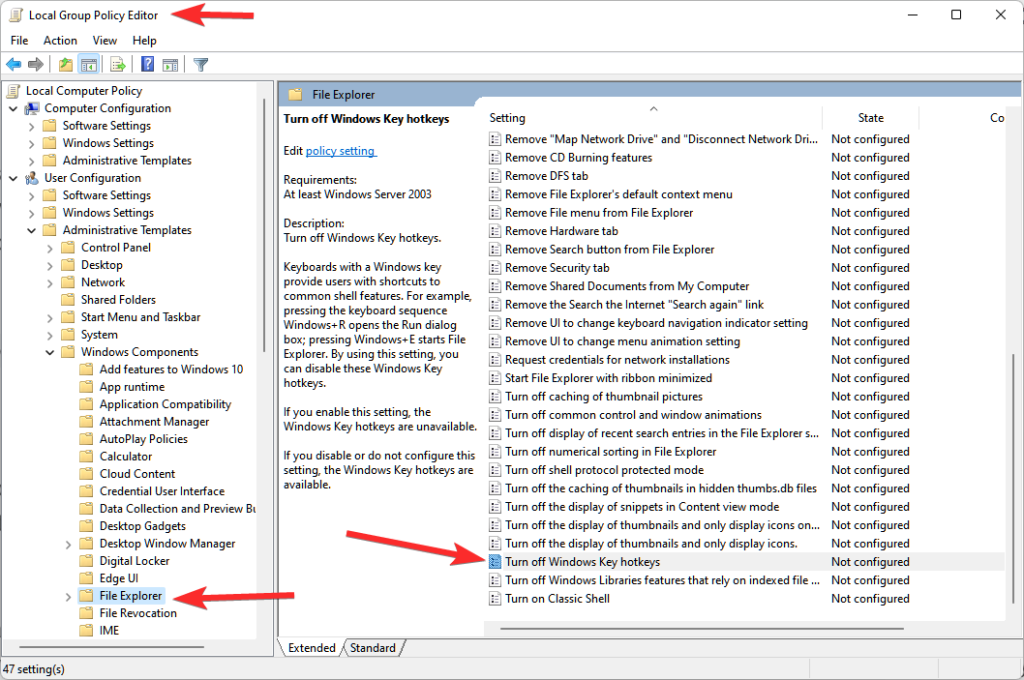
Navigate to the following path.
User Configuration > Administrative Templates > Windows Components > File Explorer
Double click on ‘Turn off Windows Key hotkeys’.
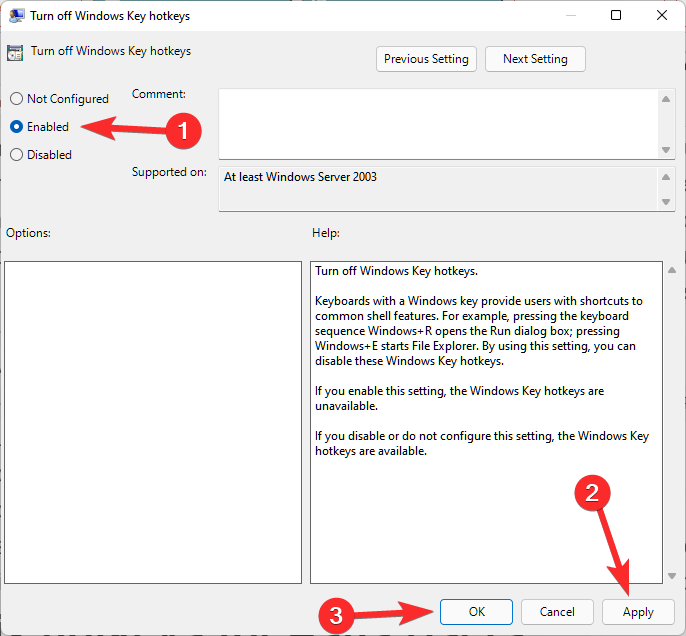
Click and select ‘Enabled’ in the top left. Then click ‘Apply’ in the bottom right and then click ‘OK’.
Restart your laptop for good measure and hotkey functionality will now be restored on your system. Please keep in mind that this will only work for OEMs that hook into Windows shortcuts natively to get hotkeys working again. For manufacturers that have dedicated utilities, you can use one of the guides below.
Fix hotkeys for Asus Users
If you are an Asus user with a ROG or a TUF unit, then it is likely that you are dealing with Armoury Crate. Armoury Crate is Asus’s utility that helps you manage your power plan, performance plan, overclocking, keyboard backlighting, and more depending on your laptop. Over the years Armoury Crate has grown to be quite finicky and has been riddled with telemetry and adware.
Moreover, the Aura Sync utility seems to be a hit or miss when syncing your peripherals’ backlighting with each other. If you have an Asus unit and hotkeys don’t seem to be working for you then it is likely that the Asus hotkeys app hasn’t been launching in the background. In this case, you can either try to manually start the app or reinstall AC service and the Asus System interface reconfigure your hotkeys and restore their functionality. Use one of the guides below that best fits your current needs and requirements.
Method #1: Try to manually start AsusHotkeyExec.exe
Press Ctrl + Shift + Esc on your system to open the Task Manager and switch to the ‘Details’ tab.
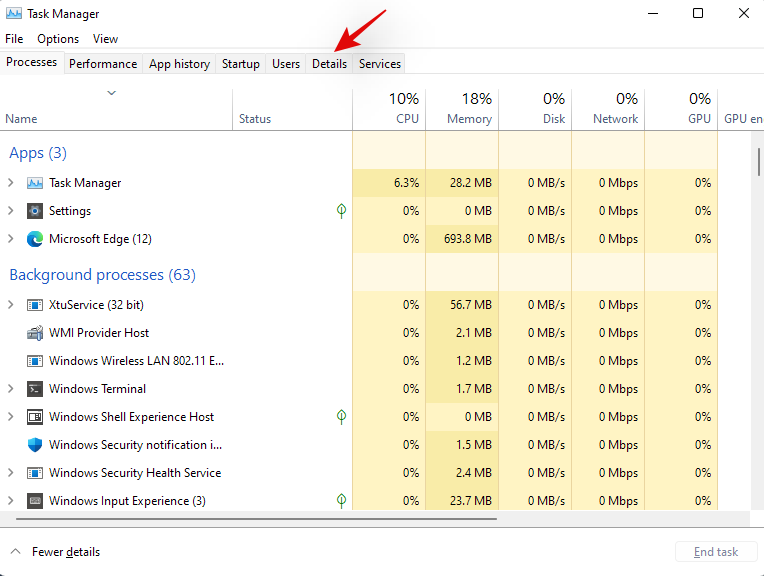
Depending on your preferences, the install location of AsusHotKeyExec.exe could vary. Hence we will use an already running process to find its install location. Start by right-clicking on either of the following ongoing tasks.
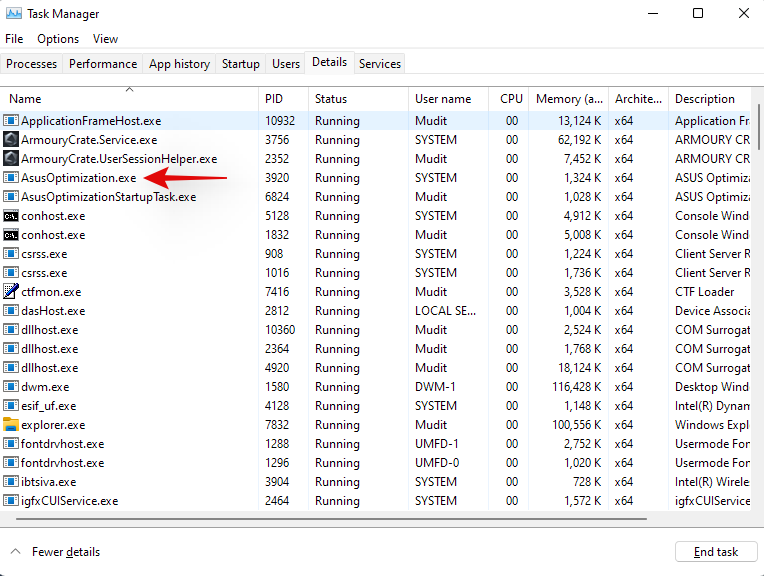
- AsusOptimization.exe
- AsusOptimizationStartupTask.exe
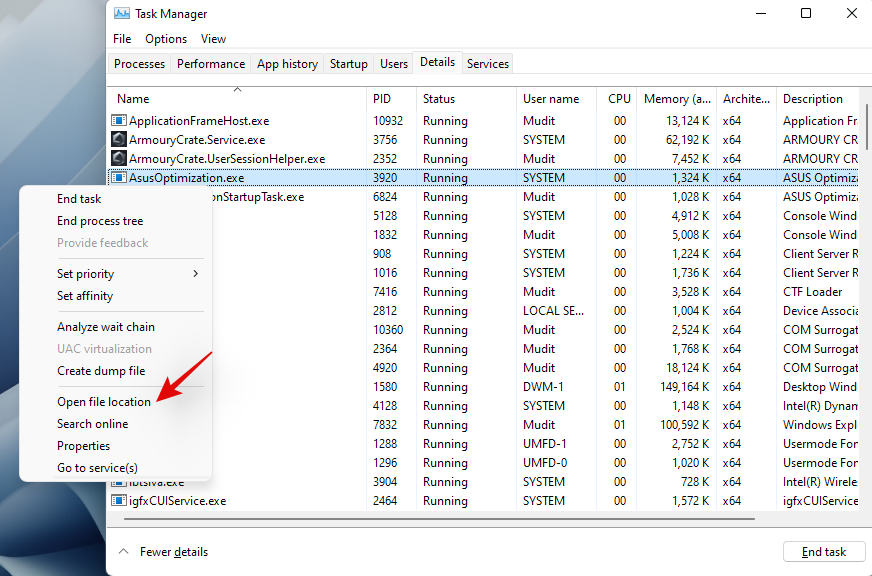
Select ‘Open file location’.
You should now be taken to the ‘C:\Windows\System32’ ideally, where you should find the ‘AsusHotkeyExec.exe’. Right-click on the app and select ‘Run as administrator’.
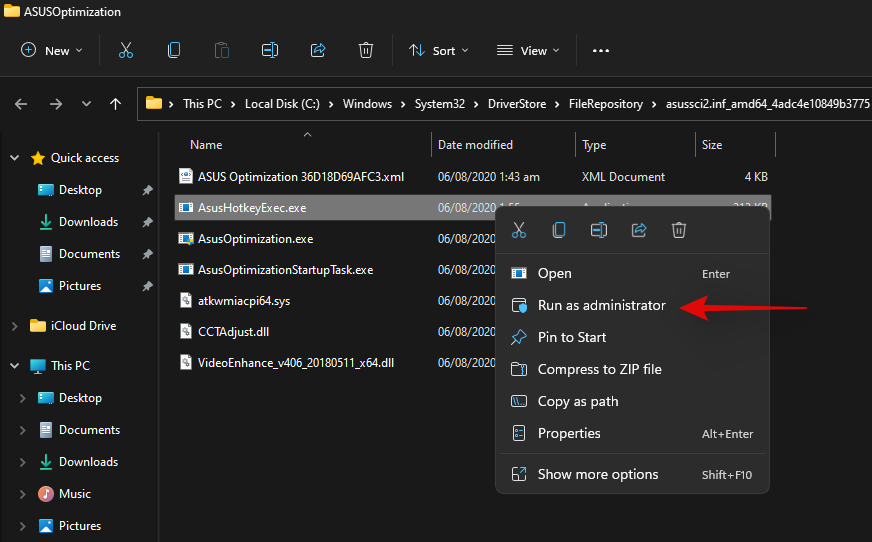
The app will now launch in the background and restore hotkey functionality on your system.
Try using one of your hotkeys now, if it seems to be working then, likely, AsusHotkeyExec.exe did not automatically launch in the background. This could be an isolated incident but if the app fails to launch even after a restart, then you will need to re-enable its auto start functionality.
You can do this by reinstalling Asus System Interface and Armoury Crate Service on your laptop using the guide below.
Method #2: Re-install Asus System Interface and Armoury Crate service
Asus System Control Interface is a prominent utility regularly updated by Asus that helps most tools like Armoury Crate, Armoury Crate Service, MyAsus System Diagnosis, and more to run properly on your system. Armoury Crate service on the other hand is your overclocking utility bundled with specific overclocking and power management configurations for your specific device. Depending on your ROG or TUF unit, AsusHotkeyExec.exe could be bundled with either of these services. Let’s re-install both of them on your system.
Visit the link above and click on ‘Laptops’.
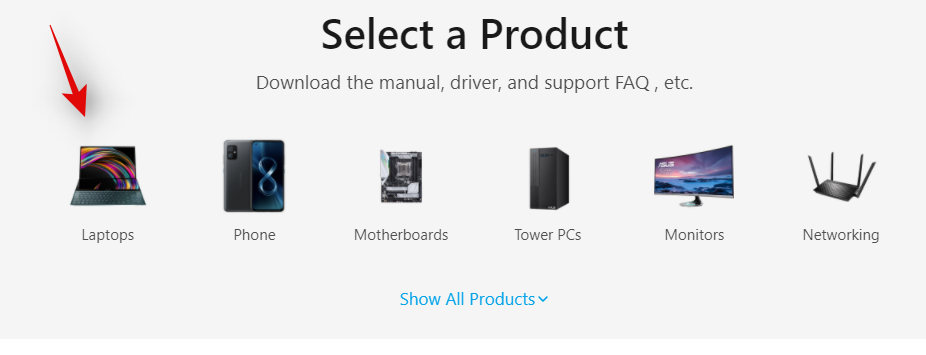
Click on ‘Product Series’ and select your Series from the drop-down menu.
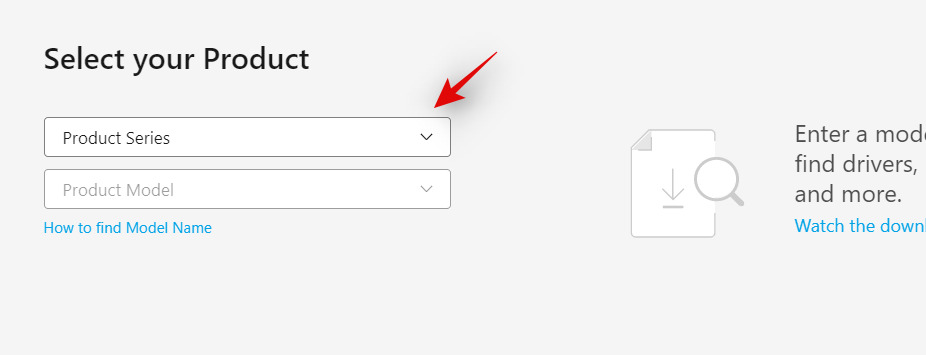
Click on the next drop-down menu and select your laptop from the list.
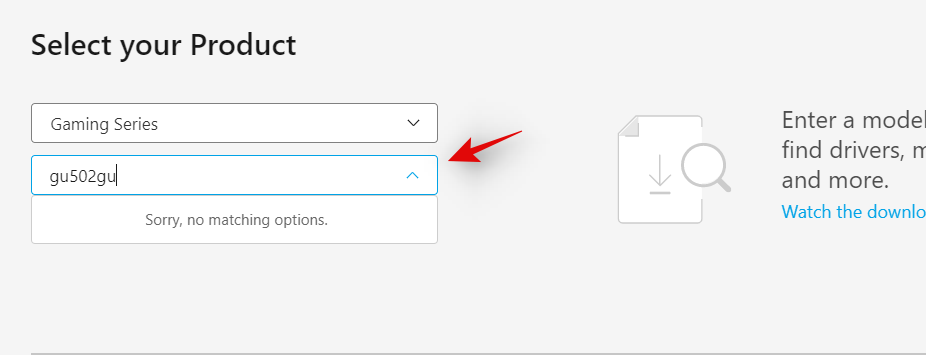
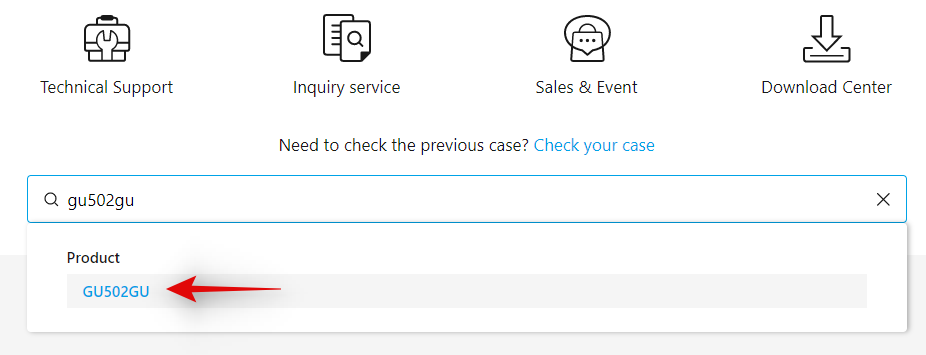
If your unit is not listed in this list, then you can search for it using the search bar at the top. Click on your laptop model once it shows up in your search results under ‘Products’.
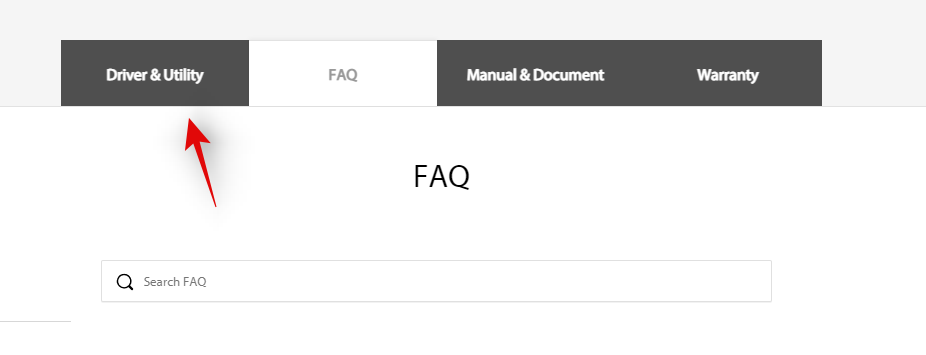
Click on ‘Driver & Utility’.
Choose ‘Windows 10 64-bit’ as your OS.
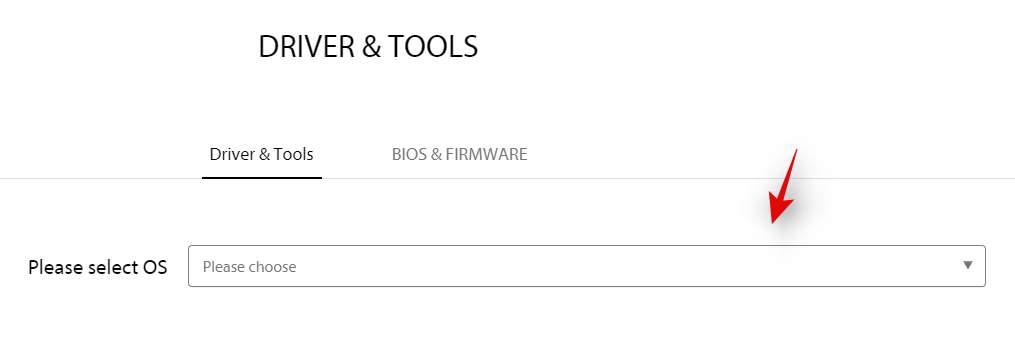
Now scroll down to the ‘Software and Utility’ section and click on ‘Show all’.
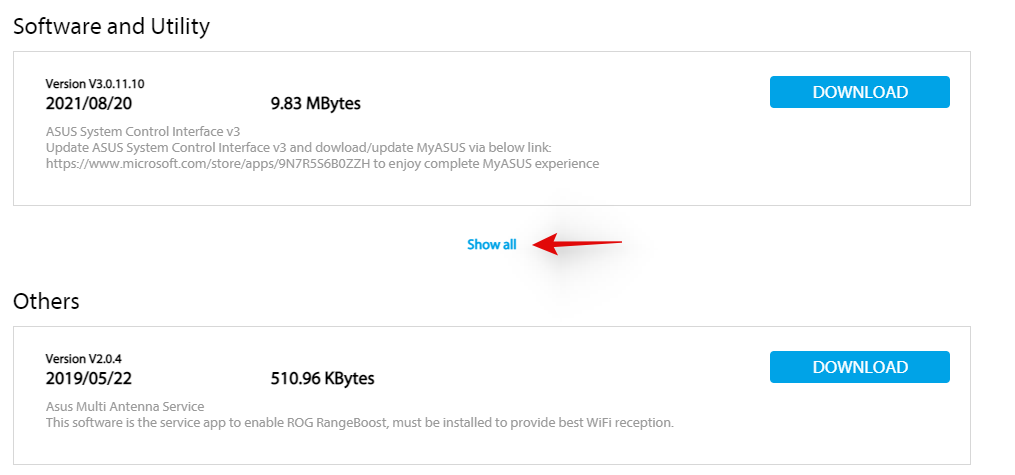
Click on ‘Download’ beside the latest version of ASUS System Control Interface.
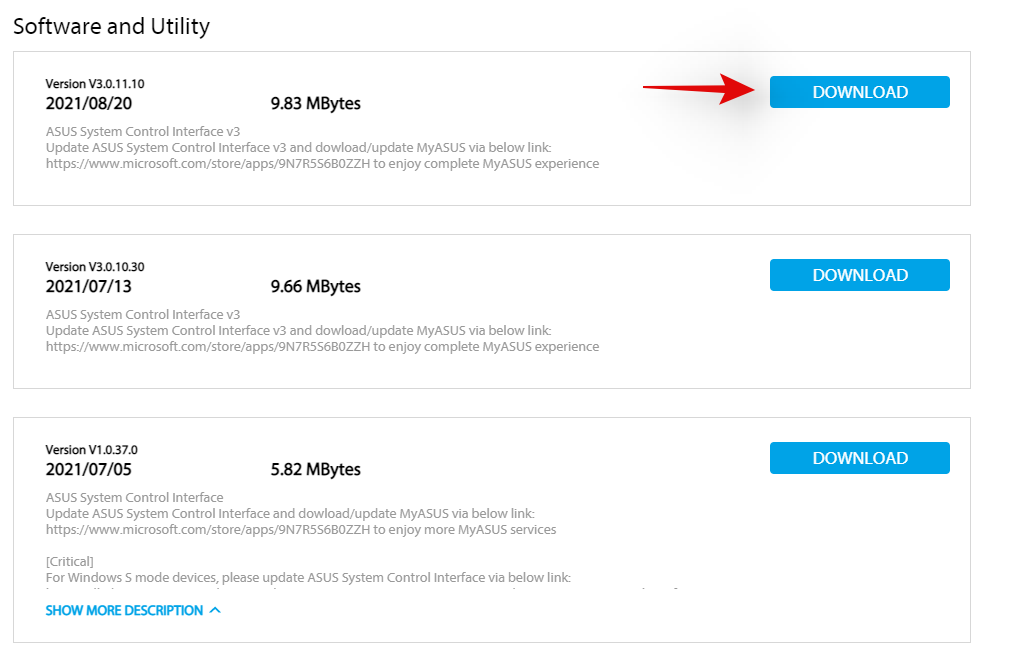
Similarly, click on ‘Download’ beside Armoury Crate Service.
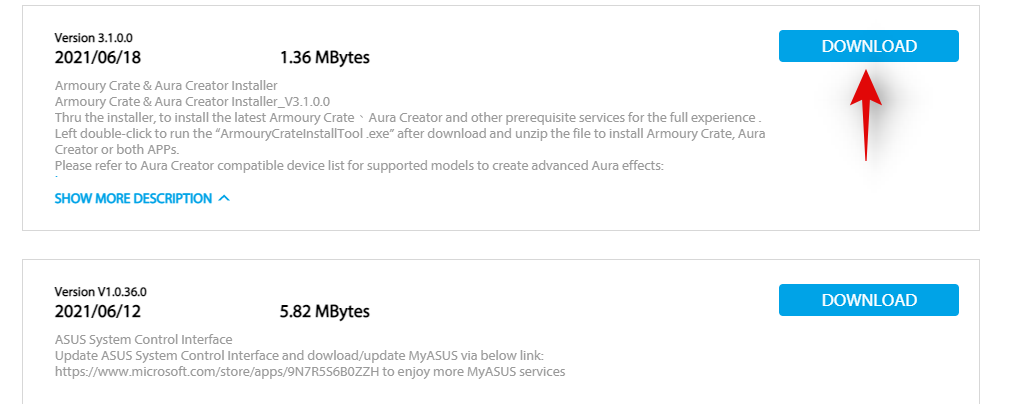
Note: Asus has now started bundling the Armoury Crate app, Armoury Crate Service, Aura Sync app, and Aura Sync service in a single package for many laptops. If this is the case for your unit as well, then you can download this package.
Now let’s remove all installed services and packages that we are going to reinstall. Press Windows + i on your keyboard and click on ‘Apps’ on your left.

Click on ‘Apps and features’.

Now uninstall the following applications if you managed to source the Armoury Crate Service package from the download page.

- Armoury Crate Service
- Armoury Crate Service core
However, if you got a single package to install Armoury Crate, Armoury Crate Service, Aura Sync app, and Aura Sync service, then uninstall the following applications from your laptop.
- Armoury Crate
- Armoury Crate Service
- Armoury Crate Service core
- Aura Sync add-on x32
- Aura Sync add-on x64
- Game Visual or Asus Splendid
- Aura Sync
To uninstall an app, click on the 3-dot menu beside it and select ‘Uninstall’. Click on ‘Uninstall’ again to confirm your choice. Repeat the steps above to uninstall all the necessary apps from your system.
Note: Do not remove services like Refresh Rate service, Pointing device service, and more from your laptop during this process. Even though they hook into the Armoury crate, there is no need to uninstall them as the existing installation will work with your reinstalled Armoury Crate and its services.
We will now uninstall Asus System Control Interface from your system. The best way to do this is by using the Device Manager. Follow the guide below to get you started.
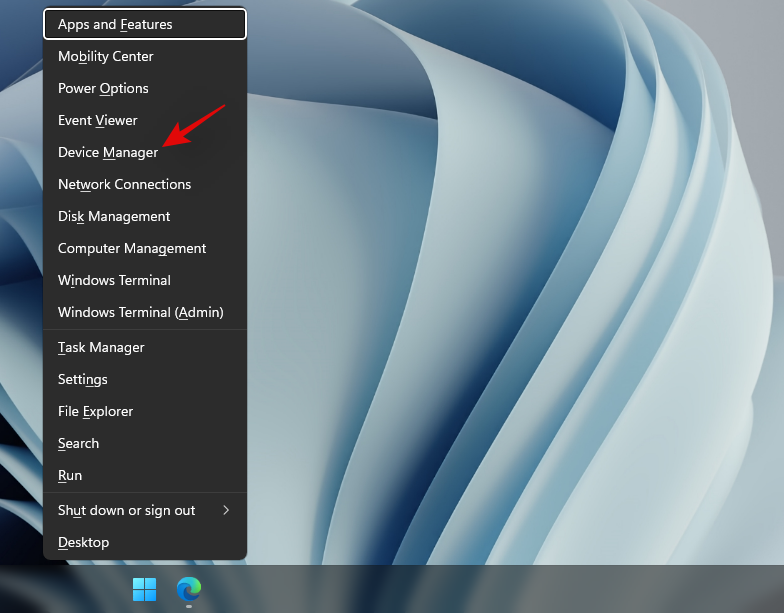
Press Windows + X on your keyboard instead and select ‘Device Manager’.
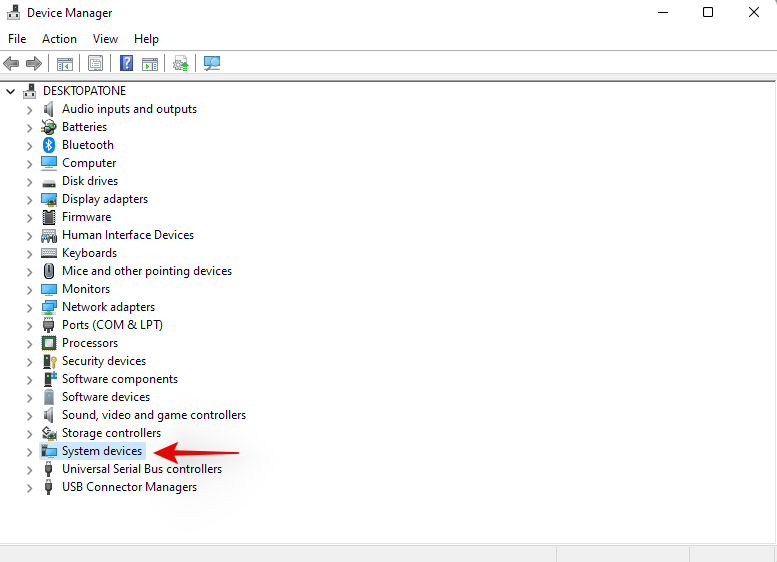
Click and expand ‘System devices’ in Device Manager.
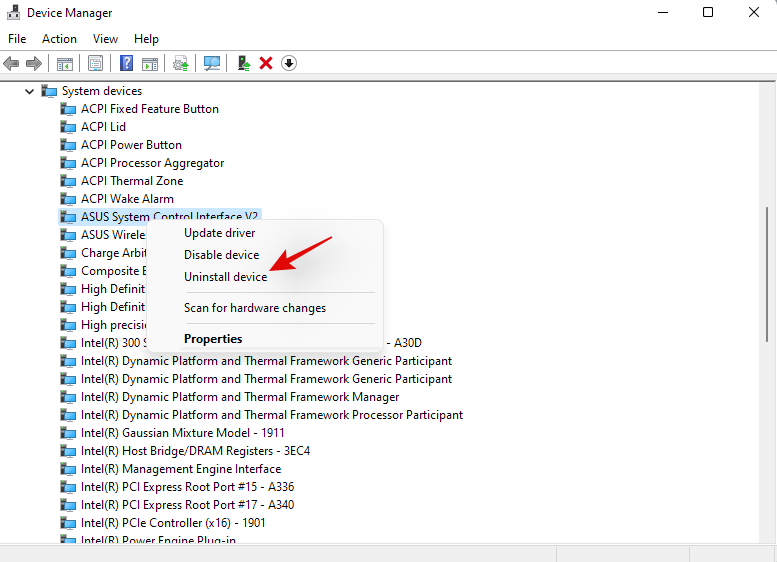
Right-click on ‘Asus System Control Interface’ and select ‘Uninstall device’.
Click on ‘Uninstall’ to confirm your choice. Additionally, check the box for ‘Attempt to remove the driver for this device’ if available.
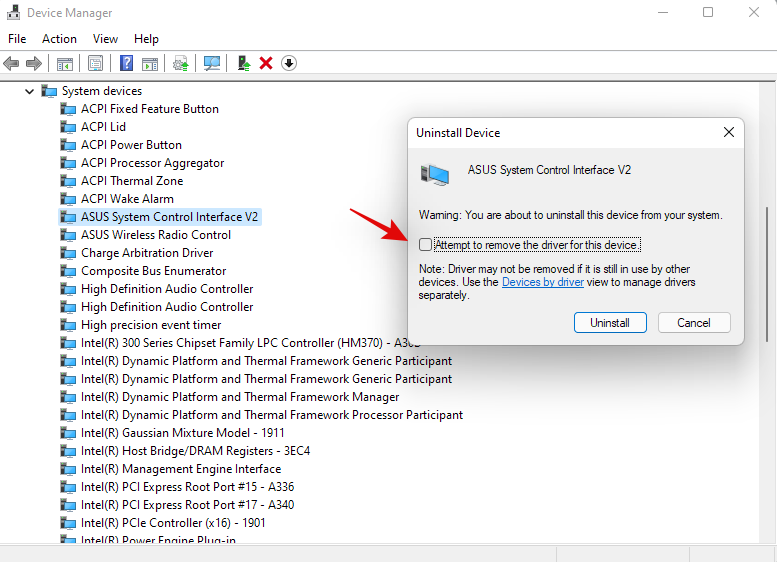
If Asus System Control Interface is unavailable in your device manager then you can restart your laptop at this point. Once restarted, follow the subsequent steps to re-install Armoury Crate and Asus System Control Interface on your system. The concerned drivers will now be uninstalled from your system. You can now restart your laptop for the changes to take effect.
Once your laptop restarts, navigate to the packages we downloaded from Asus’s website on your local storage and start by installing Asus System Control Interface first. Double-click and launch the .exe file and follow the on-screen instructions to install Asus System Control Interface on your laptop. You will be prompted to restart your system once the process completes. We recommend you restart your system at this point before proceeding with the installation of Armoury Crate on your system.
Once your system restarts, double click and launch the Armoury Crate package.
Select the utilities you wish to install on your system. Unless you have other Asus peripherals that support RGB backlighting through Aura Sync, there is no point in installing Aura Sync. Once you have selected the desired utilities, click on ‘Next’.
Click on ‘Install’ to start the installation process.
The package will now connect to Asus’s servers, identify your laptop and install the necessary compatible utilities. Once installed, we recommend you restart your system for good measure.
And that’s it! Once your system restarts, hotkeys should be back up and running again on your system.
Fix hotkeys for Lenovo users
If you own a Lenovo unit especially from the ThinkPad or IdeaPad series, then you will need to try out the following fixes. Lenovo’s professional lineup of laptops is bundled with tons of hotkeys and there are mainly 3 fixes you can try to fix your issue. Let’s first verify if your hotkeys have actually stopped working. Follow the steps below to get you started.
Method #1: Disable all shortcuts and enhancements
Let’s start by disabling all keyboard shortcuts and keyboard enhancements within Windows for your laptop’s keyboard. Follow the guide below to get you started.
Press Windows + S on your keyboard and search for ‘Control Panel’. Click and launch the app from your search results.
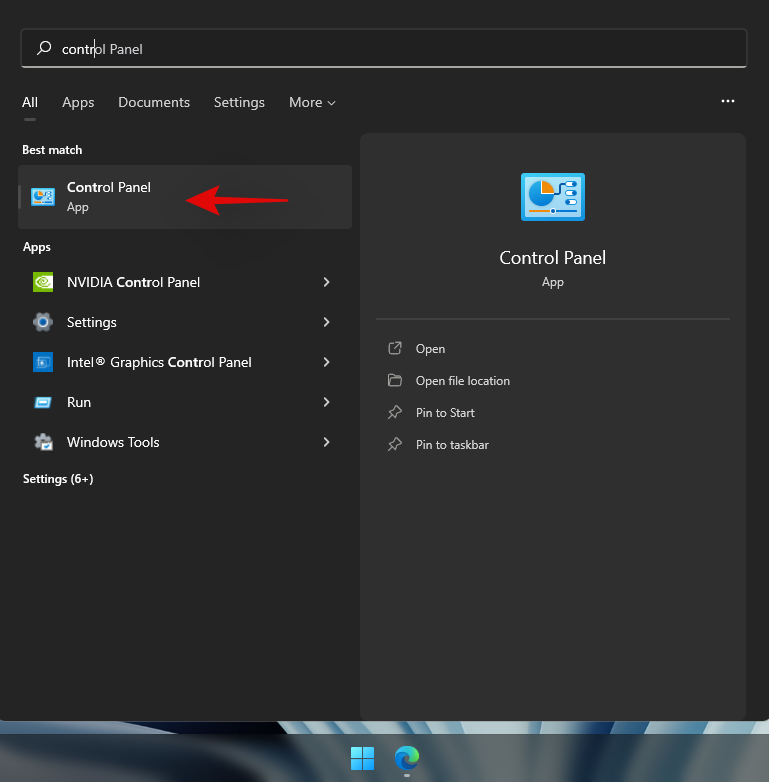
Click on the drop-down menu in the top right corner and select ‘Large icons’.

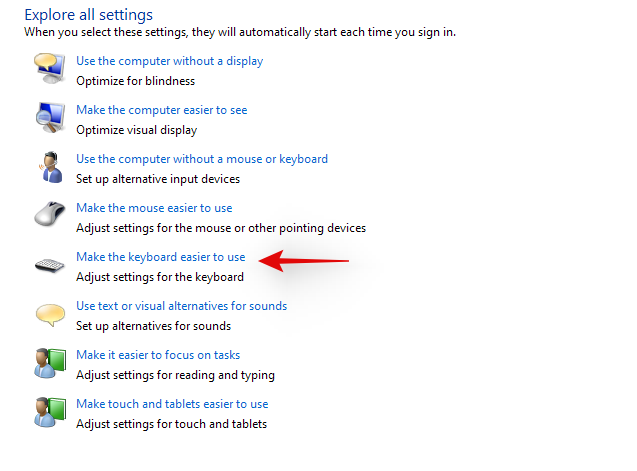
Click on ‘Ease of access center’.

Click on ‘Make the keyboard easier to use’.
Uncheck all the options available on your screen.
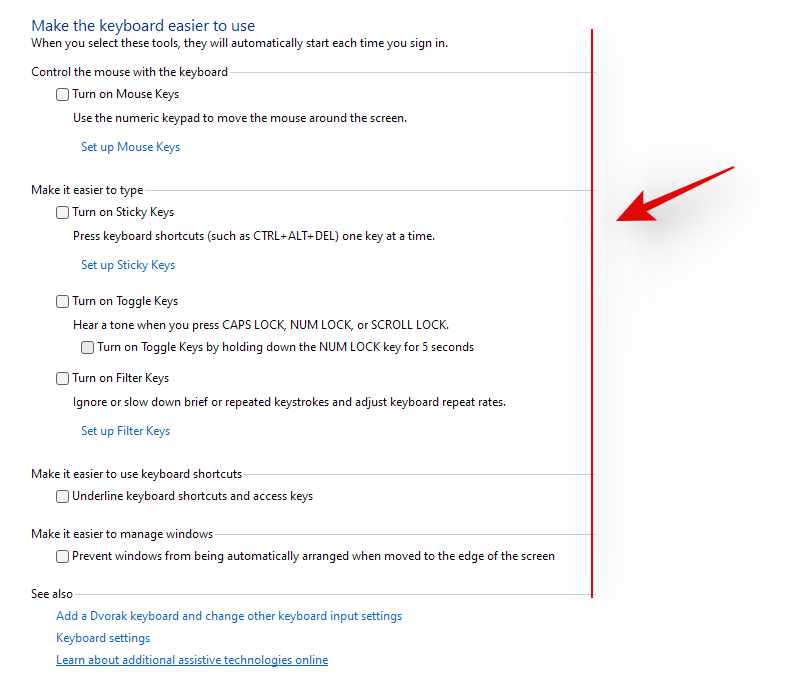
Save your changes and restart your laptop for good measure.

If keyboard enhancements enabled by Windows were causing conflicts with your hotkeys, then your hotkey functionality should be restored on your laptop by now.
Method #2: Update your drivers using Lenovo support
You might have manually updated your drivers, you might have reinstalled and rolled back your drivers, but this isn’t similar to downloading and installing drivers through the support app. Most OEM support apps are designed to automatically scan for known issues with your hardware in the background and fix them automatically. These support app also come with hotfixes and patches that aren’t readily available to the end consumer. These hotfixes and patches are applied when downloading and installing the concerned driver or utility,
Hence we recommend that you download and reinstall the following drivers on your system through the Lenovo support app. Depending on your unit’s make and model, you could be using a different Lenovo app like Lenovo Vantage and more. The process is similar for all these apps and you simply need to manually uninstall your keyboard drivers first and then reinstall the corresponding ones from your support app.
Note: We won’t be removing your power management drivers and instead we will be simply reinstalling them. Removing power management drivers can end up harming your vital components especially if your laptop is doing some resource-heavy work in the background.
Press Windows + X and select ‘Device Manager’.

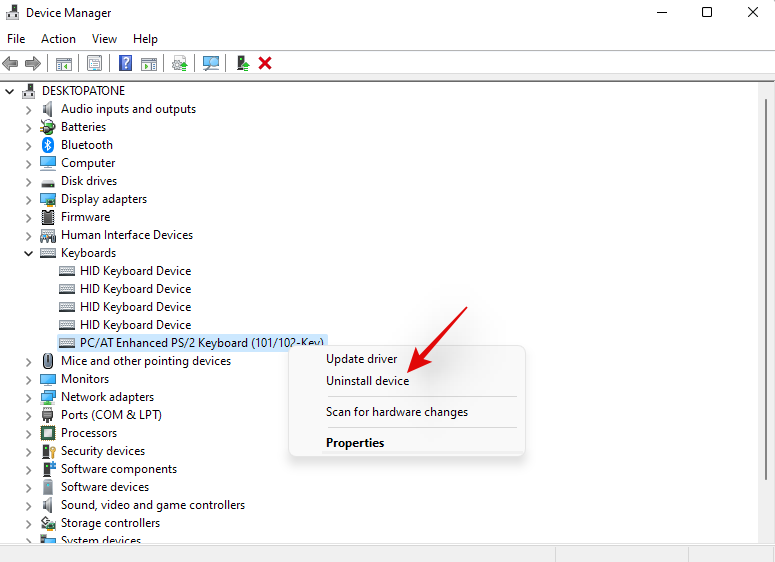
Find your keyboard under ‘Keyboards’ and right-click on it.
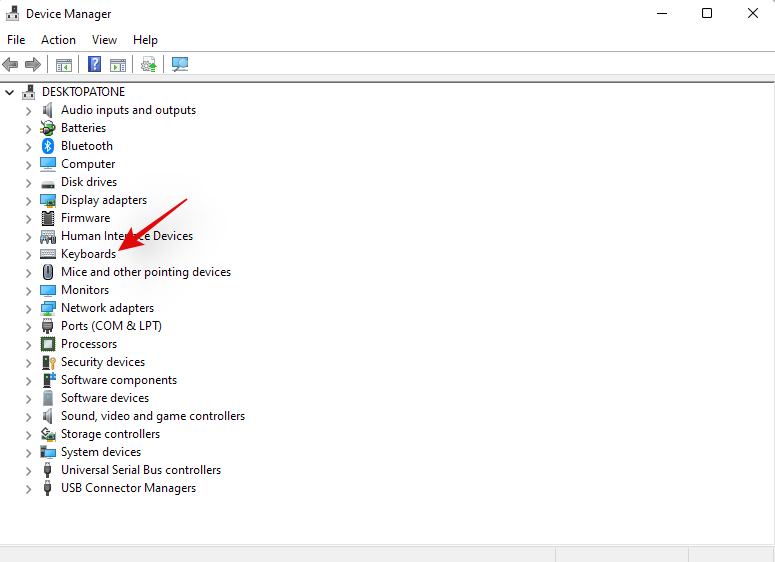
Select ‘Uninstall device’.
Check the box for ‘Attempt to remove the driver for this device’ if available. Click on ‘Uninstall’.
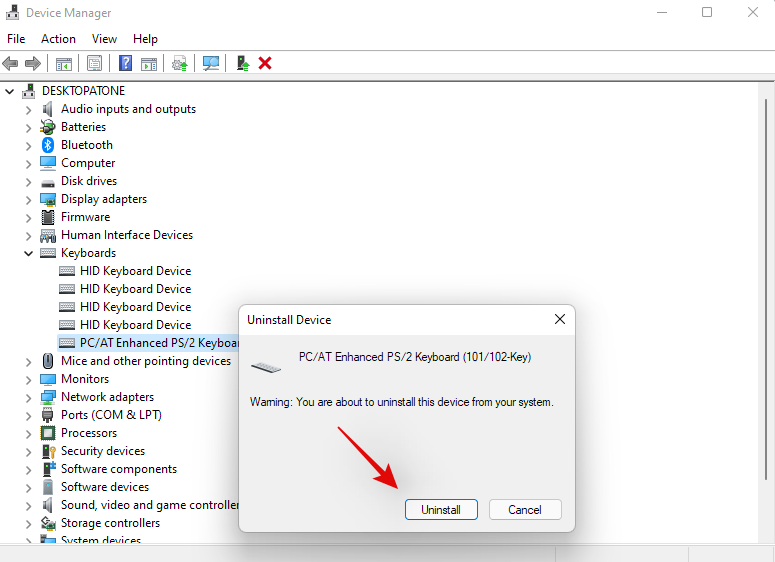
Your keyboard driver will now be uninstalled. Open the Lenovo System Update, Lenovo Vantage, or the corresponding Lenovo support app depending on your current laptop. We will be using the Lenovo System update app for this guide as that will be used by most modern systems currently and in the future. If you do not have the app installed on your unit, then you can use the link below to download it to your laptop.
Download and install the app on your system using the link above. Once installed, launch the app and log in with your device and account details if prompted.
Click on ‘Get new updates’ on your left.
Lenovo System update app will now detect your configuration and look for compatible upgrades accordingly. Once the process completes, all available updates will be shown on your screen according to their priority. Check each of the following sections and check the boxes for the updates you wish to install on your laptop. Your keyboard driver will also show up in this list as it is currently missing from your system. Ensure that you check the box for your keyboard driver before moving to the next step.
- Critical Updates
- Recommended Updates
- Optional Updates
Note: Do not check the boxes for your bios updates. We recommend you download and install bios updates, individually and separately so that your laptop does not face installation conflicts in the background during this process.
Click on ‘Download’ in the bottom right corner.
Lenovo system update will now download and install all the selected drivers on your system. Your laptop could automatically restart a few times during this process which is normal. Simply log back into your account and wait until the installation process has been completed.
Once all the drivers are installed on your system, try using your keyboard hotkeys again. In most cases for Lenovo devices, your hotkeys should be back up and running on your system again. Lenovo is known to apply certain patches in the background when installing hotkey drivers and create certain tasks to maintain the functionality of your hotkeys. A reinstallation should have reinitiated this process again which should have fixed your hotkeys.
Fix hotkeys for Acer users
If you are using an Acer system then there isn’t much you can do at this point. Acer is known to keep its hotkeys simple with minimal customization available to the end-user. This in turn means that if the above-stated general fixes did not work for you then it is unlikely that resetting the CMOS will. However, if you have overclocked your unit or have been messing around with voltage values, then you can try resetting your CMOS to get hotkeys back up and running on your system again.
Resetting the CMOS does a lot of things but it mainly helps reset changes to core system values like your voltage, frequency speed, and more. Resetting the CMOS also helps discharge capacitors on some laptops which can give you a sudo-fresh start which is known to solve many persistent errors and issues with systems in the past. Use this comprehensive guide by us to reset your CMOS on your Acer unit.
Check out: How to Reset BIOS in Windows 11
Facing error codes when restarting HID services? Try these fixes!

If you decided to restart your HID service using the guide at the top, then you could end up facing two common errors depending on how your system has been configured. These are known errors and can be fixed on your system using the guides below. Follow the steps to get you started.
Method #1: For error code 126
Error code 126 can be fixed by replacing the Hidserv.dll to your system 32 folder. Follow the guide below to get you started.
Note: You will need a Windows 11 installation media or ISO in case the .dll file is unavailable on your system. Make sure you have either of these handy before proceeding with the guide below. In case you do not have an installation media handy, then you can use the link below to download Hidserv.dll to your local storage.
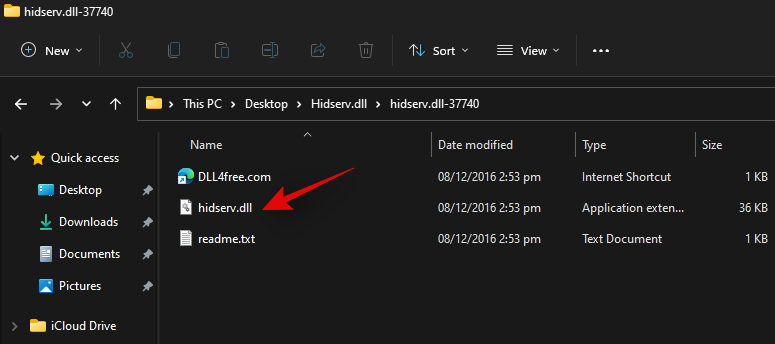
Open the Windows installation media you have handy and search for Hidserv.dll using the search box in your top right corner.
Once found, copy the file to a convenient location on your local storage. If however, you downloaded the file to your local storage using the link above, then extract the archive to a convenient location and follow the steps below to edit its security permissions.
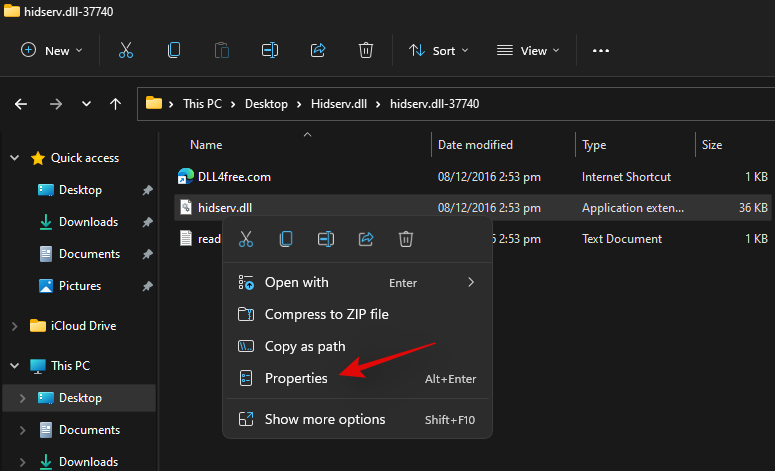
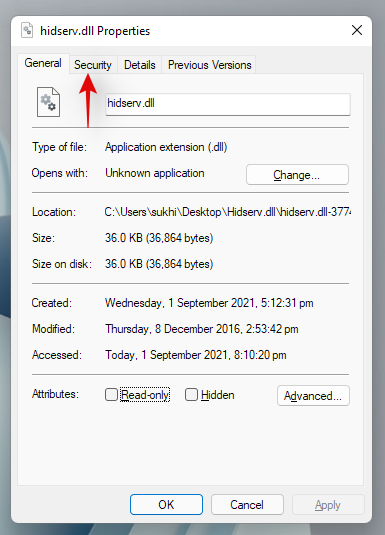
Right-click on the downloaded Hidserv.dll and select ‘Properties’.
We will now need to manually grant permissions to the necessary users and applications so that Hidserv.dll can work properly on your system. Switch to the Security tab at the top.
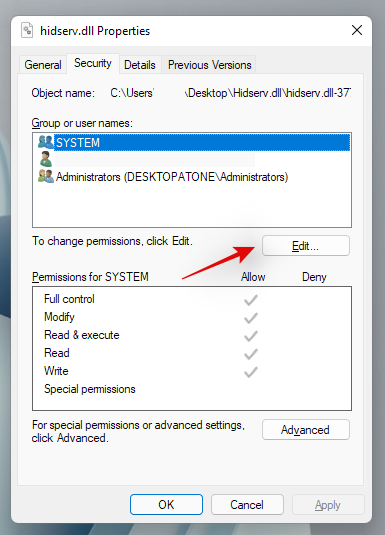
Click on ‘Edit’ at the top.
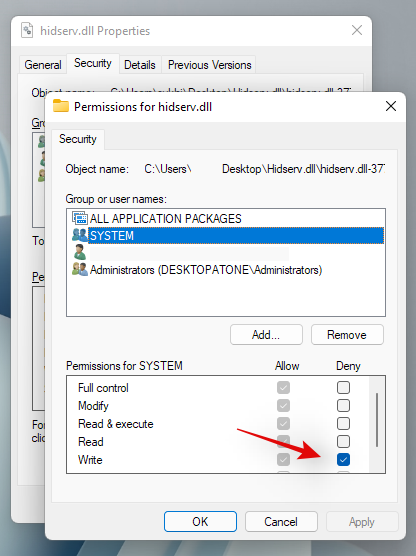
Click on ‘System’ at the top and check the box for ‘Write’
Click on ‘Apply’ once done. Select ‘Yes’ to confirm your choice. Repeat the steps above and restrict permissions for Administrators and other users in the list above. Once you are done, click on ‘Add’.
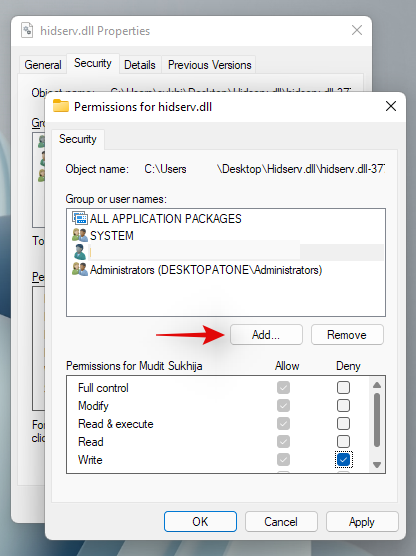
Now enter the following term and press Enter on your keyboard.
All Application Packages
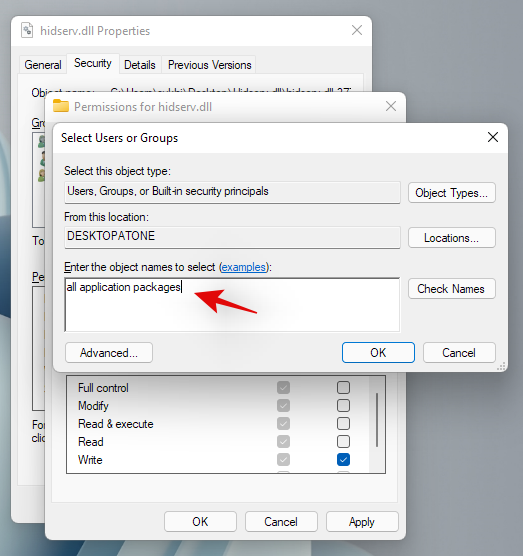
Select the following permissions for ‘ALL APPLICATION PACKAGES’.
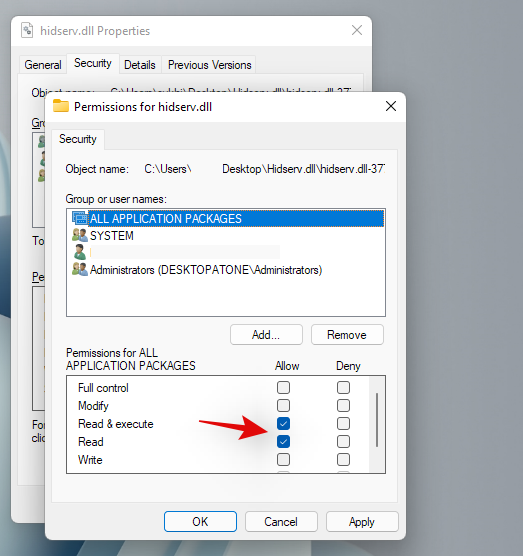
Similarly, click on ‘Add’ again.

Now enter the following term and click on ‘Ok’.
NT Service\TrustedInstaller
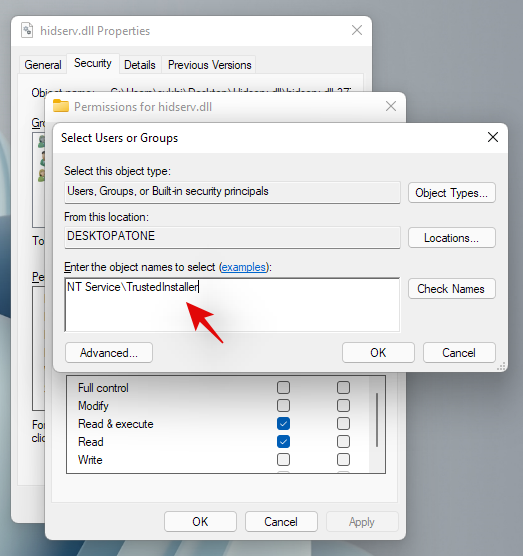
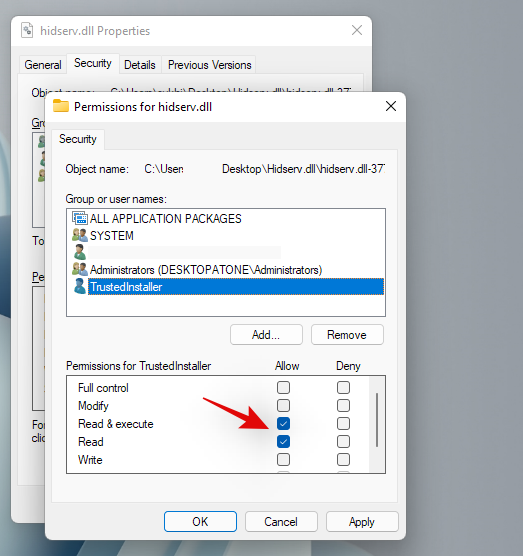
Check the boxes for the same permissions as we did for the application packages above.
We now need to add permissions for restricted UMP packages on your system. There is no way to do this using the Windows File Explorer, so we will be using a PowerShell script instead. Press Windows + S on your keyboard and search for PowerShell. Click on ‘Run as administrator’ once it shows up in your search results.
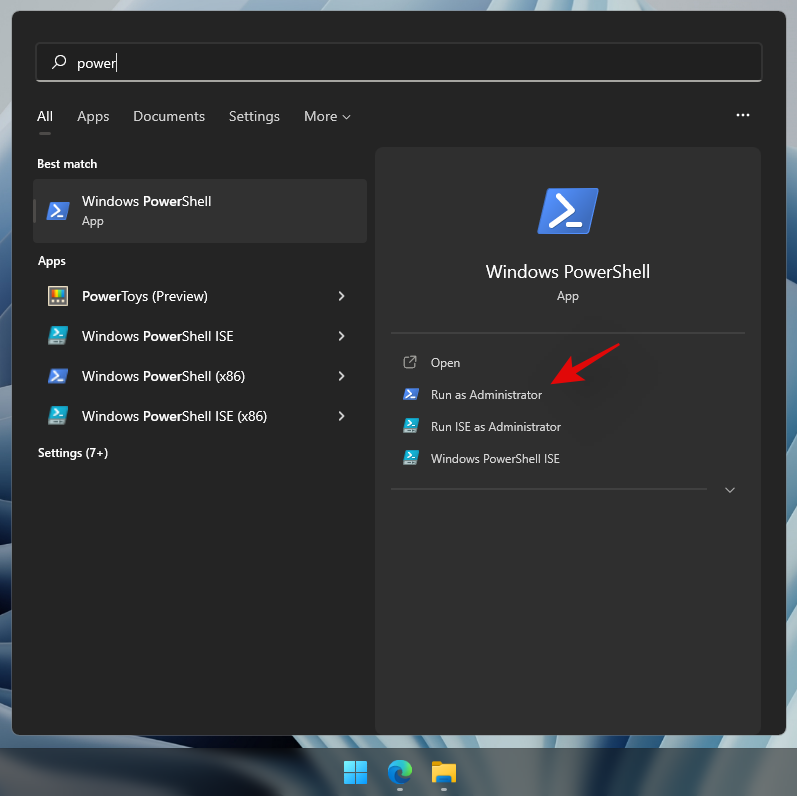
Once PowerShell launches, copy and paste the code below in your PowerShell window. Do not execute the commands just yet.
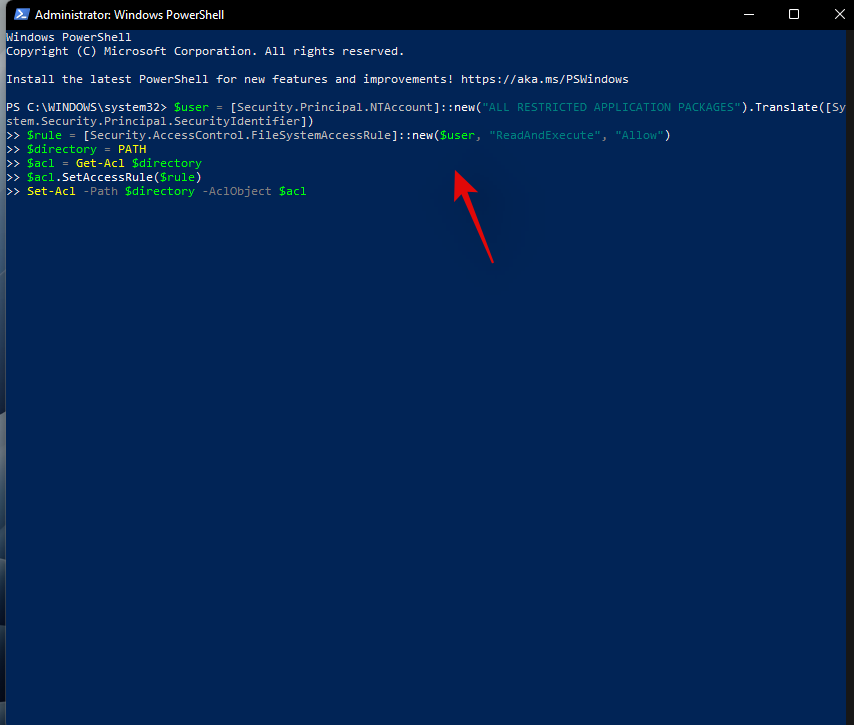
$user = [Security.Principal.NTAccount]::new("ALL RESTRICTED APPLICATION PACKAGES").Translate([System.Security.Principal.SecurityIdentifier])
$rule = [Security.AccessControl.FileSystemAccessRule]::new($user, "ReadAndExecute", "Allow")
$directory = PATH
$acl = Get-Acl $directory
$acl.SetAccessRule($rule)
Set-Acl -Path $directory -AclObject $acl
Now navigate to the Hidserv.dll file that we just edited the permissions for and right-click on it. Select ‘Copy as path’.
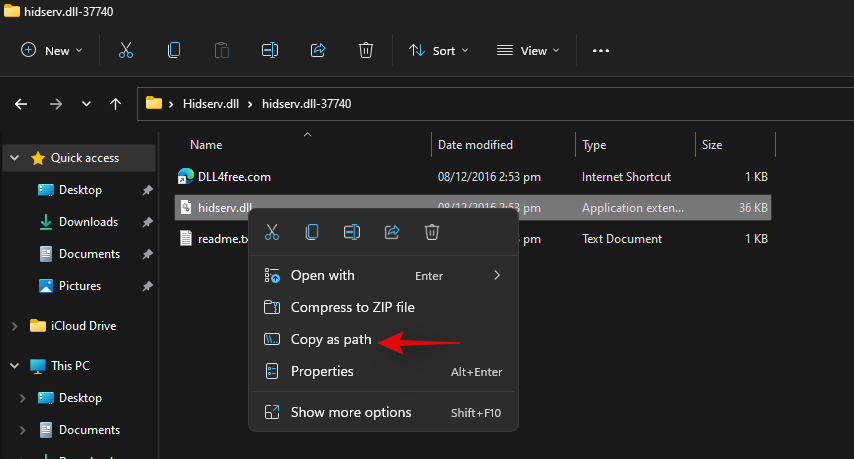
Go back to your PowerShell window and replace “PATH” with the path we just copied.
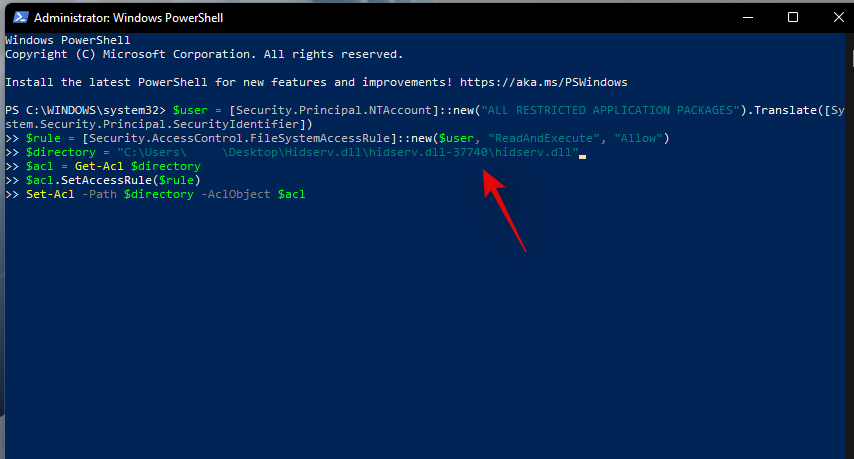
Once replaced, hit Enter on your keyboard to execute the command. Once completed, the new permissions for restricted application packages should now be added to your new Hidserv.dll file.
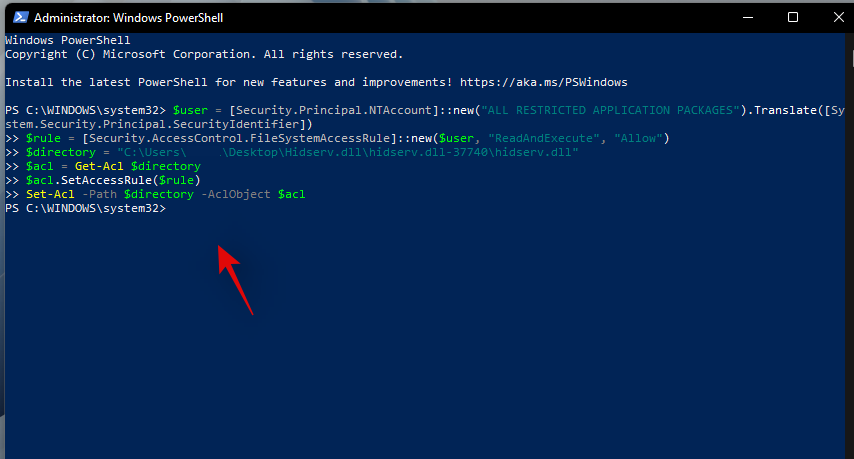
Note: If you are typing in the path manually then you will need to include in double-quotes as shown in the final screenshot. Pasting a copied path using the method above will automatically add double quotes to it.
It’s now time to replace or add the file to your boot directory. Navigate to the Hidserv.dll file we just created and copy it to your clipboard.
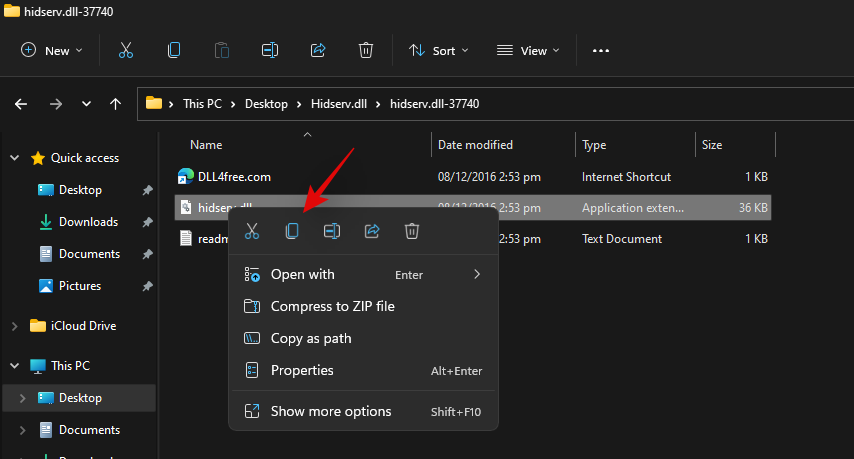
Press Windows + E on your keyboard and navigate to the following path.
C:\Windows\System32
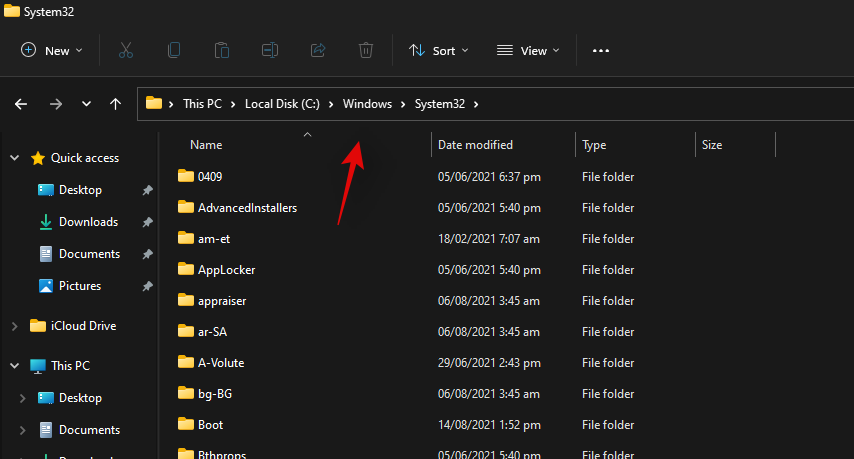
Paste your file in this location. Click on ‘Replace the file in the destination’.
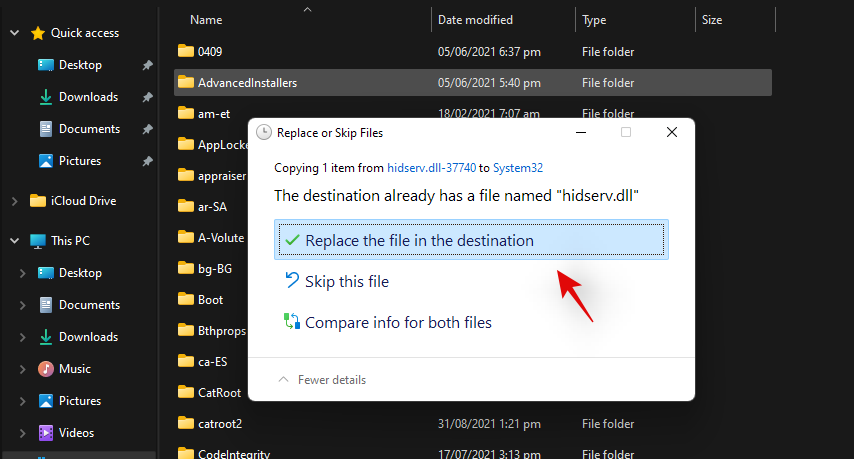
Click on ‘Yes’ to grant the necessary administrator permissions. Once the file is replaced, restart your system for good measure. You can now check your HID services in the Services app to see if it is back up and running again. If not, you can try starting it manually, and you should no longer be facing Error code 126 on your system.
Method #2: For Error code 2
If you are getting Error code 2 after trying to restart the HID service then there could be a couple of reasons why you are facing this error. The main reason is due to unwanted registry changes for the HID service. This could have happened due to recently applied manual hacks or registry cleaners used by you. We will need to check for these changes and revert them if any have been made on your system. Follow the guide below to get you started.
Press Windows + R on your keyboard, type in the following term, and hit Enter on your keyboard.
regedit
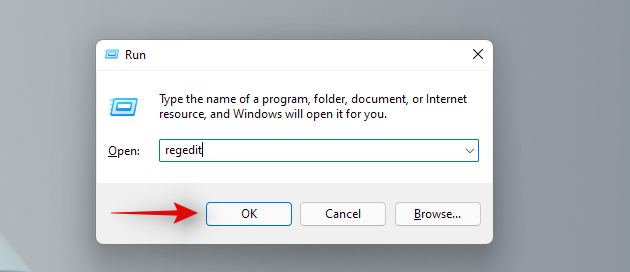
Navigate to the following registry key. You can also copy-paste the same in the address bar at the top of your screen.
Computer\HKEY_LOCAL_MACHINE\SYSTEM\ControlSet001\Services\hidserv
Double click on the ‘Type’ value on your right.
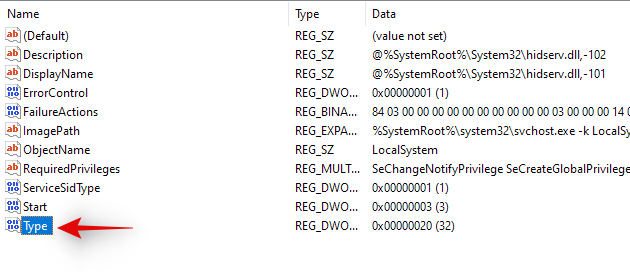
Set the value to ’20’ if it is something different and click on ‘Ok’.
Now click on ‘Parameters’ under Hidserv on your left.
Double click on ServiceDll on your right.
Enter the following path in its Value data field. Even if the same path exists, copy-paste the one below just to be sure. Ensure that there are no spaces at the starting or end of the path below.
%SystemRoot%\System32\hidserv.dll
Once done, repeat the steps above for the following registry locations given below.
- Computer\HKEY_LOCAL_MACHINE\SYSTEM\CurrentControlSet\Services\hidserv
Additionally, if folders named ControlSet002 or more exist in the location below, then we recommend repeating the steps above for the Hidserv folder in those locations as well.
- Computer\HKEY_LOCAL_MACHINE\SYSTEM\
Once you have made these changes, restart your system, and HID service should be automatically working on your laptop again. If not, launch the service manually and you should no longer face Error code 2 on your laptop.
Laptop hotkeys can be quite finicky and we hope you were able to get the back up and running again on your system using the guides above. If you face any issues or have any questions for us, feel free to reach out using the comments section below.
Related:


