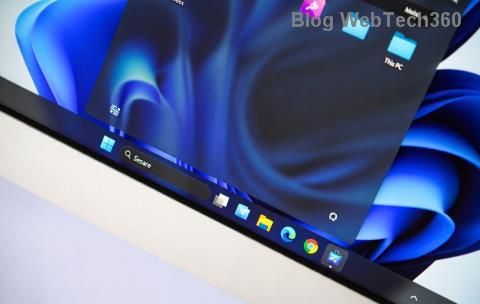
Годинама је Виндовс рекламирао мноштво нових функција и побољшања тврдећи да су удаљени само једним кликом на мени Старт. Али шта ако вам се мени Старт престане отварати? Па, може се десити да вам мени Старт у оперативном систему Виндовс 11 изненада престане да ради, па је тако обављање редовних задатака помало оптерећујуће.
Ако се мени Старт не отвара за вас у оперативном систему Виндовс 11, постоји онолико исправки колико бисмо могли да смислимо да вам помогнемо да решите проблем .
Повезано: Како деинсталирати апликације на Виндовс 11
НАПОМЕНА: Ако вам 17(!) редовних исправки наведених у наставку не успе, покушајте са исправком #18 датом испод у одељку „Последња решења“ која говори о креирању новог корисника преко командне линије . Ово вам помаже да креирате новог корисника помоћу ЦМД-а, без потребе да приступате апликацији Подешавања или менију Старт, који вам можда неће радити. Ипак, исправка број 1 у вези са проблемом изазваним „Виндовс Упдате КБ5004300“ је нови додатак, па можда прво проверите ово.
Садржај
Укључили смо укупно 20 (!) исправки да бисмо решили проблем са Старт менијем на Виндовс 11 испод. 3 од њих су опште исправке које треба испробати тек након што сте сигурни да 17 примарних поправки нису од помоћи.
17 Примарне поправке
Испробајте прво ове исправке пре него што испробате 3 општа поправка (такође наведена у наставку).
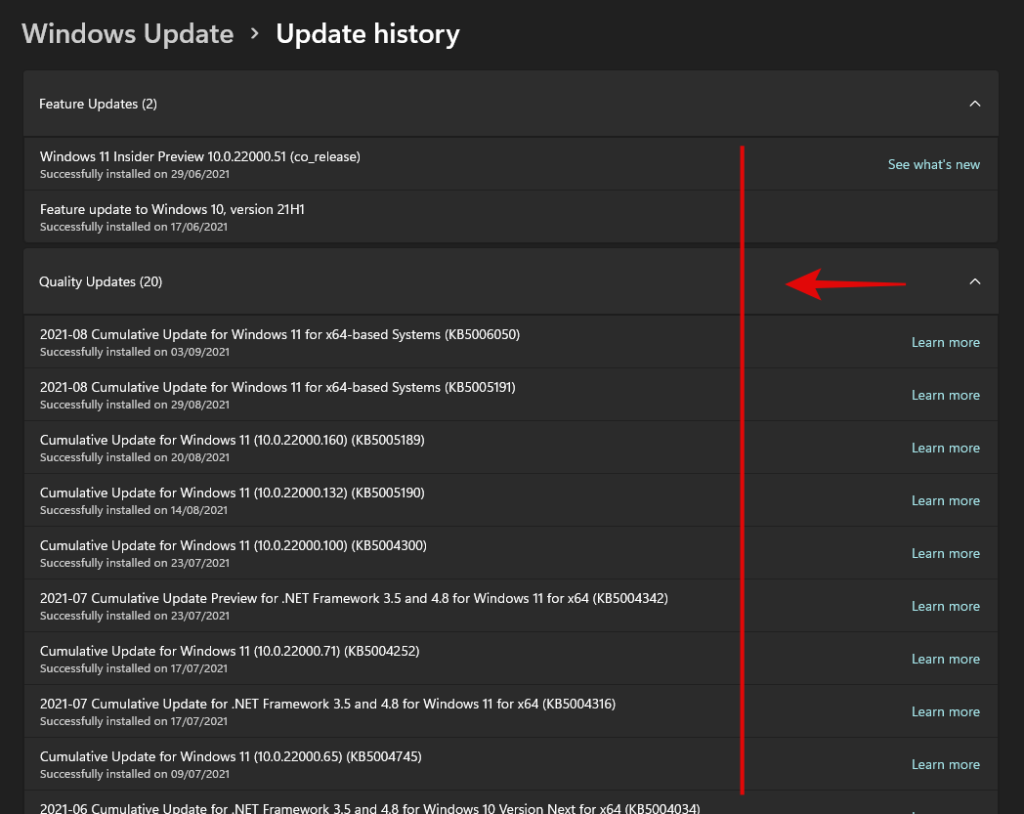
Поправка #1: Деинсталирајте и поново инсталирајте Виндовс Упдате КБ5004300
Чини се да недавна исправка коју су открили корисници орловских очију лако поправља почетни мени на новим надоградњама оперативног система Виндовс 11. Чини се да Виндовс Упдате објављен под именом КБ5004300 узрокује овај проблем. Деинсталирање и поновно инсталирање истих на рачунару ће поправити мени Старт и траку задатака за вас. Пратите водич у наставку да бисте започели.
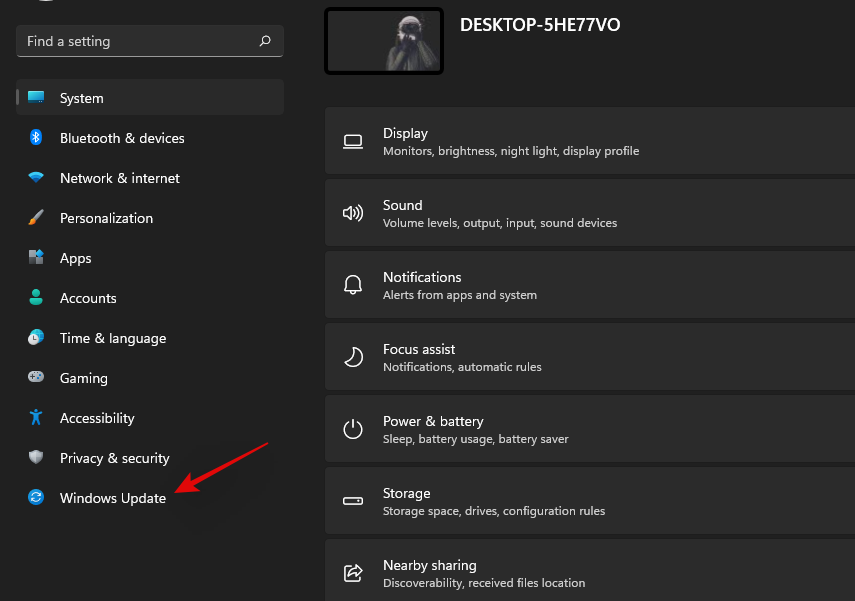
Притисните Windows + iна тастатури да бисте отворили апликацију Подешавања. Кликните на „Виндовс Упдате“ са леве стране.
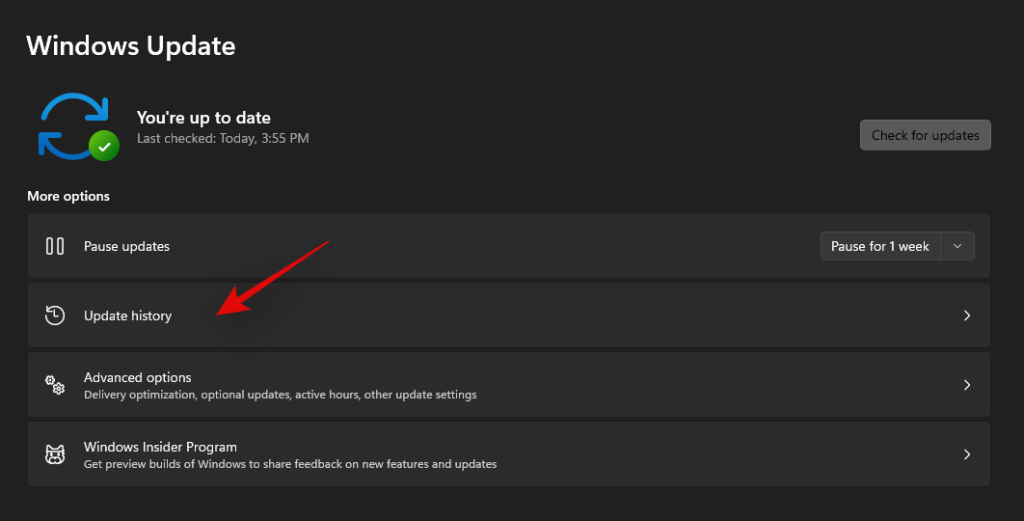
Сада кликните на „Ажурирај историју“.
Кликните на „Деинсталирај ажурирања“.
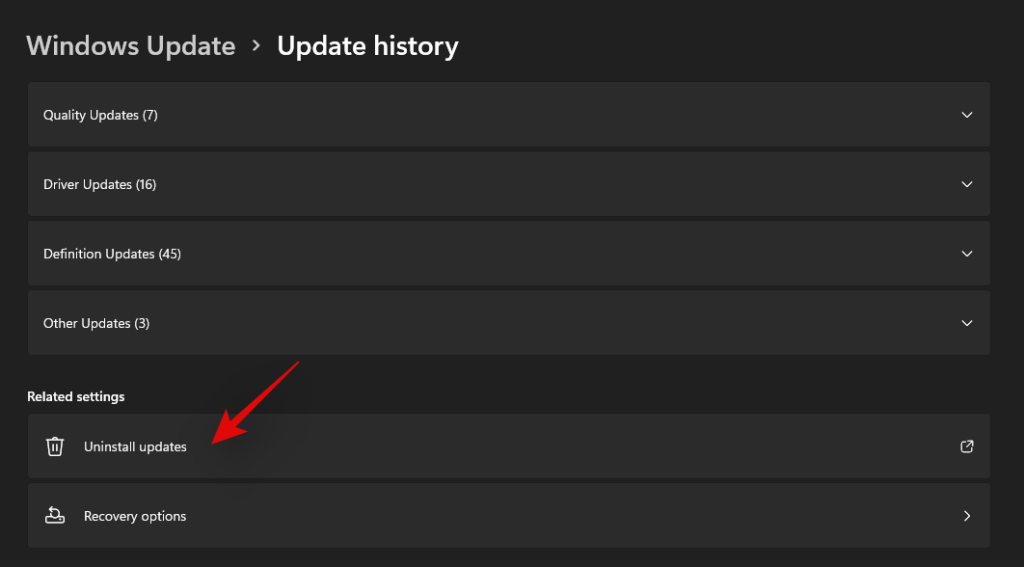
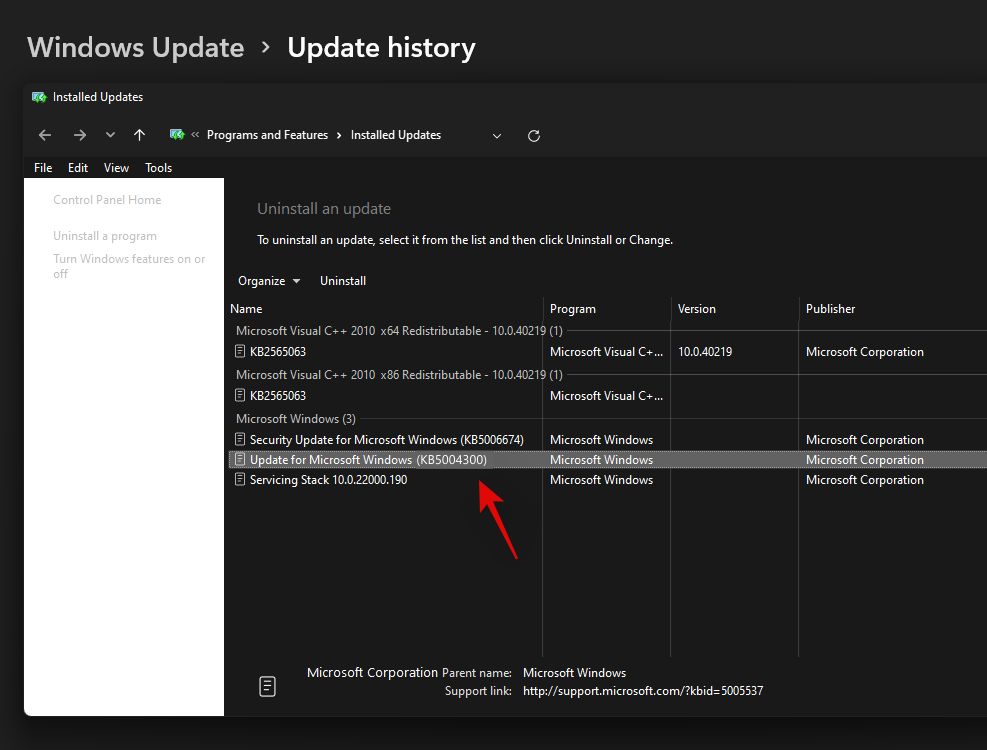
Сада ћете бити преусмерени на контролни центар. Пронађите релевантно ажурирање КБ5004300 на листи и кликните и изаберите га.
Сада кликните на 'Деинсталирај' на врху.
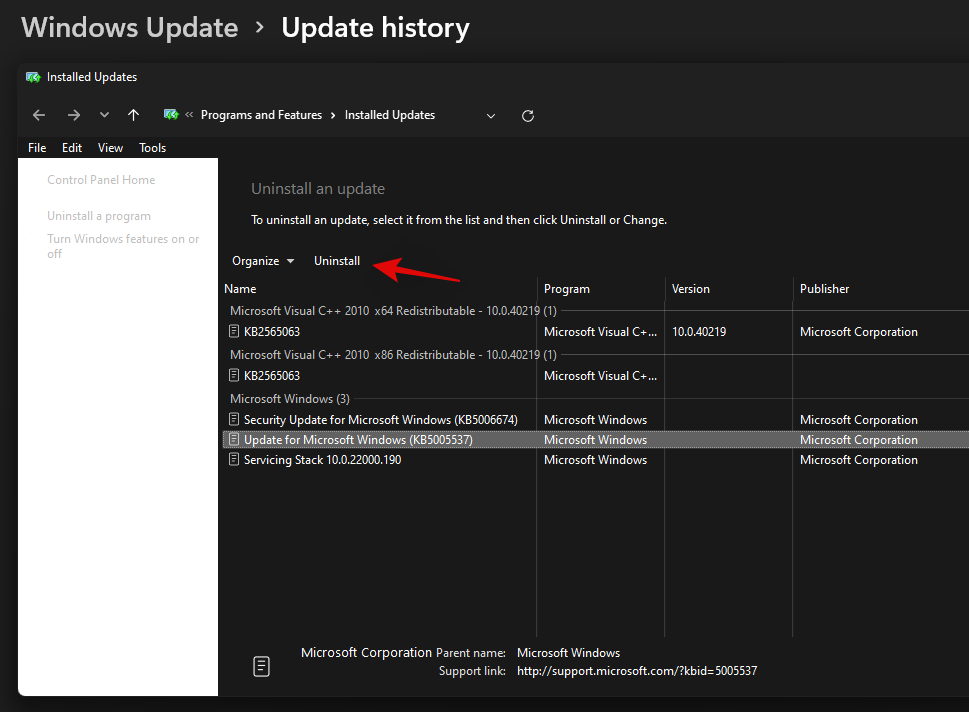
Пратите упутства на екрану да бисте уклонили ажурирање са рачунара. Када се ажурира, поново покрените рачунар за добру меру.
Сада притисните Windows + iпоново када се рачунар поново покрене и поново изаберите Виндовс Упдате.

Проверите да ли постоје исправке и сада би требало да имате опцију да поново инсталирате Виндовс Упдате КБ 5004300 на рачунар.
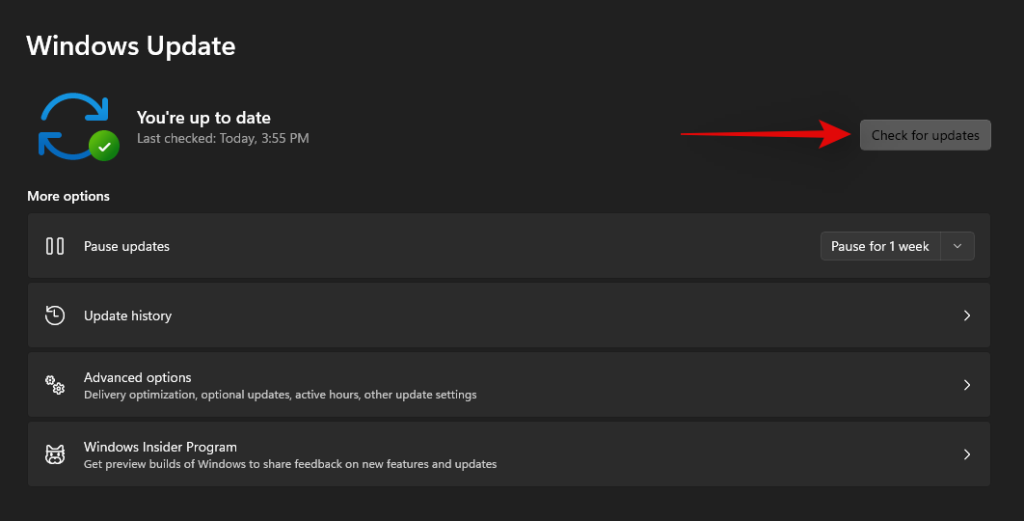
Преузмите и инсталирајте ажурирање и функционалност траке задатака и менија Старт сада би требало да се врати у Виндовс 11.
Исправка #2: Присилно рестартујте Ирис Сервице
Недавно ажурирање инсајдерских верзија од Мицрософт-а изазвало је велике проблеме са траком задатака и Старт менијем за многе кориснике. Ако сте и ви претплаћени на канал Инсајдера и имате проблема након ажурирања на број верзије 22449 или новији, можете користити исправку која је наведена у наставку.
Овај метод ће обрисати вредност регистратора за услугу Ирис која би требало да је присилно поново инсталира након поновног покретања. Чини се да поновна инсталација помаже да се реши овај проблем за већину корисника. Чак и ако нисте на истим верзијама, ова поправка је вредна покушаја. Пратите водич у наставку да бисте започели.
Напомена: Ова команда ће одмах поново покренути рачунар. Ако имате било какав текући посао у позадини, уверите се да сте га сачували пре него што наставите са овим водичем.
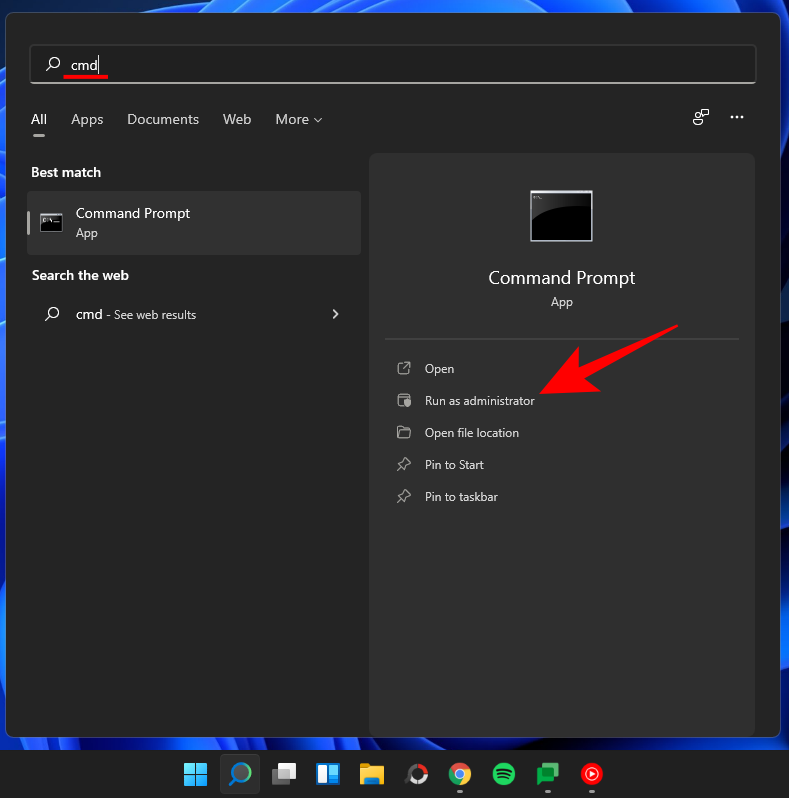
Притисните Windows + S на тастатури и потражите ЦМД. Кликните на „Покрени као администратор“ или притисните Ctrl + Shift + Enter на тастатури.
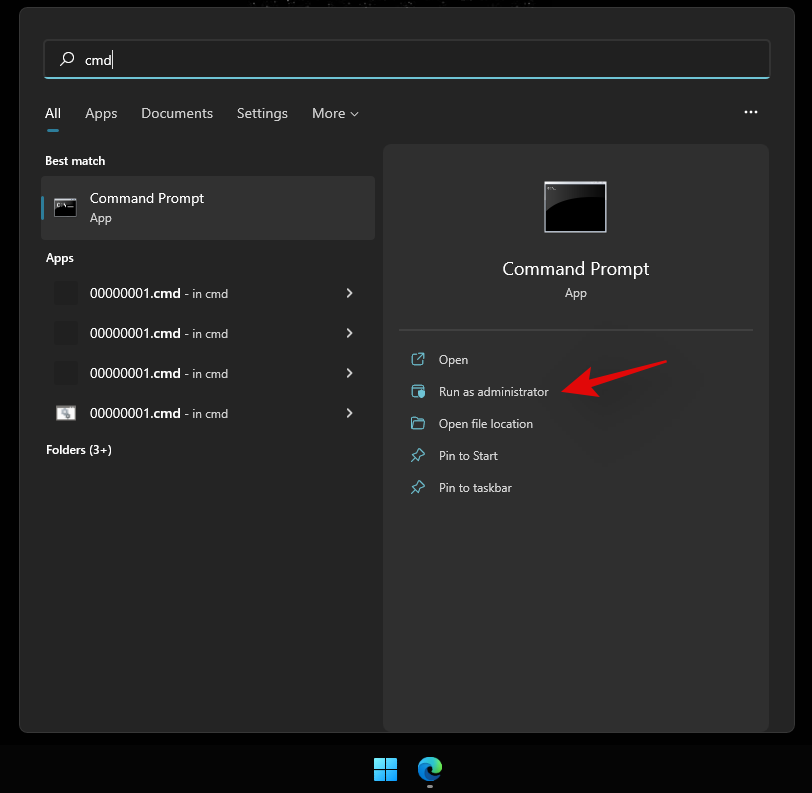
Унесите следећу команду и притисните Ентер на тастатури.
reg delete HKCU\SOFTWARE\Microsoft\Windows\CurrentVersion\IrisService /f && shutdown -r -t 0

Ваш рачунар ће се сада поново покренути. Пријавите се на свој рачунар као и обично и функција Старт менија би сада требало да се врати на ваш систем.
Поправка #3: Поново покрените рачунар
Ово је далеко најједноставнији метод који вам пада на памет док покушавате да решите већину проблема на рачунару са оперативним системом Виндовс 11. Обично, када поново покренете систем, у суштини присиљавате све процесе, укључујући Виндовс, да поново покрећу све своје услуге и процесе. Ово такође поново покреће процес менија Старт који ће помоћи да се реши проблем са њим.
Ако није очигледно, ево корака за поновно покретање рачунара.
Уверите се да су све ваше апликације и датотеке затворене. Или једноставно идите на екран радне површине тако што ћете притиснути Windows key + D заједно. Сада притисните Alt + F4 заједно тастере на тастатури да бисте добили екран „Искључи Виндовс“.
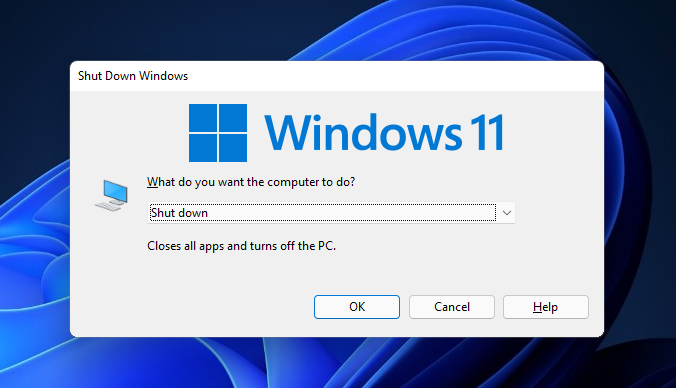
Кликните на падајући мени, изаберите „Поново покрени“ и притисните дугме „ОК“.
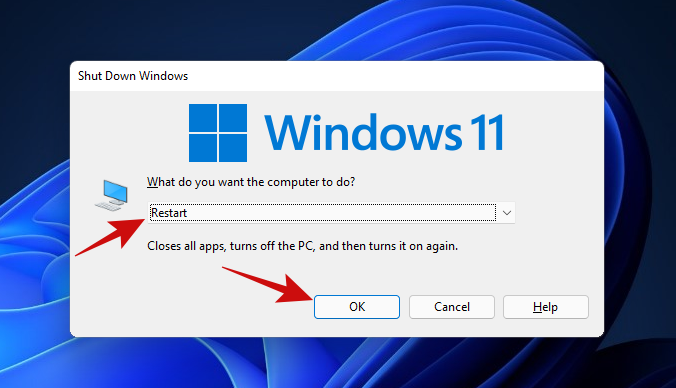
Када се рачунар поново покрене, требало би да поново можете да користите мени Старт. Ако и даље не можете, покушајте са следећим методом.
Исправка #4: Поново покрените Виндовс Екплорер користећи Таск Манагер
Следеће лако решење за замрзнути Старт мени користи Таск Манагер. Таск Манагер може бити савршен алат за управљање било којим покренутим процесом на Виндовс рачунару.
Ако имате мени Старт који не жели да реагује на ваше кликове, следите доле наведене кораке да бисте видели да ли решава ваш проблем.
Притисните Ctrl + Shift + Esc тастере да бисте покренули Таск Манагер. Ако ваш Менаџер задатака изгледа овако, кликните на дугме „Више детаља“ да бисте добили приступ детаљном приказу.
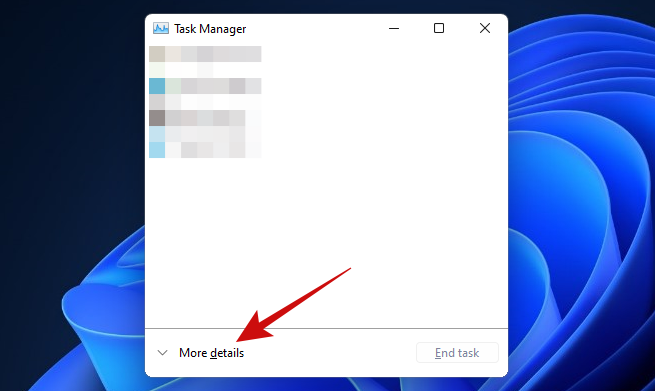
Када уђете у Таск Манагер, скролујте кроз листу Процеси да бисте пронашли процес „Виндовс Екплорер“. Кликните десним тастером миша на процес и кликните на опцију „Поново покрени“.
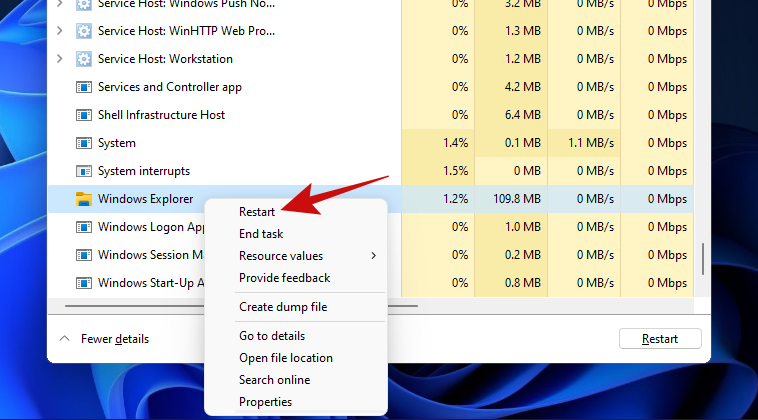
Када се кликне, Виндовс би требало да поново покрене процес Виндовс Екплорер-а у трену, а то би требало да поправи ваш старт мени.
Поновно покретање процеса Виндовс Екплорер-а је прилично слично поновном покретању рачунара. Једина разлика је у томе што овде поново покрећете само један процес, док поновним покретањем поново покрећете све процесе. Осим тога, многи људи су у прошлости успели да поправе свој Старт мени овим методом, због чега ово вреди покушати.
Исправка #5: Проверите да ли постоје ажурирања за Виндовс
Ако и даље не можете да отворите мени Старт, требало би да пробате Виндовс Упдате. Проблем је можда распрострањенији него што мислите и Мицрософт је можда објавио хитну исправку за закрпу Старт менија који не реагује.
Ево како то можете да урадите.
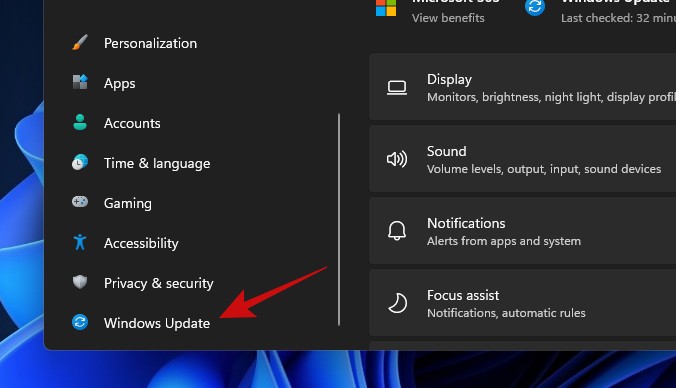
Отворите апликацију Подешавања Win key + i заједно са тастерима. Када се отвори, кликните на опцију „Виндовс Упдате“.
Кликните на велико дугме „Провери ажурирања“ да бисте почели да проверавате да ли постоје доступне исправке за Виндовс за ваш рачунар. Ако је доступно, пустите Виндовс да инсталира сва ажурирања.
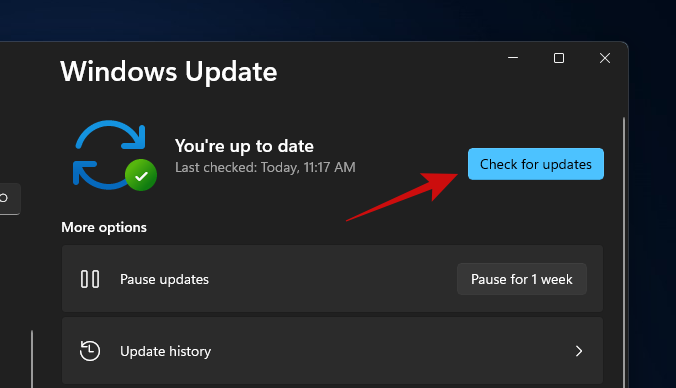
Када Виндовс заврши са ажурирањем рачунара, једноставно га поново покрените и покушајте да отворите мени Старт. Ако и даље не можете да отворите мени Старт, мислимо да је време да кренете на напредније исправке.
Поправка #6: Покрените ДИСМ и СФЦ
ДИСМ (Сервисирање и управљање сликом прилагодбе) и СФЦ (Провера системских датотека) су два најмоћнија алата за идентификацију и поправку оштећених Виндовс инсталација. Ови алати се могу користити са командном линијом или Виндовс ПоверСхелл-ом. За овај водич, користићемо их са командном линијом.
Почнимо са ДИСМ-ом. ДИСМ се може користити за преузимање нових копија оштећених Виндовс датотека.
Притисните Win key + r да бисте отворили оквир Покрени, укуцајте цмд, а затим притисните Ctrl + Shift + Enter заједно (уместо да притиснете ентер) да бисте отворили повишени командни редак.
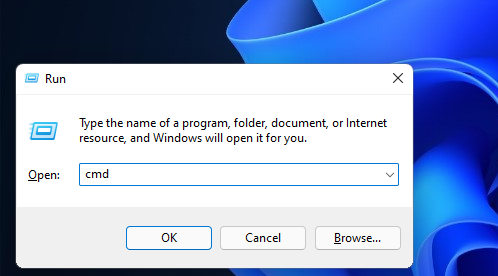
Када сте у командној линији, налепите доњи код и притисните ентер.
DISM /Online /Cleanup-Image /RestoreHealth
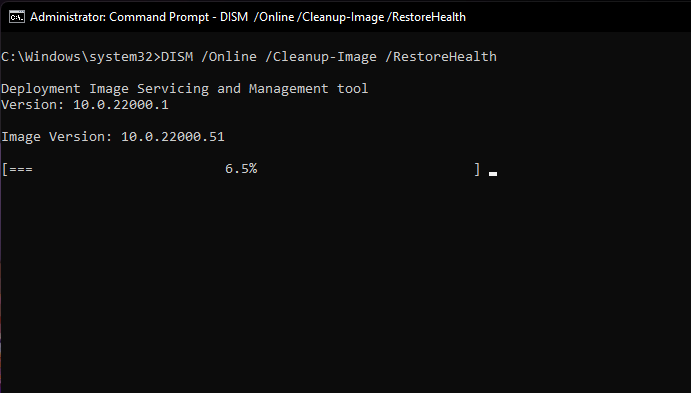
ДИСМ ће сада покушати да врати оштећене датотеке (ако их има) из ваше тренутне инсталације тако што ће захтевати нову копију те датотеке из Виндовс ажурирања. Цео процес ће трајати око 15-20 минута. Ево како команда изгледа у акцији.
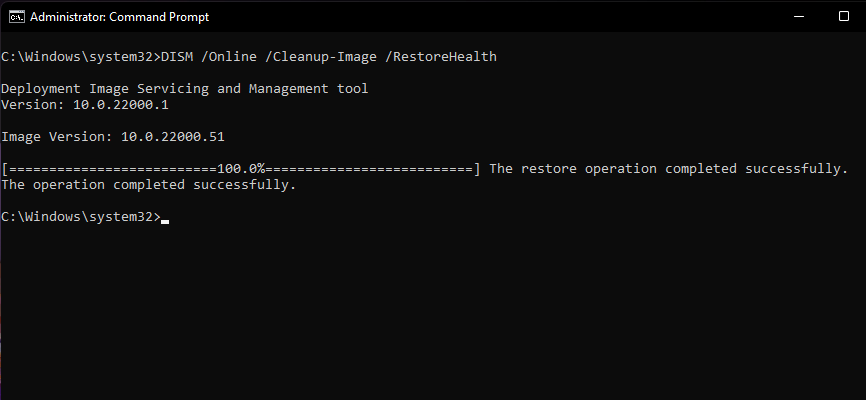
Када команда врати све оштећене датотеке, требало би да видите нешто овако.
Када завршите са овим кораком, држите прозор командне линије отворен да бисте покренули следећу команду.
Следећи корак је да проверите интегритет свих ваших Виндовс 11 датотека да бисте били сигурни да су у добром стању. За ово ћемо користити СФЦ алат.
Ево како.
Налепите доњи код у прозор командне линије и притисните ентер.
sfc /scannow
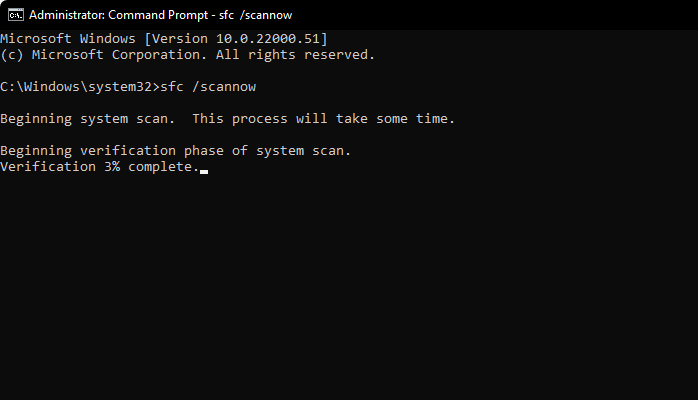
Ево како изгледа команда.
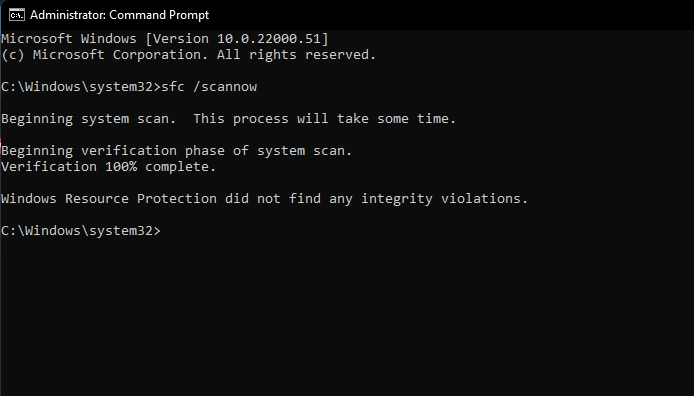
Горњој команди ће бити потребно само неколико минута да заврши скенирање интегритета ваших Виндовс датотека. Када се заврши, резултат би требао изгледати овако.
Савет: Уверите се да ваш рачунар има стабилну интернет везу да би овај метод функционисао.
Сада је време за поновно покретање.
Још увек заглављени са неисправним Старт менијем, време је да испробате следећи метод.
Повезано: 6 начина за ажурирање управљачких програма на Виндовс 11
Исправка #7: Поново изгради индекс претраге
Мени Старт и Виндовс претрага су блиско интегрисани. Проблеми са претрагом и индексирањем су се можда увукли у мени Старт и утицали на њега. Дакле, искључимо и ову могућност.
Хајде да погледамо кораке да то урадимо.
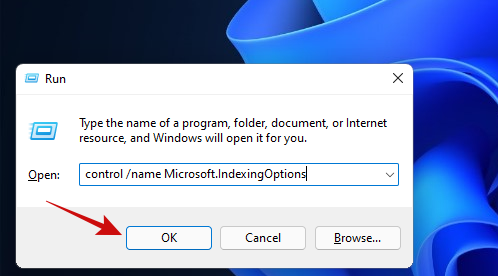
Отворите оквир Рун притиском на Win key + r. Затим налепите доњи текст у оквир Покрени и притисните ентер.
control /name Microsoft.IndexingOptions
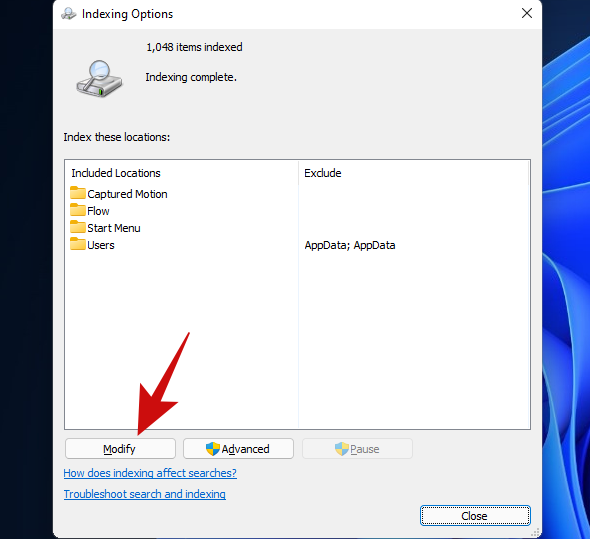
Требало би да видите да се отвара искачући прозор под називом „Опције индексирања“. Кликните на дугме 'Измени'.
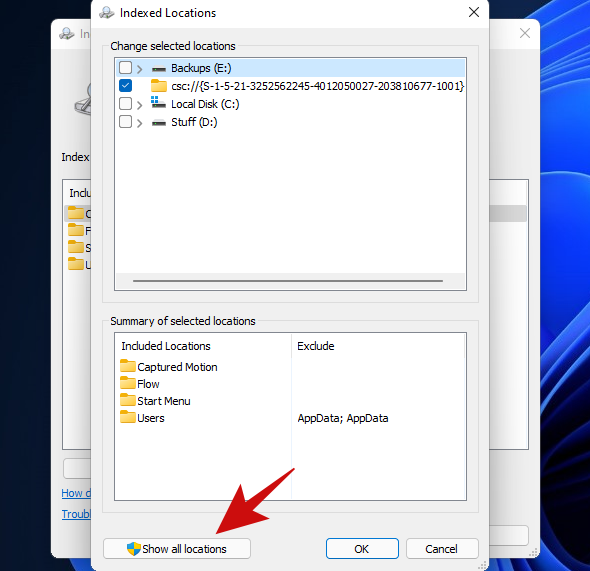
Кликните на дугме „Прикажи све локације“.
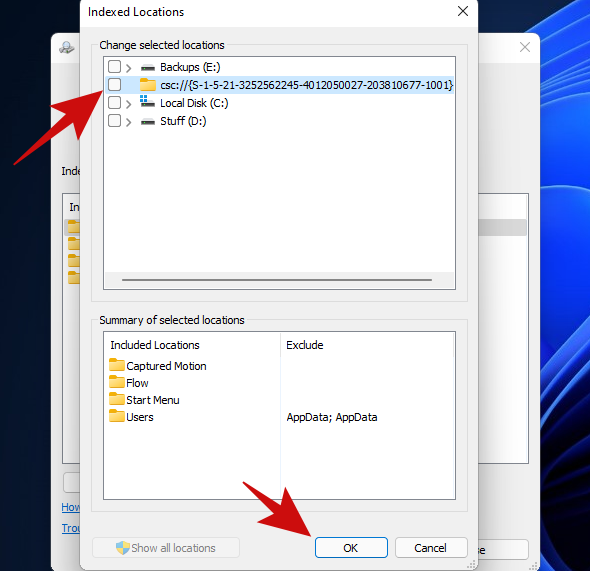
On this screen, uncheck all the locations and click on the ‘OK’ button. Ours had only one location ticked, so we unticked just one location on this list.
Click on the ‘Advanced’ button.
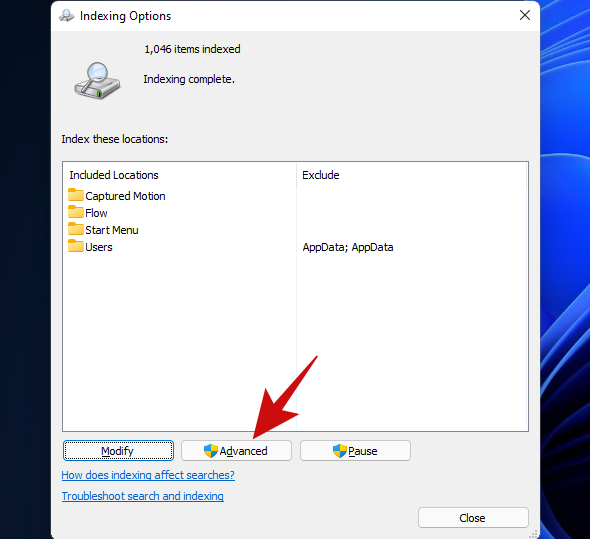
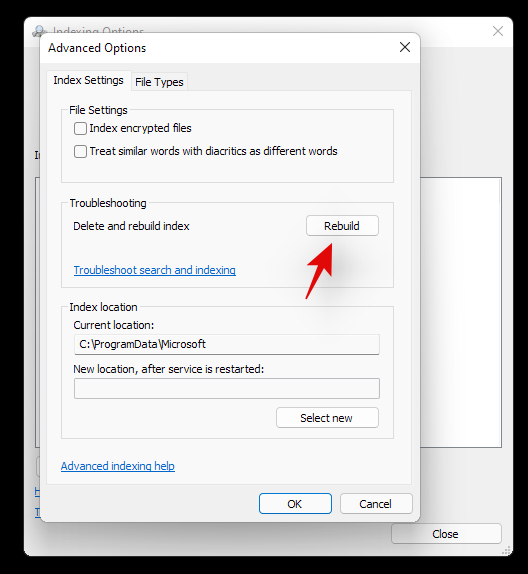
Click on the ‘Rebuild’ button.
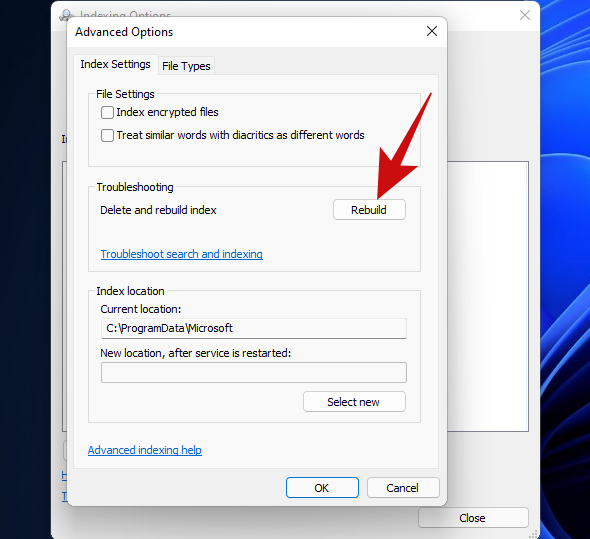
Windows will now start rebuilding the Search Index. Rest assured, the entire process will now be handled by Windows and doesn’t really require any user input, although it does take quite a bit of time to complete.
When Windows has rebuilt your Search Index, restart your PC. Once you’re inside Windows again, try opening the Start menu. If it still doesn’t work, we think it’s time to opt for a more resilient method.
If you have installed any third-party programs to modify the look or functions of your start menu then we recommend removing all such programs. Likely, one of these programs is not compatible with the new Windows 11 start menu which is why you are facing issues with your system. If you have one of the following apps mentioned below, then we recommend you revert their settings and uninstall them as soon as possible. Most of these apps were designed for Windows 10 and are incompatible with the Windows 11 Start menu code to a certain extent. A recent Windows 11 update likely broke their compatibility causing the start menu to glitch out on your system.
- Open Shell
- Classic Start
- WinAero Tasbar
- TaskbarX
And more. If removing a third-party app that modifies your start menu helps restore its functionality then you can wait for a compatible update to use the app again.
Did you use a registry hack to get the older Windows 10 start menu on Windows 11? If so then it is likely that this registry hack’s functionality broke with a recent Windows 11 update. In such cases, you can use the guide below to revert the changes on your system.
Press Windows + R on your keyboard and type in the following in the Run dialog box.
regedit

Press Enter on your keyboard once you are done to launch the registry editor. You can also click on ‘Ok’ instead.
Now copy and paste the address given below in the address bar at the top of the registry editor and press ‘Enter’ on your keyboard.
Computer\HKEY_CURRENT_USER\Software\Microsoft\Windows\CurrentVersion\Explorer\Advanced
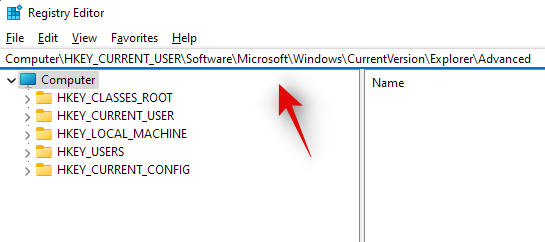
Look for ‘Show_StartClassicMode’ on your right and right-click on it.

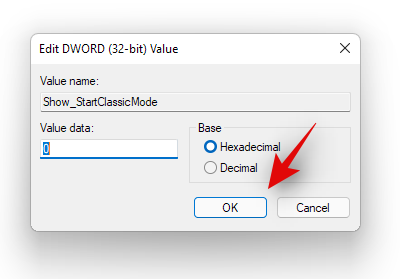
Select ‘Modify’.

Change its value data to ‘0’ and click on ‘Ok’. Do not close the registry editor just yet.
Press Ctrl + Shift + Esc on your keyboard to launch the Task Manager. Now click and switch to the ‘Details’ tab at the top.
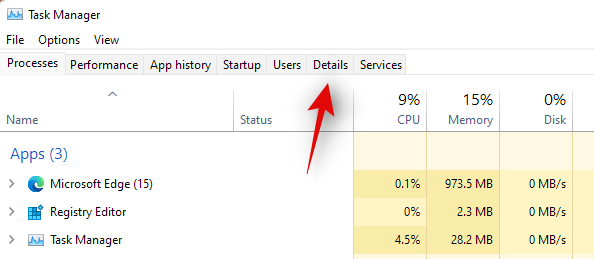
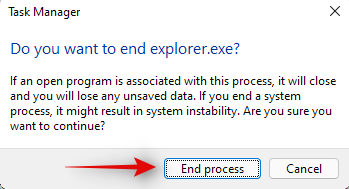
Click and select Explorrer.exe from the list and press Delete on your keyboard.

Confirm your choice by clicking on ‘End Process’.
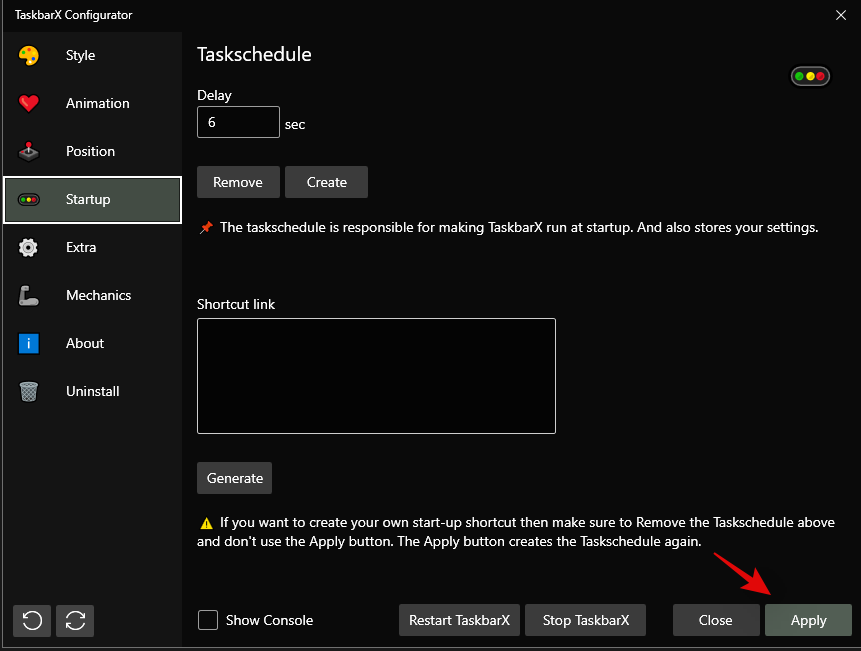
Now click on ‘File’ in the top left corner and select ‘Run new task’.
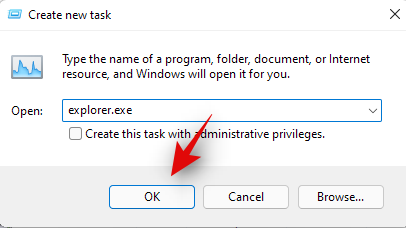
Type in ‘Explorer.exe’ and press Enter on your keyboard. You can also click on ‘Ok’ instead.
Explorer will now be restarted on your system. Switch back to the registry editor and click and select ‘Start_ShowClassicMode’.
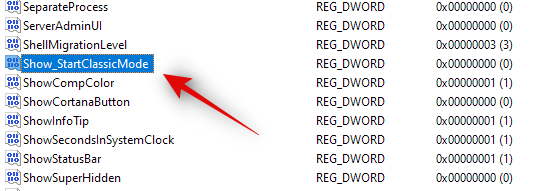
Press Delete on your keyboard and confirm your choice to delete the registry value.

Restart your system for good measure now.
If your Start menu wasn’t working due to a registry hack to get the older start menu then it should be fixed by now. You can check for the same by clicking on the Start menu icon in your taskbar.
Windows 11 has come a long way when compared to its predecessors. Background processes, tasks, and apps are more streamlined now and various features and elements seem to have their own dedicated packages. These dedicated packages make it easier for you to troubleshoot problems with certain features of Windows and even reinstall them in worst-case scenarios. If the start menu is still not working for you then you can reinstall basic elements of Windows 11 which will also reinstall the Start menu module on your system. This should help fix any background conflicts and get the Start menu back up and running on your system. Follow the guide below to get you started.
Press Windows + S on your keyboard and search for PowerShell. Click on ‘Run as administrator’ once the app shows up in your search results.
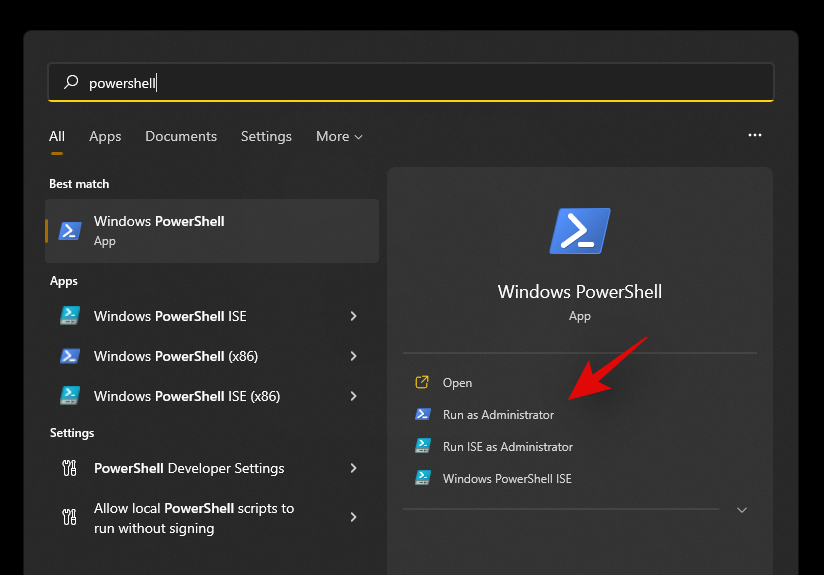
Now type in the following command and press ‘Enter’ on your keyboard.
Get-appxpackage -all *shellexperience* -packagetype bundle |% {add-appxpackage -register -disabledevelopmentmode ($_.installlocation + “\appxmetadata\appxbundlemanifest.xml”)}

Ignore any warnings that you get and continue with the process. Once complete, restart your system for good measure.
Now that the Start menu and other basic features have been reinstalled on your system, let’s rebuild your system’s index to get everything back up and running again. Press Windows + R on your keyboard to open the Run dialog box.
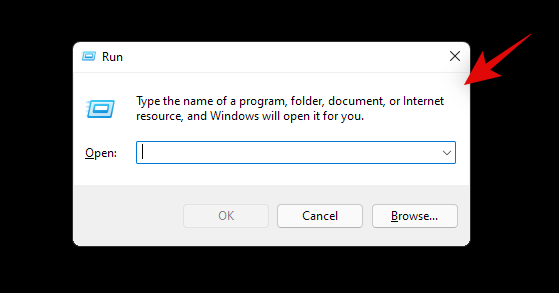
Type in the following command and press Enter on your keyboard.
control /name Microsoft.IndexingOptions
Click on ‘Modify’ and select ‘Show all locations’.
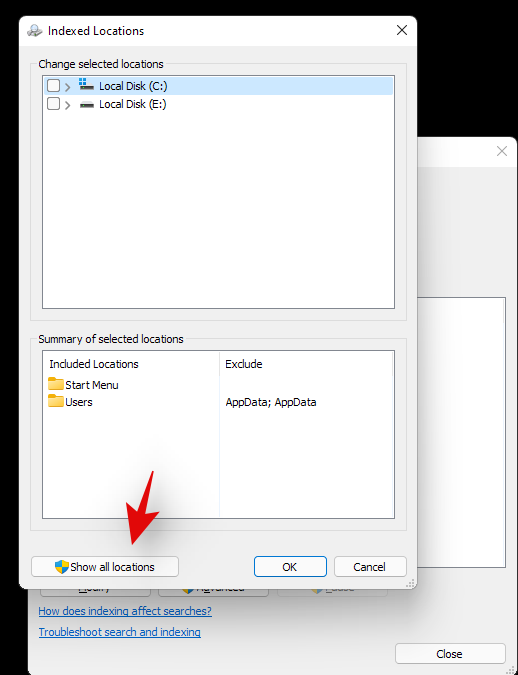
Uncheck all the boxes in the current list.
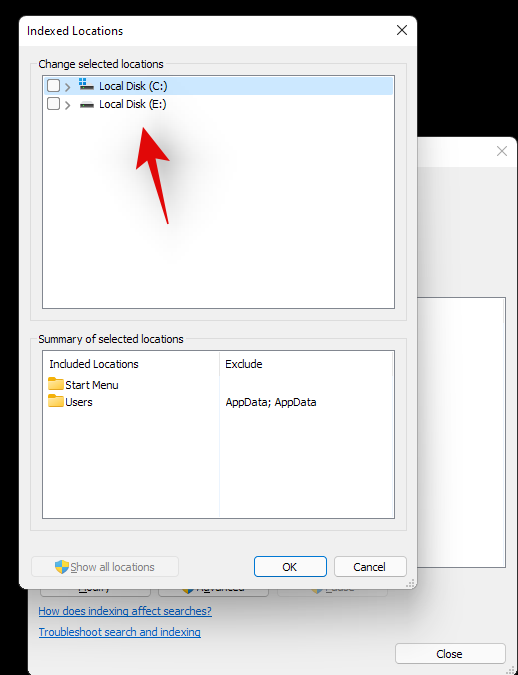
Click on ‘Ok’.
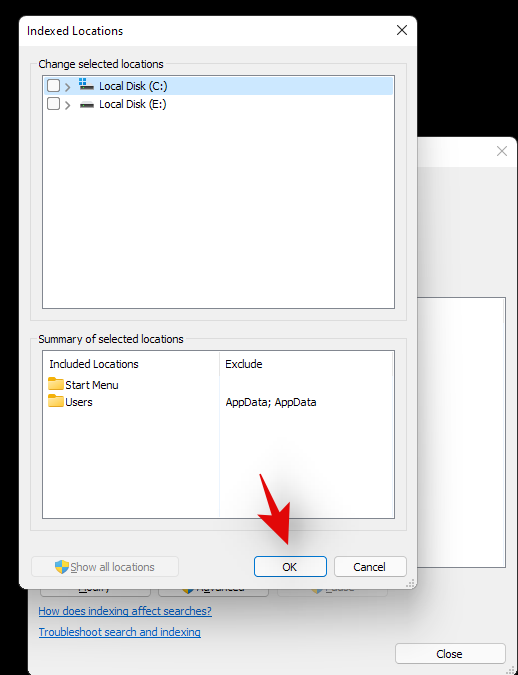
Click on ‘Advanced’ now.
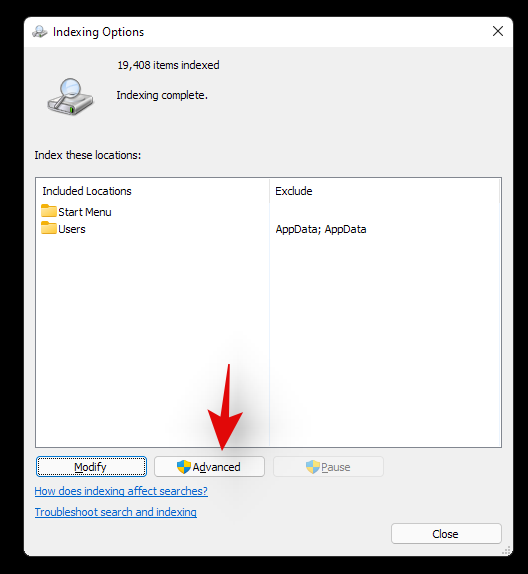
Select ‘Rebuild’ under troubleshooting.
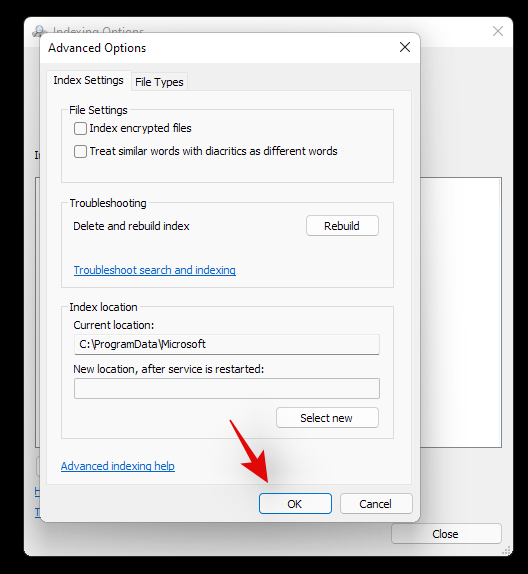
Click on ‘Ok’ once the warning pops up on your screen.
Once the process finishes, we highly recommend you restart your system.
You can now try clicking on the Start icon once your system restarts. Reinstalling the Start menu should help fix any issues with the Start menu on most systems.
Fix #11: Install any pending driver and Windows updates
This might be a bit obvious but you should definitely install any pending driver updates or Windows update on your system. This will help get you up and running on the latest drivers and help your system be compatible with all the hardware installed on your system. While drivers rarely cause issues with Windows features, you can never be too sure. Hence we recommend you install the latest available drivers on your system. You can use the link below to go to our detailed guide for updating drivers on Windows 11. If you are using a pre-built system or a laptop, then we recommend checking your OEM support page for dedicated driver updates as well.
There is a registry value that if modified, can disable your Start menu altogether. If you have been using registry modifiers, cleaners, and more, then it is likely that this registry value was modified which ended up disabling the Start menu on your system. Additionally, the Start menu’s functionality was moved to a Xaml process once Windows 10 was released. This process is known to glitch out
Use the guide below to check if the start menu is disabled on your system and re-enable it if needed.
Press Windows + R on your keyboard and type in the following command given below.
regedit
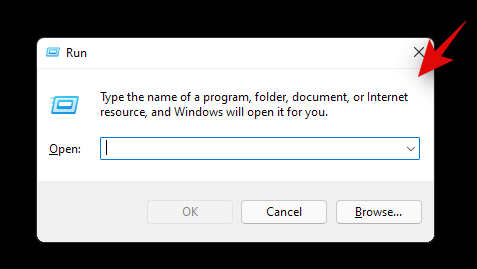
Now press Enter on your keyboard or click on ‘Ok’.
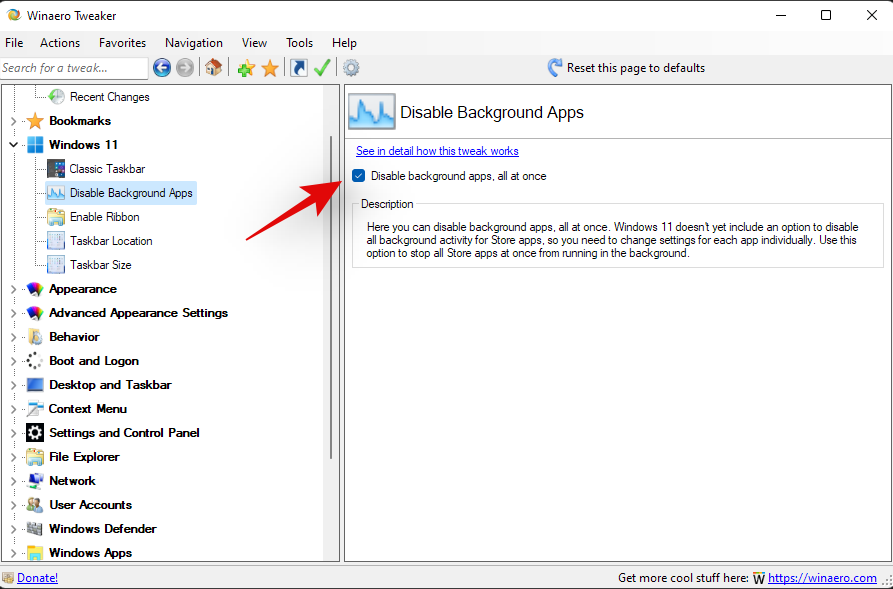
Copy and paste the following address in the address bar at the top of your registry editor.
HKEY_CURRENT_USER\Software\Microsoft\Windows\CurrentVersion\Explorer\Advanced
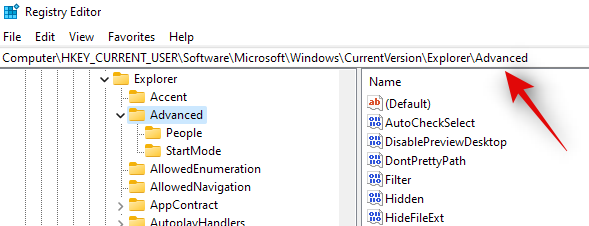
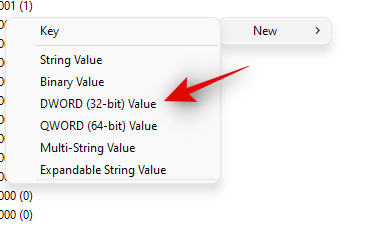
Now right-click on your right tab and select ‘New’.
Select ‘DWORD (32-bit value)’.
Enter the name as ‘EnableXamlStartMenu’.
Enter the value as ‘0’.
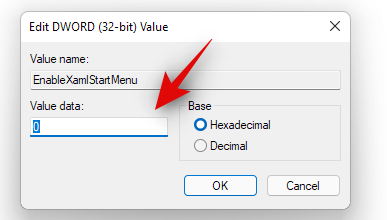
Restart your PC now.
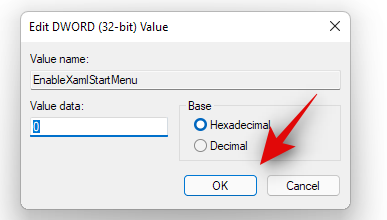
Once restarted try activating the Start menu now. If the Xaml process was facing conflicts, then they should be fixed now and the Start menu should be back up and running on your system again.
Fix #13: Restart Windows background services
If the Start menu still fails to launch then it’s time to restart all background Windows services. Usually restarting the ‘ShellExperienceHost.exe’ is enough but if that does not work for you, you can try restarting all the services listed below. This usually gets the Start menu back up and running on most systems.
Press Ctrl + Shift + Esc on your keyboard to open the ‘Task Manager’. Now click on ‘Details’ at the top to switch to the Details tab.
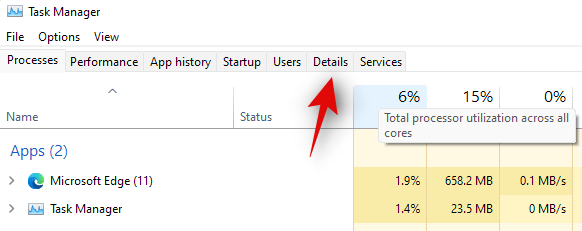
Find ‘StartMenuExperienceHost.exe’ in the list and click and select it.

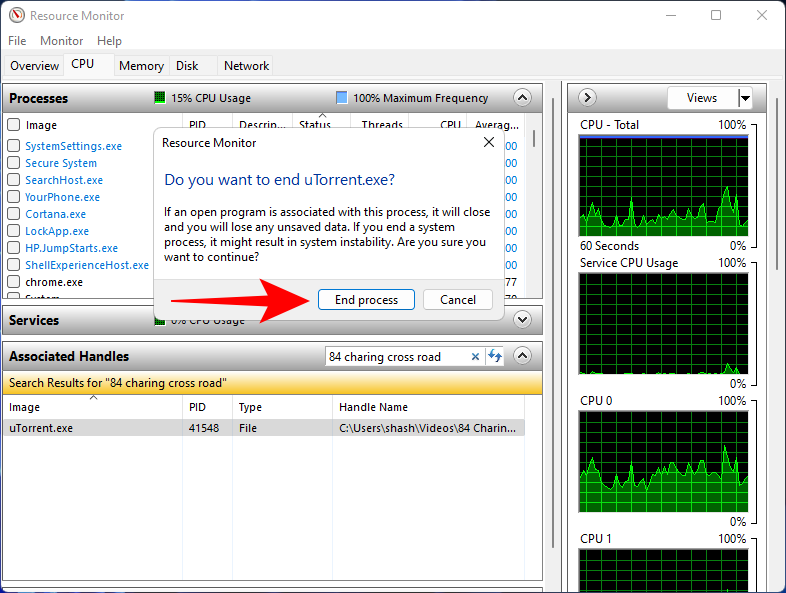
Press Delete on your keyboard or click on ‘End Task’ in the bottom right corner. Click on ‘End Process’ again to confirm your choice.
ShellExperienceHost.exe will now be killed. The process should automatically restart within a few seconds. Once restarted, try activating the Start menu on your system. If the menu starts working then you are good to go. However, if it is still not working then use the guide above to restart the following services on your system as well.
- SearchIndexer.exe
- SearchHost.exe
- RuntimeBroker.exe
And that’s it! If a background process was stopping you from accessing the Start menu then the issue should be fixed for you by now.
Fix #14: Run a Windows Troubleshooter
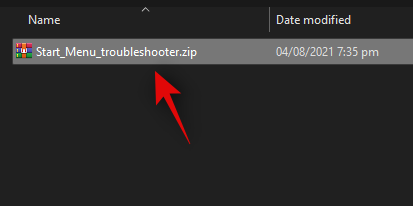
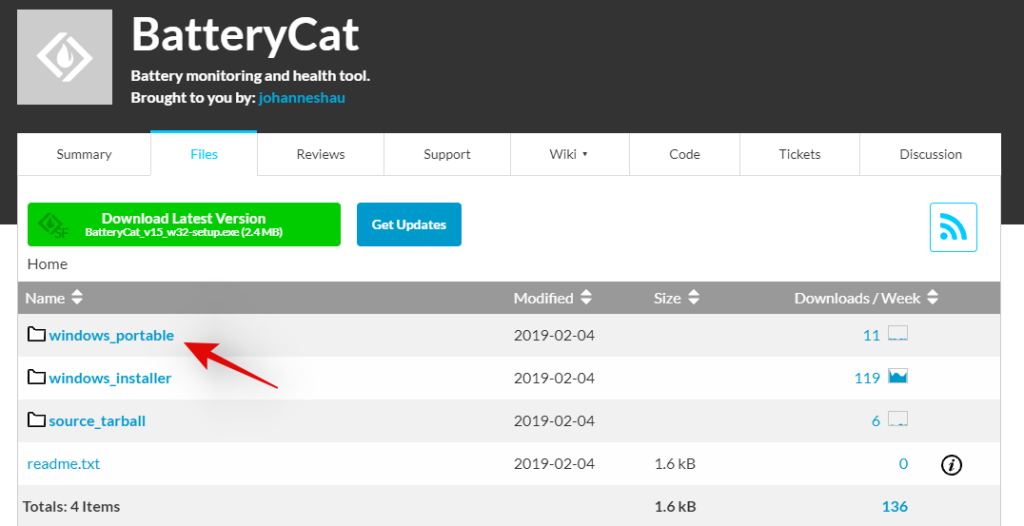
During a Windows 1909 feature update back in 2019, the Start menu was essentially broken due to a background conflict. To fix this issue for the masses, a troubleshooter was released by Microsoft to help fix this issue. If the Start menu is still not working for you then you can try running this troubleshooter on your system. Use the guide below to download and run the troubleshooter on your system.
Download the archive linked above to a convenient location on your local storage and extract its contents.
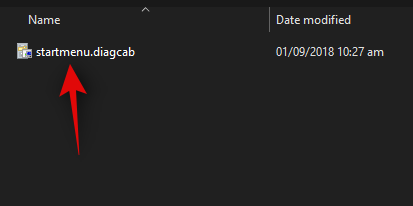
Now copy and paste the ‘startmenu.diagcab’ file on your desktop.
Double click and run the file from your desktop. Click on ‘Advanced’.
Check the box for ‘Apply repairs automatically’. Click on ‘Next’ once you are done.
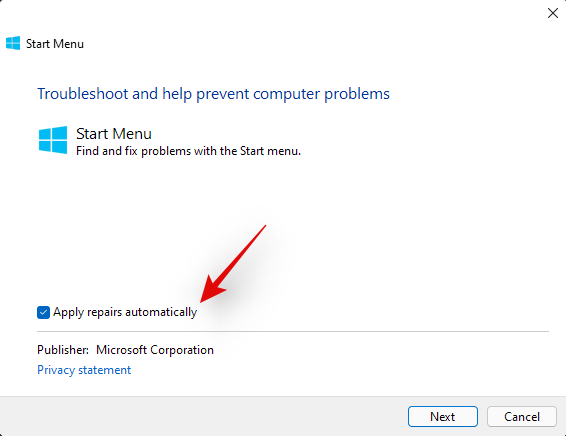
The troubleshooter will now do its thing and try to fix the Start menu on your system. Any errors or issues found will be automatically fixed and the Start menu’s functionality should now be restored on your system.
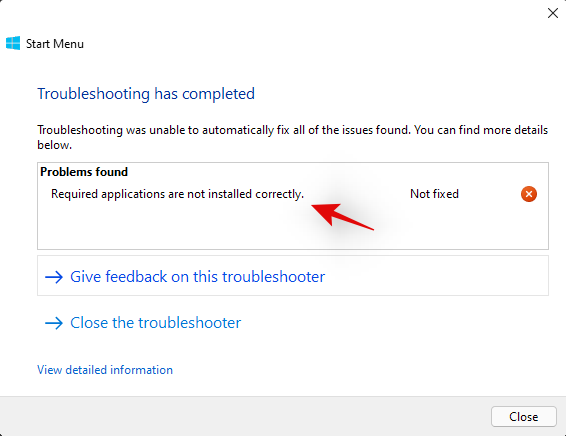
However, if the troubleshooter fails to fix the Start menu then this might indicate a more serious issue on your system. In such cases, let’s verify if Windows is actually able to access and initiate the process for the Start menu on your system. Use the checks below to help you along with the process.
We now need to check if the Start menu is actually available within your install of Windows 11. Let’s create a new local account that will help you verify its functionality. If the Start menu is working in the new account then it is likely an issue with your current user account.
Press Windows + i on your keyboard and click on ‘Accounts’ on your left.
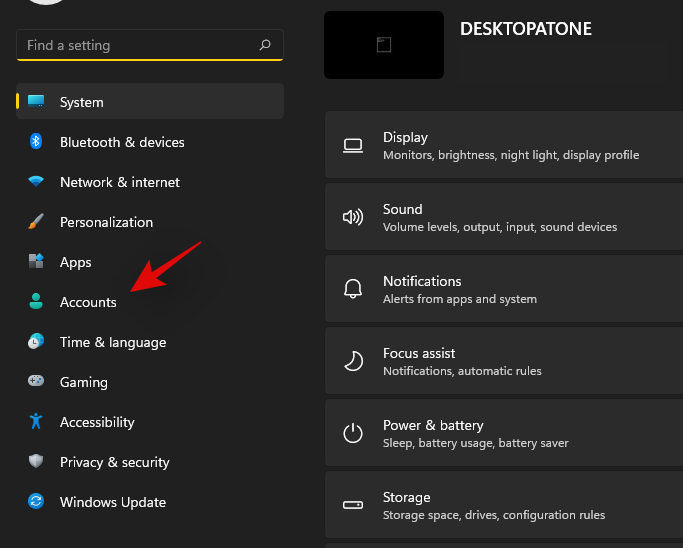
Click on ‘Family & other users’.
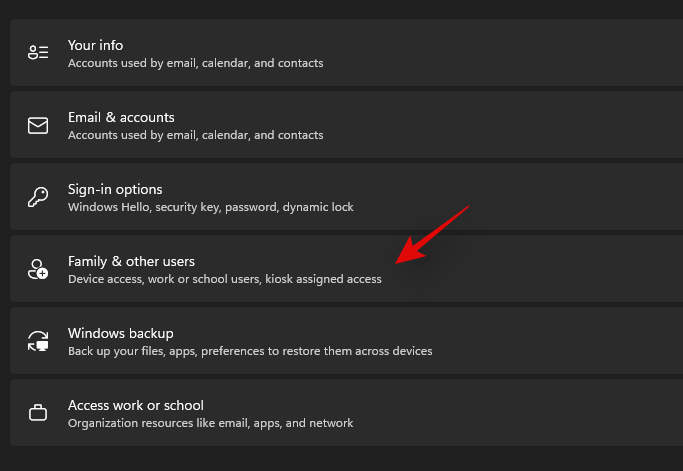
Now click on ‘Add account’ under other users.

Click on ‘I don’t have this person’s sign-in information’.
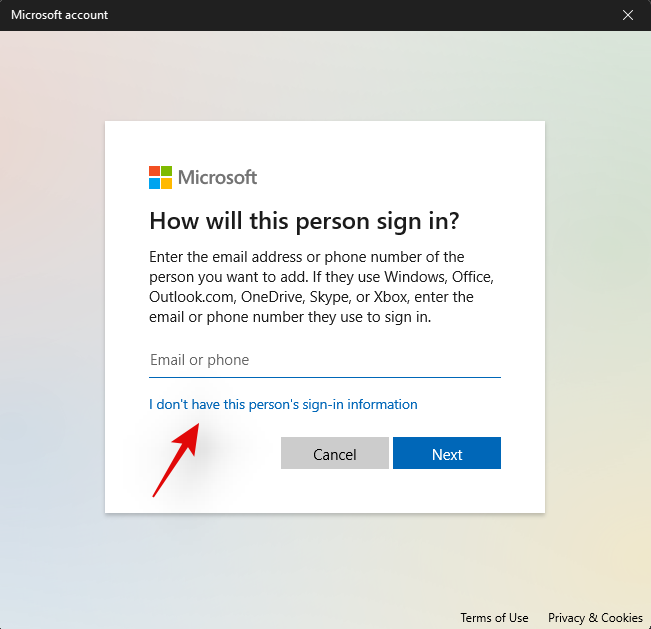
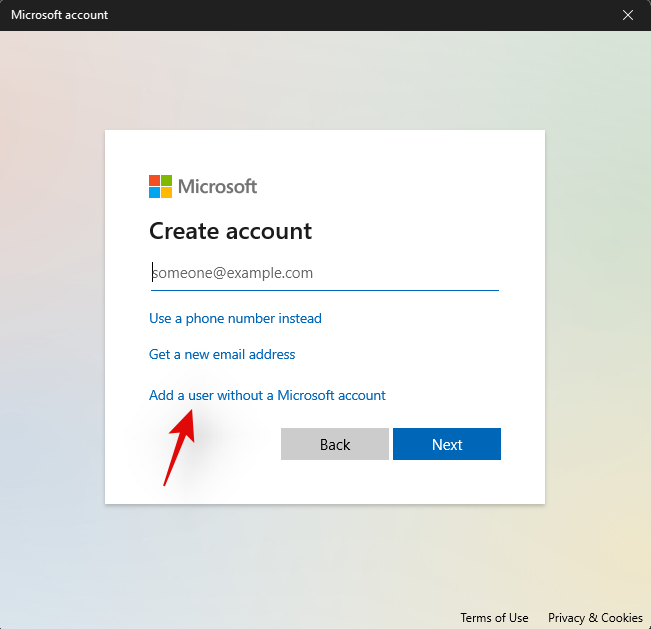
Click on ‘Add a user without a Microsoft Account’.
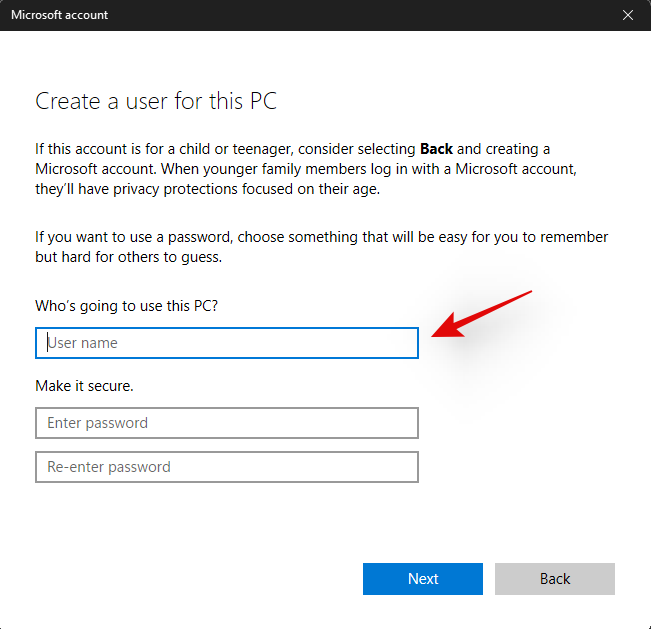
Now enter a username for the new account, and a password if needed.
Click on ‘Next’ once you are done.
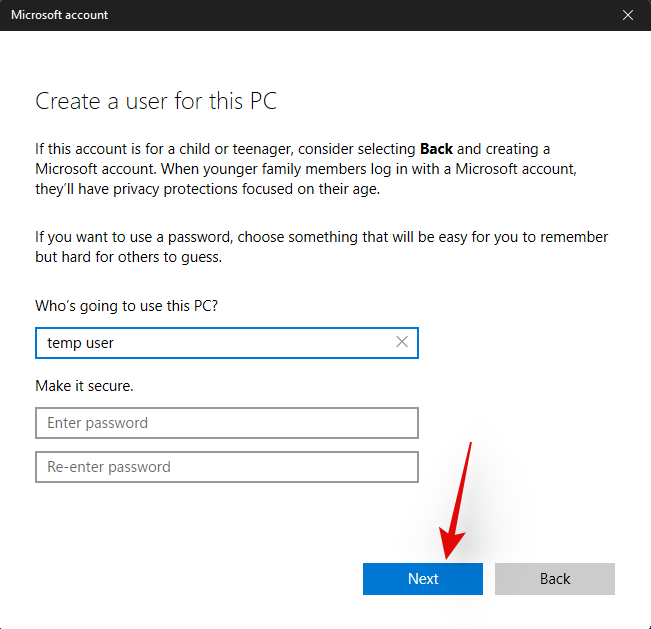
The new user account will now be created. Sign out of your current account and sign in to the new account.
Try to activate the Start menu now in the new temporary local account. If it is working then this is an issue specific to your user account. However, in case the Start menu fails to open, then this might indicate a more serious issue with your Windows 11 installation.
It’s now time to check if the Start menu is working in Safe mode. In case it is, then a third-party app is likely interfering with the Start menu’s functionality. You can remove any third-party apps used to modify the Start menu to try and fix this issue. Follow the guide below to activate Safe mode on Windows 11.
Press Windows + i on your keyboard and select ‘Windows Update’.
Now click on ‘Advanced options’.
Click and select ‘Recovery’.
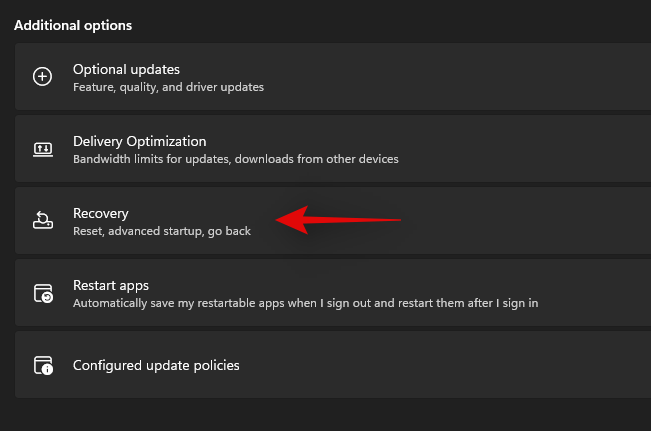
Now click on ‘Restart now’ beside ‘Advanced startup’.

Click on ‘Restart now’ again.
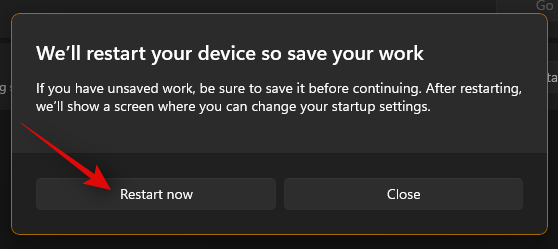
Your PC will now restart to the recovery screen. Click and select ‘Troubleshoot’.
Now click on ‘Advanced options’.
Click on ‘Startup Settings’.
Press ‘F4’ to start your PC in safe mode now.
Once your PC restarts, the safe mode should be active on your system. Now try to activate the start menu. If the menu activates, then it is likely that a third-party app is causing issues on your Windows 11 system. You can try removing apps used to customize the Start menu one by one to find the culprit on your system.
Fix #17: Run a malware and antivirus scan
We recommend you try and run a malware scan before opting for the last resort. If any malware or malicious service is causing issues with the Start menu, then a scan will help solve these issues. Use the guide below to run a malware scan through Windows Defender.
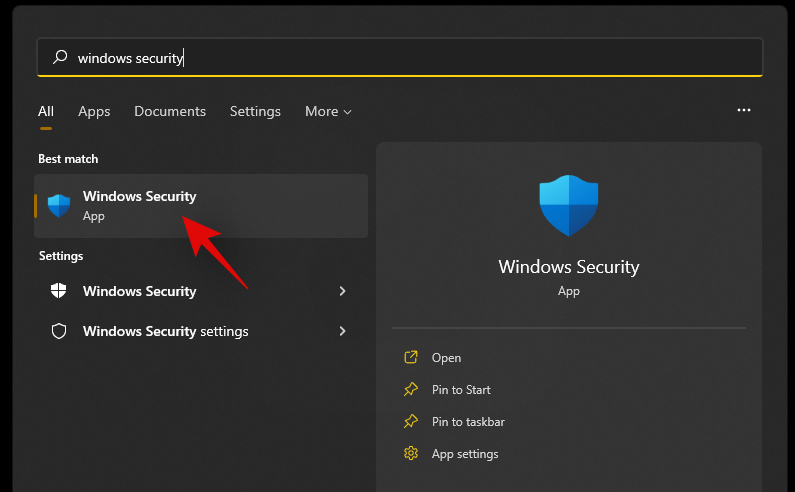
Press Windows + S on your keyboard and search for ‘Windows Security’. Click and launch the app once it shows up in your search results.
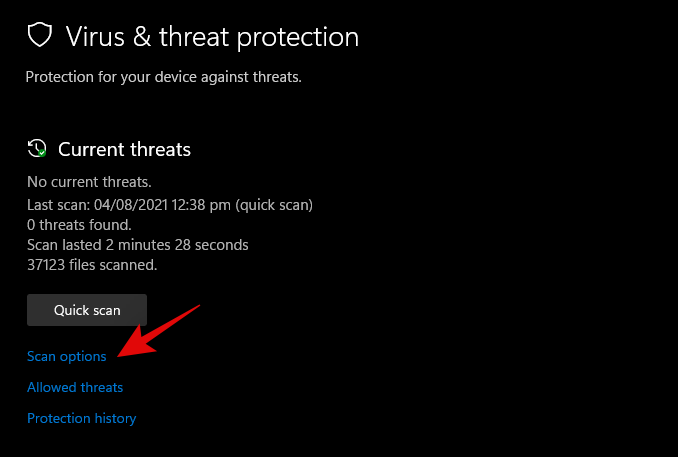
Click on ‘Virus & threat protection’.
Click on ‘Scan options’.
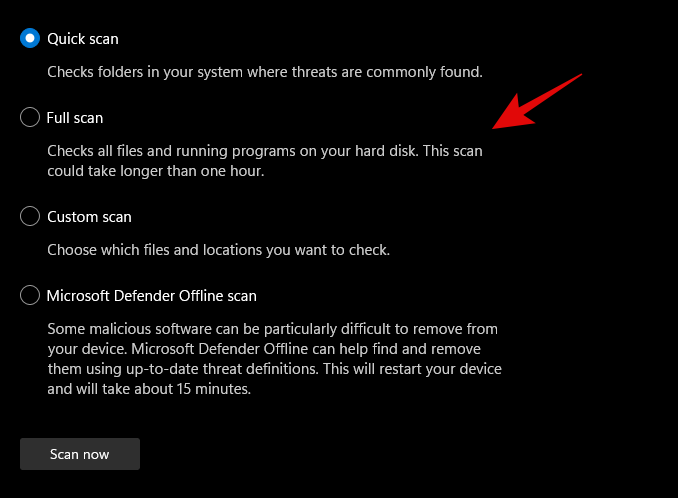
Select ‘Full Scan’.
Finally, click on ‘Scan now’.
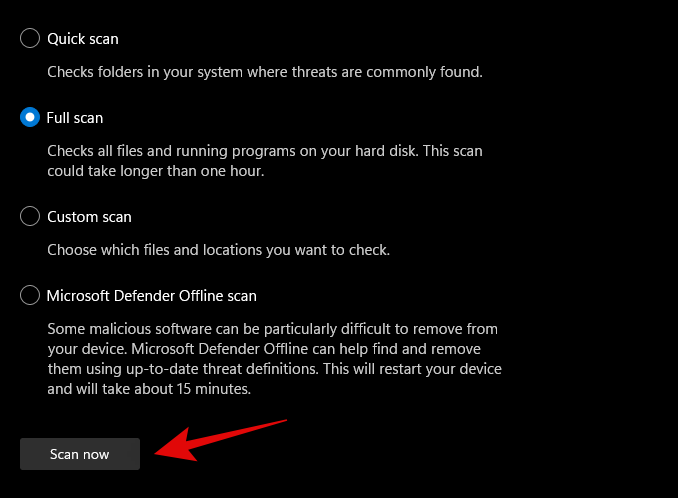
Windows Defender will now scan your entire PC for malware and malicious software. In case any are found, they will be automatically quarantined, and you will be prompted to take the necessary action as soon as possible.
3 General Fixes: Last Resort options
Fix #18: Create a new user via command prompt
If you’re facing an issue where you’re unable to add a local account via Settings to your PC then you can use the command prompt (CMD) for the same. Once added you can try and check if the Start menu is working for you. If it is, you can try the fixes below to restore it in your original account. However, if none of the fixes work for you then you can use the newly created account instead. The new account will be created with administrator privileges so you shouldn’t have problems moving your files and Settings. More on this below.
Press Windows + R to bring up the Run dialog box and type in the following. Press Ctrl + Shift + Enter on your keyboard once you are done.
cmd
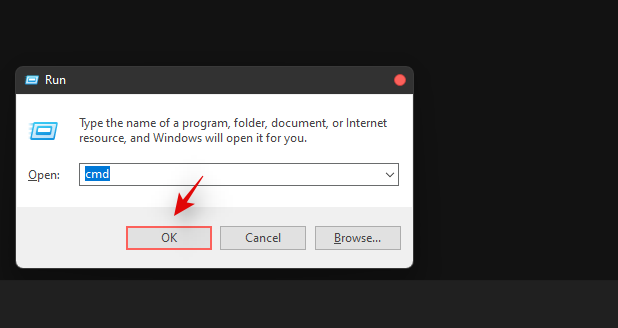
Type in the following command and press Enter on your keyboard. Replace ‘USER’ with your desired username for the new account. Similarly, replace ‘PASSWORD’ with your desired password.
net user /add USER PASSWORD
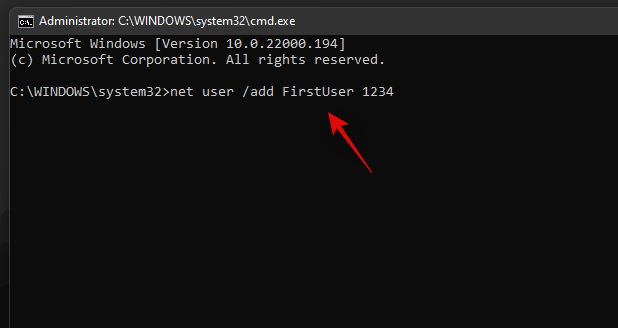
Now execute the following command as well and use the same username as above.
net localgroup administrators USER /add
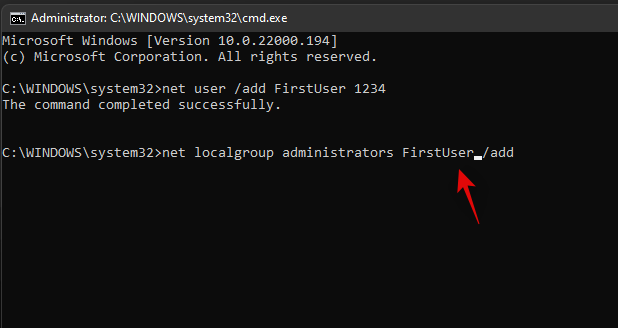
The user will now be added to your PC. Simply restart and log into the new account when the PC restarts.
The start menu should work alright now in the new user account. You can copy your files from the old user account to the new account.
To find your data in the old user account, open Windows Explorer and go to the User folder under the C Drive (or whichever drive you have installed Windows in).
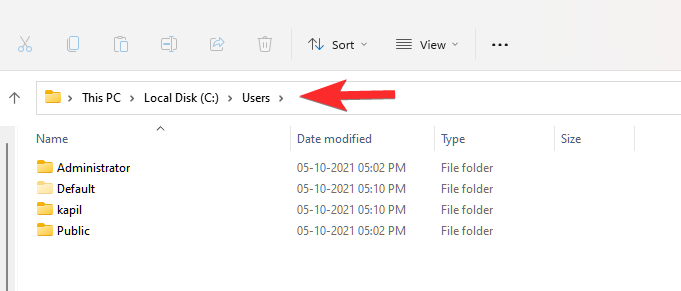
Click on the old user account. Now, copy all the files from here to your new user account that you can also find in the Users folder.
An easy method to transfer files from one user account (old one) to another user account (new one) is to copy the profile. Read more about it here.
Fix #19: Perform a Windows Reset
If you had zero luck with all of the previous methods, we think you should try a Windows Reset. It has been known to solve a host of problems in Windows 11 while keeping your personal files intact. Moreover, resetting Windows to its factory settings can give your PC a fresh start.
Here are the steps.
For this method, you’ll need an elevated PowerShell instance.
Press Win key + r to open the Run box, then type in ‘PowerShell and press Ctrl + Shift + Enter to open PowerShell as administrator.
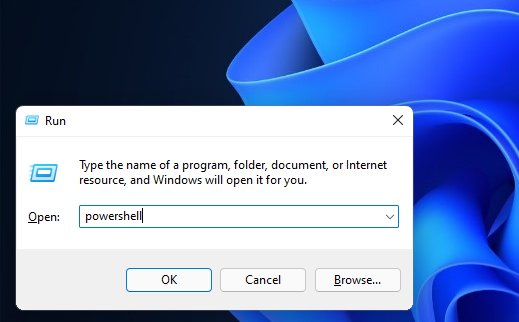
When opened correctly, you should already be inside the C:\Windows\system32 folder.
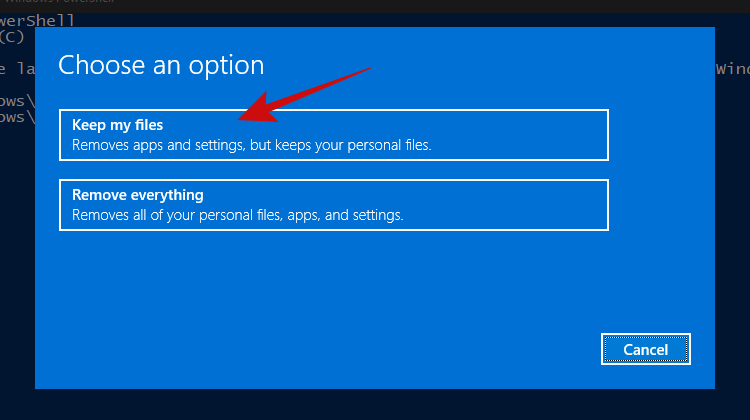
Now type in ‘system reset and press enter. You should be presented with two options, to either keep all your files or to remove everything. Click on ‘Keep my files’.
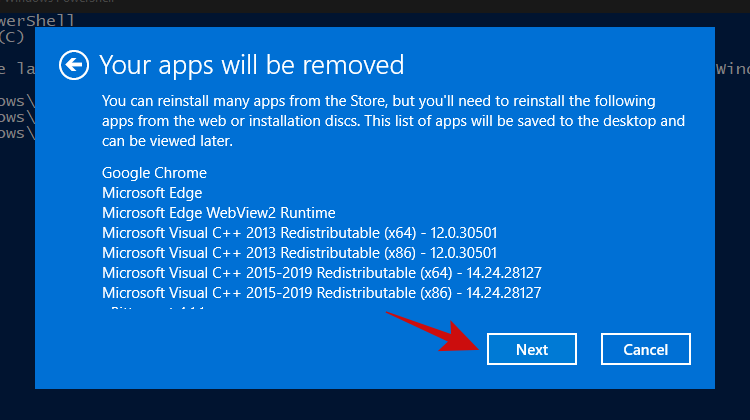
Within a few minutes, Windows should give you a list of apps that’ll be removed from your PC after the reset. Here’s how our list looks.
Once you’ve scrolled through the list of apps, simply click on the ‘Next’ button.
Windows should now start the reset process. Simply follow the instructions and your PC should be reset within a couple of minutes. The Start menu should be working now.
Fix #20: Re-install Windows from scratch
Well, if you’re really considering this method, it’s safe to assume that none of the other methods worked for you. At this point, we think it’s now time to go for a clean installation of Windows 11, which will probably wipe your current Windows partition (if you choose to).
Note: Before proceeding with this method, we recommend making a complete backup of all your files stored inside folders on the Windows drive, such as in Downloads, Documents, and the likes.
Once you have backed up all your files from the Windows drive, let’s take a look at the things you’ll need.
- A USB stick of 8GB or more (no external hard drives, unless you want to lose all your precious data)
- Rufus
Next, follow our guide on downloading and installing the Windows 11 ISO.
Read: How to Download and Install Official Windows 11 ISO
We hope that after following this guide, you were able to fix the annoying and unresponsive Start menu in Windows 11 and bring it back to life.
If you find yourself stuck at any point in this guide, let us know in the comments below.
Related:


