Error 0xc000007b – Čo to je a ako to opraviť
Zistite, ako opraviť chybu 0xc000007b v našej podrobnej príručke, ktorá sa zaoberá príčinami tohto chybového kódu a zoznamom overených riešení.
Panel úloh systému Windows je stredobodom všetkej pozornosti, pretože po vydaní systému Windows 11 získal svoj nový vylepšený vzhľad. Panel úloh teraz môžete vycentrovať, vychutnať si nové centrum akcií, zmeniť jeho zarovnanie a umiestniť ho na obe strany obrazovky. Žiaľ, nasadenie tejto funkcie bolo menej ako úspešné a stále viac používateľov sa niekoľko mesiacov snažilo spustiť svoj panel úloh v systéme Windows 11.
Aj keď spoločnosť Microsoft uznala problém, vydala riešenie a momentálne pracuje na oprave, zdá sa, že používateľom sa stále nedarí znova spustiť panel úloh. Ak ste na rovnakej lodi, zostavili sme zoznam všetkých dostupných opráv, aby sa váš panel úloh opäť spustil a fungoval v systéme Windows 11. Začnite podľa pokynov nižšie.
Obsah
Prečo sa môj panel úloh nezobrazuje?
Panel úloh systému Windows 11 má nový vzhľad, ktorý vychádza z prepracovaného pohľadu na jeho fungovanie. Panel úloh sa teraz pri správnom fungovaní spolieha na niekoľko služieb a samotnú ponuku Štart. Zdá sa, že proces inovácie zo systému Windows 10 na systém Windows 11 zrejme pokazí panel úloh v závislosti od toho, ktorú verziu systému Windows 10 máte nainštalovanú vo svojom systéme a na ktorú verziu systému Windows 11 aktualizujete.
Okrem toho sa zdá, že nedávna aktualizácia systému Windows, ktorá bola vydaná minulý mesiac, spôsobuje niektorým používateľom tento problém, zatiaľ čo iní čelia tomu istému kvôli nesprávnemu systémovému času napriek tomu, že majú všetko správne nastavené. Existuje mnoho spôsobov, ako opraviť panel úloh, a odporúčame vám začať postupne s opravami uvedenými nižšie.
12 spôsobov, ako vyriešiť problémy s panelom úloh v systéme Windows 11
Pomocou nižšie uvedených metód začnite opravovať panel úloh v systéme Windows 11. Ak ste sa už pokúsili reštartovať systém, môžete prvú metódu preskočiť.
Oprava #1: Reštartujte počítač
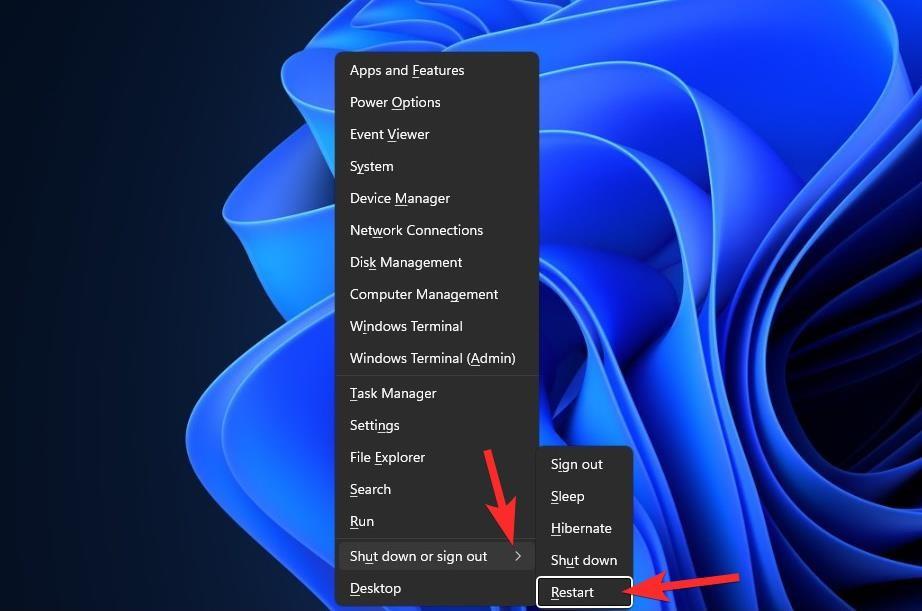
Predtým, ako vyskúšate niečo fantastické, je dobré vyskúšať jednoduchšie opatrenia, ako napríklad reštartovanie počítača alebo Windows Explorer (pozri nižšie). Ak tak urobíte, váš systém vykoná mäkký reset, čo umožní opätovné načítanie údajov a prípadne aj vyriešenie problémov s panelom úloh a ponukou Štart.
Oprava č. 2: Uistite sa, že možnosť „Automaticky skrývať panel úloh“ je vypnutá
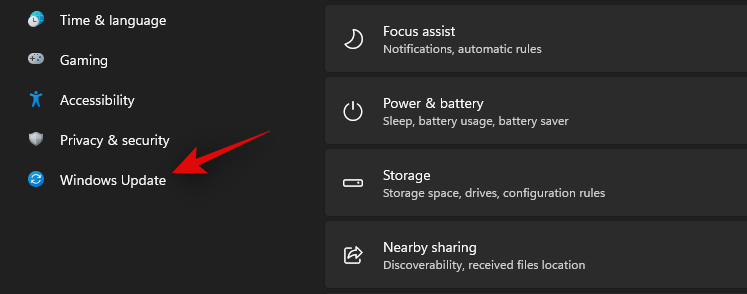
Stlačte Windows + ina klávesnici a kliknite na 'Prispôsobenie' na ľavej strane.
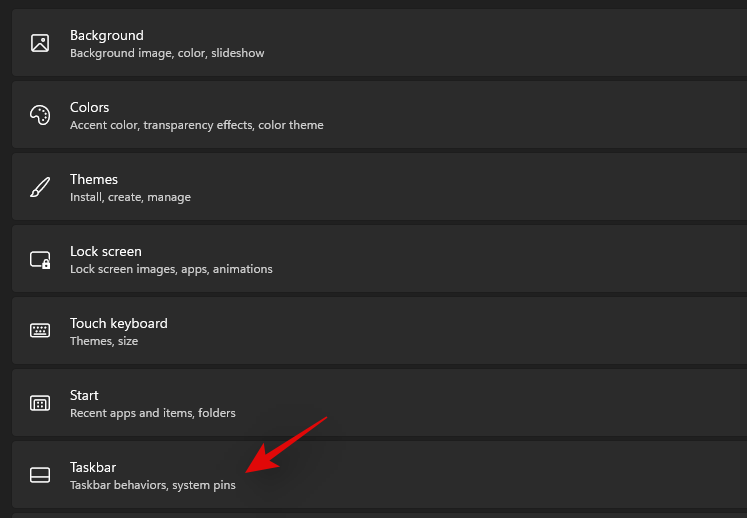
Kliknite na 'Panel úloh'.
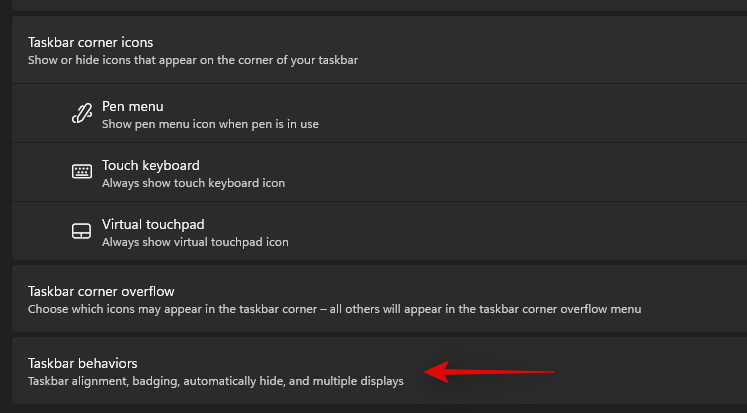
Teraz kliknite na „Správanie panela úloh“.
Zrušte začiarknutie políčka „Automaticky skryť panel úloh“.

Teraz zatvorte aplikáciu Nastavenia a ak bol váš panel úloh automaticky skrytý, mal by byť teraz vo vašom systéme vypnutý.
Oprava č. 3: Reštartujte potrebné služby
Ako už bolo spomenuté, Windows 11 prepracoval panel úloh, čo teraz znamená, že sa spolieha na to, že viaceré služby budú správne fungovať na akomkoľvek systéme. Reštartujme všetky tieto služby, aby sme sa uistili, že konflikt na pozadí nebude brániť správnemu fungovaniu panela úloh na vašom systéme.
Stlačením Ctrl + Shift + Escna vašom systéme spustíte Správcu úloh. V hornej časti prejdite na kartu Podrobnosti.
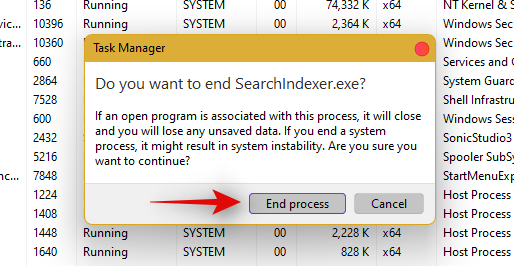
Teraz nájdite nasledujúce spustené služby a vyberte ich kliknutím na ne. Stlačte 'Delete' na klávesnici a potvrďte svoj výber výberom 'End Process'.
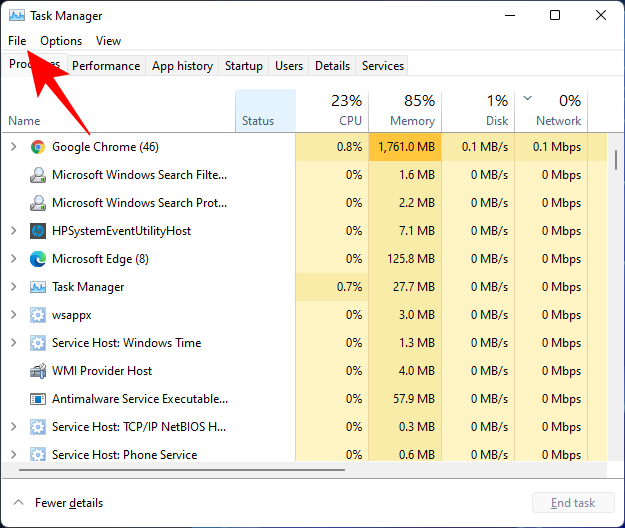
Teraz reštartujeme Windows Explorer. Kliknite na „Súbor“ v ľavom hornom rohu a vyberte „Spustiť novú úlohu“.
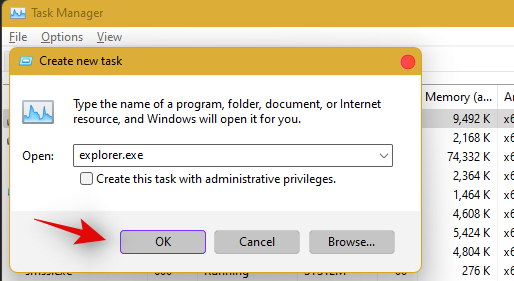
Napíšte „explorer.exe“ a stlačte Enter na klávesnici. V prípade potreby môžete kliknúť aj na „OK“.
Po reštartovaní prieskumníka stačí reštartovať počítač a reštartovať ostatné služby vo vašom systéme.
Panel úloh by sa mal teraz obnoviť, ak bol príčinou vášho problému konflikt služby na pozadí.
Oprava č. 4: Odstráňte službu IrisService v registri a reštartujte
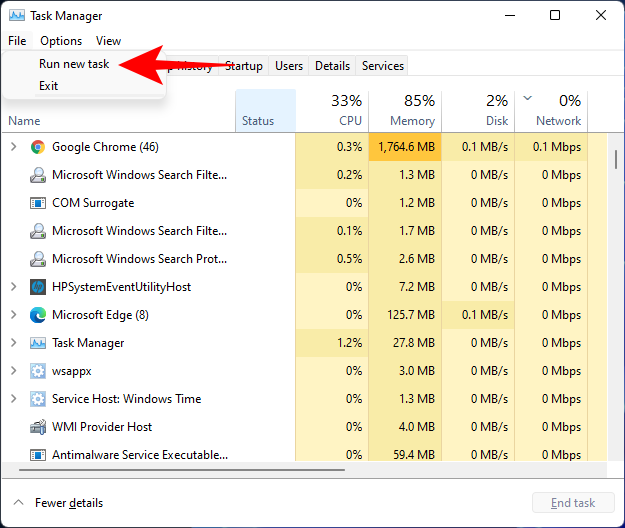
Stlačením Ctrl + Shift + Escotvoríte Správcu úloh. Potom kliknite na Súbor v ľavom hornom rohu.
Vyberte položku Spustiť novú úlohu .
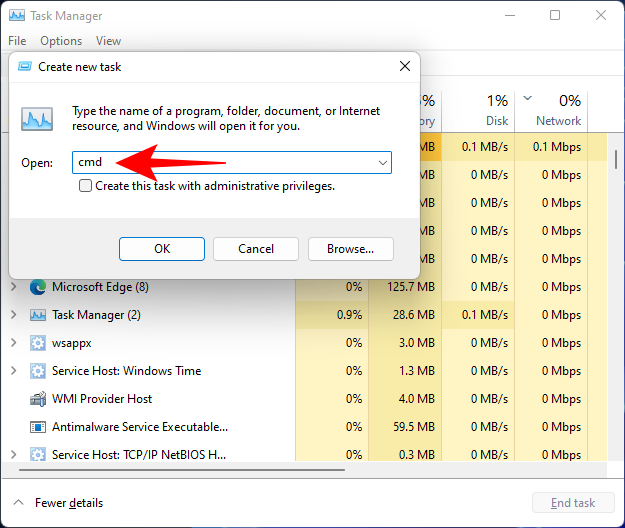
Napíšte cmd a stlačte Enter.
Tým sa otvorí zvýšená inštancia príkazového riadka. Teraz skopírujte nasledujúci príkaz a vložte ho do príkazového riadka:
reg delete HKCU\SOFTWARE\Microsoft\Windows\CurrentVersion\IrisService /f && shutdown -r -t 0

Potom stlačte Enter. Hneď ako tak urobíte, váš počítač sa reštartuje. Po spustení by sa veci mali vrátiť do normálu, vrátane hlavného panela.
Oprava #5: Pridajte UndockingDisabled do databázy Registry
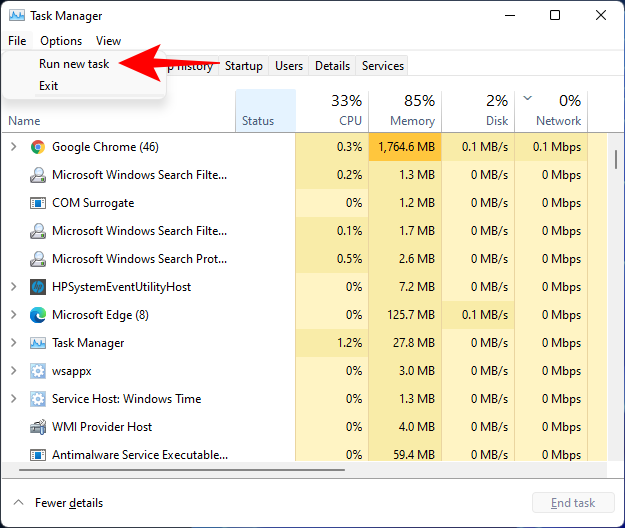
Stlačením Ctrl + Shift + Escotvoríte Správcu úloh. Potom kliknite na Súbor (ľavý horný roh) a Spustiť novú úlohu .
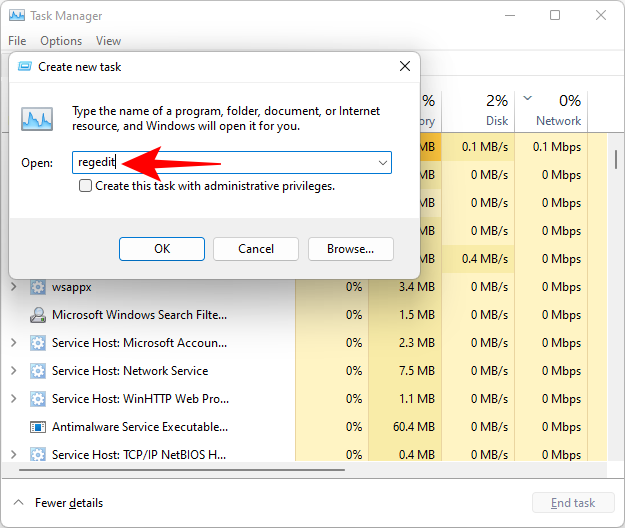
Napíšte regedit a stlačte Enter.
Tým sa otvorí Editor databázy Registry. Teraz prejdite na nasledujúcu adresu:
Computer\HKEY_LOCAL_MACHINE\SOFTWARE\Microsoft\Windows\CurrentVersion\Shell\Update\Packages
Prípadne stačí skopírovať vyššie uvedené a prilepiť ho do panela s adresou editora databázy Registry, napríklad:

Po stlačení klávesu Enter budete presmerovaní na zadaný kľúč. Vpravo kliknite pravým tlačidlom myši na medzeru a vyberte položku Nový > Hodnota DWORD (32-bitová) .
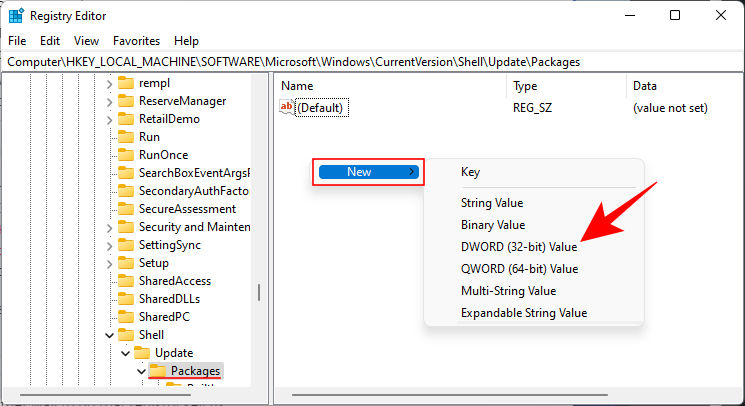
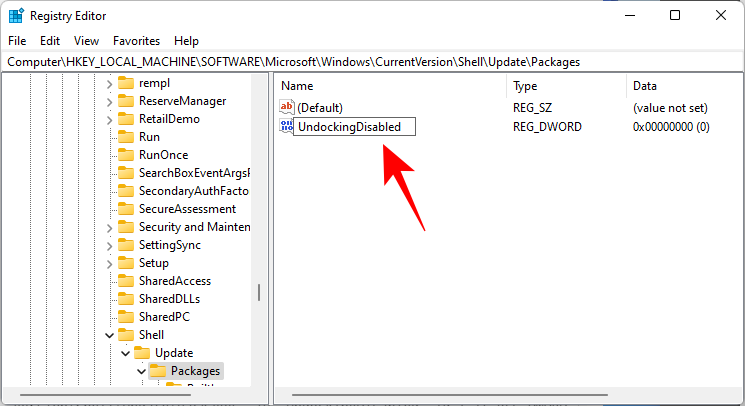
Pomenujte tento novovytvorený DWORD UndockingDisabled .
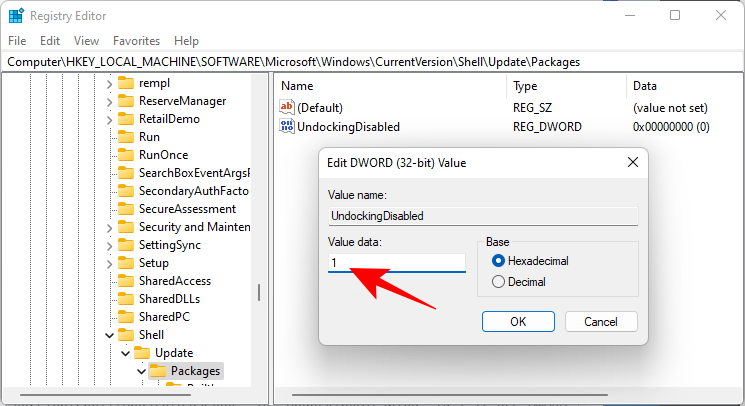
Potom naň dvakrát kliknite a zmeňte „Údaje o hodnote“ na 1 . Potom kliknite na tlačidlo OK .
Reštartujte počítač, aby sa zmeny prejavili.
Oprava #6: Spustite príkazy SFC & DISM
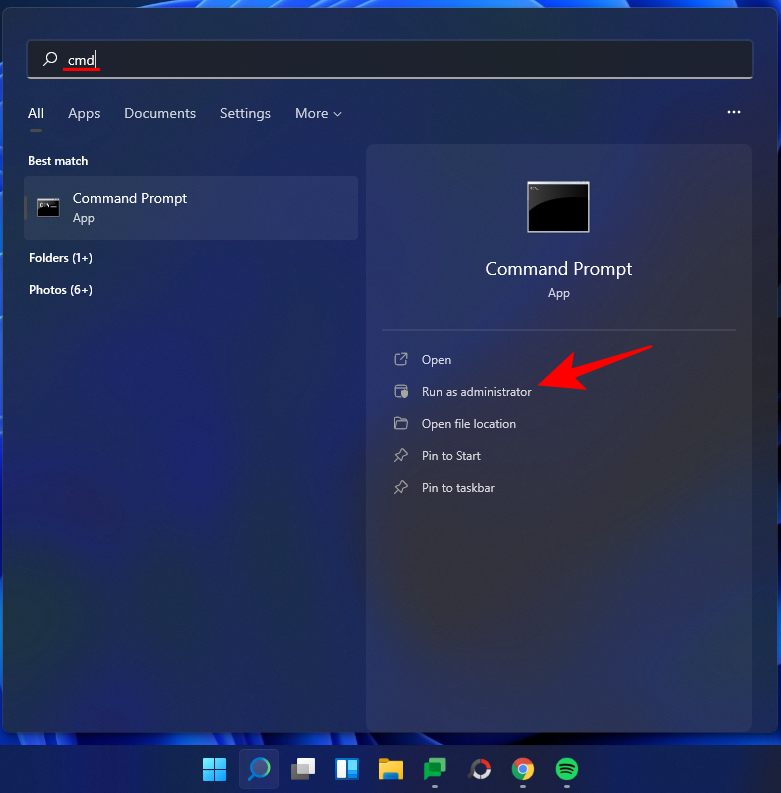
Stlačte Štart, zadajte cmd a kliknite na Spustiť ako správca .
Teraz zadajte nasledujúci príkaz:
sfc /scannow
Stlačte Enter. Počkajte, kým SFC dokončí skenovanie a opraví všetky zistené problémy.

Ďalej spustite nasledujúci príkaz DISM pre nástroj Obsluha a správa obrazu nasadenia:
dism /online /cleanup-image /scanhealth
Potom stlačte Enter. Opäť počkajte na dokončenie skenovania.

Teraz spustite nasledujúci príkaz DISM:
dism /online /cleanup-image /restorehealth

Stlačte Enter. Počkajte, kým DISM obnoví zdravie.

Nakoniec spustite príkaz chkdsk na spustenie pomôcky Check Disk:
chkdsk c: /r
Stlačte Enter. Príkazový riadok zobrazí správu, že „aktuálnu jednotku nemôže uzamknúť... pretože zväzok používa iný proces“ a požiada vás o povolenie naplánovať kontrolu pred ďalším spustením. Napíšte, Yaby ste vyhoveli.

And press Enter. Now restart your computer, let the Check Disk tool do its job, and check if the taskbar has resumed normal functioning.
Fix #7: Reinstall UWP
Press Ctrl + Shift + Esc on your keyboard to launch the Task Manager. Click on ‘File’ and select ‘Run new task’.
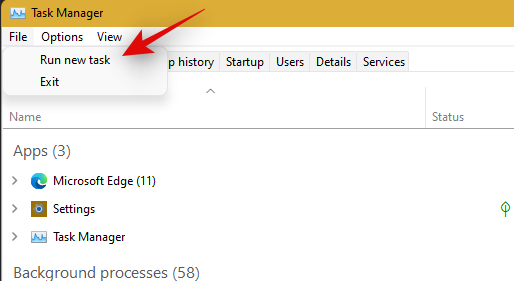
Type in ‘PowerShell’ and press Ctrl + Shift + Enter on your keyboard.
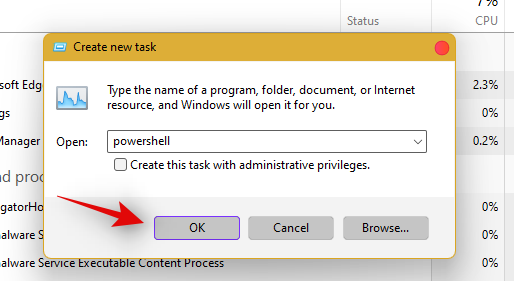
PowerShell will now be launched as an administrator on your system. Type the following command:
Get-AppxPackage -AllUsers | Foreach {Add-AppxPackage -DisableDevelopmentMode -Register “$ ($ _. InstallLocation) \ AppXManifest.xml”}
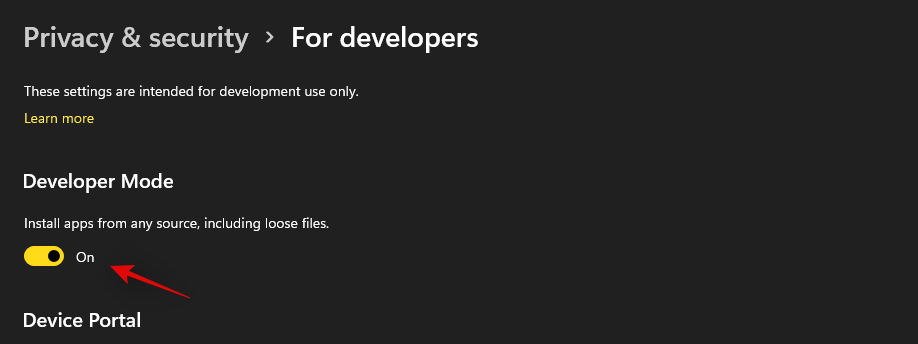
Press Enter. PowerShell will throw up a running list of messages in red. But don’t worry about it. Just wait for the command to finish executing.

Fix #8: Check UAC and add edit Registry if needed
UAC is a must-have for all modern apps and features including the Start Menu and the taskbar. You should first enable UAC if it is disabled and restart your system. If the Taskbar still fails to work for you, then we recommend you try adding a Xaml Start menu value to your Registry Editor.
Adding this value seems to restart and re-register Taskbar services which seem to get Taskbar working again on most systems. Follow the guide below to get you started.
Check and enable UAC if disabled
Press Ctrl + Shift + Esc on your keyboard to launch the task manager. Now click on ‘File’ in the top left corner of your screen and select ‘Run new task’.

Type in ‘cmd’ and press Ctrl + Shift + Enter on your keyboard.
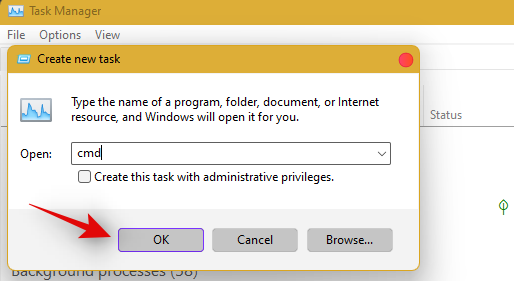
Now type in the following command and press Enter to execute the command.
C:\Windows\System32\cmd.exe /k %windir%\System32\reg.exe ADD HKLM\SOFTWARE\Microsoft\Windows\CurrentVersion\Policies\System /v EnableLUA /t REG_DWORD /d 0 /f
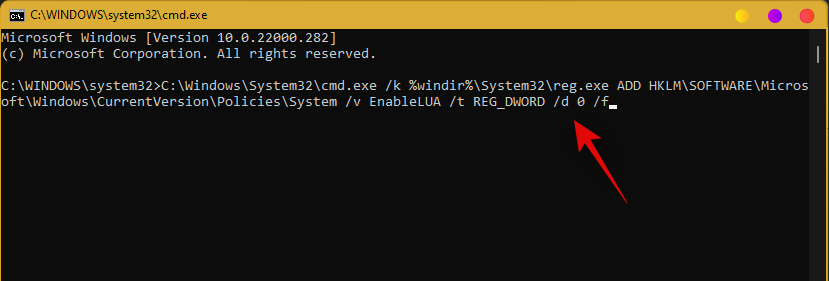
UAC will now be enabled for your system. Restart your PC for the changes to take effect on your system. Once restarted, Taskbar should be up and running on your system if UAC was the issue for you. If not, use the guide below to trigger the taskbar’s functionality on your system.
Add Registry Value
Press Ctrl + Shift + Esc to launch the task manager. Now click on ‘File’ in the top left corner and select ‘Run new task’.

Type in ‘cmd’ and press Ctrl + Shift + Enter on your keyboard.

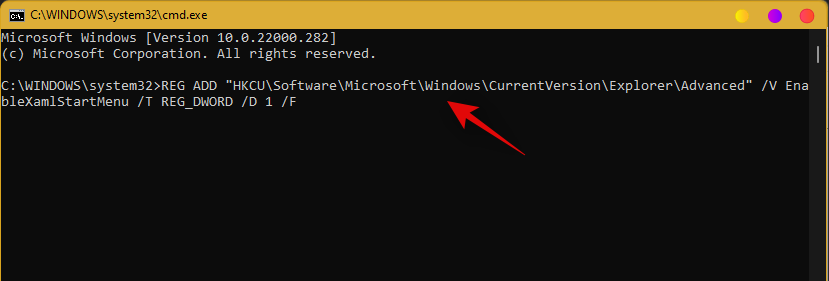
Now type in the following command and press Enter on your keyboard.
REG ADD "HKCU\Software\Microsoft\Windows\CurrentVersion\Explorer\Advanced" /V EnableXamlStartMenu /T REG_DWORD /D 1 /F
Go back to the task manager now, find Windows Explorer in the list, and right-click on it. Select Restart to restart explorer.exe.
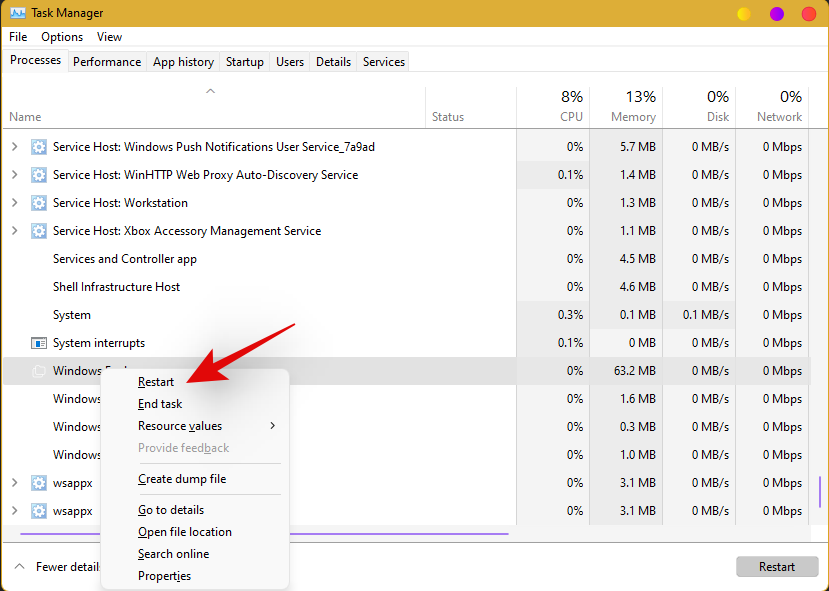
Once restarted, try to access your taskbar. The taskbar should now be available on your system.
Fix #9: Edit date and time to fix Taskbar
Date and Time settings seem to be the major cause of issues with the taskbar in Windows 11. Use the guide below to try out the following time fixes to see which one works the best for you.
Ensure that your time is correctly synchronized with the time server
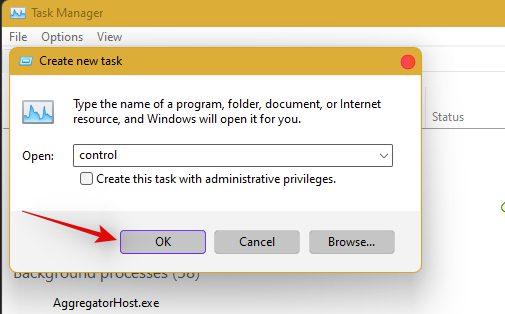
Press Ctrl + Shift + Esc on your keyboard and click on ‘File’. Select ‘Run new task’.

Type in ‘Control’ and hit Enter on your keyboard.
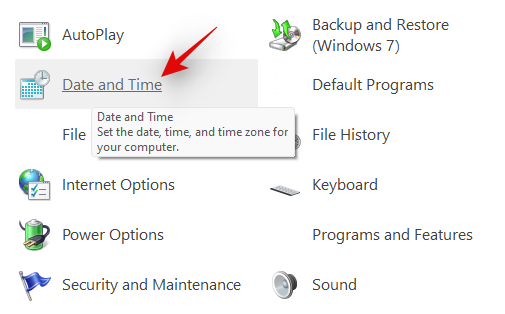
Click on ‘Date and Time’.
Select ‘Internet Time’ from the top.
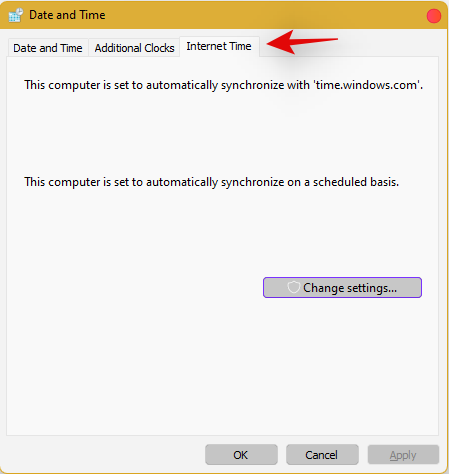
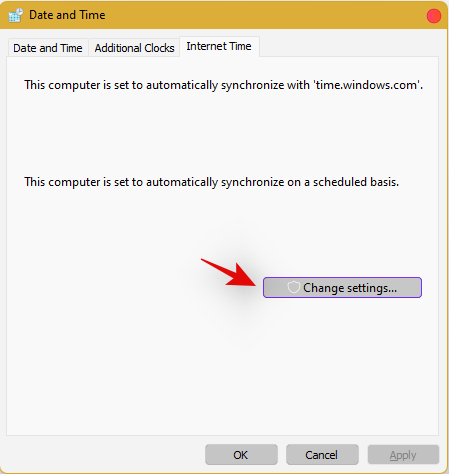
Click on ‘Change Settings’.
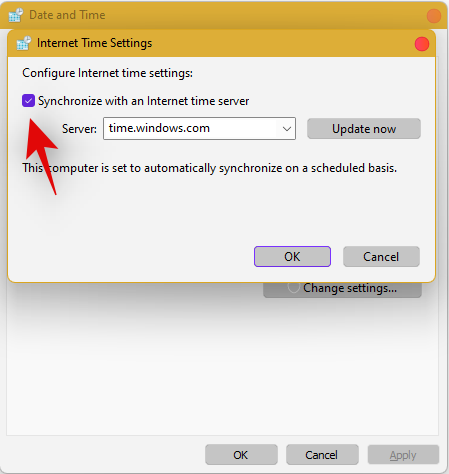
Uncheck the box for ‘Synchronize with an Internet time server’.
Click on ‘Ok’ once you are done.
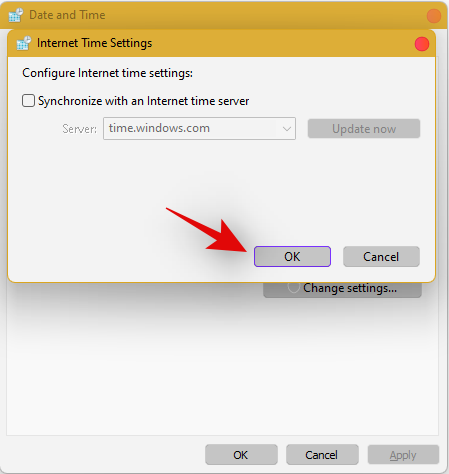
Restart your PC at this point and check your taskbar. If it is still disabled, do not fret, follow the steps above and enable Synchronization with an Internet Time Server again.
Once enabled, press Ctrl + Shift + Esc on your keyboard, and find Windows Explorer in the list on your screen. Right-click the listing and select ‘Restart’.

Once explorer restarts, try using the Taskbar. If synchronization was your issue, then it should now be fixed on your system. If not, continue with the other time fixes mentioned below.
Change date to 1 day ahead
Open the Task Manager by pressing Ctrl + Shift + Esc simultaneously. Then click on File.
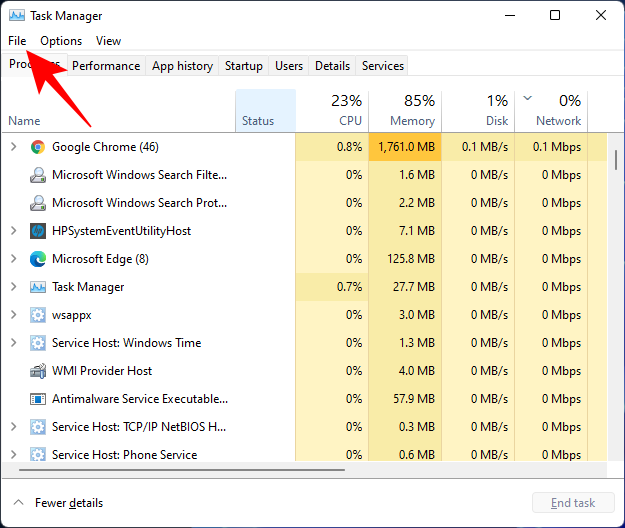
Click on Run new task.
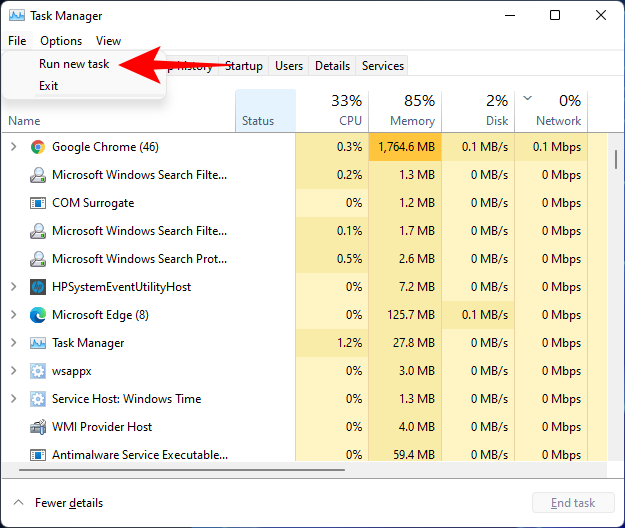
Type control panel and hit Enter.
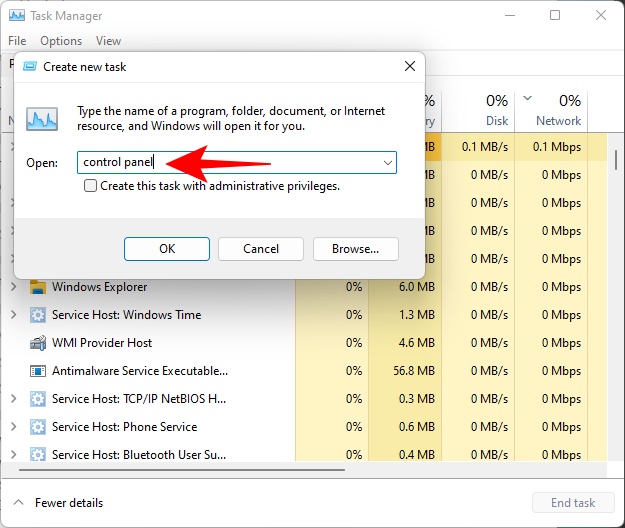
Now click on Clock and Region.
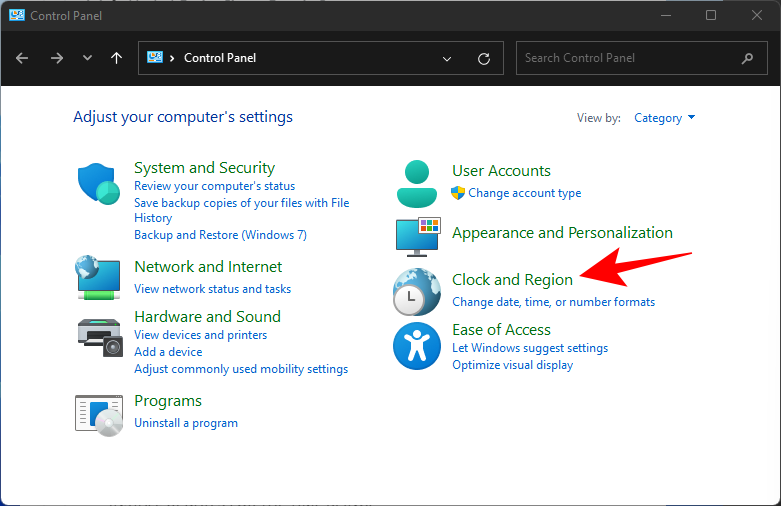
Under “Date and Time”, click on Set the time and date.
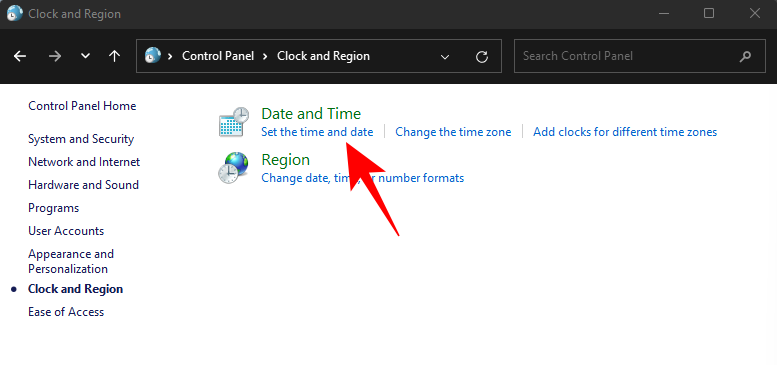
Click on the Internet Time tab to switch to it.
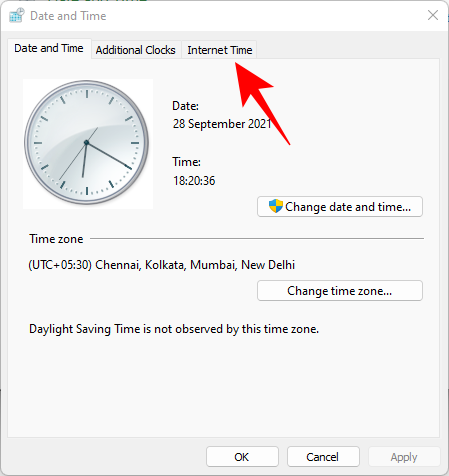
Click on Change settings…
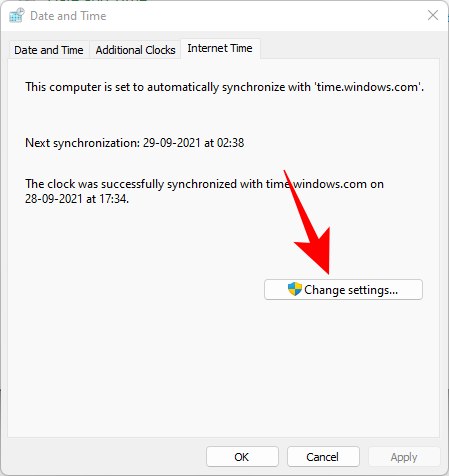
Uncheck Synchronize with an Internet time server, then click OK.
Now click on the Date and Time tab to switch back to it.
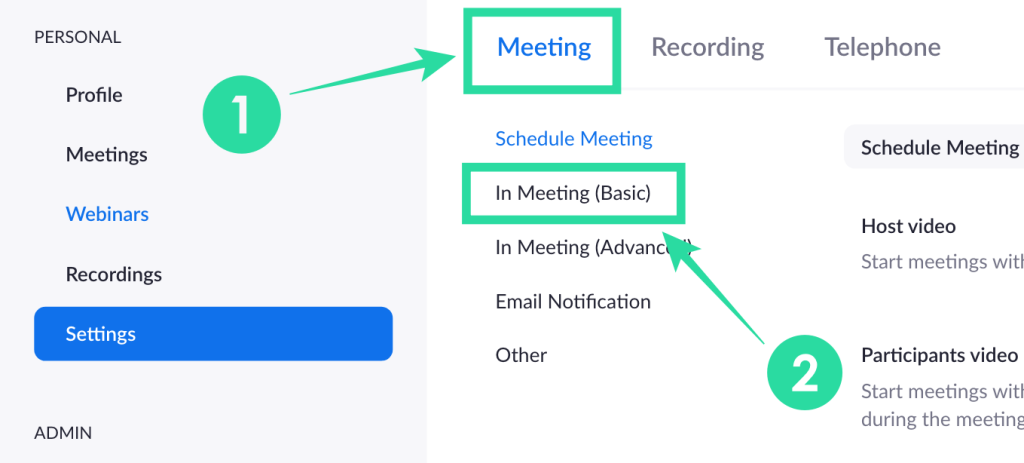
Here, click on Change date and time…
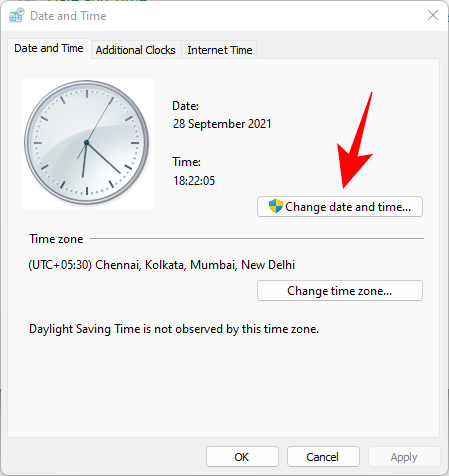
Now change the date and time to reflect tomorrow. As of writing this post, it is the 1st November so we will be changing the date to 2nd November.
Change Dates to last cumulative updates
If you are still unable to get the Taskbar working then you will have to jump through a few hoops to change your date and time multiple times and get the taskbar working on your system. Follow the guide below to get you started.
Press Ctrl + Shift + Esc on your keyboard, click on ‘File’ and select ‘Run new task’.

Type in ‘Control’ and press Enter on your keyboard.

Select ‘Date and Time’.

Switch to ‘Internet time’.

Click on ‘Change Settings’.

Uncheck the box for ‘Synchronize with an Internet Time Server’.

Click on ‘Ok’.

Switch back to ‘Date and Time’. Click on ‘Change Date and Time’ and select your date as 2nd September.
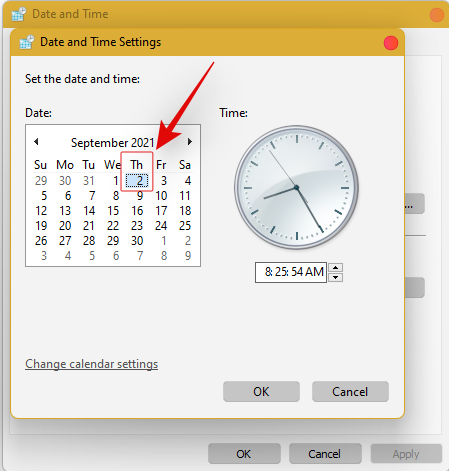
Close all windows and restart your system. Once restarted, open the ‘Date and Time’ dialog box again and change your date to 7th October this time.
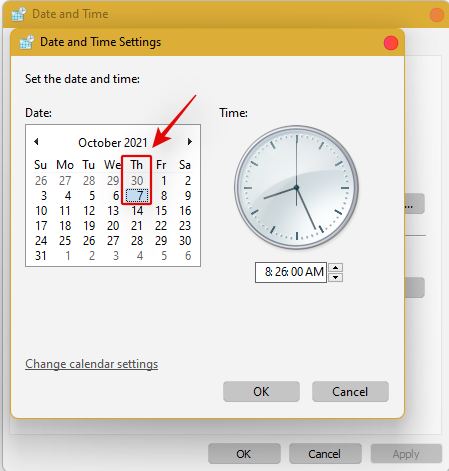
Restart your system again and Taskbar should now be back up and running on your system again. You can now enable synchronization for time again using the steps above on your system.
If synchronizing time does not work, move a month ahead to restore Taskbar
If you are still unable to get Taskbar up and running on your system again you can try the last date change fix. We recommend you use the steps above to change your date and time to a month ahead of your current date. Once changed, restart your system, and the taskbar should be up and running on your system now.
The downside of this fix is that if you revert to your normal date, Taskbar will stop working on your system. Having a mismatched date can cause issues with background syncs for various applications and cause some websites to malfunction. You will also have issues installing and getting the latest Windows Updates, so you will need to check all of these manually when updating in the future.
Fix #10: Uninstall the latest cumulative Windows Update ie: KB5006050
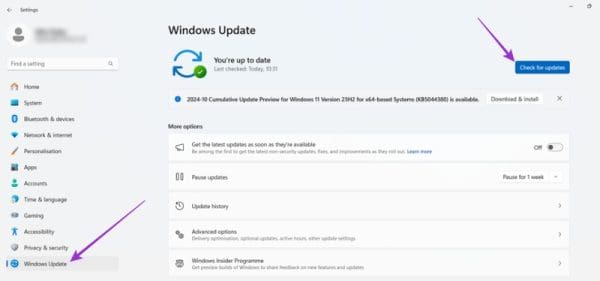
The cumulative update released in September for Windows 11 seems to also cause issues with the taskbar on some desktops and laptops. Use the guide below to uninstall the necessary update from your system.
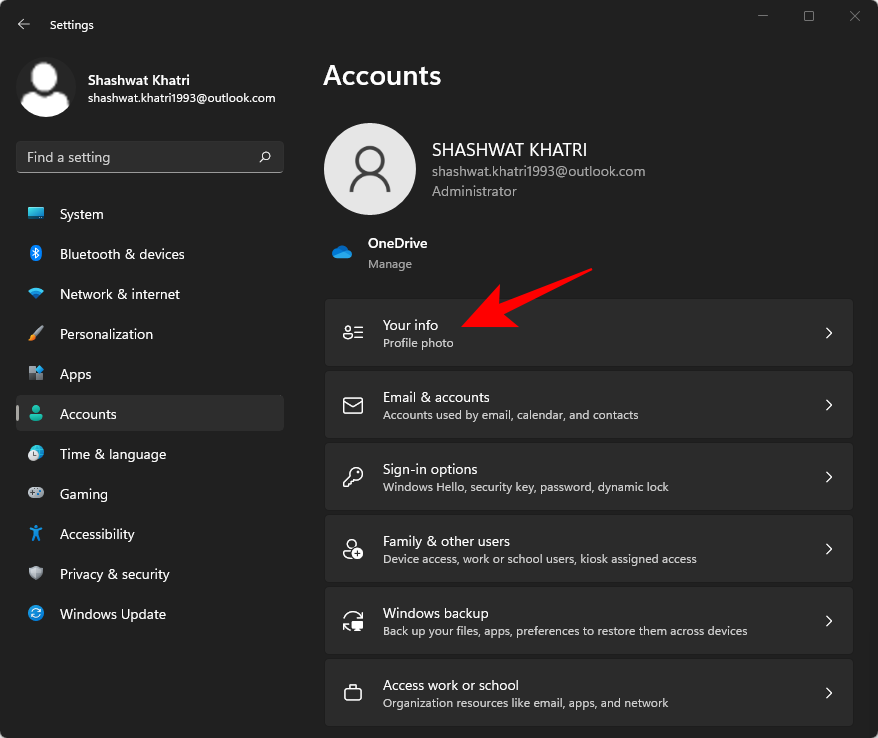
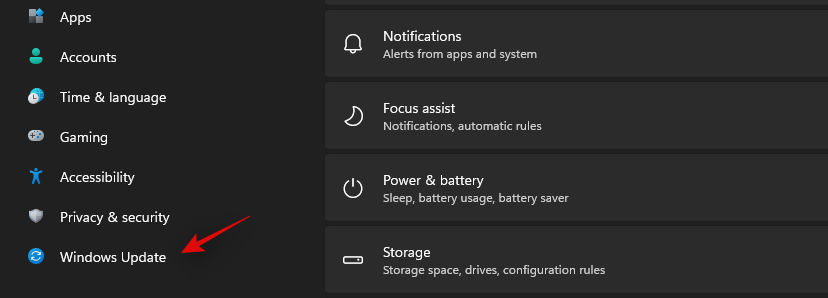
Press Windows + i and select Windows Update from the left.
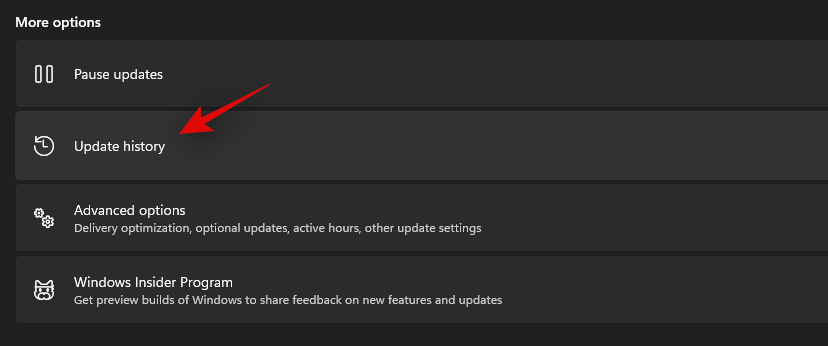
Click on ‘Update history’.
Now select ‘Uninstall updates’.
Click and select Windows Cumulative update KB5006050 from the list.
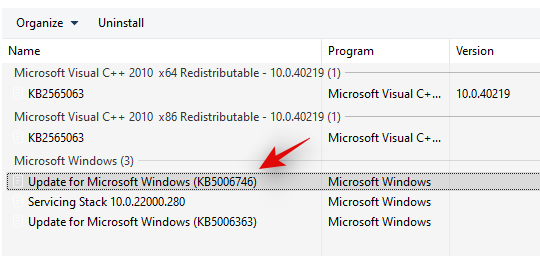
Now click on ‘Uninstall’ at the top and confirm your choice to uninstall the selected update.
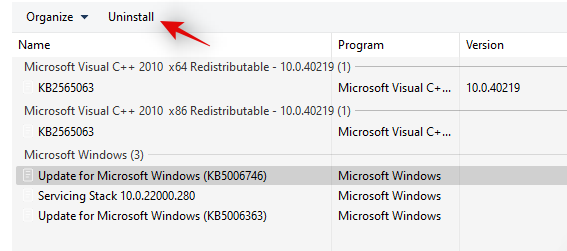
Restart your system and taskbar functionality should now be restored on your system.
Fix #11: Restore PC to a previous restore point
If you had the taskbar working at a previous point in time then we recommend you restore your PC to a previously available restore point on your system. Follow the guide below to get you started.
Press Ctrl + Shift + Esc on your keyboard and click on ‘File’. Select ‘Run new task’ once you are done.

Type in CMD and press Ctrl + Shift + Enter on your keyboard.

Now type in ‘rstrui.exe’ and press Enter on your keyboard.
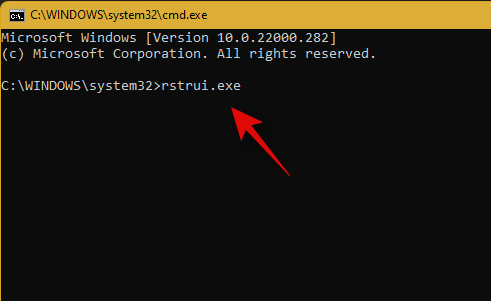
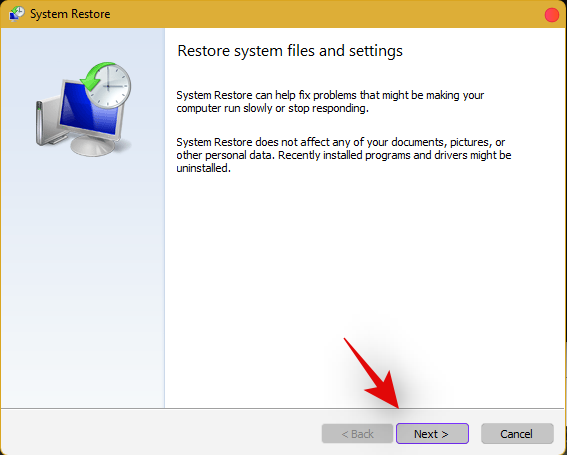
The system restore utility will now launch on your system. Click on ‘Next’.
Select the desired restore point from the list on your screen. Click on ‘Next’ once you are done.
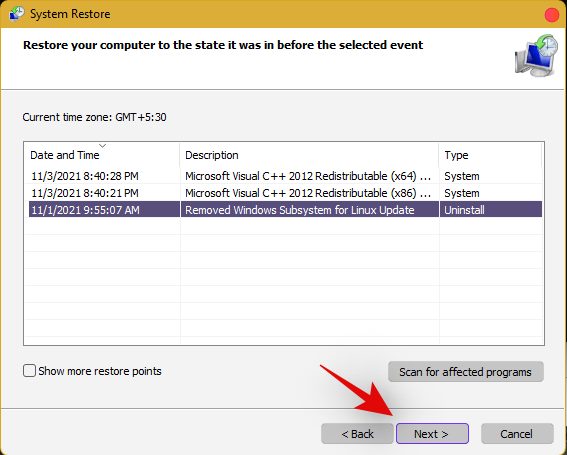
Tip: Click on ‘Scan for affected programs’ to view a list of installed programs that will be removed from your system during the restore process.
Click on ‘Finish’ once the restore finishes and restart your system.
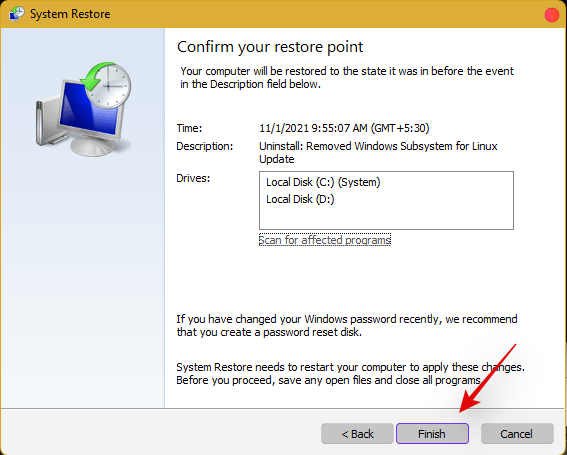
The taskbar should now be back up and running on your system again.
Fix #12: Last Resort: Create a new local admin account and transfer all your data
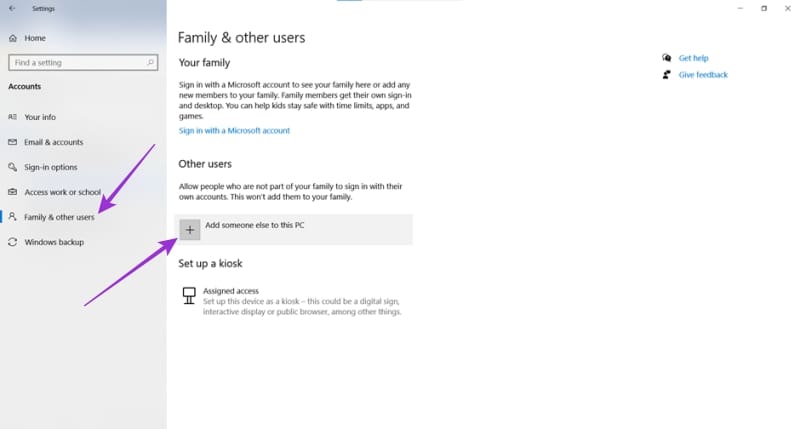
If by this point Taskbar still fails to work for you then it’s time for some drastic measures. You can create a new local admin account, check if Taskbar is working there, and then transfer all your data to the new account. This will be a tedious process but it is the next best way to get the taskbar working on your system without resetting your PC. Follow the guide below to get you started.
Create a new local admin account
Herre’s how you can create a new local admin account on your system.
Note: Most users facing the taskbar issue are unable to access the Settings app as well. Hence we will be using CMD to add a new local admin account to your PC. However, if the Settings app is available to you then you can use the same to add a new account as well.
Press Ctrl + Shift + Esc on your keyboard, click on ‘File’ and select ‘Run new task’.

Type in ‘cmd’ and press Ctrl + Shift + Enter on your keyboard.

CMD will now be launched as an administrator. Use the command below to add a new local admin account. Replace NAME with the Username of your choice for the new account. You can add a password later once you have confirmed that the taskbar is available in the new account.
net user /add NAME 
Once you have added the new user, use the command below to convert it to an administrator account on your PC. As usual, replace NAME with the Username for the new account you created earlier.
net localgroup Administrators NAME /add

Now type in the following to log out of your current account.
logoff

Once logged out, click on the newly added account to log in to the same. Once logged in, check if the taskbar is available in the new account. If it is, you can use the next section to transfer all your data. However, if the taskbar is still missing then you have no choice but to perform a fresh install of Windows 11 on your PC from a removable USB media drive.
Transfer all your data
Press Windows + i on your keyboard and click on ‘About’ on your right.
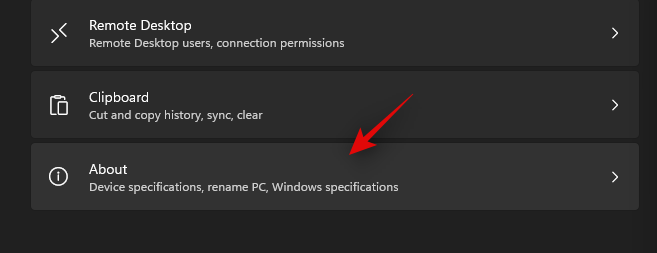
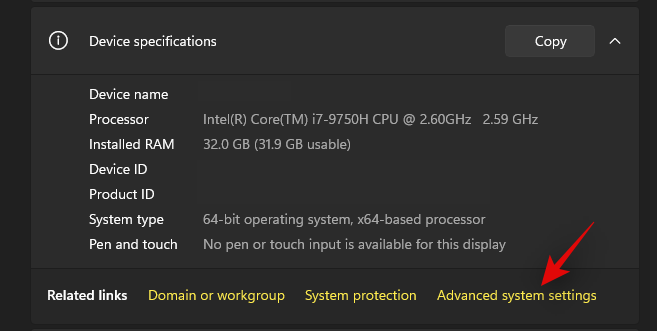
Click on ‘Advanced system settings’.
Click on ‘Settings’ under ‘User Profiles’.
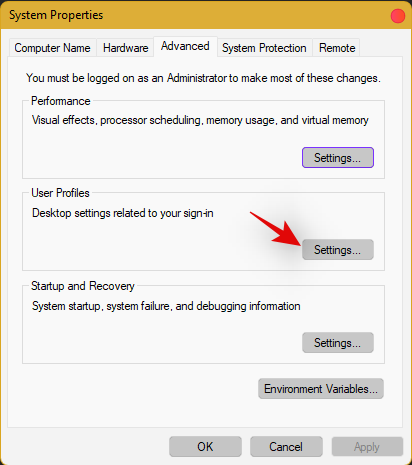
Select your original profile by clicking on it and selecting ‘Copy To’.
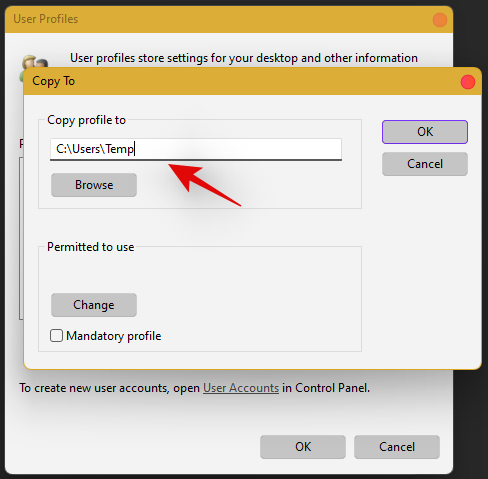
Now enter the following path under ‘Copy profile to’. Rename NAME to the username of your previous profile from where you wish to copy all your data.
C:\Users\NAME
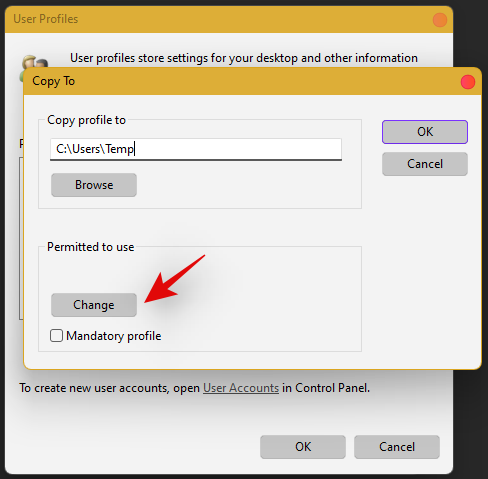
Click on ‘Change’.
Enter the name for your new user profile and press Enter on your keyboard.
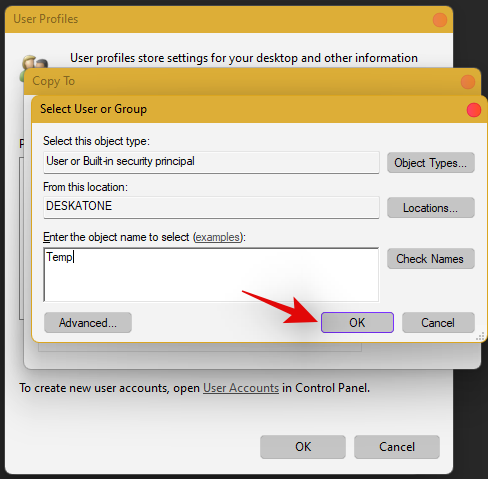
Click on ‘Ok’ once you are done.
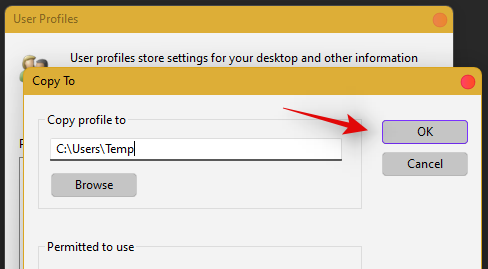
All your data will now be copied over to the new profile where the taskbar is functional on your PC. You can now delete your previous user account and set a password for your new account as well.
Frequently Asked Questions (FAQs):
With so many fixes, you are bound to have a few questions on your mind. Here are some commonly asked ones that should help you get up to speed.
How do I access Windows apps and Settings without a taskbar?
You can use the Task Manager to launch almost any program or Settings page on your system. To launch the desired program, launch the Taskbar > File > Run new task and enter the path to the program you wish to launch. Press Enter if you wish to launch the program normally or press Ctrl + Shift + Enter if you wish to launch the program with administrator privileges.
Is it safe to edit the Registry?
Registry edits are never safe as they have the potential to break your system. Fixes from trusted sources can help you avoid such issues but a good rule of thumb is to always back up your registry before making any edits. This way you can easily restore your Registry values in case some get messed up when editing the Registry.
When will Microsoft fix this issue?
Sadly, Microsoft is yet to release a proper fix for this issue. The company has tried to release a fix in the past cumulative updates to Windows 11 but they have been a hit and miss. We expect Microsoft to completely fix this issue in the upcoming feature update to Windows 11 when the OS gets the ability to run Android apps officially.
Can I update my Windows 11 after fixing the taskbar?
This will depend on the fix that you’re currently using. If you are using a date fix then you won’t be able to install updates until you restore to the current time. This will, however, cause the taskbar to be disabled again and the changes will be carried over after you update your PC. However, if you are using any other fix then you can easily update Windows.
For users with the date fix, you should try updating with the modified time first. If the update gets stuck on ‘Installing 0%’ or ‘Downloading 100%’ then change your date and time to the current date and time and update your PC. Ensure that you do not restart explorer or your PC during this process to keep the current instance of the taskbar alive on your system during the update process. This should help fix the issue for you once Microsoft officially releases an update to fix the issue.
We hope you were able to easily get the taskbar back up and running on your system using the guide above. If you face any more issues, feel free to reach out to us using the comments section below.
Related:
Zistite, ako opraviť chybu 0xc000007b v našej podrobnej príručke, ktorá sa zaoberá príčinami tohto chybového kódu a zoznamom overených riešení.
Návod, ako zapnúť alebo vypnúť núdzový režim pre tablet Samsung Galaxy Tab S3
Ak sa snažíte opraviť kód chyby 0x80860010 na vašom počítači, nájdite tu možné riešenia.
Zistite, ako vyriešiť bežný problém, pri ktorom bliká obrazovka v prehliadači Google Chrome.
Zistite, čo robiť, keď Windows 11 neustále zlyháva, s prehľadom osvedčených a otestovaných riešení, ktoré vám môžu pomôcť opraviť tento problém.
Zistite, čo robiť, ak aplikácia Windows Phone Link nefunguje, s krokovým zoznamom riešení, ktoré vám pomôžu znova pripojiť telefón k počítaču.
Zistite, čo robiť, keď Hlavný panel v systéme Windows 11 nefunguje, s prehľadom osvedčených riešení a tipov na riešenie problémov.
Ak Office oznamuje, že požadovanú akciu nebolo možné vykonať, aktualizujte a opravte svoj Office Suite. Ak problém pretrváva, preinštalujte Office.
Zistite, ako sa vyrovnať s chybou “Aw, Snap!” v Chrome, zoznam účinných metód na opravu problému a prístup na požadované stránky.
Zistite, ako sa vysporiadať so zrúteniami hry Čierna Mýtus: Wukong, aby ste si mohli vychutnať túto vzrušujúcu akčné RPG bez prerušenia.
Ovládače zariadení pomáhajú opraviť chyby, vytvárať a zlepšovať kompatibilitu periférnych zariadení. Zistite, ako **aktualizovať ovládače** v systéme Windows 11 a prečo je to dôležité.
Nvidia Shield Remote nefunguje správne? Tu máme pre vás tie najlepšie opravy, ktoré môžete vyskúšať; môžete tiež hľadať spôsoby, ako zmeniť svoj smartfón na televízor.
Windows 11 má veľa kontroverzií okolo podpory pre určité procesory, pretože operačný systém unikol v júli. Oficiálna verzia OS bola teraz uvoľnená pre verejnosť s mnohými zmenami ...
V prípade, že služba Windows Search využíva mimoriadne vysoké zdroje procesora alebo disku, môžete v systéme Windows 11 použiť nasledujúce metódy riešenia problémov. Metódy na vyriešenie problému zahŕňajú jednoduchšie metódy ...
20. februára 2021: Google teraz zablokoval všetky rozšírenia Meet, ktoré pomáhali so zobrazením mriežky, vrátane rozšírení uvedených nižšie. Tieto rozšírenia už nefungujú a zdá sa, že jedinou alternatívou je…
Jediná obrazovka, z ktorej majú používatelia Windowsu spoločný strach, je modrá obrazovka smrti. BSOD existuje už desaťročia, v priebehu rokov sa mení len veľmi málo, ale stále je dostatočne silný na to, aby…
Microsoft Teams sa vďaka svojej hlbokej integrácii s Microsoft Office 365 stal obľúbeným riešením videohovorov pre milióny ľudí na celom svete. Napriek tomu, že nie je používateľsky najpríjemnejší…
Microsoft Teams je komplexný nástroj, ktorý je v poslednej dobe pomerne populárny vďaka svojim funkciám tímovej spolupráce. Služba vám umožňuje vytvárať špecifické tímy pre vašu organizáciu, pozývať…
12. októbra 2021: Veľká aktualizácia! Upozorňujeme, že už nemusíte nahrádzať súbor appraiserres.dll, aby ste obišli kontrolu TPM a opravili chybu inštalácie pri inštalácii Windows 11. …
Od vydania Windows 11 prešlo pár mesiacov a používatelia odvtedy migrujú na nový OS. Ako stále viac používateľov skúša nové problémy Windowsu 11, objavujú sa chyby a nastavenia...
Máte problém so stratou snímača odtlačkov prstov vo Windowse 11? Objavte overené podrobné riešenia, ktoré vám bez námahy obnoví biometrické prihlásenie. Získajte späť bezpečné odomykanie odtlačkom prsta raz-dva.
Máte problémy s nefunkčným jasom v systéme Windows 11? Objavte podrobné riešenia, ktoré vám rýchlo pomôžu vyriešiť problém, od aktualizácií ovládačov až po nastavenia napájania. Získajte ešte dnes späť dokonalú viditeľnosť obrazovky.
Zistite, ako bez námahy povoliť šifrovanie BitLocker vo Windowse 11. Ochráňte svoje súbory pomocou tohto komplexného sprievodcu vrátane predpokladov, krokov a osvedčených postupov pre maximálnu bezpečnosť údajov.
Ponorte sa do nášho podrobného návodu, ako používať video editor Clipchamp pre Windows 11. Vytvárajte profesionálne videá bez námahy s tipmi, trikmi a najnovšími funkciami pre začiatočníkov aj profesionálov.
Máte problémy s chybou „Súbor VCRUNTIME140.dll sa nenašiel vo Windowse 11“? Objavte overené podrobné riešenia, ktoré vám pomôžu rýchlo ju opraviť a znova zabezpečiť bezproblémový chod vašich aplikácií. Nie sú potrebné žiadne technické znalosti!
Máte problémy s chybami Cortany a Copilota s umelou inteligenciou v systéme Windows 11? Objavte overené opravy na vyriešenie problémov s pádmi, nereagovaním a integráciou. Vráťte svojich asistentov s umelou inteligenciou do starých koľají bez námahy.
Máte problémy s chybou „SSID sa nenašlo“ v systéme Windows 11 pri pripájaní k skrytej sieti Wi-Fi? Táto podrobná príručka ponúka overené riešenia, ktoré vám pomôžu rýchlo a bezpečne sa vrátiť do online režimu. Objavte jednoduché tipy na riešenie problémov pre bezproblémové pripojenie.
Zistite, ako využiť najnovšie funkcie prístupnosti systému Windows 11 v roku 2026, aby bola práca s počítačom jednoduchšia a inkluzívnejšia. Podrobné návody pre vizuálne, sluchové, mobilné a kognitívne pomôcky, ktoré posilnia všetkých používateľov.
Máte problémy s pomalým PyCharm a IntelliJ vo Windowse 11? Objavte overené opravy, ktoré zrýchlia vaše IDE, optimalizujú výkon a obnovia vašu produktivitu. Podrobné riešenia pre vývojárov.
Trápi vás frustrujúca chyba klikania pevného disku vo Windowse 11? Objavte overené, podrobné opravy, ktoré obnoví plynulý výkon a zabráni strate údajov. Dostaňte svoj počítač späť do správnych koľají ešte dnes!
