Error 0xc000007b – Čo to je a ako to opraviť
Zistite, ako opraviť chybu 0xc000007b v našej podrobnej príručke, ktorá sa zaoberá príčinami tohto chybového kódu a zoznamom overených riešení.
Google Meet je nový nástroj na vzdialenú spoluprácu v meste, ktorý ponúka možnosti videokonferencií a audiokonferencií spolu s presvedčivými funkciami, ako je šifrovanie typu end-to-end, zvuk vo vysokom rozlíšení, video vo vysokom rozlíšení a oveľa viac. Google Meet je počas pandémie úplne zadarmo, čo znamená, že ho už používa veľa organizácií a používateľov vrátane učiteľov na celom svete.
Ak ste novým používateľom Google Meet a máte problémy s mikrofónom, nie ste sami. Mnoho používateľov uviedlo, že z rôznych dôvodov nemôžu používať svoje mikrofóny, a preto sme zostavili zoznam niektorých najbežnejších opráv, ktoré môžete použiť na vyriešenie problému. Poďme sa na ne pozrieť.
Súvisiace články: Ako si zmeniť meno v Google Meet na iPhone, Androide a PC
Obsah
Uistite sa, že mikrofón nie je stlmený
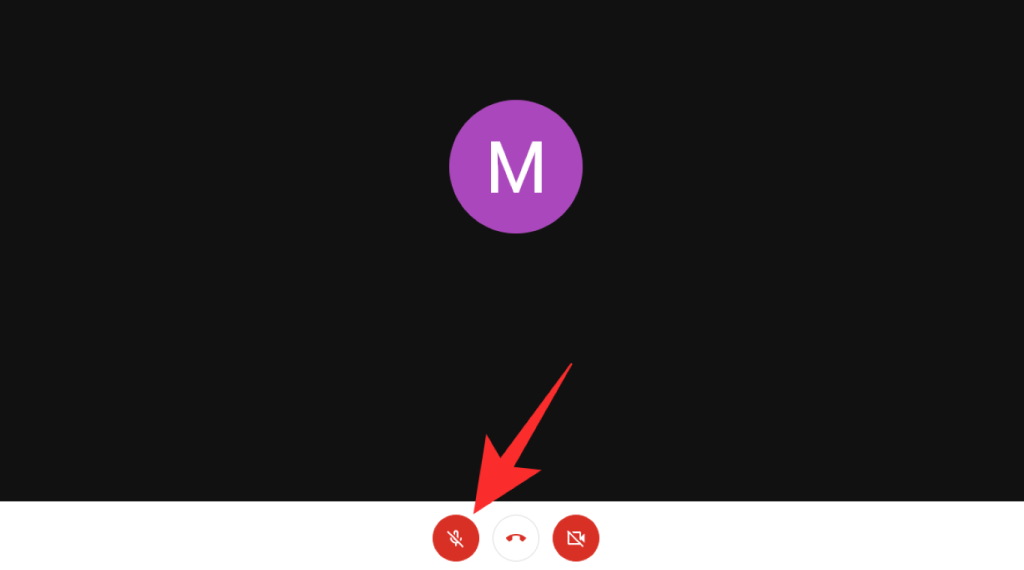
Niekedy sa môže stať, že problém bude celkom jednoduchý. Počas stretnutia Google Meet môžete byť jednoducho stlmení a neviete o tom. Skontrolujte ikonu mikrofónu v spodnej časti obrazovky na paneli hovorov. Ak je červená, v službe Google Meet máte vypnutý zvuk. Stačí kliknúť na ikonu a zapnúť zvuk. To umožní členom vašej schôdze, aby vás počuli nahlas a zreteľne.
Ak máte externý mikrofón, skontrolujte svoje hardvérové pripojenie
Ak používate externý mikrofón, či už je pripojený k náhlavnej súprave alebo samostatne, mali by ste najskôr skontrolovať fyzické pripojenia náhlavnej súpravy/mikrofónu k vášmu systému. Začnite tým, že skontrolujete, či na drôte nie sú nejaké rezy alebo neobvyklé ohyby. Akékoľvek hrbole v kábli môžu tiež naznačovať vnútorné ohyby v kábli, ktoré môžu spôsobiť poškodenie mikrofónu a brániť jeho správnemu fungovaniu.
Ak sa všetko zdá normálne, skúste odpojiť slúchadlá/mikrofón od systému a potom ich znova pripojiť. Tým sa nielen resetuje pripojenie na konci vášho systému, ale tiež sa zbavia akýchkoľvek problémov s hardvérovým pripojením, ktoré by mohli brániť správnemu fungovaniu mikrofónu.
Súvisiace články: Ako blokovať anonymných používateľov na Google Meet
Skontrolujte, či je v prehliadači Google Chrome vybraté vstupné zariadenie
Chrome má tiež funkciu na výber mikrofónu, ktorý sa použije na poskytovanie zvukového vstupu rôznym zariadeniam. Ak máte problémy s mikrofónom v službe Google Meet, je pravdepodobné, že v prehliadači Chrome nebol vybratý správny vstup pre mikrofón. Požadované vstupné zariadenie si môžete vybrať podľa nižšie uvedeného návodu.
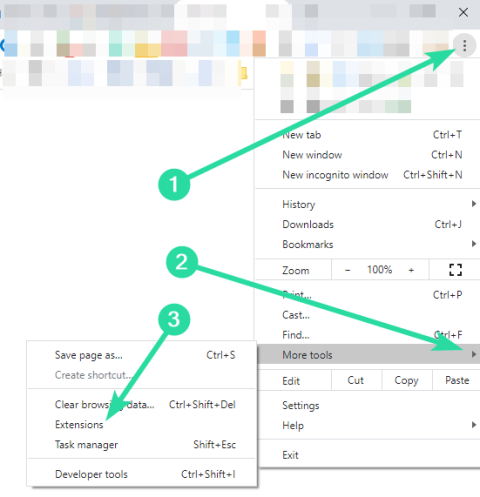
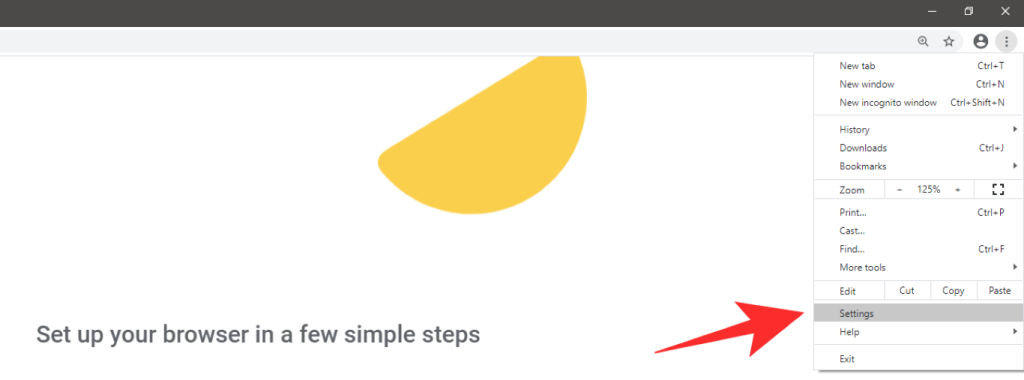
Otvorte prehliadač Chrome a kliknite na ikonu ponuky „ 3 bodky “ v pravom hornom rohu prehliadača.

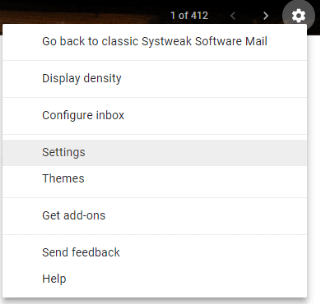
Vyberte ' Nastavenia '.
Teraz na ľavom bočnom paneli vyberte položku Súkromie a bezpečnosť .

Vyberte položku „ Nastavenia lokality “.
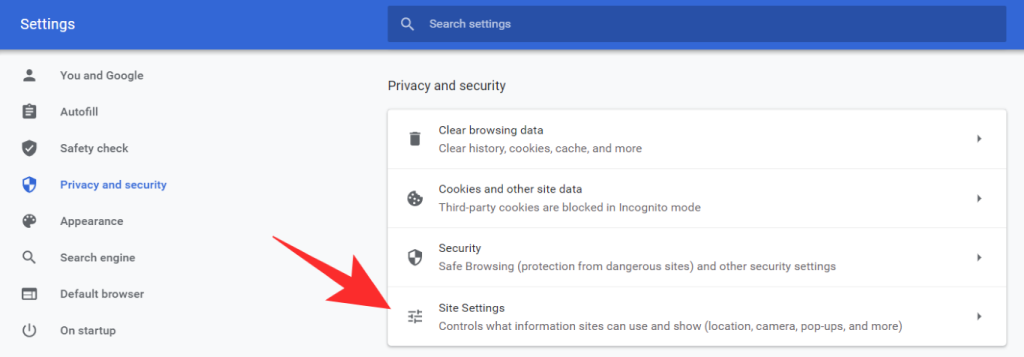
Teraz kliknite na ' Mikrofón ' na ďalšej obrazovke.

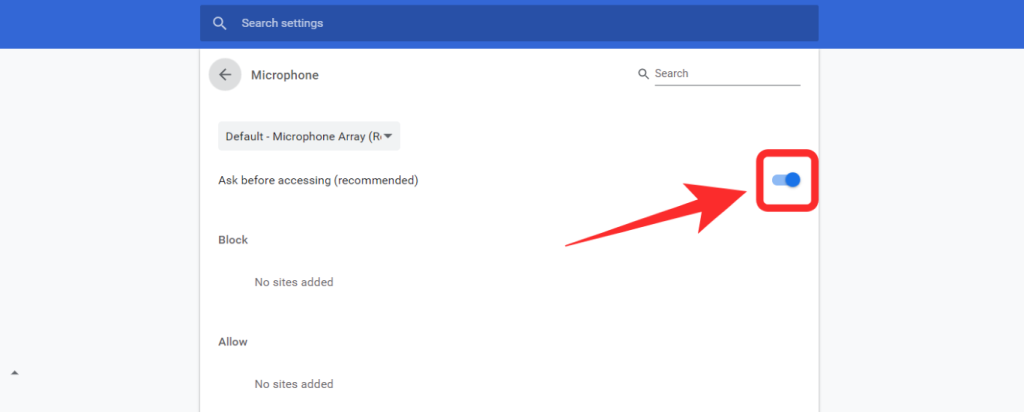
Ak je prepínač v hornej časti sivý a vedľa neho je napísané ' Blokované ', zapnite prepínač, aby ste sa uistili, že zobrazuje ' Pred prístupom sa spýtať (odporúča sa) '.
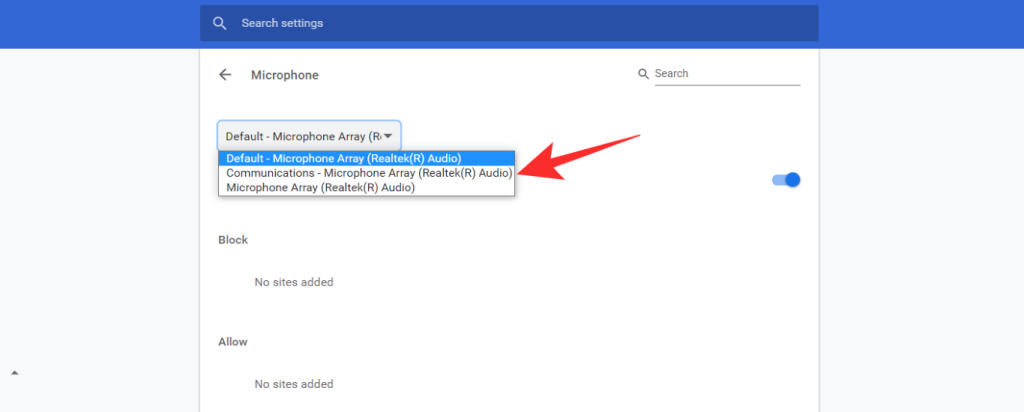
Teraz kliknite na rozbaľovaciu ponuku v hornej časti a vyberte požadovaný mikrofón, ktorý chcete použiť v Google Meet.
Zatvorte kartu „ Nastavenia “ a uložte svoje nastavenia.
Odteraz budete môcť používať vybratý mikrofón počas stretnutí Google Meet, čo by malo vyriešiť váš problém s mikrofónom.
Súvisiace: Virtuálne pozadie Google Meet: Najnovšie správy, rozšírenie Chrome a všetko, čo zatiaľ vieme
Uistite sa, že je povolený prístup k mikrofónu (Windows a Mac)
Ak stále nemôžete používať mikrofón v službe Google Meet, je pravdepodobné, že Chrome alebo prehliadač, ktorý používate, má zamietnutý prístup k mikrofónu.
V systéme Windows
Windows predstavil novú funkciu na ovládanie aplikácií, ktoré používajú váš mikrofón na zvýšenie možností ochrany osobných údajov. Ak nemôžete používať mikrofón v službe Google Meet, mali by ste skontrolovať povolenia mikrofónu v systéme Windows. Poďme sa pozrieť, ako to môžete urobiť.
Otvorte ponuku Štart kliknutím na ikonu Štart v ľavom dolnom rohu a zadajte a vyhľadajte „ Nastavenia ochrany osobných údajov mikrofónu “. Kliknite na prvú možnosť nastavenia, ktorá sa zobrazí na obrazovke.
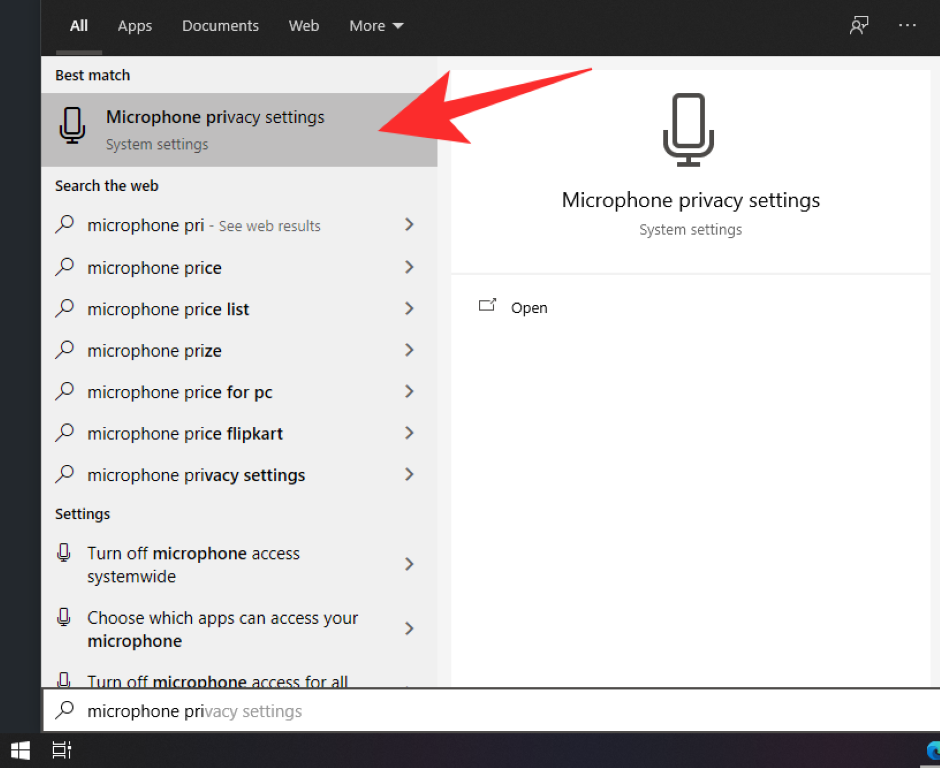
Uistite sa, že je na vašom zariadení zapnutý prepínač v hornej časti „ Povoliť aplikáciám prístup k vášmu mikrofónu “. Ak nie, aktivujte ho zapnutím prepínača.
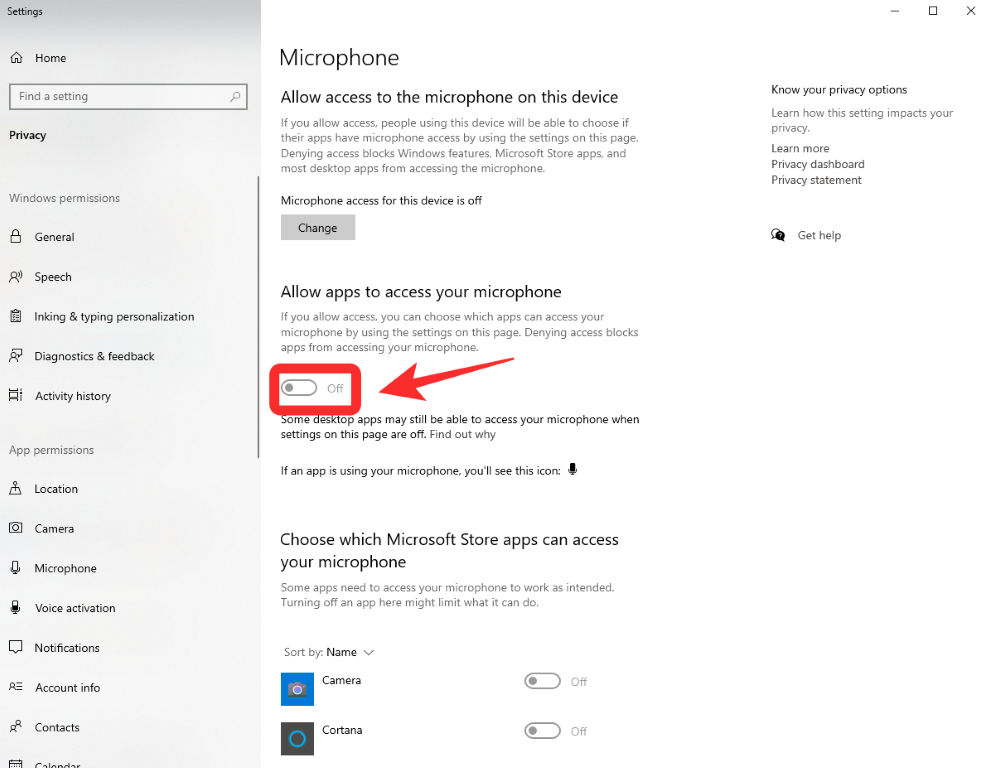
Poznámka: V časti „ Vyberte aplikácie, ktoré majú prístup k vášmu mikrofónu “ vyhľadajte prehliadač Chrome a uistite sa, že je prepínač vedľa neho zapnutý. Ak nie, zapnite ho jednoduchým kliknutím.
Na Macu
Podobne ako v systéme Windows budete musieť aplikácii/prehliadači udeliť povolenie na používanie mikrofónu. Prístup k povoleniam pre mikrofón získate tak, že najskôr otvoríte aplikáciu System Preferences na vašom Macu buď kliknutím na aplikáciu v Docku, alebo kliknutím na ikonu Apple na lište Menu a následným výberom 'System Preferences'.
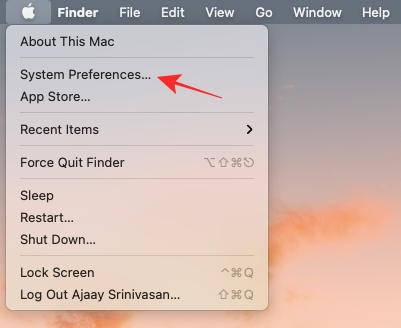
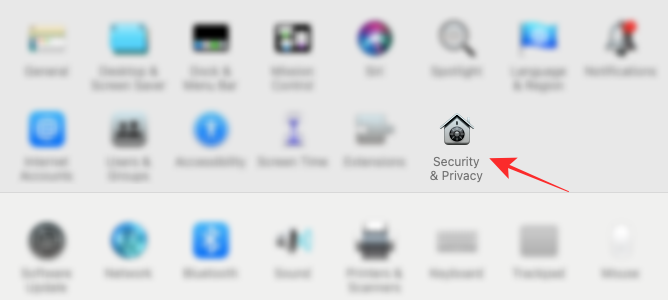
V časti Predvoľby systému vyberte možnosť Zabezpečenie a ochrana osobných údajov.
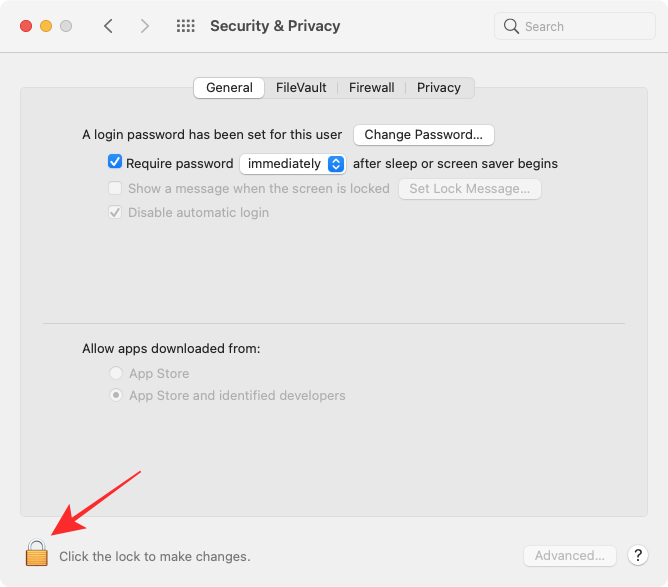
Ak je ikona zámku v ľavom dolnom rohu uzamknutá, budete ju musieť odomknúť, aby ste mohli zmeniť svoje povolenia. Kliknite na ikonu zámku a zadajte heslo/PIN vášho Macu.
Vyberte kartu Ochrana osobných údajov v hornej časti a potom kliknite na možnosť Mikrofón na ľavom bočnom paneli.
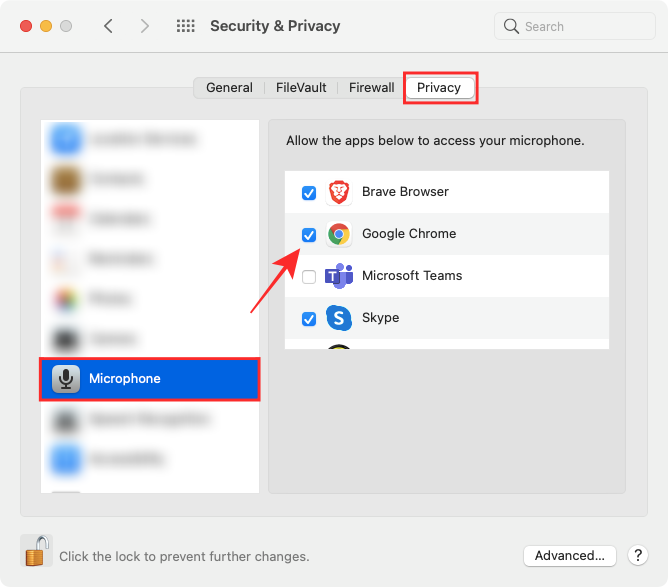
Začiarknite políčko vedľa aplikácie prehliadača, pre ktorú chcete povoliť mikrofón. Po vykonaní tohto postupu ukončite prehliadač a znova ho spustite.
Teraz by ste mali byť schopní jednoducho používať mikrofón počas stretnutí v službe Google Meet.
Skontrolujte úrovne hlasitosti mikrofónu (Windows a Mac)
Windows aj macOS umožňujú používateľom nastaviť úroveň hlasitosti pre mikrofóny ich systémov rovnako, ako by to robili na zariadeniach na výstup zvuku. Ak máte nízke úrovne mikrofónu, ostatní účastníci hovoru Google Meet vás nebudú môcť správne počuť. Preto sa odporúča, aby ste si skontrolovali úrovne mikrofónu, keď budete čeliť takejto situácii.
V systéme Windows
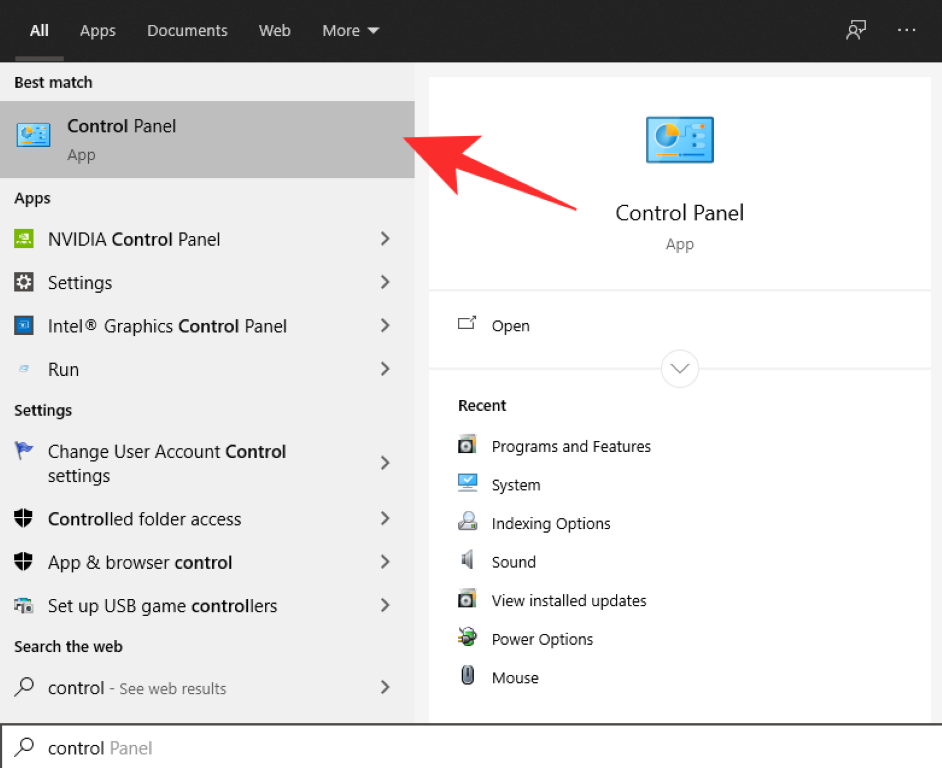
Úrovne mikrofónu v systéme Windows 10 môžete skontrolovať otvorením ovládacieho panela v počítači pomocou ponuky Štart.
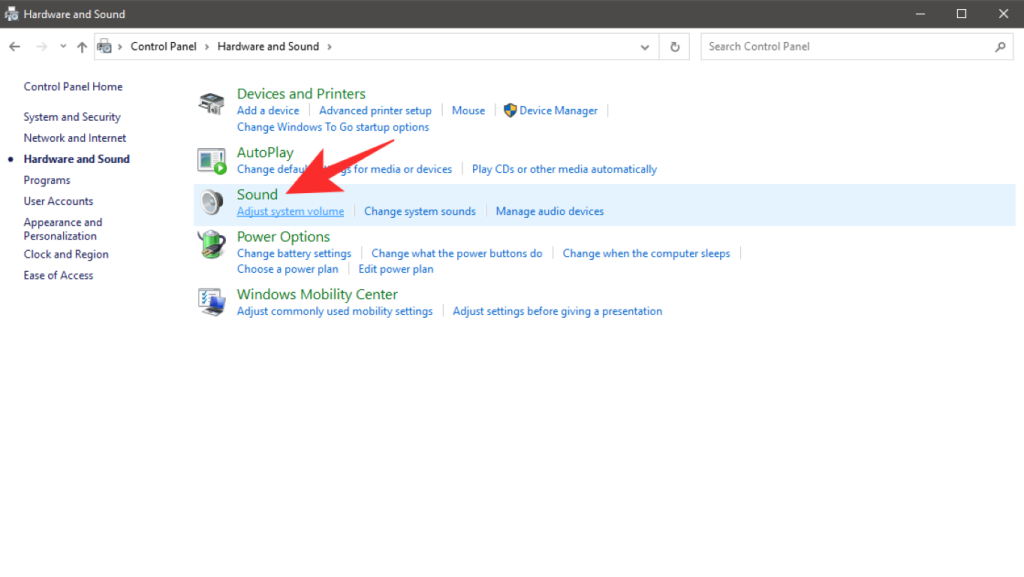
V rámci ovládacieho panela prejdite na ľavom bočnom paneli na položku „Hardvér a zvuk“ a na paneli napravo vyberte možnosť „Zvuk“.
Keď sa zobrazí okno Zvuk, vyberte kartu „Nahrávanie“ v hornej časti. Tu uvidíte zoznam všetkých vstupných zariadení, ktoré sú pripojené k vášmu systému.
Na karte Nahrávanie vyberte mikrofón, ktorý používate na hovory Google Meet, a potom kliknite na tlačidlo „Vlastnosti“ v spodnej časti tohto okna.
Keď sa na obrazovke zobrazí okno Vlastnosti mikrofónu, kliknite na kartu „Úrovne“ v hornej časti.
Pod touto kartou by ste mali vidieť posúvač v časti „Mikrofón“. Potiahnite tento posúvač doprava v závislosti od toho, akú vysokú chcete mať citlivosť mikrofónu. Čím viac potiahnete posúvač mikrofónu doprava, tým vyššia bude úroveň hlasitosti vášho mikrofónu, čo by malo pomôcť ostatným, aby vás lepšie počúvali v Google Meet.
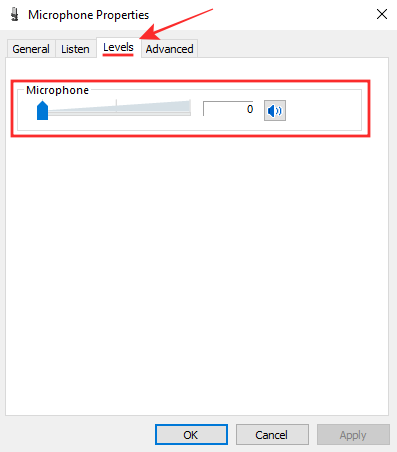
Po vykonaní potrebných zmien kliknite na tlačidlo „Použiť“ a potom na tlačidlo „OK“ na potvrdenie. Začnite hovor alebo sa k nemu pripojte v službe Google Meet, aby ste zistili, či váš mikrofón funguje správne.
na Macu
Ak chcete skontrolovať hlasitosť mikrofónu na Macu, môžete otvoriť „Predvoľby systému“ z panela ponuky, doku alebo Launchpadu.

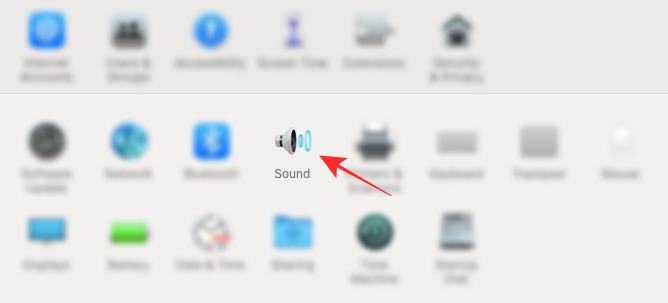
V Predvoľbách systému kliknite na dlaždicu „Zvuk“.
Keď sa načíta obrazovka Zvuk, kliknite na kartu „Vstup“ v hornej časti, vyberte mikrofón, ktorý používate na hovory Google Meet, a potiahnutím posúvača „Hlasitosť vstupu“ smerom doprava zvýšte jeho hlasitosť.
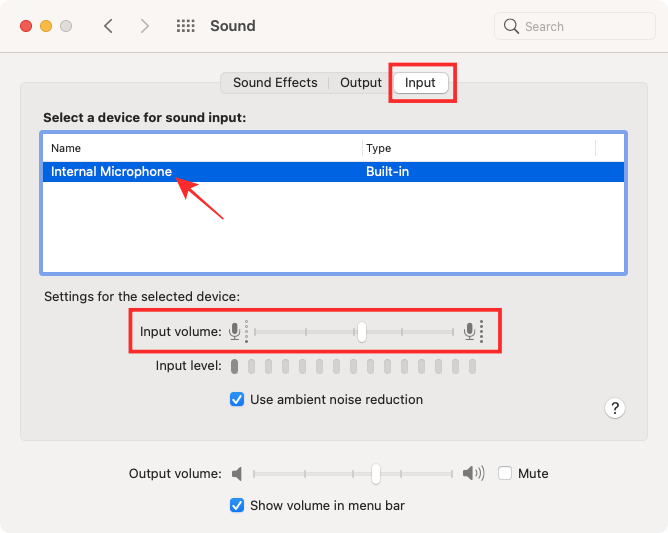
Uistite sa, že je úroveň hlasitosti dostatočná tak, že niečo poviete a potom skontrolujete, či je váš hlas počuť na indikátore „Úroveň vstupu“ na tej istej obrazovke.
Reštartujte Google Chrome
Problémy s mikrofónom môže vyriešiť aj jednoduchý reštart prehliadača. Môže to vymazať vyrovnávaciu pamäť, reštartovať rozšírenia na pozadí a čo je dôležitejšie, uvoľniť priestor navyše, ktorý by mohol spôsobovať problémy s mikrofónom. Aj keď reštartovanie môže jednoducho zavrieť a znova otvoriť aplikáciu, nie vždy sa zbaví všetkých procesov na pozadí a rozšírení spustených pre Chrome.
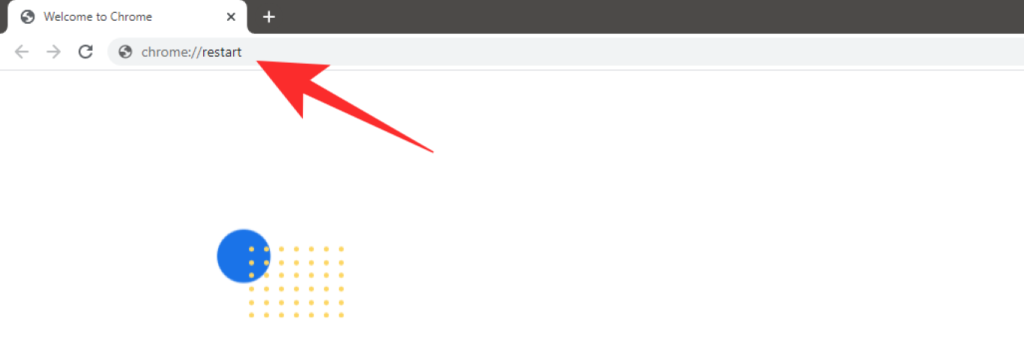
Ak chcete správne reštartovať prehliadač, otvorte novú kartu a do panela s adresou URL napíšte „ chrome://restart “. Tým sa Chrome úplne reštartuje, čo by malo odstrániť všetky konfliktné procesy na pozadí, ktoré by mohli narúšať fungovanie vášho mikrofónu.
Súvisiace články: Ako úplne odstrániť Meet Tab z Gmailu
Reštartujte systém
If restarting your browser does not help solve your microphone issues then you can try restarting your system. This will get rid of your system’s cache files and background processes that might be interfering with the functioning of your microphone. It will also release charge from the capacitors of your system which should take care of any conflicting electronics that might be preventing your microphone from working (only external mics).
If you have an external microphone, then turn off your system, wait for 20 seconds and then start your system again. If you have an in-built microphone or a headset then simply use the restart command from your Power Menu.
Restart your Microphone using CLI (Mac only)
Mac systems use an integrated optimization system that helps microphones work seamlessly across different devices. If you are unable to use your microphone on your Mac then you can try restarting the microphone using CLI. Use the guide below to restart your microphone.
Note: You will need administrator privileges to complete this process.
On your Mac system, open the Application folder in your Launchpad, select ‘Utilities’ and launch ‘Terminal’. You can also open the Terminal app from the Launchpad or Spotlight.
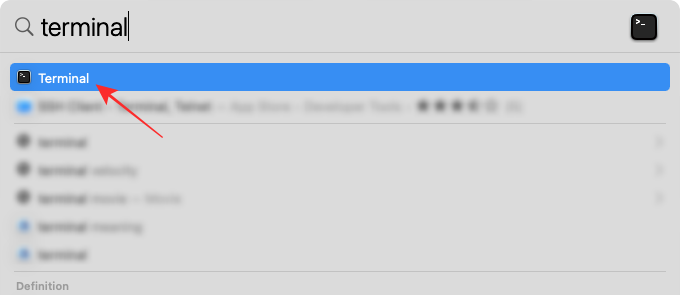
Enter the following command in Terminal:
sudo killall coreaudiod
… and hit Enter to execute it.
Now enter your credentials in the dialog box to restart the service and press Enter.
You should try joining your meeting on Google Meet again and your microphone issues should now be resolved.
Troubleshoot your Microphone on Windows
If something goes wrong with your computer’s microphone, Windows will be able to tell what might be the issue you’re facing and might even fix it for you, if possible. This is done using the native Troubleshoot tool that’s available on Windows 10 which you can use to solve problems related to your computer’s microphone.
For this, open the Windows Settings app from the Start menu or Action Center.
Inside Windows Settings, go to System and click on the ‘Sound’ tab from the left sidebar.
On this screen, click on the ‘Troubleshoot’ button under the ‘Test your microphone’ section.
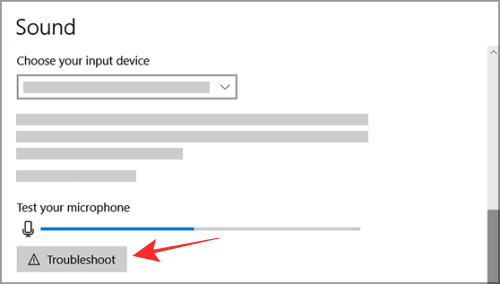
If there’s a problem with your microphone, the tool should be able to detect it and you can then follow the on-screen instructions to get it resolved.
Restart Windows Audio Service
If you have a Windows PC, you can try restarting the Windows audio service to fix the microphone issues that you are facing in Google Meet. Follow the guide below to help you get started.
Press the key combination ‘Windows+R’ on your keyboard simultaneously. This should bring up your ‘Run’ dialog box.
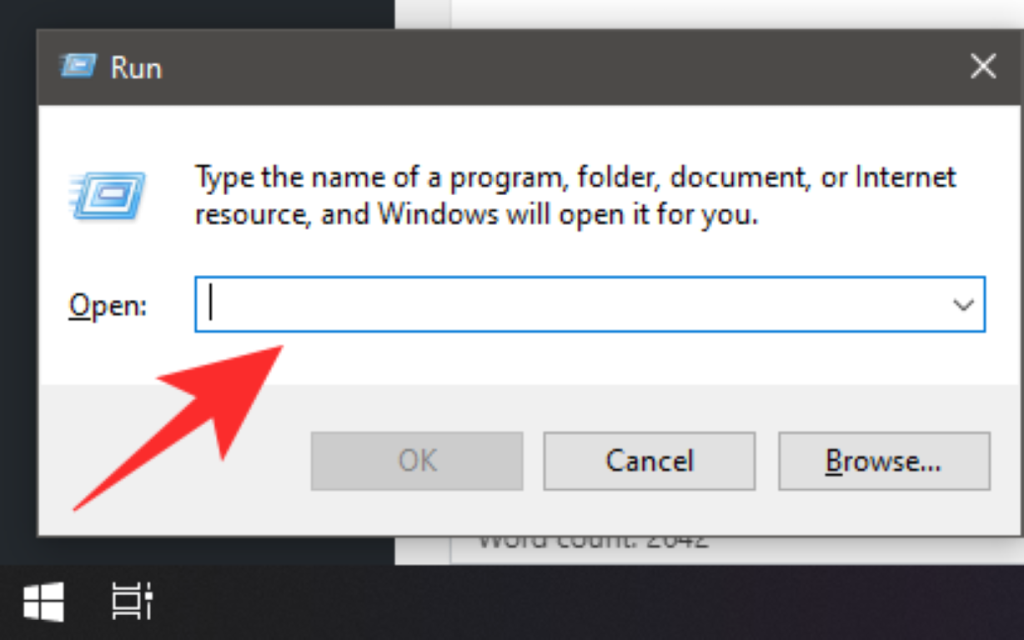
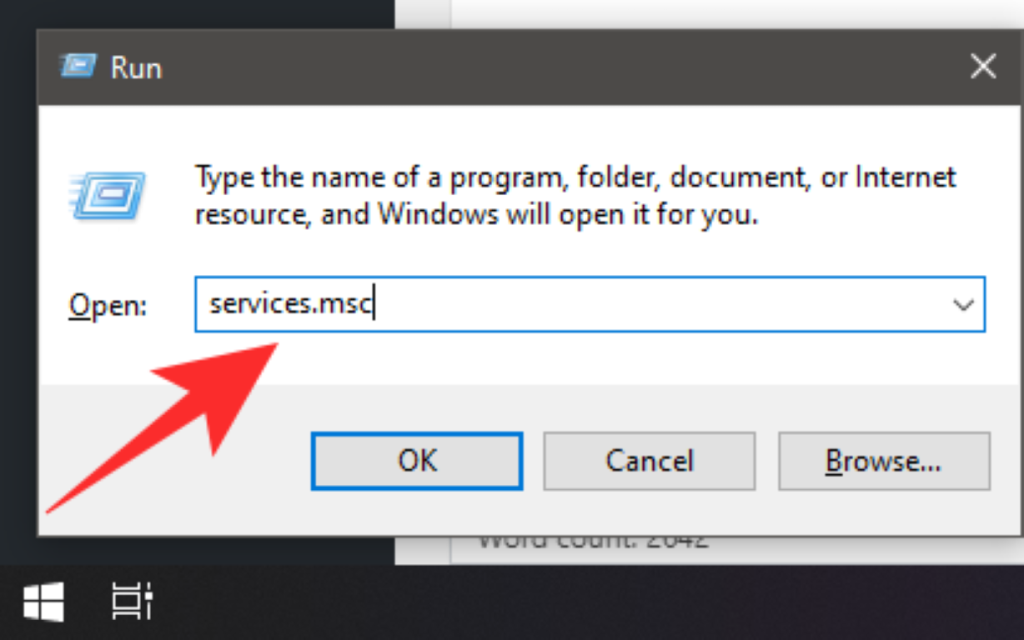
Now type ‘services.msc’ in the Run dialog box and hit Enter on your keyboard to execute the command. This will open the services window on your PC.
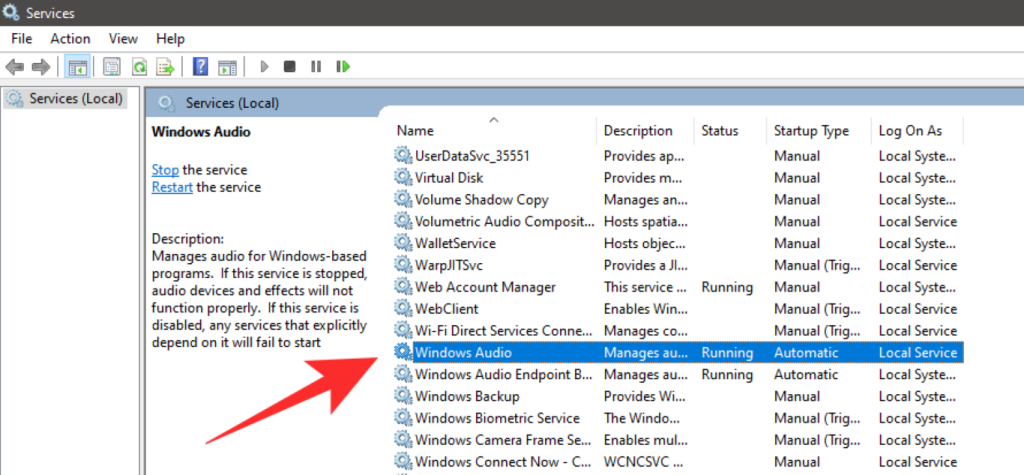
Now find ‘Windows Audio‘ in the list.
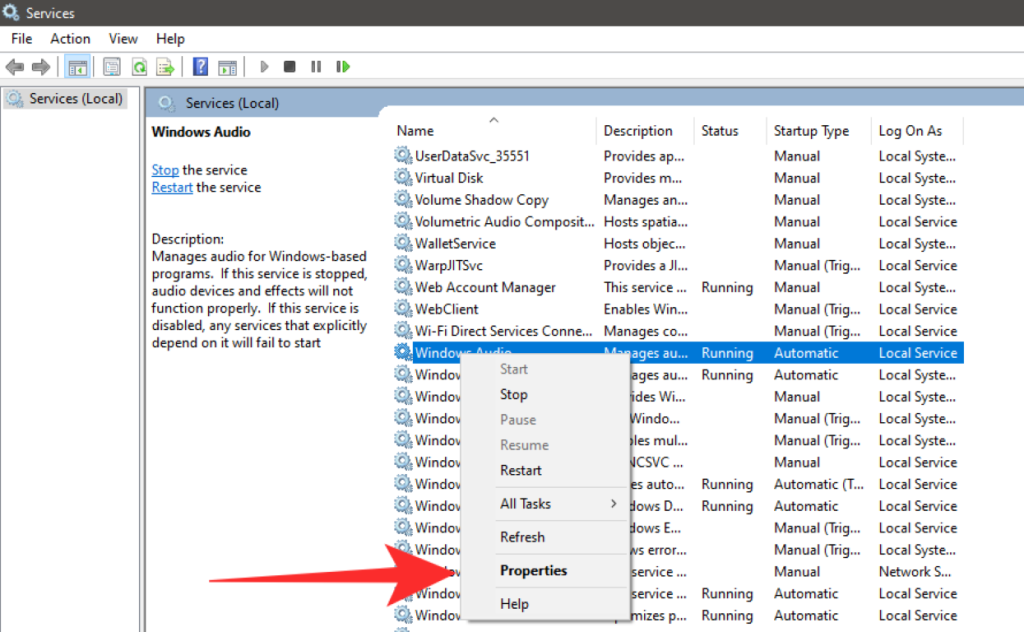
Right-click on the service and click on ‘Properties’ from the sub-menu that appears.
Click on ‘Stop’. This will stop the service.
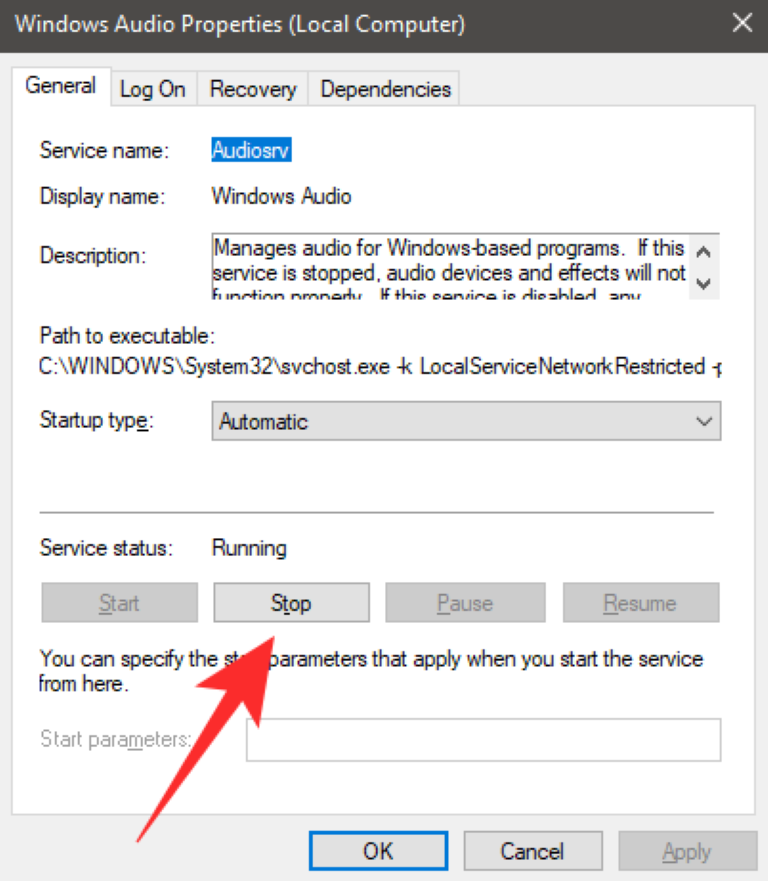
Once stopped, wait for a few seconds and then click on ‘Start‘ again.
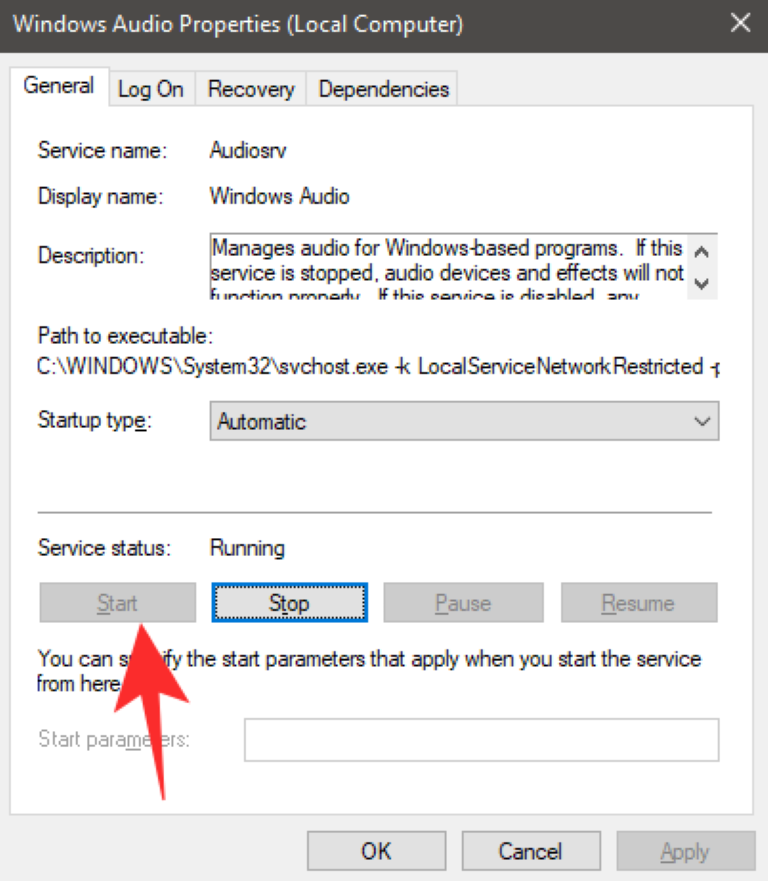
My OEM add-ons restart the service automatically which can be the case for you.
Note: In the properties window, under the ‘General’ tab, click on the drop-down menu beside the ‘Startup Type’ option and select ‘Automatic’ if not selected. Click on ‘Apply’ in the bottom right corner to apply your changes.
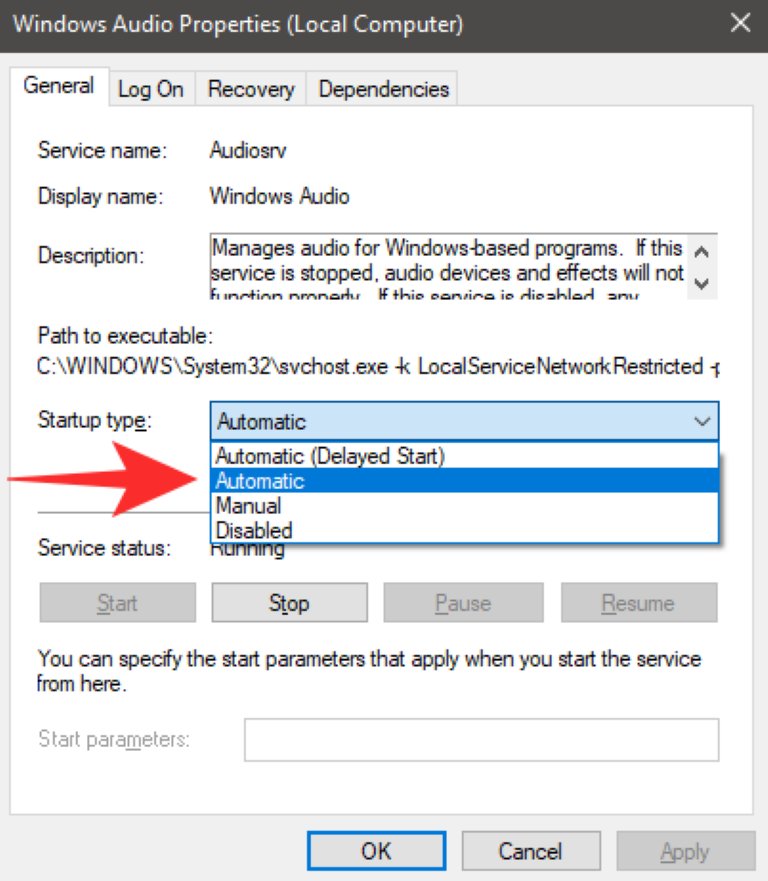
Restart your system.
The Windows audio service will now be automatically restarted on your system’s next bootup which should solve any microphone issues that you were having with Google Meet.
Switch to a Wired Headset
If you are using a Bluetooth headset with an in-built microphone then chances are that Meet services are conflicting with the wireless tech required for your headset to function properly. This is a known issue and many people trying to use a Bluetooth headset with Google Meet around the world are facing the same issue.
Google is expected to fix the issue with future updates, but for now, the only workaround seems to be to use a wired headset with an in-built microphone or to use an external microphone. This will solve all your audio issues with Google Meet and allow you to use the microphone properly.
Free Up System Memory
Real-time audio streaming and input require a decent amount of memory and processing power. If you are on a low-powered system and intermittently face microphone issues now and then, it could be there is not enough free memory for the microphone to work properly with Google Meet.
Google Chrome also uses a significant amount of your RAM and processing power which could also be interfering with your Google Meet experience. To fix these issues, you should start by closing any background applications that could be using the resources of your system.
You should also close any background tabs in Chrome other than Google Meet. This should solve your microphone issues with Google Meet.
Ensure that your Microphone is selected in Windows Settings
Windows also give you the ability to select your default microphone. If a different microphone has been selected in Windows audio settings than the one that you wish to use with Google Meet then it could be conflicting with the background services which could be the cause of your microphone issues. Follow the simple guide below to select your desired microphone as your default audio input device.
Open the Control Panel.
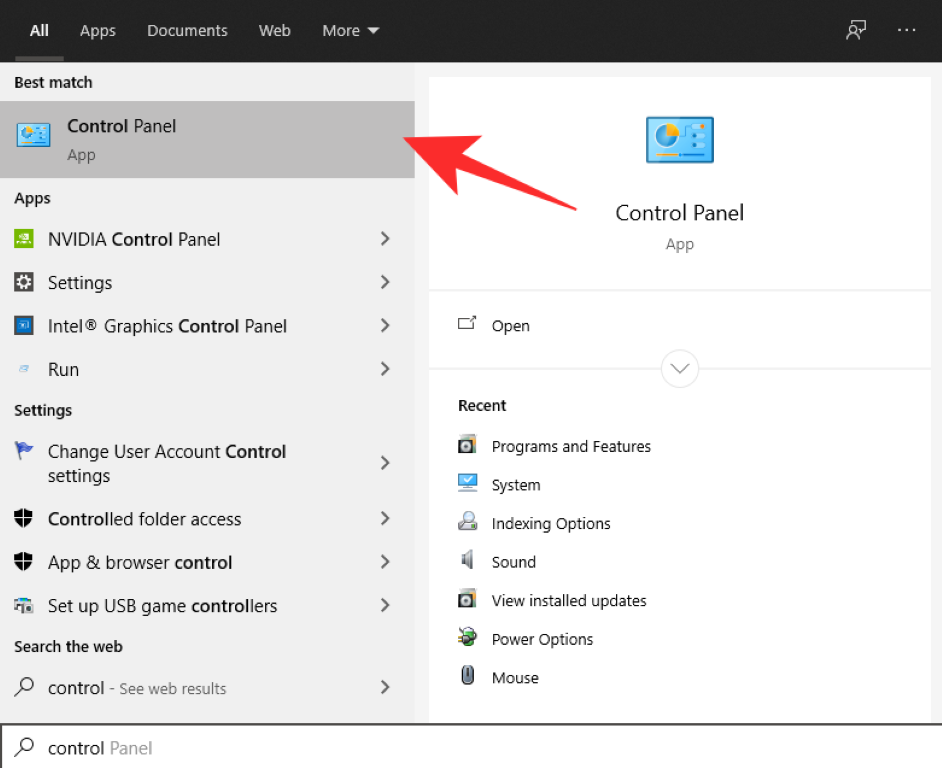
Click on the ‘Hardware and Sound’ category and select ‘Sound’ to open up your sound settings.

Now select the ‘Recording’ tab at the top.
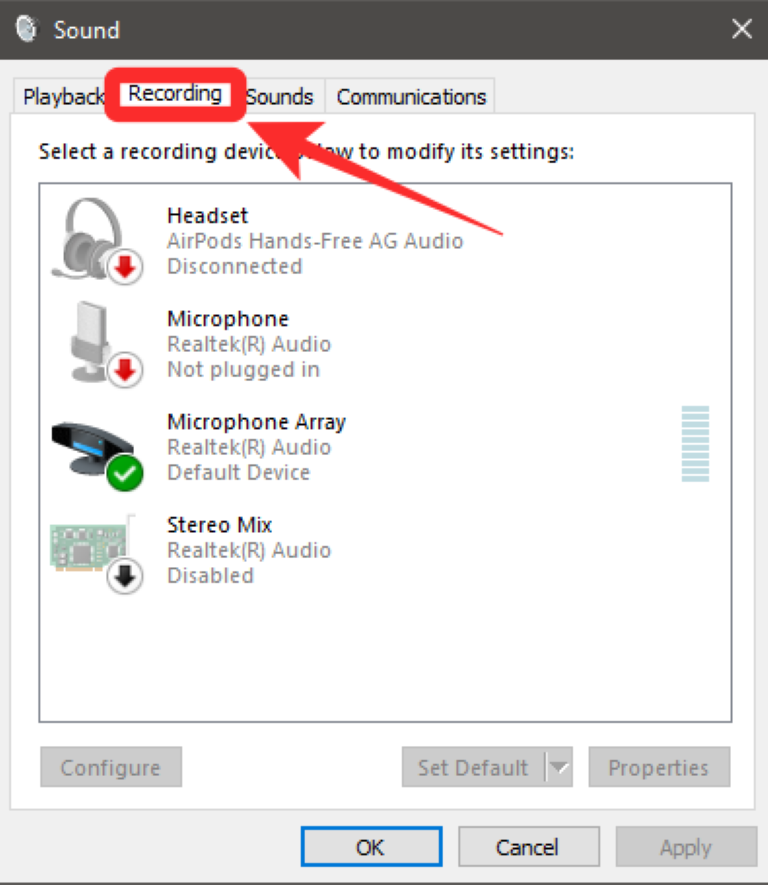
You will now be able to see a list of all the audio input devices connected to your system. Select the microphone that you want to use as your default audio input device and right-click on it.
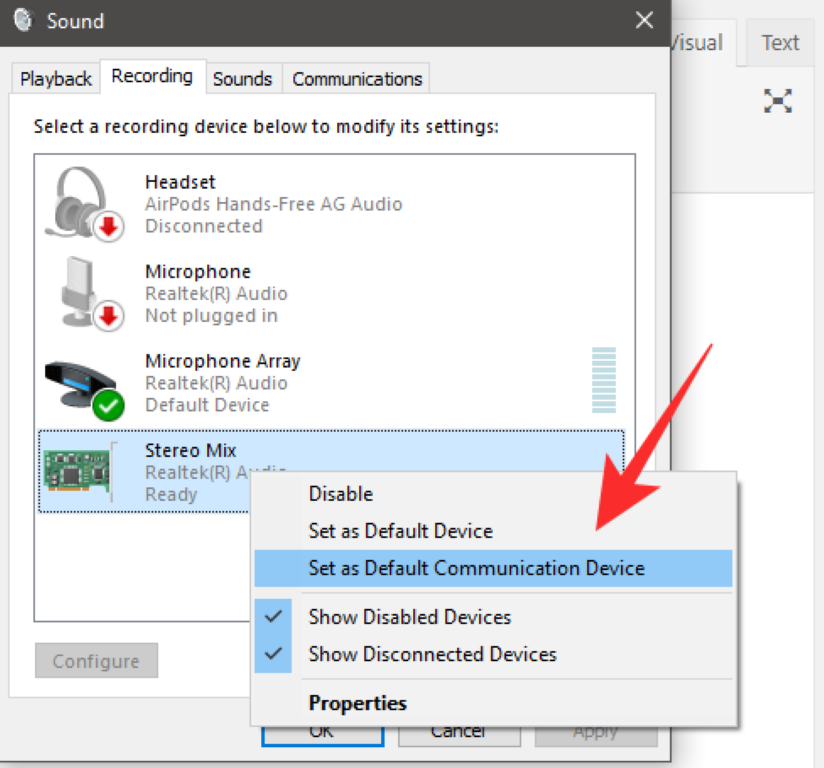
Select ‘Set as default communication device’ from the submenu that appears to start using that microphone as your default audio input device.
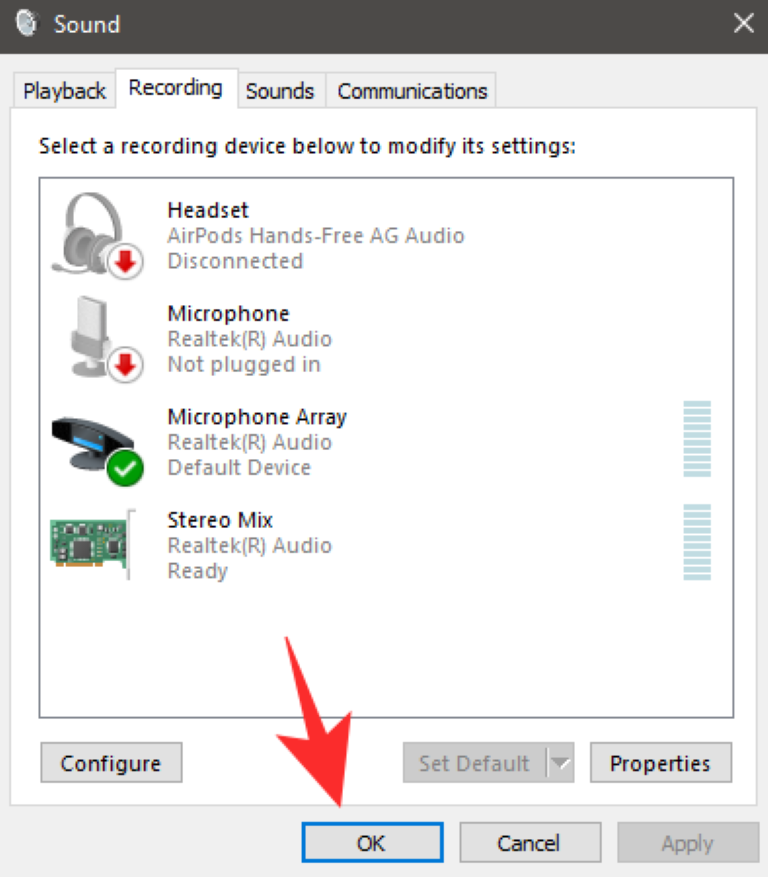
Once done, click on ‘Ok’ at the bottom right corner and close the window.
Your microphone should now be able to work without any issues during meetings on Google Meet.
Update your Microphone drivers (Windows only)
Sometimes your microphone drivers on your Windows system could be outdated which might be preventing your microphone to work properly in Google Meet. You should try to update your microphone drivers to fix these issues. Follow the guide below to help you easily update or reinstall your microphone drivers on Windows 10.
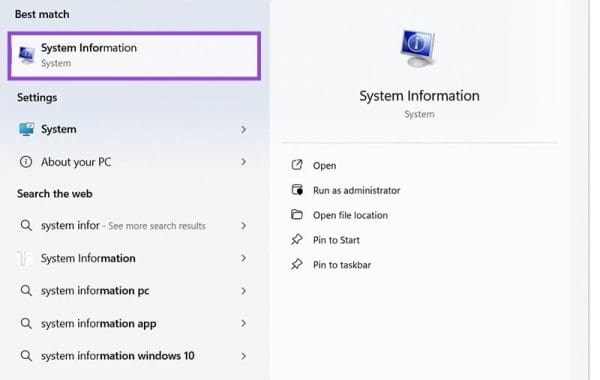
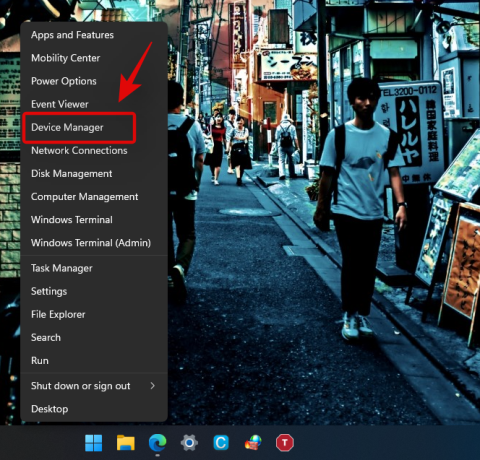
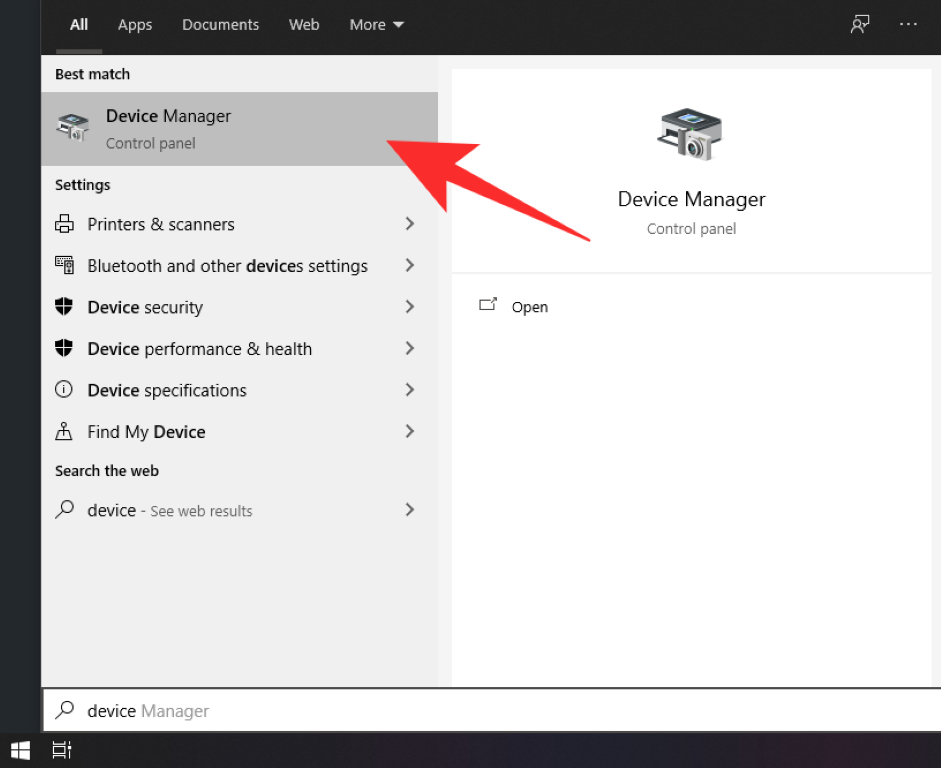
Type ‘Device Manager’ in your taskbar search bar and open the first application that shows up in the search results with the same name.
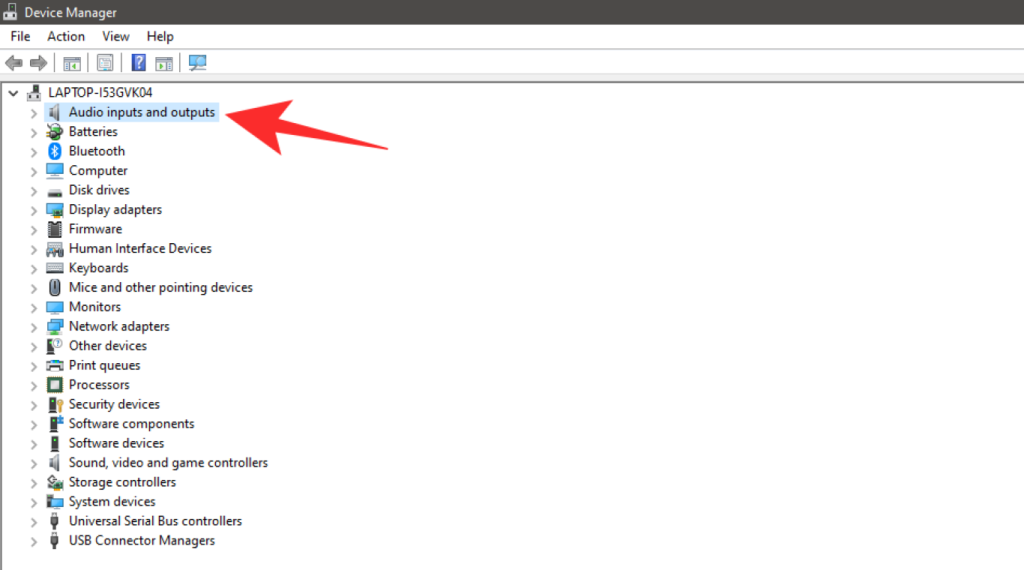
Now click on the drop-down menu beside ‘Audio Inputs and outputs’
Select the microphone that you wish to use with Google Meet.
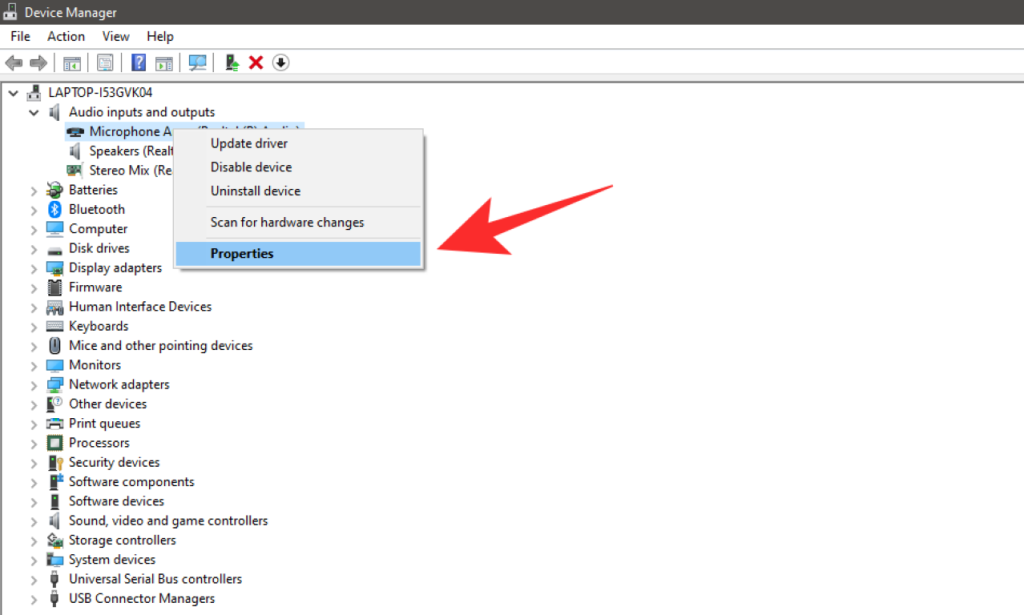
Right-click on the microphone and select ‘Properties’.
Now click on the ‘Driver’ tab at the top to open up driver options for your device. Now if the option for ‘Update Driver’ is not greyed out, click on it to update the drivers for your device.
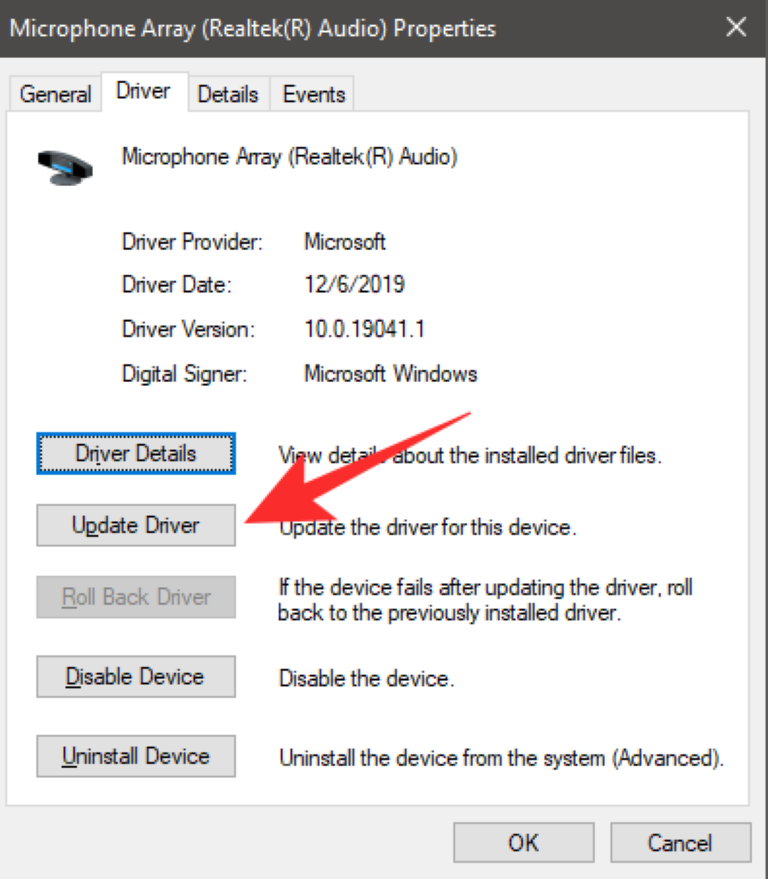
Your microphone drivers will now be updated and you should now be able to use the concerned microphone with Google Meet. Although most microphones are plug-and-play in today’s day and age, this could still help solve your issue depending on your microphone.
Disable Audio Enhancements
There is an option to enable audio enhancements for the microphone on Windows. While this helps improve audio quality for your microphone, this setting is known to interfere with the functioning of Microsoft Meet.
If you are having issues with your microphone, then chances are that audio enhancements have been enabled for your microphone in Windows. Follow the guide below to help you disable audio enhancements for your microphone.
Open the control panel on your Windows PC, click on ‘Hardware and Sound’, and select Sound. This will open the sound settings for your Windows system.

Click on the ‘Recording’ tab at the top of your screen, select the microphone you wish to use during Google Meet meetings from the list, right-click on it, and select ‘Properties’.
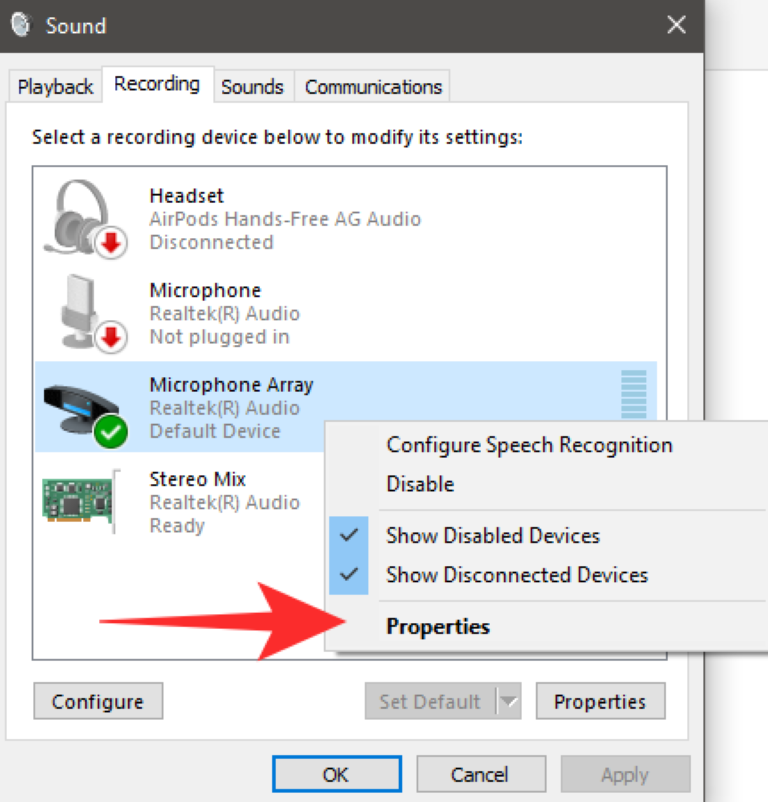
Now in the Microphone Properties window, select the ‘Advanced’ tab from the list at the top. Under the ‘Single Enhancements’ option, uncheck the box beside ‘Enable audio enhancements’.
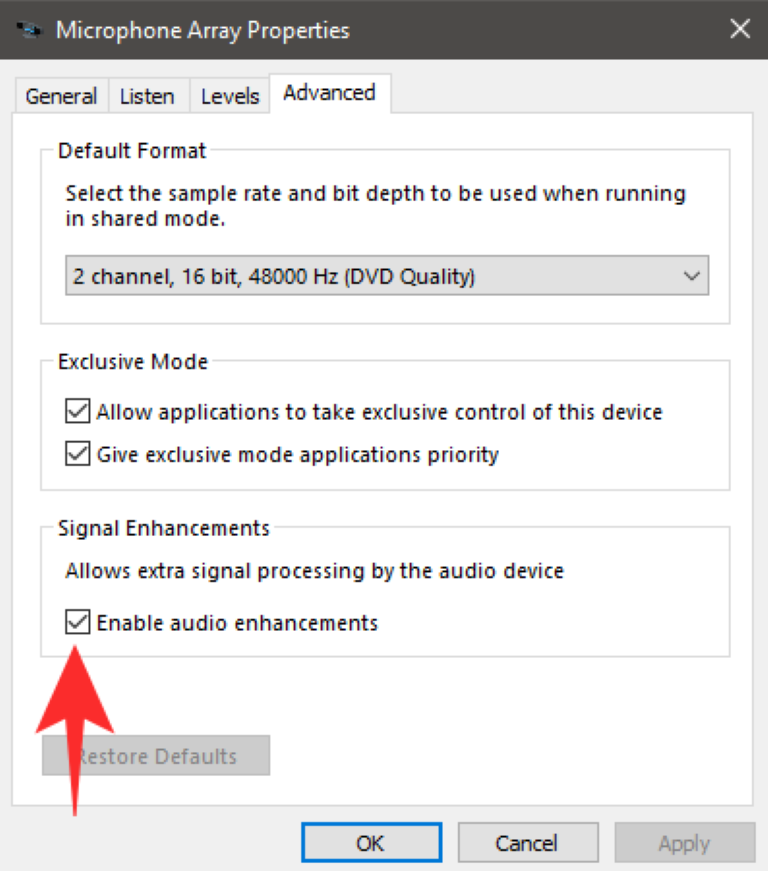
Audio enhancements will now be disabled for the microphone in question. You should now be able to use your microphone during Google Meet meetings.
Clear Google Chrome’s Cache
You can try to clear the cache on Google Chrome to fix your microphone settings. This will get rid of any stored temporary files that might be interfering with the Google Meet extension. Follow the guide below to clear the cache on Google Chrome.
Open Google Chrome, click on the ‘3-dot’ menu icon in the top right corner.
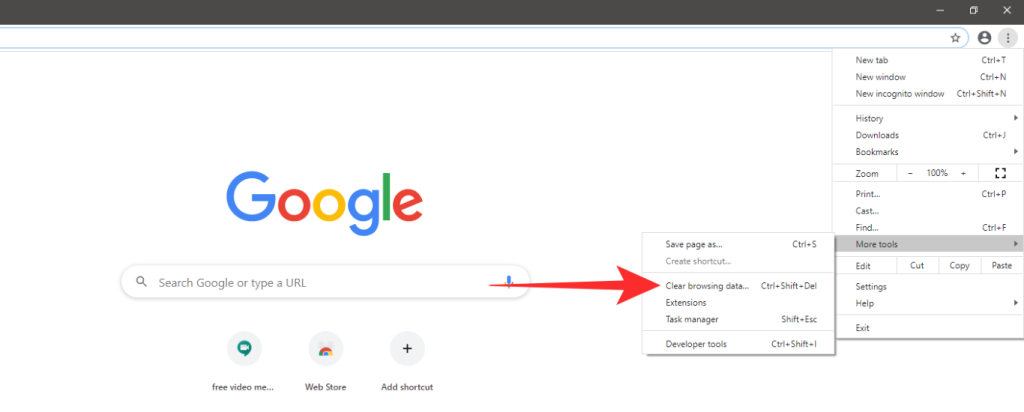
Select ‘More Tools’.
Now select ‘Clear browsing data’.

In the next window, select ‘All-time’ in the time range drop-down menu.
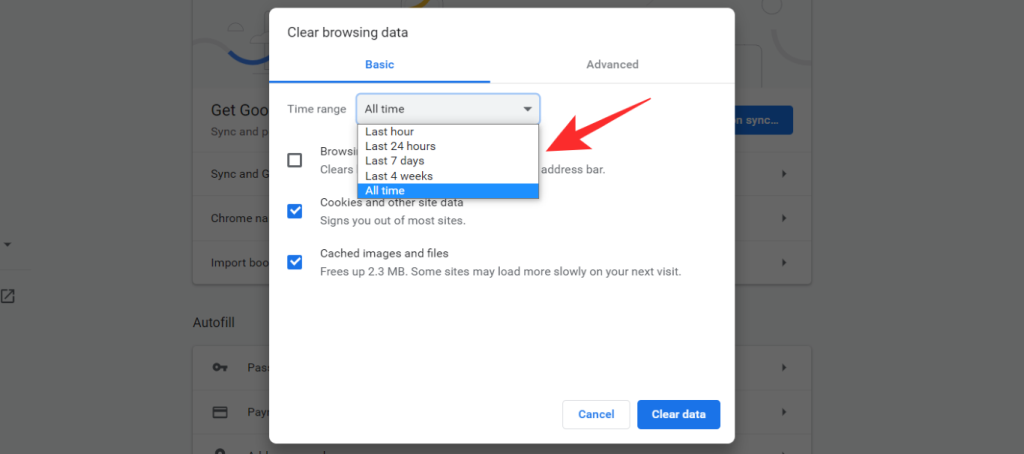
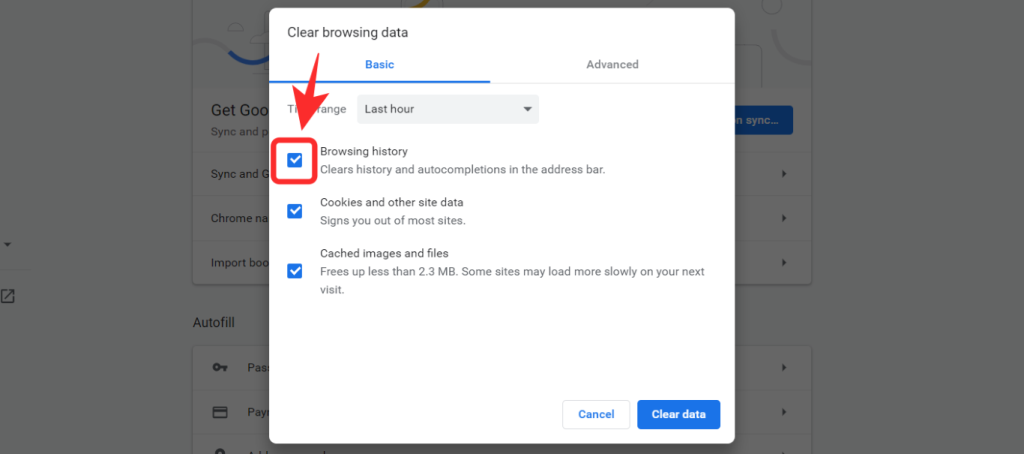
Uncheck the box for ‘Browsing History‘.
Lastly, click on ‘Clear data’ to clear all the cache files.
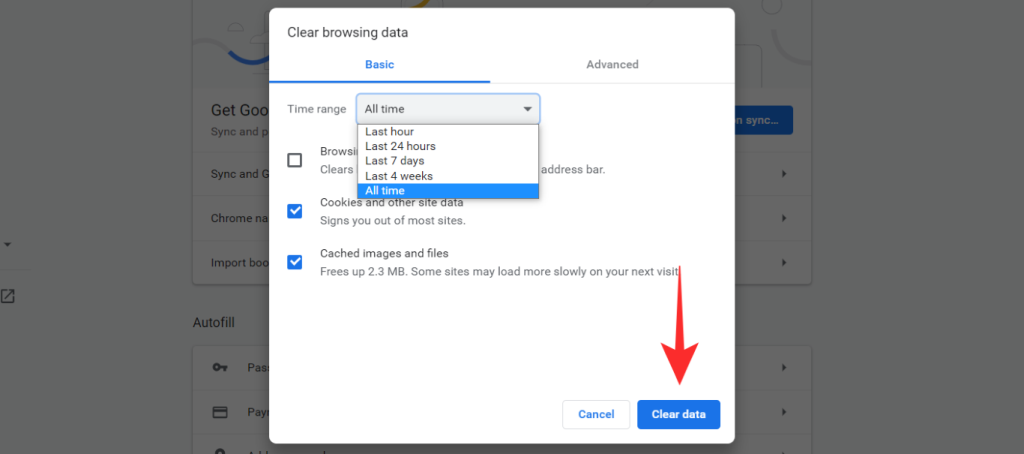
Your cache files will now be cleared and you should now be able to use the microphone in Google Meet.
Close FaceTime from the background
Many users on Mac systems have reported Facetime interfering with Google Meet which causes the microphone to malfunction. If you use Facetime regularly then you should try closing the application in the background before joining a meeting in Google Meet. This should help solve any audio input issues that you were facing with the Google Meet extension.
Sign OUT, then back IN into your Google account
Some users having issues with microphones in Google Meet have reported that signing out of your Google account and signing in again has helped solve this issue. You can try this method to see if it fixes your issue.
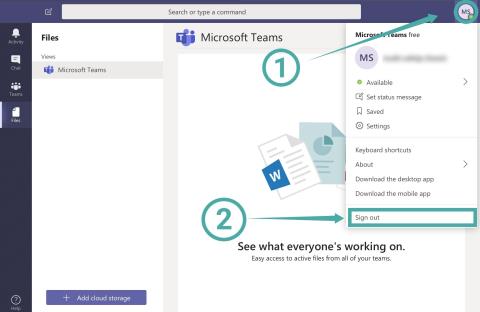
To sign out, simply click on your profile icon in the top right corner of your browser and click on Sign out. Simply sign in to your account again now and try to join a meeting on Google Meet. You should now be able to use your microphone during Google Meet meetings.
Disable Experimental Flags on Google Chrome
If you have enabled any experimental flags in Google Chrome then chances are that they are preventing your microphone from working properly in Google Chrome. You should disable any experimental flags and try to use your microphone again.
Simply type ‘chrome://flags’ in your URL bar and hit enter to access the flags page. Now scroll through the options and disable any enabled tabs by click on the drop-down menu beside it and select ‘Disable’.
Update Google Chrome
Google Meet and its corresponding extension for Chrome was recently given a new overhaul by Google chrome to support the recent influx of users. If you are using an older version of Google Chrome then chances are that it is incompatible with the latest version of Google Meet and the Google Meet extension.
Download the latest stable build of Google Chrome from this link and install it on your system. You should then be able to use your microphone in Google Meet without any issues.
Manually Update Google Meet extension
If nothing seems to work, you can try updating your Google Chrome extensions manually. Simply follow the guide below to help you get started.
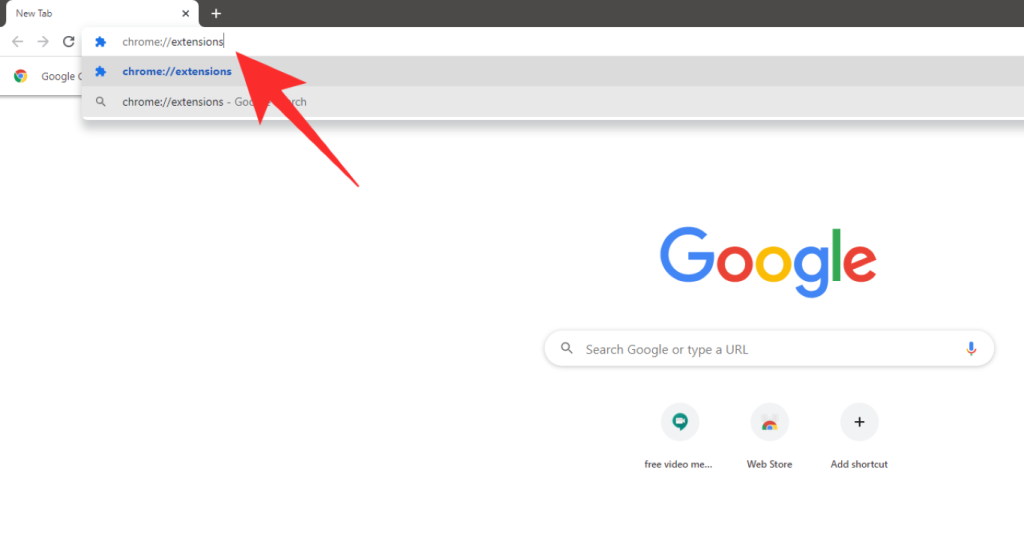
Open Google Chrome on your system and type ‘chrome://extensions’ in your URL bar and hit Enter.
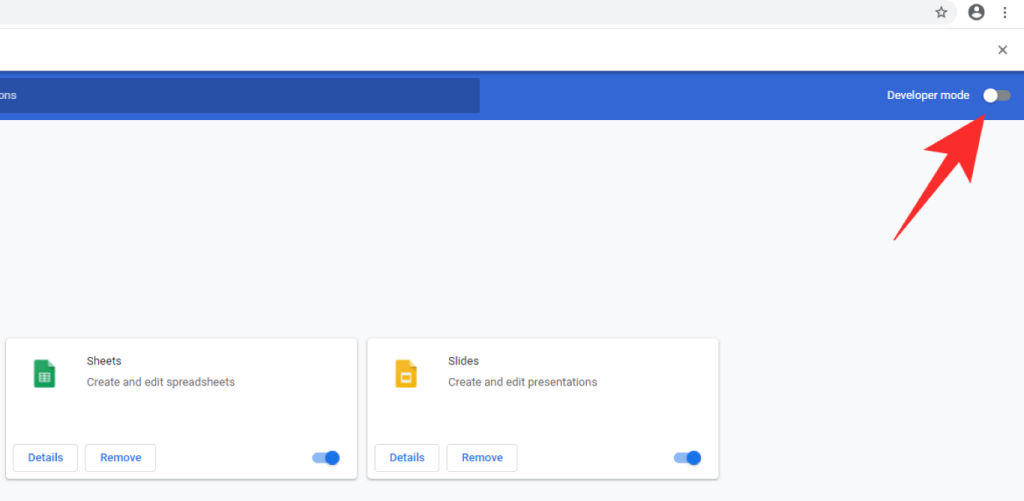
The extensions settings page will now open up. In the top right corner, turn on the toggle for ‘Developer Mode’.
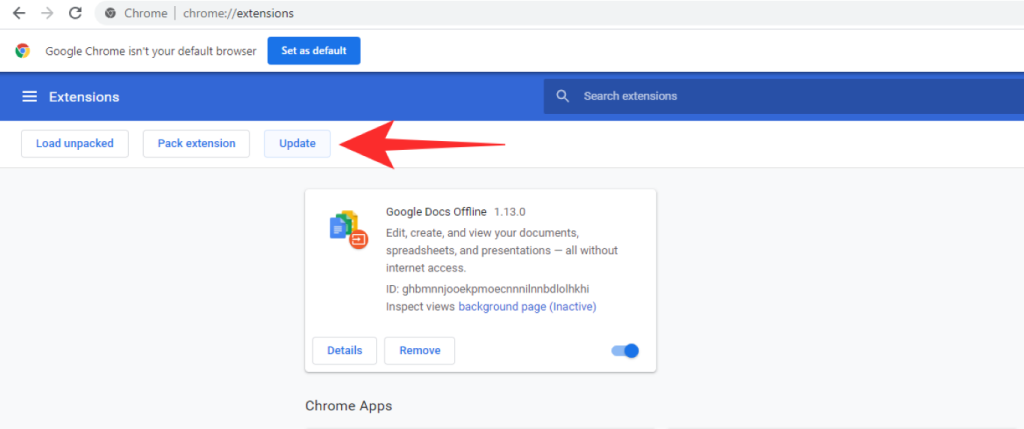
Now simply click on ‘Update’ and chrome will manually update all the extensions installed on your system including Google Meet.
You should now be able to use the microphone freely in Google Meet without any persistent issues.
We hope these fixes helped you solve your microphone issues with Google Meet. If you have any suggestions for us, feel free to get in touch with us using the comments section below.
RELATED:
Prečo sú niektoré zvuky v systéme Windows znížené?
Keď ste na schôdzi, systém Windows znižuje hluk z iných zdrojov. Nie je to kvôli Meet, ale funkcii Windows.
Ostatní účastníci môžu počuť moju čítačku obrazovky, hudobný prehrávač alebo iné aplikácie
V závislosti od operačného systému a zvukového zariadenia môžu ostatní účastníci počuť zvuky pochádzajúce z iných kariet prehliadača alebo aplikácií. Ak chcete zabrániť tomu, aby mikrofón zachytil iné zvuky, použite slúchadlá.
Zistite, ako opraviť chybu 0xc000007b v našej podrobnej príručke, ktorá sa zaoberá príčinami tohto chybového kódu a zoznamom overených riešení.
Návod, ako zapnúť alebo vypnúť núdzový režim pre tablet Samsung Galaxy Tab S3
Ak sa snažíte opraviť kód chyby 0x80860010 na vašom počítači, nájdite tu možné riešenia.
Zistite, ako vyriešiť bežný problém, pri ktorom bliká obrazovka v prehliadači Google Chrome.
Zistite, čo robiť, keď Windows 11 neustále zlyháva, s prehľadom osvedčených a otestovaných riešení, ktoré vám môžu pomôcť opraviť tento problém.
Zistite, čo robiť, ak aplikácia Windows Phone Link nefunguje, s krokovým zoznamom riešení, ktoré vám pomôžu znova pripojiť telefón k počítaču.
Zistite, čo robiť, keď Hlavný panel v systéme Windows 11 nefunguje, s prehľadom osvedčených riešení a tipov na riešenie problémov.
Ak Office oznamuje, že požadovanú akciu nebolo možné vykonať, aktualizujte a opravte svoj Office Suite. Ak problém pretrváva, preinštalujte Office.
Zistite, ako sa vyrovnať s chybou “Aw, Snap!” v Chrome, zoznam účinných metód na opravu problému a prístup na požadované stránky.
Zistite, ako sa vysporiadať so zrúteniami hry Čierna Mýtus: Wukong, aby ste si mohli vychutnať túto vzrušujúcu akčné RPG bez prerušenia.
Ovládače zariadení pomáhajú opraviť chyby, vytvárať a zlepšovať kompatibilitu periférnych zariadení. Zistite, ako **aktualizovať ovládače** v systéme Windows 11 a prečo je to dôležité.
Nvidia Shield Remote nefunguje správne? Tu máme pre vás tie najlepšie opravy, ktoré môžete vyskúšať; môžete tiež hľadať spôsoby, ako zmeniť svoj smartfón na televízor.
Windows 11 má veľa kontroverzií okolo podpory pre určité procesory, pretože operačný systém unikol v júli. Oficiálna verzia OS bola teraz uvoľnená pre verejnosť s mnohými zmenami ...
V prípade, že služba Windows Search využíva mimoriadne vysoké zdroje procesora alebo disku, môžete v systéme Windows 11 použiť nasledujúce metódy riešenia problémov. Metódy na vyriešenie problému zahŕňajú jednoduchšie metódy ...
20. februára 2021: Google teraz zablokoval všetky rozšírenia Meet, ktoré pomáhali so zobrazením mriežky, vrátane rozšírení uvedených nižšie. Tieto rozšírenia už nefungujú a zdá sa, že jedinou alternatívou je…
Jediná obrazovka, z ktorej majú používatelia Windowsu spoločný strach, je modrá obrazovka smrti. BSOD existuje už desaťročia, v priebehu rokov sa mení len veľmi málo, ale stále je dostatočne silný na to, aby…
Microsoft Teams sa vďaka svojej hlbokej integrácii s Microsoft Office 365 stal obľúbeným riešením videohovorov pre milióny ľudí na celom svete. Napriek tomu, že nie je používateľsky najpríjemnejší…
Microsoft Teams je komplexný nástroj, ktorý je v poslednej dobe pomerne populárny vďaka svojim funkciám tímovej spolupráce. Služba vám umožňuje vytvárať špecifické tímy pre vašu organizáciu, pozývať…
12. októbra 2021: Veľká aktualizácia! Upozorňujeme, že už nemusíte nahrádzať súbor appraiserres.dll, aby ste obišli kontrolu TPM a opravili chybu inštalácie pri inštalácii Windows 11. …
Od vydania Windows 11 prešlo pár mesiacov a používatelia odvtedy migrujú na nový OS. Ako stále viac používateľov skúša nové problémy Windowsu 11, objavujú sa chyby a nastavenia...
DAYZ je hra plná šialených, nakazených ľudí v postsovietskej krajine Černarus. Zistite, ako sa zbaviť choroby v DAYZ a udržte si zdravie.
Naučte sa, ako synchronizovať nastavenia v systéme Windows 10. S touto príručkou prenesiete vaše nastavenia na všetkých zariadeniach so systémom Windows.
Ak vás obťažujú štuchnutia e-mailov, na ktoré nechcete odpovedať alebo ich vidieť, môžete ich nechať zmiznúť. Prečítajte si toto a zistite, ako zakázať funkciu štuchnutia v Gmaile.
Nvidia Shield Remote nefunguje správne? Tu máme pre vás tie najlepšie opravy, ktoré môžete vyskúšať; môžete tiež hľadať spôsoby, ako zmeniť svoj smartfón na televízor.
Bluetooth vám umožňuje pripojiť zariadenia a príslušenstvo so systémom Windows 10 k počítaču bez potreby káblov. Spôsob, ako vyriešiť problémy s Bluetooth.
Máte po inovácii na Windows 11 nejaké problémy? Hľadáte spôsoby, ako opraviť Windows 11? V tomto príspevku sme uviedli 6 rôznych metód, ktoré môžete použiť na opravu systému Windows 11 na optimalizáciu výkonu vášho zariadenia.
Ako opraviť: chybové hlásenie „Táto aplikácia sa nedá spustiť na vašom počítači“ v systéme Windows 10? Tu je 6 jednoduchých riešení.
Tento článok vám ukáže, ako maximalizovať svoje výhody z Microsoft Rewards na Windows, Xbox, Mobile a iných platforiem.
Zistite, ako môžete jednoducho hromadne prestať sledovať účty na Instagrame pomocou najlepších aplikácií, ako aj tipy na správne používanie.
Ako opraviť Nintendo Switch, ktoré sa nezapne? Tu sú 4 jednoduché riešenia, aby ste sa zbavili tohto problému.
